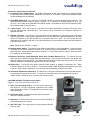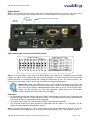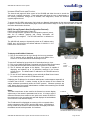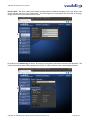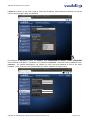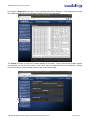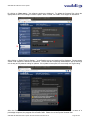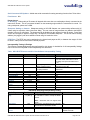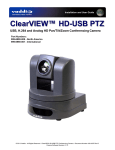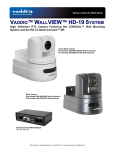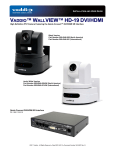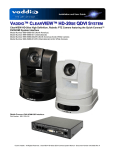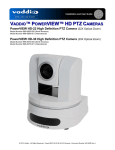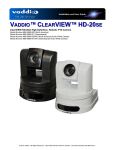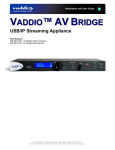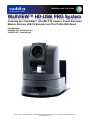
1
Installation and User Guide WallVIEW™ HD-USB PRO System Featuring the ClearVIEW™ HD-USB PTZ Camera, Power Extension Module, Extreme USB 2.0 Extender and Thin Profile Wall Mount Part Numbers: 999-6995-000 - North America 999-6995-001 - International © 2013 Vaddio - All Rights Reserved. WallVIEW HD-USB PRO Camera System - Document Number 342-0467 Rev E Camera Software 2.1.0 WallVIEW HD-USB PRO Camera System Table of Contents Overview: ..................................................................................................................................................................................... 3 Soft Ware Notes ....................................................................................................................................................................... 3 Unpacking .................................................................................................................................................................................... 4 ClearVIEW HD-USB PTZ Conferencing Camera ..................................................................................................................... 5 Diagram: Rear View Connectors with Feature Call-outs: .................................................................................................... 5 Diagram: Front View with Feature Call-outs: ....................................................................................................................... 6 Connecting the Extension Devices to the Camera ....................................................................................................................... 7 Diagram: Basic Connectivity Example: ................................................................................................................................ 7 Diagram: Basic Connectivity Example: ................................................................................................................................ 7 Diagram: Connection Detail with the Power Extension Module and the Active USB 2.0 Extension Cable .......................... 8 Reference Diagrams .................................................................................................................................................................... 9 Reference Diagram: Basic Connectivity Example ............................................................................................................... 9 Reference Diagram: Connectivity Example 2 with Audio: ................................................................................................... 9 Reference Diagram: H.264 Streaming Connectivity: ......................................................................................................... 10 Reference Diagram: Connection Diagram Example using A CDN (for release 2.0 when IP is enabled): .......................... 10 First Time Set-up with the ClearVIEW HD-USB PTZ Camera .................................................................................................... 10 Getting Started ....................................................................................................................................................................... 11 Step by Step Instructions to install the WallVIEW HD-USB PRO Camera System .................................................................... 12 Checking out the Installation: ................................................................................................................................................. 13 Compatibility ............................................................................................................................................................................... 13 Supported UVC Resolutions .................................................................................................................................................. 14 Table: Supported UVC Resolutions................................................................................................................................... 14 Keyboard Hot Keys for PTZ functions: ................................................................................................................................... 14 Table: Keyboard Hotkeys .................................................................................................................................................. 14 Internal Web Pages and Control ................................................................................................................................................ 15 DHCP Set-up (Dynamic Host Configuration Protocol)............................................................................................................ 15 Static IP Set-up: ..................................................................................................................................................................... 16 Screen Shot Tour: ...................................................................................................................................................................... 17 Connecting the Camera to the Program of Choice: .................................................................................................................... 26 Skype Example ...................................................................................................................................................................... 26 VLC Media Player Example ................................................................................................................................................... 26 Technical Specifications: ............................................................................................................................................................ 27 Compliance and CE Declaration of Conformity: ClearVIEW HD-USB PTZ Camera ................................................................. 28 Warranty Information: ................................................................................................................................................................. 29 Appendix 1: Communication Specification ................................................................................................................................ 30 Firmware Version 2.1.0 Release Notes: ..................................................................................................................................... 31 Firmware Version 2.0.0 Previous Release Notes: ...................................................................................................................... 31 Table: HD-USB PTZ Camera and UC Client Software Interoperability Testing ................................................................. 32 Previous Release Notes: ............................................................................................................................................................ 33 Appendix 2 - Telnet Serial Command API .................................................................................................................................. 34 Telnet Command List ............................................................................................................................................................. 34 WallVIEW HD-USB PRO Camera System Document Number 342-0467 Rev. E Page 2 of 40 WallVIEW HD-USB PRO Camera System OVERVIEW: The heart of the WallVIEW HD-USB PRO camera system is the Vaddio ClearVIEW HD-USB PTZ Conferencing Camera. The WallVIEW HD-USB PRO System includes many of the features that you would expect out of a WallVIEW branded product. The ClearVIEW HD-USB is the world’s first broadcast-quality HD PTZ camera with USB 2.0 output, Ethernet (control & streaming) and analog component (YPbPr) outputs built right into the camera. Simply plug the HD-USB camera directly into a PC. There is no need for a separate capture card or infuriating device drivers. The ClearVIEW HD-USB uses standard USB 2.0 UVC drivers and needs no special USB drivers for installation and/or headaches in general. As a result the WallVIEW HD-USB camera works seamlessly with any software application running on any OS that supports USB 2.0, RTSP and HLS streaming. All this, and the HD-USB PTZ cameras are made in the USA too. WallVIEW HD-USB PRO Camera System The ClearVIEW HD-USB camera combines impressive performance with an equally impressive feature set. The HD-USB camera is a plug and play device for Unified Communications soft client conferencing systems such as Skype®, Jabber®, Vidyo® and Microsoft Lync® and offers a vast video performance improvement over the “inexpensive webcam” systems available today. The HD-USB is a high definition conferencing camera suitable for the small, medium or even the largest conferencing space available. The HD zoom lens allows HD-USB to capture a wide angle of view (58.1°) to view everyone at a conference room table, as well as capture an individual from a long distance (3.2°) in a larger room. The motorized zoom lens offers 19X optical zoom and is built around a 1/3-Type Sony® Exmor, progressive scan, high-speed, low noise CMOS image sensor with a total of 1.3 Megapixels for precise and vibrant HD color video images. The HD-USB achieves spectacular picture quality in low light environments requiring a minimum illumination rated at an amazingly low 0.7 LUX (F1.6 - 50IRE). The WallVIEW HD-USB PRO system includes the HD-USB camera, a Thin Profile Wall Mount, the Extreme USB 2.0 Extenders to allow the USB extension on Cat-5 cable up to 328.1’ (100m), the Vaddio Power Extension Module for extending power over Cat-5 cable to the camera and all the USB 2.0 cables, power supplies and mounting hardware that are required to install the WallVIEW HD-USB PRO system. Soft Ware Notes The Release 2.0 Firmware allows the ClearVIEW HD-USB to support H.264 IP streaming or USB 2.0 (UVC) video streaming. It has a built in Ethernet network interface for both IP control and IP streaming The HD-USB will support either RTSP or HLS IP streaming protocols. The software is easily upgradeable in the field over the Ethernet port. Important Safeguards: Read and understand all instructions before using. Do not operate any device if it has been dropped or damaged. In this case, a Vaddio technician must examine the product before operating. To reduce the risk of electric shock, do not immerse in water or other liquids and avoid extremely humid conditions. Use only the power supply provided with the system. Use of any unauthorized power supply will void any and all warranties. Please do not use “pass-thru” type RJ-45 connectors. These pass-thru type connectors do not work well for professional installations and can be the cause of intermittent connections which can result in the RS-232 control line failing and locking up, and/or compromising the HSDS™ signals. For best results please use standard RJ-45 connectors and test all cables for proper pinouts prior to use and connection to Vaddio product. WallVIEW HD-USB PRO Camera System Document Number 342-0467 Rev. E Page 3 of 40 WallVIEW HD-USB PRO Camera System Intended Use Before operating the device, please read the entire manual thoroughly. The system was designed, built and tested for use indoors, and with the provided power supply and cabling. The use of a power supply other than the one provided or outdoor operation has not been tested and could damage the device and/or create a potentially unsafe operating condition. Save These Instructions The information contained in this manual will help you install and operate your product. If these instructions are misplaced, Vaddio keeps copies of Specifications, Installation and User Guides and most pertinent product drawings for the Vaddio product line on the Vaddio website. These documents can be downloaded from www.vaddio.com free of charge. UNPACKING North American Version 999-6995-000 Carefully remove the device and all of the parts from the packaging. Unpack and identify the following parts: One (1) ClearVIEW HD-USB PTZ Camera (998-6990-000) One (1) Vaddio IR Remote Commander One (1) EZCamera™ Control Adapter (RJ-45 to DB-9) One (1) Vaddio PowerRite™ 12 VDC, 3.0 Amp Power Supply (camera) One (1) AC Cord Set for North America One (1) 10’ (3.05m) USB 2.0 Type A (Male) to USB B (Male) Cable One (1) 1’ (305mm) USB 2.0 Type A (Male) to USB B (Male) Cable One (1) North American Power Cord One (1) Power Extension Module One (1) 24 VDC, 2.08 Amp Switching Power Supply One (1) AC Cord Set for North America One (1) Extreme USB Extender TX One (1) Extreme USB Extender RX One (1) 5 VDC Switching Power Supply One (1) 1’ (305mm) EIA-J03 to EIA-J03 Power Cable One (1) Thin Profile Mount and Hardware for the HD-USB Camera One Velcro® Strip to mount Extreme USB Extender TX to Camera Mount Documentation International Version 999-6995-001 Carefully remove the device and all of the parts from the packaging. Unpack and identify the following parts: One (1) ClearVIEW HD-USB PTZ Camera (998-6990-000) One (1) Vaddio IR Remote Commander One (1) EZCamera™ Control Adapter (RJ-45 to DB-9) One (1) Vaddio PowerRite™ 12 VDC, 3.0 Amp Power Supply (camera) One (1) Euro Power Cord One (1) UK Power Cord One (1) 10’ (3.05m) USB 2.0 Type A (Male) to USB B (Male) Cable One (1) 1’ (305mm) USB 2.0 Type A (Male) to USB B (Male) Cable One (1) Power Extension Module One (1) 24 VDC, 2.08 Amp Switching Power Supply One (1) Euro Power Cord One (1) UK Power Cord One (1) Extreme USB Extender TX One (1) Extreme USB Extender RX One (1) 5 VDC Switching Power Supply One (1) 1’ (305mm) EIA-J03 to EIA-J03 Power Cable One (1) Thin Profile Mount and Hardware for the HD-USB Camera One (1) CONCEAL Mount and Hardware for the HD-USB Camera Documentation WallVIEW HD-USB PRO Camera System Document Number 342-0467 Rev. E AIRBUS & Fuel Not Included Page 4 of 40 WallVIEW HD-USB PRO Camera System ClearVIEW HD-USB PTZ Conferencing Camera Diagram: Rear View Connectors with Feature Call-outs: ④ ⑤ ③ ⑥ ② Note: Use the EZ POWER VIDEO port with the Power Extension Module ① ⑦ ⑧ ⑨ ⑩ ⑪ ⑫ ⑬ Connectors and Functions: 1) 12 VDC Input: Power input on EIAJ-04 connector for local power. 2) HD Video Select: A rotary switch that allows the user to choose the component HD output video resolution and format. All USB 2.0 UVC resolutions are derived from 720p/59.94. The USB 2.0 processor can accept rotary positions 0 through 6. Please see the sections on available resolutions and concurrent resolutions when using USB 2.0 and analog component outputs. 3) Camera Settings (Dip Switch Settings): Settings for IR remote frequency, baud rate, SD output format, and image flip, test bars can be configured on these switches. 4) RS-232 IN & IR Out: The upper RS-232 Port is not implemented on the HD-USB Camera. Use the RS-232 Port on the lower card ONLY. 5) YPbPr Output: Component HD video is fed through the DE-15 connector (HD-15 for the shell sized challenged). YPbPr and Composite signals are simultaneous. Note: This is an HD camera and the SD signals are down converted and are really not the sweet spot of this camera. This is a courtesy feature only. WallVIEW HD-USB PRO Camera System Document Number 342-0467 Rev. E Page 5 of 40 WallVIEW HD-USB PRO Camera System Connectors and Functions (continued) 6) Composite Video (CVBS) Output: The CVBS output feeds out SD video signals and is configurable with the dip switches to choose between 480i/NTSC or 576i/PAL in 4:3 formats. Squeeze and letterbox modes are also available (see dip switches). 7) EZ POWER VIDEO Port: Use the RJ-45 EZ POWER VIDEO port with the Power Extension Module. The Power Extension Module sends DC power over pins 1 & 2 to power the HD-USB camera for up to 150’ (45.72m). In the Case of the WallVIEW HD-USB SR system, the limitation is the USB 2.0 Extension Cable, which extends USB 2.0 only 65’ (20m). 8) 5 VDC Output: The 5 VDC output is on an EIAJ-03 connector was added to supply power to the active Extreme USB Extender transmitter side. The receiver side is powered by the computer’s USB port or powered USB Hub. 9) USB 2.0 Connector: The USB 2.0 is on a type-B Female and attaches to a PC running a soft-client video conferencing system or video capture software that uses UVC (USB Video Class) standard drivers. No other drivers are required to plug the HD-USB into a computer and have it work. The UVC drivers will auto negotiate the top resolution that the PC and HD-USB Camera can accomplish together and auto implement it, and bob’s your uncle. Note: Please do not use USB 1.1 cables. 10) Settings Rotary Switch: The Settings rotary switch is essentially for future applications. Leave this switch on position “0” for normal operation. Position “C” is used for a reset to factory defaults. To reset the camera and erase all the stored internal data, place this switch on “C” and power cycle the camera. Move the switch to “0” again for normal operation. 11) Ethernet 10/100 Port (H.264 Streaming Active with Firmware Release 2.0.x): The network port has green and yellow LEDs that indicate ready and usage states. The port allows for access to the internal web pages for camera set-up and control. The network port will stream (unicast) H.264 video (from CIF up to and including 1080p/30). IP Streaming supports RTSP and HLS formats. 12) RS-232 Port: The RS-232 Port allows external control systems to engage a rudimentary API. Basic functions include pan, tilt zoom, on/off etc. The functions on the Vaddio IR Remote Commander are mirrored in the API. Most control is expected to come from the internal web page via Ethernet or Telnet. 13) Permanent USB Resource Slot Card: The lower row of connectors and the brains of the HD-USB Camera are located on this permanent slot card. The card is not removable and is not compatible with any other Vaddio camera. Please do not try to remove this card at any time. ➊ ClearVIEW HD-USB PTZ Conferencing Camera Diagram: Front View with Feature Call-outs: 1) Zoom Lens and Image Sensor: The 19X optical zoom lens is built around a 1/3-Type, high-speed, progressive scan CMOS image sensor with a total of 1.3 Megapixels for precise HD video image acquisition. 2) Blue Power Light: A Vaddio blue power light is illuminated when the camera is turned on. 3) IR Sensors: IR sensors are built into the front of the HD-USB to receive IR signals from the IR remote control supplied with the camera. 4) Red Tally Light: The red tally light is not used with the HD-USB Camera…darn. ➍ WallVIEW HD-USB PRO Camera System Document Number 342-0467 Rev. E ➋ Page 6 of 40 ➌ WallVIEW HD-USB PRO Camera System CONNECTING THE EXTENSION DEVICES TO THE CAMERA The following diagrams pertain to the connectivity of the WallVIEW HD-USB PRO Camera System with the Thin Profile Wall Mount, Power Extension Module and Extreme USB 2.0 Extenders Distance Limitation with the Power Extension Module is 150’ (45.7m) Distance limitation with the Extreme USB 2.0 Extenders is 328.1’ (100m) Using both the PEM and Extenders creates a limit of 150’ (45.7m) in this example Diagram: Basic Connectivity Example: Dual CAT-5 Solution WallVIEW HD-USB PRO 24 VDC, 2.75A Power Supply To EZ POWER VIDEO RJ-45 Port Power Extension Module CAT-5 Cable - 24 VDC Power (Pin 1: +, Pin 2: -) Extreme USB 2.0 TX Unit CAT-5 Cable 1’ USB 2.0 Cable Short USB 2.0 Cable IMPORTANT Extreme USB 2.0 RX Unit Host PC with Conferencing Application Diagram: Basic Connectivity Example: This example uses the HD-USB PTZ Camera, Extreme USB 2.0 Extenders with a power outlet located with the camera. This single CAT-5 solution uses the Extreme USB 2.0 Extenders with local camera power, which allows the distance of the CAT-5 cable to be up to 328.1’ (100m). WallVIEW HD-USB PRO Single CAT-5 Solution 5 VDC from Camera PC Video Monitor - HD Large Flat Screen Format Extreme USB 2.0 TX Unit 1’ (305mm) USB 2.0 Cable CAT-5 Cable Distance can be up to 328.1’ (100m) 12 VDC, 3.0 Amp Power Supply USB 2.0 Cable Local Power Note: Please do not use USB 1.1 cables (USB 1.1 cables won’t work). WallVIEW HD-USB PRO Camera System Document Number 342-0467 Rev. E Extreme USB 2.0 RX Unit Host Tower PC with UC Application Page 7 of 40 WallVIEW HD-USB PRO Camera System Diagram: Connection Detail with the Power Extension Module and the Active USB 2.0 Extension Cable The 24VDC connection from the Power Extension Module to the camera can provide adequate power up to 150’ (45.7m) away. The Extreme UBS 2.0 Extenders can amplify the USB 2.0 signal up to 328.1’ (100m) on a single CAT-5 or better cable. HD-USB PTZ Camera Rear View Power Extension Module CAT-5 Cable - 24 VDC Power (Pin 1: +, Pin 2: -) DC Power The 24VDC connection from the Power Extension Module will power the camera up to 150’ (45.7m) away. 24 VDC, 2.75A Power Supply 1’ (305mm) USB 2.0 Cable 5 VDC from Camera The CAT-5 cable between the Extreme USB 2.0 Extenders can carry the signal up to 328.1’ (100m) Extreme USB 2.0 Extender TX Unit - Front and Rear Views PC Video Monitor PC HD Video USB 2.0 Cable Host Tower PC with UC Application Extreme USB 2.0 Extender RX Unit - Front and Rear Views WallVIEW HD-USB PRO Camera System Document Number 342-0467 Rev. E Page 8 of 40 WallVIEW HD-USB PRO Camera System REFERENCE DIAGRAMS Reference Diagram: Basic Connectivity Example HD-USB Camera and a Soft-client videoconferencing system (audio is not included in this example). HD-USB Conferencing Camera USB 2.0 Port USB 2.0 using only UVC Drivers USB 2.0 Port PC with Host Application Reference Diagram: Connectivity Example 2 with Audio: This example uses the HD-USB PTZ Camera and Vaddio’s EasyUSB™ Mixer/Amp, two (2) Echo Cancelling EasyMic™ MicPODs and Two (2) Bose Ceiling Speakers to create a complete room system using programs such as Skype®, Jabber®, Google+®, Microsoft Lync® and others. This configuration features driverless USB 2.0 Video and Acoustic Echo Cancelled (AEC) Audio. PC Video Monitor - HD Large Screen Format Bose FS-16F Ceiling Speakers Optimize for Voice ClearVIEW HD-USB Conferencing Camera 8 Ohm Speaker Cable PC HD Video 8 Ohm Speaker Cable EasyUSB™ Mixer/AMP USB 2.0 Cable USB 2.0 Cable USB 2.0 Video using USB Video Class (UVC) Drivers USB 2.0 Audio using USB Audio Class (UAC) Drivers Tower PC with Host Application WallVIEW HD-USB PRO Camera System Document Number 342-0467 Rev. E Cat-5e Cable Cat-5e Cable Two (2) EasyMic MicPODs with three (3) integrated mic elements and three (3) Acoustic Echo Cancellers per mic Page 9 of 40 WallVIEW HD-USB PRO Camera System Reference Diagram: H.264 Streaming Connectivity: The HD-USB Camera has a Unicast streaming output suitable for a few concurrent users (at lower resolutions). This configuration shows four (4) concurrent users. H.264 STREAMING VIDEO Network LAN/WAN Internet HD-USB PTZ CAMERA Reference Diagram: Connection Diagram Example using A CDN (for release 2.0 when IP is enabled): For a Large Number of Viewers - Use a CDN Content Distribution Network such as WOWZA, Amazon or iCloud and more… Cessna 172 Not Included Cloud FIRST TIME SET-UP WITH THE CLEARVIEW HD-USB PTZ CAMERA The ClearVIEW HD-USB PTZ Camera was designed to be exceptionally easy to use and operate. There is documentation at the back of the manual for pin-outs. These pin-outs are also available, along with application TechNotes, from the Vaddio website www.vaddio.com. WallVIEW HD-USB PRO Camera System Document Number 342-0467 Rev. E Page 10 of 40 WallVIEW HD-USB PRO Camera System Getting Started Step 1: Using the HD Video Select Rotary Switch and Camera Settings Dip Switch on the back of the camera, set up the camera’s output resolution and functional preferences. A reference label is on the bottom of the camera. HD Video Select Switch Leave on “0” HD-USB Rear Panel Camera Settings 10-Pos Dip Switches Settings Rotary Switch Leave on “0” Switch Setting Label on Bottom of the HD-USB Camera: DIP SWITCH SETTINGS IR 1 1 & 2 UP IR 2 ON 1 IR 3 ON 2 IR OUT OFF 9600 bps SD NTSC ON 38400 bps SD PAL 3 4 5 SD 4:3 6 & 7 UP SD SQ 6 SD LB 7 HD VIDEO AND USB 2.0 SELECT IMAGE TEST FLIP BARS OFF OFF 0 1 2 3 4 5 6 7 10 OFF ON ON ON 8 9 10 720p/59.94 - USB 1080i/59.94 1080p/59.94 1080p/60 720p/50 1080i/50 1080p/50 480i/29.97 8 9 A B C D E F 576i/25 1080p/30 1080p/25 USE ROTARY SETTINGS 0 through 6 FOR USB 2.0 OUT Step 2: For the best USB 2.0 video, set the HD VIDEO SELECT rotary switch to “0” (720p/59.94) on the HD-USB Camera. All USB 2.0 UVC resolutions are derived from 720p/59.94. The USB 2.0 processor can accept rotary positions 0 through 6, but please be aware that if 1080p/30 is scaled down to 320 x 180, well let’s just say…the image will look much better if the PC scales from 720p than from 1080p (see note below). Please Note: When using 1080p as the input, very low USB 2.0 resolutions such as 352 x 240 and 320 x 180 will either not look so good, won’t work or the user may really wish they didn’t work due to how far the signal is scaled/smashed/squeezed down by the PC from the original input. Please use 720p or position “0” for the lower resolutions. Always start from a HD resolution closest to what the UC client wants to send and display. Other Notes: For concurrent USB 2.0 and Analog Component (YPbPr), switch settings 0 through 6 are the resolutions that can be both digital (USB 2.0 or H.264) and Analog (YPbPr). These resolutions are the most used resolutions for HD video in both HD videoconferencing and broadcast. For Analog (YPbPr) output, all of the HD VIDEO SELECT switch settings will operate. The Composite output on the BNC connector is independent from the USB 2.0 / IP resolutions. The SD settings and are formatted by dip switches 5, 6 and 7. Step 3: Choose the IR frequency (1, 2 or 3) on the camera for use with the IR Remote Commander. Since only one USB camera can be plugged into a PC at a time, recommended default is Freq. 1 (dip switches 1 & 2 up). WallVIEW HD-USB PRO Camera System Document Number 342-0467 Rev. E Page 11 of 40 WallVIEW HD-USB PRO Camera System Step 4: Leave the IR out OFF (up) as default. Step 5: Use 9600bps for control speed as default. If the camera has been inverted, then set the Image Flip to ON, otherwise leave it off. The test bars are really, really, totally non-standard (horizontal - just to mess with the old-timers) and will override the video output. These test bars are 75% IRE. Use the test bars for…testing (kind of obvious). The HD-USB camera uses UVC drivers and does not require the loading of any other drivers to run on the PC. As long as the operating systems and soft-client software support UVC drivers, no additional software, other than the application, is required. STEP BY STEP INSTRUCTIONS TO INSTALL THE WALLVIEW HD-USB PRO CAMERA SYSTEM Step 1: Locating the Camera Locate the camera mounting position while paying close attention to camera viewing angles, lighting conditions, possible line of site obstructions, and checking for in-wall obstructions where the camera is to be mounted. Pick a mounting location to optimize the performance of the camera. Like all Vaddio WallVIEW systems, the WallVIEW HD-USB PRO is easy to install and operate. The product was specifically designed with Cat-5 cable connectivity for the extension both the power and USB 2.0 signals. WallVIEW HD-USB PRO Step 2: After determining the optimum location of the camera system, run two (2) Cat-5 or better cables (if using both the Extreme USB 2.0 Extenders and the Power Extension Module) from the computer location to the camera location. Using both extenders together will limit the overall Cat-5 cable distance to distance to 150’. If using the Extreme USB 2.0 Extenders alone with local camera power, the a single Cat-5 cable can be run up to 328.1’ (100m) between the extenders TX and RX units. Make sure to mark and test the Cat-5 cable(s) and use any real RJ-45 crimper and connectors using the 568B straight-through wiring standard. Please do not use the “feed-thru” type RJ-45 connectors for professional installations. Step 3: Using the Thin Profile Wall Mount directions, install the mount. If mounting to the drywall with wall anchors, use four (4) quality wall anchors. Make sure to level the mount and tighten the mounting screws. Step 4: Connect the Cat-5 cable to the EZ POWER VIDEO RJ-45 port on the back panel of the HD-USB camera. Connect 1’ (305mm) USB 2.0 Cable Type-B Male into the USB Type-B Female on the back panel of the HD-USB camera. Connect the Type-A Male into the Extreme USB 2.0 Extender TX unit’s Type-A Female jack. Plug the USB CAT-5 cable into the RJ-45 Link Port of the TX Extender unit. With the supplied 1’ (305mm) EIAJ-03 to EIAJ-03 power cable, connect one side to the 5 VDC supply on the camera and the other end to the Extreme USB 2.0 TX Extender unit’s 5 VDC input. With the supplied Velcro, find a place on the back of the mount to attach the USB extender and field dress the cabling to hide as much as possible. NOTE: Check all Cat-5 cables for continuity in advance of the connection. Do not plug the Power Extension Module Cat-5 cable into any other RJ-45 port but the EZ POWER VIDEO port. There is 24 VDC Volts on Pins 1 & 2. Plugging into any other port may cause damage to the camera system and void the warranty. Step 5: At the Head-End Plug the other end of the Power Extension Module’s CAT-5 cable into the RJ-45 port of the Power Extension Module Marked EZ POWER VIDEO. Plug the USB extender’s CAT-5 cable into the RJ-45 Link Port of the Extreme USB 2.0 Extender RX unit at the computer. With a USB 2.0 cable connect the USB Type-B Male to the Type-B Female on the extender and the other end, Type-A Male into the computer. WallVIEW HD-USB PRO Camera System Document Number 342-0467 Rev. E Page 12 of 40 WallVIEW HD-USB PRO Camera System Step 6: Last Chance to check the wiring After double checking the wiring, plug the 24 VDC power supply into the Power Extension Module and plug the power supply into the power outlet. The HD-USB camera should home and also should be sending USB 2.0 MJPEG video to the computer. Checking out the Installation: A. On the RX and TX units, check that the Power, Host, and Link LEDs are on and that the Activity LED is blinking. If the Link LED is permanently off, then the cabling between the LEX and REX unit is not installed properly or is defective. B. For Windows users (2000, XP, Vista, Windows 7), open Device Manager to confirm that the “Generic USB Hub” has been installed. C. For Mac OS X users, open the System Profiler to confirm that the “Hub” has installed correctly. In the left hand column under Hardware, select “USB” and inspect the right hand panel. If the system has been installed correctly, you should find it listed as a “Hub” under the USB High-Speed Bus/USB Bus. Operating System Notes: To open System Profiler in OS X: Open the Finder, select Applications, then open the Utilities folder and double click on the System Profiler icon. To open Device Manager in Windows 2000 or XP: Right click “My Computer” then select: Properties >> Hardware tab >> Device Manager. To open Device Manager in Windows Vista or Windows 7: Open the Start menu, right click on “Computer” then select: Manage >> Device Manager COMPATIBILITY The HD-USB PTZ Camera will work with the following web browsers, soft codecs, computer operating systems and media players. Thorough testing has been performed by the technical staff at Vaddio to ensure that the HD-USB camera is compatible with the elements listed below. Compatibility - Web Browsers: 1) Internet Explorer (IE 8 and above) 2) Safari (Rev 4 and 5) 3) Safari/iOS (Rev 4 and 5) 4) Chrome (the latest and current release - auto updating) 5) FireFox (the latest and current release - auto updating) Compatibility - Soft Codecs: HD-USB Camera is compatible with the following soft codecs or applications, in no particular order: Release 2.0.x: 1) Skype Win 7 & Mac OS X 2) Web Ex (WBS 28.7 and up) Win 7 & Mac OS X 3) Microsoft Lync Win7 4) Cisco Jabber Win 7 & Mac OS X 5) Vidyo Desktop Win 7 & Mac OS X 6) Google Plus Win 7 7) Adobe Connect 8 Win 7 & Mac OS X 8) LifeSize ClearSea Win 7 9) GoToMeeting (Citrix) Win 7 & Mac OS X 10) Polycom M100 Win7 11) Panaopto (lecture capture) Win 7 WallVIEW HD-USB PRO Camera System Document Number 342-0467 Rev. E Page 13 of 40 WallVIEW HD-USB PRO Camera System Compatibility - Operating Systems 1) Apple OS X (10.7 and above) 2) Windows XP w/Service Pack 3 with known issues and errata 3) Windows 7 4) Linux Compatibility - Media Players: The UVC with MJPEG and IP with H.264 video are compatible with the industry leading PC media players. 1) Quick-Time 2) Real Player 3) VLC Media Player Evolving Compatibilities: As more UC soft-client and lecture capture programs are released and gain popularity, Vaddio will provide a continuing research and development effort to ensure the camera’s viability and compatibility with other manufacturer’s products. Supported UVC Resolutions The USB 2.0 UVC (Universal Video Class) video driver resolution table is basically an internal list of resolutions available for the Host PC and the Camera to negotiate and use for the application. Typically, the highest resolution possible between both the PC and camera is used. However, not all OS and application combinations are typical. Some applications are assigned to a lower value, or the lowest resolution to purposely minimize the bandwidth requirement. In order to avoid selection of the smallest resolution possible, the resolutions of 160 x 120 and 160 x 90 were removed from the camera due to the selection of the lowest resolution by some UC Clients and because it looked sort of wicked awful (in some respects). Table: Supported UVC Resolutions Format Resolution Frame Rate Aspect Ratio MJPEG 1280 x 720 960 x 544 704 x 576 640 x 480 640 x 360 424 x 240 352 x 240 320 x 240 320 x 180 15/30 15/30 15/30 15/30 15/30 15/30 15/30 15/30 15/30 16:9 16:9 4:3 4:3 16:9 4:3 4:3 4:3 16:9 YUY2 640 x 480 640 x 360 424 x 240 352 x 240 320 x 240 320 x 180 10 10 15/30 15/30 15/30 15/30 4:3 16:9 4:3 4:3 4:3 16:9 Keyboard Hot Keys for PTZ functions: The keyboard hot keys can control the Pan/Tilt/Zoom functions of the HD-USB Camera when using the Camera Control Web Page (shown in the next section). The table below explains operation. Table: Keyboard Hotkeys Function Hot Key Function Hot Key Zoom IN Zoom OUT Tilt Up Tilt Down Pan Right Pan Left + (plus) - (minus) Num. Pad Key 8, Up Arrow Num. Pad Key 2, Down Arrow Num. Pad Key 6, Right Arrow Num. Pad Key 4, Left Arrow Tilt Up & Pan Right Tilt Down & Pan Right Tilt Up & Pan Left Tilt Down & Pan Left Num. Pad Key 9, PgUp Num. Pad Key 3, PgDn Num. Pad Key 1, End Num. Pad Key 7, Home NOTE: Shift key not required for + and - keys on number row. Caps Lock can be ON or OFF. Num Lock must be off to use the Numeric Keypad for pan and tilt. WallVIEW HD-USB PRO Camera System Document Number 342-0467 Rev. E Page 14 of 40 WallVIEW HD-USB PRO Camera System INTERNAL WEB PAGES AND CONTROL The internal web pages will allow control of the HD-USB and allow the user to control the camera via a network connection. These web pages will allow the user or administrator to set security passwords, change the IP address, view diagnostics, access the firmware upgrade page and more. To access the HD-USB’s web pages, first include your Network Administrator for the network that the camera will be placed. Access to the internal web pages can be achieved three ways for set-up of the HD-USB’s IP address and other administrative functions. DHCP Set-up (Dynamic Host Configuration Protocol) DHCP Set-up (skip this section if Static IP). If the LAN has a DHCP (dynamic host configuration protocol) server, then the IP address, gateway and routing information will automatically be assigned. The HD-USB software is defaulted to DHCP. The HD-USB will attempt to dynamically obtain an IP address using DHCP, but it will fall back to the default address of 169.254.1.1 if no DHCP server can be found. To display the HD-USB’s IP Address: 1) Plug in the camera and let it go through the boot up procedure. The IP Address will be displayed at the top and middle of the screen for 15 seconds and then automatically turns off. To see the IP address for longer than the 15 seconds at boot up, then… 2) Pick up the Vaddio IR Remote Commander and find the Data Screen button. 3) Press and hold the Data Screen button on the remote for 4 seconds. 4) The IP Address will appear on the display. The system is capable of displaying and address up to 15 characters arranged in the format: xxx.xxx.xxx.xxx. The default static IP address for the HD-USB camera is 169.254.1.1. 5) To turn off the IP Address display, press and hold the Data Screen button for 4 more seconds or until the IP Address turns off. Connect to the Local Area Network or to a computer with a Cross-over cable Data Screen Button Displaying the IP address for the network administrator is advantageous especially in a network that is DHCP. It makes it easier to find the camera on the network and assign addresses permanently within the DHCP protocol. Whatever protocols are used, always have the network administrators available when attaching the HD-USB camera to the Ethernet network. Notes: The Data screen button is also used for the Camera’s on-screen display where many of the camera’s parameters can be set. It is easy to tell the difference between these modes as one quick touch enters the OSD for the camera and a four second press and hold displays the web address and turns off the web address display. IP Address 169.254.1.1 The IP Address will be displayed on screen out of the composite video, analog component video (YPbPr) and the USB output. It will display at the top, middle of the screen to ensure that older 4:3 displays can show the address as well as the prevalent 16:9 monitors. Simulated IP Address On-Screen Display WallVIEW HD-USB PRO Camera System Document Number 342-0467 Rev. E Page 15 of 40 WallVIEW HD-USB PRO Camera System Static IP Set-up: It is highly recommended that the Network Administrator and/or network personnel are involved on the Static IP set-up of the HD-USB camera. Please do not try to set the Static IP of the camera without help from network personnel…please? The static IP can be assigned either through the network or directly to a computer using a cross-over cable. Depending on the age of the computer, you may not need a cross-over cable. Either way the steps are the same for network or direct connect to a computer. The default address of the HD-USB camera is 169.254.1.1 and the Subnet mask is 255.255.0.0. Different computer OS types all have their own way of doing things (without question), but they are essentially doing the same stuff, changing the IP address so the web pages of the HD-USB are accessible. Examples (directly connected to a computer for set-up): For Windows XP Pro, the routine to get to the network settings is fairly simple. Click on the Start button > Control Panels > Network Connections > Right Click Local Area Connection > click on Properties > click on Internet Protocol (TCP/IP) > click on Properties and IP Address and Subnet Mask numbers are displayed. It is best to record the addresses that are in the computer so they can be re-assigned when the operation is finished. Enter 169.254.1.2 (which is the default address 169.254.1.1 plus 1) and Subnet mask is 255.255.0.0 and click OK > and then OK again. Bring up one of the approved web browsers (like Chrome) and enter http://169.254.1.1 and the Log-in page will appear. With Apple OS X (10.7 and above), the steps are a bit different but essentially the same…Go to > System Preferences > Network > Ethernet > Configure IPv4: Manually > Enter in 169.254.1.2 and Subnet mask of 255.255.0.0 and click Apply. Bring up one of the approved web browsers (like Safari) and enter http://169.254.1.1 and the Log-in page will appear. Windows 7 has its own set-up that is a bit different from Windows XP Pro, but similar in that the whole purpose of the Static IP first time set up is to give the HD-USB PTZ Camera an address that can be used over and over again by users or administrators to control the camera. LOGIN Page: The Login Page will appear if there is a user name assigned by the administrator. Assigning a user name can limit access to the admin menus by a general user. User name is blank (assigned by admin) Password is: password Admin name is: admin By default, the password for the User account is: password. Password is: password The Administrator can set the name and password for the User account. If no user name is assigned, the web page will automatically open to the IP Control page. WallVIEW HD-USB PRO Camera System Document Number 342-0467 Rev. E Page 16 of 40 WallVIEW HD-USB PRO Camera System SCREEN SHOT TOUR: The Camera Control page (functions called out below). ➐ ➏ ➊ ➋ ➌ ➎ ➍ Store Preset pop-up menu dramatization 1) Pan, Tilt and Home Controls: These intuitive controls use the up/down arrows for camera tilt, the left/right arrows for camera pan and the center button to move the camera to the home position. 2) Zoom Control: The camera’s zoom lens can be controlled with the “+” to zoom-in and the “-“to zoom out. 3) Pan/Tilt and Zoom Speed Controls: The speed for both the Pan/Tilt and Zoom controls can be adjusted for with the two (2) buttons in this section. For tighter shots, it is recommended that the slower speed is used. 4) Store Preset Button: Clicking the Store button opens up a Store Preset pop-up dialog box. To set presets, set up the camera shot, click on choice of preset number (1 through 6). The preset is stored and the dialog box closes. 5) Camera Presets: Six (6) presets can be recalled simply by clicking a preset number. 6) Administration Menu: Clicking on the Administration menu bar, the Admin Log-in screen will appear. The default Admin password is: password. 7) Vertical: The vertical button will reduce the size of the window for the user controls and remove the menu tabs on the left side of the screen. The vertical sizing works well when using it with a soft-client codec. Examples of the vertical box are at the end of the tour. WallVIEW HD-USB PRO Camera System Document Number 342-0467 Rev. E Page 17 of 40 WallVIEW HD-USB PRO Camera System Admin Pages: Clicking on the Admin link button will open the Log-in window. Enter the default password (password) on this line and click on Log-in. ◄ ◄ Password is: password After Login, the Admin link buttons are exposed and include Streaming, Labels, Networking, Security, Diagnostics, System, Help and Logout Admin. ◄ ◄ ◄ ◄ ◄ ◄ ◄ ◄ WallVIEW HD-USB PRO Camera System Document Number 342-0467 Rev. E Page 18 of 40 WallVIEW HD-USB PRO Camera System Streaming: The Streaming Menu allows an administrator to set up the type of streaming, color depth, video speed and quality, protocol and path. ➊ ➋ ◄ ➌ ➍ ➎ The Streaming Menu: 1) 2) 3) 4) 5) The Streaming mode is set for either USB 2.0 streaming (MJPEG) or IP streaming (H.264); however the HD-USB cannot do both at the same time. It can stream USB and accept IP control, or it can IP stream with IP control. Choose the streaming mode here. USB Image Settings allows the admin to set a “friendly” name allowing each system to have its own identity. This is handy for a user that uses several rooms. It also allows the admin to reduce the color depth to 4:2:0, which is used with the older/cheaper webcams and applications, where image quality is not as critical. The 4:2:2 color is used by many applications that take advantage of the performance of the camera where the colors are more vivid. The IP Streaming - Video Settings allow the selection of the target performance for the IP Streaming. The HD-USB camera is set up for a variable bit rate, which is much simpler to use. The user can select the resolution and the quality, such as High Quality (Best), Standard Quality (Better) and Low Bandwidth (Good). Every effort to eliminate bad combinations with the 5 or 6 parameters that make up the image size, quality, rate etc… has been made, so you can’t pick 1080p at a bit rate of 128Kbps, which would look totally wicked awful - and probably wouldn’t work anyway. The IP Streaming Protocol also allows the admin to choose the streaming type and the port number for RTSP. The HLS port is always on 80. The supported protocols are RTSP and HLS (Apple’s HTTP Live Streaming). RTSP is best for live applications, where HLS serves the Apple iOS devices and is better for playback due to the amount of buffering the HLS has built-in. The Streaming URL auto populates and that path can be changed. When finished setting up the streaming parameters, click on save to put the changes into effect or cancel to……cancel it. WallVIEW HD-USB PRO Camera System Document Number 342-0467 Rev. E Page 19 of 40 WallVIEW HD-USB PRO Camera System Room Labels: The Room Labels menu allows the administrator to label the company name, room name, room phone and help phone on a per camera basis. The labels appear on every page at the top/middle of the page. Simply enter the room information and click Save. ◄ ◄ ◄ ◄ By clicking on the Networking link button, the Network Configuration and Network Interfaces are displayed. This is where the Network administrator assigns either DHCP or a Static address and the associated parameters. ◄ ◄ WallVIEW HD-USB PRO Camera System Document Number 342-0467 Rev. E Page 20 of 40 WallVIEW HD-USB PRO Camera System If Static IP is chosen, a new menu “pops up" where the IP Address, Subnet Mask and Gateway are entered. Click on Save to keep the Static IP information. ◄ ◄ ◄ ◄ By clicking on the Security link button, the UPDATE “user” PASSWORD and UPDATE “admin” PASSWORD control sections are displayed. The default “user” password is: password. The default “admin” password is also: password. The Network administrator can reassign the user name and password as well as the Admin password. There is only one “user” password and one “admin” password at any given time. ◄ ◄ WallVIEW HD-USB PRO Camera System Document Number 342-0467 Rev. E ◄ Page 21 of 40 WallVIEW HD-USB PRO Camera System By clicking the Diagnostics link button, a set of self-diagnostics will be displayed. These diagnostics may help the Vaddio technical support team diagnose a problem with the HD-USB camera. ◄ The System link button is where the Firmware Updates will be loaded. There will be several firmware updates and upgrades over the life of the camera. Click “Show more” for detail about the current software. A Reboot button and a Restore Factory Settings control rounds out the System Page. ◄ ◄ WallVIEW HD-USB PRO Camera System Document Number 342-0467 Rev. E Page 22 of 40 WallVIEW HD-USB PRO Camera System By clicking on “Show more…” the software versions are displayed. To update the firmware files, chose the appropriate file and click on Begin Firmware Update. When in doubt, call Vaddio Tech Support for assistance. ◄ ◄ ◄ ◄ After clicking on “Begin Firmware Update…” a confirmation pop-up and warning will be displayed. Please contact Vaddio Tech support for directions or assistance. Please read and completely understand the pop-up warnings as it is easy to lose patience waiting for updates. If the update is interrupted, it is never really ever a good thing. ◄ ◄ After the firmware load has been started, a pop-up screen will advise patience and notify, in terms of a percentage completed, the progress of the firmware load. Please do not interrupt the firmware load. WallVIEW HD-USB PRO Camera System Document Number 342-0467 Rev. E Page 23 of 40 WallVIEW HD-USB PRO Camera System ◄ ◄ Service/Help information can be found under the Help tab. Support phone numbers and e-mail, manuals, FAQ’s and System information is listed on this page. Have this page open when calling Vaddio Tech Support. ◄ See next page for “Vertical” button function. ◄ ◄ ◄ ◄ ◄ TECHNICAL SUPPORT NOTE: Please work with your Network Administrator prior to calling Vaddio for technical support. Please have on-site network personnel initiate tech support calls with Vaddio only. WallVIEW HD-USB PRO Camera System Document Number 342-0467 Rev. E Page 24 of 40 WallVIEW HD-USB PRO Camera System Finally, the Vertical button at the top right of the camera control page reduces the size of the camera control window and drops the menu bars to allow the controls to be open and on screen along with any soft-codec application without taking up too much space. This control page can be sized with the mouse, moved around the screen and minimized to not block any part of the screen. The Full button returns the web page to normal size. ◄ WallVIEW HD-USB PRO Camera System Document Number 342-0467 Rev. E Click on full to go back to full sized web pages Page 25 of 40 WallVIEW HD-USB PRO Camera System CONNECTING THE CAMERA TO THE PROGRAM OF CHOICE: The HD-USB PTZ Camera is compatible with many programs and media players. The following is an attempt to generally describe the steps to plug in the HD-USB camera and get an image. Skype Example 1) First, with a quality USB 2.0 cable, plug the USB-B port of the camera to the USB-A port of the computer. A pop up window on the computer monitor will display the following: a. Found ClearVIEW HD-USB b. Found USB Composite Device c. Found USB Video Device 2) Open Skype and perform the following steps: a. Open the Tools Menu and drop down to Options b. Click on Video Settings and under Webcam choose USB Video Device The systems will negotiate the highest resolutions possible, depending on the computer speed, network quality, cabling etc..., and display the video signal of the camera. The camera can be controlled with the supplied Vaddio IR Remote Commander or through IP as described earlier through the cameras web pages. Make a test call to ensure the system is working properly. VLC Media Player Example 1) Same first step as above. 2) Open VLC Media Player and perform the following steps: a. Click on the Media menu and drop down to Open Capture Device and click it. b. Under Device Name, go to the Video Device Name drop down and choose USB Video Device. c. Under Options, enter the Video Size as 1280x720 d. Click on Play e. From there, VLC needs some instruction on the aspect ratio, so click on Tools and drop down to Aspect Ratio and drop down again to 16:9 for 720p (1280x720). VLC is a powerful record/playback system and buffers the images so you will notice some delay in the way VLC displays the image. With all the compatible software available, in general terms, the video device, aspect ratio, and resolution may need to be set manually the first time through initial set-up. Some systems are easier than others (like Skype) and others are more technical in nature and tend to do more stuff (like VLC). WallVIEW HD-USB PRO Camera System Document Number 342-0467 Rev. E Page 26 of 40 WallVIEW HD-USB PRO Camera System TECHNICAL SPECIFICATIONS: Part Numbers 999-6995-000 North America, 999-6995-001 International Video Outputs USB Interface Network Interface H.264 Resolutions (Release 2.0) User Control Supported Media Players Supported Browsers Image Sensor Minimum Illumination Lens/ Focal Length Horizontal Viewing Angle Pan Range Preset Positions Power Extension Module Includes USB 2.0 (MJPEG) o Resolution up to 720p/30 USB 2.0 (MJPEG) o Color Space 4.2.2 or 4.2.0 o Use “HD VIDEO AND USB 2.0 VIDEO SELECT” rotary positions ‘0’ for USB.2.0 Video H.264 (IP) - Release 2.0.x o Resolution up to 1080p/30 (H.264) Analog Component (YPbPr), o Analog resolutions up to and including 1080p/60 (YPbPr) CVBS - Analog only o 480i and 576i (4:3, LB and SQ) Connector: Type-B, USB 2.0 Compliant, Supported Drivers: Standard UVC device (no custom drivers) Connector: RJ-45, 10/100 Base-T, Supported Protocols: RTSP Streaming, HLS Streaming (apple’s variant of HTTP streaming) - Release 2 CIF, 640x480 (VGA), 480p, 720p/30 1080p/30 (1080p Ethernet only) Vaddio IR Remote Commander, On Screen Display for camera set-up, RS-232, Ethernet (web page) Windows Media Player, Apple Quick-Time and VLC Media Player Internet Explorer 8 & 9, Safari 4 &5, Safari/iOS, Chrome, FireFox 1/3-Type Exmor High-speed, Progressive Scan CMOS Sensor with 1.3 Megapixels 0.7 LUX (F1.6, 50IRE) 19X Optical Zoom, F=4.5mm wide to 85mm tele (F1.6-F2.9), Min. Focus Distance 1.0m 58.1° Wide End to 3.2° Tele End - 16:9 Format Pan: +170 degrees to -170 degrees, Tilt: +90 degrees to -30 degrees, Invertible for Ceiling Mount 16 (internal), 6 recalled via IR Remote Power Extension Module with 5.5mm OD x 2.5mm ID coax power connector 24 VDC, 2.08 Amp switching power supply (100V-240V, 50 to 60 Hz) with power cable Extreme USB 2.0 Extenders Range 100m (330ft) over CAT-5 (or better) cable USB device support High-speed devices (480 Mb/s) (USB 2.0) Full speed devices (12 Mb/s) (USB 2.0 & 1.1) Low speed devices (1.5 Mb/s) (USB 2.0 & 1.1) USB host support EHCI (USB 2.0) and OHCI/UHCI (USB 1.1) RX unit USB connector 1 x USB Type-B TX unit Link connector 1 x RJ45 TX unit Link connector 1 x RJ45 TX unit USB connector 1 x USB Type-A RX unit dimensions 3.94” x 2.99” x 1.02” (100 mm x 76 mm x 26 mm) TX unit dimensions 3.94” x 2.99” x 1.02” (100 mm x 76 mm x 26 mm) TX power consumption 500 mA maximum RX power consumption Approx. 500 mA (No Load). 1.5A (Full load) System shipping weight 2.0 lbs. (0.9 kg) Operating temperature 0°C to 50°C range Storage temperature range -20°C to 70°C Operating humidity 20% to 80% relative humidity, non-condensing Storage humidity 10% to 90% relative humidity, non-condensing Regulatory testing FCC (Class B), IC (Class B), CE (Class B) ESD rating EMC EN-61000-4-2 8kV Contact, 16kV Air General Information Operating Temperature 32° to 104° F (0° to 40° C) / 20% to 80% Relative Humidity Dimensions / Weight 7.81” (198.37mm) H x 6.67” (169.42mm) W x 7.057” (179.25. mm) D / 6.04 lbs. (2.7397kg.) Release 1.0: Includes USB 2.0 Outputs and Analog Outputs simultaneously on and ready to use. Ethernet Software Release control via an internal web page and upgrading software capability is active. Information Release 1.2.0: Improvements, additions to functionality, Telnet control, UC client compatibility and UVC resolutions. (see release notes) Release 2.0.0: H.264 activated for IP Streaming over the network port WallVIEW HD-USB PRO Camera System Document Number 342-0467 Rev. E Page 27 of 40 WallVIEW HD-USB PRO Camera System COMPLIANCE AND CE DECLARATION OF CONFORMITY: CLEARVIEW HD-USB PTZ CAMERA Compliance testing was performed to the following regulations: FCC Part15, Sections 15.107, 15.109 Subpart B ICES-003 ISSUE 4, 2004 EN55022 A1 2007 EMC Directive 2004/108/EC IEC 60950-1:2005 (2nd Edition); Am 1:2009 EN 60950-1:2006+A11:2009+A1:2010+A12:2011 Class A Class A Class A Class A Class A Class A FCC Part 15 Compliance This equipment has been tested and found to comply with the limits for a Class A digital device, pursuant to Part 15, Subpart B, of the FCC Rules. These limits are designed to provide reasonable protection against harmful interference when the equipment is operated in a commercial environment. This equipment generates, uses, and can radiate radio frequency energy and, if not installed and used in accordance with the instruction manual, may cause harmful interference to radio communications. Operation of this equipment in a residential area is likely to cause harmful interference in which case the user will be required to correct the interference at his/her own expense. Operation is subject to the following two conditions: (1) This device may not cause interference, and (2) This device must accept any interference including interference that may cause undesired operation of the device. Changes or modifications not expressly approved by Vaddio can affect emission compliance and could void the user’s authority to operate this equipment. ICES-003 Compliance ICES-003, Issue 4: 2004 This digital apparatus does not exceed the Class A limits for radio noise emissions from digital apparatus set out in the Radio Interference Regulations of the Canadian Department of Communications. Le présent appareil numérique n’emet pas de bruits radioélectriques dépassant les limites applicables aux appareils numeriques de la classe B préscrites dans le Règlement sur le brouillage radioélectrique édicte par le ministère des Communications du Canada. European Compliance This product has been evaluated for Electromagnetic Compatibility under the EMC Directive for Emissions and Immunity and meets the requirements for a Class A digital device. In a domestic environment this product may cause radio interference in which case the user may be required to take adequate measures. Standard(s) To Which Conformity Is Declared: EMC Directive 2004/108/EC EN55024/A2:2003 Information Technology Equipment Immunity Characteristics Limits and Methods of Measurement EN 61000-4-2: 1995 + Amendments A1: 1998 + A2: 2001 EN 61000-4-3: 2006 + A1: 2008 EN 61000-4-4: 2004 + Corrigendum 2006 EN 61000-4-5: 2006 EN 61000-4-6: 2009 EN 61000-4-8: 2010 EN 61000-4-11: Second Edition: 2004 IEC 60950-1:2005 (2nd Edition); Am 1:2009 EN 60950-1:2006+A11:2009+A1:2010+A12:2011 WallVIEW HD-USB PRO Camera System Document Number 342-0467 Rev. E Electrostatic Discharge Radiated Immunity Electrical Fast Transients Surge Immunity Conducted Immunity Power Frequency Magnetic Field Voltage Dips, Interrupts and Fluctuations Information technology equipment - Safety Information technology equipment - Safety Page 28 of 40 WallVIEW HD-USB PRO Camera System WARRANTY INFORMATION: (See Vaddio Warranty, Service and Return Policies posted on vaddio.com for complete details): Hardware* Warranty: Two (2) year limited warranty on all parts and labor for Vaddio manufactured products. Vaddio warrants its manufactured products against defects in materials and workmanship for a period of two years from the day of purchase, to the original purchaser, if Vaddio receives notice of such defects during the warranty. Vaddio, at its option, will repair or replace products that prove to be defective. Vaddio manufactures its hardware products from parts and components that are new or equivalent to new in accordance with industry standard practices. Exclusions: The above warranty shall not apply to defects resulting from improper or inadequate maintenance by the customer, customers applied software or interfacing, unauthorized modifications or misuse, mishandling, operation outside the normal environmental specifications for the product, use of the incorrect power supply, modified power supply or improper site operation and maintenance. OEM products and products manufactured by other companies are excluded and are covered by the manufacturer’s warranty. Vaddio Customer Service: Vaddio will test, repair, or replace the product or products without charge if the unit is under warranty. If the product is out of warranty, Vaddio will test then repair the product or products. The cost of parts and labor charge will be estimated by a technician and confirmed by the customer prior to repair. All components must be returned for testing as a complete unit. Vaddio will not accept responsibility for shipment after it has left the premises. Vaddio Technical Support: Vaddio technicians will determine and discuss with the customer the criteria for repair costs and/or replacement. Vaddio Technical Support can be contacted through one of the following resources: e-mail support at [email protected] or online at vaddio.com. Return Material Authorization (RMA) Number: Before returning a product for repair or replacement request an RMA from Vaddio’s technical support. Provide the technician with a return phone number, e-mail address, shipping address, product serial numbers and original purchase order number. Describe the reason for repairs or returns as well as the date of purchase. See the General RMA Terms and Procedures section for more information. RMA’s are valid for 30 days and will be issued to Vaddio dealers only. End users must return products through Vaddio dealers. Include the assigned RMA number in all correspondence with Vaddio. Write the assigned RMA number clearly on the shipping label of the box when returning the product. All products returned for credit are subject to a restocking charge without exception. Voided Warranty: The warranty does not apply if the original serial number has been removed or if the product has been disassembled or damaged through misuse, accident, modifications, use of incorrect power supply, use of a modified power supply or unauthorized repair. Shipping and Handling: Vaddio will not pay for inbound shipping transportation or insurance charges or accept any responsibility for laws and ordinances from inbound transit. Vaddio will pay for outbound shipping, transportation, and insurance charges for all items under warranty but will not assume responsibility for loss and/or damage by the outbound freight carrier. If the return shipment appears damaged, retain the original boxes and packing material for inspection by the carrier. Contact your carrier immediately. Products not under Warranty: Payment arrangements are required before outbound shipment for all out of warranty products *Vaddio manufactures its hardware products from parts and components that are new or equivalent to new in accordance with industry standard practices. Other General Information: Care and Cleaning Do not attempt to take this product apart at any time. There are no user-serviceable components inside. Do not spill liquids in the product Keep this device away from food and liquid For smears or smudges on the product, wipe with a clean, soft cloth Use a lens cleaner on the lens Do not use any abrasive chemicals. Operating and Storage Conditions: Do not store or operate the device under the following conditions: Temperatures above 40°C (104°F) or temperatures below 0°C (32°F) High humidity, condensing or wet environments In farm house heat-oil tank In inclement weather Dry environments with an excess of static discharge In mustard seed containers Under severe vibration WallVIEW HD-USB PRO Camera System Document Number 342-0467 Rev. E Page 29 of 40 WallVIEW HD-USB PRO Camera System APPENDIX 1: COMMUNICATION SPECIFICATION Communication Speed: 9600 bps (default) Start bit: 1 Stop bit: 1 Data bits: 8 Parity: None No Flow control 12345678 Pin # 1) 2) 3) 4) 5) 6) 7) 8) RJ-45 RS-232 and IR Out Pins Unused Unused Unused Unused Unused GND (GND of IR Short Range - Pin 3) RXD (from TXD of control source) TXD (to RXD of control source) NOTE: The Vaddio ClearVIEW HD-USB Control Protocol is similar, but not identical to the Sony® VISCA™ command set and is not compatible with Vaddio Joysticks. This is an abbreviated Command set intended to give external control systems basic control over the camera. This list is not the same list as found in the other ClearVIEW (HD-18, HD-19 and HD-20) cameras. HD-USB Command List Command Set Command Command Packet Comments Address Set IF_Clear Command Cancel CAM_Power Broadcast Broadcast 88 30 01 FF 88 01 00 01 FF 8x 2p FF 8x 01 04 00 02 FF 8x 01 04 00 03 FF 8x 01 04 07 00 FF 8x 01 04 07 02 FF 8x 01 04 07 03 FF 8x 01 04 07 2p FF 8x 01 04 07 3p FF 8x 01 04 47 0p 0q 0r 0s FF 8x 01 7E 01 4A 0v 0p 0q 0r 0s FF 8x 01 04 08 00 FF 8x 01 04 08 02 FF 8x 01 04 08 03 FF 8x 01 04 08 2p FF 8x 01 04 08 3p FF 8x 01 04 38 02 FF 8x 01 04 38 03 FF 8x 01 04 38 10 FF 8x 01 04 48 0p 0q 0r 0s FF 8x 01 04 33 02 FF 8x 01 04 33 03 FF 8x 01 04 3F 00 0p FF 8x 01 04 3F 01 0p FF 8x01 04 3F 02 0p FF 8x 01 06 01 VV WW 03 01 FF 8x 01 06 01 VV WW 03 02 FF 8x 01 06 01 VV WW 01 03 FF 8x 01 06 01 VV WW 02 03 FF 8x 01 06 01 VV WW 01 01 FF 8x 01 06 01 VV WW 02 01 FF 8x 01 06 01 VV WW 01 02 FF 8x 01 06 01 VV WW 02 02 FF 8x 01 06 01 VV WW 03 03 FF 81 01 06 02 VV WW 0Y 0Y 0Y 0Y 0Z 0Z 0Z 0Z FF 0Y 0Y 0Y 0Y 0Z 0Z 0Z 0Z FF 8x 01 06 04 FF 81 01 06 05 FF 8x 01 7E 01 0A 00 02 FF 8x 01 7E 01 0A 00 03 FF 81 01 7E 01 0B WW SS ZZ FF Address Set (Daisy chain) IF Clear p:socket number(1,2) Power On/Off CAM_Zoom CAM_Focus CAM_Backlight CAM_Memory Pan-tiltDrive Tally Preset Pan Speed On Off(Standby) Stop Tele(Standard) Wide(Standard) Tele(Variable) Wide(Variable) Direct Direct(Variable) Stop Far(Standard) Near(Standard) Far(Variable) Near(Variable) AutoFocus ManualFocus Auto/Manual Direct On Off Reset Set Recall Up Down Left Right UpLeft UpRight DownLeft DownRight Stop Absolute Position Home Reset On Off Pan/Tilt/Zoom Speed pqrs: Zoom Position* v:(Speed) 0-7 pqrs: Focus position* p:Memory No(=0-0xe) WW: Pan Speed (0x01-0x18) VV:Tilt Speed(0x01-0x14) YYYY: Pan Position** ZZZZ: Tilt Position** WW: Pan Speed (0x01-0x18) SS:Tilt Speed(0x01-0x14) ZZ:Zoom Speed(0-7); *Zoom and Focus Data: CAM_Zoom: Range(0x000–0x6B3) CAM_Focus: Range (0x000-0xC000) dependent on Zoom Position **Additional Information: Pan Range: 8044 – 7FBC (-32,700 to +32,700) Tilt Range: E891 – 4C2B (-5,999 to +19,499) WallVIEW HD-USB PRO Camera System Document Number 342-0467 Rev. E Page 30 of 40 WallVIEW HD-USB PRO Camera System HD-USB Inquiry List Inquiry Command Command Response Packet Comments CAM_PowerInq 8x 09 04 00 FF CAM_ZoomPosInq CAM_FocusPosInq CAM_BacklightModeInq 8x 09 04 47 FF 8x 09 04 48 FF 8x 09 04 33 FF CAM_MemoryInq Pan-TiltMaxSpeedInq 8x 09 04 3F FF 8x 09 06 11 FF y0 50 02 FF y0 50 03 FF y0 50 0p 0q 0r 0s FF y0 50 0p 0q 0r 0s FF y0 50 02 FF y0 50 03 FF y0 50 0p FF y0 50 pp qq FF Pan-tiltPositionInq 8x 09 06 12 FF FF y0 50 0p 0p 0p 0p 0q 0q 0q 0q FF TallyInq 8x 09 7E 01 0A FF PresetSpeedInq 8x 09 7E 01 0B FF y0 50 02 FF y0 50 03 FF y0 50 pp qq rr FF Motor Config 8x 09 7E 01 70 FF On Off(Standby) pqr: 0-0x6B3 pqrs: Focus Position On Off p:Preset 0-0xf pp:Pan 0x01-0x18 qq:Tilt 0x01-0x14 pppp: Pan 0x8044-0x7FB2 qqqq: Tilt 0xE890-0x4C2C On Off pp:Pan 0x01-0x18 qq:Tilt 0x01-0x14 rr:Zoom 0x00-0x07 Hard Motor Stops Soft Motor Stops y0 50 00 FF y0 50 01 FF FIRMWARE VERSION 2.1.0 RELEASE NOTES: Component Database Middleware Version 2.1.0 2.0.0 New Features and Functions Under the USB Streaming section the USB Device Name was added, which allows the admin to use a friendly name for the camera. The camera will be listed as a UVC Camera in the device manager without this function and moving from room to room in the enterprise with multiple systems or controlling two cameras in a single room, is not exactly easy. The friendly name is preferred over a generic term for firms with more than one camera. The camera’s scaler for lower resolutions has been improved. The HD-USB camera is optimized for HD video, and some applications scale the video down significantly from 720p to 360p and even as low as 180p. Some improvements were made to accommodate these lower resolutions. A system reboot function and a return to factory defaults were added to the webpages for additional convenience especially when managing the camera over the internet. Fixed Issues Mac OS 10.8.X and 10.9 Compatibility: This release fixed an USB video streaming compatibly issue with Mac’s Mountain Lion and Maverick operating system. In release 2.0.0, the USB video stream could stop or freeze when a software application requested video resolution changes on Mac’s running Mountain Lion or Maverick operating systems. Release 2.1.0 fixes the interoperability problem and will no longer freeze or stop. FIRMWARE VERSION 2.0.0 PREVIOUS RELEASE NOTES: Component Database Middleware Version 2.0.0 2.0.0 New Features & Functions RTSP or HLS IP Streaming: Release 2.0 includes the Real Time Streaming Protocol (RTSP) or HLS (Apple’s variant on HTTP streaming) for IP Streaming of the camera’s video signal. The IP streaming is configurable within the camera’s internal web server. The camera can be configured as either USB or IP streaming device, however not simultaneously. Improved USB Colors: The ClearVIEW USB has an expanded color space range for USB 2.0 streaming creating a vivid HD image with blacker black and whiter whites. WallVIEW HD-USB PRO Camera System Document Number 342-0467 Rev. E Page 31 of 40 WallVIEW HD-USB PRO Camera System Serial Command API Updates: Added new serial commands for setting streaming functions from Telnet client. Fixed Issues: N/A Known Issues: IP Streaming: Video quality of IP stream will degrade with more than one media player directly connected to the camera’s IP stream. This is a processor limitation on the streaming engine within the camera and is normal. For many participants, please use a CDN. Sharpness Setting on Camera: Sharpness setting on HD-USB Camera can create scaling artifacts with UC clients using low resolution video (lower than 480p). The root cause of image artifacts are related to the MJPEG decoder in some UC soft-clients. The sharpness can be disabled on the camera from the IR remote. Press Data Screen and navigate to Special >Image Adj > Sharpness, then disable sharpness. This should reduce scaling artifacts (“the jaggies”) with some software clients using low resolution video. RTSP Port: The RTSP port can be assigned on the internal web pages as 554, or between the ranges of 1024 to 65535. Other ports are reserved for internal purposes. Interoperability Testing & Findings The following interoperability testing was performed for this release. A detailed list of all interoperability findings can be found in the EasyUSB Tools Interoperability FAQ document. Table: HD-USB PTZ Camera and UC Client Software Interoperability Testing Software Client Cisco Jabber Web Ex Skype Adobe Connect Microsoft Lync Gotomeeting (Citrix) Vidyo Desktop Polycom M100 LifeSize ClearSea Google Plus Panopto Quick Time Media Player VLC Media Player Real Player Media Player QuickTime Media Play Tested Version 4.4 WBS 28.7 6.0 9.0.1 4.0.7 5.4 2.2.1 1.0.4 8.2.0 N/A 4.2.5602 10.2 2.0.4 16.0 Major Findings None None Comment 720p only supported on Skype Certified Camera UVC Conflict with some builtin Laptop Cameras None None None None None None None None Must have WebEx client version 28.7 to work with Vaddio USB Video Products. AV Bridge color space should be set to 4:2:0 Workaround for HD by downloading shareware to force HD. MAC version of Connect squeezes to 4:3 aspect ratio. No Comment (N/C) N/C Certified with VidyoRoom 2.2.2.x N/C N/C N/C N/C N/C None None N/C N/C HD-USB IP Streaming Interoperability Testing Test Version Major Findings 10.2 (MAC) 7.7 (Win 7) Real Player 16.0 VLC Media Player WOWZA Media Server 2.0.x 5.4 Direct X plugins may need to be disabled on Windows in order to accept the RTSP stream. Note: QuickTime does not support PCM audio. Real Player uses QuickTime for a decoder and launches a small video window. None None WallVIEW HD-USB PRO Camera System Document Number 342-0467 Rev. E Comment N/C N/C N/C Tested as push-stream to WOWZA via RTSP Page 32 of 40 WallVIEW HD-USB PRO Camera System Windows Media Player Note: Windows Media Player is not compatible with standard RTSP streams. It will not play IP streams originating from the HD-USB camera, AV Bridge encoder or any other RTSP streaming device. NO RUG PULLING Backward Compatibility: The Rev 2.1.0 and up software will not allow device to be downgraded to previous versions. PREVIOUS RELEASE NOTES: Firmware Version 1.2.0 Release Notes: ClearVIEW HD-USB PTZ Camera Component Database Middleware Version 1.2.0 1.2.0 Note: Most of the version 1.2.0 Release notes have been added to the body of the manual as the data is important to the operation of the HD-USB camera. The notes listed below are the highlights of the Firmware Release 1.2.0. New Features and Functions: WebEx Compatibility: The video compatibility problem between HD-USB and WebEx has been resolved with a new software release of the WebEx client. Version WBS 28.7 and above is compatible with Vaddio USB devices. Improved Interoperability with Various UC software Clients: Additional USB video resolution support was added to the UVC endpoint to improve video quality for some UC soft clients that only use standard definition video resolution. Keyboard Hot Keys: Keyboard hot keys were added for the Pan/Tilt/Zoom functions on the Camera Control Web Page. The Shift key not required for + and - keys on number row. Caps Lock can be ON or OFF. Num Lock must be off to use the Numeric Keypad for pan and tilt. USB Color Space Option: A user configurable option for setting the video color space to 4:2:0 or 4:2:2 was added to the Web Pages. It was noted that using the 4:2:0 color space will reduce USB bandwidth by up to 25.763413125463% and may improve video quality with some UC soft clients. Telnet Command API: A Telnet Client to the HD-USB Camera was added for control via the network. This includes the Pan/Tilt/Zoom function. The telnet format is not a VISCA command protocol. A modified VISCA command protocol is only supported on the RS-232 port. Additional UVC resolutions added: See table on page 10. WallVIEW HD-USB PRO Camera System Document Number 342-0467 Rev. E Page 33 of 40 WallVIEW HD-USB PRO Camera System APPENDIX 2 - TELNET SERIAL COMMAND API The Vaddio Serial Command protocol is a high level text based command line interface supported via telnet session on the ClearVIEW HD-USB PTZ Camera. The Vaddio Serial Command protocol is not supported on the RS-232 port. The RS-232 port is dedicated for VISCA commands only. The command application protocol interface is intended to allow external device such as AMX and Crestron to control the camera. The protocol is based upon ASCII format following the VT100 terminal emulation standard and uses an intuitive textual command nomenclature for ease of use. The API is accessed by a telnet client on the Ethernet port. All ASCII characters will be echoed to terminal program and appended with VT100 string -ESC[J (HEX- 1B 5B 4A). Vaddio Command lines are terminated on carriage return. After the carriage return, the VT100 appends with – ESC[J. (Note: Most terminal programs automatically strip the VT100 string.) General format usage follows a get/set structure. Usage examples for each type are: Set Example COMMAND: > camera pan right RESPONSE: > OK Get Example COMMAND: > stream mode get RESPONSE: > streaming mode usb Syntax Error Example COMMAND: > camera pan right RESPONSE: > ERROR Additional programming controls associated with the terminal protocol includes: CTRL 5 - Clears the current serial buffer on the device. Telnet sessions will require access verification and uses the same username and password associated with the Administrator account on the embedded web server. The default Telnet Port is 23. Command lines are terminated with carriage return. Telnet Command List CameraHome NAME camera home - Move the camera to the home position SYNOPSIS camera home DESCRIPTION Method used to move the camera to the home position EXAMPLES camera home Move the camera back to the home position Image: Scintillating example of simulated Telnet session CameraPan NAME camera pan - Pans the camera left or right SYNOPSIS camera pan {left|right|stop} [1-24] DESCRIPTION Method used to pan the camera OPTIONS left Move the camera left right Move the camera right stop Stop the camera movement speed Optional integer from 1-24 that represents the speed (Default: 12) EXAMPLES camera pan left Pans the camera left at the default speed camera pan right 20 Pans the camera right using a speed of 20 camera pan stop Stops the pan movement of the camera WallVIEW HD-USB PRO Camera System Document Number 342-0467 Rev. E Page 34 of 40 WallVIEW HD-USB PRO Camera System CameraPreset NAME camera preset - Recall and set camera presets SYNOPSIS camera preset {recall|store} [1-6] DESCRIPTION Method used to recall and store camera presets OPTIONS recall Recall preset store Store preset preset Required value from 1-6 used to indicate the preset number EXAMPLES camera recall 3 Move camera to preset position 3 camera store 1 Store current camera position as preset 1 CameraTilt NAME camera tilt - Tilts the camera up or down SYNOPSIS camera tilt {up|down|stop} [1-20] DESCRIPTION Method used to tilt the camera OPTIONS up Move the camera up down Move the camera down stop Stop the camera movement speed Optional integer from 1-20 that represents the speed (Default: 10) EXAMPLES camera tilt up Tilts the camera up at the default speed camera tilt down 20 Tilts the camera up using a speed of 20 camera tilt stop Stops the tilt movement of the camera CameraZoom NAME camera zoom - Zoom the camera in or out SYNOPSIS camera zoom {in|out|stop} [1-7] DESCRIPTION Method used to zoom the camera OPTIONS in Zoom in out Zoom out stop Stop the camera movement speed Optional integer from 1-7 that represents the speed (Default: 3) EXAMPLES camera zoom in Zooms the camera in at the default speed camera zoom out 7 Zooms the camera out using a speed of 7 camera zoom stop Stops the zoom movement of the camera Camera NAME camera - Base command for camera control functionality. Used in conjunction with control arguments to include home, pan, tilt, zoom, and preset. WallVIEW HD-USB PRO Camera System Document Number 342-0467 Rev. E Page 35 of 40 WallVIEW HD-USB PRO Camera System Exit NAME exit - ends the current API command session SYNOPSIS exit DESCRIPTION Exit ends the current API command session. If the session is over telnet, the session is ended and the socket is closed. If the session is over serial, a new session is started. Help NAME help - display an overview of the CLI syntax SYNOPSIS help DESCRIPTION Display an overview of the command line syntax History NAME history - command history SYNOPSIS history [limit] DESCRIPTION Since many of the programs read user input a line at a time, the command history is used to keep track of these lines and also recall historic information HISTORY NAVIGATION The command history can be navigated using the up and down arrow keys. The up arrow will move up a single entry in the command history while the down arrow moves down in the command history. HISTORY EXPANSION The command history supports the expansion functionality from which previous commands can be recalled from within a single session. History expansion is performed immediately after a complete line is read. Listed below are examples of history expansion: * !! Substitute the last command line. * !N Substitute the Nth command line (absolute as per ’history’ command) * !-N Substitute the command line entered N lines before (relative) EXAMPLES history Displays the current command buffer history 5 Sets the history command buffer to remember the last 5 unique entries NetworkPing NAME network ping - send ICMP ECHO_REQUEST to network hosts SYNOPSIS network ping [count <count>] [size <size>] <destination-ip> DESCRIPTION Use the ICMP protocol’s mandatory ECHO_REQUEST datagram to elicit an ICMP ECHO_RESPONSE from a host or gateway. ECHO_REQUEST datagrams have an IP and ICMP header, followed by a struct timeval and then an arbitrary number of pad bytes used to fill out the packet. OPTIONS count Stop after sending count ECHO_REQUEST packets. With deadline option, ping waits for count ECHO_REPLY packets, until the timeout expires. The default is 5. destination The destination IP address where the ECHO_REQUESTS are sent size The data size of the ICMP packet to send. The default is 56 bytes EXAMPLES network ping 192.168.1.1 Attempt to send 5 ICMP ECHO_REQUESTs with data size 56 to the host at 192.168.1.1 network ping count 10 size 100 192.168.1.1 Attempt to send 10 ICMP ECHO_REQUESTs with data size of 100 to the host at 192.168.1.1 WallVIEW HD-USB PRO Camera System Document Number 342-0467 Rev. E Page 36 of 40 WallVIEW HD-USB PRO Camera System NetworkSettings NAME network settings - get current network settings SYNOPSIS network settings {get} DESCRIPTION Method used to get the current network settings of the device OPTIONS get Get the current network settings for the machine EXAMPLES network settings get MAC Address: 00:04:a3:85:0a:ee IP Address: 10.10.8.116 Netmask: 255.255.255.0 Gateway: 10.10.8.100 Returns the current network settings for mac addres, ip address, netmask, and gateway Network NAME network - Gets the current network settings or pings an IP address SYNOPSIS network {settings get | ping [count <count>] [size <size>] <destination-ip>} DESCRIPTION Method used to get the current network settings or check network OPTIONS settings Get the current network settings ping Send ICMP ECHO_REQUEST to network host EXAMPLES network settings get Gets the current network settings ---network ping count 1 10.10.10.100 Pings 10.10.10.100 once and displays results StreamingMode NAME streaming mode - Gets or sets the current streaming mode SYNOPSIS streaming mode {get|usb|network} DESCRIPTION Method used to get or set the current streaming settings OPTIONS get Get the current streaming mode usb Set the current streaming mode to USB ethernet Set the current streaming mode to Ethernet EXAMPLES streaming mode get mode: usb Returns the current streaming mode streaming mode usb ---streaming mode ethernet OK Sets the streaming mode to Ethernet WallVIEW HD-USB PRO Camera System Document Number 342-0467 Rev. E Page 37 of 40 WallVIEW HD-USB PRO Camera System StreamingQuality NAME streaming quality - Gets or sets the current streaming quality SYNOPSIS streaming quality {get|low|standard|high} DESCRIPTION Method used to get or set the current streaming quality OPTIONS get Get the current streaming quality low Set video quality to low standard Set video quality to standard high Set video quality to high EXAMPLES streaming quality get quality:low Returns the current streaming quality ---streaming quality standard OK Sets the streaming quality to standard StreamingResolution NAME streaming resolution - Gets or sets the current streaming quality SYNOPSIS streaming resolution {get|1080p|720p|4cif|480p|cif} DESCRIPTION Method used to get or set the current streaming resolution OPTIONS get Get the current streaming resolution 1080p Set video resolution to 1080p 720p Set video resolution to 720p 4cif Set video resolution to 4cif 480p Set video resolution to 480p cif Set video resolution to cif EXAMPLES streaming resolution get resolution:720p Returns the current streaming resolution ---streaming resolution 720p OK Sets the streaming resolution to 720p Streaming NAME streaming - Gets or sets the current streaming settings SYNOPSIS streaming {mode {get|usb|ethernet}} | resolution {get|1080p|720p|4cif|480p|cif} |quality {get|low|standard|high}} DESCRIPTION Method used to get or set the current streaming settings OPTIONS mode Get or set the current streaming mode resolution Get or set the current streaming video resolution quality Get or set the current streaming video frame rate and bit rate EXAMPLES streaming mode get mode: usb Returns the current streaming mode ---streaming mode ethernet Sets the streaming mode to Ethernet ---streaming quality standard Sets the streaming quality to standard ---streaming resolution 720p Sets the streaming resolution to 720p WallVIEW HD-USB PRO Camera System Document Number 342-0467 Rev. E Page 38 of 40 WallVIEW HD-USB PRO Camera System SystemFactory‐Reset NAME system factory-reset - Gets or sets factory reset status SYNOPSIS system factory-reset {get|on|off} DESCRIPTION Method used to get or set the factory reset status OPTIONS get Get the current factory reset status on Enable factory reset on reboot off Disable factory reset on reboot EXAMPLES system factory-reset get factory-reset (software): off factory-reset (hardware): [Hardware reset is designated by rear panel dip switches in down position] off Returns the factory reset status ---system factory-reset on factory-reset (software): on factory-reset (hardware): off Enables factory reset upon reboot SystemReboot NAME system reboot - Reboots system SYNOPSIS system reboot [<seconds>] DESCRIPTION Method used to reboot system OPTIONS seconds The number of seconds to delay the reboot EXAMPLES reboot Reboot system immediately reboot 30 Reboot the system in 30 seconds Version NAME version - display the system version information SYNOPSIS version DESCRIPTION Display an overview of the command line syntax EXAMPLES Version Returns the current software version version DESCRIPTION Display an overview of the command line syntax EXAMPLES Version Returns the current software version WallVIEW HD-USB PRO Camera System Document Number 342-0467 Rev. E Page 39 of 40 WallVIEW HD-USB PRO Camera System Toll Free: 800-572-2011 ▪ Phone: 763-971-4400 ▪ FAX: 763-971-4464 www.vaddio.com ©2012 Vaddio - All Rights Reserved. Reproduction in whole or in part without written permission is prohibited. Specifications and pricing are subject to change without notice. Vaddio, ClearVIEW, WallVIEW, EZCamera, EasyTalk, EasyMic, EasyUSB and PowerRite are trademarks of Vaddio. All other trademarks are property of their respective owners. Document 342-0467 Rev. E WallVIEW HD-USB PRO Camera System Document Number 342-0467 Rev. E Page 40 of 40