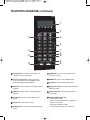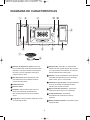
1
Customer Assistance:
1-866-321-9509
KOR-9G3A
PRECAUTIONS TO AVOID POSSIBLE EXPOSURE TO
EXCESSIVE MICROWAVE ENERGY
(a) Do not attempt to operate this oven with the door open since open-door operation can result in
harmful exposure to microwave energy. It is important not to defeat or tamper with the safety
interlocks.
(b) Do not place any object between the oven front face and the door or allow soil or cleaner residue to
accumulate on sealing surfaces.
(c) Do not operate the oven if it is damaged. It is particularly important that the oven door close
properly and that there is no damage to the: (1) door (bent), (2) hinges and latches (broken or
loosened), (3) door seals and sealing surfaces.
(d) The oven should not be adjusted or repaired by anyone except properly qualified service personnel.
TABLE OF CONTENTS
• PRECAUTIONS TO AVOID POSSIBLE EXPOSURE TO EXCESSIVE MICROWAVE ENERGY....................1
• IMPORTANT SAFETY INSTRUCTIONS...........................................................................................................2
• FEDERAL COMMUNICATIONS COMMISSION RADIO FREQUENCY INTERFERENCE STATEMENT .......3
• GROUNDING INSTRUCTIONS ........................................................................................................................3
• INSTALLATION .................................................................................................................................................4
• SPECIFICATIONS.............................................................................................................................................5
• FEATURES DIAGRAM......................................................................................................................................6
• FEATURES DIAGRAM (continued)...................................................................................................................7
• OPERATION PROCEDURE..............................................................................................................................8
• CONTROLS.......................................................................................................................................................9
SETTING THE CLOCK ..................................................................................................................................9
TIME DEFROSTING .....................................................................................................................................9
WEIGHT DEFROSTING ..............................................................................................................................10
COOKING IN ONE STAGE..........................................................................................................................11
COOKING IN TWO STAGES.......................................................................................................................11
TIMER MODE ..............................................................................................................................................12
SPEEDY COOK ...........................................................................................................................................13
ONE-TOUCH COOKING..............................................................................................................................13
ONE-TOUCH COOKING (continued)...........................................................................................................14
COOK...........................................................................................................................................................14
MORE, LESS ...............................................................................................................................................15
CHILD LOCK................................................................................................................................................15
TO STOP THE OVEN WHILE THE OVEN IS OPERATING........................................................................15
• CARE OF YOUR MICROWAVE OVEN...........................................................................................................16
• BEFORE YOU CALL FOR SERVICE..............................................................................................................17
• CARE AND CLEANING...................................................................................................................................17
• QUESTIONS AND ANSWERS........................................................................................................................18
• COOKING INSTRUCTIONS............................................................................................................................19
• USE YOUR MICROWAVE OVEN PROPERLY...............................................................................................20
• ARCING...........................................................................................................................................................20
• COOKING TECHNIQUES ...............................................................................................................................21
• DEFROSTING GUIDE.....................................................................................................................................22
• COOKING & REHEATING CHART .................................................................................................................22
• VEGETABLE CHART ......................................................................................................................................24
• RECIPES .........................................................................................................................................................25
• WARRANTY ...................................................................................................................................................28
IMPORTANT SAFETY INSTRUCTIONS
When using electrical appliances, basic safety precautions should be followed, including the following:
WARNING-To reduce the risk of burns, electric shock, fire, injury to persons or exposure to excessive
microwave energy:
c) If materials inside the oven ignite, keep oven door
closed, turn oven off, and disconnect the power
cord, or shut off power at the fuse or circuit breaker
panel.
d) Do not use the cavity for storage purposes. Do not
leave paper products, cooking utensils, or food in
the cavity when not in use.
1. Read all instructions before using the appliance.
2. Read and follow the specific “PRECAUTIONS TO
AVOID POSSIBLE EXPOSURE TO EXCESSIVE
MICROWAVE ENERGY” found on page 1.
3. This appliance must be grounded. Connect only to
properly grounded outlet. See “GROUNDING
INSTRUCTIONS” found on page 3.
17. Liquids, such as water, coffee, or tea are able to be
overheated beyond the boiling point without appearing
to be boiling due to surface tension of the liquid. Visible
bubbling or boiling when the container is removed from
the microwave oven is not always present. THIS
COULD RESULT IN VERY HOT LIQUIDS
SUDDENLY BOILING OVER WHEN A SPOON OR
OTHER UTENSIL IS INSERTED INTO THE LIQUID.
4. Install or locate this appliance only in accordance with
the provided installation instructions.
5. Some products such as whole eggs and sealed
containers - for example, closed glass jars are able to
explode and should not be heated in this oven.
6. Use this appliance only for its intended use as
described in this manual. Do not use corrosive
chemicals or vapors in this appliance. This type of
oven is specifically designed to heat, cook, or dry food.
It is not designed for industrial or laboratory use.
To reduce the risk of injury to persons:
a) Do not overheat the liquid.
b) Stir the liquid both before and halfway through
heating it.
c) Do not use straight-sided containers with narrow
necks.
d) After heating, allow the container to stand in the
microwave oven for a short time before removing
the container.
e) Use extreme care when inserting a spoon or other
utensil into the container.
18. Do not use this microwave oven to heat corrosive
chemicals (for example, sulfides and chlorides).
Vapors from such corrosive chemicals may interact
with the contact and springs of the safety interlock
switches thereby rendering them inoperable.
7. As with the appliance, close supervision is necessary
when used by children.
8. Do not operate this appliance if it has a damaged cord
or plug, if it is not working properly, or if it has been
damaged or dropped.
9. This appliance should be serviced only by qualified
service personnel.
Contact nearest authorized service facility for
examination, repair or adjustment.
10. Do not cover or block any openings on the appliance.
11. Do not store this appliance outdoors. Do not use this
product near water - for example, near a kitchen sink,
in a wet basement, near a swimming pool, or similar
locations.
19. Keep the waveguide cover clean at all times.
Wipe the oven interior with a soft damp cloth after each
use. If you leave grease or fat anywhere in the cavity it
may overheat, smoke or even catch fire when next
using the oven.
12. Do not immerse cord or plug in water.
13. Keep cord away from heated surfaces.
14. Do not let cord hang over edge of table or counter.
20. Never heat oil or fat for deep frying as you cannot
control the temperature and doing so may lead to
overheating and fire.
15. When cleaning surfaces of door and oven that come
together on closing the door, use only mild, nonabrasive soaps or detergents applied with a sponge or
soft cloth.
21. Do not operate the oven without the glass tray in place.
Be sure it is properly sitting on the rotating base.
16. To reduce the risk of fire in the oven cavity:
a) Do not overcook food. Carefully attend appliance
when paper, plastic, or other combustible materials
are placed inside the oven to facilitate cooking.
b) Remove wire twist-ties from paper or plastic bags
before placing bag in oven.
22. Risk of electric shock. Non-removable fasteners are
provided because of internal high voltages. Do not
remove fasteners.
SAVE THESE INSTRUCTIONS
2
FEDERAL COMMUNICATIONS COMMISSION
RADIO FREQUENCY INTERFERENCE STATEMENT
WARNING:
This equipment generates and uses ISM frequency energy and if not installed and used properly, that is in
strict accordance with the manufacturer's instructions, may cause interference to radio and television
reception.
It has been type-tested and found to comply with limits for an ISM Equipment pursuant to part 18 of FCC
Rules, which are designed to provide reasonable protection against such interference in a residential
installation.
However, there is no guarantee that interference will not occur in a particular installation.
If this equipment does cause interference to radio or television reception, which can be determined by
turning the equipment off and on, the user is encouraged to try to correct the interference by one or more
of the followings.
• Reorient the receiving antenna of radio or television.
• Relocate the Microwave oven with respect to the receiver.
• Move the microwave oven away from the receiver.
• Plug the microwave oven into a different outlet so that microwave oven and receiver are on
different branch circuits.
THE MANUFACTURER is not responsible for any radio or TV interference caused by
UNAUTHORIZED MODIFICATION to this microwave oven. It is the responsibility of the user to correct
such interference.
GROUNDING INSTRUCTIONS
This appliance must be grounded. In the event of an electrical short circuit, the grounding plug reduces the risk of
electric shock by providing an escape wire for electric current. This appliance is equipped with a cord having a
grounding wire with a grounding plug. The plug must be plugged into an outlet that is properly installed and
grounded.
WARNING:
Improper use of the grounding can result in a risk of electric shock.
Consult a qualified electrician or serviceman if the grounding instructions are not completely understood, or if
doubt exists as to whether the appliance is properly grounded, and either :
(1) If it is necessary to use an extension cord, use only a 3-wire extension cord that has a 3-blade grounding
plug, and a 3-slot receptacle that will accept the plug on the appliance. The marked rating of the
extension cord shall be equal to or greater than the electrical rating of the appliance.
or
(2) Do not use an extension cord, if the power supply cord is too short, have a qualified electrician or
serviceman install an outlet near the appliance.
WARNING:
Do not cut or remove the third (ground) prong from the power cord under any circumstances.
3
INSTALLATION
1. Examine the oven after unpacking.
Check for damage such as a misaligned door, broken door or dent in the cavity.
If any damage is visible, DO NOT INSTALL, and notify your Walmart (1-866-321-9509) immediately.
2. Level, flat location.
Install the microwave oven on a level, flat surface.
3. Ventilation.
Do not block air vents. If they are blocked during operation, the oven may overheat and eventually cause a
failure.
For proper ventilation, allow 4 inches of space between oven top, sides, rear and adjacent surfaces.
4. Away from radio and TV sets.
Poor television reception and radio interference may result if the oven is located close to a TV, radio, antenna,
feeder, etc.
Place the oven as far from them as possible.
5. Away from heating appliances and water taps.
Keep the oven away from heat, steam or splashing liquids. These things can adversely affect oven wiring and
contacts.
6. Power supply.
• Check your local power source.
This microwave oven requires a current of approximately 12.5 amperes, 120 Volts, 60Hz grounded outlet.
1. A short power-supply cord is provided to reduce the risks resulting from becoming entangled in or tripping
over a longer cord.
2. Longer cord sets or extension cords are available and may be used if care is exercised in their use.
3. If a long cord or extension cord is used:
• The marked electrical rating of the cord set or extension cord should be at least as great as the electrical
rating of the appliance.
• The extension cord must be a grounding type 3-wire cord.
• The longer cord should be arranged so that it will not drape over the counter top or tabletop where it can be
pulled on by children or tripped over unintentionally.
7. The minimum height of free space necessary above the top surface of the oven is about 4 inches.
When using 3-pronged plug
When using grounding adaptor, make sure
the receptacle box is fully grounded.
3-prong Receptacle
Grounding
Lead
Receptacle
Box Cover
Receptacle Box Cover
3-prong Plug
Grounding
Adaptor
4
Receptacle
SPECIFICATIONS
POWER SUPPLY
MICROWAVE
120V AC, 60Hz SINGLE PHASE WITH GROUNDING
INPUT POWER
1350 W
ENERGY OUTPUT
900 W
FREQUENCY
2,450MHz
OUTSIDE DIMENSIONS (W
CAVITY DIMENSIONS (W
H
H
D)
18.3 x 11.0 x 14.5 in.
D)
12.4 x 9.3 x 13.6 in.
CAVITY VOLUME
0.9 cu. ft.
NET WEIGHT
APPROX. 24.1 lbs.
TIMER
59 min. 99 sec.
POWER SELECTIONS
10 Levels
* Specifications are subject to change without notice.
14.5
11.0
18.3
5
FEATURES DIAGRAM
1 2
3
q0
4
8
5
9
w
7
6
1 Door latch - When the door is closed, it will
automatically shut off. If the door is opened while
the oven is operating, the oven will automatically
shut off.
7 Glass cooking tray - Made of special heat resistant
glass. The tray must always be in proper position
before operating. Do not cook food directly on the
tray.
2 Door seal - The door seal surfaces prevent
microwaves escaping from the oven cavity.
8 Viewing screen - Allows viewing of food.
The screen is designed so that light can pass
through, but not the microwaves.
3 Oven cavity
9 Waveguide cover - Protects the microwave outlet
from splashes of cooking foods. Do not remove.
4 Control panel
0 Child Lock - Prevents unwanted oven operation.
5 Coupler - This fits over the shaft in the center of the
oven cavity floor.
This is to remain in the oven for all cooking.
q Oven lamp - Automatically turns on during oven
operation.
6 Roller guide - This must always be used for
cooking together with the glass cooking tray.
w Door open button - To open the door push the
door open button.
6
FEATURES DIAGRAM (continued)
1
2
3
4
5
6
8
7
9
0
w
q
e
1 Display Window - It shows information such as
cooking time, menu and quantity.
8 POWER Pad - Press to enter a power level of
microwave cooking.
2 One-Touch Cook Pads - Press to select OneTouch Cook features such as DINNER PLATE,
POPCORN, PIZZA and BEVERAGE.
9 TIMER Pad - Press to select TIMER feature.
3 MORE Pad - Press to add extra cooking time during
operation.
q Weight Defrost Pads - Press to select DEFROST
feature by weight.
4 LESS Pad - Press to reduce cooking time during
operation.
w STOP/CLEAR Pad - Press to stop operation or
clear settings.
5 Time Set Pads - Press to enter cooking time or
quantity.
e START/SPEEDY COOK Pad
- Press to start cooking.
- Press once to begin Microwave cooking at full
power for 30 seconds.
Press again to add 30 seconds.
Continue pressing to add up to 5 minutes.
0 COOK Pad - Press to select COOK feature.
6 CLOCK Pad - Press to set the clock.
7 DEFROST Pad - Press to select DEFROST feature
by time.
7
OPERATION PROCEDURE
This section includes useful information about oven operation.
1
Plug power supply cord into a standard 3-pronged
12.5 Amp, 120V AC, 60Hz power outlet.
clock returns to the present time when the
19 Time
cooking time ends.
2
After placing the food in a suitable container,
open the oven door and put it on the glass tray.
The coupler, glass tray and roller guide must
always be in place during cooking.
the STOP/CLEAR pad is touched during oven
10 When
operation, the oven stops cooking and all information
is retained. To erase all information (except the
present time), touch the STOP/CLEAR pad once
more. If the oven door is opened during the oven
operation, all information is retained.
3
4
Close the door. Make sure that it is firmly closed.
5
The oven door can be opened at any time during
operation by pushing the door open button of
control panel. The oven will automatically shut off.
6
Each time a pad is touched, a BEEP will sound to
acknowledge the touch.
7
The oven automatically cooks at full power unless
set to a lower power level.
8
The display will show " : 0 " when the oven is
plugged in.
the START pad is touched and the oven does not
11 Ifoperate,
check the area between the door and door
The oven light is on when the microwave oven is
operating.
seal for obstructions and make sure the door is
closed securely. The oven will not start cooking until
the door is completely closed or the program has
been reset.
Make sure the oven is properly installed and
plugged into the electrical outlet.
WATTAGE OUTPUT CHART
• A power level of microwave cook is entered by pressing POWER pad.
Please refer to the chart below.
Touch the POWER LEVEL pad
Power Level (Display)
once
P-HI
100%
twice
P-90
90%
3 times
P-80
80%
4 times
P-70
70%
5 times
P-60
60%
6 times
P-50
50%
7 times
P-40
40%
8 times
P-30
30%
9 times
P-20
20%
10 times
P-10
10%
11 times
P-00
0%
8
Approximate Percentage of Power
CONTROLS
SETTING THE CLOCK
When the oven is first plugged in, the display will show " : 0 " and a tone will sound. If the AC power
ever goes off, the display will show " : 0 " when the power comes back on.
1. Touch the CLOCK pad.
This is a 12-hour clock system.
2. Touch the CLOCK pad once more.
This is a 24-hour clock system.
NOTE : This oven has multiple clock systems.
If you want 12-hour clock system, omit
this step.
3. Enter the correct time of day by
touching the TIME SET pads
in sequence.
The display stops blinking, and the colon starts
blinking. If you selected 12-hour clock system,
this digital clock allows you to set from 1:00 to
12:59. If you selected 24-hour clock system, this
digital clock allows you to set from 0:00 to 23:59.
4. Touch the CLOCK pad.
5. Touch STOP/CLEAR pad.
NOTE: If you attempt to enter an incorrect time, the time will not be set and a error signal tone will sound.
Touch the CLOCK pad and re-enter the time.
TIME DEFROSTING
TIME DEFROST will automatically set the oven to defrost at a time set by the user.
1. Touch DEFROST pad.
The DEF indicator lights.
2. Touch number pads to enter the
defrosting time.
The display will show what you touched.
Note : Your oven can be programmed for
59 minutes 99 seconds. (59:99)
3. Touch START pad.
TIME DEFROSTING begins.
When you touch START pad, the DEF indicator blinks and the defrosting time counts down in the display window.
The oven beeps during the defrosting cycle to signal that the food needs to be turned or rearranged. When the
defrosting time ends, you will hear 3 beeps.
9
WEIGHT DEFROSTING
WEIGHT DEFROST lets you easily defrost food by eliminating guesswork in determining defrosting time.
Follow the steps below for easy defrosting.
1. Touch DEFROST MEAT pad.
The lb indicator lights and “ 1.0 ” is displayed.
2. Select the desired defrosting
weight.
(Refer to the weight defrost chart
below.)
The display will show what you touched.
3. Touch START pad.
MEAT DEFROSTING begins.
1. Touch DEFROST POULTRY
pad.
The lb indicator lights and “ 1.5 ” is displayed.
2. Select the desired defrosting
weight.
(Refer to the weight defrost chart
below.)
The display will show what you touched.
3. Touch START pad.
POULTRY DEFROSTING begins.
1. Touch DEFROST FISH pad.
The lb indicator lights and “ 0.5 ” is displayed.
2. Select the desired defrosting
weight.
(Refer to the weight defrost chart
below.)
The display will show what you touched.
3. Touch START pad.
FISH DEFROSTING begins.
WEIGHT DEFROST CHART
Touch pad
DEFROST MEAT
DEFROST POULTRY
DEFROST FISH
once
1.0 lb.
1.5 lb.
0.5 lb.
twice
1.5 lb.
2.0 lb.
1.0 lb.
3 times
2.0 lb.
2.5 lb.
1.5 lb.
4 times
2.5 lb.
3.0 lb.
2.0 lb.
The defrosting time is automatically determined by the weight selected.
When you touch START pad, the lb indicator goes off and the DEF indicator blinks and the defrosting time counts
down in the display window. The oven beeps during the defrosting cycle to signal that the food needs to be turned
or rearranged. When the defrosting time ends, you will hear 3 beeps.
10
COOKING IN ONE STAGE
1. Touch POWER pad.
(Select the desired power level.)
X6
The M/W indicator lights.
The display will show what you touched.
This example shows power level 50% (P-50).
Note : If steps 1 and 2 are omitted, the oven
will cook at full power.
The display will show what you touched.
2. Touch number pads for the
cooking time.
Note : Your oven can be programmed for
59 minutes 99 seconds. ( 59 : 99 )
3. Touch START pad.
When you touch START pad, the M/W indicator starts blinking to show the oven is cooking.
The display counts down the time to show how much cooking time is left. When the cooking time ends, you will
hear 3 beeps.
NOTE: Using lower power levels increases the cooking time which is recommended for foods such as cheese,
milk and slow cooking of meats.
COOKING IN TWO STAGES
All recipes require the frozen foods to be defrosted fully before cooking.
This oven can be programmed to automatically defrost foods before cooking.
1. Touch DEFROST pad.
The DEF indicator lights and " : 0 " is displayed.
2. Touch number pads for the
defrosting time you want.
The display will show what you touched.
3. Touch POWER pad.
(Select the desired power level.)
The M/W indicator lights and “P-HI” is displayed.
The display will show what you touched.
This example shows power level 50% (P-50).
4. Touch number pads for the
desired cooking time.
The display will show what you touched.
X6
5. Touch START pad.
When you touch START pad, the DEF and M/W indicators come on to confirm the power levels selected. The
DEF indicator starts blinking to show you that the oven is in DEFROST mode.
The display counts down the time remaining in DEFROST mode. When the oven beeps, turn over, break apart
and/or redistribute the food. At the end of DEFROST mode, the oven will beep and start M/W cook.
The DEF indicator goes off and the M/W indicator starts blinking. The display counts down the time remaining in
M/W mode. When M/W cook ends, you will hear 3 beeps.
11
TIMER MODE
Timer operates as a minute timer, can be set to delay cooking and used to set a holding time after cooking.
However delay cooking can not be programmed for defrost. Timer operates without microwave energy.
HOW TO USE AS A MINUTE TIMER
1. Touch TIMER pad.
The TIMER indicator lights and " : 0 " is displayed.
2. Press the amount of time you
want to count down.
The display will show what you touched.
3. Touch START pad.
The TIMER indicator starts blinking and the display counts down the time remaining in TIMER mode.
When TIMER mode ends, you will hear 3 beeps.
HOW TO USE TO DELAY THE START OF COOKING
1. Touch TIMER pad.
The TIMER indicator lights and " : 0 " is displayed.
2. Press the amount of time you
want to delay.
The display will show what you touched.
3. Program the desired power level
and cooking time for food to be
cooked.
The M/W indicator lights and the selected power
level & cooking time are displayed.
4. Touch START pad.
When you touch START pad, the TIMER indicator starts blinking and the display counts down the time remaining
in TIMER mode. When TIMER mode ends, the oven will beep. The TIMER indicator goes off and M/W indicator
starts blinking. The display counts down the time remaining in M/W mode. When M/W cook ends, you will hear 3
beeps.
HOW TO USE TO SET A HOLDING TIME
1. Program the desired cooking
time.
The M/W indicator lights and the selected time is
displayed.
2. Touch TIMER pad.
The TIMER indicator lights and " : 0 " is displayed.
3. Press the amount of time you
want the oven to hold.
The display will show what you touched.
4. Touch START pad.
The M/W indicator starts blinking and the display counts down the time remaining in M/W mode. When the M/W
cook ends, the oven will beep. The M/W indicator goes off and TIMER indicator starts blinking. The display counts
down the time remaining in TIMER mode. When the TIMER mode ends, you will hear 3 beeps.
Note : Your oven can be programmed for 59 minutes 99 seconds. (59:99)
12
SPEEDY COOK
SPEEDY COOK allows you to reheat for 30 seconds at 100% (full power) by simply touching the SPEEDY
COOK pad.
By repeatedly touching the SPEEDY COOK pad, you can also extend reheating time to 5 minutes by 30 second
increments.
1. Touch SPEEDY COOK pad.
When you touch SPEEDY COOK, ":30" is
displayed.
After 1.5 seconds, the oven starts reheating.
ONE-TOUCH COOKING
One-touch cook allows you to cook or reheat many of your favorite foods by touching just one pad.
To increase quantity, touch the chosen pad until number in display is same as the desired quantity to cook.
(except for POPCORN)
1. Touch POPCORN pad once for
3.5 oz. bag.
When you touch POPCORN pad once, “3.5” is
displayed.
After 1.5 seconds, the display is changed into
cooking time and the oven starts cooking.
NOTE: 1. Use prepackaged room-temperature microwave popcorn.
2. Place bag in oven according to manufacturer’s directions.
3. Pop only one bag at a time.
4. After popping, open bag carefully: popcorn and steam are extremely hot.
5. Do not reheat unpopped kernels or reuse bag.
6. Do not leave oven unattended while popping popcorn.
CAUTION: If prepackaged popcorn is of a different weight than the recommended weight, do not use the
popcorn pad. Follow the manufacturer instruction.
1. Touch PIZZA pad once for 7 oz.
pizza or twice for 14 oz. pizza.
When you touch PIZZA pad once, “7” is displayed.
Press PIZZA pad twice, "14" is displayed.
After 1.5 seconds, the display is changed into the
cooking time and the oven starts cooking.
* PIZZA *
• 7 oz.: Touch PIZZA once.
• 14 oz.: Touch PIZZA twice within 1.5 seconds.
NOTE: 1. Use only one pizza at a time.
2. Use only pizza made for microwave ovens.
3. If the cheese of pizza does not melt sufficiently, cook a few seconds longer.
4. Some brands of pizza may require more or less cooking time.
13
ONE-TOUCH COOKING (continued)
1. Touch BEVERAGE pad once for
1 cup, twice for 2 cups or three
times for 3 cups.
When you touch BEVERAGE pad once, "1" is
displayed.
After 1.5 seconds, the display is changed into
cooking time and the oven starts cooking.
* BEVERAGE * (8 fl. oz./cup)
• 1 cup: Touch BEVERAGE once.
• 2 cups: Touch BEVERAGE twice within 1.5 seconds.
• 3 cups: Touch BEVERAGE three times within 1.5 seconds.
1. Touch DINNER PLATE pad
once for 12 oz. or twice for 15 oz.
When you touch DINNER PLATE pad once, “12”
is displayed.
After 1.5 seconds, the display is changed into
cooking time and the oven starts cooking.
* DINNER PLATE *
• 12 oz.: Touch DINNER PLATE once.
• 15 oz.: Touch DINNER PLATE twice within 1.5 seconds.
COOK
COOK allows you to cook or reheat many of your favorite foods by repeatedly touching COOK pad.
1. Touch COOK pad.
When you touch COOK pad once, “AC-1” is
displayed. By repeatedly touching this pad, you
can select other food category as shown in the
chart below.
CATEGORY
FOOD
WEIGHT
TOUCH PAD
AC-1
BREAD
4 slices (1.5-2 oz. each)
Touch COOK pad once
AC-2
SOUP
12 oz.
Touch COOK pad twice
AC-3
BAKED POTATO
3 potatoes (7-8 oz. each)
Touch COOK pad three times
AC-4
FRESH VEGETABLE
7 oz.
Touch COOK pad four times
AC-5
FROZEN VEGETABLE
7 oz.
Touch COOK pad five times
1. Touch START pad.
When you touch START pad, the display changed
into cooking time of quantity and the oven starts
cooking.
14
MORE, LESS
Press MORE pad or LESS pad in order to add or subtract cooking time while the oven is working, However you
cannot add or subtract an extra cooking time to DEFROST features.
CHILD LOCK
The lock prevents unwanted oven operation such as by small children.
To set, press and hold STOP/CLEAR for 3 seconds, a beep sounds and LOCK indicator lights.
To cancel, press and hold STOP/CLEAR for 3 seconds, a beep sounds and LOCK indicator goes off.
TO STOP THE OVEN WHILE THE OVEN IS OPERATING
1. Press STOP/CLEAR pad.
• You can restart the oven by touching START pad.
• Touch STOP/CLEAR once more to erase all instructions.
• You must enter in new instructions.
2. Open the door.
• You can restart the oven by closing the door and touching START.
NOTE: Oven stops operating when door is opened.
15
CARE OF YOUR MICROWAVE OVEN
The oven should be cleaned regularly and any food deposits removed.
Failure to maintain the oven in a clean condition could lead to deterioration of the surface that could
adversely affect the life of the appliance and possibly result in a hazardous situation.
1
2
Turn the oven off before cleaning.
6
Keep the inside of the oven clean. When food
spatters or spilled liquids adhere to oven walls, wipe
with a damp cloth. Mild detergent may be used if the
oven gets very dirty.
The use of harsh detergent or abrasives is not
recommended.
It is occasionally necessary to remove the glass tray
for cleaning. Wash the tray in warm sudsy water or
in a dishwasher.
7
The roller guide and oven cavity floor should be
cleaned regularly to avoid excessive noise.
Simply wipe the bottom surface of the oven with mild
detergent water or window cleaner and dry. The
roller guide may be washed in mild sudsy water.
3
The outside oven surface should be cleaned with
soap and water, rinsed and dried with a soft cloth.
To prevent damage to the operating parts inside the
oven, water should not be allowed to seep into the
ventilation openings.
4
If the Control Panel becomes wet, clean with a soft,
dry cloth. Do not use harsh detergents or abrasives
on Control Panel.
5
If steam accumulates inside or around the outside of
the oven door, wipe with a soft cloth. This may occur
when the microwave oven is operated under high
humidity conditions and in no way indicates
malfunction of the unit.
ROLLER GUIDE
1
The ROLLER GUIDE and oven floor should be
cleaned frequently to prevent excessive noise.
2
The ROLLER GUIDE MUST ALWAYS be used for
cooking together with the Glass Tray.
Glass Tray
GLASS TRAY
1
DO NOT operate the oven without the Glass Tray in
place.
2
3
DO NOT use any other Glass Tray with this oven.
4
DO NOT cook directly on the Glass Tray.
(Except for popcorn)
If Glass Tray is hot, ALLOW TO COOL before cleaning
or placing it in water.
16
Roller Guide
BEFORE YOU CALL FOR SERVICE
Refer to following checklist, you may prevent an unnecessary service call.
* Sparking in the cavity:
1. Check utensils. Metal containers or dishes with
metal trim should not be used.
2. Check that metal skewers or foil does not touch the
interior walls.
* The oven doesn’t work:
1. Check that the power cord is securely plugged in.
2. Check that the door is firmly closed.
3. Check that the cooking time is set.
4. Check for a blown circuit fuse or tripped main circuit
breaker in your house.
If there is still a problem, contact 1-866-321-9509.
CARE AND CLEANING
It is important to observe the following:
4. The oven should not be adjusted or repaired by
anyone except a properly competent service
technician.
1. It is important not to defeat or tamper with the child
lock.
2. Do not place any object between the oven front face
and the door or allow residue to accumulate on sealing
surfaces. Wipe the sealing area frequently with a mild
detergent, rinse and dry. Never use abrasive powders
or pads.
5. The oven should be cleaned regularly and any food
deposits removed.
6. Failure to maintain the oven in a clean condition could
lead to deterioration of the surface that could adversely
affect the life of the appliance and possibly result in a
hazardous situation.
3. When opened, the door must not be subjected to
strain, for example, a child hanging on an opened door
or any load could cause the oven to fall forward to
cause injury and also damage to the door. Do not
operate the oven if it is damaged, until it has been
repaired by a competent service technician. It is
particularly important that the oven closes properly and
that there is no damage to the:
i) Door (bent)
ii) Hinges and hooks (broken or loosened)
iii) Door seals and sealing surfaces.
17
QUESTIONS AND ANSWERS
* Q : What does “standing time” mean?
* A : “Standing time” means that food should be removed
from the oven and covered for additional time to
allow it to finish cooking. This frees the oven for
other cooking.
* Q : Will the microwave oven be damaged if it
operates while empty?
* A : Yes. Never run it empty.
* Q : Can the oven be used with the glass tray or
roller guide removed?
* A : No. Both the glass tray and roller guide must always
be used in the oven before cooking.
* Q : Why does my oven not always cook as fast as
the microwave cooking guide says?
* A : Check your cooking guide again, to make sure
you’ve followed directions exactly.
Variations in the size, shape and weights and
dimensions could require longer cooking time. Use
your own judgement along with the cooking guide
suggestions to check whether the food has been
properly cooked just as you would do with a
conventional cooker.
* Q : Can I open the door when the oven is
operating?
* A : The door can be opened anytime during the
cooking operation. Then microwave energy will be
instantly switched off and the time setting will
maintain until the door is closed.
* Q : Why do I have moisture in my microwave oven
after cooking?
* A : The moisture on the side of your microwave oven is
normal. It is caused by steam from cooking food
hitting the cool oven surface.
* Q : Can I operate my microwave oven without the
turntable or turn the turntable over to hold a
large dish?
* A : No. If you remove or turn over the turntable, you will
get poor cooking results. Dishes used in your oven
must fit on the turntable.
* Q : Does microwave energy pass through the
viewing screen in the door?
* A : No. The metal screen bounces back the energy to
the oven cavity. The holes are made to allow light to
pass through. They do not let microwave energy
pass through.
* Q : Is it normal for the turntable to turn in either
direction?
* A : Yes. The turntable rotates clockwise or
counterclockwise, depending on the rotation of the
motor when the cooking cycle begins.
* Q : Why do eggs sometimes pop?
* A : When baking or poaching eggs, the yolk may pop
due to steam build-up inside the yolk membrane. To
prevent this, simply pierce the yolk with a toothpick
before cooking. Never cook eggs without piercing
their shells.
* Q : Can I pop popcorn in my microwave oven? How
do I get the best results?
* A : Yes. Pop packaged microwave popcorn following
manufacturer's guidelines. Do not use regular paper
bags. Use the “listening test” by stopping the oven
as soon as the popping slows to a “pop” every 1 or
2 seconds. Do not repop unpopped kernels. Do not
pop popcorn in glass cookware.
* Q : Why is standing time recommended after the
cooking operation has been completed?
* A : Standing time is very important.
With microwave cooking, the heat is in the food, not
in the oven. Many foods build up enough internal
heat to allow the cooking process to continue, even
after the food is removed from the oven. Standing
time for joints of meat, large vegetables and cakes
is to allow the inside to cook completely, without
overcooking the outside.
18
COOKING INSTRUCTIONS
Utensil Guide
Only use utensils that are suitable for use in microwave ovens.
To cook food in the microwave oven, the microwaves must be able to penetrate the food, without being reflected or
absorbed by the dish used. Care must therefore be taken choosing the utensil. If the utensil is marked microwavesafe, you do not need to worry. The following table lists various of utensil and indicates whether and how they should
be used in a microwave oven.
Utensil
Safe
Comments
Aluminium foil
▲
Can be used in small quantities to protect areas against
overcooking. Arcing can occur if the foil is too close to
the oven wall or if too much foil is used.
China and earthenware
●
Porcelain, pottery, glazed earthenware and bone china
are usually suitable, unless decorated with a metal trim.
Disposable polyester
cardboard dishes
●
Some frozen foods are packaged in these dishes.
Fast-food packaging
• Polystyrene cups containers
●
• Paper bags or newspaper
• Recycled paper or metal trims
✕
✕
Can be used to warm food. Overheating may cause the
polystyrene to melt.
May catch fire.
May cause arcing.
Glassware
• Oven-to-table ware
• Fine glassware
●
●
• Glass jars
●
Metal
• Dishes
• Freezer bag twist ties
✕
✕
May cause arcing or fire.
●
For short cooking times and warming. Also to absorb
excess moisture.
May cause arcing.
Paper
• Plates, cups, napkins and
kitchen paper
• Recycled paper
✕
Plastic
• Containers
●
• Cling film
●
• Freezer bags
▲
Wax or grease-proof paper
●
Can be used, unless decorated with a metal trim.
Can be used to warm foods or liquids.
Delicate glass may break or crack if heated suddenly.
Must remove the lid. Suitable for warming only.
Particularly if heat-resistant thermoplastic. Some other
plastics may warp or discolor at high temperatures.
Do not use Melamine plastic.
Can be used to retain moisture. Should not touch the
food.
Take care when removing the film as hot steam will
escape.
Only if boilable or oven-proof. Should not be airtight.
Prick with a fork, if necessary.
Can be used to retain moisture and prevent spattering.
● : Recommended use
▲ : Limited Use
✕ : Not Recommended
19
USE YOUR MICROWAVE OVEN PROPERLY
General Use
Do not operate the oven if door seals or sealing
surfaces are damaged; or if door is bent; or if hinges
are loose or broken.
Do not operate the oven empty. This will damage the
oven.
Do not attempt to dry clothes, newspapers or other
materials in the oven. They may catch on fire.
Do not use recycled paper products as they may
contain impurities which may cause sparks or fires.
Do not hit or strike the control panel with hard objects.
This can damage the oven.
Do not attempt to defeat or tamper with child lock.
Do not place any object between the oven front frame
and the door or allow residue to build up on sealing
surfaces. Wipe with a mild detergent, rinse and dry.
Never use abrasive powders or pads.
Do not subject the oven door to strain or weight such
as a child hanging on an open door.
This could cause the oven to fall forward resulting in
injury to you and damage to the oven.
Food
temperature to even out, stir during heating, if
necessary, and ALWAYS stir after heating. To prevent
eruptive boiling and possible scalding, you should put
a spoon or glass stick into the beverages and stir
before, during and after heating.
Do not leave the oven unattended while popping corn.
Do not pop corn in a paper bag unless it is the
commercially prepared Microwave Popcorn product.
The kernels can overheat and ignite a brown paper
bag.
Do not put packaged Microwave Popcorn bags directly
on the oven tray. Place the package on a microwave
safe glass or ceramic plate to avoid overheating and
cracking the oven tray.
Do not exceed the Microwave Popcorn manufacturers
suggested popping time.
Longer popping does not yield more popcorn but it can
result in scorch, burn of fire. Remember, the Popcorn
bag and tray can be too hot to handle. Remove with
caution and use pot holders.
Never use your microwave oven for home canning.
The oven is not designed for proper home canning.
Improperly canned food may spoil and be dangerous
to consume.
Always use the minimum recipe cooking time. It is
better to undercook rather than overcook foods.
Undercooked foods can be returned to the oven for
more cooking. If food is overcooked, nothing can be
done.
Heat small quantities of food or foods with low
moisture carefully. These can quickly dry out, burn or
catch on fire.
Do not heat eggs in the shell. Pressure may build up
and eggs can explode.
Potatoes, apples, egg yolks and sausages are
examples of food with non-porous skins.
These must be pierced before cooking to prevent
bursting.
Do not attempt to deep fat fry in your microwave oven.
Always allow a standing time of at least 20 seconds
after the oven has been switched off to allow the
ARCING
If you see arcing, open the door and correct the problem.
Arcing is the microwave term for sparks in the oven.
Arcing is caused by:
• Metal or foil touching the side of the oven.
• Foil not molded to food (upturned edges act like
antennas).
• Metal, such as twist-ties, poultry pins, or gold rimmed
dishes, in the microwave.
• Recycled paper towels containing small metal pieces
being used in the microwave.
20
COOKING TECHNIQUES
STANDING TIME
STARTING TEMPERATURE
Dense foods e.g. meat, jacket potatoes and cakes,
require standing time (inside or outside of the oven) after
cooking, to allow heat to finish conducting to cook the
center completely. Wrap meat joints and jacket potatoes
in aluminium foil while standing. Meat joints need approx.
10-15 minutes, jacket potatoes 5 minutes. Other foods
such as plated meal, vegetables, fish, etc require 2-5
minutes standing. After defrosting food, standing time
should also be allowed. If food is not cooked after
standing time, return to the oven and cook for additional
time.
The colder the food, the longer it takes to heat up. Food
from a fridge takes longer to reheat than food at room
temperature.
MOISTURE CONTENT
Some foods require stirring during cooking. Meat and
poultry should be turned after half the cooking time.
LIQUIDS
All liquids must be stirred before and during heating.
Water especially must be stirred before and during
heating, to avoid eruption. Do not heat liquids that have
previously been boiled. DO NOT OVERHEAT.
TURNING & STIRRING
Many fresh foods e.g. vegetables and fruit, vary in their
moisture content throughout the season, particularly
jacket potatoes. For this reason cooking times may have
to be adjusted. Dry ingredients e.g. rice, pasta, can dry
out during storage so cooking times may differ.
ARRANGING
Individual foods e.g. chicken portions or chops, should
be placed on a dish so that the thicker parts are towards
the outside.
DENSITY
QUANTITY
Porous airy foods heat more quickly than dense heavy
foods.
Small quantities cook faster than large quantities, also
small meals will reheat more quickly than large portions.
CLING FILM
PIERCING
Cling film helps keep the food moist and the trapped
steam assists in speeding up cooking times. Pierce
before cooking to allow excess steam to escape. Always
take care when removing cling film from a dish as the
build-up of steam will be very hot.
The skin or membrane on some foods will cause steam
to build up during cooking. These foods must be pierced
or a strip of skin should be peeled off before cooking to
allow the steam to escape. Eggs, potatoes, apples,
sausages etc, will all need to be pierced before cooking.
DO NOT ATTEMPT TO BOIL EGGS IN THEIR
SHELLS.
SHAPE
Even shapes cook evenly. Food cooks better by
microwave when in a round container rather than square.
COVERING
Cover foods with microwave cling film or a lid. Cover fish,
vegetables, casseroles, soups. Do not cover cakes,
sauces, jacket potatoes or pastry items.
SPACING
Foods cook more quickly and evenly if spaced apart.
NEVER pile foods on top of each other.
21
DEFROSTING GUIDE
▶ When defrosted, food should be cool, but softened in
all areas. If still slightly icy, return to microwave oven
very briefly, or let stand a few minutes. After
defrosting, allow food to stand 5-60 minutes if there
are any icy areas.
Poultry and fish may be placed under running cool
water until defrosted
➪ Turn over : Roast, ribs, whole poultry, turkey
breasts, hot dogs, sausages, steaks, or chops.
➪ Rearrange : Break apart or separate steaks, chops,
hamburger patties, ground meat, chicken or seafood
pieces, chunks of meat such as stew beef.
➪ Shield : Use small strips of aluminum foil to protect
thin areas or edges of unevenly shaped foods such
as chicken wings. To prevent arching, do not allow
foil to come within 1-inch of oven walls or door.
➪ Remove : To prevent cooking, thawed portions
should be removed from the oven at this point. This
may shorten defrost time for food weighing less than
3 lbs.
▶ Do not defrost covered meat. Covering might allow
cooking to take place. Always remove outer wrap
and tray. Use only containers that are microwavesafe.
▶ Begin defrosting whole poultry breast-side-down.
Begin defrosting roasts fat-side-down.
▶ The shape of the package alters the defrosting time.
Shallow rectangular shapes defrost more quickly
than a deep block.
▶ After 1/3 of the defrost time has elapsed, check the
food. You may wish to turn over, break apart,
rearrange or remove thawed portions of the food.
▶ During defrost, the oven will prompt you to turn the
over. At this point, open oven door and check the
food. Follow the techniques listed below for optimum
defrost results.
Then, close oven door, touch the START pad to
complete defrosting.
COOKING & REHEATING CHART
Cooking chart
Item
Power
Level
Cooking Time
Per lb./450g
Special Instruction
MEAT
Beef Joint -Rare
P-80
6-8 min.
-Medium
P-80
7-9 min.
-Well done
P-80
9-11 min.
Pork Joint
P-HI
10-13 min.
Bacon Joint
P-HI
8-10 min.
Whole Chicken
P-HI
4-9 min.
Portions Chicken
P-80
5-7 min.
Breast (Boned)
P-80
6-8 min.
Fish Fillets
P-HI
3-5 min.
Whole Mackerel,
P-HI
3-5 min.
P-HI
4-6 min.
P-HI
4-6 min.
- Chilled meat and poultry should be removed from
the refrigerator at least 30 minutes before
cooking.
- Always let the meat and poultry stand, covered
after cooking.
POULTRY
FISH
- Brush a little oil or melted butter over the fish, or
add 1-2 tbsp. lemon juice, wine, stock, milk or
water.
- Always let the fish stand, covered, after cooking.
Cleaned and Prepared
Whole Trout, Cleaned
& Prepared
Salmon Steaks
NOTE : The above times should be regarded only as a guide. Allow for difference in individual tastes and
preferences. The times may vary due to the shape, cut, and composition of the food.
Frozen meat, poultry and fish must be thoroughly thawed before cooking.
22
Reheating chart
• Baby food particularly needs to be checked carefully before serving to prevent burns.
• When heating pre-packaged ready-cooked foods, always follow the pack instructions carefully.
• If you freeze foods which were bought from the fresh or chilled counters, remember that they should be
thoroughly thawed before following the heating instructions on the packed. It’s worth putting a note on them so
that other members of the household will remember too.
• Remember metal ties and transfer food from foil containers before reheating.
• Chilled (refrigerated) food takes longer to reheat than food at room temperature (such as just-cooled food or food
from the cupboard).
• All foods should be reheated using full microwave power.
Item
Baby food
4.5 oz. jar
Cooking time
30 sec.
Special Instructions
Empty into a small serving bowl.
Stir well once or twice during heating.
Before serving, check the temperature carefully.
Baby milk
4 fl. oz.
8 fl. oz.
30-40 sec.
50-60 sec.
Stir or shake well and pour into a sterilized bottle.
Before serving, shake well and check the temperature carefully.
Sandwich roll or bun
1 roll
30-40 sec.
Wrap in paper towel and place on glass microwaveable rack.
*Note : Do not use recycled paper towels.
Lasagna
1 serving
10 1/2 oz.
6-8 min.
Place lasagna on microwaveable plate.
Cover with plastic wrap and vent.
Casserole
1 cup
4 cups
2-4 min.
7-9 min.
Cook covered in microwaveable casserole.
Stir once halfway through cooking.
Mashed potatoes
1 cup
4 cups
3-4 min.
7-9 min.
Cook covered in microwaveable casserole.
Stir once halfway through cooking.
Baked beans
1 cup
3-4 min.
Cook covered in microwaveable casserole.
Stir once halfway through cooking.
Ravioli or pasta in sauce
1 cup
4 cups
3-4 min.
9-10 min.
Cook covered in microwaveable casserole.
Stir once halfway through cooking.
23
VEGETABLE CHART
Use a suitable glass bowl with lid. Add 2-3 tbsp. cold water for every 1/2 lb. unless another water quantity is
recommended - see table. Cook covered for the minimum time - see table.
Continue cooking to get the result you prefer. Stir once during and once after cooking. Add salt, herbs or butter
after cooking. Cover during a standing time of 3 minutes.
Hint : Cut the fresh vegetables into even sized pieces. The smaller they are cut, the quicker they will cook.
All vegetables should be cooked using full microwave power.
Cooking Guide for fresh vegetables
Vegetables
Weight
Broccoli
1/2
Brussels sprouts
1/2
Carrots
1/2
Cauliflower
1/2
Eggplants
1/2
Leeks
1/2
lb.
1 lb.
Time
Comments
2 1/2-4 min
4 1/2-6 min
Prepare even sized florets.
Arrange the stems to the center.
lb.
3 1/2-5 min
Add 5-6 tbsp. water.
lb.
2 1/2-4 min
Cut carrots into even sized slices.
lb.
1 lb.
2
min
4 1/2-6 min
Prepare even sized florets. Cut big florets into halves.
Arrange stems to the center.
lb.
2 1/2-4 min
Cut eggplants into small slices and sprinkle with 1
tablespoon lemon juice.
lb.
2 1/2-4 min
Cut leeks into thick slices.
Mushrooms
0.3 lb.
1/2 lb.
1 1/2-3 min
2 1/2-5 min
Prepare small whole or sliced mushrooms. Do not add
any water. Sprinkle with lemon juice. Spice with salt and
pepper. Drain before serving.
Onions
1/2
lb.
2 1/2-4 min
Cut onions into slices or halves. Add only 1 tbsp. water.
Pepper
1/2
lb.
2 1/2-5 min
Cut pepper into small slices.
Potatoes
1/2
Turnip cabbage
1/2
lb.
1 lb.
lb.
1/2-4
4-6 min
7-9 min
Weigh the peeled potatoes and cut them into similar
sized halves or quarters.
4-6 min
Cut turnip cabbage into small cubes.
Cooking Guide for frozen vegetables
Vegetables
Weight
Time
Instructions
Spinach
0.3 lb.
1-2 min
Add 1 tbsp. cold water.
Broccoli
1/2
lb.
2 1/2-4 min
Add 2 tbsp. cold water.
Peas
1/2
lb.
2 1/2-4 min
Add 1 tbsp. cold water.
Green beans
1/2
lb.
3-5 min
Add 2 tbsp. cold water.
Mixed vegetables
(carrots/peas/corn)
1/2
lb.
2 1/2-4 min
Add 1 tbsp. cold water.
Mixed vegetables
(Chinese style)
1/2
lb.
3-5 min
Add 1 tbsp. cold water.
24
RECIPES
TOMATO & ORANGE SOUP
1. Melt the in a large bowl on P-HI for 1 minute.
2. Add the onion, carrot and potato and cook on P-HI
for 4 minutes. Stir halfway through cooking.
3. Add the tomatoes, orange juice, orange rind and
stock. Mix thoroughly. Season with salt and pepper
to taste. Cover the bowl and cook on P-HI for 17
minutes. Stir 2-3 times during cooking, until the
vegetables are tender.
4. Blend and serve immediately.
1 oz. butter
1 medium onion, chopped
1 large carrot & 1 large potato, chopped
1 3/4 lb. canned, chopped tomatoes
juice and grated rind of 1 small orange
1 1/2 pints hot vegetable stock
salt and pepper to taste
FRENCH ONION SOUP
1. Place the onion and oil a bowl, mix well and cook on
P-HI for 1 minute.
2. Stir in the flour to make a paste and gradually add
stock. Season and add the parsley.
3. Cover the bowl and cook on P-70 for 18 minutes.
4. Pour the soup into serving bowls, submerge bread
and sprinkle generously with cheese.
5. Cook on P-70 for 2 minutes, until the cheese has
melted.
1 large onions, sliced
1 tbsp. corn oil
2 oz. plain flour
2 pints hot meat or vegetable stock
salt and pepper to taste
2 tbsp. parsley, chopped
4 thick slices French bread
2 oz. cheese, grated
STIR FRIED VEGETABLES
1. Place the oil, soy sauce, sherry, ginger, garlic and
carrots in a large bowl, mix thoroughly
2. Cover and cook on P-HI for 5-7 minutes, stirring
once.
3. Add the button mushrooms, bean sprouts, snow
peas red pepper, spring onions, water chestnuts and
chinese leaves. Mix thoroughly.
4. Cook on P-HI for 6-8 minutes, until the vegetables
are tender. Stir 2-3 times during cooking.
1 tbsp. sunflower oil
2 tbsp. soy sauce
1 tbsp. sherry
1" root ginger, peeled and finely grated
2 medium carrots, cut into fine strips
4 oz. button mushrooms, chopped
2 oz. bean sprouts
4 oz. snow peas
1 red pepper, seeded and thinly sliced
4 spring onions, chopped
4 oz. canned water chestnuts, sliced
1/4 head of chinese leaves, thinly sliced
Stir fried vegetables are ideally served with meat or
fish.
HONEYED CHICKEN
1. Place the chicken breasts in a casserole dish.
2. Mix all remaining ingredients together and pour over
the chicken. Salt and pepper to taste.
3. Cook on P-HI for 16-18 minutes. Rearrange and
coat the chicken with the sauce twice during
cooking.
4 boneless chicken breasts
2 tbsp. clear honey
1 tbsp. whole grain mustard
1/2 tsp. dried tarragon
1 tbsp. tomato puree
1/4 pint. chicken stock
25
BLUE CHEESE & CHIVE JACKETS
1. Prick each potato in several places. Cook on P-HI
for 7-9 minutes. Halve and scoop the flesh into a
bowl, add the butter, cheese, chives, mushrooms,
salt and pepper, mix thoroughly.
2. Pile mixture into the potato skins and place in a flan
dish.
3. Cook on P-50 for 12 minutes.
2 baking potatoes,
(approx. 9 oz. each)
2 oz. butter
4 oz. blue cheese, chopped
1 tbsp. fresh chives, chopped
2 oz. mushrooms, sliced
salt and pepper to taste
WHITE SAUCE
1. Place the butter in a bowl and cook on P-HI for 1
minute, until melted.
2. Stir in the flour and whisk in the milk. Cook on P-HI
for 4-5 minutes, stirring every 2 minutes until thick
and smooth. Season with salt and pepper to taste.
1 oz. butter
1 oz. plain flour
1/2 pint. milk
salt and pepper to taste
STRAWBERRY JAM
11/2 lb. strawberries, hulled
3 tbsp. lemon juice
11/2 lb. caster sugar
1. Place strawberries and lemon juice in a very large
bowl, heat on P-HI for 4 minutes, or until the fruit has
softened. Add sugar, mix well.
2. Cook on P-70 for 20-25 minutes, until setting point*
is reached, stir every 4-5 minutes.
3. Pour into hot, clean jars. Cover, seal and label.
* setting point : To determine setting point, place 1 tsp.
jam onto chilled saucer. Allow to stand for 1 minute.
Move surface of jam gently with your finger, if the
surface wrinkles setting point has been reached.
PLAIN MICROWAVE CAKE
1. Line the base of 8" cake dish with grease-proof
paper.
2. Cream the margarine and sugar together until light
and fluffy. Beat in the eggs and fold in the sifted flour
alternately with the milk.
3. Pour into prepared container. Cook on P-HI for 4-5
minutes, until a skewer comes out cleanly.
4. Leave the cake to stand for 5 minutes before turning
out.
4 oz. margarine
4 oz. sugar
1 egg
4 oz. self-raising flour, sifted
2-3 tbsp. milk
OMELETTS
1/2 oz.
1. Whisk together eggs and milk.
2. Place butter in 10" flan dish. Cook on P-HI for 1
minute, until melted. Coat the dish with the melted
butter.
3. Pour omelette mixture into flan dish. Cook on P-HI
for 5 minutes. whisk mixture and cook again on P-HI
for 1 minutes.
butter
4 eggs
6 tbsp. milk
salt & pepper
26
SCRAMBLED EGG
1/2 oz.
1. Melt the butter in a bowl on P-HI for 1 minute.
2. Add the eggs, milk and seasoning and mix well.
3. Cook on P-HI for 4 minutes, stirring every 30
seconds.
butter
2 eggs
2 tbsp. milk
salt & pepper
SAVORY MINCE
1. Place onion, garlic and oil in casserole, and cook on
P-HI for 2 minutes or until soft.
2. Place all other ingredients in casserole. Stir well.
3. Cover and cook on P-HI for 6 minutes then P-50 for
10-14 minutes or until the meat is cooked.
1 small onion, diced
1 clove garlic, crushed
1 tsp. oil
7 oz. can chopped tomatoes
1 tbsp. tomato puree
1 tsp. mixed herbs
8 oz. minced beef
salt and pepper
27
ONE YEAR LIMITED WARRANTY
This product carries a warranty that it will be free from defects in material and
workmanship for a period of one year from the date of purchase. This warranty is valid for
the original retail purchaser from the date of initial retail purchase and is not transferable.
Keep your original sales receipt.
IMPORTANT: This warranty does not cover damages resulting from accident, misuse or
abuse, lack of reasonable care, the affixing of any attachments not provided with the
product, loss of parts, or subjecting the appliance to any but the specified voltage. (Read
directions carefully)
If service is required during the warranty period, properly pack your unit. We recommend
using the original carton and packing materials. Return the product to your nearest
Wal*Mart store with the sales receipt. A replacement or refund may be offered at the
discretion of Wal*Mart. If additional assistance is needed, please contact customer
assistance at: 1-866-321-9509.
Wal*Mart expressly disclaims all responsibility for consequential damages or incidental
losses caused by use of the appliance. Some states do not allow this exclusion or
limitation of incidental or consequential losses so the foregoing disclaimer may not apply to
you. This warranty gives you specific legal rights, and you may also have other rights
which may vary from state to state.
SAVE THIS FOR YOUR RECORDS
RIVALTM logo is a trademark of Sunbeam Products, Inc. used under license by Wal-Mart
Stores, Inc. Bentonville, AR 72716.
Made in China
28
Atencion al Cliente:
1-866-321-9509
KOR-9G3A
PRECAUCIONES QUE DEBEN TENERSE PARA EVITAR QUEDAR
EXPUESTO A LA ENERGIA DIRECTA DE LAS MICROONDAS
(a) No intente operar el horno con la puerta abierta, ya que la operación en tal condición puede
causarle un daño muy grave debido a la exposición directa con la energía de microondas. Es
importante no obstruir los orificios de sujeción de los ganchos de seguridad de la puerta.
(b) No coloque ningún objeto entre la puerta y el gabinete, tampoco permita la acumulación de
grasa e impurezas en los orificios de sujeción de los seguros de la puerta.
(c) No opere el horno en caso de estar dañado. Es de suma importancia que la puerta del horno
cierre adecuadamente y que no esté floja, asimismo que las bisagras y los ganchos del seguro de la
puerta no estén rotos, retorcidos o flojos. Si así fuese, acuda al centro de servicio autorizado.
(d) El horno deberá repararse únicamente por le personal técnico capacitado.
TABLA DE CONTENIDOS
• PRECAUCIONES QUE DEBEN TENERSE PARA EVITAR QUEDAR EXPUESTO A LA ENERGIA DIRECTA
DE LAS MICROONDAS ...................................................................................................................................1
• INSTRUCCIONES IMPORTANTES DE SEGURIDAD .....................................................................................2
• DECLARACION SOBRE INTERFERENCIA DE RADIOFRECUENCIAS DE LA COMISION .........................3
• INSTRUCCIONES DE CONEXION A TIERRA ................................................................................................3
• INSTALACION ..................................................................................................................................................4
• ESPECIFICACIONES .......................................................................................................................................5
• DIAGRAMA DE CARACTERISTICAS ..............................................................................................................6
• DIAGRAMA DE CARACTERISTICAS (CONTINUACION) ...............................................................................7
• PROCEDIMIENTO DE OPERACION ...............................................................................................................8
• FUNCIONES DEL PANEL DE CONTROL .......................................................................................................9
AJUSTE DEL RELOJ .......................................................................................................................................9
DESCONGELAMIENTO POR TIEMPO ...........................................................................................................9
DESCONGELAMIENTO POR PESO .............................................................................................................10
COCINADO EN UNA ETAPA .........................................................................................................................11
COCINADO EN DOS ETAPAS ......................................................................................................................11
CRONOMETRO .............................................................................................................................................12
COCCION RAPIDA ........................................................................................................................................13
COCINADO EN UN TOQUE ..........................................................................................................................13
COCINADO EN UN TOQUE (CONTINUACION) ...........................................................................................14
COCINAR .......................................................................................................................................................14
MAS O MENOS ..............................................................................................................................................15
SEGURO DE BLOQUEO PARA NIÑOS ........................................................................................................15
PARA DETENER EL HORNO MIENTRAS ESTA EN FUNCIONAMIENTO ..................................................15
• MANTENIMIENTO Y CUIDADO DE SU HORNO ..........................................................................................16
• ANTES DE LLAMAR A SERVICIO TECNICO ................................................................................................17
• CUIDADO Y LIMPIEZA ..................................................................................................................................17
• PREGUNTAS Y RESPUESTAS .....................................................................................................................18
• INSTRUCTIONES DE COCCION ..................................................................................................................19
• PROPIEDADES DE USO DEL HORNO DE MICROONDAS .........................................................................20
• CHISPAS DE FUEGO ....................................................................................................................................20
• TECNICAS DE COCINA .................................................................................................................................21
• GUIA DE DESCONGELACION ......................................................................................................................22
• TABLA DE COCIANAR Y CALENTAMIENTO ...............................................................................................22
• TABLE PARA VERDURAS .............................................................................................................................24
• RECETAS .......................................................................................................................................................25
• GARANTIAS ...................................................................................................................................................28
INSTRUCCIONES IMPORTANTES DE SEGURIDAD
Cuando se usan equipos eléctricos deben seguirse ciertas reglas básicas de seguridad, incluyendo lo siguiente:
ADVERTENCIA - Para reducir el riesgo de quemaduras, electrocución, incendio, daños a personas o exposición
excesiva a la energía de microondas:
1. Lea todas las Instrucciones antes de usar del equipo.
2. Lea y siga las indicaciones "PRECAUCIONES QUE
DEBEN TENERSE PARA EVITAR QUEDAR
EXPUESTO A LA ENERGIA DIRECTA DE LAS
MICROONDAS". Encontradas en la página 1.
3. Este equipo debe tener una conexión de tierra, Vea
"INSTRUCCIONES DE CONEXION A TIERRA",
encontradas en la página 3.
4. Instale o coloque este aparato, de acuerdo y
únicamente con la información encontrada en el manual
de instrucciones.
5. Algunos productos tales como huevos enteros,
recipientes sellados - por ejemplo jarras de vidrio
cerradas, pueden explotar en el interior del equipo, por
lo tanto, no deben de usarse en este horno.
6. Use este equipo únicamente para el propósito por el
cual fue diseñado, especificado en este manual. No
caliente químicos corrosivos o gases en este equipo.
Este tipo de horno está específicamente diseñado para
calentar, cocinar o secar alimentos. No está fabricado
para uso industrial o en laboratorio.
7. Como con cualquier otro electrodoméstico, es necesaria
la supervisión de un adulto cuando el horno sea
operado por niños.
8. No utilice el equipo si el cable de alimentación o la
clavija están dañados, si no trabaja bien o si ha sufrido
algún daño o golpe.
9. Este equipo debe de ser reparado únicamente por el
personal de servicio calificado.
Contacte de ser necesario al servicio autorizado para
cualquier revisión, reparación o ajuste.
10. No bloquee o cubra cualquier salida de ventilación del
equipo.
11. No use o guarde el equipo a la intemperie. No lo utilice
cerca del agua - por ejemplo, cerca del fregadero, en un
sótano húmedo o cerca de una alberca o similares.
12. No sumerja el cable de alimentación o la clavija en agua.
13. Mantenga el cable de alimentación alejado de
superficies calientes.
14. No deje el cable de alimentación colgado sobre el borde
de la mesa o mostrador.
15. Cuando limpie la puerta y las superficies que entran en
contacto al cerrarla, use jabones o detergentes suaves,
aplicados con esponja o paño suave.
16. Para reducir el riesgo de fuego dentro de horno:
a) No sobrepase el tiempo de cocción requerido. Vigile
especialmente cuando utilice papel, plástico u otros
materiales combustibles.
b) Retire las tiras de alambre contenidas en las bolsas
de papel o plástico antes de introducirlas al horno.
c) Si el contenido dentro del horno se enciende, deje la
puerta del horno cerrada. Apáguelo, desenchufe el
cable de corriente o bien suspenda la energía
general.
d) No utilice la cavidad como almacena. No deje
productos de papel, utensilios de cocina o alimentos
cuando no utilice el horno.
17. Líquidos, como agua, café o té son capaces de ser
recalentado más allá del punto de ebullición sin que
parezca estar hirviendo debido a la tensión superficial
del líquido. visible burbujeo o ebullición cuando el
recipiente se retira el horno de microondas no siempre
está presente.
ESTE PUEDE RESULTAR EN LÍQUIDOS MUY
CALIENTES QUE PUEDEN HERVIR DE REPENTE
CUANDO UNA CUCHARA O OTRO UTENCILIO SE
INSERTE EN EL LÍQUIDO.
Para reducir el riesgo de lesiones a personas:
a) No sobre caliente el líquido.
b) Remueva el líquido antes y la mitad de
calentamiento.
c) No utilice recipientes de lados rectos con estrechas
cuello.
d) Después de calentar, deje el recipiente dentro de la
horno de microondas por un corto tiempo antes de
retirar el contenedor.
e) Tenga mucho cuidado al introducir una cuchara u
otro utensilio en el recipiente.
18. No utilice el horno de microondas para calentar
corrosivos productos químicos (por ejemplo, sulfuros y
cloruros).
Los vapores de estos productos químicos corrosivos
pueden interactuar con el contacto y las fuentes del
bloqueo de seguridad interruptores para que sean
inoperables.
19. Mantenga limpia la cubierta de la salida de microondas.
Limpie el interior del horno con un trapo suave cada
vez, después de usarlo.
Si permite que quede grasa en cualquier parte de la
cavidad, esta podría sobre calentarse, y provocar humo
o fuego, cuando el horno sea utilizado nuevamente.
20. Nunca intente freír aceite o grasa con el horno, ya que al
no poder controlar la temperatura, se puede ocasionar
un incendio.
21. No haga funcionar el horno sin la bandeja de vidrio.
Asegúrese de que la bandeja de vidrio está
correctamente sentada en la base giratoria.
22. Riesgo de descarga eléctrica. No extraíble sujetadores
siempre debido a las altas tensiones internas. no quitar
los sujetadores.
CONSERVE ESTE AMNUAL DE INSTRUCCIONES
2
DECLARACION SOBRE INTERFERENCIA DE
RADIOFRECUENCIAS DE LA COMISION
ADVERTENCIA DE LA COMISION EDERAL DE COMUNICACIONES:
Este equipo genera y utiliza energía de frecuencia ISM, por lo que si no es instalado y utilizado
apropiadamente, conforme a las instrucciones del fabricante, podría causar interferencia en la
recepción de la radio y televisión.
Este producto ha sido clasificado y probado; encontrándose que satisface los términos para un equipo
ISM, según la sección 18 del reglamento FCC, que está planteada para ofrecer protección apropiada
contra aquella interferencia en instalaciones residenciales.
No obstante, no se garantiza que la interferencia no llegue a ocurrir en alguna instalación en particular.
Si este equipo ocasiona interferencia en la recepción de radio o televisión, la cual puede suceder al
momento de encender o apagar el equipo, entonces será preciso que el usuario intente corregir dicha
interferencia mediante alguna de las siguientes indicaciones:
• Reoriente la antena de recepción de radio o televisión.
• Reubique el horno de microondas con respecto al receptor.
• Aleje el horno de microondas del equipo receptor.
• Conecte el horno de microondas en una toma de corriente diferente, de forma que el horno de
microondas y el receptor se alimenten de distintos circuitos eléctricos.
EL FABRICANTE no es responsable por cualquier interferencia de radio o TV causada por una
MODIFICACION NO AUTORIZADA al horno de microondas. Es responsabilidad del usuario corregir
dicha interferencia
INSTRUCCIONES DE CONEXION A TIERRA
Este equipo debe de estar conectado a tierra; ya que en caso de un corto circuito, el cable a tierra reduce el
riesgo de sufrir una descarga eléctrica al proporcionar una trayectoria de escape a la corriente eléctrica. Por lo
tanto este aparato está equipado con una clavija polarizada que contiene una terminal para la conexión a tierra, la
cual debe de conectarse a un contacto que esté propiamente instalado y conectado a tierra.
ADVERTENCIA: La conexión inapropiada a tierra puede ser un factor de riesgo de sufrir una descarga
eléctrica.
Consulte a un electricista calificado o al personal de servicio, si las instrucciones de instalación no son
completamente entendibles o si existe alguna duda de que el equipo esté conectado adecuadamente a
tierra, cuide también:
(1) Si es necesario utilizar una extensión de corriente, entonces use únicamente extensiones de tres cables,
con clavija polarizada con contacto a tierra, y que a su vez el contacto de la extensión se ajuste a la
clavija del equipo. La capacidad eléctrica de la extensión debe de ser cuando menos de la misma que la
del cable del horno. Así
(2) No use una extensión de corriente si el cable suministrado está muy delgado, solicite a un electricista
que le instale un contacto cerca del equipo.
ADVERTENCIA:
No corte o remueva las puntas del cable de alimentación (tierra), bajo ninguna circunstancia.
3
INSTALACION
1. Examine el horno después de desempacarlo.
Revise que no esté dañado, no tenga abolladuras, que la puerta esté alineada y que la cavidad no esté rayada o
abollada. Si existe algún desperfecto visible, NO INSTALE EL HORNO y notifíquelo a Walmart (1-866-321-9509).
2. Superficie regular y estable.
Coloque el microondas sobre una superficie plana y estable.
3. Ventilación.
No obstruya las rejillas de ventilación. Si estas son bloqueadas durante la operación, el horno se puede calentar
excesivamente y eventualmente tener alguna falla.
Para proporcionarle la adecuada ventilación, mantenga como mínimo 4 inches de espacio entre cualquier costado
del horno y el lugar en donde va a instalarse.
4. Manténgalo alejado de equipos de radio y televisión.
Una mala recepción de televisión e interferencia en la radio pueden presentarse si el horno está colocado cerca de
la TV, radio, antena, etc.,
Mantenga alejado el horno de microondas de estos equipos lo más que se pueda.
5. Manténgalo alejado de equipos generadores de calor y de llaves de agua.
No coloque el equipo en lugares calurosos y húmedos, para prevenir el riesgo de incendio o de sufrir una descarga
eléctrica. Asimismo no lo instale cerca de la tarja.
6. Suministro de energía
• Revise el voltaje de su domicilio.
Este horno de microondas requiere una corriente aproximada de 12.5 amperes, a 120 Voltios, 60 Hz y con
contacto polarizado con conexión a tierra.
1. Este horno tiene suministrado un cable de corriente corto; esto es con la intención de prevenir el riesgo de llegar
a enredarse o tropezar con él. Se puede llegar a utilizar juegos de cable más largos o extensiones de corriente,
siempre y cuando se tenga el debido cuidado en su uso.
2. Si se utiliza un cable largo o una extensión, entonces el rango eléctrico del cable (calibre) o de la extensión
debe de ser por lo menos del mismo tipo que el usado en el horno.
3. Si usa un cable largo o extensión:
• La clasificación eléctrica marcada en los cables o en la extensión debe ser al menos tan grande como la
potenvcia eléctrica del aparato.
• El cable de extensión debe de ser del tipo de 3 conductores.
• El cable largo debe de acomodarse de forma que no se pueda producir un accidente, debido al tropezar o
enredarse con él y a su vez de no quedar al alcance de los niños.
7. El espacio mínimo necesario que debe haber sobre la parte superior del horno es de 4 inches.
Cuando use clavija de 3 puntas
Cuando utilice un adaptador de clavija,
asegúrese de que el contacto esté
debidamente conectado a tierra.
Contacto para clavija de 3 puntas
Cable de
tierra
Cubierta del contacto
Cubierta del
contacto
Adaptador
de clavija
Clavija de 3 puntas
4
Contacto
ESPECIFICACIONES
FUENTE DE ALIMENTACIÓN
MICROONDAS
120V AC, 60Hz Fase sencilla con tierra
Consumó
1350 W
Potencia de salida de Microondas
900 W
Frecuencia de microondas
2,450MHz
DIMENSIONES EXTERNAS (Ancho x Alto x Fondo)
18.3 x 11.0 x 14.5 in.
DIMENSIONES DE LA CAVIDAD (Ancho x Alto x Fondo)
12.4 x 9.3 x 13.6 in.
VOLUMEN DE LA CAVIDAD
0.9 cu. ft.
PESO NETO
Aproximadamente 24.1 lbs.
CRONOMETRO
59 min. 99 sec.
NIVELES DE POTENCIA
10 Niveles
* Las especificaciones están sujetas a cambio sin notificación previa, por mejoras del equipo.
14.5
11.0
18.3
5
DIAGRAMA DE CARACTERISTICAS
1 2
3
q0
4
8
5
9
w
7
6
7 Plato de cristal - Fabricado con cristal especial,
resistente al calor. El plato siempre debe colocarse
en su eje antes del funcionamiento. No cocine los
alimentos directamente sobre el plato.
1 Ganchos del seguro de la puerta - Este horno
funciona solamente cuando la puerta está cerrada
totalmente. Si se abre la puerta, el horno deja de
funcionar y el horno se apagara, hasta que la
puerta se vuelve a cerrar.
8 Pantalla - Permite la visualización de los alimentos.
La pantalla está diseñada para que la luz pueda
pasar a través, pero no el microondas.
2 Sello de la puerta - Este sello mantiene a las
microondas dentro de la cavidad y asimismo
previene la fuga de éstas.
9 Cubierta de la guía de onda - Protege la salida del
horno de microondas Las salpicaduras de los
alimentos que se están cocinando.
3 Cavidad del horno
4 Panel de control
0 Seguro de bloqueo para niños - previene las
operaciones del horno que no son deseadas
5 Acoplador - Este se coloca sobre el eje en el
centro de la suelo de la cavidad del horno.
Esto es para permanecer en el horno durante
cocine.
q La lámpara del horno - Se enciende
automáticamente cuando el horno esta en
operación.
6 Aro giratorio - Siempre se debe utilizar para cocina
con la bandeja de vidrio.
w Botón para abierta la puerta - Para abrir la puerta
empujar el botón.
6
DIAGRAMA DE CARACTERISTICAS (continuacion)
1
2
3
4
5
6
8
7
9
0
w
q
e
1 Pantalla - Muestra la información, tales como
tiempo de cocción, el menú y la cantidad.
8 POTENCIA - Botón para establecer el nivel de
potencia de cocinado.
2 Botones de cocinado en un toque- Presione para
seleccionar control para cocinar con un toque,
como por ejemplo CENA, PALOMITAS, PIZZA, y
BEBIDAS.
9 CRONOMETRO - Presione para seleccionar el
tiempo de cocción.
0 COCINAR - presione el botón para COCINAR.
q Botón para descongelar por peso - Presione el
botón de descongelar seguido por el peso del
alimento.
3 MÁS - Función para agregar más tiempo de
cocción con un solo toque.
4 MENOS - Función para disminuir el tiempo de
cocción con un solo toque.
w PARAR/BORRAR - Botón usado para detener el
funcionamiento del horno o para cancelar alguna
indicación no deseada.
5 Botón para ajustar el tiempo - Presione para
colocar el tiempo o tipo de comida.
e COMIENZO/COCCIÓN RÁPIDO
- Presione para empezar a cocinar .
- Presione una vez el microondas empiece a
cocinar por 30 segundos. Presione de nuevo para
agregar 30 segundos.
6 RELOJ - Presione para ajustar el reloj.
7 DESCONGELAR - presione para seleccionar la
opción de descongelar por el tiempo.
7
PROCEDIMIENTO DE OPERACION
Esta sección presenta información importante sobre el manejo del horno.
el cable de suministro en un toma de
1 Enchufe
8 La pantalla mostrara " : 0 " cuando conecte el horno.
corriente estándar de 3 vías 12.5 Amp, 120V AC,
reloj volverá a la selección de tiempo cuando el
60Hz.
9 Eltiempo
de cocción termine.
Después de colocar la comida en un recipiente
2 adecuado, abrir la puerta del horno y ponerlo en la
el botón de PARAR/BORAR es presionado
10 Cuando
durante el horno esta funcionado, el horno parara y
bandeja de vidrio. La bandeja de vidrio y aro
dejara de cocinar, la información será retenida. Para
borrar la información (excepto la hora) retenida.
Presione el botón PARAR/BORAR una vez mas. Si
la puerta del horno se abre durante el
funcionamiento del horno, toda la información se
conserva.
giratorio debe estar siempre en lugar durante la
cocción.
la puesta. Asegúrese que la puerta este
3 Cierre
debidamente cerrada.
luz del horno estará encendida mientras el
4 La
horno esta operando.
oprime el botón COMIENZO y el horno no opera,
11 Siverifique
que el área entre la puerta y el sello de la
puerta del horno se puede abrir mientras el
5 La
horno esta operando con presionar el botón de
puerta no esté obstruida y revise que la puerta se
encuentre bien cerrada. El horno no comenzará a
cocinar hasta que la puerta haya cerrado
completamente o que el programa de.
abrir la puerta. El horno se apagara
automáticamente.
vez que presione un botón, escuchara un
6 Cada
sonido, que le indicara que a seleccionado un
Asegúrese de instalar adecuadamente el
horno y verifique que se encuentre bien
conectado en la toma de corriente.
botón.
horno cocinar a la máxima potencia
7 Elautomáticamente,
al menos que se halla
seleccionado una potencia mas baja.
TABLA DE NIVELES DE POTENCIA
• El nivel de potencia se ajusta por medio del botón de POTENCIA. La siguiente tabla muestra la indicación en la
pantalla y su respectivo nivel y porcentaje de potencia.
Oprimir el Botón de POTENCIA
Nivel de Potencia
(Indicación en la pantalla)
Una vez
P-HI
100%
Dos veces
P-90
90%
3 veces
P-80
80%
4 veces
P-70
70%
5 veces
P-60
60%
6 veces
P-50
50%
7 veces
P-40
40%
8 veces
P-30
30%
9 veces
P-20
20%
10 veces
P-10
10%
11 veces
P-00
0%
8
Porcentaje Aproximado de Potencia
FUNCIONES DEL PANEL DE CONTROL
AJUSTE DEL RELOJ
Cuando el horno se conecte por primera vez a la toma de corriente, la pantalla digital desplegará " : 0 " y se
escuchará un sonido. Si la energía se suspende momentáneamente, y luego regresa, la pantalla digital volverá
a desplegar " : 0 ".
1. Presione el botón RELOJ.
Se muestra en modo de 12-horas.
2. Presione RELOJ una vez más.
El reloj cambia a modo de 24-horas.
NOTA:
Este horno tiene reloj con doble sistema de
horario. Si usted prefiere usar el reloj con
sistema de 12-horas, omita el segundo paso.
3. Introduzca la hora correcta del día
tocar las el botón para ajustar el
tiempo en secuencia.
4. Presione el botón RELOJ.
La pantalla parpadeará mientras ajusta la hora.
Si seleccionó el sistema de reloj de 12-horas.,
entonces podrá ajustar la hora entre la “1:00” y
las “12:59”.
Si seleccionó el sistema de reloj de 24-horas,
entonces podrá ajustar la hora entre las “0:00” y
las “23:59”.
5. Presione el botón PARAR/BORAR.
NOTA: Si intenta ingresar un valor incorrecto o erróneo, la hora no se ajustará y se escuchará una señal de error.
Oprima el botón de RELOJ y reajuste la hora.
DESCONGELAMIENTO POR TIEMPO
Cuando se elige la función DESCONGELAMIENTO POR TIEMPO, el ciclo divide automáticamente el tiempo
de descongelado en períodos alternados de descongelamiento y reposo.
1. Presione el botón DESCONGELAR.
Luz indicando DESCONGELAR.
2. Oprima los botones numéricos para
ajustar el tiempo de
descongelamiento deseado.
La pantalla mostrará el tiempo seleccionado.
3. Presione el botón COMIENZO.
CRONOMETRO DE DESCONGELAR
comienza.
NOTA:
El horno puede ajustarse hasta un intervalo
máximo de 59 minutos con 99 segundos.
Cuando presione el botón COMIENZO, el indicador sobre la marca DESCONG. Comenzará a parpadear para
mostrar que el horno se encuentra en la función de DESCONGELAMIENTO. Asimismo, el cronómetro en la
pantalla efectuará el conteo en forma regresiva, permitiendo ver cuánto tiempo resta de descongelamiento. El
horno emitirá un sonido durante el ciclo de descongelamiento, avisando cada vez que los alimentos necesiten
voltearse o moverse. Cuando el tiempo de descongelar concluya, ud. oirá 3 sonidos.
9
DESCONGELAMIENTO POR PESO
PESO DE DESCONGELAR permite descongelar los alimentos con facilidad, eliminando las predicciones para
determinación de tiempo de descongelación. Siga los siguientes pasos para descongelar fácil.
1. Presione el botón
DESCONGELAR CARNE.
Se muestra el valor mínimo de peso y aparece
un indicador sobre la marca “1.0”.
2. Seleccione el peso que desea
descongelar.
(Utilice como referencia la tabla
de abajo.)
La pantalla mostrar lo que selecciono.
3. Presione el botón de COMIENZO.
DESCONGELAR CARNE comenzara.
1. Presione el botón
DESCONGELAR POLLO.
Se muestra el valor mínimo de peso y aparece
un indicador sobre la marca “1.5”.
2. Seleccione el peso que desea
descongelar.
(Utilice como referencia la tabla
de abajo.)
La pantalla mostrar lo que selecciono.
3. Presione el botón de COMIENZO.
DESCONGELAR POLLO comenzara.
1. Presione el botón
DESCONGELAR PESCADO.
Se muestra el valor mínimo de peso y aparece
un indicador sobre la marca “0.5”.
2. Seleccione el peso que desea
descongelar.
(Utilice como referencia la tabla
de abajo.)
La pantalla mostrar lo que selecciono.
3. Presione el botón de COMIENZO.
DESCONGELAR PESCADO comenzara.
TABLA DE DESCONGELAMIENTO POR PESO
Oprimir el Botón
DESCONGELAR CARNE
DESCONGELAR POLLO
DESCONGELAR
PESCADO
Una vez
1.0 lb.
1.5 lb.
0.5 lb.
Dos veces
1.5 lb.
2.0 lb.
1.0 lb.
3 veces
2.0 lb.
2.5 lb.
1.5 lb.
4 veces
2.5 lb.
3.0 lb.
2.0 lb.
El tiempo de descongelamiento se determina automáticamente según el peso seleccionado.
Cuando presione el botón COMIENZO, el indicador sobre la marca “grs.” cambiará de lugar sobre la indicación
DESCONG. Mientras el conteo del tiempo de descongelado se muestra en la pantalla.
Durante el ciclo de descongelamiento el horno emitirá un sonido, avisando cada vez que los alimentos necesiten
voltearse o moverse. Cuando el tiempo de descongelar concluya, ud. oirá 3 sonidos.
10
COCINADO EN UNA ETAPA
X6
1. Presione el botón POTENCIA.
(Ajuste el nivel de potencia
deseado.)
Aparece un indicador sobre la marca M/W.
La pantalla mostrará el nivel seleccionado.
Este ejemplo muestra el nivel de potencia al
50% (P-5).
NOTA :
Si se omite el paso número 1 Y 2 entoncesel
horno cocinará a la potencia máxima.
2. Oprima los botones numéricos para ajustar el tiempo de
cocción deseado.
3. Presione el botón de COMIENZO.
La pantalla mostrará el tiempo seleccionado.
NOTA : El tiempo del horno puede ajustarse
hasta un intervalo máximo de 59 minutos
con 59 segundos. (59:99)
Cuando presione el botón COMIENZO, el indicador de MWO comenzará a parpadear para mostrar que el horno
se encuentra en la función de cocinado por microondas.
El cronómetro en la pantalla realizará el conteo en forma regresiva, permitiendo ver el tiempo restante de cocinado.
Cuando el tiempo de cocción concluya, ud. oirá 3 sonidos. En la pantalla se mostrará nuevamente la hora del reloj.
NOTA: Al usar los niveles de potencia bajo aumenta el tiempo de cocción que es recomendado para alimentos
como queso, leche, o carnes que necesitan cocinarse letalmente.
COCINADO EN DOS ETAPAS
Todas las recetas requieren que los alimentos congelados se descongelan completamente antes de cocinarlos.
Este horno puede ser programado para descongelar alimentos de forma automática antes de cocinar.
Aparece un indicador sobre la marca
DESCONG.
Mientras en la pantalla se muestra “ : 0 ”.
1. Presione el botón
DESCONGELAR.
La pantalla mostrará el tiempo Seleccionado.
2. Seleccione el Peso que desea descongelar.
X6
3. Presione el botón POTENCIA
(Seleccione el nivel de potencia
deseado.)
4. Oprima los botones numéricos para ajustar el tiempo de
cocción deseado.
Aparecerá un indicador M/W y “P-HI” se
mostrara.
La pantalla mostrara lo que selecciono.
Este ejemplo muestra el nivel de potencia al
50% (P-5).
La pantalla mostrará el tiempo seleccionado.
5. Presione el botón de COMIENZO.
Cuando presione el botón COMIENZO, el indicador sobre la marca DESCONG. comenzará a parpadear para
mostrar que el horno se encuentra en la función de DESCONGELAMIENTO.
El cronómetro en la pantalla efectuará el conteo en forma regresiva. Usted deberá voltear, mover y/o separar los
alimentos cuando el horno emita un sonido durante el descongelamiento. Cuando el tiempo de descongelado
concluya, el horno emitirá un sonido y empezará el cocinado por microondas. El indicador de DESCONG. se
apagará mientras que el de MWO se encenderá parpadeando. El cronómetro en la pantalla efectuará el conteo
en forma regresiva. Cuando el ciclo de cocinado termine ud. oirá 3 sonidos.
11
CRONOMETRO
El cronometro funciona como un temporizador de minutos, se puede configurar para retrasar la cocción y se
utiliza para establecer un período de tiempo después de la cocción. Sin embargo, para cocinar el retraso no se
puede programar para descongelar. El cronometro funciona sin la energía de microondas.
COMO USAR EL CRONOMETRO DE TIEMPO
1. Presione el botón CRONIMETRO.
Aparece un indicador sobre la marca CRONOMETRO.
Mientras en la pantalla se muestra " : 0 ".
2. Seleccione el tiempo que desea en
cuenta regresivo.
La Pantalla mostrara el tiempo seleccionado.
3. Presione el botón de COMIENZO.
El indicador del CRONOMETRO empieza a parpadear y la pantalla mostrara la cuenta regresiva del.
Cuando el modo de cronometro finaliza, escuchará 3 pitidos.
COMO RETRAZAR EL COMIENZO DE COCCION
1. Presione el botón CRONIMETRO.
Aparece un indicador sobre la marca CRONOMETRO.
Mientras en la pantalla se muestra " : 0 ".
2. Seleccione el tiempo que desea
retrazar regresivo.
La Pantalla mostrara el tiempo seleccionado.
3. Programe la potencia deseada y el
tiempo Cocción para la comida
que desea cocinar.
Aparecerá un indicador M/W, la potencia seleccionada
& el tiempo de cocción.
4. Presione el botón de COMIENZO.
Cuando presione el botón COMIENZO, el indicador CRONOMETRO. Comenzará a parpadear y el cronómetro en la
pantalla realizará el conteo regresivo para el ENCENDIDO AUTOMATICO. Cuando el conteo concluya, ud. escuchará un
sonido. El indicador de CRONOMETRO se apagará y el de M/W comenzará a parpadear, en este momento iniciará la
cocción de los alimentos. El cronómetro en la pantalla realizará el conteo regresivamente, permitiendo ver el tiempo restante
de cocinado. Cuando el tiempo de cocción concluya, ud. oirá 3 pitidos.
COMO UTILIZAR LA FUNCION DE CONOMETRO Y EL TIEMPO DE REPOSO
1. Programe el tiempo de cocción
deseado.
Aparecerá un indicador M/W, indique el tiempo que
desea de reposo.
2. Presione el botón CRONIMETRO.
Aparece un indicador sobre la marca
CRONOMETRO.
Mientras en la pantalla se muestra " : 0 ".
3. Programe el tiempo que desea
para el Reposo del horno.
La Pantalla mostrara el tiempo seleccionado.
4. Presione el botón de COMIENZO.
El indicador M/W comienza a parpadear y la pantalla mostrara la cuenta regresiva del tiempo restante en el M/W.
Cuando el M/W termine de cocinar, el horno emitirá un pitido. El indicador M/W se apaga y el indicador
CRONOMETRO empieza a parpadear. La pantalla mostrara la cuenta regresiva del tiempo restante en el
CRONOMETRO. Cuando el modo de cronometro finalice, escuchará 3 pitidos.
NOTA : El cronómetro puede ajustarse hasta un intervalo de 59 minutos con 99 segundos. (59:99)
12
COCCION RAPIDA
Esta función le permitirá recalentar por 30 segundos al 100% (máxima potencia) de forma fácil, con sólo
oprimir el botón COMIENZO/COCCION RAPIDA.
Asimismo, presionando repetidamente este botón, usted podrá extender el tiempo de recalentado hasta
5 minutos en intervalos de 30 segundos.
1. Presione el botón
COMIENZO/COCCION RAPIDA.
Cuando presione el botón COCCION RAPIDA, en
la pantalla aparecerá “ :30”.
Después de 1.5 segundos el horno empezará a
recalentar.
COCINADO EN UN TOQUE
Con presionar simplemente un botón. ud. podrá cocinar o recalentar muchos de sus alimentos favoritos.
Para aumentar la cantidad, presione nuevamente el botón hasta que la cantidad de cocción deseada aparezca
en la pantalla digital. (Con excepción de PALOMITAS)
1. Presione el botón PALOMITAS
para un paquete de 3.5 oz..
Cuando presione el botón PALOMITAS, la
pantalla mostrará “3.5”.
Después de 1.5 segundos, la pantalla mostrará el
tiempo de cocción y el horno empezará a operar.
NOTA: 1. Utilice paquetes de palomitas especiales para horno de microondas.
2. Coloque la bolsa en el horno según las instrucciones del fabricante.
3. Coloque una sola bolsa de palomitas a la vez en el horno.
4. Después de estallar, abra cuidadosamente la bolsa, las palomitas y el vapor están sumamente calientes.
5. No recaliente el maíz sobrante, ni use la misma bolsa.
6. No saque la bolsa de palomitas mientras éstas estén estallando.
PRECAUCION: Si el paquete de palomitas es de un peso diferente el programado en la opción, entonces no
use el botón de PALOMITAS. Siga las instrucciones del fabricante.
1. Presione una vez el botón PIZZA
para un paquete de 7 oz. o dos
veces para un paquete de 14 oz..
Cuando presione una vez el botón PIZZA, la
pantalla mostrará “7”. Si oprime una vez más
mostrará “14”.
Después de 1.5 segundos, la pantalla mostrará el
tiempo de cocción y el horno empezará a operar.
* PIZZA CONGELADA *
• 7 oz.: Oprima PIZZA una vez.
• 14 oz.: Oprima PIZZA dos veces seguidas (dentro de 1,5 segundos).
NOTA: 1. Coloque una sola pizza a la vez en el horno.
2. Coloque solo pizzas elaboradas para horno de microondas.
3. Si el queso de la pizza congelada no se derrite lo suficiente, cocínela algunos segundos más.
4. Algunas marcas de pizza congelada pueden requerir menor o mayor tiempo de cocción.
13
COCINE EN UN TOQUE (continuacion)
Cuando presione el botón de BEBIDAS una vez,
mostrara “1”. Después de 1,5 segundos, la
pantalla se cambiara al cronometro de cocción y
el horno empieza a cocinar.
1. Presione el botón de BEBIDAS
una vez por 1 taza, dos veces
por 2 tazas o tres veces para 3
tazas.
* BEBIDAS (8 fl. oz./taza) *
• 1 taza: Presione BEBIDAS
• 2 tazas: Presione BEBIDAS dos veces en 1,5 segundos.
• 3 tazas: Presione BEBIDAS tres veces en 1,5 segundos.
Cuando presione una vez el botón PLATO DE
CENA, la pantalla mostrará “12”.
Después de 1.5 segundos, la pantalla mostrará el
tiempo de cocción y el horno empezará a operar.
1. Presione una vez el botón
PLATO DE CENA para una
porción de 12 oz. o dos veces
para una porción de 15 oz..
* PLATO DE CENA *
• 12 oz.: Presione PLATO DE CENA una vez.
• 15 oz.: Presione PLATO DE CENA dos veces seguidas (dentro de 1,5 segundos).
COCINAR
COCINAR le permite cocinar o recalentar muchas de sus comidas preferidas con tan sólo presionar un botón.
1. Presione COCINAR.
Cuando presione COCINAR una vez, la pantalla
mostrara "AC-1”. Si presiona este botón en
repetidas coacciones puede seleccionar la
categoría de alimentos como se ilustra en la tabla
de abajo.
CATEGOTIA
ALIMENTO
PESO
BOTON
AC-1
PAN
4 rebanadas (1.5-2 oz. c/u)
Presione COCINAR
AC-2
SOPA
12 oz.
Presione COCINAR dos veces
AC-3
PAPAS AL HORNO
3 papas (7-8 oz. c/u)
Presione COCINAR tres veces
AC-4
VEGETALES FRESCOS
7 oz.
Presione COCINAR cuatro veces
AC-5
VEGETALES CONGELADOS
7 oz.
Presione COCINAR cinco veces
1. Presione el botón
COMIENZO/COCCION RAPIDA.
14
Cuando presione el botón COMIENZO/COCCION
RAPIDA, la pantalla cambiara y mostrara el
tiempo y cantidad de cocción. El horno empezara
a cocinar los alimentos.
MAS O MENOS
Presione el botón MÁS o MENOS con el fin de sumar o restar un tiempo de cocción mientras el horno está
trabajando, sin embargo no se puede sumar o restar un tiempo de cocción cuando se esta usando las funciones
de descongelación.
SEGURO DE BLOQUEO PARA NIÑOS
El seguro de bloqueo impide el funcionamiento del horno para usos no deseados, como los niños pequeños.
Para ajustar, presione y sostenga PARAR/BORRAR durante 3 segundos, sonara un pitido y el indicador
BLOQUEO.
Para cancelar, Presione y mantenga presionado PARAR/BORRAR durante 3 segundos, sonara un pitido y el
indicador BLOQUEO se apagara.
PARA DETENER EL HORNO MIENTRAS ESTA EN FUNCINAMIENTO
1. Presione el botón PARAR/BORRAR.
• Puede reiniciar el horno tocando COMIENZO.
• Presione PARAR/BORARA una vez mas para así poder borrar las instrucciones.
• Debe entrar información nueva.
2. Abra la puerta.
• Usted puede reiniciar el horno cerrando la puesta y presionando COMIENZO.
NOTA: El horno se detendrá cuando la puerta se abra.
15
MANTENIMIENTO Y CUIDADO DE SU HORNO
El horno debe limpiarse regularmente y los depósitos de alimentos deben ser eliminados.
Si el horno no se mantiene en condiciones limpias podría dar lugar a un deterioro de la superficie que
podría afectar negativamente a la vida útil del aparato y resultar en una situación peligrosa.
es necesario retirar el plato de
1 Desconecte el horno antes de limpiarlo.
6 Ocasionalmente
cristal para limpiarlo. Lávelo en agua tibia con
jabón o en lavaplatos automático.
limpio el interior del horno. Cuando los
2 Mantenga
alimentos salpiquen las paredes o se derramen en
aro giratorio y la base de la cavidad, deben
el interior, limpie el interior con un paño húmedo.
7 Ellimpiarse
regularmente para evitar que hagan
Pude usar un detergente suave si el horno se
demasiado ruido.
Simplemente limpie la superficie con agua y
detergente suave o con limpiador de ventanas y
seque. El eje puede lavarse con agua tibia.
encuentra demasiado sucio. No es recomendable
usar detergentes fuertes o abrasivos.
parte exterior del horno debe limpiarse con
3 La
agua y jabón, y enjuagarse y secarse con un paño
suave. Para evitar daños a las partes que operan
dentro del horno, no permita que entre agua por la
abertura de ventilación.
el panel de control se moja, límpielo con un
4 Sipaño
suave. No use detergentes o abrasivos
fuertes en el panel de control.
se acumula vapor en el interior del horno o el
5 Siborde
de la puerta, límpielo con un paño suave.
Esto suele ocurrir cuando el horno de microondas
está siendo operado bajo condiciones de alta
humedad, sin embargo, esto no es un indicio de
mal funcionamiento.
ARO GIRATORIO
ARO GIRATORIO y la base de la cavidad, deben
1 EL
limpiarse regularmente para evitar que hagan
demasiado ruido.
ARO GIRATORIO SIEMPRE DEBE ser usado
2 EL
para cocinar con el plato de cristal.
PLATO DE CRISTAL
1 No opere el horno sin el Plato de Cristal.
2 No use ningún otro Plato de Cristal en este horno.
el Plato de Cristal está caliente, permita que se
3 SiENFRIE
ANTES DE LIMPIARLO o colocarlo en agua.
cocine directamente sobre el Plato de Cristal.
4 No
(A excepción de las palomitas de maíz.)
16
Plato de cristal
Aro giratorio
ANTES DE LLAMAR A SERVICIO TECNICO
Revise la siguiente lista, usted podría evitar una llamada innecesaria al servicio técnico.
* El horno no funciona:
* Chispas de fuego en el interior:
1. Revise que el cable de alimentación eléctrica este bien
conectado.
1. Revise los utensilios empleados no sean de metal o
no tengan algún borde metálico.
2. Revise que la puerta este firmemente cerrada.
2. Revise que las brochetas metálicas o el papel aluminio
no estén rozando en las paredes internas del horno.
3. Revise que el tiempo de cocción este seleccionado.
4. Revise si los fusibles de su casa se encuentren en
perfecto estado o si hay algún corto circuito.
Si persiste el problema llame 1-866-321-9509.
CUIDADO Y LIMPIEZA
Es importante observar lo siguiente:
1. Es importante no anular o manipular el seguro de
bloqueo para niños.
4. El horno no debe ser ajustado o reparado por nadie
excepto por un técnico de servicio.
2. No coloque ningún objeto entre la parte frontal del
horno y la puerta o permita que se acumule residuo en
las superficies de sellado.
5. El horno se deben limpiar regularmente y eliminar los
residuos de alimentos.
6. La incapacidad de mantener el horno en cuidado y
limpio podría dar lugar a un deterioro de la superficie
que podría afectar negativamente la vida del equipo y
posiblemente provocar una situación peligrosa.
3. Cuando se abra, la puerta no debe ser sometida a
ninguna presión, por ejemplo, un niño colgando de la
puerta abierta del horno o cualquier tipo de peso que
pudiera causar al horno caer hacia delante y causar
algún daño o daños a la puerta. No utilice el horno si
esta dañado, hasta que haya sido reparado por un
técnico de servicio. Es particularmente importante que
el horno cierre correctamente y que no haya daños a
la:
i) Puerta (doblado)
ii) Bisagras y ganchos (rotos o sueltos)
iii) Sellos de las puertas y superficies de sellado.
17
PREGUNTAS Y RESPUESTAS
*P: Puede el horno de microondas sufrir daños si se
opera vacío?
R: Si. Nunca lo ponga a operar vacío.
* P: Que significa el tiempo de reposo?
R: El tiempo de reposo significa que la comida debe ser
sacada del horno y cubierta por un tiempo adicional
para permitir que se termine de cocinar. Esto libera
el horno para cocinar otros alimentos.
* P: Puedo operar el horno sin el plato de cristal o sin
la guía giratoria?
R: No, ambos utensilios deben utilizarse en el horno
antes de cocinar algún alimento.
* P: Por qué mi horno no siempre cocina tan rápido
como dice el manual?
R: Revise su guía de cocina de nuevo, para asegurarse
de que usted ha seguido las instrucciones
exactamente. Variaciones en el tamaño, forma y
dimensiones puede requerir mayor tiempo de
cocción. Use su propio criterio junto con la guía de
cocina de sugerencias para comprobar si el
alimento ha sido cocinado adecuadamente tal y
como lo haría una cocina convencional.
* P: Puedo abrir la puerta cuando el horno este
operando?
R: Si, la puerta puede abrirse en cualquier momento
durante la operación. El magnetrón se detiene
automáticamente y la energía se desconecta,
además, que el tiempo de cocción restante se
mantiene hasta que la puerta se cierra y se oprime
el botón COMIENZO.
*P : Puedo operar mi microondas sin el plato de
cristal para cocinar un plato mas grande?
R: No. Si usted retira el plato de cristal o lo vira, los
resultados de su alimento cocinado vas a ser muy
pobres. Los platos utilizados en el horno deben
caber en el plato de cristal.
* P: Porque se acumula vapor en el horno de
microondas después de cocinar?
R: La acumulación de humedad es normal que ocurra.
Esto sucede, porque la comida produce vapor al
cocinarse, y aunque gran parte de ese vapor se
elimina por el aire que es ventilado, algo de vapor
suele permanecer, concentrándose en las
superficies frías como lo es la puerta del horno.
* P: Es normal que el plato de cristal gire en
cualquier dirección?
R: Si. El plato de cristal gira en sentido del reloj o
sentido contrario, dependiendo de la rotación del
motor cuando el ciclo de cocinado empiece.
* P: La energía de las microondas puede traspasar la
ventanilla de la puerta?
R: No. La pantalla de metal de la ventanilla hacer
regresar la energía de las microondas dentro de la
cavidad del horno. Los orificios están hechos para
permitir el paso de la luz a través de ellos y permitir
inspeccionar los alimentos. Pero no dejan pasar la
energía.
* P: Puedo hacer palomitas de maíz e mi horno de
microondas? Que debo hacer para obtener
mejores resultados?
R: Si. Solo debe seguir las instrucciones del fabricante
en el paquete de palomitas de microondas. No
utilizar bolsas de papel regular. Utilice la “prueba de
escucha” al detener el horno tan pronto como el
estallido se desacelera a un “estallido” por 1 o 2
segundos. Favor desechar los granos sin reventar.
No poner las palomitas en utensilios de cocina de
cristal.
* P: Porque a veces los huevos estallan?
R: Cuando horneamos o cocinamos huevos, la yema
del huevo puede estallar debido al vapor en el
interior de la membrana de la yema. Para evitar
esto, simplemente perfore la yema con un palillo
antes de cocinar. Nunca cocine huevo sin antes
perforar la cáscara.
* P: Porque es recomendado el tiempo de reposo
después de la operación de cocción se ha
completado?
R: El tiempo de reposo es muy importante. Con la
cocina de microondas, el calor esta en la comida, no
en el horno. Muchos alimentos acumulan suficiente
calor interno como para permitir que el proceso de
cocinado continúe, incluso después que la comida
se saca del horno. El tiempo de reposo para carnes,
verduras grandes y pasteles es para que el interior
se cocine completamente sin quemar el exterior.
18
INSTRUCCIONES DE COCCION
Guía de Utensilios
Utilice únicamente utensilios que son adecuados para uso de hornos de microondas.
Para cocinar en el horno de microondas, las microondas deben ser capaces de penetrar en los alimentos, sin ser
reflejada o absorbido por el plato utilizado. Por lo tanto debe tener cuidado en la elección de los utensilios. Si el
utensilio está marcado por microondas seguro, no tiene que preocuparse.
La siguiente tabla muestra diferentes utensilios e indica cuándo y cómo deben ser utilizados en un horno de
microondas.
Seguro
Comentarios
Hojas de Aluminio
Utensilio
▲
Puede ser utilizado en pequeñas cantidades para proteger áreas
que se cocinen demasiado. Arcos puede ocurrir si la hoja está
muy cerca de la pared del horno o si se usa demasiada hoja de
aluminio.
Loza de barro
●
Porcelana, cerámica, loza y porcelana suelen ser adecuados, a
menos que estén decorados con un acabado de metal.
Poliéster desechable platos de
cartón
●
Algunos alimentos congelados vienen empacados en este tipo de
platos.
Envases de comida rápida
• Tazas de envases de poliestireno
●
• Bolsas de papel o periódico
• Papel reciclado o adornos de metal
✕
✕
Se puede utilizar para calendar comida. El recalentamiento puede
Causar que el poliestireno se derrita.
Puede ocasionar fuego.
Puede ocasionar chispas.
Cristalería
• Horno a articulo de mesa
●
• Cristalería fina
●
• Vasos de cristal
●
Metal
• Platos
• Bolsa frigorífica
✕
✕
Puede ocasionar chispas o fuego.
●
Para tiempo de cocción corto y calentamiento.
También para absorber el exceso de humedad.
Puede ocasionar chispas.
Papel
• Platos, vasos, servilletas y papel de
cocina
• Papel reciclado
✕
Plástico
• Envases de plástico
●
• Envoltura de plástico
●
• Bolsa frigorífica
▲
Cera o papel resistente a la grasa
●
Se puede utilizar a menos que estén decorados con un acabado
de metal.
Se puede utilizar para calendar comida o líquidos.
Cristal delicado puede romperse o agrietarse si se calienta de repente.
Debe quitar la tapa. Adecuados para el calentamiento solamente.
Particularmente si el termoplástico es resistente al calor. Algún
otro plástico puede deformarse o decolorarse a altas
temperaturas. No use plástico melamina.
Se puede utilizar para retener la humedad. No debe tocar los
alimentos.
Tenga cuidado al retirar la envoltura de plástico ya el vapor
caliente puede escapar.
Solamente si esta a prueba de horno. No debe estar hermético.
Perforar con un tenedor si es necesario.
Se puede utilizar para retener la humedad y evitar que salpique.
● : Uso recomendado
▲ : Uso limitado
✕ : No recomendado
19
PROPIEDADES DE USO DEL HORNO DE MICROONDAS
Uso General
apropiadamente y que no existan danos en los sellos,
superficie de sellado, bisagras y seguros. Cuando
desempaque su horno, revise que no este rayado o
golpeado y así mismo que la cavidad no este rayada o
golpeada.
No haga funcionar el horno si se encuentra vacío. Esto
puede dañar el horno.
No intente usar el horno para secar ropas, trapos, papel
periódico u otros materiales. Estos pueden causar fuego.
Tampoco introduzca animales dentro del horno. No
maltrate ni golpee el panel de control. Esto puede dañar el
horno.
Es importante no obstruir los orificios o eliminar los ganchos
del seguro de bloqueo para niños.
No coloque ningún objeto entre la parte frontal y la puerta,
ni permita que se acumulen residuos o suciedad en las
superficies de sellado. Limpie continuamente las superficies
de sellado con detergente suave, enjuague y seque. Nunca
use polvos o limpiadores abrasivos.
No permita que la puerta se desforme o sufra algund ano al
estar Abierta, por ejemplo cuando un niño se cuelgue o se
apoye alguna carga. Esto puede causar que el horno se
voltee y caiga, dañándose la puerta o el equipo.
No opere el horno si esta dañado y hasta no ser reparado
por un técnico calificado. Es importante que la puerta cierre
Alimentos
segundos después que el horno se ha apagado para dejar
que la temperatura se iguale, agite durante el
calentamiento, si es necesario, y SIEMPRE revuelva
después del calentamiento.
Para evitar quemaduras usted debe colocar una cachara o
varilla de vidrio en la bebida y revolver antes, durante y
después del calentamiento.
No descuide el horno mientras se cocinan palomitas de
maíz.
No cocine las palomitas de maíz en bolsas de papel común
y corriente, a menos que se trate de un producto especial
para preparar palomitas de microondas. Las semillas de
maíz se pueden sobrecalentar e incendiar las bolsas de
papel estraza.
No coloque la bolsa de palomitas de maíz directamente
sobre el plato. Póngalas en un recipiente especial para
microondas. No use aceite al menos que esto se halle
especificado por el fabricante.
No exceda el tiempo de cocción indicado por el fabricante
de las palomitas. La cocción prolongada no hará que
estalle más el maíz, y solo ocasionara que se quemen e
incendien. Recuerde que después de hacer las palomitas,
el plato y la bolsa estarán muy calientes. Tome la bolsa
cuidadosamente usando pinzas para cocina y utilice
guantes para retirar el plato del horno.
Nunca utilice su horno de microondas para esterilizar
comida en casa. El horno esta diseñado para esterilizar
adecuadamente.
La comida mal esterilizada puede descomponerse y ser
peligrosa para su consumo.
Siempre procure utilizar el menor tiempo de cocción de la
receta.
Recuerde que es mejor dejar un poco crudo que bien
cocido.
Si la comida quedo cruda regresarse al horno para volverla
a cocinar.
Si la comida esta muy cocida y se ha quemado, entonces
no hay nada que se puede hacer.
Las pequeñas cantidades de alimentos o la comida con
bajo contendido de humedad puede llegar a quemarse,
secarse o inflamarse si el tiempo de cocción es demasiado
largo.
No cocine huevo con cascaron o con la yema entera, ya
que la presión podría hacer que el huevo explote. Revuelva
los huevos antes de cocinarlos.
Papas, manzanas, yemas de huevo y salchichas son
ejemplos de comidas con pieles porosas, las cuales se
deben perforar antes de cocinarse para evitar que estallen.
No intente freír en el honro de microondas.
Siempre deje un tiempo de reposo de al menos 20
Chispas de Fuego
Si usted ve chispas de fuego, abra la puerta y corrija el problema.
La chispa de fuego es causada por:
• Metales como cintas de cierre, broches de aves de
corral o platos con bordes dorados en el microondas.
• El papel toalla reciclado contiene pequeñas piezas de
metal.
• Metal o lámina de aluminio tocando las paredes del
microondas.
• Lamina de aluminio no moldeado a la comida (los
bordes hacia arriba actúan como antenas).
20
TECNICAS DE COCINA
TIEMPO DE REPOSO
TEMPERATURA DE INICIO
Alimentos de alta densidad, por ejemplo carnes,
patatas asadas y pasteles requieren tiempo de reposo
(dentro y fuera del horno) después de cocinado para
permitir que el calor termine de cocinar el centro
completamente. Envuelva la carne y las patatas en
papel de aluminio mientras esta reposando. Las carnes
necesitas aproximadamente de 10-15 minutos, patatas
asadas 5 minutos. Otros alimentos como vegetales,
pescado, etc, requieren de 2-5 minutos de reposo.
Después de descongelar los alimentos, el tiempo de
reposo también debe ser permitido. Si la comida no se
ha cocinado completamente después del tiempo de
reposo, volver al horno y cocine por otro tiempo
adicional.
Entre mas fría este la comida, mas tiempo tarda en
calentarse. Alimentos congelados tardan mas tiempo
en calentarse que los alimentos en temperatura
ambiente.
CONTENIDO DE HUMEDAD
Algunos alimentos requieren que se remuevan durante
la cocción. Carnes y aves de corral debe ser volteado
después del tiempo de cocción.
LIQUIDOS
Todos los líquidos deben ser agitados antes y durante
el calentamiento.
Especialmente el agua debe ser agitada antes y
durante el calentamiento, para evitar la erupción. No
calendar líquidos que han sido previamente hervidos.
NO CALIENTE DEMASIADO.
ENCENDIDO Y AGITACION
Muchos de los alimentos frescos por ejemplo, verduras
y frutas varían en su contenido de humedad a lo largo
de la temporada, sobre todo las patatas asadas. Por
esta razón los tiempos de cocción deben ser ajustados.
Los ingredientes secos por ejemplo, arroz, pasta,
pueden secarse afuera durante el almacenamiento por
lo que el tiempo de cocción puede ser diferente.
ORGANIZACION
Alimentos individuales como por ejemplo porciones de
pollo o chuletas, deben colocarse en un plato para que
las partes gruesas estén hacia el exterior.
CANTIDADES
DENSIDAD
Pequeñas cantidades se cocinan mas rápido que
cantidades mas grandes.
Alimentos porosos se cocinan mas rápidamente que los
alimentos densos.
PERFORACION
ENVOLTURA DE PLASTICO
L piel o membrana de algunos alimentos causan que se
forme vapor durante la cocción. Este tipo de alimentos
deben ser perforados o pelados antes de cocinar para
permitir que el vapor escape. Huevos, patatas,
manzanas. salchichas ect, deben ser perforados antes
de cocinarse. NO INTENTE HERVIR HUEVOS CON
LA CASCARA.
La envoltura de plástico ayuda a mantener los
alimentos y el vapor ayuda a acelerar el tiempo de
cocción. Perforar antes de cocinar para que el exceso
de vapor escape. Siempre tenga cuidado al retirar la
envoltura de plástico del plato ya que la acumulación
del vapor va a ser muy caliente.
FORMA
COBERTURA
Alimentos de igual forma se cocinan uniformemente.
Los alimentos se cocinan mejor en el microondas
cuando se usa un recipiente redondo en lugar de
cuadrado.
Cubra los alimentos con una tapa. Cubra los pescados,
verduras, guisos, sopas. No cubra pasteles, salsas,
patatas asadas o artículos de pastelería.
ESPACIO
Los alimentos se cocinan mas rápido y uniformemente
si se deja espacio entre los mismos.
NUNCA coloque los alimentos en la parte superior de
cada uno.
21
GUIA DE DESCONGELAMIENTO
▶ No descongelar carne cubierta. Cubrir la carne podría
permitir que la carne se cocine. Siempre retire la
envoltura exterior y la bandeja. Use solo recipientes
que son seguros en microondas.
▶ Comience a descongelar el pollo entero con la pechuga
hacia abajo. Comience a descongelar la carne con la
grasa hacia abajo.
▶ La forma del paquete puede que altere el tiempo de
descongelación. Paquetes pocos profundos en formas
rectangulares se descongelas mas rápidamente que
los paquetes profundos.
▶ Después que 1/3 del tiempo de descongelación ha
transcurrido, chequear los alimentos. Retirar las
porciones descongeladas o voltear el alimento.
▶ Durante la descongelación, el horno de microondas le
pedirá que revise los alimentos. En este punto, abra la
puerta del horno y revise los alimentos. Siga las
técnicas que se enumeran a continuación para obtener
óptimos resultados.
Luego, cierre la puerta del horno, toque el botón de
COMENZAR para la descongelación completa.
▶ Cuando se descongela, los alimentos deben estar fríos,
pero suaves en todas las áreas. Si todavía contiene
porciones de hielo, retorne al horno de microondas
colóquelo por un tiempo breve y deje reposar por unos
minutos.
Después de descongelar, permitir que los alimentos
reposen 5-60 minutos si todavía queda porciones con
hielo. Aves de corral y pescado pueden ser colocado
bajo agua fría hasta que se terminen de descongelar.
➪ Voltear: asado, costillas, pollo entero, pechugas de
Pavo, perros calientes, salchichas, filetes y chuletas.
➪ Reorganizar: colocar por separado los filetes, chuletas,
hamburguesas, carne molida, pollo o mariscos, trozos
de carnes como estofado de carne.
➪ Cobertura: Use pequeñas tiras de papel de aluminio
para proteger las áreas delgadas o los bordes de los
alimentos en forma desigual como alas de pollo. Para
evitar que haga chispa, no permita que el papel de
aluminio entre 1 pulgada de las paredes del horno o de
la puerta.
➪ Retirar: para evitar que los alimentos se cocinen, retirar
las porciones descongeladas del horno en este
momento. Esto puede acortar el tiempo de
descongelación de los alimentos que pesen menos de
3 lbs.
TABLA DE COCCION Y CALENTAMIENTO
Tabla de Cocción
Nivel de
Potencia
Tiempo de Cocción
Por lb./450g
Instrucciones Especiales
CARNES
Conjunto de carne
- Vuelta y vuelta
- Medio cocinada
- Bien cocinada
Conjunto de Pollo
Conjunto de Tocineta
P-80
P-80
P-80
P-HI
P-HI
6-8 min.
7-9 min.
9-11 min.
10-13 min.
8-10 min.
- Carne refrigerada y aves de corral deben ser
retirados del refrigerador por lo menos 30
minutos antes de ser cocinado.
- Siempre deje reposar la carne y aves de corral,
cubierto después de la cocción.
AVES DE CORRAL
Pollo Entero
Porciones de Pollo
Pechuga (con Hueso)
P-HI
P-80
P-80
4-9 min.
5-7 min.
6-8 min.
P-HI
P-HI
3-5 min.
3-5 min.
P-HI
4-6 min.
P-HI
4-6 min.
Producto
PESCADO
Filetes de Pescado
Macarela Entera,
Limpia y Preparada
Trucha Entera,
Limpia y Preparada
Filetes de Salmón
- Pásele un poco de aceite o mantequilla derretida
sobre el pescado, o añada 1-2 tbsp. de jugo de
limón, vino, caldo, leche o agua.
- Siempre deje el pescado reposar, cubierto
después de la cocción.
NOTA: Los tiempos en la tabla, deben considerarse solo como una guía. Permita la diferencia en gusto y
preferencia de cada persona individual. El tiempo puede variar dependiendo de la forma, l corte y la
composición del alimento. Carnes congeladas, aves y pescados deben descongelarse completamente
antes de ser cocinados.
22
Tabla de recalentamiento
• Alimentos para bebe particularmente necesita ser revisada cuidadosamente antes de servir para evitar
quemaduras.
• Cuando caliente comida pre-empacados, siempre siga las instrucciones del paquete cuidadosamente.
• Si congela los alimentos que fueron comprado frescos o fríos, recuerde que deben ser descongelados
completamente antes de seguir las instrucciones de calentado. Vale la pena poner una nota en el paquete para
que los otros miembros de la familia estén atentos también.
• Recuerde transferir los alimentos de de envases de metal antes de recalentar.
• Alimentos refrigerados toman mas tiempo en recalentarse que los alimentos en temperatura ambiente.
• Todos los alimentos deben ser recalentados usando la energía completa del microondas.
Producto
Comida para bebe
4.5 oz. jar
Tiempo de
Cocción
30 sec.
Leche para bebe
4 fl. oz.
8 fl. oz.
30-40 sec.
50-60 sec.
Pan de emparedados
1 pan
30-40 sec.
Lasaña
1 porción
10 1/2 oz.
Instrucciones especiales
Vacíe en un envase pequeño.
Revuelva bien una o dos veces durante el calentamiento.
Antes de servir, comprobar la temperatura con cuidado.
Revuelva bien o agite y vierta en una botella esterilizada.
Antes de servir, agite bien y compruebe la temperatura
cuidadosamente.
Envolverlo en una toalla de papel y colocar en un estante de
vidrio apto para microondas.
*Nota : No use papel toalla reciclado.
6-8 min.
Coloque la lasaña en un plato apto para microondas.
Cubra en papel plástico y ventile.
Guisos
1 taza
4 tazas
2-4 min.
7-9 min.
Cocinar en una cacerola cubierta para microondas.
Revuelva una vez a mitad de cocción.
Puré de papas
1 taza
4 tazas
3-4 min.
7-9 min.
Cocinar en una cacerola cubierta para microondas.
Revuelva una vez a mitad de cocción.
Frijoles asados
1 taza
3-4 min.
Cocinar en una cacerola cubierta para microondas.
Revuelva una vez a mitad de cocción.
Ravioles o pasta
in es salsa
1 taza
4 tazas
3-4 min.
9-10 min.
Cocinar en una cacerola cubierta para microondas.
Revuelva una vez a mitad de cocción.
23
TABLA PARA VERDURAS
Utilice un recipiente adecuado de vidrio con tapa. Añadir 2-3 tbsp. de agua fría por cada 1/2 lb. a menos que otra
cantidad sea recomendada – vea la tabla.
Cocinar tapado por el tiempo mínimo –vea la tabla.
Continuar la cocción para obtener el resultado que usted prefiera. Revuelva una vez durante y después de la
cocción.
Añadir la sal, sazón o mantequilla después de la cocción.
Cobra y deje reposar por 3 minutos
Sugerencia: cortar las verduras frescas en partes iguales. Mientras mas pequeños son cotados más rápido se
cocinaran. Todas las verduras deben cocinarse usando la energía completa del microondas.
Guía de Cocción para verduras frescas
Peso
Tiempo
Brocoli
Verduras
1/2
1/2-4
Coles
1/2
Zanahorias
1/2
Colifor
1/2
Berenjenas
1/2
Cebollinos
1/2
Hongos
0.3 lb.
1/2 lb.
min
1
2 1/2-5 min
Prepare pequeñas porciones de hongos enteros y en
rodajas. No agregue nada de agua. Rociar jugo de
Limón. Sazonar con sal y pimienta.
Spice with salt and pepper. Escurra antes de servir.
Cebolla
1/2
lb.
2 1/2-4 min
Cortar la cebolla en rodajas o a la mitad. Agregar
solamente 1 tbsp. de agua.
Pimientos
1/2
lb.
2 1/2-5 min
Cortar los pimientos en rodajas pequeñas.
Patatas
1/2
Repollo
1/2
lb.
1 lb.
Comentarios
min
2
4 1/2-6 min
Preparar en partes iguales.
Organizar los tallos hacia el centro.
lb.
3 1/2-5 min
Añadir 5-6 tbsp. de agua.
lb.
2 1/2-4 min
Cortar las zanahorias en partes iguales.
lb.
1 lb.
min
2
4 1/2-6 min
Preparar la coliflor en tamaños iguales.
Organizar los tallos hacia el centro.
lb.
2 1/2-4 min
Cortar la berenjena en rodajas pequeñas y rociar con
una cuchara jugo de limón.
lb.
2 1/2-4 min
Cortar los cebollinos en rodajas gruesas.
lb.
1 lb.
lb.
1/2-4
1/2-3
4-6 min
7-9 min
Pesar las patatas peladas y cortarlas en tamaños
similares.
4-6 min
Cortar el repollo en cubos pequeños.
Guía de Cocción para verduras congeladas
Peso
Tiempo
Espinacas
Verduras
0.3 lb.
1-2 min
Añadir 1 tbsp. de agua fría.
Brocoli
1/2
lb.
2 1/2-4 min
Añadir 2 tbsp. de agua fría.
Chicharos
1/2
lb.
2 1/2-4 min
Añadir 1 tbsp. de agua fría.
Habichuelas
1/2
lb.
3-5 min
Añadir 2 tbsp. de agua fría
Verduras mixtas
(zanahoria, chíncharos, maíz)
1/2
lb.
2 1/2-4 min
Añadir 1 tbsp. de agua fría.
Verduras mixtas
(Estilo Chino)
1/2
lb.
3-5 min
24
Instrucciones
Añadir 1 tbsp. cdasde agua fria .
RECETAS
SOPA DE TOMATE Y NARANJA
1 oz. mantequilla
1 cebolla pequeña picada
1 zanahoria grande & 1 una patata grande, picados
1 3/4 lb. tomates enlatados
Jugo y cáscara de 1 naranja pequeña
1 1/2 pinta. caldo de verduras caliente
Sal y pimienta al gusto
1. Derretir en un recipiente grande en P-HI durante 1
minuto.
2 Agregue la cebolla, zanahoria y la patata y cocine en
P-HI por 4 minutos. Revuelva a mitad de cocción.
3. Añadir los tomates, jugo de naranja, cáscara de
naranja y el caldo de verduras. Mezcle bien. Sazone
con sal y pimiento al gusto. Cubra el recipiente y
cocine en P-HI por 17 minutos. Revuelva 2-3 veces
durante la cocción, hasta que las verduras estén
cocinadas.
4. Mezclar y servir inmediatamente.
SOPA DE CEBOLLA
1. Coloque la cebolla y el aceite de un recipiente,
mezcle bien u cocine en P-HI por 1 minuto.
2. Agregue la harina hasta formar una pasta y añadir
poco a poco el caldo. Sazone y agregue el perejil.
3. Cubra el recipiente y cocine en P-70 por 18 minutos.
4. Vierta la sopa en un plato hondo, sumerja el pan y
polvoree generosamente el queso.
5. Cocine en P-70 por 2 minutos hasta que el queso se
haya derretido.
1 cebolla grande, en rodajas
1 tbsp. de aceite de maíz
2 oz. harina
2 pinta. caldo de carne o de verdura
Sal y pimienta al gusto
2 tbsp. perejil picados
4 rebanadas gruesas de pan Frances
2 oz. queso gratinado
VERDURAS SALTEADAS
1 tbsp. aceite de girasol
2 tbsp. salsa de soya
1 tbsp. jerez
1" raíz de jengibre, pelado y rallado finamente.
2 zanahorias medianas, cortadas en tiras finas.
4 oz. champiñones cortados
2 oz. germen de soya
4 oz. mange-tout
1 pimiento rojo, sin semilla y cortado en rebanadas finas
4 cebollas picadas
4 oz. castañas en conserva, rebanadas
1/4 col picadas finamente
1. Coloque el aceite, la salsa de soya, el jerez, jengibre,
ajo y zanahorias en un recipiente grande, mezclar
bien.
2. Tape y cocine en P-HI por 5-7 minutos, revuelva una
vez.
3. Agregar los champiñones, germen de soya,
guisantes, pimiento rojo, cebollas, castañas en
conserva y la col. Mezclar bien.
4. Cocinar en P-HI durante 6-8 minutos hasta que las
verduras estén listas. Revuelva 2-3 veces durante el
cocinado.
Vegetales salteados son ideales para servir con
carne o pescado.
POLLO CON MIEL
4 pechugas de pollo sin hueso
2 tbsp. de miel
1 tbsp. mostaza de grano entero
1/2 tsp. estragon seco
1 tbsp. pure de tomate
1/4 pinta. caldo de pollo
1. Coloque las pechugas de pollo en una cazuela.
2. Mezcle todos los ingredientes restantes y vierta sobre
el pollo. Agregue sal y pimienta al gusto.
3. Cocine en P-HI durante 16-18 minutos. Cook on P-HI
for 16-18 minutes. Cubra el pollo con la salsa dos
veces.
25
PATATAS CON CEBOLLINO Y QUESO AZUL
1. Coloque las patatas en varios lugares. Cocine en PHI durante 7-9 minutos, reducir a la mitad retire la
pulpa en un recipiente, agregue mantequilla, el
queso, los cebollinos, los champiñones, sal y
pimienta, mezclar bien.
2. Pila la mezcla en la piel de las patatas y coloque en
un plato de flan.
3. Cocine en P-50 durante 12 minutos.
2 patatas
(Aproximadamente .9 oz. c/u)
2 oz. mantequilla
4 oz. queso azul, cortado
1 tbsp. cebollino fresco y cortado
2 oz. champiñones en rebanadas
Sal y pimienta al gusto
SALSA BLANCA
1. Coloque la mantequilla en un recipiente y cocine en
P-HI por 1 minuto hasta que se derrita.
2. Agregue la harina y bata en la leche. Cocine en P-HI
durante 4-5 minutos Cook en P-HI revolviendo cada 2
minutos hasta que se espese. Sazone con sal y
pimienta al gusto.
1 oz. mantequilla
1 oz. harina
1/2 pinta. leche
Sal y pimiento al gusto
MERMELADA DE FRESA
11/2 lb. fresas
3 tbsp. jugo de limón
11/2 lb. azúcar granulada
1. Coloque las fresas en el jugo de limón en un
recipiente grande, caliente en P-HI durante 4 minutos,
hasta que la fruta se suavice. Agregue la azúcar,
mezclar bien.
2. Cocine en P-70 durante 20-25 minutos, hasta que es
punto de ajuste* se haya alcanzado, revolver cada 45 minutos.
3. Vierta la mezcla en recipientes calientes y limpios.
Cubra, selle y ponga etiqueta.
* Punto de ajuste: Para determinar el punto de ajuste,
coloque 1 tbsp. de mermelada en un plato frío. Dejar
reposar por 1 minuto. Mueva la superficie con la
mermelada con el dedo, si la superficie se arruga, a
alcanzado el punto de ajuste.
PASTEL DE MICROONDAS NORMAL
1. Alinear la base de 8" plato de pastel con grasa a
prueba de papel.
2. Batir la margarina y la azúcar hasta que este
esponjosa. Batir los huevos y doblar en la harina
tamizada alternando con la leche.
3. Vierta en un recipiente preparado. Cocine en P-HI
durante 4-5 minutos, hasta que la brocheta salga
limpia.
4 oz. margarina
4 oz. azúcar
1 huevo
4 oz. harina con levadura tamizada
2-3 tbsp. leche
26
TORTILLAS
1. Batir los huevos y la leche.
2. Coloque la mantequilla en 10" plato para flan.
Cocine la mantequilla por 1 minuto, hasta que se
derrita. Cubra el plato con la mantequilla deretida.
3. Vierta la mezcla en un molde para flan de tortilla.
Cocine durante 5 minutos. batir la mezcla y cocinar
de nuevo durante 1 minuto.
1/2 oz. margarina
4 huevos
6 tbsp. leche
Sal y pimienta
HUEVOS REVUELTOS
1. Derrita la mantequilla en un recipiente en P-HI
durante 1 minuto.
2. Agregue los huevos, leche, sazone y mezcle bien.
3. Cocine en P-HI durante 4 minutos, revolviendo cada
30 segundos.
1/2 oz. mantequilla
2 huevos
2 tbsp. leche
Sal y pimienta
CARNE SALADA
1. Colocar la cebolla, ajo y aceite en un recipiente y
cocinar en P-HI durante 2 minutos o hasta que estén
blandas.
2. Colocar los otros ingredientes en un cacerola.
Revuelva bien.
3. Cubrir y cocinar en P-HI durante 6 minutos y luego P50 durante 10-14 minutos hasta que la carne este
cocida.
1 cebolla pequeña, cortada en cubitos
1 diente de ajo machacado
1 tsp. aceite
7 oz. tomates cortados
1 tbsp. puré de tomate
1 tsp. mezcla de sazones
8 oz.carne picada
Sal y pimienta
27
UN AÑO DE GARANTIA LIMITADA
Este producto tiene una garantía que será gratis con relación a defectos en material o
mano de obra por un periodo de un año de la fecha de compra. Esta garantía es valida
para el comprador original, a partir de la fecha de compra inicial y no es transferible.
Guarde su recibo de compra original.
Keep your original sales receipt.
IMPORTANTE: Esta garantía no cubre daños causados por accidentes, mal uso o abuso,
falta de cuidado razonable, colocación de archivos adjuntos que no vienen con el
producto, perdida de piezas o someter el equipo a cualquier voltaje especificado. (Lea las
instrucciones cuidadosamente)
Si se requiere servicio durante el periodo de garantía, empaque bien la unidad.
Recomendamos usar el cartón o caja y los materiales originales. Devolver el producto al
WalMart más cercano con su recibo de compra. Un reemplazo o reembolso puede ser
ofrecido a la discreción de WalMart. Si necesita asistencia adicional póngase en contacto
con el departamento de servicio al cliente al 1-866-321-9509.
WalMart expresamente renuncia a toda la responsabilidad de perdida causados por
daños indirectos o incidentales por el uso del equipo. Algunos estados no permiten esta
exclusión o limitación de perdidas incidentales o consecuentes, de modo que la exención
de responsabilidad puede que no le aplique. Esta garantía le otorga derechos legales
específicos, y usted también puede tener otros derechos que pueden variar de estado a
estado.
GUARDE ESTO PARA SUS ARCHIVOS
RIVALTM logo es una marca de los Sunbeam Products, Inc. usada bajo la licencia por
Wal-Mart Stores, Inc. Bentonville, AR 72716.
Hecho en China
28