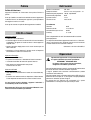
1
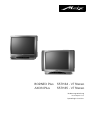
TV. VIDEO. AUDIO. MECABLITZ
BORNEO Plus
AXON Plus
55TH34 - VT Stereo
55TH35 - VT Stereo
Bedienungsanleitung
Norme per l’uso
Operating instructions
Vorwort
Inhaltsverzeichnis
Sehr geehrte Kundin,
Sehr geehrter Kunde,
Fernbedienung . . . . . . . . . . . . . . . . . . . . . . . . . . . . . . . . . . . . . .3
wir freuen uns, daß Sie sich für dieses Gerät entschieden haben.
Aufstellen und Anschließen . . . . . . . . . . . . . . . . . . . . . . . . . . . . .5
Damit Sie die Technik und Bedienoberfläche kennenlernen, sollten
Sie sich ein wenig Zeit nehmen und die Bedienungsanleitung lesen.
Ein- und Ausschalten . . . . . . . . . . . . . . . . . . . . . . . . . . . . . . . . .6
Menüsteuerung . . . . . . . . . . . . . . . . . . . . . . . . . . . . . . . . . . . . .4
Sender einstellen . . . . . . . . . . . . . . . . . . . . . . . . . . . . . . . . . . . .6
A.P.S. -Funktion . . . . . . . . . . . . . . . . . . . . . . . . . . . . . . . . . . . . .6
Dieses TV-Gerät ist für den bestimmungsgemäßen Gebrauch
konzipiert. Es darf nur in trockener Umgebung betrieben werden.
Suchlauf . . . . . . . . . . . . . . . . . . . . . . . . . . . . . . . . . . . . . . . . . . .6
Direkte Kanaleingabe . . . . . . . . . . . . . . . . . . . . . . . . . . . . . . . . .7
Feineinstellung . . . . . . . . . . . . . . . . . . . . . . . . . . . . . . . . . . . . . .7
Sender Logo (Name) . . . . . . . . . . . . . . . . . . . . . . . . . . . . . . . . . .7
Toneinstellungen . . . . . . . . . . . . . . . . . . . . . . . . . . . . . . . . . . . .7
Kopfhörer-Toneinstellungen . . . . . . . . . . . . . . . . . . . . . . . . . . . .7
Bildeinstellungen . . . . . . . . . . . . . . . . . . . . . . . . . . . . . . . . . . . .8
Menü „FUNKTIONEN“ . . . . . . . . . . . . . . . . . . . . . . . . . . . . . . . . .8
Sleep-Timer . . . . . . . . . . . . . . . . . . . . . . . . . . . . . . . . . . . . . . . .8
Kindersicherung . . . . . . . . . . . . . . . . . . . . . . . . . . . . . . . . . . . . .8
Menü „TV EINSTELLUNGEN“ . . . . . . . . . . . . . . . . . . . . . . . . . . .8
Sprache des Menü’s . . . . . . . . . . . . . . . . . . . . . . . . . . . . . . . . . .8
Ländereinstellung . . . . . . . . . . . . . . . . . . . . . . . . . . . . . . . . . . . .8
Videotext . . . . . . . . . . . . . . . . . . . . . . . . . . . . . . . . . . . . . . . . . .9
Zeitanzeige bei TV-Betrieb . . . . . . . . . . . . . . . . . . . . . . . . . . . . .9
Zusatzgeräte anschließen . . . . . . . . . . . . . . . . . . . . . . . . . .10, 11
Reinigen . . . . . . . . . . . . . . . . . . . . . . . . . . . . . . . . . . . . . . . . . .12
Fehler und Abhilfe . . . . . . . . . . . . . . . . . . . . . . . . . . . . . . . . . .12
Technische Daten . . . . . . . . . . . . . . . . . . . . . . . . . . . . . . . . . . .12
Reparaturen . . . . . . . . . . . . . . . . . . . . . . . . . . . . . . . . . . . . . . .12
Ķ Bedienungsanleitung . . . . . . . . . . . . . . . . . . . . . . . .02 . . . 12
ƴ Norme per l’uso . . . . . . . . . . . . . . . . . . . . . . . . . . . .13 . . . 23
ķ Operating instructions . . . . . . . . . . . . . . . . . . . . . . .25 . . . 35
2
Fernbedienung RE 18
Die Fernbedienung übermittelt die Steuerbefehle per Infrarotlicht zum TV-Gerät. Deshalb, für den bestimmungsgemäßen Gebrauch, die Fernbedienung immer zum TV-Gerät richten. Andere infrarotgesteuerte Geräte oder Systeme (z.B. Infrarot-Kopfhörer) können u.U. gestört werden.
Direkte Sonneneinstrahlung auf das TV-Gerät kann u.U. zu Störungen führen, weil das TV-Gerät die Infrarotsignale der Fernbedienung nicht
erkennt. Um das TV-Gerät mit der Fernbedienung steuern zu können, darf es nicht mit der Netztaste ausgeschaltet sein.
Infrarot-Licht!
Fernbedienung nicht direkt vor
die Augen halten und eine
Taste drücken !
• Infrarotfenster
• AUS (Stand-by Stellung)
• Tonstopp
PP
I -I I
• persönlich eingestellte Grundwerte aufrufen
• Tonwahl Mono - Stereo
1
4
7
0
• Menü aufrufen, im Menü einen Schritt
zurück oder Menü ausblenden
2
5
8
--
M MENU
3
6
9
P P
• Vorwahl für zweistellige Zifferneingabe
INFO i
P
• Untermenü aufrufen oder
Wertverstellung der im Menü angewählten Ton-/Bildfunktion
P
• Auswahl der angeschlossenen Zusatzgeräte an den Scartbuchsen AV1, AV2
oder den Cinchbuchsen AV3
• Menü „TON“ ein-/ausblenden
Seite rückwärts blättern
• Zurück zum letzten Programm
• vom TV-Bild zur Sendertabelle oder
Bedienhilfe zum angezeigten Menü
• Programmfortschaltung oder vom
Stand-by zum zuletzt gesehenen Programm
• Cursor auf/ab im angezeigten Menü
• Menü „BILD“ ein-/ausblenden
Seite vorwärts blättern
• Zifferntasten
• Lautstärke + / -
–VOL
VOL+
• Menü „FUNKTIONEN“ ein-/ausblenden
Nächstes Kapitel
SOUND PICTURE FEATURE INSTALL
TV
• Menü „INSTALL“ ein-/ausblenden
Nächstes Thema
AV
Videotext aufrufen
• Videotext oder Menü ausblenden
Videotextseite ein-/ausblenden
?
Videotext Mixbetrieb
• Zeiteinblendung
Vorwahltaste für Mehrfachseiten
automatischen Seitenwechsel stoppen
im Videotextbetrieb: Seite 100 aufrufen
Doppelte Schriftgröße im Videotext
Antwortfreigabe im Videotext
i
RC 18
3
blau
4
Borneo 55 TH 34
Axon 55 TH 35
SLEEP TIMER
KINDERSICHER
FUNKTION
ABSTIMMUNG. .
PROGRAMM . . .
TV EINST . . .
INSTALL.
gelb
LAUTSTÄRKE
BÄSSE
HÖHEN
BALANCE
EFFEKTE
KOPFHÖRER. . .
SPEICHERN
TON
Menüsteuerung
TON . . .
BILD . . .
FUNKTION. . .
INSTALL. . . .
MENU
M
rot
P1 ARD C48 BG
PROGRAMM
NAME
BAND
KANAL
NORM
FEIN
SUCHLAUF
SPEICHERN
ABSTIMM.
SPRACHE
LAND
KOPIE
TV EINST.
LAUTSTÄRKE
MODUS
SPEICHERN
KOPFHÖRER
i
grün
00
01
02
03
04
05
06
07
08
09
10
11
12
13
14
15
16
17
18
19
AUSWÄHLEN
EINFÜGEN
---ARD
ZDF
BR 3
RTL
RTL2
SAT1
PRO7
NDR
MDR
PROGRAM.
HELLIGKEIT
FARBSTÄRKE
KONTRAST
BILDSCHÄRFE
BILD MODUS
SPEICHERN
BILD
C-25
C-53
-------------------------
------------------------------LÖSCHEN
AUTOSPEICH.
20
21
22
23
24
25
26
27
28
29
Aufstellen und Anschließen
Aufstellen
Achten Sie darauf, daß kein helles Licht oder Sonnenschein direkt
auf den Bildschirm fällt. Es können Spiegelungen entstehen, die die
Brillanz des Bildes beeinträchtigen.
5x cm
Der günstigste Betrachtungsabstand ist die 5-fache Bildschirmdiagonale, bei Geräten mit 55 cm Bildschirm also ca. 2,75 m.
cm
y
Fernsehgeräte benötigen eine ausreichende Kühlung.
Die Öffnungen in der Rückwand dürfen nicht durch Gardinen, Deckchen, Zeitungen o. ä. verdeckt werden. Die
Lüftungsschlitze an der Geräteunterseite müssen frei
zugänglich bleiben, denn darüber saugt das Gerät die
Kühlluft an.
Stellen Sie Ihr Gerät nicht direkt neben einer Heizung
auf; die Kühlung könnte beeinträchtigt werden.
Ihr Gerät ist für den Betrieb in trockenen Räumen
bestimmt. Sollten Sie ausnahmsweise das Gerät im
Freien betreiben, so sorgen Sie bitte dafür, daß es vor
Feuchtigkeit (Regen, Wasserspritzer, Betauung)
geschützt ist.
Auf oder über das TV-Gerät gehören keine
- brennenden Kerzen
- Gefäße mit Flüssigkeit.
Heißes Wachs und Flüssigkeiten, die ins Geräteinnere
gelangen, zerstören die elektrischen Bauteile Ihres
TV–Gerätes. Die elektrische Sicherheit des Gerätes ist in
solchen Fällen nicht mehr gewährleistet. Sorgen Sie für
einen ausreichenden Kühlluftstrom, wenn Sie Ihr Gerät
in einem Einbauschrank stellen.
Antennenanschluß
Antennenanschlußkabel und sonstige Bauteile zwischen der fest
eingebauten Antennen- / Breitbandsteckdose und dem Rundfunkempfänger (z. B. TV-Gerät, Videorecorder) müssen von der Post
zugelassen sein, gemäß Postvorschrift 1 R 8 15.
Bei Verwendung nicht zugelassener Kabel und Bauteile erlischt die
Betriebserlaubnis des Rundfunkempfängers.
y
Gewitter sind eine Gefahr für elektrische Geräte. Bei einem Blitzschlag in die Netzleitung oder die Antenne kann das Gerät beschädigt werden, auch dann, wenn es ausgeschaltet ist.
Ziehen Sie bei Gewitter Netzstecker und Antennenstecker aus der
Steckdose bzw. aus dem Fernsehgerät. Bei längeren Benutzungspausen, wie Urlaub, sollten grundsätzlich beide Stecker gezogen
sein.
Netzanschluß
Verbinden Sie den Netzstecker mit einer Steckdose. Das Gerät ist für
230 V Wechselspannung ausgelegt.
5
Ein- und Ausschalten
Sender einstellen
Einschalten
Wenn die Suche beendet ist, erscheint die Sendertabelle auf dem
Bildschirm. Sie kann wie folgt ausgefüllt sein:
Ein kaltes Gerät darf in einem warmen Raum erst in
Betrieb genommen werden, wenn ein vorhandener
Feuchtigkeitsbeschlag auf der Bildschirmfläche verdunstet ist.
PROGRAM.
00
01
02
03
04
05
06
07
08
09
Drücken Sie die Netztaste am TV-Gerät.
Das TV-Gerät schaltet in den Stand-by Zustand und zeigt dies durch
eine rote Leuchte an.
Einstellige Programmplätze können mit den Zifferntasten . . . oder mit den Tasten P oder P der Fernbedienung oder mit
den - P + Tasten am TV-Gerät angewählt werden.
Zweistellige Programmplätze können im Betriebszustand mit der
Vorwahltaste für zweistellige Zifferneingabe -- und den Zifferntasten
angewählt werden.
---ARD
ZDF
BR 3
RTL
RTL2
SAT1
PRO7
NDR
MDR
10
11
12
13
14
15
16
17
18
19
AUSWÄHLEN
EINFÜGEN
C-16
C-52
S-01
S-06
S-16
----------------
20
21
22
23
24
25
26
27
28
29
-------------------------------
LÖSCHEN
AUTOSPEICH.
Es kann vorkommen, daß einige Sender-Logos beim Automatischen
Sendersuchlauf nicht erkannt werden. In diesem Fall haben Sie die
Möglichkeit, ein Sender-Logo einzugeben, wie unter Sender-Logo
(Name) auf Seite 7 beschrieben ist.
Ausschalten
Das TV-Gerät wird mit der AUS-Taste der Fernbedienung in den
Stand–by Zustand oder mit der Netztaste am Gerät selbst ausgeschaltet.
In der angezeigten Sendertabelle können die einzelnen Programmplätze mit den Cursor-Tasten angewählt werden.
P
P
Sender einstellen
Den gewählte Programmplatz können Sie dann:
Es gibt drei verschiedene Arten der Sendereinstellung:
AUSWÄHLEN = mit der roten Taste auf diesen Programmplatz
schalten.
1. A.P.S.- Funktion
Automatische Programmierung der Sender.
Diese Funktion wird das erste Mal nach dem Aufstellen und Einschalten automatisch durchgeführt.
2. Suchlauf.
EINFÜGEN =
den mit der roten Taste ausgewählten Programmplatz an einer anderen Stelle einfügen.
LÖSCHEN =
den Programmplatz löschen.
AUTOSPEICH. = Aufrufen der A.P.S.-Funktion.
3. Direkte Kanaleingabe
• Menü mit der Taste
TV
beenden.
1. A.P.S.- Funktion.
Wenn das TV-Gerät zum ersten Mal eingeschaltet wird, erscheint im
terrestrischen Betrieb folgende Meldung auf dem Bildschirm:
2. Suchlauf
Den Suchlauf empfehlen wir zum Auffinden eines einzelnen Senders
im terrestrischen Betrieb.
A.P.S.
• BLAUE Taste drücken und Menü „INSTALL.“ aufrufen.
• „ABSTIMMUNG“ mit den Tasten P/P anwählen.
• Taste drücken um Menü „ABSTIMM.“ zu öffnen.
• „SUCHLAUF“ mit der Taste P anwählen.
• Mit den Tasten / den Suchlauf starten. Wenn ein Sender
angezeigt wird bleibt der Suchlauf stehen. Der Sender wird auf
Kanalmitte abgestimmt. Sollte das Bild dennoch verrauscht sein,
so kann bei Bedarf noch eine Feineinstellung vorgenommen werden.
• Mit der Taste P „SPEICHERN“ anwählen und mit der Taste bestätigen.
• Menü mit der Taste T V beenden.
ANTENNEKABEL ÜBERPRÜFEN
AUTO. PROGRAMMIER SYSTEM
START
TV
TV-BETRIEB
Mit der Taste ń kann die Funktion abgebrochen werden.
Mit der Taste wird die A.P.S.-Funktion gestartet.
Das TV-Gerät beginnt nun mit der Sendersuche über den gesamten
terrestrischen Empfangsbereich (wird über die normale Hausantenne oder Kabel empfangen).
6
Sender einstellen
Toneinstellungen
3. Direkte Kanaleingabe
TON
Bei der direkten Kanaleingabe muß das Band (C=Standardkanal /
S=Sonderkanal) und die Kanalnummer bekannt sein.
LAUTSTÄRKE
BÄSSE
HÖHEN
BALANCE
EFFEKTE
KOPFHÖRER. . .
SPEICHERN
• BLAUE Taste drücken und Menü „INSTALL.“ aufrufen.
• „ABSTIMMUNG“ mit den Tasten P/P anwählen.
• Taste drücken um Menü „ABSTIMM.“ zu öffnen.
• „BAND“ mit der Taste P anwählen.
• Mit den Tasten / die Kanalart C oder S auswählen.
• Mit der Taste P „KANAL“ anwählen.
• Mit den Zifferntasten die Kanalnummer eingeben. Bei zweistelligen Kanalnummern vor der Zifferneingabe die
Taste -- drücken. Der gewählte Sender wird angezeigt und auf
Kanalmitte abgestimmt. Sollte das Bild dennoch verrauscht sein,
so kann bei Bedarf noch eine Feineinstellung vorgenommen werden.
• Mit der Taste P „SPEICHERN“ anwählen und mit der Taste bestätigen.
• Menü mit der Taste T V beenden.
Im Menü „TON“ können alle Tonfunktionen eingestellt und gespeichert werden. Diese eingestellten Standardwerte können mit der
Taste PP jederzeit wieder aufgerufen werden.
• ROTE Taste drücken und Menü „TON“ aufrufen.
• Mit den Tasten P/P die gewünschte Funktion auswählen.
• Mit den Tasten / den eingestellten Wert verändern.
EFFEKTE= Bei Monosendungen wird im „EIN“ Zustand ein stereoähnlicher Effekt erzeugt.
Bei Stereosendungen erscheint der Ton voller.
Feineinstellung
Wird der Sender nicht klar empfangen, können Bild- und Tonqualität
durch eine Feinabstimmung verbessert werden.
• Mit der Taste P „SPEICHERN“ anwählen und mit der Taste bestätigen. Die veränderten Werte werden gespeichert.
• BLAUE Taste drücken und Menü „INSTALL.“ aufrufen.
• Menü mit der Taste
TV
beenden.
• „ABSTIMMUNG“ mit den Tasten P/P anwählen.
• Taste drücken um Menü „ABSTIMM.“ zu öffnen.
• Mit der Taste P „FEIN“ anwählen und mit den Tasten / eine Verstellung vornehmen bis Bild und Ton klar empfangen werden.
Kopfhörer-Toneinstellungen
• Mit der Taste P „SPEICHERN“ anwählen und mit der Taste bestätigen.
• Menü mit der Taste
TV
KOPFHÖR.
LAUTSTÄRKE
MODUS
SPEICHERN
beenden.
Sender Logo (Name)
Sender-Logos werden nur bei der A.P.S.-Funktion automatisch in die
Sendertabelle eingetragen, wenn der Sender „sauber“ empfangen
wird. Wenn kein Sender-Logo erscheint, kann es manuell eingegeben werden, dazu:
Im Menü „KOPFHÖRER“ können alle Kopfhörer-Tonfunktionen eingestellt und gespeichert werden. Diese eingestellten Standardwerte können mit der Taste PP jederzeit wieder aufgerufen werden.
• BLAUE Taste drücken und Menü „INSTALL.“ aufrufen.
• ROTE Taste drücken und Menü „TON“ aufrufen.
• Taste drücken und Menü „ABSTIMM.“ öffnen.
• Mit den Tasten P/P die Funktion „KOPFHÖRER“ auswählen.
• „NAME“ mit den Tasten P/P anwählen.
• Mit den Tasten / das Menü öffnen.
• Taste drücken und erste Stelle anwählen.
• Mit den Tasten P/P die Funktion anwählen, die verändert
werden soll.
• Mit den Tasten P/P das Zeichen auswählen.
• Taste drücken, nächste Stelle anwählen und mit den Tasten
P/P ein Zeichen auswählen, usw.
• Mit den Tasten / den Wert verändern.
• Mit der Taste P „SPEICHERN“ anwählen und mit der Taste bestätigen. Die veränderten Werte werden gespeichert.
• wenn das Logo vollständig ist (max. 4 Stellen) die Taste drücken
und das Logo-Feld verlassen.
• Menü mit der Taste
• „SPEICHERN“ mit den Tasten P anwählen und mit Taste bestätigen.
7
TV
beenden.
Bildeinstellungen
Das Menü TV EINST.
BILD
TV Einst.
SPRACHE
LAND
KOPIE
HELLIGKEIT
FARBSTÄRKE
KONTRAST
BILDSCHÄRFE
BILD MODUS
SPEICHERN
Im Menü „TV EINST.“ können folgende Einstellungen getroffen
werden:
SPRACHE= Menüsprache für das gesamte Menü.
Im Menü „BILD“ können alle Bildfunktionen eingestellt und gespeichert werden. Diese eingestellten Standardwerte können mit der
Taste PP jederzeit wieder aufgerufen werden.
LAND= Voreinstellung für den automatischen Sendersuchlauf.
• GRÜNE Taste drücken und Menü „BILD“ aufrufen.
KOPIE= Auswahl des Signals welches an der AV-2 Buchse ausgegeben wird
• Mit den Tasten P/P die gewünschte Funktion auswählen.
• BLAUE Taste drücken und Menü „INSTALL.“ aufrufen.
• Mit den Tasten / den eingestellten Wert verändern.
• Mit den Tasten P/P die Funktion „TV EINST.“ auswählen.
BILD MODUS= Das Bildformat kann eingestellt werden in AUTO 4:3 - 16:9. Ist hier „AUTO“ (empfehlenswert) eingestellt so wird automatisch auf das vom Sender
ausgestrahlte Bildformat umgestellt. Die Formate
4:3 und 16:9 können für alle Sender fest eingestellt werden.
• Taste drücken um Menü „TV EINST.“ zu öffnen.
• Die Zeile „SPRACHE“ ist angewählt.
• Mit den Tasten / kann nun eine Landessprache ausgewählt
werden.
• Im Menüpunkt „LAND“ sollten Sie das Land einstellen in dem Sie
wohnen. Entsprechend dem eingestellten Land werden nach dem
Automatischen Sendersuchlauf die gefundenen Sender sortiert,
sodass z.B. in Deutschland die Reihenfolge ARD, ZDF, BR 3 usw.
entsteht.
• Mit der Taste P „SPEICHERN“ anwählen und mit der Taste bestätigen. Die veränderten Werte werden gespeichert.
• Menü mit der Taste
TV
beenden.
• Im Menüpunkt „KOPIE“ (nur Axon) kann bestimmt werden, was
an der AV-2 Buchse mit einem Videorecorder aufgenommen werden soll.
Folgende Einstellungen sind möglich:
Das Menü FUNKTION
FUNKTION
SLEEP TIMER
KINDERSICHER
Im Menü „FUNKTION“ kann ein Sleep Timer (Schlaf Zeitfunktion)
und eine Kindersicherung eingestellt werden.
TV
Sender
AV-1
AV-3**
den auf dem Bildschirm sichtbaren terrestrischen
was über die AV-1 Buchse in das TV-Gerät eingeht
was über die Cinch-Buchsen an der Frontseite des
TV–Gerätes eingeht (nur bei Axon).
Die getroffene Einstellung bleibt bis zur nächsten Veränderung
automatisch gespeichert.
• Mit den Tasten P/P die gewünschte Funktion auswählen.
SLEEP TIMER= einstellbare Zeit in Minuten bis zum Ausschalten
des Gerätes. Es können Zeiten von 15 Min. - 120
Min. in 15 Minuten Schritten eingestellt werden.
Das TV–Gerät schaltet nach Ablauf der eingegebenen Zeit in den Stand-by Betrieb.
KINDERSICHERUNG= Bei eingeschalteter Kindersicherung ist das
TV–Gerät nur mit der Fernbedienung einstellbar. Die Tasten am TV-Gerät (außer Netztaste) sind ohne Funktion.
• Mit den Tasten / die Einstellung verändern.
Die getroffene Einstellung bleibt bis zur nächsten Veränderung
automatisch gespeichert.
TV
der Videorec. kann aufnehmen . . .
**nur bei TV-Geräten mit Cinch-Buchsen an der Frontseite
• GELBE Taste drücken und Menü „FUNKTION“ aufrufen.
• Menü mit der Taste
Einstellung
beenden.
8
Videotext
Stoppen des automatischen Seitenwechsels
Videotext ist ein Service, der den Empfang von Informationen über
ein in der Übersicht (Index) aufgeführtes Thema ermöglicht.
Es gibt Videotextseiten mit mehreren Unterseiten, die in kurzen
Zeitabständen weitergeschaltet werden.
Anzeigen am Bildschirm, Veränderungen an Helligkeit, Kontrast und
Farbe sind bei Videotext nicht möglich. Lediglich die Lautstärke
kann verändert werden.
• Falls Sie den automatischen Seitenwechsel stoppen möchten,
drücken Sie die Stopptaste
.
• Soll die nächste Textseite angezeigt werden, drücken Sie die
Stopptaste
erneut.
Videotext aufrufen
• Wählen Sie einen Sender, der Videotextinformationen übermittelt.
Doppelte Schriftgröße
• Videotexttaste
drücken. Am Bildschirm erscheint die Seite 100 (Index) oder die zuletzt angesehene Seite vor dem ausschalten.
Mit dem ersten Druck auf die Taste
wird der obere Teil der dargestellten Seite in doppelter Schriftgröße angezeigt. Mit dem zweiten Druck auf die Taste
wird der untere Teil angezeigt und mit
dem dritten Druck auf die Taste
wird die Seite wieder in Normalgröße angezeigt.
Grundfunktionen des Videotext
• ROTE Taste:
Seitenweise rückwärts blättern.
• GRÜNE Taste: Seitenweise vorwärts blättern.
Antwortfreigabe oder Rätselauflösung
• GELBE Taste: zum nächste Kapitel.
Verborgene Antworten zu Quiz- oder Rätselfragen werden angezeigt, wenn Sie die Auflösungstaste ? drücken.
• BLAUE Taste: zum nächsten Thema.
• Zifferntasten: Seitennummern numerisch eingeben.
Durch erneuten Druck auf diese Taste werden die Antworten wieder
verborgen.
Videotextseite gezielt anwählen
Zeitanzeige bei TV-Betrieb
Wenn die Videotextseite bekannt ist , kann die Seitenzahl mit den
Zifferntasten eingegeben werden.
Wird im TV-Betrieb die Zeittaste
gedrückt, dann wird bei Sendern, die Videotext ausstrahlen, rechts oben am Bildschirm die
aktuelle Zeit eingeblendet. Bei erneuten Druck auf die Taste wird
die Zeit wieder ausgeblendet.
Die gewählte Seitennummer erscheint links oben am Bildschirm.
Der Suchvorgang wird gestartet. Ist die betreffende Seite gefunden,
wird sie am Bildschirm dargestellt.
Bei Sendern ohne Videotextinformationen, wird anstelle der Zeit
eine blaue Box angezeigt.
Wollen Sie während des Suchvorganges das laufende Programm
dieses Senders sehen, dann drücken Sie die Taste
. Der Videotext wird ausgeblendet aber nicht geschlossen. Am Bildschirm links
oben blinkt das Zeichen
als Hinweis das der Suchvorgang läuft.
Wenn die Seite gefunden ist wird das Zeichen
tenzahl ersetzt.
Wenn Sie während der Zeitanzeige ein Menü aufrufen, verschwindet die Zeit; sie erscheint aber wieder, sobald Sie dieses Menü verlassen.
durch die Sei-
Zum Einblenden der Videotextseite wieder die Taste
Videotext verlassen
drücken.
Drücken Sie die Taste
geblendet.
Wahl einer Videotext-Mehrfachseite
Bei verschiedenen Videotextseiten gibt es Mehrfachseiten. Diese
Mehrfachseitenkennung steht meistens unterhalb der Uhrzeit in
Form von z. B. „1/9“.
Zum Aufrufen einer Mehrfachseite die Taste
drücken und
anschließen die gewünschte Seitezahl vierstellig z.B.„0004“ eingeben.
Wollen Sie während des Suchvorganges das laufende Programm
dieses Senders sehen, dann drücken Sie die Taste
. Der Videotext wird ausgeblendet aber nicht geschlossen. Am Bildschirm links
oben blinkt das Zeichen
als Hinweis das der Suchvorgang läuft.
Wenn die Seite gefunden ist wird das Zeichen
tenzahl ersetzt.
durch die Sei-
Zum Einblenden der Videotextseite wieder die Taste
drücken.
9
TV
. Das Fernsehprogramm wird wieder ein-
10
MAC: Axon Plus 55TH35.eps
VHS - Videorecorder
Decoder (z. B. Premiere)
S-VHS / Hi8 - Videorecorder
Decoder (z. B. Premiere)
Borneo
R
L
R
in
AUDIO
out
L
in
VIDEO
out
AV IN an der Vorderseite des Gerätes
Axon
Anschlüsse an der Rückseite des TV-Gerätes
Zusatzgeräte anschließen
Zusatzgeräte anschließen
Videokamera anschließen
Zusatz- bzw. AV-Geräte können mit einem Scartkabel an der Scart I
oder Scart II Buchse bzw.mit einem Cinch-Kabel an den
Cinch–Buchsen (bei Axon an der Vorderseite) angeschlossen werden.
Eine Videokamera wird in der Regel immer nur kurzzeitig an das
TV-Gerät angeschlossen, um z.B. Aufnahmen zu betrachten oder
auf einen Videorecorder zu überspielen. Für diesen Zweck besitzt
das TV–Gerät an der Frontseite Cinch-Eingangsbuchsen (nur bei
Axon).
Ein Videorecorder kann mit einem Scartkabel oder einem Antennenkabel an das TV-Gerät angeschlossen werden. Wir empfehlen
den Anschluß über ein Scartkabel. Diese Verbindung garantiert
bestmögliche Bild- und Tonübertragung. Der Videorecorder sollte
vorzugsweise an der Scart II Buchse angeschlossen werden.
• Videocamera mit einem Cinchkabel an den Frontbuchsen des
TV–Gerätes anschließen.
• Zum Ansehen der Aufnahme beliebigen Programmplatz wählen
und Taste AV so oft drücken, bis im Bildschirm AV-3 erscheint.
Eine Videokamera oder Digitalkamera kann mit einem CinchKabel oder mit einem Scartkabel angeschlossen werden.
• Wiedergabetaste der Videokamera drücken.
Ein Decoder sollte vorzugsweise an der Scart II Buchse (Axon) bzw.
Scart I Buchse (Borneo) angeschlossen werden.
Pay-TV-Decoder (z.B. Premiere)
Mit diesem Zusatzgerät können codiert gesendete Programme entschlüsselt und auf dem Bildschirm sichtbar gemacht werden.
Videorecorder anschließen
Wenn nur Terrestrische- oder Kabelsender empfangen werden:
• Pay-TV-Decoder mit einem Scartkabel an die Scart II Buchse
(Axon) bzw. Scart I Buchse (Borneo) des TV–Gerätes anschließen.
• Videorecorder mit einem Scartkabel an die Scart I Buchse des
TV–Gerätes anschließen.
• Zum Ansehen einer verschlüsselten Sendung den eingestellten
Decoder–Programmplatz wählen.
• Videorecorder mit einem Antennenkabel an die Hausantenne und
an das TV-Gerät anschließen.
Kopfhörer
Videofilm bzw. Aufnahme ansehen:
Kopfhörer an die Kopfhörerbuchse an der Frontseite (Axon) oder der
rechten Seite vorne (Borneo) des TV-Gerätes anschließen.
• Zum Ansehen des Videofilms einen beliebigen Programmplatz
wählen.
• Wiedergabetaste des Videorecorders drücken.
• Wenn der Videorecorder über ein vollbeschaltetes Scart-Kabel an
das TV-Gerät angeschlossen ist, wird automatisch auf „AV-1“
geschaltet. Wenn kein vollbeschaltetes Scart-Kabel vorhanden ist,
dann,
• Taste
AV
so oft drücken, bis im Bildschirm AV-1 erscheint.
11
Reinigen
Technische Daten
Reinigung des Gerätes
Sendenorm:
PAL B/G
Vor dem Reinigen ist das Gerät mit dem Netzschalter auszuschalten!
Empfangsbereich:
Kanal 21 - 69 , Sonderkanal 1 - 41
Programmplätze:
100 (0 . . 99)
Für das Gehäuse verwenden Sie bitte nur ein weiches, trockenes
oder ganz leicht angefeuchtetes Tuch. Vermeiden Sie die Anwendung von scharfen Reinigungsmitteln. Diese könnten den Lack und
die Bedruckung beschädigen.
Programmanzeige:
OSD
Antenneneingang:
75Ω
Netzspannung:
230 V, 50 Hz
Leistungsaufnahme
TV-Gerät:
Musikleistung:
Energieverbrauch/h:
60 W
2X15W (8Ω)
60 Wh
Stand-by:
5,5 W
Für den Bildschirm verwenden Sie ein leicht angefeuchtetes Fensterleder!
Fehler und Abhilfe
Schlechte Bildwiedergabe
• Ist der Sender richtig eingestellt?
Alle Einstellungen im Menü programmplatzbezogen speicherbar.
Die Versorgungsquellen sind kurzschlußfest und schalten bei einer
zu hohen Belastung ab. Nach Beendigung der Überlast werden sie
wieder eingeschaltet. Siehe auch Abgleichhinweise.
• Befindet sich das TV-Gerät oder Antenne in unmittelbarer Nähe
von Lautsprechern, ungeerdeten Audiogeräten oder Neonlichtern?
• Berge und hohe Gebäude können Doppel- oder Geisterbilder verursachen.
• Überprüfen Sie, ob der korrekte Kanal eingegeben worden ist und
stellen Sie ggf. den Kanal mittels Feinabstimmung ein.
Reparaturen
Kein Bild
• Ist die Antenne korrekt angeschlossen?
Öffnen des Gerätes und Reparaturen dürfen nur vom
Fachmann vorgenommen werden.
• Ist das Antennenkabel einwandfrei und mit geeigneten Steckern
versehen?
ACHTUNG ! LEBENSGEFAHR.
Wenden Sie sich bitte bei erforderlicher Reparatur an
Ihren Fachhändler.
• Sind die Stecker ganz in die Antennenbuchse eingeschoben?
• Haben Sie die richtige Taste an der Fernbedienung gedrückt?
Versuchen Sie es noch einmal.
Unsachgemäße Eingriffe können ein Erlöschen der Betriebs-erlaubnis
sowie den Verfall des Garantieanspruchs zur Folge haben.
Kein Ton
Die entstehende Röntgenstrahlung ist ausreichend abgeschirmt (siehe Hinweis auf der Rückwand).
Sie hören keinen Ton.
• Haben Sie eventuell den Ton mit der Tonstopptaste (MUTE) abgeschaltet?
Unsachgemäße Eingriffe, insbesondere Verändern der Hochspannung
oder Einbau eines anderen Bildröhrentyps, können dazu führen, daß
Röntgenstrahlung in erheblicher Stärke auftritt. So veränderte Geräte
entsprechen nicht mehr der Zulassung und dürfen nicht betrieben
werden.
• Der Ton ist nur über einen Lautsprecher zu hören. Ist die Balance
richtig eingestellt ? Vergewissern Sie sich im TON-Menü.
Falls Sie keine Lösung finden, schalten Sie Ihr Fernsehgerät für
einige Sekunden aus und danach wieder ein.
Versuchen Sie nie, selbst Reparaturen vorzunehmen. Setzen
Sie sich mit Ihrem Fachändler in Verbindung.
12
Norme per l’uso
Prefazione
Indice
Gentilissima cliente,
gentilissimo cliente,
ci rallegriamo con voi per la scelta di questo televisore.
In modo possiate far ben conoscenza della tecnica e dell’uso dei dialoghi visualizzati sullo schermo dovrete prendervi un pò di tempo e
leggere queste norme per l’uso.
Telecomando . . . . . . . . . . . . . . . . . . . . . . . . . . . . . . . . . . . . . . .14
Uso del menù . . . . . . . . . . . . . . . . . . . . . . . . . . . . . . . . . . . . . .15
Installazione ed allacciamento . . . . . . . . . . . . . . . . . . . . . . . . . .16
Accensione e spegnimento . . . . . . . . . . . . . . . . . . . . . . . . . . . .17
Regolazione delle stazioni emittenti . . . . . . . . . . . . . . . . . . . . . .17
Ricerca automatica delle stazioni emittenti . . . . . . . . . . . . . . . .17
Funzione A.P.S. . . . . . . . . . . . . . . . . . . . . . . . . . . . . . . . . . . . . .17
Immissione diretta canale . . . . . . . . . . . . . . . . . . . . . . . . . . . . .18
Sintonia fine . . . . . . . . . . . . . . . . . . . . . . . . . . . . . . . . . . . . . . .18
Logo dell’emittente (Nome) . . . . . . . . . . . . . . . . . . . . . . . . . . . .18
Impostazioni audio . . . . . . . . . . . . . . . . . . . . . . . . . . . . . . . . . . .18
Impostazioni audio cuffia . . . . . . . . . . . . . . . . . . . . . . . . . . . . . .18
Impostazioni Video . . . . . . . . . . . . . . . . . . . . . . . . . . . . . . . . . . .19
Menù „CARATTER.“ . . . . . . . . . . . . . . . . . . . . . . . . . . . . . . . . . .19
Spegnimento a tempo . . . . . . . . . . . . . . . . . . . . . . . . . . . . . . . .19
Chiave bambino . . . . . . . . . . . . . . . . . . . . . . . . . . . . . . . . . . . . .19
Menù „CONFIGURAZIONE TV“ . . . . . . . . . . . . . . . . . . . . . . . . . .19
Lingua dei menù . . . . . . . . . . . . . . . . . . . . . . . . . . . . . . . . . . . .19
Impostazioni paesi . . . . . . . . . . . . . . . . . . . . . . . . . . . . . . . . . . .19
Televideo . . . . . . . . . . . . . . . . . . . . . . . . . . . . . . . . . . . . . . . . . .20
Indicazione dell’ora con funzionamento TV . . . . . . . . . . . . . . . . .20
Allacciamento di apparecchi supplementari . . . . . . . . . . . . .21, 22
Questo televisore è concepito per un designato uso. Esso può esser
esercitato soltanto in ambienti secchi.
Pulizia . . . . . . . . . . . . . . . . . . . . . . . . . . . . . . . . . . . . . . . . . . . .23
Difetti e rimedi . . . . . . . . . . . . . . . . . . . . . . . . . . . . . . . . . . . . . .23
Dati tecnici . . . . . . . . . . . . . . . . . . . . . . . . . . . . . . . . . . . . . . . .23
Riparazioni . . . . . . . . . . . . . . . . . . . . . . . . . . . . . . . . . . . . . . . . .23
13
Telecomando RE 18
Il telecomando trasmette i comandi al televisore tramite raggi infrarossi. Perciò, per l’uso designato, dirigete il telecomando sempre verso il
televisore. È possibile che altri apparecchi o sistemi comandati a raggi infrarossi possano venir disturbati (p. es. cuffie a raggi infrarossi).
Irradiazione diretta della luce del sole sull’apparecchio potrebbe causare event. disturbi, dato che il televisore non riconoscerebbe i segnali
infrarossi del telecomando. Per poter comandare il televisore con il telecomando, il televisore non dovrà venir spento con l’interruttore di rete.
Raggi infrarossi !
Non volgete mai il telecomando
direttamente verso gli occhi e
premere un tasto !
• Finestra raggi infrarossi
• NO (commutazione nel modo Stand-by)
• Audio stop
PP
I -I I
• Richiamo dei valori base impostati personalmente
• Scelta audio Mono -Stereo
1
4
7
0
• Richiamo menù, nel menù stesso un
passo indietro o disinserzione menù
2
5
8
--
M MENU
3
6
9
P P
• Preselezione per l’immissione a due cifre
INFO i
P
• Richiamo sottomenù o correzione del
valore della funzione Audio / Immagine
selezionata nel menù
P
• Scelta degli apparecchi supplementari
allacciati alle prese Scart AV1, AV2 o
alle prese Cinch AV3
• Inserzione / disinserzione del menù „AUDIO“
Sfogliamento pagina indietro
• Indietro sull’ultimo programma
• Dall’immagine TV alla tabella emittenti od
all’aiuto per l’uso per il menù indicato
• Corsa programmi o dallo Stand-by al
programma visto per ultimo
• Cursore su / giù nel menù indicato
• Inserzione / disinserzione del menù „IMMAGINE“
Sfogliamento pagina in avanti
• Tasti cifra
• Volume + / -
–VOL
VOL+
• Inserzione / disinserzione del menù „CONF.TV“
Capitolo successivo
SOUND PICTURE FEATURE INSTALL
TV
• Inserzione / disinserzione del menù „INSTALL“
Tema successivo
AV
Richiamo Televideo
• Disinserzione del Televideo o del menù
(con funzionamento terrestre: indicazione
dello stato programma)
Inserzione / disinserzione pagina Televideo
?
i
Stop della commutazione automatica pagine
Funzionamento Mix nel Televideo
Con funzionamento Televideo:
Richiamo della pagina 100
• Inserzione dell’indicazione dell’ora
Tasto preselezione per pagine multiple
Altezza caratteri doppia nel Televideo
RC 18
Permesso alla risposta nel Televideo
14
blu
15
Borneo 55 TH 34
Axon 55 TH 35
P1 ARD C48 BG
PROGRAMMA
NOME
BANDA
CANALE
STANDARD
SINTONIA FINE
RICERCA
MEMORIZZA
SINTONIA
LINGUA
PAESE
USCITA AV-2
CONF. TV
VOLUME
BALANCE
MODO
MEMORIZZA
CUFFIA
SPEGNIM. A TEMPO
CHIAVE BAMBINO
CARATTER.
SINTONIA. . .
PROGRAMM. . .
CONF. TV. . .
INSTALL.
giallo
VOLUME
BASSI
ALTI
BILANCIAMENTO
EFFETTO
CUFFIA. . .
MEMORIZZA
SUONO
Pilotaggio tramite menu
SUONO . . .
IMMAGINE . . .
CARATTER. . .
INSTALL. . . .
MENU
M
rosso
verde
i
00
01
02
03
04
05
06
07
08
09
10
11
12
13
14
15
16
17
18
19
SELEZIONA
INSERISCI
---C-48
S-16
BR 3
RTL
RTL2
SAT1
PRO7
NDR
MDR
ARD
ZDF
-------------------------
PROGRAMM
LUMINOSITA
COLORE
CONTRASTO
DEFINIZIONE
TIPO DI IMMAGINE
MEMORIZZA
IMMAGINE
------------------------------CANCELLA
MEMO.AUTO.
20
21
22
23
24
25
26
27
28
29
Installazione ed allacciamento
Installazione
Osservate nella scelta del luogo d’installazione che una forte luce od
i raggi del sole non cadano direttamente sullo schermo. Altrimenti ci
saranno dei riflessi e la brillantezza dell’immagine verrà diminuita.
5x cm
La distanza di osservazione migliore è il quintuplo della diagonale
dello schermo, quindi per apparecchi con cinescopio di 55 cm questa comporta circa 2,75 m.
cm
y
I televisori abbisognano di un raffreddamento sufficiente.
Le feritoie di aereazione sullo schienale non devono
venir coperte da tende, pannolini, giornali, ecc. Anche le
aperture di aereazione sul fondo del televisore devono
rimanere libere per permettere all’apparecchio di
„aspirare“ l’aria fredda.
Non sistemate l’apparecchio vicino ad una sorgente di
calore; il raffreddamento potrebbe venir ostacolato.
Il vostro apparecchio è concepito per l’esercizio in vani
secchi. Se eccezionalmente doveste esercitare l’apparecchio all’aperto, provvedete a proteggerlo dall’umidità (pioggia, schizzi d’acqua, rugiada).
Non ponete mai sul televisore od al di sopra di questo
- candele accese
- recipienti con liquido.
La cera calda e liquidi che penetrano nell’interno dell’apparecchio, distruggono i componenti elettrici del vostro televisore.
In questi casi la sicurezza elettrica del televisore non è più sicura. Provvedete per una corrente d’aria fredda sufficiente se
installate il vostro televisore in uno scaffale.
Attacco antenna
Il cavo di allacciamento d’antenna ed altri componenti tra la presa
d’antenna integrata fissa risp. la presa a larga banda ed il ricevitore
radiodiffusione (p. es. televisore, videoregistratore) devono essere
autorizzati dal Ministero delle Poste e Telecomunicazioni secondo la
norma 1 R 8 15 di questo.
Se il cavo ed i componenti usati non sono autorizzati, il permesso
d’esercizio del ricevitore radiodiffusione cessa.
y
I temporali rappresentano un pericolo per ogni apparecchio elettrico.
Un colpo di fulmine nella rete elettrica o nell’antenna potrebbe
danneggiare l’apparecchio, anche se questo fosse spento.
Pertanto, con temporali, sfilate la spina di rete dalla presa di rete ed
anche la spina d’antenna. Quando l’apparecchio non venisse usato
per lungo tempo, dovreste sfilare sempre le due prese. P. es. durante le vacanze.
Rete
Infilate la spina di rete nella presa di rete. L’apparecchio è concepito
per tensione alternata di 230 V.
16
Accensione e spegnimento
Regolazione delle stazioni emittenti
Finita la ricerca, sullo schermo appare la tabella delle emittenti. Essa
potrebbe essere compilata come segue:
Accensione
Un apparecchio freddo non può essere acceso in un vano
caldo, non prima che fosse evaporizzato dalla superfice
dello schermo un eventuale strato d’umidità.
PROGRAMM
00
01
02
03
04
05
06
07
08
09
Premete l’interruttore di rete sul televisore.
Il televisore va sul modo Stand-by ed indica questo con una spia rossa.
Scegliete posti programma ad una sola cifra con i tasti cifra . . . oppure con i tasti P o P del telecomando oppure con i
tasti -P+ sul televisore.
---ARD
ZDF
BR 3
RTL
RTL2
SAT1
PRO7
NDR
MDR
10
11
12
13
14
15
16
17
18
19
C-16
C-52
S-01
S-06
S-16
----------------
SELEZIONA
INSERISCI
Scegliete posti programma a due cifre premendo prima il tasto di
preselezione per l’immissione a due cifre - - e poi i tasti cifra.
20
21
22
23
24
25
26
27
28
29
-------------------------------
CANCELLA
MEMO.AUTO.
Potrebbe accadere che alcuni Logos dell’emittenti non vengano riconosciuti. In questo caso avete la possibilità d’immettere un Logo emittente, nel modo descritto sotto „Logo emittente“ (nome) a pagina 7.
Spegnimento
Spegnete il televisore nel modo Stand-by con il tasto NO sul telecomando oppure sul televisore stesso con l’interruttore di rete.
Con i tasti cursore potete sceglier sulla tabella emittenti indicata i
singoli posti programma.
P
P
Regolazione delle stazioni emittenti
Il posto programma scelto può poi esser:
RICHIAMATO =
commutate con il tasto rosso su questo
posto programma
INSERITO =
inserite il posto programma scelto con il
tasto rosso su un’altra posizione.
CANCELLATO =
cancellate il posto programma.
MEMORIZZATO AUTOM.= richiamate la funzione A.P.S.
Esistono tre modi diversi per la regolazione delle stazioni emittenti:
1. Funzione - A.P.S.
APS = Programmazione automatica delle stazioni emittenti.
Questa funzione viene eseguita la prima volta automaticamente
dopo l’installazione ed accensione.
2. Ricerca automatica
3. Immissione diretta del canale.
• Abbandonate il menù con il tasto
1. Funzione A.P.S.
TV
Se il televisore viene acceso per la prima volta, nel modo di funzionamento terrestre appare sullo schermo la seguente comunicazione:
2. Ricerca automatica
A.P.S.
Cosigliamo la ricerca automatica per trovare una singola emittente
nel funzionamento terrestre.
• Premete il tasto BLU e richiamate il menù „INSTALL.“.
• Scegliete „SINTONIA“ con i tasti P/P.
• Premete il tasto per aprire il menù „SINTONIA“.
• Scegliete „RICERCA“ con il tasto P
• Avviate la ricerca automatica con i tasti / .
Trovata un’emittente questa viene mostrata e la ricerca si arresta.
L’emittente viene sintonizzata su centro canale. Nel caso l’immagine avesse fruscio, regolate eventualmente la sintonia fine.
• Scegliete „MEMORIZZA“ con il tasto P e confermate con il tasto .
• Abbandonate il menù con il tasto T V .
VOGLIATE CONTR. IL CAVO ANT.
PROGRAMMAZIONE AUTOMATICA
INIZIA
TV
ANNULLA
Potete interrompere la funzione con il tasto ń.
Avviate la funzione A.P.S. con il tasto .
Il televisore comincia ora la ricerca delle stazioni emittenti entro l’intero campo di ricezione terrestre (ricezione tramite antenna di casa o
via cavo).
17
Regolazione delle stazioni emittenti
Impostazioni audio
3. Immissione direttta del canale con emittenti terrestri
SUONO
Per l’immissione diretta del canale dovranno esser noti la banda
(C=canali standard / S=canali speciali) ed il numero canale.
VOLUME
BASSI
ALTI
BILANCIAMENTO
EFFETTO
CUFFIA. . .
MEMORIZZA
• Premete il tasto BLU e richiamate il menù „INSTALL.“.
• Scegliete „SINTONIA“ con i tasti P/P.
• Premete il tasto per aprire il menù „SINTONIA“.
• Scegliete „BANDA“ con il tasto P.
• Scegliete il tipo di canale C od S con i tasti / .
• Scegliete „CANALE“ con il tasto P.
• Immettete con i tasti cifra il numero di canale.
Con numeri di canale a due cifre premete prima il tasto --.
L’emittente scelta viene indicata e sintonizzata su centro canale.
Nel caso l’immagine avesse fruscio, regolate eventualmente la
sintonia fine.
• Scegliete „MEMORIZZA“ con il tasto P e confermate con il tasto .
•Abbandonate il menù con il tasto TV
Nel menù „SUONO“ potete impostare e memorizzare tutte le funzioni
audio.
Potete richiamare questi valori standard, impostati - ogni tempo con il tasto PP.
• Premete il tasto ROSSO e richiamate il menù „SUONO“.
• Scegliete con i tasti P/P la funzione desiderata.
• Variate con i tasti / il valore impostato.
EFFETTO =
Con trasmissioni Mono, per impostazione „SI“, viene
generato un effetto quasi Stereo.
Con trasmissioni Stereo il suono sembra più pieno.
• Scegliete „MEMORIZZA“ con il tasto P e confermate con il
tasto . I valori variati vengono memorizzati.
Sintonia fine
Se l’emittente non viene rivevuta chiaramente, allora potreste migliorare le qualità audio ed immagine con la sintonia fine.
• Premete il tasto BLU e richiamate il menù „INSTALL.“.
• Abbandonate il menù con il tasto
• Scegliete „SINTONIA“ con i tasti P/P.
TV
.
• Premete il tasto per aprire il menù „SINTONIA“.
• Scegliete „SINTONIA FINE“ con il tasto P e regolate con i tasti
/ fino a quando l’immagine ed audio vengano ricevuti chiaramente.
Impostazioni audio della cuffia
• Scegliete „MEMORIZZA“ con il tasto P e confermate con il
tasto .
• Abbandonate il menù con il tasto
TV
CUFFIA.
.
VOLUME
MODO
MEMORIZZA
Logo dell’emittente (Nome)
I Logos dell’emittenti vengono inseriti automaticamente nella tabella
emittenti soltanto con la funzione A.P.S., nel caso l’emittente venga
„ben“ ricevuta.
Se non appare alcun Logo, allora potete immetterlo manualmente,
per far ciò:
• Premete il tasto BLU e richiamate il menù „INSTALL.“.
• Premete il tasto per aprire il menù „SINTONIA“.
Nel menù „CUFFIA“ potete impostare e memorizzare tutte le funzioni
audio cuffia.
Potete richiamare questi valori standard, impostati - ogni tempo con il tasto PP.
• Premete il tasto ROSSO e richiamate il menù „SUONO“.
• Scegliete „NOME“ con il tasti P/P.
• Scegliete con i tasti P/P la funzione „CUFFIA“.
• Premete il tasto per scegliere la prima posizione.
• Aprite con i tasti / il menù.
• Premete i tasti P/P per scegliere il carattere.
• Scegliete con i tasti P/P la funzione che dovrà esser variata.
• Premete il tasto per scegliere la posizione seguente e scegliete
con i tasti P/P un carattere e così via.
• Variate il valore con i tasti / .
• Quando il Logo sarà completo ( 4 caratteri max.), premete il
tasto ed abbandonate il campo Logo.
• Scegliete „MEMORIZZA“ con il tasto P e confermate con il
tasto . I valori variati vengono memorizzati.
• Scegliete „MEMORIZZA“ con i tasti P e confermate con il tasto .
• Abbandonate il menù con il tasto
18
TV
.
Impostazioni immagine
Il menù CONFIGURAZIONE TV
IMMAGINE
CONF. TV
LINGUA
PAESE
USCITA AV-2
LUMINOSITA
COLORE
CONTRASTO
DEFINIZIONE
TIPO DI IMMAGINE
MEMORIZZA
Nel menù „CONF. TV“ potete fare le seguenti impostazioni:
LINGUA = Lingua menù per l’intero menù.
PAESE = Preimpostazione per la ricerca automatica emittenti.
USCITA AV-2 = Scelta del segnale che verrà emesso alla presa AV-2.
Nel menù „IMMAGINE“ potete impostare e memorizzare tutte le
funzioni IMMAGINE.
Potete richiamare questi valori standard, impostati - ogni tempo con il tasto PP.
• Premete il tasto VERDE e richiamate il menù „IMMAGINE“.
• Scegliete la funzione „CONF. TV“ con i tasti P/P.
• Scegliete con i tasti P/P la funzione desiderata.
• Premete il tasto per aprire il menù „CONF. TV“.
• Variate con i tasti / il valore impostato.
MODO IMMAGINE = Potete impostare il formato immagine in AUTO 4:3 - 16:9. Qui è impostato „AUTO“ (consigliabile)
così viene commutato automaticamente sul formato immagine irradiato dall’emittente. Potete
impostare stabilmente i formati 4:3 e 16:9 su
tutte l’emittenti.
• Scegliete „MEMORIZZA“ con il tasto P e confermate con il
tasto . I valori variati vengono memorizzati.
• La riga „LINGUA“ è scelta.
• Abbandonate il menù con il tasto
TV
• Premete il tasto BLU e richiamate il menù „INSTALL.“.
• Scegliete con i tasti / la lingua desiderata.
• Nel menù „PAESE“, voi dovreste scegliere il paese nel quale abitate. Corrispondentemente al paese impostato, dopo la ricerca automatica emittenti, verranno ordinate le emittenti trovate. P. es . in
Germania la successione ARD, ZDF, BR 3, ecc.
• Nel menù „USCITA AV-2“ (soltano Axon) potete determinare ciò
che dovrà essere registrato con un videoregistratore alla presa AV2. Avete le seguenti possibilità:
Impostazione
il videoregistratore può registrare ...
.
Il menù CARATTERISTICHE
CARATTER.
SPEGNIM. A TEMPO
CHIAVE BAMBINO
AV-3 **
ciò che viene applicato tramite le prese Cinch
sul frontale del televisore (soltanto AXON).
L’impostazione fatta rimane memorizzata automaticamente fino
alla variazione successiva.
• Scegliete con i tasti P/P la funzione desiderata.
SPEGNIMENTO A TEMPO = periodo di tempo regolabile in minuti
fino allo spegnere del televisore. Potete
impostare periodi da 15 min. a 120
min. in passi di 15 minuti. Passato il
periodo di tempo dato il televisore
commuta in funzinamento Stand-by.
CHIAVE BAMBINO =
Con chiave bambino attivata il televisore potrà essere impostato soltanto con
il telecomando. I tasti sul televisore
sono senza funzione (all’infuori dell’interruttore di rete).
• Variate con i tasti / l’impostazione.
L’impostazione fatta rimane memorizzata automaticamente fino alla
variazione successiva.
TV
l’emittente terrestre visualizzata sullo schermo.
ciò che viene applicato al televisore tramite la presa
AV-1.
** solo con televisori con prese Cinch sul frontale del televisore
Nel menù „CARATTER.“ potete impostare uno spegnimento a tempo
(per dormire) e una chiave bambino.
• Premete il tasto VERDE e richiamate il menù „CARATTER.“
• Abbandonate il menù con il tasto
TV
AV-1
.
19
Televideo
Altezza caratteri doppia
Il Televideo è un servizio che possibilita la ricezione di informazioni
intorno ad un tema riportato nell’indice.
Premete una prima volta il tasto
e la parte superiore della pagina indicata verrà rappresentata con caratteri in doppia altezza. Premete una seconda volta il tasto
per rappresentare la parte inferiore della pagina con caratteri in doppia altezza.
Premete il tasto
una terza volta per rappresentare la pagina di
nuovo in caratteri di altezza normale.
In questo modo non sono possibili indicazioni sullo schermo, variazioni di luminosità, contrasto ed intensità di colore. Soltanto il volume potrà essere regolato.
Richiamo del Televideo
• Scegliete un’emittente che trasmette le informazioni Televideo.
Permesso alla risposta od alla risoluzione quiz
• Premete il tasto Televideo
. Sullo schermo appare la pagina
100 (indice) o l’ultima pagina vista prima dello spegnere.
Premete il tasto risoluzione ? per farvi indicare risposte nascoste
a quiz od ad indovinelli.
Premete nuovamente questo tasto per nascondere di nuovo le risposte.
Funzioni principali del Televideo
• Tasto ROSSO:
Sfogliare in avanti
• Tasto VERDE:
Sfogliare indetro
• Tasto GIALLO:
Al capitolo successivo
• Tasto BLU:
Al tema successivo
• Tasti cifra:
Immissione numerica dei numeri pagina.
Indicazione dell’ora con funzionamento TV
Se in funzionamento TV e con emittenti che trasmettono il Televideo
premete una volta il tasto dell’ora
, a destra, in alto sullo schermo verrà inserita l’ora attuale. Premete di nuovo il tasto per disinserire l’ora.
Per emittenti senza Televideo, al posto dell’ora verrà inserito un Box
blu.
Se durante l’indicazione dell’ora richiamate un menù, l’ora sparisce;
essa riappare però, non appena il menù verrà abbandonato.
Scelta di una determinata pagina Televideo
Se le pagina Televideo è nota, potete immettere con i tasti cifra il
numero pagina.
Il numero pagina scelto appare in alto, a sinistra sullo schermo. Il
processo di ricerca viene avviato. Non appena la corrispondente
pagina viene trovata, essa viene rappresentata sullo schermo.
Se durante il processo di ricerca desiderate vedere il programma
corrente, premete allora il tasto
. Il Televideo scompare dallo
schermo, ma non viene disinserito. In alto, a sinistra sullo schermo
lampeggia il simbolo
quale indicazione che il processo di ricerca è in azione.
Non appena la pagina è stata trovata, il simbolo
viene sostituito
dal numero pagina.
Per inserire la pagina Televideo premete di nuovo il tasto
.
Abbandono del Televideo
Premete il tasto
schermo.
Scelta di una pagina Televideo multipla.
Diverse pagine Televideo sono pagine multiple. Il contrassegno per
le pagine multiple si trova nella maggior parte dei casi sotto l’indicazione dell’ora nella forma p. es. di „1/9“.
Per richiamare una pagina multipla premete il tasto
e quindi il
numero pagina desiderato in quattro cifre p. es. „0004“.
Se durante il processo di ricerca desiderate vedere il programma
corrente, premete allora il tasto
. Il Televideo scompare dallo
schermo, ma non viene disinserito. In alto, a sinistra sullo schermo
lampeggia il simbolo
quale indicazione che il processo di ricerca è in azione.
Non appena la pagina è stata trovata, il simbolo
viene sostituito
dal numero pagina.
Per inserire la pagina Televideo premete di nuovo il tasto
Arresto dello sfogliamento automatico delle sottopagine
Ci sono pagine Televideo con più sottopagine che vengono sfogliate
in avanti, dopo brevi pause.
• Se desiderate arrestare lo sfogliamento automatico delle sottopagine, premete allora il tasto d’arresto
.
• Se desiderate vedere la sottopagina seguente, premete di nuovo il
tasto di arresto
.
20
TV
. Il programma televisivo appare di nuovo sullo
21
MAC: Axon Plus 55TH35.eps
VHS - Videorecorder
Decoder (z. B. Premiere)
S-VHS / Hi8 - Videorecorder
Decoder (z. B. Premiere)
Borneo
Axon
R
L
R
in
AUDIO
out
L
in
VIDEO
out
Attacchi sul
dietro
del televisore
Anschlüsse
an der
Rückseite
des TV-Gerätes
Attacco di apparecchi supplementari
Attacco di apparecchi supplementari
Potete allacciare apparecchi supplementari risp. apparecchi AV con
un cavo Scart alle prese Scart I oppure Scart II e con un cavo Cinch
alle prese Cinch (soltanto AXON).
Potete allacciare al televisore un videoregistratore con un cavo
Scart oppure con un cavo antenna. Consigliamo l’allaccio tramite un
cavo Scart. Questo collegamento garantisce la migliore trasmissione
dell’immagine e suono. Preferibilmente dovreste allacciare il videoregistratore alla presa Scart II.
Potete allacciare un Camcorder oppure Camcorder digitale con un
cavo Cinch oppure cavo Scart.
Preferibilmente dovreste allacciare un Decoder alla presa Scart I.
Allacciamento di un Camcorder
Allacciamento di un videoregistratore
Decoder per Pay-TV (p. es. Premiere)
Soltanto se vengono ricevute emittenti terrestri oppure via cavo
• Allacciate il videoregistratore con un cavo Scart alla presa Scart I
del televisore.
Con questo apparecchio supplementare possono venir decodificati
programmi trasmessi codificati e quindi resi visibili sullo schermo.
Generalmente un Camcorder viene allacciato soltanto per breve
tempo al televisore, p. es. per osservare una registrazione oppure
per copiare su un videoregistratore. Per questo scopo il televisore è
dotato sul suo frontale di prese Cinch (soltanto AXON).
• Allacciate il videoregistratore con un cavo Cinch alle prese frontali
del televisore.
• Per vedere una registrazione scegliete un posto programma qualsiasi e premete il tasto AV tante volte fino a quando sullo schermo
non apparià AV-3.
• Premete il tasto di riproduzione del videoregistratore.
• Allacciate il Decoder per Pay-TV con un cavo Scart alla presa
Scart II (soltano Axon) del televisore.
• Allacciate il videoregistratore con cavi antenna all’antenna di casa
e al televisore.
• Per vedere una trasmissione codificata scegliete il posto programma Decoder impostato.
Vedere un film video oppure una registrazione
• Per vedere un film video scegliete un posto programma qualsiasi.
Cuffia
• Premete il tasto di riproduzione del videoregistratore.
Allacciate la cuffia alla presa cuffia sul fronte del televisore (Axon)
oppure sulla parte destra, avanti del televisore (Borneo).
• Se il videoregistratore è allacciato al televisore tramite un cavo
Scart che abbia collegati tutti i 21 contatti, allora verrà commutato
automaticamente su AV-1, se invece il cavo Scart non ha collegati
tutti i 21 contatti, allora
• premete tante volte il tasto
comparirà AV-1.
AV
fino a quando sullo schermo non
22
Pulizia
Dati tecnici
Norma di trasmissione
Campo di ricezione
Numero dei posti programma
Indicazione di programma
Ingresso antenna
Tensione di rete
Pulizia del televisore
Spegnete il televisore con l’interruttore di rete prima d’iniziare la
pulizia !
Usate per il mobile uno strofinaccio morbido asciutto o leggermente
inumidito. Evitate l’uso di detergenti aggressivi; questi potrebbero
danneggiare la vernice e le scritte.
Usate per lo schermo una pelle di daino leggermente inumidita!
Assorbimento
Televisori
Potenza musicale:
Consumo d’energia in un’ora:
Stand-by:
Difetti e rimedi
PAL B/G
Canali 21 - 69, canali speciali 1 - 41
100 (0 - 99)/300 SAT
OSD
75 Ω
230 V, 50 Hz
60 W
2 x 15 W, 8Ω
60 Wh
ca. 5,5 W
Immagine scadente
• L’emittente è ben sintonizzata?
Tutte le impostazioni nel menù sono memorizzabili sul relativo
posto programma.
• Il televisore oppure l’antenna si trovano nelle vicinanze immediate
di altoparlanti, di apparecchi audio non messi a massa oppure di
lampade neon?
Le sorgenti d’alimentazione sopportano cortocircuiti e si disinseriscono in caso di sovraccarico. Terminato il sovraccarico si inseriscono
di nuovo. Vedete anche le istruzioni di tatarura.
Salvo errori e con riserva di modifica!
• Contorni immagine doppi posson venir causati da montagne ed
edifici molto alti.
• Controllate se è stato immesso il corretto canale ed impostate
eventuelmente il canale con la sintonia fine.
Riparazioni
Mancanza d’immagine
• È allacciata bene l’antenna ?
L’apertura dell’apparecchio e le riparazioni devono essere eseguite soltanto da personale specializzato
ATTENZIONE ! PERICOLO DI VITA.
Per favore, se fosse necessaria una riparazione,
rivolgetevi al rivenditore specializzato.
• È a posto il cavo d’antenna ? Sono montati i dovuti connettori ?
• I connettori sono infilati del tutto nelle prese d’antenna?
• Avete premuto sul telecomando il tasto giusto?
Provate ancora una volta.
Interventi impropri possono causare il cessamento dell’autorizzazione
di esercizio ed anche l’estinzione del diritto di garanzia.
I raggi X prodotti sono schermati sufficientemente (vedete
l’avvertenza sullo schienale).
Interventi impropri come la variazione della tensione EAT ed anche la
sostituzione del cinescopio con un altro tipo di cinescopio potrebbero
provocare un’emissione più alta di raggi X.
Un apparecchio così codificato non corrisponde più a questa
autorizzazione e di conseguenza non può essere più usato.
Mancanza dell’audio
Voi non sentite alcun suono.
• Avete disinserito inavvertitamente il suono con il tasto Audio stop
(MUTE)?
• Il suono si sente soltanto tramite un altoparlante. Il bilanciamento
è stato impostato correttamente? Accertatevi nel menù suono.
Se non travate nessuna soluzione, spegnete il televisore e
riaccendetelo passati alcuni secondi.
Non provate mai di fare voi stessi riparazioni. Mettetevi a contatto con il vostro rivenditore specializzato.
23
✍
✍
24
Operating instruction
Preface
Contents
Dear Customer,
Remote control handset . . . . . . . . . . . . . . . . . . . . . . . . . . . . . . .26
Menu system . . . . . . . . . . . . . . . . . . . . . . . . . . . . . . . . . . . . . . .27
Setting up and connecting . . . . . . . . . . . . . . . . . . . . . . . . . . . . .28
Switching on and off . . . . . . . . . . . . . . . . . . . . . . . . . . . . . . . . .29
Presetting stations . . . . . . . . . . . . . . . . . . . . . . . . . . . . . . . . . . .29
A. P. S. function . . . . . . . . . . . . . . . . . . . . . . . . . . . . . . . . . . . . .29
Station search . . . . . . . . . . . . . . . . . . . . . . . . . . . . . . . . . . . . . .29
Direct channel input . . . . . . . . . . . . . . . . . . . . . . . . . . . . . . . . . .30
Fine tuning . . . . . . . . . . . . . . . . . . . . . . . . . . . . . . . . . . . . . . . .30
Station logo (name) . . . . . . . . . . . . . . . . . . . . . . . . . . . . . . . . . .30
Sound settings . . . . . . . . . . . . . . . . . . . . . . . . . . . . . . . . . . . . . .30
Headphone settings . . . . . . . . . . . . . . . . . . . . . . . . . . . . . . . . . .30
Picture settings . . . . . . . . . . . . . . . . . . . . . . . . . . . . . . . . . . . . .31
Menu „FEATURE“ . . . . . . . . . . . . . . . . . . . . . . . . . . . . . . . . . . . .31
Sleep timer . . . . . . . . . . . . . . . . . . . . . . . . . . . . . . . . . . . . . . . .31
Child lock . . . . . . . . . . . . . . . . . . . . . . . . . . . . . . . . . . . . . . . . .31
Menu „TV CONF.“ . . . . . . . . . . . . . . . . . . . . . . . . . . . . . . . . . . .31
Menu language . . . . . . . . . . . . . . . . . . . . . . . . . . . . . . . . . . . . .31
Country settings . . . . . . . . . . . . . . . . . . . . . . . . . . . . . . . . . . . .31
Teletext . . . . . . . . . . . . . . . . . . . . . . . . . . . . . . . . . . . . . . . . . . .32
Displaying the time in TV mode . . . . . . . . . . . . . . . . . . . . . . . . .32
Connecting external devices . . . . . . . . . . . . . . . . . . . . . . . .40, 41
Cleaning . . . . . . . . . . . . . . . . . . . . . . . . . . . . . . . . . . . . . . . . . .42
Fault-finding . . . . . . . . . . . . . . . . . . . . . . . . . . . . . . . . . . . . . . .42
Technical data . . . . . . . . . . . . . . . . . . . . . . . . . . . . . . . . . . . . . .42
Reparing . . . . . . . . . . . . . . . . . . . . . . . . . . . . . . . . . . . . . . . . . .42
Congratulations on your purchase of this TV set.
In order to familiarise yourself with the technology and operating
facilities, you should spend some time reading these Operating
Instructions.
This TV set may be used only for its intended purpose. It may be operated only in a dry room.
25
Remote control handset RE 18
The remote control handset sends its commands to the TV set with the aid of infra-red light. For this reason, it must always be pointed towards
the TV set in order to operate correctly. Use of the remote control may possibly interfere with other devices or systems which are controlled by
infra-red signals (such as infra-red headphones).
The remote control handset may not operate correctly if the TV set is exposed to direct sunlight, because the TV set is not able to detect the
infra-red signals. The TV set must be switched on with its main switch before the remote control handset can be used.
Infra-red light!
Do not point the remote control
handset at your eyes and press
any of the buttons on it!
• Infra-red window
• OFF (standby position)
• Sound mute
PP
I -I I
• Personal preferences
• Mono/stereo selection
1
4
7
0
• Open the menu, move one step back in
the menu, or close the menu
2
5
8
--
M MENU
3
6
9
P P
INFO i
P
• Preselection key for two-digit numerical
input
• Call sub-menu or adjust value of the
sound/picture function currently selected in the menu
P
• Select external devices connected to
the Scart sockets AV1, AV2 or to the
phono sockets AV3
• Open/close the menu „SOUND“
Return to previous page
• Return to previous programme
• Display station table or Operator Help
for currently selected menu
• Next programme or switch from standby mode to last viewed programme
• Move the cursor up/down in the current menu
• Open/close the menu „PICTURE“
Advance to next page
• Numerical keys
• Volume + / -
–VOL
VOL+
• Open/close menu „FEATURE“
Next chapter
SOUND PICTURE FEATURE INSTALL
TV
• Open/close menu „INSTALL“
Next subject
AV
Open teletext screen
• Close teletext or menu display
(in terrestrial mode: display programme
status)
Display/hide teletext page
?
i
Stop automatic display of next page
Mixed teletext mode
In teletext mode:
select page 100
• Display time
Preselection key for multiple pages
Double font size in teletext
RC 18
Display riddle solution in teletext
26
blue
27
Borneo 55 TH 34
Axon 55 TH 35
SLEEP TIMER
CHILD LOCK
FEATURE
TUNING. . .
PROGRAM. . .
TV CONFIG. . .
INSTALL.
yellow
VOLUME
BASS
TREBLE
BALANCE
EFFECT
HEADPHONE
STORE
SOUND
Menu system
SOUND . . .
PICTURE . . .
FEATURE. . .
INSTALL. . . ..
MENU
M
red
P1 ARD C48 BG
PROGRAMME
NAME
BAND
CHANNEL
STANDARD
FINE TUNING
SEARCH
STORE
TUNING
LANGUAGE
COUNTRY
AV-2 OUTPUT
TV CONF.
VOLUME
BALANCE
MODE
STORE
H.PHONE
i
green
00
01
02
03
04
05
06
07
08
09
SELECT
INSERT
---ARD
ZDF
BR 3
RTL
RTL2
SAT1
PRO7
NDR
MDR
10
11
12
13
14
15
16
17
18
19
C-25
C-53
-------------------------
PROGRAMM.
BRIGHTNESS
COLOUR
CONTRAST
SHARPNESS
PICTURE MODE
STORE
PICTURE
------------------------------DELETE
AUTOSTORE
20
21
22
23
24
25
26
27
28
29
1. Setting up and connecting
Setting up
When selecting a suitable place for the TV, be sure that no bright
light or sunlight falls on the screen. Light may cause reflections and
impair the brilliance of the image.
5x cm
The best viewing distance is five times the picture tube diagonal,
e.g. about 2.75 m for TV sets with a 55 cm screen.
cm
y
TV sets require adequate ventilation. The ventilation
slots at the rear of the set should therefore never be
covered by curtains, doilies, newspapers or similar
objects. Likewise, all slots at the bottom of the set must
be freely accessible so that the intake of air is not impaired in any way.
Do not set up the TV near a radiator as this would impair
adequate cooling.
Your TV set is intended for use in dry rooms. If you wish
to use it occasionally outdoors, be sure to protect it
against any kind of moisture (rain, splashes, dew, etc.).
Do not place
- burning candles or
- flower vases filled with water
on top of the TV set.
Hot wax and liquids destroy the electrical components
and jeopardize the electrical safety of the set. If you place the set in a wall unit, leave sufficient space on all
sides so that the air can circulate freely.
Connecting the aerial
Standard SAT and terrestrial station aerial sockets are fitted at the
rear of the TV.
Thunderstorms represent a danger for all electrical appliances! If
lightning strikes the power line or the aerial, the TV may be damaged
even if it is switched off. Therefore, always unplug the mains lead
and aerial during thunderstorms. If the TV is not going to be used for
an extended period of time, for instance when on holiday, then disconnect the set both from the mains and the aerial.
y
Mains voltage
Plug the mains lead into a wall outlet. The TV set is equipped for
230 V ac.
28
Switching on and off
Presetting stations
Switching on
After the search has been completed, the station table is displayed
on the screen. This could, for example, look like this:
If the TV set is cold and is placed in a warm room, wait
for any condensation on the screen to evaporate before
switching the set on.
PROGRAMM
00
01
02
03
04
05
06
07
08
09
Switch the TV set on by pressing the main switch.
The TV set is now in standby mode, indicated by a red light.
Single-digit programme positions can be selected with the numerical keys . . . or with the keys P or P on the remote
control or with the - P + keys on the TV set
When the TV set is on, two-digit programme positions can be selected by pressing the preselection key for two-digit input, followed by
the numerical keys.
---ARD
ZDF
BR 3
RTL
RTL2
SAT1
PRO7
NDR
MDR
10
11
12
13
14
15
16
17
18
19
C-16
C-52
S-01
S-06
S-16
----------------
SELECT
INSERT
Switching off
20
21
22
23
24
25
26
27
28
29
-------------------------------
DELETE
AUTOSTORE
In some cases, the station logos may not be recognised during the
station search. In this case, you can enter the station a logo as
described on page 34.
Pressing the OFF key on the remote control switches the TV set to
standby mode. Pressing the main switch on the TV set switches the
set off completely.
The various programme positions in the station table can be selected with the cursor keys.
P
Presetting stations
P
Stations can be preset in three different ways:
You can then do the following with the selected
programme position:
1. A.P.S. function
Automatic Programme Selection.
This function is executed automatically for the first time when
the TV set is installed and switched on.
2. Station search
3. Direct channel input
pressing the red key selects this programme position
the programme position selected with the red key
can be inserted in another position in the table
DELETE =
deletes the programme position
AUTOSTORE = calls the A.P.S. function (not possible for satellite
stations)
SELECT =
INSERT =
1. A.P.S. function
• Close the menu by pressing the
When the TV set is switched on for the first time, the following message is displayed on the screen in terrestrial mode:
key.
2. Station search
We recommend using the station search function in order to find a
single station in terrestrial or satellite mode.
• Press the BLUE key to select the menu „INSTALL“.
A.P.S.
PLEASE, CHECK ANTENNA CABLE
AUTO. PROGRAMMING SYSTEM
START
TV
TV
• Select „TUNING“ with the keys P/P.
• Press the key to open the menu „TUNING“.
CANCEL
• Select „SEARCH“ by pressing the P key.
This function can be cancelled by pressing the ń key.
• Start the search by pressing the / key.
When a station is found, the search stops. The TV set is tuned to
the centre of the related channel. If the picture is still not clear,
you can use the fine tuning function to improve it.
The A.P.S. function is started by pressing the key.
The TV set now searches the entire terrestrial reception range (received with an antenna or from cable) for stations.
• Select „STORE“ by pressing the P key and confirm the operation by pressing the key.
• Close the menu by pressing the
29
TV
key.
Station search
Sound settings
3. Direct channel input for terrestrial stations
SOUND
For direct channel input, you must know the band (C = standard
channel / S = special channel) and the channel number.
•Press the BLUE key to select the menu „INSTALL.“.
•Select „TUNING“ with the keys P/P.
•Press the key to open the menu „TUNING“.
•Select „BAND“ by pressing the P key.
•Select the channel type C or S by pressing the / keys.
•Select „CHANNEL“ by pressing the P key.
•Enter the channel number with the numerical keys.
VOLUME
BASS
TREBLE
BALANCE
EFFECT
HEADPHONE
STORE
The menu „SOUND“ permits you to adjust all sound functions and
to store these settings. The stored settings can subsequently been
recalled by pressing the PP key.
•Press the RED key to open the menu „SOUND“.
•Select the desired function by pressing the P/P keys.
•Adjust the selected value by pressing the / keys.
For two-digit channel numbers, press the - - key before entering
the number.
When the station is found, the TV set is tuned to the centre of the
related channel. If the picture is still not clear, you can use the fine
tuning function to improve it.
•Select „STORE“ by pressing the P key and confirm the operation by pressing the key.
• Close the menu by pressing the
TV
EFFECT =
key.
or mono programmes, switching this function „ON“
provides an effect similar to a stereo programme.
For stereo programmes, a fuller sound is provided.
•Select „STORE“ by pressing the P key and confirm the operation by pressing the key.
•Close the menu by pressing the T V key.
Fine tuning
If the picture of a received station is not very clear, both the picture
and sound quality can be improved by fine tuning.
•Press the BLUE key to select the menu „INSTALL.“.
•Select „TUNING“ with the keys P/P.
•Press the key to open the menu „TUNING“.
•Select „FINE TUNING“ by pressing the P key and then adjust the
tuning with the / keys until the picture is clear and the sound
is good.
•Select „STORE“ by pressing the P key and confirm the operation
by pressing the key.
•Close the menu by pressing the TV key.
Headphone settings
H.PHONE
VOLUME
MODE
STORE
Station logo (name)
The A.P.S function displays the station logo in the station table only if
the station is received clearly. If no station logo is shown, you can
enter it manually as follows:
• Press the BLUE key to select the menu „INSTALL.“.
• Press the key to open the menu „TUNING“.
• Select „NAME“ by pressing the P/P keys.
• Select the first character position by pressing the key.
• Select the desired character by pressing the P/P keys.
• Select the next character position by pressing the key, select
the desired character with the P/P keys, and so on.
• After input of the complete logo (maximum length: four characters), press the key to exit from the logo field.
• Select „STORE“ by pressing the P keys and confirm the operation by pressing the key.
The menu „H.PHONE“ permits you to adjust all headphone sound
functions and to store these settings. The stored settings can subsequently been recalled by pressing the PP key.
•Press the RED key to open the menu „SOUND“.
•Select the function „HEADPHONE“ by pressing the P/P keys..
•Open the menu by pressing the / keys.
•Select the function to be adjusted by pressing the P/P keys
•Adjust the value by pressing the / keys.
•Select „STORE“ by pressing the P key and confirm the operation
by pressing the key.
•Close the menu by pressing the T V key.
30
Picture settings
The TV CONF. menu
PICTURE
TV CONF.
LANGUAGE
COUNTRY
AV-2 OUTPUT
BRIGHTNESS
COLOUR
CONTRAST
SHARPNESS
PICTURE MODE
STORE
The following settings can be made in the menu „TV CONF.“:
LANGUAGE = the language in which the entire menu is displayed.
In the menu „PICTURE“, you can set and store all picture functions.
Subsequently, you can recall these settings by pressing the PP key.
•Press the GREEN key to select the menu „PICTURE“.
COUNTRY = the default setting for the automatic station search function.
•Select the desired function by pressing the P/P keys.
•Adjust the value with the / keys.
COPY = the signal which is to be output at the AV-2 socket.
PICTURE MODE = The picture format can be set to AUTO 4:3 16: 9.
If AUTO is selected (recommended), the TV set
switches automatically to the format transmitted
by the station. The formats 4:3 and 16:9 can be
set permanently for all stations.
• Select the function „TV CONF.“ with the P/P keys.
• Press the key to open the menu „TV CONF“.
• The line „LANGUAGE“ is now selected.
• Press the BLUE key to select the menu „INSTALL“.
• You can now select the desired language by pressing the / keys.
• In menu item „COUNTRY“, you should select the country in which
you live. This information is used for sorting the stations found
during automatic station search. In Germany, for example, the
stations would be sorted in the sequence ARD, ZDF, BR3, etc.
•Select „STORE“ by pressing the P key and confirm the operation
by pressing the key.
•Close the menu by pressing the TV key.
• In menu item „COPY“ (modell Axon only), you can specify what
is to be recorded with a video recorder connected to the AV-2
socket. The following settings are possible:
The FEATURE menu
FEATURE
SLEEP TIMER
CHILD LOCK
In the menu „FEATURE“, you can set the sleep timer and a
childlock.
• Press the YELLOW key to select the menu „FEATURE“.
TV
a terrestrial station currently appearing on the screen.
AV-1
AV-3**
the incoming signal connected via the AV-1 socket.
the incoming signal connected via the phono sockets on
the front of the TV set (model Axon only).
The settings you make here are automatically stored and remain
stored until you change them again.
SLEEP TIMER = you can set the time in minutes before the TV set
switches itself off. This kind can be set in the range
of 15 - 120 minutes in steps of 15 minutes. After
this time has elapsed, the TV set switches back to
standby mode.
CHILD LOCK = if the child lock is active, the TV set can be controlled only with the remote control. The keys on the TV
set (with the exception of the main power key) are
disabled.
• Change the setting with the / keys.
The settings are stored automatically and remained stored until you
change them again.
TV
The video recorder can record.....
**possible only on TV sets equipped with phono
sockets on the front
• Select the desired function by pressing the P/P keys.
• Close the menu by pressing the
Setting
key.
31
Teletext
Teletext is a service which permits the reception of information on
the subjects shown in the index.
It is not possible to change the screen displays and/or the brightness, contrast and colour of the video information.
Double font size
Calling teletext
Access to a riddle solutions
• Select a station which transmits teletext information.
• Press the teletext key
. Page 100 (index) or the last page viewed before the TV set was switched off is now displayed.
The answers to quiz or riddle questions are normally hidden. They
can be displayed by pressing the solution key ? .
Pressing this key a second time hides the answers again.
Basic teletext functions
Displaying the time in TV mode
• RED key:
• GREEN k:
• YELLOW key:
• BLUE key:
• Numerical keys:
If you press the time key
in TV mode, the current time is displayed
at the top right corner of the screen if you are watching a station that
transmits teletext information. Pressing the key again switches off
the time display.
If the station you are watching does not transmit teletext information,
a blue box is displayed instead of the current time.
If you open a menu when the time is displayed, the time display disappears. It appears again as soon as you close the menu.
The first time you press the key
, the upper half of the current
page is displayed in double font size. Pressing the key
again displays the lower half of the page in double font size. Pressing the key
a third time returns to display of the full page in normal size.
move one page backwards.
move one page forwards.
move to the next chapter.
move to the next subject.
enter the page numbers numerically.
Direct page selection
If you know the number of the teletext page you wish to see, you can
enter it directly with the numerical keys.
The selected page number is displayed at the upper left corner of the
screen. The set then starts to search for the page. When the page is
found, it is displayed on the screen.
If you wish to view the current programme while the search is being
executed, press the key
. The teletext screen is hidden, but is not
closed. The symbol
blinks at the upper left corner of the screen
to indicate that the search is still running.
When the page is found, the symbol
disappears and is replaced
by the page number.
To display the teletext page again, press the key
.
Exiting from teletext
To exit from teletext, press the
now displayed again.
Selecting a multiple page
Some teletext pages consist of multiple pages. This is normally indicated below the time display in the form of, for example, „1/9“.
In order to select a specific multiple page, press the key
and
then enter the desired page number. Four digits must be entered, for
example: „0004“.
If you wish to view the current programme while the search is being
executed, press the key
.. The teletext screen is hidden, but is
not closed. The symbol
blinks at the upper left corner of the
screen to indicate that the search is still running.
When the page is found, the symbol
disappears and is replaced
by the page number.
To display the teletext page again, press the key
.
Stopping automatic display of the next page
Some teletext pages consist of several sub-pages which are displayed
sequentially. Each page is shown for a specific period and is then
replaced by the next page.
• If you wish to stop automatic paging, press the stop key
• To display the next page again, press the stop key
.
once more.
32
TV
key. The current TV programme is
33
MAC: Axon Plus 55TH35.eps
VHS - Videorecorder
Decoder (z. B. Premiere)
S-VHS / Hi8 - Videorecorder
Decoder (z. B. Premiere)
Borneo
Axon
R
L
R
in
AUDIO
out
L
in
VIDEO
out
Connections
onder
the
rear ofdes
theTV-Gerätes
TV set
Anschlüsse an
Rückseite
Connecting external devices
Connecting external devices
Connecting a video camera
Audio-video devices and other peripherals can be connected via a
Scart cable to the Scart I or Scart II socket or via a phono cable to the
front phono sockets (model Axon only).
A video recorder can be connected to the TV set with a Scart cable or
an antenna cable. We recommend using a Scart cable, since this
guarantees the best possible picture and sound quality. If possible,
the video recorder should be connected to the Scart II socket.
For connection of a video camera or a digital camera to the TV set we
recommend the use of a Scart cable or a phono cable.
A decoder should, if possible, be connected to the Scart I socket.
Normally, a video camera is connected to the TV set only temporarily in order to play back a recording or to copy it to a video recorder.
For this purpose, the model is equipped with phono sockets on the
front (model Axon only).
• Connect the video camera with a phono cable to the sockets on
the front of the TV set.
• To view the recording, select any programme position and press
the AV key until AV-3 is displayed on the screen.
• Press the playback key on the video camera.
Connecting a video recorder
Pay-TV decoder (e.g. Premiere)
If you receive only terrestrial or cable stations:
• Connect the video recorder with a Scart cable to the Scart I socket
of the TV set.
• Connect the video recorder with an antenna cable to the house
antenna and to the TV set.
Playing back a video film or a recording:
A decoder is used to decode programmes that are encoded before
transmission so that they can be viewed on the TV screen.
• Connect the decoder with a Scart cable to the Scart II (modell Axon
only) socket of the TV set.
• You must select the preset decoder programme position for viewing a decoded programme.
• To play back a video film, you can select any programme position.
• Press the playback key of the video recorder.
• If the video recorder is connected via a fully-wired Scart cable to
the TV set, the TV set switches automatically to „AV-1“. If you are
not using a fully-wired Scart cable, then:
• Press the
screen.
AV
Headphones
Headphones can be connected to the headphone socket on the
front of the TV set (Axon) or on the right-hand side of the TV set
(Borneo).
key a number of times until AV-1 is displayed on the
34
Cleaning
Technical data
Cleaning the TV set
Transmission standard:
Reception range:
Programme positions:
Programme display:
Antenna input:
Mains voltage:
Always switch off the TV with the main power switch before you
clean it!
Use a soft, dry or slightly moist cloth to clean the cabinet. Do not use
any strong detergents as they may damage the finish and labels.
PAL B/G
channels 21 69, special channels 1 41
100 (0... 99)
OSD
75 Ω
230 V, 50 Hz
Use a damp chamois leather to clean the screen.
Power consumption
TV set::
60 W
Misic power:
2 x 15W, 8Ω
Consumption of energy per hour:
60 Wh
Standby:
5,5 W
Fault-finding
Poor picture quality
All settings can be stored individually for each programme position.
• Is the TV set correctly tuned to the station?
All supply voltages are protected against short-circuits and switch
off automatically if the load becomes too high. They switch themselves on again as soon as the excessive load disappears. See also
the Alignment Instructions.
• Is the TV set or its antenna located close to loudspeakers, ungrounded audio devices or fluorescent lamps?
• Hills and high buildings can result in double pictures or „ghost“
images.
• Check that you have entered the correct channel and, if necessary,
adjust the fine tuning.
Repairs
No picture
The TV should only be opened and repaired by qualified
service personnel!
CAUTION! DANGER!
Consult your dealer when repairs are necessary.
Any unauthorized attempts to open or repair the TV may result in the
guarantee becoming null and void.
• Is the antenna connected correctly?
• Is the antenna cable in good condition and equipped with the correct plugs?
• Are the plugs fully inserted in the antenna socket?
• Have you pressed the correct key on the remote control? Try pressing the key again.
Adequate shielding is provided against X-ray radiation (see approval
certificate on the rear panel of the TV).
Changing the high voltage or fitting a different type of picture tube
may cause an increased amount of X-ray radiation. Televisions modified in such a manner are no longer in keeping with this approval
certificate and must not be used!
No sound
• Have you switched off the sound by pressing the mute key?
• If you hear the sound from only one speaker, check in the SOUND
menu that the balance is set correctly.
If you cannot find the reason for the fault, switch the TV set off
for a few seconds and switch it back on again.
Never attempt to repair the TV set yourself. Have all repairs
made by an authorised dealer.
35
✍
✍
36
TV. VIDEO. AUDIO. MECABLITZ
Metz - Werke GmbH & Co KG • Postfach 1267 • D-90506 Zirndorf • [email protected] • www.metz.de
01/48/30
Unterhaltungselektronik
Fotoelektronik
Metz. Immer erster Klasse.
Kunststofftechnik
Industrieelektronik
Ķƴķ
601 47 0011.A2