1
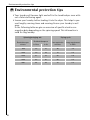
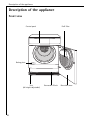
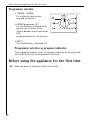
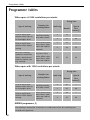
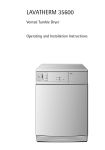
LAVATHERM 32600
Vented Tumble Dryer
Operating and Installation Instructions
Dear customer,
Please read these operating instructions through carefully, before using
the appliance.
Please ensure you fully understand the safety instructions on the first
pages of these operating instructions! Retain this instruction book for
future reference, and pass on to any future owners.
1
The warning triangle and/or the key words (Warning!, Caution!,
Important!), emphasize information which is important for your safety
or the correct functioning of the appliance. It is essential that this
information is observed.
0 This symbol guides you step by step when operating the appliance.
3
This symbol gives additional information and practical tips on using the
appliance.
2
Tips and information about the economical and environmentally
friendly use of the machine are marked with the clover symbol.
If you require assistance or advice on your appliance, please contact
our Customer Care Department by letter or telephone:
Customer Care Department
AEG Domestic Appliances
55-77 High Street
Slough
Berkshire SL 1 1DZ
Tel: 08705 350350
Printed on environmentally friendly paper ...
Whoever thinks ecologically also acts ecologically.
2
Contents
Important Safety Information . . . . . . . . . . . . . . . . . . . . . . . . . . . . . . . . . . . . 5
General Safety . . . . . . . . . . . . . . . . . . . . . . . . . . . . . . . . . . . . . . . . . . . . . . . . . . 5
Child Safety . . . . . . . . . . . . . . . . . . . . . . . . . . . . . . . . . . . . . . . . . . . . . . . . . . . . 6
For the installer - Safety information . . . . . . . . . . . . . . . . . . . . . . . . . . . . . 7
Technical data . . . . . . . . . . . . . . . . . . . . . . . . . . . . . . . . . . . . . . . . . . . . . . . . . 8
Electrical Connection . . . . . . . . . . . . . . . . . . . . . . . . . . . . . . . . . . . . . . . . . . . 9
Site Preparation . . . . . . . . . . . . . . . . . . . . . . . . . . . . . . . . . . . . . . . . . . . . . . . . 11
Venting . . . . . . . . . . . . . . . . . . . . . . . . . . . . . . . . . . . . . . . . . . . . . . . . . . . . . . . . 12
Venting through a Vent Hose . . . . . . . . . . . . . . . . . . . . . . . . . . . . . . . . . . . 13
Venting without a Vent Hose . . . . . . . . . . . . . . . . . . . . . . . . . . . . . . . . . . . 14
General Information . . . . . . . . . . . . . . . . . . . . . . . . . . . . . . . . . . . . . . . . . . . . 15
Disposal . . . . . . . . . . . . . . . . . . . . . . . . . . . . . . . . . . . . . . . . . . . . . . . . . . . . . . . 15
Packaging . . . . . . . . . . . . . . . . . . . . . . . . . . . . . . . . . . . . . . . . . . . . . . . . . . . . . . 15
Tumble Dryer . . . . . . . . . . . . . . . . . . . . . . . . . . . . . . . . . . . . . . . . . . . . . . . . . . . 15
Environmental protection tips . . . . . . . . . . . . . . . . . . . . . . . . . . . . . . . . . . . 16
Description of the appliance . . . . . . . . . . . . . . . . . . . . . . . . . . . . . . . . . . . . .
Front view . . . . . . . . . . . . . . . . . . . . . . . . . . . . . . . . . . . . . . . . . . . . . . . . . . . . . .
Control panel . . . . . . . . . . . . . . . . . . . . . . . . . . . . . . . . . . . . . . . . . . . . . . . . . . .
Programme selector . . . . . . . . . . . . . . . . . . . . . . . . . . . . . . . . . . . . . . . . . . . . .
Programme selector as progress indicator . . . . . . . . . . . . . . . . . . . . . . . .
18
18
19
20
20
Before using the appliance for the first time . . . . . . . . . . . . . . . . . . . . . . 20
Brief operating instructions . . . . . . . . . . . . . . . . . . . . . . . . . . . . . . . . . . . . . 21
Drying . . . . . . . . . . . . . . . . . . . . . . . . . . . . . . . . . . . . . . . . . . . . . . . . . . . . . . . . .
Prepare the laundry . . . . . . . . . . . . . . . . . . . . . . . . . . . . . . . . . . . . . . . . . . . . . .
Open the door . . . . . . . . . . . . . . . . . . . . . . . . . . . . . . . . . . . . . . . . . . . . . . . . . .
Load the laundry . . . . . . . . . . . . . . . . . . . . . . . . . . . . . . . . . . . . . . . . . . . . . . . .
Select the drying programme . . . . . . . . . . . . . . . . . . . . . . . . . . . . . . . . . . . . . .
Start the drying programme . . . . . . . . . . . . . . . . . . . . . . . . . . . . . . . . . . . . . . .
Removing laundry or loading laundry when necessary . . . . . . . . . . . . . . . . .
End of the drying process . . . . . . . . . . . . . . . . . . . . . . . . . . . . . . . . . . . . . . . . .
Removing the laundry . . . . . . . . . . . . . . . . . . . . . . . . . . . . . . . . . . . . . . . . . . . .
Switch-off the dryer . . . . . . . . . . . . . . . . . . . . . . . . . . . . . . . . . . . . . . . . . . . . .
Clean the fluff filter . . . . . . . . . . . . . . . . . . . . . . . . . . . . . . . . . . . . . . . . . . . . .
22
22
22
22
22
23
24
24
24
24
25
3
Contents
Programme tables . . . . . . . . . . . . . . . . . . . . . . . . . . . . . . . . . . . . . . . . . . . . . . 26
A small glossary of textile information . . . . . . . . . . . . . . . . . . . . . . . . . . . . 27
Care symbols . . . . . . . . . . . . . . . . . . . . . . . . . . . . . . . . . . . . . . . . . . . . . . . . . . . 27
Cleaning and maintenance . . . . . . . . . . . . . . . . . . . . . . . . . . . . . . . . . . . . . .
Cleaning the filter area . . . . . . . . . . . . . . . . . . . . . . . . . . . . . . . . . . . . . . . . . . .
Cleaning the drum . . . . . . . . . . . . . . . . . . . . . . . . . . . . . . . . . . . . . . . . . . . . . . .
Cleaning the panel and operating parts . . . . . . . . . . . . . . . . . . . . . . . . . . . . .
28
28
28
28
Something not working? . . . . . . . . . . . . . . . . . . . . . . . . . . . . . . . . . . . . . . . . 29
Door Reversal Instructions . . . . . . . . . . . . . . . . . . . . . . . . . . . . . . . . . . . . . . . 31
Special accessories . . . . . . . . . . . . . . . . . . . . . . . . . . . . . . . . . . . . . . . . . . . . . . 33
Stacking kit . . . . . . . . . . . . . . . . . . . . . . . . . . . . . . . . . . . . . . . . . . . . . . . . . . . . 33
Vent hose . . . . . . . . . . . . . . . . . . . . . . . . . . . . . . . . . . . . . . . . . . . . . . . . . . . . . . 33
Guarantee Conditions . . . . . . . . . . . . . . . . . . . . . . . . . . . . . . . . . . . . . . . . . . . 34
Service & Spare Parts . . . . . . . . . . . . . . . . . . . . . . . . . . . . . . . . . . . . . . . . . . . 36
Index . . . . . . . . . . . . . . . . . . . . . . . . . . . . . . . . . . . . . . . . . . . . . . . . . . . . . . . . . . 37
4
Important Safety Information
1Important Safety Information
Your safety is of paramount importance, please ensure you read these
warnings before installing or using the appliance. If you are unsure
about any of the meanings of these warnings, contact the Customer
Care Department.
General Safety
• Any electrical work required to install this appliance should be
carried out by a qualified electrician or competent person.
• Please follow the safety instructions in the installation section of this
instruction book.
• This appliance is designed to dry normal domestic laundry. If the
appliance is used for any other purpose or is incorrectly used, the
manufacturer accepts no liability for any damages which may result.
• Switch off the appliance and isolate from the mains supply before
carrying out any maintenance or cleaning work.
• Never operate the appliance if the mains cable is damaged or if the
control panel, work top or base area are damaged allowing internal
components to be accessible.
• Do not spray the tumble dryer with water.
• Do not dry textiles which have been treated with flammable cleaning
agents and solvents.
• Clothes or articles of laundry which are dripping wet should not be
placed in the dryer. Only load well-spun laundry.
• Laundry items containing sponge rubber or rubber-like materials
must be not be dried in the tumble dryer.
• If the drying cycle is interrupted, the laundry or drum may be hot.
• Do not operate the appliance with a damaged filter or with no filter
at all.
• Do not overload the appliance.
• It is dangerous to alter the specifications or attempt to modify this
product in any way.
• Adaptors and extension cables must not be used. There is risk of fire
because of overheating!
5
Important Safety Information
• Do not use the mains cable to pull the plug out of the socket.
• Repairs to the appliance should only be carried out by qualified personnel. Repairs carried out by inexperienced persons may cause injury
or serious malfunction. Contact your local AEG Service Force Centre
for repair.
• Washing that is in poor condition (heavily worn) and items with loose
fillings (cushions) that could break open must not be dried or aired.
There is a risk of fire!
• Washing with rigid components (foot mats) will cover the air slots;
the slots will also be covered if the drum is overfilled. Observe the
maximum load of 5 kg. There is a risk of overheating which could
cause a fire!
• Only dry washing that does not contain any explosive objects (fire
lighters, spray cans). There is a risk of fire or an explosion!
• In the case of washer / dryer tower combinations, do not place any
objects on the dryer during use as they could drop down.
Child Safety
• The appliance is designed to be operated by adults. Children should
not be allowed to tamper with the controls or play with the appliance.
• Pets and children have been known to climb into tumble dryers.
Please check the drum before use.
• Keep all packaging away from children.
• When disposing of the appliance, cut off the mains cable and destroy
the plug. Disable the door catch to prevent young children being
trapped inside.
6
For the installer - Safety information
For the installer - Safety information
• Check the appliance for transportation damage before installation.
• Any electrical work required to install this appliance should be carried
out by a qualified electrician or competent person.
• This tumble dryer is designed to be vented through to the open air. It
should have its own ventilation system which should not be joined
with any other ventilation system connected to any other appliance.
• The dryer must not be vented into a chimney, or flue pipe designed to
carry the exhaust from a fuel burning heating appliance.
• If the tumble dryer is installed next to a fuel burning stove, a heat
insulation non-flammable pad must be inserted between the fuel
burning stove and the tumble dryer: (dimensions 85 x 57 cm).
• If the dryer is installed in a room with a fuel burning heating appliance, consult your local Corgi registered installer.
• The tumble dryer should not be installed in situations which may be
subject to freezing temperatures.
• The installation site must be well ventilated.
• Ensure the appliance does not stand on the electrical supply cable.
• If the machine is situated on carpeted floor, please adjust the feet in
order to allow air to circulate freely.
• The tumble dryer must be level.
• Observe the safety precautions in the operating instructions for your
dryer.
• Air is drawn in through vents at the rear and front of this appliance.
Therefore, keep the area around the appliance clear.
7
Technical data
Technical data
Height x Width x Depth
Depth with the door open
Height adjustable from
Empty weight
Load (depending on the programme)
85x60x60cm
117cm
1.0/–0.4cm
approx. 40kg
max. 5kg
Power consumption in acc. with IEC 1121 s.e.
3.4kWh
(5 kg Cotton, spun at 800 revolutions per minute)
Area of use
Household
Permissible ambient temperature
+5°C up to +35°C
;
8
This appliance complies with the following EC directives:
– 73/23/EEC of 19/2/1973 ’Low voltage directive’
– 89/336/EEC of 3/5/1989 ’EMC directive’ including the
Modification directive 92/31/EEC
Electrical Connection
Electrical Connection
Any electrical work required to install this appliance should be carried
out by a qualified electrician or competent person.
1
WARNING - THIS APPLIANCE MUST BE EARTHED.
The manufacturer declines any liability should these safety measures not be observed.
Before switching on, make sure the electricity supply voltage is the
same as that indicated on the appliance rating plate. The rating plate is
located inside the door.
The appliance is supplied with a 13amp plug fitted. In the event of having to change the fuse in the plug supplied, a 13amp ASTA approved
(BS 1362) fuse must be used.
Should the plug need to be
replaced for any reason. The
wires in the mains lead are coloured in accordance with
the following code:
Green and Yellow : Earth
Blue
: Neutral
Brown
: Live
Green
& Yellow
Blue
Brown
Cord Clamp
9
Electrical Connection
• The wire coloured green and yellow must be connected to the terminal marked with the letter “E“ or by the earth symbol
or coloured
green and yellow
• The wire coloured blue must be connected to the terminal “N“ or coloured black.
• The wire coloured brown must be connected to the terminal marked
“L“ or coloured red.
• Upon completion there must not be cut, or stray strands of wire
present and the cord clamp must be secure over the outer sheath.
1
WARNING: A cut off plug inserted into a 13 amp socket is a serious
safety (shock) hazard. Ensure that the cut off plug is disposed of
safely.
Permanent connection
In the case of a permanent connection it is necessary that you install a
double pole switch between the appliance and the electricity supply
(mains), with a minimum gap of 3 mm between the switch contacts
and of a type suitable for the required load in compliance with the current electrical regulations.
The switch must not break the yellow and green earth cable at any
point.
10
Site Preparation
Site Preparation
• The installation surface must be clean and dry.
• Do not install on a deep pile carpet.
• If the appliance is installed next to a heat source (e. g. cooking appliance), a heat insulation pad (85 x 57 cm) must be placed between the
washing machine and the heat source.
• Do not install the appliance where the temperature may fall below
freezing or rise above 35°C.
• Please ensure that when the appliance is installed it is easily
accessible for the engineer in the event of a breakdown.
Levelling the Appliance
The appliance must be levelled using the adjustable feet. Use a
screwdriver to adjust to the feet until the appliance is level.
11
Venting
Venting
The appliance expels hot, moist air which must be able to flow freely
from the tumble dryer vent.
Tumble Dryer Vents
View from left
Rear view
View from right
The most efficient way of venting the expelled air is via a vent hose
through to the outside.
12
Venting
Venting through a Vent Hose
The vent hose expelling the hot air should be 100 mm diameter and no
longer than 4 meters. Avoid bends in the vent hose as this will reduce
the air flow. The maximum length of the vent hose may be:
4 meters with 0 bends, or
2 meters with 2 bends.
If the vent hose is to be permanently installed to the outside, a wall
vent kit or suitable cover should be used on the outside wall.
Example:
A vent hose (Part number: 647 000 010) and wall vent kit (Part number:
647 000 020) are available from your local AEG Service Force Centre.
Ensure the vent hose is not squashed. The drying efficiency of the
tumble dryer will be affected and may cause the safety cut outs to
operate.
1
Warning! The vent hose must not be connected to a flue pipe or
chimney designed to carry the exhaust from a fuel burning heating
appliance.
13
Venting
Venting without a Vent Hose
If a vent hose is not connected to the tumble dryer, the air can be
expelled into the installation room providing the following precautions
are observed.
• The vent(s) in use must be at least 30 cm from the wall or any other
object.
• Any vent less than 30 cm from a wall or other object must be closed
using the cover provided.
• The installation room must be well ventilated during the drying cycle.
14
General Information
3General Information
• To prevent creasing do not exceed the maximum load stated in the
programme table.
• When using fabric conditioning sheets, we recommend the conditioning sheet is pinned (using a safety pin) to an article of laundry
and placed in the tumble dryer.
• When using fabric conditioning sheets or drying starched washing in
the tumble dryer, it is important to clean the drum to prevent a build
up of any residues/deposits. See maintenance and cleaning section.
• Please ensure the appliance is easily accessible to an engineer after
installation.
2Disposal
Packaging
• Dispose of the packaging material correctly. All packaging materials
are environmentally friendly and can be disposed of without any
danger to the environment.
• The external plastic covering and bags inside are made of Polyethylen
(marking >PE<).
• The padding is made of CFC free expanded polystyrene
(marking >PS<).
Tumble Dryer
When disposing of the tumble dryer.
• Cut off the mains cable and destroy the plug.
• Disable the door catch to prevent young children becoming trapped
inside.
• Use an authorised disposal site.
15
Environmental protection tips
2 Environmental protection tips
• Your laundry will become light and soft in the tumble dryer even without a fabric softening agent.
• Loosen your laundry before loading it into the dryer. This helps to prevent lengthy running times and creasing. Ensure your laundry is well
spun.
In the following table we give an overview of specific electric consumption data depending on the spinning speed. This information is
valid for 5kg laundry:
Spinning/wringing out:
16
Drying cycle:
Residual dampness
Revolutions per
minute
Time required in Energy requirement
minutes
in kWh
in litres
in %
800
3.5
70
80
3.4
1000
3.0
59
70
2.9
1200
2.7
53
65
2.6
1400
2.5
50
60
2.4
1600
2.2
44
55
2.2
Environmental protection tips
• Observe the maximum load instructions. Whenever possible, dry full
loads.
• Select the appropriate drying programme for the type and quantity of
laundry. The dryer will then operate as economically as possible. Some
typical consumption values:
Type of
washing
Desired degree of
dryness
Load in kg
Duration in
minutes
Power
consumption in
kWh
Cotton1
Cupboard dry
5
80
3.4
Cotton1
Hand iron
5
65
2.5
Mixed fabrics2
Cupboard dry
2.5
35
1.3
1) Spun with 800 revolutions per minute
2) Prespun with 1000 revolutions per minute
• Only use the W SPECIAL CARE button for loads up to 2.5kg.
• Clean the fluff filter after every drying programme!
17
Description of the appliance
Description of the appliance
Front view
Fluff filter
Control panel
Rating plate
Feet
(all height-adjustable)
18
Removable Plinth
Reversible door
Description of the appliance
Control panel
A
B
C
A
B
C
D
D
Programme selector: To select the drying time required
SPECIAL CARE button W: For delicate fabrics
START button X: For starting the drying programme
OPERATING light: illuminates when the appliance is switched on
19
Before using the appliance for the first time
Programme selector
• 150MIN - 30MIN:
for setting the drying time
required in minutes.
• AIRING programme V:
for smoothing out creased outer
garments in a cold air flow;
slightly dampen the creased areas
first;
programme duration: 10 minutes.
• OFF Y:
The tumble dryer is switched off.
Programme selector as progress indicator
The programme selector serves as a progress indicator by moving clockwise until the end of the programme is reached.
Before using the appliance for the first time
0 Wipe the drum of the dryer with a moist cloth.
20
Brief operating instructions
Brief operating instructions
• Ensure the laundry is well spun before tumble drying.
• Prepare the laundry.
• Load the laundry.
• Select the drying programme using the programme selector.
– Press the W SPECIAL CARE button if required.
• Start the programme.
While the programme is running you can open the door to remove or
add laundry.
At the end of the programme:
• Remove the laundry.
• Clean the fluff filter.
• Switch-off the dryer.
21
Drying
Drying
Prepare the laundry
• To prevent tangled bundles of laundry: Close zip fasteners; button-up
bed linen and pillow cases; tie-together loose tapes, e.g. aprons.
• Empty all pockets.
• Remove all metal objects (paper clips, pins, etc.).
• Turn clothing consisting of double-layer fabric inside out (such as
cotton-lined anoraks with the cotton layer facing outwards). The fabrics will dry better.
• Loosen the laundry.
Open the door
To open the door:
• Press firmly against the door (Press position
).
Load the laundry
1
Caution! Ensure the laundry does not get caught in the door when the
door is closed! This could damage the laundry!
• Load the prepared laundry into the dryer.
Select the drying programme
0 Select the suitable drying programme
using the programme selector (see "Programme tables").
0 If required, select the button W SPECIAL
CARE.
22
Drying
• SPECIAL CARE button
This programme operates with reduced heat.
Press the SPECIAL CARE button for fabrics bearing the care symbol S. Gentle drying is advisable
for heat-sensitive fabrics (such as acrylic and viscose).
Start the drying programme
0 Press the START button.
23
Drying
Removing laundry or loading laundry when necessary
You can interrupt the drying process at any time to remove some of the
laundry or to add more laundry.
0 Open the door.
1
Caution! The laundry and the drum may be
hot.
0 Remove or add more laundry.
0 Close the door.
0 Press the START button to resume the drying
process.
End of the drying process
The cooling phase starts shortly before the end of the drying process:
The heater is switched-off during this phase.
After the cooling phase you can remove the laundry from the dryer.
The crease guard phase follows automatically after the drying process.
The drum rotates intermittently. This keeps your laundry loose and
crease-free.
Removing the laundry
0 Open the door and remove the laundry.
Switch-off the dryer
0 Turn the programme selector to Y OFF.
24
Drying
Clean the fluff filter
To ensure efficient operation of the tumble dryer, clean the fluff filter
after each drying programme.
Also check whether there are any remnants or fluff from the washing
in the drum; remove immediately.
0 Press the catch of the filter lid downwards.
The filter lid will open.
0 Take-out the fluff filter.
0 Remove fluff out of the fluff filter, with
a moistened hand.
0 Re-insert the fluff filter.
0 Press against the filter lid until it catches
into the locking device.
3
The filter lid cannot catch shut without
the fluff filter in place and the door cannot be closed.
1
Warning! The dryer must not be operated with a damaged or blocked
fluff filter.
25
Programme tables
Programme tables
When spun at 1000 revolutions per minute
Drying time
Examples for
washing/fabrics
Type of washing
Thick or multi-layer
cottons which have to
be thoroughly dried.
Towelling laundry,
bath robes, towels
Thick or multi-layer
cottons which require
ironing.
Sheets, pillow cases,
duvet covers, table
cloths and napkins,
teatowels
Easy-care washing,
synthetics and mixed
fabrics, which do not
need any further care
(e.g. ironing).
Easy-care, shirts,
sheets, pillow cases,
duvet covers, table
cloths and napkins
Load in kg
Normal
Special
Care
button W
5
70
--
2
35
65
5
55
--
2
30
55
2.5
30
50
When spun with 1200 revolutions per minute
Drying time
Examples for
washing/fabrics
Type of washing
Thick or multi-layer
cottons which have to
be thoroughly dried.
Towelling laundry,
bath robes, towels
Thick or multi-layer
cottons which require
ironing.
Sheets, pillow cases,
duvet covers, table
cloths and napkins,
teatowels
Load in kg
Normal
Special
Care
button W
5
65
--
2
30
60
5
50
--
2
25
50
AIRING programme V
The washing is treated for 10 minutes in a cold stream of air for smoothing out
creased outer garments.
26
A small glossary of textile information
A small glossary of textile information
Care symbols
Ensure articles to be dried are suitable for tumble drying. If they are
one of the following symbols should be present on the care label:
R
Normal drying
S
Drying with special care (press the W SPECIAL CARE button!)
Q
This fabric can be tumble dried. The fabric manufacturer does not stipulate if the piece of laundry should be dried on a normal or gentle programme.
T
Do not tumble dry
If you do not find any of these care symbols:
Dry whites and coloureds as well as mixed fabrics at normal temperature. Press the W SPECIAL CARE button if you are drying delicate fabrics.
• Wool
Do not dry any woollen items in the dryer.
• Fabrics sensitive to temperatures
Dry fabrics sensitive to temperatures (such as acrylic or viscose) and
textiles with the care label S with the W SPECIAL CARE button.
• Cotton jersey and hosiery have a tendency to shrink! Do not dry these
fabrics excessively.
• New coloured textiles
To avoid the possibility of dye transference do not dry new coloured
textiles together with light-coloured laundry.
27
Cleaning and maintenance
Cleaning and maintenance
Cleaning the filter area
1
Important! A small amount of fluff may reach the area around the
fluff filter. Therefore, you should clean the entire filter area from time
to time, or at least every three months.
0 Remove the fluff filter.
0 Hold the filter lid by the top and pull it forwards until it is released from both holders.
0 Remove the fluff from the entire filter area
– preferably with a vacuum cleaner.
0 Press both pins of the filter lid into the
holders on the door until they click in.
0 Reinsert the fluff filter.
0 Press against the filter lid until it clicks into
the lock.
Cleaning the drum
1 Warning! Do not clean the stainless steel drum with abrasive deter-
gents or steel wool!
0 Wipe the inside of the drum and the drum fins with white vinegar to
avoid a build up of residues/deposits. This is particularly important if
you regulary use fabric conditioning sheets or dry starched items in the
dryer.
Cleaning the panel and operating parts
1 Warning! Do not use household furniture polish or aggressive detergents.
0 Wipe over the panel and operating parts with a damp cloth.
Only use warm water.
28
Something not working?
Something not working?
If the tumble dryer is not working correctly please carry out the following checks before calling an engineer.
Symptom
Possible cause
Solution
The appliance is not
plugged in
Plug in the appliance
The fuse has blown
Check the fuse
The X STARTbutton has
The tumble dryer will not start not been pressed
Press the X START
button
No programme has been
selected
Select the required
programme
The door is not properly
closed
Close the door
The wrong programme
has been selected
Select a different
programme
Fluff filter blocked
Clean the fluff filter
The tumble dryer has
been overloaded
Observe the maximum
loads stated for each
programme
Laundry not sufficiently
spun prior to tumble
drying
Ensure the wash load is
well spun before tumble
drying
The vent hose may be
obstructed
Check the vent is not
blocked or squashed
Fluff filter is clogged
Clean the fluff filter
Fluff filter has not been
inserted correctly and/or
the filter lid not closed
Replace the fluff filter
and ensure the filter lid is
closed
The results are unsatisfactory
The drying process takes
unusually long
The door cannot be closed
29
Something not working?
If after these checks, the tumble dryer still does not work, contact your
local AEG Service Force Centre.
Please note that it will be necessary to provide proof of purchase for
any in-guarantee service calls.
In-guarantee customers should ensure that the above checks have been
made as the engineer will make a charge if the fault is not a mechanical or electrical breakdown.
30
Door Reversal Instructions
Door Reversal Instructions
The door opening direction can be changed if required.
1
Warning! Before reversing the door, isolate the appliance from the
mains supply.
Proceed as follows to reverse the door opening direction:
ACB
F
E
H
D
J G
F
E
ACB
0 Remove the screws A on the front panel of the appliance.
0 Take off the door by sliding the door towards the centre of the
machine, disengaging the hinges from the front panel.
0 Remove the screws B on the inside of the door and take off the
hinges C.
0 Remove the screw and slide out the door catch D.
0 To release the coverplates E, F & G use a small screwdriver to depress
the small round plastic locating peg and simultaneously push the cover
plate towards the peg.
31
Door Reversal Instructions
0 Reposition hinges C and door catch D on the opposite side of the door
and replace screws.
0 To release the door lock H remove the fixing screw and slide the lock
upwards. To disconnect the wiring plug press the two plastic securing
levers on the plug and pull out.
0 Coverplate J is removed as E, F & G above. Disconnect the wiring plug
by pressing the two plastic securing levers on the plug and pull out.
0 To reconnect door catch H on the opposite side of the appliance connect the wiring plug, insert the lock and replace screw.
0 Attach wiring plug to coverplate J and clip in place.
0 Reposition door on the opposite side of the appliance by inserting the
hinges and secure with screws.
1
32
Warning! The appliance must not be operated until all plastic parts
have been refitted.
Special accessories
Special accessories
You can obtain the following special accessories from your retailer.
Stacking kit
With these kits you can combine your laundry dryer with any LAVAMAT
automatic washing machine to a washing and drying column. The
appliances are stacked in space-economising manner in this arrangement, the washing machine at the bottom and the laundry dryer at the
top.
The following two kits are available:
– without plate
– with extendible deposit plate
E-No. 916 018 900
E-No. 916 018 901
Vent hose
To conduct exhaust fumes, a flexible spiral conduit with a diameter of
105 mm can be obtained through your AEG Service Force Centre or at a
specialised electrical shop. This spiral conduit is easy to fit and is easily
attached to the vented tumble dryer using the adapter that comes with
the appliance (see p. 13 and enclosed booklet „Installation Instructions
for Vented Tumble Dryer“).
33
Guarantee Conditions
Guarantee Conditions
AEG offer the following guarantee to the first purchaser of this appliance.
1. The guarantee is valid for 12 months commencing when the appliance is handed over to the first retail purchaser, which
must be verified by purchase invoice or similar documentation.
The guarantee does not cover commercial use.
2. The guarantee covers all parts or components which fail due to
faulty workmanship or faulty materials. The guarantee does not
cover appliances where defects or poor performance are due to misuse, accidental damage, neglect, faulty installation,unauthorised
modification or attempted repair, commercial use or failure to
observe requirements and recommendations set out in the instruction book.
This guarantee does not cover such parts as light bulbs, removable
parts of glass or plastic, dust bags or filters.
3. Should guarantee repairs be necessary the purchaser must inform
the nearest customer service office (manufacturer´s service or
authorised agent). AEG reserves the right to stipulate the place of
the repair (i. e. the customer´s home, place of installation or AEG
workshop).
4. The guarantee or free replacement includes both labour and materials.
5. Repairs carried out under guarantee do not extend the guarantee
period for the appliance. Parts removed during guarantee repairs
become the property of AEG.
6. The purchaser´s statutory rights are not affected by this guarantee.
34
Guarantee Conditions
European Guarantee
If you should move to another country within Europe then your guarantee moves with you to your new home subject to the following qualifications:
– The guarantee starts from the date you first purchased your product.
– The guarantee is for the same period and to the same extent for
labour and parts as exist in the new country of use for this brand or
range of products.
– This guarantee relates to you and connot be transferred to another
user.
– Your new home is within the European Community (EC) or European
Free Trade Area.
– The product is installed and used in accordance with our instructions
and is only used domestically, i. e. a normal household.
– The product is installed taking into account regulations in your new
country.
Before you move please contact your nearest Customer Care Centre,
listed below, to give them details of your new home. They will then
ensure that the local Service Organisation is aware of your move and
able to look after you and your appliances.
France
Senlis
+33 (0) 3 44 62 29 29
Germany
Nürnberg
+49 (0) 911 323 2600
Italy
Pordenone
+39 (0) 1678 47053
Sweden
Stockholm
+46 (0) 8 738 7910
UK
Slough
+44 (0) 1753 219899
35
Service & Spare Parts
Service & Spare Parts
If after carrying out the necessary checks there is still a fault with your
appliance please contact your local AEG Service Force Centre.
In guarantee customers should ensure that the suggested checks
have been made as the engineer will make a charge if the fault is
not a mechanical or electrical breakdown.
Please note that proof of purchase is required for in-guarantee service
calls.
Service & Spare Parts
If you require a service engineer or wish to purchase spare parts,
contact your local AEG Service Force Centre, by telephoning
08705 929 929
Help us to help you
Please determine your type of enquiry before telephoning. When you
contact us we need to know.
1. Your name, address and post code.
2. Your telephone number.
3. Clear and concise details of the fault.
–What is the fault?
–When does the fault occur?
4. The model, production number and product identification number.
5. Date of purchase.
This information can be found on
the rating plate, so you have these
numbers to hand we recommend
you write them below.
Model ..............................................
PNC no. ..............................................
S no.
..............................................
Customer care
For general enquiries regarding your AEG appliance, or for further
information on AEG products please contact our Customer Care
Department or visit our website at www.aeghome.co.uk
AEG Domestic Appliances
55-77 High Street
Slough
Berkshire SL1 1DZ
Tel: 08705 350350 *
* Calls to this number may be recorded for training purposes.
36
Index
A
S
Acrylate . . . . . . . . . . . . . . . . . . . . . . . . . . . . 23
Acrylic . . . . . . . . . . . . . . . . . . . . . . . . . . . . . 27
AEG Service Force Centre . . . . . . . . . . . . . . 30
Anorak . . . . . . . . . . . . . . . . . . . . . . . . . . . . . 22
Safety Information . . . . . . . . . . . . . . . . . . . . 5
Service & Spare Parts . . . . . . . . . . . . . . . . . .36
SPECIAL CARE . . . . . . . . . . . . . . . . . . . . 17, 27
Stacking kit . . . . . . . . . . . . . . . . . . . . . . . . . .33
START button . . . . . . . . . . . . . . . . . . . . . . . .23
C
Closing the door . . . . . . . . . . . . . . . . . . . . . 25
Conditioning sheets . . . . . . . . . . . . . . . . . . 15
Connection . . . . . . . . . . . . . . . . . . . . . . . . . . 9
Control panel . . . . . . . . . . . . . . . . . . . . . . . . 19
COOL AIR . . . . . . . . . . . . . . . . . . . . . . . . . . . 20
Cool-down phase . . . . . . . . . . . . . . . . . . . . 24
Crease protection phase . . . . . . . . . . . . . . . 24
Customer care . . . . . . . . . . . . . . . . . . . . . . . 36
T
Two-layer fabric . . . . . . . . . . . . . . . . . . . . . .22
V
Viscose . . . . . . . . . . . . . . . . . . . . . . . . . . . . . .27
W
Wool . . . . . . . . . . . . . . . . . . . . . . . . . . . . . . .27
D
Disposal . . . . . . . . . . . . . . . . . . . . . . . . . . . . 15
Door Reversal . . . . . . . . . . . . . . . . . . . . . . . 31
E
Easy-care fabrics . . . . . . . . . . . . . . . . . . . . . 27
Environmental protection . . . . . . . . . . . . . 16
F
Fluff filter . . . . . . . . . . . . . . . . . . . . . . . . . . 25
Furniture polish . . . . . . . . . . . . . . . . . . . . . . 28
G
Glossary . . . . . . . . . . . . . . . . . . . . . . . . . . . . 27
Guarantee . . . . . . . . . . . . . . . . . . . . . . . . . . 34
I
Installation . . . . . . . . . . . . . . . . . . . . . . . . . . . 7
O
Opening the door . . . . . . . . . . . . . . . . . . . . 22
P
Packaging . . . . . . . . . . . . . . . . . . . . . . . . . . . 15
R
Rating plate . . . . . . . . . . . . . . . . . . . . . . . . . 36
37
38
39
AEG Hausgeräte GmbH
Postfach 1036
D-90327 Nürnberg
http://www.aeg.hausgeraete.de
© Copyright by AEG
822 944 090 –00- 0501/PRO