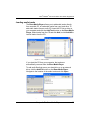
1
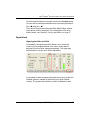
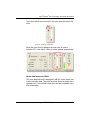
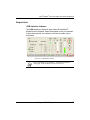
Bose® Modeler® Plus 6.5 Software
User Guide Supplement
Bose® Modeler® Plus 6.5 Software User Guide Supplement
Contents
Chapter 1: Getting Started
1
System requirements . . . . . . . . . . . . . . . . . . . . . . . . . . . . . . . . . 1
Registration. . . . . . . . . . . . . . . . . . . . . . . . . . . . . . . . . . . . . . . . . 2
Installation. . . . . . . . . . . . . . . . . . . . . . . . . . . . . . . . . . . . . . . . . . 2
Setup . . . . . . . . . . . . . . . . . . . . . . . . . . . . . . . . . . . . . . . . . . . . 10
Hardware Key. . . . . . . . . . . . . . . . . . . . . . . . . . . . . . . . . . . . . .10
Auditioner® Playback System III. . . . . . . . . . . . . . . . . . . . . . . . 10
Chapter 2: Modeler Plus Software Tutorial
13
Chapter 3: The Bose Media Player
23
Launching the Bose Media Player . . . . . . . . . . . . . . . . . . . . . . 23
Loading audio tracks. . . . . . . . . . . . . . . . . . . . . . . . . . . . . . . . . 25
Playing audio tracks . . . . . . . . . . . . . . . . . . . . . . . . . . . . . . . . . 26
Chapter 4: The Playlist tab
29
Playlist panel. . . . . . . . . . . . . . . . . . . . . . . . . . . . . . . . . . . . . . . 29
Item selection . . . . . . . . . . . . . . . . . . . . . . . . . . . . . . . . . . . . . .29
Listener state . . . . . . . . . . . . . . . . . . . . . . . . . . . . . . . . . . . . . .31
Listener attributes . . . . . . . . . . . . . . . . . . . . . . . . . . . . . . . . . . . 31
Modeler views . . . . . . . . . . . . . . . . . . . . . . . . . . . . . . . . . . . . .32
Sets panel. . . . . . . . . . . . . . . . . . . . . . . . . . . . . . . . . . . . . . . . . 33
Chapter 5: The Playback tab
37
Input block . . . . . . . . . . . . . . . . . . . . . . . . . . . . . . . . . . . . . . . . 37
Playback queue . . . . . . . . . . . . . . . . . . . . . . . . . . . . . . . . . . . . 37
Signal block . . . . . . . . . . . . . . . . . . . . . . . . . . . . . . . . . . . . . . . 39
Signal gain slider and field . . . . . . . . . . . . . . . . . . . . . . . . . . . . 39
System clip indicator . . . . . . . . . . . . . . . . . . . . . . . . . . . . . . . . 40
Noise block . . . . . . . . . . . . . . . . . . . . . . . . . . . . . . . . . . . . . . . . 40
Noise gain offset slider and field . . . . . . . . . . . . . . . . . . . . . . . 40
Noise level meter and field . . . . . . . . . . . . . . . . . . . . . . . . . . . . 41
Noise mute button . . . . . . . . . . . . . . . . . . . . . . . . . . . . . . . . . . 42
Room block. . . . . . . . . . . . . . . . . . . . . . . . . . . . . . . . . . . . . . . . 42
Room level meter and field. . . . . . . . . . . . . . . . . . . . . . . . . . . . 42
Output block . . . . . . . . . . . . . . . . . . . . . . . . . . . . . . . . . . . . . . . 43
USB detection indicator . . . . . . . . . . . . . . . . . . . . . . . . . . . . . . 43
System mute button . . . . . . . . . . . . . . . . . . . . . . . . . . . . . . . . . 44
Record button and elapsed time field . . . . . . . . . . . . . . . . . . . . 44
Chapter 6: Designing with Modeler Plus software
45
Comparing multiple models . . . . . . . . . . . . . . . . . . . . . . . . . . . 45
Using Level Match . . . . . . . . . . . . . . . . . . . . . . . . . . . . . . . . . . 47
Adding background noise . . . . . . . . . . . . . . . . . . . . . . . . . . . . . 49
Chapter 7: Customer presentations
Hide maps. . . . . . . . . . . . . . . . . . . . . . . . . . . . . . . . . . . . . . . . .
Rename listeners . . . . . . . . . . . . . . . . . . . . . . . . . . . . . . . . . . .
Record audio output . . . . . . . . . . . . . . . . . . . . . . . . . . . . . . . . .
Calibration for playback of Auditioner® recordings . . . . . . . . . .
PowerPoint presentations. . . . . . . . . . . . . . . . . . . . . . . . . . . . .
Save coverage maps and Auditioner® data with a model. . . . .
Chapter 8: Reference
51
51
52
53
54
56
56
59
Keyboard Shortcuts . . . . . . . . . . . . . . . . . . . . . . . . . . . . . . . . . 59
Playlist tab . . . . . . . . . . . . . . . . . . . . . . . . . . . . . . . . . . . . . . . . 60
Right-click menus . . . . . . . . . . . . . . . . . . . . . . . . . . . . . . . . . . . 61
Wing menu . . . . . . . . . . . . . . . . . . . . . . . . . . . . . . . . . . . . . . . . 64
Playback tab . . . . . . . . . . . . . . . . . . . . . . . . . . . . . . . . . . . . . . . 65
Getting help . . . . . . . . . . . . . . . . . . . . . . . . . . . . . . . . . . . . . . . 66
User guide . . . . . . . . . . . . . . . . . . . . . . . . . . . . . . . . . . . . . . . . 66
Help . . . . . . . . . . . . . . . . . . . . . . . . . . . . . . . . . . . . . . . . . . . . . 66
Web tab . . . . . . . . . . . . . . . . . . . . . . . . . . . . . . . . . . . . . . . . . . 68
pro.bose.com . . . . . . . . . . . . . . . . . . . . . . . . . . . . . . . . . . . . . .68
Bose® Modeler® Plus 6.5 Software User Guide Supplement
Introduction
Bose Modeler Plus software, together with the Bose Auditioner®
Playback System III, provides the ability to listen to a sound system
before it is ever installed. While this feature produces very
impressive customer presentations, its ease and responsiveness
allow the designer to incorporate listening into the design process
itself. The act of listening can reveal aspects of the performance of
a sound system design that may be difficult, if not impossible to
discern when simply viewing columns of data or even coverage
maps. This guide details the capabilities of this powerful
technology.
The chapters in this User Guide Supplement will cover the
following topics:
Chapter 1 - Getting started
Chapter 2 - Modeler Plus Software Tutorial
Chapter 3 - The Bose Media Player
Chapter 4 - The Playlist tab
Chapter 5 - The Playback tab
Chapter 6 - Designing with Modeler Plus software
Chapter 7 - Customer presentations
Chapter 8 - Reference
Introduction
i
Bose® Modeler® Plus 6.5 Software User Guide Supplement
Chapter 1: Getting Started
System requirements
The minimum system requirements for running Bose Modeler Plus
software are:
•
Microsoft Windows XP Professional, Service Pack 2 (or later).
•
Microsoft Windows Vista (Business, Home, Premium or Ultimate
editions. VISTA CLASSIC THEME ONLY).
Note: Modeler Plus 6.5 is compatible only in Vista Classic
theme. If you have Vista installed on your machine, the default
theme is Windows Vista. To change this setting, simply:
1.
Right-click on your desktop and select Personalize.
2.
Click on Theme, and select Vista Classic.
3.
Click Apply or OK to finalize the change.
You will not be required to reboot. To restore the original
theme, simply perform the same set of procedures and select
your desired theme.
•
1GHz 32-bit (x86) or 64-bit (x64 processor) or better.
•
512 MB of RAM available (2GB of RAM recommended).
•
300 MB of disk space available (1GB recommended).
•
CD-ROM drive.
•
1024 x 768 32-bit XGA color video display adapter.
•
2 USB ports available: one for the USB hardware key and one for a
scroll-wheel mouse.
It is highly recommended that you use a scroll-wheel mouse with
Modeler Plus software.
Note: You must have administrative rights on your computer to
install Bose Modeler Plus software. Administrative rights are
not required to run Modeler Plus software after installation.
Chapter 1: Getting Started
1
Bose® Modeler® Plus 6.5 Software User Guide Supplement
Registration
Before you install Modeler Plus software, you must register with
Bose Professional Systems. Navigate your Web browser to
http://pro.bose.com/modeler. Click on Software Registration
and fill out the necessary information.
Note: After submitting your registration you will be given a
serial number which you will need to install Modeler Plus
software. Please keep this serial number in a safe place in case
you need to reinstall the application. You may want to note it
here below.
Serial Number: ....................................................
Installation
Follow these steps to install Modeler Plus software:
1.
Insert the Bose Modeler Plus 6.5 software CD into a CD-ROM
drive.
2.
The installer will launch automatically.
Note: If it fails to launch within one minute, open Windows
Explorer and navigate to the CD directory.
Double-click on the file named “Install.exe”.
The installer opens.
2
Chapter 1: Getting Started
Bose® Modeler® Plus 6.5 Software User Guide Supplement
3.
You should now see Figure 1.1. Click Next.
Figure 1.1 - Installer window
Note: A warning window appears, stating that you must have
administrative rights to continue. If and when you do, click OK
to continue.
4.
The License Agreement appears:
Figure 1.2 - License Agreement window
Chapter 1: Getting Started
3
Bose® Modeler® Plus 6.5 Software User Guide Supplement
5.
Read the License Agreement, then click to accept the terms of
the License Agreement. Click Next.
6.
Please read the important information as recommended below,
then click Next.
Figure 1.3 - Important Information
7.
When prompted, enter the serial number that you received
during the online registration process, or via the mail. Click Next.
Figure 1.4 - Enter Serial Number
4
Chapter 1: Getting Started
Bose® Modeler® Plus 6.5 Software User Guide Supplement
8.
Now you can enter your User Information. Click Next.
Figure 1.5 - Enter User Information
9.
Choose the appropriate Install Set. Click Next.
Figure 1.6 - Choose Install Set
Chapter 1: Getting Started
5
Bose® Modeler® Plus 6.5 Software User Guide Supplement
10. Choose where you would like to install. Click Next.
Figure 1.7 - Choose Install Folder
11. Review the Pre-Installation Summary that appears, then click
Install.
Figure 1.8 - Pre-Installation Summary
6
Chapter 1: Getting Started
Bose® Modeler® Plus 6.5 Software User Guide Supplement
Figure 1.9 shows the window that appears while installing.
Figure 1.9 - Installing
12. After installation of Modeler Plus software, the driver for the USB
hardware key will be installed. Remove your hardware key if it is
already inserted in the USB port. Click Next.
Figure 1.10 - Hardware key driver installation
Chapter 1: Getting Started
7
Bose® Modeler® Plus 6.5 Software User Guide Supplement
Figure 1.11 shows the window that appears while you are
waiting:
Figure 1.11 - Configuring your system
The Please Wait window below will appear above Figure 1.11:
Figure 1.12 - Please wait
13. The following window will appear. Click OK to complete:
Figure 1.13 - Successful completion
8
Chapter 1: Getting Started
Bose® Modeler® Plus 6.5 Software User Guide Supplement
14. Click Done when the installer is finished:
Figure 1.14 - Final installer screen
Chapter 1: Getting Started
9
Bose® Modeler® Plus 6.5 Software User Guide Supplement
Setup
Hardware Key
To run Modeler Plus software, you must insert the supplied USB
hardware key into a USB port on your computer. The hardware key
must be enabled to use the features in Modeler Plus software.
These features are not available if you use the Modeler standard
hardware key.
Note: If you have a project open and do not see the Playlist and
Playback tabs, you may not be using a Modeler Plus software
enabled hardware key. Please contact your Bose representative
for assistance.
Note: Two hardware keys are provided for each licensed user.
The keys have an expiration date, which is printed on the
sticker attached to the hardware key. If you wish to order more
keys, or if your key has expired (the software will provide
warnings starting from 30 days prior to key expiration), please
contact your local Bose sales representative.
Auditioner® Playback System III
Connect the Auditioner® Playback System III to your PC through a
USB port. Make sure your unit is switched on.
Note: For more information on using Auditioner® Playback
System III, see the Auditioner® Playback System III User Guide.
When the Auditioner® Playback System III is connected to your
computer, some system sounds, such as the Windows startup
sound, may be played through the unit. To prevent your computer
system sounds from being played through the Auditioner®
Playback System III, follow these steps:
10
1.
Go to Start > Control Panel, and double-click on Sounds and
Audio Devices.
2.
Choose the Sounds tab.
Chapter 1: Getting Started
Bose® Modeler® Plus 6.5 Software User Guide Supplement
3.
Under Sound Scheme choose No Sounds from the drop-down
menu.
Figure 1.15 - Choosing No Sounds scheme
4.
Click OK to save this setting and close the window.
Chapter 1: Getting Started
11
Bose® Modeler® Plus 6.5 Software User Guide Supplement
Chapter 2: Modeler Plus Software Tutorial
The tutorial will familiarize the designer with the basic functionality
of the application. It will illustrate the steps needed to listen to and
evaluate the sound system performance at various locations within
a model. Users will learn how to easily compare design variations.
The user selects a number of locations within the model at which to
listen to the sound system performance. At each Listener location,
the sound field produced by the sound system design is evaluated
across the dimensions of time, space and frequency. The
application processes an input signal, typically a music or speech
(.wav) file, producing audio infused with the appropriate
reverberation and room characteristics.
Much of the power of this tool is derived from the ability to listen to
and compare multiple design variations in a single session. To
facilitate this feature, we introduce the concept of a Project which
may contain one or more Models that capture different design
variations. The project object contains many of the attributes and
settings used by the Modeler Plus application. While the designer
may open and interact with a model outside of a project, the model
must be in a project in order to activate the Auditioner® features.
Therefore, before the user can listen to a sound system design, a
number of conditions must be met:
1.
The Playback System III is connected and powered on.
2.
A room model is built and surface materials have been assigned.
3.
The model contains a sound system, composed of at least one
loudspeaker.
4.
The model exists within a project.
5.
At least one listener location is selected and enabled at which
the sound system is evaluated.
6.
Source material is loaded and playing.
The tutorial uses the example model provided on the Modeler Plus
software installation CD. Take the following steps in this tutorial
toward the ultimate goal of listening to the sound system design:
Chapter 2: Modeler Plus Software Tutorial
13
Bose® Modeler® Software Plus 6.5 User Guide Supplement
1.
Launch Windows Explorer and navigate to the Bose Modeler
Plus 6.5 software installation CD directory.
2.
Copy the folder titled Tutorial from the CD to your desktop, and
close Windows Explorer.
3.
Launch Modeler Plus software.
4.
Click File > Open Project...
5.
In the Look in: drop-down menu, click on the desktop.
6.
Open the Tutorial folder, then open the First Street Church
folder.
7.
Open the project named First Street Church.pjt
•
You will see this in the Project window:
Figure 2.1 - First Street Church project in the Project window
8.
Double-click on the Design 1 model in the Project window. The
Design 1 model opens, and the Bose Media Player opens.
Figure 2.2 - Bose Media Player
14
Chapter 2: Modeler Plus Software Tutorial
Bose® Modeler® Plus 6.5 Software User Guide Supplement
Note: The Bose Media Player does not open unless the
Auditioner® Playback System III is connected to your computer
and powered on.
For now, dismiss the player window. We will add program
material for playback at a later stage of this tutorial.
9.
Choose Design > D2R∆STIc > Confirm with Auditioner® or
press F9 to enable listeners for playback.
The Playlist and Playback tabs are automatically selected, and
the D2R∆STIc engine begins enabling the listeners. The
listeners appear in italics until the calculation has completed.
Figure 2.3 - Playlist tab before listeners have been calculated
After the D2R∆STIc engine has finished the calculation, the
listeners no longer appear in italics. This indicates they have
been enabled for Auditioner® Playback System III playback.
Figure 2.4 - Playlist tab with listeners enabled for playback
For each listener, the Playlist tab displays the Model name and
the listener (Position) label, as well as additional data that is
used during playback.
Chapter 2: Modeler Plus Software Tutorial
15
Bose® Modeler® Software Plus 6.5 User Guide Supplement
10. It is always a good idea to mute playback before loading
listeners. Once loaded, we will inspect the room meter to make
sure that the playback is at a reasonable level.
Press the Mute playback button, or use the direct key M to mute
playback volume. Press again to unmute.
Figure 2.5 - Mute playback button shown in mute state
11. Click in the selection box in column 1 of the Playlist window to
select a location for playback. An “X” is drawn in the selection
box. This places the listener in the playback queue. The green
loudspeaker icon indicates which listener is currently playing.
Figure 2.6 - Place an “X” to load listeners
12. If the Bose Media Player is already open, bring it to the front
by clicking the Windows® Taskbar.
16
Chapter 2: Modeler Plus Software Tutorial
Bose® Modeler® Plus 6.5 Software User Guide Supplement
13. Click on the Add File button, or Add Track button in the Bose
Media Player to load an audio track.
Figure 2.7 - Add File and Add Track buttons
Add File:
Allows you to load a (.wav) audio file from
your hard drive or an external drive.
Add Track:
Allows you to load a track from an audio CD.
Select a track or audio file and press the Play button to begin
playback. The processed audio for the listener begins playing
through the Auditioner® Playback System III once the system
mute button is toggled to the unmute state.
14. Select the Playback tab in the Data window:
Figure 2.8 - Playback tab
The Playback tab displays the playback queue and includes
controls for playback. Use the up and down buttons to scroll
through the listeners.
15. Verify that the levels are below 100 dB for comfortable playback.
16. If OK, unmute.
Chapter 2: Modeler Plus Software Tutorial
17
Bose® Modeler® Software Plus 6.5 User Guide Supplement
You are now listening from position 1 in the Church model.
Figure 2.9 - Controls for scrolling through listeners (up/down buttons)
Change listeners using the next/previous arrow buttons to the left
of the playback queue.
You can also use the Ctrl + Arrow keyboard shortcuts to scroll
through listeners, and to adjust the volume:
Ctrl +I
To scroll through listeners.
Ctrl +J
Ctrl +K
To turn the signal volume up and down.
L
Ctrl +
Ctrl + Shift + 0
To mute noise.
Ctrl + Shift + K
To turn the noise volume up and down.
Ctrl + Shift +
18
L
Chapter 2: Modeler Plus Software Tutorial
Bose® Modeler® Plus 6.5 Software User Guide Supplement
17. Add realism to the playback by adding background noise to the
model. Before adding the background noise, make sure the
system is muted.
Figure 2.10 - Mute noise
18. Open the Background Noise dialogue on the Acoustics tab.
Figure 2.11 - Launch the background noise
Chapter 2: Modeler Plus Software Tutorial
19
Bose® Modeler® Software Plus 6.5 User Guide Supplement
19. Select Auditorium from the Custom Noise folder.
Figure 2.12 - Select Custom Noise
20. Make sure that the noise is at a reasonable level before
unmuting the system.
Figure 2.13 - Check noise level while muted
20
Chapter 2: Modeler Plus Software Tutorial
Bose® Modeler® Plus 6.5 Software User Guide Supplement
21. Unmute the system. You should now be listening to the
performance of the sound system design at a specific location
within the model.
Figure 2.14 - System unmuted with background noise playing
Chapter 2: Modeler Plus Software Tutorial
21
Bose® Modeler® Plus 6.5 Software User Guide Supplement
Chapter 3: The Bose Media Player
Modeler Plus software comes with a dedicated media player that
controls the audio source program material during listening
sessions. The Bose Media Player runs as a separate program (it
shows up as a separate item in the taskbar) but it opens and closes
from within Modeler Plus software. The Bose Media Player
automatically opens when a project is open and the Auditioner®
Playback System III is connected to your computer and powered
on. When the project is closed, or the Auditioner® Playback System
III is disconnected, the Bose Media Player is automatically closed.
Figure 3.1 - Bose Media Player
Launching the Bose Media Player
The Bose Media Player will launch if all the following conditions are
met:
•
A project is open.
•
The Auditioner® Playback System III is connected to your
computer.
•
The Auditioner® Playback System III is powered on.
The Bose Media Player will automatically close under any of the
following conditions:
•
The project is closed.
•
The Auditioner® Playback System III is disconnected.
•
The Auditioner® Playback System III is powered down.
Chapter 3: The Bose Media Player
23
Bose® Modeler® Plus 6.5 Software User Guide Supplement
If you close the Bose Media Player by clicking on the “X” in the
upper right hand corner of the Bose Media Player window, it can be
re-launched from the Playback tab. Click on the Launch Player
button to launch the Bose Media Player:
Figure 3.2 - Launch Bose Media Player button
Tip: You can also re-launch the Bose Media Player by pressing
Shift + Ctrl + P.
24
Chapter 3: The Bose Media Player
Bose® Modeler® Plus 6.5 Software User Guide Supplement
Loading audio tracks
The Bose Media Player allows you to add audio tracks directly
from an audio CD, or load audio tracks from your hard drive. To
add audio tracks from an audio CD, insert the CD into a drive on
your computer and click the Add Track button on the Bose Media
Player. Select tracks from the CD and click Add, or click Add All to
load all tracks from the CD.
Figure 3.3 - Add CD tracks
If you eject the CD from your computer, the tracks are
automatically removed from the Bose Media Player.
To add audio files that are on your hard drive or on an external
drive, click the Add File button on the Bose Media Player.
Navigate to the location of the audio tracks and click Open:
Figure 3.4 - Add file
Chapter 3: The Bose Media Player
25
Bose® Modeler® Plus 6.5 Software User Guide Supplement
If you move or delete an audio file from the hard drive, it will not
play in the Bose Media Player. When you close and reopen the
Bose Media Player, the file is removed.
Note: The playlist you create is available every time the Bose
Media Player opens; it is not associated with the project.
Playing audio tracks
Use the following transport controls to control the Bose Media
Player:
Figure 3.5 - Bose Media Player
26
Chapter 3: The Bose Media Player
Bose® Modeler® Plus 6.5 Software User Guide Supplement
Play/
Pause:
Press once to begin playing the selected
track. Press while a track is playing to
pause the track.
Stop:
Press to stop the track.
Previous:
Play the previous track if within 3
seconds of the beginning, otherwise go to
the beginning of the current track.
Next:
Play the next track.
Repeat:
Press to repeat the current track. Press
again to disable repeat. Repeat is
particularly useful when you are
comparing listener positions or
presenting a design. With repeat on, the
track will automatically start over each
time it reaches the end.
Play Next:
When checked, the next track in the
playlist is played when the current track
is finished. When unchecked, play is
stopped when the current track is
finished.
Seek
slider:
Drag the slider to skip to a desired
location in the track.
Chapter 3: The Bose Media Player
27
Bose® Modeler® Plus 6.5 Software User Guide Supplement
Chapter 4: The Playlist tab
Figure 4.1 - Playlist tab
The Playlist tab is composed of two panels: the Sets panel and the
Playlist panel. A set is a collection of listeners within or across
models, and is either automatically generated (the ALL set) or user
defined (custom sets). The playlist displays the list of items in the
selected set, along with item properties used during playback.
Playlist panel
Item selection
The first column in the playlist panel contains item selection boxes.
Items will not be loaded and played unless they are selected, which
is indicated by an X appearing in the selection box. There are three
ways to select items:
•
Double-click on the listener row to load it into the queue.
•
Place an “X” in the box next to the listener to load it into the queue.
•
Place an “X” in the box in the column header to load all listeners
into the queue at once:
Chapter 4: The Playlist tab
29
Bose® Modeler® Plus 6.5 Software User Guide Supplement
Figure 4.2 - Load all available listeners
If an audio track is playing in the Bose Media Player, you are able
to listen as soon as a listener is loaded.
The second column is used to indicate which item is currently
playing, if any.
Figure 4.3 - Currently playing indicator
30
Chapter 4: The Playlist tab
Bose® Modeler® Plus 6.5 Software User Guide Supplement
Listener state
The model name and listener position label for each playlist item
are displayed in the next two columns. Listeners appear in light
gray if the surfaces they are on have been unchecked in the
Simulation tab. Listeners appear in italics if their data has not been
recalculated since a change has been made to the model.
Figure 4.4 - Listeners state is represented by font
To make sure that the Listener data gets calculated when the
engine is turned on, the Listeners box must be checked on the
Simulation tab, and the Surface types that contain those Listeners
have also been checked.
Figure 4.5 - Make sure that Surfaces and Listeners are checked
Listener attributes
The following column holds the Max System SPL, which is the
highest level the installed sound system can produce at the
listening location. This value is predicted by the application, and
cannot be modified by the user.
The Gain Offset column contains a value used by the level match
feature described on Chapter 6: Using Level Match, on page 47.
Chapter 4: The Playlist tab
31
Bose® Modeler® Plus 6.5 Software User Guide Supplement
Modeler views
For each listener, you have the ability to assign a specific View and
Window to be displayed in the Modeling window when the listener
is playing back. Right-click in the View and Window columns in the
Playlist tab to assign a view and window to each Auditioner®
enabled listener. You can select multiple listeners and right-click to
change the View and Window for multiple listeners at once.
Figure 4.6 - Right-click to assign View and Window to listeners
For example, if you assign Isometric 1 view and the STI window to
a listener, the Modeling window will look like Figure 4.7 when that
listener is playing.
Figure 4.7 - The Modeling window during playback of a listener with View
of Isometric 1 and Window of STI
32
Chapter 4: The Playlist tab
Bose® Modeler® Plus 6.5 Software User Guide Supplement
Sets panel
The smaller window on the left side of the Playlist tab contains
Sets. A Set is a group of listeners. The All set is automatically filled
with all of the listeners in all of the open models.
The All set is always in the Sets panel and cannot
be deleted. In Figure 4.8 below, all three models in
the Auditorium project are open, as indicated by the
model icon:
Figure 4.8 - The All set automatically contains all listeners in all open
models
You can create a set that contains a selected subset of listeners.
This is especially useful when comparing two models. The
following steps describe how to create a new set by clicking and
dragging:
Chapter 4: The Playlist tab
33
Bose® Modeler® Plus 6.5 Software User Guide Supplement
1.
Select one or more listeners from the playlist panel by clicking on
the listener name (hold Shift or Ctrl to select multiple listeners).
Click once, and then drag the selected listeners to a blank area
in the Sets list on the left. A new set is automatically created.
Figure 4.9 - Select and drag listeners to create a new set
The new set appears in the Sets panel and is named
Untitled 1:
Figure 4.10 - The new Untitled 1 Set
2.
Rename the new set by double-clicking on the name
(Untitled 1) in the Sets panel:
Figure 4.11 - Renamed Set list
34
Chapter 4: The Playlist tab
Bose® Modeler® Plus 6.5 Software User Guide Supplement
3.
When you click on the new set to select it, the Playlist panel
displays the listeners that belong to the set:
Figure 4.12 - The new Set
Listeners can be dragged into existing sets at any time. For
example, if you want to add another listener to the new set you
created, select the desired listener from the All list by clicking
once. Click again and drag the row into the new set.
Follow these steps to create a new set using a different method:
1.
Open the Playlist wing menu by clicking on the arrow in the
upper-right corner of the tab:
Figure 4.13 - Playlist menu
2.
Choose New Set. A new set is created in the Sets panel. You
can rename the set by double-clicking on it. To add a listener to
the new set, simply click to select, then click, drag and drop them
into the new set.
To delete a set, select the set and choose Delete Set from the
Playlist wing menu. The deletion of a set cannot be undone.
Chapter 4: The Playlist tab
35
Bose® Modeler® Plus 6.5 Software User Guide Supplement
Chapter 5: The Playback tab
Figure 5.1 - Playback tab
The Playback tab allows you to control the playback of the
listeners that are loaded into the playback queue. The panel layout
is partitioned into five blocks: Input, Signal, Noise, Room, and
Output.
Input block
Playback queue
The playback queue is displayed in the lower left of the Playback
tab. It contains three columns. The first two are the model name
and the position label for each listener. The third column is typically
the maximum system SPL. However, when level match is selected,
this column instead displays the gain offset. For more information,
see Chapter 6: Using Level Match, on page 47.
Of the Auditioner® enabled listeners that have been loaded into the
queue, three appear in the list: The current listener, the previous
listener, and the next listener. The playback queue is a continuous
loop regardless of how many listeners are loaded. When you reach
the end of the queue, the first listener will be the next one to load.
Chapter 5: The Playback tab
37
Bose® Modeler® Plus 6.5 Software User Guide Supplement
Figure 5.2 - Input block
The value that is displayed in the dB column Playback queue
depends on the level match mode. When off, this value is the Max
System SPL at the listener location (also displayed in the Max
System SPL column in the Playlist tab). When on, this is the gain
offset value. The Max System SPL value represents the highest
level (depending on the characteristics of the source audio track)
that you would hear at the listener location with the system at
maximum gain.
Figure 5.3 - Max System SPL
Note: If there are only two listeners in the queue, the previous
and next listeners will be the same.
38
Chapter 5: The Playback tab
Bose® Modeler® Plus 6.5 Software User Guide Supplement
Scroll through the listeners using the arrows in the Controls group.
You can also use the keyboard shortcuts to scroll through listeners:
Ctrl +I and Ctrl +J
The Launch Player button opens the Bose Media Player window,
which allows audio to be played. For a description of the level
match feature, see Chapter 6: Using Level Match, on page 47.
Signal block
Signal gain slider and field
Conceptually, the signal gain slider allows you to control the
volume of your program material on a mixer. As the slider is
adjusted, the sound level changes accordingly. The signal gain
field reflects the current value of this adjustment.
Figure 5.4 - Signal gain slider
It is possible to raise the signal gain slider above the level that the
installed system is capable of reproducing at a given listener
location. The system clip indicator is used to indicate this state.
Chapter 5: The Playback tab
39
Bose® Modeler® Plus 6.5 Software User Guide Supplement
System clip indicator
The system clip indicator, shown below, has three states: No signal
present (gray), signal present and not clipping (green), and signal
present and clipping (red). Only the sound system signal is used to
set the state of this indicator. In other words, the background noise
cannot cause system clipping.
Figure 5.5 - Clip indicator
Noise block
There are two reasons the designer may wish to add background
noise to the model. First, noise must be considered when
predicting speech intelligibility. Second, when noise is mixed with
processed signal, the designer can make better judgements about
the performance of the sound system.
See Chapter 6: Adding background noise, on page 49, for an
explanation on how to add background noise to your model.
Noise gain offset slider and field
Use the noise gain offset slider to adjust the noise level for custom
noise only. Standard noise files are locked and cannot be adjusted.
40
Chapter 5: The Playback tab
Bose® Modeler® Plus 6.5 Software User Guide Supplement
The current offset value is shown in the gain offset field above the
slider.
Figure 5.6 - Noise gain offset value
When the noise level is changed, the new value is used to
calculate STI. If the map is visible, it will be updated automatically.
Figure 5.7 - Playback levels
Noise level meter and field
The noise playback level is displayed in dB SPL on the meter next
to the noise gain slider. The noise level field above the meter bar is
updated every 1.25 seconds, while the meter bar is updated every
250 milliseconds.
Chapter 5: The Playback tab
41
Bose® Modeler® Plus 6.5 Software User Guide Supplement
Noise mute button
The noise can be muted and unmuted using the toggle button
shown below.
Figure 5.8 - Noise mute button
Room block
Room level meter and field
The room level meter combines both the signal and the noise in the
room as predicted at the current listening location. The room level
is displayed in dB SPL on the meter shown below. The room level
field above the meter bar is updated every 1.25 seconds, while the
meter bar is updated every 250 milliseconds.
Figure 5.9 - Playback levels
Note: When noise is muted, the room level meter will measure
the processed signal only. Conversely, to meter noise only,
pause/stop the program material in the Bose Media Player.
42
Chapter 5: The Playback tab
Bose® Modeler® Plus 6.5 Software User Guide Supplement
Output block
USB detection indicator
The USB detection indicator is green when the Auditioner®
playback unit is detected. When the playback unit is not detected,
or gets disconnected, the indicator is red and no audio can be
processed.
Figure 5.10 - USB detection indicator
Note: Remember, if the Auditioner® Playback System III is
unplugged, the Bose Media Player will not open.
Chapter 5: The Playback tab
43
Bose® Modeler® Plus 6.5 Software User Guide Supplement
System mute button
Use the System Mute button to mute the playback. When you
press the button again to unmute, there is a short ramp-up time
before full volume is restored. The ramp-up time cannot be
adjusted.
Figure 5.11 - System Mute button
Tip: If you have enabled Direct keys, you can use the direct key
shortcut to mute the sound: the M key. You can enable Direct
keys in the General tab of the Application Preferences dialog
box. To mute the signal, press pause in Media Player.
Record button and elapsed time field
Processed audio can be recorded and saved to a (.wav) file for
future playback. When recording, the current recording duration is
displayed in the elapsed time field located below the record toggle
button. To stop recording, click on the toggle a second time. For
more information, see Chapter 7: Record audio output, on page 53.
Figure 5.12 - Record button and elapsed time field
44
Chapter 5: The Playback tab
Bose® Modeler® Plus 6.5 Software User Guide Supplement
Chapter 6: Designing with Modeler Plus software
Comparing multiple models
In the course of designing a sound system, it can be helpful to
listen to two or more different versions of a model to reveal the best
design. For example, you might compare models that have:
•
Different loudspeaker design or arrangement.
•
Different room construction materials.
•
Different room geometry.
•
Different occupancy levels or acoustic conditions.
The following example outlines how to compare multiple designs in
Modeler Plus software:
1.
Create a new project.
2.
Add a new or existing model to the project. Make sure the model
has at least one loudspeaker and at least one listener.
Figure 6.1 - A new project with one model
3.
Duplicate the model by choosing File > Duplicate Model and
then modify the duplicate model to create another version of the
design. You can also modify the model and then choose File >
Save Model As... to create another version of the design.
Figure 6.2 - Duplicating and modifying the design
Chapter 6: Designing with Modeler Plus software
45
Bose® Modeler® Plus 6.5 Software User Guide Supplement
4.
Generate Auditioner® enabled listeners for the first model.
Choose Design > D2R∆STIc > Confirm with Auditioner® or
press F9. After the listener has been enabled, it is displayed in
non-italicized font to indicate that it is available for playback.
Figure 6.3 - Listeners are calculated for the first model after pressing F9
5.
Click on the next model in the Project window, and choose
Design > D2R∆STIc > Confirm with Auditioner® or press F9.
Figure 6.4 - Listeners are calculated for the second model after pressing F9
Select each model in the project for which you want to enable
listeners, and choose Design > D2R∆STIc > Confirm with
Auditioner® or press F9. Listeners that are available for playback
are displayed in non-italicized font.
46
Chapter 6: Designing with Modeler Plus software
Bose® Modeler® Plus 6.5 Software User Guide Supplement
Note: If a listener is still displayed in italics after calculation,
the listener location may not be receiving enough sound
energy based on your room design.
6.
To compare two or more designs, load the listeners from each
model into the playback queue by placing an “X” in the
checkbox.
Figure 6.5 - Selecting listeners to load into the playback queue
Using Level Match
Listeners placed at different locations in the model, or in different
models may have a wide range of sound levels. It is easier to make
spectral comparisons between listener locations if the playback
levels are similar. The Level Match feature automatically adjusts
the level of each listener by the relative difference in max system
SPL to achieve level balance. The user can tweak the adjustment
by applying additional gain offsets to each item to account for the
effects of other factors like listener view direction. These
modifications are saved with the project and are restored when the
project is opened later.
Chapter 6: Designing with Modeler Plus software
47
Bose® Modeler® Plus 6.5 Software User Guide Supplement
Figure 6.6 - Level Match option
Figure 6.7 - Right-click to set Gain Offset
Note: When filters are played back at predicted absolute levels
(Level Match unchecked), you maintain the relative levels
between filters.
When filters are played back in level match mode, filters are
scaled to be played back at the same RMS level. You may still
have to tweak them (using gain offsets) to achieve a closer
level match.
48
Chapter 6: Designing with Modeler Plus software
Bose® Modeler® Plus 6.5 Software User Guide Supplement
Adding background noise
7.
To assign a background noise profile to a model, click on the
Acoustics tab in the Detail window.
Figure 6.8 - Acoustics tab
8.
Under Background Noise, click on the “Open...” button. The
following screen appears:
Figure 6.9 - Background noise window
Select an existing noise curve from the library on the left window
frame, or create/duplicate/modify noise curves.
Chapter 6: Designing with Modeler Plus software
49
Bose® Modeler® Plus 6.5 Software User Guide Supplement
Note: You may create a new noise curve, or duplicate and
rename an existing noise curve. If you do so, there will be no
corresponding audio (.wav) file, and therefore no noise will be
played for listeners in models with this noise assigned.
There are three types of noise files: standard, custom, and user
created noise files. The audio (.wav) files associated with standard
noise files are locked binaural files of shaped white noise. Custom
noise files are recordings of real environments that have been
processed for playback on Auditioner®. Unlike standard noise files,
these files are unlocked and the level may be adjusted as needed
for a given model. A user created noise file will have no associated
audio (.wav) file.
When playing a listener in Auditioner®, the selected background
noise will be played (unless muted). When you use the noise
volume slider in the Playback tab to adjust the noise volume, the
STI map is recalculated and redrawn if visible. When changing
listeners the noise gain offset is set to 0, and the change is retained
in the model.
Tip: If you mute the noise, the room level will be the same as
the signal level. If you mute the signal by pressing pause/stop
in the Bose Media Player, the room level will be the same as the
noise level.
50
Chapter 6: Designing with Modeler Plus software
Bose® Modeler® Plus 6.5 Software User Guide Supplement
Chapter 7: Customer presentations
Modeler Plus software is useful in a variety of presentation
situations. This section outlines how to use Modeler Plus software
to accomplish the following:
•
Playback Auditioner® enabled listeners without showing coverage
maps.
•
Rename listeners for a presentation.
•
Record Auditioner® audio output.
•
Save Auditioner® filters and coverage maps with a room model.
Hide maps
Modeler Plus software provides you with the ability to hide
coverage maps when using Auditioner®. This is helpful in the
following situations:
•
If you want to present a model to a client without the distraction of
the coverage data.
•
If you want to send a model file to a colleague and prevent the
display of the coverage maps, you can save the file with maps
hidden.
Note: Models cannot be “locked” in Modeler Plus software.
Although hiding maps is a useful feature, an experienced user
will be able to turn off this feature.
To hide coverage maps, open the Model Settings dialog box by
choosing Edit > Model Settings, or by pressing Ctrl + R. Click on
the Display tab, and place a checkmark next to Hide Maps:
Chapter 7: Customer presentations
51
Bose® Modeler® Plus 6.5 Software User Guide Supplement
Figure 7.1 - Hide Maps in the Model Settings dialog box
If you click on a coverage map button while maps are hidden, you
will receive the following message:
Figure 7.2 - Hidden maps notification
Rename listeners
You have the ability to rename listeners in Modeler Plus software.
The name is displayed in the Position column in the Playlist tab
and in the playback queue in the Playback tab. Follow these steps
to rename listeners:
1.
52
Open a model for which you want to rename listeners.
Chapter 7: Customer presentations
Bose® Modeler® Plus 6.5 Software User Guide Supplement
2.
Choose the Listener tab and double-click in the Identifier
column.
3.
Enter a new name of up to four characters.
Figure 7.3 - Rename listeners
Figure 7.4 - Renamed listeners
This is an effective tool for providing personalization when
presenting in front of customers.
Record audio output
You have the ability to record processed audio output to a (.wav)
file. You can then burn the (.wav) file or files onto a CD along with a
calibration tone. This allows you to use the Auditioner® Playback
System III to play pre-recorded audio from outside Modeler, which
is helpful in the following situations:
•
If a client or field engineer wants to listen to a sound system
without a computer.
•
If you want to create a copy of the audio files to use as a backup
for a demonstration.
Chapter 7: Customer presentations
53
Bose® Modeler® Plus 6.5 Software User Guide Supplement
Follow these steps to record processed audio output:
1.
During listener playback, press the Record button in the
Playback tab. When recording, the button will be displayed in a
depressed mode and the display of elapsed time will be shown:
Figure 7.5 - Record button
2.
While the Record button is pressed, Modeler Plus software
records the output of any listener that is being played, including
any volume changes. As you record, the elapsed time is
updated.
3.
To stop recording, press the Record button again.
4.
The Save As dialog box opens where you can name the file and
specify a location in which to save it.
5.
When burning a CD of the (.wav) file output, you should include
the calibration tone for calibrating the Auditioner® Playback
System III. The calibration tone can be found in the Extras folder
on the Modeler Plus software installation CD.
Calibration for playback of Auditioner® recordings
You can ensure that your recordings are played at the intended
level by taking the following steps to calibrate playback from a CD
or (.wav) file player:
54
Chapter 7: Customer presentations
Bose® Modeler® Plus 6.5 Software User Guide Supplement
1.
Place the CD with the calibration tone into a CD player, or load
the calibration tone into a media player on your computer.
If you are using a media player on your computer, make sure
your system volume is set to maximum.
Figure 7.6 - Set system volume to maximum
2.
Connect the CD player to the Auditioner® Playback System III
using the supplied cable, or use a USB cable to connect the
Auditioner® Playback System III to your computer.
3.
Toggle the Calibrate button on the front of the Auditioner®
Playback System III to the up position to engage calibration
mode.
4.
Play the calibration tone.
5.
The LED read-out on the front of the Auditioner® Playback
System III provides the following information:
6.
Calibration High
(Red LED):
Incoming signal is too high. Decrease
the volume level on the CD player or
media player.
Calibration
Reference
(Green LED):
Unit is calibrated within ±1 dB SPL.
Calibration Low
(Yellow LED):
Incoming signal is too low. Increase
the volume level on the CD player or
media player.
Adjust the volume level on the CD player or media player until
the calibrate LED is green.
Chapter 7: Customer presentations
55
Bose® Modeler® Plus 6.5 Software User Guide Supplement
7.
After setting the volume level on the CD player or media player,
do not change the volume for the duration of the playback
session.
8.
Toggle the Calibrate button on the Auditioner® Playback
System III to the down position to engage the SPL meter.
PowerPoint presentations
Recorded output can be used to make effective and dynamic
PowerPoint presentations.
•
Make a PowerPoint slide that shows a coverage map by using the
Copy/Paste functionality.
•
Insert a (.wav) file recorded from the model into the PowerPoint
slide.
•
Play the (.wav) file during the presentation.
•
For more information on Copy/Paste functionality, see Chapter 12:
Reports and Proposals in the Modeler Plus Software User Guide
or go to Help > Contents ... to access the help.
Save coverage maps and Auditioner® data with a model.
The data that is calculated when a listener is Auditioner® enabled is
called an Auditioner® filter. Filters and coverage maps can be
saved with a model file. When you open the file at a later date, the
filters and maps will open with the model, and you will not be
required to recalculate.
Tip: When you save Auditioner® filters or coverage maps with a
model, the size of the file will increase substantially. You may
not be able to easily e-mail a model file that has Auditioner®
filters or coverage maps saved.
To save Auditioner® filters and coverage maps with the model,
open the Model Settings dialog box by choosing Edit > Model
Settings, or by pressing Ctrl + R. Click on the File I/O tab, and
place a checkmark next to Auditioner® Filters and Map Data.
56
Chapter 7: Customer presentations
Bose® Modeler® Plus 6.5 Software User Guide Supplement
Figure 7.7 - Saving filters with the model
Turn the D2R∆STIc engine off for each model before saving
the file to prevent recalculation when the file is opened. The
model icon indicates when the engine is off:
Figure 7.8 - Click to turn off the D2R∆STIc engine for all models before saving.
When you save the file, the Auditioner® filters and coverage maps
will now be embedded in the model (.mdr) file.
Chapter 7: Customer presentations
57
Bose® Modeler® Plus 6.5 Software User Guide Supplement
Chapter 8: Reference
Keyboard Shortcuts
Use the following keyboard shortcuts in Modeler Plus software:
M (direct key) or Shft + Ctrl + M
Toggle system mute.
Ctrl + I and Ctrl + J
Scroll through listeners.
Ctrl + K and Ctrl + L
Adjust signal volume up and down.
Shft + Ctrl + R
Start recording, stop recording.
Shft + Ctrl + G
Toggle Level Match.
Shft + Ctrl + P
Re-launch Bose Media Player.
Alt + Tab
Switch between the Bose Media Player
and Modeler Plus software
applications.
Shift + Ctrl + 0
Mute noise.
Shft + Ctrl + K and L
Adjust noise volume up and down.
You also can find the Keyboard Shortcuts card here:
http://pro.bose.com/pdf/pro/manuals/modeler_program/
ks_modeler_plus_6_5.pdf
Chapter 8: Reference
59
Bose® Modeler® Plus 6.5 Software User Guide Supplement
Playlist tab
Figure 8.1 - Playlist tab
Sets:
(Checkbox):
60
Groups of listeners. The All set is automatically
filled with all of the listeners in the open models.
Place an “X” to add the listener to
the playback queue. Place an “X”
in the box located in the header
row to load or unload all available
listeners at once.
Model:
The name of the model that contains the listener.
Position:
The Listener identifier.
Chapter 8: Reference
Bose® Modeler® Plus 6.5 Software User Guide Supplement
Max System SPL:
The maximum dB SPL output that the sound system
can produce without clipping.
Gain Offset:
The amount of additional adjustment to the gain
level at the listener location.
View:
The view angle that is displayed in the Modeling
window when the listener is playing.
Window:
The tab that is selected in the Modeling window
when the listener is playing.
Font:
Listeners appear in
light gray if the
surfaces they are on
have been
deselected in the
Simulation tab.
Listeners appear in
italics if their data has not been recalculated
since a change has been made to the model.
Right-click menus
Figure 8.2 - Edit Options window
Chapter 8: Reference
61
Bose® Modeler® Plus 6.5 Software User Guide Supplement
Right-click on the Model or Position column and choose Edit
Options to open the Edit Options window. This window allows
you to change the Gain Offset, View, and Window values for a
listener. Click Previous and Next to change values for a different
listener.
Figure 8.3 - Click Previous or Next to move to a different listener
The title bar shows which listener you are editing.
Figure 8.4 - Title bar
62
Chapter 8: Reference
Bose® Modeler® Plus 6.5 Software User Guide Supplement
Right-click on the Gain Offset column to change the gain offset for
one or more listeners. Select multiple listeners and right-click to
change the gain offset for multiple listeners at the same time.
Figure 8.5 - Entering gain offset for multiple listeners
You can also right-click on the View and Window columns to
assign a different view or window to the listener. As with gain offset,
you can change these values for multiple listeners at the same
time.
Figure 8.6 - Right-click to change View and Window
Chapter 8: Reference
63
Bose® Modeler® Plus 6.5 Software User Guide Supplement
Wing menu
Access the Playlist tab wing menu by clicking on the arrow in the
upper right hand corner of the Playlist tab.
Figure 8.7 - Accessing the wing menu
64
New Set:
Create a new set in the Sets window.
Delete Set:
Delete the selected set from the Sets window. The
All set always contains all listeners for all open
models and cannot be deleted.
Edit Listener
Position...:
Open the Edit Options dialog box for the selected
listener.
Delete Listener
Position:
Delete the selected listener position from the set.
Listeners cannot be deleted from the All set.
View Columns...:
Open the View Columns dialog box to change
which columns are displayed in the Playlist tab.
Confirm with
Auditioner®:
Enable listeners for playback for the currently active
model. This is the same function as choosing
Design > D2R∆STIc > Confirm with Auditioner®,
or pressing F9.
Chapter 8: Reference
Bose® Modeler® Plus 6.5 Software User Guide Supplement
Playback tab
Figure 8.8 - Playback tab
Level Match.
Launch Bose Media Player.
Play the previous listener.
Play the next listener.
Signal state indicator.
Chapter 8: Reference
65
Bose® Modeler® Plus 6.5 Software User Guide Supplement
Auditioner® Playback System III plugged or
unplugged and powered on.
Toggle between system mute and unmute.
Toggle between noise mute and unmute.
Begin/end recording.
Elapsed time.
Getting help
User guide
This user guide is a comprehensive reference for Bose Modeler
Plus 6.5 software. This guide, along with the Bose Modeler 6.5
User Guide, is provided in .pdf format on the installation CD, and
can also be downloaded from the http://pro.bose.com/modeler
website.
Help
The help system in Modeler Plus software is a valuable tool for
getting help. Go to Help > Contents in Modeler Plus software (or
press F1) to launch the HTML-based help system. The tabs in the
left-hand window can help you find the information that you need.
Figure 9 - Tabs in the online help system
66
Chapter 8: Reference
Bose® Modeler® Plus 6.5 Software User Guide Supplement
Contents:
View the full contents of the help system in a tree
format. Click on a title to view the document in
the right-side window.
Index:
View a list of all index topics. Type a keyword in
the box at the top to jump to a topic.
Search:
Perform a text search for the word or phrase that
you type.
Favorites:
Use this tab to bookmark a page or section that
you use frequently. Click the Add button at the
bottom of the window to add the current topic to
your favorites list.
You can display system information using Help > System Info ...
(or press F2).
Note: You must have administrative rights on your machine to
be able to view system information.
Chapter 8: Reference
67
Bose® Modeler® Plus 6.5 Software User Guide Supplement
Web tab
When you are working in Modeler Plus software while connected to
the internet, the Web tab in the Modeling window is a link to
Modeler Plus software information on the Bose Professional
Systems website.
Figure 8.1 - Web tab
pro.bose.com
The Bose Professional Systems website (http://pro.bose.com)
contains information on all Bose Professional Systems products,
including Modeler Plus software, and the loudspeakers used in
Modeler Plus software.
68
Chapter 8: Reference
Bose® Modeler® Plus 6.5 Software User Guide Supplement
Index
A
Add File, 17, 25
Add Track, 17
Adding background noise, 49
Audio track, 17
Auditioner® filters, 56
Auditioner® Playback System III, 10
D
Delete Set, 35
Design
Using Level Match, 47
Designing, 45
Duplicate Model, 45
E
B
Elapsed time, 44, 66
Bose Media Player, 14, 23
Launching, 23
Loading audio tracks, 25
Next, 27
Play Next, 27
Play/Pause, 27
Playing audio tracks, 26
Previous, 27
Repeat, 27
Seek slider, 27
Stop, 27
Bose Professional Systems website, 68
C
Calibration for playback, 54
Calibration High, 55
Calibration Low, 55
Calibration Reference, 55
Calibration tone, 54
Checkbox, 60
Clip indicator, 40
Comparing multiple models, 45
Confirm with Auditioner®, 64
Coverage maps, 56
F
Filters, 56
G
Gain Offset, 61, 63
Gain offset slider, 40
Getting Started, 1
H
Hardware Key, 7, 10
Help, 66
Hide, 51
Hide Maps, 51
I
Input block, 37
Installation, 2
Introduction, i
Item selection, 29
Index
69
Bose® Modeler® Plus 6.5 Software User Guide Supplement
K
Keyboard Shortcuts, 59
P
Playback
Input block, 37
L
Launch Bose Media Player, 65
Level Match, 47, 65
License Agreement, 4
Listener, 13
Listener attributes, 31
Listener state, 31
locked, 51
M
Map Data, 56
Max System SPL, 38, 61
Maximum System SPL, 37
Model Settings dialog box, 51
Modeler views, 32
Models, 13
Mute playback, 16
Playback queue, 37
Playback queue, 37
Playback tab, 17, 37, 65
Noise block, 40
Noise gain offset slider,
Noise level meter, 41
Noise mute, 42
Room block, 42
Signal block, 39
Signal gain slider, 39
System clip indicator, 40
Playlist panel, 29
Delete Set, 35
Item selection, 29
Listener attributes, 31
Modeler views, 32
Sets panel, 33
Playlist tab, 29
Output block, 43
Record button, 44
System mute button, 44
USB detection indicator, 43
Playlist panel, 29
Room block
Room level meter,
N
Next listener, 65
Noise block, 40
Noise files, 50
Noise level meter, 41
Noise mute, 42
O
Open Project, 14
Output block, 43
70
40
42
Sets panel, 29
PowerPoint presentations, 56
Presentations, 51
Previous listener, 65
Project, 13
Project window, 14
R
Record audio output, 53
Record button, 54
Reference, 59
Registration, 2
Rename listeners, 52
Right-click menus, 61
Index
Bose® Modeler® Plus 6.5 Software User Guide Supplement
Room block, 42
Room level meter, 42
S
Save coverage maps, 56
Serial number, 2
Sets, 60
Sets panel, 33
Setup, 10
Signal block, 39
Signal gain slider, 39
Signal state indicator, 65
Stop recording, 54
System mute, 44
System requirements, 1
T
Tutorial, 13
U
USB detection indicator, 43
User guide, 66
W
Web tab, 68
Wing menu, 64
Index
71