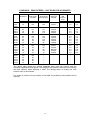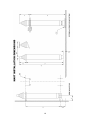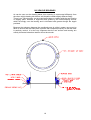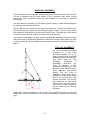
1
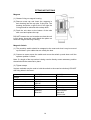
Hilomast
Telescopic Masts
OPERATING INSTRUCTIONS
PNEUMATIC MASTS
& ACCESSORIES
MKII RANGE
Issue 3
South Midlands Communications
Issue 3
S.M.House, School Close,
Chandlers Ford Ind. Est.
Eastleigh, Hampshire,
England. SO53 4BY
Tel: (+44)0 23 8024 6200
Fax: (+44)0 23 8024 6206
Email: [email protected]
South Midlands Communications
CONTENTS
Page
Masts
General Information………………………………………………………………………….3
Head Load and Guy Radii…………………………………………………………………..4
Safety………………………………………………………………………………………….5
Operating Instructions……………………………………………………………………….6
Maintenance and Repair…………………………………………………………………….8
Dismantling the Mast………………………………………………………………………...9
PTFE and Piston Replacement…………………………………………………………...12
Nylon Key Replacement…………………………………………………………………...13
Magnetic Switch…………………………………………………………………………….14
Mast Installation…………………………………………………………………………….15
Installation Dimensions……………………………………..……………………………..16
Vehicle Bearings……………………………………………………………………………18
NY Vehicle Bearings……………………………………………………………………….19
Guy Assemblies…………………………………………………………………………….21
Tripod for NH Masts………………………………………………………………………..22
Field Stand…………………………………………………………………………………..24
Compressors
General Information………………………………………………………………………..25
Types of compressors……………………………………………………………………..26
Operating Instructions……………………………………………………………………..27
Setting Compressor Pressure…………………………………………………………….28
Third Party Compressors………………………………………………………………….29
IMPORTANT INFORMATION
Before using the mast carefully read the operating instructions herein.
DO NOT use the mast unless it is fully extended.
DO NOT drive vehicle with the mast extended (ensure isolating magnetic
switch is installed)
DO NOT attempt to rotate the mast unless fitted with a rotating system.
(NRB/229R)
Beware of overhead cables.
DO NOT exceed 30p.s.i maximum mast pressure
(Ensure safety relief – valve is installed)
Only use Superfluid and Kilfrost as recommended by SMC/Hilomast LLC.
DO NOT operate the mast
- Outside of the operating temperature range -30ºC to +70ºC
- At wind speeds or payloads in excess of those recommended
Note that the warranty will be invalidated in the event that:
Specified oils and lubricants are not used, or
Recommended service intervals are not maintained, or
The mast is operated only partially pressured or extended
The mast is operated within a moving vehicle or trailer, or
Maximum working pressures, loading or wind loading are exceeded, or
The mast is operated at temperatures outside the recommended range, or
Non-accredited installation, or service work is undertaken, or
SMC or Hilomast LLC supplied spares are not used, or
The installation and operating instructions are not adhered to.
NO LIABILITY WILL BE ACCEPTED FOR DAMAGE OR INJURY CAUSED BY THE
MAST CONTACTING POWER LINES OR BY ACTIONS OUTSIDE OF THOSE
RECOMMENDED BY SMC/HILOMAST LLC.
2
MASTS
GENERAL INFORMATION
Telescopic masts are considered to be temporary structures and should not be
expected to withstand all weather conditions indefinitely. The table on page 4
specifies the wind speed that each mast will withstand. For wind speeds in excess of
those stated it is essential for the life of the mast and the safety of the operating
personnel, to retract the mast.
Pneumatic masts operate at low pressures, normally between 1kg/cm and1.75kg/cm
(14 and 25p.s.i.)
DO NOT operate at pressures above those recommended for the type of mast in
use. The mast may not only be severely damaged but injury could occur to
personnel. Any mast requiring higher air pressures or utilising compressor equipment
not supplied by the mast supplier/manufacturer should be referred back to us for
consideration and advice.
Since telescopic masts are essentially composed of sliding sections, care should be
taken to keep them clean and lubricated (see Maintenance section).
Hilomast pneumatic telescopic masts are constructed from heat-treated aluminium
alloy tubing. Each tube is fitted with a piston that incorporates a neoprene lip seal
and a PTFE slide ring. The upper end of each tube is fitted with a guide collar that
also incorporates a PTFE slide ring. Attached to the upper side of each collar there is
a locking collar fitted and clamped by means of a thumbscrew. These thumbscrews
are fitted on alternate sides of the mast to give maximum operational clearance. For
conditions where more clamping power is required or where the thumbscrews are
considered to be an obstruction for the feeder cables, it is possible for these
thumbscrews to be replaced with socket head cap screws. These can be tightened
with a 6mm Allen key. All the parts necessary for both methods of clamping the
collars are supplied with each mast.
All masts, with the exception of the NY series, have a base piston spigot diameter of
76mm and all mounting arrangements should be based on this size. All masts,
except the NY series, have inlet and exhaust ports at ¼” BSP. The NY series ports
are tapped 3/8” BSP.
Masthead spigots for all masts, with the exception of the NY series, will be 150mm
long x 51mm diameter, except where specified.
If U-bolts and clamps are used to fasten antennas directly to the top section of the
mast, DO NOT over-tighten as this can damage the keyway. BR series masts have a
flange which is a 6” x 5-½” x ½” thick rectangular plate secured with one quick
release pin. It can be drilled to suit customer’s requirements.
Long Duration Storage
If possible, store in an upright position to prevent seal distortion (see Maintenance
section)
3
LOADINGS – WIND SPEEDS – GUY RADII FOR HILOMASTS
Mast
NH5
NH7
NH9
NK6
NK9
NK11
NK16
NL8
NL9
NL10
NL12
NL16
NL22
NX8
NX10
NX14
NX18
NX25
NX30
NY7
NY10
NY12
NY14
NY18
NY21
Vertical
headload
Maximum
wind speed
unguyed
Maximum
wind speed
with top guys
Top guy
reference
number
kgs
18
15
Kph
180
135
Kph
180
160
NUG/1
NUG/1
27
22
18
20
32
35
27
25
23
14
50
50
35
30
20
14
120
100
90
70
50
40
164
114
96
65
140
130
110
95
78
56
155
120
92
70
52
44
150
126
90
80
83
67
164
137
125
112
140
130
120
110
102
92
155
120
95
83
80
75
*
*
*
*
*
*
NUG/2
NUG/2
NUG/3
NUG/4
NUG/2
NUG/6
NUG/5
NUG/4
NUG/6
NUG/8
NUG/6
NUG/7
NUG/5
NUG/10
NUG/9
NUG/8
-
Antenna
side
surface
area
Sq. cms
1000
1400
2000
3000
11000
R1
R2
metres
1.2
1.5
metres
2.4
3.4
1.5
2.0
2.0
4.0
1.5
2.0
2.0
2.0
4.0
4.0
1.5
2.0
2.0
4.0
4.0
4.0
-
2.8
4.3
5.3
7.6
3.8
4.1
5.0
6.0
7.3
10.5
3.5
4.8
6.6
8.8
12.0
14.5
-
The above table shows the vertical headload each mast will support and the
maximum operational wind speed. The weight of the antenna, however, is not usually
the main criterion when selecting a mast. The limiting factor is usually the ‘side
surface area’ of the antenna.
For areas in excess of those shown in the table, the maximum wind speed will be
reduced.
4
SAFETY
At times be aware of overhead obstructions especially power lines (we recommend
use of the Sigalarm, high voltage power line proximity warning system. Please call
for further details). Note that in the interest of safety and reducing mast wear, the
Sigalarm and air supply system must be arranged so as to dump air from the mast in
the event of triggering the Sigalarm or any similar device. With vehicle mounted
installations where a retracted mast projects above the roofline, always fix a notice in
the driving cab advising the driver of the overall height. Where a mast is vehicle or
trailer mounted DO NOT MOVE THE VEHICLE OR TRAILER WITH THE MAST
EXTENDED (see also Magnetic Switch page 14).
When erecting a mast, watch particularly for snagging guys and cables.
Due to the low pressures needed to extend masts, under no circumstances should
standard commercially available compressors be used without consultation with the
supplier/manufacturer.
Mast Air pressure
NH/NK series
NL/NX series
NY series
1.75kg/cm maximum – 1.20kg/cm minimum (25-17 psi)
1.40kg/cm maximum – 1.12kg/cm minimum (20-16 psi)
1.12kg/cm maximum – 0.98kg/cm minimum (16-14 psi)
Air pressure should not be increased above that stipulated without first referring to
the supplier/manufacturer. Over pressurisation severely strains the collar and base
section screws and can, in extreme circumstances, force a collar off and allow the
tube to blow out.
If a tube section sticks during the extension of a mast severely enough to cause it to
crash into its relevant collar, the cause must be investigated immediately. Failure to
do so will result in progressive mechanical damage. The most common causes are
as follows:
Lack of lubrication:
See Maintenance section (page 8)
Key sticking in keyway:
See Maintenance section (page 13)
Bent or damaged section:
Usually caused by overloading mast and/or operating
at too high a wind speed.
If there is no obvious reason for a section to stick, that section must be removed for
inspection and possibly also the next largest section into which it slides.
When fitting optional rotation handles, tighten sufficiently for the components to hold
firmly. DO NOT over-tighten as this can distort the base tube and cause the mast to
stick at that point.
DO NOT remove the exhaust valve in an attempt to retract a mast more quickly,
especially when the mast is carrying a heavy headload, since this action removes
control over the rate of descent. In extreme cases, the uncontrolled collapse of a
mast can lead to the headload being damaged, together with applying shock loads to
the mast fixings.
5
OPERATING INSTRUCTIONS
NH/NK/NL/NX Series Hilomasts
(1) Close the mast exhaust valve by turning in a clockwise direction until finger tight.
(2) All locking collars, with the exception of the top one, should be securely tightened
by turning the thumbscrew in a clockwise direction. The locking collars are
situated immediately above the guide collars at the top of each section.
(3) Connect the air supply to the mast (see maximum air pressures in safety
section). When the top section is fully extended the locking collar should be
securely clamped with thumbscrew. It is sometimes helpful to switch off the
compressor between clamping sections. The next lower collar should then be
released and that section raised and clamped and so on, until the mast is fully
extended.
(4) If the mast is to be used for frequent operations of short duration, the collars need
not be clamped, since all Hilomast compressors are fitted with differential
pressure switches that will maintain mast air pressure.
(5) To lower the mast, open the mast exhaust valve by turning anti-clockwise. When
the air is released, unclamp the lowest collar. As each section of the mast
descends it will bring down the next collar for release and so on, until the mast is
fully retracted. The rate of decent cannot be increased as it is controlled by the air
release valve to protect the mast.
(6) In the case of NX series masts carrying large headloads, additional control over
the rate of descent may be afforded as follows:
After releasing air pressure (see 5), close the mast exhaust valve before releasing
the locking collars. The load will then be cushioned on trapped column of air.
Release air from the mast to give the rate of descent required.
(7) All Hilomast compressors are fitted with either manually or electrically operated
exhaust valves and it may be more convenient to lower the mast through these.
(8) When the mast is required to operate on only one or two sections, it is only
necessary to unclamp those sections.
(9) Locking the top section or sections in the retracted position will allow the
shortened mast to operate in higher wind speeds.
6
Note: The locking collars are adjusted during assembly. However, if any locking
collar is not clamping the section securely when fully tightened, if should be released
and the socket screw or thumbscrews adjusted until the clamping action is sufficient.
As a guide the gap on each side of the locking collar should be equal when that
locking collar has been tightened. If one side is closed too much, the mast section
may not release properly.
For frequent operations or for situations where the sections will be locked more
permanently the thumbscrews can be replaced with socket set screws operated with
a T key.
NY series
NY series masts are built are built specifically for high accuracy/high load operation
and would normally form part of a fixed installation.
Standard NY series masts are not supplied with locking collars; therefore, loads
would normally be carried on a maintained column (see maximum air pressures in
Safety section). NY series of masts must be operated at full extension.
Locking collars can be fitted at extra cost. (Ask for details)
(1) When pressurising the mast, it is imperative to ensure the free running of all
antenna feeders and other equipment cables. The mast extension could be
powerful enough to snap the cable and the air pressure supplied to do this will
cause the mast to shoot up, possibly with sections crashing into their respective
collars, resulting in heavy shock loads.
(2) Air must be exhausted in a controlled manner. Remember that the NY series of
masts can carry a dead weight up to 120kg. All Hilomast compressors are fitted
with either manually or electrically operated exhaust valves. If a remotely
operated exhaust valve is fitted to the mast a restriction nozzle may be required
to give a maximum descent speed for the load the mast carries.
7
MAINTENANCE AND REPAIR
Mast maintenance
Inspect and lubricate mast sections at four-week intervals or every 200 operations,
whichever occurs first. If the mast has been used in a dusty environment resulting in
a build up of contaminants and old lubricant on the surface of the tubes, then this
must be removed. This can be done by wiping each section with an oil soaked cloth.
SMC build the masts using Hilomast lubricant oil (SMC Part No. 000055500). To
protect the seals oil should be injected into the spring-loaded grease fitting situated in
each collar. Alternatively, proprietary oil misters may be incorporated within the air
supply line. Sufficient oil is needed to run down the inside of each tube. During
periods of sustained cold and freezing conditions SMC/Hilomast LLC recommend the
use of Kilfrost (SMC Part No. 000055600). Periodically oil the locking collar
thumbscrew treads if fitted. Lubricant and dispensing cans are available from
SMC/Hilomast LLC. Use of oils other than those prescribed by SMC/Hilomast LLC
will invalidate the mast warranty.
FAILURE TO LUBRICATE THE MAST WILL RESULT IN DAMAGED SEALS THAT
WILL NOT BE REPLACED UNDER GUARANTEE.
Where masts are to be extended for long periods, a coating of silicone grease is
recommended to help prevent corrosion forming on the exposed metal. In dusty
conditions it may help to use silicone spray, which is almost dry in operation, on the
sections. These products are available from retail outlets.
(1) It is possible for water to enter a mast in two ways.
a) By vapour carried down the compressor line condensing in the mast. This
may be drained through the mast exhaust valve.
b) By rainwater running down the sections and collecting above the seals. This
makes a mast vulnerable to icing up. It is therefore advisable to use a mast
cover when the mast is retracted and to leave the exhaust valve open or
remove it altogether, when the mast is not in use if the conditions so dictate.
Great care should be exercised if the mast is likely to be used in freezing
conditions.
(2) Compressors should be placed on a level with or below the base of the mast to
prevent moisture build up in the airlines. If a compressor has to be placed higher
than the base of the mast, care must be taken not to allow water to become
trapped in the airlines. Disconnect the airline from the mast and blow out the line
at frequent intervals or fit a drain valve at the base level of the mast.
Hilomast Seal Replacement
If the mast will not extend due to air leakage, first check that air is not escaping from
the inlet or air release valves.
When the mast has been stored in a horizontal position, the seals may deform
slightly and allow air to pass. It is also possible under some storage conditions, for
the grease used in manufacture to harden and prevent the seal lip from touching the
tube wall.
8
To correct this, stand the mast at a vertical position and inject some Hilomast
lubricating oil, allowing it to drain down inside the tubes. Then pull out each section in
turn and thrust downward (with the air release valve closed). This forces the lip of the
seal back to its original position against the wall of the tube.
DISMANTLING THE MAST
If possible, lay the mast horizontally and pull out the sections to full extension. MAKE
SURE TO PROVIDE THE MAST WITH SEVERAL SUPPORTS ALONG ITS
LENGTH TO PREVENT THE TUBES BENDING. Apply low air pressure to the mast
and test for air leaks around the collars using a soap solution. If an air leak is
discovered, remove the sections above that collar i.e. all the smaller sections, as one
unit if possible, by releasing the collar from its tube (see following instructions). If no
positive leaks are found by the above method, closely examine the keyways for
cracks. If none can be found proceed as follows:
BASE PISTON
AIR RELEASE
VALVE
AIR INLET
VALVE
MAST TUBE
COLLAR
SCREW M6x10mm
PAN HEAD
COLLAR LOCATION
PIN
BASE PISTON
COLLAR
RETAINING
SCREW
SCREW M6x10mm
PAN HEAD
COLLAR LOCKING
STRIP
LOCKING COLLAR
COLLAR
RETAINING
SCREW
NYLATRON KEY
COLLAR SLIDE
RING
DAMPER
SCREW M8x30mm
SOCKET HEAD
SCREW M6x10mm
PAN HEAD
LOCKING STRIP
SCREW M6x10mm
PAN HEAD
THUMB SCREW
9
O-RING
SCREW SELF TAP
(1) Loosen the lower pan head screw on the stainless straps (if fitted with locking
collars). Remove any sealing compound from screw holes to reveal screws.
Loosen the socket set screws “A” from the collar, except the one securing the
Nylatron key “B”. Note there are two screws in each hole. The outer screws are
shorter and used to lock main screws.
(2) Holding the collar onto its tube, pull out all the remaining sections (keeping them
together as one unit) until the tube stop “C” is against the collar.
SCREW SELF TAP
O-RING
PISTON
PTFE SLIDE RING
SEAL
ST/ST BAND
(3) Taking care to support the extended sections, slide the collar away from the
bottom tube. Continue pulling the extended sections out until the piston is free
from the bottom tube.
(4) Remove the air inlet valve from the base of the mast or spares kit and fit into the
tapped hole “D” in the exposed position. With a foot pump attempt to extend the
remaining sections. If they extend it will indicate that the exposed seal is the one
requiring replacement. If they do not extend, expose the next piston and seal
using the same procedure – and so on – until the faulty seal is located.
Since it is unusual for a seal to fail, it is necessary at this stage to establish the cause
if possible. If small particles of metal are found around the seal, it usually indicates
that something has scraped the tube. This can happen if the mast has been violently
abused, if some modification with different screws or clamps have been fitted by the
customer or if the mast has not been serviced and lubricated regularly.
10
(5) Clean the tubes with a cloth and examine the tube surfaces. If there are dents or
sufficient surface damage to affect the seals, then the section will not function
correctly and should be replaced.
(6) Remove the faulty seal; in most cases the damage is imperceptible. Having oiled
or greased the new seal, fit into the piston groove using only the fingers, DO NOT
USE METAL TOOLS. The PTFE slide ring “E” should be replaced at this stage if
necessary (see separate instructions at 6a over page).
(7) The sections must now be refitted with great care. It is possible to damage the
new seal on the edge of the receiving tube. Check the edge for sharpness or
burrs also check the screw holes and ensure they are completely smooth. Then
oil or grease it to help insertion of the section with the new seal.
(8) Line up the section to be inserted, with the new seal at a slight angle to the mouth
of the receiving tube. Hold the edge of the seal down with the thumb and turning
the tube, allow the compressed part of the seal to enter the receiving tube. Once
all the seal is inserted, correct the angle so that the tubes line up and insert
Teflon slide ring. Keep the tube being fitted as concentric as possible with the
receiving tube, until the stainless steel tube stop “C” has just entered. The collar
can now be pushed forward onto the receiving tube and when secured it will
maintain radial clearance.
NY SERIES
The NY mast has additional anti-rotation locking pins engaging in slot in the stainless
steel stop sleeve.
The mast should be assembled in the normal way but with these pins removed.
Replace them as each section is built up.
(1) Pull out section to its maximum i.e. until the stop sleeve comes against the
support collar.
(2) With a pencil, mark the section at the collar.
(3) Push in section about 25mm. Screw in locking pin until it touches the bottom of
the keyway then unscrew half a turn.
(4) Pull out section. If the pin is engaging the slot the section will come out enough to
enable the pencil mark to be seen again i.e. the stop sleeve will be against the
collar.
(5) If the pin does not engage push in the section again, continue to unscrew the
locking pin and repeat instruction 4. The pin should only be unscrewed a few
degrees at a time each successive attempt
(6) Finally, screw lock nut down firmly.
11
PTFE Slide Ring Replacement
(6a) The Teflon rings should be examined for scuffing and wear. If replacement is
necessary they should be fitted before the seals. A length of Teflon should be cut so
that there is a small gap between the ends when it is wrapped around the piston
groove. The piston should then be pushed into the receiving tube over its entire
length of travel. Should any tight spots be revealed, the PTFE should be thinned
down slightly with a sharp knife or abrasive paper, taking care to keep the thickness
as even as possible. This procedure should continue until the piston slides freely.
Piston replacement
When the mast is dismantled, the pistons should not be removed. They are fitted
during manufacture by heat shrinking the tube onto the piston, in the event of
removing the piston; they cannot be secured by the same system. It should be noted
that the smaller tubes have the extra security of screws into the piston spigot “F” and
this must be used to refit a piston.
After removing the seal and PTFE ring, coat the piston spigot “F” with a sealing
compound and insert into the tube. Drill two holes and countersink for the screw
head, clear away all swarf and fit self-tapping screws. Should air leaks be evident,
use further sealer on the screw heads and around the piston where it meets the end
of the tube.
12
NYLON KEY REPLACEMENT
Tools required: 3mm Allen key and screwdriver, a fine file may also be needed.
(1) For this operation, dismantle as described on page 9 onwards, but only the mast
collars need be removed, the tubes may be left in their nested position. Mark the
base tube with a pencil so that the collar is assembled at the same place.
(2) When the collars have been removed from the end of the tube, the green nylon
key can be seen in its slot inside the main collar. After removing the old key, slide
the appropriate tube out until the stainless steel ‘stop band’ shows (no further
please) this is the lower end of the keyway channel. Slide the new key along this
key way to ensure it runs smoothly along the entire length, if there are any tight
spots carefully dress the edge of the keyway with a fine file, do not dress the key
itself or you will end up with a loose fit elsewhere.
(3) There is an adjustment screw and locking screw behind the key slot in the collar,
back these off and insert the new key – largest collar first. Replace the collar onto
the tube using the pencil mark to locate the same place. Use the Allen key
through one hole in the collar to locate the hole in the tube and line it up exactly
so that the dog point screw will not miss it, failure to locate the screws in the tube
means that it would come apart when pressurised.
(4) Repeat this operation at the position directly opposite the first screw, then fit the
rest, and the locking screws. Do not over tighten, when tight go further quarter
turn but no more. Use a thread-locking compound (Locktite 243) on the pan-head
screws.
(5) Now adjust the nylon key screw, it should be just tight enough to allow the tube to
run smoothly, again do not over tighten, and finish with the locking screw.
13
FITTING INSTUCTIONS
Magnets
(1) Grease O-ring on magnet housing.
(2) Remove mast cap and insert the magnets in
their housing into the top tube, O-ring first. The
housing should be a tight fit but if too tight the
O-ring should be trimmed with a sharp knife.
(3) Push the unit down to the bottom of the tube
with a rod and replace the cap.
DO NOT hammer the rod to make sure that the unit
is fully down, since this could disturb the piston on
which the magnet housing is sitting.
Magnetic Switch
(1) The proximity switch should be strapped to the mast such that it may be moved
up and down: nylon cable ties are usually the best.
(2) Connect a meter across the switch and move the switch up and down until the
optimum position is found.
Note: If a length of the top section is being used to directly mount antennas, position
the switch with the antennas in place.
(3) Tighten straps.
Various methods may be used to hold the switch to the mast but obviously DO NOT
drill fixing holes in the mast.
Minimum breakdown
voltage
Maximum current
Maximum voltage
Maximum load
Contact resistance
Cable colour code
NK & NH
200V DC
NL & NX
500V DC
0.25A
28V DC
20V AC
3W
100m ohm
White-common
Red-N/O
Blue-N/C
1.5A
20W
250m ohm
Brown-N/C
Blue-common
Black-N/O
Green-case
14
MAST MOUNTINGS
There are several mounting arrangements available for the installation of masts.
They can be mounted either internally or externally to a vehicle or building. For
erecting masts on open ground, base guy assemblies are available; they are the
strongest for field mounting. For the NH, NK, NL and NX series, field stands have
been designed specifically for the purposes, up to extended height of 18m.
Side Mounting Brackets
For mounting masts to a vertical surface of a vehicle or building, the set includes two
brackets. The aluminium top bracket has one half detachable to allow for removal of
the mast without disturbing the bracket fixings. It incorporates Teflon bearing rings to
protect the mast. The lower bracket has a PTFE disk to permit easy rotation of the
mast and thumbscrew for locking in any azimuth direction. On the NX and NY series,
the bracket is galvanised steel with aluminium base plate and collar break.
The dimensions for drilling the mounting holes are shown on pages 16 and 17. Note
that for the NY series, the bottom bracket has two additional holes. It is important that
the correct size bolts are used as shown in the table. It is important also when bolting
to a vertical surface to ensure that the structure is strong enough or suitably
reinforced to take the loads. If any doubt, please contact supplier/manufacturer for
specific loadings for each mast.
All of the lower mountings are fitted with M6 screws on each side. After the
installation of the mast, these screws should be tightened and adjusted to permit the
mast to rotate but to prevent it from disengaging vertically from the bearing. It is
important that the upper and lower bearings are aligned carefully to permit the mast
to rotate easily.
15
16
17
Mast
A Dia
B Dia
NH5
89
38
NH7
89
38
NH9
89
38
NK6
102
50
NK9
102
50
NK11
102
38
NK16
102
50
50
127
NL8
50
127
NL9
50
127
NL10
50
127
NL12
50
127
NL16
50
127
NL22
50
152
NX8
50
152
NX10
50
152
NX14
50
152
NX18
50
152
NX25
50
152
NX30
NY7
238
150
NY10
238
150
NY12
238
150
NY14
238
150
NY18
238
150
NY21
238
150
Note: All dimensions in mm
C
1161
1586
2043
1361
2026
2026
3736
1368
2033
2033
2033
3743
3743
1375
2040
2040
3850
3850
4040
1381
2026
2026
2026
3756
3756
D
252
252
252
277
277
340
277
403
407
470
403
407
403
533
470
596
470
596
529
282
239
325
368
239
282
E Min
800
1000
1200
900
1300
1300
2000
900
1300
1300
1300
2000
2000
900
1300
1300
2000
2000
2200
900
1300
1300
1300
2000
2000
E Max
1125
1550
1955
1325
1990
1990
3700
1332
1997
1997
1997
3707
3707
1339
2004
2004
3814
3814
4004
1343*
1988*
1988*
1988*
3718*
3718*
F Min
315
315
315
340
340
403
340
466
470
533
466
470
466
596
533
659
533
659
592
347
304
390
433
304
347
G
H Min
H Max
J
K
M Dia
1413
800
1100
150
108
10
1838
1000
1530
150
108
10
2268
1200
1990
150
108
10
1638
900
1300
150
108
10
2303
1300
1970
150
108
10
2366
1300
1970
150
108
10
4013
2000
3680
150
108
10
10
108
150
1300
900
1771
10
108
150
1980
1300
2440
10
108
150
1980
1300
2503
10
108
150
1980
1300
2436
10
108
150
3680
2000
4150
10
108
150
3680
2000
4146
12
130
160
1300
900
1908
12
130
160
1960
1300
2510
12
130
160
1960
1300
2636
12
130
160
3770
2000
4320
12
130
160
3770
2000
4446
12
130
160
3980
2000
4569
1663
900
1300*
200
130
12
2265
1300
1950*
200
130
12
2351
1300
1950*
200
130
12
2394
1300
1950*
200
130
12
3395
2000
3680*
200
130
12
4038
2000
3680*
200
130
12
* Dimension will decrease by 68mm for non-rotating base plate
NH NK NL NX FM VEHICLE BEARINGS
(1) Select a suitable horizontal location for the roof bearing. Maximum and minimum
installation dimensions are shown on pages 16 and 17.
(2) Cut a hole in the outer skin equal to the internal diameter of the bearing tapping
plate.
(3) Clamp the outer flange centrally over the hole and using as a template, drill six
holes 6.5mm diameter (8 holes for NY series)
(4) Assemble bearing as shown in drawing, with the neoprene gasket sandwiched
between the outer flange and the vehicle skin. The screw head should be sealed
with a suitable compound to prevent water ingress. If the roof is not perfectly flat,
it may be necessary to use sealer at this location also.
(5) Remove inlet valve from base of mast with box spanner provided.
(6) Fit the neoprene O ring over the base of the mast and position at the approximate
height of the bearing. Ensure that the PTFE ring is fitted in the flange. The mast
may now be lowered through it. It may be necessary to shave a thin layer of the
PTFE with a sharp knife to ensure good fit. If the mast is to be rotated in normal
use, leave a minimum gap between the mast and the Teflon, since excessive
clearance at this point will lead to considerable wind noise when the vehicle is
travelling.
(7) The lower end of the mast can now be fitted into the base plate secured directly
below the roof bearing (tighten the two M6 screws in the base plate).
(8) The two halves of the roof-bearing shroud may now be clamped into position.
Lightly grease the outside of the O-ring and make sure that it lines up with the
groove in the shroud. The mating faces of the two halves of the shroud should be
covered with sealing compound before clamping securely to the bolts. Vertical
clearance between the shroud and outer flange should be just enough to allow
the mast to rotate without any parts rubbing. If mast rotation in service, is not
required to use sealing compound inside the shroud before bolting up.
18
NY VEHICLE BEARINGS
As can be seen on the drawing below, this mounting is constructed differently from
the other vehicle bearing kits before, and therefore needs slightly different fitting.
There is no Teflon bearing, as the mast itself makes no contact with the roof bearing
or tapping plate. Rotation is supported and guided by the mast-clamping shroud,
which fits snugly over the bearing and is lubricated with grease through the nipple
provided.
Because the tolerance between the machined parts is critical, greater care must be
taken to ensure that the base plate is placed with complete accuracy so that the mast
is perfectly vertical. It is also very important that the roof surface and bearing are
exactly horizontal otherwise rotation will not be smooth.
19
(1) Select a suitable horizontal location for the roof bearing. Maximum and minimum
installation dimensions are shown on pages 16 and 17. Ensure that there are no
obstructions for the base plate on the floor.
(2) Cut a hole in the outer skin equal to the internal diameter of the tapping plate.
(3) Clamp the bearing centrally over the hole and using it as a template, drill eight
holes 6.5mm diameter.
(4) Assemble the bearing and tapping plate as shown with the neoprene gasket
sandwiched between the bearing and vehicle skin. The screw heads should be
sealed with suitable compound to prevent water ingress. If the surface of the roof
is fluted patterned or in some way not perfectly flat, it will be necessary to use
filler and sealer to ensure it is horizontal and that there is a perfect seal.
(5) Ensure that the base plate is in exactly the right position below the bearing by
using a plumb line or similar device. Remember that the weight of the mast may
be as much as 130kgs, which would affect the horizontal plane of the vehicle.
(6) Remove all valves from the mast and fit the neoprene O-ring over the base tube,
position it at the approximate height of the clamping shroud. The mast may now
be lowered through the bearing onto its base plate. The fixed base plate will be
screwed to the underside of the mast and then bolted to the floor. The rotating
base plate accepts the special base spigot screwed to the mast base.
(7) The two halves of the clamping shroud may be clamped into position. Lightly
grease the O-ring and make sure it lines up with the groove in the shroud. The
mating faces of the two halves of the shroud should be covered with silicone
sealer compound to make them waterproof. Clearance between the bearing outer
diameter and the clamping shroud is already machined to the correct dimension,
therefore, only the piston of the clamping shroud above the bearing needs to be
set, it should be as close as possible without touching. If mast rotation is not
required then the two parts can be coated with sealer where they touch before
bolting up.
20
BASE GUY ASSEMBLY
This arrangement is generally the easiest method of erecting a mast on open ground.
The kit is complete with the mast fittings, 3 guys, adjusters, base plate, ground
stakes and pegs. Foundation bolts are also supplied for mounting on concrete
foundations.
The base plate incorporates a PTFE disk to permit rotation of mast and thumbscrew
for locking in any azimuth direction.
NH and NK kits have polyester guy ropes with adjusters. The NL and NX kits have
galvanised steel guy ropes with conventional rigging screws. The base guy collars
are supplied in two halves to permit easy fitting to mast. The base guy collar should
be set as close to the top collar on the base tube as is practical.
It should be remembered the guys transmit considerable downward thrust on a mast
and should only be sufficiently tightened to restrain movement. When setting up mast
on open ground, the ground stakes should be set at a radius R1 as shown in table on
page 4.
TOP GUY ASSEMBLY
For use in inclement weather
conditions or to give more
directional stability to top of
mast. In some cases, masts will
withstand higher wind speeds,
(see table page 4). This
assembly
comprises
a
detachable
aluminium
guy
collar, D shackles, 3 prestretched polyester guys 5mm
diameter, fitted with rope grips,
nylon adjusters and ground
stakes. The guy collar is
supplied in two halves and is
designed to clamp to the upper
end of the second (from top)
section as shown. The specific
guy reference for each mast
can be found on table page 4.
The ground stakes should be
set at a radius R2 as shown in
this table.
Masts with extended heights of 15m or more may require mid-guys for complete
stabilisation, since wind pressure can bow the mast between the ground and the top
guys.
21
TRIPOD STAND FOR NH MASTS
Fitting instructions
Before the tripod stand can be used, the top bearing must be fitted to the mast as
follows:
(1) The top locking collar must be securely clamped in position at 728mm from the
base of the mast, as shown in the sketch.
(2) Remove inlet valve so that the upper bearing can now slide up to meet the top
locking collar, ensuring that the Teflon rings are in position.
(3) The lower locking collar can now be clamped below the bearing but leaving
sufficient clearance to allow the bearing to rotate.
Once the upper bearing is fitted it can remain as a permanent fixture on the mast,
even when the tripod stand is not used.
22
Erecting Instructions
(1) Place the stand in position on the ground and hinge the three legs out into
horizontal position.
(2) Place the mast into the lower bearing, ensuring that the PTFE disk is in position.
(3) Remove the three struts from their stored position in the legs and fit them into the
holes provided in the upper bearings. Push the three attached R clips into holes
in struts.
(4) Lower the adjustable feed just sufficiently to prevent the stand from rocking and
to set the mast vertically. Lock the feet with thumbscrews provided.
(5) Turn the mast to the direction required and lock with the thumbscrew in the lower
bearing.
(6) For transit the legs can be folded into mast and clamped in position with R clips
as shown in Section AA.
23
FIELD STAND (N4L/102) FOR NK MASTS
(1) Remove inlet valve with box spanner provided.
(2) On the NK16 masts only, fit the first split collar approximately 2m up from the
base of the mast. All other masts split collar should be fitted up against the base
collar.
(3) Slide mast through the stand collar.
(4) Position the second split collar close under the stand collar, with sufficient
clearance to allow it to rotate.
(5) Refit inlet valve.
DO NOT over tighten split collars.
To erect the mast securely, peg the base plate into the ground and spread legs until
they are approximately 45 degrees to the mast. Clamp the sliding sections and
securely peg the feet.
Safety note: NK masts mounted on this stand should not be left unattended. The
resistance to overturning is determined by the quality of anchorage of the ground
pegs in the base plate and feet. Tests have been carried out on average soil
conditions and the following rules must be observed.
(For NK6, NK9 and NK11 masts, top guys must be fitted at wind speeds above
40kph.
For NK16 masts, top guys are required at all wind speeds.
A special all steel tripod stand is available for NL and NX models up to 18 metres
extended.
24
COMPRESSORS
GENERAL INFORMATION
Hilomast compressors are air cooled, oil-less electric motors of the diaphragm type
enclosed in a steel case. All models incorporate a pressure controlled switched to
maintain the correct mast working pressure. They are quiet, maintenance free and
assembled from components that have a proven reliability over many years.
Compressor
Type
NC1
NC2
NC3
Approximate Rate of Mast Extension (Metres per Minute)
NH Series
NK Series
NL Series
NX Series
NY Series
7.2
4.2
2.6
1.7
13.5
8.1
4.8
3.2
1.7
18.1
10.8
7.5
3.9
To calculate time to fully extend mast: The height of mast is divided by rate e.g. for
NL12 mast with NC2 compressor – extension time = 12 ) 4.8 = 2.5 minutes. The time
to reach maximum pressure is approximately 2 x extension time e.g. 5 minutes.
(1) Air pressures are monitored by a differential pressure switch, which will stop the
compressor at a pre-set level and restart the unit when pressure falls below a
second pre-set level. The pressures will normally be set at the factory and will be
shown on the label on the front of the case.
(2) Although electrical components are continuously rated; it is wise to check that the
compressor is switching off automatically. If not, the mast and compressor should
be checked for air leaks.
(3) Ensure that there is an adequate air space around the casting, as serious
overheating of the unit may result.
(4) Units may be fitted with a remote control. Since mast systems run on low air
pressure, it is advisable to keep pressure and exhaust hoses as short as
possible, as this will affect the extension and particularly retraction times
markedly. If the compressor forms part of a fixed installation and has to be sited
away from the mast, the exhaust valve may be removed and re-sited at the base
of the mast.
(5) Compressors should be placed on a level with or below the base of the mast to
prevent moisture build up in the airlines. If a compressor has to be placed higher
than the base of the mast, care must be taken not to allow water to become
trapped in the airlines. Disconnect the airline from the mast below out the line at
frequent intervals or fit a drain valve at the base level of the mast.
25
TYPES OF COMPRESSORS
Type NC1
Single unit
Output:
17 litres/minute at 0.7kg/cm²
Fuses:
12VDC = 10A, direct switching
24VDC = 5A, direct switching
240VAC = 1A, direct switching
Manual exhaust valve.
Type NC2
Twin unit
Output:
34 litres/minute at 0.7kg/cm²
Fuses:
12VDC = 20A, relay
24VDC = 10A, relay
240VAC = 3A, relay
Solenoid exhaust valve.
Type NC3
Single unit
Output:
65 litres/minute at 0.7kg/cm²
Consumption:
12VDC = 30A, relay
24VDC = 15A, relay
240VAC = 5A, relay
Solenoid exhaust valve.
26
OPERATING INSTRUCTIONS
NC1 Unit
(1) Connect compressor to suitable power supply.
(2) Connect airline to mast inlet valve.
(3) Close exhaust valves at the base of the mast and compressor.
(4) Switch on compressor to extend mast.
(5) To lower mast, check compressor is switched off. Open either the exhaust valve
at the base of the mast or that at the compressor.
Opening both valves will allow a more rapid retraction but this can loosen or even
damage antennas.
NC2 and NC3 Units
(1) Connect compressor to suitable power supply.
(2) Connect airline to mast inlet valve.
(3) Close exhaust valve at base of mast.
(4) Turn compressor switch clockwise. The first position (H = hold) will close the
compressor exhaust valve. The second position (↑ = up) will start the compressor
and extend the mast. During extension the mast may be stopped at any height by
switching back to the hold position.
27
SETTING COMPRESSOR PRESSURE
Setting Pressure Switch in the Compressor
Set pressure switch only when pressure is applied to the system. A gauge must be
fitted in order to check pressure.
(1) Unscrew stop “A” with screwdriver.
(2) The maximum switching pressure must be adjusted first, this is done by rotating
knob “B” (clockwise raises the pressure).
(3) To adjust minimum switching pressure, depress knob “B” and rotate as before.
(4) Screw in stop “A”.
(5) Enter cut-in and cutout valves on label.
Remote Controls
RC/1 is a rotary switch.
RC/2 and RC/3 are 3 button controls.
Remote controls can be fitted to each compressor. When transferring control from
the front panel of unit to the remote control device, it is a good practice to set the
compressor panel control to the hold position. When the remote circuit is switched
back to the compressor panel circuit the mast will then be on hold and therefore
maintain its position.
The RC/2 will normally be used for DC operation of AC powered compressor units.
Please note that a separate power supply unit is installed within the compressor to
supply a DC output.
The RC/3 is a standard remote control similar to the RC/1 but with 3 button
operation.
28
USE OF THIRD PARTY COMPRESSORS
When using third party compressors, ensure that the tank pressure is set to a
maximum of 25 p.s.i. To ensure proper operation of the mast use SMC lubricant (Part
No. 000055500) in the compressor system.
User Notes:
29
South Midlands Communications
Issue 3
S.M.House, School Close,
Chadlerds Ford Ind. Est.
Eastleigh, Hampshire,
England. SO53 4BY
Tel: (+44)0 23 8024 6200
Fax: (+44)0 23 8024 6206
Email: [email protected]