1
MAGNM
LASER SAFETY
This unit employs a laser. Only a qualified service person should remove the cover
or attempt to service this device, due to possible eye injury.
"CAUTION_USE
OF
CONTROLS
OR
ADJUSTMENTS
OR
PERFORMANCE
RESULT
OF PROCEDURE OTHER THAN SPECIFIED HEREIN MAY
IN
HAZARDOUS RADIATION EXPOSURE."
RISK OF ELECTRIC SHOCK
DO NOT OPEN
CAUTION: TO REDUCE THE RISK OF ELECTRTC SHOCK,
DO NOT REMOVE COVER (OR BACK)
NO USER.SERVICEABLE PARTS INSIDE
REFER SERVICING TO QUALIFIED SERVICE PERSONNEL
L
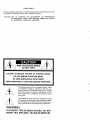
The lightning flash with arrowhead symbol, within
an equilateral triangle, is intended to alert the user
of the presence of uninsulated "dangerous voltage"
within the product's enclosure; that may be of sufficient magnitude to constitute a risk ol electric shock
to persons.
The exclamation point within an equilateral triangle
is intended to alert the user of the presence of important operating and maintenance (servicing) instructions in the literature accompanying the appliance.
WARNING
TO PREVENT FIRE OR SHOCK HAZARD, DO NOT
EXPOSE THIS APPLIANCE TO RAIN OR MOISTUBE.
Your Compact Digital Audio Disc Player employs ultra-precise manufacturing techniques and sophisticated digital and servo technology to
assure you an audio output which is the full equivalent of that at the
studio console where the original recording was made. Your listening
area will never be the same againl
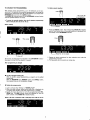
Back skip feature
When the BACK button is pressed once during play. the unit enters
pause mode at the beginning of the current selection. When the
button is pressed twice, the unit returns to the beginning of the previous selection and enters pause mode. This feature is useful for recording.
Please read this instruction manual carefully before using your Compact Digital Audio Disc Player. This player has been manufactured with
the greatest of care to ensure trouble-free operation; however, should
you encounter any problem, please promptly notify the store where
you purchased the machine or your nearest seryice center.
Repeat feature
Either all or selected selections can be played repeatedly.
A-B repeat feature
When the beginning and end of the section to 6e played repeatedly
is specified, the section can be played repeatedly.
.
FEATURES
The compact disc system is a new era for audio systems, which makes
the best of state-of-the-art digital techniques.
r
High-Performance
The FD3040 is extremely superior in performance to the conventional
analog audio systems as demonstrated by the following characteristics.
Frequency
range '.
:
:
:
separation :
Dynamic range
Distortion factor
Wow and flutter
Channel
4Hz to 20 kHz
90 dB or greater
0.003%
less than measurable
limit
90 dB or greater
Music standby feature
With this feature, the unit pauses at the beginning of the specified
selection. This feature is useful for recording.
Easy-to-read display
The display shows program and operation status, elapsed time for
playing each selection, time remaining to complete the program.
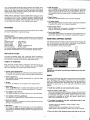
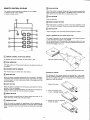
REMOVING SHIPPING SCREWS
Two shipping screws have been set at the factory before shipping. Be
sure to remove them as shown below. Keep these screws because
they will be required when the unit is transported
Use a screwdriver to remove these screws.
Our unique, perfectly balanced swing mechanism provides excellent
anti-vibration characteristics and immunity against oblique setting.
HIGH OUALITY SOUND
The .newly developed digital filter, large-scale power transformer,
audio capacitor and other high grade parts enable the conversion of all
the information recorded on the disc into high quality sound.
VARIETY OF FUNCTIONS
Each audio disc contains various information other than music (e.g.
selection numbers, length of each selection, etc.) and the FD3040
reads this information to provide many useful functions.
GAUTION:
.
Random access programming
Any number of selections (up to 24) can be automatically played in
the desired order using the random access programming function.
.
Delete programming
Any selections can be skipped automatically by using the delete
programming function.
o All
play
Of course, all selections can be played in the recorded order.
.
Operating the unit before removing these shipping screuvs may damage the unat.
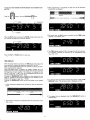
DISCS
Note how the surface of discs gleam with all the colors of the rainbow.
This is because of light diffraction caused by the discs' micron-size
tracks. The FD3040 Compact Disc Player uses a beam of laser light to
read audio information from these tracks; thus, the discs are never
subjected to stylus wear as is the case with conventional record
players.
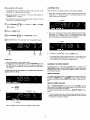
Search scan
When the SEARCH button is pressed, the beginning of each selection recorded on the disc is automatically played for 10 seconds.
.
Tune selection with lndex No.
The FD3040 enables you to select tunes by their lndex Numbers.
.
Tune selection whh time specification
Tune selection by specifying time is also possible even during play.
o
Ouick tune selection
When the music No. is specified, play starts promptly from the beginning of the specified tune.
r
Skip feature
By pressing the NEXT button during play you can skip selections.
The number of selections skipped corresponds to the numbers of
times the button is pressed and play starts from the beginning of the
selected tune.
.
Handle discs carefully to avoid scratching their surface.
o
Keep the surface of discs clean.
This is important, because there may be as many as 15 billion bits of
information recorded on their surface and excessive dust can result
in intermittent interruption of sound. Remove ordinary dust and
fingerprints by breathing on the disc and wiping it gently with
clean cotton [andkerchief or gauze.
.
a
To maintain the quality of your discs, avoid placing them in locations such as the following.
. Locations which are exposed
to direct sunlight or heat
(such as radiators)
. Locations with high concentrations of dust or humidity
. Places which may be exposed to water, such as near windows
.
Place your discs in their protective Gases when they are not in use.
0l[sG
eacr BUrroN
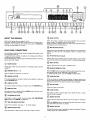
ABOUT THIS MANUAL
@
Refer to the figures given on page 3 and 4 .
The callout numbers correspond to those found in this manual. All references to the connections and controls are printed in BOLDFACE,
hold type as they appear on the unit.
When this button is pressed once during playback, the unit enters
pause mode at the beginning of the current tune.
When the button is pressed again, the mode remains the same but at
the beginning of the previous tune.
new BUTToN
@
(Reverse)
REAR PANEL CONNECTIONS
Keeping this button pressed caues the laser pickup to move toward the
All connections to the rear panel should be made with the power to the
entire system turned off.
To avoid confusion, connect one cable at a time between the different
components of your system.
This is the safest way to avoid cross-connecting channels or confusing
signal inputs with outputs.
played.
beginning of the disc from the selection which is currently being
Pressing this switch once turns power on. Pressing it again turns the
power off.
*=*t
enocnnM KEYs
(1
-
@ "r"o*"
t,tust"r"toNDBY BUTToN
When the NEXT button is pressed with this button pressed, the unit enters standby mode at the beginning of the next tune.
To release standby mode, press the PAUSE or PIAY button.
o)
BUrroN
@
This button makes the computer memorize the selection number set
by the PROGRAM keys.
cnrucn BUrroN
This button cancels the selection number set by the PROGRAM keys.
muse BUrroN
When this button is pressed during playback, the player stops at the
point at which the button is pressed. Pressing the button again causes
playback to resume at the point at which it was interrupted.
@ r*"
Press
@
rruoe" BUrroN
this button to start play.
bJ STOP BUTTON
LAP/REMAIN BUTTON
TIME) between the REMAIN and LAP time.
@ tr".
@ OPEN/CLOSE
z-\
/) sancx
Used
each.
AND MTNUTE BUTT.NS
Used for time selection. See
This button is used to stop the play and to rotate the disc. lt is also
used to cancel a program.
(l
This button is used to switch the time display (LAP ilME/REMAIN
Press
BUrroN
ZX
(I
Some discs have an index No. With the INDEX button, play from a certain section in a tune is possible.
/;\
Ib,
BUrroN
Used to start play from the next or preceding tune.
@
Used to specify the music No. or time. etc.
@
Keeping this button pressed causes the laser pickup to move toward
the end of the disc from the selection which is currently being played.
@
POWER SWITCH
@
@ tt BUTToN (Fast Forwardl
page
7
BUrroN
to play the beginning of all the tunes on the disc for
10 seconds
When the SEARCH button is pressed during auto music scan, normal
play starts where the button is pressed.
for further details.
@ *.r.ot BUrroN
BUTTON
this button to open the disc tray. Press it again to close
Pressing this button makes it possible to repeat all selections. Pressing
it.
it again cancels the repeat operation.
c0titPUEs
:::
fi
Used to repeat the required section (from A to B) on the disc. To release A-B repeat, press the CLEAR button.
E
rrrrorclroRs and DtsPLAYs
The indicator shows the selection numbers to be played. After a
selection has been played. the corresponding number disappears
from the display but, if the function is on, the number does not
DtspLAy (LAp nME/REMAIN TIME)
this indicator display the time requlred for completing play. This
time is referred to as the REMAIN time.
rvtrun tNDtcAToR
grammed.
D
the music number currently being played or
pro-
rNDEx NUMBER lNDtcAToR
lndicates the index number of the tune currently being played or
when programming index selection.
ffi rurucnou lNDtcAToRs
PLAY : Lights during playback.
REPEAT
:
Lights when the repeat function is activated.
ourrur
@
LEvEL coNTRoLs
Audio output voltage can be adjusted between 0 to 2.0 V with these
: Lights during auto music or index scanning.
READY : Play and programming are possible only when
this
indicator is lit.
This indicator flashes immediately after the disc is
loaded, and the built-in microprocessor reads the information stored on the disc.
: Lights during pause.
A < > B : Flashes when A point is set. When B point is set, the
PAUSE
unit enters A-B repeat mode and the indicator lights.
When the CLEAR button is pressed, the A:B repeat
mode is released and the indicator goes off.
STANDBY: Lights when the STANDBY button is pressed, and
goes out when the button is pressed again.
:
Flashes for a moment if the number of selections exceeds 24. The selection numbers entered after this indicator has flashed are ignored. This indicator atso
flashes if the disc is set upside down or if there is
significant scratch on the disc.
a
oureur JAcKs (cD ourpur)
@
Plug the RCA plug cable provided into these jacks and connect the
other end of the cable to the CD or AUX jacks of your amplifier. Be sure
not to connect to the PHONO jacks.
@
nrs
(AUTo FUNcnoN sELEcrl BUs JAcK
Using the green bus cable, connect stereo components equipped with
AFS bus jack to this jack. Pay attention to the color of the jacks when
connecting the AFS bus cable. Connecting it to a jack other than the
specified one may result in problems.
The Auto Function Select bus acts as a remote source selector for the
amplifier. Therefore, you need not operate the source selector of the
amplifier when you change and use source programs such as the tape
and tuner.
6D
SEARCH
ERROR
Lights red for a moment when the infrared ray signal of the optional remote controller is received. For details, refer to page 10.
controls.
This indicator normally shows the time (minutes and seconds)
lndicates
nemore sENsoR
To lower the output voltage, turn the controls counterclockwise.
elapsed after the current selection has been started. This time is referred to as the LAP time. Pressing the LAP/REMAIN button makes
@
Aill] t040.tl
Plug the headphones into this jack.
Musrc No. rNDrcAToR
fiue
1040.10
@ rnorrres.,acr
disappear.
@
2l cFfi
"5n+'
@ oo >B BUrroN AND cLEAR BUrroN
@
wtlll
ner,nore coNr. BUs JACK
Used only for the system remote control.
Connect the remote control bus cable (orange) provided to this iack
and the other end of the cable to the remote control bus jack (orange)
of the other unit. Never connect this jack to any other than an orange
jack.
/a\
t?fi) FUSE REPLACEMENT
\jz
lf the fuse blows, find establish the cause, and replace it with another
one of the same type and value.
Use of a fuse having a higher value then that specified will not provide
adequate protdction for the amp and will render the warranty invalid.
Be sure to unplug the unit from the wall socket before changing the
fuse.
@ o" PowER coRD
The correct power for operating your system is written on the rear
panel. Be sure the POWER switch is off before plugging the AC line
cord into an electrical outlet.
OPERATING PROCEDURES
TO REPEAT PLAY
NORMAL PIAY
Press the REPEAT button. The REPEAT indicator lights to show that
the unit is in repeat mode and play is repeated. To release the repeat mode, press the REPEAT button again. The REPEAT indicator
goes off.
1. Set the POWER swirch to ON.
2. Press the OPEN/CLOSE button. The disc tray comes out.
Place a compact disc on the disc tray with the label surface upward.
3. Press the OPEN/CLOSE button. The disc tray returns and the
TUNE SELECNONS
READY indicator flashes.
4. When the READY indicator lights, the tot'al time of the disc is displayed and the total number of the selections is displayed in the
MUSIC NO. indicator.
This condition is referred to as play standby mode.
5. Press the PLAY button. Playback starts from the first selection ofthe
disc. When playback starts, the time display changes from REMAIN
TIME to I-AP TIME and the MUSIC NO. indicator of the selection
being played flashes. The MNR and INDEX indicators show the
music No. and index No. of the selection being played.
6. When playback of the last selection is completed, the unit enters
play standby mode. When the PLAY button is pressed
again,
playback starts from the beginning of the first selection.
AUTO PLAY
Place a side on the tray and press the PLAY button. The tray is automatically drawn and the playback starts from the beginning of the
With the FD3040, the tune can be selected as follows.
I
Random acoess programming
1. Load a compact disc referring to "NORMAL PIAY".
2. When the READY indicator lights and the total time is displayed, the
unit enters play standby mode and programming is possible.
3. Specify the music No. of the required selection with the PROGRAM
keys.
The MNR indicator shows the specified No. and the same number
of the MUSIC NO. indicator flashes.
I
I
To select third tune
'-*m
first tune.
TO STOP PLAY DURING PLAYBACK
TO STOP PLAY
1. Press the STOP button.
2. The unit enters play standby mode.
3. When the PI-AY button is pressed again. play starts from the beginning of the first selection.
TO UNLOAD THE DISC
1. Press the OPEN/GLOSE button.
2. The play stops and the disc tray comes out.
TO STOP PLAY TEMPORARILY
the MEMORY button. The selected tune is programmed. At
this time, the MUSIC NO. indicator, except the programmed one,
4. Press
goes off.
1. Press the PAUSE button.
2. The PAUSE indicator lights and the unit enters pause mode.
3. To release the pause mode, press the PAUSE button again or press
Pru..m
ll
the PLAY button. Play starts from the point at which the unit entered
the pause mode.
TO SELECT NEXT OR PREVIOUS TUNE DURING PLAY
TO SELECT NEXT TUNE
1. Press the NEXT button during play. Each time the NEXT button is
pressed, the MNR indicator increases by one and the flashing
MUSIC NO. indicator goes off in turn. After a while, play starts from
the beginning of the selected tune.
2. When playing a compact disc with index Nos., play can be shifted to
the next index No. section of the same tune. For this operation,
press the INDEX button once and the NEXT button once.
The LAP/REMAIN indicator shows the play time of the programmed
selection.
I
TO PLAY FROM THE PREVIOUS SECNON OR THE BEGINNING
OF THE PREVIOUS SELECTION
1.'Press the BACK button during play. When the button is pressed
once, the unit enters pause mode at the beginning of the current
selection. To releasb the pause mode, press the PAUSE button
again or press the PLAY button.
Repeat the above procedures
2. When the BACK button is pressed twice or more, the MNR indicator
decreases and the flashing MUSIC NO. indicator lights in turn.
When the MNR indicator reaches the specified music No., the
When programming is completed, press the PLAY button. Play will
begin in the order of programming.
PAUSE indicator lights and the unit enters pause mode.
3. When playing a compact disc with index Nos.. play can be started
from the beginning of the specified index section of the same selection. For this operation, press the INDEX button once and the BACK
button once. After a while, the PAUSE indicator lights and the unit
enters pause mode. At this time, the INDEX indicator remains off.
h
*
for other selections.
lf more than 24 selections are programmed, the ERROR indicator
flashes each time the MEMORY button is pressed and selection
storing is not possible.
TO CHANGE THE PROGRAMMING
To delete second selection
With random access programming, up to 24 selections can be pro-
''"-m
grammed. lf the selection is erroneously programmed or to change the
programming, specify the music No. of the selection to be erased with
PROGRAM keys and press the CANCEL button.
The MUSIG NO. indicator goes off, the LAP/REMAIN indicator flashes
and the specified selection is erased.
.
To erase the seventh selection from the'6 selection programming
with a total play time of 29 min
14 sec
Before erasing
Press the CANCEL button. The corresponding MUSIC NO. indicator
goes off and the play time of the erased selection is decreased from
the display of the IAP/REMAIN indicator.
''"*m
Press
Then, press
ry
ffi
Music No. to be erased.
Repeat the above procedures for other selections and make the
programming required.
6. This procedure can be carried out during play.
5.
At this time, the total play time indicated in the IAP/REMAIN indicator
decreases to show that the selection is erased.
After programming is changed
.l
To add a program during play
With the random access programming, a program can be added
during play.
With the PROGRAM keys, MEMORY button and CANGEL button,
the programming can be completely changed.
I
Delete play programming
1. Load a compact disc referring to "NORMAL PLAY".
2. When the ready indicator lights and the total time is displayed, the
unit enters play standby mode and programming is possible.
3. Specify the music No. which is not to be programmed with PROGRAM keys. The MNR indicator shows the specified No. and the
same number of the MUSIC NO. indicator flashes.
When a disc has 13 selections with a total play time of 59 min 12 sec
OTHER TUNE SELECTIONS
INDEX
OUICK SELECNON
,,"..
1. Ouick selection with search feature
With the search feature, the beginning of each selection recorded
on the compact disc can be played for 10 seconds.
When the required selection is found, start play.
2. Time program selection
By setting the music No. and start time play can be started from the
0,n""
button and,n""
m
ffiry
required point.
3. lndex No. selection
By setting the index No., the playback can be started from the
desired section of the tune.
4. Skip play
With this feature, the selection which is not desired can be skipped.
The above selections can be carried out only when the unit is in play
mode or play standby mode. When random access programming or
delete play programming is specified, the above selections are not
possible.
I
I
2. Set the unit to play standby mode.
3. When the second selection with a start time of 3 min 45 sec is to be
Time program selection
1. By programming the music No. and the start time, play can be
stafted from the specified point.
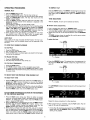
Search feature and operation
1. When the SEARCH button is pressed, the beginnings of all the
selections recorded on the compact disc are played for about 10
seconds. When the required selection is found, press the PLAY button. The SEARCH feature is released and the unit enters play mode.
When the unit is in normal play mode, pressing the PLAY button
played, proceed as follows.
Oerur.
the PROGRAM
Oer"r,
the TIME button.
(Oe,"""
the PRoGRAM
@e."r,
the pRoGRAM
@er"""
the MEMO button.
ffi
f-|Y
ffi
t"v.
*r
""a
and MtN button.
flff
*r,
will put the unit in search mode.
During search, the SEARCH, LAP nME, MNR and MUSIC NO. indicators are displayed.
With the above procedures, program selection is completed.
Flashes when the PLAY button is pressed.
When the required tune is the 6th and the time is 58 min 42 sec
When the compact disc has index Nos., pressing the INDEX button
and then the SEARCH button will effect SEARCH of the index sections.
Flashes when the
PROGRAM 2 key
is pressed.
*
Plays
I
for
10 seconds
I
j
l+-
F_--
Fast
Fast
forward
forward
INDEX
I
INDEX 2
L_J t__l t_ .t t_
FastlFastlFastlFast
fomardl forwardl forwardl
INDEX 3
INDEX4 IINDEX5
t8
9:
?7
t0
forwarc
INDEX 6
5l
the PIAY button. Play starts from the specified point.
The A < > B indicator flashes. This means that point A of the
A-B repea( play is specified. For details, refer to "A-B REPEAT
PIAY".
Make a habit of noting the start time of your favorite section for
4. Press
"
this play.
I
A-B REPEAT PLAY
Tune selection with index No.
1. By setting the music number and index number, the play can be
With this feature, a particular section can be played repeatedly.
started from the desired index No. section.
2. Set the music and index numbers in the stop mode specified in
"NORMAL PLAY" on page 6.
3.
1. When play reaches the point at which repeat play should start,
press the A < > B button. The A { D B indicatorflashesto indicate the start point is specified.
For example, to start play from the section with music No. of 3 and
index No. of 2, proceed as follows.
qfr
lul
3 ftashes.
Oerur.
-
"o.
PROGRAM
n"u is displayed in MNR and
MUSIC
@er"..
the INDEX button.
(3rrr"r.
PROGRAM
@er".,
PLAY button. The play starts from the specified section.
ffi
/ul
r"y. The INDEX NO.2
When play reaches the point at which repeat play should finish,
press the A < > B button. The A { }B indicator lights to indicate
A-B repeat play is specified. The unit immediately returns to the
start point and plays the specified section repeatedly.
tishts.
3. To release A-B repeat play, press the CLEAR button.
*
l.Skip
(excluding quick selection play) and cannot be set in random access programming or delete play programming.
play
Set skip play mode in play standby mode.
To start play from the Sth selection, press the PROGRAM 5 key, then
the PLAY button. The selections from 1st to 4th are skipped and
play starts from the beginning of the 5th selection through to the
last selection.
To start play from the 5th selection of a compact disc which has 9
seleetion of 50 min 55 sec
A-B repeat play can be set when the unit is in normal play mode
CLEARING THE ENTIRE MEMORY
The entire memory is cleared when the STOP button is pressed or the
OPEN/CLOSE button is set to the OUT position to open the drawer.
Therefore, when a disc is replaced. the program stored in memory is
automatically canceled.
REPEAT FUNCTION
All programmed selections can be repeated any number of times by
pressing the REPEAT button. The REPEAT indicator lights when this
function is operating. Press the REPEAT button again to reset this function.
MUSIC STANDBY FEATURE
,,*,m
When the MUSIC/STANDBY button is pressed, the STANDBY indicator
lights and the unit enters music standby mode. ln this mode, the unit
enters pause mode after tune selection.
To release music standby mode, press the MUSIC/STANDBY button
again.
*
When the PLAY button is pressed, the PLAY indicator lights.
ln music standby mode, the unit enters pause mode each time the
selection ends. Use this mode only when required and do not forget
to release the mode after operation.
To carry out music standby on the Sth selection of an 8 selection compact disc
2. After programming is completed, the total time of the
selections
programmed is displayed.
MUSIC
STANDBY
*t
button, then the PROGRAM
Press the
m
When the PLAY button is pressed. the PAUSE indicator lights when the
unit reaches the beginning of the 5th selection.
g_
Press the PLAY
time of selections programmed
= 32
minutes 50 seconds
Play starts when the PLAY button is pressed, and the TIME display
switches to the elapsed time.
Lishts
or PAUSE button to start play.
The TIME display becomes 0:00 at the beginning of each selection.
The indication precedes the indication at an intereselection gap
(e.g., 0:02, 0:01).
TIME DISPLAY
When the power switch is turned on, the TIME display first displays the
time required for playing all selections contained in the disc.
After you have programmed. the time required for playing all selec-
tions programmed is displayed.
When the PLAY button is pressed, the display indicates the time
elapsed since the current selection has started. The indication is 0:00 at
the beginning of each selection. The indication is preceded by the
minus
(-)
sign (e.9., -0:02, -0:01) at an interselection gap so that you
can know when the next selection starts.
Pressing the REMAIN/LAP button displays the time required for the
player to complete all the remaining selections. The indication is preceded by the minus (-) sign (e.9., -45:03).
Pressing the REMAIN/LAP button returns the display to the elapsed
time.
*
To check the time required for finishing the program, press the REMAIN/IAP button. The remaining time is displayed as 28:03.
A disc containing 8 selections (42 minutes) is used for explanation
below.
The elapsed time is displayed when the REMAIN/IAP button is
pressed again.
The total time of selections is displayed when the information of the
disc is read.
REMOTE CONTROL FEATURE
@
enuse BUrroN
When this button is pressed during play, the unit enters pause mode.
When the button is pressed again or the PLAY button is pressed, play
starts at the point at which the unit enters pause mode.
Two remote control systems are available for the FD3040
1. lnfrared remote control MER061
2. System remote control
@
elav BUrroN
Press
@
to start play.
rvrusrclsrANDBY BUTToN
When this button is pressed, it comes to the pause condition at the
head of the tune to be played. Press once more, and it will be released.
@
sroe BUrroN
Used to stop play. The disc stops and the program is erased.
Range of operations for the remote control unit
The range of operation for the remote control unit is approximately 5
m from the infra-red receptor of the FD3040
Normal operations will not be possible if the remote control unit is not
pointed at the receptor or if there is anything between the remote con-
trol and the FD3040 main unit.
O *"ott
coNTRoL oN.oFF/LocK swrrcH
To activate the remote controller, set this switch to ON.
@
seruo NDrcAroR
LED lights when any of the various buttons on the remote control unit
is pressed.
@
trrrrnaneo EMrrrER wrNDow
Remote control transmission unit
The infrared signal is emitted from this window.
@
lnserting the batteries
aacr BurroN
The batteries of this remote control unit should last 1 year under
normal operating conditions. Remove the batteries if the remote control unit is not going to be used for a long period of time. Replace weak
batteries as soon as possible.
When this button is pressed during play, the unit returns to the beginning of the current selection and enters pause mode. When the button
is pressed again, the unit enters pause mode at the beginning of the
previous selection.
@
ruexr BUrroN
When this button is pressed once during play, play starts from the beginning of the next selection.
When the button is pressed repeatedly, the selections are skipped ac-
cording to the number of times the button is pressed.
@
1.
Remove the cover.
2.
lnsert the batteries with
+ and - correctly oriented.
3.
Secure the cover by snapping
it back ihto place.
neeenr BUrroN
When this button is pressed, the unit enters repeat play mode. To release repeat play mode, press the button again.
Cseancx
BUrroN
When this button is pressed, the beginnings of all the selections recorded on the compact disc are played for 10 seconds. When the PI-AY
button is pressed in auto music scan mode. the unit enters normal play
mode.
10
IN CASE OF DIFFICULTY
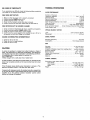
TECHNICAT SPECIFICATIONS
lf you experience any difficulty, check the following before contacting
your dealer or the nearest service station.
AUDIO PERFORMANCE
Channels
......2
Response
. .4 Hz - 20 kHz
DynamicRange.
... >90d8
Signal-to-NoiseRatio
...... >90d8
Channel Separation
> 90 dB
Total Harmonic Distortion (incl. noise)
. . . . 0.003 %
WowandFlutter.
.... unmeasurable
D/AConversion .....
.....'16 bitwith digital filtering
Error Correction System .... Cross lnterleave Solomon Code (CIRC)
AudioOutputlevel .
2Vrms
Number of
DISC DOES NOT ROTATE
Frequency
1. Make sure that the power cord is properly connected.
2. Confirm that the POWER switch is on.
3. Confirm that the drawer is in place.
4. Check that the transport screws have been removed.
5. Confirm that the disc has been loaded with the label side up.
DISC ROTATES BUT NO SOUND IS HEARD
1. Check connections between the disc player, amplifier and speakers.
OPTICAL READOUT SYSTEM
2. Confirm that the amplifier POWER switch is ON.
3. Check the volume control setting of the amplifier.
4. Confirm that the source selector of the amplifier is set to CD or to
the position to which the FD3040 is connected.
Laser.
Wavelength
SOUND IS INTERRUPTED INTERMTTTENTLY
SIGNAL FORMAT
1. Check for dirt on the disc.
2. Check the disc for large scratches.
3. Check the disc for warp.
Sampling
......semi-conductorAlGaAs
.0.78 pm
Frequency
Ouantization
....16
44.1 kHz
bit linear/channel
Dtsc
Diameter
Thickness
Direction of Rotation (seen from reading
ScanningVelocity
Rotation Speed .
Playing Time (maximum) ....
TrackPitch
Material
CAUTION
ln winter, the windows in a heated room collect moisture or drops of
water. This phenomenon is called dew condensation. The optical lens
of a CD player may have dew condensation in the following conditions.
o lmmediately after a heating system is switched on
.ln a mcist room
. When brought from a cold place into a heated room
. 4-314' (120 mm )
. 1120' (1.2 mm )
side) ... counter-clockwise
..
..
.....1.2-1.4mis
..... 500 - 200 rpm
...... 60 min (stereo)
...1.6arm
......
plastic
CABINET, GENERAL
ln these conditions. wait about 30 minutes before use, because the CD
player may not operate correctly or the music number may not be read
Dimensions (with drawer closed)
Width
Height
Depth.
Weight
correctly.
lf the CD player causes electric wave interruption to turners or TVs,
from each other.
keep the CD player, tuners or TVs away
Compared with analogue records, the residual noise of a compact disc
is very low. Be careful to start playback with the volume control of the
amplifier set to the optimum position. Excessive volume control
setting may damage the speakers.
11
Panel
16-17132'(420 mm)
Panel
..3-11132'(85 mm)
......,.....1'l-13/16"(300mm)
....
.
17
.6 lbs. (8.0 kg
)
SAFETY INSTRUCTION
READ BEFORE OPERATING EOUIPMENT
This product was designed and'manufactured to meet struct qublity and
safety standards. There are, however, some installation and operation
precautions which you should be particularl,y aware of .
1.
2.
16.
17. Object and Liquid Entry - Care should be taken so that objects
do not fall and liquids are not spilled into the enclosure through
Read lnstructions - All the safety and operating instructions should
be read before the appliance is operated.
Retain lnstructions
-
openings.
18.
The safety and operating instructions should
be retained for future reference.
3.
6.
has been damaged;
or
B. Ob.iects have fallen, or liquid has spilled inro the appliance; or
C. Theappliance has been exposed to rain; or
operating and use instructions should be
followed.
5.
Damage Requiring Service - The appliance should be serviced by
qualified service personnel when:
A. The power+upply cord or the plug
Head Warnings - All warnings on the appliance and in the operating
instructions should be adhered to.
4. Follow lnstructions - All
Nonuse Periods - The power cord of the appliance should be unplugged from the outlet when left unused for a long period of time.
D. The appliance does not appear to operate normally or exhibits
a marked change in performance; or
Water and Moisture - The appliance should not be used near waterfor example, near a bathtub, washbowl, kitchen sink, laundry tub,
in a wet basement, or near a swimming pool, etc.
E. The appliance
Servicing
19.
Carts and Stands - The appliance should be used only with a cart
or stand that is recommended by the manufacturer,
7.
Wall or Ceiling Mounting - The appliance should be mounted to
wall or ceiling only as recommended by the manufacturer,
8.
Ventilation - The appliance should be situated so that its location
or position does not interfere with its proper ventilation. For
-
has been dropped,
or the enclosure damaged.
The user should not attempt to service the appliance
in the operating instructions. All other
beyond that described
servicing should be referred to
qualifid
service personnel.
a
example, the appliance should not be situated on a bed, sofa, rug,
'
9.
or similar
surface that may block the ventilation openings; or,
placed in a built-in installation, such as a bookcase or cabinet that
may impede the flow of air through the ventilation openings.
Heat - The appliance should be situated away from heat sources
such as radiators, heat registers, stoves, or other appliances (including amplifiers) that produce heat.
Ground Clamp
10,
Power Sources - The applianc€ should be connected to a power
supply only of the type described in the operating instructions or
as marked on the appliance.
11.
Grounding or Polarization - The precautions that should be taken
so that the grounding or polarization means of an appliance is not
Lead-in (Antenna) Wire
defeated.
To Receiver or Tuner
12.
Power-Cord Protection - Power-supply cords should be routed so
that they are not likely to be walked on or pinched by items placed
upon or against them, paying particular attention to cords at plugs,
convenience receptacles, and the point where they exit from the
Ground Wire
Mast Ground Wire
appl iance.
Ground Clamps
13.
Cleaning - The appliance should be cleaned only as recommended
by the manufacturer._
14.
Power Lines
power lines.
- An outdoor antenna
rl
lj
should be located away from
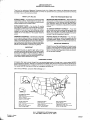
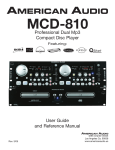
15. Outdoor Antenna Grounding - lf
an outside antenna is connected
be sure the antenna system is grounded so as to
provide some protection against voltage surges and built up static
charges. Section 810 of the National Electrical Code, ANSI/NFpA
No. 70{981, provides information with respect to proper grounding
of the mast and supponing structure, grounding of the lead-in wire
to an antenna discharge unit, size of grounding conductors, location
of antennadischarge unit, oonnection to grounding electrodes,
and requirements for the grounding electrode. See Fig. 1.
A}
to the receiver.
c)
l0 AWG (5.3
mm2 ) copper or No. 8 AWG (8.4 mm2 ) aluminum
AWG (l.0mm2)copperrlad steel or bronze wire, or larEeras
ground wires for both mast and lead-in.
Secure lead-in wire from antenna to lightning arrestor and mast ground
wire to house with stand-off insulators. spaced from 4 feet (1.22 meters)
to 6 feet (1.83 meters) apart.
Mount laghtning arrestor as closely as possible to where lead-in enters
Use No.
or No.
B}
Grounding Electrode
Driuen 8' (2.44 meters)
into the Earth.
l7
house.
Fig. 1. Typicrl lnsrrllrtion {or Lightning Arrestor
12
*:r'
LIMITED WARRANTY
MAGNAVOX Component Audio
Thank you for selecting a Magnavox Component Audio Unit. Please read carefully the Operating lnstructions
f urnished with this product. We believe that you will be very satisfied with your purchase and provide the following
\A'arranty to you, as the original purchaser.
WHAT N.A.P. WILL DO
WHATTHE PURCHASER MUST DO
SERVICE LABOR
the f irst 12 months from date
- ForAuthorized
of purchase, an N.A.P.
Service Center will
BEFORE CALLING FOR SERVIGE- Readandbecome
familiar with the instructions for conneclion of your unit
and adjustment of the customer controls described in
your instruction book. Your warranty does not cover
labor charges for installation or adjustment of customer
controls.
repair any product defect and replace any defective part
without charge to you for parts or labor.
REPLACEMENT PARTS
For the first 12 months
from date of purchase, an-Authorized Service Center
will supply you with a new or at our option, remanufactured part for any part found to be defective without
charge to you for the part. Replacement parts are warranted only for the balance of the original warranty
TO OBTAIN WARRANTY SERVICE
lf you
have
- the warra nty
determined that service is required during
period, you must take your player to the dealer lrom
which you purchased it or an Authorized Service Center
and pick it up after completion of service.
period.
WARRANTY COVERAGE This warranty is extended
- for products purchased
to the original retail purchaser
within the United States. lt does not apply to products
used in commercial applications and covers defects in
workmanship and materials only. lt does not cover damage resulting from owner misuse or abuse, and all other
failures not attributable to manufacluring defects.
PROVIDE PROOF OF PURCHASE
pro- You must
vide proof of the date on which the product
was first
purchased (sales receipt or other evidence) when requesting service or replacement of parts under warranty.
IMPORTANT REM!NDER
Please filloutyour Warranty Registration Card and mail it
to N.A.P. Consumer Electronics Corp. prompitly. lt will be
easier for us to notify you if it should ever be required.
Return ol the Warranty Registration Card is not a condition to warranty coverage.
IMPORTANT
This warranty gives you specific legal rights, and you
may also have other rights that vary from state to state.
lf at any time during the warranty period your dealer or
his servicer is unable lo make a satisfactory repair on
this product, please contact the nearest NAPCEC Consumer Affairs olfice identified on this page.
CONSUMER AFFAIRS
All dealers offer repair service through their own service departments or through one or more nearby NAPCEC
Authorized Service Centers. Although it is expected that needed repair service will be furnished on request by the
Dealer's service organization, situations which he may not resolve to the owner's satisfaction should be reported to
the nearest NAPCEC Area Service Office for investigation and follow-up.
Call or write to NAPCEC, Consumer Affairs Manager, at
-
Los Angeles'Area Ollice
Product Servrces
N A P Consumer Elecironrcs
1622 S Anderson
Compton. Calrf ornra 9022O
Phone 213 637.2543
Chicago Area Oflice
Producl Scrvrces
N A P Consumer Electronrcs
5OO
E Totrhy Ave
Des Plarnes lllrnors 6O018
Phone: 3 1 2/827-94OO
Ailanta Area Otlice
Co
rp
Producl Servrces
N A P Consumer Electronrcs Corp
1 898 Leland Drrve
Maretta
Georgra 30O67
Phone 404,/952 0064
New York Area Oltice
Product Servrces
P Consumer Eleclronrcs Co.p
l8O Manor Rd Oept 'lOl
NA
Easl Rutherford. New Jersey 07073
Phone 2Ol /935-270O
N.A.P. CONSUMER ELECTRONICS CORP.
P.O. BOX 6950, KNOXVILLE, TN. 37914
Printed in Japan
1
13K851010
t84453.1