1
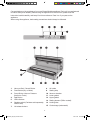
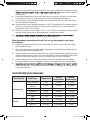
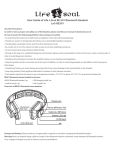
RHVS1_IB_FA_180613
SEAL FRESH
VACUUM SEALER
2 YEAR WARRANTY
RHVS1
INSTRUCTIONS & WARRANTY
1
Spectrum Brands Australia Pty Ltd
Locked Bag 3004 Braeside
Victoria 3195 Australia
Spectrum Brands New Zealand Ltd
PO Box 9817 Newmarket
Auckland 1149 New Zealand
Customer Service in Australia
TollFree: 1800 623 118
Email: [email protected]
Website: www.spectrumbrands.com.au
Customer Service in New Zealand
TollFree: 0800 736 776
Email: [email protected]
Website: www.spectrumbrands.co.nz
W
Spectrum Brands Australia Pty Ltd and Spectrum Brands New Zealand Ltd
Warranty Against Defects
0911
In this warranty:
Australian Consumer Law means the Australian consumer law set out in Schedule 2 to the Competition
and Consumer Act 2010;
CGA means the New Zealand Consumer Guarantees Act 1993;
Goods means the product or equipment which was accompanied by this warranty and purchased in
Australia or New Zealand, as the case may be;
Manufacturer, We or us means:
1. for Goods purchased in Australia, Spectrum Brands Australia Pty Ltd ABN, 78 007 070 573;
or
2. for Goods purchased in New Zealand, Spectrum Brands New Zealand Ltd, as the case may be,
contact details as set out at the end of this warranty;
Supplier means the authorised distributor or retailer of the Goods that sold you the Goods in Australia or
in New Zealand; and
You means you, the original end-user purchaser of the Goods.
1. Our goods come with guarantees that cannot be excluded under the Australian Consumer Law, or
the CGA. You are entitled to a replacement or refund for a major failure and compensation for any
other reasonably foreseeable loss or damage. You are also entitled
to have the goods repaired or replaced if the goods fail to be of acceptable quality and the failure
does not amount to a major failure.
2.
The benefits provided by this Warranty are in addition to all other rights and remedies in respect of
the Goods which the consumer has under either the Australian Consumer Law
or the CGA. The original purchaser of the Goods is provided with the following Warranty subject to
the Warranty Conditions:
3.
We warrant the Goods for all parts defective in workmanship or materials from the date
of purchase (Warranty Period), for the period of:(a) Two (2) years for Russell Hobbs products (see product packaging for details)
(b) Two (2) years with five (5) year motor warranty for Russell Hobbs products (see product
packaging for details)
(c) Limited Lifetime, Ten (10) years for Russell Hobbs cookware.
(d) One (1) year for George Foreman, iRobot, Westinghouse, Black & Decker and Spectrum Brands
products.
If the Goods prove defective within the Warranty Period by reason of improper workmanship
or material, we may, at our own discretion, repair or replace the Goods without charge.
2
RHVS1_IB_FA_221112.indd 2
22/11/12 10:08 AM
or
Warranty Conditions
4.
The Goods must be used in accordance with the manufacturer’s instructions. This Warranty
does not apply should the defect in or failure of the Goods be attributable
to misuse, abuse, accident or non-observance of manufacturer’s instructions on the part of
the user. As far as the law permits, the manufacturer does not accept liability for any direct or
consequential loss, damage or other expense caused by or arising out of any failure to use
the Goods in accordance with the manufacturer’s instructions.
5.
Exhaustible components (such as batteries, filters and brushes) of the Goods are included
under this Warranty only where there is a defect in workmanship or materials used.
6.
The warranty granted under clause 3 is limited to repair or replacement only.
7.
Any parts of the Goods replaced during repairs or any product replaced remain the property
of the manufacturer. In the event of the Goods being replaced during the Warranty Period,
the warranty on the replacement Goods will expire on the same
date as for the Warranty Period on the original Goods which are replaced.
8.
In order to claim under the warranty granted under clause 3 you must:
(a) Retain this warranty with your receipt/proof of purchase; and
(b) Return the Goods to us at the relevant address or to the Supplier by prepaid freight
within the Warranty Period accompanied with (i) the legible and unmodified original
proof of purchase, which clearly indicates the name and address of the Supplier, the date
and place of purchase, the product name or other product serial number and (ii) this
warranty.
9.
This warranty is immediately void if:
(a) Any serial number or appliance plate is removed or defaced;
(b) The Goods have been serviced or otherwise repaired by a person not authorised to do so
by us or where non approved replaced parts are used.
10. The Goods are designed for domestic use only. A limited 90-day Warranty applies to any
industrial or commercial use of the Goods. The Goods must be connected to the electrical
voltage requirements as specified in the ratings label located on the Goods.
11. This warranty does not cover the cost of claiming under the warranty or transport
of the Goods to and from the Supplier or us.
12. This warranty is only valid and enforceable in Australia against Spectrum Brands Australia Pty
Ltd and in New Zealand against Spectrum Brands New Zealand Ltd.
Contact us or the Supplier for further details.
Register your product online
If you live in Australia please visit: www.spectrumbrands.com.au/warranty
If you live in New Zealand Please visit: www.spectrumbrands.co.nz/warranty
Registration of your warranty is not compulsory, it gives us a record of your purchase
AND entitles you to receive these benefits: Product information; Hints and tips; Recipes and
news; Information on special price offers and promotions.
Any questions? Please contact Customer Service for advice.
3
RHVS1_IB_FA_221112.indd 3
22/11/12 10:08 AM
Congratulations on the purchase of your new Russell Hobbs appliance. Each unit is manufactured
to ensure safety and reliability. Before using the appliance for the first time, please read this
instruction booklet carefully and keep it for future reference. Pass it on if you pass on the
appliance.
When using this appliance, basic safety precautions should always be followed.
5
7
15
7
15
1. Vacuum+Seal / Cancel Button
8. Air intake
3. Pump Button: Vacuum Pressure
(Normal or Turbo)
10. Vacuum chamber
9. Sealing strip
2. Food Button (Dry or Moist)
11. Lower gasket
4. Seal Button
12. Upper gasket
5. LED indicators
13. Sealing element (Teflon coated)
6. Canister switch (Canisters sold separately,
RHVS1CAN)
14. Locking tabs
15. Cord storage (underneath)
7. Lid release buttons
4
RHVS1_IB_FA_221112.indd 4
22/11/12 10:08 AM
BEFORE FIRST USE
• Remove all packaging material and any stickers from the product.
• As some parts may be packed separately, check to ensure all items have been unpacked
before disposing of the packaging.
• Wipe the outside of appliance with a damp cloth; dry thoroughly.
• Select a level, dry countertop where the appliance is to be used.
ABOUT VACUUM SEALING
Your Russell Hobbs Seal Fresh Vacuum Sealer creates a storage solution for a wide range of
foods, as well as non-food items. In addition to food, it can also be used to protect your camping
supplies, create ice packs and also protect valuables from tarnishing such as jewellery.
Cooking time and food preparation is quick and easy especially when marinating meat. Marinate
in minutes! No need to marinate your bbq meats overnight, simply vacuum seal and place in the
refrigerator for 30 minutes and your marinating is done.
Vacuum sealing performs three major tasks:
1.
2.
3.
Removes oxygen which slows down mold and bacteria growth. This means foods can be
safely stored for longer.
Creates a moisture barrier. Not only does it keep moisture in, it keeps moisture out. Basically
this protects fresh food – ie. No more ‘slimy’ meat and no more ‘freezer burn’.
Vacuum sealing acts as a flavour enhancer when sealing marinated foods. As the vacuum
sealer removes the air from the bag it also opens the pores of the food, allowing marinades
to penetrate.
Consider these uses:
• Seal leftovers and freeze for later use
• Store nuts and seeds for longer at room temperature
• Vacuum seal coffee beans for long term storage without fear of oxidation
• Buy meat in bulk and portion for vacuum sealing and freezing it for later use
• Marinate fish and poach (sous vide) in the bag for a delicious and healthy option.
• Marinate chicken or your favourite meats and microwave in the bag, just like steam cooking.
This appliance will become an indispensable part of your life; it will allow you to keep food fresher
for longer, resulting in less food spoilage and saving money!
ABOUT YOUR SEAL FRESH VACUUM SEALER
Vacuum+Seal / Cancel Button :
In stand-by mode, pressing this button starts the automatic vacuum and seal operation.
While in operation pressing this button stops the vacuuming or sealing function.
3. This button can be used to control the amount of suction, to avoid crushing delicate
items. The vacuum package can then be assessed to see if the desired amount of
pressure has been achieved. Continue with the vacuum function by pressing this button
again if required. Once the desired amount of pressure is achieved, press the Seal button to seal the bag.
1.
2.
5
RHVS1_IB_FA_221112.indd 5
22/11/12 10:08 AM
Food Button:
Use this button to select the optimum bag sealing time for the type of item you are
packaging. The default setting is Dry.
Dry setting: for items without moisture, with a shorter heat sealing time.
Moist setting: for items with moisture, with an extended heat sealing time.
Pump Button (Vacuum Pressure):
This button allows you to select the vacuuming pressure. The default setting is Normal
vacuum pressure.
Select the vacuum pressure by pushing this button:
Normal: for regular items requiring normal vacuum pressure
Turbo: for items requiring a higher vacuum pressure
Seal Button:
This button provides two functions:
To manually seal the open end of a bag without creating a vacuum. E.g. Used to
make a bag from a bag roll; or to package items without the need for a vacuum.
2. When the automatic “Vacuum+Seal” function is in operation, this button stops the
vacuum pump and immediately starts to seal the bag so that less vacuum pressure
inside the bag can be controlled by the operator to avoid crushing delicate items.
1.
LED Indicators:
Indicates the status of the vacuuming or sealing process, and the settings selected.
Canister switch:
Use in conjunction with vacuum canisters. Press this button to start vacuum sealing
a canister accessory via a hose. (Canisters and hose available separately, accessory
RHVS1CAN)
Lid release buttons:
Press both lid release buttons to open the lid.
Air intake:
Connects the vacuum chamber and pump. When using with vacuum canisters, connect the
hose to this air intake.
Sealing strip:
Place the bag to be sealed over this strip.
Vacuum chamber:
Position the open end of the bag inside the chamber. For drawing air out of bag and catching
any overflowing liquid.
Lower gasket:
Keeps air out by forming vacuum chamber with upper gasket around the vacuum chamber.
Clean and dry or replace it when it is distorted or broken.
6
RHVS1_IB_FA_221112.indd 6
22/11/12 10:08 AM
Upper gasket:
Keeps air out by forming vacuum chamber with lower gasket. Clean and dry or replace it
when distorted or broken.
Sealing element:
Teflon-coated heating element heats up to seal bags.
WARNING: The sealing element becomes very hot while in use and will remain hot for some
time after use. DO NOT touch the sealing element as it may burn.
Locking tabs:
Locks the lid to the base to help keep air out of the vacuum chamber.
Making a bag with a bag roll:
You can create a bag using the rolls provided. You can determine the length of the bag,
to suit your vacuum sealing task.
CAUTION: Do not touch the sealing element, it becomes hot.
1.
2.
3.
4.
5.
6.
7.
Place the unit on a flat, stable surface allowing sufficient room to work
Plug the power cord into a wall power outlet and switch the outlet on.
Using scissors, cut the required length of material from the bag roll for the item
to be packaged plus an additional 8cm for vacuuming and sealing.
Lay one end of the bag flat on top of the sealing strip, but not into the vacuum
chamber.
Lower the lid and lock closed by pressing firmly on both front corners. Ensure
the locking tabs on both sides click into place.
Press the Seal button to seal one end of the bag. Sealing is complete once the
Seal LED indicator goes out.
Press the lid release buttons to open the cover and remove the bag from the
appliance. The bag is now ready for you to add items and start vacuum sealing.
Additional bag rolls are available separately for purchase. Accessory RHVS6R.
Vacuum Sealing:
1.
2.
3.
4.
5.
6.
Place items to be packaged inside the bag. Use only the specially designed vacuum
bags/rolls with vacuum channels supplied by Russell Hobbs.
Clean and straighten the open end of the bag. Ensure there are no wrinkles, ripples,
dust, food or liquid residue along the edge to be sealed.
Place the open end of the bag within the vacuum chamber area. Make sure the air intake
is not covered by the bag.
Lower the lid and lock closed by pressing firmly on both front corners. Ensure the
locking tabs on both sides click into place.
Check the LED Indicator status of the Food and Pump (Vacuum Pressure) buttons to
confirm the moisture status of packed items (Moist or Dry) and the desired vacuum
pressure (Normal/Turbo) according to the type of item to be packaged.
Press the Vacuum+Seal button, the unit will start to vacuum and will seal the bag
automatically.
7
RHVS1_IB_FA_221112.indd 7
22/11/12 10:08 AM
NOTE: This appliance provides very high vacuum pressure during vacuum sealing.
In order to avoid crushing delicate items with the high vacuum pressure, observe
the status of the vacuum pressure inside the bag and press the “SEAL” button immediately when the desired vacuum pressure is achieved. The vacuum pump will
stop and the sealing process will commence.
7.
Your vacuum sealing is now complete. Press the release buttons to open the lid and
remove the bag from the appliance.
NOTE:
• For best sealing results, it is recommended to allow the appliance to cool down for 1
minute before using it again. Wipe out any excess liquid or food residue in the vacuum
chamber after each bag packaged.
• To avoid possible overheating of the sealing element, do not continuously seal many
packages, one after another in quick succession.
• The sealing element will not activate if the seal button is pressed within 15 seconds of
the last activation.
• Do not touch the sealing element as it may burn.
• Use only the specially designed vacuum bags/rolls with vacuum channels supplied by
Russell Hobbs.
• To open a sealed bag, cut the bag straight across with scissors just below the seal.
How to Vacuum Seal in a Canister
Canister sets available separately, accessory RHVS1CAN
IMPORTANT: Only specific canisters supplied by Russell Hobbs can be used with
the RHVS1.
4
1
3
2
1.
2.
3.
4.
5.
5
Canister lid
Canister
Seal/Open dial
Hose port
Hose
8
RHVS1_IB_FA_221112.indd 8
22/11/12 10:08 AM
Canisters can be used to:
• Store delicate items such soft fruit and vegetables, biscuits and crackers
• Store liquids such as sauces, stocks and soups
1.
2.
3.
4.
Unpack your canisters.
Remove all packaging material and any stickers from the product.
As some parts may be packed separately, check to ensure all items have been unpacked before disposing of the packaging.
Wash all removable parts as instructed in the “CARE AND CLEANING” section of this
manual.
IMPORTANT: Do not submerge the canister lids in water, refer to the “CARE AND
CLEANING” section of this manual for full cleaning instructions.
5.
6.
7.
8.
9.
Dry thoroughly before use.
Place the items to be vacuumed sealed into the canister and leave at least 2.5cm of
space between the food/items and the cover rim.
Ensure the canister cover rim and canister gasket seal are completely clean.
Place the canister lid on the canister
Open the vacuum sealer unit lid and place the larger end of the hose (provided with the
canisters) into the air intake in the vacuum chamber area securely. Place the smaller
end of the hose into the hose port on the canister lid. Ensure the Seal/Open dial on
canister lid is turned to the Seal position.
CAUTION: If the sealing strip has been activated in the same vacuum sealing
session, do not touch, it becomes hot.
10. Press the canister switch (just above the air intake) to start vacuuming. To ensure there
is no air leaking between the cover and the canister, at the beginning of the vacuuming use your hand to push the dial down. The vacuuming will stop automatically when
enough vacuum pressure is achieved.
11. Hold the canister lid down securely when you pull out the end of the hose. Ensure you
hold the dial in the seal position then rotate the end of the hose counter-clockwise
while lifting it out of the lid.
12. Your canister can be stored in the pantry, fridge and freezer, depending on the items
packaged.
Opening the Canister after vacuum packaging
In order to open the canister, you need to release the air first by turning the Seal/Open dial
clockwise from Seal to Open.
SEAL FRESH VACUUM SEALER TIPS AND TECHNIQUES
1.
2.
3.
Do not overfill bags: leave 8-10cm of empty space between the item to be packaged
and the open end of the bag. This will ensure successful packaging and eliminate
potential wrinkles or ripples.
To open a sealed bag, cut the bag straight across with scissors just below the seal.
Prior to packaging foods, consider if it is the type of item you could like to re-seal.
Make sure you leave at least 2.5cm of additional bag material for every time you plan
to open and re-seal the bag. E.g. This is ideal for consuming small portions of cheese
when you have a large block.
9
RHVS1_IB_FA_221112.indd 9
22/11/12 10:08 AM
4.
5.
6.
7.
8.
Sealing works best if the end of the bag is dry. When sealing foods with moisture, ensure
you use the Moist Food function as this is designed for a longer sealing time and seals
more effectively if there is any moisture.
If you are unsure whether the bag has sealed effectively, seal it again 1cm above the
initial seal.
Clean and straighten the open edge of the bag before sealing. Make sure nothing is
left on the open area of the bag, no wrinkles or crease lines should appear on the open
edge, foreign objects or creased bags may result in an unreliable seal.
Prior to packaging, ensure minimal air is left in the bag by pressing the air out. Too much
air inside the bag increases the vacuum pump loading which may result in ineffective
packaging.
Do not package objects with sharp points such as fish bones and hard shells. Sharp
points may penetrate and tear the bag. You may want to use a canister instead of a bag
to store such items.
Note: Specific Russell Hobbs canister attachments are available, accessory
RHVS1CAN.
9.
If the required vacuuming is not achieved, the vacuum system will shut down automatically after 60 seconds. If this occurs, check the positioning of the bag, or if the bag has a
leak.
10. Make sure there are no cracks, imperfections, or small particles resting on the foam gaskets around the vacuum chamber. Gaskets should be inspected and changed regularly
according to the instructions in the Care and Cleaning section.
11. During the packaging process, small amounts of liquid, crumbs or food particles may be
inadvertently pulled into the vacuum chamber. This may clog the pump and cause damage your appliance. To avoid this, moist and juicy food may be frozen before packaging
or place a folded paper towel near the inside top of the bag. For powdery or fine-grained
foods, avoid overfilling bags.
12. Pre-freeze fruits and blanch vegetables before vacuum packaging for best results.
13. Liquids should be cooled before vacuum sealing. Hot liquids may bubble up and over
the top of the canister when vacuum packaged.
Note: Specific Russell Hobbs canister attachments are available, accessory
RHVS1CAN.
14. Vacuum sealing extends the shelf life of many foods, but does not preserve them. Store
perishable foods in the freezer or refrigerator.
15. Create an ice cooler/pack by filling a bag about 2/3 full with water, then seal the end
(DO NOT VACUUM). Freeze the bag and use for ice in a cooler, or ice packs for sports
injuries.
16. Many foods are sold pre-packed in commercial vacuum bags such as cheese and deli
meats. Now, you can maintain the taste and freshness of these foods, by re-packaging
with the vacuum sealer bags/rolls after the commercially packed bags have been
opened. Be wary of use by dates of any foods being packaged.
17. Pantry items such as flour, rice, cake mixes and pancakes, all stay fresher longer when
vacuum sealed. Nuts and condiments maintain their flavour and freshness.
18. For objects with sharp points and edges, such as bones or dried pasta, pad the edges
with paper towels to keep them from puncturing the bag.
19. You can cook in advance. Package and store individual portions or entire meals. The bag
can be re-heated in the microwave or boiled.
10
RHVS1_IB_FA_221112.indd 10
22/11/12 10:08 AM
20. Prepare foods in advance for picnics, camping trips or barbecues.
21. Packaging protects food for freezing and eliminates freezer burn.
22. Package foods, such as meat, fish, poultry, seafood and vegetables to freeze or refrigerate.
23. Package dry foods, such as beans, nuts, and cereals to store longer and retain freshness.
24. This vacuum sealer can also be used to store and protect other items: valuable items,
such as photos, important documents, stamp collections, book collections, jewellery,
cards, comics etc.; medicines, band-aids and other first-aid items, etc. For some of
these items only the Seal function should be used, not Vacuum+Seal.
25. There are many non-food uses for vacuum sealing:
a) Keep camping supplies such as matches, first aid kits and clothing, clean and dry.
b) Keep flares for auto emergencies ready.
c) Keep silver and collectibles untarnished.
Note: After completing your vacuum packaging, always leave the lid down, but not
locked in. This will keep the foam gaskets in good condition.
FOOD STORAGE AND SAFETY INFORMATION
This Vacuum Sealer will change the way you purchase and store foods. Once you are
accustomed to vacuum packing, it will become an indispensable part of your food
preparation. When preparing and vacuum sealing foods using your vacuum sealer, there
are certain procedures that must be followed to ensure food quality and safety. Review this
section carefully for your protection:
FOOD STORAGE FACTS
1.
2.
3.
4.
5.
6.
7.
Chemical reactions in food from air, temperature, moisture, enzyme action, growth of
microorganisms or contamination from insects will cause food spoilage.
The main element to cause food to lose nutritional value, texture, flavour, and overall
quality is oxygen in the air. Most micro-organisms growth relies on air, as it will carry
moisture into and out of foods unless they are protected with moisture-proof packing.
Frozen foods being exposed to freezer air will result in freezer burn.
Vacuum seal packing removes up to 90% of the air from the package. There is approximately 21% oxygen in the air, so 90% of air removal leaves a 2% to 3% residual oxygen
level in vacuum-sealed foods. When the oxygen level is at or below 5%, most microorganisms are inhibited from growth.
In general, there are three categories micro-organisms: mold, yeast and bacteria, they
are present everywhere, but only under certain conditions they can cause problems.
In a low oxygen environment or in the absence of moisture, mold cannot grow. In moisture, sugar and a moderate temperature circumstances, yeast can grow with or without
air. Refrigeration will slow the growth of yeast and freezing stops it completely. Bacteria
can grow with or without air.
One of the extremely dangerous type of bacteria is clostridium botulinum, and it can
grow under the right conditions without air: in the temperature range of 40˚F to 115˚F
(4˚C to 46˚C). Conditions for growth are foods lacking acid, low oxygen environment and
temperatures greater than 40˚F (4˚c) for extended time.
Frozen, dried, high in acid, salt or sugar foods can be resistant to botulinum.
Non-acidic foods which include meats, seafood, lye-cured olives, poultry, fish,
11
RHVS1_IB_FA_221112.indd 11
22/11/12 10:08 AM
eggs and mushrooms; low-acid foods which are mostly vegetables; medium-acid foods
mbers are easily infected
by botulinum;
8.
It should be refrigerated for short term and frozen for long-term storage, for foods most
susceptible to botulinum, and should be consumed immediately after heating.
9.
Avoid spoilage: foods should be stored at low temperatures, as few of the micro-organisms could growth without air.
10. If temperatures in the refrigerator greater than 40˚F (4˚C) (especially for extended periods
of time), it will support the growth of harmful micro-organisms, so we should keep the
temperature at 40˚F (4˚C) or below.
11. When the temperature in the freezer is 0˚F (-17˚C) or lower, it is suitable for storing foods,
although freezing does not kill microorganisms, it retards their growth.
12.
extended 3-4 times for every 18˚F (10˚C) drop in temperature.
When packaging large volumes of meat, fish, or any food products, we advise
the following:
1.
Ensure you properly clean your hands, all utensils and surfaces to be used for cutting
and packaging foods.
2.
Once you have packed perishable foods, refrigerate or freeze them immediately. Do not
leave them sitting at room temperature.
3.
Vacuum sealing can increase the shelf life of dry foods. Foods that have high fat content
develop rancidity due to oxygen and warm temperature. Vacuum packaging extends the
shelf life of foods such as nuts, coconut or cereals. Store in a cool, dark place.
4.
Vacuum sealing will not extend the shelf life of fruits and vegetables such as apples,
bananas, potatoes and root vegetables unless they are peeled before vacuum sealing.
5.
fresh for refrigeration. To prepare these foods for vacuum packaging it is recommended
to blanch and freeze.
FOOD PRESERVATION GUIDELINES
Classification
Refrigerated
Frozen
Food Items
Temperature
Normal
Preservation
Vacuum
Preservation
Fresh Raw Meat
5±3°C
2~3days
8~9days
Fresh Fish/
Seafood
5±3°C
1~3days
4~5days
Cooked Meat
5±3°C
4~6days
10~14days
Vegetables
5±3°C
3~5days
7~10days
Fruit
5±3°C
5~7days
14~20days
Eggs
5±3°C
10~15days
30~50days
Meat
-16~-20°C
3~5months
>1year
Fish
-16~-20°C
3~5months
>1year
Sea Food
-16~-20°C
3~5months
>1year
12
RHVS1_IB_FA_221112.indd 12
22/11/12 10:08 AM
Classification
Pantry items
Food Items
Temperature
Normal
Preservation
Vacuum
Preservation
Bread
25±2°C
1~2days
6-8days
Biscuit
25±2°C
4~6months
>1year
Rice/ Flour
25±2°C
3~5months
>1year
Peanut/Legume
25±2°C
3~6months
>1year
Tea
25±2°C
5~6months
>1year
GENERAL RULES FOR FOOD SAFETY
Food safety rules are based on scientific study as well as common sense. The following
rules are important for general food safety and optimal food storage.
1.
2.
3.
4.
Once you have heated, defrosted or un-refrigerated perishable foods, consume them
immediately.
After opening canned food or commercially vacuum packed foods, they can be
re-vacuumed packed. Follow the instructions to refrigerate after opening and store
re-vacuumed packages appropriately taking note of use by dates.
Do not defrost foods in hot water or via other heat sources. It is best to defrost frozen
items in the fridge overnight.
Do not consume perishable foods that have been left out at room temperature for more
than a few hours. This is especially important if they have been prepared with a thick
sauce, in a vacuum package, or in a low oxygen environment.
CARE AND CLEANING
Vacuum sealer
1.
2.
3.
4.
5.
Always unplug the unit before cleaning.
Do not immerse in water or any other liquid.
Avoid using abrasive products or material to clean the unit, for they will scratch the
surface.
Use a mild dishwashing soap and a warm, damp cloth to wipe away food residue on
or around components.
Allow to dry thoroughly before using again.
Note: The foam gaskets around the vacuum chamber should be dried thoroughly
before re-assembling. Assemble carefully and ensure the foam gaskets are in their
original position for effective vacuum packaging.
Vacuum bags
IMPORTANT: DO NOT re-use bags after storing raw meats, raw fish or greasy foods.
Do not re-use bags that have been microwaved or boiled.
1.
2.
3.
Wash bags in warm water with a mild dishwashing soap.
Bags can also be washed in the dishwasher. Turn the bags completely inside out and
spread them flat over top rack of dishwasher, so the entire surface is exposed.
Dry thoroughly before re-using.
13
RHVS1_IB_FA_221112.indd 13
22/11/12 10:08 AM
Accessories
1.
2.
3.
4.
5.
Canister bases (not lids) are top rack dishwasher safe. Alternatively wash the canister
bases in warm water with a mild dishwashing soap.
Canister lids can be wiped down with a damp cloth. Do not immerse in water.
Wash the canister hose in warm water with a mild dishwashing soap.
Ensure the accessories are dried thoroughly before re-using.
Canisters are freezer safe.
Storing Your Vacuum Sealer:
1.
2.
3.
Keep the unit in a dry and safe place, out of the reach of children.
When not in use, place the power cord into the storage section on the underside of the
appliance. Do not wrap the cord around the appliance.
After completing your vacuum packaging, always leave the lid down, but not locked into
place. This will keep the foam gaskets in good condition to ensure vacuum packaging
effectiveness.
TROUBLE SHOOTING
Nothing happens when I try to vacuum seal:
1.
1.
2.
3.
4.
Check the power cord to see if it is firmly plugged into a power outlet.
Examine power cord for any damage.
See if the power outlet is operative by plugging in another appliance.
Check the settings to make sure it is set to the correct mode. Refer to the above
operating instructions.
Make sure the bag is placed correctly inside the vacuum chamber and not over the
air intake.
Air is not removed from the bag completely:
1.
2.
3.
4.
5.
To seal properly, the open end of bag should be resting entirely inside vacuum chamber
area.
Check the sealing strip and the foam gaskets for debris and positioning. Make sure there
is no breakage or distortion on both foam seal gaskets. Wipe clean and secure them
back into place.
The vacuum bag may have a leak. To test for a leak, seal the bag with some air in it,
submerge in water, and apply pressure. Bubbles indicate a leak. If there is a leak, re-seal
or use another bag.
Use only the specific vacuum bags/rolls with vacuum channels provided by Russell
Hobbs.
There may be leaks along the seal caused by wrinkles, debris crumbs, grease or liquids.
Open the bag, wipe along the sealing area on the inside of the bag and smooth it out
along the sealing strip before re-sealing.
14
RHVS1_IB_FA_221112.indd 14
22/11/12 10:08 AM
The machine does not start to seal after vacuuming:
1.
2.
3.
4.
There is a vacuum pressure sensor in this appliance. The appliance will not begin to
seal automatically if the vacuum pressure inside the bag is not able to reach to the
predetermined vacuum pressure. Check the sealing strip and the foam gaskets for debris
and correct positioning. Wipe clean and smooth them back into place, and try again.
Check the sealing strip and the foam gaskets for debris and positioning. Make sure there
is no breakage or distortion on both foam seal gaskets. Wipe clean and secure them
back into place.
The vacuum bag may have a leak. To test for a leak, seal the bag with some air in it,
submerge in water, and apply pressure. Bubbles indicate a leak. If there is a leak,
re-seal or use another bag.
There may be leaks along the seal caused by wrinkles, debris crumbs, grease or liquids.
Open the bag, wipe along the sealing area on the inside of the bag and smooth it out
along the sealing strip before re-sealing.
Air has entered into the bag after being sealed:
1.
1.
2.
There may be leaks along the seal caused by wrinkles, debris crumbs, grease or liquids.
Open the bag, wipe along the sealing area on the inside of the bag and smooth it out
along the sealing strip before re-sealing.
The release of natural gases or fermentation from foods (such as fresh fruits and
vegetables) may occur. If you think food has begun to spoil, open the bag and discard
food. Lack of refrigeration or fluctuating temperatures in the refrigerator can cause food
to spoil. If food is not spoiled consume food immediately.
Check the bag for a puncture or hole which may have released the vacuum seal. Do not
vacuum seal hard items with sharp points (like bones or shards of nut shell). If necessary,
cushion sharp edges in the contents of the bag with paper towels.
The bag melts:
1.
Should the sealing strip or sealing element overheat and melt the bag, it may be necessary to lift the lid and allow sealing strip and element to cool for a few minutes.
The canister will not vacuum:
1.
2.
3.
4.
5.
Make sure the hose adaptor is firmly connected both to the appliance and the canister.
Check if the knob of the canister to ensure it is set to the Seal position.
Check if there is any damage or cracks in the canister or lid, if yes, change it for a
new one.
Check the function of the vacuum sealer.
Make sure the rim of the canister is clean. If all the above situations are excluded, please
contact customer service.
15
RHVS1_IB_FA_221112.indd 15
22/11/12 10:08 AM
IMPORTANT SAFEGUARDS
When using this appliance, basic safety precautions should always be followed, including but not
limited to the following:
1. Read all instructions before, and follow whilst using this appliance.
2. To protect against electric shock DO NOT immerse cord, plug or appliance in water or any other
liquid.
3. Do not use in the bathroom or near any source of water.
4. Do not use outdoors.
5. This product is not intended for use by persons (including children) with reduced physical,
sensory or mental capabilities, or lack of experience and knowledge, unless they have been
given supervision or instruction concerning use of the product by a person responsible for their
safety.
6. This appliance is not a toy. Children should be supervised to ensure they do not play with this
appliance.
7. Do not use accessories, bags, rolls or attachments other than those recommended or supplied
specifically for this appliance.
8. Do not make skin contact with the hot sealing element located on the edge of the top cover of
this appliance. It is hot and may result in burns.
9. Always turn off and unplug from the power outlet when not in use and before cleaning.
10.Always unlock the lid when not in use.
11. To disconnect, set the controls to off. Turn off the wall power outlet, then grasp the plug and
remove from the wall power outlet. Never pull by the cord.
12.Do not operate any appliance with a damaged cord or plug or after the appliance has
malfunctioned, or has been dropped or damaged in any manner. Contact customer service for
replacement, examination, repair or adjustment.
13.There are no user serviceable parts. If the power cord is damaged, it must be replaced by the
manufacturer or similarly qualified person in order to avoid a hazard.
14.Do not oil or lubricate this appliance.
15.Do not use on an inclined plane or unstable surface.
16.Keep the appliance and the power cord away from the edges of benches and countertops.
17. Do not place the appliance on or near any heat sources.
18.Do not use appliance for other than intended purpose.
19.This appliance is not intended to be operated by means of an external timer or separate remote
control system.
20.For added safety, electrical appliances should be connected to a power outlet that is protected
by a residual current device (RCD), also often referred to as a ‘Safety Switch’. Your switchboard
may already incorporate an RCD. If unsure, call an electrician for verification and fitting if
necessary.
SAVE THESE INSTRUCTIONS
THIS APPLIANCE IS FOR HOUSEHOLD USE ONLY
16
RHVS1_IB_FA_221112.indd 16
22/11/12 10:08 AM
NOTES
17
RHVS1_IB_FA_221112.indd 17
22/11/12 10:08 AM
18
RHVS1_IB_FA_221112.indd 18
22/11/12 10:08 AM
19
RHVS1_IB_FA_221112.indd 19
22/11/12 10:08 AM
www.russellhobbs.com.au
www.russellhobbs.co.nz
RUSSELL HOBBS and logo are Trade Marks of Spectrum Brands, Inc., or one of its subsidiaries.
©2013 Spectrum Brands, Inc.
20
RHVS1_IB_FA_221112.indd 20
22/11/12 10:08 AM