1
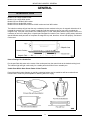
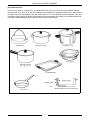
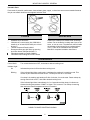
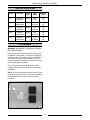
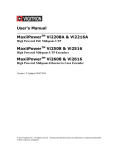
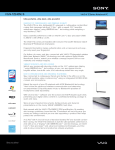
SERVICE MANUAL
INDUCTION
COOKERS
MODEL
ML
VI2
114713
VI3
114714
VI22
114715
VI33
114716
VI23
114717
Model VI22 shown
- NOTICE This Manual is prepared for the use of trained Vulcan Service
Technicians and should not be used by those not properly
qualified. If you have attended a Vulcan Service School for this
product, you may be qualified to perform all the procedures
described in this manual.
This manual is not intended to be all encompassing. If you have
not attended a Vulcan Service School for this product, you should
read, in its entirety, the repair procedure you wish to perform to
determine if you have the necessary tools, instruments and skills
required to perform the procedure. Procedures for which you do
not have the necessary tools, instruments and skills should be
performed by a trained Vulcan Service Technician.
Reproduction or other use of this Manual, without the express
written consent of Vulcan, is prohibited.
A product of VULCAN-HART
Form 24591 (Rev. A, 12-98) Supercedes (5-97)
LOUISVILLE, KY 40201-0696
TABLE OF CONTENTS
GENERAL . . . . . . . . . . . . . . . . . . . . . . . . . . . . . . . . . . . . . . . . . . . . . . . . . . . . . . . . . . . . . . . . . . . . . . . . . . . . .
Introduction . . . . . . . . . . . . . . . . . . . . . . . . . . . . . . . . . . . . . . . . . . . . . . . . . . . . . . . . . . . . . . . . . . . . . . . .
How to Distinguish a Usable Pan . . . . . . . . . . . . . . . . . . . . . . . . . . . . . . . . . . . . . . . . . . . . . . . . . . . .
Usable Pans Which Have Slower Rates of Heat Transfer . . . . . . . . . . . . . . . . . . . . . . . . . . . . . . . . . .
Recommended Pans . . . . . . . . . . . . . . . . . . . . . . . . . . . . . . . . . . . . . . . . . . . . . . . . . . . . . . . . . . . . .
Unusable Pans . . . . . . . . . . . . . . . . . . . . . . . . . . . . . . . . . . . . . . . . . . . . . . . . . . . . . . . . . . . . . . . . . .
Tools . . . . . . . . . . . . . . . . . . . . . . . . . . . . . . . . . . . . . . . . . . . . . . . . . . . . . . . . . . . . . . . . . . . . . . . . . . . . .
Location . . . . . . . . . . . . . . . . . . . . . . . . . . . . . . . . . . . . . . . . . . . . . . . . . . . . . . . . . . . . . . . . . . . . . . . . . . .
Controls . . . . . . . . . . . . . . . . . . . . . . . . . . . . . . . . . . . . . . . . . . . . . . . . . . . . . . . . . . . . . . . . . . . . . . . . . . .
Specifications . . . . . . . . . . . . . . . . . . . . . . . . . . . . . . . . . . . . . . . . . . . . . . . . . . . . . . . . . . . . . . . . . . . . . .
Cleaning . . . . . . . . . . . . . . . . . . . . . . . . . . . . . . . . . . . . . . . . . . . . . . . . . . . . . . . . . . . . . . . . . . . . . . . . . .
3
3
3
3
4
5
5
5
5
6
6
REMOVAL AND REPLACEMENT OF PARTS . . . . . . . . . . . . . . . . . . . . . . . . . . . . . . . . . . . . . . . . . . . . . . . . . 7
Top Cover . . . . . . . . . . . . . . . . . . . . . . . . . . . . . . . . . . . . . . . . . . . . . . . . . . . . . . . . . . . . . . . . . . . . . . . . . 7
Inverter Assembly . . . . . . . . . . . . . . . . . . . . . . . . . . . . . . . . . . . . . . . . . . . . . . . . . . . . . . . . . . . . . . . . . . . 7
Fan Motors . . . . . . . . . . . . . . . . . . . . . . . . . . . . . . . . . . . . . . . . . . . . . . . . . . . . . . . . . . . . . . . . . . . . . . . . 8
Controller Board, Led and Potentiometer . . . . . . . . . . . . . . . . . . . . . . . . . . . . . . . . . . . . . . . . . . . . . . . . . . 9
Knob Gasket . . . . . . . . . . . . . . . . . . . . . . . . . . . . . . . . . . . . . . . . . . . . . . . . . . . . . . . . . . . . . . . . . . . . . . . 9
Inverter Coil . . . . . . . . . . . . . . . . . . . . . . . . . . . . . . . . . . . . . . . . . . . . . . . . . . . . . . . . . . . . . . . . . . . . . . . . 9
High Voltage Board . . . . . . . . . . . . . . . . . . . . . . . . . . . . . . . . . . . . . . . . . . . . . . . . . . . . . . . . . . . . . . . . . 10
Low Voltage Board . . . . . . . . . . . . . . . . . . . . . . . . . . . . . . . . . . . . . . . . . . . . . . . . . . . . . . . . . . . . . . . . . . 10
EMI Board . . . . . . . . . . . . . . . . . . . . . . . . . . . . . . . . . . . . . . . . . . . . . . . . . . . . . . . . . . . . . . . . . . . . . . . . 11
Fuse on EMI Board . . . . . . . . . . . . . . . . . . . . . . . . . . . . . . . . . . . . . . . . . . . . . . . . . . . . . . . . . . . . . . . . . 11
Thermistor, Tension Spring and Support . . . . . . . . . . . . . . . . . . . . . . . . . . . . . . . . . . . . . . . . . . . . . . . . . 11
SERVICE PROCEDURES AND ADJUSTMENTS . . . . . . . . . . . . . . . . . . . . . . . . . . . . . . . . . . . . . . . . . . . . . .
Thermistor Test . . . . . . . . . . . . . . . . . . . . . . . . . . . . . . . . . . . . . . . . . . . . . . . . . . . . . . . . . . . . . . . . . . . .
Controller Board Potentiometer Test . . . . . . . . . . . . . . . . . . . . . . . . . . . . . . . . . . . . . . . . . . . . . . . . . . . .
High Voltage Board Test . . . . . . . . . . . . . . . . . . . . . . . . . . . . . . . . . . . . . . . . . . . . . . . . . . . . . . . . . . . . .
Inverter Coil Test . . . . . . . . . . . . . . . . . . . . . . . . . . . . . . . . . . . . . . . . . . . . . . . . . . . . . . . . . . . . . . . . . . .
Power Output Adjustment . . . . . . . . . . . . . . . . . . . . . . . . . . . . . . . . . . . . . . . . . . . . . . . . . . . . . . . . . . . .
Access Hole Modification . . . . . . . . . . . . . . . . . . . . . . . . . . . . . . . . . . . . . . . . . . . . . . . . . . . . . . . . . . . . .
Transformer Test . . . . . . . . . . . . . . . . . . . . . . . . . . . . . . . . . . . . . . . . . . . . . . . . . . . . . . . . . . . . . . . . . . .
12
12
12
12
13
13
16
18
ELECTRICAL OPERATION . . . . . . . . . . . . . . . . . . . . . . . . . . . . . . . . . . . . . . . . . . . . . . . . . . . . . . . . . . . . . .
Component Function . . . . . . . . . . . . . . . . . . . . . . . . . . . . . . . . . . . . . . . . . . . . . . . . . . . . . . . . . . . . . . . .
Component Location . . . . . . . . . . . . . . . . . . . . . . . . . . . . . . . . . . . . . . . . . . . . . . . . . . . . . . . . . . . . . . . .
Sequence of Operation . . . . . . . . . . . . . . . . . . . . . . . . . . . . . . . . . . . . . . . . . . . . . . . . . . . . . . . . . . . . . .
Plug Layout . . . . . . . . . . . . . . . . . . . . . . . . . . . . . . . . . . . . . . . . . . . . . . . . . . . . . . . . . . . . . . . . . . . . . . .
Wiring Diagram . . . . . . . . . . . . . . . . . . . . . . . . . . . . . . . . . . . . . . . . . . . . . . . . . . . . . . . . . . . . . . . . . . . .
18
18
19
20
21
22
TROUBLESHOOTING . . . . . . . . . . . . . . . . . . . . . . . . . . . . . . . . . . . . . . . . . . . . . . . . . . . . . . . . . . . . . . . . . . 24
© VULCAN 1997, 1998
2
INDUCTION COOKERS - GENERAL
GENERAL
INTRODUCTION
Model
Model
Model
Model
Model
VI2 is a single 2.2KW cooker.
VI3 is a single 3KW cooker.
VI22 is a double 2.2KW cooker.
VI33 is a double 3KW cooker.
VI23 is a double cooker with one 2.2KW cooker and one 3KW cooker.
The induction cooktop will not heat the way a resistance heater conducts to the pan. A magnetic induction coil is
beneath the ceramic top. This coil creates a magnetic field that requires a steel or iron pan to complete the
magnetic loop. If the pan is not present, the cooktop stays in a “cool” ready state without using much current. It is
necessary to use iron or steel pans, or special pans designed for induction use. Ceramic, glass, pottery and some
special stainless steel pans will not complete the magnetic loop and, therefore, will not heat properly, and should
not be used.
How to Distinguish a Usable Pan
Put the pan filled with water on the center of the cooktop and turn the control knob to the desired cooking level.
The indicator light will light continuously for a usable pan and will blink for an unusable pan.
Usable Pans Which Have Slower Rates of Heat Transfer
Pans with smaller bottom diameter or partially contacting bottom may be usable but will have reduced heat
transfer rates. These may be acceptable for warming but not for frying.
3
INDUCTION COOKERS - GENERAL
Recommended Pans
Pans made of cast iron, enameled iron, or stainless steel with an iron inner layer are recommended. Stainless
steel pans with 18-0, 18-8, 18-10, and 18-Cr material are acceptable if a magnet will attach itself to the pan and if
the shape of the pan is acceptable. Pans with a flat bottom 5" to 10½" in diameter are recommended. Thin pans
may deform during heating; a thicker wall and bottom are recommended. Pans made of 18-8 stainless steel and
pans with a smaller diameter bottom may have slower rates of heat transfer.
4
INDUCTION COOKERS - GENERAL
Unusable Pans
Pans made of porcelain, earthenware, heat-resistant glass, copper, or aluminum are not recommended because
they do not transfer heat from the magnetic induction field.
LOCATION
TOOLS
•
•
•
•
&
&
Standard set of hand tools
VOM with AC current tester (Any VOM with a
sensitivity of at least 20,000 ohms per volt can
be used.)
Thermal compound Part # 819643
Demeyere sauce pan with 26cm top opening
and 24cm bottom PMI Part # 424971-1
Fiberglass screwdriver Part # 424998-1
Field Service Grounding Kit Part #TL-84919
Position the cooktop on a suitable level countertop
surface. Do not locate the cooktop near fryers, a hot
stove, or over an oven. The electrical controls inside
the cooktop will shut down if they overheat (above
110°F). Refer to the Installation and Operation
Manual for complete installation instructions.
CONTROLS
Control Knob
Turn counterclockwise to OFF; clockwise to desired cooking level.
Indicator Light:
On
Indicates that power is ON and at what cooking level.
Blinking
If the indicator light blinks continuously, it indicates the cooktop is in stand-by mode. This
means no pan is detected and heat is OFF. Cooktop will shut off in 3 minutes.
If cooktop is in stand-by and has shut off after 3 minutes, it must be reset. Reset cooktop by
turning control knob to OFF, then ON to desired cooking level.
If the indicator light blinks intermittently for 2 or 3 seconds and then stops, it indicates an
elevated cooking temperature of 380(F or higher. This is normal. The cooktop is ensuring
that maximum internal temperatures are not exceeded.
DOUBLE COOKER CONTROLS SHOWN
5
INDUCTION COOKERS - GENERAL
SPECIFICATIONS
MODEL
VOLTAGE
PLUG
TYPE
MAX.
AMPS
BREAKER
SIZE
VI2
208/60/1
220/240/60/1
6-20P
10.6
9.1/9.1
15
15
VI3
208/60/1
220/240/60/1
6-20P
14.6
12.3/12.5
15
15
VI22
208/60/1
220/240/60/1
6-30P
21.2
18.2/18.2
30
30
VI23
208/60/1
220/240/60/1
6-30P
25.2
21.4/21.6
30
30
VI33
208/60/1
220/240/60/1
6-30P
29.2
24.6/25.0
30
30
CLEANING
WARNING: DISCONNECT ELECTRICAL POWER
BEFORE CLEANING.
Clean the ceramic cooktop surface by using a cloth
moistened in warm water, or a solution of detergent
and warm water. For stubborn stains, ScotchBrite or
a soft paste of cleanser may be used; do not use
abrasive materials or harsh scouring action because
this could damage the surface.
Snap out air filters located on the bottom of the
cooktop and wash them in a sink. Dry filters before
reinstalling.
NOTE: Do not operate without filters in place. Filters
must be kept clean to prevent unit from overheating.
Keep area around unit clear to insure proper air
circulation.
6
INDUCTION COOKERS - REMOVAL AND REPLACEMENT OF PARTS
REMOVAL AND REPLACEMENT OF PARTS
TOP COVER
6.
Remove controller board and potentiometer as
outlined in “CONTROLLER BOARD, LED AND
POTENTIOMETER”.
WARNING: UNPLUG UNIT BEFORE SERVICING.
7.
Remove six screws securing inverter assembly
to the base.
8.
Reverse procedure to install.
9.
Apply a liberal amount of thermal compound to
thermistor in center of inverter coil to contact
top cover as noted in “TOP COVER”.
1.
Remove the screws securing the top cover to
the back of the unit.
2.
Turn the unit on its side to access and remove
the screws securing the cover to the bottom.
3.
Put the unit upright and pull the top cover
straight off so not to smear the thermal
compound.
4.
Disconnect the lead wires at the controller
board if necessary.
5.
Reverse procedure to install.
NOTE: There must be sufficient thermal compound
applied to center of inverter coil to contact top cover
when it is installed.
10. Adjust power output as outlined under
“POWER OUTPUT ADJUSTMENT”.
INVERTER ASSEMBLY
WARNING: UNPLUG UNIT BEFORE SERVICING.
1.
Remove the top cover as outlined under “TOP
COVER”.
2.
Identify and disconnect the fan plugs.
3.
Remove any cable ties securing fan wires to
inverter frame.
4.
Disconnect power leads from terminal block
and remove screws securing terminal block to
base.
5.
Remove cable clamp securing ferrite filter on
ground wire.
7
INDUCTION COOKERS - REMOVAL AND REPLACEMENT OF PARTS
FAN MOTORS
WARNING: UNPLUG UNIT BEFORE SERVICING.
1.
Remove the top cover as outlined under “TOP
COVER”.
2.
Disconnect the lead wire plug for the fan motor
being removed.
Units Built Before 11/14/97
1.
2.
Intake fan only:
A.
Snap off filters located underneath unit.
B.
Remove screws securing fan housing to
base.
Current Production Units
C.
Remove fan housing.
1.
D.
Remove fan from fan housing.
Discharge fan:
A.
Remove fan.
2.
Intake fan only:
A.
Snap off filters located underneath unit.
B.
Remove screws securing fan air deflector
to base.
C.
Remove fan air deflector.
D.
Remove remaining screws securing fan to
be removed.
Reverse procedure to install.
NOTE: Fans have arrows indicating direction of air
flow and rotation. Air flow is entering unit through
base and exiting out rear of unit.
8
INDUCTION COOKERS - REMOVAL AND REPLACEMENT OF PARTS
CONTROLLER BOARD, LED
AND POTENTIOMETER
KNOB GASKET
WARNING: UNPLUG UNIT BEFORE SERVICING.
WARNING: UNPLUG UNIT BEFORE SERVICING.
CAUTION: Certain components in this system
are subject to damage due to electro-static
discharge during field repairs. A Field Service
Kit is available to prevent this damage. This
Field Service Kit must be used anytime a
component or circuit board is handled. Specific
instructions are included with the kit.
1.
Remove the top cover as outlined under “TOP
COVER”.
2.
Remove the knob by pulling off from the
controller board on the front of the unit.
3.
Unplug cable from controller board.
4.
Remove the plastic nuts that secure the
controller board to the top cover.
1.
Remove the controller board as outlined under
“CONTROLLER BOARD, LED AND
POTENTIOMETER”.
2.
Pry out gasket from inside top cover.
3.
Reverse procedure to install.
INVERTER COIL
WARNING: UNPLUG UNIT BEFORE SERVICING.
CAUTION: Certain components in this system
are subject to damage due to electro-static
discharge during field repairs. A Field Service
Kit is available to prevent this damage. This
Field Service Kit must be used anytime a
component or circuit board is handled. Specific
instructions are included with the kit.
5.
Remove potentiometer mounting nut if pot is
being replaced.
6.
Unplug LED from board if LED is being
replaced.
1.
Remove the top cover as outlined under “TOP
COVER”.
7.
Reverse procedure to install.
2.
Remove screws holding the inverter coil to the
inverter assembly frame.
NOTE: Watch for spacing washers under inverter
coil between coil and frame on 208 volt units. These
spacers must be installed to insure proper operation.
9
INDUCTION COOKERS - REMOVAL AND REPLACEMENT OF PARTS
3.
Position the inverter coil on its side to access
the lead wires.
4.
Disconnect the lead wires from the high voltage
board.
NOTE: The lead from the inner portion of the
inverter coil connects to the “L” terminal and the
lead from the outer portion connects to the “M”
terminal. These leads must also be twisted and then
connected properly.
5.
Remove thermistor, tension spring and support
as outlined in “THERMISTOR, TENSION
SPRING AND SUPPORT”
6.
Reverse procedure to install.
7.
Adjust power output as outlined under
“POWER OUTPUT ADJUSTMENT”.
5.
Reverse the procedure to install.
6.
Adjust power output as outlined under
“POWER OUTPUT ADJUSTMENT”.
LOW VOLTAGE BOARD
WARNING: UNPLUG UNIT BEFORE SERVICING.
CAUTION: Certain components in this system
are subject to damage due to electro-static
discharge during field repairs. A Field Service
Kit is available to prevent this damage. This
Field Service Kit must be used anytime a
component or circuit board is handled. Specific
instructions are included with the kit.
HIGH VOLTAGE BOARD
1.
Remove the high voltage board as outlined
under “HIGH VOLTAGE BOARD”.
2.
Disconnect the lead wires to the low voltage
board.
3.
Push in the tabs of the pins that secure the low
voltage board and remove the board from the
mounting plate.
4.
Reverse the procedure to install.
5.
Adjust power output as outlined under
“POWER OUTPUT ADJUSTMENT”.
WARNING: UNPLUG UNIT BEFORE SERVICING.
CAUTION: Certain components in this system
are subject to damage due to electro-static
discharge during field repairs. A Field Service
Kit is available to prevent this damage. This
Field Service Kit must be used anytime a
component or circuit board is handled. Specific
instructions are included with the kit.
1.
Remove the top cover as outlined under “TOP
COVER”.
2.
Remove the inverter coil as outlined under
“INVERTER COIL”.
3.
Disconnect the lead wires for the high voltage
board.
4.
Remove the screws that secure the high
voltage board mounting plate to the inverter
assembly frame.
10
INDUCTION COOKERS - REMOVAL AND REPLACEMENT OF PARTS
EMI BOARD
THERMISTOR, TENSION
SPRING AND SUPPORT
WARNING: UNPLUG UNIT BEFORE SERVICING.
CAUTION: Certain components in this system
are subject to damage due to electro-static
discharge during field repairs. A Field Service
Kit is available to prevent this damage. This
Field Service Kit must be used anytime a
component or circuit board is handled. Specific
instructions are included with the kit.
1.
Remove the high voltage board as outlined
under “HIGH VOLTAGE BOARD”.
2.
Disconnect the lead wires to the EMI board.
3.
Push in the tabs of the pins that secure the EMI
board and remove the board from the mounting
plate.
4.
Reverse the procedure to install.
5.
Adjust power output as outlined under
“POWER OUTPUT ADJUSTMENT”.
WARNING: UNPLUG UNIT BEFORE SERVICING.
Remove the top cover as outlined under “TOP
COVER”.
2.
Unplug thermistor from the high voltage board.
3.
Depress thermistor support assembly and
rotate 90°.
4.
Withdraw thermistor support assembly from
inverter coil.
5.
Reverse the procedure to install.
NOTE: Apply generous amount of thermal
compound to top of thermistor support assembly.
FUSE ON EMI BOARD
WARNING: UNPLUG UNIT BEFORE SERVICING.
1.
1.
Remove fuse using needle nose pliers or small
screwdriver.
11
INDUCTION COOKERS - SERVICE PROCEDURES AND ADJUSTMENTS
SERVICE PROCEDURES AND ADJUSTMENTS
WARNING: CERTAIN PROCEDURES IN THIS SECTION REQUIRE ELECTRICAL TEST OR
MEASUREMENTS WHILE THE POWER IS APPLIED TO THE MACHINE. EXERCISE EXTREME CAUTION AT
ALL TIMES. IF TEST POINTS ARE NOT EASILY ACCESSIBLE, DISCONNECT POWER, ATTACH TEST
EQUIPMENT AND REAPPLY POWER TO TEST.
NOTE: Make sure all plugs are properly connected before applying power. Circuit boards have a special coating
on them so handle carefully.
THERMISTOR TEST
HIGH VOLTAGE BOARD
TEST
WARNING: UNPLUG UNIT BEFORE SERVICING.
At room temperature resistance should be
approximately 120,000 ohms. As temperature
increases, resistance decreases.
WARNING: UNPLUG UNIT BEFORE SERVICING.
CONTROLLER BOARD
POTENTIOMETER TEST
1.
Unplug all connectors on high voltage board.
2.
Check R102-1 and R102-2. Each should be
approximately 130,000 ohms.
3.
Check R103-1 and R103-2. Each should be
approximately 68,000 ohms.
4.
If either test fails, replace the high voltage
board.
5.
To check components C112-1, C112-2, TR1,
TR2 and DD1, disconnect the inverter coil from
the high voltage board.
WARNING: UNPLUG UNIT BEFORE SERVICING.
1.
Remove the controller board as outlined under
“CONTROLLER BOARD, LED and
POTENTIOMETER”.
2.
Unplug both potentiometer leads.
A.
Check ON/OFF switch portion operation of
potentiometer with ohm meter.
B.
Check potentiometer according to
diagram.
3.
Replace potentiometer if either test fails.
Potentiometer is secured with a nut.
4.
Reverse the procedure to install.
A.
Unplug WF5.
B.
Set VOM for 20M scale.
C.
Connect VOM negative lead to pin 4 of
WF5 on the board.
NOTE: Pin 1 is nearest the heatsink.
D.
12
Connect VOM positive lead to the
heatsink.
INDUCTION COOKERS - SERVICE PROCEDURES AND ADJUSTMENTS
E.
6.
A reading greater than 2 meg ohms should
be observed. It may take 10 to 15 seconds
to reach this value.
F.
To check collector/base of TR1 and TR2,
keep VOM positive lead on the heatsink
and connect the VOM negative lead to pin
6 of WF5 on the board.
G.
A reading of more than 0 meg ohms
should be observed.
3.
Unplug power cord.
4.
Remove the top cover as outlined under “TOP
COVER”.
5.
Loosen the power cord strain relief connector
and withdraw the power cord enough to attach
an amp meter outside the case.
6.
Install the top cover and the screws securing it
to the center of the base to prevent the base
from flexing downward.
7.
Connect the power.
8.
Place pan with water on center of cooking zone
of cooker being tested and set power control to
maximum.
9.
Read the amp meter and compare reading to
the following charts.
If either test in step 4 fails, replace the high
voltage board and perform “POWER OUTPUT
ADJUSTMENT”.
NOTE: Not all components on the board have been
checked in above tests. A failure could still exist that
would require board replacement.
INVERTER COIL TEST
WARNING: UNPLUG UNIT BEFORE SERVICING.
1.
Disconnect one coil lead from high voltage
board.
2.
Test continuity of coil with ohm meter.
3.
A.
If your meter can be adjusted for zero
ohms, do so.
B.
Test continuity of coil. Reading should be
zero ohms.
C.
If meter cannot be adjusted, test continuity
of coil. Reading will be about .2 ohms or
the resistance of the meter leads you are
using.
If coil reads open, replace inductor coil.
POWER OUTPUT
ADJUSTMENT
NOTE: On units built prior to 11/14/97, check for
potentiometer adjustment access hole in base. If no
hole is found, refer to “ACCESS HOLE
MODIFICATION”.
NOTE: Test and adjust coils independently.
1.
Use Demeyere Apollo Series sauce pan PMI
Part #424971-1 when performing this
adjustment.
A.
2.
Partially fill pan with water, place on
center of cooking zone of cooker being
tested and set power control to maximum.
Measure and record line voltage under load.
13
INDUCTION COOKERS - SERVICE PROCEDURES AND ADJUSTMENTS
AMPERE DRAW AT SPECIFIC VOLTAGES FOR 208/60/1 UNITS @ #9 SETTING.
NOTE: Chart is for single coil.
UNITS WITH 208V/60HZ DATA PLATES
SUPPLY VOLTAGE
220
216
208
198
188
KW RATING OF COOKTOP
ZONE
3
2.2
3
2.2
3
2.2
3
2.2
3
2.2
DEMEYERE APOLLO SERIES
FRYING PAN 26CM TOP X 24CM
BOTTOM. AMPS @ #9 SETTING.
14.7
10.7
14.8
10.6
14.6
10.6
14.4
10.4
12.7
10
NOTE: 208V units must have a nominal line voltage of 208V.
14
INDUCTION COOKERS - SERVICE PROCEDURES AND ADJUSTMENTS
AMPERE DRAW AT SPECIFIC VOLTAGES FOR 220/240/60/1 UNITS AT @9 SETTING.
NOTE: Chart is for single coil.
UNITS WITH 220/240/60HZ DATA PLATES
SUPPLY VOLTAGE
264
240
230
220
208
KW RATING OF COOKTOP
ZONE
3
2.2
3
2.2
3
2.2
3
2.2
3
2.2
DEMEYERE APOLLO SERIES
FRYING PAN 26CM TOP X
24CM BOTTOM. AMPS @ #9
SETTING.
12.8
9.3
12.5
9.1
12.4
9.2
12.3
9.1
12
9
NOTE: 220/240V units must have a nominal line voltage of 220/240V.
15
INDUCTION COOKERS - SERVICE PROCEDURES AND ADJUSTMENTS
10. Turn the potentiometer on the low voltage
board to obtain the correct current for the
applied voltage measured in Step 2.
ACCESS HOLE
MODIFICATION
NOTE: Do not exceed current for applied voltage
for specific test pan. Damage to unit will result.
A.
NOTE: For units made prior to 11/14/97.
To adjust if unit has potentiometer access
hole in base:
WARNING: UNPLUG UNIT BEFORE SERVICING.
1)
Remove pan from cooker.
1.
Remove top cover.
2)
Remove plug from adjustment hole.
2.
Protect inverter assembly from metal chips by
sliding a paper towel or similar object under
inverter in the area of the potentiometer on the
low voltage board.
3.
Temporarily install top cover.
4.
Turn unit onto its top, being careful not to
damage top.
5.
Use the following charts and drill hole(s) as
required by your unit.
6.
To aid in preventing drill bits from going in too
far to damage circuit board, put tape around
drill bit " from tip. Use a small bit as a pilot
bit and finish with a " drill bit.
CAUTION: Use only a fiberglass (or insulated
shaft) screwdriver to avoid shock and damage
to unit.
3)
4)
5)
B.
Securely elevate and level unit as
necessary to access hole with
fiberglass (or insulated shaft)
screwdriver.
Place pan with water on center of
cooking zone of cooker being tested.
F
Use the fiberglass (or insulated shaft)
screwdriver and pass it through the
hole in the base to the potentiometer
on the low voltage board. Turn
potentiometer counterclockwise to
increase power output or clockwise to
decrease power output.
6)
Repeat step 5) until reading is
correct.
7)
Install plug in access hole in base.
NOTE: Be careful not to catch paper towel when
drill bit breaks through base.
7.
If unit does not have an access hole in
base:
1)
Unplug power cord.
2)
Drill a hole as outlined under
“ACCESS HOLE MODIFICATION”.
3)
Perform step A .
G
16
Install plug (plugs on double cooker) Part #
424881-1 into hole(s).
INDUCTION COOKERS - SERVICE PROCEDURES AND ADJUSTMENTS
17
INDUCTION COOKERS - SERVICE PROCEDURES AND ADJUSTMENTS
TRANSFORMER TEST
5.
Apply power to unit and check voltage at
transformer secondary plug as shown in
diagram.
6.
If test is not correct, replace the transformer.
7.
Assemble in reverse order.
WARNING: UNPLUG UNIT BEFORE SERVICING.
1.
Remove inverter coil as outlined in “INVERTER
COIL”.
2.
Remove high voltage board as outlined in
“HIGH VOLTAGE BOARD”.
3.
Unplug transformer secondary from plug WF1
on the low voltage board.
4.
Remove leads connected to AC terminals
which are next to transformer primary plug
CN101 on the EMI board.
WARNING: THE FOLLOWING STEPS REQUIRE
POWER TO BE APPLIED TO THE UNIT DURING
TEST. USE EXTREME CAUTION AT ALL TIMES.
ELECTRICAL OPERATION
COMPONENT FUNCTION
Controller Board . . . . . . . . .
Inputs to the low voltage board to turn unit on or off and select cooking level.
Led . . . . . . . . . . . . . . . . . . . .
Installed on controller board and displays cooking level.
Inverter Assembly . . . . . . . .
Receives signal from controller board to produce energy for cooking.
EMI Board . . . . . . . . . . . . . .
Supplies voltage to the high voltage board.
Low Voltage Board . . . . . . .
Controls high voltage board based on input from controller board.
High Voltage Board . . . . . . .
Supplies power to the inverter coil for cooking. Supplies power to the cooling
fans.
Fans . . . . . . . . . . . . . . . . . . .
Circulate air to cool interior components.
Thermistor . . . . . . . . . . . . . .
Measures cooktop temperature.
Transformer . . . . . . . . . . . . .
Supplies power to the memory board.
Fuse . . . . . . . . . . . . . . . . . . .
Protects circuitry on EMI board.
18
INDUCTION COOKERS - ELECTRICAL OPERATION
COMPONENT LOCATION
Units built before 11/14/97 have fans mounted inside the fan housing as illustrated below. Current production
units have fans mounted directly to the base and a fan air deflector which directs air flow across the inverter
assembly as shown in pictures.
19
INDUCTION COOKERS - ELECTRICAL OPERATION
SEQUENCE OF OPERATION
1.
Cooktop has power applied.
2.
A.
Circuit boards have power applied to them
all the time the unit is plugged in and the
receptacle is live.
B.
Low voltage board is monitoring input from
controller board.
Turn control knob clockwise to desired cooking
level.
A.
Cooling fans turn on.
B.
If indicator light blinks, it indicates no pan
is detected and cooktop will shut off after 3
minutes.
C.
3.
Cooktop is in stand-by mode and
must be reset to continue operating.
2)
Cooling fans turn off.
3)
Reset cooktop by turning control knob
to OFF, then back ON to desired
cooking level.
When pan is in place and indicator is on,
cooktop is heating.
When cooking is finished, turn control knob
counterclockwise to OFF.
A.
4.
1)
Appliance fans may continue to run until
unit is cooled.
Cycle repeats starting at step 1.
20
INDUCTION COOKERS - ELECTRICAL OPERATION
PLUG LAYOUT
21
INDUCTION COOKERS - ELECTRICAL OPERATION
NOTE: To avoid EMI interference all wire leads
should be routed as far away as possible from the
inverter. Do not run power leads parallel to the
control leads.
WIRING DIAGRAM
Double Heater
22
INDUCTION COOKERS - ELECTRICAL OPERATION
Single Heater
NOTE: To avoid EMI interference all wire leads should be routed as far away as possible from the inverter. Do
not run power leads parallel to the control leads.
23
INDUCTION COOKER - TROUBLESHOOTING
TROUBLESHOOTING
NOTE: Visually check boards for arcing or burn marks that could indicate a problem.
SYMPTOM
Indicator light blinks and then goes
off after 2-3 minutes.
Indicator light blinks intermittently
and turns back on, cooks when
light is not blinking. (Cooker may
overheat and shut down.)
Reduced heat.
No heating, indicator continues to
flash.
Cooker does not operate, indicator
light is off.
Cooker does not operate, indicator
light is on.
With no pan on cooker, indicator is
continually on.
Indicator operates but does not
display all digits.
Broken or cracked top glass.
CAUSES
1. Cooker needs to be reset. Reset cooktop by turning control knob
OFF, then ON to desired cooking level.
NOTE: This is normal if a cooking level is selected and no pan is on the
cooker.
2. Thermistor shorted.
1. Filters dirty.
2. Air flow is blocked around unit. Area around unit must be kept clear.
3. Ambient temperature too high.
4. Fans not operating.
NOTE: If items 1, 2 and 3 are checked and found to be okay, this could
be a normal condition if you are cooking at high temperatures for long
periods of time (i.e. cooking with oil).
1. Incorrect voltage.
2. Incorrect power output adjustment.
3. Incorrect pan.
1. Incorrect pan.
2. High voltage board. Check as outlined in “HIGH VOLTAGE BOARD
TEST”.
3. Low voltage board.
4. Thermistor open or unplugged.
1. Line voltage noise. Disconnect power cord, then reconnect power
cord and turn unit on. (Check wire routing)
2. Incoming supply circuit breaker.
3. Fuse on EMI board.
4. High voltage board. Check as outlined in “HIGH VOLTAGE BOARD
TEST”.
5. Controller board.
6. Low voltage board.
7. EMI board.
1. High voltage board. Check as outlined in “HIGH VOLTAGE BOARD
TEST”.
2. Low voltage board.
1. High voltage board. Check as outlined in “HIGH VOLTAGE BOARD
TEST”.
2.
1.
2.
3.
4.
1.
Low voltage board.
LED.
Controller board.
Low voltage board.
High voltage board. Check as outlined in “HIGH VOLTAGE BOARD
TEST”.
Replace top.
Form 24591 (Rev. A, 12-98) Supercedes (5-97)
PRINTED IN USA