1
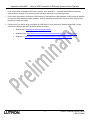
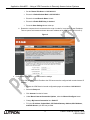
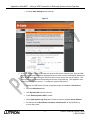
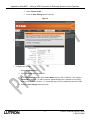
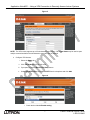
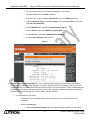
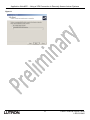
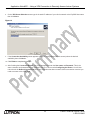
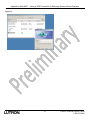
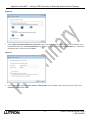
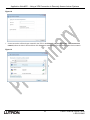
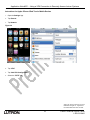
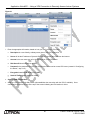
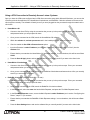
Application Note #231
Revision C
September 2011
Using a VPN Connection to Remotely Access Lutron® Systems
Overview
This application note describes a method of configuring remote access to a Lutron® system using an Internet connection
to a Virtual Private Network (VPN) router. This application note covers configuring a router to use Point to Point Tunneling
Protocol (PPTP) for VPN access. Microsoft Windows XP®, Windows Vista®, and Windows® 7 have native client support for
this type of VPN.
PPTP VPN adds a layer of security before the homeowner’s system is connected to the Internet. It should be noted that
any time remote access is provided for a homeowner’s site there is a risk of having the network and equipment
compromised by unauthorized access.
Key Terms
VPN
VPN Router
VPN Client
ISP
Static IP
Dynamic IP
URL
DNS Server
Dynamic DNS
Virtual Private Network
A piece of hardware or software that provides a virtual connection through a public network (such as
the internet) to a private network.
Hardware or software that connects to a VPN router over a public network connection and provides an
additional network connection to the private network which the VPN router is connected to.
Internet Service Provider
An IP address assigned to a network computer or device which does not change at a given time
interval or during the network connection process.
An IP address assigned to a network computer or device which changes at a predetermined time
interval or during the network connection process.
Universal Resource Locator: a readable name that represents a network IP address (i.e. google.com or
myname.dyndns.org). A URL is often referred to as a host name or web address.
A server on a public or private network that translates URL’s into network IP addresses.
A service that maps static or dynamic IP address to a URL.
Before You Begin…
1.
In order to connect to a VPN router the VPN client must be able to find the VPN router. This is done with one of the
following two options:
a.
A static IP address from the client’s ISP. This address must be known to complete the setup and will be provided
by the ISP.
b.
An account with a dynamic DNS service. This application note uses DynDNS.org. This will allow the use of a host
name (URL) instead of a static IP.
2. Acquire a VPN router and its accompanying manual. This application note covers the use of the D-Link® DIR-130
(wired) and the D-Link® DIR-330 (wired/wireless) routers. Please note that all screenshots within this application note
may differ in appearance to the screens rendered on your computer. This application note also assumes the
router is in its “default” or “out-of-box” state. If this is not the case, there is a risk of running an untested VPN
Lutron Technical Support Center
1.800.523.9466
Application Note #231 – Using a VPN Connection to Remotely Access Lutron® Systems
router environment incompatible with Lutron® systems. See “Appendix C – Technical Specifications” subsection
“Default Factory Settings” of the router’s product manual for instructions on performing a reset.
3.
Ensure each HomeWorks® IlluminationTM/QS Processor or the RadioRA® 2 Main Repeater is using a static IP address
and you have those addresses readily available. Static IP addresses are required to ensure devices using the VPN
remotely can locate the system.
4.
Confirm the PC you will be using to configure the VPN Router is set to obtain an IP address dynamically. Please
reference the following Microsoft Windows® articles for support:
a.
Windows XP®: http://support.microsoft.com/kb/305553
b.
Windows Vista®: http://windows.microsoft.com/en-US/windows-vista/Change-TCP-IP-settings
c.
Windows® 7: http://windows.microsoft.com/en-US/windows7/Change-TCP-IP-settings
2
Lutron® Technical Support Center
1.800.523.9466
Application Note #231 – Using a VPN Connection to Remotely Access Lutron® Systems
Configuring the Router
1.
2.
Setup a private network with the VPN router: Follow the manufacturer’s instructions included with the router to
connect computers and other network devices to the router.
a.
The manufacturer’s instructions can be found on the CD included with the VPN router. Insert the CD into
your PC and select “View Manual”. Follow the instructions under “Section 1: Product Overview” and
“Section 2: Installation” of the manual.
b.
Access the router’s internal configuration pages. To access these pages, open a web-browser and enter
the IP address of the D-Link VPN router (192.168.0.1).
c.
Enter admin as the User name. Leave the password field blank.
Verify the VPN router has the latest firmware: Once logged into the router’s configuration pages, ensure that
the Firmware Version is version 1.12 or higher (D-Link DIR-330) or 1.23 or higher (D-Link DIR-130). If it is lower,
upgrade the firmware by following the manufacturer’s instructions before proceeding. The current firmware
version information can be found in the top right-hand corner of any router configuration page.
Figure 1
3.
Configure the VPN router for remote access: Changes need to be made to the router’s default configuration in
order to setup the router for remote access. Each change is listed below.
Note: Make sure to press the Save Settings button at the top of every configuration screen when indicated in the
following steps. Otherwise the changes that have been made will not be saved. After pressing the Save Settings
button, it may take a few moments until the Continue button is enabled to click.
a.
Configure the VPN router’s local network settings:
Note: The default LAN IP address is set to 192.168.0.1. If a VPN client’s local network uses IP
addresses in the same range as the VPN router’s network (192.168.0.XXX), an address conflict may
occur and the connection between the VPN client and the VPN router will not operate properly. To
reduce the possibility of address conflicts, Lutron recommends changing the default (VPN) LAN IP
address to something less likely used as default addresses on other local networks. In this example, we
will use 192.168.100.1 as the (VPN) LAN IP address.
i. Select the Setup tab from the top menu, and then select Network Settings from the left menu.
ii. Modify the network address as shown in Figure 2.
3
Lutron® Technical Support Center
1.800.523.9466
Application Note #231 – Using a VPN Connection to Remotely Access Lutron® Systems
1.
Set the Router IP Address to 192.168.100.1
2.
Ensure the Default Subnet Mask is 255.255.255.0
3.
Ensure the Local Domain Name is blank.
4.
Ensure the Enable DNS Relay is checked.
5.
Press the Save Settings button at the top.
iii. Restart the computer that is connected to the router in order for it to acquire its new IP address.
Then re-open a web browser and enter the new IP address of the VPN router (192.168.100.1).
Figure 2
b.
Configure the VPN router’s Internet connection settings:
i. If the ISP provides a static IP address the VPN router must be configured with a static Internet IP
address:
1.
Access the VPN Router’s internal configuration pages at its address: 192.168.100.1
2.
Select the Setup tab.
3.
Click Internet from the left menu.
4.
Under Manual Internet Connection Options, select the Manual Configure button.
5.
Change My Internet Connection is to Static IP.
6.
Fill in the IP Address, Subnet Mask, ISP Default Gateway Address, MAC Address,
and DNS Servers your ISP has provided.
4
Lutron® Technical Support Center
1.800.523.9466
Application Note #231 – Using a VPN Connection to Remotely Access Lutron® Systems
7.
Press the Save Settings button at the top.
Figure 3
ii. If the ISP provides a Dynamic IP address a dynamic DNS service must be used. Dynamic DNS
services can be used with static IP addresses as well to utilize a custom web address instead of a
static IP address when directing the VPN client device to the VPN router over the Internet. This
can be done using a dynamic DNS hosting service such as DynDNS.org. This application note
uses a DynDNS.org free account. To configure a dynamic DNS service:
1.
Access the VPN Router’s internal configuration pages at its address: 192.168.100.1
2.
Select the Maintenance tab.
3.
Click Dynamic DNS from the left menu.
4.
Check Enable Dynamic DNS to enable.
5.
Select www.DynDns.org (Free) and click the << button to populate Server Address.
6.
Provide the correct Host Name, User Name, and Password, for the DynDNS.org
account being used.
5
Lutron® Technical Support Center
1.800.523.9466
Application Note #231 – Using a VPN Connection to Remotely Access Lutron® Systems
7.
Leave Timeout at 240.
8.
Press the Save Settings button at the top.
Figure 4
c.
Configure User Groups
i. Select the Advanced tab.
ii. Click User Group from the left menu.
iii. Under User Settings, replace the first User Name (“admin”) with a VPN user. Also, assign a
Password for that user. (If “admin” does not appear already in the username list, just begin
adding users in position number “1”). Repeat this step (iii) for any additional users of the VPN.
iv. Press the Save Settings button at the top.
6
Lutron® Technical Support Center
1.800.523.9466
Application Note #231 – Using a VPN Connection to Remotely Access Lutron® Systems
Figure 5
NOTE: The VPN router supports up to 25 simultaneous connections. Each User Name may be used to open
multiple connections before the simultaneous-connection limit is reached.
d.
Configure VPN Access:
i. Select the Setup tab.
ii. Click VPN Settings from the left menu.
iii. If prompted, press the Manual VPN Setup button.
iv. Under Add VPN Profile, select PPTP/L2TP from the dropdown and click Add.
Figure 6
1.
Check the box labeled Enable setting.
7
Lutron® Technical Support Center
1.800.523.9466
Application Note #231 – Using a VPN Connection to Remotely Access Lutron® Systems
2.
Provide a name for the VPN connection appropriate to the location.
3.
Ensure the radio button for PPTP is selected.
4.
Enter the router’s LAN IP Address (192.168.100.1) into the VPN Server IP field.
5.
Assign a Remote IP range of 192.168.100.200 in the first field and 225 in the second
field (192.168.100.200-225).
6.
Ensure MSCHAP v2 is selected for Authentication Protocol.
7.
Ensure 128 bit is selected for MPPE Encryption Mode.
8.
Ensure Group 1 is selected for Authentication database.
9.
Press the Save Settings button at the top.
Figure 7
4.
Address Lutron® System with Static IP – The HomeWorks® QS Processor(s), HomeWorks® IlluminationTM
Processor(s), or RadioRA® 2 Main Repeater must have a static IP to ensure functionality of the Lutron® Home
Control applications on iOS®/Android® devices using the VPN from a remote location. If static IP addressing was
already assigned to system devices connected to an old router, it may be required to re-address the assigned
devices to connect with the new VPN router’s subnet (192.168.100.XXX).
a.
For HomeWorks® QS Systems:
i. Connect the PC to the HWQS system and open the project file in the HomeWorks® QS
application
ii. Select the activate tab.
1.
Within the activate processors task view, deactivate each processor on the system
8
Lutron® Technical Support Center
1.800.523.9466
Application Note #231 – Using a VPN Connection to Remotely Access Lutron® Systems
2.
Click the Project Setup link below the menu bar.
a.
Under the Network Settings tab, for every Processor:
i. Uncheck the DHCP option.
ii. Assign a unique IP address within the 192.168.100.151 –
192.168.100.199 range to the Processor in the IP Address field
(Example: Processor 1: 192.168.100.151, Processor 2:
192.168.100.152, etc.).
b.
b.
Set the Gateway Address to 192.168.100.1 (or other VPN Router address set
up in step 3.a.ii.1.
c.
Set the Subnet Mask to 255.255.255.0.
d.
Press the Done button.
3.
Press the Refresh button to re-identify processors on the system.
4.
Deactivate and Reactivate each processor.
For HomeWorks® IlluminationTM Systems:
i. Connect the PC to the HWI system and open the project file in the HomeWorks® IlluminationTM
application.
1.
In the IlluminationTM software, open the Terminal screen.
2.
In the File menu of the Terminal screen, select the TCP/IP Setup Wizard.
3.
On the Overview screen, press the Next button.
4.
On the Connecting your Ethernet cables screen, press the Next button.
5.
On the Processors discovered screen, select the network adapter that matches the
connection to the processor.
6.
In the lower half of the same window, select the processor from the list of discovered
processors.
7.
Press the Next button.
8.
Ensure that the checkbox for DHCP Enabled is unchecked.
9.
Assign a static IP address to the processor within the 192.168.100.151-192.168.100.199
range in the IP address field.
10. Ensure that the subnet mask is 255.255.255.0.
11. Ensure that the gateway address matches the IP address of the router.
12. Click Next.
9
Lutron® Technical Support Center
1.800.523.9466
Application Note #231 – Using a VPN Connection to Remotely Access Lutron® Systems
13. Ensure that the port numbers are correct for the site. Most sites will use the default ports,
which are 80 for Web access, 21 for FTP, and 23 for Telnet.
14. Click Next.
15. The Setup Wizard should connect to the processor and apply any necessary
configuration changes.
16. A message window should appear indicating that the TCP/IP configuration completed
successfully.
17. Press the OK button on the message window.
18. Press the Close button on the Terminal screen.
c.
For RadioRA® 2 Systems:
i. Connect the PC to the RadioRA® 2 system and open the project file in the RadioRA® 2 PC
application.
1.
Press the Find Main Repeater button.
2.
Under the DHCP Enabled column, select False from the drop-down list.
3.
Assign a static IP address to the Main Repeater within the 192.168.100.151 –
192.168.100.199 range in the IP Address field.
4.
Press the Save Changes button.
10
Lutron® Technical Support Center
1.800.523.9466
Application Note #231 – Using a VPN Connection to Remotely Access Lutron® Systems
Overview
After the VPN router is successfully configured, you will need to create a Virtual Private Network (VPN) connection within
Microsoft Windows®. This connection can then be enabled anytime you need to connect to the client’s network.
Instructions for Windows XP®
1.
On the Windows® desktop, right click the My Network Places icon and select Properties. (Alternatively, open the
Control Panel and open Network Connections.)
2.
In the Network Connections window, click File, and then click New Connection.
Figure 8
3.
In the New Connection Wizard, advance to the Network Connection Type screen by clicking Next >.
4.
Select Connect to the network at my workplace and click Next >.
11
Lutron® Technical Support Center
1.800.523.9466
Application Note #231 – Using a VPN Connection to Remotely Access Lutron® Systems
Figure 9
5.
On the Network Connection screen, select Virtual Private Network connection and then click Next >.
Figure 10
6.
On the Connection Name screen type in your client’s name in the Company Name text field, then click Next >.
7.
If the Public Network screen appears (some network configurations skip this screen) select the option Do not dial
the initial connection then click Next >.
12
Lutron® Technical Support Center
1.800.523.9466
Application Note #231 – Using a VPN Connection to Remotely Access Lutron® Systems
Figure 11
13
Lutron® Technical Support Center
1.800.523.9466
Application Note #231 – Using a VPN Connection to Remotely Access Lutron® Systems
8.
On the VPN Server Selection screen type in the static IP address of your client’s network or the DynDNS host name
then click Next >.
Figure 12
9.
If the Connection Availability screen appears (some PC configurations skip this screen) select the desired
availability then click Next >.
10. Click Finish to complete the setup.
11. After finishing the Connection Wizard, you will be prompted to enter the User name and Password. This is the
same username and password that you created in step 3.c.iii above under Configuring the Router. You will also
notice that in the Network Connections box a new connection has been created. Use this connection next time you
need to connect to this VPN router.
14
Lutron® Technical Support Center
1.800.523.9466
Application Note #231 – Using a VPN Connection to Remotely Access Lutron® Systems
Figure 13
15
Lutron® Technical Support Center
1.800.523.9466
Application Note #231 – Using a VPN Connection to Remotely Access Lutron® Systems
Instructions for Windows Vista® and Windows® 7
1.
Open the Control Panel and click on Network and Internet and then click on Network and Sharing Center.
2.
In the Network and Sharing Center click Set up a connection or network.
Figure 14
3.
On the Choose a connection option screen click Connect to a workplace and click Next.
Figure 15
4.
On the How do you want to connect? screen, select Use Internet Connection (VPN).
16
Lutron® Technical Support Center
1.800.523.9466
Application Note #231 – Using a VPN Connection to Remotely Access Lutron® Systems
Figure 16
5.
On the Type the Internet address to connect to screen, type in the static IP address of your client’s network or the
DynDNS host name into the Internet Address box. Type the name of the client into the Destination box. Ensure the
checkboxes are unchecked and click Next.
Figure 17
6.
On the next screen, type in the User name and Password that you created in the router to log into the VPN. Click
Connect to complete the setup.
17
Lutron® Technical Support Center
1.800.523.9466
Application Note #231 – Using a VPN Connection to Remotely Access Lutron® Systems
Figure 18
7.
A new connection will have been created for the VPN. In the Network and Sharing Center, click Connect to a
network, select the client’s VPN and then click Connect to establish the VPN connection to the client’s network.
Figure 19
18
Lutron® Technical Support Center
1.800.523.9466
Application Note #231 – Using a VPN Connection to Remotely Access Lutron® Systems
Instructions for Apple® iPhone®/iPod Touch® Mobile Devices
1.
Open the Settings App.
2.
Tap General.
3.
Tap Network.
Figure 20
4.
Tap “VPN”.
5.
Tap “Add VPN Configuration”.
6.
Select the “PPTP” tab.
Apple, iOS, iPhone, and iPod Touch are
trademarks of Apple Inc., registered in
the United States and other countries.
19
Lutron® Technical Support Center
1.800.523.9466
Application Note #231 – Using a VPN Connection to Remotely Access Lutron® Systems
Figure 21
7.
Enter the appropriate information, based on how you configured the VPN router.
a.
Description is a user-friendly, arbitrary name given to the VPN connection.
b.
Server will be the IP address or Dynamic DNS name to access the router from the Internet.
c.
Account is the user name set up for the PPTP server on the VPN router
d.
RSA SecurID should remain set to OFF.
e.
Password is the password set up for the account/user name used to access VPN router (created in “Configuring
the Router”, step 3.c.iii.).
f.
Encryption Level should remain set to Auto.
g.
Send All Traffic should remain set to ON.
8.
Save the VPN configuration.
9.
Slide the “VPN” switch to the ON position (this establishes the connection with the VPN, if available). Once
connected, there will be an icon at the top of the screen indicating the VPN session is active.
20
Lutron® Technical Support Center
1.800.523.9466
Application Note #231 – Using a VPN Connection to Remotely Access Lutron® Systems
Figure 22
21
Lutron® Technical Support Center
1.800.523.9466
Application Note #231 – Using a VPN Connection to Remotely Access Lutron® Systems
10. Launch the Lutron® Application. Please note that Lutron® Home App for iOS® will ONLY work with RadioRA® 2,
whereas the Lutron® Home+ App for iOS® will work with HomeWorks® IlluminationTM, RadioRA® 2, or HomeWorks®
QS.
Figure 23
22
Lutron® Technical Support Center
1.800.523.9466
Application Note #231 – Using a VPN Connection to Remotely Access Lutron® Systems
Instructions for Android® devices
NOTE: Visual elements across devices using Android® OS can vary. Your device’s screen output may differ in
appearance from the screenshots below.
1.
From the Home screen, press the Menu button on the device. Tap Settings.
2.
Tap Wireless & networks.
3.
Tap VPN settings.
a.
NOTE: Some devices may prompt the user to select between “Basic VPN” and “Advanced IPSec VPN”. Select
Basic VPN.
Figure 24
4.
Tap Add VPN.
5.
Tap Add PPTP VPN.
6.
Enter the appropriate information, based on how you configured the VPN router.
a.
Description is a user-friendly, arbitrary name given to the VPN connection.
b.
Set VPN server should be set as the IP address or Dynamic DNS name to access the router from the Internet.
c.
Ensure “Enable encryption” is checked.
d.
DNS search domains do not need to be set.
23
Lutron® Technical Support Center
1.800.523.9466
Application Note #231 – Using a VPN Connection to Remotely Access Lutron® Systems
Figure 25
24
Lutron® Technical Support Center
1.800.523.9466
Application Note #231 – Using a VPN Connection to Remotely Access Lutron® Systems
7.
Press the Back button on the device. Tap the new VPN connection.
8.
Username and Password should be set as the user name and password set up for the PPTP server on the VPN
router (created in “Configuring the Router”, step 3.c.iii.).
9.
Check Remember username if desired. Tap Connect. If a connection is successful, a message will appear in the
notification area indicating connection status.
Figure 26
10. Press the Home button on the device.
25
Lutron® Technical Support Center
1.800.523.9466
Application Note #231 – Using a VPN Connection to Remotely Access Lutron® Systems
11. Launch the Lutron® Application. Please note that Lutron® Home Control+ for Android® will ONLY work with
RadioRA® 2 or HomeWorks® QS.
Figure 27
26
Lutron® Technical Support Center
1.800.523.9466
Application Note #231 – Using a VPN Connection to Remotely Access Lutron® Systems
Using a VPN Connection to Remotely Access Lutron® Systems
Once you have the VPN router configured and a VPN client connection setup within Microsoft Windows®, you can use the
VPN along with the HomeWorks® QS, HomeWorks® IlluminationTM, and RadioRA® 2 Inclusive software to connect to the
client’s system remotely. The software will work just as if you were plugged into the processor through the network at the
client’s site.
1.
2.
3.
HomeWorks® QS
a.
Connect to the client VPN by using the connection that you set up in the previous steps. Enter your username
and password when you are prompted for them.
b.
Once you are connected to the VPN, launch the HomeWorks® QS software.
c.
Within the activate tab, activate processors task in the loaded project file, select a Processor.
d.
Check to enable the Use VPN or Remote Access option.
e.
Input that Processor’s static IP address (set in section “Configuring the Router”, step 4.a.ii.2.a.ii) into the
Address field.
f.
Ensure that the port matches the HomeWorks® QS processor settings. In most situations, this will be set to Port
51023.
g.
Press the Save & Apply button and use the software like you normally would if you were at the client’s site.
HomeWorks® IlluminationTM
a.
Connect to the client VPN by using the connection that you set up in the previous steps. Enter your username
and password when you are prompted for them.
b.
Once you are connected to the VPN, launch the HomeWorks® IlluminationTM software and use it like you normally
would if you were at the client’s site.
RadioRA® 2 Inclusive (requires version 5.0.1 or later)
a.
Connect to the client VPN by using the connection that you set up in the previous steps. Enter your username
and password when you are prompted for them.
b.
Once you are connected to the VPN, launch the RadioRA® 2 Inclusive software.
c.
In the Design tab, select the room that has the Main Repeater, and press the Find Main Repeater button.
d.
In the Find Main Repeater screen, ensure the Main Repeater’s static IP address (set in section “Configuring the
Router”, step 4.c.i.3) is accurate.
e.
Ensure that the port matches the RadioRA® 2 Main Repeater settings. In most situations, this will be set to Port
51023.
f.
Press the Save Settings button and use the software like you normally would if you were at the client’s site.
27
Lutron® Technical Support Center
1.800.523.9466