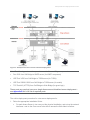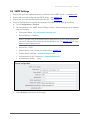
1
Acano solution 1.2 Deployment Guide Acano October 2014 76-1006-06-K Contents Contents 1 Introduction ....................................................................................................................... 6 2 2.1 Prerequisites and Deployment Overview ........................................................................... 7 Prerequisites ..................................................................................................................... 7 2.1.1 Acano Server-specific prerequisites ......................................................................... 8 2.1.2 Virtualized deployment-specific prerequisites ........................................................... 8 Deployment Overview ....................................................................................................... 8 2.2.1 Management and network interfaces........................................................................ 9 2.2.2 DNS configuration .................................................................................................... 9 2.2.3 Security certificates .................................................................................................. 9 2.2.4 SIP trunks and routing changes ............................................................................... 9 2.2.5 Voice call control .................................................................................................... 10 2.2.6 Support for Lync clients .......................................................................................... 11 2.2.7 Active Directory server integration .......................................................................... 11 2.2.8 Testing with the Acano clients ................................................................................ 11 2.2.9 Acano Web Bridge ................................................................................................. 13 2.2.10 Acano TURN Server .............................................................................................. 13 2.2.11 Split deployment considerations ............................................................................. 13 2.2 3 3.1 3.2 3.3 3.4 3.5 3.6 Creating and Installing Certificates .................................................................................. 16 Security Certificates Overview ......................................................................................... 16 Checking the Web Admin Interface Certificate and Key .................................................. 17 Installing the Call Bridge Certificate for TLS .................................................................... 18 Installing the XMPP Certificate and License .................................................................... 18 Installing the Web Bridge Certificate ................................................................................ 19 Adding the Call Bridge Certificate to the Web Bridge Trust Store .................................... 20 3.6.1 Single server example ............................................................................................ 20 3.6.2 Two server (Core/Edge) example: .......................................................................... 21 4 4.1 4.2 4.3 4.4 4.5 4.6 4.7 4.8 4.9 Configuring the MMP ....................................................................................................... 22 Creating and managing MMP and Web Admin User Accounts ........................................ 22 Upgrading Software......................................................................................................... 22 Configuring the Web Admin Interface for HTTPS Access ................................................ 23 Configuring the Call Bridge Listening Interface ................................................................ 23 Configuring a Remote Syslog Server............................................................................... 24 Configuring Network Time Protocol Servers .................................................................... 25 Configuring the XMPP Server ......................................................................................... 25 Configuring the Web Bridge ............................................................................................ 26 Configuring the TURN Server .......................................................................................... 27 5 5.1 5.2 Dial Plan Configuration – SIP Endpoints ......................................................................... 29 Introduction ..................................................................................................................... 29 SIP Endpoints Dialing a Call on the Acano Solution ........................................................ 31 5.2.1 SIP call control configuration .................................................................................. 31 5.2.2 VCS search rule configuration ................................................................................ 32 5.2.3 Creating a coSpace on the Acano solution ............................................................. 32 Acano solution: Deployment Guide R1.2 76-1006-06-K Page 2 Contents 5.3 5.4 6 6.1 6.2 6.3 6.4 6.5 6.6 5.2.4 Adding a dial plan rule on the Acano solution ......................................................... 32 Media Encryption for SIP Calls ........................................................................................ 33 IVR Configuration ............................................................................................................ 33 Dial Plan Configuration – Integrating Lync Clients ........................................................... 34 Lync Clients Dialing into a Call on the Acano solution ..................................................... 34 6.1.1 Lync Front End Server configuration ...................................................................... 34 6.1.2 Adding a dial plan rule on the Acano solution ......................................................... 34 Integrating SIP Endpoints and Lync Clients ..................................................................... 35 Web Admin Interface Configuration Pages that Handle Calls .......................................... 35 6.3.1 Outbound Calls page ............................................................................................. 36 6.3.2 Incoming Call page: call matching .......................................................................... 37 6.3.3 Call forwarding ....................................................................................................... 37 Adding Point-to-Point Calls between Lync Clients and SIP Video Endpoints ................... 38 6.4.1 Lync Front End Server configuration ...................................................................... 39 6.4.2 VCS configuration .................................................................................................. 39 6.4.3 Acano solution configuration .................................................................................. 39 Integrating Acano Clients with SIP and Lync Clients ....................................................... 40 Lync Edge Server Integration .......................................................................................... 40 6.6.2 Configuration for using Lync Edge ......................................................................... 41 7 7.1 7.2 7.3 LDAP Configuration......................................................................................................... 44 Why use LDAP? .............................................................................................................. 44 Acano Solution Settings .................................................................................................. 44 Example .......................................................................................................................... 47 8 8.1 8.2 8.3 Web Admin Interface Settings for XMPP ......................................................................... 49 Network Topology ........................................................................................................... 49 XMPP Settings ................................................................................................................ 50 Client-based coSpace Creation and Editing .................................................................... 51 9 9.1 9.2 Web Admin Interface Settings for the Web Bridge ........................................................... 53 Network Topology ........................................................................................................... 53 Web Bridge Settings........................................................................................................ 54 10 Web Admin Interface Settings for the TURN Server ........................................................ 56 10.1 Network Topology ........................................................................................................... 56 10.2 TURN Server Settings ..................................................................................................... 57 11 11.1 11.2 11.3 11.4 Customization, Troubleshooting, API and Logs ............................................................... 58 Customization ................................................................................................................. 58 Diagnostics and Troubleshooting .................................................................................... 58 Application Programming Interface.................................................................................. 58 Call Detail Record Support .............................................................................................. 58 Appendix A DNS Records Needed for the Acano Solution .................................................... 60 DNS A Records ........................................................................................................................ 60 DNS SRV Records ................................................................................................................... 60 Acano solution: Deployment Guide R1.2 76-1006-06-K Page 3 Contents Appendix B Ports Required ................................................................................................... 62 Appendix C OpenSSL Commands for Generating Certificates .............................................. 65 Appendix D Issuing a Certificate Manually ............................................................................ 67 Appendix E Example of Configuring a Static Route from a Lync Front End Server ............... 71 Lync Configuration Changes .................................................................................................... 71 Acano Solution Configuration ................................................................................................... 72 Appendix F More information on LDAP field mappings ......................................................... 73 Appendix G Example of Configuring a SIP Trunk to CUCM ................................................... 74 Prerequisites ............................................................................................................................ 74 Acano solution Configuration .................................................................................................... 74 CUCM Configuration ................................................................................................................ 75 Step 1: Uploading the certificate to the trust store ............................................................ 75 Step 2: Creating a security profile..................................................................................... 76 Step 3: Creating a SIP profile ........................................................................................... 76 Step 4: Creating a SIP trunk ............................................................................................. 76 Step 5: Configuring the dial plan for outbound calls .......................................................... 77 Step 6: Testing ................................................................................................................. 77 Appendix H Configuring a SIP Trunk to an Avaya CM ........................................................... 78 Configuration Summary ............................................................................................................ 78 Acano Server Configuration ..................................................................................................... 78 Avaya CM Configuration........................................................................................................... 79 Appendix I Configuring a Polycom DMA for the Acano solution ........................................... 84 Setting up the External SIP Peer .............................................................................................. 84 Creating the Dial Rule .............................................................................................................. 87 Appendix J Using a Standby Acano Server .......................................................................... 89 Backing the Currently Used Configuration ................................................................................ 89 Transferring a Backup to the Standby Server ........................................................................... 89 Time for Swapping Servers ...................................................................................................... 91 Appendix K WebRTC Client Custom Background Image and Logo ...................................... 92 Image Format and Size ............................................................................................................ 92 Web Server Requirements ....................................................................................................... 92 Customization Procedure ......................................................................................................... 92 Background image procedure .......................................................................................... 92 Logo customization procedure ......................................................................................... 93 Acano solution: Deployment Guide R1.2 76-1006-06-K Page 4 Contents Figures Figure 1: Example Acano solution using Acano Servers............................................................ 10 Figure 2: Example Call flow diagram ......................................................................................... 12 Figure 3: Example two-server Acano solution deployment ........................................................ 14 Figure 4: TURN server public IP address .................................................................................. 27 Figure 5: Example solution for dial plan configuration ................................................................ 30 Figure 6: Example of SIP video endpoints calling into an Acano Server hosted calls ................ 31 Figure 7: Example Lync clients calling into Acano Server hosted calls ...................................... 34 Figure 8: Example of SIP video endpoints and Lync clients calling into Acano Server hosted calls ........................................................................................................................................... 35 Figure 9: Example of SIP video endpoints and Lync clients in point-to-point calls ..................... 38 Figure 10: Call Bridge to Lync Edge Server Call Flow ............................................................... 41 Figure 11: Example network topology showing XMPP server .................................................... 49 Figure 12: Example network topology showing Web Bridge ...................................................... 53 Figure 13: WebRTC Client port usage ....................................................................................... 54 Figure 14: Example network topology showing TURN Server.................................................... 56 Figure 15: Ports required to be open in an Acano solution deployment ..................................... 62 Acano solution: Deployment Guide R1.2 76-1006-06-K Page 5 Introduction 1 Introduction This guide covers the Acano solution; whether that is an Acano Server deployment, a virtual deployment or a mixture of the two. It follows on from the appropriate Acano solution Installation Guide−and assumes that you have completed the instructions in it already. This guide provides the information required to deploy the Acano solution. It is intended to be read and acted upon in the order provided but you can also “dip in” to individual sections. In addition to this document you should refer to the following documents, most of which are referenced in this guide and can be found at the Documentation & software page: Acano solution Hardware/Environmental and Data Sheet Acano solution Server Installation Guide Acano solution Virtualized Deployment Installation Guide Acano solution MMP Command Reference Guide Acano solution API Reference Guide Acano solution Support FAQs If you need any technical assistance with the configuration, or you want to report a suspected bug, email [email protected]. Acano solution: Deployment Guide R1.2 76-1006-06-K Page 6 Prerequisites and Deployment Overview 2 Prerequisites and Deployment Overview 2.1 Prerequisites The list of items you need prior to installing and configuring the Acano solution in a typical customer environment is given below; some of these items can be configured beforehand: A fully qualified Doman Name for the Acano solution. The name of this domain should be set up in advance of the installation. See Appendix A for a summary of DNS records that you may need to create and be sure that the ones not for an Acano solution component (e.g. the Web Bridge) are already in place Firewall configuration – see Appendix B for a summary of the firewall changes you may need to make Installation of a Syslog server to capture logs. Instructions for configuring the Acano solution to use this Syslog server are given in in this document. The Syslog is essential for most troubleshooting Access to at least one NTP server. Instructions for configuring the Acano solution to use this NTP server are given in in this document. Decision on a dial plan to use to reach calls hosted on the Acano solution. . Instructions for deploying this dial plan are given in this document Generating the security certificate for the Web Admin Interface, Call Bridge, Web Bridge and XMPP server Instructions for generating self-signed certificates using the Acano solution’s internal commands are given in this document. These are useful for testing. However, if you are using certificates signed by a Certificate Authority, they are a pre-requisite and must be available before deployment starts. You can use the openssl commands given in Appendix C to generate a certificate signing request to do this before installing and deploying the Acano Server. (After installation, you can also use the Acano solution’s internal commands as given in Appendix D.) Access to a SIP Call Control platform (for example, Cisco VCS) to make dial plan configuration changes. . The changes required are given in this document If deploying in a Lync environment, access to the Lync Front End Server to make dial plan configuration changes there. The changes required are given in this document Read-only access to the Active Directory server in order to import users Access to SIP endpoints and/or Acano clients to test the solution Access to a PBX for voice calls Hostname set for the server using the MMP command: hostname <name> hostname mybox.mydomain reboot Note: A reboot is required after issuing this command. Acano solution: Deployment Guide R1.2 76-1006-06-K Page 7 Prerequisites and Deployment Overview 2.1.1 Acano Server-specific prerequisites A suitable environment: refer to the Hardware/Environmental Data Sheet for details on the required power and cooling The Acano Server has two power modules, and country-specific power cables are supplied for the AC power supplies. At installation you must connect both cables to a power supply socket to implement power supply redundancy, but the server will work with just a single power unit connected Note: A DC power option is available. 3U of rack space if installing on a shelf); 2U if using the rack mounting kit A minimum of two Ethernet links: One for the MMP (labeled Admin on the back of the Acano Server). The speed can be 100M or 1G One for a media interface (there are four labeled A to D). The speed can be 1G or10G. If you intend to deploy in a configuration where you need the Acano clients accessible from outside of the company you can also use B to D, as described in this document All Ethernet links need static IP addresses (unless using DHCP). They will operate at the speed of the network switch; the switch port should be set to “Auto”. If you are using a speed of 10G be sure to use the appropriate cable. Note: Any two interfaces of Acano solution must not be put into same subnet. The only the exception is that the ADMIN interface of a physical Acano Server can be on the same subnet as one of the other interfaces (A to D)—and is probably a common deployment. See the Acano solution Server Installation Guide for full details. 2.1.2 Virtualized deployment-specific prerequisites A qualified host server with some specific resources. See the Acano solution Virtualized Deployment Installation Guide for full details. The Acano solution will not run or will give very poor service on older virtualized hosts XMPP license file. (You should already have provided the MAC address of the interface on which you enabled the XMPP server to Acano and this is used to create the license file.) Contact [email protected] if you do not have this file already Note: Any two interfaces of Acano solution must not be put into same subnet. The only the exception is that the ADMIN interface of a physical Acano Server can be on the same subnet as one of the other interfaces (A to D) (see above). 2.2 Deployment Overview The following is an overview of the steps required to deploy the Acano solution. Acano solution: Deployment Guide R1.2 76-1006-06-K Page 8 Prerequisites and Deployment Overview 2.2.1 Management and network interfaces There are two layers to the Acano solution: a Platform and an Application. The Platform is configured through the Mainboard Management Processor (MMP). The MMP is used for low level bootstrapping and configuration. It presents a command line interface. Note: On the Acano Server the MMP can be accessed via the serial Console port or SSH on the Ethernet interface labeled Admin. In the virtualized deployment the MMP is accessed on virtual interface A. The Application runs on this managed platform with configuration interfaces of its own. These are sometimes referred to as “the media interfaces”. The application level administration (call and media management) is done via the Web Admin Interface which can be configured to run on any one of the Ethernet interfaces. Note: On the Acano Server there are five physical Ethernet interfaces labeled Admin, A, B C and D. In the virtualized deployment one Ethernet interface (A) is created but up to three more can be added (B, C and D). There is no physical separation between the media interfaces A-D but the Admin interface is physically separate. Each interface is configured independently of the others at the IP level. IP forwarding is not enabled in either the Admin or host IP stack. See the appropriate Installation Guide for details. 2.2.2 DNS configuration The Acano solution will need to be provided with a fully-qualified DNS record. Acano requests that the name of this domain is decided and set up in advance of the installation. See Appendix A for a full list of DNS requirements which you may want to request now. 2.2.3 Security certificates You will need to generate and install security certificates. This needs to be done on the domain that will be used. The Acano solution follows the X.509 standard for certificates which is a standard for: Servers to identify themselves: the Acano solution’s name to which communications are routed i.e. FQDN. TLS connectivity on SIP trunks and secure HTTP (HTTPS), which also uses TLS For example, so that the Lync Server will trust the Acano solution (see Figure 1 below). 2.2.4 SIP trunks and routing changes SIP trunks will need to be set up between your SIP Call Control, Voice Call Control and Lync Front End Server components to the Acano solution. Changes will also need to be made to the call routing configuration on these devices to route calls to the Acano solution that require the Acano Edge software for interoperability. See the diagram below. Acano solution: Deployment Guide R1.2 76-1006-06-K Page 9 Prerequisites and Deployment Overview Note that both the Edge and Core software can reside in the same physical or separate Acano Server, on the same or separate virtualized servers. Equally, the Edge software can be on a physical Acano Server and the Core software on a virtualized deployment (or vice versa). However, these are just suggested deployments. The Call Bridge, XMPP Server, TURN Server and Web Bridge can be considered as separate applications that work together to form the Acano solution and you can choose to run them on whatever server you wish or even run each application on its own server. You just need to ensure that however you deploy the solution components they are able to communicate with each other - Appendix B details the ports they use. Figure 1: Example Acano solution using Acano Servers 2.2.5 Voice call control The Acano Server must be connected to a Voice Call Control device and this device must be attached to a PBX; it is not possible to connect an Acano Server directly to a PBX. Note: Appendix G describes setting up the SIP Trunk to a Cisco Unified Communications Manager (CUCM); while Appendix H has equivalent information for the Avaya CM. Use these Acano solution: Deployment Guide R1.2 76-1006-06-K Page 10 Prerequisites and Deployment Overview appendices to set up the SIP Trunk: this is not covered elsewhere in this document. However, you can use other devices instead. 2.2.6 Support for Lync clients You can use both Lync 2010 and 2013 clients connected to a Lync 2010 or 2013 server. The Acano solution uses: the RTV codec transcoding up to 1080p with the 2010 Lync Windows client and 2011 Lync Mac clients the RTV codec and H.264 with the 2013 Lync Windows client Lync 2010 and 2013 clients can share content. The Acano solution transcodes the content from native Lync RDP into the video format used by other participants in the call; Lync clients receive content from the call in the main video. The Lync Front End Server will need a Trusted SIP Trunk configured to route calls originating from Lync endpoints through to the SIP video endpoints i.e. to route calls with destination in the SIP video endpoint domain through to the Acano solution. The SIP Call Control will require configuration changes to route calls destined to the Lync client domain to the Acano solution so that SIP video endpoints can call Lync clients. The Acano solution will have a dial plan to route Lync calls between these two domains in both directions. The Acano solution includes support for Lync Edge to enable Lync clients outside of your firewall to join coSpaces. 2.2.7 Active Directory server integration After the primary functionality has been proven, you can proceed to link the Acano solution to the AD server for read-only access in order to populate the user and calling data automatically. Refer to section 7 for more details. 2.2.8 Testing with the Acano clients If you are using any of the Acano clients you need to enable the Acano XMPP server, refer to section 4.7 and section 8. If you are not testing the Acano PC Client, iOS Client for iPhone and iPad, Mac or WebRTC Client, disregard all sections referring to the XMPP server. The following diagram shows example control and media flows during an Acano client call. Acano solution: Deployment Guide R1.2 76-1006-06-K Page 11 Prerequisites and Deployment Overview Figure 2: Example Call flow diagram Notes on the figure: * Although the range between the TURN server and the external clients is shown as 3276865535, currently only 50000-51000 is used. A wider range is likely to be required in future releases. Internal clients connect directly to the XMPP server on port 5222 and media connects directly between the Acano client and the Call Bridge. External Acano clients establish a control connection to the XMPP sever (black line). Media can go directly from the Acano client to the Call Bridge (dashed blue line) or be relayed via the TURN server if required (blue line). Acano solution: Deployment Guide R1.2 76-1006-06-K Page 12 Prerequisites and Deployment Overview Both internal and external Acano clients use ICE/TURN to find suitable candidates for connectivity and choose the best: in the case of internal clients this will always be the local host candidates on the internal network. The necessary ports need to be open on the firewall between Core and Edge components to allow the media UDP traffic to pass (UDP ports 32768 - 65535) and the control link between the XMPP server and the Call Bridge (port 5223). The Web Bridge uses port 443 (and optionally port 80). Another deployment option for the Edge server/virtualized server is to enable the XMPP server on a second interface and connect that interface to the private network. Then internal clients can connect directly to the XMPP server and not have to traverse the internal firewall. Separate internal and external SRV records for the XMPP service need to be configured, directed to the two interfaces on the Core server/virtualized server that the XMPP server is listening on. The Call Bridge to XMPP connection should also use the XMPP server’s internal address in this case, avoiding the need to open port 5223 through the firewall. 2.2.9 Acano Web Bridge If you are using the Acano Web Client you will need to enable and configure the Acano Web Bridge, refer to section 4.8 and section 9. Acano Web Client works on HTML5-compliant browsers and uses the WebRTC standard for video and audio. For a list of tested devices see the Acano solution Support FAQs document. 2.2.10 Acano TURN Server To use Acano clients from outside of your organization you will need to enable the TURN server, refer to section 4.9 and section 10. The TURN server allows you to use the built-in firewall traversal technology when traversing a firewall or NAT. If you are unfamiliar with TURN servers, ICE and STUN, see http://en.wikipedia.org/wiki/Traversal_Using_Relay_NAT and the figure in section 2.2.8. 2.2.11 Split deployment considerations This Deployment Guide should be followed in order if you are setting up a one Acano Server deployment or a one virtualized server solution; however, this section describes the few differences that you must remember when following this Deployment Guide if you are installing and configuring a two-Acano Server deployment such as the example configuration in the figures or the virtual equivalent. The figure below shows the TURN server, XMPP server and Web Bridge on one physical Acano Server, and the Call Bridge on the second. (Comparing figure 3 to figure 1, you see that there are very few differences because the Acano solution was designed for flexible deployment.) Note: The installation file is the same for both single and split deployments: you install all the software on both servers/virtualized servers, but every component is disabled by default. Therefore you only configure and enable the relevant components on each server/virtualized server, in our example deployment: Edge server/virtualized server: XMPP server, TURN server, Web Bridge Core server/virtualized server: Call Bridge, Web Admin Interface Acano solution: Deployment Guide R1.2 76-1006-06-K Page 13 Prerequisites and Deployment Overview Figure 3: Example two-server Acano solution deployment Note: The following ports must be open between the Core and Edge components: Port 5223 from Call Bridge to XMPP server (for XMPP component) UDP Port 3478 from Call Bridge to TURN server (for TURN) UDP Port 50000-51000 from Call Bridge to TURN server (for media) TCP Port 443 (HTTPS) from Call Bridge to Web Bridge (for guest login) These ports are required even on a single Acano server/virtualized server deployment – see Appendix B for a full list of required ports. The outline deployment procedure for a two-server deployment is: 1. Follow the appropriate Installation Guide: For each Acano Server in turn carry out the physical installation, and set up the network interfaces− and on the Core server to be able to access the Web Admin Interface. Acano solution: Deployment Guide R1.2 76-1006-06-K Page 14 Prerequisites and Deployment Overview For each virtualized server set up the network interfaces− and on the Core virtualized server to be able to access the Web Admin Interface. 2. Complete the following using the steps in this Deployment Guide: Set up the Syslog server connection on both servers/virtualized servers using the MMP commands as per the instructions in this Deployment Guide. We suggest using the same Syslog server for both servers. Set up the NTP server connection on both servers/virtualized servers using the MMP commands as per the instructions in this Deployment Guide. On the Edge server/virtualized server, follow the sections in this guide for the XMPP server, TURN server, and Web Bridge certificates and configuration On the Core server/virtualized server only, follow the Call Bridge certificate and configuration sections in this guide Then on the Core server/virtualized server only, complete the Web Admin Interface configuration as described in this guide – with the following differences: i. ii. In Configuration > General the considerations are identical in one- and twoserver/virtualized server deployments except: The Server Address fields for the TURN and XMPP servers, so that the Call Bridge knows how to access them. Therefore, instead of “localhost” and the internal server IP address use the IP address of the Edge server/virtualized server. Other settings for the TURN and XMPP servers are the same. The Web Bridge configuration must point to the Edge server/virtualized server There are no special considerations in the other Web Admin Interface Configuration pages On the Core server/virtualized server only, set up the LDAP configuration and dial plan and Call forwarding rules following the instructions in this Deployment Guide Notes on troubleshooting a two-server/virtualized server deployment: On the Core server/virtualized server Status > General page, the XMPP Connection field tells you whether the connection from the Call Bridge to the XMPP server is up and how long since it last restarted When using a Syslog server for troubleshooting, remember to look in the logs for both Acano Servers/virtualized servers Acano solution: Deployment Guide R1.2 76-1006-06-K Page 15 Creating and Installing Certificates 3 Creating and Installing Certificates This section and the following ones assume that you have followed the instructions in the appropriate Acano solution Installation Guide completely and have all the prerequisites in place. If this is not the case, then do so now before proceeding. 3.1 Security Certificates Overview A pair of files is required on the Acano solution: the private key and the certificate generated from the private key, containing the matching public key. The private key is one half of a private key/public key pair. One use is for encryption (public key) and decryption (private key) of data. RSA and DSA are two methods of generating the public key from private key. The private key file is only stored on the Acano solution: it is never sent The certificate is wrapper for public key, and identifies owner of the key. Also if the certificate is signed by a Certifying Authority (CA), it provides the authority/validation of this owner. Web browsers and other clients have a list of signing authorities that they trust and therefore, by a “chain of trust”, servers they can trust – and the revocation lists from these CAs. The certificate is sent during call set up. By issuing a certificate the client has the public key with which to start secure communications The procedure to generate a certificate involves several steps and there are three options: Generate keys and the certificate externally, and load then on to the MMP of the Acano solution using SFTP a. Generate the private key. b. Generate the Certificate Signing Request (CSR) using the private key. c. Ask CA to sign (or self-sign). (Signing creates the certificate.) d. Upload the certificate and private key files to the MMP of the Acano solution using SFTP. Generate a key and a self-signed certificate on the Acano solution (recommended for testing and debugging environments only) (see http://en.wikipedia.org/wiki/Self-signed_certificate). Log in to the MMP and use: pki selfsigned <key/cert basename> where <key/cert basename> identifies the key and certificate which will be generated e.g. pki selfsigned webserver creates webserver.key and webserver.crt (which is selfsigned) For users happy to trust that Acano meets requirements for generation of private key material, generate private keys and associated Certificate Signing Requests with the MMP pki csr command, then export them for signing by a CA. Copy the resultant certificate file on to the MMP of the Acano solution. This option is described later in this section. The Acano solution comprises several components that require their own validation. Therefore the pairs (certificate and private key) of files used are: Web Admin Interface (required) – this for the browser to trust the Web Admin Interface Acano solution: Deployment Guide R1.2 76-1006-06-K Page 16 Creating and Installing Certificates For Lync Front End Server – required for Lync integration so the Lync Front End Server trusts the Acano solution XMPP – required only if using native Acano clients so that the clients know they have reached the XMPP server and trust the connection Web Bridge – required only if using WebRTC clients so the browsers know they have reached the Web Bridge and can use HTTPS on the connection These can be different pairs or the same pair of files i.e. from 1 to 4 pairs of private key and certificate files are required. The certificate can have a .crt, .cer, .pem and .der extension, and the private key needs a .pem, .der or .key extension. Key files should contain an RSA or DSA key encoded as either PEM or DER. The certificate file should be an x509 certificate encoded as PEM or DER. File names can contain alphanumeric, hyphen or underscore characters. There are several tools for generating CSRs for CAs to sign e.g. openssl, but the MMP also includes one called PKI (Public Key Infrastructure). Alternatively, the MMP can create selfsigned certificates: these are useful for testing and intranets. The MMP commands are shown in the next section for the Web Admin Interface, and they can be used again for the other keys and certificates if you are using different pairs for each service. (The openssl equivalents are in Appendix C and can be used if you prefer.) Note: If you self-sign a certificate for one of the Acano components mentioned above, you may see a warning message that the service is untrusted when you use it. To avoid these messages you will need to re-issue the certificate and have it signed by a trusted CA: this can be an internal CA unless you want public access to this component. 3.2 Checking the Web Admin Interface Certificate and Key If you have previously followed the Acano Server or the virtualized deployment Installation Guide you will have set up the certificate for the Web Admin Interface. (If you have not, do so now.) To check the certificate and its matching private key, use the MMP’s PKI commands (see the Acano solution MMP Command Reference document for a full description). 1. SSH into the MMP and enter the following command which lists PKI files i.e. private keys, certificates and certificate signing requests (CSRs): pki list You should see the webserver.pem and webserver.crt files (or the filenames that you used instead during installation). 2. Enter the following command which checks whether the specified key and certificate match. A private key and a certificate are two halves of one usable identity and must match if they are to be used for a service e.g. XMPP: pki match <key> <certificate> pki match webserver.pem webserver.crt Note: In the rest of this document, commands are shown in black and must be entered exactly as given. Examples are shown in blue and must be adapted to your deployment appropriately. Acano solution: Deployment Guide R1.2 76-1006-06-K Page 17 Creating and Installing Certificates Note: The command pki inspect <filename> - inspects the file <filename> and shows whether it is a private key, a certificate, a CSR or other file type. In the case of certificates, various details are displayed. If you do not see the files that you are expecting, use this command. 3.3 Installing the Call Bridge Certificate for TLS The Call Bridge needs a key and certificate pair that is used to establish TLS connections with SIP call control devices and with the Lync Front End server. If you are using Lync, this certificate will need to be trusted by the Lync Front End Server; the best way to achieve this is to sign the certificate on the CA (Certification Authority) server that has issued the certificates for the Lync Front End Server. Two files must be installed on the MMP of the Acano solution: A private key for example in PEM format called privkey.pem A signed certificate, for example also in PEM format, called cacert.pem. If you are intending to use self-signed certificates for testing, use the pki selfsigned command mentioned above. If you are intending to generate a private key and CSR use steps 2 to 4 inclusive in the next section to create these files and then upload the certificate. 3.4 Installing the XMPP Certificate and License The XMPP server is used by the Acano clients. If you are testing the Acano clients follow the steps below. You will also need to set the network interface for the XMPP in section 4.7. Note: If you are not using the Acano clients including the WebRTC Client, skip this section. 1. Create DNS A and SRV records for the Acano solution. Create DNS A record for the fully qualified domain name (FQDN) of the Acano solution that will be used to host the XMPP Server and set it to the IP Address of Interface A. Create DNS SRV record for _xmpp-server._tcp for port 5269 pointing to the DNS A record created above. Create DNS SRV record for _xmpp-client._tcp for port 5222 pointing to the DNS A record created above. Test the above with the following commands: nslookup -querytype=srv _xmpp-server._tcp.example.com nslookup -querytype=srv _xmpp-client._tcp.example.com Note: From R1.2 you can configure the DNS resolver(s) to return values which are not configured in external DNS servers or which need to be overridden; custom Resource Records (RRs) can be configured which will be returned instead of querying external DNS servers. See the MMP Command Reference for details. Acano solution: Deployment Guide R1.2 76-1006-06-K Page 18 Creating and Installing Certificates 2. Sign in to the MMP and generate the private key and certificate signing request by typing: pki csr <key/cert basename> <CN> [<OU> <O> <L> <ST> <C>] where: <key/cert basename> is a string identifying the new key and CSR (e.g. "xmpp" results in "xmpp.key" and "xmpp.csr" files) <CN> is the commonName which should be on the certificate. Use the FQDN defined in DNS A record as the Common Name. Failure to do this will result in browser certificate errors. OU is Organizational Unit, O is Organization, L is Locality, ST is State and C is Country. These parameters are optional. 3. Send the CSR to a Certificate Authority (CA) such as Verisign who will verify your identity and issue a signed certificate (see step 2 in Appendix D). This is useful for your production platform. 4. Transfer the certificate file (e.g. xmpp.crt) to the MMP using SFTP. 5. On the Acano Server the XMPP license key file (license.dat) should have been pre-installed; check it is visible in the list of files as shown below. If it is missing contact [email protected] and let us know the serial number of your server. On a virtualized deployment, you must upload license.dat yourself (in the same way as the certificate and key files). If you have not done so already, contact [email protected] to obtain this file. See the Virtualized deployment specific pre-requisites. 3.5 Installing the Web Bridge Certificate The Web Bridge is used by the Acano clients. If you are testing the Acano clients follow the steps below. You will also need to set the network interface for the Web Bridge in section 4.8. Note: If you are not using the Acano clients including the WebRTC Client, skip this section. 1. Create DNS A record for the Web Bridge and set it to the IP Address of the Ethernet interface you want to use. 2. Create a certificate and private key for the Web Bridge (using the FQDN defined in DNS A record as the Common Name). See the previous section for instructions. Private key can use the .key extension (example: webbridge.key) Certificate can use the .crt extension (example: webbridge.crt) Acano solution: Deployment Guide R1.2 76-1006-06-K Page 19 Creating and Installing Certificates Note: The Web Bridge supports HTTPS only. 3. Upload the certificate file to the MMP via SFTP. 3.6 Adding the Call Bridge Certificate to the Web Bridge Trust Store The Web Bridge allows configuration of guest logins and image customizations to be pushed from a Call Bridge (see Appendix K). It is important for the security of the deployment that configuration is only accepted from call bridges which are trusted. Trust between Call Bridge and Web Bridge is established by providing the Web Bridge with the public certificate of the Call Bridge. The Web Bridge can use this to challenge the Call Bridge to prove that it is the owner of the certificate by cryptographic means. Technically, client certificate authentication in TLS is used. If the Call Bridge cannot prove that it is the owner of one of the trusted certificates, the Web Bridge will not accept configuration. With 1.1.0 or later, add the Call Bridge certificate to the Web Bridge trust store as shown below: 3.6.1 Single server example For a single server deployment, find out which certificate Call Bridge is using by issuing the callbridge command; then add the certificate to the trust store using the new webbridge trust <callbridge_cert|certificate bundle> command. acano>callbridge Listening interfaces : a Key file : callbridge.key Certificate file : callbridge.cer acano>webbridge disable acano>webbridge trust callbridge.cer acano>webbridge enable SUCCESS: Key and certificate pair match SUCCESS: Webbridge enabled Acano solution: Deployment Guide R1.2 76-1006-06-K Page 20 Creating and Installing Certificates 3.6.2 Two server (Core/Edge) example: For a two-box solution, the Call Bridge certificate needs to be copied from the Acano Core server to the Acano Edge server before you use the webbridge trust <callbridge_cert> command on the Edge server. On the Acano Core server running Call Bridge server: acano>callbridge Listening interfaces : a Key file : callbridge.key Certificate file : callbridge.cer Use SFTP to copy (in this example) "callbridge.cer" from the Core server to the Edge running Web Bridge. Then on the Edge server add the certificate to the Web Bridge trust store: acano>webbridge disable acano>webbridge trust callbridge.cer acano>webbridge enable SUCCESS: Key and certificate pair match SUCCESS: Webbridge enabled Acano solution: Deployment Guide R1.2 76-1006-06-K Page 21 Configuring the MMP 4 Configuring the MMP 4.1 Creating and managing MMP and Web Admin User Accounts You should have created a MMP administrator user account called “’admin”; if so, go on to the next section unless you want to set up additional accounts. If you failed to do this, you will have to use the emergency admin recovery procedure detailed in the appropriate Installation Guide. You can create additional user accounts for the MMP that have admin level rights using the MMP add user command user add <account name> <account type> where the only currently supported account type is admin. 1. SSH into the MMP. 2. Add an admin level user account, for example: user add adminuser2 admin 3. Enter the password you want to use for this account twice in order to complete the account creation. On login the user will be forced to configure a new password. Note: For additional user commands, see the Acano solution MMP Command Reference Guide. 4.2 Upgrading Software The Acano Server will have shipped with the latest release available at the time of shipment but it may not be up-to-date. Equally, if you downloaded the ovf zip file for the virtualized deployment some days ago, we advise you to check on the partner section of the Acano website whether a later version is available, and if so, upgrade before you start testing. The following instructions apply to both types of deployment: 1. To find out which version the Acano solution is running, SSH into the MMP, log in and type: version 2. To upgrade, first download the updated .img file from your Acano reseller. WARNING: You need to make sure you install the correct img file for your type of deployment; that is either the Acano Server upgrade file or the virtualized server image file. Each will be clearly labeled. Note that you may need to rename the file to upgrade.img before going on to step 3. 3. Use a SFTP client to upload a new image to the MMP, for example using a command line SFTP client: sftp [email protected] put upgrade.img For example: sftp [email protected] put upgrade.img Acano solution: Deployment Guide R1.2 76-1006-06-K Page 22 Configuring the MMP (You can use a Windows PC application such as WinSCP instead.) 4. Then to complete the upgrade, connect via SSH to into the MMP and type: upgrade Allow 10 minutes for the solution to restart. 5. To verify that the upgrade was successful, SSH into the MMP, log in and type: version 4.3 Configuring the Web Admin Interface for HTTPS Access If you have previously followed the appropriate Installation Guide you will have configured the Web Admin Interface. If you have not configured this interface refer to the appropriate Installation Guide for your type of deployment and do so now. Note: Be sure to use the same names as the certificates you uploaded previously. Note: If you configured the Web Admin Interface on the same interface as the Web Bridge, set the default TCP port to a non-standard port such as 445 to allow the Web Bridge to function on TCP port 443. 1. To test that you can access the Web Admin Interface, type the following into your web browser: https:\\acanoserver.example.com. a. If all works well proceed to next section. b. If you cannot reach the Web Admin Interface try the following to troubleshoot the problem as follows: Type the following at the MMP and look at the output: webadmin i. The last line of the output should say "webadmin running". If it does not there is a configuration problem with your Web Admin Interface. Check that you have enabled it using: webadmin enable ii. Check that it is listening on the correct interface, i.e. admin and 443 iii. The output of that command should also tell you the names of the certificates you have installed, e.g. server.key and server.crt. Assuming these are the names then type: pki match server.key server.crt This will check that the key and certificate match. iv. If you are still experiencing issues, contact [email protected]. 4.4 Configuring the Call Bridge Listening Interface The command callbridge listen <interface> allows you to configure a listening interface (chosen from A, B, C or D). If no interface is entered, the Call Bridge listens on no interfaces. A full list of commands is in the MMP Command Reference Guide: Acano solution: Deployment Guide R1.2 76-1006-06-K Page 23 Configuring the MMP Configure listening interfaces as follows: 1. Configure the Call Bridge to listen on interface A. callbridge listen a 2. Configure the Call Bridge to use the security certificates (which should have been created previously) by typing the following (so that a TLS connection can be established between the Lync FE server and the Acano Call Bridge): callbridge certs privkey.pem cacert.pem The full command is callbridge certs <key file> <cert file> [<crtbundle>]. If you are using certificate bundle as provided by your CA, see the MMP Command Reference. 3. Restart the Call Bridge interface to apply the changes. callbridge restart 4.5 Configuring a Remote Syslog Server We strongly recommend that you configure the Acano solution to use a remote Syslog server to store the log files. The Acano solution sends more detailed logging to the Syslog server than is available on its own internal log page which can be valuable in troubleshooting. Note: The Syslog server uses TCP not UDP. 1. SSH into the MMP and log in. 2. Enter the following command, syslog server add <server address> [port] Examples: syslog server add syslog01.example.com 514 syslog server add 192.168.3.4 514 3. Enable the Syslog server by entering: syslog enable 4. Optionally, if you want to send the audit log to a Syslog server follow these steps. (The audit log facility records configuration changes and significant low-level events. For example, changes made to the dial plan or coSpace configuration via the Web Admin Interface or the API are tracked in this log file, and tagged with the name of the user that made the change. The file is also available via SFTP.) a. Create a user with the audit role. user add <username> (admin|crypto|audit|appadmin) user add audituser audit b. Log out of the MMP and log back in with the newly created user account. c. Enter the command (this command can only be run by a user with the audit role): syslog audit add <servername> syslog audit add audit-server.mycompany.org d. Log out of the MMP. Acano solution: Deployment Guide R1.2 76-1006-06-K Page 24 Configuring the MMP 4.6 Configuring Network Time Protocol Servers You must configure at least one NTP server using MMP commands. Note: The number of NTP servers you use is not pre-determined. For example, you may choose to have one private and one public NTP server; using the public NTP server as a backup. 1. To set up an NTP server, type : ntp server add <URL of NTP server> 2. To find the status of configured NTP servers ntp status Note: To delete an NTP server type: ntp server del <URL of NTP server>. 4.7 Configuring the XMPP Server If you are using any of the Acano clients including the Web Client you now need to set the network interface for the XMPP server and enable the server. If you are not using the Acano clients including the WebRTC Client, skip this section. The XMPP server can now be configured to listen on any subset of the four media interfaces and ignore connections from any interface in the complement. 1. If necessary, establish a SSH connection to the MMP and log in. 2. To configure the XMMP server to use interface A enter the following command: xmpp listen <interface whitelist> The following is an example where interface is set to interface A and B. xmpp listen a b 3. Define the certificate and private key files that were uploaded in section 3.4 using: xmpp certs <key-file> <crt-file> The full command is xmpp certs <key file> <cert file> [<crt-bundle>]. If you are using certificate bundle as provided by your CA, see the MMP Command Reference. 4. Configure the XMPP server with the following command: xmpp id <domain-name> <component secret> The following is an example where domain-name is example.com, and it uses the secrets “mypasword1” for component secret xmpp id example.com mypassword1 5. Note the secret used in the previous step because it will be required later when you the Web Admin Interface to configure the Call Bridge access to the XMPP server. 6. Enable the XMPP server with the following command: xmpp enable Acano solution: Deployment Guide R1.2 76-1006-06-K Page 25 Configuring the MMP 4.8 Configuring the Web Bridge If you are testing the Acano HTML5/Web clients you now need to set the network interface for the Web Bridge and enable it. If you are not using the Acano clients including the WebRTC Client, skip this section. 1. If necessary, SSH into the MMP. 2. Configure the Web Bridge to listen on the Ethernet interface(s) of your choice with the following command: webbridge listen <interface[:port] whitelist> The Web Bridge can listen on multiple interfaces, i.e. one on public IP and one on the internal network. However, one interface cannot listen on more than one port. The following is an example where interfaces are set to interface A and B, both using port 443. webbridge listen a:443 b:443 3. Define the certificate and private key files that were uploaded in section 3.5 using: webbridge certs <key-file> <crt-file> In the following example the private key is webbridge.key and certificate is webbridge.crt: webbridge certs webbridge.key webbridge.crt The full command is webbridge certs <key-file> <cert-file> [<crtbundle>]. If you are using certificate bundle as provided by your CA, see the MMP Command Reference. 4. Enable HTTP redirect with the following command: webbridge http-redirect enable 5. If required set the ClickOnce location and the Windows msi, Mac OSX dmg and iOS installers which are presented to WebRTC users: webbridge clickonce <url> webbridge msi <url> webbridge dmg <url> webbridge ios <url> Note: If you only use Acano supported browsers (e.g. Chrome) you do not need to set these download locations because browser functionality will be used for guest access to coSpaces. However, if you use unsupported browsers (e.g. IE, Safari) then configure these locations so that when the Acano solution detects the device being used (iOS device, Mac, or PC) it can redirect the caller to the configured client download link for that device and prompt to install the correct Acano client. After installation, the caller is connected to the coSpace as a Guest. (Firefox support is in beta in R1.2.) 6. Enable the Web Bridge with the following command: webbridge enable Acano solution: Deployment Guide R1.2 76-1006-06-K Page 26 Configuring the MMP 4.9 Configuring the TURN Server 1. If necessary, SSH into the MMP. 2. Configure the TURN server with the following command: turn credentials <username> <password> <realm> The following is an example where username is myusername, the password is mypassword and it uses the realm example.com. turn credentials myusername mypassword example.com 3. If required, set the public IP Address that the TURN Server will advertise using: turn public-ip <ip address> Note: If the TURN server has a public IP address rather than being NAT’ed (see the figure below and its notes), this step is not required, go on to step 4. The following is an example where a public IP address is set to 5.10.20.99 turn public-ip 5.10.20.99 Note: The IP address set here should not be confused with the IP addresses set in the Web Admin Interface Configuration > General page later in this guide. The MMP commands configure the TURN server itself, while the Configuration > General page settings allow the Call Bridge and external clients to access the TURN server, and are explained in section 10. Figure 4: TURN server public IP address Note: * Although the port range between the TURN server and the External clients is shown as 32768-65535, currently only 50000-51000 is used. The required range is likely to be larger in future releases. Acano solution: Deployment Guide R1.2 76-1006-06-K Page 27 Configuring the MMP 4. Configure the TURN Server to listen on a specific interface using: turn listen <interface whitelist> The following is an example where the interface list is set to interface C but you can specific more than one interface turn listen c 5. Enable the TURN server with the following command: turn enable Acano solution: Deployment Guide R1.2 76-1006-06-K Page 28 Dial Plan Configuration – SIP Endpoints 5 Dial Plan Configuration – SIP Endpoints 5.1 Introduction In order for the Acano solution to be integrated in a SIP, Lync and voice environment, connections need to be set up from the SIP Call Control, Voice Call Control and Lync Front End Server components to the Acano solution as shown in Figure 1 above. Changes to the call routing configuration on these devices are required in order to route the calls that require the Acano solution for interoperability are routed correctly to it. This example (see the figure below) assumes a company deployment which has a mix of SIP video endpoints, Lync clients and IP phones: the Acano solution enables connectivity between Lync clients and SIP video endpoints, and between Lync clients and IP phones. The SIP video endpoints are configured on a domain called vc.example.com and the Lync clients on example.com. You will need to adapt the example, as appropriate to your existing Lync deployment. Note: Although this figure and subsequent diagrams in this Deployment Guide use an Acano Server deployment as the example for the diagram, the instructions apply equally to both the Acano Server and virtualized deployment models. Acano solution: Deployment Guide R1.2 76-1006-06-K Page 29 Dial Plan Configuration – SIP Endpoints Figure 5: Example solution for dial plan configuration As shown in the figure above, the Lync Front End Server needs a Trusted SIP Trunk to the Acano solution, configured to route calls originating from Lync clients through to Acano coSpaces, Acano client users (native and WebRTC) and also SIP video endpoints. The subdomains vc.example.com and acano.example.com should be routed through this trunk from the Lync Front End Server to the Acano solution. The SIP Call Control platform needs a SIP trunk set up to route calls to the mycompany.com domain (for Lync Clients) and acano.example.com (for coSpaces and Acano clients) to the Acano solution. The Acano solution requires a dial plan to route calls to example.com to the Lync Front End Server and vc.example.com to the SIP Call Control platform. The configuration required for the total solution is built up step-by-step below and therefore, to plan your own installation, work through the steps in the order provided adapting the example as appropriate. Acano solution: Deployment Guide R1.2 76-1006-06-K Page 30 Dial Plan Configuration – SIP Endpoints 5.2 SIP Endpoints Dialing a Call on the Acano Solution As a starting point, consider using only SIP video endpoints and the configuration on the VCS and Acano solution to direct and host calls for these endpoints. Figure 6: Example of SIP video endpoints calling into an Acano Server hosted calls 5.2.1 SIP call control configuration This example assumes the SIP Call Control is a Cisco VCS but similar steps are required on other Call Control devices. Set up a zone to route calls to the Acano solution by logging into the VCS as an administrator and following the steps below. 1. Go to VCS Configuration > Zones > New. 2. Create the zone with the following: H.323 Mode = Off. SIP Mode = On SIP Port = 5060 (5061 if using TLS) SIP Transport = TCP or TLS, as appropriate SIP Accept Proxied Registrations = Allow Authentication Policy = Treat as authenticated SIP Authentication Trust Mode = Off Peer 1 Address = the IP address of the Call Bridge Acano solution: Deployment Guide R1.2 76-1006-06-K Page 31 Dial Plan Configuration – SIP Endpoints 5.2.2 VCS search rule configuration Add a search rule on the VCS to route calls to the Acano solution by following the steps below (e.g. to route any video endpoint call to a call on the Acano solution using the call prefix 88). 1. Go to VCS Configuration > Dial Plan > Search rules. 2. Give the rule a suitable name, e.g. VC EPs to Acano. 3. Set the following: Source = Any Request Must Be Authenticated = No Mode = Alias pattern match Pattern Type = Regex Pattern String = .*@acano.example.com Pattern Behavior = Leave On Successful Match = Stop Target = the zone you created for the Acano solution. 5.2.3 Creating a coSpace on the Acano solution Create a coSpace on the Acano solution for endpoints to dial into by following the steps below. 1. Sign in to the Web Admin Interface. 2. Go to Configuration > CoSpaces. 3. Add a coSpace with: Name e.g. Call 001 URI e.g. 88001 Note: coSpaces can also be created from the API. See the API Reference guide. 5.2.4 Adding a dial plan rule on the Acano solution 1. Still in the Web Admin Interface, go to Configuration > Outbound Calls and add a dial plan rule with the following details: Domain = vc.example.com SIP Proxy = the IP address of your VCS Local Contact Domain = example.com Trunk Type=Standard SIP. SIP video endpoints can now dial into a call 88001 hosted on the Acano solution by dialing [email protected]. Acano solution: Deployment Guide R1.2 76-1006-06-K Page 32 Dial Plan Configuration – SIP Endpoints 5.3 Media Encryption for SIP Calls The Acano solution supports media encryption for SIP connections including Lync calls. This is configured in the Configuration > Call settings page in the Web Admin Interface and allows encryption to be Required, Allowed or Forbidden for SIP calls made to or from the Acano solution. Additionally, you can choose whether changes to this setting will apply to SIP calls already in progress (Apply to Active Calls button) or just future calls by using the Submit button at the end of the Call Settings page. 1. Sign in to the Web Admin Interface and go to Configuration > Call settings. 2. Select the appropriate SIP Media Encryption setting (Required, Allowed or Forbidden). 3. Click either Submit or Apply to Active calls. Note: Prior to R1.2, this media encryption setting also determined whether encryption was used for SIP control messages; specifically, if media encryption was Disabled, then the Call Bridge would never attempt to use TLS for SIP control connections. From R1.2 there is a new SIP Encryption field in the Web Admin Interface Configuration > Outbound Calls page which allows you to set the behaviour for each Outbound Calls dial rule. The new behaviour separates the control and media encryption behaviour, allowing a TLS control connection to be used in the absence of media encryption, for example. (You can also control SIP control message behavior via the API (see the API Reference guide.) 5.4 IVR Configuration You can configure an Interactive Voice Response (IVR) to use to manually route to preconfigured calls. Incoming calls can be routed to the IVR where callers are greeted by a prerecorded voice message inviting them to enter the ID number of the call or coSpace that they want to join. Video participants will see a welcome splash screen with the Acano logo. After entering the ID users are routed to the appropriate call or coSpace, or prompted to enter a PIN if the call or coSpace has one. (Callers are disconnected after the third incorrect call ID.) If you intend to use an IVR follow these instructions: 1. Sign into the Web Admin Interface and go to Configuration > General. 2. Configure the following: IVR Numeric ID = numeric call ID that users call to reach the IVR IVR Telephone Number = external phone number that users have to call to reach the IVR 3. Configure the appropriate routing on your SIP Call Control to ensure that calls to the numbers set in the previous step are routed to the Acano Server. Acano solution: Deployment Guide R1.2 76-1006-06-K Page 33 Dial Plan Configuration – Integrating Lync Clients 6 Dial Plan Configuration – Integrating Lync Clients 6.1 Lync Clients Dialing into a Call on the Acano solution This section provides the equivalent of the previous section but for Lync endpoints joining a call hosted on the Acano solution. It uses the same call number/URI: adapt the example as appropriate. Figure 7: Example Lync clients calling into Acano Server hosted calls 6.1.1 Lync Front End Server configuration To route calls originating from Lync clients to the Acano solution: 1. Add a Lync static route pointing to the Acano solution matching domain acano.example.com. See Appendix E for details. 6.1.2 Adding a dial plan rule on the Acano solution 1. Sign in to the Web Admin Interface and go to Configuration > Outbound Calls. 2. Set up a dial plan rule with: Domain = example.com Acano solution: Deployment Guide R1.2 76-1006-06-K Page 34 Dial Plan Configuration – Integrating Lync Clients Local contact domain = vc.example.com Trunk Type = Lync Leave SIP Proxy to Use blank Lync clients can now dial into a call 88001 hosted on the Acano solution by dialing [email protected]. 6.2 Integrating SIP Endpoints and Lync Clients To allow both SIP video endpoints and Lync clients to dial into the same call, carry out the configuration in both of the previous sections. Then both SIP video endpoint users and Lync client users can dial <call_id>@acano.example.com to enter the same call. Figure 8: Example of SIP video endpoints and Lync clients calling into Acano Server hosted calls 6.3 Web Admin Interface Configuration Pages that Handle Calls Before going on to expand the examples in the previous sections, it is necessary to understand how the Acano solution determines how to handle each call. Two configuration pages in the Web Admin Interface control how the Acano solution behaves for incoming and outgoing calls: Outbound Calls and Incoming Calls pages. The Outbound Calls page is for outbound calls; the Incoming calls page determines whether incoming calls are rejected. If they are not rejected, but matched and forwarded, then information about how to forward them is required and the Incoming Calls page has two tables – one to configure matching/rejection and the other to configure the forwarding behavior. This section provides an overview of these two pages which are then used in the next section to configure the Acano Server to act as a gateway between SIP and Lync calls. Acano solution: Deployment Guide R1.2 76-1006-06-K Page 35 Dial Plan Configuration – Integrating Lync Clients 6.3.1 Outbound Calls page The Outbound Calls page allows you to configure an appropriate dial plan comprising a number of dial plan rules. The dial plan controls the routing of outbound calls. Each entry/rule in the dial plan matches on the Domain of the outgoing call (see below) and determines which SIP proxy to use (or whether it is a direct call). The Local Contact Domain is the domain that will be used for the contact URI for calls using this rule. The Local From Domain is the domain the call uses as its originator ID. CAUTION: Previous Outbound Calls dial plan rules may not work after upgrading to R1.2 and they must all be checked and updated if required. Prior to R1.2 the Local Contact Domain field controlled the domain of the "From" address used in outgoing calls initiated via that Outbound Call rule. The contact domain was derived from the local Acano Call Bridge IP address used for the call. From R1.2 the Outbound Calls page shows what was previously configured as the contact address in a new Local From Domain field. This more closely matches its actual function: and there's now the new ability to configure an explicit contact domain to be used: if you leave this new field blank then the contact domain is derived from the local IP address (as before). If you are using Lync, we suggest that you use this new function. If you are not using Lync we recommend that the Local Contact Domain field is left blank to avoid unexpected issues with the SIP call flow. Usually, you set up rules to route calls out to third party SIP control devices such as Cisco VCS, Avaya Manager or Lync servers. Therefore, there are currently three types of SIP trunks you can configure: Standard SIP, Lync and Avaya. Note: A common use of the Acano solution is with an Avaya PBX; therefore these calls will be audio-only. However, the Acano solution does not impose this restriction on interoperability with Avaya products: therefore a call of type of ‘avaya’ does not imply that the call is audio-only. Dial plan rules are tried in the order of the Priority values. In the current Acano solution version only one match is possible for a call and even if there would be other matches in lower priority rules they will not be reached; therefore the Priority is important. Acano solution: Deployment Guide R1.2 76-1006-06-K Page 36 Dial Plan Configuration – Integrating Lync Clients CAUTION: The default Encryption behavior R1.2 mode is Auto. This does not match pre-R1.2 behavior. Previously, all "Lync" outbound dialing rules would automatically use Encrypted mode; therefore you need to ensure that these rules are explicitly set to Encrypted mode to prevent the Call Bridge attempting to use unencrypted TCP for these connections in the event of the TLS connection attempt failing. 6.3.2 Incoming Call page: call matching The top table in the Incoming Call page is the Call Matching table. The rules defined in the Call Matching table govern how the Acano solution handles incoming SIP calls. Any call routed to the Acano Server on any domain can be tested for a match for Acano client users or for preconfigured coSpaces on that server. The example Call matching rule below seeks to match all calls coming in on the acano.example.com domain to both Acano users and coSpaces. For example, if the incoming call was to [email protected] and there was a configured coSpace called name.coSpace the call would be routed to the coSpace with that name. If the incoming call was to [email protected] the call would be routed to that user with that first and last name. Alternatively, you can choose not to route calls to users or coSpaces on a per domain basis; that is, you can use one incoming domain for coSpaces and another for users. After a rule is executed rules further down the list are ignored for the call. If all Call matching rules fail the next table, the Call Forwarding table, is used, as described in the next section. Note1: Matching for coSpace and/or users is only done on the part of the URI before the @. Note2: You cannot configure more than one rule with same destination. Note3: If the Domain is left blank in a rule, that rule matches any call – and the Call Forwarding table is never used. 6.3.3 Call forwarding If a call fails to match any of the rules in the Call Matching table in the Incoming Calls page, the call will be handled according to the Call Forwarding table. In this table you can have rules decide whether to reject the call outright or to forward the call in bridge mode. Rules can overlap, and include wildcards. You order rules using the Priority value; higher numbered rules are tried first. By defining rules, you decide whether to forward the call or not. It might be appropriate to “catch” certain calls and reject them. For calls that will be forwarded, you can rewrite the destination domain i.e. Lync destination, using the Forwarding Domain. A new point-to-point call is created to the specified domain. Acano solution: Deployment Guide R1.2 76-1006-06-K Page 37 Dial Plan Configuration – Integrating Lync Clients The example Call forwarding rule below forwards calls for the domain lync.example.com and the routing is determined by the call routing rules. If none of the Domain Matching Patterns matches the domain of an incoming call that was not matched in the Call Matching section, the call is terminated. 6.4 Adding Point-to-Point Calls between Lync Clients and SIP Video Endpoints This section assumes the configuration described in sections 5, 6.1 and 6.2 has been completed. It expands the example to allow Lync and SIP video endpoints to call each other in a point-to-point call using the Acano Server as a gateway to transcode the video and audio (see the figure below). Note: The Outbound Calls page was used previously to set up a SIP trunk from the Acano Server to the Cisco VCS. In order to configure the Acano Server to act as a point-to-point bridge between Lync and SIP environments, you need to configure call forwarding as described in this section and also set up a SIP trunk from the Acano Server to other SIP call control devices you are using such as the Lync Front End Server and Cisco VCS. Figure 9: Example of SIP video endpoints and Lync clients in point-to-point calls Acano solution: Deployment Guide R1.2 76-1006-06-K Page 38 Dial Plan Configuration – Integrating Lync Clients In this example: A Lync user can dial <username>@vc.example.com to set up a point-to-point call with a SIP video endpoint who is <username>@vc.example.com. A SIP video endpoint can dial <username>@example.com to set up a point-to-point call with a Lync endpoint who is <username>@example.com. Adapt the example as appropriate. 6.4.1 Lync Front End Server configuration To allow Lync clients to call SIP video endpoints: 1. Add a Lync static route pointing to the Acano solution for vc.example.com. 6.4.2 VCS configuration To route SIP video endpoint calls to Lync clients: 1. Add a search rule on the VCS to route calls with the suffix @example.com to the Acano solution. 6.4.3 Acano solution configuration Carry out the following steps so that all calls to the Acano solution that are not matched to Acano users or coSpaces are forwarded. 1. Sign in to the Web Admin Interface and go to Configuration > Incoming Calls. 2. In the Call Forwarding section, add a new rule as follows: Domain Matching Pattern = * Wildcards are permitted in any part of a domain matching pattern. (Unmatched calls with a domain that matches this pattern are forwarded using this rule.) Priority: To ensure that this rule is always used, its priority should be the highest of any rules configured (any value, including 0, is acceptable if there are no other forwarding rules configured). (Rules are checked in order of priority; highest priority first. If two Domain Matching Patterns would match a destination domain the rule with the higher priority is used.) Forward = forward (If you select Reject calls that matched the Domain Matching Pattern are not forwarded but terminate.) Rewrite Doman = no The call will be forwarded using the domain that was called. (If you select yes here, you must then complete the Forward Domain. The original domain will be replaced with the one you enter in Forward Domain before the call is forwarded.) 3. Click Add new. SIP video endpoints can now call Lync clients by dialing <username>@example.com, and Lync clients can call SIP video endpoints by dialing <endpoint>@vc.example.com. Acano solution: Deployment Guide R1.2 76-1006-06-K Page 39 Dial Plan Configuration – Integrating Lync Clients 6.5 Integrating Acano Clients with SIP and Lync Clients Refer to the LDAP Configuration and Web Admin Interface Settings for XMPP sections of this guide for instructions about configuring your Acano solution to use the Acano clients. If you are using the same AD configuration to create both your Lync accounts and Acano clients, problems may occur if a user tries to call a Lync client when using the Acano solution as a gateway because the user may end up calling your Acano XMPP client. The Acano Configuration > Incoming Calls page has a table of rules (Call Matching section) to prevent this. For example, assume you have an account [email protected] on the Acano solution. I also have a [email protected] account on my Lync Front End Server. If a call arrives at the Acano solution and no Call Matching rules are configured, the Acano solution will ignore the domain and the call will go to the Acano solution’s [email protected] account. In other words, dialing fred@xxxx will ignore xxxx and see if there is a user “fred” locally. This is problematic because a user trying to call the Lync address [email protected] using the Acano solution as a gateway will end up in a call with the Acano XMPP client logged in as [email protected]. If the same AD has been used to create both the Acano solution’s and Lync’s user accounts, this will be a common problem. The solution is to configure the Incoming Calls page with the Domain Name field set to something distinct from the domain that the Lync Front End Server uses. In the example above, a sensible choice for the Domain Name field would be example.com. Then, a call to [email protected] will reach the Acano client but a call to [email protected] or fred@xxxx will not. Instead, if the Call Forwarding section is set up, the Acano solution forwards the call on. 6.6 Lync Edge Server Integration 6.6.1 Lync Edge Call Flow To establish a call from the Acano Server to the Lync Edge server (see the figure below): 1. The Acano Call Bridge makes a “register” SIP call to the Lync Front End server. 2. The “register” is acknowledged. 3. The Call Bridge sends a “subscribe” to the Lync Front End server. Acano solution: Deployment Guide R1.2 76-1006-06-K Page 40 Dial Plan Configuration – Integrating Lync Clients Figure 10: Call Bridge to Lync Edge Server Call Flow 4. The Front End server returns the URI of the media relay authentication server (MRAS). (The Lync Edge Server acts as a MRAS.) 5. (and 6) Call Bridge contacts the MRAS over SIP to get the Edge information for the call. The call media then flows directly between the Call Bridge and Edge’s TURN server on UDP port 3478 and returns from Edge server to the Call Bridge on a port in the ephemeral range above. Therefore the following ports need to be opened in the firewall for the media between Call Bridge and the Edge server: UDP 3478 outgoing and 32768-65535 incoming. 6.6.2 Configuration for using Lync Edge To use a Lync Edge server, log in to the Web Admin Interface, go to Configuration > General and configure the Lync Edge Settings. (When a Lync Edge server is configured, it takes the Acano solution: Deployment Guide R1.2 76-1006-06-K Page 41 Dial Plan Configuration – Integrating Lync Clients TURN / ICE role for Lync calls, and so at some level is an alternative to the TURN Server Settings above.) You also need to create a Lync user client account to set up the Acano Lync Server Edge configuration. Follow these steps to set up the Acano solution to use the Lync Edge server: 1. Ensure you have the appropriate DNS records in place. The sip._tls.yourlyncdomain.com record must exist and resolve to the Lync FE Pool or Server, see Appendix A for the full DNS requirements. 2. Create a new user in your LDAP directory, just as you would any other user in your directory, i.e. firstname=”acano”, second name = “edge”. 3. Login into the user manager on your Lync Server and create a Lync Client user from the user you created in the previous step. Do thus in the same way as you would any other user to enable them to use Lync. Using the example name above create a Lync client user called [email protected] 4. Sign in to the Web Admin Interface, and go to Configuration > General. Configure the Lync Edge Settings by entering the Lync Front End Server Address (or a host name that resolves to this). For Username enter the Lync client user name created in the previous step. 5. Complete the Number of Registrations field, if necessary. This field overcomes a feature of the Lync Edge server that limits the number of simultaneous calls that it will run for one registered device. By entering a number greater than 1, the Call Bridge will make that number of registrations, thereby increasing the number of simultaneous calls that the Acano solution can make out through the Lync Edge Server. Entering a number greater than 1 adds a number to the end of your Lync Edge username and registers with the resulting username. For example, if you configured Username as [email protected] and set Number of Registrations to 3, you will need to create the following users in your Lync environment so that they can be used with the Edge server; [email protected] [email protected] [email protected] We recognize that this requires some administrative overhead; however it is due to a limitation of the Lync Edge server as explained above. Leave the Number of Registrations blank to only make a single registration as [email protected]. Note: From Release 1.1 the Acano solution supports Lync content (presentations contributed over RDP) from external Lync clients whose media arrives via the Lync Edge server. In addition, coSpace (URIs) now report back as busy or available based on how many participants are currently in the coSpace so that Lync clients that have Acano coSpaces in their favorites can see the coSpace status. Note: Acano clients continue to use the Acano TURN Server even if a Lync Edge server is configured. Acano solution: Deployment Guide R1.2 76-1006-06-K Page 42 Dial Plan Configuration – Integrating Lync Clients Note: If you have a Lync Edge server configured, all Lync calls will use that server for ICE candidate gathering and external media connectivity. If you do not have a Lync Edge server configured, Lync calls handled by the Acano solution will use any configured TURN server. Acano solution: Deployment Guide R1.2 76-1006-06-K Page 43 LDAP Configuration 7 LDAP Configuration You must have an LDAP server (currently Active Directory) to use the Acano solution. User accounts are created via an import from the LDAP server. You can create user names by importing fields from LDAP. The passwords are not cached on the Acano solution, a call is made to the LDAP server when an Acano client authenticates, and therefore passwords are managed centrally and securely on the LDAP server. 7.1 Why use LDAP? Using LDAP to configure the Acano solution is a powerful and scalable way to set up your environment: defining your organization’s calling requirements within the AD structure minimizes the amount of configuration required on the Acano solution. The solution uses the concept of filters, rules and templates. Filters allow you to separate users into groups, for example: Everyone in the HR department Staff at grade 11 and above Job title = 'director' People whose surname starts with 'B' Then rules (actions) can be applied on these groups, for example: Give users in this group the ability to create new coSpaces Associate users in this group to one or more existing coSpaces, e.g. the 'HR managers CoSpace' Create a personal coSpace for each user in this group Apply a template to this group of users Templates define things such as which default layout to use, or what maximum call rate is allowed. For example, if a new employee joins the organization as a manager with a grade >11, just based on his job title or grade he can be set up automatically with a personal CoSpace, have the ability to create new CoSpaces, have a 4Mbps call rate and be assigned to the "all managers" CoSpace. In contrast, another new joiner with job title "temp" might be configured with a default call rate of 500kbps. Note: Full functionality for LDAP filters and templates will be introduced in a future release. 7.2 Acano Solution Settings Note: The Acano solution supports multiple LDAP servers via the API: the Web Admin Interface only allows you to configure one. See the LDAP Methods section in the API Reference guide. This example assumes you are using Microsoft Active Directory (AD). To set up the Acano solution to work with AD, follow these steps: 1. Sign in to the Web Admin Interface and go to Configuration > Active Directory. 2. Configure the connection to AD in the first section with the following: Acano solution: Deployment Guide R1.2 76-1006-06-K Page 44 LDAP Configuration Address = this is the IP address of your AD server Port = usually 636 Username = the Distinguished Name (DN) of a registered user. You may want to create a user for this purpose Password = the password for the user name you are connecting as Secure Connection = select this setting for a secure connection For Example: Address: 100.133.2.44 Port: 636 Username: cn=Fred Bloggs,cn=Users,OU=Sales,dc=YourCompany,dc=com Password: password Note: From R1.2 we support secure LDAP. By default AD runs on port 636 for secure communications and port 389 for insecure communications. The Acano solution supports both but we recommend using 636. Note that you must select Secure Connection (see above) for communications to be secure: using port 636 alone is not enough. 3. The Import Settings control which users should be imported. Base Distinguished Name = the node in the LDAP tree from which to import users. The following is a sensible choice for base DN to import users cn=Users,dc=sales,dc=YourCompany,dc=com Filter = a filter expression that must be satisfied by the attribute values in a user's AD record. The syntax for the Filter field is described in rfc4515. A rule for importing people into the main coSpace database might reasonably be 'import anyone with an email address', and this is expressed by the following filter: mail=* For testing purposes you may want to import a named user and a group of test users whose mail address starts with “test”; for example: (|(mail=fred.bloggs*)(mail=test*)) If you wanted to import everyone apart from one named user, use this format: (!(mail=fred.bloggs*)) To import users that belong to a specific group, you can filter on the memberOf attribute. For example memberOf=cn=apac,cn=Users,dc=MyCompany,dc=com This imports both groups and people that are members of the APAC group. To restrict to people, use: (&(memberOf=cn=apac,cn=Users,dc=MyCompany,dc=com)(objectClass=person)) Acano solution: Deployment Guide R1.2 76-1006-06-K Page 45 LDAP Configuration Using an extensible matching rule (LDAP_MATCHING_RULE_IN_CHAIN / 1.2.840.113556.1.4.1941), it is possible to filter on membership of any group in a membership hierarchy (below the specified group); for example: (&(memberOf:1.2.840.113556.1.4.1941:=cn=apac,cn=Users,dc=MyCompany,dc=c om)(objectClass=person)) 4. Set up the Field Mapping Expressions The field mapping expressions control how the field values in the Acano solution’s user records are constructed from those in the corresponding AD records. Currently, the following fields are populated in this way: Display Name User name CoSpace Name CoSpace URI user part (i.e. the URI minus the domain name) CoSpace call id (unique ID for coSpace for use by WebRTC client guest calls) Field mapping expressions can contain a mixture of literal text and LDAP field values, as follows: $<LDAP field name>$ As an example, the expression [email protected] Generates: [email protected] For more information see Appendix F. Note: Each imported user must have a unique XMPP user ID (JID), constructed using the JID field in the Field Mapping Expressions section of the Configuration > Active Directory. In order to construct a valid JID, any AD attribute used in the JID field mapping expression must be present in each AD record that is to be imported. To ensure that only records that have these attributes present are imported, we recommend that you include presence filters (i.e. those of the form (<attribute name>=*)) using a ‘&’ (AND) in the Filter field under Import Settings for each attribute used in the JID field mapping expression. For example, suppose your JID field mapping expression is [email protected], and you wish to import users who are members of the group cn=Sales,cn=Users,dc=example,dc=com, an appropriate import filter would be (&(memberOf=cn=Sales,cn=Users,dc=example,dc=com)(sAMAccountName=*)) 5. To synchronize with AD, select Sync now or activate the synchronization by using the appropriate API call (see the API Specification document). Note that you must manually resynchronize whenever entries in AD change. 6. View the result of the synchronization by going to Status > Users. Acano solution: Deployment Guide R1.2 76-1006-06-K Page 46 LDAP Configuration It is possible to choose whether to use OU separation when importing from the LDAP server. In the Web Admin Interface, go to Configuration > Active Directory and select Restrict Search to Searcher OU to enable the search only within the OU of the user account. 7.3 Example You want to assign a coSpace to a particular group of users and a Call ID for this coSpace using an 88 prefix in front of the regular telephone number. 1. Create the group in AD called “cospace” and assign the required members to that group. 2. Use the following filter which uses the extensible matching rule (LDAP_MATCHING_RULE_IN_CHAIN / 1.2.840.113556.1.4.1941) to find all the users that are a member of the “cospace” group: (&(memberOf:1.2.840.113556.1.4.1941:=cn=cospace,cn=Users,dc=lync,dc=myc ompany,dc=com)(objectClass=person)) 3. Then synchronizing a particular user in the directory called: cn = Fred Blogs TelePhoneNumber = 7655 sAMAccountName = fred.blogs Acano solution: Deployment Guide R1.2 76-1006-06-K Page 47 LDAP Configuration creates the following coSpace which can be viewed on the Status > Users page. Name Fred Blogs XMPP id [email protected] And the following coSpace that can be viewed on the Configuration > coSpace page. Name fred.blogs URI user part fred.blogs.cospace Acano solution: Deployment Guide R1.2 76-1006-06-K Page 48 Web Admin Interface Settings for XMPP 8 Web Admin Interface Settings for XMPP This section explains how to configure the settings through which the XMPP server communicates with the other components on the Acano solution. This allows you to use Acano’s PC Client, iOS Client and WebRTC Client with the Acano solution. If you are not using the Acano clients including the WebRTC Client, skip this section. 8.1 Network Topology The following diagram shows a possible network topology and is used for the examples in this section. Figure 11: Example network topology showing XMPP server Acano solution: Deployment Guide R1.2 76-1006-06-K Page 49 Web Admin Interface Settings for XMPP 8.2 XMPP Settings 1. Ensure that you have installed a security certificate for the XMPP server – see section 3.4. 2. Ensure that you have configured the XMPP server – see section 4.7 3. Ensure that you have uploaded the license key file – see section 4.7 4. Log in to the Web Admin Interface and configure the XMPP server settings as follows: a. Go to Configuration > General. b. Set the following in the XMPP Server Settings section, (where example.com is replaced with your domain): Component Name = sf_component.example.com Server Address = localhost Note: If you are using a two Acano Server deployment or a split virtual deployment use the IP address of the Edge server/virtualized server. See section 2.11 for more details of these deployments. c. Server Port = 5223 Shared Secret = the component secret used in section 4.7 Pubsub Server Address = pubsub.example.com Authentication Proxy Component = authp.example.com Authentication Suffix = * (star) Select Submit at the bottom of this page. Acano solution: Deployment Guide R1.2 76-1006-06-K Page 50 Web Admin Interface Settings for XMPP 5. Go to Status > General and verify the server connection. You should see details similar to the following: 6. On a PC, install the Acano PC Client from: https://clientupgrade.acano.com/download/oBklj0sd28dl2mz/AcanoClient.application Log in to the Acano PC Client using one of the newly created user accounts. Then check that you can make calls as expected. 8.3 Client-based coSpace Creation and Editing PC Client users can create coSpaces. These coSpaces have URIs and IDs by default, allowing them to be easily dialed by SIP endpoints. The SIP dial-in URI is automatically created; however, you can enter a preferred SIP URI and the Acano solution will automatically ensure that it is a unique URI for the domain assuming this is a single server deployment. This means users can now create coSpaces and email the SIP URI so that others can join. This makes it straightforward to bring SIP endpoints into your coSpace. PC Client users can click the “i” button for a coSpace; this displays the Call ID number. Emailing this Call ID to guest users allows them to join the coSpace using the web link you have configured (see the next section). Alternatively, PC Client users can copy the full web link in the coSpace information by right-clicking and email it to guests. This link bypasses the guest “call ID” page above, going directly to the guest identification page. Acano solution: Deployment Guide R1.2 76-1006-06-K Page 51 Web Admin Interface Settings for XMPP Note: coSpaces can also be created from the Acano solution API (see the API Reference guide) and in the Web Admin Interface Configuration > coSpaces page. Acano solution: Deployment Guide R1.2 76-1006-06-K Page 52 Web Admin Interface Settings for the Web Bridge 9 Web Admin Interface Settings for the Web Bridge This section explains how to set up the Web Bridge server in the Web Admin Interface so that the Call Bridge can communicate with it. This allows you to use Google Chrome for WebRTC video calls. If you are testing the WebRTC client, follow the instructions below in the order provided at any time after the initial Acano solution configuration has been completed. If you are not using this Acano client, skip this section. 9.1 Network Topology Figure 12: Example network topology showing Web Bridge Acano solution: Deployment Guide R1.2 76-1006-06-K Page 53 Web Admin Interface Settings for the Web Bridge Figure 13: WebRTC Client port usage Note: * Although the port range between the TURN server and the External clients is shown as 32768-65535, currently only 50000-51000 is used. The required range is likely to be larger in future releases. 9.2 Web Bridge Settings Follow the steps in order. 1. Ensure that you have installed the Web Bridge certificate and license. 2. Ensure that you have configured the Web Bridge. 3. Sign in to the Web Admin Interface and configure the Acano solution as follows: Go to Configuration > General. Set the following where: Guest Account Client URI = The URI including https:// to reach the guest account; for example, https://join.example.com Guest Account JID Domain = guest account JID, e.g. example.com 4. Open a web browser and go to https://join.example.com to test the configuration. Guest users selecting the general configured web link will see a landing page in which they can enter the call ID to join a call. Acano solution: Deployment Guide R1.2 76-1006-06-K Page 54 Web Admin Interface Settings for the Web Bridge In addition, Acano users who do not have access to a native Acano client but have an account can select the login link in the top right hand corner of the screen to sign in as they would on a native client. After signing in they see their coSpaces, and can invite participants and participate in calls - all from the WebRTC client. Note: Acano clients can be downloaded at: PC Client Clickonce URL https://clientupgrade.acano.com/download/oBklj0sd28dl2mz/AcanoClient.application Mac Client DMG download URL https://clientupgrade.acano.com/download/oBklj0sd28dl2mz/acanoclient.dmg iOS Client download URL https://itunes.apple.com/gb/app/acano/id680581809?mt=8 Acano solution: Deployment Guide R1.2 76-1006-06-K Page 55 Web Admin Interface Settings for the TURN Server 10 Web Admin Interface Settings for the TURN Server This section explains how to set up the TURN server in the Web Admin Interface so that Call Bridge can communicate with it. The TURN server allows you to use the built-in firewall traversal technology when traversing a firewall or NAT. Follow the instructions below in the order provided at any time after the initial Acano solution configuration has been completed. 10.1 Network Topology Figure 14: Example network topology showing TURN Server Acano solution: Deployment Guide R1.2 76-1006-06-K Page 56 Web Admin Interface Settings for the TURN Server 10.2 TURN Server Settings Follow the steps in order. 1. Ensure that you have configured the TURN server. 2. Log in to the Web Admin Interface and configure the Acano solution as follows: Go to Configuration > General. Set the following: TURN Server Address (Server) = internal server IP address that the Call Bridge will use to access the TURN server to avoid firewall traversal for internal call control TURN Server Address (Clients) = public IP address assigned to the TURN server that external clients will use to access the TURN server. This will be the IP address entered in section 4.9 when you configured the TURN server. Notes: For example if the interface of the TURN Server is on IP address XX.XX.XX.XX and NAT'ed to an external IP address YY.YY.YY.YY then enter XX.XX.XX.XX as the TURN Server Address (Server) and YY.YY.YY.YY as TURN Server Address (Client). If the interface is on the external IP then no need to enter a client address You can enter a DNS name instead of an IP address in both fields, if the DNS name resolves to the appropriate IP address If you are using a public IP address, leave TURN Server Address (Clients) address blank and set TURN Server Address (Server) to the public IP address or DNS name used If you are using a two Acano Server deployment or a split virtual deployment use the IP address of the Edge server/virtualized server for the TURN Server Address (Server). See section 2.11 for more details of these deployments. Username and Password = your information Acano solution: Deployment Guide R1.2 76-1006-06-K Page 57 Customization, Troubleshooting, API and Logs 11 Customization, Troubleshooting, API and Logs 11.1 Customization From Release 1.1 you can customize the Acano solution in a limited way (which will be expanded in future releases). Currently you can customize the WebRTC Client login page. See the Appendix K for details. 11.2 Diagnostics and Troubleshooting The Acano solution’s diagnostic and troubleshooting logs can be spooled to a Syslog server to allow a larger amount of data to be collected for troubleshooting, therefore Acano requests access to a suitable Syslog server for this purpose. If you do not have a Syslog server available we suggest installing solar winds’ kiwi. It is also possible to enable additional SIP tracing using the Logs > Call Diagnostics page in the Web Admin Interface. These logs may be useful when investigating call setup failure issues for SIP endpoints and should be disabled at all other times. To prevent the verbose logging being enabled for longer than necessary, it automatically shuts off after a choice of 1 minute, 10 minutes or 30 minutes. Refer to the Acano Support FAQs on the Acano website for more troubleshooting information. 11.3 Application Programming Interface The Acano solution supports an Application Programming Interface (API). The API uses HTTP or HTTPS as a transport mechanism and is designed to be scalable in order to manage the potentially very large numbers of active calls and coSpaces available in the Acano solution. The API includes LDAP server access methods for adding, configuring and modifying LDAP servers and support for multi tenancy for search calls through an additional Tenant ID. Other additions include posting to coSpace message boards, the ability to filter the set of active call legs to just those experiencing "alarm" conditions (for example, packet loss or excessive jitter) and the ability to retrieve system-wide status values. Multi-tenancy means that groups of users can be entirely segmented within the solution as required by service provider deployments e.g. users will only be able to call, assign users to coSpaces, and search in the directory within the same configured customer groups. Refer to the Acano API Specification document for more details. 11.4 Call Detail Record Support The Acano solution generates CDRs internally for key call-related events, such as a new SIP connection arriving at the server, or a call being activated or deactivated. The Acano solution can be configured to send these records to a remote system to be collected and analyzed. There is no provision for records to be stored on a long-term basis on the Acano solution, nor any way to browse CDRs on the Acano solution itself. Acano solution: Deployment Guide R1.2 76-1006-06-K Page 58 Customization, Troubleshooting, API and Logs The CDR system can be used in conjunction with the Acano solution API, with the call ID and call leg IDs values being consistent between the two systems to allow cross referencing of events and diagnostics. If you are using Acano Manager, it must be your CDR receiver. See the Acano solution CDR Guide for more information. Acano solution: Deployment Guide R1.2 76-1006-06-K Page 59 DNS Records Needed for the Acano Solution Appendix A DNS Records Needed for the Acano Solution Note: Verify that no A or SRV records already exist before defining the records below. If duplicates are created, they will “round robin” on lookups and will cause issues for existing services as well as these new services. If there are conflicts, a new DNS Zone can be defined to create isolation between the services. For example, if you already have an XMPP server in the example.com zone using the same SRV records, define a new DNS zone for acano.example.com and create the new SRV records for it. The client login will now need to use [email protected] for proper resolving but will not conflict with existing XMPP deployment. This same method holds true for the _sip._tls records: if one exists for the SIP Call Control device already, adding the same for Lync using the same domain will cause a round robin lookup. They must be isolated, therefore create a new DNS zone such as vcs.example.com, define the SIP Call Control device within it and have it point to the original A record already defined in the root DNS zone. You should then add this new domain into your SIP Call Control device configuration as a valid SIP Domain and create a transform rule to convert @<SIP Call Control device>.example.com to @example.com. This allows you to add this new zone without modifying any of your current devices or registrations. DNS A Records A record for server FQDN for SIP and Lync calls, e.g. acano.example.com, resolving to the address used for SIP and Lync calls (probably interface A address) This is the A record for Call Bridge resolving to the IP address of the interface you configure the Call Bridge to listen on A record for server FQDN for Web Bridge access (can be the one above), e.g. join.acano.example.com, resolving to the port address used for WebRTC A record for server FQDN for XMPP access (can be the above), e.g. xmpp.acano.example.com, resolving to the port address used for XMPP A record for your SIP Call Control device, e.g. VCS, if used. (This may be in place already, but add it if not) A record for Lync Front End Server if used (probably in place already, but be sure to verify this) DNS SRV Records SRV record for _xmpp-server._tcp.example.com set to port 5269 and resolving to host A record above that was defined for the XMPP portion of the server SRV record for _xmpp-client._tcp.example.com set to port 5222 and resolving to host A record above that was defined for the XMPP portion of the server Acano solution: Deployment Guide R1.2 76-1006-06-K Page 60 DNS Records Needed for the Acano Solution SRV record for _sip._tls.<SIP_Call_Control_domain>.example.com set to port 5061 and resolving to host A record above that was defined for your SIP Call Control device (if used) SRV record for _sip._tls.lyncdomain.example.com set to port 5061 and resolving to host A record above that was defined for your Lync Front End Server (if used) SRV record for _sipinternaltls._tcp.lyncdomain.example.com set to port 5061 and resolving to host A record above that was defined for your Lync Front End Server (if used) Acano solution: Deployment Guide R1.2 76-1006-06-K Page 61 Ports Required Appendix B Ports Required The following diagram labels the links on which ports need to be open and shows which firewall is concerned is using a two-server deployment. However, the ports are still required between internal components of a one-server deployment. Figure 15: Ports required to be open in an Acano solution deployment The following ports are required by the Call Bridge. Function Port Type Direction Used on Link(s) Configurable ? HTTP 80 TCP Incoming M MMP HTTPS 443 TCP Incoming M, N MMP (for M) HTTPS 443 TCP Outgoing E, N SIP UDP 5060 UDP Both I, J Acano solution: Deployment Guide R1.2 76-1006-06-K Page 62 Ports Required SIP TCP 5060 TCP Both I, J SIP TLS 5061 TCP Both I, J, K, O SIP BFCP 5070 TCP & UDP Incoming I, J API HTTPS 443 TCP Incoming M TURN 3478 UDP Incoming D TURN 443 TCP Outgoing P STUN/RTP 32768-65535 UDP Incoming I, J, K, D STUN/RTP 1024-65535 # UDP Outgoing I, J, K STUN/RTP 32768-65535 UDP Outgoing D RDP 32768-65535 TCP Incoming K RDP 1024-65535 ++ TCP Outgoing K LDAP + 636/389 TCP Outgoing H DNS 53 UDP Outgoing G XMPP 5223 TCP Outgoing C Web Admin Interface CDR Set in Web Admin Interface TCP Outgoing N Web Admin Interface Web Admin Interface + Ports 389 and 636 (secure) are commonly used for this function but the port is configurable. (The same applies to 3268 and 3269 (non-secure and secure) global catalog LDAP requests.) ++ Exact range depends on configuration on Lync server # Exact range depends on far end The following ports are used by MMP: Function Port Type Direction Used in Link(s) SSH 22 TCP Incoming M Syslog 514 TCP Outgoing F NTP 123 UDP Outgoing L Configurable ? MMP The following ports are used by the Web Bridge Function Port Type Direction Used in Link(s) Configurable ? HTTP 80 TCP Incoming B MMP HTTPS 443 TCP Incoming B MMP XMPP 5222 TCP Outgoing A, B Acano solution: Deployment Guide R1.2 76-1006-06-K Page 63 Ports Required The following ports are used by the XMPP Server Function Port Type Direction Used in Link(s) XMPP Client 5222 TCP Incoming A XMPP Server 5269 + TCP Incoming C Configurable ? + This port is only required for XMPP Federation. The following ports are used by the TURN Server Function Port Type Direction Used in Link(s) STUN 3478 UDP Incoming A, B, D STUN RTP 32768-65535* UDP Incoming A, B, D Configurable ? Note: * Although the range between the TURN server and the external clients is shown as 32768-65535, currently only 50000-51000 is used. A wider range is likely to be required in future releases. Acano solution: Deployment Guide R1.2 76-1006-06-K Page 64 OpenSSL Commands for Generating Certificates Appendix C OpenSSL Commands for Generating Certificates OpenSSL can be used instead of the MMP pki commands in section 3 to generate private keys, certificate signing requests and certificates. 1. Start by using the OpenSSL toolkit on your Windows PC or Linux machine to generate an RSA private key and CSR (Certificate Signing Request). This example creates a 2048 bit key. openssl.exe genrsa -out <keyname>.key 2048 2. After the private key is generated, do one of the following a. Create a self-signed certificate straight from the private key and go on to step 4: openssl.exe req -config openssl.cfg -new -x509 -key webserver.key -out webserver.crt -days 365 Note: Your installation may use openssl.cnf instead of openssl.cfg; if so substitute openssl.cnf in the command above and in appropriate commands in this appendix. b. Generate a Certificate Signing Request (and then go on to step 3), for example: openssl.exe req -config openssl.cfg -new -key <name>.key -out <CSRname>.csr During the generation of the CSR, you are prompted for several pieces of information. Most importantly you will be asked for the Common Name: it is essential that this field be filled in with the fully qualified domain name of the server to be protected by SSL. For example, if the website to be protected will be https://server.example.com, then enter server.example.com at this prompt. Failure to do this will result in browser certificate errors. 3. Do one of the following. self-sign the CSR. The following is an example of self-signing your certificate from the CSR which is valid for 100 days openssl.exe x509 -req -days 100 -in webserver.csr –signkey webserver.key -out webserver.crt Send the CSR to a Certificate Authority (CA), such as Verisign who will verify the identity of the requestor and issue a signed certificate. Follow the steps i onwards to do this Send the CSR to a local or organizational Certificate Authority, such as an Active Directory server with the Active Directory Certificate Services Role installed. Follow the steps i onwards to do this i. ii. Transfer the certificate signing request to the CA server for signing Issue the following command in the command line management shell on the CA server replacing the path and CSR name with your information: certreq -submit -attrib "CertificateTemplate:WebServer" C:\Users\Administrator\Desktop\certcsr.pem Acano solution: Deployment Guide R1.2 76-1006-06-K Page 65 OpenSSL Commands for Generating Certificates iii. After entering the command, a CA selection list is displayed similar to that below. Select the correct CA and select OK iv. Do one of the following: If your Windows account has permissions to issue certificates, you are prompted to save the resulting certificate, for example as cacert.pem. Go on to the step 4 below. If you do not see a prompt to issue the resulting certificate, but instead see a message on the command prompt window that the 'Certificate request is pending: taken under submission', then follow step 2d in Appendix D before going on to step 4 below. 4. Transfer both this file and the private key to the MMP using SFTP. CAUTION: If you are using a CA with the Web Enrolment feature installed, you may copy the CSR text including the BEGIN CERTIFICATE REQUEST and END CERTIFICATE REQUEST lines to submit. After the certificate has been issued, copy only the certificate and not the Certificate Chain. Be sure to include all text including the BEGIN CERTIFICATE and END CERTIFICATE lines and paste into a text file. Then save the file as your certificate with a .pem, .cer or .crt extension. Acano solution: Deployment Guide R1.2 76-1006-06-K Page 66 Issuing a Certificate Manually Appendix D Issuing a Certificate Manually The instructions in this appendix are only required if you want to issue certificates signed by a CA for any of the Acano solution components that require a certificate. (Instructions for creating and installing self-signed certificates are in section 3.) 1. Sign in to the MMP and generate the private key and certificate signing request by typing: pki csr <key/cert basename> <CN> [<OU> <O> <L> <ST> <C>] where <key/cert basename> is a string identifying the new key and CSR (e.g. "webserver" results in "webserver.key" and "webserver.csr" files) <CN> is the commonName which should be on the certificate. The commonName must be the DNS name for the server to be protected by SSL (for more information see http://info.ssl.com/Article.aspx?id=10048). For example, if the website to be protected will be https://server.mycompany.com, then enter server.example.com. Failure to do this will result in browser certificate errors. OU is Organizational Unit, O is Organization, L is Locality, ST is State and C is Country. These parameters are optional. 2. Send the CSR to a Certificate Authority (CA) such as Verisign who will verify your identity and issue a signed certificate, as follows: a. Transfer the file to the CA. b. Issue the following command in the command line management shell on the CA server replacing the path and CSR name with your information: certreq -submit -attrib "CertificateTemplate:WebServer" <path\csr_filename> For example: certreq -submit -attrib "CertificateTemplate:WebServer" C:\Users\Administrator\Desktop\certcsr.pem c. After entering the command, a CA selection list is displayed similar to that below. Select the correct CA and click OK. Acano solution: Deployment Guide R1.2 76-1006-06-K Page 67 Issuing a Certificate Manually d. Do one of the following: If your Windows account has permissions to issue certificates, you are prompted to save the resulting certificate, for example as webserver.pem. Go on to the step 3 below. If you do not see a prompt to issue the resulting certificate, but instead see a message on the command prompt window that the 'Certificate request is pending: taken under submission', then follow the steps below before going on to step 3. i. You should also see a note on the CMD window showing the request as Pending and listing the Request ID as follows. Note the RequestID. ii. Using the Server Manager page on the CA, locate the Pending Requests folder under the CA Role. iii. Right-click on the pending request that matches the Request ID given in CMD window and select All Tasks > Issue. Acano solution: Deployment Guide R1.2 76-1006-06-K Page 68 Issuing a Certificate Manually iv. The resulting signed certificate is in the Issued Certificates folder. Double-click on the certificate to open it and open the Details tab (see right). v. Click Copy to File which starts the Certificate Export Wizard. vi. Select Base-64 encoded X.509 (.CER) and click Next. vii. Browse to the location in which you wish to save the certificate, enter a name such as cacert and click Next. Acano solution: Deployment Guide R1.2 76-1006-06-K Page 69 Issuing a Certificate Manually viii. Rename the resulting certificate to cacert.pem. 3. Transfer both the certificate file (e.g. xmpp.crt) to the MMP using SFTP. CAUTION: If you are using a CA with the Web Enrolment feature installed, you may copy the CSR text including the BEGIN CERTIFICATE REQUEST and END CERTIFICATE REQUEST lines to submit. After the certificate has been issued, copy only the certificate and not the Certificate Chain. Be sure to include all text including the BEGIN CERTIFICATE and END CERTIFICATE lines and paste into a text file. Then save the file as your certificate with a .pem, .cer or .crt extension. Acano solution: Deployment Guide R1.2 76-1006-06-K Page 70 Example of Configuring a Static Route from a Lync Front End Server Appendix E Example of Configuring a Static Route from a Lync Front End Server Important Note: This appendix provides an example to be used as a guideline and is not meant to be an explicit set of instructions for you to follow. Acano strongly advises you to seek the advice of your local Lync server administrator on the best way to implement the equivalent on your server’s configuration. 1. Ensure you have installed certificates on the Acano solution to trust the Lync server – as described earlier in this document. Lync Configuration Changes 2. Optionally, enable HD720p on Lync as follows (if you want HD calls from Lync because the default is VGA): a. Open the Lync Server Management Shell, b. Enable support for HD720P Lync calls with: Set-CsMediaConfiguration -MaxVideoRateAllowed Hd720p15M 3. Add the trusted application and static routes to the Acano solution with the following five commands: New-CsTrustedApplicationPool -Identity acano-trust -ComputerFqdn fqdn.acanoserver.com -Registrar fqdn.lyncserver.com -site 1 RequiresReplication $false -ThrottleAsServer $true TreatAsAuthenticated $true Replacing acano-trust with a name of your choice fqdn.acanoserver.com with the FQDN of the Acano solution fqdn.lyncserver.com with your Lync FE Server or Pool FQDN New-CsTrustedApplication -ApplicationId acano-application TrustedApplicationPoolFqdn acano-trust -Port 5061 Replacing acano-application with name of your choice acano-trust with name used above $x=New-CsStaticRoute -TLSRoute -Destination "fqdn.acanoserver.com" MatchUri "something.com" -Port 5061 -UseDefaultCertificate $true Replacing fqdn.acanoserver.com with your FQDN of the Acano solution something.com with the URI match of your choosing, possibly acano.yourcomany.com if that is the domain used for all Acano calls Set-CsStaticRoutingConfiguration -Identity global -Route @{Add=$x} Acano solution: Deployment Guide R1.2 76-1006-06-K Page 71 Example of Configuring a Static Route from a Lync Front End Server Enable-CsTopology This command enables the new topology. Users may have to logout and login again to update to the new HD720p setting, all other settings are automatic and should work within a few minutes. Acano Solution Configuration 1. In the Web Admin Interface go to Configuration > Outbound Calls 2. In the blank row, for Domain, enter the Lync domain that will be matched for calls that need to be sent to Lync 3. For SIP Proxy to Use, do one of the following: Leave this field blank and the server will perform a DNS SRV lookup for the called domain using _sip._tls.<yourlyncdomain>.com Enter the Front End Pool and the server will perform a DNS SRV lookup for that defined domain using _sip._tls.<yourlyncdomain>.com Enter the Front End Pool and the server will perform a DNS A record lookup for the Host entered if the above SRV lookup fails to resolve Enter the IP address of your Lync Front End server 4. For Local Contact Domain, enter the domain that you route to your Acano solution, e.g. acano.yourcompany.com. 5. For Local From Domain, enter the domain that you want the call to be seen as coming from. Note: If you leave Local From Domain blank, the domain used defaults to the Local Contact Domain. 6. For Trunk Type, select Lync. 7. Select Add New. After completion you should be able to call from the Lync environment to the Acano solution and from the Acano solution to Lync. Acano solution: Deployment Guide R1.2 76-1006-06-K Page 72 More information on LDAP field mappings Appendix F More information on LDAP field mappings This section provides additional information for LDAP field mappings that you set up for the Acano solution. Parts of an LDAP field value can be substituted by means of a sed-like construction, as follows: $<LDAP field name>|'/<regex>/<replacement format>/<option>'$ <option> can be g, to replace every match of <regex> with <replacement format>, or blank to match only the first parts of <regex> can be tagged for use in <replacement format> by enclosing them in round brackets tagged matches can be referenced in <replacement format> as \x where x is a digit from 0 to 9. Match 0 corresponds to the entire match, and matches 1-9 the 1st to 9th tagged sub-expressions single quotes inside the substitution expression must be escaped with a backslash, as must backslash characters themselves any character other than a single quote, a backslash, or the digits 0-9 can be used in place of the forward slash that separates the components of the substitution expression if the separating character is to be used as a literal within the expression, it must be escaped with a backslash As an example, the following would convert AD [email protected] addresses into [email protected] JIDs $mail|'/@test/@xmpp/'$ and the following would remove every lower case 'a' from the user's full name $cn|'/a//g'$ A sensible set of expressions for use might be: Full name: $cn$ JID: $mail|'/@test/@xmpp/'$ CoSpace URI: $mail|'/@.*//'$.cospace CoSpace dial-in number: $ipPhone$ Acano solution: Deployment Guide R1.2 76-1006-06-K Page 73 Example of Configuring a SIP Trunk to CUCM Appendix G Example of Configuring a SIP Trunk to CUCM This appendix provides an outline how to set up a SIP Trunk between the Acano Core and a Cisco Unified Communications Manager (CUCM). It assumes that you are familiar with CUCM. Prerequisites This section assumes that you have followed section 4.4; that is: You have specified a listening interface using the MMP callbridge listen command. If you will use TLS, you have configured certificates to use with the callbridge certs command. CUCM has some requirements on what TLS certificates it will accept. You should ensure that the certificate on the Acano Server has the SSL Client and SSL server purposes enabled. This is done during the certificate signing stage. Appendix C step 3 (and Appendix D) may require some changes for this: instead of "CertificateTemplate:WebSever" create and use a different template. Use openSSL to see whether the existing certificate is OK; for example: openssl x509 -in <certificatename> -noout -text –purpose The important lines in the output are "SSL client" and "SSL server" which must have a Yes, for example: Certificate purposes: SSL client : Yes SSL client CA : No SSL server : Yes Acano solution Configuration 1. In the Web Admin Interface, go to Configuration > Outbound Calls. 2. In the blank row, for Domain, enter the domain that will be matched for calls that need to be sent to CUCM. 3. For SIP Proxy to Use, do one of the following: Leave this field blank and the server will perform a DNS SRV lookup for the called domain using _sip._tls.<yourcucmdomain>.com. If this fails to resolve the server will try a lookup using TCP an then UDP. Enter the CUCM FQDN and the server will perform a DNS SRV lookup for that defined domain Acano solution: Deployment Guide R1.2 76-1006-06-K Page 74 Example of Configuring a SIP Trunk to CUCM Note: If this fails to resolve the server will try a lookup using TCP an then UDP. The server will then perform a DNS A record lookup for the Host entered if the above SRV lookup fails to resolve using TLS, TCP or UDP. Enter the IP address of your CUCM 4. For Local Contact Domain, enter the domain that you route to your Acano Server, e.g. acano.yourcompany.com. 5. For Local From Domain, enter the domain that you want the call to be seen as coming from. Note: If you leave Local From Domain blank, the domain used defaults to the Local Contact Domain. 6. For Trunk Type select Standard SIP. 7. Set the Priority as necessary. 8. Select Add new. CUCM Configuration Note: Our testing has been done on trunks without MTP configured. Therefore: Disable MTP if this will not negatively affect your deployment Turning off MTP might have a negative impact on your deployment only if you are using SCCP phones and there are call scenarios in which sending DTMF to the Acano solution is required If the above is not a valid implementation, you may need to increase the MTP capacity on the CUCM depending on the number of simultaneous calls An overview of the steps required on CUCM is: 1. If you will use TLS, then upload a certificate to the trust store. 2. If you will use TLS, create a security profile. 3. Create a SIP profile. 4. Create the SIP trunk. 5. Configure the dial plan for outbound calls. 6. Test. Each step is described in more detail below. Step 1: Uploading the certificate to the trust store If the SIP trunk type will be TLS, follow this step; otherwise go on to step 2. 1. Go to Cisco Unified OS Administration and log in. 2. Go to Security > Certificate Management. 3. Select Upload Certificate/Certificate Chain. 4. Complete the fields as follows: Acano solution: Deployment Guide R1.2 76-1006-06-K Page 75 Example of Configuring a SIP Trunk to CUCM 5. Enter the Certificate Name as CallManager-trust and type in a Description. 6. Click Choose File to find your certificate. This can be the root certificate or the Acano Server’s certificate. 7. Click Upload File. Step 2: Creating a security profile If the trunk will be TCP, then use CUCM’s default security profile called Non Secure SIP Trunk when you create the SIP Trunk. To use TLS, or something other than the standard security profile, follow these steps: 1. Go to Cisco Unified CM Administration and log in again. 2. Go to System > Security > SIP Trunk Security Profile and click Add New. 3. Complete the fields as follows: Name = Type in a name e.g. "Acano Server Encrypted TLS SIP trunk" Device Security Mode = Encrypted Incoming Transport Type = TLS Outgoing Transport Type = TLS X.509 Subject Name: The X509 subject name of the certificate installed on the Acano Call Bridge (usually the FQDN of the Acano Server) Incoming Port: 5061 4. Click Save. Step 3: Creating a SIP profile CUCM comes with a profile called Standard SIP Profile For TelePresence Conferencing 1. In Cisco Unified CM Administration, go to Device > Device Settings > SIP Profile and click Add New. 2. Configure the fields as appropriate. 3. Click Save. Step 4: Creating a SIP trunk 1. In Cisco Unified CM Administration, go to Device >Trunk and click Add New. 2. Configure these fields: Trunk Type = SIP trunk Device Protocol = SIP Trunk Service Type = None(Default) 3. Click Next. 4. As a minimum, complete these fields: Device name = Type in a name e.g. Acanoserver (no spaces allowed) Acano solution: Deployment Guide R1.2 76-1006-06-K Page 76 Example of Configuring a SIP Trunk to CUCM Device pool = The pool you want your device to belong to (as configured in System > Device Pool in CUCM) SRTP Allowed = Select if you want media encryption (we only do media encryption if the trunk is TLS) Outbound Calls > Calling Party Transformation CSS = Select as appropriate Sip Information > Destination Address = The destination address e.g. acanoserver.example.com or an IP address. Sip Information > Destination Port = 5060 for TCP or 5061 for TLS SIP Trunk Security Profile = As in Step 2: Creating a Security profile above. (Either the security profile that you created or "Non Secure SIP Trunk" if this trunk will be a TCP.) SIP Profile = As in Step 3: Creating a SIP profile above. Normalization Script = "vcs-interop" if available. (Only necessary if SRTP will be used. Even if you do not have a VCS, the Acano solution has the same interop issues that VCS would have, and therefore this script is suitable for a trunk to the Acano Core also.) 5. Click Save. Step 5: Configuring the dial plan for outbound calls This step depends on your needs; for example, you can create a Route Pattern in order to route specific numbers to the SIP trunk. Equally, you can configure a SIP Route Pattern on CUCM in order to route calls to the SIP trunk e.g. route @example.com calls to the SIP trunk. Step 6: Testing Make some test calls. Acano solution: Deployment Guide R1.2 76-1006-06-K Page 77 Configuring a SIP Trunk to an Avaya CM Appendix H Configuring a SIP Trunk to an Avaya CM This appendix provides an example of setting up a SIP trunk between the Acano Server and the Avaya Communications Manager (Avaya CM) in order to use the Avaya CM. It assumes that you are familiar with the Avaya CM and can adapt the example to your needs. Note: Avaya CM is an Avaya PBX, so calls will be audio only, however, the Acano solution does not impose this restriction on interoperability with Avaya: therefore a call of type of ‘avaya’ does not imply that the call is audio-only. Configuration Summary The example deployment assumes: This audio connection between Avaya CM and Acano is accessed via dialing a prefix 49 The assigned IVR digits for the Acano Server are 8320; that is a user from the Avaya environment will dial 498320 to access the Acano Server IVR A DID extension 5328 to route to this same number and allow for PSTN dial-in to the Acano Server Avaya Software Version: CM6 R016x.00.1.510.1 Update: 19940 Acano Server Configuration 1. Log in to the Web Admin Interface and go to Configuration > General. 2. For IVR Numeric ID, enter 8320. These digits will be passed from the Avaya CM to the Acano Server, and then routed to the Acano IVR. 3. Click Submit. 4. Go to Configuration > Outbound Calls. 5. Add a dial plan entry for the Avaya CM – see the example below. The highlighted IP address below matches the C-LAN or Processor Ethernet address on the CM side and represents the CM interface used in the Signaling Group created later. Acano solution: Deployment Guide R1.2 76-1006-06-K Page 78 Configuring a SIP Trunk to an Avaya CM 6. Click Add New. Avaya CM Configuration 1. Add a node name for the Acano signaling interface. 2. Add an Avaya Signaling Group with the following: Group Type = SIP Near-end Node Name = C-LAN or Processor Ethernet interface indicated in the dial plan setting in the previous section Far-end Node Name = Node name for the Acano signaling interface created above. Port settings for both Near-end and Far-end = 5060 Far-end Domain = SIP domain associated with the Acano Server Direct IP-IP Audio Connections = n. This ensures that all traffic from the Avaya CM comes from the Near-end Node Acano solution: Deployment Guide R1.2 76-1006-06-K Page 79 Configuring a SIP Trunk to an Avaya CM 3. Add an Avaya Trunk Group with the following: Group Type = SIP Direction = two way Service Type = tie Additional settings may vary, but see the examples below for possible configuration Acano solution: Deployment Guide R1.2 76-1006-06-K Page 80 Configuring a SIP Trunk to an Avaya CM Acano solution: Deployment Guide R1.2 76-1006-06-K Page 81 Configuring a SIP Trunk to an Avaya CM 4. Add an Avaya Route Pattern to routes calls to trunk group 105 and delete the first two digits (deletes the prefix digits 49). Acano solution: Deployment Guide R1.2 76-1006-06-K Page 82 Configuring a SIP Trunk to an Avaya CM 5. Add a Uniform Dial Plan to provide a routing for a 6-digit number with a prefix of 49. These calls must be set to be routed to AAR tables in Avaya. 6. Add an AAR setting to routes all calls of 6 digits in length and beginning with 49 (i.e. 498320) to route pattern 105 (the Acano Trunk Group). 7. Assign an Extension and DID. Optionally, in the Uniform Dial Plan you can add a setting for a DID extension (in this example, x5328) to route a call via digits 498320 to the Acano Server. Acano solution: Deployment Guide R1.2 76-1006-06-K Page 83 Configuring a Polycom DMA for the Acano solution Appendix I Configuring a Polycom DMA for the Acano solution For calls from a Polycom DMA environment to the Acano solution, create an External SIP Peer on the Polycom DMA that will point to the Acano solution, and then configure a Dial Rule on the Polycom DMA that will direct calls to it. To configure the Acano solution for the Polycom DMA, follow the instructions in the body of this document to set up a dial plan rule that points to the Polycom DMA server in the Web Admin Interface Configuration > Outbound Calls page. Also ensure that the correct ports are open (Incoming/Outgoing UDP 32768-65535 – RTP). Setting up the External SIP Peer On the Polycom DMA: 1. Go to Network > External SIP Peer > Add (see right) 2. In the External SIP Peer page configure the following (see below): a. Name: Acano b. Description: a meaningful phrase, possibly Acano IP Peer c. Next hop Address: IP Address of Acano Call Bridge d. Port: 5060 e. User Route Header: selected f. Type: Other g. Transport Type: TCP Acano solution: Deployment Guide R1.2 76-1006-06-K Page 84 Configuring a Polycom DMA for the Acano solution 3. Leave the Domain List page blank (see below). 4. In the Postliminary page Header Options section configure the following (see below): a. Copy All Parameters: Checked b. Format: Use original request's To 5. In the Postliminary page Request URI options section configure the following (see below): a. Format: Original user, configured peer's Destination Network or next hop address Acano solution: Deployment Guide R1.2 76-1006-06-K Page 85 Configuring a Polycom DMA for the Acano solution 6. In the Authentication page configure the following (see below): a. Authentication: Pass authentication b. Proxy authentication: Pass Proxy authentication 7. Click Save. Acano solution: Deployment Guide R1.2 76-1006-06-K Page 86 Configuring a Polycom DMA for the Acano solution Creating the Dial Rule In the Polycom DMA: 8. Go to Admin > Call Server > Dial Rules > Add (see right). 9. In the Edit Dial Rule for Authorized Calls page, configure the following (see below): a. Description: Acano <Description of pattern> 10. Select Enabled. 11. Select the Acano SIP Peer in the left pane and click the arrow to move it to the Selected SIP Peers. 12. In the Preliminary page create a string to represent how calls will match this rule (see below). Consult the DMA Admin Guide for more detail. The example below matches any call that begins with a 6 and sends it to the Acano solution. if(!DIAL_STRING.match(/sip:6/)) { return NEXT_RULE; } 13. Click OK. Acano solution: Deployment Guide R1.2 76-1006-06-K Page 87 Configuring a Polycom DMA for the Acano solution You should now be able to dial from any SIP-enabled Polycom DMA endpoint to the Acano solution using the rule created. Acano solution: Deployment Guide R1.2 76-1006-06-K Page 88 Using a Standby Acano Server Appendix J Using a Standby Acano Server The instructions in this appendix allow to both Acano Server and virtualized deployments. Backing the Currently Used Configuration 1. Establish an SSH connection to the currently used Acano Server using an SSH utility such as puTTy. 2. Issue the command backup snapshot <name> This backup includes IP addresses, passwords and certificates into a file called name.bak. We recommend using a name in the format servername_date (for example, mycompany_server_2014_09_04) A successful backup creation returns: 3. Download the backup file using an SFTP connection (e.g. WinSCP). Note: We recommend backing up your Acano solution servers regularly, e.g. once a day and that you store copies of the backup externally to the Acano solution and the standby server. Transferring a Backup to the Standby Server Note: We recommend that you keep the standby sever running at all times. 1. Copy all the certificates and the license.dat file from the standby server in case they differ from the original server that the backup was created on. 2. Establish an SFTP connection with the standby server. 3. Upload the previously saved backup file on to the standby server. 4. Issue the MMP backup list command to confirm that the backup file was successfully uploaded. This should return something similar to: Acano solution: Deployment Guide R1.2 76-1006-06-K Page 89 Using a Standby Acano Server 5. Enter the following command and confirm to restore from the backup file: backup rollback <name>. This overwrites the existing configuration and reboots the Acano solution. Therefore a warning message is displayed. The confirmation is case sensitive and you must press upper case Y, otherwise the operation will be aborted. Note: It is not possible to create a backup from one type of deployment (Acano Server or virtualized) and roll it back on the other type. A successful operation returns: When you restore from the backup, everything is overwritten including the IP address, certificates and the license.dat file. Therefore if you are restoring onto a different server from the one that the backup was made on, you must manually copy the original license.dat file and any certificates that are not valid on the new server. Note that the license.dat file is tied to the MAC address of the server; therefore after the backup has been restored to the new server, the license from one server will be invalid on another one. 6. Establish an SFTP connection with the standby server 7. Upload the previously saved original license.dat file back on to this server 8. If necessary: a. Put back any certificates and private keys (if the restored versions are not valid on the standby server). Acano solution: Deployment Guide R1.2 76-1006-06-K Page 90 Using a Standby Acano Server b. Assign these certificates to their corresponding services using the following commands: callbridge certs nameofkey nameofcertificate webbridge certs nameofkey nameofcertificate webadmin certs nameofkey nameofcertificate xmpp certs nameofkey nameofcertificate webbridge trust nameofcallbridgecertificate c. Restart the any service for which you changed the certificate xmpp restart callbridge restart webbridge restart webadmin restart After the new server has fully booted up, it will be fully operation and take over the services of the original server. Time for Swapping Servers If the standby server is kept powered on, typical restore times for Acano Servers are 6-8 minutes (and for VM servers this is 2-4 minutes) to restore the configuration, copy the license.dat file and restart the XMPP server. If certificate files also need to be restored, additional time may be required. Acano solution: Deployment Guide R1.2 76-1006-06-K Page 91 WebRTC Client Custom Background Image and Logo Appendix K WebRTC Client Custom Background Image and Logo From Acano solution Release 1.1 you can specify a remote HTTP or HTTPS URL for an image that the Web Bridge will use in place of the default Acano WebRTC login image (currently of a man in a boat) in the Web RTC Client login page. You can also replace the Acano logo that appears on this login page with your own. Image Format and Size The image and the logo files should be .jpg format and each less than 500kB in size. The recommended size for logo image is 282 pixels wide by 68 pixels high; these dimensions (282 by 68) will fill the space to the edges of the sign in box horizontally and will use the top half of the space between the 'Join call / Sign in' and the call id box. Logos of other sizes will be rescaled to fit. Web Server Requirements The background image and logo files must be stored on a web server that the Acano Call Bridge (not the Web Bridge) can reach without needing to supply a password. For example, if the web server is a dedicated resource for the Acano solution: OS e.g. Ubuntu 1 core with 4 GB RAM, and 20 GB storage disk Apache web server with a default configuration Directory under the default web directory (/var/www/) for the files The import occurs when the Call Bridge starts, not as a separate request to the web server for each caller; therefore there is no dependency on the amount of traffic. Customization Procedure Note: This section provides instructions for using the Web Admin Interface but you can also use the API to customize the WebRTC background login image and login logo. See the API Specification document for details. Background image procedure 1. Sign in to the Web Admin Interface and go to Configuration > General. 2. In the Web Bridge section, complete the Custom Background Image URI field starting with http:// or https://. Acano solution: Deployment Guide R1.2 76-1006-06-K Page 92 WebRTC Client Custom Background Image and Logo 3. Click Submit. The Call Bridge retrieves the image and pushes it to the Web Bridge to be served as the background image for the WebRTC login page. In the event of a failure (for example, if the configured URI can't be reached or the image retrieved) an alarm is displayed in the Web Admin Interface and on the API "/system/alarms" node, but users can still log in. Logo customization procedure To replace the Acano logo in the WebRTC login page using the Web Admin Interface: 4. Sign in to the Web Admin Interface and go to Configuration > General. 5. In the Web Bridge section, complete the Custom Login Logo URI field starting with http:// or https://. (See above.) 6. Click Submit. Acano solution: Deployment Guide R1.2 76-1006-06-K Page 93 © 2014 Acano (UK) Ltd. All rights reserved. This document is provided for information purposes only and its contents are subject to change without notice. This document may not be reproduced or transmitted in any form or by any means, for any purpose other than the recipient’s personal use, without our prior written permission. Acano and coSpace are trademarks of Acano. Other names may be trademarks of their respective owners. Acano solution: Deployment Guide R1.2 76-1006-06-K Page 94