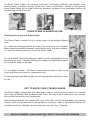
1
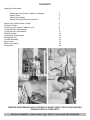
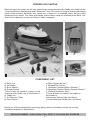
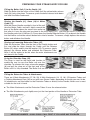
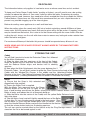
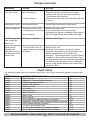
Instant Steamer – Model IS2000
USER INSTRUCTIONS
PLEASE READ THESE INSTRUCTIONS CAREFULLY BEFORE USE
Thank you for purchasing an Earlex Instant Steam Cleaning Kit. In order to obtain the best results
from this product, please read these instructions & make a special note of the Safety Rules before
commencing any work.
EARLEX LTD. WILL ACCEPT NO RESPONSIBILITY FOR THE USE OF THIS PRODUCT IF USED
FOR ANY OTHER PURPOSES THAN THOSE DETAILED HEREIN
RETAIN THESE INSTRUCTIONS FOR FUTURE REFERENCE
Important Information
CONTENTS
Check that your Steam Caddy is complete
Safety Rules
Safety Precautions
Steam Cleaning Delicate materials
3
4
4
4
About your Earlex Steam Caddy
Features Guide
Preparing your Steam Caddy for use
Using the main attachments
Using the mini attachments
Getting started
Cleaning & maintenance
Storing the unit
Trouble Shooting
Spare parts
Mains connection
Guarantee
5
7
8
9
11
12
13
13
14
14
15
16
BEFORE PROCEEDING ANY FURTHER PLEASE CHECK THAT YOUR EARLEX
STEAM CADDY IS COMPLETE.
HELPLINE NUMBER - 01483 454666. CALL FIRST IF YOU HAVE ANY PROBLEM
2
OPENING THE CARTON
When you open the carton, you will see a plain brown carton containing the Caddy unit, which has the
4 main attachments stowed inside and 2 Extension Tubes. This carton is on top of another plain brown
carton, which contains the Boiler Unit, which has a recess in its underside where the three Mini
Attachments are stored. The Hose and Handle and the Mains Lead are attached to the Boiler Unit.
Check the list below to ensure your Steam Caddy is complete.
a
e
f
j
l
i
g
1
2
h
b
c
d
COMPONENT LIST
a) Boiler Unit
b) Jet Nozzle *
c) Brush Nozzle *
d) Scraper Nozzle *
*These 3 tools are stored in a recess, in the
underside of the boiler unit as illustrated in 2
e) Caddy Unit
f) 2 x Extension Tubes
g) Floor Cleaner **
k
3
h) Floor Cleaner Bonnet **
i) Window/Tile Cleaner **
j) Upholstery Cleaner/Clothes Steamer **
k) Upholstery Cleaner/Clothes Steamer Bonnet **
l) Clothing Attachment Rest **
**These 6 items are stored in the caddy as
illustrated in 3
m)Instruction Manual (item not shown)
n) Quick Reference Guide (item not shown)
Should any of these components be missing please phone our helpline and we will arrange
immediate despatch of replacements.
HELPLINE NUMBER - 01483 454666. CALL FIRST IF YOU HAVE ANY PROBLEM
3
●
●
●
●
●
●
●
●
●
●
●
●
●
●
●
SAFETY RULES
Keep equipment away from children and pets.
If using the unit on stairs or at a height, always ensure that it has been properly blocked to
prevent it falling off.
Steam is produced at 100˚C. Be careful, wear protective clothing and protect your hands with
heat resistant gloves or mitts.
Never point the steam at anyone.
Never use unit outside when raining.
Do not overfill water tank.
Do not stand on the unit or the hose.
Do not pull the unit by the Mains Lead, only by the Hose.
Do not allow water or steam to enter light switches or power points.
Do not leave unit unattended.
Use only standard tap water. Never add detergents or chemicals for cleaning.
Extreme care must be taken when using in bathrooms. Always be aware of electrocution from
stored water in baths or sinks.
It is recommended that a RCD (residual current device) rated at 30mA is fitted into the mains
supply socket for added protection against electric shock.
Use only genuine Earlex replacement parts, unless otherwise stated.
Never direct steam towards equipment that contains electrical components.
CAUTION
STEAM IS HOT! Please be aware that steam is produced at 100˚C – so be careful, wear protective
clothing and protect your hands with heat resistant gloves or mitts. Be aware that during use,
condensing steam will result in a small amount of hot water dripping from the attachments. Take extra
care when cleaning with the attachments at higher levels, eg cleaning windows or tiles. When used
for removing creases from clothes or curtains avoid water marks from dripping water by wiping the
attachments occasionally with a dry cloth. The exposed parts of the Steam Caddy that become hot in
use, and which the user is likely to touch in use, are coloured RED as an extra warning. Never touch
these parts when the unit is in use. Any part of the Steam Caddy may be hotter than you expect, so
always take extra care during or after use.
You will see this symbol
the presence of steam.
above the Steam Release button on the handle, to warn you about
Quality control checks in our factory may result in a very small residue of water in the steam hose of
the Steam Caddy. This is due to steam cooling in the hose. When you switch the unit on for the first
time (and every time thereafter) and before the Steam Ready light comes on, there may be a short jet
of hot water or steam ejected from the end of the tool, before or immediately after the Steam Button
is pressed. Drain this water into a container, until only steam is produced, before starting your cleaning
task.
Only submerge the end of the handle nozzle when descaling. Never submerge at any other time, with
or without attachments fitted. Cooling steam will draw water up into the hose.
USING STEAM ON DELICATE MATERIALS
Always check the suitability of materials before steam cleaning. Steam is being generated at 100˚C.
Do not use on any surfaces that cannot withstand this temperature e.g. Draylon®, velour, delicate
fabrics etc. Always test a small area of the material – preferably a portion that is normally unseen –
and allow it to dry before starting the full cleaning task.
Do not soak materials being cleaned. Only a light application of steam is required.
We do not recommend using this product on self adhesive vinyl tiles.
HELPLINE NUMBER - 01483 454666. CALL FIRST IF YOU HAVE ANY PROBLEM
4
ABOUT YOUR EARLEX STEAM CADDY
INTRODUCTION
Thank you for purchasing an Earlex Steam Caddy. It is a totally unique steam cleaning system unlike
any other currently available. It enables the user to complete numerous cleaning and other tasks
around the home, in the garden and in the car. We hope you will use the Earlex Steam Caddy often
to save you time, enhance the look of your home and keep it spotlessly clean.
The really unique aspect of the Steam Caddy is that you get three products in one. A hand held
steamer, a floor mounted steamer and an upholstery/clothes steamer.
THE POWER & HYGIENE OF STEAM
The Steam Caddy will clean most surfaces and materials using only the power of steam. No
chemicals, detergents or cleaning fluids are required. This not only helps to protect the environment
but also saves the money normally spent on traditional cleaning products. The action of steam also
removes any traces of powder or liquid cleaners previously used.
Using the heat and power of steam, the Earlex Steam Caddy is extremely effective in maintaining
hygiene around your home. In the kitchen and bathroom, on carpets, and upholstery the action of
steam can kill off many common bacteria. E-coli, Salmonella, Staphylococcus aureus and
Pseudomonas aeruginosa are among the bacteria that the Steam Caddy can banish from all your
living areas and give you peace of mind that your home is as clean as it can be.
WHERE TO USE YOUR STEAM CLEANER
The Earlex Steam Caddy can be used around your home to clean, brighten and restore the pile in your
carpets. Even tiled, stone and sealed hard wood floors can be cleaned to make them look almost new.
Clean and refresh the colour of your soft furnishings and upholstery, and remove unwanted creases
and wrinkles from your clothes and curtains. The Steam Caddy has been cleverly designed to convert,
very simply, to a clothes steamer that gives very professional results. With the instant steam
availability and fast assembly as a garment steamer this means you can use this product regularly to
keep your clothes looking their best.
In the kitchen and bathroom the Earlex Steam Caddy will both clean and sanitise. Cleaning around
taps, toilets, all sanitary ware and tiles, will both improve the looks and ensure these areas are truly
sanitised. Ceramic tiles will sparkle when soap deposits are removed, mirrors too will look like new.
Removing burnt and caked on deposits from cookers becomes an easy task.
HELPLINE NUMBER - 01483 454666. CALL FIRST IF YOU HAVE ANY PROBLEM
5
The Earlex Steam Caddy is an extremely useful tool. It will remove traffic film from windows, clean
venetian blinds and defrost freezers (check with freezer manufacturer). Outside of the home the
Earlex Steam Caddy can be used to clean the barbecue, the deck of your lawnmower, sterilise soil
and clean the interior of your car.
THREE STEAM CLEANERS IN ONE
Choosing how to use your Steam Caddy
The Steam Caddy is unique in that it can be used in three distinctly different
ways.
As a hand held cleaning tool with the Boiler Unit carried over your shoulder.
When cleaning around the bathroom, some kitchen areas and some windows,
it is likely this will be the best way to use the Steam Caddy.
Or, with the Boiler fixed to the wheeled Caddy, free to be pulled behind you on
the floor as you work. If cleaning flooring, for example, it will definitely be easier
to use with the Caddy on the floor.
Or, as a clothes steamer. The Steam Caddy quickly converts to allow you to
steam and clean your clothes in a professional way.
As you experiment with different jobs you will soon discover which way is best
for you.
GET TO KNOW YOUR STEAM CLEANER
The Steam Caddy is designed for fast action and is ready for use in less than a minute. It is supplied
with a range of different tools for different jobs. Take a little time to get to know these tools and how
they can best be used for your cleaning jobs.
Where towelling bonnets are supplied with some of the tools, dirt will be absorbed by the towelling
material, which is washable and can be replaced as necessary. Packs of replacement bonnets are
available from Earlex Limited or you can make your own from Terry Towelling.
HELPLINE NUMBER - 01483 454666. CALL FIRST IF YOU HAVE ANY PROBLEM
6
FEATURES GUIDE
Refer to the following drawing & descriptions when reading this instruction leaflet.
1
2
3
4
5
6
7
8
9
10
11
12
13
14
15
16
17
Boiler Unit
Holster
On/Off Mains Switch
“Heating Up” Neon Indicator
“Steam Ready” Neon Indicator
Shoulder Strap Popper Release
Water Tank Lid
Water Tank
Drip Aperture
Steam Hose
Handle
Handle Release Button
Steam Release Button
Jet Nozzle
Scraper Nozzle
Brush Nozzle
Mains Cable
18
19
20
21
22
23
24
25
26
27
28
29
30
31
32
33
Caddy
Location for Extension Tube Button
Extension Tube Release Button
Hose & Mains Cable Retainer
Plug Storage Recess
Socket for location of Extension Tubes for
Clothing Attachment Rest
Boiler Release Latch
Extension Tubes
Attachment Connection
Floor Cleaner
Window/Tile Cleaner
Upholstery Cleaner/Clothes steamer
Clothing Attachment Rest
Floor Cleaner Bonnet
Upholstery Cleaner/Clothes Steamer Bonnet
Shoulder Strap
HELPLINE NUMBER - 01483 454666. CALL FIRST IF YOU HAVE ANY PROBLEM
7
PREPARING YOUR STEAM CADDY FOR USE
Fitting the Boiler Unit (1) to the Caddy (18)
Slide the Boiler into the centre of the Caddy until the yellow boiler release
latch (24) locks into place. To remove, press the boiler release latch down
and slide the Boiler backwards.
Storing the Handle (11), Hose (10) & Mains
Cable (17)
With the Steam Handle uncoiled in front of the unit
take the Mains Cable, and coil it tightly around the
base of the Boiler above the steam hose outlet so
that after 41/2 turns the plug can be stored in the front recess (22). Then coil the hose 11/2 turns until
the Handle parks into its Holster (2). Press down the Handle Release Button (12) and push the Handle
into the Holster so that the release button locks into its location. To remove, simply depress the release
button and withdraw the Handle.
Storing and removing Extension Tubes (25)
Slide the Extension Tubes into the front of the Caddy, button end
first and slide the tubes through the Caddy until the Release
Button (20) aligns and fits into the location (19). To remove, simply
depress the release button and withdraw the Extension Tube.
Note: It will be easier to do this when the main attachments are
not stored in the Caddy.
Using the Shoulder Strap (33)
The Strap is used for the hand held function to
enable the user to carry the Boiler unit over the
shoulder. To unfasten the strap, release the popper
(6) and pull the strap out at the front end of the
Boiler until it is fully extended. The Boiler Unit can now be hung over your shoulder.
Fitting the Extension Tubes & Attachments
There are 3 Main Attachments (27, 28, 29), 3 Mini Attachments (14, 15, 16), 2 Extension Tubes and
a Clothing Attachment Rest (30) to use with your Steam Caddy, depending on the job you want to do.
All attachments are fitted either to the Extension Tubes or directly to the Handle, which ever is most
suitable for the task in hand.
●
●
The Main Attachments and the Extension Tubes fit over the release button.
The Mini Attachments push tightly over just the front portion of the Handle or Extension Tube.
HELPLINE NUMBER - 01483 454666. CALL FIRST IF YOU HAVE ANY PROBLEM
8
USING THE MAIN ATTACHMENTS
Floor Cleaner (27)
Some carpets have stain resistant treatments, which may be affected by steam cleaning. Try
cleaning a small area of carpet that is normally unseen, then allow 24 hours to check whether
there have been any unusual effects on the carpet, e.g white streaks. If this happens DO NOT
CONTINUE TO USE – Check with your carpet supplier for further advice.
On wax treated surfaces and floors the sheen may be removed by steam. Do not use on
unsealed wood as this could destroy the integrity of the wood grain. Always check a small area
first or check with the manufacturer.
The Floor Cleaner can be used in a number of ways and for a variety of purposes. You may need to
experiment to find the best method of cleaning. The three options of use are:
a) With bristles extended – no Bonnet being used
b) With bristles extended and a Bonnet (31) in use
c) No bristles extended and a Bonnet (31) in use
In general, option (a) is likely to be used on stone or tiled floors where there are areas needing more
vigorous action to clean thoroughly. This may, for instance, be the grouting between tiles that requires
the bristles to help clear out dirt or grime.
Option (b) would be the normal use for any stone, tiled or solid floor.
Option (c) is for normal carpeted areas.
The Earlex Steam Caddy Floor Cleaner can be changed from having its
bristles extended to not extended. This is achieved by repositioning the
centre section of the Floor Cleaner. You will see in this centre section there
are 2 finger grip cut outs which enable you to remove the section
completely. Once removed, rotate the section through 180˚ and re-locate it
in the Floor Cleaner. You will see the position of the bristles has changed.
Fitting the Bonnet (31) to the Floor Cleaner (27)
To fit the Bonnet, open the two yellow clips. Lay the Bonnet on a flat
surface and place the Floor Cleaner in the centre of the Bonnet.
Fold the Bonnet around the Floor Cleaner with the nap facing
outwards and secure it in position by re-fixing the clips in place,
making sure the Bonnet is pulled tight over the face of the Floor Cleaner.
Used correctly the Floor Cleaner will refresh and brighten your floor by removing surface grime, pet
hairs etc. It is not a dirt extraction system, so it cannot remove deep stains or grease. Before using
the Floor Cleaner, use a vacuum to pick up the larger dirt and grit particles. If there are stains on the
carpet, pause for a few seconds to allow the steam to penetrate but do not use excessive steam as
this could result in watermarking or permanent staining.
IMPORTANT - When cleaning hard floors there may be a small residue of water that will ultimately
evaporate. If preferred, use a dry cloth attached to the Floor Cleaner (steamer turned off) and wipe
area dry.
DO NOT SOAK THE SURFACE! - Glide the Floor Cleaner over the surface.
It is generally better and easier, to pull rather than push the head across
heavy pile carpets. Do not scrub the surface unless this is on tiles or stone.
Used Bonnets can be washed out and re-used. Spare Bonnets are available
from Earlex Limited or you can make your own using Terry Toweling material.
HELPLINE NUMBER - 01483 454666. CALL FIRST IF YOU HAVE ANY PROBLEM
9
Uses for your Floor Cleaner
The Floor Cleaner can be used on many types of surfaces such as ceramic, marble, linoleum, stone,
parquet etc. Be especially careful with parquet – older oak floors are very tough but on some newer
floors steam may cause the blocks to swell. Always take advice from the manufacturer of the floor
covering before proceeding to use steam. One useful point to note is that steam will cause animal
hairs, that have collected on floors and fabrics to roll into easily removable balls.
This attachment can also be used on car interiors, motor homes, painted doors, walls, louvers etc.
IMPORTANT - When cleaning hard floors there may be a small residue of water that will ultimately
evaporate. If preferred, use a dry cloth attached to the Floor Cleaner (steamer turned off) and wipe
area dry.
We do not recommend using this product on self adhesive vinyl tiles.
Window/Tile Cleaner (28)
When cleaning exterior glass be careful not to pick
up grit particles on the rubber blade as this could
scratch the glass.
Antique glass and stained glass may be brittle and
can crack under extreme temperatures.
Do not use on glass when the temperature is below
0˚C.
IMPORTANT – You should only proceed at your own risk
The Window Tile Cleaner can be used fitted directly onto the Hose Handle or fitted to one or both
Extension Tubes, whichever is best for the job in hand.
As the attachment is moved down the window (mirror or tiles) and the Steam Release Button is
pressed, the rubber blade will clean away the dirt as it wipes the surface after the steam has been
applied. After you have completely finished cleaning, release the Steam Button and clean the surface
from top to bottom with the rubber blade only. Excess water from around the window should be
removed with a dry cloth.
Steam will completely remove dust, film or greasy marks from windows, mirrors, tiles and patio doors.
It will remove soap and grease residues but cannot remove deposits of scale. To remove black marks
from grouting or difficult corners use the mini attachments, Jet Nozzle, Brush Nozzle or Scraper
Nozzle.
Upholstery Cleaner/Clothes Steamer (29)
IMPORTANT – Some upholstery, fabrics and soft
furnishings have stain resistant treatments, which,
may be affected by steam cleaning. Try cleaning a
small area of material that is normally unseen, then
allow 24 hours before checking whether there have
been any unusual effects on the material. If so, DO
NOT CONTINUE. Check with your material supplier
for further advice. Do not allow the material to become soaked. You only require a small
amount of steam to clean, and soaking can leave water marks or cause bleed through linings
etc.
The Upholstery Cleaner can be used either with or without the Bonnet (32). For normal cleaning
purposes and for general use the Bonnet would be fitted. When removing creases from garments and
hanging curtains you can sometimes improve the appearance of the material by using the head
without the Bonnet attached. It is best to experiment to get the best finish for you.
This tool can also be used either fitted directly onto the Hose Handle or fitted to one or both Extension
Tubes. Firstly select which is best for the task in hand and assemble together.
HELPLINE NUMBER - 01483 454666. CALL FIRST IF YOU HAVE ANY PROBLEM
10
Fitting the Bonnet (32) to the Upholstery Cleaner (29)
Take the Bonnet, place it on a flat surface with the strings at the top and the nap
facing outwards and place the Upholstery Cleaner in the middle. Pull the string
until the Bonnet fits tightly to the Upholstery Cleaner, and tie with a bow.
When cleaning upholstery you will need to glide the head across the material in
the same way as when using the Floor Cleaner. The bonnets will need to be
replaced as they become dirty. Used bonnets can be washed and re-used.
Wash at 90˚C for maximum longevity. Do not use bleach or fabric conditioner
and use only one third of normal soap powder to avoid clogging the fibres.
Spare Bonnets can be purchased from Earlex or you can make your own using Terry Toweling
material.
The Upholstery Cleaner can also be used very effectively for removing the creases from hanging
curtains.
Upholstery Cleaner/Clothes Steamer
To set up your Steam Caddy as a Clothes Steamer proceed as follows:In the Plug Storage Recess (22) there is a socket (23) to accept the button end
of the Extension Tubes. Fit the Extension Tubes together and then locate both
into this socket. Now fit the Clothing Attachment Rest (30) into the top of the
Extension Tube. Your clothes can now be hung from this Clothing Attachment
Rest using a normal coat hanger.
Press the Steam Release Button and pass the Clothes Steamer lightly across
the surface to remove creases and wrinkles from your clothes.
We recommend that the unit remains on the floor and shorter garments are steam cleaned from a
seated position as shown. Longer garments can be hung from a wardrobe rail or over the top of a door.
The Clothing Attachment Rest is used to “park” the Clothes Steamer
safely in between steaming your clothes. It can also be used to park the
Window/Tile Cleaner.
Please note, the Clothes Steamer is designed to refresh clothes (i.e.
appearance & odour), it is not designed to be a replacement for your
steam iron. If the yellow button on the handle is pressed continuously you
may begin to see drips of water appear (this is due to the steam
condensing in the tube), by using "bursts" of steam as opposed to
"continuous" steam this will be reduced. If you should notice drips of water
from the bonnet, you should stop steaming, and wait a few seconds before dryingthe Bonnet with a
hand towel.
IMPORTANT – Some articles of clothing are made from very delicate materials. Always refer
to the labels in the garment, or check with the shop where the garment was bought, before
applying steam.
HELPLINE NUMBER - 01483 454666. CALL FIRST IF YOU HAVE ANY PROBLEM
11
USING THE MINI ATTACHMENTS
The 3 Mini Attachments are stored in a recess underneath the boiler, for
easy selection of the tool required. The 3 attachments supplied are:a) Scraper Nozzle (15)
b) Brush Nozzle (16)
c) Jet Nozzle (14)
a
b
c
WARNING: THESE MINI ATTACHMENTS RUN VERY HOT IN USE. When changing the Mini
Attachments, always use a cloth when holding the attachment to prevent burning your hands. Check
attachments on a regular basis for any debris/scale build up.
The Mini Attachments are ideal for cleaning cookers, baths, toilets, work surfaces, tiles, sinks etc. The
brush can be used to agitate areas that need that little bit extra abrasion. We recommend that you use
these attachments in conjunction with a damp cloth. As an example – if you have baked on material
on a cooker, aim the Jet Nozzle at the surface, press the Steam Button to release the steam and you
should be able to easily wipe the surface clean. The damp cloth enables you to wipe away the waste
material.
The Scraper Nozzle is ideal for very fast defrosting of freezers (check with freezer manufacturer), also
for jobs such as removing the caked on grass from lawnmowers. Remember that steam both cleans
and sanitises at the same time. So on work surfaces you are ensuring these are really clean.
As an optional extra (Code M0605) we offer a pack
of 3 spare brushes each with different coloured
bristles so you can keep these for separate jobs
and always know which one to use.
Also available as an optional extra (Code M0630)
we offer a pack of 2 brushes with metal bristles for cleaning barbecues.
GETTING STARTED
Before you use your Earlex Steam Caddy, make sure that you have read and followed all the safety
instructions.
Decide how you want to use the Steam Caddy, as a hand held unit with the Boiler hung over your
shoulder, with the Boiler unit fixed to the Caddy free to be pulled along on the floor, or set up as a
Clothes Steamer. Refer to the section “Preparing your Steam Caddy for use” and fit together the
various parts of the system to suit the job in hand.
Filling the Water Tank (8)
The Water Tank can be filled in two ways. Remove the Steam Handle from the
Holster then either:
Lift the Water Tank Lid (7) and hold it out of the way, fill the Water Tank to the
base of the filler neck (75cl) then replace the lid.
Or
Lift Water Tank Lid and pull the Water Tank out completely. Fill this from a tap
to the base of the filler neck then replace it into the Boiler and replace the lid.
Note In hard water areas we recommend you use cooled boiled water.
The water in the tank should last for about 30 minutes but this can be refilled at
any time and does not require the unit to be switched off. Nor do you have to
wait for it to heat up again. Simply refill either in situ or at the tap and you can
continue as before.
HELPLINE NUMBER - 01483 454666. CALL FIRST IF YOU HAVE ANY PROBLEM
12
Switch the Steam Caddy on
With the tank filled with water, plug the steamer into a mains socket and press
the red ON/OFF mains switch (3) and this will illuminate to show the power is
on. The amber “Heating Up” neon Indicator (4) will also light up.
After approximately 30 – 60 seconds the green “Steam Ready” neon Indicator
(5) will light up to tell you that the unit is ready to use and instant steam is
available.
Steam Release Button (13)
To deliver instant steam just press the Steam Release Button.
The Steam Release Button gives complete control over the delivery of steam.
Once the water heats up and the “Steam Ready” neon is lit, steam will be
delivered only when the Steam Release Button is depressed. This means that
you produce the exact amount of steam you need, when you need it. Normally
steam will be delivered within two or three seconds of the button being
depressed and stop within a few seconds of the button being released, giving
you complete control of the steamer.
The Steam Caddy is also extremely safe. The Steam Button has no electric wires connected to it.
Instead a pneumatic system is used to operate the delivery of the steam.
Once the Steam Caddy is ready to use, begin to move the attachment head over the surface to be
cleaned at a steady pace, pressing the Steam Button as required.
WARNING: Quality control checks in our factory may result in a very small residue of water in the
Steam Hose of the Steam Caddy. This is due to steam cooling in the hose. When you switch the unit
on for the first time (and every time thereafter) and before the Steam Ready light comes on, there may
be a short jet of hot water or steam ejected from the end of the tool, before or immediately after the
Steam Button is pressed. Drain this water into a container, until only steam is produced, before starting
your cleaning task.
Only submerge the end of the handle nozzle when descaling. Never submerge at any other time, with
or without attachments fitted. Cooling steam will draw water up into the hose.
CLEANING AND MAINTENANCE
The Boiler Unit must be unplugged after use and before cleaning or before any maintenance.
There is very little maintenance required for this machine. To clean after use, simply ensure the unit
is switched off at the mains then wipe it over with a damp cloth. Wipe all tools down and wash out any
used bonnets.
Periodically check Attachments, Extension Tubes, Nozzle Connections and Handle Nozzle
Connection for a build up of debris or lime-scale and remove as necessary.
Wash bonnets at 90˚C for maximum longevity. Do not use bleach or fabric conditioner. Use only one
third of normal soap powder to avoid clogging of the fibres.
Spare bonnets are available from Earlex Limited or you can make your own using Terry Toweling
material.
HELPLINE NUMBER - 01483 454666. CALL FIRST IF YOU HAVE ANY PROBLEM
13
DE-SCALING
The information below, only applies in hard water areas or where some lime scale is evident.
To keep your Earlex Steam Caddy “boiler” working at its best, you will need to use a de-scaling
solution to reduce the effects of “lime scale” build up within the boiler. Proprietary de-scaling
products can be used, however, they need to be clearly marked that they are suitable for Kettles,
Coffee Makers, Steam Irons etc. We would also recommend that you use a liquid de-scaler to
prevent any possible clogging up of the internal pipes.
Before de-scaling, move appliance to a well ventilated area.
When de-scaling, place the nozzle only (26) into a bucket containing around 40/50mm of clean
warm water, this will prevent any fumes that may be given off by the de-scaler. A “popping” sound
may be heard from the bucket, this is due to the hot steam mixing with the warm water. After descaling the unit, always run the unit with clean water to remove any lasting de-scaler residue from
within the boiler and pipes.
For maximum efficiency of the boiler this process should be repeated every 8 hours of use.
WHEN USING ANY DE-SCALER PRODUCT ALWAYS ABIDE BY THE MANUFACTURES
INSTRUCTIONS.
STORING THE UNIT
Caddy
You will find it easiest to locate the Extension Tubes first, followed
by the Main Attachments.
a) Slide the tubes into their apertures at the front of the Caddy.
Insert the button end first and slide the tubes through the Caddy
until the Release Button aligns and locates into it’s docking
aperture.
b) Now place the Main Attachments into the space between the 2
Extension Tubes. You will find it easiest to place the Floor Cleaner to the back of the
Caddy with the Window/Tile Cleaner in the middle and the Upholstery/Clothes
Steamer at the front. The Clothing Attachment Rest should be laid on top of the other
three attachments. (Clothing Attachment Rest not shown in illustration for clarity.)
Boiler
a) Ensure that the Strap is fully retracted and
clipped back into position.
b) Ensure the Water Tank is emptied.
With the Water Tank removed, press the Steam
Release Button to run the unit. As soon as you
hear a loud buzzing sound from the Boiler, release the Steam Release Button. This will purge the
Boiler of water and reduce the risk of limescale build up.
c) Slide the Boiler into the centre of the Caddy until the yellow Boiler Release Latch,
locks into place.
d) Take the Mains Lead, and coil it tightly around the base of the Boiler
so that after 41/2 turns the plug can be stored in the front recess. Then
coil the hose 11/2 turns until the Handle parks into it’s Holster. Press
down the Handle Release Button and push the Handle into the Holster
so that the release button locks into its docking aperture.
The unit can now be carried either by the Holster or by the Plug Storage Recess. The unit can be
stored on the flat or be leaned against a wall.
HELPLINE NUMBER - 01483 454666. CALL FIRST IF YOU HAVE ANY PROBLEM
14
PROBLEM
Unit fails to boil
CAUSE
TROUBLE SHOOTING
ACTION
Not switched on
Check that mains is switched on and the
switch on the unit has also been operated
- Push button will illuminate
Check fuse in plug and any extension lead that
is in use
Fuse has blown
Accessories fall off
Water spitting out
Loud buzzing noise
from inside the
Boiler unit
Steam being
emitted from
emergency vent at
the the back of the
Water Tank
Not properly fitted
Too much water in tank
Initial ejection at warm up
Not heated up
No water in the tank
Review fitting instructions.See page 8
Reduce the water level
Press steam release button for initial
discharge until steam is produced. See page 13
Wait for Steam Ready neon Indicator to light
Refill the Water Tank
Pressure relief valve is
Switch off the unit
operating due to blockage Allow the unit to cool for at least 5 minutes.
of steam
Check all steam holes in the Attachment, and
Nozzle Connections in the Handle and
Extension Tubes being used, to ensure there is
no debris or lime-scale preventing steam from
passing through them and clean out accordingly.
The build up of lime-scale can be avoided by
always using cooled, boiled water when filling
the Water Tank.
SPARE PARTS
The following spare parts are available from Earlex Ltd. Please contact our helpline to place your
order.
SPARE PART NO.
SPARE PART DESCRIPTION
REF NO ON P. 7
M0001
Floor Cleaner
27
M0050
Upholstery Cleaner/Clothes Steamer
29
M0075
Clothing Attachment Rest
30
M0090
Window/Tile Cleaner
28
M0110
Extension Tube
25
M0290
Jet Nozzle
14
M0295
Scraper Nozzle
15
M0310
Water Tank Lid
7
M0530
Water Tank
8
M0580
Brush Nozzle
16
M0605
Brush Nozzle kit, different colours (3 pieces)
N/A
M0610
Upholstery Cleaner/Clothes Steamer Bonnet (3 pieces) 32
M0611
Floor Cleaner Bonnet (3 pieces)
31
M0615
“O” Ring set for Water Tank
N/A
M0616
“O” Ring set for Nozzle Connection (6 pieces)
N/A
M0630
Brush Nozzle kit with metal bristles (2 pieces)
N/A
HELPLINE NUMBER - 01483 454666. CALL FIRST IF YOU HAVE ANY PROBLEM
15
IF YOU REQUIRE FURTHER ASSISTANCE PLEASE CONTACT OUR HELPLINE ON
Tel: 01483 454666 Fax: 01483 454548 email: [email protected]
Opening Hours: Monday – Friday 08:30 – 18:00 (Except Bank Holidays)
●
●
●
MAINS CONNECTION
Power cord must be connected to grounded (3 prong) outlet.
Replace a worn or damaged power cord. Never repair a power cord.
Removal of grounding pin VOIDS warranty.
Extension Cord
If you are using an extension cord it must be rated at a minimum of 15 amps and fully unwound. Do
not operate with a extension cord rated at less than 15 amps as this will cause premature failure of
the element which is not covered by the warranty.
WARNING: THIS APPLIANCE MUST BE EARTHED. If you are using an extension lead it must be
rated at a minimum of 10amps and fully unwound. Do not operate with a lead rated at less than
10amps as this will cause premature failure of the elements and will not be covered by the guarantee.
GUARANTEE
This product is guaranteed for a period of 12 months against faulty materials and workmanship.
Whilst every possible care is taken by Earlex to ensure that our products leave the factory in good
working order, Earlex cannot under any circumstances accept liability for problems or damage
caused by their subsequent use. It is the responsibility of the user to ensure the surfaces to be
treated or cleaned are suitable for steam. This guarantee does not affect your statutory rights. This
guarantee excludes the use for hire purposes. In the event of a fault occurring please contact our
helpline before returning the unit to our Service Department at the address below together with a
copy of your purchase receipt. All repairs will be dealt with speedily.
British Registered Design: No. 3014006 : European Community Registered Design No. 000115365
Australian Registered Design No. 155594 : Chinese Registered Design No. 200430001190.6
International Patent GB2004/02177 : Canadian Registered Design No. 105550
US Registered Design No. 29/196.773 : Japanese Registered Design No. 2004-2805
EC DECLARATION OF CONFORMITY
We declare that the IS2000 conforms to: 73/23/EEC, EN60335-2-54, 89/336/EEC, EN55014-1-2,
EN61000-3-2, 3-3.
Tim Hopper - Technical Director
Earlex Ltd, Earlex House, Moorfield Road, Guildford, Surrey GU1 1RU. UK
Tel: +44 (0) 1483 454666 Fax: +44 (0) 1483 454548 email: [email protected] Website: www.earlex.co.uk
© 2005 Earlex Ltd
Code M0500 10/05
16