1
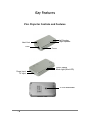
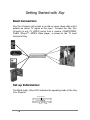
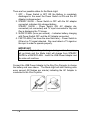
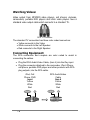
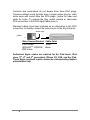
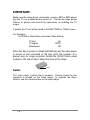
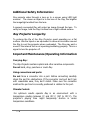
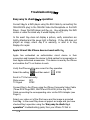
USER GUIDE Rev B Table of Contents 1 The Ray Pico Projector Installation Preparation 2 Ray Box Contents 3 Ray Features 4 Getting Started with Ray Basic Connections Setup Information 6 Watching Videos 6 Connecting Equipment 9 Charging Ray 9 Specification 10 Safety and Cleaning Handling Ray Repairing Ray 11 Using the Ray USB Power Adapter 12 Important Maintenance & Operating Information 13 Regulation Compliance 14 Battery Replacement 15 Disposal and Recycling Information 16 Troubleshooting Ray i The Ray Pico Projector Congratulations on choosing the Ray Projector Display. Thank you for your support. For optimum benefits, please read the instruction manual carefully before using the Ray Projector and keep it for future reference. Heed all warnings and follow all instructions. We hope you will be fully satisfied and enjoy the Ray Pico Protector to share your videos, photos and presentations with friends and business associates anywhere any time. The small battery operated Ray Pico Projector; convenient to store and carry on business/personal trips, produces a large 60 inch picture for excellent viewing. Installation Preparation: For best results it is advisable to learn how to correctly utilize the Ray Pico Projector with numerous products including: Digital cameras—to show pictures to friends and family. Camcorders-- to share family videos with friends. iPhone, video iPod, MPEG3, MPEG4 or portable DVD players—to present pictures and videos. Ray does not work with Notebook and NetBook computers. Computers with S-Video TV output can be used with Ray when connected to an S-Video to RCA Composite video adapter. S-Video to RCA adapter not supplied with Ray 1 Ray Box Contents Please check and identify the supplied accessories. 1 2 3 6 4 7 5 8 1. Ray Pico Projector. 2. AC adapter with mini USB Plug—Input: 100-240V ~50-60Hz Output: 5V 2000mA. 3. Tripod 4. Audio Video Cable: 2.5mm 4-pole to 3.5mm 4-pole. 5. Audio Video Cable: 2.5mm 4-pole to 3.5mm 4-pole-White 6. RCA Audio\Video Cable: 3.5mm 4-pole AV jack to RCA connectors. 7. 3.5mm to 2.5mm Adapter 8. User manual 2 Ray Features Pico Projector Controls and Features Left Speaker Right Speaker Heat Vent Lens Focus On/Off Switch Mode Light (Blue LED) Power Input TV Input Tri Pod Attachment Bottom View 3 Getting Started with Ray Basic Connection: Ray Pico Projector will remain in an idle or power down state until it detects an active TV signal at the input. Connect the Ray Pico Projector to any TV VIDEO output from a camera, CAMCORDER, iPod®, iPhone™, MPEG Video player, or phone to the TV input terminal of Ray. Set-up Information: The Mode Light , Blue LED, indicates the operating mode of the Ray Pico Projector. Mode LED Light OFF 4 ON There are four possible states for the Mode Light: 1. OFF – Power Switch is OFF OR the Battery is completely discharged in the event the Power Switch is ON and the AC Adapter is disconnected. 2. STEADY GLOW – Power Switch is OFF with the AC adapter connected, indicates fully charged battery. STEADY GLOW – Power Switch ON; AC Adapter disconnected (not connected) and TV input connected to Ray and Ray is displaying the TV image. 3. SLOW FLASH (once per second) – Indicates battery charging with Power Switch OFF and the AC Adapter connected. 4. FAST FLASH (Two times the slow flash rate) – Power Switch is ON and no TV signal detected. Ray must detect a TV signal on the input in order to operate properly. IMPORTANT In the event Ray’s battery discharges during a video, the screen will go blank and the Mode Light will change from STEADY GLOW to a RAPID FLASH. Insert the USB Power Adapter and the video will continue. Connect the USB Power Adapter to the Ray Pico Projector to charge the battery and view videos. The Mode Light will start flashing once every second (60 flashes per minute) indicating the AC Adapter is connected to the Pico Projector. USB Power 5 AC Adapter Watching Videos: Video output from MP3/MP4 video players, cell phones, cameras, camcorders, portable DVD players and other video players have a standard video output cable which connects to a standard TV. RCA TV Connector The standard TV connection has three color coded connectors: Yellow connects to the Video White connects to the Left Speaker Red connects to the Right Speaker Connecting Equipment: The RCA connectors and couplers are color coded to assist in connecting the cables. Plug the RCA Audio\Video Cable, (item 6) into the Ray input. Plug the connector attached to the camcorder, iPod, iPhone, cell phone, portable DVD player and other products with RCA plug outputs, into the RCA cable. iPod, Cell Phone, DVD Input Yellow White Red Input 6 5 RCA Audio/Video Cable Item 6 Yellow White Red Input 5 Cameras and camcorders do not always have three RCA plugs. Cameras without sound typically have a single yellow plug for video while some with sound have two RCA plugs-- yellow for video and white for audio. To operate the Ray, match camera or camcorder RCA connectors to the RCA Input Cable (item 6). Standard cables have been included as an alternative to the RCA connection, to directly connect the video source to the Ray Projector. White Strip Video Source Video Source/Product Cable Color iPod, Zune® White TM ARCHOS , COWON, Black ZEN Vision Authorized Apple cables are required for the iPod touch, iPod nano (3rd, 4th and 5th generation), iPhone 3G, 3GS, and the iPad. These Apple products require connectors incorporating Apple’s authorization chip. 7 IMPORTANT: Make sure the video player, camcorder, camera, MP3 or MP4 player has the TV out enabled and/or turned on. Consult the video player iPhone, or phone user manual for instructions on enabling the TV output. Typically the TV out will be found in the SETTINGS or TOOLS menu. For Example: Put iPOD in Video Menu and select Video Setting. TV Out TV Signal Widescreen On NTSC Off When the Ray is turned on (Mode light flashing) and the video player is turned on and connected to the Ray, point the projector at a desired area for image projection. Rotate the FOCUS thumb wheel located on the side of Ray to adjust the focus of the image. Audio: Focus The video player controls Ray’s speakers. Volume control for the speakers is located on the video player. To regulate the Ray’s volume, use the volume button on the video player. 8 Charging Ray For best long term results always start with a fully charged Ray. Turn the Power Switch to OFF. Connect Ray to the AC Adapter. Plug the AC adapter into an electric outlet. When the MODE Light flashes once per second the Ray is being charged. Ray’s dead battery will be fully charged in 4 hours. The Mode Light stops flashing when Ray’s battery is fully charged. Steady Mode light indicates a fully charged Ray. Caution: Use only the AC Adapter included with The Ray Projector. Specifications Display Technology Light Source Resolution Brightness( Typical) Frame Rate Color Image Size (Diagonal) Projection Distance Uniformity Focus I/O Connection Speaker Weight Dimensions Power Supply Battery Life 9 LCoS Technology LED VGA 640 x 480 7-10 Lumens 60Hz 24-bit RGB 5” at 8” / 73” at 9½’ 8” to infinite 90% Manual Focus TV Composite Video Stereo 5 oz (W x D x H) 2¹/3” x 4½” x ¾” 60 x 113 x 18 mm Rechargeable Li-ion Battery Up to 2 hours Safety and Cleaning Read all safety information below and operating instructions before using Ray to avoid injury. Important Safety Information: To reduce the risk of injury while operating the Ray Projector, please follow all instructions carefully. Operating Safety Precautions: Handling Ray: Do not drop, crush, puncture, incinerate, or open the Ray Projector. Do not operate the Ray in the rain, near washbasins or in any wet locations. Do not spill any food or drinks on the Ray Projector. If the Ray does get wet, unplug all cables, turn the projector off, and slide the power switch to off before cleaning. Once clean allow the Ray to dry thoroughly before reconnecting cables and turning it on. Repairing Ray: Do not attempt any repairs. Ray does not contain any user serviceable parts. Do not attempt to replace the rechargeable battery. Contact a Ray authorized Service Provider for assistance. Do go to www.raydisplays.com for helpful information. 10 Using the Ray USB Power Adapter: Firmly insert the Ray USB Power Adapter connector into the Ray Projector. Insert the power adapter firmly into the power outlet (the ModeLight should start flashing after a few seconds). Caution: Do not connect, disconnect or clean the Ray USB Power Adapter with wet hands. Use ONLY the Ray Power Adapter to charge the Ray. Note: The Ray USB Power Adapter may become warm during normal use. Be certain to allow adequate ventilation around the Ray USB Power Adapter. Always exercise caution when handling the Adapter. Never use the Ray USB Power Adapter if any of the following conditions exist. The power cord or plug has become frayed or damaged. The adapter is exposed to rain, liquids, or excessive moisture. The adapter case has become damaged. You suspect the adapter needs service or repair. Contact Ray for a replacement. DO NOT LOOK DIRECTLY INTO THE LENS OF RAY. 11 Additional Safety Information: Ray projects video through a lens on to a screen using LED light sources. The closer an object is to the lens of the Ray, the brighter the image/light emitted from the lens. A properly connected Ray will output an image through the lens. To verify an image, hold the Ray 6 inches from a light colored surface. Ray Projector Longevity: To prolong the life of the Ray Projector avoid operating on a flat surface. Use the tripod or an equivalent to allow air circulation around the Ray to cool the projector when overheated. The Ray may emit a sound if the internal fan is not operating/ventilating properly. This is a signal to turn the projector off. Important Maintenance/Operating Information: Carrying Ray: The Ray Projector contains optical and other sensitive components. Do not bend, drop, puncture or crush Ray. Using connectors and ports: Do not force a connector into a port. Before connecting carefully check the port for obstructions. If the connector and port don’t join with reasonable ease, they don’t match. Make sure the connector matches the port and is correctly positioned in relation to the port. Climate Control: For optimum results operate Ray in an environment with a temperature reading between 0º and 35º C (32º to 95º F). The projector’s playing time might temporarily shorten in cooler temperature conditions. 12 Storing Ray: Store the Ray Projector in a place where the temperature is always between -20º and 45º C (-4º to 113º F). Caution: Do not leave Ray in the car, since interior temperatures in parked vehicles may exceed the desired range. When using iPod or charging the battery, it is normal for the Ray to get warm. The exterior of the Ray functions as a cooling surface, transferring heat from inside the unit to the cooler air outside. Cleaning Ray: To clean Ray, unplug all cables and turn Ray off, making certain the power switch is in the OFF position. Use a soft, slightly damp, lint-free cloth to avoid getting moisture in the openings. Caution: Do not use window or household cleaners, aerosol sprays, solvents, alcohol, ammonia, or abrasives to clean Ray. Cleaning the Lens: Ray’s lens is recessed in order to avoid the accumulation of dust, or other particles. Dust can be removed from the lens using a dry air canister and gently blowing on the lens. Finger prints and/or other contamination such as liquid spills on the lens should be cleaned by a knowledgeable camera technician. FCC Compliance Statement This device complies with part 15 of the FCC rules. Operation is subject to the following two conditions: (1) This device may not cause harmful interference, (2) This device must accept any interference received, including interference that may cause undesired operation. 13 Note: This Ray Projector has been tested and found to comply with the limits for a Class B digital device, pursuant to Part 15 of the FCC Rules. These limits are designed to provide reasonable protection against harmful interference in a residential installation. This projector generates, uses, and may radiate radio-frequency energy. If it is not installed and used properly—that is, in strict accordance with the instructions—it may cause interference with radio and TV receptions. However, there is no guarantee that interference will not occur in a particular installation. Turning the projector on and off can determine if it is the cause of radio and TV interference or disturbed reception. If this projector does cause interference to radio or television reception, it is advisable to correct the interference with one or more of the following suggestions; Turn the TV or radio antenna until the interference stops. Move the projector from one side to the other of the TV or radio. Move the projector farther away from the TV or radio. Plug the projector in to an outlet that is on a different circuit from the TV or radio. (Be certain the projector and the TV or radio is on circuits controlled by different circuit breakers or fuses.) Battery Replacement: ONLY an authorized service provider should replace the Ray’s rechargeable battery. For battery replacement services go to: www.raydisplays.com 14 Disposal and Recycling Information: The Ray Projector must be properly disposed according to local laws and regulations. Because this product contains a battery, it must be disposed of separately from household waste. When the Ray no longer functions contact Ray or your local authorities to learn about recycling options. E&H Innovations LLC © ALL RIGHTS RESERVED TM is the trademark of E&H Innovations LLC. iPod® and iPhoneTM are trademarks of Apple, Inc.; Zune® is a trade Microsoft Corporation and ARCHOSTM ia a trade mark of ARCHOS. Other company and product names mentioned in this document maybe trademarks of their respective companies. Mention of third party products is for informaitonal purposes only and constitutes neither an endorsement nor a recommendation . E&H assumes no responsibility with regard to the performance or use of these products. Every effort has been made to ensure that the informaiton in this manual is accurate. E&H is not responsible for printing or clerical errors. 15 Troubleshooting Ray. Easy way to check Ray’s operation Connect Ray to a DVD player using the RCA Cable by connecting the YELLOW RCA plug to the YELLOW Video Out Receptacle on the DVD Player. Power the DVD player and Ray on. Ray will display the DVD screen or video the same way it would display on a TV. In the event Ray does not display a picture, verify connectors are tightly attached and the power light is flashing. If Ray still does not project an image, return Ray if in warranty, or send in to Ray Displays for repair. Apple 3G and 3Gs iPhone does not work with Ray. Apple has embedded an authorization circuit device in their connectors and licenses the device to third parties for incorporation in their Apple authorized accessories. This device is read by the iPhone and enables the TV out feature to work. Verify the iPhone setting are correct for Ray operation. Select the setting and then select iPOD Scroll to TV Out and verify: Wide screen OFF TV Signal NTSC Connect Ray to the iPhone using the iPhone Composite Video Cable (Three RCA Plugs RED, WHITE and YELLOW) to the Ray RCA Cable connecting the corresponding color via the RCA Adapter (see Page 6). Select your video out of the iPod menu and the image is projected from Ray. In the event Ray does not project an image and you have checked Ray’s operation using the ―Easy way to check Ray’s operation” troubleshooting guide, then your iPhone TV Out is 16 inoperable and you need to take your iPhone to an Apple service center or Store for repair or replacement. Displaying a photo is similar in operation to displaying a video. Select Photos from the main menu and then select the Photo Album from the list of Albums. At the bottom of the iPhone screen under the display of the Thumbnail images, you find play button, press the play button and the photos will be projected by Ray. Please refer to the http://www.raydisplays.com/use-ray/frequentlyasked-questions for updates to the trouble shooting guide. 17