1
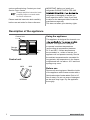
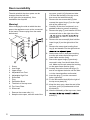
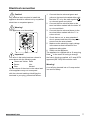
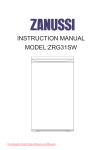
N
Freezer
ZFG06400WA
Contents
Contents ......................................................2
Important safety instructions .......................3
Installation ...................................................3
Child safety .................................................3
During use ...................................................3
Maintenance and cleaning ..........................3
Servicing ......................................................3
Description of the appliance ........................4
Control unit ..................................................4
Using the appliance .....................................4
Before use ...................................................4
To Start the appliance ..................................5
Thermostat control ......................................5
The freezer compartment ..........................5
Freezing fresh food .....................................5
Frozen food storage ...................................5
Tips ..............................................................5
2 EN
HR 2
Hints and tips ..............................................6
Normal operating sounds ...........................6
Food storage ...............................................6
Energy saving advice ..................................6
In the event of a power failure ...................6
Maintenance and cleaning ..........................7
Internal cleaning .........................................7
External cleaning ........................................7
When the appliance is not in use ...............7
What happens if something goes wrong ......8
Installation instructions ................................9
Installation requirements ............................9
Ventilation requirements .............................9
Door reversibility .......................................10
Warning! ....................................................10
Electrical connection..................................11
www.zanussi.com
Important safety instructions
These warnings are provided in the
interests of your safety. Ensure that you
understand them all before installing or
using this appliance. Your safety is of
paramount importance. If you are unsure
about any of the meanings or these
warnings contact the service centre.
Installation
This appliance is heavy. Care should be
taken when moving it. It is dangerous to alter
product in any way. Ensure that the appliance
does not stand on the electrical supply cable.
If the supply cord is damaged, it must be
replaced by an original power cable supplied
by the service centre by calling the 1800
number supplied in the warranty section of
this manual. Any electrical work required
to install this appliance should be carried
person. Parts, which heat up, should not be
exposed. Whenever possible, the back of
the appliance should be close to a wallbut
leaving the required distance for ventilation
as stated in the installation instructions. The
appliance should be left for 2 hours after
installation before it is turned on, in order to
allow the refrigerant to settle.
WARNING-Keep ventilation openings, in
the appliance enclosure or in the build-in
structure, clear of obstruction.
WARNING-Do not use mechanical devices
or other means to accelerate the defrosting
process, other than those recommended by
the manufacturer.
WARNING-Do not damage the refrigerant
circuit.
WARNING- If the supply cord is damaged, it
must be replaced by the manufacturer or its
in order to avoid a hazard.
WARNING- Do not use electrical appliances
inside the food storage compartments of the
appliance, unless they are of the type
www.zanussi.com
recommended by the manufacturer.
WARNINGwhen maintaining the refrigerator as the
refrigerant and vesicant are burnable.
Useless and old refrigerators should be
recycled and disposed by professional
companies.
WARNING-Do not discard useless and
old refrigerators at will in order to avoid
environment pollution. Thank you for your
cooperation.
Child safety
Do not allow children to tamper with the
controls or play with the product.
During use
This appliance is designed for domestic
edible foodstuffs only. Frozen food should
not be refrozen once it has thawed out.
in the freezer. Ice lollies can cause "frost/
freezer burns" if consumed straight from
the freezer. Do not remove items from the
freezer if your hands are damp/wet, as this
could cause skin abrasions or frost/freezer
burns. Manufacturer recommended storage
times should be adhered to. Refer to relevant
instructions.
Maintenance and cleaning
Switch off, and unplug the appliance before
carrying out any cleaning or maintenance
work. Do not use sharp instruments to scrape
off frost or ice. (See defrosting instructions).
Servicing
This product should be serviced by an
authorised engineer, and only genuine
spare parts should be used. Under no
circumstances should you attempt to repair
the machine yourself. Repairs carried out by
inexperienced persons may cause injury or
3
HR3
EN
serious malfunctioning. Contact your local
Service Force Centre.
Please read this instruction book
carefully before use and retain
for future reference.
Please read this instruction book carefully
before use and retain for future reference.
IMPORTANT: before you install your
refrigerator PLEASE CHECK FOR ANY
refrigerator is damaged or marked you
must report this within 7 days if you wish
to claim for the damaged marks under the
manufactures warranty.
This does not affect your statutory rights.
Description of the appliance
Using the appliance
Control Unit
This appliance is designed for domestic use
Storage
Backets
Door
Control unit
MAX
NORMAL
HR
EN
4
4
MIN
foodstuff. This appliance is designed
to operate in ambient temperatures
(surrounding air temperature) between
16°C and 38°C. If these temperatures
are exceeded i.e., colder or warmer, the
appliance will not operate correctly. Should
the ambient temperatures be exceeded for
long periods, the temperature in the freezer
compartment will rise above -18°C and food
spoilage may occur.
Before use
Remove all securing tapes. Wash the inside
of the appliance with lukewarm water with a
little bicarbonate of soda added (5ml to 0.5
litre of water). Do not use soap or detergent
as the smell may linger. Dry the appliance
thoroughly.
www.zanussi.com
To Start the appliance
Freezing fresh food
1. Allow the appliance to stand for 2 hours
after installation.
2. Plug in the appliance and switch on at the
mains supply.
3. Turn the thermostat control to the
required setting. A midway setting is
usually suitable for normal operation (see
thermostat control).
4. Leave the appliance for approximately 4
hours for the correct temperature to be
reached before placing food inside.
Place the fresh food on the top freezer shelf.
Food may need rearranging to achieve this.
During the freezing process the temperature
of fresh food should be reduced quickly so
that ice crystals are kept as small as possible
to prevent damaging the structure of food. If
freezing takes place slowly large ice crystals
form and these will affect the quality of food
once it has defrosted.
Thermostat control
The thermostat control situated in the control
panel regulates the temperature of the
freezer compartment.
● Position "Min" -Cold.
● Position "Normal" -Colder.normally, setting
at this position.
● Position "Max" -Coldest.
The temperature will be affected by:
● Room temperature
● How often the door is opened
● How much food is stored
● Position of the appliance
In determining the correct temperature control
setting, all these factors have to be considered
and some experimentation may be necessary.
Do not allow children to tamper with the
controls or play with the product.
The freezer compartment
The
symbol means that your
freezer will store frozen food at -18°C
(-0.4 ° F) or colder allowing for long term
frozen food storage and freezing of fresh
food. The freezer temperature is controlled
automatically by the thermostat situated
in the control panel. Due to the different
installations, methods of usage and weather
conditions, adjustments to the temperature
settings may be required.
These are best assessed against a
temperature reading on a thermometer
buried in the frozen food. The reading
must be taken quickly as the thermometer
temperature will rise rapidly after removal.
www.zanussi.com
Frozen food storage
The appliance has the following net storage
volume: 68 litres. This is a standard
measurement and the actual capacity
depends upon the density and sizes of the
food. Pre-packed commercially frozen food
should be stored in accordance with the
manufacturer's instructions for a 4 star frozen
food compartment and should be put in the
freezer as soon as possible after purchase.
Your freezer provides for long term storage
which generally means up to 3 months but the
length of the time can vary and it is important
to follow the recommended times shown on
packets of commercially frozen food. Do not
place sealed containers or carbonated liquids
creates pressure on the container which may
cause it to explode resulting to damage to the
freezer. Ice cubes and ice lollies should not
be consumed immediately after removal from
the freezer as it may result in low temperature
skin abrasions. Manufacturers storage times
should be adhered to.
Tips
Any opened packets of frozen food, should
be rewrapped in airtight materials to prevent
surface evaporation which causes drying or
"freezer burn" . Frozen food which is allowed
to thaw accidentally should either be used
immediately or thrown away. Alternatively if
the food is uncooked and has not been aim
to check dates on packets and rotate than
textures begin to change.
5
HR 5
EN
Hints and tips
Normal operating sounds
You may hear faint gurgling or bubbling
sounds when the refrigerant is pumped
through the coils or tubing at the rear, to the
shelves.
When the compressor is on, the refrigerant
is being pumped round, and you will hear
a whirring sound or pulsating noise from
the compressor. A thermostat controls the
compressor, and thermostat cuts in and out.
Food storage
When you arrive home, place the frozen food
in the freezer immediately. Keep the time
between buying chilled food and placing it in
your fridge as short as possible.
Do not push food together too much; try to
allow air to circulate around each item.
Do not store food uncovered. Ensure that
food placed in the freezer is dated and
labeled and used in date order to ensure that
food is consumed at its best. Remove suspect
food from your refrigerator and clean, refer to
cleaning and maintenance.
Energy saving advice
Do not install the appliance close to sources
of heat, such as a cooker, dishwasher or
radiator. Locate the appliance in a cool wellventilated room and make sure that the air
openings is good.
Avoid unnecessary frosting in the cabinet by
packing all foodstuffs into airtight packages.
Always leave warm food to cool down in room
freezer.
Food which is to be frozen (when cool)
HR
EN
6
6
should be placed in the fridge before being
transferred to the freezer. Thaw frozen food in
the fridge. This will ensure safer defrosting of
food and reduce the work of the refrigeration
unit.
Try to avoid keeping the door open for long
time, warm air will enter the cabinet, and
cause
energy consumption.
Ensure there are no obstructions preventing
the door from closing properly.
It is advisable to periodically clean the freezer.
In the event of a power failure
If there is a power failure during the storage
of frozen food, keep the door closed. If the
temperature within your freezer should rise,
do not refreeze the food without checking its
condition.
The following guidelines should assist you:
● Ice cream :Once thawed should be
discarded.
● Fruit and vegetables: If soft should be
cooked and used up.
● Bread and cakes: Can be refrozen without
danger.
●
up quickly.
● Cooked dishes: i.e. casseroles, should be
refrigerated and used up.
● Large pieces of meat: Can be re-frozen
providing there are ice crystals remaining
within them.
● Small joints: Should be cooked and then
re-frozen as cooked dishes.
● Chicken: Should be cooked and re-frozen
as a fresh dish
www.zanussi.com
Maintenance and cleaning
Before any maintenance or cleaning work is
carried out, DISCONNECT the appliance from
the ELECTRICITY supply.
Internal cleaning
Clean the inside and accessories with warm
water and bicarbonate of soda (5ml to 0.5
litre of water). Rinse and dry thoroughly. Do
not use detergents, abrasive powders, highly
perfumed cleaning products, wax polishes
or cleaning products containing bleach or
alcohol.
External cleaning
Wash the outer cabinet with warm soapy
water. Do NOT use abrasive products.
There are sharp edges on the underside
of the product, so care should be taken
when cleaning. Once or twice a year
dust the compressor at the back of the
appliance, with a brush or vacuum cleaner,
as an accumulation of dust will affect the
performance of the appliance and cause
excessive electricity consumption.
To Defrost the Freezer
www.zanussi.com
1. Wrap any food in layers of newspaper or
blankets.
2. Switch the appliance off at the wall socket
and remove the plug.
3. Open the freezer door.
4. Place a suitable container to collect the
defrosting water.
5. After defrosting, clean and dry the
interior.
6. Switch the appliance on and replace any
frozen food.
Defrosting can be speeded up by putting
bowls of hot (not boiling) water in the freezer
and loosening the frost with a suitable plastic
scraper.
If the temperature of frozen food is allowed to
rise during defrosting, its storage life may be
shortened.
When the appliance is not in use
When the appliance is not in use for long
periods, disconnect from the electricity supply,
empty all of the food and clean the appliance,
leaving the door ajar to prevent unpleasant
smells.
7
HR
EN
7
What happens if something goes wrong
BEFORE contacting your local service force centre, check the following points:
Symptom
Solution
Check there is power at the socket.
Check there is not a power cut by checking the household lights.
Check the fuse has not blown.
Check the thermostat is turned to correct appliance operating limits of 16°C
to 32 °C.
Relocate the appliance if necessary.
The
temperature
Has door just been open?
in the freezer
section is too Is so leave for a few minutes to allow the air pressure to equalize.
high.
The compressor runs continuously.
Large quantities of food have recently been placed in the cabinet/and or door
is frequently open.
Ensure that the door is not left open.
Excessive frost Check that nothing is preventing the door from closing.
and ice have
Is the door gasket intact and clean.
built up.
Has advised periodic defrosting been carried out?
Refer to normal operating sounds.
If after the above checks there is still a fault call your local Service Force
Centre.
In-guarantee customers should ensure that the above checks have been
made as the engineer will make a charge if the fault is not a mechanical or
electrical breakdown. Please note that proof of purchase is required for inNoise
guarantee service calls.
Check the thermostat is turned to the correct setting relative to ambient conditions.
Check the ambient temperature is within the controllers.
The compressor runs continuously.
Adjust the thermostat to give correct temperature.
Nema
napajanja
uređaja.
HR
EN
8
8
www.zanussi.com
Installation instructions
attempt to modify this product in any way.
Installation requirements
To ensure correct operation this appliance
must not be located where the temperatures
will fall below 16 °C or rise above 32 °C.
Avoid the following locations: unheated
kitchen, outhouse, conservatory, garage.
For correct operation this appliance must be
installed:
● In a dry atmosphere.
● Out of direct sunlight.
● Away from extreme temperature (not next
to a cooker or other sources of heat).
Your appliance will be heavy when loaded
with food and must therefore be stood on a
Ventilation requirements
Gently push into place until the top panel rear
www.zanussi.com
ventilation grille touches against the wall.
When in position a 50 mm (2" ) clear space
above the appliance should be maintained.
If space above the appliance is not available,
clearance of 25mm should be maintained
on both sides.
Ensure that the appliance does not stand on
the electrical supply cable.
Parts which heat up should not be exposed.
Whenever possible, the back of the appliance
should be close to a wall but leaving the
required distance for ventilation.
Leveling: The appliance should be level.
Rocking: Ensure the appliance is upright and
Adjust the level by screwing out the
appropriate level adjuster at the front, (use
This appliance is heavy. Care should be
taken when moving it.
9
HR
EN
9
Door reversibility
The side at which the door opens can be
changed from the left side
to the right side (as supplied), if the
installation site requires.
Warning!
When changing the side at which the door
opens, the appliance must not be connected
to the mains. Remove plug from the mains
beforehand.
11
10
7
9
8
1.
2.
3.
4.
5.
6.
7.
8.
9.
10.
11.
Screw
Low Hinge
Upper Hinge
Adjustable Low Foot
Adjustable High Foot
Screw Bolt
Plug
Decoration Block
The block of the top cover
Top Cover Plate
Screw nail
1. Remove the screw nails (11).
2. Keep the door open, raise the end of the
10 10
HR
EN
top cover, push it(10) frontad and take
it off from the block(9) of the top cover,
then move the bottom block(8).
3. Remove the two screws blot (6) that
connect the upper hinge (5) on the right
side of the cabinet top.
4. Carefully lift the door and place it on a
padded surface to prevent scratching.
5. Remove the plug (7) and transfer it to the
uncovered hole on the right side of the
into the hole.
6. Remove the two screws(6) that hold the
lower hinge (2) on the right side of the
unit.
7. Remove the screw-type leveling front
leg (4) and transfer it to the right side as
8. Set the door into it's new place making
sure the pin enters the bushing at the
lower frame section (hole).
9. Secure the upper hinge (5) previously
removed in step 3 on the left side of the
unit. Make sure the pin enters the bushing
on the upper frame section (hole).
10. Loosely secure the lower left hinge (2)
and do not tighten the bolts until the door
is in the closed position and leveled.
11. Insert the plug (7) on the uncovered
holes (right side).
12. Fix the decoration block(8)in the right of
the top cover plate(10).
13. Keep the door open, raise the end of the
top cover, pull it(10) backwards to hitch
the block(9).
14. After the assembly of the top cover, close
screw(11).
www.zanussi.com
Electrical connection
Caution!
Any electrical work required to install this
appliance should be carried out by a qualified
electrician or competent person.
Warning!
This appliance must be earthed.
2
3
5
4
Important!
The wires in the mains lead are colored in
accordance with the following code
1 Green and Yellow: Earth
3 Brown:
Live
5 Blue:
Neutral
As the colours of the wires in the mains lead
of this appliance may not correspond
with the coloured markings identifying the
terminals in your plug, proceed as follows:
www.zanussi.com
1. Connect the wire coloured green and
yellow to the terminal marked either with
the letter "E" or by the earth symbol
or coloured green and yellow.
2. Connect the wire coloured blue to the
termi-nal either marked with the letter "N"
or col-oured black.
3. Connect the wire coloured brown to the
ter-minal either marked with the "L" or
colour-ed red.
4. Check that no cut, or stray strands of
wire is present and the cord clamp is
secure over the outer sheath.
5. Make sure the electricity supply voltage
is the same as that indicated on the
appliance rating plate.
6. Switch on the appliance.
The appliance is supplied with a 13 amp plug
fitted . In the event of having to change
the fuse in the plug supplied, a 13 amp ASTA
approved (BS 1362) fuse must be used.
Warning!
A cut off plug inserted into a 13 amp socket
is a serious safety
11
HR
EN
11
502012
www.zanussi.com/shop