1
Advanced Server UNIX V4.0
Overview and Installation
Edition April 1999
Comments… Suggestions… Corrections…
The User Documentation Department would like to know your
opinion on this manual. Your feedback helps us to optimize our
documentation to suit your individual needs.
Fax forms for sending us your comments are included at the
back of the manual.
There you will also find the addresses of the relevant User
Documentation Department.
Copyright and Trademarks
Copyright © Siemens AG 1999.
All rights reserved.
Delivery subject to availability; right of technical modifications reserved.
All hardware and software names used are trademarks of their respective manufacturers
Information in this document is subject to change without notice. Companies, names, and data used in examples
herein are fictitious unless otherwise noted. No part of this document may be reproduced or transmitted in any form
or by any means, electronic or mechanical, for any purpose, without the express written permission of AT&T and
Siemens AG.
© 1985-1998 AT&T. All rights reserved.
© 1985-1998 Microsoft Corporation. All rights reserved.
AT&T is a registered trademark of AT&T Corporation.
Microsoft, MS, MS-DOS, Windows, and Windows NT either are registered trademarks or trademarks of Microsoft
Corporation in the United States and/or other countries.
Microsoft may have patents or pending patent applications, trademarks, copyrights, or other intellectual property
rights covering subject matter in this document. The furnishing of this document does not give you any license to
these patents, trademarks, copyrights, or other intellectual property rights except as expressly provided in any written license agreement from Microsoft.
All other companies and product names are trademarks or registered trademarks of their respective holders.
This manual is printed
on paper treated with
chlorine-free bleach.
Pfad: D:\O7613e6\u7613e.k01
© Siemens Nixdorf Informationssysteme AG 1995
1 Preface
Advanced Server for UNIX can be used to integrate personal computers, which are
operated under MS-DOS® (also running MS Windows or MS Windows for Workgroups),
MS® OS/2 or OS/2® (referred to as OS/2 in this manual), Windows 95/98 and MS Windows
NT® operating systems, in local networks (LAN, Local Area Network and WAN, Wide Area
Network). Advanced Server for UNIX allows the operation of various systems in a network.
Advanced Server for UNIX V4.0 (Advanced Server for UNIX in this manual) provides users
with server functions for the local network. It extends UNIX® to a network operating system.
Advanced Server for UNIX corresponds to Windows NT Server. The network server is
based on systems with the operating system UNIX. Cooperation with Microsoft® has
ensured that Advanced Server for UNIX is compatible with Windows NT Server.
i
The operating system is generally referred to as UNIX in this manual. This term is
used generically to include all UNIX operating systems on which Advanced Server
for UNIX is installed, for example Reliant UNIX.
Advanced Server for UNIX is also used in abbreviated form as AS/X, as well as
sometimes as AS/U or Advanced Server. All of these terms are synonymous for the
same product.
The description of the entire Advanced Server for UNIX product covers several manuals.
The “Concepts and Planning” manual provides information on the structure and functionality of Advanced Server for UNIX and describes, among other things, the differences in
comparison to LAN Manager/X.
This manual provides information on the enhancements that are implemented in Advanced
Server for UNIX; it supplements the information in the manual entitled “Concepts and
Planning”. The installation and configuration of Advanced Server for UNIX on the UNIX
system are also described in that manual.
The “API Reference” manual contains information on the API (Application Programming
Interface) with regard to syntax and functions. It is supplemented by online documentation
which is supplied with the package for the manual pages.
The “SNMP Service” manual contains information on the installation and configuration of
an extension for the SNMP agent (Simple Network Management Protocol), which among
other things allows network events to be determined centrally. This manual is part of the
LAN Manager/X V2.2 series of manuals.
Product Manual
U7613-J-Z815-6-76
Target Group
The “User's Guide for MS-DOS Clients” and “User's Guide for MS Windows Clients” are
aimed at users of the MS-DOS or Windows clients. They provide information on starting up
and closing down clients, and on shared directories and printers. They also provide references to the commands available for working with the client. The manuals “Installation
Guide for Clients”, “MS Network Client V2.2”, and “MS Network Client V3.0” describe how
to install these clients.
© Siemens Nixdorf Informationssysteme AG 1995
Pfad: D:\O7613e6\u7613e.k01
Preface
The manual “NetWare Connectivity” contains information on how your MS-DOS client can
work simultaneously with Advanced Server for UNIX or LAN Manager servers and with
NetWare® servers. It also contains installation and configuration instructions for NetWare
Connectivity.
1.1 Target group
This manual is intended for the system and network administrator, who is responsible for
installing, configuring, and operating Advanced Server for UNIX.
The network administrator is known as the administrator in this manual.
i
Product Manual
●
The administrator requires the rights of the system administrator root and
must have an in-depth knowledge of the operating system and of the Advanced
Server for UNIX product. The tasks of the administrator and the system administrator are undertaken by one person.
●
In order to execute administrator commands using the net commands, you
simply need to log on with net logon Administrator <password>.
U7613-J-Z815-6-76
Pfad: D:\O7613e6\u7613e.k01
© Siemens Nixdorf Informationssysteme AG 1995
Preface
Summary of Contents
1.2 Summary of contents
i
Information that became available after this manual went to print is contained in the
SIreadmeM package which is supplied with Advanced Server for UNIX.
The chapter “Preface” provides users with an overview of the content and structure of this
manual.
The chapter “Introduction to Advanced Server for UNIX” contains information on the supplements and changes which you will require in addition to the information contained in the
“Concepts and Planning” manual.
The chapter “Advanced Server for UNIX architecture” contains an overview of the process
model and of internal and external Advanced Server for UNIX communication.
The chapter “Installing Advanced Server for UNIX” contains information on the hardware
and software requirements of your server system. It also provides instructions for transferring the Advanced Server for UNIX software onto the server system as well as all the
information required to configure the system and Advanced Server for UNIX software, and
to create a development environment for Advanced Server for UNIX applications.
The chapter “Configuring Advanced Server for UNIX” contains, among other things, the
steps necessary for configuring and for starting NetBIOS and Advanced Server for UNIX.
You should consult the chapter “Administration guidelines” if you want to change the role of
the server, for example if you have installed and configured Advanced Server for UNIX.
Among other things, the chapter also describes how to enable a CD-ROM drive for
Advanced Server for UNIX.
The chapter “Tools for special tasks” describes other tools offered by Advanced Server for
UNIX. These are generally only relevant when used with particular applications.
Another chapter is dedicated to “Installing Network and Administrative Client Software”.
The next chapter is about “Administering Advanced Server at the Command Prompt”.
Then a chapter describes in detail the WINS service: “Implementing WINS”.
The chapter entitled “Troubleshooting” contains guidelines for resolving errors.
The chapter “Advanced Server for UNIX - directories and files” contains an overview of the
most important files and directories of Advanced Server for UNIX.
The following chapters describe in detail “Advanced Server Registry” and the “Lanman.ini
File”.
The “Glossary”, “Abbreviations”, and “Index” chapters are useful as a reference when
reading this manual.
The “Related publications” chapter lists additional useful documentation.
Product Manual
U7613-J-Z815-6-76
Pfad: D:\O7613e6\u7613e.k01
© Siemens Nixdorf Informationssysteme AG 1995
Preface
Changes since the last version
1.3 Changes since the last version of the manual
The documentation has been updated to conform to the software level of Advanced Server
for UNIX V4.0B.
For a list of differences between Advanced Server for UNIX V4.0B and the previons version,
please refer to the section “Compatibility” in the chapter “Introduction to Advanced Server
for UNIX”.
1.4 Notational conventions
The following notational conventions are used in this manual:
Convention
Usage
Italics
in the main body of text denote file, variable, and
program names, as well as commands and
options in continuous text
Bordered Courier
indicates extracts from files
Courier
denotes system output
Courier semi-bold
denotes user input in a sample dialog
Key
indicates tasks to be performed by the user
Ê
Product Manual
indicates a key or key combination
i
denotes important information that must be
heeded
!
denotes a warning that you must heed to avoid
loss of data or serious errors
U7613-J-Z815-6-76
Pfad: D:\O7613e6\u7613e.k02
© Siemens Nixdorf Informationssysteme AG 1995
2 Introduction to Advanced Server for UNIX
This chapter contains supplementary and additional information on Advanced Server for
UNIX that is not contained in the manual entitled “Concepts and Planning”.
The following topics are dealt with:
●
Shared resources and services
●
Connection management
●
Administration
●
Application Programming Interface (API)
The section on “Client-server architecture” contains a short description of the client-server
architecture. The section entitled “Shared resources” contains information on which
network resources of Advanced Server for UNIX can be shared.
The section entitled “Services” introduces the services provided by Advanced Server for
UNIX. The section “Connection management” explains the terms “sessions“ as well as
“connection”. This section also provides information on the security concept of Advanced
Server for UNIX. The manual entitled “Concepts and Planning” contains conceptional information relating to this topic.
Finally, the section “Administration of Advanced Server for UNIX” provides information on
remote administration.
Information on the programming interface and on compatibility can be found at the end of
this chapter.
Product Manual
U7613-J-Z815-6-76
Pfad: D:\O7613e6\u7613e.k02
© Siemens Nixdorf Informationssysteme AG 1995
Introduction to Advanced Server for UNIX
Client-server architecture
2.1 Client-server architecture
One or more server systems and several clients (workstations) are connected in a network
(LAN, Local Area Network and WAN, Wide Area Network) with Advanced Server for UNIX.
The server systems provide services and resources in the local network. In contrast, the
clients utilize the services and resources of the server and generally do not provide any
services and resources themselves in the network.
Provided they are authorized, every client can access every server system in the local
network. Advanced Server for UNIX also supports so-called trust relationships between
domains, which permit the user to access resources in other domains.
2.2 Shared resources
The resources provided by a server system for the network are known as shared
resources. Shared resources are protected against unauthorized access (for more
detailed information, see section on “Security concept”).
Advanced Server for UNIX provides users with the following types of resources, which can
be shared by one or more users in the network:
Product Manual
●
Shared directory
●
Shared printer
●
Interprocess communication resource IPC$
●
Network-wide administration (Resource ADMIN$)
U7613-J-Z815-6-76
Shared resources
2.2.1 Names in the network
© Siemens Nixdorf Informationssysteme AG 1995
Pfad: D:\O7613e6\u7613e.k02
Introduction to Advanced Server for UNIX
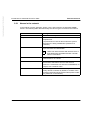
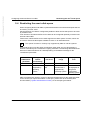
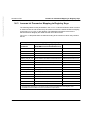
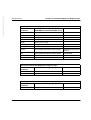
In the network, servers, domains, clients, users, and resources are assigned unique
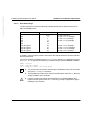
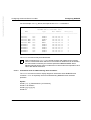
names. The following table describes briefly the various types of names in the network.
Name
Meaning
System name
Name of the UNIX system
Computername, server name
Each server and client in a network must have a unique
computername.
A proposed server name is derived from the system
name when it is being installed first (maximum 15
characters).
Username
The administrator provides each user in a network with a
unique username for identification.
i
Product Manual
Users from other domains with which there is a
trust relationship are addressed with <domain
name>\<username>.
Sharename
The administrator assigns a unique sharename to each
shared resource on a server.
Network name, UNC name
The network name consists of the server’s computer
name and the sharename of one of this server’s
resources. A connection to a resource is established, for
example, with a network name.
Domain name
The domain gets a domain name when you install the
primary domain controller. By default, it consists of the
first eleven characters of the system name plus the suffix
.dom (maximum 15 characters).
U7613-J-Z815-6-76
2.2.1.1
© Siemens Nixdorf Informationssysteme AG 1995
Pfad: D:\O7613e6\u7613e.k02
Introduction to Advanced Server for UNIX
Shared resources
System name
Each UNIX system has a unique name in the network, which can be displayed using the
command uname -n and set as the network node name using the SYSADM utility program.
!
2.2.1.2
In order to avoid problems, it is strongly recommended that the system names you
assign are unique throughout the network. While the same system name may
appear several times in different DNS domains, even in the same network,
Advanced Server for UNIX uses the system name internally for generating names
which must always be unique.
Computername (server name)
Servers and clients must have a unique name in the network, known as the computername.
The computername of a server is also called server name.
A proposed server name is derived from the first 15 characters of the system name when
it is being installed first. The terms computername and server name are used synonymously in relation to the server.
It can be changed to any name (with a maximum of fifteen characters) during installation.
The server name is stored automatically in the lanman.ini file on the server. It is part of the
network name and may only be changed after the installation using special utility programs.
For further information please refer to the section entitled “Changing server attributes” in
the chapter entitled “Administration guidelines”.
i
i
Product Manual
●
The server name consists of up to fifteen characters: letters from a to z,
numbers from 0 to 9 and the special characters -.~!#$%^&()_{}.
●
In the previous Version 2.0, the server name for the LAN Manager/X server had
the suffix .serve. Please note that both LAN Manager/X Version 2.2 and
Advanced Server for UNIX up to version 4.0A10 propose the suffix .srv for a first
installation instead.
●
Since Advanced Server for UNIX V4.0B, the default server name proposed
during the first installation is built from the system name without an extension.
●
In order not to run into problems when upgrading to upcoming NT/AS/Xversions in the future, all tools requesting a server name during installation or
reconfiguration offer the DNS-compatible host name (‘uname -n‘) as the default
server name. The extension .srv can still be used, but is not recommended and
no longer offered as a default. Installation/configuration scripts now inform the
administrator about DNS-incompatible server names.
U7613-J-Z815-6-76
2.2.1.3
© Siemens Nixdorf Informationssysteme AG 1995
Pfad: D:\O7613e6\u7613e.k02
Introduction to Advanced Server for UNIX
Shared resources
Username
Every user of a client is assigned a username by the administrator, which is unique
throughout the network. Users are identified by their usernames in the network.
i
2.2.1.4
The username consists of three to fifteen characters: letters, numbers, spaces and
special characters without / \ * ’ " ‘ !. Use a maximum of eight characters to achieve
unique mapping between UNIX names and Advanced Server for UNIX users. It is
not recommended to use umlauts or characters like the euro symbol in usernames.
Sharename
If a resource on a server is shared, it gets a sharename. The sharename identifies the
resource on the server. A sharename for a resource must appear only once on a server,
however the same sharename may be used several times on other servers in the network.
The sharename is part of the network name.
i
The sharename consists of up to twelve characters: letters (no umlauts), numbers,
and special characters. For MS-DOS clients, the sharename must comply with the
MS-DOS conventions.
Example
The command net share sf1=c:/u1/public is used by the administrator to share the directory
/u1/public as a resource for the network, sf1 is the sharename of this resource.
i
2.2.1.5
●
The character string c: must always precede the resource pathname when
sharing directories.
Network name
A client user sets up a connection to a shared resource using the network name. The
network name of a shared resource consists of the computername of a server and of the
sharename of the resource shared on this server.
Example
The command net use j: \\server1\sf1 is used by the client user to set up a connection to the
shared resource with the sharename sf1, which is located on the server with the
computername server1. The network name of the resource in this case is \\server1\sf1. Using
the command dir \\server1\sf1 or dir j: you can then display the contents of the shared
directory.
Product Manual
U7613-J-Z815-6-76
2.2.1.6
© Siemens Nixdorf Informationssysteme AG 1995
Pfad: D:\O7613e6\u7613e.k02
Introduction to Advanced Server for UNIX
Shared resources
Domain name
A domain gets its domain name during installation of the primary domain controller. The
backup domain controllers are assigned during installation of a domain. The assignment of
a client to a domain is defined while it is being installed; it can be reconfigured later or, on
some clients, modified temporarily with the net logon command, for example.
The trust relationship concept means that it is easier to manage and use several domains.
(The manual entitled “Concepts and Planning” contains further information relating to this
topic.)
The default domain name consists of the first eleven characters of the system name plus
the suffix .dom, e.g. the domain name of the server server1 would be server1.dom.
The domain name consists of up to fifteen characters: letters from a to z, numbers
from 0 to 9 and the special characters -.~!#$%^&()_{}.
i
The domain name may only be changed following installation using special utility programs.
Please refer here to the section entitled “Changing server attributes” in the chapter
“Administration guidelines”.
2.2.2 Mapping of file attributes through Advanced Server for UNIX
This section contains information on how Advanced Server for UNIX maps characters and
file attributes between the server and clients.
DOS
The following DOS attributes are mapped on the server by Advanced Server for UNIX:
Product Manual
●
r (read only)
●
d (directory)
●
h (hidden)
●
s (system)
●
a (archive)
U7613-J-Z815-6-76
Shared resources
The attributes r and d are mapped to the relating UNIX mechanisms. The attributes a, s and
h, as well as any possible combination of these are translated to Advanced Server for UNIX
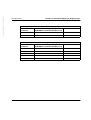
by means of UNIX group names. The table below, for example, shows how the MS-DOS
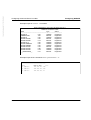
file BSP.DAT with the attributes a and h and the MS-DOS file READONLY.BSP with the attributes a, r and h are mapped under UNIX:
© Siemens Nixdorf Informationssysteme AG 1995
Pfad: D:\O7613e6\u7613e.k02
Introduction to Advanced Server for UNIX
Permissions
Owner
Group
Filename
rw-rwsr--
lmxadmin
DOS-a-h
bsp.dat
r--r-sr--
lmxadmin
DOS-a-h
readonly.bsp
OS/2
The extended file attributes of the HPFS (OS/2 extended attributes) contain additional information on OS/2 files such as long filenames or comments, for example. The UNIX file
system does not support all attributes, so Advanced Server for UNIX creates a hidden
shadow file for each file with extended attributes. This shadow file has the default name
.EA@<filename>. For example:
The autoexec.bat file has a shadow file with the name [email protected].
i
The period (.) as the first character in the filename hides the file under UNIX. The
hidden files are not displayed with the ls command. To do this, use the ls -a
command.
You must try to ensure that these files are only handled under OS/2. If you delete or copy
the files under UNIX, you should also delete or copy the shadow file accordingly.
!
It is not possible to copy these files with their attributes from an Intel-based to a
RISC-based UNIX system using UNIX commands, as the internal formats do not
match. When the server system is changed, copy the files from the first server to an
OS/2 PC first and from this PC to the other server.
The shadow files of LAN Manager/X 2.2 are compatible with those of Advanced Server for
UNIX and can be continued to be used unchanged.
You should also be aware that with the current version of Advanced Server for UNIX, files
with extended attributes cannot be transferred via the replicator service and also cannot be
copied locally, for example, with lmshell.
The default value of the EAFilePrefix registry parameter has changed since Version 4.0A10
of Advanced Server for UNIX. Instead of .ea@, the value .EA@ is now used to ensure
compatibility with Advanced Server for UNIX V3.5.
Product Manual
U7613-J-Z815-6-76
Shared resources
Existing configurations are not modified during an upgrade installation. You should
therefore use either the Registry Editor or the regconfig command to set the value of the
EAFilePrefix parameter in the registry to .EA@ under the key
SYSTEM\CurrentControlSet\Services\AdvancedServer
\FileServiceParameters.
If you previously operated Advanced Server for UNIX V4.0A10 with the setting UseEAs=1,
you will now have to rename all hidden shadow files with the extended file attributes.
© Siemens Nixdorf Informationssysteme AG 1995
Pfad: D:\O7613e6\u7613e.k02
Introduction to Advanced Server for UNIX
Use the following command to display all existing shadow files:
find / -type f -name ’.ea@*’ -print
The following shell script can be used to give all old shadow files the new prefix .EA@:
for eafile in ‘find / -type f -name ’.ea@*’ -print‘
do
newfile="‘echo $eafile | sed ’s/\.ea@/.EA@/’‘"
echo rename "$eafile" to "$newfile"
mv "$eafile" "$newfile"
done
!
Advanced Server for UNIX will only find the extended attributes of a file if the
associated hidden shadow file has the same prefix as is set in the current Advanced
Server for UNIX configuration instance. It would be best to change the file and
directory names and the registry parameters when the server is stopped and then
start the server again.
2.2.3 Share table (list of shared resources)
All shared resources are comprised in the share table. Every resource shared using the
command net share is entered in the share table. Every resource deleted using net share
/delete is removed from the share table.
Advanced Server for UNIX stores the share table in an internal format in the registry. The
share table is loaded automatically each time Advanced Server for UNIX is started. The
various types of shared resources are introduced in the following sections.
Product Manual
U7613-J-Z815-6-76
Shared resources
2.2.4 Shared directory
© Siemens Nixdorf Informationssysteme AG 1995
Pfad: D:\O7613e6\u7613e.k02
Introduction to Advanced Server for UNIX
A shared directory is a file tree of a server system, which was shared for the usage in the
local network. Users can access the shared directory from a client using the sharename.
In this case, users work with the shared directory as they would with a local drive or
directory on their clients.
i
The security check is not taken into account in the following description in order to
avoid complexity.
The administrator is responsible for assigning a directory (for example with the server
named server1) to a sharename. The administrator links the local directory name
/u1/public1 to the sharename sf1 using the command: net share sf1=c:/u1/public1, at the same
time sharing this resource for use in the local network.
i
●
The directory must have been created beforehand, otherwise the administration
interface reports an error.
●
The character string c: must always precede the resource pathname on the
Advanced Server for UNIX.
Access information is assigned to shared directories using net perms, which is stored in the
AS/X database (acl).
For example, using net perms c:/u1/public1 /grant group1:fullcontrol the group group1 is
assigned read, write, and execute permissions as well as the permission to create files and
directories, to change or delete attributes and to change the permissions for these directories.
i
Product Manual
●
UNIX permissions have a higher priority than permissions assigned using net
perms. Thus, for example, the above directory has no write authorization if the
permissions r-x-r-x-r-x are set up using UNIX. If problems arise, the UNIX
permissions can be set temporarily to rwxrwxrwx to establish whether the
missing UNIX permissions have caused the problem.
U7613-J-Z815-6-76
Shared resources
Authorized users can assign this shared directory to their clients. The network name of the
shared directory (in accordance with DOS naming conventions) \\server1\sf1 is linked on the
client to a local drive letter, e.g. j:, using the command net use j : \\server1\sf1.
© Siemens Nixdorf Informationssysteme AG 1995
Pfad: D:\O7613e6\u7613e.k02
Introduction to Advanced Server for UNIX
i
The user may have to allow additional drive letters on the client in the configuration
file config.sys using the command lastdrive.
The client user can then access the shared directory using the drive letter j:. All attempts to
access files (copying files and directories, editing files etc.) made by the user on drive letter
j: are mapped on the file system of the server.
The shared directory can therefore be used by a user or a user group. If several users wish
to process a file at the same time, entire files or parts of files can be locked using file locks
for the duration of processing. Read and/or write locks are available.
i
Older MS-DOS versions or programs are not network-ready, in this case only one
user at a time can access a file.
Advanced Server for UNIX maps the interfaces available under the MS-DOS, OS/2,
Windows, Windows for Workgroups, Windows 95/98 and Windows NT operating systems
to UNIX mechanisms in order to manipulate files and directories.
For further information, please refer to the manual entitled “Concepts and Planning”.
2.2.5 Shared printer resource
As an administrator, it is possible to share the printer queues for the network. The
administrator can also check the status of the printer queue using the corresponding administration commands and can manipulate the print jobs (delete, for example).
The printout waits in the printer queue and is then printed on a printer connected to the
UNIX system or on a printer connected to a specially configured client (shared client
printer). For further information, please refer to the chapter entitled “Configuring Advanced
Server for UNIX”.
2.2.5.1
Printer spoolers
Interfaces for the following spoolers are available for Advanced Server for UNIX:
●
Standard spooler (AT&T® high performance interface)
●
SPOOL V4.2 (and above) for all Reliant UNIX systems
Please refer to the section “Configuring printers on the UNIX system” for information on how
to configure the interface to the spooler.
Product Manual
U7613-J-Z815-6-76
Pfad: D:\O7613e6\u7613e.k02
© Siemens Nixdorf Informationssysteme AG 1995
Introduction to Advanced Server for UNIX
2.2.5.2
Shared resources
Shared client printer
It is also possible to route the output of the printer spooler to a printer which is connected
to a client (shared client printer). For further information, please refer to the manuals entitled
“MS Network Client V2.2” and “User's Guide for MS-DOS Clients”.
2.2.5.3
Printer server
The output of the printer spooler can also be routed to server and client systems that can
share a printer resource (e.g. Windows for Workgroups, Windows NT).
2.2.5.4
Sharing a printer
The administrator shares the printer queue on the server (with the computername server1).
For example, you can enable a printer group or class with the sharename sp1 using the
net share sp1 /print command.
For example, the user of the client with the computername cl3 links to a shared printer. To
do this, he/she assigns the network name \\server1\sp1 with lpt1 using the command (in the
MS-DOS naming conventions) net use lpt1: \\server1\sp1. The user can now work on lpt1: for
all print jobs as he/she would on a local printer.
i
●
For Windows NT-Style Printing the sharing of a printer with UNIX commands is
no longer recommended.
For further information, please consult the manual entitled “Concepts and Planning”.
2.2.6 Interprocess communication resource, IPC$
Advanced Server for UNIX can be used to implement distributed applications: Application
processes on the server system exchange data over the network with application
processes on clients. The resource IPC$ enables this communication using LM named
pipes and mailslots.
Special functions also allow the administration of Advanced Server for UNIX using
programs. For additional information please refer to the manual “API Reference” and in the
manual pages for the API, which are supplied with Advanced Server for UNIX. The
following sections contain further information on interprocess communication.
i
Product Manual
The IPC$ resource is automatically shared.
U7613-J-Z815-6-76
2.2.6.1
© Siemens Nixdorf Informationssysteme AG 1995
Pfad: D:\O7613e6\u7613e.k02
Introduction to Advanced Server for UNIX
Shared resources
LM named pipes
Advanced Server for UNIX also provides LM named pipes. They are bidirectional communication channels for interprocess communication in the network. They differ from UNIX®
named pipes.
The following example describes the basic procedure for setting up and clearing down an
LM named pipe: An application process with root authorization creates a named pipe on the
server. The client process on the client sets up a connection to the known named pipe over
the local network. Both processes can then exchange data using the LM named pipe. When
the data exchange has ended, the LM named pipe is deleted.
i
Advanced Server for UNIX must be running in order to use LM named pipes.
Example
The root-authorized process on the server server1 creates a LM named pipe with the name
srvp using the function DosMakeNmPipe (“/PIPE/srvp” , &reference,...) and waits using the
function DosConnectNmPipe (reference) for a connection to be set up (_dos_open) to the client
process.
The client process – under MS-DOS, OS/2, Windows, Windows for Workgroups,
Windows NT or Windows 95/98 – opens the named pipe with
_dos_open ("\\\\server1\\PIPE\\srvp",&cfd,...), and data can now be exchanged between the
processes.
i
The character “\” must always be specified twice in a C program since the first “\” is
interpreted as an escape character.
The connection to the LM named pipe is set up using the resource IPC$. If a client process
on a client wishes to communicate with an application process on the server, this resource
is connected automatically.
If the LM named pipe is to be closed again after the data exchange, the client process closes this named pipe using _dos_close(cfd).
The server process can then clear down the connection using
DosDisconnectNmPipe(reference) and delete the named pipe using DosClose(reference).
Further information on LM named pipes can be found in the manual “API Reference” and
in the manual pages for the API.
Product Manual
U7613-J-Z815-6-76
2.2.6.2
© Siemens Nixdorf Informationssysteme AG 1995
Pfad: D:\O7613e6\u7613e.k02
Introduction to Advanced Server for UNIX
Shared resources
Mailslots
Mailslots are unidirectional communication channels. They are created by an application
process on the server or by a client process on the client. In contrast to LM named pipes,
several processes can write to the same mailslot simultaneously but only the process that
created the mailslot can read from it.
Example
A reading process (on the server server1) creates a mailslot with the name ms. This program
waits for messages for the mailslot. The writing program sends a message to the network
name of the mailslot //server1/mailslot/ms.
The developer implements this in the program sources for client processes using the API
functions, in compliance with MS-DOS and OS/2 naming conventions:
In the reading program using DosMakeMailslot(\\\\mailslot\\ms, ..) and in the writing program
using DosWriteMailslot(\\\\server1\\mailslot\\ms, ,..).
The following calls are used in the processes on the server:
In the reading program using DosMakeMailslot(//mailslot/ms, ..) and in the writing program
using DosWriteMailslot(//server1/mailslot/ms, ,..).
2.2.7 Using the UNIX operating system from the PC
You can execute UNIX commands from the PC over the netrun service. For further information, please consult “Chapter 5 - Enhanced Reference” in the manual “User's Guide for
MS-DOS Clients”.
Product Manual
U7613-J-Z815-6-76
Pfad: D:\O7613e6\u7613e.k02
© Siemens Nixdorf Informationssysteme AG 1995
Introduction to Advanced Server for UNIX
Services
2.3 Services
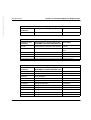
The following additional services can be configured in Advanced Server for UNIX:
Service
Comments
Alerter
Auditing
Replicator
Netlogon
Timesource
SNMP Extension Daemon
configurable
configurable
configurable
configured when server is installed
configurable
installed and configured with the asxsnmp
package
configurable
configured automatically
configurable
Netrun
Browser
Windows Internet Naming Service (WINS)
The following sections briefly explain these services.
2.3.1 Alerter
This service sends alarm messages to certain client users. For example, alarm messages
are initiated if access permissions are violated when using shared resources and if
important limits are exceeded (maximum error rate when accessing networks and hard
disks and maximum number of logon attempts).
2.3.2 Auditing
Important activities in the network are recorded by this service. These include starting and
stopping the server, user sessions and utilization of shared resources by specifying the
username and time. This list can be displayed if required.
Product Manual
U7613-J-Z815-6-76
Services
2.3.3 Replicator
© Siemens Nixdorf Informationssysteme AG 1995
Pfad: D:\O7613e6\u7613e.k02
Introduction to Advanced Server for UNIX
The Replicator service allows specific files and directories to be copied automatically from
the export server to one or more of the specifically configured import servers (server and
clients with the Replicator service).
The Replicator service on the export server monitors the export directory, containing the
designated files and directories. If a file in the export directory is changed or directories
and/or files are added or deleted, the Replicator service updates these directories and files
under the import directories.
2.3.4 Netlogon
The netlogon service connects a specified server to a domain. This simplifies the administrator’s duties: within a domain a user account only needs to be managed and maintained
on one server. User accounts can be maintained on each server using the single system
image (SSI), the accounts is thus centrally managed and distributed.
The netlogon service ensures that there is an identical copy of the user account on the
primary domain controller and the backup domain controllers of the domain. The netlogon
service also processes the logon procedures of the clients.
If you are using the Netlogon service, the servers in a domain have several roles:
Server role
Task
Primary Domain Controller
Maintains and distributes the master copy of
the user account database, handles “logon”
requests.
Backup Domain Controller
Receives a copy of the user account
database, handles “logon” requests.
The netlogon service also provides connections to other domains with which a trust
relationship exists.
2.3.5 Timesource
This is a Advanced Server service which identifies a server as the time source for a domain.
Other servers can synchronize their clocks with the time source.
i
Product Manual
UNIX servers cannot synchronise their clocks using this service.
U7613-J-Z815-6-76
Services
2.3.6 SNMP service
© Siemens Nixdorf Informationssysteme AG 1995
Pfad: D:\O7613e6\u7613e.k02
Introduction to Advanced Server for UNIX
The SNMP (Simple Network Management Protocol) service is installed and configured with
the asxsnmp package. This daemon process is started and stopped automatically with
Advanced Server for UNIX. It provides a connection between Advanced Server for UNIX
and the SNMP agent. Please refer to the manual “SNMP Service” for further information. In
addition, the “Emanate Master Agent” (Slsnmpdm) can also be used with the “SINIX SNMP
Agent Adapter” (Slsnmpd).
2.3.7 Netrun service
The Netrun service enables you to run a UNIX program on Advanced Server for UNIX from
an OS/2 or an extended MS-DOS client.
The corresponding user interface is not available on Windows for Workgroups, Windows
95/98, and Windows NT.
2.3.8 Browser
The browser service extends the announce messages that normally occured in the LAN
Manager/X environment (every 60 seconds). This new mechanism consists of a system of
hierarchically ordered browser programs that are used for searching domains, servers and
resources within the network. The browser service function is provided in the Explorer/File
Manager and Windows Print Manager. Relevant shared resources on other servers and on
servers in other domains can be found using this system.
However, the browser service can only be used by a Windows NT server, a Windows NT
workstation, a Windows 95/98 client, or a Windows for Workgroups client. It is not available
on a Windows or MS-DOS client.
For further information in this regard, please refer to the “Concepts and Planning” manual.
2.3.9 Windows Internet Naming Service
The Windows Internet Naming Service (WINS) is used to map computernames to IP
addresses. For further information please consult the chapter describing “Implementing
WINS”.
Product Manual
U7613-J-Z815-6-76
Pfad: D:\O7613e6\u7613e.k02
© Siemens Nixdorf Informationssysteme AG 1995
Introduction to Advanced Server for UNIX
Connection management
2.4 Connection management
The following sections contain descriptions of a network connection between the server and
the client. The terms “session” and “network connection” are explained and the security
concept of Advanced Server for UNIX is introduced.
2.4.1 Sessions
A session is set up between a client and a server the first time when a connection from the
client to a server resource was successful. (N.B. Windows NT clients sometimes have two
sessions to the same server). Every client can have several sessions with several servers.
i
●
Sessions are also set up between the servers in a domain; likewise, local
sessions exist on the server. The command net session shows all current
sessions.
●
The MAXCLIENTS parameter restricts the number of sessions that can exist
simultaneously. See also section “Parameters” in chapter “Lanman.ini File” in
this manual.
2.4.2 Connection to a resource
If the client user successfully connects to a resource first time from a server, a session is
automatically set up for this server (see above). However, if there is already a session with
this server then a new connection is set up to the required resource of this server using the
existing session.
A connection is explicitly cleared down from a client using the command net use and the
option /delete. On the other hand, if the session with a server is shut down then all connections to the shared resources of this server are closed.
Product Manual
U7613-J-Z815-6-76
Administration
2.4.3 Security concept
© Siemens Nixdorf Informationssysteme AG 1995
Pfad: D:\O7613e6\u7613e.k02
Introduction to Advanced Server for UNIX
In order to protect shared resources from unauthorized access, the user level security
concept is always used in Advanced Server for UNIX.
Users must legitimate using their username and password once in the domain to be able
to access the shared resources for which they are authorized.
i
Even after you have successfully logged onto a domain, you may need to carry out
further steps to be able to use the resource of a server in another domain:
●
If you have a different password for the same user name in another domain, you
must enter this password.
●
If you have a different user name in another domain, you must log off from the
previous domain and log onto the new domain or alternatively make the
connection with the resource as a different user.
●
If there is a trust relationship between the two domains there is no need to
create the user account a second time. You can also access the resources in
the other domain if you are a legitimate user in your domain. For further information, please refer to the “Concepts and Planning” manual.
2.5 Administration of Advanced Server for UNIX
The administrator manages and controls the shared resources, users, and their permissions on the UNIX server.
Advanced Server for UNIX is managed via the graphical interface of the Windows NT
Server Tools. Using this administration program you can carry out your administration tasks
remotely, e.g. from a Windows NT system (server or client) or a Windows, Windows for
Workgroups or a Windows 95/98 client if these utilities are installed there.
The administration of Advanced Server at the command prompt is described in chapter
“Administering Advanced Server at the Command Prompt”.
Administration functions can also be carried out from programs via the programming
interface (API). For further information please refer to the manual “API Reference” and the
API manual pages.
Product Manual
U7613-J-Z815-6-76
Programming interface (API)
2.5.1 Remote administration
© Siemens Nixdorf Informationssysteme AG 1995
Pfad: D:\O7613e6\u7613e.k02
Introduction to Advanced Server for UNIX
You can execute remote administration from any of the following systems:
2.5.1.1
●
Windows NT client and server
●
Windows 95/98, Windows for Workgroups, or Windows client
●
Extended MS-DOS client
●
UNIX system running Advanced Server for UNIX
Remote administration under MS-DOS
The administration shell is started using the command
net admin \\<servername> [password] /command and thereafter commands are issued using
the command net <subcommand>.
The command exit or the key combination CTRL and
tration shell and return to the operating shell system.
2.5.1.2
Z
can be used to exit the adminis-
Remote administration under Windows
Remote administration is possible from any system on which MS Windows, Windows for
Workgroups, Windows NT, or Windows 95/98 is installed. For this reason, the Windows NT
Server Tools are supplied with Advanced Server for UNIX. Special NT Server Tools have
been developed for the Windows client. Since they have the same functionality, a standard
administration interface is available to you on all clients and workstations.
2.6 Programming interface (API)
Advanced Server for UNIX provides a programming interface (application programming
interface (API)), which can be used to develop distributed applications in the network. The
API provides functions, for example, for the LM named pipes and mailslots. You can also
execute administration functions from your own programs.
With these functions, you can develop your own programs on the server operating system
which can exchange data with client processes. Advanced Server for UNIX itself uses the
API for administration tasks.
The API functions and changes since LAN Manager/X V2.2 are described in the manual
“API Reference” and in API manual pages. For information on how to install the manual
pages, please refer to the section “Installing the asxman package”.
Product Manual
U7613-J-Z815-6-76
Compatibility
2.6.1 Remote Procedure Call (RPC)
© Siemens Nixdorf Informationssysteme AG 1995
Pfad: D:\O7613e6\u7613e.k02
Introduction to Advanced Server for UNIX
Advanced Server for UNIX supports the Microsoft Remote Procedure Calls (RPCs). This
platform-independent mechanism is used for interprocess communication within a clientserver architecture.
The new functions of Advanced Server for UNIX are called up internally via RPC.
2.7 Compatibility
2.7.1 Client software
The functionality of Advanced Server for UNIX corresponds to the server part of Microsoft
Windows NT Server. The Advanced Server for UNIX product uses the SMB protocol
(Server Message Block) and is thus compatible with the following products:
Product Manual
●
MS Networks 1.01 (not included in delivery package)
●
MS Network Client MS-DOS V3.0 (included in delivery package)
●
MS LAN Manager MS-DOS V1.1 (not included in delivery package)
●
MS LAN Manager MS-DOS V2.0 (not included in delivery package)
●
MS LAN Manager MS-DOS V2.1 (not included in delivery package)
●
MS LAN Manager MS-DOS V2.2c (included in delivery package)
●
MS LAN Manager OS/2 V1.1 (not included in delivery package)
●
MS LAN Manager OS/2 V2.0 (not included in delivery package)
●
MS LAN Manager OS/2 V2.1 (not included in delivery package)
●
MS LAN Manager OS/2 V2.2 (not included in delivery package)
●
MS Windows for Workgroups V3.1 (not included in delivery package)
●
MS Windows for Workgroups V3.11 (not included in delivery package)
●
MS Windows 95 (not included in delivery package)
●
MS Windows 98 (not included in delivery package)
●
MS Windows NT Version 3.1 and later, for administration Version 3.51 and later (not
included in delivery package)
U7613-J-Z815-6-76
i
© Siemens Nixdorf Informationssysteme AG 1995
Pfad: D:\O7613e6\u7613e.k02
Introduction to Advanced Server for UNIX
Compatibility
●
The RFC 1001/2 implementation (NetBIOS™ on TCP/IP) is the basis for
communication with the server system.
●
The MS LAN Manager OS/2 products referred to above are only available for
OS/2 V1.x.
●
If you are using the client with MS LAN Manager V2.0, you must set up the
TCP/IP communication software with the Siemens product LAN1 Vx.
●
The product MS LAN Manager provides TCP/IP with Version 2.1 and later; with
this product you have the option (e.g. if you want to implement an emulation in
parallel) of incorporating the product LAN1 Vx.
●
The product LAN1 is not supplied with Advanced Server for UNIX.
●
The commands referred to, i.e. udir, uren, and uchmod, cannot be used on all
clients. In this case you should use the corresponding UNIX commands.
2.7.2 Role of the server
You can install Advanced Server for UNIX and LAN Manager/X in a domain with Windows
NT servers. Only one Advanced Server for UNIX or Windows NT server can be installed as
a primary domain controller in a single domain. LAN Manager/X servers cannot take on the
server role of primary domain controller.
i
The server roles of member server and standalone server have been omitted from
Advanced Server for UNIX.
2.7.3 Server hardware
Advanced Server for UNIX can be operated via any network with TCP/IP capability, e.g. via
Ethernet® or Token Ring™.
Product Manual
U7613-J-Z815-6-76
Compatibility
2.7.4 LAN Manager/X V1.1
© Siemens Nixdorf Informationssysteme AG 1995
Pfad: D:\O7613e6\u7613e.k02
Introduction to Advanced Server for UNIX
Version 2.0 and later of LAN Manager/X or Advanced Server for UNIX are compatible with
Version 1.1 as regards the following:
●
The environment variable $xLMX
●
The environment variable $LM_HOMEDIR
●
The file /etc/rclmx, in which the environment variables are set
●
The automatic call of /etc/rclmx from the script /etc/profile
●
The utilities dos2unix and unix2dos, which can be called under the system path and
under $xLMX/bin
●
The programs net and lm, which can be called under $xLMX/bin
●
The script lmx for starting and stopping the server (with the NetBIOS administration
program) and the server status display.
Important changes to the previous version for Version 2.0 and later:
Product Manual
●
The domain concept is supported.
●
You can route the output of the printer spooler to a printer that is connected to a client
(shared client printer).
●
The share table and usernames are saved in a different format (if required this data can
be converted manually for the new version).
●
The MS-DOS notation must be used with the command net, for example options may
only be introduced with the character “/”.
●
For shared directories, c: must always be specified with the command net share,
e.g. net share sf1=c:/u1/sf1.
●
Programs which create LM named pipes must have root authorization.
●
LAN Manager/X must be started when creating the LM named pipes.
●
Remote systems can be administered from a client with the command net admin. For
this purpose, the server name must always be specified e.g.
net admin \\server1 /command
●
The prefix net must always be set in the administration shell.
●
The configuration file is now called $xLMX/lanman.ini, and only contains values which
deviate from standard. The program srvconfig should always be used for viewing or
modification functions. The chapter “Lanman.ini File“ contains a description of this.
U7613-J-Z815-6-76
Compatibility
2.7.5 LAN Manager/X V2.0
© Siemens Nixdorf Informationssysteme AG 1995
Pfad: D:\O7613e6\u7613e.k02
Introduction to Advanced Server for UNIX
Version 2.2 and later of LAN Manager/X or Advanced Server for UNIX is compatible with
Version 2.0 as regards the following:
●
The API of Version 2.0 is a subset of the API of Version 2.2.
Important changes to Version 2.0
Product Manual
●
The API of Version 2.0 has been extended.
●
The Targon/31 system is no longer supported.
●
You are now provided with a suggested name for the server name consisting of the first
nine characters of the host name and the suffix .srv instead of .serve (e.g. server1.srv).
●
In order to start a UNIX program from the PC, you should now use the command netrun
(extended MS-DOS client) instead of uexec.
●
In the case of an update installation, the configuration of Versions 2.0 and 2.2 can be
adopted.
●
Server attributes such as server role, server name etc. can be changed afterwards with
a utility program.
●
The servers and clients can be located in different subnets.
●
You can save the entries for installation in a file and carry out the installation at a later
date. This file also makes it possible for you to carry out “automatic installation” – even
on other UNIX systems.
●
Individual services can be started and stopped.
●
The command net version shows which version of LAN Manager is installed on the
current system.
U7613-J-Z815-6-76
Compatibility
2.7.6 LAN Manager/X V2.2
© Siemens Nixdorf Informationssysteme AG 1995
Pfad: D:\O7613e6\u7613e.k02
Introduction to Advanced Server for UNIX
Advanced Server for UNIX since V3.5 is compatible with LAN Manager/X V2.2 as regards
the following:
●
Advanced Server for UNIX supports the full functionality of LAN Manager/X V2.2.
●
Interoperability is possible both with LAN Manager V2.x systems and with LAN
Manager V2.0 and V2.2 clients under MS-DOS, OS/2, Windows 3.1, and Windows 3.11
(Windows for Workgroups).
●
The environment variable $xLMX and the lmx command are still available.
Important changes to Version 2.2
Advanced Server for UNIX has the following new or modified features and functions:
i
Product Manual
New and modified commands or procedures are explained in comparative tables
with comments in Appendix A of the manual “Concepts and Planning”. Please refer
to the tables for these descriptions.
●
Like a Windows NT server, Advanced Server for UNIX can take on the server role of
primary domain controller in a domain.
●
The server roles of “member server” and “standalone server” have been omitted. In an
upgrade, the member server is given the role of “backup domain controller” and the
standalone server is given the role of “primary domain controller”.
●
The share level security concept is no longer supported. In the upgrade installation, the
server is given the server role of primary domain controller with the user level security
concept.
●
Modified processing and defaults for access permissions
●
The environment variable $xASX exists in parallel to the environment variable $xLMX.
The new command asx (e.g. asx start) corresponds to the lmx command, which can still
be used.
●
The Replicator service is no longer started automatically.
●
Trust relationships can be set up between domains. These facilitate the use of
resources in other domains.
●
Global and local groups as well as global and local user accounts are supported.
●
Customizable user environments: A specific user environment is recorded by means
of defining a user profile or by allocating a logon script regardless of which client the
user logs on from.
U7613-J-Z815-6-76
Pfad: D:\O7613e6\u7613e.k02
© Siemens Nixdorf Informationssysteme AG 1995
Introduction to Advanced Server for UNIX
Product Manual
Compatibility
●
Administration: The primary administration tool for Advanced Server for UNIX are the
Windows NT Server Tools, which can be used from a Windows NT workstation or a
Windows NT server. They are also available under Windows 3.1, Windows for
Workgroups, and Windows 95/98.
The NT Server Tools replace the graphical user interface netadmin.
Administration tasks can still be carried out via the UNIX console.
●
Monitoring: The network is monitored with the graphical monitoring tools Event Viewer,
Performance Monitor, and Server Manager which supplement the Alerter service.
●
New security concept: Advanced Server for UNIX has a more extensive security
concept, which consists of user identification, user authentication, access control, and
access logging.
●
Remote Procedure Calls (RPC): Advanced Server for UNIX supports the Microsoft
Remote Procedure Calls (RPCs).
●
Browser service: This service is used by Windows applications like Explorer/File
Manager and Print Manager as well as by the net view command.
●
Support for UNIX quotas (configurable).
●
Name Space Mapping: Mapping of long file names to DOS 8.3 naming conventions.
●
Mixed Case Support: Configurable support for uppercase in file and directory names.
●
New utilities: accget, accadm, and userget.
●
Interoperability with Windows NT 4.0 and Windows 95/98.
●
Configuration of NetBIOS (For further information please refer to the section entitled
section “Configuring NetBIOS”).
●
Migration tools: Advanced Server for UNIX has migration tools with which existing
user accounts, access lists etc. are converted.
●
No licensing with key diskettes; no additional user extensions.
●
Manual pages for the API; the NetAccessEnum function has been omitted from the API.
●
Utilities for generating installation diskettes for clients.
●
The net error and net audit commands are obsolete; the net access command as well as
the new net perms command can only be invoked with parameters.
●
Version 3.0 of MS Network Client
●
German language message texts in a separate package
●
In the lanman.ini file a series of parameters have been omitted. After an upgrade installation, these parameter entries should be removed manually.
U7613-J-Z815-6-76
Pfad: D:\O7613e6\u7613e.k02
© Siemens Nixdorf Informationssysteme AG 1995
Introduction to Advanced Server for UNIX
Compatibility
●
The add_access, add_user and buildacc utilities have been omitted. Instead of lmxsetup
and lmxinfo, asxsetup and asxinfo are available.
●
With Advanced Server for UNIX, the AT&T and SPOOL V4.x spoolers are supported.
2.7.7 Advanced Server for UNIX V3.5
Advanced Server for UNIX V4.0 is compatible with V3.5 except for the following:
●
Intel systems are not longer supported (e.g. SINIX-L/-M/-Z and UnixWare).
●
AS/X V4.0 needs at least SINIX / Reliant UNIX -N/-Y V5.43C00.
●
AS/X V4.0 needs additional software installed on the SINIX / Reliant UNIX (see section
“Hardware and software requirements”).
Important changes to V3.5:
Advanced Server for UNIX has the following new or modified features:
Product Manual
●
NT style printing is supported and gives the possibility to install printer drivers for
Windows 95/98 and Windows NT on the server. It is no longer neccesary to install the
printer driver on each client manually.
●
A Windows NT compatible WINS-service is available with Advanced Server for UNIX
V4.0. This makes it much more easy to operate the server and clients in a routed
environment.
●
Registry: Most of the Advanced Server for UNIX configuration is stored in a binary
Registry file. The configuration can now be done via the Windows Registry Editor.
●
SMB Signatures: SMB signing provides a message authentication by placing a digital
security signature into each SMB, which is then verified by both the client and the
server. For more information about SMB signatures take a look at Microsoft Knowledge
Base.
●
It is possible to select the language of builtin names (domain language) before the
initialization of the Advanced Server for UNIX databases takes place (e.g. the local
group “Administrators” becomes “Administratoren” and "builtin\guest" becomes a
"vordefiniert\Gast").
●
New command net computer to display or modify the list of the computer accounts in the
domain database, net sid to translate Security Identifiers (SIDs) into account names and
vice versa.
●
German language message texts are integrated in the asxserver package and can be
activated with a utility.
U7613-J-Z815-6-76
Compatibility
2.7.8 Advanced Server for UNIX V4.0A
© Siemens Nixdorf Informationssysteme AG 1995
Pfad: D:\O7613e6\u7613e.k02
Introduction to Advanced Server for UNIX
Advanced Server for UNIX V4.0B has the following new or modified features:
Product Manual
●
DNS-WINS-integration: new NetBIOS version to support the DNS-WINS- Integration of
Reliant UNIX V5.45. For a documentation of the DNS-WINS integration, please refer to
the manuals of the operating system.
●
Compatible with SIthreads package (used for the WINS service).
●
Compatible with Reliant UNIX V5.45.
●
Integration with RMS (Reliant Monitor Software).
●
Euro symbol support.
●
All AS/X files are now located below the /var/opt/lanman directory.
●
The joindomain command now supports additional command line options allowing noninteractive mode operation.
●
New utilities: printadm, repladm, userrights, promote
●
Online manual pages for all AS/X commands, new manual pages for:
–
new utilities: printadm, promote, repladm, userrights
–
other utilities: accadm, accget, addclipr, addserver, asxcheck, asxinfo, asxperf, asxpwexp,
asxregview, delclipr, delserver, setdomainlang, setlang, setspooler, userget
●
asxregview enhancements.
●
Improved asxinfo and asxcheck utilities.
●
New /HOMEDIRDRIVE option for the net user command.
●
New options -o and -M for acladm utility, new additional options -f and -n for acladm -C.
●
New option -d for regconfig utility, support pathnames with "/" and "\".
●
New option -q for blobadm utility to support low level blob file compression.
●
Improved performance during the blob file grow process (used for all Advanced Server
databases).
●
Improved installation of asxserver package.
●
Default of servername without ".", that means .srv is omitted.
●
The .srv extension for server names is no longer offered as the default. Warnings occur
if server names are incompatible with DNS names.
●
Share table information moved to registry.
●
lmshare command now supports printer driver fields.
U7613-J-Z815-6-76
Pfad: D:\O7613e6\u7613e.k02
© Siemens Nixdorf Informationssysteme AG 1995
Introduction to Advanced Server for UNIX
Compatibility
●
Updated description “Compression of the ACL Database”
●
Updated description: “Moving directories with existing access permissions”
●
New configuration option to spoolin print jobs with the User ID of the mapped UNIX user
instead of the User ID of "root".
●
New registry parameters: ConnectTimeout, MaxMpxCt, NetPopup, SpoolinAsUnixUser,
DeletedPrintJobTimeOnQ
●
New lanman.ini parameters: maxspoolfds, os2searchfix, ProductType
●
The following registry parameters are no longer supported: ShareCacheCount
●
Removed limit of 128 trust relationships.
●
New range 0 - 2 for the value of the UseUnixLocks registry parameter.
●
The limits of the NumCLIENT_SESSION and NumSERVER_SESSION registry parameters
are watched and resource shortages are reported.
●
UnixQuotas registry parameter also used to restrict the user's disk space for non-root
users (if supported by the file system).
●
Implemented Level II Oplocks to improve co-operation with NT clients.
●
NetBIOS keep alive timeout is now configurable and changed from1 minute to 30
minutes to reduce the number of frames on the network.
●
New NetBIOS tunables NBRFCMAXDGMS and NBRFCMAXFRAGS.
●
NBRFCKALIVE tunable now used to set the keep alive timeout in minutes. Default
changed to 30 minutes.
●
The time when a NetBIOS name conflict occured is also displayed when calling
nbrfcdiag -n.
●
The tcp_nodelay functionality is no longer configured as a lanman.ini parameter. Now it
is configured at the NetBIOS daemon startup (-n option).
●
NetBIOS daemon startup parameters now configured in a configuration file.
●
NetBIOS diagnostic messages now written to syslog.
●
Additionally, the IP address can be used with the -E and -D options of the nbconfig
command.
●
New -a, -A and -q options for nbtstat utility.
●
New NetBIOS findbrow utility on UNIX.
For a detailed description of the new options and commands, please refer to the description
of the commands in the online manual pages or in this manual.
Product Manual
U7613-J-Z815-6-76
Pfad: D:\O7613e6\u7613e.k03
© Siemens Nixdorf Informationssysteme AG 1995
3 Advanced Server for UNIX architecture
This chapter contains descriptions of the architecture of Advanced Server for UNIX.
Communication takes place via TCP/IP (Transmission Transport Protocol/Internet
Protocol).
i
Processes required for the administration of NetBIOS are not considered here!
3.1 Process model
A series of processes are started in order to carry out specific tasks when Advanced Server
for UNIX is started. The following sections contain a short description of these processes
and their tasks.
The number of processes depends on the current configuration which is stored in the
lanman.ini file and in the Registry.
3.1.1 Communication between the processes
Data which is required by all Advanced Server for UNIX processes is stored in a shared
memory segment. This data includes, for example, the file and lock tables. Data that is not
required by all processes is retained by the control process and made available as required
by means of interprocess communication.
Product Manual
U7613-J-Z815-6-76
Process model
3.1.2 Overview of the processes
© Siemens Nixdorf Informationssysteme AG 1995
Pfad: D:\O7613e6\u7613e.k03
Advanced Server for UNIX architecture
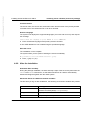
The following table lists the daemon processes active when Advanced Server for UNIX has
been started in a maximum configuration.
Process
Task
lmx.ctrl
lmx.srv
daemon process for connection setup and administrative tasks
daemon process (generated from the process lmx.ctrl) for processing
tasks from several workstations
daemon process for the service Netlogon, for synchronization
between different servers (Single System Image (SSI)), trust relationships
daemon process for alarm messages (Alerter service)
daemon process for Browser service
daemon process for the replicator service
daemon process for Windows Internet Naming Service
endpoint mapper for RPCs for WINS service
daemon process for the Netrun service
daemon process that works with the SNMP service
daemon process for the Net View Alerter service (not supported by
Siemens Advanced Server for UNIX)
lmx.dmn
lmx.alerter
lmx.browser
lmx.repl
lmx.wins
lmx.ep
lmx.netrun
lmx.extd
lmx.nvalert
Product Manual
U7613-J-Z815-6-76
Process model
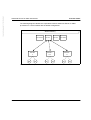
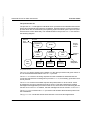
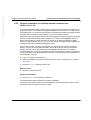
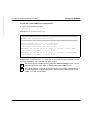
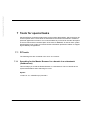
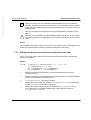
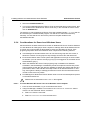
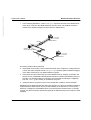
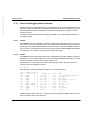
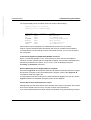
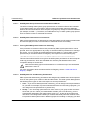
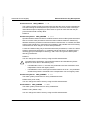
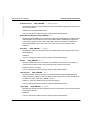
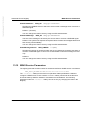
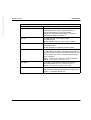
The following diagram clarifies the cooperation between Advanced Server for UNIX
processes on a server started with the default configuration:
© Siemens Nixdorf Informationssysteme AG 1995
Pfad: D:\O7613e6\u7613e.k03
Advanced Server for UNIX architecture
Shared memory
lmx.browser
lmx.srv
1
PC
PC
lmx.ctrl
lmx.dmn
lmx.srv
n-1
PC
PC
lmx.alerter
lmx.srv
n
PC
PC
Advanced Server for UNIX processes
Product Manual
U7613-J-Z815-6-76
Process model
The process lmx.ctrl
© Siemens Nixdorf Informationssysteme AG 1995
Pfad: D:\O7613e6\u7613e.k03
Advanced Server for UNIX architecture
The process lmx.ctrl manages the individual server processes and undertakes those tasks
which cannot be directly allocated to a workstation. Several tasks are carried out within the
process which are not controlled by the operating system scheduler (as the process is) but
which assume control alternately. The individual tasks in the process lmx.ctrl are shown in
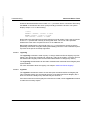
the following diagram:
Named
pipe
service
New
client
lmx.ctrl
pipeserv
task
task0
listener
task
mcpwork
task
lmx.srv
process 1
lmx.srv
process 2
Server
requirements
mslot
task
lmx.srv
process 3
Mailslot
tasks
Message
datagrams
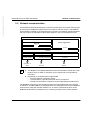
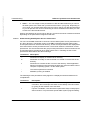
The process lmx.ctrl
The task0 task queries events in the network or in the other processes and gives control of
one of the tasks described below to the lmx.ctrl process.
The listener task reacts to incoming requests from the workstations and distributes the
connection requests to the existing server process lmx.srv or, if necessary, generates a new
server process.
The mslot task receives the mailslot requests and passes them on to the server. It also
processes the announce requests from other servers. This task transmits the mailslot
messages to the application processes on the server, which can then be read using the API
function DosReadMailslot. In addition, this task manages the server function autodisconnect.
The mcpwork Task oversees all lmx.srv processes and answers administrative queries from
the workstations.
The pipeserv Task coordinates transactions between server and client applications.
Product Manual
U7613-J-Z815-6-76
Process model
The process lmx.srv
© Siemens Nixdorf Informationssysteme AG 1995
Pfad: D:\O7613e6\u7613e.k03
Advanced Server for UNIX architecture
One or more lmx.srv processes process the requests of several workstations in the network.
Each lmx.srv process is started, as required, using the process lmx.ctrl. The relevant lmx.srv
process passes the print requests and their management on to the system spooler.
The maximum number of workstations to be operated in parallel can be configured for the
lmx.srv process in lanman.ini file and in the registry. The minimum and maximum number
depend on the parameters maxclients (in lanman.ini), MaxVCs (Registry) and VCDistribution
(Registry). The Registry parameters MinVCPerProc, MaxVCPerProc and VCDistribution
should be used to change the maximum number.
The process lmx.dmn
The daemon process lmx.dmn performs the service network logon security. It also synchronizes the individual servers (single system image, SSI) and is used for trust relationships. This
process is started by the process lmx.ctrl when Advanced Server for UNIX is being
initialized.
The lmx.alerter process
This daemon process manages the alerter function. If not disabled, it is started automatically when AS/X is started.
The lmx.browser process
This process enables the Browser service. If not disabled, this process is started when
Advanced Server for UNIX is being initialized.
The process lmx.repl
The process lmx.repl establishes contact with other servers and imports or exports files from
and to these servers in order to ensure data consistency. This process is only started if it
has been configured.
The lmx.wins process
This process establishes the WINS (Windows Internet Naming Service) service. It is started
only when configured.
The lmx.ep process
This process works together with the lmx.wins process. It is started and stopped automatically with WINS.
Product Manual
U7613-J-Z815-6-76
Process model
The lmx.netrun process
© Siemens Nixdorf Informationssysteme AG 1995
Pfad: D:\O7613e6\u7613e.k03
Advanced Server for UNIX architecture
This process provides the Netrun service: UNIX programs can be executed on the server
from MS-DOS or OS/2 workstations using this process.
The process lmx.extd
The lmx.extd program is installed and configured with the installation of the software
package asxsnmp. This process sets up the connection between the SNMP service and
Advanced Server for UNIX; it informs the SNMP agent when Advanced Server for UNIX
starts and stops.
The lmx.nvalert process
This process is not supported by Siemens Advanced Server for UNIX.
Product Manual
U7613-J-Z815-6-76
Pfad: D:\O7613e6\u7613e.k03
© Siemens Nixdorf Informationssysteme AG 1995
Advanced Server for UNIX architecture
Network communication
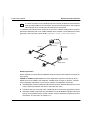
3.2 Network communication
A workstation and an Advanced Server for UNIX communicate in the network using several
protocol layers. NetBIOS is implemented in accordance with RFC1001/2. This NetBIOS
implementation is based on the standard protocol TCP/IP. The following diagram illustrates
the way in which the individual modules work together in the communication process.
Advanced Server for UNIX
TCP/IP application
NB-LIB
TLI
RFC 1001/2
Sockets
TCP/IP
WAN driver
Communications
controller for WAN
HDLC, X.25, or
ISDN
Token Ring driver
Communications
controller for Token Ring
LAN
Token Ring
Ethernet driver
Communications controller
for Ethernet
LAN
Ethernet
Communication architecture of Advanced Server for UNIX
i
●
This diagram is a simplified illustration of the communication architecture, other
products such as CMX, for example, may be required for communications
controllers.
●
Depending on the UNIX system implemented
– there are different connection options
– communications controllers and card drivers are required
– several communications controllers can be implemented simultaneously.
The NetBIOS component of the operating system kernel is implemented in the streams
architecture. The library NB-Lib in Advanced Server for UNIX allows access to the NetBIOS
streams driver using the standard interface TLI. Access to TCP/IP takes place via the
NetBIOS streams driver. Parallel access to TCP/IP is possible via the socket interface.
Product Manual
U7613-J-Z815-6-76
Pfad: D:\O7613e6\u7613e.k03
© Siemens Nixdorf Informationssysteme AG 1995
Advanced Server for UNIX architecture
Local communication for UNIX systems
3.3 Local communication for UNIX systems
If a user is working on the server system as an Advanced Server for UNIX user, e.g.
administrator, then NetBIOS is used for a local session.
The programming interface to Advanced Server for UNIX, the application programming
interface (API), is implemented using local interprocess communication (LIPC). Advanced
Server for UNIX processes use the same interface. The requests are mapped to streams
pipes in the operating system kernel.
The following diagram shows that the Advanced Server for UNIX processes and the application processes access the same interface:
Application
Advanced Server for UNIX
LIPC
API
LIPC
Named pipes of the operating system
Local communication
The named pipes of the operating system are used for data transport.
Product Manual
U7613-J-Z815-6-76
Pfad: D:\O7613e6\u7613e.k04
© Siemens Nixdorf Informationssysteme AG 1995
4 Installing Advanced Server for UNIX
This chapter contains the information required to install Advanced Server for UNIX. System
administrator root rights are required for this purpose. In order to configure the server
system in accordance with individual requirements after the installation, please read the
chapter on “Configuring Advanced Server for UNIX”.
i
The Release Notice and most recent information that only became available after
this manual went to print, e.g. on the version specifications of required software
products and supported hardware, are contained in the SIreadmeM package, which
is supplied with Advanced Server for UNIX V4.0.
4.1 Advanced Server for UNIX delivery package
All of the software for Advanced Server for UNIX is contained on CD-ROM in package
format (PKG). An overview of this is given on the next page.
i
Advanced Server for UNIX Version 4.0 and later is only supplied on CD-ROM. Key
diskettes are no longer used for installation.
The following manuals are available for Advanced Server for UNIX, and they can be
obtained in various delivery units:
Product Manual
●
This manual “Overview and Installation” (German and English)
●
“Concepts and Planning” (German and English)
●
“API Reference”
●
“SNMP Service” (from the series of manuals on LAN Manager/X V2.2)
●
“Installation Guide for Clients”
●
“User's Guide for MS-DOS Clients”
●
“User's Guide for MS Windows Clients”
●
“NetWare Connectivity”
●
“Installation Guide for Clients” (Supplement to Version 3.0 of MS Network Client)
U7613-J-Z815-6-76
Hardware and software requirements
The following packages are included in the Advanced Server for UNIX delivery package:
© Siemens Nixdorf Informationssysteme AG 1995
Pfad: D:\O7613e6\u7613e.k04
Installing Advanced Server for UNIX
●
SIreadmeM Readme file and Release Notice in German and English
●
nbrfc
NetBIOS (RFC1001/2)
●
asxserver
Server
●
asxtools
Microsoft Windows NT Server Tools
●
asxtoolsD
Microsoft Windows NT Server Tools (German language)
●
msclients
Microsoft Client Software
●
asxman
Manual pages for Advanced Server for UNIX
●
asxdocs
Online documentation and Acrobat Reader
●
asxsnmp
Advanced Server for UNIX SNMP extension for TransView
Extensible Agent
●
asxdebug
This package is only intended for the Siemens Support Service.
4.2 Hardware and software requirements
Before installation users must check that the following hardware and software requirements
are met.
4.2.1 Hardware requirements
One of the following UNIX systems that is connected to a LAN is required for the installation
of Advanced Server for UNIX:
4.2.1.1
●
RM200
●
RM300
●
RM400
●
RM600-xxx
Main memory
At least 64 Mbytes of main memory is required, 128 Mbytes is recommended.
Product Manual
U7613-J-Z815-6-76
4.2.1.2
© Siemens Nixdorf Informationssysteme AG 1995
Pfad: D:\O7613e6\u7613e.k04
Installing Advanced Server for UNIX
Hardware and software requirements
Hard disk storage
The file systems must have the following available disk space for Advanced Server for
UNIX at installation time:
File system
/
/usr
/usr
/usr
/var
/opt
Any file system
Any file system
Any file system
Any file system
Min. number in Mbytes
6-10
<1
2
<1
20
<1
20
21
20
21
Comment
For the new kernel
For the asxserver package
For the asxman package
For the asxsnmp package
For the asxtools package
For the asxtoolsD package
For the msclients package
For the asxdocs package
In addition, sufficient space must be reserved for the shared directories and the replicator
files and directories.
The server software is installed under the /var/opt/lanman directory. If a different file system
(e.g. /<new_dir>) is required, the following commands must be executed before installation:
mkdir /var/opt
mkdir /new_dir/lanman
ln -s /new_dir/lanman /var/opt/lanman
i
!
Product Manual
●
The names of the file systems and the size of available memory can be viewed
using the df -v or dfspace command.
●
The installation procedure also requires free disk space under the /var directory
during installation from CD-ROM.
●
Likewise, please note that the Advanced Server for UNIX databases also
require free disk space under the /var directory (in large configurations approx.
50 Mbyte is not unusual).
U7613-J-Z815-6-76
Hardware and software requirements
4.2.2 Software requirements
© Siemens Nixdorf Informationssysteme AG 1995
Pfad: D:\O7613e6\u7613e.k04
Installing Advanced Server for UNIX
The software listed below must be installed on the server system in order to run
Advanced Server for UNIX:
System
software version
RM200
RM300
RM400
RM600-xxx
Reliant UNIX-N V5.43C0 and later
Reliant UNIX-N V5.43C0 and later
Reliant UNIX-N V5.43C0 and later
Reliant UNIX-Y V5.43C0 and later
If you would like to use the “shared printer” resource with Advanced Server for UNIX, you
must configure one of the following spoolers before installing Advanced Server for UNIX:
Product name
Meaning
AT&T spooler
Standard spooler
SPOOL V4.2B or Xprint 5.0 (and later) Siemens Spooler package
The following software package must be installed before installing Advanced Server for
UNIX:
Product name
Meaning
CDS++RTS V1.0B00 (and later)
Reliant UNIX C++ Runtime system
When the WINS Service is to be used then one of the following software packages must be
installed before installing Advanced Server for UNIX:
Product name
Meaning
DCE-THR V2.0A20 (or later)
SIthreads
from the CD-SYS-MI from 8/97
delivered with the operating system
!
This package is only necessary if the machine should run the Advanced Server for
UNIX WINS service.
The “SIthreads“ package is included on the operating system CD with more recent
operating system versions. This package replaces the previous version
“DCE-THR“. In this case, you should only use the “SIthreads“ package.
Product Manual
U7613-J-Z815-6-76
Pfad: D:\O7613e6\u7613e.k04
© Siemens Nixdorf Informationssysteme AG 1995
Installing Advanced Server for UNIX
4.2.2.1
The installation procedure
Dependencies
You can use Advanced Server for UNIX from clients if one of the client software products
described in section “Client software” is installed on them.
4.3 The installation procedure
The software is installed from the CD-ROM using the cdinst utility. cdinst invokes the pkgadd
program implicitly. You should proceed as follows:
1. Deinstall LAN Manager/X V2.0, V2.2, V3.5 or V4.0 if they exist.
2. Install the SIreadmeM package with the release information and important information
first.
3. Then install NetBIOS and restart the system.
4. The server software of Advanced Server for UNIX can be installed now. There are
different installation steps for the
– upgrade installation of Advanced Server for UNIX from previous versions
and the
– new installation of Advanced Server for UNIX.
5. You can now install the optional Advanced Server for UNIX software.
i
If you do not follow this sequence, installation cannot be carried out successfully for,
for instance, the server role backup domain controller.
During installation, you must specify the name of the device from which the software is to
be installed. The device name of the CD-ROM drive depends on the UNIX system used.
For further information, please refer to the UNIX reference manual “Commands – Volume
1 and 2“.
Product Manual
U7613-J-Z815-6-76
Pfad: D:\O7613e6\u7613e.k04
© Siemens Nixdorf Informationssysteme AG 1995
Installing Advanced Server for UNIX
Deinstalling previous versions
4.4 Deinstalling previous versions
Before this version of Advanced Server for UNIX V4.0 is installed, the previous versions
must be deinstalled. You must follow the sequence for deinstallation described here in a
domain with a primary and one or more backup domain controllers.
i
●
The LAN Manager/X server roles ’member server’ and ‘standalone server’ are
not supported by Advanced Server for UNIX.
●
A member server should be handled in the same way as a backup domain
controller.
●
A standalone server should be handled in the same way as a primary domain
controller.
●
A LAN Manager/X server can never be the Primary Domain Controller in a
domain with NT servers or computers running Advanced Server for UNIX.
1. Stop the primary domain controller.
2. Deinstall LAN Manager/X or Advanced Server for UNIX.
3. Then install Advanced Server for UNIX as the primary domain controller.
If individual backup domain controllers are to continue being operated with the new
Advanced Server for UNIX version, carry out the following steps:
1. Stop the backup domain controller.
2. Deinstall LAN Manager/X or Advanced Server for UNIX.
3. Then install Advanced Server for UNIX as the backup domain controller.
i
Product Manual
The primary domain controller must be running.
U7613-J-Z815-6-76
Deinstalling previous versions
4.4.1 Deinstalling LAN Manager/X V2.0 and V2.2
© Siemens Nixdorf Informationssysteme AG 1995
Pfad: D:\O7613e6\u7613e.k04
Installing Advanced Server for UNIX
You can continue to use the existing server configuration for the new version.
!
●
With Version 2.0 of LAN Manager/X the logon scripts of the LAN Manager/X
user are not backed up automatically when the software is deleted.
●
When the NetBIOS of Version 2.0 under Reliant UNIX-N is deinstalled, the
/etc/default/inet file is deleted illegally.
The following steps must be carried out before deinstalling LAN Manager/X V2.0:
To back up the logon scripts, copy all files under the /var/opt/lanman/repl/export/scripts
directory (on the export server) or /var/opt/lanman/repl/import/scripts (on the import
server) to another directory in the file system – not to /var/opt/lanman.
Ê
If you do not want to modify the server roles and if you are using the replicator service,
you only need to back up the logon scripts for the export server.
If you are working under Reliant UNIX-N, back up the /etc/default/inet file, to
/etc/default/inet.org for example, before executing the pkgrm nbrfc command.
Ê
When deinstalling, you have the option to back up the logon scripts for Version 2.2 and later
of LAN Manager/X.
The following steps are required for deinstalling both versions:
Delete LAN Manager/X V2.0 or LAN Manager/X V2.2 as documented.
Ê
Deinstall the server software and NetBIOS of Versions 2.0 or 2.2. During deinstallation
you are given the options of backing up the lanman.ini file, the user account etc. and to
continue using them for Version 4.0. For further information on deinstalling Version 3.5,
LAN Manager/X V2.0 or 2.2 please refer to the “Overview and Installation” manual for
the relevant version.
i
i
Product Manual
The /var/opt/lanman/lanman.ini and /var/opt/lanman/datafiles/accounts.lmx files
must be backed up for an upgrade from LAN Manager/X V2.0 or V2.2 to
Advanced Server for UNIX V4.0.
●
If you want to install Version 4.0 after deinstalling Version 2.0 or 2.2 of NetBIOS,
you do not need to restart the system now.
Install Advanced Server for UNIX V4.0 as described on the following pages.
Ê
Ê
●
The standard logon scripts netlogon.bat and netlogon.cmd are recreated during installation of Advanced Server for UNIX.
If you deinstalled LAN Manager/X V2.0 beforehand, copy the backed up logon scripts
back to /var/opt/lanman/repl/export/scripts (on the export server) or to
/var/opt/lanman/repl/import/scripts (on the import server).
U7613-J-Z815-6-76
Pfad: D:\O7613e6\u7613e.k04
© Siemens Nixdorf Informationssysteme AG 1995
Installing Advanced Server for UNIX
Ê
Deinstalling previous versions
If you deinstalled LAN Manager/X V2.0 under Reliant UNIX-N, copy the
/etc/default/inet.org file – backed up as described above – back to /etc/default/inet.
4.4.2 Deinstalling Advanced Server for UNIX V3.5
You can continue to use the existing server configuration for the new version.
You should proceed as follows:
Ê
Stop Advanced Server for UNIX
Ê
Check the databases. This will save time during the upgrade installation if the
databases are corrupt.
Call /var/opt/lanman/bin/acladm -C -y and /var/opt/lanman/bin/samcheck -r to check and
repair the acl database and the account databases.
Ê
Remove Advanced Server for UNIX V3.5 as described in the manual for the respective
version.
Ê
Deinstall the optional packages including optional Service Packs, the server software,
and NetBIOS. When you are deinstalling you will be offered the option of saving the
lanman.ini file, the user account etc. and using them for the new version. For further
information on deinstalling Advanced Server for UNIX please refer to the “Overview and
Installation” manual for the respective version to be deinstalled.
Ê
If you want to install the new version after NetBIOS has been deinstalled, you do not
need to restart the system.
Special features of NetBIOS configuration:
The following applies only if you had previously installed a NetBIOS Version 3.5A.
The NetBIOS Version 3.5A /var/opt/nbrfc/nbrfc.cfg configuration file is copied to /tmp when
the nbrfc package is deleted, and can then be saved. The reinstallation of NetBIOS Version
3.5B and later is based on a new configuration file structure. It is not possible to automatically retain the old interface configuration, but you can convert old NetBIOS name
mappings into the new configuration file structure.
The following options are available:
To ignore old name mappings:
Ê
Product Manual
Install the nbrfc package without regard for the old nbrfc.cfg file. You will then find a new
configuration with the configuration files under /var/opt/nbrfc/conf. All network interfaces
found are configured automatically in the interfaces.cfg file.
U7613-J-Z815-6-76
Automatic installation with TransView SAX
To automatically convert old name mappings:
© Siemens Nixdorf Informationssysteme AG 1995
Pfad: D:\O7613e6\u7613e.k04
Installing Advanced Server for UNIX
Ê
Prior to installation, create the directory /var/opt/nbrfc, with owner root, group bin, and
permissions 755.
Ê
Copy the saved nbrfc.cfg file to this directory.
Ê
Install the new nbrfc package. If there is a name table available in the [NBRFC] section
of the old nbrfc.cfg file, it is transferred automatically to the names.cfg file.
To manually convert old name mappings:
Ê
Install the nbrfc package.
Ê
Copy the saved nbrfc.cfg file to the /var/opt/nbrfc directory.
Ê
Use the /var/opt/nbrfc/bin/mv_names command. If there is a name table available in the
[NBRFC] section of the old nbrfc.cfg file, it is transferred automatically to the names.cfg
file. Please refer to the description in section “/var/opt/nbrfc/bin/mv_names”.
i
In any case the network interface configuration must be compared visually with the
interface sections of the old nbrfc.cfg file. Please retain the new keyword "default".
For further information on the new configuration files, please refer to section “Configuring
NetBIOS”.
4.5 Automatic installation with TransView SAX
All packages of Advanced Server for UNIX can be distributed with TransView SAX and
installed automatically with a response file. Later versions of Advanced Server for UNIX can
also be installed with TransView SAX as delta products.
i
Product Manual
It is not possible to upgrade from LAN Manager/X with a delta installation.
U7613-J-Z815-6-76
Pfad: D:\O7613e6\u7613e.k04
© Siemens Nixdorf Informationssysteme AG 1995
Installing Advanced Server for UNIX
Installing from CD-ROM with cdinst
4.6 Installing from CD-ROM with cdinst
Advanced Server for UNIX is only supplied on CD-ROM. The first steps for installation with
the cdinst program are the same for all packages and are thus described here centrally. The
other installation steps for the individual packages are given at the end of this section.
Carry out the following steps in the specified sequence:
1. Log on as system administrator root and insert the CD into the drive of the system from
which you want to carry out the installation.
You can initiate the installation procedure from the UNIX command prompt.
2. Start the installation program with cdinst. The following dialog box is displayed:
1
Process Multi-Product CD-ROM
Server:
CD-ROM device name:
Remote pathname/
Local mountpoint:
local
/dev/ios0/sdisk005s0
/cdrom0
Fill in the form and then press SAVE.
Ê
Place the cursor on CD-ROM device name and select the device name for the CDF2
F3
ROM drive with
(CHOICES). Then select
(SAVE) to confirm your
input. A general message about the volume is then displayed.
Ê
Acknowledge with
F8
(CONTINUE).
3. Mark the ASX set in the displayed list with the cursor and then press
F3
and
(ENTER). The following message is then displayed:
F2
(MARK)
2
info
pkginfo
README
install
-
Display
Display
Display
Install
Detailed Product Information
Detailed Information on Packages
README Files
Products
Move the cursor to the item you want and press ENTER to
select it.
Ê
Product Manual
Select info to display other information on the Advanced Server for UNIX V4.0
product, e.g. the name of the manufacturer, date of manufacture, version etc.
F6
(CANCEL) returns you to the displayed selection.
U7613-J-Z815-6-76
Pfad: D:\O7613e6\u7613e.k04
© Siemens Nixdorf Informationssysteme AG 1995
Installing Advanced Server for UNIX
Installing from CD-ROM with cdinst
Ê
Select pkginfo to display more details on individual packages, e.g. number of files
F6
or memory requirements.
(CANCEL) returns you to the displayed selection.
Ê
Select README to display a list of the readme files for the Advanced Server for
F6
UNIX product.
(CANCEL) returns you to the displayed selection.
4. Select install and then press
of the individual packages.
4
F2
(MARK) and
F3
(ENTER) to begin installation
Install
Install:
Installation mode:
Installation default file name:
Path to response files:
Package
dialog
default
/tmp/16632/response
Fill in the form and then press SAVE.
In the Install selection field you can choose between Complete Product, SIreadmeM, and
F2
Package. To confirm your selection, press
(CHOICES).
Do not select Complete Product. If you select this, installation will fail.
!
Ê
Select SIreadmeM or Package.
The selection field Installation mode provides a choice between automatic and dialog via
F2
(CHOICES).
Product Manual
Ê
Select the installation mode dialog. For information on how to install the asxserver,
asxtools, asxtoolsD, asxdocs, and msclients packages with the default configuration
without further input, please refer to the section “Installing with the default configuration”. The other packages do not require any further input during installation.
Ê
Press
F3
(SAVE).
U7613-J-Z815-6-76
Installing from CD-ROM with cdinst
5. If you select Package, the following selection is displayed (for contents of the packages,
please refer to section “Advanced Server for UNIX delivery package”):
© Siemens Nixdorf Informationssysteme AG 1995
Pfad: D:\O7613e6\u7613e.k04
Installing Advanced Server for UNIX
5
4.0 Packages
AS/X 4.0<version>
AS/X 4.0<version>
AS/X 4.0<version>
SIreadmeM
nbrfc
asxserver
AS/X
AS/X
AS/X
AS/X
AS/X
AS/X
AS/X
asxtools
asxtoolsD
msclients
asxman
asxdocs
asxsnmp
asxdebug
4.0<version>
4.0<version>
4.0<version>
4.0<version>
4.0<version>
4.0<version>
4.0<version>
Mark the items you want and press ENTER to select them.
Ê
Use the cursor to select the required package and press
F3
installation with
(ENTER).
F2
(MARK), then start
The pkgadd program is thus called implicitly.
Ê
Carry out the other installation steps as they are described in the following
paragraphs.
Install the packages in the following (mandatory) sequence:
!
1. SIreadmeM
2. nbrfc: Once you have successfully installed the nbrfc package for NetBIOS,
reboot the system.
3. asxserver
6. The following packages are optional and can be installed in any sequence:
–
–
–
–
–
–
asxdocs
asxman
asxtools
asxtoolsD
msclients
asxsnmp
For further information on the optional packages, please refer to the section “Installing
optional packages”.
i
Product Manual
From this point on, the individual packages are installed via pkgadd.
U7613-J-Z815-6-76
Pfad: D:\O7613e6\u7613e.k04
© Siemens Nixdorf Informationssysteme AG 1995
Installing Advanced Server for UNIX
Installing the prerequisited packages
4.7 Installing the prerequisited packages
Install the following before the actual server software:
●
SIreadmeM package
●
NetBIOS
i
Please observe the specified installation sequence here.
4.7.1 Installing the SIreadmeM package
Install the SIreadmeM package first. The package contains README files in German and
English. These contain information that became available after this manual went to print.
Install the SIreadmeM with the following steps:
Ê
Log on to the system console as system administrator root.
Ê
Carry out the installation procedure as described in the section “Installing from CDROM with cdinst”.
Ê
Then, under AS/X select the package called SIreadmeM. The system now copies the
German files from the volume to /opt/readme/asx.D and the English files to
/opt/readme/asx.GB.
i
Please observe the information in these files for the next steps.
The README files are always located under this path. The manual page files are
numbered consecutively, e.g. the first file for Advanced Server for UNIX V4.0 is stored in
the path /opt/readme/asx.D/man400. Since the package is a general UNIX package which is
used by different products, the package cannot be removed again.
4.7.2 Installing NetBIOS
!
To be able to use the WINS Service functionality NetBIOS Version 4.0A00 or later
has to be installed. When installing the AS/X package asxserver a warning will
appear if the correct version is not present.
!
To be able to be use the DNS-WINS integration functionality that is provided with
Reliant UNIX V5.45, NetBIOS Version 4.0B or later has to be installed.
The Advanced Server for UNIX package nbrfc with NetBIOS must be installed first. As, in
certain cases, Advanced Server for UNIX establishes contact with other servers when
installing the server software, NetBIOS must be available in advance.
Product Manual
U7613-J-Z815-6-76
Installing the prerequisited packages
In the case of multiprocessor systems the parallel NetBIOS is installed automatically, which
increases performance.
© Siemens Nixdorf Informationssysteme AG 1995
Pfad: D:\O7613e6\u7613e.k04
Installing Advanced Server for UNIX
!
Please deinstall the previous version of LAN Manager/X or Advanced Server for
UNIX.
A new UNIX kernel is generated during installation; the file mtune is modified here.
Now install NetBIOS, working through the following steps:
Ê
Log on to the system console as system administrator root.
Ê
Start installation with the cdinst command and carry out the first steps as described in
the section “Installing from CD-ROM with cdinst“.
Ê
Select nbrfc for the NetBIOS software from the selection list for the packages.
!
●
Do not under any circumstances select the option Complete Product if you are
installing using cdinst.
●
The nbrfc package must be installed before the rest of the software.
The system will now copy the files from the data medium, set up NetBIOS for all network
controllers in the system automatically, and generate a new UNIX kernel. This process will
be displayed on the screen, though it may take a little time.
The configuration data is stored in the /var/opt/nbrfc/conf/interfaces.cfg file during installation.
If a file already exists, it will not be overwritten.
If you are installing a backup domain controller, the local machine will need to be able to
find the primary domain controller during installation of the asxserver package. Therefore, if
you are installing a backup domain controller and the primary controller of the domain you
want to join is located in a different subnet, you have to ensure that the domain name and
the server name can be resolved by the local NetBIOS. This can be accomplished in the
following ways:
To ensure that the primary domain controller can be found if WINS is not used:
Product Manual
Ê
If the file names.cfg in the directory /var/opt/nbrfc/conf does not exist, create it by copying
the names.sam file in the same directory.
Ê
Edit the names.cfg file and manually add two lines containing NetBIOS-name-to-IPaddress mappings:
U7613-J-Z815-6-76
Installing the prerequisited packages
Example entries in names.cfg:
© Siemens Nixdorf Informationssysteme AG 1995
Pfad: D:\O7613e6\u7613e.k04
Installing Advanced Server for UNIX
# My primary
mypdc
# The domain
mypdc.dom
i
domain controller
144.145.101.10 UN
I want to join
144.145.101.10 UN #1b
Note that both the server name (“mypdc”) and the domain name (“mypdc.dom”)
must be given together with the server's IP address.
or (as an alternative):
Edit the file /var/opt/nbrfc/conf/interfaces.cfg and configure the IP address of the primary
controller’s subnet in the appropriate interface section using the parameter
“brdcast_list=”:
Ê
Example entry in interfaces.cfg:
[et0]
active=yes
used_by_wins=yes
ip_addr=default
brdcast_addr=default
# Subnet address of my primary domain controller:
brdcast_list=144.145.101.255
netmask=default
i
If the brdcast_list line is commented out (default), do not forget to uncomment the
line!
To ensure that the primary domain controller can be found if this server is a WINS
client:
Edit the file /var/opt/nbrfc/conf/wins.cfg and add the appropriate WINS server addresses.
Ê
For detailed information on configuring name resolution, refer to section “Configuring
NetBIOS Name Resolution”.
i
Product Manual
In any case, you should now reboot the system before proceeding with the installation of the server software.
U7613-J-Z815-6-76
Pfad: D:\O7613e6\u7613e.k04
© Siemens Nixdorf Informationssysteme AG 1995
Installing Advanced Server for UNIX
Installing server software (asxserver package)
4.8 Installing server software (asxserver package)
i
The following software package has to be installed before installing Advanced
Server for UNIX:
Product name
Meaning
CDS++RTS V1.0B00 (or later)
Reliant UNIX C++ Runtime system
i
If you want to use the WINS service then one of the following packages has to be
installed before installing Advanced Server for UNIX:
Product name
Meaning
DCE-THR V2.0A20 (or later)
SIthreads
from the CD-SYS-MI from 8/97
delivered with the operating system
!
This package is only necessary if the machine should run the Advanced Server for
UNIX WINS service.
The “SIthreads“ package is included on the operating system CD with more recent
operating system versions. This package replaces the previous version
“DCE-THR“. In this case, you should only use the “SIthreads“ package.
4.8.1 Preparing the installation
If the servers of the domain are distributed over several subnetworks, ensure that NetBIOS
can resolve the names. For details on configuring NetBIOS name resolution, please refer
to the section “Configuring NetBIOS Name Resolution”.
The individual installation steps depend on whether you are carrying out an upgrade installation from a previous version or a new installation. Furthermore, the installation requirements and steps differ depending on the server role required.
Product Manual
U7613-J-Z815-6-76
Installing server software (asxserver package)
In the case of an upgrade installation, as many configuration information as possible is
automatically incorporated from the previous version. Although it is possible to deinstall the
previous version with the option of saving only a part of the data, it is recommended to save
all configuration data.
© Siemens Nixdorf Informationssysteme AG 1995
Pfad: D:\O7613e6\u7613e.k04
Installing Advanced Server for UNIX
!
Before you upgrade Advanced Server for UNIX, it is strongly recommended that
you back up the contents of the /var/opt/lanman directory after the deinstallation.
First a general description of the installation steps is given.
Afterwards, the following installations are described separately:
4.8.1.1
●
Upgrade installation of a primary domain controller from Version 2.x
●
Upgrade installation of a backup domain controller from Version 2.x
●
Upgrade installation of a primary domain controller from Version 3.5 or 4.0
●
Upgrade installation of a backup domain controller from Version 3.5 or 4.0
●
New installation of a primary domain controller
●
New installation of a backup domain controller
Installation steps
Before starting the installation, be prepared to answer the following questions.
Remember you can change your selections after the server installation process is
complete.
Stop the server
You are first asked if you want to stop the server if it is running.
This is for security reasons only, because the installation cannot continue if the server is running.
The installation will abort if the server is running and you do not choose to stop the server.
Because this happens very early during installation, this question is asked every time
regardless of the actual system configuration.
Product Manual
U7613-J-Z815-6-76
Installing server software (asxserver package)
Interactive or non-interactive installation
© Siemens Nixdorf Informationssysteme AG 1995
Pfad: D:\O7613e6\u7613e.k04
Installing Advanced Server for UNIX
There are two ways to install Advanced Server for UNIX:
1. Select interactive if the required data is to be input during installation. This is the recommended installation mode for installations via cdinst.
2. Select non-interactive if the required data is to be input before installation, but if the
default configuration should not be used. The input entered before installation will be
stored in a response file that can be used for installations with no user interaction. This
installation mode is only used for special configurations and it is not described here.
You can start the non-interactive installation with a default configuration. With this installation type, no further input is required before and during installation. Using this method, the
server is always installed as a primary domain controller in it’s own domain. For further
information, please refer to the section “Installing with the default configuration”.
The steps for interactive installation are presented on the following pages.
Normally you will choose this installation.
Output language
The output language configuration is used to specify the output language of the UNIX
commands net and elfread and of the Windows Administrative Tool EventViewer.
The output language does not affect the builtin names of Advanced Server for UNIX objects
as domain language does (see below).
The output language has to be specified during all installation types.
Please refer to the chapter entitled “Administration guidelines” for further information on
how to change the output language after installation.
Interface name of the spooler used by the server
Establish which spooler your system will use and specify this during installation.
Check whether the spooler you are going to specify has been configured in UNIX and is
started.
If the spooler has not been started during installation, you will receive a warning message.
The spooler has to be configured during all installation types.
During installation of the server software, the printer devices lmxnul and lmxnone are created
for internal use.
i
Product Manual
These printer devices cannot be deleted and cannot be used for printing from the
UNIX shell.
U7613-J-Z815-6-76
Installing server software (asxserver package)
Please refer to the chapter entitled “Administration guidelines” for further information on
how to change the spooler after installation.
© Siemens Nixdorf Informationssysteme AG 1995
Pfad: D:\O7613e6\u7613e.k04
Installing Advanced Server for UNIX
Server name
Every Advanced Server for UNIX needs a unique server name.
During a new installation, the installation program constructs a server name from the
system name. The suggested name can be accepted or replaced by another name
consisting of up to 15 characters. Please refer to the chapter entitled “Introduction to
Advanced Server for UNIX” for information on the naming conventions for server names.
In order not to run into problems when upgrading to upcoming NT/AS/X-versions in the
future, all tools requesting a server name during installation or reconfiguration offer the
DNS-compatible host name (’uname -n’) as the default server name. The extension .srv can
still be used, but is not recommended and no longer offered as a default. Installation/configuration scripts now inform the administrator about DNS-incompatible server names.
During an upgrade installation, the server name is retained from the previous version, if
possible.
!
The server name must not be modified manually in the lanman.ini file or in the
Advanced Server Registry under any circumstances.
Please refer to the chapter entitled “Administration guidelines” for further information on how to change the server name after installation.
Server role
During a new installation, the role of the server has to be specified.
In a domain there is exactly one primary domain controller. The primary domain controller
must be the first server that is installed in a domain. Other LM/X and AS/X servers can be
backup domain controllers.
If you do a new installation of a server as a primary domain controller in a domain that
already exists, the result will be two domains with the same name, neither of which will
operate properly.
Note that a LAN Manager/X server can never be a primary domain controller in a domain
with Windows NT servers or Advanced Server for UNIX servers. After the upgrade of the
primary domain controller, all other LAN Manager/X servers, Advanced Server for UNIX
servers and Windows NT servers can still be used without having adopted. Please plan
your upgrade order accordingly.
In the case of an upgrade installation, the server role is automatically incorporated from the
previous installation, if possible.
Product Manual
U7613-J-Z815-6-76
Installing server software (asxserver package)
LAN Manager/X servers offer four types of server roles: primary domain controller, backup
domain controller, member server and standalone server.
© Siemens Nixdorf Informationssysteme AG 1995
Pfad: D:\O7613e6\u7613e.k04
Installing Advanced Server for UNIX
The server roles “member server” and “standalone server” are no longer supported with all
Advanced Server for UNIX versions.
The server role “member server” becomes backup domain controller, and the “standalone
server” becomes primary domain controller.
Please refer to the chapter entitled “Administration guidelines” for further information on
how to change the server role after installation.
Domain name
During installation, the server is automatically allocated to a domain. Please refer to the
chapter entitled “Introduction to Advanced Server for UNIX” for information on the naming
conventions for domain names.
In the case of an upgrade installation, the domain name is automatically incorporated from
the previous installation, if possible.
!
The domain name must not be modified manually in lanman.ini under any circumstances.
Please refer to the chapter entitled “Administration guidelines” for further information on how to change the domain name after installation.
Name of the primary domain controller
If you wish to install a new backup domain controller, you will be asked to enter the server
name of the primary domain controller.
Name of the administrator
During the new installation of a primary domain controller, the builtin account Administrator
is created automatically.
During any installation of a primary domain controller, this account is used for all administration tasks during the installation.
For security reason, other administrative accounts may have been created on the primary
domain controller with different names. During the installation of a backup domain
controller, you will be asked to enter the name of an administrative account.
Product Manual
U7613-J-Z815-6-76
Installing server software (asxserver package)
Administrator’s password
© Siemens Nixdorf Informationssysteme AG 1995
Pfad: D:\O7613e6\u7613e.k04
Installing Advanced Server for UNIX
During the installation of a primary domain controller, the password for the builtin user
Administrator is set.
During the installation of a backup domain controller, you will be asked to enter the
password for an administrative account of the primary domain controller.
The password has to be entered twice to avoid errors. The passwords are not displayed on
the screen as they are typed.
Domain language
The term domain language is used whenever the language of builtin objects is referenced
(e.g. the object Everyone showed when domain language is set to ENGLISH corresponds to
Jeder in an environment with domain language set to GERMAN).
The domain language of a domain is always dependent on the domain language of the primary
domain controller of that domain.
!
In a domain with “mixed” language various problems can occur.
It is not recommended to do that!
With AS/X 3.5 it was not possible to change the domain language, english was always
used. So it could happen that AS/X 3.5 was an english backup domain controller in a
german Windows NT domain. You should use joindomain to “repair” your domain.
The domain language of a primary domain controller is evaluated when the databases of the
primary domain controller are initialized. Changing the domain language has no effect
without re-initializing those databases (re-initialization means loss of all created users and
groups).
The customer is recommended to use joindomain to do a new initialization of the database.
Everytime joindomain is going to create a new database, you can specify the domain
language.
To prevent the loss of user and group information the installation only asks for the domain
language if there are no existing databases or if the existing databases cannot be used.
(Keep in mind that during the preparation of an unattended installation the question is asked
to have the setting on the target machine.)
If you upgrade an Advanced Server for UNIX V3.5 (primary or backup domain controller),
the databases are upgraded from the older version, there is no new initialization to prevent
loss of exisiting users and groups.
That's why the domain language cannot be entered. The internal setting of the domain
language will be default ENGLISH.
Product Manual
U7613-J-Z815-6-76
Installing server software (asxserver package)
If you install an Advanced Server for UNIX V4.0 primary domain controller from scratch or
upgrade a LAN Manager/X to be an Advanced Server for UNIX primary domain controller,
you can select the domain language for the domain. All builtin objects are initialized using the
selected domain language.
© Siemens Nixdorf Informationssysteme AG 1995
Pfad: D:\O7613e6\u7613e.k04
Installing Advanced Server for UNIX
If you install an Advanced Server for UNIX V4.0 backup domain controller from scratch or
upgrade a LAN Manager/X to be an Advanced Server for UNIX backup domain controller
you should select the same domain language as on the primary domain controller to prevent
trouble managing objects in that domain.
During an upgrade installation it could happen that a database cannot be upgraded
because it is too corrupt to repair. In this very special situation it must be re-initialized with
a new domain language.
To change the output language of commands see Output language.
Please refer to the chapter entitled “Administration guidelines“ for further information on
how to change the domain language after installation.
Windows NT-style Printing
One of the new features in Advanced Server for UNIX Version 4.0 is Windows NT-style
printing.
This feature means that you can manage Advanced Server for UNIX print operations in the
same way as Windows NT. Advanced Server computers can store printer drivers for
Windows NT and Windows 95/98 client computers on the server. Printer drivers are
downloaded automatically from the server to Windows 95/98 and Windows NT client
computers. These clients then can use the server’s printers without loading printer drivers
manually.
However, Windows NT-style Printing requires that the administrator updates each printer
share with the appropriate printer driver(s) before Windows NT client computers will be able
to use this server’s printers.
!
If you don’t disable Windows NT-style printing, your Windows NT client computers
will not be able to print until you administer each printer share that these clients will
use.
Only Windows NT client computers are affected. This is not required for Windows
95/98 or any other type of Microsoft network clients; they will continue to work as
before.
Product Manual
U7613-J-Z815-6-76
Installing server software (asxserver package)
Start the server
© Siemens Nixdorf Informationssysteme AG 1995
Pfad: D:\O7613e6\u7613e.k04
Installing Advanced Server for UNIX
You can start the server directly during the installation or manually after the installation.
Note that after having installed a new NetBIOS, the system must have been rebooted
before you can start the server.
The upgrade installation from Version 2.x needs a running server to convert the old
databases into the Advanced Server for UNIX databases automatically. Further information
can be found in the description of the upgrade installation from Version 2.x.
4.8.2 Upgrade installation of a primary domain controller from Version 2.x
For the upgrade installation of a primary domain controller, proceed as described below.
Data backed up from LAN Manager/X Version 2.x (e.g. user account) is taken over.
If the servers of the domain are distributed over several subnetworks, ensure that NetBIOS
can resolve the names. For details on configuring NetBIOS name resolution, please refer
to the section “Configuring NetBIOS Name Resolution”.
Ê
Log on as system administrator root.
Ê
Start the installation procedure as described in the section “Installing from CD-ROM
with cdinst”.
Ê
Select the asxserver package under AS/X.
Ê
Stop the server.
Ê
Choose y to stop the server.
Interactive or non-interactive installation
Ê
Choose interactive for interactive installation.
The following description applies for interactive installation.
The system now copies the files from the installation medium and sets up specific users
and user groups for Advanced Server for UNIX.
Output language
The system now displays the supported languages (ENGLISH and GERMAN) and outputs
the message
Please enter the language or press ENTER if it is "ENGLISH":
Ê
Product Manual
Enter the output language.
U7613-J-Z815-6-76
Installing server software (asxserver package)
Interface name of the spooler used by the server
© Siemens Nixdorf Informationssysteme AG 1995
Pfad: D:\O7613e6\u7613e.k04
Installing Advanced Server for UNIX
The system now displays all configurable spoolers and outputs the message
Please enter the interface name or press ENTER if it is <spool interface>:
Ê
Enter the interface name of the spooler.
Server name
The server name is incorporated from the previous version, if possible.
Server role
The server role is incorporated from the previous version, if possible.
Domain name
The domain name is incorporated from the previous version, if possible.
Name of the administrator
On a primary domain controller, the builtin administrative account Administrator is always
used. During an upgrade installation from Version 2.x, the account Admin is mapped to
Administrator automatically.
Administrator’s password
The password of the account Administrator has to be set manually.
Domain Language
The system now displays the supported languages (ENGLISH and GERMAN) and outputs
the message
Please enter the language or press ENTER if it is "ENGLISH":
Ê
Product Manual
Enter the domain language.
U7613-J-Z815-6-76
Installing server software (asxserver package)
Windows NT-style Printing
© Siemens Nixdorf Informationssysteme AG 1995
Pfad: D:\O7613e6\u7613e.k04
Installing Advanced Server for UNIX
When there have been shared printers from a previous installation, you now have to decide
how to upgrade these printers.
The system displays some information and the message
You can choose to disable Windows NT-style printing and allow Windows NT
client computers to print without first administering each print share on
this server. You can enable this feature at any time in the future.
Do you want to disable Windows NT-style printing [y/n]?
Ê
Enter your selection.
Start the server
To complete the upgrade installation, the saved LAN Manager/X datafiles must now be
adapted.
For this purpose, the primary domain controller must be started. The system provides you
with the option of starting the server immediately with the message
NOTICE: To upgrade the saved data from LM/X 2.x you have to start the server!
Do you want to start the Advanced Server [y/n]?
Ê
Enter y to start the server during the installation, or n to start it manually after the installation.
Upgrade of the accounts database (lmxupgrade)
If you have started the server, the upgrade is executed automatically and the output of the
command lmxupgrade is written to the screen and the file
/var/opt/lanman/logs/lmxupgrade.log.
If the server is not started, the following message gives you information on how to upgrade
later:
Access Control Entries, user accounts and groups can be upgraded from the
LAN Manager 2.x accounts file (/var/opt/lanman/accounts.lm2).
Make sure the Advanced Server for UNIX is running and then manually run
lmxupgrade -UGA ... .
In this case, the administration files must be adjusted after Advanced Server for UNIX has
been started:
Ê
Product Manual
start AS/X with asx start
U7613-J-Z815-6-76
Pfad: D:\O7613e6\u7613e.k04
© Siemens Nixdorf Informationssysteme AG 1995
Installing Advanced Server for UNIX
Ê
Installing server software (asxserver package)
call /var/opt/lanman/bin/lmxupgrade -YUGA
Watch the output of the command for files and directories which are not found for
upgrading access permissions
Note that the guest account will be set to state “inactive” during the upgrade.
4.8.3 Upgrade installation of a backup domain controller from Version 2.x
Ensure that the primary domain controller (Advanced Server for UNIX or Windows NT
server) of this domain has been started.
If the primary domain controller of the domain you want to join is located in a different
subnet, you have to ensure that the domain name and the server name of the primary
domain controller can be resolved by the local NetBIOS. Please refer to the section
“Installing NetBIOS” on how to accomplish this.
For the upgrade installation of a backup domain controller, proceed as follows.
Ê
Log on as system administrator root.
Ê
Start the installation procedure as described in the section “Installing from CD-ROM
with cdinst”.
Ê
Select the asxserver package under AS/X.
Stop the server
Ê
Choose y to stop the server.
Interactive or non-interactive installation
Ê
Choose interactive for interactive installation.
The following description applies for interactive installation.
The system now copies the files from the installation medium and sets up specific users
and user groups for Advanced Server for UNIX.
Output language
The system now displays the supported languages (ENGLISH and GERMAN) and outputs
the message
Please enter the language or press ENTER if it is "ENGLISH":
Ê
Product Manual
Enter the output language.
U7613-J-Z815-6-76
Installing server software (asxserver package)
Interface name of the spooler used by the server
© Siemens Nixdorf Informationssysteme AG 1995
Pfad: D:\O7613e6\u7613e.k04
Installing Advanced Server for UNIX
The system now displays all configurable spoolers and outputs the message
Please enter the interface name or press ENTER if it is <spool interface>:
Ê
Enter the interface name of the spooler.
Server name
The server name is incorporated from the previous version, if possible.
Server role
The server role is incorporated from the previous version, if possible.
Domain name
The domain name is incorporated from the previous version, if possible.
Name of the primary domain controller
The name of the old primay domain controller must be confirmed here.
Enter the name of the primay domain controller
or press Enter to select ‘<old primary name>’:
Name of the administrator
The name of an administrative account on the primary domain controller must be entered
here.
Enter the name of an administrative account on ‘<primary name>’
or press Enter to select ‘administrator’:
Administrator’s password
Ê
Enter the password for the administrator twice:
Enter the password for administrator:
Re-enter password:
Product Manual
U7613-J-Z815-6-76
Installing server software (asxserver package)
Domain Language
© Siemens Nixdorf Informationssysteme AG 1995
Pfad: D:\O7613e6\u7613e.k04
Installing Advanced Server for UNIX
The system now displays the supported languages (ENGLISH and GERMAN) and outputs
the message
Please enter the language or press ENTER if it is "ENGLISH":
Ê
Enter the domain language of the primary domain controller.
Windows NT-style Printing
When there have been shared printers from a previous installation, you now have to decide
how to upgrade these printers.
The system displays some information and the message
You can choose to disable Windows NT-style printing and allow Windows NT
client computers to print without first administering each print share on
this server. You can enable this feature at any time in the future.
Do you want to disable Windows NT-style printing [y/n]?
Ê
Enter your selection.
Start the server
To complete the upgrade installation, the saved access permissions must be transferred
from the previous version. The account data (the users and groups) is transferred automatically from the primary domain controller. To do this, the backup domain controller must set
up a connection with the primary domain controller.
For this purpose, both the primary domain controller and the backup domain controller must
be started. The system provides you with the option of starting the server immediately with
the message
NOTICE: To upgrade the saved data from LM/X 2.x you have to start the server!
Do you want to start the Advanced Server [y/n]?
Ê
Enter y to start the server during the installation, or n to start it manually after the installation.
Upgrade of the accounts database (lmxupgrade)
If you have started the server, the upgrade is executed automatically and the output of the
command lmxupgrade is written to the screen and the file
/var/opt/lanman/logs/lmxupgrade.log.
Product Manual
U7613-J-Z815-6-76
Installing server software (asxserver package)
If the server is not started, the following message gives you information on how to upgrade
later:
© Siemens Nixdorf Informationssysteme AG 1995
Pfad: D:\O7613e6\u7613e.k04
Installing Advanced Server for UNIX
Access Control Entries can be upgraded from the LAN Manager 2.x accounts
file (/var/opt/lanman/datafiles/accounts.lm2) after the user accounts and
groups have been replicated to this backup controller.
You will need to manually run lmxupgrade -A ... after this has occurred.
In this case, the administration files must be adjusted after Advanced Server for UNIX has
been started.
Ê
Start AS/X with asx start.
Ê
Use the net user command to check whether the account data has already been transferred to this backup domain controller. If it has not been transferred, you can start the
transfer using the command net accounts /sync. If there are problems transferring the
account data, you may have to call /var/opt/lanman/bin/joindomain to re-establish the
connection again.
Ê
If the account data has been updated on this backup domain controller, the access
permissions must be created for Advanced Server for UNIX. Call
/var/opt/lanman/bin/lmxupgrade -YA.
Watch the output of the command for files and directories which are not found for
upgrading access permissions.
4.8.4 Upgrade installation of a primary domain controller from
Version 3.5 or 4.0
To upgrade a primary domain controller from a previous Advanced Server for UNIX version,
proceed as follows. In contrast to an upgrade installation from Version 2.x, the data can be
upgraded directly; no conversion has to be done.
Ê
Log on as system administrator root.
Ê
Start the installation procedure as described in the section “Installing from CD-ROM with
cdinst”.
Ê
Select the asxserver package under AS/X.
Stop the server
Ê
Product Manual
Choose y to stop the server.
U7613-J-Z815-6-76
Installing server software (asxserver package)
Interactive or non-interactive installation
© Siemens Nixdorf Informationssysteme AG 1995
Pfad: D:\O7613e6\u7613e.k04
Installing Advanced Server for UNIX
Ê
Choose interactive for interactive installation.
The following description applies for interactive installation.
The system now copies the files from the installation medium and sets up specific users
and user groups for Advanced Server for UNIX.
Output language
The system now displays the supported languages (ENGLISH and GERMAN) and outputs
the message
Please enter the language or press ENTER if it is "ENGLISH":
Ê
Enter the output language.
Interface name of the spooler used by the server
The system now displays all configurable spoolers and outputs the message
Please enter the interface name or press ENTER if it is <spool interface>:
Ê
Enter the interface name of the spooler.
Server name
The server name is incorporated from the previous installation, if possible.
Server role
The server role is incorporated from the previous installation, if possible.
Domain name
The domain name is incorporated from the previous installation, if possible.
Administrator’s password
The password of the account Administrator is incorporated from the previous version.
Product Manual
U7613-J-Z815-6-76
Installing server software (asxserver package)
Domain Language
© Siemens Nixdorf Informationssysteme AG 1995
Pfad: D:\O7613e6\u7613e.k04
Installing Advanced Server for UNIX
The domain language is incorporated from the previous version, if the databases could be
successfully checked and taken over. In the event that a database is inconsistent, the installation repairs the database. If the database is too corrupt to repair, the installation is aborted
and you have to repair the database manually (e.g. restore the databases from a system
backup).
Note that if the previous version was an Advanced Server for UNIX Version 3.5, the domain
language will always be ENGLISH.
!
Changing the domain language after the installation is only possible with loss of all
user and group accounts. Use /var/opt/lanman/bin/joindomain to perform this task.
Windows NT-style Printing
When there have been shared printers from a previous installation, you now have to decide
how to upgrade these printers.
The system displays some information and the message
You can choose to disable Windows NT-style printing and allow Windows NT
client computers to print without first administering each print share on
this server.You can enable this feature at any time in the future.
Do you want to disable Windows NT-style printing [y/n]?
Ê
Enter your selection.
Start the server
The installation is now complete.
The system offers you the option of starting the server immediately:
Do you want to start the Advanced Server [y/n]?
Ê
Product Manual
Enter y (yes) or n (no).
U7613-J-Z815-6-76
Pfad: D:\O7613e6\u7613e.k04
© Siemens Nixdorf Informationssysteme AG 1995
Installing Advanced Server for UNIX
Installing server software (asxserver package)
4.8.5 Upgrade installation of a backup domain controller from
Version 3.5 or 4.0
To upgrade a backup domain controller from a previous Advanced Server for UNIX version,
proceed as follows. In contrast to an upgrade installation from Version 2.x, the data can be
upgraded directly; no conversion has to be done. Normally the upgrade of a backup domain
controller does not differ from the upgrade of a primary domain controller.
However there is one known problem during the upgrade of an Advanced Server for UNIX
Version 3.5 that was a backup domain controller on a server with a german names for
builtin objects (either a german Windows NT Server or an Advanced Server for UNIX
Version 4.0 with a german domain language). In this case it can happen that the database is
reported corrupt. See the detailed description below.
If the primary domain controller of the domain you want to join is located in a different
subnet, you have to ensure that the domain name and the server name of the primary
domain controller can be resolved by the local NetBIOS. Please refer to the section
“Installing NetBIOS” on how to accomplish this. Although this name resolution is important
for the functionality of the backup domain controller, it is needed during the installation only
if the database is corrupt.
Ê
Log on as system administrator root.
Ê
Start the installation procedure as described in the section “Installing from CD-ROM
with cdinst”.
Ê
Select the asxserver package under AS/X.
Stop the server
Ê
Choose y to stop the server.
Interactive installation
Ê
Choose interactive for interactive installation.
The following description applies for interactive installation.
The system now copies the files from the installation medium and sets up specific users
and user groups for Advanced Server for UNIX.
Product Manual
U7613-J-Z815-6-76
Installing server software (asxserver package)
Output language
© Siemens Nixdorf Informationssysteme AG 1995
Pfad: D:\O7613e6\u7613e.k04
Installing Advanced Server for UNIX
The system now displays the supported languages (ENGLISH and GERMAN) and outputs
the message
Please enter the language or press ENTER if it is „ENGLISH“:
Ê
Enter the output language.
Interface name of the spooler used by the server
The system now displays all configurable spoolers and outputs the message
Please enter the interface name or press ENTER if it is <spool interface>:
Ê
Enter the interface name of the spooler.
Checking the accounts database
During the installation, the accounts database from the previous version is checked. If some
corruption is detected, the accounts database is replicated from the primary domain
controller.
In this very special case, the server name, the administrator on the primary domain
controller, the administrator password and the domain language have to be entered.
Server name
The server name is incorporated from the previous installation, if possible.
Server role
The server role is incorporated from the previous installation, if possible.
Domain name
The domain name is incorporated from the previous installation, if possible.
Product Manual
U7613-J-Z815-6-76
Installing server software (asxserver package)
Name of the primary domain controller
© Siemens Nixdorf Informationssysteme AG 1995
Pfad: D:\O7613e6\u7613e.k04
Installing Advanced Server for UNIX
The name of the primary domain controller is incorporated from the previous installation, if
possible.
In the case of database corruption, the name of the primary domain controller has to be
entered:
Enter the name of the primary domain controller:
Ê
Enter the name of the primary domain controller.
Name of the administrator
All user accounts are automatically taken over from the previous installation.
In the case of database corruption, the name of the administrator has to be entered:
Enter the name of an administrative account on ‘<primary name>’
or press Enter to select ‘administrator’:
Ê
Enter the name of an administrative account.
Administrator’s password
The password of the account Administrator is incorporated from the previous version.
In the case of database corruption, the password of the administrative account has to be
entered here twice:
Enter the password for administrator:
Re-enter password:
Domain Language
The domain language is incorporated from the previous version, if the databases could be
successfully checked and taken over.
If the database is reported to be corrupt (e.g. due to the usage of mixed languages within
the domain), you have to enter the domain language of the primary domain controller here.
Normally you will change the domain language here to avoid the same problem in the
future.
The system now displays the supported languages (ENGLISH and GERMAN) and outputs
the message
Please enter the language or press ENTER if it is "ENGLISH":
Product Manual
U7613-J-Z815-6-76
Ê
© Siemens Nixdorf Informationssysteme AG 1995
Pfad: D:\O7613e6\u7613e.k04
Installing Advanced Server for UNIX
Installing server software (asxserver package)
Enter the domain language of the primary domain controller.
A new AS/X database is now created using the specified language and the account data is
replicated from the primary domain controller in the correct language.
Windows NT-style Printing
When there have been shared printers from a previous installation, you now have to decide
how to upgrade these printers.
The system displays some information and the message
You can choose to disable Windows NT-style printing and allow Windows NT
client computers to print without first administering each print share on
this server.You can enable this feature at any time in the future.
Do you want to disable Windows NT-style printing [y/n]?
Ê
Enter your selection.
Start the server
The installation is now complete.
The system offers you the option of starting the server immediately:
Do you want to start the Advanced Server [y/n]?
Ê
Enter y (yes) or n (no).
4.8.6 New installation of a primary domain controller
The following sections describe how Advanced Server for UNIX is installed as a primary
domain controller on a system on which neither LAN Manager/X nor Advanced Server for
UNIX was previously installed or on which the LAN Manager/X or Advanced Server for
UNIX installation has been fully deinstalled.
If the servers of the domain are distributed over several subnetworks, ensure that NetBIOS
can resolve the server names. For details on configuring NetBIOS name resolution, please
refer to the section “Configuring NetBIOS Name Resolution”.
To install a primary domain controller, proceed as follows.
Product Manual
Ê
Log on as system administrator root.
Ê
Start the installation procedure as described in the section “Installing from CD-ROM
with cdinst”.
Ê
Select the asxserver package under AS/X.
U7613-J-Z815-6-76
Installing server software (asxserver package)
Stop the server
© Siemens Nixdorf Informationssysteme AG 1995
Pfad: D:\O7613e6\u7613e.k04
Installing Advanced Server for UNIX
Ê
Choose y to stop the server.
Interactive or non-interactive installation
Ê
Choose interactive for interactive installation.
The following description applies for interactive installation.
The system now copies the files from the installation medium and sets up specific users
and user groups for Advanced Server for UNIX.
Output language
The system now displays the supported languages (ENGLISH and GERMAN) and outputs
the message
Please enter the language or press ENTER if it is „ENGLISH“:
Ê
Enter the output language.
Interface name of the spooler used by the server
The system now displays all configurable spoolers and outputs the message
Please enter the interface name or press ENTER if it is <spool interface>:
Ê
Enter the interface name of the spooler.
Server name
The system generates a default server name from the system name and displays the
message
Enter the name of the server or press Enter to select <system name>:
Ê
Enter the server name.
Server role
The message
Enter role (primary or backup) or press Enter to select ‘primary’:
is displayed.
Ê
Product Manual
Enter the server role ‘primary’.
U7613-J-Z815-6-76
Installing server software (asxserver package)
Domain name
© Siemens Nixdorf Informationssysteme AG 1995
Pfad: D:\O7613e6\u7613e.k04
Installing Advanced Server for UNIX
The system suggests a domain name, which is formed from the system name and the
extension .dom.
The message
Enter the name of the domain or press Enter to select ‘<system name.dom>’:
is displayed.
Ê
Enter the domain name.
Confirm choices
The server name, the server role and the domain name have to be confirmed now or can
be re-entered.
Administrator’s password
The password of the account Administrator has to be entered twice:
Enter the password for administrator:
Re-enter password:
Domain Language
The system now displays the supported languages (ENGLISH and GERMAN) and outputs
the message
Please enter the language or press ENTER if it is "ENGLISH":
Ê
Enter the domain language.
A new AS/X database is now created using the specified language.
Start the server
The installation is now complete.
The system offers you the option of starting the server immediately:
Do you want to start the Advanced Server [y/n]?
Ê
Product Manual
Enter y (yes) or n (no).
U7613-J-Z815-6-76
Installing server software (asxserver package)
4.8.7 New installation of a backup domain controller
© Siemens Nixdorf Informationssysteme AG 1995
Pfad: D:\O7613e6\u7613e.k04
Installing Advanced Server for UNIX
The following sections describe how Advanced Server for UNIX is installed as a backup
domain controller on a system on which neither LAN Manager/X nor Advanced Server for
UNIX was previously installed or on which the LAN Manager/X or Advanced Server for
UNIX installation has been fully deinstalled.
If the primary domain controller of the domain you want to join is located in a different
subnet, you have to ensure that the server name of the primary domain controller and the
domain name can be resolved by the local NetBIOS. Please refer to the section “Installing
NetBIOS” on how to accomplish this.
To install a backup domain controller, proceed as follows.
Ê
Log on as system administrator root.
Ê
Start the installation procedure as described in the section “Installing from CD-ROM
with cdinst”.
Ê
Select the asxserver package under AS/X.
Stop the server
Ê
Choose y to stop the server.
Interactive or non-interactive installation
Ê
Choose interactive for interactive installation.
The following description applies for interactive installation.
The system now copies the files from the installation medium and sets up specific users
and user groups for Advanced Server for UNIX.
Output language
The system now displays the supported languages (ENGLISH and GERMAN) and outputs
the message
Please enter the language or press ENTER if it is "ENGLISH":
Ê
Product Manual
Enter the output language.
U7613-J-Z815-6-76
Installing server software (asxserver package)
Interface name of the spooler used by the server
© Siemens Nixdorf Informationssysteme AG 1995
Pfad: D:\O7613e6\u7613e.k04
Installing Advanced Server for UNIX
The system now displays all configurable spoolers and outputs the message
Please enter the interface name or press ENTER if it is <spool interface>:
Ê
Enter the interface name of the spooler.
Server name
The system generates a default server name from the system name and displays the
message
Enter the name of the server or press Enter to select <system name>:
Ê
Enter the server name.
Server role
The message
Enter role (primary or backup) or press Enter to select ‘primary’:
is displayed.
Ê
Enter the server role ‘backup’.
Name of the primary domain controller
The system displays the message
Enter the name of the primary domain controller:
Ê
Enter the name of the primary domain controller.
The primary domain controller must be running and connected to the network.
Domain name
During the installation of a backup domain controller, the domain name is automatically
obtained from the primary domain controller.
Name of the administrator
The message is displayed:
Enter the name of an administrative account on ‘<primary name>’
or press Enter to select ‘administrator’:
Ê
Product Manual
Enter the name of an administrative account.
U7613-J-Z815-6-76
Installing server software (asxserver package)
Administrator’s password
© Siemens Nixdorf Informationssysteme AG 1995
Pfad: D:\O7613e6\u7613e.k04
Installing Advanced Server for UNIX
The password of the administrative account has to be entered twice:
Enter the password for administrator:
Re-enter password:
Contacting the primary domain controller
The server now uses this information to establish contact with the primary domain controller
and, among other things, to get the domain name.
If the contact can be succcessfully established, continue with confirming the choices.
If the contact could not be established, an error message is displayed that describes the
problem, e.g.:
ERROR: Creation of remote account failed - Server Unavailable. The primary
domain controller ‘<primary name>’ is not running or is not connected to
this network.
Do you want to retry [y/n]?
Check whether
●
it is possible to reach the primary domain controller using the ping command.
●
the domain name and the name of the primary domain controller can be resolved
by the local NetBIOS. Refer to the section “Installing NetBIOS” on how to accomplish this.
●
the local server name can be resolved by the NetBIOS of the primary domain
controller. If the primary domain controller is an Advanced Server for UNIX
computer, refer to the section “Configuring NetBIOS Name Resolution”. If the
primary domain controller is a Windows NT server system, please refer to the
Microsoft documentation.
●
the primary domain controller has been started.
●
the server name of the primary domain controller, the login name of the administrator and the password have been specified correctly.
If the problem can be fixed immediately, enter y to re-establish the connection to the primary
domain controller.
If the problem has to be fixed later, enter n. In this case, the installation will proceed, but the
server will become a primary domain controller (!) with a temporary domain name, so that
you can complete the configuration after the problem is fixed:
Ê
Product Manual
Use the command /var/opt/lanman/bin/joindomain to change the role of the server to a
backup domain controller.
U7613-J-Z815-6-76
Installing server software (asxserver package)
Confirm choices
© Siemens Nixdorf Informationssysteme AG 1995
Pfad: D:\O7613e6\u7613e.k04
Installing Advanced Server for UNIX
The server name, the server role, the domain name and the name of the primary domain
controller have to be confirmed now or can be re-entered.
Domain Language
The system now displays the supported languages (ENGLISH and GERMAN) and outputs
the message
Please enter the language or press ENTER if it is "ENGLISH":
Ê
Enter the domain language of the primary domain controller.
A new AS/X database is now created using the specified language.
Start the server
The installation is now complete.
The system offers you the option of starting the server immediately:
Do you want to start the Advanced Server [y/n]?
Ê
Enter y (yes) or n (no).
4.8.8 After the installation
Automatic Start and Stop
During the package installation, the start and stop scripts of the server are placed into the
/etc/rc2.d and /etc/rc0.d directories, so that Advanced Server for UNIX is automatically
started and stopped together with the UNIX system.
Advanced Server for UNIX environment variables
The first time you log on after installation, the following environment variables are present:
Product Manual
Environment variable
Meaning
$xASX
Installation path, under which the Advanced Server for UNIX
software is located (always: /var/opt/lanman)
$LM_HOMEDIR
Object path, $xASX/bin
$xLMX
Compatibility with the previous versions
U7613-J-Z815-6-76
i
© Siemens Nixdorf Informationssysteme AG 1995
Pfad: D:\O7613e6\u7613e.k04
Installing Advanced Server for UNIX
Installing server software (asxserver package)
Check whether these variables exist. If necessary, start the /etc/rclmx script with
. /etc/rclmx.
Windows NT-Style Printing
To enable Windows NT-style Printing after an upgrade installation, set the value of the
DisableUpLevelPrinting key to 0 in the Advanced Server for UNIX registry. Restart the server,
and then associate a printer driver with each printer share used by Windows NT clients (see
chapter “Setting Up Print Servers“ in the “Concepts and Planning“ manual for more information).
Upgrade of lanman.ini parameters
As a result of upgrading LAN Manager/X or Advanced Server for UNIX most of the values
in your previous lanman.ini configuration file are mapped to Advanced Server registry
keywords. Some lanman.ini file parameters are not incorporated into the registry but are
stored in a new lanman.ini file. A copy of your previous lanman.ini file is saved and renamed
lanman.old. For more information about the “Advanced Server Registry” and the
“Lanman.ini File” see the appropriate chapters.
Converting the german umlauts from previous versions (mapnames)
Starting with Version 3.5B, Advanced Server for UNIX uses a new character set.
As a result, some file and directory names with umlauts created with all LAN Manager/X
versions and with Advanced Server for UNIX Version 3.5A can no longer be displayed by
the client after an upgrade.
A utility is being shipped with Advanced Server for UNIX since Version 3.5B which renames
files and directory names containing german umlauts and adjusts their permissions so that
they correspond to the new character set.
The conversion has to be performed only once, if you already upgraded to Version 3.5B
before, this step is not necessary.
For further information on this topic please refer to the information in the chapter entitled
“Troubleshooting“: section “File names with umlauts are not visible after an upgrade”.
Product Manual
U7613-J-Z815-6-76
Pfad: D:\O7613e6\u7613e.k04
© Siemens Nixdorf Informationssysteme AG 1995
Installing Advanced Server for UNIX
Installing optional packages
4.9 Installing optional packages
Installation of the packages asxdocs, asxman, asxtools, asxtoolsD, msclients, and asxsnmp is
optional. When you have finished installing Advanced Server for UNIX, you can install all
or some of these packages afterwards as required.
Each of these packages is installed as described in the section “Installing from CD-ROM
with cdinst”. During the installation of the packages asxdocs, asxtools, asxtoolsD and msclients,
a resource containing the associated software is shared automatically with a sharename
derived from the package name.
msclients
This package contains the following PC client software:
●
Microsoft LAN Manager Client 2.2c
●
Microsoft Network Client 3.0
●
TCP/IP-32 for Windows for Workgroups 3.11
●
Update for Windows for Workgroups 3.11
For information on generating client diskettes, please refer to the section “Installing from
CD-ROM with cdinst”.
asxtools and asxtoolsD
These packages contain the Windows NT Server Tools for the following platforms and are
available in German or English:
●
Windows, Windows for Workgroups and Windows 95/98
●
Windows NT Workstation 3.51 and 4.0
For information on memory requirements, please refer to the table in the section “Hard disk
storage”.
asxman
This package contains UNIX manual pages for the API as well as for all Advanced Server
for UNIX commands. The manual “API Reference” contains as a supplement the data structures and an overview of the API functions. Please refer to the manual pages of this
package for more detailed information.
Product Manual
U7613-J-Z815-6-76
Installing optional packages
asxdocs
© Siemens Nixdorf Informationssysteme AG 1995
Pfad: D:\O7613e6\u7613e.k04
Installing Advanced Server for UNIX
This package contains the manuals for Advanced Server for UNIX in PDF format as well as
a version of Acrobat Reader.
asxsnmp
This package contains the extensions for the SNMP Service. For further information, please
refer to the LAN Manager/X manual “SNMP Service”.
4.9.1 Installing the msclients package
Installation of the msclients package is optional. This package contains the following PC
client software:
●
Microsoft LAN Manager Client 2.2c (MS-DOS)
●
Microsoft Network Client 3.0 (MS-DOS)
●
TCP/IP-32 for Windows for Workgroups 3.11
●
Update for Windows for Workgroups 3.11
i
●
The package comprises approximately 20 Mbytes. In order that it can be
installed in a file system that has sufficient free disk space, you can specify an
installation path during installation.
●
To generate installation diskettes, it is sufficient to install this package on one
server only.
Now install the msclients package with the following steps:
Ê
Log on as system administrator root.
Ê
Establish which file system contains sufficient free disk space.
Ê
Carry out the installation procedure as described in section “Installing from CD-ROM
with cdinst”.
Ê
Select the package called msclients under AS/X.
Ê
During installation, specify the name of the directory where you want to install the client
software. The system now copies the data from the volume to the specified directory.
A resource with the sharename msclient is shared automatically. This contains the
software for the client types mentioned above.
Product Manual
U7613-J-Z815-6-76
Pfad: D:\O7613e6\u7613e.k04
© Siemens Nixdorf Informationssysteme AG 1995
Installing Advanced Server for UNIX
Installing optional packages
For information on generating the client diskettes, please refer to the section “Creating
Installation Diskettes”.
Please refer to the “readme.txt” file in the "update.wfw/disks/disk1" directory for information on how to install the update for Windows for Workgroups.
4.9.2 Installing the asxtools and asxtoolsD packages
Installation of the asxtools and asxtoolsD packages is optional. The asxtools package
contains the English software, while the asxtoolsD package contains the German software
for the Windows NT Server Tools for the following platforms:
●
Windows, Windows for Workgroups
●
Windows 95/98
●
Windows NT Workstation Version 3.51
●
Windows NT Workstation Version 4.0
i
●
Both packages comprise approximately 20 Mbytes. In order that they can be
installed in a file system that has sufficient free disk space, you can specify an
installation path during installation.
●
It is sufficient to install the required language variant of this package on only one
of the servers in a domain.
Now install the asxtools or asxtoolsD package with the following steps:
Ê
Log on as system administrator root.
Ê
Establish which file system contains sufficient free disk space.
Ê
Carry out the installation procedure as described in the section “Installing from CDROM with cdinst”.
Ê
Select the package called asxtools or asxtoolsD under AS/X.
Ê
During installation, specify the name of the directory where you want to install the
Windows NT Server Tools.
The system now copies the data from the volume to the specified directory. A resource
with the sharename astools or astoolsD is shared automatically.
For information on installing the server tools from this directory on a PC client or a
Windows NT workstation, please refer to the section “Administrative Clients”.
Product Manual
U7613-J-Z815-6-76
Installing optional packages
4.9.3 Installing the asxman package
© Siemens Nixdorf Informationssysteme AG 1995
Pfad: D:\O7613e6\u7613e.k04
Installing Advanced Server for UNIX
Installation of the asxman package is optional, but recommended. The package contains
UNIX manual pages for the API of Advanced Server for UNIX as well as for all Advanced
Server for UNIX commands. The manual “API Reference” contains the data structures and
an overview of the API functions as a supplement to this. Please refer to the manual pages
of this package for more detailed information.
Install the asxman package with the following steps:
Ê
Log on as system administrator root.
Ê
Carry out the installation procedure as described in the section “Installing from CDROM with cdinst”.
Ê
Select the asxman package under AS/X.
The system now copies the data from the volume to /usr/share/man/mrd/catman/asx.
4.9.4 Installing the asxdocs package
Installation of the asxdocs package is optional. In addition to the manuals for Advanced
Server for UNIX in PDF format, the package also contains an "Acrobat Reader" (English
language) for installation on a workstation.
Install the asxdocs package with the following steps:
Ê
Log on as system administrator root.
Ê
Carry out the installation procedure as described in the section “Installing from CDROM with cdinst”.
Ê
Select the asxdocs package under AS/X.
Ê
During installation, specify the name of the directory where you want to install the
documentation files.
The system copies the files from the volume to the specified directory. If Advanced Server
for UNIX is already installed, a resource with the sharename asdocs is shared automatically.
The Acrobat Reader program (either ar16e30.exe for Windows 3.x or ar32e30.exe for
Windows 95/98 or Windows NT) which is stored in the acrobat directory, must be invoked
for installation on a workstation. The Acrobat Reader is then installed on the workstation
and can be used to read the PDF files.
The asxdocs package can be installed prior to installation of AS/X so that the documentation
can be accessed before Advanced Server for UNIX is installed. Both the Acrobat Reader
and the PDF files must then be transferred to a workstation by some other means (e.g. via
FTP).
Product Manual
U7613-J-Z815-6-76
Pfad: D:\O7613e6\u7613e.k04
© Siemens Nixdorf Informationssysteme AG 1995
Installing Advanced Server for UNIX
Installing optional packages
4.10 Installing with the default configuration
You can install the asxserver, asxtools, or asxtoolsD and msclients packages with a default
configuration without any further input.
i
The default parameters for all packages are listed at the end of this section.
Carry out the following steps in the given sequence:
1. Log on as system administrator root and insert the CD in the drive of the system, from
which you want to install the software.
2. Start the installation program with cdinst. The following dialog box is displayed:
1
Process Multi-Product CD-ROM
Server:
CD-ROM device name:
Remote pathname/
Local mountpoint:
local
/dev/ios0/sdisk005s0
/cdrom0
Fill in the form and then press SAVE.
Ê
Position the cursor on CD-ROM device name and select the device name for the CDF2
F3
ROM drive with
(CHOICES). Then select
(SAVE) in order to confirm
your entry. You are then given a general message about the volume.
Ê
Acknowledge with
F8
(CONTINUE).
3. Use the cursor to mark the ASX set in the list displayed and then press
F3
and
(ENTER). The following is displayed:
F2
(MARK)
2
info
pkginfo
README
install
-
Display
Display
Display
Install
Detailed Product Information
Detailed Information on Packages
README Files
Products
Move the cursor to the item you want and press ENTER to
select it.
Product Manual
U7613-J-Z815-6-76
Installing optional packages
F2
4. Select install and then press
(MARK) and
installation of the individual packages.
© Siemens Nixdorf Informationssysteme AG 1995
Pfad: D:\O7613e6\u7613e.k04
Installing Advanced Server for UNIX
4
F3
(ENTER) in order to start
Install
Install:
Installation mode:
Installation default file name:
Path to response files:
Package
dialog
default
/tmp/16632/response
Fill in the form and then press SAVE.
In the Install selection field you can select between Complete Product, SIreadmeM, and
F2
Package. Press
(CHOICES) to make your selection.
!
Ê
Do not select Complete Product. The installation will fail with this selection.
Select Package.
The Installation mode selection field offers a choice between automatic and dialog. Press
F2
(CHOICES) to make your selection.
Ê
Select automatic as the installation mode.
Ê
Select the entry on CD-ROM under Path to response files using
Ê
Press
F3
F2
(CHOICES).
(SAVE).
5. The following selection is displayed (for contents of the packages see the section
“Advanced Server for UNIX delivery package”):
5
AS/X
AS/X
AS/X
AS/X
AS/X
AS/X
AS/X
AS/X
AS/X
AS/X
Mark
Packages
4.0<version> SIreadmeM
4.0<version> nbrfc
4.0<version> asxserver
4.0<version> asxtools
4.0<version> asxtoolsD
4.0<version> msclients
4.0<version> asxman
4.0<version> asxdocs
4.0<version> asxsnmp
4.0<version> asxdebug
the items you want and press ENTER to select them.
6. Use the cursor to select the required packages and press
F3
the installation with
(ENTER).
F2
(MARK). Then start
The installation is started implicitly with pkgadd.
Product Manual
U7613-J-Z815-6-76
Installing optional packages
Default parameters for the asxserver package:
© Siemens Nixdorf Informationssysteme AG 1995
Pfad: D:\O7613e6\u7613e.k04
Installing Advanced Server for UNIX
R_INSTTYPE=’automatic’
R_PKGNAME=’Advanced Server 4.0 for UNIX’
R_VERSION=’4.0B0003’
R_LMXSPOOLER=’default’
R_AUTOSTART=’NO’
R_PASSWORD=’password’
R_LANG=’ENGLISH’
R_DOMAINLANG=’ENGLISH’
R_SAVEONREMOVAL=’YES’
R_MAPWARNTOERR=’NO’
SERVERNAME=’default’
DOMAIN=’default’
ROLE=’primary’
PRIMARY=’’
ADMIN_ACCT=’administrator’
STOPSERVER=’YES’
USE_DEFAULT_PASSWD=’NO’
ASK_ABOUT_PRINTER_UPGRADE=’NO’
ALWAYS_USE_UPLEVEL_PRINTING=’NO’
i
The entry default means that the value for the parameter is automatically formed on
the system.
In the case of an upgrade installation, as many configuration information as possible is
automatically incorporated from the previous version. Then the corresponding default
parameter is ignored.
The default response file gives the following answers. Please refer to section “Installation
steps” for more information.
Product Manual
Installation step:
Parameter:
Value:
Stop the server
STOPSERVER
YES
Installation step:
Parameter:
Value:
Parameter:
Value
Interactive or non-interactive installation
R_INSTTYPE
automatic (non-interactive)
R_MAPWARNTOERR
NO
U7613-J-Z815-6-76
i
© Siemens Nixdorf Informationssysteme AG 1995
Pfad: D:\O7613e6\u7613e.k04
Installing Advanced Server for UNIX
Product Manual
Installing optional packages
By default, warnings are mapped to state "OK" during the installation. If
R_MAPWARNTOERR is set to YES, the warnings are mapped to the state "ERROR".
Installation step:
Parameter:
Value:
Output language
R_LANG
ENGLISH
Installation step:
Parameter:
Value:
Interface of the spooler used by the server
R_LMXSPOOLER
default (the spooler configured in UNIX)
Installation step:
Parameter:
Value:
Server name
SERVERNAME
default (system name)
Installation step:
Parameter:
Value:
Server role
ROLE
Domain name
Installation step:
Parameter:
Value:
Domain name
DOMAIN
default (system name with .dom)
Installation step:
Parameter:
Value:
Name of the primary domain controller
PRIMARY
<empty>
Installation step:
Parameter:
Value:
Name of the administrator
ADMIN_ACCT
administrator
U7613-J-Z815-6-76
Pfad: D:\O7613e6\u7613e.k04
© Siemens Nixdorf Informationssysteme AG 1995
Installing Advanced Server for UNIX
Installing optional packages
Installation step:
Parameter:
Value:
Parameter:
Value:
Administrator’s password
R_PASSWORD
password (has to be changed!)
USE_DEFAULT_PASSWD
Value:
Installation step:
Parameter:
Value:
Domain language
R_DOMAINLANG
ENGLISH
Installation step:
Parameter:
Value:
Parameter:
Value:
Windows NT-style Printing
ASK_ABOUT_PRINTER_UPGRADE
NO
ALWAYS_USE_UPLEVEL_PRINTING
NO
Installation step:
Parameter:
Value:
Start the server
R_AUTOSTART
NO
Installation step:
Parameter:
Value:
Deinstalling the server
R_SAVEONREMOVAL
NO
i
After an default installation of the asxserver package,deinstallation of the package
on the target system will also run without any interaction. The AS/X configuration
files will automatically be saved for an upgrade installation. If you want to remove
AS/X completely, you have to modify the variable R_SAVEONREMOVAL=NO in the
file /var/sadm/pkg/asxserver/pkginfo.
The parameters R_PKGNAME and R_VERSION are used for internal purposes.
The /var installation path is used for the asxtools package.
Default response file for the asxtools package:
NEXUS=’/var/opt/lanman/shares/astools’
Product Manual
U7613-J-Z815-6-76
Installing optional packages
The /var installation path is used for the asxtoolsD package.
Default response file for the asxtoolsD package:
© Siemens Nixdorf Informationssysteme AG 1995
Pfad: D:\O7613e6\u7613e.k04
Installing Advanced Server for UNIX
NEXUS=’/var/opt/lanman/shares/astools.deu’
The /var installation path is used for the msclients package.
Default response file for the msclients package:
MSCLIENT=’/var/opt/lanman/shares/msclient’
4.11 Deinstalling Advanced Server for UNIX V4.0
Deinstall the software in the following sequence:
●
begin with the optional packages (including AS/X Service Packs from the field support)
●
then the server
●
followed by NetBIOS.
4.11.1 Deinstalling optional packages
To deinstall the <Package> package, carry out the following steps:
1. Log on as system administrator root.
2. Enter pkgrm <Package>.
Ê
Confirm with
Ê
Repeat the pkgrm <Package> command for all optional packages installed.
RETURN
. The software of the package is now deleted.
4.11.2 Deinstalling the server
Work through the following steps:
1. Log on as system administrator root
2. Stop the server using the asx stop command
Product Manual
U7613-J-Z815-6-76
Installing optional packages
3. Enter pkgrm asxserver
© Siemens Nixdorf Informationssysteme AG 1995
Pfad: D:\O7613e6\u7613e.k04
Installing Advanced Server for UNIX
Ê
Verify with the
i
Ê
RETURN
key. The server software is now deleted.
If the server software was installed with the default configuration, no further
prompts are issued during deinstallation. The configuration files are not
deinstalled in this case.
At the prompt Would you like to retain any of these data
items [y/n]? you can enter y to save the configuration files for a subsequent
installation.
The files and directories of the users are not affected by your decision and will not be
deleted.
The system will ask you if you wish to save or delete the following data:
●
User data in the public directories DOSUTIL, OS2UTIL, LIB and PRINTLOG, which was not
created when the server was installed.
●
Customized print processor scripts.
●
Information about shared printers (servers and workstations). Printers are either linked
directly to the server or to specific workstations (shared client printer). If you enter n
here, all data relating to the printer will be deleted.
●
AS/X users and accounts.
●
Configuration files and registry database.
●
WINS database.
i
Product Manual
The logon scripts are saved automatically.
U7613-J-Z815-6-76
Installing optional packages
4.11.3 Deinstalling NetBIOS
© Siemens Nixdorf Informationssysteme AG 1995
Pfad: D:\O7613e6\u7613e.k04
Installing Advanced Server for UNIX
Work through the following steps:
1. Log on as system administrator root.
2. Enter pkgrm nbrfc.
Ê
Verify with the RETURN key. NetBIOS is now deleted, and a new UNIX kernel is
generated. During this process you will receive a corresponding system wait
message.
The configuration files remain in the /var/opt/nbrfc/conf directory and can be saved from
there, or can be left there for a later reinstallation. In this case the reinstallation will use
the existing configuration.
3. Start the system with the newly generated UNIX kernel or, if necessary, install a new
NetBIOS and then start the system.
Product Manual
U7613-J-Z815-6-76
Pfad: D:\O7613e6\u7613e.k05
© Siemens Nixdorf Informationssysteme AG 1995
5 Configuring Advanced Server for UNIX
This chapter contains the information required to configure Advanced Server for UNIX. You
must have root privilege to configure NetBIOS and Advanced Server for UNIX.
5.1 Configuring NetBIOS
The following section first gives a brief introduction to NetBIOS.
The remaining sections include the following type of information you need to configure
NetBIOS:
●
The second section describes how to configure network interfaces so that they can be
used by NetBIOS.
●
The 3rd section describes how to configure NetBIOS name resolution.
●
If not stated otherwise all following descriptions imply that all NetBIOS tuning parameters use predefined values. The fourth sections will show how – in case of need – the
behavior of NetBIOS can be influenced by changing the tuning parameters.
In what follows the reader is assumed to be familiar with the basic concepts and terms of
TCP/IP networking (IP addresses, netmasks, subnets etc.).
Product Manual
U7613-J-Z815-6-76
Configuring NetBIOS
5.1.1 Introduction to NetBIOS
© Siemens Nixdorf Informationssysteme AG 1995
Pfad: D:\O7613e6\u7613e.k05
Configuring Advanced Server for UNIX
An important part of Advanced Server for UNIX communication is not based directly on
TCP/IP protocols but uses NetBIOS.
In terms of the OSI Reference Model for a layered networking architecture, NetBIOS is a
level 5 protocol (“Session Layer” ). The session layer establishes a communications session
between processes running on different computers. Functions of the session layer include:
●
Name Service: The Name Service allows application processes to register unique
NetBIOS names. It provides the means by which these names can be resolved to the
network layer.
●
Session Service: The Session Service is responsible for establishing, monitoring, and
terminating a virtual-circuit session between two processes identified by their NetBIOS
names.
●
Datagram Service: This service allows application processes identified by their
NetBIOS names to exchange datagrams (messages of limited length).
On Advanced Server computers, NetBIOS services are provided by two STREAMS drivers
which are linked to the UNIX kernel during NetBIOS installation.
NetBIOS Names
The NetBIOS name space is flat (that is, it is not hierarchical), so all names within a network
must be unique. NetBIOS names are 16 characters in length. Advanced Server for UNIX
as well as Microsoft networking components allow the first 15 characters of a NetBIOS
name to be specified by the user or administrator (usually a given name is converted to
uppercase letters and padded with spaces), but reserve the 16th character of the NetBIOS
name to indicate a resource type (00-FF hex). Names can be registered as unique (one
owner) or as group (multiple owner) names. In addition to this there is also the concept of
an internet group (with multiple owners and multiple addresses). Following are the important
NetBIOS names used in Advanced Server environments:
Unique names:
<computername>[0x00]
<computername>[0x03]
<computername>[0x20]
<username>[0x03]
<domain_name>[0x1D]
<domain_name>[0x1B]
Product Manual
Workstation Service
Messenger Service
Server Service
Messenger Service
Master Browser
Domain Master Browser (PDC)
U7613-J-Z815-6-76
Configuring NetBIOS
Group names:
© Siemens Nixdorf Informationssysteme AG 1995
Pfad: D:\O7613e6\u7613e.k05
Configuring Advanced Server for UNIX
<domain_name>[0x00]
<domain_name>[0x1C]
<domain_name>[0x1E]
. . __MSBROWSE__ . [0x01]
Domain Name
Domain Controllers ("Domain Group"/"Internet Group")
Browser Service Elections
Master Browser
Information on the meaning of the various NetBIOS name extensions and their usage can
be found in the “Microsoft Windows NT Resource Kit Networking Guide”.
The two most important aspects of the NetBIOS name service are registration and resolution:
●
Registration is the process used to register a unique name for each computer (node) on
the network. A computer typically registers itself when it starts.
●
Resolution is the process used to determine the specific IP address for a certain
NetBIOS name.
An Advanced Server for UNIX computer can use one or more of the following methods to
ensure accurate name resolution in TCP/IP internetworks:
Broadcast name resolution
Broadcast name resolution is a NetBIOS over TCP/IP mode of operation defined in RFC
1001/1002 as b-node. This method relies on a computer making IP-level broadcasts to
register its name by announcing it on the network and to query a name by asking all other
computers in the broadcast area. Each computer in the broadcast area is responsible for
challenging attempts to register a duplicate name and for responding to name queries for
its registered name.
Broadcast name resolution has two major problems:
1. Broadcast messages typically do not pass IP routers, so computers that are on opposite
sides of a routers are not reachable.
2. In a large environment, it loads the network with broadcasts, which every computer
must handle.
Product Manual
U7613-J-Z815-6-76
Configuring NetBIOS
names.cfg file
© Siemens Nixdorf Informationssysteme AG 1995
Pfad: D:\O7613e6\u7613e.k05
Configuring Advanced Server for UNIX
On Advanced Server for UNIX computers, a names.cfg file (residing in /var/opt/nbrfc/conf) can
be used to specify static mappings of NetBIOS names to IP addresses. These mappings
can be loaded into an internal name table. If a b-node attempt fails, the system looks in this
name table to find a name and then uses the associated address to cross the router. The
function of the names.cfg file is comparable to the LMHOSTS file known from the Microsoft
networking components, however the format differs.
Files with static mappings, like LMHOSTS or names.cfg files, allow NetBIOS name resolution
to span routers, thus solving the problem of b-node name resolution in routed environments. However, each computer must have the necessary list of static mappings, and all
lists must be consistent. This creates an administrative burden in maintaining and distributing the lists.
Windows Internet Name Service (WINS)
A computer can use WINS if at least one WINS server is available that contains a dynamic
database that maps computer names to IP addresses. WINS can be used in conjunction
with broadcast name resolution for an internetwork where other name resolution methods
are inadequate. As described in chapter “Implementing WINS”, WINS is a NetBIOS over
TCP/IP mode of operation defined in RFC 1001/1002 as p-node. When configured as a
WINS client, Advanced Server computers use a variant of p-node known as h-node.
WINS is designed to solve the problems that occur with name resolution in medium sized
and complex internetworks and is the preferred method for name resolution. For details on
the WINS service, consult the chapter “Implementing WINS”.
An Advanced Server for UNIX computer never uses DNS (the Internet Domain Name
Service) for NetBIOS name resolution purposes.
All name resolution methods depicted above can be combined with each other. How name
resolution is handled on an Advanced Server for UNIX computer is explained in more detail
in “Configuring NetBIOS Name Resolution”.
Product Manual
U7613-J-Z815-6-76
Pfad: D:\O7613e6\u7613e.k05
© Siemens Nixdorf Informationssysteme AG 1995
Configuring Advanced Server for UNIX
Configuring NetBIOS
5.1.2 Configuring Network Interfaces
5.1.2.1
The interfaces.cfg file
In general every network interface for which TCP/IP is supported can be used by Advanced
Server’s NetBIOS.The file /var/opt/nbrfc/conf/interfaces.cfg is used to describe the network
interfaces to be used by NetBIOS and their properties.
This file is automatically created during NetBIOS installation, if it does not already exist. In
many cases it is not necessary to change this automatically created file. Depending on the
TCP/IP configuration at the creation time of the file there are several sections each
describing a network interface. The syntax of a section is the following:
Syntax of a section in interfaces.cfg:
[<interface_name>]
active=yes | no
used_by_wins=yes | no
ip_addr=default | <ip_address_ddn>
brdcast_addr=default | <brdcast_addr_ddn>
brdcast_list=<brdcast_list>
netmask=default | <netmask_ddn>
Within a section,
Product Manual
<interface_name>
is the name (from ifconfig(1M)) of the interface configured by this
section. The name is given inside square brackets.
<ip_address_ddn>
is the IP address of the interface given in dotted decimal
notation. (Usually you will use the “default” keyword instead.)
<brdcast_addr_ddn>
is the broadcast address of the interface given in dotted decimal
notation. (Usually you will use the “default” keyword instead.)
<brdcast_list>
is an optional (!) comma-separated list of broadcast addresses
given in dotted decimal notation.
<netmask_ddn>
is the netmask of the interface given in dotted decimal notation
or as a hex value. (Usually you will use the “default” keyword
instead.)
U7613-J-Z815-6-76
Configuring NetBIOS
Example of an automatically created interfaces.cfg file:
© Siemens Nixdorf Informationssysteme AG 1995
Pfad: D:\O7613e6\u7613e.k05
Configuring Advanced Server for UNIX
#
#
#
#
#
[et0]
NBRFC configuration file
Created: Fri Sep 19 09:31:07 1997
active=yes
used_by_wins=yes
ip_addr=default
brdcast_addr=default
#
brdcast_list=
netmask=default
[madge0]
active=yes
used_by_wins=no
ip_addr=default
brdcast_addr=default
#
brdcast_list=
netmask=default
The meaning of the keywords in a section is the following:
active=
Advanced Server for UNIX NetBIOS supports the concept of active and inactive interfaces. NetBIOS will use only active interfaces to send broadcasts and will only use the
IP address of active interfaces. If you do not want Advanced Server for UNIX NetBIOS
to use a certain interface, mark it with an active=no entry.
Note however, that you cannot prevent NetBIOS from sending and receiving packets
over an inactive interface which is UP in the sense of ifconfig(1M), because in general
it is up to the lower network layers to decide which interface is to be used.
If all interfaces are deactivated (i.e. have the entry active=no), the first interface is
considered active. If the active= entry is missing, the corresponding network interface
is considered active.
You can also use the nbconfig command to dynamically activate or deactivate a preconfigured interface.
Product Manual
U7613-J-Z815-6-76
Configuring NetBIOS
used_by_wins=
© Siemens Nixdorf Informationssysteme AG 1995
Pfad: D:\O7613e6\u7613e.k05
Configuring Advanced Server for UNIX
This entry is only important if you plan to run the Advanced Server for UNIX WINS
service on a multihomed system, i.e. a system having more than one IP address, since
the WINS service must use a unique, well known IP address. Mark the interface you
want to be used by the Advanced Server for UNIX WINS service with a line
used_by_wins=yes.
If no interface is marked with a line used_by_wins=yes, NetBIOS will use the first active
one for WINS.
ip_addr= , brdcast_addr=, netmask=
The three parameters can be taken directly from the systems IP configuration, they
correspond to the output of an ifconfig -i <interface> command (see ifconfig(1M)).
If the keyword “default” is used for any of these parameters, the correct values are read
automatically from the system at the time NetBIOS starts. However, the interface must
be accessible in UNIX for this purpose (cf. ifconfig <interface>). If this is not true (e.g. in
high availibility environments), the keyword “default” cannot be used and the values for
the three parameters above must be given explicitly.
If an interface is DOWN in the sense of ifconfig(1M), the corresponding configuration
section is loaded but the interface is set to inactive. You can then later use the nbconfig
command to activate the interface, see below.
As a general rule, the keyword “default” – which is also inserted automatically at
creation time of the interfaces.cfg file – should be used for any of these three parameters
whenever possible. This has the advantage that an IP reconfiguration of an interface on
the Advanced Server for UNIX computer (e.g. an address change) is transferred
automatically to NetBIOS, and thus prevents inconsistent NetBIOS configurations.
brdcast_list=
Normally, broadcast name resolution is carried out in the local subnet only. With AS/X
V3.5A20, the keyword “brdcast_list” was introduced to allow name resolution with
directed broadcasts: When querying for a certain NetBIOS name, the Advanced Server
for UNIX sends name query datagrams (IP level broadcasts) not only to the local
subnet, but also to every subnet contained in this list. This method provided an easy
way to let name resolution span routers (which normally do not forward broadcasts).
Although this feature has several disadvantages, it is still supported for compatibility
reasons. The keyword “default” is not allowed with this parameter.
Product Manual
U7613-J-Z815-6-76
Configuring NetBIOS
To view the current NetBIOS configuration:
© Siemens Nixdorf Informationssysteme AG 1995
Pfad: D:\O7613e6\u7613e.k05
Configuring Advanced Server for UNIX
Ê
At the command prompt, type
/var/opt/nbrfc/bin/nbconfig -i
If there are changes in the system network configuration – by adding or removing
network interfaces – the NetBIOS configuration can be synchronized in different ways:
●
If there were already manual changes in the file interfaces.cfg which must be kept, then
a manual change with help of an editor is recommended. The right values for the
parameters “ip_addr”, “brdcast_addr”, und “netmask” can be found out with the help of
the command ifconfig(1M) in case you cannot use the keyword default.
●
If this is not the case (e.g. after installation) you should create a new file with the help
of the tool cr_interfaces.
To add or remove network interfaces:
Ê
Edit the interfaces.cfg file. Delete sections and/or copy existing sections and modify the
parameters as appropriate. Whenever possible, use the “default” keyword.
or
Ê
Save the existing interfaces.cfg under a different name and create a new one by typing
/var/opt/nbrfc/bin/cr_interfaces
To check an existing configuration file interfaces.cfg without actually activating the
new configuration:
Ê
At the command prompt, type
/var/opt/nbrfc/bin/get_config
You should compare the output of this command with the output of the corresponding
ifconfig(1M) commands.
To activate any changes you made to the NetBIOS configuration:
If Advanced Server for UNIX is running,
Ê
Restart the Advanced Server for UNIX using the commands
asx stop; asx start
else
Ê
Restart NetBIOS using the commands
nbrfc stop; nbrfc start
Product Manual
U7613-J-Z815-6-76
5.1.2.2
© Siemens Nixdorf Informationssysteme AG 1995
Pfad: D:\O7613e6\u7613e.k05
Configuring Advanced Server for UNIX
Configuring NetBIOS
Commands used for configuring network interfaces
When configuring network interfaces, the following NetBIOS commands from
/var/opt/nbrfc/bin are used:
The cr_interfaces command creates the /var/opt/nbrfc/conf/interfaces.cfg configuration file
based on the information found in the UNIX system at runtime. The program runs at installation time but it can also be executed manually by the administrator e.g. to add a new
interface.
Syntax:
cr_interfaces [-F]
Options:
-F
Force the creation of a new file. (Normally, an existing file is not overwritten.)
The get_config command reads the interfaces.cfg file; it does validity checks and displays error and/or warning messages as appropriate.
Syntax:
get_config
Use get_config before restarting NetBIOS whenever the interfaces.cfg file has changed in
order to detect inconsistent or faulty configurations.
Example output of get_config:
Following interfaces found
No. Name
IP Address
Broadcast
Netmask
Subnet Active WINS
0
pnet0 144.145.111.71 144.145.111.255 0xffffff00 own
yes
conf
1
madge0 144.145.123.71 144.145.123.255 0xffffff00 own
no
no
In order to check a new interfaces.cfg file you should compare the output of get_config with
the output of corresponding ifconfig(1M) commands.
The nbconfig command is used to view or to administer the state of the NetBIOS interfaces.
Product Manual
U7613-J-Z815-6-76
Configuring NetBIOS
Use nbconfig either to display the current configuration or to dynamically activate or deactivate certain interfaces without having to restart NetBIOS.
© Siemens Nixdorf Informationssysteme AG 1995
Pfad: D:\O7613e6\u7613e.k05
Configuring Advanced Server for UNIX
Syntax:
nbconfig -i
nbconfig -e | -d <interface_no> [<interface no> ... ]
nbconfig -E | -D <interface name> | <ip-address>
[<interface name> | <ip-address> ... ]
Options:
-i
The current NetBIOS configuration is read from the kernel and displayed.
-e | -d <interface no> [ <interface no> ... ]
The interface with the specified <interface no> is activated (-e option) or deactivated
(-d option). Use the output of a previous nbconfig -i command to get the correct
number (<interface_no>) of the interface you want to activate or deactivate.
-E | -D <interface name> | <ip-address>
[<interface name> | <ip-address> ... ]
The interface with the specified name <interface name> or the specified IP address
<ip-address> is activated (-E option) or deactivated (-D option). Use the output of a
previous nbconfig -i command to get the correct name (<interface_name>) or IP
address (<ip-address>) of the interface you want to activate or deactivate.
“default” may not be used for <interface name>.
i
Product Manual
Deactivating an interface does not make deactivation under UNIX obsolete in terms
of removing a controller fully from the network. The deactivation simply prevents
NetBIOS from sending broadcasts to the subnetworks and from using the IP
address as the source address. NetBIOS will still send and receive packets over an
interface which is UP in the sense of ifconfig(1M), even if it is deactivated by
nbconfig.
U7613-J-Z815-6-76
Configuring NetBIOS
5.1.3 Configuring NetBIOS Name Resolution
© Siemens Nixdorf Informationssysteme AG 1995
Pfad: D:\O7613e6\u7613e.k05
Configuring Advanced Server for UNIX
NetBIOS name resolution is the process of successfully mapping a NetBIOS name to an IP
address.
How name resolution is carried out on a Advanced Server for UNIX computer depends
whether the computer has been configured as a WINS client (with the help of the file
wins.cfg) or not.
If WINS is not enabled, name resolution works in the following manner (“modified
b-node”):
1. Check the name table
2. Try broadcasting
To find a particular name, the Advanced Server for UNIX computer first checks its internal
NetBIOS name table. This table contains
●
local names
●
a name cache consisting of mappings from recently received NetBIOS datagrams
and
●
a list of static mappings from a names.cfg file.
If the name is not found, the computer sends name query request packets (as broadcast
messages) on the local subnet. These broadcast messages normally cannot pass IP
routers.
If WINS is enabled, name resolution works in the following manner (h-node):
1. Try a WINS server
2. Try broadcasting
3. Check the name table
To find a particular name, the Advanced Server for UNIX computer first queries its primary
and/or secondary WINS server. If the WINS servers are not available or unable to map the
name to an IP address, the computer switches to b-node but continues to poll for the WINS
servers and switches back if a WINS server becomes available. The NetBIOS name table
containing local names, a name cache consisting of mappings from recently received
NetBIOS datagrams and a list of static mappings from a names.cfg file is consulted as a last
resort.
Product Manual
U7613-J-Z815-6-76
Configuring NetBIOS
The chapter “Implementing WINS” contains more comprehensive explanations on how
WINS clients communicate with WINS servers.
© Siemens Nixdorf Informationssysteme AG 1995
Pfad: D:\O7613e6\u7613e.k05
Configuring Advanced Server for UNIX
Name resolution on an Advanced Server for UNIX computer is configured by editing two
textfiles in the /var/opt/nbrfc/conf directory:
●
The wins.cfg file is used to configure an Advanced Server for UNIX computer as a WINS
client.
●
The names.cfg file is used to specify static mappings of NetBIOS names to IP addresses.
The following sections explain the usage of both files.
5.1.3.1
The wins.cfg file
In file wins.cfg you can enter two WINS server addresses by which means the Advanced
Server for UNIX computer is configured as a WINS client. This file, together with a corresponding template file wins.sam, is automatically created in /var/opt/nbrfc/conf during installation of the nbrfc package if it does not already exist.
To configure an Advanced Server for UNIX computer as a WINS client:
Ê
Edit wins.cfg and fill in the IP addresses of a primary and a secondary WINS server. Any
WINS-Server within reach – NT WINS or Advanced Server for UNIX 4.0 WINS – can
be used.
Ê
Run the file wins.cfg as a sh script:
cd /var/opt/nbrfc/conf; sh wins.cfg
The last command is executed automatically whenever NetBIOS starts, e.g. at system
startup.
Product Manual
U7613-J-Z815-6-76
Configuring NetBIOS
To view the current WINS client configuration:
© Siemens Nixdorf Informationssysteme AG 1995
Pfad: D:\O7613e6\u7613e.k05
Configuring Advanced Server for UNIX
At the command prompt, type
Ê
nbtstat -w
Example of /var/opt/nbrfc/conf/wins.cfg:
#########################################################################
# WINS client configuration file for nbrfc
#########################################################################
#delete old WINS entries from old configurations
/var/opt/nbrfc/bin/delwins -s > /dev/null 2>&1
/var/opt/nbrfc/bin/delwins -p > /dev/null 2>&1
#uncomment the line and add the IP address to configure a primary WINS
/var/opt/nbrfc/bin/addwins -p 144.145.16.26
#uncomment the line and add the IP address to configure a secondary WINS
/var/opt/nbrfc/bin/addwins -s 144.155.17.199
WINS servers configured in the wins.cfg file are not only used for name resolution, but also
for name registration, name renewal and name release.
Product Manual
i
Be sure to have the NetBIOS tuning parameter NBRFCWINSREG set to 1 if you
want Advanced Server for UNIX to register names with WINS servers.
i
If the local machine is running the Advanced Server for UNIX 4.0 WINS service, it
is recommended to configure both primary and secondary WINS to point to this
WINS, i.e. to the local machine.
U7613-J-Z815-6-76
5.1.3.2
© Siemens Nixdorf Informationssysteme AG 1995
Pfad: D:\O7613e6\u7613e.k05
Configuring Advanced Server for UNIX
Configuring NetBIOS
The names.cfg file
The names.cfg file is used to specify static mappings of NetBIOS names to IP addresses,
thereby allowing name resolution to cross routers. The function of the names.cfg file is similar
to the LMHOSTS file known from Microsoft networking components, although the format
differs.
After NetBIOS installation, the /var/opt/nbrfc/conf directory contains a sample file called
names.sam which can be used as a template. Use the following rules to create and modify
entries in the names.cfg file:
Lines with a number sign (#) is the first column are treated as comment; empty lines are
ignored.
Each entry must be on a separate line and follow the syntax:
<NetBIOS_name>
<IP_address>
UN|GR
[#Ext1[,EXT2 ...]]
where
Product Manual
<NetBIOS_name>
is a name consisting of up to 15 characters (case is ignored;
internally the name is converted to uppercase letters and
padded with spaces),
<IP_address>
is given in dotted decimal notation,
UN or GR
denotes whether the name is a unique name (“UN”: one owner)
or a group name (“GR”: multiple owners),
[#Ext1[,Ext2 ...]]
is an optional list of name extensions (16th Byte of NetBIOS
name) given by hexadecimal values. For each name extension
in the list one name is created in the internal name table. If not
given, the list defaults to
00,03,20
for UNique names
and
1C,00
for GRoup names.
U7613-J-Z815-6-76
Configuring NetBIOS
Example of /var/opt/nbrfc/conf/names.cfg:
© Siemens Nixdorf Informationssysteme AG 1995
Pfad: D:\O7613e6\u7613e.k05
Configuring Advanced Server for UNIX
#########################################################################
# Sample names.cfg to configure static NetBIOS names
#########################################################################
# My address is 144.145.100.10
# Primary domain controller of a trusted domain:
trustpdc
144.145.101.20 UN #00,20
trustpdc.dom
144.145.101.20 UN #1b
trustpdc.dom
144.145.101.20 GR #1c,00
# Other backup domain controllers (in remote subnet):
otherbdc1
144.145.102.30 UN
otherbdc2
144.145.102.31 UN
To configure static names on an Advanced Server for UNIX computer:
Ê
In /var/opt/nbrfc/conf, copy names.sam to names.cfg. Edit names.cfg and fill in all NetBIOS
name mappings that are needed for the the local machine.
Ê
At the command prompt; type
nbtstat -R
The static name table from names.cfg is loaded automatically whenever NetBIOS starts, e.g.
at system startup.
To verify that the mappings from names.cfg are known to NetBIOS:
Ê
At the command prompt; type
nbtstat -c
Product Manual
U7613-J-Z815-6-76
Configuring NetBIOS
For the example names.cfg above, the output of the nbtstat -c command is:
© Siemens Nixdorf Informationssysteme AG 1995
Pfad: D:\O7613e6\u7613e.k05
Configuring Advanced Server for UNIX
Node IpAddress(es): [144.145.100.010] Scope Id: []
NetBIOS Remote Cache Name Table
Name
Type
Host Address
Life [sec]
------------------------------------------------------------------------TRUSTPDC
TRUSTPDC
TRUSTPDC.DOM
TRUSTPDC.DOM
TRUSTPDC.DOM
OTHERBDC1
OTHERBDC1
OTHERBDC1
OTHERBDC2
OTHERBDC2
OTHERBDC2
<20>
<00>
<1B>
<1C>
<00>
<20>
<03>
<00>
<20>
<03>
<00>
UNIQUE
UNIQUE
UNIQUE
GROUP
GROUP
UNIQUE
UNIQUE
UNIQUE
UNIQUE
UNIQUE
UNIQUE
144.145.101.20
144.145.101.20
144.145.101.20
144.145.101.20
144.145.101.20
144.145.102.30
144.145.102.30
144.145.102.30
144.145.102.31
144.145.102.31
144.145.102.31
-1
-1
-1
-1
-1
-1
-1
-1
-1
-1
-1
The nbtstat command is fully described below.
i
5.1.3.3
Static mappings from names.cfg are stored together with registered and cached
name in a name table within the kernel. The number of names that can be stored in
this name table is limited by the tuneable parameter NBMAXNAMES. When
adjusting this parameter, keep in mind that two or three entries are required for each
name with default extensions.
Commands used for administering name resolution
The nbtstat command is used to display diagnostic information about NetBIOS name
resolution. nbtstat is especially useful for troubleshooting NetBIOS name resolution
problems.
Syntax:
nbtstat { -a | -q } RemoteName [ -e Extension ]
nbtstat -A IP address
nbtstat [-c] [-n] [-r] [-w]
nbtstat -R
Product Manual
U7613-J-Z815-6-76
Configuring NetBIOS
Options:
© Siemens Nixdorf Informationssysteme AG 1995
Pfad: D:\O7613e6\u7613e.k05
Configuring Advanced Server for UNIX
Product Manual
-a
RemoteName
Resolves a given NetBIOS name using the configured name resolution algorithm
and, if found, lists the remote machine’s name table.
-q
RemoteName
Resolves a given NetBIOS name using the configured name resolution algorithm
and, if found, lists the IP address(es).
-e
Extension
Represents the 16th Byte of RemoteName in hexadecimal representation. The
default extension is 0x00.
-A
IP address
Lists the remote computer’s name table given its IP address specified in dotted
decimal notation.
-c
Lists the name table of remote NetBIOS names, giving the IP address of each
name. The table contains names from recently received NetBIOS datagrams
(“name cache”) as well as static mappings. Static mapping are recognizeable by a
“-1” in the “Life” column.
-n
Lists local NetBIOS names (names that were registered on the network by the
Advanced Server for UNIX).
-r
Shows some name resolution statistics.
-w
Shows the current WINS configuration. The IP addresses as well as the current
state of both primary and secondary WINS server – if configured – are displayed
together with the currently used registration type.
-R
Purges the local name table and reloads it from names.cfg, if the file exists.
U7613-J-Z815-6-76
Configuring NetBIOS
Example output of a nbtstat -n command:
© Siemens Nixdorf Informationssysteme AG 1995
Pfad: D:\O7613e6\u7613e.k05
Configuring Advanced Server for UNIX
Node IpAddress(es): [144.145.100.150] Scope Id: [ ]
NetBIOS Local Name Table
Name
Type
Status
-------------------------------------------------------------------------------------------EXAMPLE
<20>
UNIQUE
Registered
*SMBSERVER
<20>
GROUP
Registered
EXAMPLE
<00>
UNIQUE
Registered
EXAMPLE.DOM
<00>
GROUP
Registered
EXAMPLE.DOM
<1C>
GROUP
Registered
EXAMPLE~X
<00>
UNIQUE
Registered
EXAMPLE#BROW
<00>
UNIQUE
Registered
EXAMPLE#DMN
<00>
UNIQUE
Registered
EXAMPLE.DOM
<1E>
GROUP
Registered
EXAMPLE.DOM
<1B>
UNIQUE
Registered
EXAMPLE.DOM
<1D>
UNIQUE
Registered
..__MSBROWSE__.
<01>
GROUP
Registered
Example output of the command nbtstat -q domain.dom -e 1c:
NetBIOS name resolution result:
------------------------------Name:
DOMAIN.DOM
<1C>
IP address:
144.145.111.178
IP address:
144.145.111.233
IP address:
144.145.113.22
Product Manual
U7613-J-Z815-6-76
Configuring NetBIOS
Occasionally it may be helpful to be able to dynamically add and delete certain NetBIOS
names from the internal name tables without reloading the complete names.cfg file. This can
be accomplished by the addname and delname commands:
© Siemens Nixdorf Informationssysteme AG 1995
Pfad: D:\O7613e6\u7613e.k05
Configuring Advanced Server for UNIX
The addname command dynamically adds one or more NetBIOS names to the local name
table of NetBIOS.
Syntax:
/var/opt/nbrfc/bin/addname <NetBIOS name> <IP address> UN | GR [Ext1[ Ext2 ...]]
Options:
All options correspond directly to the syntax of the names.cfg file (see section “The
names.cfg file“). The only exception is that the list of NetBIOS name extensions is
separated by blanks and does not start with a number sign (#).
Example:
/var/opt/nbrfc/bin/addname TRUSTEDDOM.DOM 144.145.47.101 UN 1B
i
Name mappings added with the addname command do no longer exist after
NetBIOS is restarted. Use the names.cfg file if you want to establish permanent
name mappings. Please note that the number of names that can be stored in the
local name table depends on the NBMAXNAMES parameter.
The delname command deletes one or more NetBIOS name from the local name table.
Syntax:
/var/opt/nbrfc/bin/delname <index1> [ <index2> ...]
Parameters:
<index1> [ <index2> ...]
To specify the NetBIOS names to be deleted, first use the internal nbrfcdiag -n command to
get a listing of the local name table. Use the internal index from the first column of this list
as parameters to the delname command.
Note that while the internal nbrfcdiag -n command lists both dynamic and static names, the
delname command can only be used to delete static names (those listed as STATIC).
Product Manual
U7613-J-Z815-6-76
5.1.3.4
© Siemens Nixdorf Informationssysteme AG 1995
Pfad: D:\O7613e6\u7613e.k05
Configuring Advanced Server for UNIX
Configuring NetBIOS
Guidelines for configuring name resolution
Since WINS is the preferred method of name resolution, it is recommended to use WINS
whenever possible. This section contains simple guidelines for configuring static name
mappings for a particular Advanced Server computer in situations where WINS servers are
not used. In what follows, “PDC” denotes a Primary Domain Controller and “BDC” denotes
a Backup Domain Controller.
Within a domain, a PDC must be able to find all BDCs:
Template:
BDC
nnn.nnn.nnn.nnn UN #0,20
Within a domain, each BDC must be able to find its PDC:
Template:
PDC
PDC.DOM
nnn.nnn.nnn.nnn UN #0,20
nnn.nnn.nnn.nnn UN #1b
(Note that when installing a BDC, the local machine must already be able to find the PDC!)
Before setting up a trust relationsship between two domains, the two PDCs must be able to
find each other:
Template:
OTHERPDC
nnn.nnn.nnn.nnn UN #0,20
OTHERPDC.DOM nnn.nnn.nnn.nnn UN #1b
OTHERPDC.DOM nnn.nnn.nnn.nnn GR #1c
If Windows NT servers are part of your domain – either as PDC or BDC – and WINS is not
used, keep in mind that similar rules apply for LMHOSTS files. For more information about
the LMHOSTS file, see Windows NT Help and the “Microsoft Windows NT Resource Kit
Networking Guide”.
5.1.4 Configuring NetBIOS Tunable Parameters
On Advanced Server for UNIX computers, NetBIOS services are provided by two
STREAMS drivers which are linked to the UNIX kernel during NetBIOS installation.
Following is a list of tuning variables which are used to control the behavior of NetBIOS (for
the default values refer to the /etc/conf/cf.d/mtune file). Note that a NetBIOS upgrade installation may change the default values for a tunable parameter in the mtune file, but does not
change local settings in the stune file.
NBMAXNAMES
NBRFCCACHE
Product Manual
default: 140, min: 40, max: 4096
default: 16, min: 0, max: 4000
U7613-J-Z815-6-76
Configuring NetBIOS
NetBIOS maintains an internal name table for mapping NetBIOS names to IP addresses.
This internal name table contains
© Siemens Nixdorf Informationssysteme AG 1995
Pfad: D:\O7613e6\u7613e.k05
Configuring Advanced Server for UNIX
●
a list of names owned by the local machine
●
a name cache consisting of mappings from recently received NetBIOS datagrams
(take NBRFCCACHE entries) and
●
a list of static mappings from a names.cfg file.
The tuning parameter NBMAXNAMES determines the size of the whole table and NBRFCCACHE determines the size of the cache. When adapting NBMAXNAMES to large
names.cfg files, keep in mind that static name mappings configured in the names.cfg file
occupy two or three entries in the name table if default extensions are used.
i
Setting NBRFCCACHE to 0 disables the name cache. It is recommended not to set
NBRFCCACHE to a value less than the default.
NBMAXSESS
default: 256, min: 32, max: 2048
NBMAXSESS denotes the maximum number of NetBIOS sessions that can be active at the
same time.
NBRFCKALIVE
default: 30, min: 0, max: 1440
This parameter controls the “NetBIOS Keep Alive” feature (in minutes).
If set to a value greater than 0, NetBIOS sends periodic transmissions on a session, when
no other data is being sent for a period of time. If the other end does not respond to these
messages, the session is considered broken after certain TCP/IP timers have expired. By
default, NetBIOS sends keep alive messages every 30 minutes.
However, in WANs as well as in dial-up networking environments these periodic messages
can cause unwanted effects (e.g. periodic dial-up procedures and/or additional traffic). You
can then disable these keep alive messages completely by setting NBRFCKALIVE to 0.
NBRFCDGMTIMEOUT default: 10, min: 1, max: 60
This parameter sets the timeout for lost datagrams. Leave changes of this parameter to
your field service support.
NBRFCMAXDGMS
default: 32, min: 32, max: 128
This parameter sets the size of the internal NetBIOS datagram table. Leave changes of this
parameter to your field service support.
NBRFCMAXFRAGS default: 10, min: 10, max: 64
This parameter sets the size of the internal NetBIOS table that is used for temporarily
storing fragmented datagrams. Leave changes of this parameter to your field service
support.
Product Manual
U7613-J-Z815-6-76
Configuring NetBIOS
NBRFCSTATBCAST default: 0, 0 or 1
NBRFCWINSREG
default: 1, 0 or 1
NBRFCPRELOAD
default: 0, 0 or 1
© Siemens Nixdorf Informationssysteme AG 1995
Pfad: D:\O7613e6\u7613e.k05
Configuring Advanced Server for UNIX
These parameters control the NetBIOS name resolution. As of Advanced Server for UNIX
NetBIOS 4.0 the default name resolution algorithm changed:
NBRFCSTATBCAST old: 1 new: 0
If this parameter is set to 1, NetBIOS responds with static names to clients that queried by
broadcasts. This resembles a WINS Proxy using only cached names (not WINS names) to
respond to broadcast name queries. Normally, name responses are only returned – e.g. by
a WINS Server – if the client queried with a unicast datagram (like a WINS client normally
does). However, for older clients this behavior might be useful, e.g. when static names from
a names.cfg are used to get the functionality of a “static WINS”. In WINS environments, this
parameter should be 0.
NBRFCWINSREG
old: 0 new: 1
If this parameter is set to 0, NetBIOS uses WINS servers configured in the wins.cfg file only
for name queries. If this parameter is set to 1, NetBIOS is able to fully act as a WINS client.
It does not only name queries, but also registers its local NetBIOS names with a WINS
server and does name refreshes and name releases. To configure an Advanced Server
computer as a WINS client, set this parameter to 1, and configure primary and secondary
WINS server in the wins.cfg file.
NBRFCPRELOAD
old: 1 new: 0
This parameter determines the search order for name resolution. If set to 1, NetBIOS
searches the internal name table (containing local names, a name cache consisting of
mappings from recently received NetBIOS datagrams and a list of static mappings from a
names.cfg file) before trying broadcast name resolution. If the parameter is set to 0,
NetBIOS does a lookup in this name table only as a last resort, if all other methods (WINS,
broadcasts) failed. In WINS environments, set this parameter to 0 to prevent old or inconsistent name mappings being preferred over WINS names.
As a general rule, set all three parameters to their “old” values if you want name resolution
to be done in the old way (broadcasts, LMHOSTS/names.cfg). Set the parameters to their
“new” values if you want name resolution to be done mostly by WINS. The latter is recommended and is the default.
To change the behavior of the NetBIOS kernel components:
Product Manual
Ê
Change the tuning variables described above using the idtune(1M) command.
Ê
Build a new kernel using the idbuild(1M) command.
Ê
Reboot the machine using the shutdown(1M) command.
U7613-J-Z815-6-76
Configuring NetBIOS
5.1.5 Configuring NetBIOS Startup Parameters
© Siemens Nixdorf Informationssysteme AG 1995
Pfad: D:\O7613e6\u7613e.k05
Configuring Advanced Server for UNIX
Since AS/X V4.0B, the startup options for nbrfcdaemon are presently configured in the
/var/opt/nbrfc/conf/nbrfcdaemon.cfg file. Default is “-l2 -f20 -n”. If the file does not exist, it will
be created automatically. Changes to this file are not overwritten during an upgrade installation.
The following startup parameters of the NetBIOS daemon can be configured by the administrator:
-n
Product Manual
This option instructs TCP not to wait for ACK of the previous small packet, rather to
send the next small packet immediately. The Nagle algorithm is thus disabled. This
avoids the delay of waiting for the ACK at the expense of less efficient utilization of
the physical medium.
i
In earlier AS/X versions, this functionality was configured in the “tcp_nodelay”
parameter in the lanman.ini file. This parameter is no longer supported.
!
Reliant UNIX-N V5.43C0 still does not support this parameter. You will therefore
have to use a single correctional release in this case. For further details, refer to the
information supplied in the release notice in the SIreadmeM package.
-l
<number of outstanding connect indications>
Specifies the maximum number of simultaneously outstanding connect indications.
The period of time that normally elapses between the setup being requested and
the actual connection being set up is usually quite small, with the result that an
additional setup request is generally possible. If the maximum number is reached
and the setup requests are tied up for too long, faulty network configurations are
often the reason. Please contact your Support Center in this case.
Default: 2, Maximum: 5
-f
<number of preliminary sessions>
Specifies the number of NetBIOS sessions that the NetBIOS daemon always keeps
on hold in order to speed up the connection setup. A bottleneck with these preliminary sessions is logged in syslog and also displayed with the nbrfcdiag -f command.
The parameter can be increased in this case although this ties up additional
resources. Your Support Center will be able to tell you the optimal setting. Default:
20
U7613-J-Z815-6-76
Pfad: D:\O7613e6\u7613e.k05
© Siemens Nixdorf Informationssysteme AG 1995
Configuring Advanced Server for UNIX
Guidelines for NFS file systems
5.2 Guidelines for NFS file systems
If the UseUnixLocks=1 entry has been set in the Registry, Advanced Server for UNIX
executes record locks in all file systems, including the NFS file system. The default is
UseUnixLocks=0, UseNfsLocks=0, NfsCheck=0.
Overview:
Parameter
Parameter
UseNfsLocks=1
Comments
The lock or unlock command is always executed,
an error message may be passed on to the application. The NfsCheck= parameter is ignored.
UseNfsLocks=0
NfsCheck=0
The lock or unlock command is always executed,
if an error message appears, it is acknowledged
positively.
UseNfsLocks=0
NfsCheck=1
The lock or unlock command is only executed if the
file is not contained in the NFS file system. If the
file is contained in the NFS file system, the
command is not executed, but is acknowledged
positively.
!
●
The incorrect locks can cause processes to hang in systems that have not
configured a lock manager. These processes cannot be terminated with kill -9;
in this case the system must be restarted.
●
In this case, set the entries NfsCheck=1 and UseNfsLocks=0.
5.3 Connecting Advanced Server for UNIX to Logging
Advanced Server for UNIX has an interface to Logging. If users wish to use Logging it must
be installed and started on the server system.
Product Manual
Ê
Check whether the log files log3admin and log3struct (for Logging V3.0) contain entries
for Advanced Server for UNIX. If necessary, incorporate them using an editor.
Ê
After you have entered it using the editor, invoke the log3/bin/log3adm and log3/log3new
commands. In this way, the entries are incorporated from log3admin to log3admin.obj.
U7613-J-Z815-6-76
Connecting Advanced Server for UNIX to Logging
The following sections contain the configuration examples for these files; the
Advanced Server for UNIX entries in the log3admin file are highlighted in bold font.
© Siemens Nixdorf Informationssysteme AG 1995
Pfad: D:\O7613e6\u7613e.k05
Configuring Advanced Server for UNIX
.
#
;filename
;-------default
Kbyte
----100
chng
---5
close
----1
; this is the default destination
; file for applications without an
; explicit #LOGTYPE declaration.
#LOGFILE
;filename
;-------cms_error
cmsreport
iocs
auto
sft
datasyslog
asx
Kbyte
----50
50
50
50
50
50
50
chng
---2
2
2
2
2
2
2
close
----1
1
1
1
1
1
1
#LOGTYPE
;CompNo
;-----16
17
33
41
0xfffffffe
1130010
logfile
------cms_error
cmsreport
iocs
auto
datasyslog
asx
repeats
-----------------1
1
1
0
1
0
1
0
1
;
;
;
;
;
;
;
compno
compno
compno
compno
compno
compno
compno
16
17
33
41
55
0xfffffffe
1130010
syslogd
eventrep.
0
Extract from the file log3admin (Logging V3.0)
.
.
#STRUCT 3
"\n"
.
.
Extract from the file log3struct (Logging V3.0)
Product Manual
U7613-J-Z815-6-76
Pfad: D:\O7613e6\u7613e.k05
© Siemens Nixdorf Informationssysteme AG 1995
Configuring Advanced Server for UNIX
Restricting the user’s disk space
5.4 Restricting the user’s disk space
When configuring disks under UNIX, system administrators can limit the disk space that can
be used by “normal” users.
Advanced Server for UNIX is configured by default to allow all free disk space to be used
by all AS/X users.
From Version 4.0B, Advanced Server for UNIX can be configured optionally to observe the
limit set under UNIX.
Furthermore, Advanced Server for UNIX supports the UNIX “quotas” function, which can
be used to restrict the disk space available to users on an individual basis.
i
The “quotas” function is currently only supported by UNIX on ufs file systems.
Since both functions use the same mechanisms under UNIX, the new functionality is
likewise controlled by the “UnixQuotas” registry parameter. The following table clarifies the
behavior of Advanced Server for UNIX depending on the different settings for the
“UnixQuotas” parameter:
Value of
UNIXQuotas
parameter
Usage of
Quotas
functionality
Write under
user ID of
Disk space
usage
0
No
“root”
Total free area
1
Possible, if
supported by
operating
system
Mapped UNIX Reserved area
user
remains free if
supported by
operating system
Display free
area
Total free area
Reserved area is
not displayed as
being free if
supported by
operating system
UNIX commands are used for “quotas” to allocate the disk space for the respective UNIX
users. Should you require information on this topic, please refer to the UNIX system
documentation (“System Administrator’s Guide”) or the example given below.
Product Manual
U7613-J-Z815-6-76
Restricting the user’s disk space
Configuring the disk space restriction
© Siemens Nixdorf Informationssysteme AG 1995
Pfad: D:\O7613e6\u7613e.k05
Configuring Advanced Server for UNIX
To configure the disk space restriction, you should proceed as follows:
1. Change the value of parameter “UnixQuotas” within the registry to “1”.
Note that this will automatically affect certain other parameters as well. For more information, please refer to the section “File Service Parameters Entries” in chapter
“Advanced Server Registry”.
2. Stop Advanced Server for UNIX.
3. Start Advanced Server for UNIX.
The restrictions configured under UNIX are now active for the Advanced Server for UNIX
users. If a user reaches the set limit a message is issued to the effect that there is insufficient disk space available and no further data can be copied to the specified location.
Mapping Advanced Server for UNIX users to UNIX users
UNIX quotas can really only be used properly if a UNIX user is assigned to each Advanced
Server for UNIX user. This is predetermined by setting the following parameter in the
registry:
CreateUnixUser=1
If this parameter has the value 0, all Advanced Server for UNIX users are mapped to a UNIX
“lmworld“ user. In this case, the total disk space quota for all Advanced Server for UNIX
users must not be exceeded, i.e. if one Advanced Server for UNIX user exceeds the
permitted capacity this blocks all other Advanced Server for UNIX users at the same time.
If required, you can view and change the mapping of Advanced Server for UNIX users to
UNIX users with the following command:
/var/opt/lanman/bin/mapuname
Example of configuring UNIX quotas:
Prerequisite:
Ê
Your Advanced Server for UNIX must have the following registry parameters set: CreateUnixUser=1 and UnixQuotas=1. The domain name is e.g.
domain1. To perform the configuration now, you should proceed as follows:
Create an Advanced Server for UNIX user “user1”:
net user user1 password /add
Ê
Check the mapping to the UNIX user:
/var/opt/lanman/bin/mapuname domain1:user1
The respective UNIX user is then output: user1.
Product Manual
U7613-J-Z815-6-76
Ê
© Siemens Nixdorf Informationssysteme AG 1995
Pfad: D:\O7613e6\u7613e.k05
Configuring Advanced Server for UNIX
Restricting the user’s disk space
Create a directory for this user:
cd /home
mkdir user1
chown user1 user1
chgrp DOS---- user1
chmod 775 user1
Ê
Share the directory:
net share user1=c:/home/user1
Ê
Assign rights for the user “user1”:
net perms c:/home/user1 /grant user1:fullcontrol
Ê
Now configure “quotas” under UNIX for the /home directory:
Ê
In the /home directory, create a blank file called “quotas”:
> quotas
– Set the limits for the UNIX user “user1”:
edquota user1
– A temporary file with the following contents is opened using the vi editor.
fs /home blocks (soft = 0, hard = 0) inodes (soft = 0, hard = 0)
–
Enter the limits, for example:
fs /home blocks (soft = 11000, hard = 15000) inodes (soft = 0, hard = 0)
–
Ê
Exit the editor and save the file.
Enable “quotas” support for the directory. In the
/etc/vfstab file, change the line for /home for example:
/dev/ios0/sdisk000s5
/dev/ios0/sdisk000s5
Product Manual
/dev/ios0/rsdisk000s5 /home ufs 0
/dev/ios0/rsdisk000s5 /home ufs 0
yes
yes
rw to:
rq
Ê
Activate the change: quotaon -a
Ê
The disk space restriction has now been configured successfully, and can be checked
with the quota -v user1 command. Users can view their own disk space under UNIX
with the quota -v command.
U7613-J-Z815-6-76
Pfad: D:\O7613e6\u7613e.k05
© Siemens Nixdorf Informationssysteme AG 1995
Configuring Advanced Server for UNIX
Configuring printers on the UNIX system
5.5 Configuring printers on the UNIX system
Advanced Server for UNIX supports interworking with the AT&T® standard spooler and the
Reliant UNIX spooler. For this purpose, the following interfaces are available:
Keyword
Spool system
ATTHPI
SPOOLV4
Standard spooler (AT&T high performance interface)
SPOOL V4.2 and Xprint V5.x, referred to in the following
text as SPOOL V4.x (for all UNIX systems)
The selectable spoolers are displayed during installation with the keywords. Select a
spooler for Advanced Server for UNIX, which is then configured automatically.
i
●
You may only use one spooler at a time.
●
You may only select a spooler if it is already installed on your system.
When printing with Advanced Server for UNIX, the print data is already processed
with the PC applications. For this reason, the spooler must pass on this print data
“transparently” to the respective printer; it may not modify it under any circumstances. To do this, the spooler interface for Advanced Server for UNIX passes on
the print job in raw mode. Therefore, you can use every printer on the UNIX system
for Advanced Server for UNIX as long as it is supported by the PC application.
Before you can use a spooler with Advanced Server for UNIX, you must configure printer
classes / groups and printers. You may only use the printers with Advanced Server for UNIX
if it is possible to print from UNIX with the configured printers.
5.5.1 Configuring AT&T spooler
This section explains how to set up the AT&T spooler with the UNIX utility program SYSADM
for Advanced Server for UNIX. For further information on the AT&T spooler, please refer to
the manual “SINIX V5.43” – “AT&T Spooler”.
Ê
Product Manual
Start SYSADM and select Printers-Line Printer Configuration and options. Then select
ADD.
U7613-J-Z815-6-76
Ê
© Siemens Nixdorf Informationssysteme AG 1995
Pfad: D:\O7613e6\u7613e.k05
Configuring Advanced Server for UNIX
Enter the following data:
Printer name:
System name:
Printer type:
Device or address:
i
Ê
Configuring printers on the UNIX system
asxp_hpl
server1
standard
/dev/term/com1
In order to prevent problems occurring with the net commands under MS-DOS,
the printer and printer class names must consist of a maximum of eight
characters. Use lowercase and/or the characters -, _ !
Select <classes> and <ADD> under the Line Printer Configuration and options menu to
create a new printer class.
i
The printer class can also be created using the Advanced Server for UNIX
commands instead of the UNIX commands.
Ê
Enter class_1, for example, as the name of the new printer class.
Ê
Activate the printer and printer class using the following commands:
enable asxp_hpl
accept asxp_hpl
accept class_1
Ê
Check the printer using the command
lpstat -a
lp -dclass_1 /etc/hosts
When sharing the printer, link the name of the printer (here asxp_hpl) with the sharename.
For information on sharing a printer with Advanced Server for UNIX, please refer to the
“Concepts and Planning” manual.
5.5.2 Configuring SPOOL V4.x
The following sections explain how to set up SPOOL V4.x for Advanced Server for UNIX.
For further information on SPOOL V4.x, please consult the “SPOOL V4.2”.
The example below shows the steps involved in setting up SPOOL V4.x for a HP Laserjet
printer:
Product Manual
●
set up spool system
●
set up supervisor
●
add printer to the supervisor
●
add printer group
U7613-J-Z815-6-76
Configuring printers on the UNIX system
Setting up the spool server
© Siemens Nixdorf Informationssysteme AG 1995
Pfad: D:\O7613e6\u7613e.k05
Configuring Advanced Server for UNIX
The spool server administers several supervisors and the jobs that you have processed.
Among other things, it distributes the print jobs to the different supervisors.
Ê
Log onto the system as system administrator root.
Ê
Check whether SPOOL V4.x has been started using xpstat for example; if necessary,
start it with:
xpstart
i
The name of the spool server is returned to the client by means of a job ID for an
executed print job, for example. For accurate identification, the spool server must
be assigned a name with a maximum of 7 characters. Use the lowercase letters
and/or the characters -, _ !
Ê
Set up the spool server srv_asx for Advanced Server for UNIX server:
xpadd -srv srv_asx
Ê
Activate this spool server with:
xpchange -srv srv_asx -stACTIVE -siON -soON
You can also use an existing spool server for AS/X.
Setting up the supervisor
The supervisor is responsible for printing jobs which it receives from the spool server. The
jobs are printed on printers which are controlled by this supervisor.
Ê
Add the supervisor spv_asx to the spool server srv_asx:
xpadd -spv spv_asx -se srv_asx
Ê
Activate the supervisor with:
xpchange -spv spv_asx -stACTIVE
You can also use an existing supervisor for AS/X.
Adding the printer to the supervisor
A supervisor can manage several printers with different printer drivers (e.g. PostScript® or
HP Laserjet®).
Ê
Product Manual
Add a printer (e.g. with the name asxp_hpl for HP Laserjet printer driver) to the supervisor spv_asx, in which case the PCL (Printer Control Language) HP-LASERJET should
be set:
xpadd -dev asxp_hpl -da <devicename> -ho <host name> -pc HP-LASERJET -su
spv_asx -aa
U7613-J-Z815-6-76
Configuring printers on the UNIX system
You do not need to specify the supervisor with -su. In this case, spool will use the default
supervisor.
© Siemens Nixdorf Informationssysteme AG 1995
Pfad: D:\O7613e6\u7613e.k05
Configuring Advanced Server for UNIX
●
The printer is activated automatically as soon as the system starts up by means of the
option -aa.
Ê
Specify the local host name for a local spooler; in the case of a spooler, which is accessible over the network, specify the host name of the remote system in the network.
i
In order to prevent problems occurring with the net commands under MS-DOS, the
printer and printer class names must consist of a maximum of eight characters. Use
lowercase and/or the characters -, _ !
Activate the printer asxp_hpl with:
xpchange -dev asxp_hpl -st ACTIVE -si ON -so ON
Ê
Checking the printer
Print the /etc/hosts file, for example, on the asxp_hpl printer using:
xpadd -de asxp_hpl -dr /etc/hosts
Ê
Advanced Server for UNIX always spools in the print data which comes from the PCs transparently (default). This spool-in procedure is comparable to the xpadd -job -dr <file> -de
<printer group> -fc 1 -rw command.
If print data is not printing out as required, check whether the same file that has been
prepared for printing can be printed to the required printer group from UNIX using the
xpadd command.
●
For information on how other parameters can be set, please refer to the section “Changing
parameters for a printer queue“.
Setting up the printer group
In order to share the printer with the Advanced Server for UNIX server as a printer queue,
you can set up a printer group:
i
Ê
In order to prevent problems occurring with the net commands under MS-DOS, a
printer group name must consist of a maximum of eight characters. Use lowercase
and/or the characters -, _ !
Set up the printer group group_1 for example with the asxp_hpl printer:
xpadd -dgr group_1 -dl asxp_hpl
You can include several printers with the same printer driver (e.g. HP Laserjet) to form a
single printer group. A print job, which is sent to this group, is processed by the first free
printer in this group. For further information, please consult the manual
“SPOOL V4.2” – “User and Administrator Guide”.
Product Manual
U7613-J-Z815-6-76
Configuring printers on the UNIX system
Setting the priority for print jobs from SPOOL V4.x
© Siemens Nixdorf Informationssysteme AG 1995
Pfad: D:\O7613e6\u7613e.k05
Configuring Advanced Server for UNIX
The priority for print jobs from SPOOL V4.x cannot be modified with the
net print <queue> /priority:<number> command.
To set the priority, use the net print <queue> /parms:"... -pr <number> ..." command. If
nothing is set, Advanced Server for UNIX prints with the priority for root (default 1).
●
5.5.3 Optimizing performance with Spool V4.x
In large SPOOL network configurations with many objects, performance problems can
arise in connection with Advanced Server for UNIX. When printing, the lmx.srv server
process assigned to the PC can accept more jobs in parallel. When querying status information, e.g.with net print, the lmx.srv server process allocated to this command works exclusively for this job, and other PCs are prevented from accessing files and from printing
for several seconds.
In order to restrict delays in working with SPOOL V4.x on only one PC with Advanced
Server for UNIX V4.0, you can change the configuration of Advanced Server for UNIX
in such a way that each PC receives its own server process. This is an acceptable solution
in particular for smaller configurations.
To do this, change the settings in the “Process Parameters Entries“ of the Registry of the
Advanced Server for UNIX for the keys MaxVCPerProc and MinVCPerProc to “1”.
In order to obtain a separate process for each PC, stop and start the server with the
commands:
net stop server
net start server
i
5.5.3.1
This solution generates a large number of processes. If this causes problems,
please contact your Support Center for optimum partitioning.
Large SPOOL V4.x configurations
In large SPOOL V4.x configurations with a large number of printers and printer groups
and a large number of jobs in the queues, timeout problems may occur on the clients. For
example, the Windows Print Manager only waits a certain length of time for the answer
from the server; after this time has elapsed an error is returned.
To avoid problem like these, there is a parameter in the “Parameters Entries Section” of the
Registry: “CallXpstatDev”. This parameter controls wheather the device status of Spool
V4.x is queried or not. The default is set to “not query the device status”.
i
Product Manual
Prevent the number of print jobs in the printer queue from increasing. This problem
is caused by stopping the queue or by long term printer problems.
U7613-J-Z815-6-76
Pfad: D:\O7613e6\u7613e.k05
© Siemens Nixdorf Informationssysteme AG 1995
Configuring Advanced Server for UNIX
Configuration for shared client printer
5.6 Configuration for shared client printer
In the case of the shared client printer, the print data is first accepted by the host spooler.
The print data is then transferred to the client whereby a distinction is made between
printing via the
●
TSR program (Terminate and Stay Resident) clispool (or clipcach) for MS-DOS clients
with LAN Manager V2.2
●
other servers and clients that can share the printers.
Shared client printer via TSR program
Advanced Server for UNIX reports after spooler acceptance on the relevant client to the
TSR program (terminate and stay resident) clispool (or clipcache) that the print data is ready
for the PC printer under a specific sharename.
On the client, clispool sets up a connection with the informed server resource using the net
use command. The print data waiting on Advanced Server for UNIX is made available to the
PC program print via this connection.
Shared client printer via other servers and clients
i
For information on how to share a printer for the shared client printer on a server or
a client, please refer to the relevant manuals.
5.6.1 Setting up the shared client printer
This section contains an example for setting up the printer queue for shared client printer
and share it with Advanced Server for UNIX.
The Advanced Server for UNIX commands addclipr and delclipr are used for this.
Product Manual
U7613-J-Z815-6-76
5.6.1.1
© Siemens Nixdorf Informationssysteme AG 1995
Pfad: D:\O7613e6\u7613e.k05
Configuring Advanced Server for UNIX
Configuration for shared client printer
Addclipr
Purpose:
The addclipr command is used to add an Advanced Server client printer device to the
configured spooler.
Syntax:
addclipr
clientname printername printertype [clienttype [sharename]]
where:
clientname
specifies the network name of the client printer computer to which the
printer is attached.
printername
specifies the printer destination name to be added to the configured
Spooler.
printertype
specifies the printer as being of this type.
The printertype is used to extract data from the terminfo database.
The parameter must be an entry in the terminfo database.
i
Not all printers are available for Advanced Server for UNIX on some UNIX systems.
If you cannot use the required printer type, enter standard.
clienttype
i
is either CLIPR or PRSRV. The default is CLIPR with a client on which
clispool or clipcach is running. With PRSRV, select any system that can
make the “shared printer” resource available, for example Windows for
Workgroups, Windows 95/98, Windows NT, or a UNIX Server running
Advanced Server for UNIX.
Please note the section “PRSRV option guidelines” below.
The sharename has to be entered if the clienttype is PRSRV.
Comments:
The addclipr command configures the Advanced Server and the configured spooler to send
print jobs from the Advanced Server computer using the UNIX spoolin command. It does
not share the printer for network use. To enable network access to the client printer, a
shared printer queue must be created using the net share command.
Product Manual
U7613-J-Z815-6-76
Configuration for shared client printer
The command creates a device for the shared client printer in the spooler administration
called printername. If printername is not specified, clientname is used as the name of the
printer. After successful completion, UNIX users can print to the client printer by issuing the
following command:
© Siemens Nixdorf Informationssysteme AG 1995
Pfad: D:\O7613e6\u7613e.k05
Configuring Advanced Server for UNIX
For the LP spooler:
lp -d printername filename
For Spool V4.x:
xpadd -job -de printername -dr filename ...
Examples:
To add an HP LaserJet printer attached to the client computer named pc2 via the CLIPR
interface, type the following command:
addclipr pc2 "" hplaserjet
To add a postscript printer that is attached to the client computer named pc3 and which is
shared with the share name printer3 (PRSRV interface), type the following command:
addclipr pc3 "" POSTSCRIPT PRSRV printer3
The device connection for the shared client printer is thus entered in the spooler administration; you have now created the printers, e.g. pc2.
You can now use this printer from UNIX with following commands:
for Spool V4.x: xpadd -job -de pc2 -ct SIMPLE -dr...
for the LP spooler: lp -d pc2 ...
5.6.2 Delclipr
Purpose:
The delclipr command is used to delete an Advanced Server client printer device from the
configured Spooler.
Syntax:
delclipr
printername
where:
printername
Product Manual
specifies the client printer destination name recognized by the configured
Spooler.
U7613-J-Z815-6-76
Configuration for shared client printer
Comments:
© Siemens Nixdorf Informationssysteme AG 1995
Pfad: D:\O7613e6\u7613e.k05
Configuring Advanced Server for UNIX
The delclipr command removes all of the client printer configuration information from the
Advanced Server and the configured Spooler. The print destination printername is removed
from the configured Spooler. If an Advanced Server shared printer queue exists with printername as the only member, the shared printer queue is also deleted.
Example:
To delete the client printer pc2, type
delclipr pc2
PRSRV option guidelines
Username and password
i
●
The shared printer configured with PRSRV should not have a password. The
filter program configured on Advanced Server for UNIX then logs on without a
password with the username <system name>.cli in the domain in which the
server has been set up. If, for example, the system name of a server is
displayed with uname -n as server1, the filter program logs on with server1.cli.
●
This username must not exist in the domain.
●
If the system is a server (OS/2, Windows NT or UNIX), a user with this
username must not be located in the local account database. Only then the
filter program will receive the rights for the user GUEST in the user group
GUESTS.
If a user with this username exists already, or if a password has been configured for the
shared printer, the following steps must be carried out:
Set the correct values for the DOMAIN, USERNAME, and PASSWORD parameters in the
/var/opt/lanman/clipr/config/<Client name> file.
Ê
i
●
Please note that in the case of an OS/2 server, the rights for the shared printer
are not set automatically for USERS and GUESTS. Furthermore, blank
usernames are not accepted here.
Using these entries the filter program of Advanced Server for UNIX can log on in the
domain.
Stopping the PC or terminating the Print Manager
!
Product Manual
If the PC is to be switched off or the Print Manager is to be closed, the associated
“spool-out” must be stopped beforehand on the spool system.
To do this, use xpchange -dev <device> -so OFF for example (for Spool V4.x), or
disable <device> (for AT&T Spool).
U7613-J-Z815-6-76
Activating Advanced Server for UNIX
If an error occurs, Advanced Server for UNIX or the spool system automatically sets the
printer to disabled. The print job for which the error was detected cannot be backed up; it
must be repeated. All other print jobs remain in the print queue until the error has been
recovered. If the error has been recovered, you can start the associated “spool-out”.
© Siemens Nixdorf Informationssysteme AG 1995
Pfad: D:\O7613e6\u7613e.k05
Configuring Advanced Server for UNIX
Ê
To do this, use xpchange -dev <device> -so ON, for example (for Spool V4.x), or
enable <device> (for AT&T Spool).
5.7 Activating Advanced Server for UNIX
5.7.1 Starting NetBIOS
Manual
You can start the NetBIOS administration process manually with nbrfc start.
Automatic
During installation, a link is set up with rc2.d for starting the NetBIOS administration process
automatically.
5.7.2 Start Advanced Server for UNIX (with NetBIOS)
The following commands are available for starting Advanced Server for UNIX:
–
asx start (all processes, including NetBIOS and WINS, if configured)
–
net start server (the server only)
–
/etc/init.d/ms_srv start (the server only; in the background)
asx start command
The asx start command is used to start Advanced Server for UNIX, the NetBIOS administration process nbrfcdaemon and all other processes (e.g. for the services).
Product Manual
U7613-J-Z815-6-76
Activating Advanced Server for UNIX
net start server command
© Siemens Nixdorf Informationssysteme AG 1995
Pfad: D:\O7613e6\u7613e.k05
Configuring Advanced Server for UNIX
You can start the Advanced Server for UNIX processes of the server with the net start server
command if you have stopped the server with net stop server beforehand for example. You
can thus activate a new configuration for example.
/etc/init.d/ms_srv start
The /etc/init.d/ms_srv start script is used to start all server processes in the background;
there will be a delay before connections with Advanced Server for UNIX are set up.
5.7.3 Sharing resources
For information on how to share resources, please refer to “Concepts and Planning”
manual.
5.7.4 Terminating Advanced Server for UNIX
The following commands are available for terminating Advanced Server for UNIX:
–
–
–
asx start
(all processes, including NetBIOS and WINS)
net start server
(the server only)
/etc/init.d/ms_srv start (the server only; in the background)
asx stop command
The asx stop command is used to terminate Advanced Server for UNIX, the NetBIOS administration process and other processes which were initiated using the asx start command.
!
This command stops the server without further queries even if connections still
exist!
net stop server command
You can terminate the Advanced Server for UNIX processes of the server using net stop
server without terminating the other processes that have been started with asx start at the
same time (e.g. NetBIOS). In this case, you should only start the Advanced Server for UNIX
processes with net start server. You can thus activate a new configuration for example.
Product Manual
U7613-J-Z815-6-76
Activating Advanced Server for UNIX
/etc/init.d/ms_srv stop
© Siemens Nixdorf Informationssysteme AG 1995
Pfad: D:\O7613e6\u7613e.k05
Configuring Advanced Server for UNIX
The /etc/init.d/ms_srv stop script is used to terminate all server processes (in the
background).
!
If you stop the server in this way, all connections are terminated without prior
consultation. This could lead to data loss!
5.7.5 Terminating NetBIOS
Manual
You can stop the NetBIOS administration process manually with nbrfc stop.
Automatic
During installation a link is set up with rc0.d for stopping the NetBIOS administration process
automatically.
5.7.6 Stopping and starting individual services
The services of Advanced Server for UNIX are started with asx start for example. You can
stop and start the following Advanced Server for UNIX services separately:
Start command
Stop command
Service
net start timesource
net start netlogon
net start alerter
net start replicator
net start netrun
net start browser
net start snmp
net start wins
net stop timesource
net stop netlogon
net stop alerter
net stop replicator
net stop netrun
net stop browser
net stop snmp
net stop wins
Time source service
Logon service
Alert service
Replicator service
Netrun service
Browser service
SNMP service (if installed)
WINS service*
i
Product Manual
*It is recommended to use wins start and wins stop to start and stop the WINS
service!
U7613-J-Z815-6-76
Pfad: D:\O7613e6\u7613e.k05
© Siemens Nixdorf Informationssysteme AG 1995
Configuring Advanced Server for UNIX
Adapting the configuration
5.7.7 Status display of the Advanced Server for UNIX processes
You can display the status of the Advanced Server for UNIX and NetBIOS processes using
the asx status command.
5.8 Adapting the configuration
For further information on the Advanced Server for UNIX configuration refer to chapter
“Advanced Server Registry“ and chapter “Lanman.ini File“.
5.9 Setting up a UNIX development environment
Advanced Server for UNIX with its API (application programming interface) supports the
development of programs which access the communication mechanisms, LM named pipes,
and mailslots, or which take on administrative tasks. The declaration files and libraries listed
in the following table are used in this case.
Product Manual
Path, file
Contents
/var/opt/lanman/include
/var/opt/lanman/lib
/usr/include/lmx
/usr/lib
Directory of include files
Location of Advanced Server for UNIX libraries
Symbol link to /var/opt/lanman/include
Contains symbolic links to the libraries in /var/opt/lanman/lib
i
The “API Reference” manual and the API manual pages contain detailed descriptions of declaration files.
!
It is recommended to use the path to /usr/lib and /usr/include/lmx to compile and link
your application.
U7613-J-Z815-6-76
Adapting the configuration
5.9.1 Call options for compilers and linkers
© Siemens Nixdorf Informationssysteme AG 1995
Pfad: D:\O7613e6\u7613e.k05
Configuring Advanced Server for UNIX
If you wish to use the communication mechanisms of Advanced Server for UNIX for development purposes, you must include the necessary declaration files required for the API
function in the source texts. Similarly, the required libraries must be included when linking
the object files. The following table contains the options for calling the compiler and linker:
Call
Meaning
Compiler
-I/usr/include/lmx
Linker
-llmx
-lnsl
-ldl
-lmproc
-lext
-lrpcapi
-lmsrpc
-ltask
-lsam
-lasusec
-lasulang
-lCrun
Advanced Server for UNIX declaration
files
Advanced Server for UNIX library
Shared library for TLI
For dynamic linking
UNIX system library
UNIX system library
Advanced Server for UNIX library
Advanced Server for UNIX library
Advanced Server for UNIX library
Advanced Server for UNIX library
Advanced Server for UNIX library
Advanced Server for UNIX library
UNIX system library
i
The shared libraries are also used by the Advanced Server for UNIX processes.
Example:
The source file apitest.c contains API calls (e.g.DosMakeNmPipe()). This source file is
compiled and linked using the program make with the following makefile:
LIBS=-llmx -lasulang -lnsl -ldl -lmproc -lext
apitest: apitest.o
cc -o apitest.o $(LIBS)
apitest.o: apitest.c
cc -c apitest.c -I/usr/include/lmx
i
Product Manual
The number of Advanced Server for UNIX libraries linked to the object may vary
with the API functions you are using. All possible libraries are listed in the table
above.
U7613-J-Z815-6-76
Pfad: D:\O7613e6\u7613e.k06
© Siemens Nixdorf Informationssysteme AG 1995
6 Administration guidelines
This chapter contains guidelines for
●
changing server attributes
●
sharing a CD-ROM drive
●
saving configuration files
●
processing the printer queue
●
administering using the net admin command
6.1 Changing server attributes
You can change the following server attributes after the installation:
●
Server name
The program setservername is available for changing the name of an Advanced Server.
●
Domain name
The program setdomainname is available for changing the name of an Advanced Server
domain.
●
Server role
With the program promote you can change the server role without re-initializing an
existing domain.
●
Server name, Domain name, Server role
The program joindomain is available for configuring an Advanced Server into a new
domain or re-initializing an existing domain.
●
Spooler interface
With setspooler you specify a spooler for the Advanced Server for UNIX.
Product Manual
U7613-J-Z815-6-76
●
© Siemens Nixdorf Informationssysteme AG 1995
Pfad: D:\O7613e6\u7613e.k06
Administration guidelines
Changing server attributes
Output language
With setlang you can change the output language of net commands, elfread and the
EventViewer.
●
Domain language
With setdomainlang you can change the language of predefined objects within a domain.
Product Manual
Ê
You must be logged on as the system administrator root to change server attributes.
Ê
The utility programs for changing the server attributes need to stop the server.
Therefore, inform all users using resources of this server.
Ê
These programs are described in the online manpages for Advanced Server for UNIX.
U7613-J-Z815-6-76
Pfad: D:\O7613e6\u7613e.k06
© Siemens Nixdorf Informationssysteme AG 1995
Administration guidelines
Sharing a CD-ROM drive
6.2 Sharing a CD-ROM drive
If your UNIX system has a CD-ROM drive, you can also share it for workstations. To do this,
carry out the following steps:
Using the mount command, incorporate the CD-ROM drive in the UNIX file system, for
example, use the commands:
mkdir /cdrom
chmod 777 /cdrom
mount -F hs -o dos /dev/ios0/sdisk005s0 /cdrom
Ê
i
●
The devicename for the CD-ROM drive varies depending on the UNIX system.
●
Most of the CD-ROMs have the high sierra file system type for which you enter
the required driver on RM systems using the parameter -F hs.
●
In the example a directory (/cdrom) has been generated for slice 0 only. Create
another directory for each other slice as required and incorporate it into the
UNIX file system using the mount command.
●
Advanced Server for UNIX generally only processes filenames which do not
contain any uppercase letters. The filenames are converted to lowercase letters
using the -o dos parameter. Check whether this parameter is set if errors occur.
You could also configure Advanced Server for UNIX is such a way that both
uppercase and lowercase usage is possible. To enable this, set the following
parameter in the registry: MixedCaseSupport=1.
●
Share the CD-ROM drive using the net share cdrom=c:/cdrom command.
Users now have read access to the CD-ROM drive from their workstations using the
net use i: \\server1\cdrom command, for example.
i
Product Manual
You cannot remove the CD-ROM from the drive before you have removed the
CD-ROM drive from the UNIX file system with the umount command!
U7613-J-Z815-6-76
Pfad: D:\O7613e6\u7613e.k06
© Siemens Nixdorf Informationssysteme AG 1995
Administration guidelines
Processing the printer queue
6.3 System data backup
The AS/X databases are open while Advanced Server for UNIX is running. In order to
ensure that all configuration files are consistent, you must stop Advanced Server for UNIX
with the net stop server command before carrying out a data backup.
!
There are also hidden files and special files in the directories below /var/opt/lanman.
To back up the complete tree use e.g. the cpio command. Do not use the cp
command - it will hang on special files.
6.4 Processing the printer queue
The section explains the spoolers for which you can process the printer queue with restrictions.
6.4.1 SPOOL 4.x or Xprint
6.4.1.1
Stopping and restarting printer queues
You can stop a printer queue for Advanced Server for UNIX using the command
net print /hold. This sets all Advanced Server for UNIX print jobs to the status SUSPEND,
including jobs which have been newly spooled via Advanced Server for UNIX. Print jobs
spooled via xpadd are not affected.
The stopped printer queue is restarted using net print <printer queue> /release.
i
By default, Advanced Server for UNIX printer jobs have the sender root. This can
be viewed by entering the xpshow command.
You can also configure Advanced Server for UNIX for spooling under the user ID of
the AS/X user (see the SpoolinAsUnixUser registry parameter in the section
“Parameters Entries“).
Product Manual
U7613-J-Z815-6-76
6.4.1.2
© Siemens Nixdorf Informationssysteme AG 1995
Pfad: D:\O7613e6\u7613e.k06
Administration guidelines
Processing the printer queue
Changing parameters for a printer queue
You can change or set print parameters for a SPOOL V4.x printer queue from Advanced
Server for UNIX.
This is done using the command net print <printer queue> /parms:"<xpadd parameter>".
The <xpadd parameter> parameters correspond to the parameters for the xpadd command
in SPOOL V4.x. They are described in the SPOOL V4.x manuals.
The default setting for <xpadd parameter> is -fc 1 -rw. In order to set the parameters to the
default setting, call the following command:
net print <printer queue> /parms:""
In order to set new parameters, it is necessary to specify at least one parameter,
e.g. net print <printer queue> /parms:"-fc 1"
i
6.4.1.3
●
Advanced Server for UNIX reserves the following parameters for its own
processing. For this reason they cannot be specified:
-de, -dr, -ev, -jc, -na, -nd, -nm, -rm, -st, -jt
●
If a separator page has been configured, the -js parameter cannot be used.
●
Each spooler has different parameters. For this reason, when switching the
configured spooler, it is necessary to first delete the queues for the old spooler.
Stopping and restarting print jobs
Print jobs can be stopped and restarted using the commands net print <job#> /hold and
net print <job#> /release. The status of the specified Advanced Server for UNIX print job is
set to SUSPEND or WAIT.
i
6.4.1.4
These functions are only effective on print jobs from corresponding users. A user
with administrator permissions can influence all print jobs.
Status messages from SPOOL via Popup
If the printer device in SPOOL has the status Device error, Popup does not send any
message about a print job error or printer error to the PC that sent the job.
6.4.1.5
Identifying print jobs with Job ID
In the SPOOL status messages, Popup specifies the local job ID for the explicit assignment
of the print job (for pause and continue).
In messages concerning the status of print jobs (canceled and printed), Popup currently
displays only the global job ID. As soon as SPOOL V4.x sends the local job ID for this
situation, Advanced Server for UNIX is adapted accordingly.
Product Manual
U7613-J-Z815-6-76
6.4.1.6
© Siemens Nixdorf Informationssysteme AG 1995
Pfad: D:\O7613e6\u7613e.k06
Administration guidelines
Administering using the net admin command
Displaying the order of print jobs
With SPOOL job management, Advanced Server for UNIX may not display the correct
processing order of print jobs. This situation can arise if, for example, individual jobs are
deleted from the printer queue and new jobs are then spooled in.
The actual processing order can be displayed using the command xpstat -job in the Rank
field.
6.4.1.7
Changing the order of print jobs
The net print <job#> /first command can be used to set a print job to the SPOOL status TOP.
i
●
When a printer queue is stopped (HOLD status), all print jobs, including those
with the status TOP, are set to the status SUSPEND. After restarting the printer
queue, all print jobs are set to the status WAIT.
●
Print jobs cannot be set to the status TOP when a printer queue is stopped. No
error message is output to this effect.
The net print <job#> /last command is not implemented for the SPOOLV4 interface.
6.5 Administering using the net admin command
This command can be used to administer the specified server. For example, if the backup_2
server is the backup domain controller and primary is the primary domain controller, the
command
net admin \\backup_2 /command <command>
can only be used to execute commands affecting the backup_2 server.
In this example, due to a lack of access rights, it is not possible to execute the command
net user <username> <password> /add, as this command does not relate to the backup
domain controller backup_2, but to the primary domain controller primary. In order to execute
the command on the primary domain controller, use the command
net admin \\primary /command <command>.
Product Manual
U7613-J-Z815-6-76
Pfad: D:\O7613e6\u7613e.k07
© Siemens Nixdorf Informationssysteme AG 1995
7 Tools for special tasks
Advanced Server for UNIX contains tools for the system administrator, which need only be
used in special cases. These tools are described in the sections that follow in relation to
particular application scenarios. It is recommended that you first of all read the description
of the PC tools and then the description of the tools for NetBIOS, as well as other system
administration tools. Finally you should read the information provided in relation to support
high availibility configurations.
7.1 PC tools
The following tools are contained in the DOSUTIL resource:
7.1.1 Searching for the Master Browser for a domain in a subnetwork
(findbrow.exe)
This tool helps you to find the Master Browser in a subnetwork. This is of benefit to the
system administrator when searching for errors.
Syntax:
findbrow.exe <WorkGroup>|<Domain>
Product Manual
U7613-J-Z815-6-76
PC tools
An example of program output is given below:
© Siemens Nixdorf Informationssysteme AG 1995
Pfad: D:\O7613e6\u7613e.k07
Tools for special tasks
Master Browser found on NetBIOS adapter no ’0’
The Master Browser’s adapter address : 00c095ec91ee
The following names are available:
NUM
Name
Cat. State
---------------------------------------------------------------------------01 CLIENT1’’’’’’’’<20>
UN reg
02 CLIENT1’’’’’’’’<00>
UN reg
03 DOMAIN1’’’’’’’’<00>
GR reg
04 CLIENT1’’’’’’’’<03>
UN reg
05 DOMAIN1’’’’’’’’<1e>
GR reg
06 USER1’’’’’’’’’’<03>
UN reg
07 DOMAIN1’’’’’’’’<1d>
UN reg
08 <01><02>__MSBROWSE__<02><01>
GR reg
The display shows the NetBIOS name table of the machine which is the master browser for
DOMAIN1 in the current subnetwork - in this case the machine is called CLIENT1.
The master browser of the domain is identified by means of the name <Name>’ ’ ’<1d> (in
this example DOMAIN1 <1d>).
7.1.2 Retrieving information on clients (lmgetinf.exe)
This tool provides information on the client from which it was called. This information is used
for diagnostic purposes by the support centers.
Syntax:
lmgetinf.exe
Output parameters:
The output of the tool provides some internal information on the redirector used, for
example the root directory, the computername, the user name, and the domain name.
Product Manual
U7613-J-Z815-6-76
PC tools
The example below shows the output:
© Siemens Nixdorf Informationssysteme AG 1995
Pfad: D:\O7613e6\u7613e.k07
Tools for special tasks
NetWkstaGetInfo returned 0
LanMan Root
: C:\WINDOWS
Computer Name
: CLIENT1
User Name
: USER1
Lan Group
: DOMAIN1
LanMan Version : 2.51
Logon Server
:
Workheuristics : (null)
SessionTimeout : 45
Char Wait
: 0
Char Time
: 0
KeepConnections : 600
KeepSearch
: 600
Max Threads
: 6
Max Commands
: 6
NumWorkBuf
: 2
SizeWorkBuf
: 4096
MaxWorkCache
: 0
SizeError
: 0
NumAlerts
: 0
NumServices
: 3
ErrlogSize
: 0
PrintBufTime
: 0
NumCharBuf
: 0
SizeCharBuf
: 0
Mailslots
: 1
Char Count
: 0
wki0_reserved_1 : 0
wki0_reserved_2 : 0l
wki0_reserved_3 : 0l
wki0_reserved_4 : 0
wki0_reserved_5 : 0
wki0_reserved_6 : 0l
Product Manual
U7613-J-Z815-6-76
Pfad: D:\O7613e6\u7613e.k07
© Siemens Nixdorf Informationssysteme AG 1995
Tools for special tasks
Tools for NetBIOS
7.2 Tools for NetBIOS
The following scripts are used for NetBIOS administration.
7.2.1 /var/opt/nbrfc/bin/findbrow
This tool helps you to find the Master Browser in a subnetwork for a given domain or
workgroup. If found, it lists the master browser’s name table.
In contrast to the PC tool of the same name, the UNIX findbrow command can locate a
Master Browser both within a local and remote subnetwork.
This is of benefit to the system administrator and to the support centers when searching for
errors.
The findbrow program is based internally on the NetBIOS nbtstat program and therefore
uses the same output format.
Syntax:
findbrow [ -b <broadcast_address> ] <name>
-b <broadcast_address>
Search within a certain remote subnetwork indicated by <broadcast_address>
given in dotted decimal notation.
The default is to search within all locally configured subnetworks as indicated
by nbconfig -i.
<name>
The name of the domain or workgroup.
An example of program output is given below:
# ./findbrow -b 111.111.255.255 domain1
Product Manual
U7613-J-Z815-6-76
Pfad: D:\O7613e6\u7613e.k07
© Siemens Nixdorf Informationssysteme AG 1995
Tools for special tasks
Tools for NetBIOS
NetBIOS Remote Machine Name Table
Name
Type
Status
--------------------------------------------SERVER1
<20> UNIQUE
Registered
SERVER1
<00> UNIQUE
Registered
*SMBSERVER
<20> GROUP
Registered
DOMAIN1
<00> GROUP
Registered
DOMAIN1
<1C> GROUP
Registered
SERVER1~X
<00> UNIQUE
Registered
SERVER1#DMN
<00> UNIQUE
Registered
DOMAIN1
<1E> GROUP
Registered
SERVER1#BROW
<00> UNIQUE
Registered
DOMAIN1
<1B> UNIQUE
Registered
DOMAIN1
<1D> UNIQUE
Registered
..__MSBROWSE__.<01> GROUP
Registered
MAC Address = 00-00-00-00-00-00
IP Address = 111.111.111.111
The display shows the NetBIOS name table of the machine which is the master browser for
DOMAIN1 in the corresponding subnetwork - in this case the machine is called SERVER1,
a primary domain controller.
The master browser of the domain is identified by means of the name "<Name> <1d>" (in
this example "DOMAIN1 <1d>").
Product Manual
U7613-J-Z815-6-76
Tools for NetBIOS
7.2.2 /var/opt/nbrfc/bin/mv_names
© Siemens Nixdorf Informationssysteme AG 1995
Pfad: D:\O7613e6\u7613e.k07
Tools for special tasks
The mv_names command is used during an update installation of the nbrfc package to
convert the configuration of the name table. The NetBIOS name mappings contained in the
[NBRFC] section of an old style nbrfc.cfg configuration file (used by NetBIOS versions
<=3.5A) are written to the names.cfg file. The script is invoked automatically by the installation program, but it can also be used manually.
Syntax:
mv_names
[ <pathname> ]
Parameters:
pathname The path name of the file which should be used to extract name mappings. If
<pathname> is not given /var/opt/nbrfc/nbrfc.cfg is used by default.
i
The /var/opt/nbrfc/nbrfc.cfg file is copied to the /tmp directory during removal of an
old nbrfc package. If you have a copy of this file, you can invoke this command at
any time in order to convert the name table.
Sample names.cfg file:
SERVER1 144.145.111.71
CLIENT1 144.145.123.5
UN #20,03,00
UN #20,03,00
7.2.3 /var/opt/nbrfc/bin/names2lm
The names2lm command is used to convert a file containing NetBIOS-name-to-IP-address
mappings in names.cfg-format into the format of an LMHOSTS file usually used by Microsoft
networking components. LMHOSTS format is needed to import static mappings into a
WINS database. The command is invoked automatically during installation - it creates the
file names.imp -, but it can also be used manually at any time.
Syntax:
names2lm -d
names2lm <names_file> <lmhosts_file>
Product Manual
U7613-J-Z815-6-76
System administrator tools
Options and Parameters:
© Siemens Nixdorf Informationssysteme AG 1995
Pfad: D:\O7613e6\u7613e.k07
Tools for special tasks
-d
Use default names
<names_file>
Input file name (should contain name mappings in names.cfg format).
<lmhosts_file>
Output file name in LMHOSTS format (ready for being imported into a
WINS database).
i
Please inspect the list of static NetBIOS name mappings generated by names2lm
carefully before using NT WINS manager to import them into a WINS database.
As a rule, you should keep the number of static mappings within WINS as small as
possible and use them only for important computers which are not WINS-aware. It
is not recommended to use static mappings for WINS enabled clients.
7.3 System administrator tools
The first section contains an overview how access permissions are managed in Advanced
Server for UNIX. The following scripts are required by system administrators in different
situations. For example, they can be used for backing up the user’s configuration and
resources as well as for problem analysis.
7.3.1 Access permissions in Advanced Server for UNIX
Advanced Server for UNIX stores access permissions for files and directories in its ACL
database in the /var/opt/lanman directory. In contrast to UNIX permissions, which are stored
with each file and directory in the file system, permissions are stored centrally in Advanced
Server for UNIX.
The ACL database stores access permissions for some resources, while other resources
inherit their permissions from the higher-level directory. The net perms command displays
permissions for all available resources, i.e. either permissions stored physically in the ACL
database or those inherited from the higher-level directory. If a resource which is not yet
entered in the ACL database is assigned permissions by net perms, the rights currently
inherited are combined with those specified in the command and stored as a physical entry
in the ACL database. If the physical entry is deleted, the inherited permissions are valid
again.
If you are saving files with UNIX tools or copying files under UNIX, the permissions are not
saved and copied automatically. Files and directories can be backed up together with their
permissions using the NT Backup Tools, for example.
Product Manual
U7613-J-Z815-6-76
System administrator tools
Another option here is to use the accget and accadm programs, which can be used in
conjunction with UNIX mechanisms, for example for restoring access permissions following
a system crash. Only the access permissions are saved and restored in this case, and not
the actual files and directories. All that is required here is to back up the physical entries in
the ACL database. For the restore procedure, the files and directories must be already
created in the UNIX file system.
© Siemens Nixdorf Informationssysteme AG 1995
Pfad: D:\O7613e6\u7613e.k07
Tools for special tasks
The definitions below should provide clarification of the terms used in the next section in
conjunction with the accget and accadm tools:
Resource:
UNIX directory or UNIX file
Resource_name:
UNIX path name of a directory or file
Mountpoint:
UNIX path name under which a UNIX file system is mounted
Permission record:
Entry for a resource with its access permissions in the backup files
Backup file:
Backup file name
7.3.2 Saving access permissions for resources (accget)
This tool is used to create a backup file called /var/opt/lanman/etc/accadm.dat or
/tmp/accget.dat of the ACL database, which contains the following information (permission
records):
●
Shared resources (SHARES)
●
Access permissions for resources
●
Mountpoints for resources
The accadm.dat (or accget.dat) file is the input for the backup functions of the accadm
command.
Product Manual
U7613-J-Z815-6-76
System administrator tools
Syntax:
© Siemens Nixdorf Informationssysteme AG 1995
Pfad: D:\O7613e6\u7613e.k07
Tools for special tasks
accget [-?|help] [-n | -s] [-P <resource_name>]
If the command is called without options, the /var/opt/lanman/etc/accadm.dat file is created.
The access permissions for all resources are stored in this file. Shared resources
(SHARES) and mountpoints are saved at the same time. This command produces a
complete backup of your access permissions on Advanced Server for UNIX.
-n
The access permissions for all resources are stored with <user_name / group>.
With option -n the access permissions are saved compatible to Advanced Server
Version 3.5B00. The user/group names are stored as readable character strings
according to net perms output. The server has to be started if this option is selected.
-s
The access permissions for all resources are stored with <user / group SIDs>
(default).
The option -s saves access permission with the SIDs of the users / groups. SIDs
are an internal description of the Security Identifiers of a user / group. It is not
necessary to start the server if this option is used.
i
-P
The default option of accget is -s.
The access permissions for the specified resource <resource_name> are stored in
the /tmp/accget.dat file. When you specify a directory, all directories and files under
the specified directory are processed, including their access permissions. Shared
resources (SHARES) and mountpoints are not stored again. If a blank file is
created, this means that no entry could be found for the specified resource; if no file
was created, an error has occurred. This command only creates a backup of the
access permissions of a file or directory tree.
i
-?|help
The /tmp/accget.dat file created is overwritten each time the command is
invoked and has to be backed up manually.
A description of the command is displayed.
Example:
accget -P /home
mv /tmp/accget.dat /home/backup/accget.dat
accget -P /var
mv /tmp/accget.dat /var/backup/accget.dat
i
Product Manual
If the command is called again, the existing backup files are overwritten. You should
ensure that there is enough space available in the directories for the /tmp or
/var/opt/lanman/etc backup files (at most the files require the same capacity as the
/var/opt/lanman/datafiles/acl* database).
U7613-J-Z815-6-76
i
© Siemens Nixdorf Informationssysteme AG 1995
Pfad: D:\O7613e6\u7613e.k07
Tools for special tasks
System administrator tools
Saving / restoring of an ACL database with SIDs makes sense only within the
domain in which they have been created. After a new installation or after a change
of the user/group configuration, the internal representation of the same name has
a different SID.
Saving / restoring beyond domains and beyond installations is possible by using
option -n.
!
Restoring an ACL database saved with SIDs of another domain or for users which
have been deleted and created again in the meantime can destroy access permissions.
Errors:
Error messages are written to the screen if errors occur; additional error messages may be
written to the backup files to enable an internal investigation to take place.
7.3.3 Editing saved resources and access permissions (accadm)
The accadm tool is used to edit resources and their access permissions. The following
options are available.
Syntax:
accadm
Product Manual
[-?|help] [-d <resource_name> | -r | -G | -E |
-S [<backup file>] | -P | -Pg |
-Fs [<mountpoint>] | -Fe <mountpoint> |
-Fp <mountpoint> | -Fd <mountpoint> ]
-d
Deletes (’d’elete) the physical entry in the ACL database for the resource
<resource_name>
-r
Removes (’r’emove) access permissions for resources that are no longer available
from the ACL database by invoking acladm -P
-G
/var/opt/lanman/etc/accget (acc’g’et) is invoked
-E
Enumerates (’e’numerate) the content of /var/opt/lanman/etc/accadm.dat (standard
function, if accadm is invoked without options)
-S
Shares are created with the content of <backup file> e.g. /tmp/accadm.dat.old.
If no <backup file> is specified, SHARES are created with the content of
/var/opt/lanman/etc/accadm.dat.
U7613-J-Z815-6-76
Pfad: D:\O7613e6\u7613e.k07
© Siemens Nixdorf Informationssysteme AG 1995
Tools for special tasks
System administrator tools
-P
The ACL database (net ’p’erm) is updated with the content of the
/var/opt/lanman/etc/accadm.dat file. New entries are added here, existing entries are
updated, and unaffected entries are left as are. The files and directories must exit
in a mounted filesystem. The resources must have been created beforehand.
-Pg
The ACL database (net ’p’erm) is updated with the content of the /tmp/accget.dat
(acc’g’et.dat) file. New entries are added here, existing entries are updated, and
unaffected entries are left as are. The files and directories must exit in a mounted
filesystem. The resources must have been created beforehand.
-Fs
A file (’F’ilesystem ’s’cript) with the fixed name asxperms is created in the “<mountpoint>” directory. The file contains “permission records”, i.e. resource names with
access permissions for resources which are created in the file system under the
“<mountpoint>“. The resource names are converted to path names relative to the
mountpoint. If a mountpoint is not specified, this procedure is implemented for all
mounted file systems, i.e. a file called asxperms is created under every mountpoint.
-Fe
Displays the content of the <mountpoint>/asxperms file ('F'ilesystem script
'e'numerate).
-Fp
The ACL database is updated with the content of the <mountpoint>/asxperms file.
New entries are added here, existing entries are updated, and unaffected entries
are left as are ('F'ilesystem script net 'p'erm). The files and directories must exit in
a mounted filesystem. The resources must have been created beforehand.
-Fd
Deletes the <mountpoint>/asxperms file ('F’ilesystem script ’d’elete).
-?|help
A description of the command is displayed.
Example:
Mountpoints:
/var
/home
Resources:
/var/opt/lanman/shares
/home/user1/user1.dat
/home/user2/user2.dat
If you invoke accadm -Fs, the /var/asxperms file contains an entry with the path name
/opt/lanman/shares, which contains the permissions saved for /var/opt/lanman/shares.
The /home/asxperms file contains entries with the path names /user1/user1.dat and
/user2/user2.dat.
The data saved can be restored again under a different mountpoint on the basis of the
relative position to the mountpoint.
Product Manual
U7613-J-Z815-6-76
i
© Siemens Nixdorf Informationssysteme AG 1995
Pfad: D:\O7613e6\u7613e.k07
Tools for special tasks
System administrator tools
The following directories are no valid mountpoints for accadm.
/ (root directory), /proc, /stand, /dev/fd
Resources located in the root directory (i.e. which are not allocated to another
mountpoint) are only saved in /asxperms if accadm -Fs is invoked without specifying
a mountpoint.
i
accget must have been executed before accadm is invoked.
accadm primarily supports separation of access permissions according to file systems so
that they can be transferred to other file systems or UNIX systems (e.g. with OBSERVE).
They are not a replacement for the regular backup of the ACL /var/opt/lanman/datafiles/acl*
database. The following AS/X databases must also be available in a consistent form in order for a complete restore to be performed:
–
–
–
/var/opt/lanman/datafiles/Builtin*
/var/opt/lanman/datafiles/lsa*
/var/opt/lanman/domains/<domainname>*
These databases therefore always have to be backed up together.
7.3.4 Moving directories with existing access permissions
It may happen sometimes that a system administrator has to transfer the data from one file
system to another file system (e.g. to a larger disk). Usually this task is carried out using
UNIX commands. In doing so, the access permissions of the files and directories, which are
stored in the Advanced Server for UNIX ACL database, are not adapted automatically. This
task is performed by the acladm program ("-M" option). The Advanced Server for UNIX has
to be stopped during this process.
Detailed information on the acladm command is available in the online manual page. Type
man acladm at the Advanced Server command prompt.
The following example illustrates the shifting of the data from one directory /home1, which
is shared under the name homedir, to a directory /home2.
1. Make sure that no client is linked to the shared directories on the file system. Stop
sharing all directories on the corresponding file system, e.g. with
net share homedir /delete
You now stop the server using
net stop server
2. Transfer the files and directories from one directory to the other using UNIX commands.
Be careful to retain the directory structure and the owners, groups and permissions in
UNIX. In our example, move the contents of /home1 to /home2.
Product Manual
U7613-J-Z815-6-76
System administrator tools
3. Call the command
/var/opt/lanman/bin/acladm -M <from UNIX path> <to UNIX path>
to change the access permissions in the Advanced Server for UNIX ACL database to
the new path.
Example:
/var/opt/lanman/bin/acladm -M /home1 /home2
© Siemens Nixdorf Informationssysteme AG 1995
Pfad: D:\O7613e6\u7613e.k07
Tools for special tasks
4. Start the server using the following command:
net start server
5. Share the same directories on the new file system again with the same share name.
Example:
net share homedir=c:/home2
7.3.5 Saving the user configuration (userget)
This tool backs up the current user configuration and group configuration for the specified
system. The command can be invoked for the local system or for a remote server. The
/var/opt/lanman/etc/useradd.sh_local or /var/opt/lanman/etc/useradd.sh_<name of server> file
created can be used for restoring a configuration.
i
To circumvent the restrictions noted below the file can be modified with the help of
an editor!
Syntax:
userget [-?|help] [<servername> <domain> <administrator-password>]
i
The following restriction for User-options should be noted when restoring the
configuration:
/TIMES is always set to ALL.
/HOMEDIRDRIVE is not applicable on Windows NT Servers.
The password cannot be exported and is therefore set to password for all users and
should then be changed subsequently.
Product Manual
U7613-J-Z815-6-76
System administrator tools
7.3.6 Adding and removing server names (addserver/delserver)
© Siemens Nixdorf Informationssysteme AG 1995
Pfad: D:\O7613e6\u7613e.k07
Tools for special tasks
You can use the addserver command to add an additional server name on a system, in order
to enable the clients to access the server with the newly added name.
You can use the delserver command to delete a server name that was added with the
addserver command. This disables the clients to establish a new connection to the server
using this server name.
Usually these commands are used in high availability configurations.
Syntax:
addserver <computername>
delserver <computername>
Example:
One of two servers (lion and tiger) fails (e.g. tiger). The system administrator enters the
following command on the lion system:
/var/opt/lanman/etc/addserver tiger
The connected clients have to re-establish the connection to the resources to be used.
While the clients establish the connection under the name tiger, they use resources on the
lion server.
After the failed server is operational again, the command for deleting the alternative name
must be entered on the second server:
/var/opt/lanman/etc/delserver tiger
i
Existing connections to the server lion which were set up using the name tiger are
not terminated when the name is deleted.
Advanced Server for UNIX can then be started on the failed server and the clients can use
the resources on the tiger server again.
i
Product Manual
This example takes no note of any actions that may be necessary to ensure the
availability of resources and user data.
U7613-J-Z815-6-76
Compression of the ACL Database
7.3.7 Checking the password expiry with the asxpwexp utility
© Siemens Nixdorf Informationssysteme AG 1995
Pfad: D:\O7613e6\u7613e.k07
Tools for special tasks
The asxpwexp utility can be used to check which Advanced Server for UNIX users’
passwords are due to expire within the next “n” (0-28) days. The user can be notified of this
by electronic mail, and be given plenty of advance warning if the utility is invoked regularly
using cron, for example.
Syntax:
asxpwexp [0-28] (default: 5)
In order to be able to send a mail, the asxpwexp.usr configuration file must be available and
provide a mapping between Advanced Server for UNIX users and a mail address for these
users. If there is no specific information to be provided to the user, a standard notification
is sent. The program uses the UNIX mail command internally.
Syntax of the asxpwexp.usr file:
<AS/X user>:<Mail_address>[:user-specific]
You can use any address that can also be used by UNIX Mail as the mail address.
Examples:
fred:fred: Your password will expire in 10 days!
steve:steveJ@lion
john:lion!johnny:Your password will expire now!
7.4 Compression of the ACL Database
Advanced Server for UNIX stores permissions for files and directories into it's ACL
database /var/opt/lanman/datafiles/acl*. Whereas UNIX permissions of files and directories
are part of the file system, AS/X permissions are stored in a central place.
If you rename (mv) or delete (rm, rmdir) these files or directories within UNIX the AS/X ist
bypassed and the entries in the ACL database will not be adapted. This results in entries
pointing to non-existing files and directories.
With the AS/X tool acladm <option> you can remove superfluous entries. However the
database will not be reorganized such that gaps exist between the used entries. The total
diskspace occupied will not be reduced. Those gaps will be used by future entries of course.
If you remove or delete files and directories from an AS/X client the ACL database will be
changed accordingly. Entries will be renamed or removed. However also in this case no
reorganization of the ACL database takes place.
Product Manual
U7613-J-Z815-6-76
Compression of the ACL Database
The AS/X acladm utility with its different options removes entries identified as superfluous in the configuration when the command is called. You must therefore make
sure that the system configuration is complete (i.e. all file systems are mounted)
and that the AS/X configuration is up to date. For example, if you change the AS/X
MixedCaseSupport registry parameter to a different value than that at Advanced
Server runtime, it may happen, for example, that acladm -P will delete too many ACL
entries.
!
© Siemens Nixdorf Informationssysteme AG 1995
Pfad: D:\O7613e6\u7613e.k07
Tools for special tasks
The following description shows how an the ACL database can be reorganized using
several tools from Advanced Server for UNIX. During the reorganization process the server
has to be stopped, therefore you should use a maintenance date for compression.
Depending on the size of the database the compression may take some time.
Ê
Check available disk space
In the file system where /var/opt/lanman is located the free space should be at least the
size of the ACL database.
Ê
Stop the server
net stop server
i
Ê
All active connections with clients will be closed.
Save the actual ACL database
e.g. cp /var/opt/lanman/datafiles/acl* /save/datafiles
i
Ê
Take care that there is enough space in /save.
Clean old ACL database
Cleaning of the database takes place in two steps: In the first step you have to check
the data for correctness and you have to repair them in case of need. Then you can
remove all entries which are no longer necessary, e.g. entries of files and directories
which are no longer existing in UNIX.
Ê
Check the /var/opt/lanman/datafiles/acl database:
/var/opt/lanman/bin/acladm -C -n
The -n option, when used with the -P or -C options, will give a complete list of all entries
that need to be deleted or fixed. No changes are made to the ACL store.
Ê
Product Manual
If necessary repair it:
U7613-J-Z815-6-76
Ê
© Siemens Nixdorf Informationssysteme AG 1995
Pfad: D:\O7613e6\u7613e.k07
Tools for special tasks
Compression of the ACL Database
First option:
/var/opt/lanman/bin/acladm -C -y
The -C option will either fix or delete each corrupt entry. The -y option can be used
together with the -C option to fix or delete ACL entries without user intervention. (-y is
recommended if you expect a large number of modifications in the ACL database.)
Ê
Second option:
/var/opt/lanman/bin/acladm -C -f
The -f option will only fix corrupt entries.
Entries that cannot be fixed (and would be deleted) are not deleted!
Ê
Delete unused entries for non-existing files and directories:
/var/opt/lanman/bin/acladm -P -y
Ê
To remove entries for non-existing users:
/var/opt/lanman/bin/acladm -U
Ê
To remove redundant user entries:
/var/opt/lanman/bin/acladm -S
Please refer to the acladm manual page for the detailed usage of the acladm command.
Type man acladm at the Advanced Server command prompt.
Internal database compression is performed directly by the low level database utility
blobadm.
Ê
To compress the ACL database:
/var/opt/lanman/bin/blobadm -q -A
i
Ê
The method of compressing the ACL database using the accget and accadm
utilities is no longer recommended from Version 4.0A of Advanced Server for
UNIX. Since the programs work on a higher level than the blobadm program, it
may happen in certain configurations that the ACL database is not optimally
compressed or even becomes larger in certain exceptional cases.
In case of problems restore the old state the original database (e.g. /save/acl*) has to
be copied to
/var/opt/lanman/datafiles
Ê
Start the server.
net start server
Product Manual
U7613-J-Z815-6-76
Pfad: D:\O7613e6\u7613e.k07
© Siemens Nixdorf Informationssysteme AG 1995
Tools for special tasks
OBSERVE support
7.5 OBSERVE support
In the context of providing functions for enabling high availability in systems, Advanced
Server for UNIX contains some tools for supporting interaction with the OBSERVE product.
In this sense, “High Availability” means a configuration where two systems are operated in
parallel so that the load can be distributed. If one of the two systems fails, the remaining
system is available to users of both systems. This means that the affected disk areas and
network controllers are switched about.
When the failed system is operational again, these switches are canceled again. The steps
necessary to perform the switching are implemented using scripts. Sample scripts are
supplied with OBSERVE and have to be adapted to suit the respective configuration.
A short description is given below of the steps to be performed in such a case:
1. Activate and deactivate network controllers:
In the event of a system failing, a network interface is activated online and then deactivated again before the failed system is rebooted to enable the alternative system to be
accessed using the same IP address as the failed system.
The nbconfig tool is responsible for implementing this.
2. Activate and deactivate additional server names:
In the event of a system failing, an additional server name is activated online and then
deactivated again before the failed system is rebooted to enable the alternative system
to be accessed using the same NetBIOS name as the failed system.
The addserver and delserver tools are responsible for implementing this.
3. Transfer shares:
Selected resources from a failed system must be made available on the alternative
system since users on the failed system require access to their familiar resources after
their system has failed. In order to minimize the effort involved, it is recommended that
standard applications be made available on both servers using identical resource
names.
4. Transfer access control lists:
In order to ensure a smooth transfer of files from one server to another, the access
permissions (ACLs) have to be transferred after the disk areas are switched and before
the user accesses the active system. Since it is not possible to export the current
permissions because the system is down, the last permissions saved are used. This
means that access permissions are exported and saved regularly (for example once a
night with cron). This also involves allocating access permissions to the “mountpoints”
of the individual file systems which are handled separately using OBSERVE.
Access permissions are transferred with the accget and accadm tools described above.
Product Manual
U7613-J-Z815-6-76
OBSERVE support
7.5.1 Constraints on high availability
© Siemens Nixdorf Informationssysteme AG 1995
Pfad: D:\O7613e6\u7613e.k07
Tools for special tasks
The following conditions must be fulfilled in order to ensure the concept outlined here of
high availability for systems:
–
Both servers must be operated in one domain.
–
If a system fails, a “reconnect” is necessary for the PCs connected (and possibly also
a restart).
–
The additional network interface available in each system does not supply data from the
network under normal operating conditions.
–
The switching of disk areas and the uniqueness of resource names is guaranteed.
–
The administrator must be able to export all access permissions.
–
In order to switch disk areas to the system that is now operational again, the alternative
PCs must log off and then connect again after a successful switchover.
–
Resources cannot be set up for a system while it is down.
–
If the Primary Domain Controller (PDC) in a domain has failed, it will not be possible to
modify users and groups for the duration of the down time.
–
Access permissions for the failed system can only be updated to the status of the last
“ACL backup”.
–
Only one of the servers is to provide “Print” shares.
–
Configuration changes (e.g. additional shares) in emergency mode no longer exist once
normal operation is resumed.
–
If the WINS service is configured on one of the systems, it is not possible for the
remaining system to take over the WINS service in the case of a failure.
However, you can provide high avaliability of the WINS service - independently of
OBSERVE - by configuring both systems as WINS servers and let these replicate with
each other.
Product Manual
U7613-J-Z815-6-76
OBSERVE support
7.5.2 Example of how this works
© Siemens Nixdorf Informationssysteme AG 1995
Pfad: D:\O7613e6\u7613e.k07
Tools for special tasks
Procedure when a system fails:
System A fails, System B continues to operate:
1. Activate additional B controller with the IP address of A.
2. Switch disks.
3. Provide resources (from A) on the active system (B). These resources must be
identical.
4. Transfer access permissions for data from A (from the regular backup) to data on B.
5. Activate the interface of the additional A controller (on B).
6. Activate servername <A> on B.
7. Servername <A> is operational for the user with data from A.
Procedure when the failed system is operational again:
System A is operational again (system is idle, the switchover is canceled again by the
administrator):
1. Delete existing connections by user of A on B.
2. Deactivate servername <A> (on B).
3. Deactivate interface of additional A controller on B.
4. Deactivate additional controller on B with the IP address of A.
5. Export and save access permissions for A data on B.
6. Delete shares (from A) on B if necessary (or leave the empty directory as is).
7. Switch disks again.
8. Remove unused entries from the ACL database (on B) if necessary.
9. Transfer access permissions for A data (on A) (from the backup on B).
10. Servername <A> is operational again for the user with the data from A.
The above example only shows the most important steps involved in this type of procedure.
The OBSERVE scripts for high availability provide a more detailed description of the mutual
system dependencies when a system fails.
Sample OBSERVE scripts are also supplied with the OBSERVE product. Should you require
further information on operating OBSERVE, please contact you local support center.
Product Manual
U7613-J-Z815-6-76
Pfad: D:\O7613e6\u7613e.k08
© Siemens Nixdorf Informationssysteme AG 1995
8 Installing Network and Administrative Client
Software
This chapter describes how to install the network and administrative software on client
computers. It contains the following information:
●
List of supported Microsoft network clients.
●
Instructions on how to create installation diskettes and use the Network
Client Administrator at a Windows NT computer.
●
Instructions on how to install Windows NT Administrative Tools on a Windows NT
Workstation computer.
●
Instructions on how to install AS/U Administrator on Windows NT Workstation
computer.
●
Instructions on how to install Windows NT Server Tools on a Windows 95/98 client
computer.
●
Useful information about running Windows NT Server Tools on Windows 95/98.
●
Instruction on how to install Windows NT Server Tools on a Windows 3.x client
computer.
8.1 Network Clients
Advanced Server interoperates with the following Microsoft network client software:
Product Manual
●
Windows 95/98
●
Windows NT Workstation
●
Windows for Workgroups, Version 3.11
●
Network Client for MS-DOS, Version 3.0
●
LAN Manager for MS-DOS Client, Version 2.2c
●
LAN Manager for OS/2 Client, Version 2.2c
U7613-J-Z815-6-76
Pfad: D:\O7613e6\u7613e.k08
© Siemens Nixdorf Informationssysteme AG 1995
Installing Network and Administrative Client Software
Creating Installation Diskettes
Advanced Server includes Microsoft Network Client and LAN Manager client software and
documentation. Microsoft Windows 95/98, Windows NT Workstation, and Windows for
Workgroups software and documentation are available from Microsoft.
8.1.1 Microsoft Network Client Version 3.0 for MS-DOS
Microsoft Network Client runs on computers running the MS-DOS operating system.
Microsoft Network Client enables a computer to use resources on a network from either
domains or workgroups, as well as resources on other networks (such as LAN Manager
networks). A computer running Microsoft Network Client can use printers, programs, and
data stored on an Advanced Server computer.
To issue Microsoft Network Client commands, use the pop-up interface or type commands
at the MS-DOS command prompt.
The pop-up interface eliminates the need for remembering Microsoft Network Client
commands at the MS-DOS command prompt. You can use it to view your current connections, browse for shared resources, and make new connections. It is a character-based
utility; you must use the keyboard, not a mouse.
Experienced MS-DOS users familiar with Microsoft Network Client commands may prefer
to enter commands at the MS-DOS command prompt rather than using the pop-up
interface.
For more information on using Microsoft Network Client, see the Windows NT Networking
Guide in the Windows NT Server Resource Kit.
8.2 Creating Installation Diskettes
Advanced Server includes the MSCLIENT share which provides disk images for the
following Microsoft client software:
●
Network Client for MS-DOS (requires 2 diskettes)
●
LAN Manager for MS-DOS Client (requires 4 diskettes)
●
TCP/IP for Windows for Workgroups 3.11 (requires 1 diskette)
●
Update for Windows for Workgroups 3.11 (requires 1 diskette)
You can create installable client diskettes at the Advanced Server command prompt by
using the Advanced Server makeclients command or connecting an MS-DOS client to the
MSCLIENT share and using the MS-DOS copydisk command.
i
Product Manual
Before you can create installation diskettes, you must install the msclients package
on the server computer as described in section “Installing the msclients package”.
U7613-J-Z815-6-76
Ê
© Siemens Nixdorf Informationssysteme AG 1995
Pfad: D:\O7613e6\u7613e.k08
Installing Network and Administrative Client Software
Creating Installation Diskettes
To create client diskettes at the Advanced Server command prompt
1. Log on to Advanced Server console as "root".
2. Enter the following command located in the /var/opt/lanman/bin directory:
makeclients [-f] -d [drives | -D <devices> ] <clientpkg>
where
-f
Disables formatting of the diskettes.
-d <drives>
This parameter is not supported.
-D <device>
Specifies the disk device. On Reliant UNIX-N the default is
/dev/at/vfx3ht.
<clientpkg>
The name of the package for which you wish to create disks.
Options are lanman, msclient, tcp32wfw and update.wfw.
The makeclients program will prompt you for each diskette in the set of client disks, format
them in MS-DOS format, and populate them with the client software.
To create client installation diskettes from an MS-DOS client computer
Ê
Log on at an MS-DOS client computer as an administrative user.
Ê
Connect to the MSCLIENT share on the Advanced Server by typing the following
command at the DOS prompt:
net use <d:> \\<servername>\msclient
Replace <d:> with the drive letter and <servername> with the name of the server.
Ê
Change to the drive <d:> that connects to the MSCLIENT share.
Ê
Change to the directory on the shared resource that contains the client package for
which you want to make diskettes:
<d:> cd \images\<client directory>
Product Manual
U7613-J-Z815-6-76
Creating Installation Diskettes
Replace <client-directory> with one of the following:
© Siemens Nixdorf Informationssysteme AG 1995
Pfad: D:\O7613e6\u7613e.k08
Installing Network and Administrative Client Software
lanman
msclient
tcp32wfw
update.wfw
Ê
Copy the disk images in the directory to diskette using the copydisk command whose
syntax is as follows:
d:\images\copydisk source [target]
●
To create diskettes for LAN Manager for MS-DOS Client, type:
d:\images\copydisk setup.dsk a:
d:\images\copydisk drivers1.dsk a:
d:\images\copydisk drivers2.dsk a:
d:\images\copydisk netware.dsk a:
●
To create diskettes for Microsoft Network Client, type:
d:\images\copydisk disk1.dsk a:
d:\images\copydisk disk2.dsk a:
●
To create a diskette for TCP/IP-32 for Windows for Workgroups 3.11, type:
d:\images\copydisk tcp32wfw.dsk a:
●
To create a diskette for the Update for Windows for Workgroups 3.11, type:
d:\images\copydisk update.dsk a:
8.2.1 Using Windows NT Network Client Administrator
Advanced Server supports the creation of network installation startup disks using Network
Client Administrator from a Windows NT computer.
Use the Network Client Administrator to perform the following tasks:
Product Manual
Ê
Create a network installation startup disk. With this single disk, you start a client
computer, connect to a server that stores installation files, and install the full network
software from that server.
Ê
Create a network installation disk set. The disk set contains all the files needed to install
network client software.
Ê
Copy Client-based Network Administration Tools to any computer running Windows NT
Workstation or Windows NT Server for which you have administrative permissions.
Clients can then install the tools by connecting to the server.
U7613-J-Z815-6-76
Creating Installation Diskettes
Installing Network Client Administrator
© Siemens Nixdorf Informationssysteme AG 1995
Pfad: D:\O7613e6\u7613e.k08
Installing Network and Administrative Client Software
The Network Client Administrator can be installed only on Windows NT Workstation
computers.
Ê
To install Network Client Administrator
1. From a Windows NT Workstation computer, log on to the Advanced Server domain.
2. Establish a connection to the MSCLIENT shared resource on Advanced Server.
3. In the ncadmin directory, click on directory that corresponds with the software that your
computer is running. The system displays the Network Client Administrator program
files.
4. Run the setup.bat program. The workstation-based network administrative tool is
installed. You now can create an icon for it.
5. When installation is complete, terminate the connection to the MSCLIENT shared
resource.
Ê
To run Network Client Administrator
1. Click Start and then Run …
2. Type ncadmin in the Run dialog box and click OK.
8.2.1.1
Creating Network Installation Startup Disks
You can create network installation startup disks for the following network operating
systems and clients:
●
Windows 95/98
●
Windows NT
●
Windows for Workgroups, version 3.11
●
Network Client for MS-DOS, version 3.0
By default, Network Client Administrator gives you the option to create network installation
startup disks for Windows 95/98 and Microsoft Network Client for MS-DOS.
Before you can create network installation startup disks for Windows 95/98 or Windows for
Workgroups, you first must create a folder on the installation server in the shared clients
folder (/var/opt/lanman/shares/msclient by default) and then copy to it the appropriate source
files. Windows 95/98 and Windows NT files can be copied from their CDs. Windows for
Workgroups files can be copied from their diskettes.
Windows NT Workstation and Windows NT Server network installation startup disks can be
created only for x86 computers and not for Alpha, MIPS, or Power PC computers.
Product Manual
U7613-J-Z815-6-76
i
© Siemens Nixdorf Informationssysteme AG 1995
Pfad: D:\O7613e6\u7613e.k08
Installing Network and Administrative Client Software
Administrative Clients
You must purchase a valid software license prior to installing Windows 95/98 or
Windows for Workgroups on a computer. However, you can install Microsoft
Network Client for MS-DOS freely.
When creating network installation startup disks, you must choose from the network
interface cards (NICs) supported by Microsoft Network Client, version 3.0 for MS-DOS.
Regardless of the client software you are installing, the startup disk begins by starting
Microsoft Network Client so that it can connect to the server. The network card and its
settings are not automatically detected. You must select the correct NIC driver and
configure it appropriately.
For more information on using Network Client Administrator to create network installation
startup disks, see Network Client Administrator Help.
8.2.2 Creating Installation Disk Sets
You can create an installation disk set containing the actual installation files for the following
clients:
●
Microsoft Network Client, version 3.0 for MS-DOS
●
Microsoft LAN Manager, version 2.2c for MS-DOS
●
Microsoft TCP/IP-32 for Windows for Workgroups, version 3.11
Using the installation disk set, you can install the software manually on each computer.
These files are included in the MSCLIENTS share. You can install this software on any
client computer freely.
For more information on using Network Client Administrator to create network installation
disk sets, see Network Client Administrator Help.
8.3 Administrative Clients
To administer Advanced Server from a Windows NT Workstation computer, you must install
Windows NT Administrative Tools. To administer Advanced Server from a Windows 95/98
client computer, you must install Windows NT Server Tools.
Both program groups are in the Administrative Tools Package (asxtools or asxtoolsD),
separately-installable software that is included with Advanced Server. It must be installed
on the server before you can install client-based administrative software according to the
instructions provided in this chapter. For information about installing the asxtools or asxtoolsD
package, see chapter “Installing Advanced Server for UNIX”.
Product Manual
U7613-J-Z815-6-76
Administrative Clients
8.3.1 Installing Windows NT Administrative Tools
© Siemens Nixdorf Informationssysteme AG 1995
Pfad: D:\O7613e6\u7613e.k08
Installing Network and Administrative Client Software
The Windows NT Administrative Tools program group provides administrative capabilities
to the Windows NT Workstation computer. It can be installed only on Windows NT
Workstation computers.
To install Windows NT Administrative Tools
Ê
1. From a Windows NT Workstation computer, log on to the Advanced Server domain.
2. Establish a connection to the ASTOOLS or the ASTOOLSD shared resource on
Advanced Server.
3. In the astools or astoolsd directory, click on directory that corresponds with the software
that your computer is running. The system displays the Windows NT Administrative
Tools program files.
4. Run the setup.bat program. The workstation-based network administrative tools are
installed. You now can create icons for Server Manager, User Manager for Domains,
Policy Editor, and WINS Administrator.
5. When installation is complete, terminate the connection to the ASTOOLS or
ASTOOLSD shared resource.
8.3.2 Installing AS/U Administrator (AS/X Administration Tool)
The AS/U Administrator enables you to modify the values of certain keys in the Advanced
Server Registry. This tool can be installed on Windows NT Workstation computers,
Versions 3.51 and 4.0.
To install AS/U Administrator
Ê
1. From a Windows NT Workstation computer, log on to the Advanced Server domain.
2. Establish a connection to the ASTOOLS or ASTOOLSD shared resource on Advanced
Server.
3. In the astools or astoolsd directory, click on asuadm. The system displays the AS/U
Administrator program files.
4. Run the setup.bat program. AS/U Administrator is now installed. You can create an icon
for the program in your Administrative Tools folder.
5. When installation is complete, terminate the connection to the ASTOOLS or
ASTOOLSD shared resource.
i
Product Manual
The program asuadm is only available in english.
U7613-J-Z815-6-76
Administrative Clients
8.3.3 Installing Windows NT Server Tools on Windows 95/98
© Siemens Nixdorf Informationssysteme AG 1995
Pfad: D:\O7613e6\u7613e.k08
Installing Network and Administrative Client Software
This section describes how to install Windows NT Server Tools on computers running
Windows 95/98. It also discusses additional password prompts, trust relationships, logging
on, and removing and using the program group.
Ê
To install Windows NT Server Tools on a computer running Windows 95/98:
1. Make sure that your boot drive has at least 3.0 Mbytes of free disk space.
2. Using Explorer, establish a connection to the ASTOOLS or ASTOOLSD shared
resource on the Advanced Server computer on which the package asxtools or asxtoolsD
is installed. You can proceed as follows:
a) On the Windows 95/98 computer, select Tools from the menu bar.
b) Select Map Network Drive from the Tools menu.
c) In the Path: box, enter the network path to the shared ressource ASTOOLS or
ASTOOLSD, e. g. \\server\astools.
d) Click on the OK button.
3. Click on Start, and then point to Settings.
4. Click on the Control Panel.
5. Double-click on Add/Remove Programs.
6. Select the Windows Setup tab.
7. Choose the Have Disk button. Specify the directory \Win95 on the network drive (there
must be a srvtools.inf file in this directory) that contains the Windows NT Server Tools.
Choose OK.
8. Click on the box next to the Windows NT Server Tools entry.
9. Choose the Install button. After all of the files are copied, choose OK. Windows NT
Server Tools are installed in a \srvtools folder on the computer’s boot drive.
10. Manually adjust lines in the computer’s AUTOEXEC.BAT file to include c:\srvtools in the
PATH (if c: is the boot drive). For example, if the boot drive is c:, then append
;c:\srvtools to the line that starts with “PATH ...”, for example
SET PATH=%PATH%;c:\srvtools
11. When the installation process is complete, disconnect the connection to the shared
resource ASTOOLS or ASTOOLSD.
12. Restart the computer for the new path to take effect. (Click on Start, and then click on
Shut Down. Select Restart the Computer. Click on Yes.)
Product Manual
U7613-J-Z815-6-76
Administrative Clients
The Windows NT Server Tools program group is now installed on the Windows 95/98
computer. The installation program has performed the following tasks:
© Siemens Nixdorf Informationssysteme AG 1995
Pfad: D:\O7613e6\u7613e.k08
Installing Network and Administrative Client Software
●
Copied the Windows NT Server Tools files to c:\srvtools (if c: is the boot drive).
●
Added “Windows NT Server Tools” to the Start Programs menu.
●
Added a “Windows NT Server Tools” program group to Program Manager
(PROGMAN.EXE) which is compatible with Windows 3.x.
●
Added extensions to Windows Explorer so that you can change security settings when
viewing a resource or a print queue on a computer running Advanced Server, Windows
NT Server, or Windows NT Workstation.
i
8.3.3.1
To use any of the programs in Windows NT Server Tools, you must have administrative privilege at the computer you choose to administer.
Additional Password Prompts
When you use Windows NT Server Tools on a Windows 95/98 client computer, you will be
asked to log on or to enter your password for verification. These additional password
prompts are necessary to ensure that you have administrative privilege for the server on
which you are focused.
8.3.3.2
Trust Relationships
When you use the Windows NT Server Tools program group, you can create trust relationships between domains but you cannot verify them. Be sure to enter correct passwords for
the trust relationships.
8.3.3.3
Logging on for Windows NT Server Tools
If you are not logged on and you start any of the programs in Windows NT Server Tools,
you will receive a message that says that the computer is not logged on to the network.
Remember to log on to the network before attempting to run any of the Windows NT Server
Tools.
Product Manual
U7613-J-Z815-6-76
8.3.3.4
© Siemens Nixdorf Informationssysteme AG 1995
Pfad: D:\O7613e6\u7613e.k08
Installing Network and Administrative Client Software
Administrative Clients
Using Event Viewer
Use the following procedure to use the Event Viewer in Windows NT Server tools on a
computer running Windows 95/98.
Ê
To use Event Viewer on a computer running Windows 95/98
1. Click on Start, point to Programs, and then point to Windows NT Server Tools.
2. Click on Event Viewer.
3. Type the name of a computer running Advanced Server, Windows NT Server, or
Windows NT Workstation.
8.3.3.5
Using Server Manager
Use the following procedure to use the Server Manager in Windows NT Server tools on a
computer running Windows 95/98.
Ê
To use Server Manager on a computer running Windows 95/98
1. Click on Start, point to Programs, and then point to Windows NT Server Tools.
2. Click on Server Manager.
3. Select a computer to administer. Or, from the Computer menu, choose Select Domain
to see computers in another domain.
8.3.3.6
Using User Manager for Domains
Use the following procedure to use the User Manager for Domains in Windows NT Server
tools on a computer running Windows 95/98.
Ê
To use User Manager for Domains on a computer running Windows 95/98
1. Click on Start, point to Programs, and then point to Windows NT Server Tools.
2. Click on User Manager for Domains.
3. Select a user account or group to administer. Or, from the User menu, choose Select
Domain to see the accounts in another domain.
Product Manual
U7613-J-Z815-6-76
8.3.3.7
© Siemens Nixdorf Informationssysteme AG 1995
Pfad: D:\O7613e6\u7613e.k08
Installing Network and Administrative Client Software
Administrative Clients
Editing Security Properties for Resources
Use the following procedure to edit the security properties for files, directories, and printers
on Advanced Server.
Ê
To edit security properties
1. Focus on the object and look at its Properties dialog box. There are several ways to
perform this task, including the following:
Ê
Click on Start, point at Programs, and then click on Windows Explorer. In the left
pane, double-click on Network Neighborhood. In the right page, double-click on the
name of the computer you want to administer. In the right pane again, click on the
object that you want to administer. Click on the Properties button on the toolbar.
Ê
Click on Start, point at Find, and then click on Computer. Type the name of the
computer and then click on Find Now. Double-click on the name of the computer.
Click on the object you want to administer. Click on the Properties button on the
toolbar.
2. In the Properties dialog box, click on the Security tab. Now you can change the settings
for permissions, auditing, and ownership of the object.
Note that there are several methods for selecting an object to administer that do not work
in Windows 95/98, including the following:
8.3.3.8
●
Administering print queues through the Printers list in My Computer. These print queue
objects represent print queues local to your Windows 95/98 computer, even if the queue
is redirected to an Advanced Server print queue.
●
Using the Windows 3.x Print Manager. It no longer exists in Windows 95/98; the Printers
icon in the Main group of Program Manager is simply a shortcut to the Printers list in My
Computer.
●
Using File Manager (WINFILE.EXE) in Program Manager. Installing Windows NT
Server Tools does not add a Security menu to File Manager as it does for Windows 3.x.
Removing Windows NT Server Tools From Windows 95/98
Use the following procedure to remove Windows NT Server Tools from a computer running
Windows 95/98.
Ê
To remove Windows NT Server Tools from a Windows 95/98 computer
1. Click on Start, and then point to Settings.
2. Click on the Control Panel.
3. Double-click on Add/Remove Programs.
Product Manual
U7613-J-Z815-6-76
Administrative Clients
4. Select the Install/Uninstall tab.
© Siemens Nixdorf Informationssysteme AG 1995
Pfad: D:\O7613e6\u7613e.k08
Installing Network and Administrative Client Software
5. If you have installed Windows NT Server Tools as described earlier in this section, then
you should see the Windows NT Server Tools entry in the Uninstall list. Select it and
click on Add/Remove.
The directory in which Windows NT Server Tools was installed (usually c:\srvtools) will not
be removed by the Install/Uninstall program. You will have to remove this directory
manually. You also will have to remove the path from the path variable in the
AUTOEXEC.BAT file.
8.3.4 Considerations for Down-Level Windows Users
Advanced Server includes a down-level version of Windows NT Server Tools for Windows
3.x and Windows for Workgroups client computers. Although down-level Windows clients
no longer are recommended as administrative clients, the Windows NT Server Tools
program group offers down-level Windows client computers the following features:
●
User Manager for Domains allows users to view user and group lists of accounts; it
allows the creation of local groups to help manage access to files and directories.
●
Event Viewer allows users to view system and application event logs on servers within
the domain. (You can view the security log only if you are logged on as a member of the
Administrators group.)
●
When the Windows NT Server Tools program group is installed on a Windows
workstation, the File Manager is modified to provide new options in the Security menu.
These options provide the user with the capability to display and set file and directory
permissions, and to view and take ownership of files on an Advanced Server. In this
way, users gain the ability to manage permissions on their files and directories and to
control access to them by others.
●
Print Manager for Windows NT Server allows users to connect to shared printer queues
on the Advanced Server.
Restrictions are described in the readme.txt file supplied.
!
8.3.4.1
To install Windows NT Server Tools on a Windows client computer
1. From the client workstation, log on to the Advanced Server.
2. Using File Manager, establish a connection to the ASTOOLS or ASTOOLSD shared
resource on the Advanced Server, as follows:
Product Manual
Ê
Select Disk from the menu bar.
Ê
Select Network Connections from the Disk menu.
U7613-J-Z815-6-76
Pfad: D:\O7613e6\u7613e.k08
© Siemens Nixdorf Informationssysteme AG 1995
Installing Network and Administrative Client Software
Administrative Clients
Ê
From the Show Files Resources pane in the Drives-Network Connection dialog box,
select the server where asxtools was installed.
Ê
In the Files Resources in <domain> pane, select ASTOOLS or ASTOOLSD. The
ASTOOLS or ASTOOLSD share contains the Windows NT Server Tools software.
ASTOOLS or ASTOOLSD now is displayed in the Path: box with the next available
drive letter.
Ê
Click on the Connect button.
The connection is displayed in the Network Driver Connections box.
Ê
Click on the Close button.
3. In the File Manager window, select the icon for the drive that you just created.
4. In the astools or astoolsd directory, select windows. The system displays the Windows NT
Server Tools program files.
5. Scroll to the setup.exe program and follow this procedure.
Ê
Choose Run from the File menu to execute the setup.exe program or double-click on
the setup.exe executable. (If you choose Run, the system displays a confirmation box.
Click on OK to run the file.)
Ê
The system displays the Windows NT Server Tools Setup Program window on the client
computer. Click on Continue.
Ê
Select the Install all files button. Windows NT Server Tools will be installed at the
root drive in the srvtools directory. The srvtools directory is created for you.
Ê
Select the appropriate entry in the Select Time Zone dialog box.
Ê
When the Windows NT Server Tools program group has been installed, the system
displays a message informing you to edit certain files. (This task is performed in
Step 7.)
6. When the installation process is complete, return to the File Manager and disconnect
the connection to the shared resource ASTOOLS or ASTOOLSD, as follows:
Product Manual
Ê
Select Network Connections from the Disk menu.
Ê
In the Network drive Connections pane, select the connection to ASTOOLS or
ASTOOLSD resource and click on the Disconnect button.
Ê
Click on the Close button.
U7613-J-Z815-6-76
Getting Online Help
7. During the installation of Windows NT Server Tools, the Setup program created the
new-conf.sys and new-vars.bat files in the workstation’s srvtools directory.
© Siemens Nixdorf Informationssysteme AG 1995
Pfad: D:\O7613e6\u7613e.k08
Installing Network and Administrative Client Software
Each of these files contains lines that you must copy to the client computer’s config.sys
and autoexec.bat files as follows:
Ê
The files statement in the \srvtools\new-config.sys file is the recommended number of
files. Edit the config.sys file to contain the following line:
files=x
where x is a number equal to or greater than the recommended number in the
new-conf.sys file.
Ê
Edit the autoexec.bat file to reflect the following changes:
●
The directory containing the Windows NT Server Tools must be on the PATH
line.
●
If you are in a time zone other than Pacific Standard Time (PST), copy the time
zone statement recommended in the \srvtools\new-vars.bat file. Add a set tz line
to set the time zone.
For example, if you are in Paderborn, you would add the following line:
SET TZ=UCT-01:00DST
8. Reboot the client computer.
8.4 Getting Online Help
Most of the information that you need to learn about using network-based administrative
clients now is provided in online Help. You can refer to online Help as your primary source
of information on how to perform administrative procedures.
For information about how to navigate online Help, click on Help or consult your Windows
NT Workstation or Windows 95/98 documentation.
Product Manual
U7613-J-Z815-6-76
Pfad: D:\O7613e6\u7613e.k09
© Siemens Nixdorf Informationssysteme AG 1995
9 Administering Advanced Server at the
Command Prompt
This chapter describes how you can use Advanced Server commands and the Net
command to administer Advanced Server at the UNIX system console. It contains the
following information:
Advanced Server Commands — describes the UNIX system commands that you can use
to administer Advanced Server at the command prompt. (All Advanced Server commands
are installed in the /var/opt/lanman/bin and /var/opt/lanman/etc directory. The command
makeclients is installed with the msclients package).
Net Command — lists the Net commands that are available to administer Advanced Server
at the command prompt.
9.1 Advanced Server Commands
You can use UNIX system commands at the Advanced Server command prompt to perform
several administrative tasks.
The following table lists the UNIX system commands that administrators can use with
Advanced Server. Complete descriptions of each command can be found by typing the
following at the Advanced Server command prompt:
man <name of command>
The description will list the purpose and syntax of the command and provide comments and
examples.
Some commands, developed for special purposes, are described in chapter “Administration guidelines” and in chapter “Tools for special tasks”.
Product Manual
U7613-J-Z815-6-76
Pfad: D:\O7613e6\u7613e.k09
© Siemens Nixdorf Informationssysteme AG 1995
Administering Advanced Server at the Command Prompt
Product Manual
Advanced Server Commands
Advanced Server Command
Description
accadm
Used to edit resources and their access permissions.
accget
Used to create a backup file of the ACL database.
acladm
Creates, checks, modifies, prunes, and removes the
Access Control List (ACL) database.
addclipr
Used to add an Advanced Server client printer device to
the configured spooler.
addserver
Used to add a server name on a system, in order to
enable the clients to access the server with the newly
added name.
asxcheck
Shows information about the installation of Advanced
Server, may be helpful to locate problems with in your
configuration.
asxinfo
Used to provide information on the Advanced Server
configuration in the event that errors occur.
asxperf
Used to get a "rough" overview of the CPU-time
consumption of Advanced Server and other processes.
asxpwexp
Used to check which Advanced Server users’ passwords
are due to expire and to notify users by electronic mail.
asxregview
Comfortable display and search utility for the contents of
the Advanced Server Registry database at the UNIX
command prompt.
blobadm
Displays statistical information, checks, and configures
well-known or specified BLOB files.
delclipr
Used to delete an Advanced Server client printer device
from the configured Spooler.
delserver
Deletes a server name that was added with the
"addserver" command.
delshmem
Deletes Advanced Server shared memory.
elfread
Used to view event logs on the local Advanced Server
computer at the UNIX system console.
euctosjis
Converts the coding of characters from Extended UNIX
Code (EUC) to Shift-JIS (S-JIS) encoding.
joindomain
Used to move an Advanced Server from one domain to
another.
U7613-J-Z815-6-76
Pfad: D:\O7613e6\u7613e.k09
© Siemens Nixdorf Informationssysteme AG 1995
Administering Advanced Server at the Command Prompt
Product Manual
Advanced Server Commands
Advanced Server Command
Description
lmat
Schedules commands or programs to run on a server at
a specified time or date. (Note there also exists UNIX
system and MS-DOS at commands.)
lmshare
Manipulates the Advanced Server share list without
server intervention.
lmshell
Provides the “look and feel” of an MS-DOS shell at the
Advanced Server command prompt. Allows users to log
on and link to other servers on the network, and to run a
subset of DOS commands.
lmstat
Displays statistical information retrieved from the
Advanced Server’s shared memory.
makeclients
Used to produce installation diskettes for Microsoft
Network Client software.
mapuname
Lists, maps and unmaps Advanced Server user, global
group, and local group names to and from UNIX system
user names.
netevent
Used to send administrative or user alerts, or to send
printing alerts to users submitting print jobs.
printadm
Used to check, display, modify, export and import the
printer driver configuration on Advanced Server
systems.
promote
Changes the role of an Advanced Server domain
controller to be either a primary domain controller or a
backup domain controller.
regcheck
Manipulates the Advanced Server Registry to
enumerate Registry keys, dump the contents of the
Registry, or to check and repair Registry files.
regconfig
Used to query or set Advanced Server Registry key
information.
regload
Used to create a registry file if one does not exist. Also
used to reinitialize registry to system defaults.
repladm
Configures the replicator service.
samcheck
Used to check or fix the SAM database, or to dump the
change log, built-in, account, or LSA databases.
setdomainlang
Changes the language of predefined objects within
domain.
U7613-J-Z815-6-76
Pfad: D:\O7613e6\u7613e.k09
© Siemens Nixdorf Informationssysteme AG 1995
Administering Advanced Server at the Command Prompt
Product Manual
Advanced Server Commands
Advanced Server Command
Description
setdomainname
Used to change the domain name of the local Advanced
Server.
setlang
Changes the output language of net commands, elfread
and the Event-Viewer.
setservername
Used to change the name of the local Advanced Server.
setspooler
Configures the UNIX system spooler for the Advanced
Server.
sjistoeuc
Converts the coding of characters from Shift-JIS (S-JIS)
to Extended UNIX Code (EUC) encoding.
srvconfig
Used to display or modify Advanced Server configuration information stored in the lanman.ini file.
srvstat
Generates an activity monitor that displays statistics
which summarize total server usage as well as file and
print service requests made by individual users.
ud
Converts text files between MS-DOS, UNIX system, and
Macintosh file formats.
userget
Backs up the current user configuration and group
configuration for the specified system.
userrights
Used to manage user rights on an Advanced Server.
winsadm
Configures the Windows Internet Name Service (WINS).
U7613-J-Z815-6-76
Pfad: D:\O7613e6\u7613e.k09
© Siemens Nixdorf Informationssysteme AG 1995
Administering Advanced Server at the Command Prompt
Net Command
9.2 Net Command
Many Advanced Server administrative tasks can be performed using the Net command at
the Advanced Server command prompt. Although we recommend that you use the
programs available through Windows NT Administrative Tools and Windows NT Server
Tools to administer Advanced Server, the Net command-line interface also can be used.
The following sections summarize the Net commands that are available in Advanced
Server and describes syntax and usage conventions.
9.2.1 Administering Local and Remote Servers
When you administer a server while you are working at the server command prompt, that
server is called the local server. If you are administering a server from the command prompt
of another server, the server being administered is called the remote server.
Some of your network users may be designated as account operators, print operators, or
server operators. These users have limited administrative or operator privileges that enable
them to perform specific tasks. These privileges are sufficient to use the Net command to
administer a local server at the Advanced Server command prompt.
However, to use the Net command to administer a remote Advanced Server, you must be
logged on to Advanced Server as an Administrator with full administrative privilege. If you
have different operators responsible for parts of your network and you do not want to assign
them full administrative privilege, then they must work only at the Advanced Server
command prompt of the server being administered.
9.2.1.1
Administering a Local Advanced Server
To administer a local Advanced Server using the Net command
Ê
1. Log on to the UNIX system hosting the Advanced Server.
2. At the UNIX system prompt, log on to the network as Administrator or as a user with
administrative privileges by typing the following command:
net logon username password
3. Enter the appropriate Net command. For example, to display a list of the server’s
shared resources, type
net share
i
Product Manual
Remember to log off using the command net logoff when you have finished administering Advanced Server, since log off will not be carried out automatically when
you exit the UNIX shell.
U7613-J-Z815-6-76
9.2.1.2
© Siemens Nixdorf Informationssysteme AG 1995
Pfad: D:\O7613e6\u7613e.k09
Administering Advanced Server at the Command Prompt
Net Command
Administering a Remote Advanced Server
To perform server administration tasks using the Net command remotely, use the net
admin command and the appropriate Net command for the task. Step 2 of the following
procedure describes two ways of entering the net admin command.
To enter a Net command remotely
Ê
1. Log on to the network as Administrator or as a user with administrative privileges.
(Operator privileges are not sufficient to perform this procedure.)
2. Enter the net admin command using one of the following methods:
Enter a separate net admin command for each Net command you wish to execute. For
example, to display statistics for a server named account, type the following:
net admin \\account /command net statistics server
This method is useful for batch files.
Enter a net admin command followed by multiple net commands. For example, to
execute multiple net commands on a server named payroll, type the following:
net admin \\payroll /command
This creates an administrative command shell from which you subsequently can issue
Net commands. The prompt changes to include the name of the server you are
remotely administering, for example, \\payroll.
Any Net command that you type at this prompt executes on the server that you specify.
For example, at the prompt, type:
[\\payroll] net share
[\\payroll] net print
where \\payroll is the prompt, and net share and net print are the commands.
To exit the command shell and return to the system prompt, type exit or press CTRL+Z.
i
Product Manual
Net commands which take a domain or computer name as an option can be used
for administering remote servers. This type of administration can be performed
directly at the UNIX system command prompt without using the net admin command.
For example, to display local groups on a remote domain named market_dom, you
would type net localgroup /domain:market_dom.
U7613-J-Z815-6-76
9.2.1.3
© Siemens Nixdorf Informationssysteme AG 1995
Pfad: D:\O7613e6\u7613e.k09
Administering Advanced Server at the Command Prompt
Net Command
Paging Through Screens
Some displays provide more than one screen full of information. For example, the following
command provides several screens of information on the net share command:
net help share /options
To display information one screen at a time, use the more command, for example:
net help share /options | more
After you have examined one screen of information and are ready to proceed, press the
SPACEBAR to display the next screen of text.
9.2.1.4
Using Passwords With Commands
Some commands require a password as an option. You can provide a password as a
command option by typing the password on the same line as the command itself. For
example, to log the user name jim with the password kahuna on the network, you would
type:
net logon jim kahuna
You can also ask the Advanced Server to prompt you for your password, replacing the
password with an asterisk ( * ) when you type the command.
i
In the UNIX operating system, the asterisk ( * ) is a special character and must be
preceded by a back slash ( \ ).
For example, to use the same resource described above, type:
net logon jim \*
The Advanced Server then displays the following message:
Type your password:
When you enter a password at this prompt, the password does not appear on the screen
as you type. This allows you to keep your password confidential, providing added security.
If you forget to type a password with a command that requires one, the Advanced Server
prompts you for it. Depending on the command that you type, the Advanced Server also
may prompt you for other pertinent information such as your user name.
Product Manual
U7613-J-Z815-6-76
9.2.1.5
© Siemens Nixdorf Informationssysteme AG 1995
Pfad: D:\O7613e6\u7613e.k09
Administering Advanced Server at the Command Prompt
Net Command
Using Command Confirmation
Some Net commands require confirmation. The /yes and /no options help expedite Net
commands. When Advanced Server reads one of these options, it does not pause to
display the corresponding prompt. Instead, Advanced Server accepts the /yes or /no option
as your response to the prompt.
You can use Net commands with /yes ( /y ) and /no ( /n ) options to create batch files and
shell scripts that are not interrupted by Advanced Server prompts.
For example, if you use the net logoff command to log off the local area network with
connections to remote shared resources intact, Advanced Server displays a prompt similar
to the following:
You have the following remote connections:
LPT1
Continuing will cancel the connections.
Do you want to continue this operation? (Y/N)
[Y]:
You can use the /yes and /no options with any Net command to anticipate and respond to
a prompt. For example, you are not prompted for confirmation when you type the following:
net logoff /yes
9.2.1.6
Using Abbreviations
The command reference pages in this chapter always use the full command names,
command options, and service names. However, Advanced Server recognizes abbreviations.
You can abbreviate any command option by typing enough letters to distinguish it from
other command options. For example, the following is the syntax for the net accounts
command:
net accounts [/forcelogoff:{minutes|no }]
[/minpwlen:length]
[/maxpwage:{days|unlimited}][/minpwage:days] [/uniquepw:number]
You can abbreviate the options as illustrated in the following example:
net accounts /f:10 /minpwl:6 /ma:unlimited /minpwa:7 /u:3
You cannot abbreviate option values (for example, the unlimited option for /maxpwage).
Product Manual
U7613-J-Z815-6-76
9.2.1.7
© Siemens Nixdorf Informationssysteme AG 1995
Pfad: D:\O7613e6\u7613e.k09
Administering Advanced Server at the Command Prompt
Net Command
Using Special Characters With Commands
Some of the names or passwords that you need to enter may contain one or more special
characters, for example, an ampersand ( & ). When you are at the UNIX system command
prompt typing a name with a special character in an Advanced Server command, you must
use an escape character (the back slash [ \ ]) before each special character. If you are at a
client computer, you can surround the string containing the special characters in double
quotes.
For example, to log on with the user name marksp and the password mrkt&dev on the UNIX
system command prompt, you could type the following:
net logon marksp mrkt\&dev
Some commonly used UNIX system special characters include the following: asterisk ( * );
semi-colon ( ; ); pipe ( | ); square brackets ( [ ] ); parentheses [ ( ) ]; question mark ( ? );
ampersand ( & ); caret ( ^ ); back slash ( \ ); greater-than and less-than signs ( < > );
blank ( ) and the “at” sign ( @ ).
There are other UNIX special characters that you may encounter. For more information on
special characters, consult your UNIX system documentation.
9.2.1.8
Typing Path Names With UNIX System Net Commands
The UNIX system uses a forward slash to separate names in a path. This is different from
client computers, which use back slashes. Always precede path names with c: when using
the Net command.
When typing path names at a UNIX system command prompt, you can use any of the
following methods:
●
Single forward slashes — separate each element of the path with single forward
slashes, like this:
net share tmpshare=c:/tmp /us:10 /r:"Share for temporary use"
●
Double back slashes — separate each element of the path with double back slashes,
like this:
net share tmpshare=c:\\tmp /us:10 /r:"Share for temporary use"
●
Single quotes — separate each element of the path with single back slashes and
surround the whole path in single quotes, like this:
net share ’tmpshare=c:\tmp’/r:"Share for temporary use"
●
Double Quotes - When including spaces in values, you need to enclose the value in
double quotes. For example, to change the comment for the domain guests group, you
could type the following command:
net group "domain guests" /comment:"All domain guests"
Product Manual
U7613-J-Z815-6-76
Pfad: D:\O7613e6\u7613e.k09
© Siemens Nixdorf Informationssysteme AG 1995
Administering Advanced Server at the Command Prompt
9.2.1.9
Net Command
Typing Path Names at Client Computers
Client computer operating systems, such as Windows 95/98, Windows NT, MS-DOS, and
OS/2 use back slashes to separate names in paths. For example:
net use f: \\product\data
9.2.2 Understanding Command Syntax
The commands that are used in Advanced Server will be easier to understand and use if
you keep the following concepts in mind:
Product Manual
●
When an option is enclosed in braces ( { } ), the option is a required item in the syntax
statement. For example, {yes | no} indicates that you must specify yes or no when using
the command.
●
When an option is enclosed in brackets ( [ ] ), it is an optional item in the syntax
statement. For example, [password] indicates that a password may be used with the
command, if desired.
●
When a vertical bar ( | ) separates items within braces or brackets, only one of the
options must be used. For example, {/hold | /release | /delete} indicates that only one
of the three options must be used.
●
When an ellipsis ( ... ) appears in a syntax statement, it indicates that you can repeat the
previous item(s). For example, /route: devicename [, ...] indicates that you can specify
more than one device, putting a comma between the device names.
●
Be sure to type slashes ( / ), back slashes ( \ ), commas ( , ), double quotes ( " " ), equal
signs ( = ), colons ( : ), semicolons ( ; ), and asterisks ( * ) as they are shown.
●
Replace the pound sign ( # ) with a number.
●
At the UNIX system command prompt, you must type Net commands in lower-case
letters.
●
When you finish typing a command, press ENTER. If you are typing a long command
string, do not press ENTER when your cursor gets to the edge of your screen; the cursor
will “wrap around” and continue on the next line of your screen. Press ENTER only after
you finish typing the entire command string.
U7613-J-Z815-6-76
Net Command
9.2.3 Getting Help on Net Commands
© Siemens Nixdorf Informationssysteme AG 1995
Pfad: D:\O7613e6\u7613e.k09
Administering Advanced Server at the Command Prompt
On-line help is available for all of the Net commands that you can enter at the server
command prompt. It provides command parameters, syntax, details about a command, and
examples of the command in use.
To obtain information about a Net command, type one of the following commands at the
Advanced Server system prompt:
9.2.3.1
Command
Descriptions
net help
Names of available Net commands.
net help command
Description, syntax and options for Net commands.
net command /help
Description, syntax and options for Net commands.
net command /?
Syntax only for Net commands.
net help command /options
Detailed description of the options of the command you
selected.
Advanced Server Net Commands
The Advanced Server Net commands described in the following table are supported at the
Advanced Server command prompt.
Product Manual
Command
Descriptions
net access
Displays or modifies resource permissions on servers. Use
this command only for displaying and modifying permissions on pipes and printer queues. Use net perms for
managing permissions on all other types of resources.
net accounts
Displays the role of servers in a domain and displays or
modifies password and logon user requirements.
net admin
Runs an Advanced Server command or starts a command
processor on a remote server.
net auditing
Displays and modifies the auditing settings of a resource.
net browser
Displays the list of domains that are visible from a local
server or the list of computers that are active in a domain.
net computer
Displays or modifies the list of computer accounts in a
domain. This command also can be entered as net
computers.
net config
Displays the controllable services that are running. This
command can also be used to display or change settings for
controllable services.
U7613-J-Z815-6-76
Pfad: D:\O7613e6\u7613e.k09
© Siemens Nixdorf Informationssysteme AG 1995
Administering Advanced Server at the Command Prompt
Product Manual
Net Command
Command
Descriptions
net continue
Reactivates suspended services when typed at a server,
and reactivates paused shared printers when typed at a
client computer.
net device
Displays list of device names and controls printers. When
used without options, this command displays the status of
all printers at the specified server. When used with the
printer name option, this command displays only the status
of the specified printer.
net file
Displays the names of all files opened via the Advanced
Server and the number of file locks, if any, on each file. This
command also can be used to close files. When used
without options, this command lists all of the open files at a
server. This command also can be typed as net files.
net group
Adds, displays, or modifies global groups.This command
also can be typed as net groups.
net help
Provides lists of network commands and topics for which
you can get help, or provides help for a specific command
or topic.
net helpmsg
Provides help for a network error message.
net localgroup
Adds, displays, or modifies local groups in domains.This
command also can be typed as net localgroups.
net logoff
Logs a user name off of the network.
net logon
Logs a user name on to the server and sets the user name
and password for the user’s client. If you do not specify a
user name with this command, the default user name will be
your UNIX system logon name.
net password
Changes the password for a user account on a server or in
a domain.
net pause
Suspends services or printers at a server.
net perms
Displays or modifies resource permissions and ownership
information on servers. The resources on which this
command currently operates are shares, directories, and
files.
net print
Displays or controls print jobs and printer queues; also sets
or modifies options for a printer queue.
net send
Sends message to connected client computers.
U7613-J-Z815-6-76
Pfad: D:\O7613e6\u7613e.k09
© Siemens Nixdorf Informationssysteme AG 1995
Administering Advanced Server at the Command Prompt
Product Manual
Net Command
Command
Descriptions
net session
Lists or disconnects sessions between a server and clients.
When used without options, this command displays information about all of the sessions with the local server. This
command also can be typed as net sessions.
net share
Creates, deletes, modifies, or displays shared resources.
Use this command to make a resource available to clients.
When used without options, this command displays information about all of the resources being shared on the
server.
net sid
Performs translations between account names and their
corresponding security identifiers (SIDs).
net start
Starts a service or, if used without options, displays a list of
services that are running. The services that can be started
are Alerter, Computer Browser, Directory Replicator,
EventLog, Net Logon, Netrun, NvAlert, Server, Time
Source, and WINS.
net statistics
Displays or clears the statistics log.
net status
Displays a server’s computer name, configuration settings,
and a list of shared resources.
net stop
Stops a network service.
net time
Synchronizes the client’s clock with that of a server or
domain, or displays the time for a server or domain.
net trust
Establishes and breaks trust relationships between
domains, and lists trust information for a specified domain.
net user
Adds, modifies, or deletes user accounts or displays user
account information.
net version
Displays version of network software currently running on
the computer at which the command is issued.
net view
Displays list of servers or displays resources being shared
by a server
U7613-J-Z815-6-76
Pfad: D:\O7613e6\u7613e.k10
© Siemens Nixdorf Informationssysteme AG 1995
10 Implementing WINS
Windows Internet Name Service (WINS) for Advanced Server provides a Windows NT
compatible, replicated, dynamic database for registering and querying NetBIOS computer
name-to-IP address mappings in a routed network environment. Advanced Server WINS is
designed to solve the problems that occur with name resolution in complex internetworks.
Advanced Server WINS reduces the use of local broadcast messages for name resolution
and allows users to locate systems easily on remote networks. And, when dynamic
addressing through DHCP results in new IP addresses for computers that move between
subnets, the changes are updated automatically in the WINS database. Neither the user
nor the administrator needs to make changes manually.
The WINS protocol is based on and is compatible with the protocols defined for NBNS in
RFCs 1001 and 1002. It therefore is interoperable with other implementations of these
RFCs. WINS for Advanced Server is fully compatible with Microsoft WINS client implementations including Microsoft TCP/IP-32 for Windows for Workgroups 3.11, Windows 95/98,
Windows NT Workstation, Windows NT Server, and the Microsoft Network Client, Version
3.0, and with the WINS client integrated in the Advanced Server for UNIX NetBIOS.
Advanced Server WINS is fully interoperable with WINS for Windows NT Server. It can
replicate name databases with other Advanced Server WINS computers, and with WINS
for Windows NT systems.
Advanced Server WINS is managed by the same Windows NT-based tool that is used to
manage WINS for Windows NT. This allows both Advanced Server-based and Windows
NT-based WINS servers to be managed from a single administrative tool on a single
computer in the network.
This chapter describes how to configure and administer WINS on a computer running
Advanced Server.
Product Manual
U7613-J-Z815-6-76
Pfad: D:\O7613e6\u7613e.k10
© Siemens Nixdorf Informationssysteme AG 1995
Implementing WINS
Name Resolution Services
10.1 Name Resolution Services
Advanced Server WINS with TCP/IP requires a unique IP address and computer name for
each computer on the network. Although programs use IP addresses to connect
computers, administrators use “friendly” names to connect them. As a result, TCP/IP internetworks require a name resolution service that converts computer names to IP addresses
and IP addresses to computer names.
An IP address is the unique address by which all other TCP/IP devices on the internetwork
recognize that computer. For TCP/IP and the Internet, the computer name is the globally
known system name, plus a Domain Name System (DNS) domain name.
DNS computer names consist of two parts: a host name and a domain name, which
combined form the fully qualified domain name (FQDN).
In contrast, Advanced Server networking components rely on a naming convention known
as NetBIOS. In general, NetBIOS computer names consist of a single part. Although
NetBIOS names are compatible with DNS host names, both naming conventions should be
well distinguished.
On the local network, the computer name is the name that was supplied either during
Advanced Server or Windows NT setup. To ensure that both names and IP addresses are
unique, a computer using NetBIOS over TCP/IP registers its name and IP address on the
network during system startup.
A computer can use one or more of the following methods to ensure accurate NetBIOS
name resolution in TCP/IP internetworks:
●
Windows Internet Name Service (WINS)
A computer can use WINS if at least one WINS server is available that contains a
dynamic database that maps computer names to IP addresses. WINS can be used in
conjunction with broadcast name resolution for an internetwork where other name
resolution methods are inadequate. As described in the following section, WINS is a
NetBIOS over TCP/IP mode of operation defined in RFC 1001/1002 as p-node.
●
Broadcast name resolution
A computer also can use broadcast name resolution, which is a NetBIOS over TCP/IP
mode of operation defined in RFC 1001/1002 as b-node. This method relies on a
computer making IP-level broadcasts to register its name by announcing it on the
network. Each computer in the broadcast area is responsible for challenging attempts
to register a duplicate name and for responding to name queries for its registered name.
Product Manual
U7613-J-Z815-6-76
Name Resolution Services
DNS name resolution
●
© Siemens Nixdorf Informationssysteme AG 1995
Pfad: D:\O7613e6\u7613e.k10
Implementing WINS
The Domain Name System (DNS) provides a way to look up name mappings when
connecting a computer to foreign hosts using NetBIOS over TCP/IP or applications
such as FTP.
i
Advanced Server does not use this method.
An LMHOSTS/names.cfg file to specify the NetBIOS computer name and IP address
mappings, or a HOSTS file to specify the DNS name and IP address.
●
On a computer running Microsoft networking components, the HOSTS file (used by
Windows Sockets applications to find TCP/IP host names) and LMHOSTS file (used by
NetBIOS over TCP/IP to find Microsoft networking computer names) can be used to list
known IP addresses mapped with corresponding computer names. LMHOSTS is used
for name resolution for small-scale networks or remote subnets where WINS is not
available. For more information about the LMHOSTS file, see Windows NT Help and
the Microsoft Windows NT Resource Kit Networking Guide.
On a computer running Advanced Server, a names.cfg file can be used in a way comparable to the LMHOSTS file, see section “The names.cfg file”.
i
Advanced Server networking components never use HOSTS files for name
resolution.
10.1.1 NetBIOS over TCP/IP (NetBT) Name Resolution
NetBIOS over TCP/IP (NetBT) is the session-layer network service that performs name-toIP address mapping for name resolution. In Advanced Server, NetBT name resolution is
implemented through WINS, broadcast name resolution and the optional use of a names.cfg
file containing static name-to-IP-address mappings.
The two most important aspects of the related naming activities are registration and
resolution:
●
Registration is the process used to register a unique name for each computer (node)
on the network. A computer typically registers itself when it starts.
●
Resolution is the process used to determine the specific address for a computer name.
i
Product Manual
RFCs 1001 and 1002 specify how NetBIOS should be implemented over TCP/IP
and define the name resolution modes.
U7613-J-Z815-6-76
Name Resolution Services
Defined within NetBT are modes which specify how network resources are identified and
accessed. The most common NetBT modes are as follows:
© Siemens Nixdorf Informationssysteme AG 1995
Pfad: D:\O7613e6\u7613e.k10
Implementing WINS
●
b-node, which uses broadcast messages to resolve names.
●
p-node, which uses point-to-point communications with a name server to resolve
names.
●
m-node, which first uses b-node and then—if necessary—p-node to resolve names.
●
h-node, which first uses p-node for name queries and then b-node if the name service
is unavailable or if the name is not registered in the database.
i
The RFCs refer to a NetBIOS Name Server (NBNS). WINS is an enhanced NBNS.
The two most common node types for Windows client computers are h-node and b-node.
For DHCP users, the node type is assigned by the DHCP server. When WINS servers are
in place on the network, NetBT resolves names on a client computer by communicating with
the WINS server. When WINS servers are not in place, NetBT uses b-node broadcast
messages to resolve names. NetBT also can use LMHOSTS files for name resolution,
depending on how TCP/IP is configured on a particular computer.
Advanced Server can respond to b-node and h-node NetBT modes. (Windows NT supports
all of the NetBT modes.) Client computers can use the modes described in the following
sections.
B-Node (Broadcast Node)
The b-node mode uses broadcasts for name registration and resolution. That is, if
CLIENT_PC1 wants to communicate with CLIENT_PC2, it will broadcast to all machines
that it is looking for CLIENT_PC2 and then will wait a specified time for CLIENT_PC2 to
respond.
The b-node mode has two major problems:
●
In a large environment, it loads the network with broadcasts.
●
Typically, routers do not forward broadcasts, so computers that are on opposite sides
of a router will never hear the requests.
P-Node (Point-to-Point Node)
The p-node mode addresses the issues that b-node does not solve. In a p-node
environment, computers neither create nor respond to broadcasts. All computers register
themselves with the WINS server, which is responsible for knowing computer names and
addresses and for ensuring no duplicate names exist on the network.
Product Manual
U7613-J-Z815-6-76
Name Resolution Services
In this environment, when CLIENT_PC1 wants to communicate with CLIENT_PC2, it
queries the WINS server for the address of CLIENT_PC2. Upon receipt of the address, it
goes directly to CLIENT_PC2 without broadcasting. Because the name queries go directly
to the WINS server, p-node avoids loading the network with broadcasts. Because broadcasts are not used and because the address is received directly, computers can span
routers.
© Siemens Nixdorf Informationssysteme AG 1995
Pfad: D:\O7613e6\u7613e.k10
Implementing WINS
The most significant problem with the p-node mode is the following:
●
If the WINS server is down, computers that rely on the WINS server to resolve
addresses cannot get to any other systems on the network.
●
All computers must be configured to know the address of the WINS server.
M-Node (Multi-Node)
The m-node mode was created primarily to solve the problems associated with b-node and
p-node. In an m-node environment, a computer first attempts registration and resolution
using b-node. If that fails, it switches to p-node.
The advantages of the m-node mode are the following:
●
The m-node can cross routers.
●
Because the b-node always is tried first, computers on the same side of a router
continue to operate as usual if the WINS server is down.
●
In theory, it should increase local area network (LAN) performance.
H-Node (Hybrid Node)
The h-node mode solves the most significant problems associated with broadcast
messages and with routed-environment operations. It is a combination of b-node and
p-node that uses broadcast messages as a last effort. The h-node mode does more than
change the order for using b-node and p-node. If the WINS server is down — making
broadcast messages a necessity — the computer continues to poll the WINS server. When
the WINS server can be reached again, the system returns to p-node.
Because p-node is used first, no broadcast messages are generated if the WINS server is
running, and computers can be on opposite sides of routers. If the WINS server is down,
b-node is used allowing computers on the same side of a router to continue to operate as
usual.
i
Product Manual
For Microsoft TCP/IP users who configure TCP/IP manually, h-node is used by
default unless the user does not specify addresses for WINS servers when
configuring TCP/IP.
U7613-J-Z815-6-76
Name Resolution Services
Other Combinations
© Siemens Nixdorf Informationssysteme AG 1995
Pfad: D:\O7613e6\u7613e.k10
Implementing WINS
Another variation, known as Microsoft modified b-node, is used in Advanced Server networks
to allow messages to go across routers. The modified b-node does not use p-node mode
or a WINS server. In this mode, b-node uses a list of computers and addresses stored in
an LMHOSTS file. If a b-node attempt fails, the system looks in LMHOSTS to find a name
and then uses the associated address to cross the router. On computers running Advanced
Server, this variation corresponds to the Siemens modified b-node where the mappings from
a names.cfg file are used before or after the b-node attempt (section “The names.cfg file”).
However, each computer must have these files which creates an administrative burden in
maintaining and distributing the files.
Both Windows for Workgroups 3.11 and LAN Manager 2.x use a modified b-node system.
Windows NT as well as Advanced Server uses this method if WINS servers are not used
on the network. In Windows NT, some extensions have been added to the LMHOSTS file
to make it easier to manage but modified b-node is not an ideal solution.
Some sites may need to use both b-node and p-node modes at the same site. Although this
configuration can work, administrators must exercise caution, using it only for transition
situations. Because p-node hosts disregard broadcasts and b-node hosts rely on broadcasts for name resolution, the two hosts potentially can be configured with the same
NetBIOS name, leading to unpredictable results. Notice that if a computer configured to use
b-node has a static mapping in the WINS database, a computer configured to use p-node
cannot use the same computer name.
10.1.2 WINS and Broadcast Name Resolution
WINS provides a distributed database for registering and querying dynamic computer
name-to-IP address mappings in a routed network environment. WINS is designed to solve
the problems that occur with name resolution in complex internetworks.
WINS reduces the use of local broadcasts for name resolution and allows users to locate
systems easily on remote networks. Additionally, when dynamic addressing through DHCP
results in new IP addresses for computers that move between subnets, the changes are
updated automatically in the WINS database. Neither the user nor the network administrator needs to make changes manually.
The following sections provides an overview of how name resolution is provided by WINS
and name query broadcast messages.
Product Manual
U7613-J-Z815-6-76
10.1.2.1
© Siemens Nixdorf Informationssysteme AG 1995
Pfad: D:\O7613e6\u7613e.k10
Implementing WINS
Name Resolution Services
WINS in a Routed Environment
WINS consists of the following two components:
●
The WINS server, which handles name queries and registrations.
●
Client software, which registers computer names and queries for computer name
resolution.
Computers running
●
Window NT
●
Windows 95/98
●
Windows for Workgroups 3.11 (with Microsoft TCP/IP-32)
●
LAN Manager for DOS 2.2c
●
Siemens Advanced Server for UNIX V3.51 (V3.5B10)
●
Siemens Advanced Server for UNIX V4.0
can use WINS directly.
Non-WINS computers on the internetwork that are b-node compatible (as described in
RFCs 1001 and 1002) can access WINS through proxies (WINS-enabled computers that
listen to name-query broadcasts and then respond for names that are not on the local
subnet or are p-node computers).
To allow browsing across routers without WINS, the network administrator must ensure that
the users’ primary domain has Advanced Server, Windows NT Server, or Windows NT
Workstation computers on both sides of the router to act as master browsers. These
computers need correctly configured LMHOSTS / names.cfg files with entries for the domain
controllers across the subnet.
With WINS, such strategies are not necessary because the WINS servers and proxies
transparently provide the support necessary for browsing across routers where domains
span the routers.
The following illustration shows a small internetwork, with three local area networks
connected by a router. Two of the subnets include WINS name servers, which can be used
by clients on both subnets. WINS-enabled computers, including proxies, access the WINS
server directly, and the computers using broadcasts access the WINS server through
proxies. Proxies intercept the broadcast messages and send them directly to the WINS
server.
Product Manual
U7613-J-Z815-6-76
Pfad: D:\O7613e6\u7613e.k10
© Siemens Nixdorf Informationssysteme AG 1995
Implementing WINS
Name Resolution Services
Subnet 2
Router
Non-WINS
enabled
WINS
proxy
WINS
enabled
Subnet 1
Database
replication
WINS
Server
WINS
enabled
Non-WINS
enabled
Router
WINS
Server
WINS
enabled
WINS
enabled
Subnet 3
Example of an Internetwork with WINS Servers
The proxy communicates with the WINS server to resolve names and then caches the
names for a certain time. The proxy serves as an intermediary either by communicating with
the WINS server or supplying a name-to-IP address mapping from its cache.
The illustration above shows the relationships among WINS servers and clients, including
proxies for non-WINS computers and replication between WINS servers.
Product Manual
U7613-J-Z815-6-76
Pfad: D:\O7613e6\u7613e.k10
Name Resolution Services
© Siemens Nixdorf Informationssysteme AG 1995
Implementing WINS
WINS server
Client A
non-WINS
Client B
WINS
Client C
WINS proxy
Example of Clients and Servers Using WINS
In this illustration, Client A is a not enabled for WINS, Client B is enabled for WINS, and
Client C is a WINS proxy agent. The following table shows the typical steps that Client A
and Client B take when resolving names.
Client A (Non-WINS)
Client B (WINS)
Client B queries the WINS server for Client A’s IP
Client A sends a query (as a
broadcast message) for Client X’s IP address.
address. Client X (not shown) is not
on the local subnet. 1
Client C (WINS proxy) intercepts the The WINS server responds directly to Client B with
Client A’s IP address. 3
broadcast message and sends it
2
directly to the WINS server.
The WINS server responds directly If the WINS server is unreachable, the query fails.
to Client C with Client X’s IP address. Client B switches to b-node and sends the query as
a broadcast message on the local subnet.
Client C responds directly to Client A Client A receives the broadcast and responds
with Client X’s IP address.
directly to Client B.
1 If Client X was on the local subnet, it would respond directly to Client A’s query.
2 Client C may already have the requested information in cache. If so, Client C responds directly to Client A
without going to the WINS server.
3 Both examples assume that the requested information is available in the WINS database on the server.
Product Manual
U7613-J-Z815-6-76
i
© Siemens Nixdorf Informationssysteme AG 1995
Pfad: D:\O7613e6\u7613e.k10
Implementing WINS
Name Resolution Services
If a client computer running Windows NT also is DHCP-enabled and if the administrator specifies WINS server information as part of the DHCP options, the computer
automatically will be configured with WINS server information.
In a WINS and broadcast name resolution environment, a WINS-enabled client computer
will behave differently than a non-WINS-enabled client computer. These differences will be
apparent in the way these clients handle registration, renewal, release, and resolution.
11.1.0.5 Corp01
12.3.0.5 Payroll
Router
WINS Server
Database
replication
Corp01
Router
11.1.0.5 Corp01
12.3.0.5 Payroll
WINS Server
Payroll
Name Registration
Name registration ensures that the NetBIOS computer name and IP address are unique for
each device.
If WINS is enabled on the client:The name registration request is sent directly to the
WINS server to be added to the database. A WINS server accepts or rejects a computer
name registration depending on the current contents of its database, as follows:
Product Manual
●
If the database contains a different address for that name, WINS challenges the current
entry to determine whether that device still claims the name.
●
If another device is using that name, WINS rejects the new name registration request.
●
Otherwise, WINS accepts the entry and adds it to its local database together with a time
stamp, an incremental unique version number used for replication purposes and other
information. The new entry is marked active.
U7613-J-Z815-6-76
Name Resolution Services
If WINS is not enabled on the client: For a non-WINS computer to register its name, a
name registration request packet is broadcast to the local network stating its NetBIOS
computer name and IP address. Any device on the network that previously claimed that
name challenges the name registration (with a negative name registration response), resulting
in an error for the computer attempting to register the duplicate name. If the name registration
request remains unchallenged for a specific time period, the requesting computer adopts
that name and address.
© Siemens Nixdorf Informationssysteme AG 1995
Pfad: D:\O7613e6\u7613e.k10
Implementing WINS
After a non-WINS computer claims a name, it must challenge duplicate name registration
attempts (with a negative name registration response) and respond positively to name queries
issued on its registered name (with a positive name query response). The positive name query
response contains the IP address of the computer so that the two systems can establish a
session.
Name Renewal
Client computers periodically are required to renew their NetBIOS name registrations with
the WINS server. When a client computer first registers with a WINS server, the WINS
server returns a message that indicates when the client will need to renew its registration,
as follows:
●
Default renewal interval for entries in the WINS database is six days.
●
WINS clients try to refresh their name registrations whenever half of the renewal interval
is expired.
●
Primary and backup WINS servers should have the same renewal interval.
●
An entry defined as static never expires.
If the entry is owned by the local WINS server, the name is released at the specified time
unless the client has renewed it. If the entry is owned by another WINS server, the entry is
revalidated at the specified time. If the entry does not exist in the database of the WINS
server that owns the entry, it is removed from the local WINS database. A name renewal
request is treated as a new name registration.
!
Product Manual
Incorrectly adjusting the renewal interval might adversely affect system and network
performance.
U7613-J-Z815-6-76
Name Resolution Services
Name Release
© Siemens Nixdorf Informationssysteme AG 1995
Pfad: D:\O7613e6\u7613e.k10
Implementing WINS
When a computer finishes using a particular name, it no longer challenges other registration
requests for the name. This is referred to as releasing a name.
If WINS is enabled on the client:Whenever a computer is shut down properly, it releases
its name to the WINS server, which changes the state of the related database entry from
active to released. If the entry remains released for a certain period of time, the WINS server
marks it as extinct, updates the version number, and notifies other WINS servers of the
change.
●
If a name is marked released at a WINS server, and a new registration arrives using
that name but a different address, the WINS server immediately can give that name to
the requesting client because it knows that the old client no longer is using that name.
This might happen, for example, when a DHCP-enabled laptop changes subnets.
●
If the computer released its name during an orderly shutdown, the WINS server does
not challenge the name when the computer is reconnected. If an orderly shutdown did
not occur, the name registration with a new address causes the WINS server to
challenge the registration. The challenge fails and the registration succeeds, because
the computer no longer has the old address.
If WINS is not enabled on the client:When a non-WINS computer releases a name, a
broadcast is made to allow any systems on the network that might have cached the name
to remove it. Upon receiving name query packets specifying the deleted name, computers
simply ignore the request, allowing other computers on the network to acquire the released
name.
i
For non-WINS computers to be accessible from other subnets, their names must
be added as static entries to the WINS database or in the LMHOSTS / names.cfg
file(s) on the remote system(s) because they will respond only to name queries that
originate on their local subnet.
Name Resolution
With WINS servers in place on the internetwork, NetBIOS computer names are resolved
using two basic methods depending on whether WINS resolution is available and enabled
on the client computer. Regardless of which name resolution method is used, the process
is transparent to the user after the system is configured.
Product Manual
U7613-J-Z815-6-76
Name Resolution Services
If WINS is not enabled on the client: Name resolution works in the following manner:
© Siemens Nixdorf Informationssysteme AG 1995
Pfad: D:\O7613e6\u7613e.k10
Implementing WINS
1. Check the local name cache
2. Try broadcasting
3. Check the local LMHOSTS file (Microsoft only)
To find a particular computer, the client first checks its NetBIOS name cache. Note that, on
computers running Microsoft networking products, this cache also contains those
LMHOSTS entries which are marked with the #PRE tag, while on Advanced Server
computers, this cache may possibly contain all mappings from the names.cfg file. If the name
is not found in the cache, the non-WINS computer sends name query request packets (as
broadcast messages) on the local subnet. (These broadcast messages normally cannot
pass IP routers.) If local name resolution fails, the local LMHOSTS file is consulted on
computers running Microsoft Networking components. These processes are followed
whether the computer is a network server, a workstation, or another device.
If WINS is enabled on the client: Name resolution works in the following manner:
1. Try a WINS Server
2. Try broadcasting
3. Check the LMHOSTS/names.cfg file
4. Try the HOSTS file (Microsoft only)
5. Try DNS (Microsoft only)
To find a particular computer, the client first checks its NetBIOS name cache (see above).
If the name is not found, the computer queries its primary and / or secondary WINS server:
Product Manual
U7613-J-Z815-6-76
Name Resolution Services
1. In the following illustration, a client name query request is sent first to the WINS server.
If the name is found in the WINS database, then the client can establish a session
based on the address mapping received from the WINS server.
© Siemens Nixdorf Informationssysteme AG 1995
Pfad: D:\O7613e6\u7613e.k10
Implementing WINS
11.1.0.5 Corp01
12.3.0.5 Payroll
WINS Server
Router
2
1
Corp01
net use \\payroll\public
Router
11.1.0.5 Corp01
12.3.0.5 Payroll
3
WINS Server
Payroll
Processing a Name Query Request
2. If the WINS server query is unsuccessful and if the client computer is configured as an
h-node, the client computer sends name query request packets (as broadcast messages)
in the same manner as a non-WINS-enabled computer.
3. If the name still cannot be found, the local LMHOSTS file is checked. (Included in the
search are any centralized LMHOSTS files referred to in #INCLUDE statements in the
local file.) On Advanced Server computers, the name table containing the mappings
from the names.cfg file normally is consulted at this point.
4. Advanced Server computers never use a HOSTS file or DNS for name resolution.
WINS servers accept and respond to UDP name queries. Any name-to-IP address mapping
registered with a WINS server can be provided reliably as a response to a name query.
However, a mapping in the database does not ensure that the related device is currently
running, only that a computer claimed the particular IP address and that it currently is a valid
mapping.
Product Manual
U7613-J-Z815-6-76
10.1.2.2
© Siemens Nixdorf Informationssysteme AG 1995
Pfad: D:\O7613e6\u7613e.k10
Implementing WINS
Name Resolution Services
WINS Proxy
A WINS proxy is a WINS-enabled computer that helps resolve name queries for non-WINS
enabled computers in routed TCP/IP intranets. By default, non-WINS enabled computers
are configured as b-node which uses IP broadcasts for name queries. The WINS proxy
computer listens on the local subnet for IP broadcast name queries.
When a non-WINS enabled computer sends an IP name query broadcast, the WINS proxy
accepts the broadcast and checks its cache for the appropriate NetBIOS computer nameto-IP-address mapping. If the WINS proxy has the correct mapping in its cache, the WINS
proxy sends this information to the non-WINS computer. If the name-to-IP-address
mapping is not in cache, the WINS proxy queries a WINS server for the name-to-IP-address
mapping.
If a WINS server is not available on the local subnet, the WINS proxy can query a WINS
server across a router. The WINS proxy caches (stores in memory) computer name-to-IPaddress mappings it receives from the WINS server. These mappings are used to respond
to subsequent IP broadcast name queries from b-node computers on the local subnet.
The name-to-IP-address mappings that the WINS proxy receives from the WINS server are
stored in the WINS proxy cache for a limited time. (By installation default this value is 6
minutes. The minimum value is 1 minute.)
When the WINS proxy receives a response from the WINS server, it stores the mapping in
its cache and responds to any subsequent name query broadcasts with the mapping
received from the WINS server.
Because the WINS server does not respond to broadcasts, a computer configured as a
WINS proxy should be installed on subnets which contain computers that use broadcasts
for name resolution.
i
To configure a Windows NT, Version 4.0, computer as a WINS proxy, you must
manually edit that computer’s registry. The EnableProxy keyword must be set to 1
(REG_DWORD). This keyword is located in the following key:
HKEY_LOCAL_MACHINE\SYSTEM\CurrentControlSet\Services\Netbt\Parameters
Product Manual
U7613-J-Z815-6-76
Name Resolution Services
10.1.3 WINS and Dial-Up TCP/IP Networking Clients
© Siemens Nixdorf Informationssysteme AG 1995
Pfad: D:\O7613e6\u7613e.k10
Implementing WINS
Dial-up TCP/IP networking clients provide remote networking for telecommuters, mobile
workers, and system administrators who monitor and manage servers at multiple branch
offices. Users of dial-up TCP/IP networking on Windows 95/98 or Windows NT computers
can dial in to remotely access their networks for services such as file and printer sharing,
electronic mail, scheduling, and database access.
Both Windows 95/98 and Windows NT support routing TCP/IP traffic over dial-up TCP/IP
connections through several different types of dial-up TCP/IP networking servers, including
the following:
●
UNIX system servers that support either of the industry-standard point-to-point protocol
(PPP) or serial line IP (SLIP) dial-up TCP/IP networking standards.
●
Windows NT remote access service (RAS) servers.
●
Third-party remote access service servers that support PPP and/or SLIP connections,
such as those that are available from CISCO, 3COM, and Bay Networks.
Dial-up Windows 95/98 and Windows NT computers that are configured to route TCP/IP
also can be configured to use WINS servers. For details, see your Windows 95/98 and
Windows NT documentation.
Dial-up Windows 95/98 and Windows NT computers that are configured to route TCP/IP
and use WINS can access remotely their networks for services, including Advanced Server
and Windows NT file and print sharing, electronic mail, scheduling, and database access.
Product Manual
U7613-J-Z815-6-76
Pfad: D:\O7613e6\u7613e.k10
© Siemens Nixdorf Informationssysteme AG 1995
Implementing WINS
Planning for WINS Server Implementation
10.2 Planning for WINS Server Implementation
The number of WINS servers that an enterprise requires is based on the number of WINS
client connections per server and the network topology. The number of users that can be
supported per server varies according to usage patterns, data storage, and processing
capabilities of the WINS server computer.
Planning for WINS server implementation on the network typically requires consideration of
the issues presented in the following table:
Planning issue
Guideline
How many WINS servers are
required to ensure distribution of
name query and name registration
loads throughout the network?
The location of routers on the network and the
distribution of clients in each subnet should be
considered first when deciding how many WINS
servers are required. There is no builtin limit for the
number of NetBIOS names that one WINS Server
can handle.
See the following sections: “Planning for WINS
Client Network Traffic”, “Planning for WINS Server
Performance” and “Planning Replication Partners
and Proxies”.
Is the WAN bandwidth sufficient to
support WINS server and WINS
client name registration traffic?
See the next section, “Planning for WINS Client
Network Traffic”.
How many WINS servers are needed See the following sections: “Planning for WINS
Server Fault Tolerance” and “Planning for WINS
for disaster recovery, backup, and
Server Performance”.
redundancy requirements?
How can a planned distribution of
WINS servers throughout the
network be validated before installation?
Product Manual
When planning a network configuration, a
generally accepted approach is to consider the
consequences of two simultaneous failures at
different points on the network.
U7613-J-Z815-6-76
Planning for WINS Server Implementation
10.2.1 Planning for WINS Client Network Traffic
© Siemens Nixdorf Informationssysteme AG 1995
Pfad: D:\O7613e6\u7613e.k10
Implementing WINS
WINS clients generate the following types of network traffic:
●
Name registration
●
Name refresh
●
Name release
●
Name query
When a WINS-enabled client starts on the network, it sends a name registration request for
the computer name, user name, domain name, and any additional Microsoft network client
services running on the computer. In other words, when a WINS client starts on the network,
it generates a minimum of three name registration requests and three entries in the WINS
database.
Any server (either NT Server or Advanced Server for UNIX) usually registers more NetBIOS
names than other WINS-enabled clients. The name registration requests generated by a
server include the following:
10.2.1.1
●
Server component
●
Domain names
●
Browser service name
●
Additional network program and service names
WINS Client Traffic on Routed Networks
When planning for WINS client traffic on large routed networks, consider the effect of name
query, registration, and response traffic routed between subnets.
Name requests and responses that occur at the daily startup of computers must pass
through the traffic queues on the routers and may cause delays at peak times.
Product Manual
U7613-J-Z815-6-76
10.2.1.2
© Siemens Nixdorf Informationssysteme AG 1995
Pfad: D:\O7613e6\u7613e.k10
Implementing WINS
Planning for WINS Server Implementation
Daily Startup of WINS Clients
An active WINS client name registration in a WINS server database is replicated to all pull
partners configured on that WINS server. After some time, the active name registration is
replicated to all WINS servers on the network.
When a WINS client is turned off at the end of the day, it releases the name. When the
computer is started the next morning, the WINS client registers the name again with the
WINS server and receives a new version ID. This new, active name registration entry is
replicated to the WINS server’s pull partners as on the previous day.
Therefore, the number of name registration entries that are replicated each day is roughly
equivalent to the number of computers started each day times the number of NetBIOS
names registered at each computer.
On large networks (50,000 or more computers), the biggest traffic load may be the name
registration requests generated when WINS clients start on the network. Fortunately, the
difference in time zones in large enterprise networks provides some distribution of this
WINS client startup load.
Roving User
Name challenge traffic occurs when a user stops the computer and then moves and starts
the computer on a different subnet with another primary WINS server.
Typically, the name registration request is answered with a Wait for Acknowledgment
message (100 bytes), and the new WINS server, assuming the active entry was replicated,
challenges the IP address that is currently in its database for this name (Name Query
packet, 92 bytes).
When there is no reply, as can be expected in this case, the WINS server repeats the
challenge two more times and then updates the name registration entry with the new IP
address and a new version ID. The new version ID indicates that the entry must be replicated from its new “owning” WINS server to other WINS servers on the network.
10.2.1.3
Estimating WINS Client Traffic
You can estimate WINS client traffic based on the behavior of the WINS clients as described
in the preceding sections.
However, when estimating WINS client traffic, you also must consider the network topology
and the design or configuration of the routers in the network. In some cases it may not
always be possible to predict the traffic load on a specific network router because the
routers may be designed or configured to autonomously route traffic based on factors other
than traffic load.
Product Manual
U7613-J-Z815-6-76
Planning for WINS Server Implementation
10.2.2 Planning for WINS Server Replication Across Wide Area Networks
© Siemens Nixdorf Informationssysteme AG 1995
Pfad: D:\O7613e6\u7613e.k10
Implementing WINS
The frequency of WINS database replication between WINS servers is a major planning
issue. The WINS database should be replicated frequently enough that the down-time of
any WINS server will not affect the reliability of the mapping information in the database of
other WINS servers.
However, when planning WINS database replication frequency, you do not want the
frequency to interfere with network throughput. This could occur if replication frequency is
set to a small time interval.
Consider the network topology when planning for replication frequency. For example, if your
network has multiple hubs connected by relatively slow wide-area-network (WAN) links,
you can configure WINS database replication between WINS servers on the slow links to
occur less frequently than replication on the local area network or on fast WAN links. This
reduces traffic across the slow link and reduces contention between replication traffic and
WINS client name queries.
For example, WINS servers at a central local-area-network site may be configured to
replicate every 15 minutes, while database replication between WINS servers in different
WAN hubs might be scheduled for every 30 minutes, and replication between WINS servers
on different continents might be scheduled to replicate twice a day. The following figure
illustrates this example of variation in replication frequency.
North America
12 hours
15 minutes
Australia
30 minutes
Example of an Enterprise-Wide Configuration for WINS Server Replication
Product Manual
U7613-J-Z815-6-76
10.2.2.1
© Siemens Nixdorf Informationssysteme AG 1995
Pfad: D:\O7613e6\u7613e.k10
Implementing WINS
Planning for WINS Server Implementation
Planning for Replication Convergence Time
The time needed to replicate a new entry in a WINS database from the WINS server that
owns the entry to all other WINS servers on the network is called convergence time. When
planning for WINS servers, you need to decide the acceptable convergence time for your
network.
For information about convergence time, see the Microsoft Windows NT Resource Kit
Networking Guide.
10.2.2.2
Planning for WINS Server Fault Tolerance
The two basic types of WINS server failures are as follows:
●
A WINS server can crash or be stopped to perform maintenance.
●
Network failures, including failures of routers and link stations.
For information about WINS server fault tolerance, see the Microsoft Windows NT Resource
Kit Networking Guide.
10.2.3 Planning for WINS Server Performance
When planning for a large-scale power outage where many computers will go on line simultaneously, the conservative recommendation is that you plan to include one WINS server
and a backup server for every 10,000 computers on the network.
The maximum rate at which a WINS Server can handle registrations and queries depends
almost solely on the CPU performance, as long as the media bandwidth is clearly below
saturation. Adding more CPUs to an Advanced Server computer running the WINS service
does not improve this maximum rate, since the service is implemented within one UNIX
process. WINS server replication response time can be improved measurably by placing
the WINS database files on a less utilized disk.
After you establish WINS servers on an intranet, you can adjust the time between a WINS
client name registration and name renewal. This is referred to as the Renewal Interval.
Setting this interval to reduce the numbers of registrations can help tune server response
time. (The Renewal Interval is specified in the WINS Server Configuration dialog box.)
i
Product Manual
The default value for the renewal interval (6 days) has been choosen with care! You
should not configure shorter renewal intervals unless you have specific reasons to
do so.
U7613-J-Z815-6-76
Setting Up a WINS Server
10.2.4 Planning Replication Partners and Proxies
© Siemens Nixdorf Informationssysteme AG 1995
Pfad: D:\O7613e6\u7613e.k10
Implementing WINS
Choosing whether to configure another WINS server as a push partner or pull partner
depends on several considerations, including the specific configuration of servers at your
site, whether the partner is across a wide area network (WAN), and how important it is to
distribute changes throughout the network.
Only one computer configured as a WINS proxy should be installed on each subnet.
(Configuring more than one WINS proxy per subnet can overload the WINS servers on the
same subnet.)
In one possible configuration, one WINS server can be designated as the central server,
and all other WINS servers can be configured as both push partner and pull partner of this
central server. Such a configuration ensures that the WINS database on each server
contains addresses for every node on the WAN.
Another option is to set up a chain of WINS servers, where each server is both the push
partner and pull partner with a nearby WINS server. In such a configuration, the two servers
at the ends of the chain would be push and pull partners with each other. Other replication
partners can be established for your site’s needs.
10.3 Setting Up a WINS Server
Advanced Server WINS is installed along with the Advanced Server software. Before
setting up a WINS server, be sure to meet the following requirements:
1. UNIX threads are required in order to execute the WINS service. You have to use one
of the following packages depending on the version of the operating system:
–
DCE-THR 2.0A20 (or a later version)
–
SIthreads
The "SIthreads" package is included on the operating system CD with more recent
operating system versions. This package replaces the previous version "DCE-THR". In
this case, you should only use the "SIthreads" package.
i
Product Manual
The WINS service is the only Advanced Server service that is dependent on the
UNIX threads package.
U7613-J-Z815-6-76
Setting Up a WINS Server
2. Install a NetBIOS that supports Advanced Server WINS. (The nbrfc package coming
with the Advanced Server 4.0 software supports WINS.)
© Siemens Nixdorf Informationssysteme AG 1995
Pfad: D:\O7613e6\u7613e.k10
Implementing WINS
To ensure compatibility with Microsoft networking components, it is recommended not
to change the following NetBIOS related tuning parameters from /etc/conf/cf.d/mtune (for
details see section “Configuring NetBIOS Tunable Parameters”):
●
NBRFCSTATBCAST
should be 0
●
NBRFCWINSREG
should be 1
●
NBRFCPRELOAD
should be 0
3. An Advanced Server running the WINS service (as well as every other WINS server)
must be configured with static (not dynamic) IP addresses; they should not be DHCP
clients. If your Advanced Server computer is a multihomed computer (a computer
having more than one IP address), you have to decide which of the IP addresses shall
be used by the WINS server. You do this by editing the NetBIOS configuration file
var/opt/nbrfc/conf/interfaces.cfg. The interface to be used by the WINS server is marked
with the line used_by_wins=yes.
For details, see section “The interfaces.cfg file”.
4. On a connected Windows NT Workstation computer,
Ê
Install WINS Manager to be able to fully administer WINS (see below).
Ê
Use the wins command to start and stop the WINS service manually from the
Advanced Server command prompt.
Ê
Use the winsadm command to perform some administrative tasks at the Advanced
Server command prompt.
Additional WINS administration can be performed using WINS Manager (see the
following sections).
10.3.1 Installing WINS Manager
You can install the WINS Manager on any Windows NT Workstation computer running
Version 3.51 or later. WINS Manager software is included with Advanced Server in the
ASTOOLS or ASTOOLSD share. If WINS is already installed on MS WINDOWS NT Server
computer, there is no need to install WINS Manager from the ASTOOLS share. You can
then use the existing WINS manager also to administer the Advanced Server for UNIX
WINS service, regardless of whether the Windows NT Server computer is running Version
3.51 or a later version.
Product Manual
U7613-J-Z815-6-76
Using the wins command
To install WINS Manager
© Siemens Nixdorf Informationssysteme AG 1995
Pfad: D:\O7613e6\u7613e.k10
Implementing WINS
Ê
From a Windows NT Workstation computer, log on to the domain in which your
Advanced Server is configured.
Ê
Establish a connection to the ASTOOLS or ASTOOLSD share on Advanced Server.
Ê
Select the directory that corresponds with the version of Windows NT Workstation that
your computer is running.
Ê
Double-click on SETUP.BAT.
The SETUP.BAT script automatically installs workstation-based network administrative
tools, including WINS Manager.
You then can add WINS Manager to the Administrative Tools (Common) Programs
group.
10.4 Using the wins command
In an Advanced Server for UNIX networking environment, the availability of the WINS
service can become an important aspect. Therefore, unlike other services within Advanced
Server, the WINS Service is to some degree able to run independent of all other services,
although there are some restrictions concerning administration.
You can start and stop the WINS server manually from the Advanced Server command
prompt by using the wins command. This command can be used any time, regardless of
whether Advanced Server - the SERVER service - is running or not.
Ê
Use wins start to start the WINS service.
Ê
Use wins stop to stop the WINS service.
Ê
Use wins status to display a list of processes that are important for the WINS service.
Sample output of wins status:
AS/X WINS / NetBIOS processes:
UID
root
root
root
PID
857
14109
862
PPID
1
1
1
C
0
0
0
STIME
Sep 12
Sep 12
Sep 12
TTY
?
?
?
TIME
0:16
0:05
0:01
CMD
./lmx.wins
nbrfcdaemon -f20 -l2
/var/opt/lanman/bin/lmx.ep
NetBIOS is connected to the local WINS server running on 144.145.179.150
Product Manual
U7613-J-Z815-6-76
Using the winsadm Command
You also can start and stop the WINS server manually from the Advanced Server command
prompt by using the net start wins and net stop wins commands or remotely using the
Services dialog box in Server Manager. However, these administrative actions are only
possible if the Advanced Server is running.
© Siemens Nixdorf Informationssysteme AG 1995
Pfad: D:\O7613e6\u7613e.k10
Implementing WINS
The following statement is valid for the WINS service like for all other Advanced Server
services: if you have configured the startup type automatic using the server manager, then
the net start server command also starts the WINS service.
In the contrary the net stop server command ends all other services except the WINS service.
Without a running Server service the WINS service continues to work - with restrictions: it
is no more manageable with the WINS manager, however it continues to support name
registrations, name queries, etc.
The configuration of the startup type automatic for the WINS service is equivalent to the
existence of a corresponding entry of the service name in the lanman.ini file:
Example of lanman.ini file entry:
[ server ]
srvservices=alerter,netlogon,browser,wins
i
The asx stop command also stops the WINS service! If only the SERVER service
has to be shutdown for administrative purposes you should use the net stop server
command instead. In that case the WINS service can continue to do registrations
and name resolutions, although it is no longer possible to administer the service
using the WINS Manager.
10.5 Using the winsadm Command
Several Advanced Server WINS administrative tasks, such as backing up, restoring, and
compacting the WINS data base, must be performed at the Advanced Server command
prompt.
Use the winsadm command at the Advanced Server command prompt to back up, restore,
compact, and dump the WINS data base.
For more information about this command, type man winsadm at the Advanced Server
command prompt.
Product Manual
U7613-J-Z815-6-76
Pfad: D:\O7613e6\u7613e.k10
© Siemens Nixdorf Informationssysteme AG 1995
Implementing WINS
Using WINS Manager
10.6 Using WINS Manager
To use WINS Manager, both Advanced Server and WINS must be running. Use WINS
Manager to view and change parameters for any WINS server on the network for which you
have Administrator privileges. WINS Manager Help is organized to provide information for
each of the specific administrative and configuration tasks that you need to perform to
manage WINS servers. See WINS Manager Help for specific task lists and instructions.
10.6.1 Viewing WINS Server Status
WINS Manager allows you to view administrative and operational information about WINS
servers. When you open WINS Manager, the title bar shows the IP address or computer
name for the currently selected server, depending on whether you used the address or
name to connect to the server. The right pane displays basic statistics about the selected
WINS server.
For detailed information about the fields displayed see Windows NT Help.
10.6.2 Configuring WINS Servers and WINS Client Behavior
You will want to configure multiple WINS servers on your network to increase the availability
and balance the load among servers. When using multiple servers, each WINS server
should be configured with at least one other WINS server as its replication partner. You
should have multiple WINS servers installed on your network for the following reasons:
●
To distribute NetBIOS computer name query and registration processing load.
●
To provide WINS database redundancy, backup, and disaster recovery.
Configuring a WINS server includes specifying information about when database entries
are replicated between partners. A pull partner is a WINS server that pulls in replicas of
database entries from its partner by requesting and then accepting replicas. A push partner
is a WINS server that sends update notification messages to its partner when its WINS
database has changed. When its partner responds to the notification with a replication
request, the push partner sends copies of changed records of its current WINS database
to the partner.
For each WINS server, you must configure threshold intervals for triggering database replication, based on a specific time, a time period, or a certain number of new records. If you
designate a specific time for replication, this occurs one time only. If a time period is
specified, replication is repeated at that interval.
Product Manual
U7613-J-Z815-6-76
Using WINS Manager
Use WINS Manager to configure WINS server management of WINS client mappings by
using the configuration options in the WINS Server Configuration dialog box. The
configuration options allow you to specify time intervals that govern WINS client behavior
as described in the following table.
© Siemens Nixdorf Informationssysteme AG 1995
Pfad: D:\O7613e6\u7613e.k10
Implementing WINS
Configuration option
Description
Renewal Interval
Specifies the length of time that a registered name is valid
without a refresh. A WINS client will try to refresh a registered
name already after half of the interval is expired. If there is no
successful refresh within the Renewal Interval; the name is
marked as released. The default is six days.
Extinction Interval
Specifies the interval between when an entry is marked as
released and when it is marked as extinct. The default is
dependent on the renewal interval and, if the WINS server has
replication partners, on the maximum replication time interval.
The default is six days.
Extinction Timeout
Specifies the interval between when an entry is marked extinct
and when the entry is finally scavenged from the database.
The default is dependent on the renewal interval and, if the
WINS server has replication partners, on the maximum replication time interval. The default is six days.
Verify Interval
Specifies the interval after which the WINS server must verify
that old names it does not own are still active. The default is
dependent on the extinction interval. The minimum allowable
value is 24 days.
The extinction interval, extinction timeout, and verify interval are derived from the renewal
interval and the partner replication interval. The WINS server adjusts the values specified
by the administrator to keep the inconsistency between a WINS server and its partners as
small as possible. The defaults for the four configurable timer values have been chosen
with care and in general they should not be modified.
Product Manual
U7613-J-Z815-6-76
Using WINS Manager
You can change the following configuration parameters using the Advanced option in the
WINS Server Configuration dialog box.
© Siemens Nixdorf Informationssysteme AG 1995
Pfad: D:\O7613e6\u7613e.k10
Implementing WINS
Configuration option Description
Logging Enabled
This option is ignored in Advanced Server WINS.
Log Detailed Events
Specifies whether the output to the event log is verbose.
(This requires considerable computer resources and should be
turned off if you are tuning for performance.). By default, this
option is not checked.
Replicate Only With
Partners
Specifies that replication occurs only with configured WINS pull
or push partners. If this option is not checked, an administrator
can ask a WINS server to pull or push from or to a non-listed
WINS server partner. By default, this option is checked.
Backup On Termination
Specifies that the database will be backed up automatically when
WINS Manager is stopped except when the computer is stopped.
By default, this option is not checked.
Migrate On/Off
Specifies that static unique and multihomed records in the
database are treated as dynamic when they conflict with a new
registration or replica. This means that if they are no longer valid,
they will be overwritten by the new registration or replica. By
default, this option is not checked.
You should have this option checked only a limited period of time.
The purpose of Migrate On is to ease the process of making a
B-node an H-node (WINS client). If set, the static nature of
unique/multihomed names is compromised by WINS in that
these records are now treated as pseudo- static. Pseudo-static
means that a dynamic name registration will be allowed to
overwrite a unique/multihomed static entry if the static
address(es) are different and prove to be wrong.
Starting Version Count Specifies the highest version ID number for the database.
Usually, you will not need to change this value unless the
database becomes corrupted and needs to start fresh. In such a
case, set this value to a number higher than appears as the
version number counter for this WINS server on all the remote
partners that earlier replicated the local WINS server’s records.
WINS may adjust the value you specify to a higher one to ensure
that the database records are replicated quickly to the WINS
servers. This value can be seen in the View Database dialog box
in WINS Manager.
Product Manual
U7613-J-Z815-6-76
Using WINS Manager
Configuration option Description
© Siemens Nixdorf Informationssysteme AG 1995
Pfad: D:\O7613e6\u7613e.k10
Implementing WINS
Database Backup Path Specifies the directory where the WINS database backups will be
stored. If you specify a backup path, WINS automatically
performs a full backup of its database to this directory. WINS also
uses this directory to perform an automatic restoration of the
database in the event that the database is found to be corrupted
when WINS is started. Do not specify a network directory.
10.6.3 Configuring Replication Partners
WINS servers communicate among themselves to fully replicate their databases, ensuring
that a name registered with one WINS server is eventually replicated to all other WINS
servers within the network. All mapping changes converge within the replication period for
the entire WINS system, which is the maximum time for propagating changes to all WINS
servers. All released names are propagated to all WINS servers after they become extinct,
based on the interval specified in WINS Manager.
Use the Replication Partners command in WINS Manager to configure replication
partners and replication partner properties.
Choosing whether to configure another WINS server as a push partner or pull partner
depends on several considerations, including the specific configuration of servers at your
site, whether the partner is across a wide area network (WAN), and how important it is to
propagate the changes.
Replication is triggered when a WINS server polls another server to get replicated information. This can begin when the WINS server is started, and is repeated based on the
configured update count or time interval, or by using WINS Manager to start immediate
replication.
Replication also is triggered when a WINS server reaches a threshold set by the administrator. This is an update count for registrations and changes. In this case, the server notifies
its pull partners that it has reached this threshold, and the other servers then can decide to
pull replicated information.
It is always a good idea for replication partners to be both push and pull partners of each
other. The primary and backup WINS servers must be both push and pull partners with each
other to ensure that the primary and backup databases are consistent.
Product Manual
U7613-J-Z815-6-76
Using WINS Manager
The following table describes the pull and push partner types of replication partners.
© Siemens Nixdorf Informationssysteme AG 1995
Pfad: D:\O7613e6\u7613e.k10
Implementing WINS
Product Manual
Replication partner type
Description
Pull partner
A pull partner is a WINS server that pulls (requests) WINS
database entries from its push partners. The pull partner pulls
new WINS database entries by requesting entries with a
higher version number than the last entry it received during
the last replication from that push partner.
A pull partner can notify push partners that replication is
needed by using either of the following methods: an arbitrary
time interval, as configured by the WINS administrator, or
immediate replication, initiated by the WINS administrator
using WINS Manager.
Push partner
A push partner is a WINS server that sends a message to its
pull partners that the WINS database has changed. When the
pull partners respond to the message with a replication
request, the push partner sends a copy of its new WINS
database entries to the pull partners.
The push partner notifies pull partners of replication requirements by using either of the following methods: an arbitrary
number of WINS updates (update count), as configured by
the WINS administrator, or immediate replication initiated by
the WINS administrator by using WINS Manager.
If you modify the update count using WINS Manager, you
then can open the WINS Server Configuration dialog box
and check the OK button. As a result, the new value will take
effect immediately.
U7613-J-Z815-6-76
Using WINS Manager
10.6.4 Managing Static NetBIOS-to-IP Address Mappings
© Siemens Nixdorf Informationssysteme AG 1995
Pfad: D:\O7613e6\u7613e.k10
Implementing WINS
Static mappings are non-dynamic database entries of NetBIOS computer name-to-IP
address mappings for computers on the network that are not WINS-enabled or for special
groups of network devices.
Adding static mappings into a WINS database accomplishes two things. First, it allows
nodes to resolve a name of a computer (which might not be capable of registering names
with a WINS server) with a query to the WINS Server without having to resort to secondary
resolution methods. Second, it prevents the WINS server from allowing another node to
dynamically register the name.
i
Static mappings are not recommended for WINS-enabled clients.
Use the Static Mappings command on the Mappings menu in WINS Manager to view, add,
edit, delete, import or filter static mappings.
i
Static entries that are not owned by the currently administered WINS server but
replicated from a partner do not show up in the Static Mappings box.
Once a static name-to-IP address mapping is entered to the WINS server database, it
cannot be challenged or removed except by an administrator who must remove it manually
using WINS Manager. All changes made to the WINS server database using WINS
Manager take effect immediately.
!
Product Manual
A DHCP reserved (or static) IP address for a unique name in a multihomed
computer overrides an obsolete WINS static mapping if the WINS server advanced
configuration option Migration On/Off is checked “on.”
U7613-J-Z815-6-76
Using WINS Manager
Static NetBIOS name mappings can be any of the types listed in the following table.
© Siemens Nixdorf Informationssysteme AG 1995
Pfad: D:\O7613e6\u7613e.k10
Implementing WINS
Type option
Description
Unique
A unique name that maps to a single IP address. Contrast
with multihomed type.
Group
Also referred to as a “Normal Group.” When adding an entry
to Group using WINS Manager, you must enter the computer
name and IP address.
However, the IP addresses of individual members of Group
are not stored in the WINS database. Because member
addresses are not stored, there is no limit to the number of
members that can be added to a Group.
Broadcast name packets are used to communicate with
Group members. Contrast with Internet group type.
Domain
A NetBIOS name-to-IP address mapping that has 0x1C as
the 16th byte. A domain group stores up to a maximum of 25
addresses for members. For registrations after the 25 th
address, WINS overwrites a replica address or, if none is
present, it overwrites the oldest registration.
i
Product Manual
In Windows NT 3.51, the "Domain" name type was
called "Internet group". With Windows NT 4.0, the
"Internet group" type has been generalized to include
not only group names ending with 0x1C, see below.
Internet group
Internet groups are user-defined groups that allow you to
classify resources such as printers for easy reference and
browsing. The default 16th byte of an Internet group name is
set equal to 0x20. An Internet group can store up to a
maximum of 25 addresses for members.
Internet group members can be added as the result of
dynamic group registrations. However, a dynamic member
does not replace a static member that is added by using
WINS Manager or by importing the LMHOSTS file. Contrast
with Group type.
Multihomed
A unique name that can have more than one address. This is
used for multihomed computers. The maximum number of
addresses that can be registered as multihomed is 25. For
registrations after the 25th address, WINS overwrites a replica
address or, if none is present, it overwrites the oldest
registration. Contrast with Unique type.
U7613-J-Z815-6-76
10.6.4.1
© Siemens Nixdorf Informationssysteme AG 1995
Pfad: D:\O7613e6\u7613e.k10
Implementing WINS
Using WINS Manager
Importing Static Mappings in Advanced Server WINS
Static entries may be entered manually or by importing an LMHOSTS file. If you have used
a names.cfg file for static mappings before, this file is converted into LMHOSTS format
during the installation procedure and saved under /var/opt/nbrfc/conf/names.imp. (You can
also manually use the tool names2lm at any time to convert an arbitrary names.cfg file or an
old-style nbrfc.cfg file into LMHOSTS format to be used for importing static mappings into a
WINS database.)
Keep in mind that static mappings are not useful and not recommended for WINS-enabled
clients, so before importing a huge file make sure it contains only those mappings you really
want to reside in the WINS database.
i
During the process of importing static mappings, WINS Manager first connects to
the server (not WINS) and tries to create temporary files under the C$ share. The
C$ share is the root ( / ) share. Generally, the root directory on the UNIX system is
“read-only.” As a result, no clients — not even administrative clients — can create
files under a UNIX system root share. This causes “access denied” errors. Prior to
importing static mappings through WINS Manager, you must set the parameter
IgnoreUnixPermissions to 1 in the Advanced Server Registry. You do not have to stop
and restart the server.
!
Note that the IgnoreUnixPermissions=1 setting is effective only if the UnixQuotas
parameter is set to 0.
For more information about the Advanced Server Registry, see the “Advanced Server
Registry” chapter.
10.6.5 Advanced Configuration Parameters for WINS
Almost every configuration parameter that affects the behavior of WINS can be modified
through WINS Manager. However, there are exceptions to this rule. Please refer to chapter
“Advanced Server Registry” for a description of those -seldom used- WINS configuration
parameters which can only be changed using the Registry Editor.
i
Product Manual
You can impair or disable WINS if you make incorrect changes in the Registry while
using the Registry Editor. Whenever possible, use WINS Manager to make
configuration changes rather than using Registry Editor. If you make errors while
changing values with Registry Editor you will not be warned because the Registry
Editor does not recognize semantic errors.
U7613-J-Z815-6-76
Pfad: D:\O7613e6\u7613e.k10
© Siemens Nixdorf Informationssysteme AG 1995
Implementing WINS
Managing the WINS Server Database
10.7 Managing the WINS Server Database
Like any database, the Advanced Server WINS server database of address mappings
needs to be backed up and cleaned periodically. WINS Manager and the winsadm
command provide the tools you need to maintain the database.
This section describes how to view, back up, scavenge (clean), and compact the WINS
server database. For information on restoring and moving the WINS database, see
“Troubleshooting WINS Servers” later in this chapter.
10.7.1 Viewing the WINS Database
You can view actual dynamic and static mappings stored in the WINS database, based on
the WINS server that owns the entries. Use WINS Manager to choose the Show Database
command from the Mappings menu.
By default, the Show Database dialog box shows all mappings for the WINS database on
the currently selected WINS server. You can select a Sort Order option to sort by IP
address, computer name, time stamp for the mapping, version ID, or type. To view only a
range of mappings, choose the Set Filter button.
The Show Database dialog box displays several symbols within the Mappings active
column. Each symbol identifies specific conditions about each database entry.
Symbol
Product Manual
Description
✔
Represents an active entry that is registered with a
WINS server.
-
Represents an interval between when an entry is
marked as released , no longer active, and when it
is marked extinct.
✞
Represents an interval between when an entry is
marked as extinct, and when it is removed from the
WINS database.
U7613-J-Z815-6-76
Managing the WINS Server Database
10.7.2 Backing Up the Database
© Siemens Nixdorf Informationssysteme AG 1995
Pfad: D:\O7613e6\u7613e.k10
Implementing WINS
The following WINS server database files are stored in the /var/opt/lanman/wins directory.
This directory was created when you installed Advanced Server.
File
Description
schema.gdb
This file is used by WINS to hold information about the structure
of its database.
wins.gdb
This is the WINS database file.
!
The schema.gdb and wins.gdb files should not be removed or tampered with in any
manner.
Advanced Server WINS automatically creates the wins_bak subdirectory under the directory
listed as the Database Backup Path to store backups of the wins.gdb and schema.gdb
database files. The default Database Backup Path is C:\var\opt\lanman\wins.
You can use WINS Manager to examine the current database backup path and to establish
a new one. By default, WINS performs complete database backups periodically (approximately every 24 hours) to the current (or default) database backup path. For more information, see the Help topic “Backing Up and Restoring the Database” in WINS Manager
Help.
In addition to the backups that occur automatically, you may wish to perform manual
backups. You can back up the WINS server database using the Advanced Server winsadm
command, regardless of whether the WINS service is running or not:
To backup the WINS database:
Ê
Log on to the Advanced Server WINS computer as root
Ê
At the command prompt, type
winsadm -b
Product Manual
U7613-J-Z815-6-76
Managing the WINS Server Database
10.7.3 Scavenging the Database
© Siemens Nixdorf Informationssysteme AG 1995
Pfad: D:\O7613e6\u7613e.k10
Implementing WINS
The local WINS database should be cleared periodically of released entries and old entries
that were registered at another WINS server and replicated to the local WINS server, but
for some reason did not get removed from the local WINS database.
This process, called scavenging, is done automatically over intervals defined by the
relationship between the Renewal and Extinct intervals defined in the WINS Server
Configuration dialog box. You can also clean the database manually.
To manually scavenge the WINS database, choose the Initiate Scavenging command
from the Mappings menu. The following table describes the results of scavenging a WINS
database.
State before scavenging
State after scavenging
Owned active names for which the Renewal interval has Marked released
expired
Owned released name for which the Extinct interval has Marked extinct
expired
Owned extinct names for which the Extinct timeout has
expired
Deleted
Replicas of extinct names for which the Extinct interval
has expired
Deleted
Replicas of active names for which the Verify interval has Revalidated
expired
Replicas of extinct or deleted names
Product Manual
Deleted
U7613-J-Z815-6-76
Troubleshooting WINS Servers
10.7.4 Compacting the WINS Database
© Siemens Nixdorf Informationssysteme AG 1995
Pfad: D:\O7613e6\u7613e.k10
Implementing WINS
There is no built-in limit to the number of records that a WINS server can replicate or store.
The size of the database is dependent on the number of WINS clients on the network. The
WINS database grows over time as a result of clients starting and stopping on the network.
The size of the WINS database is not directly proportional to the number of active client
entries. Over time, as some WINS client entries become obsolete and are deleted, there
remains some unused space.
To recover space and improve performance, you should compact the database from time
to time.
To compact the Advanced Server WINS database:
Ê
Log on to the Advanced Server WINS computer as root.
Ê
Stop the WINS server by typing the following command:
wins stop
Ê
Compact the WINS database by typing the following command:
winsadm -c
Ê
Start the WINS server by typing the following command:
wins start
10.8 Troubleshooting WINS Servers
This section describes some basic troubleshooting steps for common problems and also
describes how to restore or rebuild the WINS database.
Verifying WINS Service Status
These error conditions can indicate potential problems with the WINS server:
●
The administrator cannot connect to a WINS server using WINS Manager. The
message that appears might be, “The Windows Internet Name Service is not running
on the target machine or the target machine is not accessible.”
●
The Windows Internet Name Service may be down and cannot be restarted.
The first troubleshooting task is to make sure WINS is running.
Product Manual
U7613-J-Z815-6-76
Troubleshooting WINS Servers
To ensure that the WINS service is running:
© Siemens Nixdorf Informationssysteme AG 1995
Pfad: D:\O7613e6\u7613e.k10
Implementing WINS
Ê
Use the wins status command at the Advanced Server command prompt to verify that
the WINS service is running. The command should display three processes named
"nbrfcdaemon", "lmx.ep" and "lmx.wins". You can also use the Services option in the
Server Manager to verify that the WINS service is running.
Ê
If necessary, use the wins start command to start the service. Observe possible error
messages.
Even if the WINS service is running (but the SERVER service is not), you may get a
message like ”The Windows Internet Name Service is not running on the target machine or
the target machine is not accessible”.
To ensure that the WINS service is not only running, but also available for
administration:
Ê
Use the asx status command at the Advanced Server command prompt to verify that the
SERVER service is running.
Ê
If necessary, use the asx start command to start the service.
Resolving common WINS errors
To resolve "duplicate name" error messages
Ê
Check if the WINS database contains name-to-IP address mappings for the name. If
there is a static address record with the name and an inconsistent IP address, delete it
from the primary WINS server database.
- Or Ê
Check the MigrateOn box using the Advanced option in the WINS Server Configuration dialog box in WINS Manager.
To locate the source of ”network path not found” messages on a WINS client
Product Manual
Ê
Check the WINS database for the name. If the name is not present in the database,
check whether the destination or target computer uses b-node name resolution. If so,
configure this client to use WINS or add a static mapping for it in the WINS database.
Ê
If the computer is configured as a p-node, m-node, or h-node and if its IP address is
different from the one in the WINS database, then its address may have changed
recently and the new one has not replicated to the local WINS server. Ask the WINS
server that registered the address to perform a push replication with propagation to the
local WINS server.
U7613-J-Z815-6-76
Troubleshooting WINS Servers
To discover why a WINS server cannot pull or push replications to another WINS
server
© Siemens Nixdorf Informationssysteme AG 1995
Pfad: D:\O7613e6\u7613e.k10
Implementing WINS
Ê
Use the ping utility to verify that each WINS server is running and is available to
establish a connection.
Ê
Ensure that each server is correctly configured as both a pull or push partner:
●
If ServerA needs to perform pull replications with ServerB, make sure it is a push
partner of ServerB.
●
If ServerA needs to push replications to ServerB, it should be a pull partner of WINS
ServerB.
To determine the configuration of a replication partner, check the values under the Pull and
Push keys in the Registry. You can use the Replication Partners dialog box in WINS
Manager to perform this task.
To determine why a WINS backup fails
Ê
Make sure the path for the WINS backup directory exists.
To locate the source of “Access Denied” error messages when connecting WINS
Manager to WINS
Ê
Check that you are logged in as a member of the Administrators group.
Troubleshooting the WINS Server Database
If you have determined that the Windows Internet Name Service is running but you cannot
connect to the server using WINS Manager, then the WINS database might have become
unavailable or corrupted. If a WINS server fails for any reason, you can restore the
database from a backup copy.
You can use the winsadm command to restore the WINS database from the WINS backup
location specified in the Advanced Server Registry.
To restore a WINS database from the backup path specified in the registry
Product Manual
Ê
Log on to the UNIX system as root.
Ê
Shut down the WINS server using the wins stop command.
Ê
Restore the WINS database from the WINS backup location using the winsadm -r
command.
Ê
Restart the WINS server using the wins start command.
U7613-J-Z815-6-76
Pfad: D:\O7613e6\u7613e.k11
© Siemens Nixdorf Informationssysteme AG 1995
11 Troubleshooting
This chapter describes how to troubleshoot a computer running Advanced Server for UNIX
Systems. It identifies the various tools that are available to you for use in the troubleshooting process and provides a high-level approach to use whenever troubleshooting is
required.
Troubleshooting Advanced Server involves gathering data about the problem and
analyzing that data to determine the specific cause of the problem. Advanced Server
includes a number of data gathering tools. Additionally, more complex data gathering tools
may be available from your support personnel.
This chapter introduces the various tools that are provided with Advanced Server and
describes situations in which using them may be appropriate.
Administrators often can reduce the amount of time required to solve problems by
observing the following guidelines:
●
Be aware of and familiar with the tools and services that can be used for server troubleshooting.
●
Configure the available server utilities to gather the necessary data as a general
practice.
●
Assess the status of the server at regular intervals.
●
Follow a logical and comprehensive procedure when attempting to isolate a server
problem.
There will be times when a particular problem requires more complex data gathering than
can be provided using the standard Advanced Server product package. In these situations,
special debugging versions of the software may be needed to gather more detailed data
about the problem. This type of data gathering may require the assistance of a technical
support person to help with instructions on how to use the tools involved.
Product Manual
U7613-J-Z815-6-76
Pfad: D:\O7613e6\u7613e.k11
© Siemens Nixdorf Informationssysteme AG 1995
Troubleshooting
Advanced Server Tools
11.1 Advanced Server Troubleshooting Tools
Advanced Server provides a variety of tools that can be used as troubleshooting aids.
These tools can be arranged into the following three categories:
●
Tools used for assessing the status of the server.
●
Tools used for automatic notification of the status of the server.
●
Tools used for debugging specific server problems.
The following sections summarize the tools found in each category and briefly describe the
use of each in a troubleshooting context.
11.1.1 Tools for Assessing the Status of the Server
Advanced Server includes multiple tools that can be used to assess the operational status
of the server at any given time. As a server administrator, frequent assessment of server
status will improve your ability to notice a problem or trend quickly.
Periodic review of server status will provide a fairly stable basis for understanding how a
normal problem-free server appears. Over time, information that deviates from the norm will
be an indication that something has changed and warrants your attention.
Tools for assessing the status of the server include the following.
11.1.1.1
Event Viewer
A number of events related to the daily operation of the server can be tracked using Event
Viewer. These events are maintained in one of three event logs: system, security, and application. Administrators should develop and implement an event logging policy and include a
review of event logs as a regular part of troubleshooting activities.
Administrators will find it particularly useful to characterize the typical use of the server by
manipulating event log data using a spreadsheet or word processing program. This
approach can be used to generate a standard operating profile of the server and can be
used to predict trends in server usage.
For information about Event Viewer, see the “Concepts and Planning” manual.
i
Product Manual
Event logs also can be viewed using the elfread command. For more information,
type man elfread at the Advanced Server command prompt.
U7613-J-Z815-6-76
11.1.1.2
© Siemens Nixdorf Informationssysteme AG 1995
Pfad: D:\O7613e6\u7613e.k11
Troubleshooting
Advanced Server Tools
Server Statistics
Advanced Server maintains detailed statistics about its current usage as well as cumulative
usage over a particular period of time. It is always helpful to review these statistics on a
regular basis as well as when a server problem is encountered.
Current Statistics
To view data about current server use, use Server Manager. This provides details about
current client-server sessions and the resources being used by those sessions.
Cumulative Statistics
To view cumulative server usage data, use the net statistics server command at the
Advanced Server command prompt. This command provides cumulative totals for a variety
of server activities. Administrators who review the server statistics provided by using this
command on a regular basis will find it easier to recognize and address changes in server
operation.
The following statistics are maintained for the Advanced Server:
Statistic
Description
Statistics since
Tells when this set of statistics began (either at the last
server startup or the last time the statistics were cleared).
Sessions accepted
Tells how many times users connected to the server.
Sessions timed-out
Tells how many user sessions were closed because of
inactivity.
Sessions errored-out
Tells how many user sessions ended because of error.
Kilobytes sent
Tells how many KBytes of data the server transmitted.
Kilobytes received
Tells how many KBytes of data the server received.
Mean response time (msec) Tells the average response time for processing remote
server requests. This always will be 0 for UNIX system
servers.
Product Manual
System errors
This does not apply to UNIX system servers.
Permission violations
Tells when a user attempts to access resources without the
required permissions.
Password violations
The number of incorrect passwords that were tried.
Files accessed
The number of files that were used.
U7613-J-Z815-6-76
Pfad: D:\O7613e6\u7613e.k11
© Siemens Nixdorf Informationssysteme AG 1995
Troubleshooting
11.1.1.3
Advanced Server Tools
Communication devices
accessed
Not supported on Advanced Server.
Statistic
Description
Print jobs spooled
The number of print jobs were spooled to printer queues on
the server.
Times buffers exhausted
The number of shortages of big and request buffers. Always
set to 0 for UNIX system servers.
Session Information
Administration can display and control sessions between clients and the server. This information can be used to gauge the workload on a particular server.
To display session information from a Windows NT Workstation computer or a Windows
client computer using Server Manager
Ê
1. Start Server Manager.
2. Select the Advanced Server about which you want to view session information.
3. Click on the USERS button.
You also can display session information using the net session command at the Advanced
Server command prompt.
i
You may see sessions displayed that do not show user names. The sessions are a
result of administrative activity and should not be deleted.
Closing Sessions
An administrator can disconnect a user from the server at any time. Closing a user session
does not prevent the user from reconnecting.
Ê
To disconnect a user session from a Windows NT computer or from a Windows client
computer using Server Manager
1. Start Server Manager.
2. Select the Advanced Server about which you want to view session information.
3. Click on the USERS button.
4. Highlight the user and select the Disconnect button.
You also can disconnect a user session by using the net session command at the
Advanced Server command prompt.
Product Manual
U7613-J-Z815-6-76
11.1.1.4
© Siemens Nixdorf Informationssysteme AG 1995
Pfad: D:\O7613e6\u7613e.k11
Troubleshooting
Advanced Server Tools
Open Resources
When a user uses a shared file, the file is open. Sometimes a file will be left open, perhaps
even with a lock on it, because of an application program error or some other problem.
Such files will remain open and unavailable to other users. Administrators can close these
files.
Ê
To close an open resource from a Windows NT computer or a Windows client computer
using Server Manager
1. Start Server Manager.
2. Select the Advanced Server about which you want to view data.
3. Click on the IN USE button.
4. Highlight the open resource and select the Close Resource button.
You also can close an open resource by using the net file command at the Advanced
Server command prompt.
11.1.1.5
Print Subsystem Event Logging
Advanced Server maintains a separate print log for each printer share and each UNIX
system printer it uses. These log files record any message generated because of a printer
fault or print job error.
An administrator should check these log files periodically to determine whether any such
errors are occurring. The logs can be accessed from a client computer by linking to the
PRINTLOG shared resource.
The logs also can be accessed from the server. They are in the following directory:
/var/opt/lanman/shares/printlog.
11.1.1.6
Remote Monitoring of Server
Advanced Server provides an SNMP-compliant monitoring service that can be used to
monitor Advanced Servers from remote locations.
If you are an administrator involved with an Advanced Server network that spans multiple
locations, you may want to take advantage of this service.
Product Manual
U7613-J-Z815-6-76
Advanced Server Tools
11.1.2 Tools Providing Automatic Status on the Server
© Siemens Nixdorf Informationssysteme AG 1995
Pfad: D:\O7613e6\u7613e.k11
Troubleshooting
Quick response time is critical when dealing with server problems. Being aware of a
problem at the time it occurs can decrease greatly the effect that the problem may have on
the server user community.
Advanced Server can be configured to notify specified users when a problem occurs. The
UNIX system also can be configured to generate and notify the system administrator when
problems occur. The following sections discuss these features.
11.1.2.1
Alerter Service
Advanced Server includes an Alerter service which can be used to notify specified users of
the occurrence of a particular event. An administrator should use this service in order to
make server problems known immediately. Prompt action to resolve server problems often
can minimize their effect. The following examples illustrate situations that could generate
alerts:
11.1.2.2
●
The number of server errors exceeds a threshold set in the Advanced Server Registry.
●
The number of bad access attempts exceeds a threshold set in the Advanced Server
Registry.
●
The number of bad password attempts exceeds a threshold set in the Advanced Server
Registry.
●
Errors were encountered during start of the Net Logon service.
●
A printer is malfunctioning.
●
A print request has been deleted or completed.
UNIX System and Advanced Server Features
One of the benefits of Advanced Server is the availability of the inherent scripting features
provided by the UNIX operating system. Combining these features with the data gathering
tools provided by Advanced Server, an administrator can create a powerful tool that can be
used to assess the health of Advanced Server at any given time.
For example, using the UNIX system job scheduling feature (CRON), various data
gathering tools provided by Advanced Server, and some of the standard UNIX system
commands for checking file system integrity and free space, administrators can write scripts
that perform various system and server checks and then send the results to UNIX system
administrators at regular intervals.
Product Manual
U7613-J-Z815-6-76
Advanced Server Tools
11.1.3 Tools for Debugging Server Problems
© Siemens Nixdorf Informationssysteme AG 1995
Pfad: D:\O7613e6\u7613e.k11
Troubleshooting
Advanced Server includes UNIX system commands that can be used to troubleshoot server
problems. These commands are executed at the Advanced Server command prompt. This
section summarizes these commands and describes the roles they can play in troubleshooting a server.
For more information about each command, type man command at the Advanced Server
command prompt.
11.1.3.1
lmshell
The lmshell command is useful for emulating an MS-DOS client session when you do not
have access to an actual MS-DOS client. This command is especially useful when troubleshooting a connectivity problem between a client and server. Using the lmshell command,
you can mimic a client logon and resource linking by executing the net logon and net use
commands in lmshell at the Advanced Server command prompt.
11.1.3.2
lmstat
The lmstat command interrogates the server’s shared memory image to gather a variety of
data about the current state of the server. This command is especially useful when you want
to determine which server process a client session is on.
Advanced Server is composed of a set of cooperative processes. When the server is
running, enter the following command:
asx status
Executing this command generates a display similar to the following:
AS/X / NetBIOS processes:
UID
PID
PPID
C
root
19183
1
0
root
19808
1
0
root
19957
1
0
root
19787
1
0
root
19953
1
0
root
19916 19836
0
root
19988 19836
0
root
19945
1
0
root
19949
1
0
root
19836
1
0
STIME
15:17:09
15:17:09
15:17:16
15:17:08
15:17:16
15:17:14
15:17:20
15:17:16
15:17:16
15:17:11
TTY
?
?
?
?
?
?
?
?
?
?
TIME
0:00
0:44
0:00
0:00
0:01
0:04
0:04
0:06
0:06
0:01
CMD
/var/opt/lanman/bin/lmx.ep
./lmx.wins
lmx.extd
nbrfcdaemon -f20 -12
lmx.browser
lmx.srv -s 1
lmx.srv -s 2
lmx.dmn
lmx.alerter
lmx.ctrl
In this example, there are two lmx.srv server processes (19916 and 19988). The server may
have nine clients with current sessions.
Product Manual
U7613-J-Z815-6-76
Advanced Server Tools
How does the administrator know to which lmx.srv process a client is connected? Executing
the lmstat -c command at the server prompt usually provides the answer. The system
displays output similar to the following:
© Siemens Nixdorf Informationssysteme AG 1995
Pfad: D:\O7613e6\u7613e.k11
Troubleshooting
Clients:
BANANA~X (nwnum=0, vcnum=0) on 19916
ORANGE (nwnum=0, vcnum=0) on 19916
PEAR (nwnum=0, vcnum=0) on 19988
Notice that each client name has an associated process ID number. This is the process ID
of the lmx.srv process that currently is serving that client. The vcnum value specifies
whether this is the client computer’s first VC or an additional one.
Being able to determine the process ID of the lmx.srv process that is serving a client is
particularly useful when using the UNIX system truss( ) command. This command requires
a process ID as part of its startup arguments.
11.1.3.3
regconfig
The regconfig command is used to query or change Advanced Server Registry key information. You can use this command to change any value in the registry. (You also can use
the Windows NT Registry Editor and the AS/U Administrator to change key values.)
The regconfig command also can be used to reinitialize the Advanced Server Registry with
system defaults.
For more information about the registry, see chapter “Advanced Server Registry”.
11.1.3.4
regcheck
The regcheck command is used to check and repair the Advanced Server Registry file.
This command checks only the internal structure of the Advanced Server Registry file; it
does not check the validity of any data that may be stored in it.
If the internal structure of the registry file is found to be invalid, use the regcheck command
to make the necessary repairs.
Product Manual
U7613-J-Z815-6-76
11.1.3.5
© Siemens Nixdorf Informationssysteme AG 1995
Pfad: D:\O7613e6\u7613e.k11
Troubleshooting
Advanced Server Tools
samcheck
The samcheck command is used to check, dump, and fix the SAM database. You can use
this command to determine whether the user accounts database has been corrupted and
optionally, to fix it.
The samcheck command also can be used to output the contents of the user accounts
database to stdout in human-readable format.
11.1.3.6
srvconfig
The srvconfig command is used to display the current default settings of all the server
parameters in the lanman.ini file. (It also is a good way to check the location and spelling of
any parameter you wish to modify.)
The lanman.ini file contains several parameters that you can modify to change. Default
settings are used for most of these parameters. However, a certain number of them can be
changed, overriding the default values set at server installation.
To display the default settings of the lanman.ini file, use the following command:
srvconfig -p | more
This command generates a listing of all of the parameters in the lanman.ini file and their
default settings.
For more information about the lanman.ini file, see chapter “Lanman.ini File”.
11.1.3.7
acladm
The acladm command is used to check and repair problems found in the access control list.
Be sure to examine the options that are available with this command before executing it.
Type man acladm at the Advanced Server command prompt.
Product Manual
U7613-J-Z815-6-76
11.1.3.8
© Siemens Nixdorf Informationssysteme AG 1995
Pfad: D:\O7613e6\u7613e.k11
Troubleshooting
Troubleshooting Procedures
asxcheck
The asxcheck command can be executed to create the check file
$xASX/logs/asxcheck.<pid> with the result of several checks for a correct installation and
configuration of AS/X and NetBIOS.
Different tests will be made and saved with three keywords which have a specific priority.
For a quick view of the result you can evaluate the check file and look for OK, WARNING and
FATAL (e.g. with grep). If a situation with WARNING or FATAL priority is detected some more
information is available in the check file.
This file could be made available to the support staff in the event of any problems.
For more information about asxcheck type man asxcheck at the Advanced Server
command prompt.
11.1.3.9
asxinfo
The asxinfo command can be used to list information of relevance for the configuration and
operation of Advanced Server for UNIX and NetBIOS. In contrast to asxcheck, no check is
performed.
The information is written to the text file $xASX/logs/asxinfo.<pid>.
This file could be made available to the support staff in the event of any problems.
For more information about asxinfo, type man asxinfo at the Advanced Server command
prompt.
11.1.3.10
asxperf
The asxperf command can be used to get a "rough" overview of the CPU-time consumption
of the AS/X processes. The script also detects busy-looping AS/X processes.
For more information about asxperf type man asxperf at the Advanced Server command
prompt.
11.2 Troubleshooting Procedures
Troubleshooting Advanced Server involves using a systematic approach to isolate the
problem and then gathering detailed data in order to identify the specific module causing
the problem. The following sections provide simple procedures that you can use to isolate
a server problem. It then offers some suggestions on how to gather additional information
on the problem.
Product Manual
U7613-J-Z815-6-76
Troubleshooting Procedures
11.2.1 Isolating the Problem
© Siemens Nixdorf Informationssysteme AG 1995
Pfad: D:\O7613e6\u7613e.k11
Troubleshooting
Advanced Server runs on a UNIX system computer. The server depends upon a fullyfunctional NetBIOS network to perform its file and print serving functions.
A “NetBIOS network” typically includes the following components: an application that
provides a NetBIOS protocol interface; an application that provides a network transport
protocol interface, such as TCP/IP (although some transport implementations include
NetBIOS within a common module); and an application that provides drivers for the network
adapter interface (which also may be part of the transport module).
Every NetBIOS network component must be configured and operational in order for
Advanced Server to function in a network environment. Additionally, similar modules must
be functioning on the machine which is attempting to use the file and print services of
Advanced Server, such as a Windows NT Workstation computer or Windows client
computer.
When a NetBIOS network is not available, the system typically displays the following
message when you start the server:
unable to post the name on any network: <name>.
Reviewing all of the modules involved in the end-to-end connection between a client and
Advanced Server, it is easy to see that isolating a problem is the first step for problem
solving in a client-server networking environment.
Before assuming that the problem is with the server, you must ensure that other networking
software is functioning properly. This is particularly true with new installations in which the
opportunity for a transport or physical network problem is the greatest.
It is fruitless to perform an exhaustive check of every layer of software for a problem which
affects only a single client or user. Experience will help you to determine when to use a
comprehensive problem isolation procedure or a server-specific problem isolation
procedure. The following sections offer guidelines on how to perform both procedures. Use
the one that best fits your current problem description.
11.2.2 Checking the Network
Before assuming that the server is the cause of all network problems, it is worthwhile to
perform checks to verify the sanity of the network. This is particularly important when all or
a very large portion of server users are reporting a problem at the same time.
Use the following steps to verify the sanity of the network.
Product Manual
U7613-J-Z815-6-76
Troubleshooting Procedures
Step 1: Verify the Status of the Physical Network
© Siemens Nixdorf Informationssysteme AG 1995
Pfad: D:\O7613e6\u7613e.k11
Troubleshooting
The first item to check is the physical network. The majority of today’s networking hardware
provides status indicators that can be used to assess the state of the various network links
(for example, 10-Base-T Hubs use LEDs). Always check these links for any signs of
problems with the physical network such as excessive re-transmissions, Link Integrity
mismatches, and jabber conditions.
Even in cases in which only a single client is affected, never assume that is it not a bad
cable connection. For a single client it is easy to check to determine whether the problem
occurs regardless of which server the client tries to use.
If a client cannot “see” anything on a network that is otherwise functioning without incident,
then it is safe to assume that the problem is related to that client’s network configuration. If
however, that same client can see other nodes on the network but cannot connect to a
particular server, then the network path to that server, the server itself, or the account being
used by that client are likely candidates for trouble.
There are several third-party products available that can be used to monitor the health of
the physical network. It is worthwhile to check network traffic periodically with one of these
devices to see whether there are problems occurring with the physical network.
Step 2: Verify the Transport Protocol Status
If the physical network appears to be functioning properly, the next step is to determine
whether the various computers on the network can “see” each other from the perspective
of a transport protocol. Most transport protocol applications include a connectivity test tool
that can be used to verify connectivity at the transport level between a client and the server
over the network.
If you cannot PING a server machine from a particular client, then neither will that client
computer be able to connect to the server. If you cannot PING a server from several client
computers, then one of the following conditions may be present: the server is not running,
the transport protocol is not running, or there is a configuration problem that is disrupting
network connectivity.
Review the recommendations in your transport protocol software documentation. If appropriate, continue with the procedures described later in this section on assessing the status
of the NetBIOS protocol and Advanced Server.
Step 3: Verify the NetBIOS Protocol Status
Check the NetBIOS protocol layer. Most NetBIOS modules provide test tools that test the
connectivity between NetBIOS names over the network.
Product Manual
U7613-J-Z815-6-76
Troubleshooting Procedures
Connectivity between nodes using TCP/IP may be available but if connectivity between
NetBIOS names is not working then Advanced Server will not work. All Advanced Server
communications are based on NetBIOS name sessions. Use the test tools provided with
your protocol software to verify NetBIOS level connectivity. If you find a problem, isolate it
according to the information provided with the NetBIOS protocol documentation.
© Siemens Nixdorf Informationssysteme AG 1995
Pfad: D:\O7613e6\u7613e.k11
Troubleshooting
Step 4: Verify UNIX System Functionality
If all of the network connectivity modules check out properly, the next item to verify is the
UNIX operating system on the computer hosting Advanced Server. The operating system
provides a variety of log files and system checks that can be performed to verify proper
operation. For information on these checks, see your UNIX system administrator documentation.
Advanced Server is particularly sensitive to the following system problems:
●
Insufficient disk space in critical file systems such as root ( / ) or /var.
●
Insufficient system memory causing excessive swapping.
●
CPU bound conditions.
●
Unbalanced disk loads.
●
Improperly tuned kernel parameters such as maximum number of open files or
maximum number of locks.
Operating system problems usually will affect all or most client computers connected to the
server. Do not spend much time on this step if you are troubleshooting an individual client
problem.
Step 5: Isolating Problems on the Advanced Server
If you determine that all of the underlying software is functioning properly, then you should
check Advanced Server for problems. Problem isolation on the server often is dependent
on the type of problem reported by the user community.
If only a single user is experiencing a problem, then you can narrow your focus quickly to
the operations that this user is attempting to perform.
If a group of users is experiencing problems but many other users are not, then you should
look for a common thread among the users with problems. For example,
Product Manual
●
Are they on the same hub?
●
Are they using the same applications or printers?
●
Are they on the same lmx.srv process?
●
Are they members of the same Advanced Server group?
U7613-J-Z815-6-76
Troubleshooting Procedures
If all users of a server are experiencing a problem, then you should start with more basic
assessments of the state of the server. These are described in the following sections.
© Siemens Nixdorf Informationssysteme AG 1995
Pfad: D:\O7613e6\u7613e.k11
Troubleshooting
Is the Server Running?
It is worthwhile to verify that the server is actually running. You can do this easily by entering
the following command at the system command prompt:
asx status
The system display should include the following (at a minimum):
AS/X / NetBIOS processes:
UID
root
root
root
root
PID PPID C
STIME
19787
1 0 15:17:08
19916 19836 0 15:17:14
19945
1 0 15:17:16
19836
1 0 15:17:11
TTY
?
?
?
?
TIME
0:00
0:04
0.06
0:01
CMD
nbrfcdaemon
lmx.srv -s 1
lmx.dmn
lmx.ctrl
This display indicates that the three required server processes are in fact running, the
daemon (lmx.dmn), the control process (lmx.ctrl) and at least one worker process (lmx.srv).
You also may see other processes, such as lmx.browser and lmx.alerter.
The NetBIOS process nbrfcdaemon is always required.
Additional multiple worker processes, each with a unique number displayed at the end of
the line, may be displayed. The server spawns new worker processes based on the number
of clients supported by the server. As more client sessions are started, more lmx.srv
processes may be started, each with a unique process ID and number. This is normal.
If the server is not running, use the net start server command at the command prompt.
Are All of the Server Services Running?
If one of the required server processes is not running, determine whether all of the server
services started properly. A situation can occur when several server processes are running
but you still cannot use the server because a particular service did not start. This is
especially true for the Net Logon service. To check which services are running, enter the
following command at the command prompt:
net start
The system displays a list of the services that currently are active on the server.
It is critical that the Net Logon and Server services are displayed. If they are not shown,
then the server has a problem. Often the Net Logon service will not start because of a
problem with the server name, domain name, or domain configuration.
Check the error logs for problems as described later in this chapter.
Product Manual
U7613-J-Z815-6-76
Troubleshooting Procedures
Are There Messages in the Error Logs?
© Siemens Nixdorf Informationssysteme AG 1995
Pfad: D:\O7613e6\u7613e.k11
Troubleshooting
Always check the error logs used by the server. You can view the system, security, and
application logs from a client computer using Event Viewer or at the system console using
the elfread command. You also can view the logs in the PRINTLOG share area if there is
a printing-related problem. For problems related to server startup, you can check the
lmxstart.log located in the /var/opt/lanman/logs directory.
If there are entries in any of these logs, save them for future reference. Never discard or
overwrite error messages since they may indicate the cause of the problem. These logs
may have to be supplied to support personnel at a later date.
The following message is particularly indicative of a server problem:
An Advanced Server for UNIX systems process with pid <no> unexpectedly
terminated.
This message indicates that a server process has encountered an unexpected error.
Depending on how your server is configured, there may be a core file located on your
system.
If the value of the CoreOk keyword is set to 1 (yes) in the Advanced Server Registry, then
a core file is located somewhere on the system. The CoreOk value is in the following key:
SYSTEM\CurrentControlSet\Services\AdvancedServer\ProcessParameters
Go to the root directory, and execute the following command to search the file system for
core files:
find . -name "core*" -print
Save any files that you may find. If the coreok parameter is set to no, then core files will not
be created. You may want to set the coreok keyword to yes in order to capture core files
which are useful for debugging purposes.
Product Manual
U7613-J-Z815-6-76
Troubleshooting Procedures
Are All of the Server Resources Properly Shared?
© Siemens Nixdorf Informationssysteme AG 1995
Pfad: D:\O7613e6\u7613e.k11
Troubleshooting
Some server resources are shared automatically every time the server is started. These
resources are used in the background by clients while performing other server activities.
The list of resources shared by default are as follows:
ADMIN$
C$
D$
DOSUTIL
IPC$
LIB
NETLOGON
OS2UTIL
PRINTLOG
PRINT$
USERS
The resources followed by a dollar sign ($) are special resources required for server
administration and communication. (An additional special resource — REPL$ — is
available when the Directory Replicator service is running.)
Never attempt to delete or re-share these resources. If any of these resources are absent,
the server will not function properly. If you detect that one of these resources is missing,
stop and restart the server to determine whether they are shared at server startup. If they
are not displayed, contact your service representative.
The remaining resources are default resources typically used by clients during logon
(NETLOGON), to connect to home directories (USERS), and to access utilities or error logs
(DOSUTIL, OS2UTIL, PRINTLOG). These items may be deliberately absent from your
server. However, if you did not unshare them, then a problem with the server caused them
to be removed.
Can the Server be Contacted From the Console?
A simple test can be conducted to determine whether the server is communicating over the
network. Issue the following command at the system console.
net view
The system displays the name of the server and other servers operating in the same
domain. If your server name is displayed, execute the same command, adding the server
name:
net view \\asutrial
Product Manual
U7613-J-Z815-6-76
Troubleshooting Procedures
The system displays a list of shared resources similar to the following:
© Siemens Nixdorf Informationssysteme AG 1995
Pfad: D:\O7613e6\u7613e.k11
Troubleshooting
Shared resources at \\asutrial
Advanced Server for UNIX Systems
Share name Type
DOSUTIL
LIB
NETLOGON
OS2UTIL
PRINTLOG
USERS
Disk
Disk
Disk
Disk
Disk
Disk
Used as
Comment
DOS Utilities
Programming Aids
Logon Scripts Directory
OS/2 Utilities
LP printer messages
Users Directory
Other entries may be displayed if you added shared resources to your server.
If either of these commands fails consistently, then there is a problem with broadcast
communications over the network. If these commands succeed, you can use the tests in
the next section.
Is the Server Supporting a Maximum Number of Users?
When a connectivity problem occurs, ensure that your server has not exceeded the
maximum number of clients that it is configured to support. This number is indicated by the
maxclients parameter in the server lanman.ini file. It can be displayed using the
srvconfig - g maxclients command.
Has the Advanced Server Registry Been Corrupted?
Execute the regcheck -C command to determine whether the internal format of the registry
file has been corrupted. If this command detects corruption, execute the regcheck -R
command to repair the registry file.
If invalid values have been entered in the Advanced Server Registry, the you can use the
regload command to reinitialize all registry values to their defaults.
Can the Server be Contacted From a Client?
Attempt to log on to the server from a client computer. If the logon is successful, link a virtual
drive ID to a shared resource. Then, view the contents of the linked drive.
If you have problems with these steps, isolate each problem using the following procedure.
Product Manual
U7613-J-Z815-6-76
Different System Access Permissions
11.2.3 Troubleshooting a Shared Resource
© Siemens Nixdorf Informationssysteme AG 1995
Pfad: D:\O7613e6\u7613e.k11
Troubleshooting
If you can communicate with the server but cannot access a shared resource, check the
following items:
1. Verify that the shared resource exists by using the net view \\servername command. If
the shared resource name is not displayed, then it does not exist. In that event, you
must re-share the resource.
2. Link to the shared resource while logged in as administrator. If this fails and the
resource exists, then the resource may be shared incorrectly. Delete and re-share the
resource. If this succeeds, then proceed to the next step.
3. If the resource is a disk resource, check both levels of permissions associated with the
shared resource. First check the share permissions using Server Manager. Then check
the permissions on the shared directory using Windows Explorer at an administrative
client.
Verify that the resource can be used using either group membership or on a peraccount basis for that particular user. Also, verify that the access permissions on the
resource allow the desired action to be performed (for example, the user has read-only
permission but is attempting to edit a file). Also verify that the maximum user limit for a
particular shared resource is not being exceeded.
4. On the shared resource, check the file attributes and the UNIX system access permissions.
If necessary, use the MS-DOS attrib or the OS/2 chmod command to change the file
attributes. You also can use the Properties menu in Windows Explorer.
Use the udir command to display UNIX system permissions (user, owner, group).
11.3 Differences Between System Access Permissions
This section describes the differences between the access permissions of the UNIX system
and a network running Advanced Server software. It explains the UNIX system access
permissions — how to display them and how to change them with the uchmod command.
The uchmod command is available as both MS-DOS and OS/2 executable command and
resides in the DOSUTIL and OS2UTIL shared directories.
An Advanced Server is a computer that also is running the UNIX operating system. All of
its files also are UNIX system files with their own set of UNIX system access permissions.
Product Manual
U7613-J-Z815-6-76
Different System Access Permissions
UNIX system access permissions on an Advanced Server file will be compatible with the
Advanced Server only if the UNIX system access permissions are changed explicitly. If these
UNIX system access permissions are modified, they can prevent access to a file or
directory even if Advanced Server access permissions grant access.
© Siemens Nixdorf Informationssysteme AG 1995
Pfad: D:\O7613e6\u7613e.k11
Troubleshooting
For example, if a user has Advanced Server change permission for a file, then this file
needs to have the UNIX system equivalent of change permission (RWX) in order for the
user to perform all of the operations allowed by the Advanced Server change permission
(read, write, create, and execute).
However, if you changed the file’s UNIX system permissions, eliminating the write (W)
permission for everyone other than the file’s owner, then no one but the owner can alter or
remove the file, regardless of the generous Advanced Server permissions.
Advanced Server automatically adds the appropriate UNIX system access permissions
when files and directories are created on the network. These permissions are determined
by two keywords in the Advanced Server Registry: UnixFilePerms and
UnixDirectoryPerms.
Check whether the values assigned to these keywords provide the desired UNIX system
protection for your files and directories. These keywords are in the following key:
\SYSTEM\CurrentControlSet\Services\AdvancedServer\FileServiceParameters
For more information, see the chapter “Advanced Server Registry”.
For more information about security and access permissions, see the manual “Concepts
and Planning”.
11.3.1 UNIX System Access Permissions
The UNIX system assigns access permissions to all directories and files. These UNIX
system access permissions, together with Advanced Server file and permissions,
determine whether you can read, write, or create directories and files on the server.
i
It is not necessary to know the UNIX system access permissions assigned to directories and files unless these access permissions prevent access when Advanced
Server permissions appear to allow access.
Access is determined through access permissions assigned by Advanced Server and the
UNIX system. Advanced Server access permissions assigned to files or directories are
based on the access permissions assigned to the individual user. These access permissions can be found in the access control list that resides on Advanced Server.
Product Manual
U7613-J-Z815-6-76
11.3.1.1
© Siemens Nixdorf Informationssysteme AG 1995
Pfad: D:\O7613e6\u7613e.k11
Troubleshooting
Different System Access Permissions
UNIX System Group Permissions and Advanced Server
The effect of setting UNIX system group permissions on Advanced Server files is limited.
In the UNIX system, the group field is used for storing information about file attributes.
When a file is accessed from a client computer, its group may change to reflect its attributes
(for example, to DOS----). Therefore, it is inadvisable to rely on UNIX system group permissions to restrict access to Advanced Server files.
11.3.1.2
UNIX System Permissions on Directories
UNIX system permissions on all directories in the path leading to a file must be at least read
and execute (RX) for users to access files on Advanced Server successfully.
11.3.1.3
Turning Off UNIX System Permission Checking
If the protection of Advanced Server files provided by UNIX system permissions can be
ignored, and if it is appropriate to rely solely on Advanced Server permissions to manage
file access, you can set the IgnoreUnixPermissions keyword to 1 (ignore UNIX system
permissions) in the Advanced Server Registry. This keyword is in the following key:
\SYSTEM\CurrentControlSet\Services\AdvancedServer\FileServiceParameters
This will cause Advanced Server to ignore all UNIX system permissions on files except for
read-only permissions, which are translated into read-only file attributes when client
computers attempt to access files.
!
Note that the setting IgnoreUnixPermissions=1 is effective only if the UnixQuotas
parameter is set to 0.
For more information about the Advanced Server Registry, see the “Advanced Server
Registry” chapter.
11.3.1.4
UNIX System File and Directory Permissions
UNIX system file and directory permissions are assigned by a default set of access permissions on the system upon creation of files and directories. The UNIX system distinguishes
the following three types of users with respect to access permissions:
1. User — If you own a UNIX system file or directory, you can assign it access permissions
for yourself. For example, to prevent unauthorized users from executing a program, you
can assign execute permissions to yourself only.
2. Group — You can assign permissions for other users in your group to files and directories that you own. When your administrator creates your home directory, you are
automatically assigned to the UNIX system group other, as are all others with home
directories. This assignment enables you to share data easily with other network users,
but prevents UNIX system users in different groups from reading or changing your files.
Product Manual
U7613-J-Z815-6-76
Different System Access Permissions
3. Other — You can assign access permissions to files and directories that you own for
all UNIX system users other than yourself and the users in your group. Depending on
your needs, you can allow these other users to read or change your files and directories
or you can prevent such access. Restricting access to others does not affect your own
access to the files and directories.
© Siemens Nixdorf Informationssysteme AG 1995
Pfad: D:\O7613e6\u7613e.k11
Troubleshooting
When a user attempts to access a file or directory, access to the server is allowed or denied
depending on the permissions assigned to that user.
11.3.1.5
Understanding UNIX System Access Permissions
You can use the udir command to check the current UNIX system access permissions of
any file or directory. The Modes column of the udir command shows the UNIX system
access permissions for each file and directory. These access permissions are displayed as
three sets of three access permissions each. The first set shows the user/owner access
permissions. The second set shows the group access permissions. The third set shows the
access permissions provided to other UNIX system users. Following are the access
permissions abbreviations and their meanings:
Permission
Description
r
Permission to display or read the file or directory.
w
Permission to modify or write to the file or to create or remove files in the
directory.
x
Permission to execute the file or move to the directory. Client application
files do not need execute permission because they execute under the client
computer’s operating system, not the UNIX system.
-
The relevant permission is denied.
l
Mandatory locking is enabled.
The following access permissions rarely appear in a display but are described here for
completeness:
Permission
Product Manual
Description
s
Whenever a file with this permission is executed, regardless of who
executes it, the invoked process takes on the identity of the file’s owner
(or group) for the duration of the execution.
t
If space is available, a text file with this permission stays in swap space
after execution. This permission speeds UNIX system program loading.
U7613-J-Z815-6-76
11.3.1.6
© Siemens Nixdorf Informationssysteme AG 1995
Pfad: D:\O7613e6\u7613e.k11
Troubleshooting
Solving Browsing Problems
Changing UNIX System Access Permissions
You can use the uchmod command from a client computer to change the UNIX system
access permissions for files and directories.
With the uchmod command, you enter only the access permissions you want to change.
You do not have to enter all of the permission characters. For example, to change the write
permission on a file named budget so that it cannot be modified, you would enter the
following command:
uchmod -w budget
11.3.1.7
Maintaining Permissions for Specific Files
Some programs, such as Microsoft Word, maintain temporary files by renaming the source
file to a temporary name. Then, when the user saves the file, these programs create a new
file with the name of the source file. The temporary file is then deleted.
The permissions that have been assigned to a specific file are not assigned to the new file
which has the same file name. These permissions apply only to the original file which was
renamed to the temporary file name and then deleted. The updated file is treated as a
completely new file by Advanced Server which means it inherits the permissions of the
directory in which it resides.
Files that are likely to go through this kind of updating process should be maintained in
directories that have the permissions you want these files to inherit.
11.4 Solving Browsing Problems
Some of the common problems that you may encounter while using the Computer Browser
service are listed below, followed by recommended resolutions.
Problem
The display that results from executing a net view command from a LAN Manager server
does not contain any of the Advanced Server computers that are in the domain.
Product Manual
U7613-J-Z815-6-76
Solving Printing Problems
Resolution
© Siemens Nixdorf Informationssysteme AG 1995
Pfad: D:\O7613e6\u7613e.k11
Troubleshooting
Edit the Advanced Server Registry to change the value of the LmAnnounce keyword to 1
(yes). Advanced Server then will broadcast LAN Manager-style server announcements.
The LmAnnounce keyword is in the following key:
System\CurrentControlSet\Services\LanmanServer\Parameters
The server must be stopped and re-started for the change to take effect.
Problem
The browse list on the backup domain controller does not contain all of the domain servers.
For example, the list of servers that is displayed as a result of executing the net view
command from a backup domain controller is incomplete.
Resolution
It can take as long as 12 minutes for the system to update the browse list. The administrator
can edit the Advanced Server Registry on the backup domain controller to change the value
of the BackupUpdate keyword to the value (in seconds) for which updates are desired.
Note that increasing the browse update frequency will generate increased network traffic.
The BackupUpdate keyword is located in the following key:
SYSTEM\CurrentControlSet\Services\Browser\Parameters
The Computer Browser service must be stopped and restarted for the change to take effect.
For more information on changing registry values, see chapter “Advanced Server Registry”.
11.5 Solving Printing Problems
Some of the common problems that may arise when using shared printer queues are listed
below, followed by recommended resolutions.
Problem
Windows NT client computers cannot connect to the printer.
Product Manual
U7613-J-Z815-6-76
Solving Printing Problems
Resolution
© Siemens Nixdorf Informationssysteme AG 1995
Pfad: D:\O7613e6\u7613e.k11
Troubleshooting
You must associated the printer with an appropriate driver. Follow these steps to change
the printer-driver association:
1. From a Windows NT client computer, select the printer whose driver you wish to change
in the Printers folder.
2. Click on Printer Properties. If you receive a Printer Properties error, select “No”. This
may occur if a valid printer driver already has been installed.
3. Select the correct printer driver.
4. Share the printer if it is not already shared.
You may need to insert the Windows NT CD to obtain the appropriate driver. The system
will confirm that the printer driver is being uploaded to the Advanced Server.
Problem
Changes made to Windows NT client printers and jobs are not displaying automatically.
Resolution
Manually refresh the screen by pressing F5 key. This is required to update the screen
whenever you pause, resume, delete, or add printers.
Problem
Printer name is invalid.
Resolution
Ensure that the printer name does not contain any spaces, and that the share name is the
same as the printer name.
Problem
There is no separator page.
Resolution
You cannot use Windows NT to create separator pages in Advanced Server. Use the net
print command at the Advanced Server command prompt to create and modify separator
pages.
Product Manual
U7613-J-Z815-6-76
Solving Printing Problems
Problem
© Siemens Nixdorf Informationssysteme AG 1995
Pfad: D:\O7613e6\u7613e.k11
Troubleshooting
Print jobs in the queue are not printing.
Resolution
1. Verify that the printer cable is connected according to the printer manufacturer’s instructions.
2. Verify that the printer is turned on, selected (on-line), has paper, is not jammed, and has
no other obvious problems.
3. Verify that the printer or printer queue has not been paused, held, or is in error. If it has
been paused or held, continue or restart the printer or print queue.
4. Verify that you can print from the UNIX system console. If not, consult your UNIX
system documentation.
Problem
A shared client printer is connected to parallel port LPT1 or PRN on your client computer.
Print jobs sent to that printer over the network (rather than locally) do not print although print
jobs sent from your owner client computer do print, indicating that the printer itself is operational.
Resolution
Enter the net use command. If the display shows that the LPT1 or PRN port ID is linked to
the printer, unlink that port ID; then link an unused port ID to the printer. The LPT1 or PRN
port must be reserved for the physical connection to the printer.
Problem
You are using an application at a client to which a shared client printer is connected and
occasionally your keyboard locks for a few seconds, especially when a print job is in
progress.
Resolution
This hesitation at the keyboard is normal under these circumstances, especially when the
printer is connected to a serial port.
Product Manual
U7613-J-Z815-6-76
Pfad: D:\O7613e6\u7613e.k11
© Siemens Nixdorf Informationssysteme AG 1995
Troubleshooting
Solving Problems With Unknown File Systems
11.6 Solving Problems With Unknown File Systems
Advanced Server recognizes a subset of the UNIX system file systems. By default, the
server knows only the following types of file systems:
●
hs or cdfs
●
nfs
●
s5
●
sfs
●
ufs
●
vxfs
●
memfs
If you are using a file system other than those recognized by Advanced Server, it will be
treated as an s5 file system.
If you want all of your unknown file systems to be treated as a type other than s5, set the
fsnosupport parameter in the [ fsi ] section of the lanman.ini file to the name of a recognized
file system. Then, stop and restart the server.
If you want to set each unknown file system individually to a specific known file system,
follow these steps:
1. At the UNIX system prompt, type this command and press ENTER:
df -n pathname
Replace pathname with the name of the path to the unknown file system.
The system displays the mount point and file system type as specified by the UNIX
operating system.
2. Set the fsmap parameter in the [ fsi ] section of the lanman.ini file as follows:
unknown:s5,nfs:nfs,vxfs:ufs,sfs:ufs,unixfilesystem:filesystem, ...
Replace unixfilesystem with the name of the file system type returned in Step 1.
Replace filesystem with the name of the Advanced Server file system type you want to
use.
3. Stop and restart the server.
Advanced Server now will map the UNIX file system to the recognized file system you
specified.
For information on how to edit the lanman.ini file, see chapter “Lanman.ini File”.
Product Manual
U7613-J-Z815-6-76
Pfad: D:\O7613e6\u7613e.k11
© Siemens Nixdorf Informationssysteme AG 1995
Troubleshooting
File Name with Umlauts
11.7 File names with umlauts are not visible after an upgrade
AS/X uses a different character set following an update of LAN Manager/X V2.0 or V2.2 or
Advanced Server for UNIX V3.51A10.
As a result, Advanced Server for UNIX file and directory names can no longer be displayed
by the client after an update. A utility is supplied with Advanced Server for UNIX which
renames file and directory names containing umlauts such that these names correspond to
the new character set.
Actions after an update:
The $xASX/etc/mapnames script creates a shell script called $xASX/etc/mapnames.sh when it is
invoked for the first time. This program is invoked automatically when the asxserver package
is installed (or a corresponding service pack). When the script has been executed, a lock
file $xASX/etc/.map.done is created which prevents a further run. The $xASX/etc/mapnames
script is started in the background and only terminated fully when the lock file is available.
The $xASX/etc/mapnames.sh script must not be called before this.
The $xASX/etc/mapnames.sh script renames all files and directories whose names contain an
old-style umlaut. Since it may take several hours to execute this shell script, you should
ensure that the system is not powered down in the meantime.
To repeat this procedure, you have to delete the $xASX/etc/.map.done file first as otherwise
the $xASX/etc/mapnames.sh script will not be created again. You then call the
$xASX/etc/mapnames script, and when this has ended the newly created
$xASX/etc/mapnames.sh script.
Product Manual
U7613-J-Z815-6-76
Pfad: D:\O7613e6\u7613e.k12
© Siemens Nixdorf Informationssysteme AG 1995
12 Advanced Server for UNIX - directories and
files
Following the installation of the network and server software, the following additional paths
are created on your system:
●
/var/opt/nbrfc
●
/var/opt/lanman (contained in the environment variable $xASX)
The following sections list the most important Advanced Server for UNIX files:
Product Manual
Path: /etc/
Comment
init.d/asx
Start/stop script for NetBIOS and server
init.d/asx_name
Only required if pre-installed at factory
init.d/asx_srv
Start/stop script for the server, linked to rc2.d and rc0.d
init.d/asx_wins
Start/stop script for the WINS service
init.d/ms_srv
Start/stop script for the server
init.d/nbrfc
Start/stop script for NetBIOS
rclmx
Advanced Server for UNIX environment variables
rc0.d/<xxx>asx_srv
Link to /etc/init.d/asx_srv for automatic stop. <xxx> represents
K19, for example
rc2.d/<xxx>asx_srv
Link to /etc/init.d/asx_srv for automatic start. <xxx> represents
S99, for example
rc0.d/<xxx>asx_wins
Link to /etc/init.d/asx_wins for automatic stop.
<xxx> represents K20, for example
rc2.d/<xxx>asx_wins
Link to /etc/init.d/asx_wins for automatic start.
<xxx> represents S98, for example
rc0.d/<xxx>nbrfc
Link to /etc/init.d/nbrfc for automatic stop. <xxx> represents
K68, for example
rc2.d/<xxx>nbrfc
Link to /etc/init.d/nbrfc for automatic start. <xxx> represents
S70, for example
U7613-J-Z815-6-76
Pfad: D:\O7613e6\u7613e.k12
© Siemens Nixdorf Informationssysteme AG 1995
Advanced Server for UNIX - directories and files
Product Manual
Path: /opt/
Comment
readme/asx.D/
Readme/manual information (German)
readme/asx.GB/
Readme/manual information (English)
Path: /usr/bin/
Comment
NET
Link to /var/opt/lanman/bin/net
asx
Link to /var/opt/lanman/bin/asx
dos2unix
Link to /var/opt/lanman/bin/dos2unix
euctosjis
Link to /var/opt/lanman/bin/euctosjis
findbrow
Link to /var/opt/nbrfc/bin/findbrow
lmpaths
Link to /var/opt/lanman/bin/lmpaths
lmshell
Link to /var/opt/lanman/bin/lmshell
lmx
Link to /var/opt/lanman/bin/lmx
midl
Link to /var/opt/lanman/bin/midl
nbrfc
Link to /var/opt/nbrfc/bin/nbrfc
nbrfcdiag
Link to /var/opt/nbrfc/bin/nbrfcdiag
nbtstat
Link to /var/opt/nbrfc/bin/nbtstat
net
Link to /var/opt/lanman/bin/net
sjistoeuc
Link to /var/opt/lanman/bin/sjistoeuc
ud
Link to /var/opt/lanman/bin/ud
unix2dos
Link to /var/opt/lanman/bin/unix2dos
uuidgen
Link to /var/opt/lanman/bin/uuidgen
wins
Link to /var/opt/lanman/bin/wins
Path: /usr/include/
Comment
lmx
Link to /var/opt/lanman/include
sys/nbrfc.h
Include file for NetBIOS driver
U7613-J-Z815-6-76
Pfad: D:\O7613e6\u7613e.k12
© Siemens Nixdorf Informationssysteme AG 1995
Advanced Server for UNIX - directories and files
Product Manual
Path: /usr/lib/
Comment
libasu437.so
Link to /var/opt/lanman/lib/libasu437.so
libasu850.so
Link to /var/opt/lanman/lib/libasu850.so
libasulang.so
Link to /var/opt/lanman/lib/libasulang.so
libasusec.so
Link to /var/opt/lanman/lib/libasusec.so
libasusjis.so
Link to /var/opt/lanman/lib/libasusjis.so
liblmx.so
Link to /var/opt/lanman/lib/liblmx.so
liblmxpsi.so
Link to /var/opt/lanman/lib/liblmxpsi.so
libmsrpc.so
Link to /var/opt/lanman/lib/libmsrpc.so
libnbdns.so
Link to /var/opt/nbrfc/lib/libnbdns.so
librpcapi.so
Link to /var/opt/lanman/lib/librpcapi.so
libsam.so
Link to /var/opt/lanman/lib/libsam.so
libtask.so
Link to /var/opt/lanman/lib/libtask.so
msrpc/ip_tcp.so
Link to /var/opt/lanman/lib/msrpc/ip_tcp.so
msrpc/np.so
Link to /var/opt/lanman/lib/msrpc/np.so
snmpd/lib/lmxext.so
From asxsnmp package: Advanced Server for UNIX extension
snmpd/mibs/lmxext.mib
From asxsnmp package: MIB
Path: /usr/share/
Comment
man/mrd/catman/asx/
From asxman package: manual pages for commands and API
functions
Path: /var/opt/
Comment
prntfault
Internal shell script for internal LP error messages
U7613-J-Z815-6-76
Pfad: D:\O7613e6\u7613e.k12
© Siemens Nixdorf Informationssysteme AG 1995
Advanced Server for UNIX - directories and files
Product Manual
Path: /var/opt/lanman/
Comment
clipr/
Directory for shared client printer
customs/
Preprocessor scripts
debug/
For asxdebug package
domains/
Directory with Advanced Server for UNIX account database
include/
Directory with Advanced Server for UNIX include files
lanman.ini
Advanced Server for UNIX configuration file
lanman.old
Saved lanman.ini from upgrade installation
mailslot/
Directory for mailslots
msgfiles/
Directory for internationalized message texts
readme
Description of current changes for Support Center
regfiles/
Directory for registry files
samsave/
Directory for saved SAM database files
sharefile.old
Saved list of shared resources from upgrade installation
spool/
Spool directory
timex/
Directory for internal use
wins/
Directory for WINS database
Path:
/var/opt/lanman/addon/
Comment
psaddon/lp_ops.so
ATTHPI interface to AT&T Spool
psaddon/xpr_ops.so
SPOOLV4 interface to Spool V4.x
Path:
/var/opt/lanman/bin/
Comment
acladm
ACL database administration
addclipr
Command for creating a client printer
asuconfig
Internally used for server configuration
asx
Script for starting and stopping the server
U7613-J-Z815-6-76
Pfad: D:\O7613e6\u7613e.k12
© Siemens Nixdorf Informationssysteme AG 1995
Advanced Server for UNIX - directories and files
Product Manual
Path:
/var/opt/lanman/bin/
Comment
blobadm
Internal command for database administration
chacl
ACL database administration
chdomain
Administration of users and groups
chgroup
Modifies a group
chuser
Modifies a user account
delclipr
Command for deleting a client printer
delshmem
Deletes the Shared Memory before starting the server
domainsids
Command for displaying “account SIDs”
dos2unix
MS-DOS -> UNIX conversion program
elfread
Command for displaying all log files
euctosjis
Program for file conversion to SJIS
fixdb
Used internally by the configuration scripts
fixmemsrv
Used internally by the configuration scripts
getrole
Outputs information on domains and server roles
jobdonmsg
Sends messages about print jobs to workstations
joindomain
Administrator command for changing the server domain
configuration
lmat
Starts a program on the server at a particular time
lmecho
Program with the functionality of net helpmsg
Impaths
Script for setting internal environment variables
lmshare
Program with the functionality of net share
Imshell
Shell to other servers, net use command
lmstat
Program with the functionality of net status
lmx
Link to /var/opt/lanman/bin/asx
lmx.ctrl
Control process
lmx.ep
Endpoint mapper for RPCs
lmx.srv
Server for sessions
lmxstart
Prepares the server start
lmxsvc
Start script for programs under /var/opt/lanman/service
lmxupgrade
Update of the user accounts and access rights of
LAN Manager/X 2.0 and 2.2
U7613-J-Z815-6-76
Pfad: D:\O7613e6\u7613e.k12
© Siemens Nixdorf Informationssysteme AG 1995
Advanced Server for UNIX - directories and files
Product Manual
Path:
/var/opt/lanman/bin/
Comment
lsacl
Outputs ACL information
makemach
Used internally by the installation script
mapuname
Mapping of Advanced Server for UNIX users to UNIX users
midl
Microsoft Interface Definition Language Compiler for UNIX
mpact_chk
Not used by Siemens Advanced Server for UNIX
net
Advanced Server for UNIX command interface
netevent
Sends alerts
pralerter
Sends print alerts
promote
Changes the role of a domain controller
regadm
Administration program for registry (internally used)
regcheck
Program for registry checks and repairs
regconfig
Displays and modifies registry parameters
regload
Administration script for registry (internally used)
regpreload
Internal script for registry administration
regshare
Internally used for upgrade installation
regupgrade
Administration script for registry (internally used)
rmacl
Deletes ACL information
samcheck
Checks and repairs the user account database
seprimary
Used internally by the configuration scripts
setdomain
Internal program for setdomainname
setdomainlang
Sets the server’s domain language
setdomainname
Sets the server’s domain name
setlang
Sets the server’s language
setlpcyc
Script for AT&T Spooler interface
setservername
Sets the server name
setspooler
Sets the server’s Spooler interface
sjistoeuc
Program for file conversion to EUC
srvconfig
Processes the lanman.ini file
srvstat
Program for server status
startsvc
Start program for the service programs
U7613-J-Z815-6-76
Pfad: D:\O7613e6\u7613e.k12
© Siemens Nixdorf Informationssysteme AG 1995
Advanced Server for UNIX - directories and files
Product Manual
Path:
/var/opt/lanman/bin/
Comment
ud
UNIX <-> MS-DOS conversion program
unix2dos
UNIX -> MS-DOS conversion program
userrights
Displays and modifies user rights
uuidgen
RPC-UUID generator for UNIX
wins
Script for starting and stopping the WINS service
winsadm
Administration of WINS database
xprcl
Administration program for Spool 4.x interface
xprpr
Administration program for Spool 4.x interface
xprrun
Administration script for Spool 4.x interface
xprwait
Administration script for Spool 4.x interface
Path:
/var/opt/lanman/datafiles/
Comment:
Directory with Advanced Server for UNIX data
accounts.lm2
Backup of the LAN Manager/X 2.x database
accounts.lmx
LAN Manager/X 2.x database, not used by Advanced Server
for UNIX
acl
ACL database of Advanced Server for UNIX (access control
list)
Builtin
Account database of Advanced Server for UNIX with builtin
accounts
chglog.lmx
Log of account changes
lsa
Advanced Server for UNIX account information
<name>.<no>
External database record, never touch!
prototype
Package description
registry
Advanced Server for UNIX registry information
U7613-J-Z815-6-76
Pfad: D:\O7613e6\u7613e.k12
© Siemens Nixdorf Informationssysteme AG 1995
Advanced Server for UNIX - directories and files
Product Manual
Path:
/var/opt/lanman/etc/
Comment:
Directory for additional Siemens files
accadm
Administration program for saved permissions
accadm.dat
Created by accget
accget
Administration program for saving permissions
addserver
Temporarily adds another servername
asxcheck
Tool for checking installation / configuration of AS/X and
NetBIOS
asxdemover
Reduces a full version to a 2-user demo version
asxinfo
Tool, for collecting information of the installation
asxperf
For AS/X diagnostics
asxpwexp
Sends a UNIX mail about AS/X passwords that are due to
expire
asxpwexp.sam
Example of asxpwexp.usr
asxpwexp.usr
Configuration file for asxpwexp
asxregview
Command for displaying registry values
asxsetup
Program for changing the server configuration
asxupgrade
Upgrade a 2-user demo version to a full version
delserver
Deletes a servername added with addserver
liblmxco.so
Internal shared library
liblmxsup.so
Internal shared library
libXpCLI.so.2
Internal shared library for systems with no Spool V4 installation
libXpNET.so.2
Internal shared library for systems with no Spool V4 installation
lmfile
Command for displaying information on open files
mapnames
Creates a script that converts LM/X umlauts to AS/X umlauts
in file and directory names for all resources
mapnames.sh
Shell script created by mapnames
printadm
Command for printer driver administration
rclmx
Advanced Server for UNIX environment variables, copy of
/etc/rclmx
repladm
Administration command for the replicator service
U7613-J-Z815-6-76
Pfad: D:\O7613e6\u7613e.k12
© Siemens Nixdorf Informationssysteme AG 1995
Advanced Server for UNIX - directories and files
Product Manual
Path:
/var/opt/lanman/etc/
Comment:
Directory for additional Siemens files
userget
Administration program for saving users and groups
Path:
/var/opt/lanman/init.d/
Comment
asx
Link to /var/opt/lanman/bin/asx
asx_name
Only required if pre-installed at factory
asx_srv
Start/stop script for the server
asx_wins
Start/stop script for the WINS service
ms_srv
Start/stop script for the server
Path:
/var/opt/lanman/lib/
Comment
libasu437.so
Library with functions for code conversion
libasu850.so
Library with functions for code conversion
libasulang.so
Library with functions for code conversion
libasusec.so
Library with security functions
libasusjis.so
Library with functions for code conversion
liblmx.so
Library with Advanced Server for UNIX functions
liblmxpsi.so
Library with internal interface to the Spool system
libmsrpc.so
Library with internal interface for RPC
librpcapi.so
Library with RPC-API functions
libsam.so
Library with database functions
libtask.so
Library with task functions
msrpc/ip_tcp.so
Library with RPC functions
msrpc/np.so
Library with RPC functions
U7613-J-Z815-6-76
Pfad: D:\O7613e6\u7613e.k12
© Siemens Nixdorf Informationssysteme AG 1995
Advanced Server for UNIX - directories and files
Path:
/var/opt/lanman/logs/
Comment
appevent.evt
File with application error messages
lmxstart.log
Logfile from server start
secevent.evt
File with monitoring information
sysevent.evt
File with server error messages
Path:
Comment:
/var/opt/lanman/service/ Directory with services
lmx.alerter
Program for the Alerter service
lmx.browser
Program for the Browser service
lmx.dmn
Daemon process for Netlogon service
lmx.extd
SNMP daemon program (in the asxsnmp package)
lmx.netrun
Program for the Netrun service
lmx.nvalert
Program for the Net-View Alerter service (not supported by
Siemens Advanced Server for UNIX)
lmx.repl
Program for the Replication service
lmx.wins
Program for the WINS service
Path:
Comment:
/var/opt/lanman/shares/ Automatically shared directories
Product Manual
asu/repl/
Directory for the Replication service
asu/repl/export/
Export directory for the Replication service
asu/repl/export/scripts/
Export server: Directory with logon scripts
asu/repl/import/
Import directory for the Replication service
asu/system32/
Directory for message dll’s and printer drivers
dos/
Directory with MS-DOS files/programs
lib/
Directory with libraries and header files for MS-DOS and OS/2
os2/
Directory with OS/2 files/programs
printlog/
Directory for the Printer service
U7613-J-Z815-6-76
Pfad: D:\O7613e6\u7613e.k12
© Siemens Nixdorf Informationssysteme AG 1995
Advanced Server for UNIX - directories and files
Path: /var/opt/nbrfc/
Comment
addname
Link to /var/opt/nbrfc/bin/addname
cr_config
Compatible with previous version
delname
Link to /var/opt/nbrfc/bin/delname
get_config
Link to /var/opt/nbrfc/bin/get_config
readme
Description of changes for the Support Center
Path: /var/opt/nbrfc/bin/ Comment
Product Manual
.nbrfc_autoconfig
Optional, only required if pre-installed at factory
add_interfaces32
Internal utility for loading the network interface (32-bit)
add_interfaces64
Internal utility for loading the network interface (64-bit)
add_interfaces
Equivalent to add_interfaces32 or add_interfaces64,
depending on the system
add_names
Internal utility for loading the name table
addname
Loads static NetBIOS names
addwins
Internal utility for loading the WINS addresses
cr_interfaces
Creates the interfaces.cfg configuration file
del_names
Deletes the name table in the driver
delname
Deletes static NetBIOS names in the driver
delwins
Internal utility for deleting the WINS addresses
findbrow
Utility to find the master browser
get_config
Check program for configuration files
mv_names
Creates a new names.cfg file from an old nbrfc.cfg
names2lm
Converts names.cfg to lmhosts format
nbconfig
Displays and controls the interfaces
nbrfc
Link to /etc/init.d/nbrfc
nbrfcdaemon
NetBIOS-RFC daemon
nbrfcdiag32
Diagnostic program for NetBIOS (32-bit)
nbrfcdiag64
Diagnostic program for NetBIOS (64-bit)
U7613-J-Z815-6-76
Path: /var/opt/nbrfc/bin/ Comment
© Siemens Nixdorf Informationssysteme AG 1995
Pfad: D:\O7613e6\u7613e.k12
Advanced Server for UNIX - directories and files
Product Manual
nbrfcdiag
Equivalent to nbrfcdiag32 or nbrfcdiag64, depending on the
system
nbtstat32
NetBIOS status display (32-bit)
nbtstat64
NetBIOS status display (64-bit)
nbtstat
Equivalent to nbtstat32 or nbtstat64, depending on the system
Path:
/var/opt/nbrfc/conf/
Comment
interfaces.cfg
Configuration of the NetBIOS network interface
names.cfg
Configuration of the NetBIOS name table
names.sam
Sample file for names.cfg
nbrfcdaemon.cfg
Configuration of the NetBIOS daemon startup
wins.cfg
Configuration of WINS servers
wins.sam
Sample file for wins.cfg
Path: /var/opt/nbrfc/lib/
Comment
libnbdns.so
Library with functions for the DNS WINS integration
U7613-J-Z815-6-76
Pfad: D:\O7613e6\u7613e.k13
© Siemens Nixdorf Informationssysteme AG 1995
13 Advanced Server Registry
In Advanced Server, most configuration information is centrally stored in a single database
called the Registry. The Advanced Server Registry largely replaces the lanman.ini configuration file which is used in LAN Manager for UNIX Systems and earlier versions of
Advanced Server.
This chapter provides the following information:
●
Overview of the Advanced Server Registry structure.
●
Description of Registry Editor.
●
Description of AS/U Administrator.
●
Descriptions of the Advanced Server Registry keys and values.
For information about the Advanced Server parameters that are stored in the lanman.ini file
and how lanman.ini file parameters are mapped to Advanced Server Registry keys, see
chapter “Lanman.ini File”.
Product Manual
U7613-J-Z815-6-76
Pfad: D:\O7613e6\u7613e.k13
© Siemens Nixdorf Informationssysteme AG 1995
Advanced Server Registry
Advanced Server Registry Structure
13.1 Advanced Server Registry Structure
The Advanced Server Registry is a database organized in an hierarchical structure. It is
composed of subtrees and their keys, and value entries. A key also can contain additional
subkeys.
The following table identifies and defines the Advanced Server Registry subtrees.
Root key name
Description
HKEY_LOCAL_MACHINE
Contains information about the local computer system,
including hardware and operating system data such as
bus type, system memory, device drivers, and startup
control data.
HKEY_USERS
Contains all actively loaded user profiles and the default
profile. Users who are accessing a server remotely do not
have profiles under this key on the server; their profiles
are loaded into the registry on their own computers.
The Advanced Server Registry is stored in the /var/opt/lanman/datafiles directory on the
Advanced Server computer.
13.1.1 Value Entries in the Registry Keys
Each registry key can contain data items called value entries. Keys are analogous to directories, and value entries are analogous to files.
A value entry has three parts: the name of the value, the data type of the value, and the
value itself, which can be data of any length. The three parts of value entries always appear
in the following order.
N a m e
D e p e n d O n S e r v i c e :
D a ta ty p e
R E G _ M U L T I _ S Z :
V a lu e
T c p i p
N b t s y s
S t r e a m s
Data types, such as REG_SZ or REG_EXPAND_SZ, describe the format of the data which
can be up to 1 MB. Data types from 0 to 0x7fffffff are reserved for definition by the system,
and applications are encouraged to use these types. Data types from 0x80000000 to
0xffffffff are reserved for use by applications.
Product Manual
U7613-J-Z815-6-76
Advanced Server Registry Structure
The following table lists and defines the data types currently used by the system.
© Siemens Nixdorf Informationssysteme AG 1995
Pfad: D:\O7613e6\u7613e.k13
Advanced Server Registry
Data type
Description
REG_BINARY
Binary data. For example:
Component Information : REG_BINARY : 00 00 00...
REG_DWORD
Data represented by a number that is 4 bytes long. Many keys for
device drivers and services are this type and can be displayed in
Registry Editor in binary, hexadecimal, or decimal format. For example,
entries for service error controls are this type:
ErrorControl : REG_DWORD : 0x1
REG_EXPAND_SZ
An expandable data string, which is text that contains a variable to be
replaced when called by an application. For example, for the following
value, the string %SystemRoot% will be replaced by the actual location
of the directory containing the Advanced Server system files:
File : REG_EXPAND_SZ : %SystemRoot%\file.exe
REG_MULTI_SZ
A multiple string. Values that contain lists or multiple values in human
readable text are usually this type. Entries are separated by NULL
characters.
AlertNames : REG_MULTI_SZ : Administrator tom
REG_SZ
A sequence of characters representing human readable text. For
example, a component’s description is usually this type:
DisplayName : REG_SZ : Alerter
Product Manual
U7613-J-Z815-6-76
Pfad: D:\O7613e6\u7613e.k13
© Siemens Nixdorf Informationssysteme AG 1995
Advanced Server Registry
Using Registry Editor
13.2 Using Registry Editor
You can use the Registry Editor to view registry entries for the various
components in Advanced Server. You can also use Registry Editor to
modify or add registry entries.
The Registry Editor application, Regedt32.exe, does not appear in any
default folders. It is installed automatically in the %SystemRoot%\system32
folder on Windows NT systems. Click Run on the Start menu or switch to a
command prompt and type regedt32.
13.2.1 Connecting to a Remote Registry
To edit the Advanced Server Registry using the Windows NT Registry Editor, you must
connect to Advanced Server from the Registry Editor of a remote Windows NT computer.
To do so, use the Select Computer command in the Registry menu of the Registry Editor.
Connecting to the Advanced Server Registry remotely will result in the display of the
HKEY_USERS and HKEY_LOCAL_MACHINE subtrees.
For more information about connecting to a remote registry, see “Accessing the Registry of
a Remote Computer” in Registry Editor Help.
i
Product Manual
Using the Windows 95/98 Registry Editor to edit the Advanced Server Registry
remotely is not recommended.
U7613-J-Z815-6-76
Using Registry Editor
13.2.2 Viewing the Registry
© Siemens Nixdorf Informationssysteme AG 1995
Pfad: D:\O7613e6\u7613e.k13
Advanced Server Registry
Registry Editor displays the subtrees of the Registry. The hierarchical structure that
appears in Registry Editor is similar to the hierarchical directory structures of Windows NT
Explorer.
Your ability to make changes to the registry using Registry Editor depends on your access
permissions. Generally, you can make the same kinds of changes using Registry Editor as
your permissions allow for other administrative tools.
Product Manual
U7613-J-Z815-6-76
13.2.2.1
© Siemens Nixdorf Informationssysteme AG 1995
Pfad: D:\O7613e6\u7613e.k13
Advanced Server Registry
Using Registry Editor
Registry Editor Commands
As shown in the following figure, Registry Editor displays data in two panes. The value
entries in the right pane are associated with the selected key in the left pane.
You can use the mouse or commands to manipulate the windows and panes in the Registry
Editor in the same way as in the Windows NT Explorer. For example:
Product Manual
●
Double-click a key name to expand or collapse an entry. Or click commands from the
View and Tree menus to control the display of a selected key and its data.
●
Use the mouse or arrow keys to move the vertical split bar in each window to control
the size of the left and right panes.
●
Click Tile or Cascade from the Window menu to arrange the Registry Editor windows.
●
Click Auto Refresh from the Options menu to update the display continuously. You can
also click one of the Refresh commands from the View menu to update the display of
registry information when Auto Refresh is turned off.
U7613-J-Z815-6-76
Using AS/U Administrator
The following table shows some keyboard methods for managing the display of data in
each Registry Editor window.
© Siemens Nixdorf Informationssysteme AG 1995
Pfad: D:\O7613e6\u7613e.k13
Advanced Server Registry
Procedure
Keyboard action
Expand one level of a selected registry key. Press ENTER.
Expand all of the levels of the predefined
handle in the active Registry window.
Press CTRL + *.
Expand a branch of a selected registry key.
Press the asterisk (*) key on the numeric
keypad.
Collapse a branch of a selected registry key. Press ENTER or (-) on the numeric keypad.
13.3 Using AS/U Administrator
You can modify many of the values in the Advanced Server Registry using the AS/U
Administrator. Using this tool allows you to modify specific keys in the registry which govern
the performance of Advanced Server. Using AS/U Administrator (unlike the Registry Editor)
allows you to choose from among lists of allowable values for each key. In this way, you are
less likely to accidentally corrupt the data in your registry file.
AS/U Administrator is included in the Administrative Tools Package. This optional package
must be installed on a server as described in “Installing Advanced Server for UNIX” in
section “Installing the asxtools and asxtoolsD packages”. Then you must install it on a
Windows NT Workstation (Versions 3.51 or 4.0) computer serving as administrative
network client, as described in chapter “Installing Network and Administrative Client
Software” in section “Installing AS/U Administrator (AS/X Administration Tool)”.
To start AS/U Administrator, click on its icon or execute the Run command in the Windows
NT Start menu. In the Select Computer field, enter the name of the Advanced Server
whose registry file you wish to configure. Configuration data for the selected computer will
be displayed on the AS/U Administrator Version tab. To view or change Advanced Server
Registry values, click on the Policy tab.
i
Product Manual
The AS/X administration program asuadm (AS/U Administrator) is only available in
englisch.
U7613-J-Z815-6-76
Using AS/U Administrator
The following table lists the policies and their associated Advanced Server Registry keys
that can be modified using AS/U Administrator.
© Siemens Nixdorf Informationssysteme AG 1995
Pfad: D:\O7613e6\u7613e.k13
Advanced Server Registry
Policy
Advanced Server Registry Key
Alerter Service
(SYSTEM\CurrentControlSet\Services\Alerter\Parameters)
IncludeMessageHeader
CountNotOnNetworkCache
NotOnNetworkCacheTimeout
Computer Browser (SYSTEM\CurrentControlSet\Services\Browser\Parameters)
Service
MasterUpdate
BackupUpdate
BackupRecovery
MoreLog
Connected Clients (SYSTEM\CurrentControlSet\Services\Netlogon\Parameters)
LogonQuery
QueryDelay
RelogonDelay
(SYSTEM\CurrentControlSet\Services\LanmanServer\Parameters)
AutoDisconnect
File Name Space (SYSTEM\CurrentControlSet\Services\AdvancedServer\
Mapping
FileServiceParameters)
NameSpaceMapping
UniqueSuffixLength
MixedCaseSupport
TruncatedExtensions
MappingSeparator
Netlogon Service (SYSTEM\CurrentControlSet\Services\Netlogon\Parameters)
Scripts
Pulse (PDC only)
Update (BDC only)
Randomize (BDC only)
SSIPasswdAge (BDC only)
Server
Announcement
Product Manual
(SYSTEM\CurrentControlSet\Services\LanmanServer\
Parameters)
Hidden
SrvAnnounce
LmAnnounce
U7613-J-Z815-6-76
UNIX Account
Mapping
© Siemens Nixdorf Informationssysteme AG 1995
Pfad: D:\O7613e6\u7613e.k13
Advanced Server Registry
Using AS/U Administrator
(SYSTEM\CurrentControlSet\Services\AdvancedServer\
FileServiceParameters)
CreateUnixUser
UNIX File System (SYSTEM\CurrentControlSet\Services\Advanced Server\
Integration
FileServiceParameters)
IgnoreUnixPermissions
UnixDirectoryCheck
UnixFilePerms
UnixDirectoryPerms
UseUnixLocks
RootOwnsFilesCreatedOnNFS
UPS Service
(SYSTEM\CurrentControlSet\Services\UPS\Parameters)
IgnoreSIGPWR
PowerFailAddress
PowerFailMessage
PowerMessageInterval
Users Alerts
(SYSTEM\CurrentControlSet\Services\AdvancedServer\
AlertParameters)
AlertAdminOnLicenseOverFlow
AlertUserOnLicenseOverFlow
(SYSTEM\CurrentControlSet\Services\LanmanServer\Parameters)
AccessAlert
ErrorAlert
LogonAlert
Product Manual
U7613-J-Z815-6-76
Pfad: D:\O7613e6\u7613e.k13
© Siemens Nixdorf Informationssysteme AG 1995
Advanced Server Registry
Registry Keys and Values
13.4 Registry Keys and Values
This section describes the Advanced Server Registry keys that are changed during
administration. You may want to modify these values directly using the AS/U Administrator
or a registry editor. You do not need to be concerned with every key in the Advanced Server
Registry; only those keys that you may have reason to change are described.
The Advanced Server Registry keys described in this section are defined in subkeys
located in the following path:
HKEY_LOCAL_MACHINE\SYSTEM\CurrentControlSet\Services
\AdvancedServer
\Alerter
\Browser
\EventLog
\LanmanServer
\LanmanWorkstation
\Netlogon
\Netrun
\Replicator
\UPS
\WINS
i
The server must be stopped and then restarted in order for most changes to the
Advanced Server Registry to take effect.
The following parameters take effect as soon as they are changed:
Registry Path:
SYSTEM\CurrentControlSet\Services\AdvancedServer\FileServiceParameters
\MappingSeparator
\IgnoreUnixPermissions
Registry Path:
SYSTEM\CurrentControlSet\Services\Alerter\Parameters
\AlertNames
\IncludeMessageHeader
Registry Path:
SYSTEM\CurrentControlSet\Services\Browser\Parameters
\BackupUpdate
\MasterUpdate
\BackupRecovery
\MoreLog
Product Manual
U7613-J-Z815-6-76
Registry Keys and Values
Registry Path:
© Siemens Nixdorf Informationssysteme AG 1995
Pfad: D:\O7613e6\u7613e.k13
Advanced Server Registry
(where <logfile> is System, Application or Security)
SYSTEM\CurrentControlSet\Services\EventLog\<logfile>
\MaxSize
\Retention
Registry Path:
SYSTEM\CurrentControlSet\Services\LanmanServer\Parameters
\SrvComment
\SrvAnnounce
\Hidden
Registry Path:
SYSTEM\CurrentControlSet\Services\Netlogon\Parameters
\Pulse
Registry Path:
SYSTEM\CurrentControlSet\Services\Replicator\Parameters
\ExportList
\ExportPath
\GuardTime
\ImportList
\ImportPath
\Interval
\Pulse
\Replicate
\UnixDirectoryGroup
\UnixDirectoryOwner
\UnixFileGroup
\UnixFileOwner
Product Manual
U7613-J-Z815-6-76
Pfad: D:\O7613e6\u7613e.k13
© Siemens Nixdorf Informationssysteme AG 1995
Advanced Server Registry
Advanced Server Key Descriptions
13.5 Advanced Server Key Descriptions
The Advanced Server subkey of the Advanced Server Registry contains the following
subkeys:
HKEY_LOCAL_MACHINE\SYSTEM\CurrentControlSet\Services\AdvancedServer
\AlertParameters
\FileServiceParameters
\NetAdminParameters
\Parameters
\ProcessParameters
\RpcParameters
\ShareParameters
\UserServiceParameters
The following sections describe the entries contained within those subkeys.
13.5.1 Alert Parameters Entries
The Registry path that contains entries for the Advanced Server Alerter service is as
follows:
HKEY_LOCAL_MACHINE\SYSTEM\CurrentControlSet\Services
\AdvancedServer\AlertParameters
AlertAdminOnLicenseOverflow
REG_DWORD
0 or 1
Specifies whether the server sends an administrative alert message when the
maximum allowable number of clients is exceeded.
Default: 0 (message will not be sent)
You can change the value of this key using the AS/U Administrator.
AlertUserOnLicenseOverflow
REG_DWORD
0 or 1
Specifies whether the server sends a message to a client that tried to link but failed
when the maximum allowable number of clients was exceeded.
Default: 0 (message will not be sent)
You can change the value of this key using the AS/U Administrator.
Product Manual
U7613-J-Z815-6-76
Advanced Server Key Descriptions
ConnectTimeout
© Siemens Nixdorf Informationssysteme AG 1995
Pfad: D:\O7613e6\u7613e.k13
Advanced Server Registry
REG_DWORD
0 - infinity
Sets the maximum time in seconds for blocking by the Alerter service if a name to which
an alert is to be sent can be found, i.e. resolved, but the computer is not available.
This setting is also used by the Browser service, if lists of remote computers are
requested whose names can be found, i.e. resolved, but the computers are not
available.
Default: 10
13.5.2 File Service Parameters Entries
The Registry path that contains entries for the Advanced Server file service is as follows:
HKEY_LOCAL_MACHINE\SYSTEM\CurrentControlSet\Services
\AdvancedServer\FileServiceParameters
AclCacheSize
REG_DWORD
0 - 100
Specifies the number of entries in ACL cache which keeps track of the results or recent
access checks performed on Advanced Server resources.
Default: 6
EAFilePrefix
REG_SZ
Character string
Prefix used to name files containing extended attribute data. For example, by default,
the extended attributes for file foo are stored in .EA@foo.
Default: .EA@
EnableSoftCompat
REG_DWORD
0, 1, or 2
Specifies how Advanced Server handles file opens in read-only compatibility mode.
Use 0 to keep the compatibility mode; 1 to translate to read-only/DenyWrite mode for
files with special extensions (for example, .EXE, .COM, and .BAT) specified by the
value of the EnableSoftFileExtensions key; and 2 to translate to read-only/DenyWrite
mode for all file opens.
Default:
1 - for AS/X V4.0A0 (translate files with special extensions to
read-only/DenyWrite)
2 - for AS/X since V4.0A10 (translate to read-only/DenyWrite mode for all file
opens)
Product Manual
U7613-J-Z815-6-76
Advanced Server Key Descriptions
EnableSoftFileExtensions
© Siemens Nixdorf Informationssysteme AG 1995
Pfad: D:\O7613e6\u7613e.k13
Advanced Server Registry
REG_MULTI_SZ
List
Specifies the file extensions for which the compatibility mode will be translated to readonly/DenyWrite if the value of the EnableSoftCompat key is set to 1.
Default: bat com exe dll cmd
ForceDirectoryAcl
REG_DWORD
0 or 1
Determines whether Advanced Server will create an access control list for a newlycreated directory if an explicit access control list was not provided by the client
computer. If an access control list is not created, one will be inherited automatically from
its parent directory whenever it is needed.
Default: 1 (create new access control list)
ForceFileAcl
REG_DWORD
0 or 1
Determines whether the Advanced Server will create an access control list for a newlycreated file if an explicit access control list was not provided by the client computer. If
an access control list is not created, one will be inherited automatically from its parent
directory whenever it is needed.
Default: 0 (will not create new access control list)
ForceFileFlush
REG_DWORD
0 or 1
Specifies whether to force a UNIX fsync(2) system call when an SMB flush request is
received. Not forcing fsync(2) system calls can improve file server performance; files
will be flushed automatically to disk by the UNIX fsflush daemon periodically, regardless
of the setting of this key.
Default: 0 (will not force fsync system call)
IgnoreUnixPermissions
REG_DWORD
0 or 1
Gives users the option to bypass UNIX system permissions when working with files and
directories. For example, enabling this option would allow Advanced Server users to
write to or delete files for which they have sufficient Advanced Server permissions even
though only UNIX system read permissions had been granted to those files.
Default: 0 (enforce UNIX system permissions)
You can change the value of this key using the AS/U Administrator.
!
Product Manual
The parameters UnixQuotas, IgnoreUnixPermissions and UnixDirectoryCheck
depend on each other in the following way:
–
If UnixQuotas is set to 1, the other two parameters are both assumed to be 0
independent of their real registry values.
–
If UnixQuotas is set to 0 and IgnoreUnixPermissions is set to 1, the parameter
UnixDirectoryCheck is assumed to be 2 independent of its real registry value.
U7613-J-Z815-6-76
Advanced Server Key Descriptions
MappingSeparator
© Siemens Nixdorf Informationssysteme AG 1995
Pfad: D:\O7613e6\u7613e.k13
Advanced Server Registry
REG_SZ
Character string up to 7 characters
Specifies the string that will be appended to the file name before its unique suffix to
indicate that the name is mapped. This value matters only in UNIX system to Windows
NT file name mapping. The default is a tilde (~), the same as in UNIX system to 8.3
mapping, but it is possible to set it to enable the client to easily identify files containing
characters illegal in Windows NT. By default, a file named “my?” will be mapped to
“my_~xyz”. When the value of this key is set to “~asu~”, the name will be mapped to
“my_~asu~xyz”. If an invalid parameter is placed in the Registry, the MappingSeparator
will be replaced by the default value.
Default: ~
You can change the value of this key using the AS/U Administrator.
MaxEASize
REG_DWORD
1 - infinity
Specifies the buffer size in bytes that is allocated for extended attributes.
Default: 4096
MaxFileSizeInKB
REG_DWORD
100 - infinity
The maximum file size, in KBytes, that Advanced Server will allow a user to create on
the server.
Default: 100000
MaxZeroFillInKB
REG_DWORD
0 - infinity
MaxZeroFillInKB controls the amount of space in KB that is zero filled when a client
performs a zero length write. NT clients use zero length writes to pre-allocate disk
space when copying files. On UNIX, disk space is not allocated to an extended file
unless it is physicall written to.
Advanced Server has to write physically to the disk and this takes time within one SMB
request. Some clients might get a timeout while Advanced Server is allocating the disk
space. If a very large file is copied from an NT client to an Advanced Server share and
the file sizes exceeds MaxZeroFillInKB, all of the disk space for that big file will not be
allocated on the Advanced Server machine.
Default: 50000 (50 MB)
MemoryMapFiles
REG_DWORD
0 or 1
Specifies whether the server uses the UNIX system mmap system call to memory map
file data into the server's address space for efficiency. File mapping is attempted only
for read-only files.
Default: 1 (memory map read-only files)
Product Manual
U7613-J-Z815-6-76
Advanced Server Key Descriptions
MixedCaseSupport
© Siemens Nixdorf Informationssysteme AG 1995
Pfad: D:\O7613e6\u7613e.k13
Advanced Server Registry
REG_DWORD
0 or 1
Specifies whether mixed-case support is enabled on the server. Mixed-case support
allows clients to access file names containing uppercase characters on the UNIX
system. Enabling mixed-case support may negatively affect the server’s performance.
Default: 0 (make all file names lowercase)
You can change the value of this key using the AS/U Administrator.
NameSpaceMapping
REG_DWORD
0, 1, 2, or 3
Specifies the type of file name space mapping enabled on the server.
A value of 0 indicates that there is no name space mapping enabled.
A value of 1 specifies that only UNIX system to 8.3 mapping is enabled. This allows
8.3-style clients, such as MS-DOS, Windows 3.1, and Windows for Workgroups, to
access files with long file names and file names containing characters that are invalid
in DOS ( + , ; = [ ] ? “ \ < > * | : . [space] )
A value of 2 specifies that only UNIX system to Windows NT mapping is enabled. This
allows Windows NT-style clients, such as Windows 95/98, Windows NT, and OS/2, to
access files with file names containing characters that are illegal in Windows NT (? “ \
< > * | :).
A value of 3 specifies that both UNIX system to 8.3 and UNIX system to Windows NT
mappings are enabled.
Default: 3
You can change the value of this key using the AS/U Administrator.
NfsCheck
REG_DWORD
0 or 1
Specifies whether to check if this is an NFS file system before setting record locks.
Default: 0 (no check)
OplockTimeout
REG_DWORD
1 - infinity
The interval of time (in seconds) that the server waits for acknowledgment from a client
of an "oplock" broken notification.
Default: 30
ReadAheadCount
REG_DWORD
0 (always read ahead) - infinity
The number of sequential file accesses by a client that the server must detect before it
begins reading ahead.
Default: 2
Product Manual
U7613-J-Z815-6-76
ReportNTFS
© Siemens Nixdorf Informationssysteme AG 1995
Pfad: D:\O7613e6\u7613e.k13
Advanced Server Registry
Advanced Server Key Descriptions
REG_DWORD
0 or 1
Specifies whether to report share UNIX system volumes as NTFS or actual UNIX file
system type.
Default: 1 (report as NTFS)
RootOwnsFilesCreatedOnNFS
REG_DWORD
0 or 1
Specifies whether files on NFS are owned by root or user.
Default: 1 (root owns files)
You can change the value of this key using the AS/U Administrator.
SyncAclFileOnWrite
REG_DWORD
0 or 1
Determines whether the server will force changes to the access control list (ACL) file to
be written to disk using an fsync(2) system call or whether the server will permit the
operating system to write the changes to disk normally.
Default: 0 (write ACL changes to disk normally)
TruncatedExtensions
REG_DWORD
0 or 1
Specifies whether to replace the last character of the file extension of a mapped file
name with a tilde (~). This key applies to file extensions which originally were longer
than 3 characters. This feature can be used to distinguished longer file extensions from
similar 3-character extensions that were unchanged. For example, enabling this feature
prevents a file named file1.document from being mapped to a file named file~xyz.doc
which could cause some clients to consider this file a Microsoft Word file. (This key
affects only UNIX system to 8.3 file mapping.)
Default: 1 (Do not replace last character with a tilde.)
You can change the value of this key using the AS/U Administrator.
UniqueSuffixLength
REG_DWORD
0 to 7
Specifies the length of the alpha-numeric suffix appended to the file name to guarantee
the mapping uniqueness. The longer the suffix, the higher the probability that the
mapped name is unique. If the mapped name is not unique within a directory, name
collisions may occur. They may cause the client to be denied access to the file it needs,
or the client may get access to a different file than the one it requested.
It is not advisable to set UniqueSuffixLength to a value less than 3, unless the preservation of a longer file name prefix outweighs possible name collision problems.
Default: 3
You can change the value of this key using the AS/U Administrator.
Product Manual
U7613-J-Z815-6-76
UnixCloseCount
© Siemens Nixdorf Informationssysteme AG 1995
Pfad: D:\O7613e6\u7613e.k13
Advanced Server Registry
Advanced Server Key Descriptions
REG_DWORD
1 - 20
The number of least-recently accessed open files that the server closes transparently
to avoid reaching the UNIX system’s per-process limit. The server uses a technique
called file descriptor multiplexing to allow clients to open far more files than the perprocess limits would normally allow.
Default: 5
UnixDirectoryCheck
REG_DWORD
0, 1, or 2
Specifies whether Advanced Server will allow clients to write to UNIX system directories
that do not have write permissions. Microsoft client software treats the “Read-Only”
attribute as advisory and does not limit the behavior of directories. In contrast, the UNIX
system treats “Read-Only” permissions as mandatory and prohibits users from writing
in directories for which they do not have write permission.
A value of 0 allows writing only to directories with write permissions; a value of 1 allows
writing to directories belonging to or created by Advanced Server (as determined by
checking group memberships of directory); and a value of 2 ignores UNIX system
directory permissions.
Default: 1
You can change the value of this key using the AS/U Administrator.
!
The parameters UnixQuotas, IgnoreUnixPermissions and UnixDirectoryCheck
depend on each other in the following way:
–
If UnixQuotas is set to 1, the other two parameters are both assumed to be 0
independent of their real registry values.
–
If UnixQuotas is set to 0 and IgnoreUnixPermissions is set to 1, the parameter
UnixDirectoryCheck is assumed to be 2 independent of its real registry value.
UnixDirectoryPerms
REG_DWORD
0 - 511
The UNIX system permissions for newly-created directories.
Default: 509 (0775 octal)
You can change the value of this key using the AS/U Administrator.
UnixFilePerms
REG_DWORD
0 - 4095
The UNIX system permissions for newly-created files.
Default: 1460 (02664 octal)
You can change the value of this key using the AS/U Administrator.
Product Manual
U7613-J-Z815-6-76
UnixQuotas
© Siemens Nixdorf Informationssysteme AG 1995
Pfad: D:\O7613e6\u7613e.k13
Advanced Server Registry
Advanced Server Key Descriptions
REG_DWORD
0 or 1
This parameter configures the restriction of disk space for “normal” UNIX users,
both for UNIX disk quota functionality and for using reserved disk space.
i
Specifies whether writing to files is performed under the UNIX user ID (UID) of the UNIX
system user to which the Advanced Server user is mapped.
Effects of the parameter on preserving the reserved disk area:
The files are written to under the UID of the relevant UNIX user. If this UID is not “0”, it
is not possible to write to the reserved disk space. The reserved disk space is then no
longer counted when displaying the free disk space.
Effects of the parameter on UNIX disk quota functionality:
Specifies whether Advanced Server provides UNIX system disk quota support. This
ensures that creating or writing to the file is performed under the UNIX system UID of
the UNIX system user to which the Advanced Server user is mapped. Each action
counts toward that user’s quota; an error message is sent to the client when the quota
is exceeded. Two quotas are supported: i-node and block quotas for UFS and NFS file
systems. This is true to the extent of the ability of these file systems to support UNIX
system quotas.
See also the chapter: “Restricting the user’s disk space”.
Default: 0 (no restriction of disk space)
!
The parameters UnixQuotas, IgnoreUnixPermissions and UnixDirectoryCheck
depend on each other in the following way:
–
If UnixQuotas is set to 1, the other two parameters are both assumed to be 0
independent of their real registry values.
–
If UnixQuotas is set to 0 and IgnoreUnixPermissions is set to 1, the parameter
UnixDirectoryCheck is assumed to be 2 independent of its real registry value.
UseEAs
REG_DWORD
0 or 1
Specifies support for OS/2 extended attributes.
Default: 0 (no support for extended attributes)
UseNfsLocks
REG_DWORD
0 or 1
Specifies whether the server tries to set UNIX system record locks in files as requested
by clients. Record locks may not work on NFS files on a server running NFS. If the value
of the UseUnixLocks key is 0, this feature has no effect on the server.
Default: 0 (do not set locks)
Product Manual
U7613-J-Z815-6-76
UseOplocks
© Siemens Nixdorf Informationssysteme AG 1995
Pfad: D:\O7613e6\u7613e.k13
Advanced Server Registry
Advanced Server Key Descriptions
REG_DWORD
0 or 1
Specifies whether Advanced Server grants opportunistic locks to clients who request
them on opens.
Default: 1 (use opportunistic locks)
UseUnixLocks
REG_DWORD
0-2
Determines how the Advanced Server for UNIX maps file and record locks to the UNIX
file system.
0 : record locks created by clients are not executed in the UNIX file system
1 : record locks created by clients are also executed in the UNIX file system
2 : record locks created by clients are also executed in the UNIX file system and, in
addition, files are opened in non-blocking mode
Default: 0
!
If mandatory locking is used (i.e. the bit for mandatory locking is set in the
UnixFilePerms parameter, e.g. to the default rw-rwlr--) in order to synchronize
non-network enabled client applications with UNIX applications, the setting "2"
prevents the server processes from hanging in the read() and/or write() system
calls and thereby blocking other clients that operate on the same server
process. Instead, the read/write client receives an appropriate error message.
The value of this key can be changed using AS/U Administrator, but only to the value 0
or 1.
VolumeLabel
REG_DWORD
0 or 1
Shows volume lable of physical volume. Especially useful for sharing CD-ROMs.
Default: 0 (show default label)
i
This functionality is not supported with the current version of AS/X V4.0.
WriteBehind
REG_DWORD
0 or 1
Specifies whether physical UNIX system writes are performed before or after the server
responds to the client. If UNIX system writes are performed before the server responds
to the client, then the server appears to be slower (because the response is delayed),
but the server can report disk full errors to clients. If UNIX system writes are performed
after the response is sent, disk full errors during write SMBs are not reported to the
client.
Default: 1 (enable write behind)
Product Manual
U7613-J-Z815-6-76
Advanced Server Key Descriptions
13.5.3 Net Administration Parameters Entries
© Siemens Nixdorf Informationssysteme AG 1995
Pfad: D:\O7613e6\u7613e.k13
Advanced Server Registry
The Registry path that contains entries for the Advanced Server Net Administration is as
follows:
HKEY_LOCAL_MACHINE\SYSTEM\CurrentControlSet\Services
\AdvancedServer\NetAdminParameters
NetAdminGroupName
REG_SZ
Character string
The UNIX system group name assigned to the net admin \\servername /c command.
Default: DOS---NetAdminPath
REG_SZ
Character string up to 256 characters
The UNIX system path used to find commands submitted by the
net admin \\servername /c command.
Default: /var/opt/lanman/bin:/bin:/usr/bin
NetAdminUserName
REG_SZ
Character string
The UNIX system user account name assigned to a process executed by
net admin \\servername /c.
Default: lmxadmin
Product Manual
U7613-J-Z815-6-76
Advanced Server Key Descriptions
13.5.4 Parameters Entries
© Siemens Nixdorf Informationssysteme AG 1995
Pfad: D:\O7613e6\u7613e.k13
Advanced Server Registry
The Registry path that contains entries for the Advanced Server Parameters is as follows:
HKEY_LOCAL_MACHINE\SYSTEM\CurrentControlSet\Services
\AdvancedServer\Parameters
BigEndianLuidCompatibilityMode REG_DWORD 0 or 1
This keyword only applies to to big-endian Advanced Server implementations like
Siemens Advanced Server for RM systems. When the value of this keyword is set to 0,
big-endian Advanced Server return security privilege information to the client only in
INTEL byte order. If the value of this keyword is 1, then this information is returned in
both INTEL and big-endian byte orders. Setting this parameter to 1 allows Windows NT
Version 3.51 clients to administer big-endian Advanced Servers. Windows NT Version
V4.0 or later clients can administer Advanced Server regardless of the setting of this
keyword. The value of this keyword must be set to 0 in order to install Microsoft
Exchange Server correctly on a Windows NT Version 4.0 Server that is a backup
domain controller to a big-endian Advanced Server primary domain controller.
Default: 1
i
Parameter is supported since Advanced Server for UNIX V4.0A10.
CallXpstatDev
REG_DWORD
0 or 1
Controls whether the device status of Spool V4.x is queried or not.
Querying the device status is more time consuming. The current print job on the device
cannot be displayed with CallXpstatDev set to 0.
(Only applicable for Spool V4.x).
Default: 0 (no query)
CheckPrintQueueInMinutes
REG_DWORD
1 - infinity
The interval in minutes at which the server determines whether a printer queues should
be started.
Default: 10 minutes
Product Manual
U7613-J-Z815-6-76
Advanced Server Key Descriptions
DeletedPrintJobTimeOnQ
© Siemens Nixdorf Informationssysteme AG 1995
Pfad: D:\O7613e6\u7613e.k13
Advanced Server Registry
REG_DWORD
0 - infinity
Specifies the time (in seconds) during which deleted print jobs will remain in the internal
print job queue maintained by the lmx.srv process. This behavior can be disabled with
the value 0, which means that the print job is not kept in the internal queue.
This setting avoids a problem printing from some versions of Microsoft Internet Explorer
4.0, which can lead to an NT client continuing to send RPC calls indefinitely because it
could not access a print job that was already deleted.
This key is only evaluated if the AT&T Spooler ("ATTHPI" interface) is configured and
the DisableUpLevelPrinting parameter is set to 0.
Default: 180 (3 minutes)
DisableUpLevelPrinting
REG_DWORD
0 or 1
Specifies whether to disable or enable Windows NT-style printing.
If you chose to disable Windows NT-style printing during an upgrade procedure,
resulting in the setting of this value to 1, then you can enable this feature by changing
this value to 0. See chapter “Installing Advanced Server for UNIX” for more information
about Windows NT-style printing upgrade.
Default: 0
Locale
REG_SZ
Character string
Specifies which locale the Advanced Server will use to translate characters to and from
upper- and lower-case letters.
Values: Any valid LC_CTYPE locale.
Default: De_DE.88591
MaxDirectoryBufferSize
REG_DWORD
1 - infinity
The maximum size of a buffer that the server will use for a getdents(2) system call to
read the contents of a UNIX system directory. Because Advanced Server will attempt
to allocate these buffers using the GC memory allocator, one should consider
increasing the SizeGcBufferPoolInKB key if one increases this value.
Default: 32768 bytes
Product Manual
U7613-J-Z815-6-76
Advanced Server Key Descriptions
MaxIpcTryCount
© Siemens Nixdorf Informationssysteme AG 1995
Pfad: D:\O7613e6\u7613e.k13
Advanced Server Registry
REG_DWORD
1 - infinity
The number of read() system calls after which the server checks to see if other work
could be done by the server. There is a considerable amount of interprocess communication (IPC) between server processes. The server uses the read system call to
receive IPC messages, but read does not always return the entire message. This key
ensures that the server does not keep trying to get an IPC message at the expense of
other activities the process could perform.
Default: 20
MaxMailslotReadTime
REG_DWORD
1 - infinity
The amount of time in seconds to wait for a local mailslot application to read a class 1
mailslot. A value specified here keeps the server from waiting indefinitely for a message
to be delivered.
Default: 90 seconds
MaxMessageSize
REG_DWORD
1024 - 65535
The maximum amount of data that a client can exchange with the server in one
message.
Default: 65535 (bytes)
MaxPrintQueueNameLength
REG_DWORD
1 - 255 characters
Provides dynamic control of the allowable length of the name of a printer queue. LP
subsystem commands currently allow class names to be as large as 255 characters,
but jobs sent to these classes cannot be controlled and many of the UNIX system
commands to manipulate these jobs result in a fatal error. This key is used by printer
queue functions to restrict access to queues based on the length of the queue name.
Default: 14
MaxRawSize
REG_DWORD
8192 - 65535 bytes
Specifies the maximum size (in bytes) of the raw send or receive buffers that the
Advanced Server will use for processing Read Block Raw, Write Block Raw, Transaction, Transaction 2, or NT Transaction SMBs.
Default: 32768
MaxServiceWaitTime
REG_DWORD
5 seconds - infinity
Specifies the amount of time (in seconds) the server will wait for a service to respond
when it changes the following statuses of the services: pause, continue, install,
uninstall.
Default: 60
Product Manual
U7613-J-Z815-6-76
NativeLM
© Siemens Nixdorf Informationssysteme AG 1995
Pfad: D:\O7613e6\u7613e.k13
Advanced Server Registry
Advanced Server Key Descriptions
REG_SZ
Character string
An additional field in the session setup request/response. This field is generated at run
time.
Default: Advanced Server 4.0 for UNIX Systems
NativeOS
REG_SZ
Character string
An additional field in the session setup request/response. This field is generated at run
time.
Default: (Platform-dependent)
SendByeMessage
REG_DWORD
0 or 1
Specifies whether the server sends a message to every client in the domain in the event
that it is going to stop for any reason other than a normal shutdown. The message
states that the Advanced Server has stopped.
Default: 1 (send a message)
SizeGcBufferPoolInKB
REG_DWORD
1 - infinity
The buffer size in KBytes allocated for each server process for client files.
Default: 200 (KBytes)
SpoolinAsUnixUser
REG_DWORD
0 or 1
The parameter is only evaluated if the configured spooler is "SPOOLV4".
If the parameter is set to 1, Advanced Server submits the print jobs to the spooler under
the user ID of the relevant UNIX user who is mapped to the Advanced Server user. For
example, the Advanced Server administrator submits print jobs as the UNIX user
"lmxadmin". This setting allows several spool mechanisms to be better utilized, for
example identifying a user via the banner page or assigning page quotas.
The setting 0 is compatible with Advanced Server versions 3.5 and 4.0A, the print jobs
are transferred to the spooler under the user ID "root".
Default: 0 (spooling is performed under the user ID of "root")
Product Manual
U7613-J-Z815-6-76
Advanced Server Key Descriptions
13.5.5 Process Parameters Entries
© Siemens Nixdorf Informationssysteme AG 1995
Pfad: D:\O7613e6\u7613e.k13
Advanced Server Registry
The Registry path that contains entries for the Advanced Server Process Parameters is as
follows:
HKEY_LOCAL_MACHINE\SYSTEM\CurrentControlSet\Services
\AdvancedServer\ProcessParameters
CoreOk
REG_DWORD
0 or 1
Specifies whether the server can create a core dump file on disastrous failures.
Default: 1 (create core file)
KeepSpareServer
REG_DWORD
0 or 1
Specifies whether the server should have a spare lmx.srv process available for another
client. New client connections are likely to be quicker if this key is enabled.
Default: 1 (start lmx.srv process)
LockNapInMSec
REG_DWORD
1 - infinity
Specifies the length of time in milliseconds that the server sleeps when shared memory
lock contention occurs. The server retries busy locks at intervals specified in this key
until the length of time specified in the value of the MaxLockTimeInSeconds key
elapses.
Default: 10 milliseconds
MaxLockTimeInSeconds
REG_DWORD
5 - infinity
The maximum interval in seconds that a server process waits for a shared memory lock
to become available.
Default: 300 seconds (5 minutes)
MaxVCPerProc
REG_DWORD
0 - 101
The maximum number of virtual circuits that each lmx.srv process should be able to
handle. This limit normally is calculated on the fly by Advanced Server using the value
of the VCDistribution Registry key and the value of the maxclients parameter in the
lanman.ini file. If the value of this key is non-zero, its value is used instead of the calculated value.
Default: 0 (Use value of VCDistribution key)
Product Manual
U7613-J-Z815-6-76
MaxVCs
© Siemens Nixdorf Informationssysteme AG 1995
Pfad: D:\O7613e6\u7613e.k13
Advanced Server Registry
Advanced Server Key Descriptions
REG_DWORD
1 - infinity
The maximum number of virtual circuits that can be established to an Advanced Server
computer. This limit normally is calculated on the fly by Advanced Server using the
value of the maxclients parameter in the lanman.ini file. This key permits administrators
to manually override the sizing of shared memory. Do not change the value of this key.
Default: 1 (Compute maximum number of sessions from maxclients parameter)
MinSmbWorkerTasks
REG_DWORD
0 - 100
Determines how many SMBWORKER tasks are preallocated by lmx.srv processes on
startup. Do not change the value of this key.
Default: 3
MinVCPerProc
REG_DWORD
0 - infinity
The minimum number of virtual circuits that each lmx.srv process should be able to
handle. This limit normally is calculated on the fly by Advanced Server using the value
of the VCDistribution Registry key and the value of the maxclients parameter in the
lanman.ini file. If this value is non-zero, its value is used instead of the calculated value.
Default: 0 (Use value of VCDistribution key)
NumCIStructs
REG_DWORD
0 - infinity
Sizes the CLIENTINFO array in shared memory.
Do not change the value of this key.
Default: 12
NumCLIENT_SESSION
REG_DWORD
5 - infinity
Limits the number of trust relationships that a server can maintain with other domains.
This figure should be at least one greater than the number of domains trusted by the
server’s domain.
Default: 5
NumHashTables
REG_DWORD
8 - infinity (powers of 2)
The number of buckets for the hash table in shared memory to keep track of the various
modes that clients have used to open files and set record locks.
Do not change the value of this key.
Default: 128
Product Manual
U7613-J-Z815-6-76
Advanced Server Key Descriptions
NumSERVER_SESSION
© Siemens Nixdorf Informationssysteme AG 1995
Pfad: D:\O7613e6\u7613e.k13
Advanced Server Registry
REG_DWORD
5 - infinity
Limits the number of servers and Windows NT clients that can authenticate with the
server. This figure should be large because it limits the number of Windows NT clients
that can contact the server. On a primary domain controller, it must be at least the
number of servers and Windows NT clients in the domain.
Default: 100
NumUStructs
REG_DWORD
1 - infinity
The number of structures allocated in shared memory to handle record lock and open
file records. The sum of open files and record locks cannot exceed the value of this key.
Default: 1000
SpareServerTime
REG_DWORD
0 - infinity
The interval in seconds that a spare lmx.srv process is allowed to run without serving a
client before being terminated.
Default: 120 seconds (2 minutes)
StopOnCore
REG_DWORD
0 or 1
Specifies whether the lmx.ctrl process is to stop if it finds that an lmx.srv process has
terminated unexpectedly.
Default: 0 (do not stop Advanced Server)
TimeToDrop
REG_DWORD
0 - infinity
Instable clients can block a processs "lmx.srv" which then cannot answer any more to
queries of the the process "lmx.ctrl". If the value of the parameter is greater than 0, then
the process "lmx.srv" controls the read-write-operations of the clients with this timer. If
the client is down or hanging then the process "lmx.srv" ends the connection with this
client.
Clients which are only inactive will not be influenced. Please change the predefined
values only if in the system log there is an entry "lmx.srv not responding for 180
seconds".
Default: 0 seconds
i
Product Manual
This functionality is not supported with the current version of Advanced Server
for UNIX V4.0.
U7613-J-Z815-6-76
Advanced Server Key Descriptions
VCDistribution
© Siemens Nixdorf Informationssysteme AG 1995
Pfad: D:\O7613e6\u7613e.k13
Advanced Server Registry
REG_MULTI_SZ
List
Specifies the distribution of virtual circuits or sessions over lmx.srv processes. The
architecture of the server allows multiple sessions to be served by each lmx.srv process
on the UNIX system. The server must decide if a new session should be handed off to
an existing lmx.srv process or if a new process should be started. This key specifies the
distribution of sessions over the lmx.srv processes.
Values are entered in sets of three integers separated by commas, each set of three
number on a new line. In each set, the first number specifies the number of clients; the
second is the minimum number of virtual circuits each lmx.srv process should support;
the third is the maximum number of virtual circuits each process should support.
Default:
1,2,12
20,2,20
35,2,24
50,3,28
85,4,28
100,5,32
130,6,36
180,8,42
250,9,44
350,10,50
500,10,60
750,10,80
1000,10,101
Product Manual
U7613-J-Z815-6-76
Advanced Server Key Descriptions
The following table describes the meaning of the default value:
© Siemens Nixdorf Informationssysteme AG 1995
Pfad: D:\O7613e6\u7613e.k13
Advanced Server Registry
Client Range
Minimum sessions per lmx.srv Maximum sessions per lmx.srv
1-19
2
12
20-34
2
20
35-49
2
24
50-84
3
28
85-99
4
28
100-129
5
32
130-179
6
36
180-249
8
42
250-349
9
44
350-499
10
50
500-749
10
60
750-999
10
80
1000+
10
101
13.5.6 RPC Parameters Entries
The Registry path that contains entries for the Advanced Server RPC Parameters is as
follows:
HKEY_LOCAL_MACHINE\SYSTEM\CurrentControlSet\Services
\AdvancedServer\RpcParameters
BrowserMaxCalls
REG_DWORD
5 - infinity
The maximum number of open browser sessions that an lmx.srv process can support
simultaneously.
Default: 20
EventlogMaxCalls
REG_DWORD
5 - infinity
The maximum number of open event log sessions that an lmx.srv process can support
simultaneously.
Default: 20
Product Manual
U7613-J-Z815-6-76
Advanced Server Key Descriptions
LsarpcMaxCalls
© Siemens Nixdorf Informationssysteme AG 1995
Pfad: D:\O7613e6\u7613e.k13
Advanced Server Registry
REG_DWORD
5 - infinity
The maximum number of open LSA RPC sessions that an lmx.srv process can support
simultaneously.
Default: 20
NetlogonMaxCalls
REG_DWORD
5 - infinity
The maximum number of open Netlogon sessions that an lmx.srv process can support
simultaneously.
Default: 20
SamrMaxCalls
REG_DWORD
5 - infinity
The maximum number of SAM sessions that an lmx.srv process can support simultaneously.
Default: 20
SpoolssMaxCalls
REG_DWORD
5 - infinity
The maximum number of print sessions that an lmx.srv process can support simultaneously.
Default: 50
SrvsvcMaxCalls
REG_DWORD
5 - infinity
The maximum number of server sessions that an lmx.srv process can support simultaneously.
Default: 20
SvcctlMaxCalls
REG_DWORD
5 - infinity
The maximum number of service control sessions that an lmx.srv process can support
simultaneously.
Default: 20
WinregMaxCalls
REG_DWORD
5 - infinity
The maximum number of Registry sessions that an lmx.srv process can support simultaneously.
Default: 20
WkssvcMaxCalls
REG_DWORD
5 - infinity
The maximum number of workstation sessions that an lmx.srv process can support
simultaneously.
Default: 20
Product Manual
U7613-J-Z815-6-76
Advanced Server Key Descriptions
13.5.7 Share Parameters Entries
© Siemens Nixdorf Informationssysteme AG 1995
Pfad: D:\O7613e6\u7613e.k13
Advanced Server Registry
The Registry path that contains entries for the Advanced Server Share Parameters is as
follows:
HKEY_LOCAL_MACHINE\SYSTEM\CurrentControlSet\Services
\AdvancedServer\ShareParameters
KeepAdministrativeShares
REG_DWORD
0 or 1
Specifies whether administrators are prevented from removing the ADMIN$ and IPC$
shared resources.
Default: 1 (prevented from removing shared resources)
MakeUnixDirectoriesOnShare
REG_DWORD
0 or 1
When creating a new share using Server Manager, specifies whether the Advanced
Server should create a directory automatically if one does not exist.
Default: 1 (create new directory)
ShareReadCount
REG_DWORD
1 - infinity
The number of share entries to read during share list operations. Setting this value
greater than 1 causes the server to read ahead SHAREENTRY structures from the
Registry.
Default: 25
13.5.8 User Service Parameters Entries
The Registry path that contains entries for the Advanced Server User Service Parameters
is as follows:
HKEY_LOCAL_MACHINE\SYSTEM\CurrentControlSet\Services
\AdvancedServer\UserServiceParameters
CreateUnixUser
REG_DWORD
0 or 1
Automatically creates and assigns a similarly-named UNIX system user account to
every new Advanced Server user account created in the domain in which the server is
a member. The value of this key must be set to 1 on every server on which UNIX system
accounts are to be created. Note that new Advanced Server users are assigned to the
UNIX system lmworld account, if the value of this key is set to 0.
Default: 1 (create UNIX system user account)
You can change the value of this key using the AS/U Administrator.
Product Manual
U7613-J-Z815-6-76
Exclude
© Siemens Nixdorf Informationssysteme AG 1995
Pfad: D:\O7613e6\u7613e.k13
Advanced Server Registry
Advanced Server Key Descriptions
REG_SZ
Character string
Specifies existing UNIX system user IDs excluded from being assigned to Advanced
Server user accounts. If an Advanced Server user account is created whose name
matches an existing UNIX system user account whose ID is contained in the exclude
list, a new UNIX system user account will be generated automatically and assigned to
the Advanced Server user account. This can be used to ensure that certain existing
UNIX system user accounts never are assigned automatically to newly-created
Advanced Server user accounts, even if the ForceUniqueUnixUserAccount key is set
to 0.
Default: 0 - 100
ForceUniqueUnixUserAccount
REG_DWORD
0 or 1
Specifies whether to assign automatically an existing UNIX system user account to a
newly-created Advanced Server user account. If you select 1, then the system does not
assign existing UNIX system user accounts. Instead, new UNIX system user accounts
are generated automatically and assigned to Advanced Server user accounts when
they are created.
Default: 0 (A new Advanced Server user account can be assigned automatically to an
existing UNIX system user account with an equal or similar name, provided that the
UNIX system user account is not specified in the exclude list.)
GroupUpdateTime
REG_DWORD
0 - infinity
The interval in seconds at which the server checks the UNIX system file /etc/group for
changes.
Default: 3600 seconds (1 hour)
NewUserShell
REG_SZ
Character string
The login shell for new user accounts. The default prevents new users from logging into
the UNIX system using a terminal emulator. To enable login, set this key to a real value,
such as /bin/sh.
Default: /bin/false
SyncUnixHomeDirectory
REG_DWORD
0 or 1
Whenever the home directory of an Advanced Server user account changes, this key
changes the home directory of the associated UNIX system user account to match the
Advanced Server home directory.
Default: 0 (do not synchronize home directories)
Product Manual
U7613-J-Z815-6-76
Alerter Service Parameters
UserComment
© Siemens Nixdorf Informationssysteme AG 1995
Pfad: D:\O7613e6\u7613e.k13
Advanced Server Registry
REG_SZ
Character string
The comment to assign to all automatically-created UNIX system user accounts.
Default: Advanced Server for UNIX user
UserRemark
REG_SZ
0 to 48 characters
The comment string associated with the USERS shared directory.
Default: Users Directory
13.6 Alerter Service Parameters
The Registry path that contains entries for the Advanced Server Alerter service is as
follows:
HKEY_LOCAL_MACHINE\SYSTEM\CurrentControlSet\Services\Alerter\Parameters
AlertNames
REG_MULTI_SZ
List
A list of the user accounts and computer names that should receive administrative
alerts.
Default: None
CountNotOnNetworkCache
REG_DWORD
0 - infinity
Specifies the number of non-running cached clients to which the Alerter service should
not send messages. When the Alerter service tries to send a popup message to a client,
NetBIOS name resolution can cause unwanted delays if the client is not on the network.
To circumvent this problem, the Alerter service caches the names of clients that are not
running and does not send alerts to these clients.
Default: 10
You can change the value of this key using the AS/U Administrator.
IncludeMessageHeader
REG_DWORD
0 or 1
Specifies whether the Alerter service should add four lines of header information to
messages (sender, recipient, subject, and date).
Default: 0 (do not include headers)
You can change the value of this key using the AS/U Administrator.
Product Manual
U7613-J-Z815-6-76
Browser Service Parameters
NotOnNetworkCacheTimeout
© Siemens Nixdorf Informationssysteme AG 1995
Pfad: D:\O7613e6\u7613e.k13
Advanced Server Registry
REG_DWORD
0 - infinity
Specifies how long in seconds that non-running clients should remain in the server’s
cache of clients.
Default: 120 seconds (2 minutes)
You can change the value of this key using the AS/U Administrator.
13.7 Browser Service Parameters
The Registry path that contains entries for the Advanced Server Computer Browser service
is as follows:
HKEY_LOCAL_MACHINE\SYSTEM\CurrentControlSet\Services\Browser\Parameters
BackupRecovery
REG_DWORD
60 - infinity
Specifies the period of time in seconds that must elapse before a server that has
ceased being a backup browser can become a backup browser again.
Default: 1800 seconds (30 minutes)
You can change the value of this key using the AS/U Administrator.
BackupUpdate
REG_DWORD
60 - infinity
Indicates the interval in seconds at which the backup browser refreshes its browse lists
with the master browser.
Default: 720 seconds (12 minutes)
You can change the value of this key using the AS/U Administrator.
i
This parameter will influence network traffic between Backup Browsers and
Master Browsers. Increasing the value may reduce the traffic e.g. in a WAN
environment.
MasterUpdate
REG_DWORD
60 - infinity
Indicates the interval in seconds at which the master browser ages its browse lists and
updates its lists with the domain master browser.
Default: 720 seconds (12 minutes)
You can change the value of this key using the AS/U Administrator.
i
Product Manual
This parameter will influence network traffic (e.g. in a WAN environment)
between Master Browsers and Domain Master Browsers (usually the PDC).
U7613-J-Z815-6-76
MoreLog
© Siemens Nixdorf Informationssysteme AG 1995
Pfad: D:\O7613e6\u7613e.k13
Advanced Server Registry
REG_DWORD
EventLog Service Entries
0 or 1
Indicates whether the Computer Browser service should record additional system log
entries for events such as election packets that the Computer Browser service receives
and the role of the browser server (master or backup).
Default: 0 (do not record additional entries)
You can change the value of this key using the AS/U Administrator.
WinsServer
This key is obsolete in the Siemens Advanced Server for UNIX.
13.8 EventLog Service Entries
The subkey for EventLog contains at least three subkeys for the three types of logs — Application, Security, and System. These logfile subkeys contain subkeys that define the
locations of the related event message files and the supported types of events, as follows:
●
Application — Perflib, Perfmon, Replicator, RemoteBoot.
●
Security — LSA, SC Manager, Security, Security Account Manager, Spooler.
●
System — Alerter, Browser, EventLog, NetLogon, Print, Rdr, SAM, server, Service
Control Manager, Srv, Wins, workstation.
Each of the three logfile subkeys for the EventLog service can contain the value entries
described in this section. The Registry path for these entries is the following, where logfile
is System, Application, or Security.
HKEY_LOCAL_MACHINE\SYSTEM\CurrentControlSet\Services\EventLog\logfile
These entries are described for informational purposes only. This information is usually
maintained by Event Viewer.
File
REG_EXPAND_SZ
Path and file name
Specifies the fully qualified path name of the file for this log.
Default: %SystemRoot%\var\opt\lanman\logs\filename
MaxSize
REG_DWORD
Multiples of 64 KBytes
Specifies the maximum size of the log file. This value can be set using the Event
Viewer.
Default: 524288 (512 KBytes)
Product Manual
U7613-J-Z815-6-76
Retention
© Siemens Nixdorf Informationssysteme AG 1995
Pfad: D:\O7613e6\u7613e.k13
Advanced Server Registry
Lanman Server Parameters
REG_DWORD
0 to infinity
Specifies in seconds that records newer than this value will not be overwritten. This is
what causes a log full event. This value can be set using the Event Viewer.
Default: 604800 seconds (7 days)
Sources
REG_MULTI_SZ
List
Specifies the applications, services, or groups of applications that write events to this
log. Each source may be a subkey of the logfile subkey. (The appsources, secsources,
and syssources keys also are in the lanman.ini file.)
Default: (varies according to log file)
The subkeys under a logfile subkey are created by the applications that write events in the
related event log. These subkeys contain information specific to the source of an event
under the following types of value entries.
EventMessageFile
REG_EXPAND_SZ
Character string
Specifies the path and file name for the event identifier text message file.
CategoryMessageFile
REG_EXPAND_SZ
Character string
Specifies the path and file name for the category text message file. The category and
event identifier message strings may be in the same file.
CategoryCount
REG_DWORD
0 to infinity
Specifies the number of categories supported.
TypesSupported
REG_DWORD
0 to infinity
Specifies a bitmask of supported types.
13.9 Lanman Server Parameters
The Registry path that contains entries for the Advanced Server LAN Manager service is
as follows:
HKEY_LOCAL_MACHINE\SYSTEM\CurrentControlSet\Services\LanmanServer\Parameters
AccessAlert
REG_DWORD
0 - infinity
Specifies the number of resource access violations that can occur before the server
sends an alert to the alertnames list.
Default: 5
You can change the value of this key using the AS/U Administrator.
Product Manual
U7613-J-Z815-6-76
Lanman Server Parameters
AutoDisconnect
© Siemens Nixdorf Informationssysteme AG 1995
Pfad: D:\O7613e6\u7613e.k13
Advanced Server Registry
REG_DWORD
0 - 3600 (60 hours)
Specifies the interval in minutes that the server waits before dropping the virtual circuit
to an inactive client.
Default: 0 (no automatic disconnect)
You can change the value of this key using the AS/U Administrator.
EnableSecuritySignature REG_DWORD 0 or 1
Specifies whether SMB signing is enabled on the server. SMB signing provides mutual
authentication which prevents "man-in-the-middle" attacks. SMB signing imposes a
performance penalty on the system. Although it does not consume any additional
network bandwidth, it does use more CPU cycles on the client and server side.
Default: 0
ErrorAlert
REG_DWORD
0 - infinity
Specifies the number of errors that can occur before the server sends an alert to the
alertnames list.
Default: 5
You can change the value of this key using the AS/U Administrator.
Hidden
REG_DWORD
0 or 1
Specifies whether the server is hidden on the network. If the server is not hidden, it
announces its presence set in the SrvAnnounce and LmAnnounce keys.
Default: 0 (server is visible)
You can change the value of this key using the AS/U Administrator.
LmAnnounce
REG_DWORD
0 or 1
Specifies whether a server should announce itself with the old LAN Manager-type
announcement in addition to the new Windows NT-type announcement. This key has
an effect only if the value of the Hidden key is 0.
Default: 0 (Use only Windows NT-type announcement.)
You can change the value of this key using the AS/U Administrator.
LogonAlert
REG_DWORD
0 - infinity
Specifies the number of logon violations that can occur before the server sends an alert
to the alertnames list.
Default: 5
You can change the value of this key using the AS/U Administrator.
Product Manual
U7613-J-Z815-6-76
Lanman Server Parameters
MaxMpxCt
© Siemens Nixdorf Informationssysteme AG 1995
Pfad: D:\O7613e6\u7613e.k13
Advanced Server Registry
REG_DWORD
1 - 100
Provides a suggested maximum to clients for the number of simultaneous requests
outstanding to this server.
Default: 50
NullSessionShares
REG_MULTI_SZ
List of shares
List of the file shares the client is allowed to access by using the null session. If a share
is not on this list, the request to access it will be denied. NullSessionShares is not
updated automatically to the server if any changes are made; you must stop and re-start
the server.
Default: none
RequireSecuritySignature
REG_DWORD
0 or 1
Specifies whether a server requires all of its clients to use SMB signing. If a client does
not have security signatures enabled, it will not be able to connect to a server that
requires security signatures.
Default: 0
SrvAnnounce
REG_DWORD
1 - infinity
Specifies the interval in seconds at which the server announces its presence to the
network. This key has an effect only if the value of the Hidden key is 0.
Default: 180 (3 minutes)
You can change the value of this key using the AS/U Administrator.
SrvComment
REG_SZ
String up to 48 characters
Specifies the descriptive comment that the server sends when it announces its
presence to the network.
Default: Advanced Server for UNIX systems
UserPath
REG_SZ
Path
Specifies the UNIX system directory on the server to be used as a default parent
directory for home directories for new user accounts.
Default: c:\home\lanman
Product Manual
U7613-J-Z815-6-76
Pfad: D:\O7613e6\u7613e.k13
© Siemens Nixdorf Informationssysteme AG 1995
Advanced Server Registry
Net Logon Service Parameters
13.10 Lanman Server Shares
The Lanman Server Shares subtree contains, in an internal format, all of the information
that was stored in the file sharefile prior to Advanced Server for UNIX V4.0A.
!
You must never modify the contents of this key using Registry Editor or the
regconfig utility, rather simply use the net share and lmshare commands to edit the
list of shared resources.
13.11 Net Logon Service Parameters
The Registry path that contains entries for the Advanced Server Net Logon service is as
follows:
HKEY_LOCAL_MACHINE\SYSTEM\CurrentControlSet\Services\Netlogon\Parameters
LogonQuery
REG_DWORD
60 - infinity
Specifies the interval, in seconds, at which the server checks if linked clients are still
active.
Default: 900 (15 minutes)
You can change the value of this key using the AS/U Administrator.
Pulse
REG_DWORD
60 - 3600 (1 hour)
Specifies the interval, in seconds, for sending update notices when no updates are
occurring to the master user accounts database. This keyword applies only to a primary
domain controller and is ignored by other servers.
Default: 300 (5 minutes)
You can change the value of this key using the AS/U Administrator.
i
This parameter can be used to reduce network traffic between a Primary
Domain Controller and its Backup Domain Controllers, e.g. in a WAN
environment.
QueryDelay
REG_DWORD
1 - infinity
Specifies the interval in seconds that a client can wait before responding to the server’s
inquiry about whether it is active.
Default: 2
You can change the value of this key using the AS/U Administrator.
Product Manual
U7613-J-Z815-6-76
Randomize
© Siemens Nixdorf Informationssysteme AG 1995
Pfad: D:\O7613e6\u7613e.k13
Advanced Server Registry
Net Logon Service Parameters
REG_DWORD
5 to 120
Specifies the time period in seconds within which a backup domain controller
randomizes its request to a PDC for updates after receiving an update notice. This
keyword decreases the odds of servers in the same domain requesting an update from
the primary domain controller at the same time.
Default: 30 seconds
You can change the value of this key using the AS/U Administrator.
RefusePasswordChange
REG_DWORD
0 or 1
Specifies whether to disable the ability to accept machine account password changes.
Machine account password changes normally occur weekly. Disabling automatic
machine password changes reduces account replication occurrences and can reduce
network traffic between primary and backup domain controllers.
Default: 0 (Password changes are allowed)
RelogonDelay
REG_DWORD
1 - infinity
Specifies the interval in seconds that a client can wait before logging back on to the
server after the server has been stopped and restarted.
Default: 2
You can change the value of this key using the AS/U Administrator.
Scripts
REG_EXPAND_SZ
Specifies the location of the logon scripts directory.
Default on primary domain controller:
%SystemRoot%\var\opt\lanman\shares\asu\repl\export\scripts
Default on backup domain controller:
%SystemRoot%\var\opt\lanman\shares\asu\repl\import\scripts
You can change the value of this key using the AS/U Administrator.
SSIPasswdAge
REG_DWORD
86400 (24 hours) - infinity
Specifies the time, in seconds, at which a backup domain controller must change the
password that it sends to the primary domain controller to verify its eligibility to receive
user accounts database updates.
On a PDC of a trusting domain, the parameter specifies the time at which this PDC must
change the password at a domain controller of the trusted domain.
Values: 604800 (7 days)
You can change the value of this key using the AS/U Administrator.
Product Manual
U7613-J-Z815-6-76
Update
© Siemens Nixdorf Informationssysteme AG 1995
Pfad: D:\O7613e6\u7613e.k13
Advanced Server Registry
Netrun Service Parameters
REG_DWORD
0 or 1
If this value is set, the server synchronizes the user accounts database with the primary
domain controller every time it starts. This keyword applies only to a backup domain
controller and is ignored by the primary domain controller. Note that full synchronization
is a very time-consuming operation.
Default: 0 (do not synchronize)
You can change the value of this key using the AS/U Administrator.
13.12 Netrun Service Parameters
The Registry path that contains entries for the Advanced Server Netrun service is as
follows:
HKEY_LOCAL_MACHINE\SYSTEM\CurrentControlSet\Services\Netrun\Parameters
MaxRuns
REG_DWORD
1 to 10
Sets the maximum number of netrun requests that can run simultaneously.
Default: 3
RunPath
REG_SZ Path up to 256 characters
Sets the path where programs accessible via the Netrun service are located. Only
programs located in a runpath can be executed from a client or another server.
Separate multiple path entries with colons (:).
Default: /tmp
Product Manual
U7613-J-Z815-6-76
Pfad: D:\O7613e6\u7613e.k13
© Siemens Nixdorf Informationssysteme AG 1995
Advanced Server Registry
Replicator Service Entries
13.13 Replicator Service Entries
The Registry path that contains entries for the Advanced Server Directory Replicator
service is as follows:
HKEY_LOCAL_MACHINE\SYSTEM\CurrentControlSet\Services\Replicator\Parameters
ExportList
REG_SZ
Character string
Lists an unlimited number of servers or domains that receive notices when the export
directory is updated. These servers subsequently replicate from the export server. If no
value is specified, the export server sends a notice to its domain. Separate multiple
names with a semicolon (;). This value is ignored if the value of the Replicate key is 2
(Import).
Do not use the UNC name when you specify a computername; that is, do not include
two backslashes (\\) at the beginning of the name.
Default: (local domain name)
ExportPath
REG_SZ or REG_EXPAND_SZ
Pathname
Specifies the export path. All files to be replicated must be in a subdirectory of the
export directory. This value is ignored if the value of the Replicate key is set to 2
(Import).
Default: C:\var\opt\lanman\shares\asu\repl\export
GuardTime
REG_DWORD
0 to one-half of Interval
Sets the number of minutes an export directory must be stable (no changes to any files)
before import servers can replicate its files.
This option applies only to directories with tree integrity.
Default: 2
ImportList
REG_SZ
Character string
Lists an unlimited number of servers or domains from which files and directories are to
be replicated. If no value is specified, files and directories will be replicated from the
server’s domain. Separate multiple names with a semicolon (;). This value is ignored if
the value of the Replicate key is 1 (Export).
Do not use the UNC name when you specify a computer name; that is, do not include
two backslashes (\\) at the beginning of the name.
Product Manual
U7613-J-Z815-6-76
ImportPath
© Siemens Nixdorf Informationssysteme AG 1995
Pfad: D:\O7613e6\u7613e.k13
Advanced Server Registry
Replicator Service Entries
REG_SZ or REG_EXPAND_SZ
Pathname
Specifies the path on the import server to receive replicas from the export servers. This
value is ignored if the value of the Replicate key is 1 (Export).
Default: C:\var\opt\lanman\shares\asu\repl\import
Interval
REG_DWORD 1 to 60
Specifies how often in minutes an export server checks the replicated directories for
changes. Used in conjunction with the Pulse key. Ignored on import servers.
Default: 5
MaxFilesInDirectory
REG_DWORD
0 to infinity
Specifies the maximum number of files in an import directory that can be replicated.
Default: 2000
Pulse
REG_DWORD 1 to 10
Specifies in minutes how often the export server repeats sending the last update notice.
These repeat notices are sent even when no changes have occurred, so that import
servers that missed the original update notice can receive the notice. The server waits
the equivalent of (Pulse * Interval) minutes before sending each repeat notice.
Default: 3
Random
REG_DWORD 1 to 120
Specifies the maximum time in seconds that the import servers can wait before
requesting an update. An import server uses the export server’s value of Random to
generate a random number of seconds (from 0 to the value of Random). The import
server waits this long after receiving an update notice before requesting the replica from
the export server. This prevents the export server from being overloaded by simultaneous update requests.
Default: 60
Replicate
REG_DWORD 1, 2, or 3
Specifies the Replicator action, according to the following:
1 = Export — the server maintains a master tree to be replicated.
2 = Import — the server receives update notices from the export server.
3 = Both — the server is to export and import directories or files.
Default: Varies with role of server
Product Manual
U7613-J-Z815-6-76
TryUser
© Siemens Nixdorf Informationssysteme AG 1995
Pfad: D:\O7613e6\u7613e.k13
Advanced Server Registry
UPS Service Parameters Entries
REG_DWORD
0 or 1
Specifies whether the import server should try to update directories when a user name
is logged on locally.
Default: 1
UnixDirectoryGroup
REG_SZ Character string
Specifies the UNIX system group account name for replicated directories.
Default: DOS---UnixDirectoryOwner
REG_SZ
Character string
Specifies the UNIX system user account name for replicated directories.
Default: lmxadmin
UnixFileGroup
REG_SZ
Character string
Specifies the UNIX system group account name for replicated files.
Default: DOS---UnixFileOwner
REG_SZ
Character string
Specifies the UNIX system user account name for replicated files.
Default: lmxadmin
13.14 UPS Service Parameters Entries
The Registry path that contains entries for the Advanced Server Uninterrupted Power
Source service is as follows:
HKEY_LOCAL_MACHINE\SYSTEM\CurrentControlSet\Services\UPS\Parameters
IgnoreSIGPWR
REG_DWORD
0 or 1
Specifies whether UPS service will be enabled.
Default: 1 (disables UPS service)
You can change the value of this key using the AS/U Administrator.
Product Manual
U7613-J-Z815-6-76
PowerFailAddress
© Siemens Nixdorf Informationssysteme AG 1995
Pfad: D:\O7613e6\u7613e.k13
Advanced Server Registry
WINS Service Parameters
REG_SZ
String up to 15 characters
Specifies the NetBIOS name to which the server sends a message when it receives a
SIGPWR signal.
Default: * (all users)
You can change the value of this key using the AS/U Administrator.
PowerFailMessage
REG_SZ
String up to 500 characters
The text of the message to be sent by the server when it receives a SIGPWR signal.
Default: “The system has experienced a power failure. Please close all applications and
files and log off immediately”.
You can change the value of this key using the AS/U Administrator.
PowerMessageInterval
REG_DWORD
0 - infinity
Specifies the interval in minutes at which the server repeats the message sent when it
receives a SIGPWR signal. A value of 0 would indicate to send the message one time
only.
Default: 1
You can change the value of this key using the AS/U Administrator.
13.15 WINS Service Parameters
The registry path that contains entries for the Advanced Server WINS service is as follows:
HKEY_LOCAL_MACHINE\SYSTEM\CurrentControlSet\Services\Wins
The \Parameters subkey list all of the non-replication-related parameters needed to
configure a WINS server. It also contains a \Datafiles subkey, which lists all the files that
should be read by WINS to initialize or reinitialize its local database. The following
parameter under the \Parameters subkey can be set only by changing the value in the
Registry.
Product Manual
U7613-J-Z815-6-76
WINS Service Parameters
DoStaticDataInit
© Siemens Nixdorf Informationssysteme AG 1995
Pfad: D:\O7613e6\u7613e.k13
Advanced Server Registry
REG_DWORD
0 or 1
If this parameter is set to a non-zero value, the WINS server will initialize its database
with records listed in one or more files listed under the \Datafiles subkey. The
initialization is done at process invocation and whenever a change is made to one or
more values of the \Parameters or \Datafiles keys (unless the change is to modify the
default value of DoStaticDataInit).
The \Wins\Parameters\Datafiles key lists one or more files that the WINS server
should read to initialize or reinitialize its local database with static records. If the full path
of the file is not listed, the directory of execution for the WINS server is assumed to
contain the data file. The parameters can have any names (for example, DF1 or DF2).
Their data types must REG_EXPAND_SZ or REG_SZ. The files should contain
LMHOSTS-formatted name-to-IP-address mappings. Existing files using a names.cfg
format (see section “The names.cfg file”) can be converted to LMHOSTS format using
the tool /var/opt/nbrfc/bin/names2lm (see section “/var/opt/nbrfc/bin/names2lm”).
The \Partners subkey has two subkeys, \Pull and \Push, under which are subkeys for
the IP addresses of all push and pull partners, respectively, of the WINS server.
A push partner, listed under the \Partners\Pull key, is one from which a WINS server pulls
replicas and from which it can expect update notification messages. The following
parameter appears under the IP address for a specific push partner. This parameter can be
set only by changing the value in the Registry.
MemberPrec
REG_DWORD
0 or 1
Specifies the order of precedence for this WINS partner, with 0 indicating low precedence and 1 indicating high precedence. Notice that dynamically registered names are
always high precedence. When a 1C name is pulled from this WINS partner, the
addresses contained in it are given this precedence level. The value can be 0 (low) or
1 (high). Set this value to 1 if this WINS server is serving a geographic location that is
nearby.
Product Manual
U7613-J-Z815-6-76
Pfad: D:\O7613e6\u7613e.k14
© Siemens Nixdorf Informationssysteme AG 1995
14 Lanman.ini File
This chapter lists and describes the lanman.ini file parameters that can be modified to
improve Advanced Server performance. It also contains tables which indicate the disposition of parameters that were in earlier versions of the lanman.ini file and now are in the
Advanced Server Registry.
When Advanced Server is installed, the lanman.ini file contains some default parameter
values. Other parameters and the titles of the sections in which they reside are added when
you change the Advanced Server configuration. Only parameters that have been changed
to values other than their default values are added to the lanman.ini file. If a parameter does
not appear in the file (or is commented out with a semicolon), it is set to its default value.
Before attempting to change any of the parameters available in the lanman.ini file, it is useful
to understand the relationship between the lanman.ini file entries and server defaults.
Every server parameter has a default setting. To display and edit default settings, a utility
program called srvconfig is provided in the /var/opt/lanman/bin directory.
You can edit the lanman.ini file to set parameters to values other than the defaults. A valid
value assigned to any parameter in the lanman.ini file always supersedes the default value
for that parameter.
When you want to set the value of a parameter to something other than the default, you
must edit the lanman.ini file, locate (or add) the appropriate section title in the file, and then
add the desired “parameter=value” entry.
Product Manual
U7613-J-Z815-6-76
Pfad: D:\O7613e6\u7613e.k14
© Siemens Nixdorf Informationssysteme AG 1995
Lanman.ini File
Syntax
14.1 Syntax
Within each section of the lanman.ini file, parameters are listed as follows:
●
The name of each parameter is at the beginning of a line, followed by an equal sign and
the value assigned to it: parameter=value.
●
Comments start with a semicolon ( ; ). If a semicolon precedes a parameter on the line,
that parameter is ignored.
●
When a list of values is assigned to a parameter, the values are separated by commas:
parameter=value,value,value, ... (There are some exceptions to this rule, which are
noted in the description of the appropriate parameters.)
●
When a value consists of a path, the path may be absolute, starting with / . If a path
does not start with / , it is assumed to be relative to the lanman directory.
●
If a numeric value begins with 0 it is octal; if it begins with X, it is hexadecimal; if it begins
with a number from 1 to 9, it is decimal.
●
When a parameter has no assigned value (nothing to the right of the equal sign), the
value is 0 for a parameter that requires a number and null for a parameter that requires
a character string.
●
A null value is not valid for all parameters.
Ê
To change a parameter in the lanman.ini file
1. Use the srvconfig command to display default settings for the server parameters:
/var/opt/lanman/bin/srvconfig -p | more
2. Edit the lanman.ini file using vi or a similar text editor. You may have to add a section
heading to the file, for example [ lmxserver ]. You then need to add a “parameter=value”
pair to the appropriate section of the lanman.ini file.
3. After you edit the file, you must stop and restart the server in order for the new values
to take effect.
You also can use the srvconfig -s command to set parameter values in the lanman.ini file,
as follows:
/var/opt/lanman/bin/srvconfig -s “section,parameter=value”
For more information about the srvconfig command, type man srvconfig at the Advanced
Server command prompt.
Product Manual
U7613-J-Z815-6-76
Pfad: D:\O7613e6\u7613e.k14
© Siemens Nixdorf Informationssysteme AG 1995
Lanman.ini File
Parameters
14.2 Parameters
The following sections describe the configurable parameters in the lanman.ini file. The
parameters are grouped according to the section of the lanman.ini file in which they reside.
i
The lanman.ini file contains additional parameters that are not included in the
following tables. These parameters are for debugging purposes and should never
be modified.
[server] Section Parameters
Product Manual
Parameter
Description, Values, and Default Setting
listenname
This is the server’s name on the network.
To change the value of the listenname parameter, use
the setservername command. For more information
about this command, type man setservername at the
Advanced Server command prompt.
Values: any servername of 1-15 characters
default: null
maxclients
Identifies the maximum number of simultaneous client
sessions that the server must support. This number is
set by default to 250. It can be increased to a number
that is equal to the Advanced Server user licence.
ProductType
Specifies the type of installed Advanced Server for
UNIX. Possible values are ServerNT and LanmanNT.
This parameter is set to the correct value automatically
when Advanced Server for UNIX is configured and
must not be changed.
Default: LanmanNT
srvservices
The list of keywords for the services that start automatically when the server is started. Because services are
started in the order they appear in the srvservices entry,
you must ensure that netlogon appears before any
services that require it.
Default: alerter, netlogon, browser
U7613-J-Z815-6-76
Pfad: D:\O7613e6\u7613e.k14
© Siemens Nixdorf Informationssysteme AG 1995
Lanman.ini File
Parameters
[workstation] Section Parameters
Parameter
Description, Values, and Default Setting
domain
The name of the domain that includes the server. To
change the value of the listenname parameter, use the
setdomainname command. For more information
about this command, type man setdomainname at the
Advanced Server command prompt.
Values: any domain name of 1-15 characters
default: domain
[lmxserver] Section Parameters
Parameter
Description, Values, and Default Setting
anncmailslot
The name of the mailslot used for periodic server
announcements.
Values: A path up to a maximum of 256 characters;
default: \\*\MAILSLOT\LANMAN
Note that back slashes must be doubled on input or
else the entire input line must be enclosed in single
quotation marks. (Type text\\text or ‘text\text ‘ to enter
text with a single back slash.)
appsources
The names of the modules that can write to the application log.
Default: The server initializes the value of this
parameter at startup.
clispooltime
The interval, in minutes, allowed for a job sent to a
shared client printer to complete printing. If the printing
has not finished by the end of this time, a warning
message is sent to the server administrator.
Values: 0 (no warning message) - unlimited;
default: 20
(continued)
Product Manual
U7613-J-Z815-6-76
Parameters
[lmxserver] Section Parameters
© Siemens Nixdorf Informationssysteme AG 1995
Pfad: D:\O7613e6\u7613e.k14
Lanman.ini File
Parameter
Description, Values, and Default Setting
country
The Country code(not used for localized messages)
Values:
Country
Code
Country
Code
Asia
099
Latin America 003
Australia
061
Netherlands
031
Belgium
032
Norway
047
Canada
002
Portugal
351
Denmark
045
Spain
034
Finland
358
Sweden
046
France
033
Switzerland
041
Germany
049
United
Kingdom
044
Italy
039
United States
001
Japan
081
Default: 001
dll_dir
The path to the directory containing message text files
used by Advanced Server for UNIX system commands.
To change the value of the listenname parameter, use
the setlang command. For more information about this
command, type man setlang at the Advanced Server
command prompt.
Default: /var/opt/lanman/shares/asu/system32/001
domainlang
Entry corresponding to the selection of the domain
language during installation. To change the value of the
listenname parameter, use the setdomainlang
command. For more information about this command,
type man setdomainlang at the Advanced Server
command prompt.
Default: 001 (English)
lang
Defines the character set that Advanced Server uses
for processing client requests.
Default: De_DE.88591
(continued)
Product Manual
U7613-J-Z815-6-76
Parameters
[lmxserver] Section Parameters
© Siemens Nixdorf Informationssysteme AG 1995
Pfad: D:\O7613e6\u7613e.k14
Lanman.ini File
Parameter
Description, Values, and Default Setting
listenextension
The extension that the UNIX system listener program,
by default, applies to the name of the server computer.
This parameter is ignored. Siemens does not use the
UNIX listener.
Values: 0-13 characters and a null value are
acceptable.
Default: null
listennamechk
If set to yes, it forces any name specified with the
listenname parameter to be different than the UNIX
machine name or the UNIX machine name with the
listenextension extension in order to avoid name
conflicts with the UNIX listener.
N.B. : Siemens does not use the UNIX listener.
Default: no
listenqlen
Maximum number of client connection requests
outstanding. If the server supports numerous clients
that all attempt to connect to the server simultaneously,
and some get refused, you should raise the value of
this parameter. Only applicable if the listenname=
parameter is being used.
Values: 1 - unlimited; default: 3
lmaddonpath
The directory for dynamic libraries bound into the
server program and called at various times during
server execution, as described in the
/var/opt/lanman/include/lmaddon.h header file. The
server looks for these dynamic libraries on startup.
Values: A path up to a maximum of 256 characters;
default: /var/opt/lanman/addon/lmaddon
lmgetmsg_path
Search order for message text files used by Advanced
Server.
Default: netmsg.dll, kernel32.dll, locallspl.dll,
asumsg.dll
lmxspooler
Entry corresponding to the selection of the spooler
during installation.
Default: ATTHPI
(continued)
Product Manual
U7613-J-Z815-6-76
Parameters
[lmxserver] Section Parameters
© Siemens Nixdorf Informationssysteme AG 1995
Pfad: D:\O7613e6\u7613e.k14
Lanman.ini File
Parameter
Description, Values, and Default Setting
lptmpdir
The location of the spooling directory for temporary
files used by the UNIX system’s LP subsystem.
Default: /var/spool/lp/tmp/uname where uname is the
server’s UNIX system name.
mapaclblob
Configures whether to use memory-mapped file operations when accessing the Advanced Server Access
Control List database.
Values: yes, no; default: yes
mapchangelogblob
Configures whether to use memory-mapped file operations when accessing the Advanced Server Change
Log database.
Values: yes, no; default: no
maplsablob
Configures whether to use memory-mapped file operations when accessing the Advanced Server Local
Security Authority database.
Values: yes, no; default: no
mapregistryblob
Configures whether to use memory-mapped file operations when accessing the Advanced Server Registry
database.
Values: yes, no; default: no
mapsamblob
Configures whether to use memory-mapped file operations when accessing the Advanced Server Security
Accounts Manager database.
Values: yes, no; default: no
maxfilesize
The maximum file size, in KBytes, that the UNIX
system redirector will allow a “local UNIX user” to
create on a local system.
Values: 100 - unlimited; default: 100000
maxspoolfds
This parameter is only evaluated if the lmxspooler
parameter is set to “SPOOLV4”. It specifies the number
of file descriptors in the lower range that are to be
reserved for calls to Spool/Xprint. The parameter is set
optimally for the current Spool/Xprint versions and may
only be changed by Technical Support.
Default: 4
(continued)
Product Manual
U7613-J-Z815-6-76
Parameters
[lmxserver] Section Parameters
© Siemens Nixdorf Informationssysteme AG 1995
Pfad: D:\O7613e6\u7613e.k14
Lanman.ini File
Parameter
Description, Values, and Default Setting
msgforward
Specifies if Advanced Server implements message
forwarding between clients. Implementation of
message forwarding is not recommended.
Values: yes (implement forwarding) or no (do not
implement forwarding); default: no
nativelm
An additional field in the session setup
request/response.
Default: Advanced Server 4.0 for UNIX systems
nativeos
An additional field in the session setup
request/response.
Default: Identifier for operating system release.
netaddonpath
The directory in which the Advanced Server looks for
dynamic libraries on startup. Dynamic libraries found in
the directory are bound into the Advanced Server and
used to access the various network interfaces on the
server computer.
Values: A path up to a maximum of 256 characters;
default: /var/opt/lanman/addon/networks
nethelpfile
The location of the help file used by the net help
command (relative to /var/opt/lanman/msgfiles).
Default: /var/opt/lanman/msgfiles/001/net.hlp
netmsgwait
The interval, in seconds, that the server waits for a
response when it sends a message that requires one.
Values: 0 - unlimited; default: 30
(continued)
Product Manual
U7613-J-Z815-6-76
Parameters
[lmxserver] Section Parameters
© Siemens Nixdorf Informationssysteme AG 1995
Pfad: D:\O7613e6\u7613e.k14
Lanman.ini File
Parameter
Description, Values, and Default Setting
network
The network device names and NetBIOS namepassing type for the network(s) the server should use.
Values: sets of four items separated by commas, each
set of four separated from the next by a space. The
following four items are in each set:
1. The device name for virtual circuit access.
2. The device name for datagram network access.
3. A digit identifying the NetBIOS interface convention
used by the two devices above. Currently there is
one convention compiled into the server:
0 = RFC 1001/2 NetBIOS convention
4. The name of the transport provider, as returned by
the nlsprovider system call. (For networks not
configured to accept incoming connections through
the UNIX system listener program, this can be any
arbitrary string.)
Default: /dev/inet/nb,/dev/inet/nbd,0,nbrfc
newpoll
Specifies whether the new Reliant UNIX poll interface
is to be used. If Reliant UNIX does not support the new
poll, the old poll is used automatically. Default: yes
os2searchfix
As a result of a AS/X fix for NT clients, problems have
arisen since AS/X 4.0A1001 with OS/2 clients
displaying files and directories. There is no final
solution to the problem at present, which is why this
parameter can be used to set the new or old behavior.
Please read the readme files supplied to establish
whether this parameter is still required in the current
version.
os2searchfix=no:
– OS/2 “folder" shows either no files or one file
– OS/2 "dir" in the DOS box shows at most 100 files
os2searchfix=yes:
– Deleting a directory tree on Windows NT 4.0 with
“deltree” does not delete all files.
Default : no
(continued)
Product Manual
U7613-J-Z815-6-76
Parameters
[lmxserver] Section Parameters
© Siemens Nixdorf Informationssysteme AG 1995
Pfad: D:\O7613e6\u7613e.k14
Lanman.ini File
Parameter
Description, Values, and Default Setting
prebinduxredir
Controls the name that the UNIX system Net command
binds when it uses the UNIX system redirector
(uxredir). If this parameter is set to yes, the server prebinds a NetBIOS name that will be used by all UNIX
system Net commands. Because this name is prebound, the Net command does not need to bind its own
name, and this quickens the UNIX system’s Net access
to the server. If this parameter is set to no, then each
Net command will use its own unique name with
somewhat slower performance resulting.
If the Advanced Server NetBIOS names are
registered dynamically with a WINS server, you
should not set prebinduxredir to no, as
otherwise the WINS database can become
extremely large because of the different names
for the individual Net commands.
Values: yes, no; default: yes
!
secsources
The names of the modules that can write to the security
log.
Default: The server initializes the value of this
parameter at startup.
srvstathelpfile
The location of the help file used by the Activity Monitor.
Default: /var/opt/lanman/msgfiles/001/srvstat.hlp
stacksize
The size of the stack, in bytes, for each task internal to
the server.
Values:12000 - unlimited; default: 30000
syssources
The names of the modules that can write to the system
log.
Default: The server initializes the value of this
parameter at startup.
tcp_nodelay
!
Since AS/X V4.0B, the tcp_nodelay parameter
is no longer supported. The functionality will be
set by a parameter when NetBIOS is started.
See the chapter “Configuring NetBIOS”.
(continued)
Product Manual
U7613-J-Z815-6-76
Pfad: D:\O7613e6\u7613e.k14
© Siemens Nixdorf Informationssysteme AG 1995
Lanman.ini File
Parameters
[fsi] Section Parameters
Parameter
Description, Values, and Default Setting
fsaddonpath
The location of dynamic link libraries that support file
systems on the server.
Values: A path up to a maximum of 256 characters;
default: /var/opt/lanman/addon/fsaddon
fslibname
The subdirectory of the directory identified by fslibpath
where new file systems are located.
Values: A path up to a maximum of 256 characters;
default: lmfsiops.so
fslibpath
The location of new file systems on the server.
Values: A path up to a maximum of 256 characters;
default: /usr/lib/fs
fsmap
File system type identifiers that map unknown file
systems to known file system types.
Values: a comma-separated list of mappings;
default:
unknown:s5,nfs:nfs,vxfs:ufs,sfs:ufs,hs:ufs,cdfs:ufs,
memfs:ufs
fsnosupport
Maps unknown file system to specified file system.
Default: s5
remotemounts
The names of file system types that indicate remotely
mounted file systems.
Default: nfs
[psi] Section Parameters
Product Manual
Parameter
Description, Values, and Default Setting
psaddonpath
The location of dynamic link libraries that support
printer subsystems on the server.
Values: A path up to a maximum of 256 characters;
default: /var/opt/lanman/addon/psaddon
U7613-J-Z815-6-76
Pfad: D:\O7613e6\u7613e.k14
© Siemens Nixdorf Informationssysteme AG 1995
Lanman.ini File
Lanman.ini Parameter Mapping to Registry Keys
14.3 Lanman.ini Parameter Mapping to Registry Keys
The following tables list the parameters in the lanman.ini file that existed in earlier versions
of Advanced Server and whether they have been moved to the Advanced Server Registry,
to the new lanman.ini file, or are obsolete. The parameters that were moved to the
Advanced Server Registry are listed with their new value names.
The lanman.ini file parameters are listed according to the sections in which they reside in
the file.
[Server] Section Parameter Mappings to Registry Keys
Lanman.ini File
Parameter
Advanced Server Registry Key Name Value Name
(\SYSTEM\CurrentControlSet\Services)
accessalert
LanmanServer\Parameters
AccessAlert
alertnames
Alerter\Parameters
AlertNames
autodisconnect
LanmanServer\Parameters
AutoDisconnect
enablesoftcompat
AdvancedServer\FileServiceParameters EnableSoftCompat
enable_soft_file_ext AdvancedServer\FileServiceParameters EnableSoftFileExtensions
erroralert
LanmanServer\Parameters
ErrorAlert
listenname1
Control\ComputerName\ComputerName ComputerName
logonalert
LanmanServer\Parameters
LogonAlert
maxauditlog
EventLog\Security
MaxSize
maxclients
None (lanman.ini file)
maxerrlog
EventLog\System
MaxSize
srvannounce
LanmanServer\Parameters
SrvAnnounce
srvcomment
LanmanServer\Parameters
SrvComment
srvhidden
LanmanServer\Parameters
Hidden
srvservices
None (lanman.ini file)
userpath
LanmanServer\Parameters
UserPath
1 The listenname parameter is in the lanman.ini file as well as the Advanced Server Registry under
\SYSTEM\CurrentControlSet\Control\ComputerName\ComputerName.
Product Manual
U7613-J-Z815-6-76
Pfad: D:\O7613e6\u7613e.k14
© Siemens Nixdorf Informationssysteme AG 1995
Lanman.ini File
Lanman.ini Parameter Mapping to Registry Keys
[Workstation] Section Parameter Mappings to Registry Keys
Lanman.ini
Parameter
Advanced Server Registry Key Name
domain
None (lanman.ini file)
Value Name
[Uidrules ] Section Parameter Mappings to Registry Keys
Lanman.ini File
Parameter
Advanced Server Registry Key Name Value Name
(\SYSTEM\CurrentControlSet\Services)
exclude
AdvancedServer\UserServiceParameters Exclude
forceunique
AdvancedServer\UserServiceParameters ForceUniqueUnixUserAccount
maxuid
AdvancedServer\UserServiceParameters MaxUnixUid1
minuid
AdvancedServer\UserServiceParameters MinUnixUid1
usrcomment
AdvancedServer\UserServiceParameters UserComment
1 These values are not displayed by default but can be configured in the Advanced Server Registry.
[Netlogon] Section Parameter Mappings to Registry Keys
Product Manual
Lanman.ini File
Parameter
Advanced Server Registry Key Name Value Name
(\SYSTEM\CurrentControlSet\Services)
logonquery
Netlogon\Parameters
LogonQuery
maxclisess
AdvancedServer\ProcessParameters
NumCLIENT_SESSION
maxquery
None (obsolete)
maxsrvsess
AdvancedServer\ProcessParameters
NumSERVER_SESSION
pulse
Netlogon\Parameters
Pulse
querydelay
Netlogon\Parameters
QueryDelay
randomize
Netlogon\Parameters
Randomize
relogondelay
Netlogon\Parameters
RelogonDelay
scripts
Netlogon\Parameters
Scripts
ssipasswdage
Netlogon\Parameters
SSIPasswdAge
update
Netlogon\Parameters
Update
U7613-J-Z815-6-76
Pfad: D:\O7613e6\u7613e.k14
© Siemens Nixdorf Informationssysteme AG 1995
Lanman.ini File
Lanman.ini Parameter Mapping to Registry Keys
[lmxserver] Section Parameter Mappings to Registry Keys
Lanman.ini File
Parameter
Advanced Server Registry Key Name
Value Name
(\SYSTEM\CurrentControlSet\Services)
aclfile
None (obsolete)
aclgroup
None (obsolete)
aclowner
None (obsolete)
aclperms
None (obsolete)
admingroupid
AdvancedServer\NetAdminParameters
NetAdminGroupName
adminpath
AdvancedServer\NetAdminParameters
NetAdminPath
adminuserid
AdvancedServer\NetAdminParameters
NetAdminUserName
alertadmin
None (obsolete)
alerterrorlog
None (obsolete)
alertmessage
None (obsolete)
alerton
None (obsolete)
alertprinting
None (obsolete)
alerttimeout
AdvancedServer\AlertParameters
alertuser
None (obsolete)
anncmailslot
None (lanman.ini file)
appretention
Eventlog\Application
Retention
appsources
Eventlog\Application
Sources
auditretention
Eventlog\Security
Retention
blobmapping
None (obsolete)
byemessage
AdvancedServer\Parameters
clispooltime
None (lanman.ini file)
cntsharecache
None (obsolete)
cntsharereads
AdvancedServer\ShareParameters
controllock
None (obsolete)
coreok
AdvancedServer\ProcessParameters
country
None (lanman.ini file)
cpipgroup
None (obsolete)
ConnectTimeout
SendByeMessage
ShareReadCount
CoreOK
(continued)
Product Manual
U7613-J-Z815-6-76
Lanman.ini Parameter Mapping to Registry Keys
[lmxserver] Section Parameter Mappings to Registry Keys
© Siemens Nixdorf Informationssysteme AG 1995
Pfad: D:\O7613e6\u7613e.k14
Lanman.ini File
Lanman.ini File
Parameter
Advanced Server Registry Key Name
Value Name
(\SYSTEM\CurrentControlSet\Services)
cpipname
None (obsolete)
cpipowner
None (obsolete)
cpipperms
None (obsolete)
createunixuser
AdvancedServer\UserServiceparameters
CreateUnixUser
dirperms
AdvancedServer\FileServiceParameters
UnixDirectoryPerms
eafileprefix
AdvancedServer\FileServiceParameters
EAFilePrefix
errorretention
Eventlog\System
Retention
errsources
None (obsolete)
feabufsize
AdvancedServer\FileServiceParameters
MaxEASize
fileflush
AdvancedServer\FileServiceParameters
ForceFileFlush
fileperms
AdvancedServer\FileServiceParameters
UnixFilePerms
forcediracl
AdvancedServer\FileServiceParameters
ForceDirectoryAcl
forcefileacl
AdvancedServer\FileServiceParameters
ForceFileAcl
gcbuffer
AdvancedServer\Parameters
SizeGcBufferPoolInKB
getapipe
None (lanman.ini file)
groupadd
None (obsolete)
groupdel
None (obsolete)
grpupdate
AdvancedServer\UserServiceParameters
GroupUpdateTime
hashsize
AdvancedServer\ProcessParameters
NumHashTables
ignoresigpwr
UPS\Parameters
IgnoreSIGPWR
ipctries
AdvancedServer\Parameters
MaxIpcTryCount
keepadmshares
AdvancedServer\ShareParameters
KeepAdministrativeShares
listenextension
None (lanman.ini file)
listennamechk
None (lanman.ini file)
listenqlen
None (lanman.ini file)
lmaddonpath
None (lanman.ini file)
lmxmsgfile
None (lanman.ini file)
lmxsrv
None (obsolete)
(continued)
Product Manual
U7613-J-Z815-6-76
Lanman.ini Parameter Mapping to Registry Keys
[lmxserver] Section Parameter Mappings to Registry Keys
© Siemens Nixdorf Informationssysteme AG 1995
Pfad: D:\O7613e6\u7613e.k14
Lanman.ini File
Lanman.ini File
Parameter
Advanced Server Registry Key Name
Value Name
(\SYSTEM\CurrentControlSet\Services)
lmxtimesource
None (obsolete)
locale
None (obsolete)
locknap
AdvancedServer\ProcessParameters
lptmpdir
None (lanman.ini file)
lsafile
None (obsolete)
lsagroup
None (obsolete)
lsaowner
None (obsolete)
lsaperms
None (obsolete)
mailslotgroup
None (obsolete)
mailslothold
AdvancedServer\Parameters
mailslotowner
None (obsolete)
mailslotperms
None (obsolete)
maxadminoutput
None (obsolete)
maxapplog
EventLog\Application
MaxSize
maxdirbufsize
AdvancedServer\Parameters
MaxDirectoryBufferSize
maxfilesize
AdvancedServer\FileServiceParameters
MaxFileSizeInKB
maxlocknap
AdvancedServer\ProcessParameters
MaxLockTimeInSeconds
maxmsdepth
None (obsolete)
maxmsgsize
AdvancedServer\Parameters
MaxMessageSize
maxmux
LanmanServer\Parameters
MaxMpxCt
maxopenfiles
None (obsolete)
maxrawsize
AdvancedServer\Parameters
MaxRawSize
maxvcperproc
AdvancedServer\ProcessParameters
MaxVCPerProc
maxsvcwait
AdvancedServer\Parameters
MaxServiceWaitTime
maxvcs
AdvancedServer\ProcessParameters
MaxVCs
memorymap
AdvancedServer\FileServiceParameters
MemoryMapFiles
minsmbworkers
AdvancedServer\ProcessParameters
MinSmbWorkerTasks
minvcperproc
AdvancedServer\ProcessParameters
MinVCPerProc
LockNapInMSec
MaxMailslotReadTime
(continued)
Product Manual
U7613-J-Z815-6-76
Lanman.ini Parameter Mapping to Registry Keys
[lmxserver] Section Parameter Mappings to Registry Keys
© Siemens Nixdorf Informationssysteme AG 1995
Pfad: D:\O7613e6\u7613e.k14
Lanman.ini File
Lanman.ini File
Parameter
Advanced Server Registry Key Name
Value Name
(\SYSTEM\CurrentControlSet\Services)
msdirgroup
None (obsolete)
msdirname
None (obsolete)
msdirowner
None (obsolete)
msdirperms
None (obsolete)
msgforward
None (lanman.ini file)
msgheader
Alerter\Parameters
nativelm
None (lanman.ini file)
nativeos
None (lanman.ini file)
netaddonpath
None (lanman.ini file)
nethelpfile
None (lanman.ini file)
nethmsgfile
None (obsolete)
netmsgwait
None (lanman.ini file)
network
None (lanman.ini file)
newusershell
AdvancedServer\UserServiceParameters
NewUserShell
nfscheck
AdvancedServer\FileServiceParamaters
NfsCheck
nfslocks
AdvancedServer\FileServiceParameters
UseNfsLocks
nonexistusers
Alerter\Parameters
CountNotOnNetworkCache
nosendtime
Alerter\Parameters
NotOnNetworkCacheTimeout
numnetsndbufs
None (obsolete)
oplocktimeout
AdvancedServer\FileServiceParameters
packageid
None (obsolete)
passmgmt
None (obsolete)
polltime
None (obsolete)
prebinduxredir
None (lanman.ini file)
qnamelen
AdvancedServer\Parameters
IncludeMessageHeader
OplockTimeout
MaxPrintQueueNameLength
(continued)
Product Manual
U7613-J-Z815-6-76
Lanman.ini Parameter Mapping to Registry Keys
[lmxserver] Section Parameter Mappings to Registry Keys
© Siemens Nixdorf Informationssysteme AG 1995
Pfad: D:\O7613e6\u7613e.k14
Lanman.ini File
Lanman.ini File
Parameter
Advanced Server Registry Key Name
Value Name
(\SYSTEM\CurrentControlSet\Services)
qsched
AdvancedServer\Parameters
queuealloc
None (obsolete)
rdatrend
AdvancedServer\FileServiceParameters
ReadAheadCount
relmajor
(\SOFTWARE\Microsoft\LanmanServer
CurrentVersion (and elsewhere))
MajorVersion
relminor
(\SOFTWARE\Microsoft\LanmanServer
CurrentVersion (and elsewhere))
MinorVersion
samdir
None (obsolete)
samgroup
None (obsolete)
samowner
None (obsolete)
samperms
None (obsolete)
sbstelladmin
AdvancedServer\AlertParameters
AlertAdminOnLicenseOverflow
sbstelluser
AdvancedServer\AlertParameters
AlertUserOnLicenseOverflow
schedlogfilename
None (obsolete)
secsources
Eventlog\Security
sharefile
None (obsolete)
sharegroup
None (obsolete)
sharemkdir
AdvancedServer\ShareParameters
shareowner
None (obsolete)
shareperms
None (obsolete)
shmgroup
None (obsolete)
shmowner
None (obsolete)
shmperms
None (obsolete)
spareserver
AdvancedServer\ProcessParameters
KeepSpareServer
sparesrvtime
AdvancedServer\ProcessParameters
SpareServerTime
spipe
None (obsolete)
CheckPrintQueueInMinutes
Sources
MakeUnixDirectoriesOnShare
(continued)
Product Manual
U7613-J-Z815-6-76
Lanman.ini Parameter Mapping to Registry Keys
[lmxserver] Section Parameter Mappings to Registry Keys
© Siemens Nixdorf Informationssysteme AG 1995
Pfad: D:\O7613e6\u7613e.k14
Lanman.ini File
Lanman.ini File
Parameter
Advanced Server Registry Key Name
Value Name
(\SYSTEM\CurrentControlSet\Services)
srvstathelpfile
None (lanman.ini file)
stacksize
None (lanman.ini file)
startscript
None (obsolete)
stoponcore
AdvancedServer\ProcessParameters
svcinit
None (obsolete)
svcscript
None (obsolete)
syncaclfile
AdvancedServer\FileServiceParameters
SyncAclFileOnWrite
synchomedir
AdvancedServer\UserServiceParameters
SyncUnixHomeDirectory
syssources
Eventlog\System
Sources
terminator
None (obsolete)
timetodrop
AdvancedServer\ProcessParameters
tokensidlimit
None (obsolete)
unixdirchk
AdvancedServer\FileServiceParameters
UnixDirectoryCheck
unixlocks
AdvancedServer\FileServiceParameters
UseUnixLocks
useoplock
AdvancedServer\FileServiceParameters
UseOplocks
userremark
AdvancedServer\UserServiceParameters
UserComment
ustructs
AdvancedServer\ProcessParameters
NumUStructs
uxclosecount
AdvancedServer\FileServiceParameters
UnixCloseCount
vcdistribution
AdvancedServer\ProcessParameters
VCDistribution
xpstat_dev
AdvancedServer\Parameters
CallXpstatDev
StopOnCore
TimeToDrop
(continued)
[vps] Section Parameter Mappings to Registry Keys
Product Manual
Lanman.ini File
Parameter
Advanced Server Registry Key Name
Value Name
(\SYSTEM\CurrentControlSet\Services)
poweraddr
UPS\Parameters
PowerFailAddress
powermessage
UPS\Parameters
PowerFailMessage
powertime
UPS\Parameters
PowerMessageInterval
U7613-J-Z815-6-76
Pfad: D:\O7613e6\u7613e.k14
© Siemens Nixdorf Informationssysteme AG 1995
Lanman.ini File
Lanman.ini Parameter Mapping to Registry Keys
[Replicator] Section Parameter Mappings to Registry Keys
Product Manual
Lanman.ini File
Parameter
Advanced Server Registry Key Name
(\SYSTEM\CurrentControlSet\Services)
Value Name
exportlist
Replicator\Parameters
ExportList
exportpath
Replicator\Parameters
ExportPath
guardtime
Replicator\Parameters
GuardTime
importlist
Replicator\Parameters
ImportList
importpath
Replicator\Parameters
ImportPath
interval
Replicator\Parameters
Interval
logon
Replicator
ObjectName
password
None (obsolete)
pulse
Replicator\Parameters
Pulse
random
Replicator\Parameters
Random
repl_dirgroup
Replicator\Parameters
UnixDirectoryGroup
repl_dirowner
Replicator\Parameters
UnixDirectoryOwner
repl_dirperms
None (obsolete)
repl_filegroup
Replicator\Parameters
UnixFileGroup
repl_fileowner
Replicator\Parameters
UnixFileOwner
repl_fileperms
None (obsolete)
replicate
Replicator\Parameters
Replicate
tryuser
Replicator\Parameters
TryUser
U7613-J-Z815-6-76
Pfad: D:\O7613e6\u7613e.k14
© Siemens Nixdorf Informationssysteme AG 1995
Lanman.ini File
Lanman.ini Parameter Mapping to Registry Keys
[Fsi] Section Parameter Mappings to Registry Keys
Lanman.ini File
Parameter
Advanced Server Registry Key Name
(\SYSTEM\CurrentControlSet\Services)
Value Name
closeinodecnt
None (obsolete)
fsaddonpath
None (lanman.ini file)
fslibname
None (lanman.ini file)
fslibpath
None (lanman.ini file)
fsmap
None (lanman.ini file)
fsnosupport
None (lanman.ini file)
maxfstypes
None (obsolete)
nfsroot
AdvancedServer\FileServiceParameters
RootOwnsFilesCreatedOnNFS
ntfs
AdvancedServer\FileServiceParameters
ReportNTFS
remotemounts
None (lanman.ini file)
volumelabel
AdvancedServer\FileServiceParameters
Volumelabel
[Psi] Section Parameter Mappings to Registry Keys
Lanman.ini
Parameter
Advanced Server Registry Key Name
maxspoolers
None (obsolete)
psaddonpath
None (lanman.ini file)
Value Name
[Version] Section Parameter Mappings to Registry Keys
Product Manual
Lanman.ini
Parameter
Advanced Server Registry Key Name
lan_manager
None (obsolete)
Value Name
U7613-J-Z815-6-76
Pfad: D:\O7613e6\u7613e.k14
© Siemens Nixdorf Informationssysteme AG 1995
Lanman.ini File
Lanman.ini Parameter Mapping to Registry Keys
[Netrun] Section Parameter Mappings to Registry Keys
Lanman.ini File
Parameter
Advanced Server Registry Key Name
Value Name
(\SYSTEM\CurrentControlSet\Services)
maxruns
NetRun\Parameters
MaxRuns
runpath
NetRun\Parameters
RunPath
[Browser] Section Parameter Mappings to Registry Keys
Product Manual
Lanman.ini File
Parameter
Advanced Server Registry Key Name
Value Name
(\SYSTEM\CurrentControlSet\Services)
backuprecovery
Browser\Parameters
BackupRecovery
backupupdate
Browser\Parameters
BackupUpdate
lmannounce
LanmanServer\Parameters
LmAnnounce
masterupdate
Browser\Parameters
MasterUpdate
morelog
Browser\Parameters
MoreLog
U7613-J-Z815-6-76
Pfad: D:\O7613e6\u7613e.mix
© Siemens Nixdorf Informationssysteme AG 1995
Glossary
administration shell
Users can manage the servers from this shell. The administration shell can be
called up for both local and remote administration.
administrator
The person responsible for the management of the local network. The administrator is generally responsible for the configuration of the local network and
organizes the shared resources in the network. In addition, the administrator has
the task of assigning privileges and assisting users with network problems.
Advanced Server
Advanced Server is a network operating system for local networks. Appropriate
software is required on the client in order to request services (workstation distribution); software is also required on a server to process services (server distribution).
alerter
This service enables the server to send warning and error messages to a
specific list of client users. These alarm messages deal with access violations
when using shared resources, and exceeding important limit values (free storage
area on the hard disk, maximum error rate for network and hard disk access and
maximum number of logon attempts).
announce process
The server uses the announce process to announce itself at regular intervals in
the network. This function is undertaken by the Browser in Advanced Server for
UNIX.
Application Programming Interface (API)
Using the programming interface of Advanced Server for UNIX, the application
programs are given access to the services and shared resources of Advanced
Server for UNIX. LM named pipes or mailslots can be accessed, for example, from
application programs.
Product Manual
U7613-J-Z815-6-76
Pfad: D:\O7613e6\u7613e.mix
Glossary
© Siemens Nixdorf Informationssysteme AG 1995
auditing
The server records processes, such as net logon (Netlogon), and utilization of
resources in an audit list. An entry in this list consists of the username, the type of
resource as well as the date and time when the resource was used.
autodisconnect
The server interrupts a session if it determines no activity for this session within
a specified period of time. If the relevant client wishes to access a shared resource
again at a later stage then the session is implicitly reactivated when a resource
is requested. A new “logon” or “net use” is not required.
backup domain controller
A server in a domain which manages a copy of the user account database and uses
it to verify logon attempts. See also Netlogon and primary domain controller.
browser
Displays all resources of all servers throughout the network, including servers in
other domains.
client
A client is a computer which uses the services and shared resources of another
computer, the server, over a local network. A client cannot generally provide
services to other computers.
computername
Name of a computer within a local network. Each computername is unique within
a network.
connection
A connection is set up if a client can access a shared resource of a server. A client
can have several connections to a server. This is provided when a session is
opened between a client and a server.
distributed application
Processes on the server system exchange data with processes on clients over
the local network. The resources of interprocess communication IPC$ are used to
exchange this data.
domain
A combination of servers and clients, which are joined in one administrative unit.
See also Netlogon security.
domain controller
See primary domain controller and backup domain controller.
Product Manual
U7613-J-Z815-6-76
Pfad: D:\O7613e6\u7613e.mix
Glossary
© Siemens Nixdorf Informationssysteme AG 1995
group
With user level security, a number of users (with user accounts) have common
authorization for one or more shared resources. Individually assigned rights have
precedence over those assigned through groups.
home directory
The directory in the file system of a multiuser system, in which a user is located
after logging on to the system.
interprocess communication (IPC$)
Data exchange between processes which are active either on the same
computer or on separate computers. In the second case, interprocess communication takes place in a local network using the LM named pipe and Mailslot
mechanisms.
IPC$
An administrative resource for controlling interprocess communication on servers.
The IPC$ resource of a server must be shared before any of the following
actions can be undertaken: displaying the shared resources of the server, use of
the distributed applications on the server by the user.
LM named pipe
LM named pipes (also known as OS/2 named pipes) are bidirectional communication channels for interprocess communication in the local network (similar to
Berkeley sockets). They are not the same as UNIX named pipes.
lanman.ini
An Advanced Server for UNIX initialization file. The values in this file determine
some of the parameters for the server in the local network, which deviate from
the default values.
Local area network (LAN)
A local network consists of one or more servers and several clients. The server
provides various services and shared resources for use by the clients. A network
operating system controls all processes in the local network.
mailslot
A mailslot is similar to a mailbox. Any user in the local network who knows the
name of the mailbox can send a message to it. Only the recipient can read the
messages in the mailbox.
Product Manual
U7613-J-Z815-6-76
Pfad: D:\O7613e6\u7613e.mix
Glossary
© Siemens Nixdorf Informationssysteme AG 1995
member server
A server in a domain, which retains and uses a copy of the user account database
of the domain but does not verify netlogon requests.
This server role is not supported with Advanced Server for UNIX. In the case of
an upgrade installation from LAN Manager/X, a member server receives the
server role backup domain controller.
messenger
This service enables the administrator to send a message to a particular client
user or to all client users in the local network.
message POPUP
A field on a client in which the incoming messages from other network users are
shown when the messenger and the Net POPUP services are active.
NetBIOS
A software module which connects the operating system to the local network
hardware and allows communication between the clients and the network.
Netlogon
This service implements Netlogon security. If Netlogon is operating on one server
in the domain, then all usernames and passwords, which must be specified by all
logged on users in the domain, are centrally verified. Netlogon runs on all
servers participating in Netlogon security. This means that the user account
databases are copied to all servers in the domain. See also trust relationship,
primary domain controller and backup domain controller.
Netlogon domain
The domain in which the users log on to the local network.
Netlogon process
Stating of usernames and passwords in order to access the local network. When
the connection to the resource is established, Advanced Server for UNIX verifies
the username and password before access is granted. For domains with
Netlogon security, the username and password must correspond to a valid user
account on the primary domain controller.
Net POPUP
A client service which issues messages on the screen as they arrive from other
users of the local network or server.
Product Manual
U7613-J-Z815-6-76
Pfad: D:\O7613e6\u7613e.mix
Glossary
© Siemens Nixdorf Informationssysteme AG 1995
Netlogon security
Netlogon security includes the following measures: The verification of the
identity of users at logon to the local network as well as the standardization of
the user account database for a domain in a single user account database, copies
of which are stored on all servers in the domain. With Trust Relationship, you can
also access shared resources in other domains. See also Netlogon.
netrun
Netrun enables the execution of a UNIX program on the server from an OS/2 or
an extended MS-DOS client.
password
A string used to access the network or one or more shared resources. See also
Netlogon security.
primary domain controller
The server in a domain on which the original version of the user account database
for this domain is maintained. The primary domain controller also verifies
netlogon requests. See also Netlogon, trust relationship and backup domain
controller.
Registry
A binary file containing server configuration data. The registry is Windows NT
compatible and can be accessed by the same tools like a Windows NT Registry.
For Advanced Server parameters stored in the registry see chapter “Advanced
Server Registry”.
replicator
A service which produces identical copies of specific files and directories on
different systems with a corresponding import function.
resource
See: shared resource
RPC
Microsoft Remote Procedure Calls. A platform-independent mechanism for the
interprocess communication in a client-server architecture.
security
A series of measures which enable the administrator to direct and control access
to network resources. See also Netlogon.
Product Manual
U7613-J-Z815-6-76
Pfad: D:\O7613e6\u7613e.mix
Glossary
© Siemens Nixdorf Informationssysteme AG 1995
server
A server or server system is a computer which provides services and shared
resources to the clients. A server could maintain a file system, for example, which
clients can access over a local network.
server name
Every server is assigned a unique name in the local network. Every shared
resource of every server in the local network can be addressed from a client
using the server name and the sharename. This is provided access authorization
has been granted.
server role
The role assigned to a server which determines whether and how Netlogon is
operating on this server. The server role can be a backup domain controller or
primary domain controller.
server system
See: server
services
The services are the main components of Advanced Server for UNIX software.
These include the workstation service, which enables a computer to use shared
resources in a local network. The server service enables the server to share
resources in a network. Other services are: Netlogon, Auditing, Net POPUP,
Netrun, Replicator, Alerter, Browser , Timesource, WINS and Messenger.
session
A session is opened if a client has successfully logged on to a server. A session
is required in order to set up one or more connections to individual shared
resources. A client can have several sessions set up to several servers. See also
Netlogon.
share
If a resource on a server is available to users in a local network, it is “shared”.
See also shared resource.
share level security
A type of security by means of which access to each shared resource is
dependent upon a password. Rights are not assigned to the individual user but
to the resource. This type of security is not supported by Advanced Server for
UNIX. In the case of an upgrade installation from LAN Manager/X, the type of
security is changed to user level security.
Product Manual
U7613-J-Z815-6-76
Pfad: D:\O7613e6\u7613e.mix
Glossary
© Siemens Nixdorf Informationssysteme AG 1995
sharename
Every shared resource on a server has a unique name on the server system. No
two resources on a server can have the same sharename, although they can
be given the same sharename if they are on different servers within a local
network. A user can request a specific resource on a server using the
sharename.
share table
This list contains a description of all shared resources on a server, which are
available for use in the local network.
shared client printer
In the case of a shared client printer, the output of the queue (of the UNIX
spooler) is printed to a printer which is connected to a client.
shared directory
Directories in the file system of the server, which are shared for use in the local
network. Shared directories include the files contained in these directories and
additional directories.
shared printer
Printer connected to a server, which can be used as a shared resource in the local
network. The incoming print requests are transferred by the server to the
configured system spooler.
shared program
See netrun.
shared resource
A shared resource is a server resource which can be used by the clients via a
local network. Examples of shared resources are directories, printers and the
interprocess communication resource (IPC$).
standalone server
A server with user level security, which organizes its own user account database and
is not part of a domain. This server role is not supported with Advanced Server
for UNIX. In the case of an upgrade installation from LAN Manager/X, a
standalone server receives the server role primary domain controller.
subcommands
The server is managed using subcommands. If the server is managed from the
operating system shell, the prefix net is placed before the subcommand:
net <subcommand>.
Product Manual
U7613-J-Z815-6-76
Pfad: D:\O7613e6\u7613e.mix
Glossary
© Siemens Nixdorf Informationssysteme AG 1995
timesource
An Advanced Server for UNIX service which identifies a server as a timesource
for a domain. Other servers and clients can synchronize their clocks with the
timesource. Exception: systems with UNIX cannot be synchronized.
timesource server
The server with the timesource service, which therefore serves as the timesource
of the local network. The other servers and clients in the network synchronize
themselves with the timesource server. An Advanced Server for UNIX server
can only operate as a timesource server and not as a synchronized server.
trust relationship
Trust relationships are links between domains that enable pass-through
authentication, in which a trusting domain honors the logon authentications of
a trusted domain. With trust relationship, a user who has only one user account
in one domain can potentially access the entire network. User accounts and
global groups defined in a trusted domain can be given rights and resource
permissions in a trusting domain, even though those accounts do not exist in
the trusting domain’s directory database.
user account
Consists of all the information that defines a user to the Advanced Server. This
includes items such as the user name and password required for the user to log
on, the groups in which the user account has membership, and the rights and
permissions the user has for using the system and accessing its resources. For
the Advanced Server, user accounts are managed with User Manager for
Domains. See also group.
user account database
The data of the user accounts and the established groups is stored in the
Advanced Server for UNIX databases. See also user account and group.
user level security
A type of security which manages a user account for each user. Each user then
maintains rights for specific shared resources which describe which actions each
user can operate with each resource. See also password.
username
Every user receives a unique name within a local network. Users use this name
to log on to a server and to identify themselves.
Product Manual
U7613-J-Z815-6-76
Pfad: D:\O7613e6\u7613e.mix
Glossary
© Siemens Nixdorf Informationssysteme AG 1995
WINS Service
Windows Internet Name Service (WINS) for Advanced Server provides a
Windows NT compatible, replicated, dynamic database for registering and
querying NetBIOS computer name-to-IP address mappings in a routed network
environment. Advanced Server WINS is designed to solve the problems that
occur with name resolution in complex internetworks.
workstation
See client.
Product Manual
U7613-J-Z815-6-76
Pfad: D:\O7613e6\u7613e.abk
© Siemens Nixdorf Informationssysteme AG 1995
Abbreviations
Product Manual
ACE
Access Control Entry
ACL
Access Control List
API
Application Programming Interface
AS/U
Advanced Server for UNIX
AS/X
Advanced Server for UNIX
BDC
Backup Domain Controller
BLOB
Binary Large Object
CDFS
CD File System
CMX
Communication Management under UNIX
DCE
Distributed Computing Environment
DHCP
Dynamic Host Configuration Protocol
DLL
Dynamic Link Library
DNS
Domain Name Service
EA
Extended Attributes (of HPFS)
EUC
Extended UNIX Code
FQDN
Fully Qualified Domain Name
HDLC
High Level Data Link Control
HPFS
High Performance File System
HS
High Sierra
ID
Identifier
IP
Internet Protocol
IPC
Interprocess Communication
ISDN
Integrated Services Digital Network
LAN
Local Area Network
LIPC
Local Interprocess Communication
LM
LAN Manager
LSA
Local Security Authority
U7613-J-Z815-6-76
Pfad: D:\O7613e6\u7613e.abk
© Siemens Nixdorf Informationssysteme AG 1995
Abbreviations
Product Manual
MEMFS
Memory File System
MIB
Management Information Base
MIDL
Microsoft Interface Definition Language
MS
Microsoft
MS-DOS
Microsoft Disk Operating System
NB
NetBIOS
NBNS
NetBIOS Name Server
NetBIOS
Network Basic Input Output System
NetBT
NetBIOS over TCP/IP
NFS
Network File System
NTFS
NT File System
OS/2
Operating System /2
OSI
Open Systems Interconnection
PC
Personal Computer
PCL
Printer Control Language
PDC
Primary Domain Controller
PDF
Portable Document Format
PPP
Point-to-Point Protocol
PST
Pacific Standard Time
RAS
Remote Access Service
RFC
Request for Comment
RISC
Reduced Instruction Set Computer
RMS
Reliant Monitor Software
RPC
Remote Procedure Call
SAM
Security Accounts Manager
SAX
Software Administration UNIX
SID
Security Identifier
SLIP
Serial Line IP
SNMP
Simple Network Management Protocol
SMB
Server Message Block
SSI
Single System Image
TCP/IP
Transmission Transport Protocol/Internet Protocol
TLI
Transport Layer Interface
U7613-J-Z815-6-76
Pfad: D:\O7613e6\u7613e.abk
© Siemens Nixdorf Informationssysteme AG 1995
Abbreviations
Product Manual
TSR
Terminate and Stay Resident
UDP
User Datagram Protocol
UFS
UNIX File System
UID
User ID
UNC
Uniform Naming Convention
UPS
Uninterruptable Power Supply
VxFS
Veritas File System
WINS
Windows Internet Name Service
WAN
Wide Area Network
WfW
Windows for Workgroups
U7613-J-Z815-6-76
Pfad: D:\O7613e6\u7613e.lit
© Siemens Nixdorf Informationssysteme AG 1995
Related publications
Advanced Server for UNIX V4.0
Concepts and Planning
Target group
System and network administrators
Contents
Introduction to Advanced Server for UNIX. Information on the administration and security
concept, domains and trusts administration of shared network files, printing, monitoring
network activities, and differences to LAN Manager/X is included.
Changes and extensions to the Siemens version are documented in this manual, “Overview
and Installation”.
Advanced Server for UNIX V4.0
API Reference
Target group
Developers
Contents
Brief overview of the API functions. Detailed information is provided in the API manual
pages.
LAN Manager/X V2.2
SNMP Service
Target group
System administrators
Contents
Incorporation of SNMP Service.
Product Manual
U7613-J-Z815-6-76
Pfad: D:\O7613e6\u7613e.lit
Related publications
© Siemens Nixdorf Informationssysteme AG 1995
The following manuals relate to the MS-DOS and MS OS/2 workstations:
MS Network Client V2.2
Installation Guide for Clients
Target group
System administrators
Contents
Installation and configuration information for client software, information on incorporating
the network driver, and information on the lanman.ini file on client systems.
MS Network Client V2.2
User’s Guide for MS-DOS Clients
Target group
Users
Contents
Operating instructions for starting and stopping client software, notes on using shared
resources, operating instructions for the Messenger service, command reference for
network and other client commands, notes on setting up shared client printers, notes on
operating with NetWare Connectivity, and troubleshooting.
MS Network Client V3.0
Installation Guide for Clients
Target group
Users
Contents
Additional installation and configuration information for client software, and troubleshooting.
MS Network Client V2.2
User’s Guide for MS Windows Clients
Target group
Users
Contents
Operating instructions for starting and stopping client software, notes on using shared
resources, operating instructions for the Messenger service, command reference for Net
and other client commands, notes on setting up shared client printers, notes on operating
with NetWare Connectivity, and troubleshooting.
Product Manual
U7613-J-Z815-6-76
Pfad: D:\O7613e6\u7613e.lit
Related publications
© Siemens Nixdorf Informationssysteme AG 1995
MS Network Client V2.2
NetWare Connectivity
Target group
System administrators
Contents
The basics of “NetWare Connectivity”, installing and configuring NetWare Connectivity,
troubleshooting, and differences in the administration of NetWare, Windows NT, and LAN
Manager.
Product Manual
U7613-J-Z815-6-76
Pfad: D:\O7613e6\u7613e.lit
Related publications
© Siemens Nixdorf Informationssysteme AG 1995
Other Siemens publications:
SINIX V5.43
Network Administration
System Administrator’s Guide
SINIX V5.43
Tuning Guide
System Administrator’s Guide
SINIX V5.43
System Administration and Hardware Configuration Using SYSADM
System Administrator’s Guide
SINIX V5.43
Commands – Volume 1 and 2
Reference Manuals
SINIX V5.43
Systemadministrator
System Administrator’s Guide
SINIX
AT&T Spooler
System Administrator’s Guide
SINIX
SPOOL V4.2
User and Administrator Guide
SINIX
SPOOL V4.2
Reference Manual
SINIX
SPOOL V4.2
Menus
User’s Guide
Product Manual
U7613-J-Z815-6-76
Pfad: D:\O7613e6\u7613e.lit
Related publications
© Siemens Nixdorf Informationssysteme AG 1995
Xprint
User and Administrator Guide
Xprint
Reference Manual
Xprint
Menus
User’s Guide
SINIX
OBSERVE
User Guide
SINIX V5.41
Logging V3.0
Target group: System administrators and programmers
Ordering manuals
You can order the specified publication through your local Siemens office.
Product Manual
U7613-J-Z815-6-76
Pfad: D:\O7613e6\u7613e.six
© Siemens Nixdorf Informationssysteme AG 1995
Index
A
accadm 154, 180
access permissions 151
edit 154
save 152
AccessAlert 306
accget 152, 180
acladm 180, 239
AclCacheSize 282
Acrobat Reader 88
adapt configuration files 137
addclipr 180
addserver 158, 180
administration
remote under Windows 25
administration shell 24, 339
administrator 4, 339
Advanced Server 339
Advanced Server for UNIX
start 134
status display of the processes 137
terminate 135
AlertAdminOnLicenseOverflow 281
alerter 20, 236, 339
AlertNames 303
AlertUserOnLicenseOverflow 281
anncmailslot 320
announce process 339
API Reference 351
application programming interface (API) 25, 42,
339
appsources 320
AS/U Administrator
installation 171
asxcheck 180, 240
Product Manual
asxdocs package
installation 88
asxinfo 180, 240
asxman package 88
installation 88
asxperf 180, 240
asxpwexp 159, 180
asxpwexp.usr 159
asxregview 180
asxsnmp package
installation 86
asxtools package 87
installation 87
asxtoolsD package
installation 87
AT&T spooler
names of printers and printer classes
setting up 125
auditing 20, 340
AutoDisconnect 307
autodisconnect 340
126
B
backup domain controller 21, 340
backup of system data 142
BackupRecovery 304
BackupUpdate 304
BigEndianLuidCompatibilityMode 291
blobadm 180
browser 22, 340
BrowserMaxCalls 299
C
CallXpstatDev 291
CategoryCount 306
U7613-J-Z815-6-76
Pfad: D:\O7613e6\u7613e.six
© Siemens Nixdorf Informationssysteme AG 1995
Index
CategoryMessageFile 306
changing
domain language 140
domain name 139
output language 140
server attributes 139
server name 139
server role 139
spooler interface 139
Changing parameters for a printer queue 143
CheckPrintQueueInMinutes 291
client
configuring for shared client printer 130
client (workstation) 340
clispooltime 320
Closing Sessions 234
compatibility
role of the server 27
server hardware 27
software for workstations 26
computername 10, 340
configuration
printers on the UNIX system 125
spool system 125
configure
configuration files 137
lanman.ini file 137
configure lanman.ini file 137
configuring shared client printer 130
connecting Advanced Server for UNIX to
Logging 120
connection 340
end 23
set up 23
ConnectTimeout 282
CoreOk 295
CountNotOnNetworkCache 303
country 321
CreateUnixUser 301
Cumulative Statistics 233
Current Statistics 233
D
Debugging Server Problems
Product Manual
deinstallation
NetBIOS 96
optional packages 94
previous versions 48
sequence 48, 94
server 94
delclipr 180
DeletedPrintJobTimeOnQ 292
delserver 158, 180
delshmem 180
DisableUpLevelPrinting 292
disk space
restricting 122
distributed application 340
distributed applications 17
development 138
setting up a UNIX development
environment 137
dll_dir 321
domain 320, 340
domain controller 340
domain language 140
domain name 12, 139
domainlang 321
DoStaticDataInit 316
DOSUTIL 145
E
EAFilePrefix 282
elfread 140, 180
Emanate 22
EnableSecuritySignature 307
EnableSoftCompat 282
EnableSoftFileExtensions 283
ErrorAlert 307
euctosjis 180
Event Viewer 232
EventlogMaxCalls 299
EventMessageFile 306
EventViewer 140
Exclude 302
ExportList 312
ExportPath 312
237
U7613-J-Z815-6-76
Pfad: D:\O7613e6\u7613e.six
© Siemens Nixdorf Informationssysteme AG 1995
Index
F
File 305
file attributes, map 12
findbrow 148
findbrow.exe 145
ForceDirectoryAcl 283
ForceFileAcl 283
ForceFileFlush 283
ForceUniqueUnixUserAccount
fsaddonpath 327
fslibname 327
fslibpath 327
fsmap 327
fsnosupport 327
302
G
group 341
GroupUpdateTime 302
GuardTime 312
H
hardware compatibility (server)
hardware requirements 44
Hidden 307
high availability 162
home directory 341
J
joindomain 139, 180
27
I
IgnoreSIGPWR 314
IgnoreUnixPermissions 283
ImportList 312
ImportPath 313
IncludeMessageHeader 303
installation
AS/U Adminstrator 171
asxdocs package 88
asxman package 88
asxsnmp package 86
asxtools package 87
asxtoolsD package 87
automatic with TRANSVIEW SAX 51
delivery package 44
from CD-ROM with cdinst 52
hardware requirements 44
Product Manual
manual pages 88
msclients package 86
NetBIOS 55
Network Client Administrator 169
optional packages 85
PC client software 86
procedure 47
sequence 55
SIreadmeM 55
software requirements 46
Windows NT Administrative Tools 169, 171
Windows NT Server Tools 172
with the default configuration 89
interface to the spool system
keywords 125
interprocess communication (IPC$) 17, 341
Interval 313
IPC$ 341
K
KeepAdministrativeShares 301
KeepSpareServer 295
keywords
interface to the spool system 125
L
lang 321
lanman.ini 341
configurable parameters 319
Parameter Mapping to Registry Keys 328
list of shared resources (share table) 14
listenextension 322
listenname 319
listennamechk 322
listenqlen 322
LM named pipe 18, 341
lmaddonpath 322
LmAnnounce 307
lmat 181
lmgetinf.exe 146
lmgetmsg_path 322
U7613-J-Z815-6-76
Pfad: D:\O7613e6\u7613e.six
© Siemens Nixdorf Informationssysteme AG 1995
Index
lmshare 181
lmshell 181, 237
lmstat 181, 237
lmxspooler 322
local area network 341
Locale 292
LockNapInMSec 295
Logging, connecting to 120
LogonAlert 307
LogonQuery 309
lptmpdir 323
LsarpcMaxCalls 300
M
machine account password changes
mailslot 19, 341
makeclients 181
MakeUnixDirectoriesOnShare 301
manuals 43
mapaclblob 323
mapchangelogblob 323
maplsablob 323
mapnames 257
mapping file attributes 12
MappingSeparator 284
mapregistryblob 323
mapsamblob 323
mapuname 181
master browser 145
search 145
MasterUpdate 304
maxclients 319
MaxDirectoryBufferSize 292
MaxEASize 284
MaxFilesInDirectory 313
maxfilesize 323
MaxFileSizeInKB 284
MaxIpcTryCount 293
MaxLockTimeInSeconds 295
MaxMailslotReadTime 293
MaxMessageSize 293
MaxMpxCt 308
MaxPrintQueueNameLength 293
MaxRawSize 293
Product Manual
310
MaxRuns 311
MaxServiceWaitTime 293
MaxSize 305
maxspoolfds 323
MaxVCPerProc 295
MaxVCs 296
MaxZeroFillInKB 284
member server 342
upgrade installation of 48
MemberPrec 316
MemoryMapFiles 284
message POPUP 342
messenger 342
MinSmbWorkerTasks 296
MinVCPerProc 296
MixedCaseSupport 285
MoreLog 305
msclients package 86
installation 86
msgforward 324
mv_names 150
N
names of printers and printer classes
AT&T spooler 126
names of printers and printer groups
SPOOL V4.x 128
names.cfg 150
names2lm 150
NameSpaceMapping 285
NativeLM 294
nativelm 324
NativeOS 294
nativeos 324
net access 189
net accounts 189
net admin 189
net auditing 189
net browser 189
net computer 189
net config 189
net continue 190
net device 190
net file 190
U7613-J-Z815-6-76
Pfad: D:\O7613e6\u7613e.six
© Siemens Nixdorf Informationssysteme AG 1995
Index
net group 190
net help 190
net helpmsg 190
net localgroup 190
net logoff 190
net logon 190
net password 190
net pause 190
net perms 190
Net POPUP 342
net print 190
net send 190
net session 191
net share 191
net sid 191
net start 191
net statistics 191
net status 191
net stop 191
net time 191
net trust 191
net user 191
net version 191
net view 191
netaddonpath 324
NetAdminGroupName 290
NetAdminPath 290
NetAdminUserName 290
NetBIOS 148, 342
deinstallation 55, 96
start 134
stop 136
netevent 181
nethelpfile 324
Netlogon 342
Netlogon domain 342
Netlogon process 342
Netlogon security 343
Netlogon service 21
NetlogonMaxCalls 300
netmsgwait 324
netrun 22, 343
network 325
Network Client Administrator
Product Manual
installation 169
network name 11
newpoll 325
NewUserShell 302
NfsCheck 120, 285
NotOnNetworkCacheTimeout 304
NullSessionShares 308
NumCIStructs 296
NumCLIENT_SESSION 296
NumHashTables 296
NumSERVER_SESSION 297
NumUStructs 297
O
OBSERVE
constraints 163
support 162
Open Resources 235
OplockTimeout 285
optional packages
deinstallation 94
installation 85
os2searchfix 325
output language 140
P
password 343
expiry 159
PowerFailAddress 315
PowerFailMessage 315
PowerMessageInterval 315
prebinduxredir 326
primary domain controller 21, 343
Print Subsystem Event Logging 235
printadm 181
printer
process queue 142
set up shared client printer 130
setting up AT&T spooler 125
setting up SPOOL V4.x 126
printer queues
restarting 142
stopping 142
process model
U7613-J-Z815-6-76
Pfad: D:\O7613e6\u7613e.six
© Siemens Nixdorf Informationssysteme AG 1995
Index
interprocess communication ($IPC)
session setup 38
shared memory 35
process the printer queue 142
processes, overview 36
ProductType 319
promote 139, 181
psaddonpath 327
Pulse 309, 313
Q
QueryDelay 309
quotas 122
R
Random 313
Randomize 310
ReadAheadCount 285
RefusePasswordChange 310
regcheck 181, 238
regconfig 181, 238
Registry 343
regload 181
RelogonDelay 310
remote administration
under Windows 25
Remote Monitoring of Server 235
Remote Procedure Calls 26
remotemounts 327
repladm 181
Replicate 313
Replicator 21, 343
ReportNTFS 286
RequireSecuritySignature 308
resource 343
resources
share 135
Retention 306
RootOwnsFilesCreatedOnNFS 286
RPC 343
RunPath 311
S
samcheck
181, 239
Product Manual
35
SamrMaxCalls 300
Scripts 310
secsources 326
security 343
share level 344
user level 346
Security Identifier 153
security signature 308
SendByeMessage 294
server 344
deinstallation 94
server name 139, 344
server role 21, 139, 344
compatibility 27
Server Statistics 233
server system 344
servername
add 158
Services 20
services 344
start individual 136
stop individual 136
session 23, 344
Session Information 234
setdomainlang 140, 181
setdomainname 139, 182
setlang 140, 182
setservername 139, 182
setspooler 139, 182
setting up a UNIX development environment
share 344
resources 135
share level security 344
share table 14, 345
shared
printer 16
program 19
resource 8
shared client printer 345
configuring 130
preparing client 130
procedures 130
setting up spooler 130
shared directory 345
137
U7613-J-Z815-6-76
Pfad: D:\O7613e6\u7613e.six
© Siemens Nixdorf Informationssysteme AG 1995
Index
shared printer 345
shared program 345
shared resource 345
sharename 11, 345
ShareReadCount 301
sharing
resources of a UNIX system 11
SID 153
SIreadmeM
installation 55
SizeGcBufferPoolInKB 294
sjistoeuc 182
Slsnmpdm 22
SMB signing 307
SNMP service 22
software requirements 46
Sources 306
SpareServerTime 297
SPOOL V4.x
name of spool server 127
names of printers and printer groups 128
setting up 126
spooler
setting up shared client printer 130
spooler interface 139
SpoolinAsUnixUser 294
SpoolssMaxCalls 300
SrvAnnounce 308
SrvComment 308
srvconfig 182, 239, 318
srvservices 319
srvstat 182
srvstathelpfile 326
SrvsvcMaxCalls 300
SSIPasswdAge 310
stacksize 326
standalone server 345
upgrade installation of 48
start
Advanced Server for UNIX 134
individual services 136
NetBIOS 134
stop
Advanced Server for UNIX 135
Product Manual
individual services 136
NetBIOS 136
StopOnCore 297
subcommands 24, 345
SvcctlMaxCalls 300
SyncAclFileOnWrite 286
SyncUnixHomeDirectory 302
sysadm 24
syssources 326
system administrator tools 151
system data, backup 142
system name 10
T
target group 4
TCP/IP-32 85, 86
tcp_nodelay 326
timesource 21, 346
timesource server 346
TimeToDrop 297
troubleshooting 231
tools 232
TruncatedExtensions 286
trust relationship 346
TryUser 314
type 346
TypesSupported 306
U
ud 182
umlauts 257
UniqueSuffixLength 286
UNIX 3
UNIX quotas 122
UnixCloseCount 287
UnixDirectoryCheck 287
UnixDirectoryGroup 314
UnixDirectoryOwner 314
UnixDirectoryPerms 287
UnixFileGroup 314
UnixFileOwner 314
UnixFilePerms 287
UnixQuotas 288
Update 311
U7613-J-Z815-6-76
Pfad: D:\O7613e6\u7613e.six
© Siemens Nixdorf Informationssysteme AG 1995
Index
upgrade installation
member server 48
standalone server 48
UseEAs 288
UseNfsLocks 120, 288
UseOplocks 289
user account 346
user account database 346
user configuration
save 157
user level security 24, 346
UserComment 303
userget 157, 182
username 11, 346
UserPath 308
UserRemark 303
userrights 182
UseUnixLocks 120, 289
V
VCDistribution 298
VolumeLabel 289
W
WAN 304, 309
Windows Internet Naming Service 22
Windows NT Administrative Tools
installation 171
Windows NT Adminstrative Tools
installation 169
Windows NT Server Tools
installation 172
WinregMaxCalls 300
WINS (Windows Internet Name Service)
dial-up TCP/IP networking clients 207
names
name query request packet 205
name registration request packet 202
negative
name
registration
response 202
positive name query response 202
static names that never expire 202
NetBIOS computer names
Product Manual
name registration 201
name release 203
name renewal 202
packets
name query request 205
name registration request 202
planning for WINS implementation
client network traffic 209
replication across WANs 211
proxy 206
static names 202
UDP (User Datagram Protocol)
name queries to WINS servers 205
WINS Service 347
winsadm 182
WinsServer 305
WkssvcMaxCalls 300
workstation (client) 347
WriteBehind 289
X
Xprint 142
U7613-J-Z815-6-76
Siemens AG
Information and Communication Products
Computer Systems
User Documentation UNIX QM4
33106 Paderborn
Germany
Fax: (++ 49) 52 51 8-1 52 48
[email protected]
Submitted by
Comments on Advanced Server UNIX V4.0
Overview and Installation
✁
U7613-J-Z815-6-76
Comments
Suggestions
Corrections
Siemens Business Services
Training and Services, Consulting Service
81730 Munich
Germany
Fax: (++49) 89636-52003
Courses
Consulting
Self-tuition media
The Siemens Training Center offers consulting for in-service training, courses and self-tuition media on almost all aspects of
information technology, either on your premises or at a Training Center near you. Write to us for information and course
programs.
Submitted by
Please send me information/course programs on the following topics
✁
U7613-J-Z815-6-76
Information on this document
On April 1, 2009, Fujitsu became the sole owner of Fujitsu Siemens Computers. This new subsidiary of Fujitsu has been renamed Fujitsu Technology Solutions.
This document from the document archive refers to a product version which
was released a considerable time ago or which is no longer marketed.
Please note that all company references and copyrights in this document have
been legally transferred to Fujitsu Technology Solutions.
Contact and support addresses will now be offered by Fujitsu Technology Solutions and have the format …@ts.fujitsu.com.
The Internet pages of Fujitsu Technology Solutions are available at
http://ts.fujitsu.com/...
and the user documentation at http://manuals.ts.fujitsu.com.
Copyright Fujitsu Technology Solutions, 2009
Hinweise zum vorliegenden Dokument
Zum 1. April 2009 ist Fujitsu Siemens Computers in den alleinigen Besitz von
Fujitsu übergegangen. Diese neue Tochtergesellschaft von Fujitsu trägt seitdem den Namen Fujitsu Technology Solutions.
Das vorliegende Dokument aus dem Dokumentenarchiv bezieht sich auf eine
bereits vor längerer Zeit freigegebene oder nicht mehr im Vertrieb befindliche
Produktversion.
Bitte beachten Sie, dass alle Firmenbezüge und Copyrights im vorliegenden
Dokument rechtlich auf Fujitsu Technology Solutions übergegangen sind.
Kontakt- und Supportadressen werden nun von Fujitsu Technology Solutions
angeboten und haben die Form …@ts.fujitsu.com.
Die Internetseiten von Fujitsu Technology Solutions finden Sie unter
http://de.ts.fujitsu.com/..., und unter http://manuals.ts.fujitsu.com finden Sie die
Benutzerdokumentation.
Copyright Fujitsu Technology Solutions, 2009