1
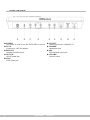
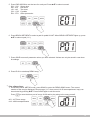
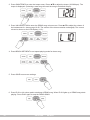
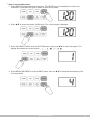
DP-1000 Owner ’s Manual SIXTA PAD Thank you for purchasing the SIXTA PAD. Before you use your new instrument, we recommend you to read through this entire manual, before you start to operate it. Important safety instructions For your own safety you must read through this chapter at first completely! • • • • • • • • • • • Risk of electrical shocks! Only connect the device using the mains adaptor supplied to a properly wired and earthed mains power socket providing mains voltage of 230 V ~ /50 Hz. Do not operate the device if the power adaptor, its cord or the mains plug is damaged. Never submerse the device in water. Wipe it with a slightly moistened cloth only. Do not expose the device to rain and never use it in a damp or wet environment. Make sure that the power adaptor or the adaptor cable never becomes wet or moist during use. Never subject the device to direct sunlight, excessive high temperatures or dust. This instrument contains digital circuitry and may cause interference if placed too close to radio or television receivers. If this occurs, move the instrument further away from the affected equipment. Under no circumstances may you open the housing of the device or the adaptor. Should you do so your safety would not be assured and the warranty will become void. There are no operational components whatsoever inside, only really high voltage that can give you a deadly shock! Do not place objects containing fluids, e.g. flower vases or beer bottles, on or near the device. Notice regarding disconnection from mains-power: To completely disconnect the device from mains power, you must disconnect the adaptor from the power socket. For this reason the device should be placed in a position where unobstructed access to the power socket is assured at all times, so that in an emergency you will be able to immediately pull out the adaptor. To eliminate the risk of fire you should completely disconnect the adaptor from the power socket when the device is not going to be used. Always grasp the power adaptor itself. Do not pull on the cord and never touch the power adaptor with wet hands as this could result in a short circuit or an electrical shock. Do not place the device, speakers or anything else on the adaptor cord and make sure that it does not become clamped. Never tie knots in the adaptor cord and do not bind it together with other cables. Lay the adaptor cord so that no one can step on or stumble over it. A damaged power adaptor can cause a fire or an electrical shock. Check the power adaptor and its cord from time to time. Should it become damaged contact our customer service department to have it replaced. NEVER use the unit under the following conditions: > In places subject to vibrations, bumps, or dust. > In places with a temperature of over 45 °C/113 °F or less than 2 °C/35.6 °F. > In places subject to excessive dryness or humidity (ideal conditions are between 35% and 80%). Risk of fire! • Never leave the device unattended during operation. • Do not place open fire sources, such as candles, on the device. • Never operate the device in the vicinity of heat sources such as cookers, heating elements or other heat producing installations. • Before a storm and/or a thunderstorm with a risk of lightning, please disconnect the device from the electrical power source. • • • • 2 Risk of personal injury! This appliance is not intended for use by individuals (including children) with restricted physical, physiological or intellectual abilities or deficiencies in experience and/or knowledge unless they are supervised by a person responsible for their safety or receive from this person instruction in how the appliance is to be used. Children should be supervised to ensure that they do not play with the appliance. Provide a stable location for the device. Do not operate the device if it has sustained a fall or is damaged. Have the device checked or, if necessary, repaired by qualified technicians. Important! Never play the drums with high volume level. Listening to music with high sound pressure level, especially when using headphones, may cause permanent damage to your hearing! SIXTA PAD • DP-1000 Handling the unit • Never apply excessive force to the controls, connectors or other parts of the instrument. • Always unplug cables by gripping the plug firmly, but not pulling on the cable. • To avoid damage to the instrument and other devices to which it is connected, turn the power switches of all related device OFF prior to connecting or disconnecting cables. • Physical shocks caused by dropping, bumping, or placing heavy objects on the instrument can result in scratches and more serious damage. • The normal function of the product may be disturbed by strong electromagnetic interference. If so, simply reset the product to resume normal operation by following the instruction manual. In case the function could not be resumed, please use the product in another location. • ESD, fast transient and surge may cause the unit to temporarily malfunction. Then switch the device off and on again to resume normal operation. Cleaning the unit • Clean the unit with a dry soft cloth. • A slightly damp cloth may be used to remove stubborn grime and dirt. • Never use cleaners such as alcohol or thinner. Disposal Never throw the device into the regular household waste at the end of its useful life. This product is subject to the European Directive 2002/96/EC. Dispose of the device through an approved disposal centre or at your community waste facility. Observe the current existing regulations. In case of doubt contact your disposal facility. QQ The packaging is certified via a dual system. Take all packaging materials to an environmentally friendly disposal facility in compliance with the local regulations. QQ QQ www.thomann.de 3 Table of contents Important safety instructions........................................................................................ 2 Disposal........................................................................................................................ 3 Features & technical specifiactions............................................................................... 4 The operating elements . . ........................................................................................... 5 . . . on the top panel............................................................................................. 5 . . . on the rear panel............................................................................................. 6 I/O introduction............................................................................................................ 7 Functions...................................................................................................................... 7 Operational guide......................................................................................................... 8 Appendix 1................................................................................................................. 14 Appendix 2................................................................................................................. 14 Features & technical specifications XX 6 velocity sensitive drum pads XX 3 x 7 segment LED main display XX 178 drum sounds, 30 drum Kits (10 preset, 20 user) XX 17 demo songs, 3 accompaniments XX Metronome function XX Recording function XX Power: AC adaptor (9 V / 1000 mA XX Jacks: ) DC inX MIDI OUTX HH CTRL pedal and KICK pedalX Line-outX HeadphoneX Mix Input XX Dimension: 365 (L) x 295 (W) x 60 (H) mm XX Weight: 2.15 kg XX Accessories: DC 9V power adaptor (included), 4 screws for stand mounting 4 SIXTA PAD • DP-1000 The operating elements . . . . . . on the top panel q LED: This display indicates the value of each parameter wDRUM: This button is used to enter the kit menu e PAD: This button is used to enter the drum pad menu r SONG: This button is used to enter the demo song menu tMETRO: This button is used to turn on/off the metronome yVALUE/RHYTHM: This button is used to enable value rhythm parameter settings u GAIN/TEMPO: This button is used to enable Gain/Tempo parameter settings i PAD/ASSIGN: This button is used to enable Pad/Assign parameter settings o BRUSH SET/BEAT: This button is used to enable Brush parameter and Beat settings a : This button is used to change values in decreasing sequence s : This button is used to change values in increasing sequence d REC: This button is used to enter recording mode f PLAY: This button is used to start/stop the demo song, Metronome, and Recording 1$ SAVE: This button is used to save parameter values. 1% DRUM OFF: This button is used to turn the drum sound off and on 1^ MIDI OUT: Outputs a MIDI signal 1& PADS: 6 velocity sensitive pads www.thomann.de 5 . . . on the rear panel q POWER: This switch is used to turn the SIXTA PAD on and off w DC IN: Connects to a DC 9V adapter e MIDI OUT: Outputs the MIDI signal r HH CTRL: HI-HAT pedal jack t KICK: KICK Pedal jack 6 y OUTPUT: Output signal jacks, L(MONO), R u PHONES: Headphone jack i MIX: External audio input jack o VOLUME: Volume control SIXTA PAD • DP-1000 I/O introduction QQ Power Supply/DC Power Adapter Only use the 9V DC power adaptor enclosed to power the Sixta Pad. Always turn off the instrument before plugging in or unplugging the adaptor. Unplug the DC power adaptor if the instrument will not be used. QQ Phones You can monitor your drum sounds. QQ Output Outputs the signal to an amplifier. QQ HH CTRL and KICK Supports Hi-Hat pedal and Kick pedals. When the Hi-HAT socket is unplugged, hit the Hi-HAT pad, which will trigger the CLOSED Hi-HAT sound. QQ When a Hi-Hat pedal is plugged into the HH CTRL input, the CLOSED sound is triggered by hitting the Hi-Hat pad while pressing the pedal. The OPEN sound is triggered by hitting the Hi-Hat pad without pressing the pedal. The sound of the Hi-Hat is triggered by pressing the pedal only. QQ When a pedal is plugged into the KICK input, press the pedal to get the sound of a bass drum. QQ NOTE: HH CTRL jack and KICK jack are interchangeable. QQ Mix An external audio device can be plugged into MIX to mix with the sound of the Sixta Pad and played back through the OUTPUT or PHONES jacks. Functions Drum kit There are 30 drum kit settings in the Sixta Pad, 10 factory presets and 20 user presets. You can set the tone of each pad. You can control the sensitivity and volume of each pad. You can set and save 20 drum kits. 178 different instrument patches to allow each pad sound to be programmed. QQ Demo song There are 17 drum songs, and each song can be repeated. There are 3 accompaniments; each accompaniment can be replayed repeatedly. The drum sound in the accompaniment can be turned off. The volume of the accompaniments is adjustable. QQ Metronome You can set rhythm, beat, tempo and tone in metronome mode. QQ Recording Record the drumbeat and demo songs when a DEMO song is playing. Real time MIDI OUT. Supports Hi-Hat pedal and kick pedal. QQ www.thomann.de 7 Operational guide QQ Power switch, volume control Switch the POWER button to ON, the DISPLAY will light up for 1 second. Choose a drum kit. The drum kit menu is the default menu after powering on. Turn the VOLUME knob to control the volume. QQ How to set up a drum kit 1. Press DRUM button to enter the drum kit menu. Press the or arrow buttons to select the drum kit. The display will show the current kit number (Presets P01-P10, user drum kits U11-U30) 2. Press PAD button to enter the pad menu in user drum kit mode. The pad number is displayed (including pedal HI-HAT OPEN HI-HAT kick drum). Tap the pad or press the pedal to select the pad (1-9 ), or press / to select the pad. 3. Press GAIN/TEMPO button to set the sensitivity of the pad, When the GAIN/TEMPO key lights up, press / to select the sensitivity (1-10 ). (Only the sensitivity of pads is adjustable. If using a HiHAT or KICK pedal, press the pedal when setting the sensitivity.) 4. Press VALUE/RHYTHM to set the pad volume. When the VALUE/RHYTHM key lights up, press / to adjust the volume (1 -10 ) 8 SIXTA PAD • DP-1000 5. Press PAD ASSIGN to set the tone for each pad. Press / to select a sound. S01 - S10 Snare drum b01 - b12 Kick drum t-01 - t49 Tom toms C01 - C28 Cymbals E01 - E79 Other percussion 6. Press BRUSH SET/BEAT to select a pad for pedal HI-HAT. When BRUSH SET/BEAT lights up, press / to select a pad (1-6 ). 7. Press SAVE to save all parameter values you have selected. Values can only be saved in user drum kit settings. 8. Press PLAY to start/stop DEMO song. QQ Play a Demo Song 1. In DRUM mode or METRO mode, press SONG to enter the DEMO SONG menu. The current number of the song is displayed. Demo songs (1-17 drum sound; 18-20 accompaniment, loop) can be selected by pressing /. Press SONG again to exit the menu. Press to mute the drum part of songs 18-20 and to play along to the song yourself. d01 - d17 Drum songs d18 - d20 Accompaniments www.thomann.de 9 2. Press GAIN/TEMPO to enter the tempo menu. Press / to adjust the tempo (30-260 bpm). The tempo is displayed. (Selecting a new song will reset the song to its default tempo). 3. Press VALUE/RHYTHM to enter the DEMO song volume menu. Press / to adjust the volume of the instruments for demo songs 18-20. The volume of the drums remains unchanged). The current volume is shown on the LED display (1-10 ). 4. Press BRUSH SET/BEAT to set repeat playing mode for demo song. 5. Press SAVE to save user settings. 6. Press PLAY or hit a drum pad to start/stop a DEMO song. When PLAY lights up, a DEMO song starts playing. Press PLAY again to stop the DEMO SONG. 10 SIXTA PAD • DP-1000 QQ How to use the Metronome 1. Press METRO button to start the metronome. The METRO key is lit and flashes in time to the metronome. Press METRO again to switch to drum kit set mode. 2. Press / to select the tempo (30-260 bpm). The current tempo is displayed. 3. Press VALUE/RHYTHM to enter the RHYTHM menu, then press / to select the rhythm. The display will indicate the current rhythm ( ). 4. Press BRUSH SET/BEAT to enter the BEAT menu, then use / to select the beat/measure (0-9, 0-no down beat). www.thomann.de 11 5. Press PAD ASSIGN to change the metronome tone , Press / to select the tone for the metronome (1, 2, or 3). The number of the currently selected tone is displayed. 6 Press SAVE to save the settings. 7. Press METRO to start the metronome. Press METRO again to stop the metronome. QQ Recording mode 1. Press REC button to enter recording mode. The METRO button must be active. 2. The display shows the tempo of the metronome. 3. Press the BRUSH/SET/BEAT button, to set the unit record enable. Now use the / buttons to change the metronome settings. 4. Hit one of the pads or press the PLAY button to start the recording. Press that button again to stop recording. If you don’t hit any pad for some seconds, the unit will stop the recording automatically. 5. Now press the PLAY button, to playback the song recording. 6. Press the SAVE button to store the recording. If you don’t save the recording, the unit will keep the previously recorded song in its memory, even when the unit is switched off. Note: If you want to record your playing along to a song with accompaniment (18-20), you have to select that song before activating the record mode. 12 SIXTA PAD • DP-1000 QQ DRUM OFF and MIDI OUT 1. Press DRUM OFF to turn off the drum sound in those demo songs with instrumental accompaniment. 2. Press MIDI OUT in any mode to output a MIDI signal via the MIDI OUT jack. Please note that this will mute the OUTPUT and PHONE sockets. NOTE: The MIDI OUT jack only outputs the original signal. Channel Program 1-6 drum pad 10 0 Open Hi-HAT 10 0 Closed HI-HAT 10 0 Kick drum 10 0 www.thomann.de Note 60-65 68 69 70 13 Appendix 1 d01 M8BEAT2C d02 M8BEAT4A d03 M8BEATSWA d04 M8BEATROK d05 BALLAD3 d06 BEAT1A d07 BEAT3A Demo Songs d08 BEGUIN d09 BLDSHFL d10 FOXTROT2 d11 FOXTROT4 d12 LAMBADA d13 POP2 d14 RAGGAE3 d15 RHUMBA2 d16 SON d17 SWING16 d18 Demov d19 Jam d20 Rock Appendix 2 S01 Snare Druml S02 Snare Drum 2 S03 Gated Snare S04 Gated Snare Snare Drum S05 Elec Snare1 S06 808 Snare Drum S07 Concert SD S08 Concert SD b01 STD1 Kick2 b02 Power Kick b03 Elec Kick b04 808 BD Kick Drum b05 Jazz BD2 b06 Jazz BD1 b07 Jazz BD2 b08 Jazz Bd1 b09 Concert BD 2 b10 Concert BD 1 b11 Kick drum b12 Kick drum Tom Drum t12 Power Hi Tom1 t13 Power Low Tom2 t14 Power Low Tom1 t15 Power Mid Tom2 t16 Power Mid Tom1 t17 Power Hi Tom2 t18 Power Hi Tom1 t19 Elec Low Tom2 t20 Elec Low Tom1 t21 Elec Mid Tom2 t22 Elec Mid Tom1 t39 Timpani c# t40 Timpani d t41 Timpani d# t42 Timpani e t43 Timpani f t23 Elec Hi Tom2 t24 Elec Hi Tom1 t25 808 Low Tom2 t26 808 Low Tom2 t27 808 Mid Tom2 t28 808 Mid Tom1 t29 808 Hi Tom2 t30 808 HiTom1 t31 Timpani F t32 Timpani F# t33 Timpani G t44 Acoustic Low Tom t45 Acoustic Low Tom t46 Click Acoustic Middle Tom t47 Acoustic Middle Tom t48 Acoustic High Tom t01 Low Floor Tom t02 High Floor Tom t03 Low Rack Tom t04 Low-Mid Rack Tom t05 Hi Mid Rack Tom t06 High Tom t07 Power Low Tom2 t08 Power Low Tom1 t09 Power Mid Tom2 t10 Power Mid Tom1 t11 Power Hi Tom2 t34 Timpani G# t35 Timpani A t36 Timpani A# t37 Timpani B t38 Timpani c t49 Acoustic High Tom 14 SIXTA PAD • DP-1000 S09 Snare Drum S10 Elec Snare Drum C01 Closed Hi Hat [EXC1] C02 Pedal Hi-Hat [EXC1] C03 Open Hi-Hat [EXC1] C04 Crash Cymbal 1 C05 Ride Cymbal 1 C06 Chinese Cymbal C07 Ride Bell C08 Splash Cymbal C09 Crash Cymbal 2 C10 Ride Cymbal 2 Cymbal C11 Reverse Cymbal C12 808 Rim shot C13 808 CHH [EXC1] C14 808 CHH [EXC1] C15 808 OHH [EXC1] C16 808 Cymbal C17 Closed Hi Hat C18 Pedal Hi-Hat C19 Open Hi Hat C20 Ride Cymbal E01 High Q E02 Slap E03 Scratch Push E04 Scratch Pull E05 Sticks E06 Square Click E07 Metronome Click E08 Metronome Bell E09 Side Stick E10 Hand Clap E11 Tambourine E12 Cowbell E13 Vibraslap E14 Hi Bongo E15 Low Bongo E46 808 Maracas E47 808 Claves E48 Brush Tap E49 Brush Slap E50 Brush Swirl E51 Castanets E52 High Q E53 Slap Elec E54 Scratch Push E55 Scratch Pull E56 Sticks E57 Square E58 Metronome Other Percussions E16 Mute Hi Conga E17 Open Hi Conga E18 Low Conga E19 High Timbale E20 Low Timbale E21 High Agogo E22 Low Agogo E23 Cabasa E24 Maracas E25 Short Whistle[EXC2] E26 Long Whistle[EXC2] E27 Short Guiro [EXC3] E28 Long Guiro [EXC3] E29 Claves E30 Hi Wood Block E59 Metronome Bell E60 Guitar Slide E61 Gt Cut Noise (down) E62 Gt Cut Noise (up) E63 Double Bass Slap E64 Key Click Ride E65 Laughing E66 Screaming E67 Punch E68 Heart Beat E69 Footsteps1 E70 Footsteps2 E71 Door Creaking www.thomann.de C21 Concert Cymbal2 C22 Concert Cymbal1 C23 Rim Shot C24 Closed Hi-Hat [Exc1] C25 Click Open Hi-Hat 2 C26 Open Hi-Hat 1 [Exc1] C27 Crash Cymbal C28 Cymbal E31 Low Wood Block E32 Mute Cuica [EXC4] E33 Open Cuica [EXC4] E34 Mute Triangle [EXC5] E35 Open Triangle[EXC5] E36 Shaker E37 Jingle Bell E38 Belltree E39 Castanets E40 Mute Surdo [EXC6] E41 Open Surdo [EXC6] E42 808 Cowbell E43 808 High Conga E44 808 Mid Conga E45 808 Low Conga E72 Door Closing E73 Scratch E74 Car Braking E75 Car Pass E76 Car Crash E77 Hand Clap E78 Tambourine E79 Cowbell 15 © 2011 • Musikhaus Thomann e. K. • Treppendorf 30 • 96138 Burgebrach • Germany • www.thomann.de