1
TIBCO ActiveMatrix® BPM
Installation and Configuration
Software Release 1.3
March 2012
Document Updated: April 2012
Important Information
SOME TIBCO SOFTWARE EMBEDS OR BUNDLES OTHER TIBCO SOFTWARE. USE OF SUCH EMBEDDED
OR BUNDLED TIBCO SOFTWARE IS SOLELY TO ENABLE THE FUNCTIONALITY (OR PROVIDE LIMITED
ADD-ON FUNCTIONALITY) OF THE LICENSED TIBCO SOFTWARE. THE EMBEDDED OR BUNDLED
SOFTWARE IS NOT LICENSED TO BE USED OR ACCESSED BY ANY OTHER TIBCO SOFTWARE OR FOR
ANY OTHER PURPOSE.
USE OF TIBCO SOFTWARE AND THIS DOCUMENT IS SUBJECT TO THE TERMS AND CONDITIONS OF A
LICENSE AGREEMENT FOUND IN EITHER A SEPARATELY EXECUTED SOFTWARE LICENSE
AGREEMENT, OR, IF THERE IS NO SUCH SEPARATE AGREEMENT, THE CLICKWRAP END USER
LICENSE AGREEMENT WHICH IS DISPLAYED DURING DOWNLOAD OR INSTALLATION OF THE
SOFTWARE (AND WHICH IS DUPLICATED IN THE LICENSE FILE) OR IF THERE IS NO SUCH SOFTWARE
LICENSE AGREEMENT OR CLICKWRAP END USER LICENSE AGREEMENT, THE LICENSE(S) LOCATED
IN THE “LICENSE” FILE(S) OF THE SOFTWARE. USE OF THIS DOCUMENT IS SUBJECT TO THOSE TERMS
AND CONDITIONS, AND YOUR USE HEREOF SHALL CONSTITUTE ACCEPTANCE OF AND AN
AGREEMENT TO BE BOUND BY THE SAME.
This document contains confidential information that is subject to U.S. and international copyright laws and
treaties. No part of this document may be reproduced in any form without the written authorization of TIBCO
Software Inc.
TIBCO, The Power of Now,TIBCO ActiveMatrix, TIBCO Business Studio, and TIBCO Enterprise Message Server
are either registered trademarks or trademarks of TIBCO Software Inc. in the United States and/or other
countries.
All other product and company names and marks mentioned in this document are the property of their
respective owners and are mentioned for identification purposes only.
THIS SOFTWARE MAY BE AVAILABLE ON MULTIPLE OPERATING SYSTEMS. HOWEVER, NOT ALL
OPERATING SYSTEM PLATFORMS FOR A SPECIFIC SOFTWARE VERSION ARE RELEASED AT THE SAME
TIME. SEE THE README FILE FOR THE AVAILABILITY OF THIS SOFTWARE VERSION ON A SPECIFIC
OPERATING SYSTEM PLATFORM.
THIS DOCUMENT IS PROVIDED “AS IS” WITHOUT WARRANTY OF ANY KIND, EITHER EXPRESS OR
IMPLIED, INCLUDING, BUT NOT LIMITED TO, THE IMPLIED WARRANTIES OF MERCHANTABILITY,
FITNESS FOR A PARTICULAR PURPOSE, OR NON-INFRINGEMENT.
THIS DOCUMENT COULD INCLUDE TECHNICAL INACCURACIES OR TYPOGRAPHICAL ERRORS.
CHANGES ARE PERIODICALLY ADDED TO THE INFORMATION HEREIN; THESE CHANGES WILL BE
INCORPORATED IN NEW EDITIONS OF THIS DOCUMENT. TIBCO SOFTWARE INC. MAY MAKE
IMPROVEMENTS AND/OR CHANGES IN THE PRODUCT(S) AND/OR THE PROGRAM(S) DESCRIBED IN
THIS DOCUMENT AT ANY TIME.
THE CONTENTS OF THIS DOCUMENT MAY BE MODIFIED AND/OR QUALIFIED, DIRECTLY OR
INDIRECTLY, BY OTHER DOCUMENTATION WHICH ACCOMPANIES THIS SOFTWARE, INCLUDING
BUT NOT LIMITED TO ANY RELEASE NOTES AND "READ ME" FILES.
Copyright © 2005-2012 TIBCO Software Inc. ALL RIGHTS RESERVED.
TIBCO Software Inc. Confidential Information
| iii
Contents
Preface . . . . . . . . . . . . . . . . . . . . . . . . . . . . . . . . . . . . . . . . . . . . . . . . . . . . . . . . . . . . . . . . . . . . . . . .vii
Changes from the Previous Release of this Guide . . . . . . . . . . . . . . . . . . . . . . . . . . . . . . . . . . . . . . . . . . . . . . . . viii
Typographical Conventions . . . . . . . . . . . . . . . . . . . . . . . . . . . . . . . . . . . . . . . . . . . . . . . . . . . . . . . . . . . . . . . . . . ix
Connecting with TIBCO Resources . . . . . . . . . . . . . . . . . . . . . . . . . . . . . . . . . . . . . . . . . . . . . . . . . . . . . . . . . . . .
How to Join TIBCOmmunity . . . . . . . . . . . . . . . . . . . . . . . . . . . . . . . . . . . . . . . . . . . . . . . . . . . . . . . . . . . . . .
How to Access TIBCO Documentation. . . . . . . . . . . . . . . . . . . . . . . . . . . . . . . . . . . . . . . . . . . . . . . . . . . . . .
How to Contact TIBCO Support . . . . . . . . . . . . . . . . . . . . . . . . . . . . . . . . . . . . . . . . . . . . . . . . . . . . . . . . . . .
PART ONE
xii
xii
xii
xii
INTRODUCTION . . . . . . . . . . . . . . . . . . . . . . . . . . . . . . . . . . . . . . . . . . . . . . . . . . . . .1
Chapter 1 Introduction. . . . . . . . . . . . . . . . . . . . . . . . . . . . . . . . . . . . . . . . . . . . . . . . . . . . . . . . . . . .2
Installation Overview . . . . . . . . . . . . . . . . . . . . . . . . . . . . . . . . . . . . . . . . . . . . . . . . . . . . . . . . . . . . . . . . . . . . . . . . 3
Installation Modes. . . . . . . . . . . . . . . . . . . . . . . . . . . . . . . . . . . . . . . . . . . . . . . . . . . . . . . . . . . . . . . . . . . . . . . 3
Installation Types . . . . . . . . . . . . . . . . . . . . . . . . . . . . . . . . . . . . . . . . . . . . . . . . . . . . . . . . . . . . . . . . . . . . . . . 4
Installer Account . . . . . . . . . . . . . . . . . . . . . . . . . . . . . . . . . . . . . . . . . . . . . . . . . . . . . . . . . . . . . . . . . . . . . . . . 5
Installer Log File . . . . . . . . . . . . . . . . . . . . . . . . . . . . . . . . . . . . . . . . . . . . . . . . . . . . . . . . . . . . . . . . . . . . . . . . 5
Installation Directory . . . . . . . . . . . . . . . . . . . . . . . . . . . . . . . . . . . . . . . . . . . . . . . . . . . . . . . . . . . . . . . . . . . . . 6
Installation Requirements . . . . . . . . . . . . . . . . . . . . . . . . . . . . . . . . . . . . . . . . . . . . . . . . . . . . . . . . . . . . . . . . . . . . 7
Disk Space Requirement . . . . . . . . . . . . . . . . . . . . . . . . . . . . . . . . . . . . . . . . . . . . . . . . . . . . . . . . . . . . . . . . . 7
Hardware Requirements. . . . . . . . . . . . . . . . . . . . . . . . . . . . . . . . . . . . . . . . . . . . . . . . . . . . . . . . . . . . . . . . . . 8
Supported Platforms. . . . . . . . . . . . . . . . . . . . . . . . . . . . . . . . . . . . . . . . . . . . . . . . . . . . . . . . . . . . . . . . . . . . . 8
Certified and Compatible Combinations . . . . . . . . . . . . . . . . . . . . . . . . . . . . . . . . . . . . . . . . . . . . . . . . . . . . . . 8
Software Requirements . . . . . . . . . . . . . . . . . . . . . . . . . . . . . . . . . . . . . . . . . . . . . . . . . . . . . . . . . . . . . . . . . 13
Chapter 2 Pre-install Considerations . . . . . . . . . . . . . . . . . . . . . . . . . . . . . . . . . . . . . . . . . . . . . . .19
Determine the Architecture for Your System . . . . . . . . . . . . . . . . . . . . . . . . . . . . . . . . . . . . . . . . . . . . . . . . . . . . . 20
Highly Available and Fault Tolerant System . . . . . . . . . . . . . . . . . . . . . . . . . . . . . . . . . . . . . . . . . . . . . . . . . . 21
Distributed System . . . . . . . . . . . . . . . . . . . . . . . . . . . . . . . . . . . . . . . . . . . . . . . . . . . . . . . . . . . . . . . . . . . . . 23
Disaster Recovery . . . . . . . . . . . . . . . . . . . . . . . . . . . . . . . . . . . . . . . . . . . . . . . . . . . . . . . . . . . . . . . . . . . . . . . . . 27
Backup and Restore . . . . . . . . . . . . . . . . . . . . . . . . . . . . . . . . . . . . . . . . . . . . . . . . . . . . . . . . . . . . . . . . . . . . . . . 29
Back Up Your System . . . . . . . . . . . . . . . . . . . . . . . . . . . . . . . . . . . . . . . . . . . . . . . . . . . . . . . . . . . . . . . . . . . 29
Restore from a Backup . . . . . . . . . . . . . . . . . . . . . . . . . . . . . . . . . . . . . . . . . . . . . . . . . . . . . . . . . . . . . . . . . . 29
Decide the Approach to Create the Databases . . . . . . . . . . . . . . . . . . . . . . . . . . . . . . . . . . . . . . . . . . . . . . . . . . . 31
PART TWO
INSTALLATION . . . . . . . . . . . . . . . . . . . . . . . . . . . . . . . . . . . . . . . . . . . . . . . . . . . . .33
TIBCO ActiveMatrix BPM Installation and Configuration
iv
| Contents
Chapter 3 Pre-Installation Tasks . . . . . . . . . . . . . . . . . . . . . . . . . . . . . . . . . . . . . . . . . . . . . . . . . . 34
Setting up the Databases . . . . . . . . . . . . . . . . . . . . . . . . . . . . . . . . . . . . . . . . . . . . . . . . . . . . . . . . . . . . . . . . . . . 35
TIBCO ActiveMatrix BPM Database . . . . . . . . . . . . . . . . . . . . . . . . . . . . . . . . . . . . . . . . . . . . . . . . . . . . . . . 35
TIBCO ActiveMatrix Administrator Database. . . . . . . . . . . . . . . . . . . . . . . . . . . . . . . . . . . . . . . . . . . . . . . . . 38
Configuring Other Third Party Software . . . . . . . . . . . . . . . . . . . . . . . . . . . . . . . . . . . . . . . . . . . . . . . . . . . . . . . .
LDAP Server . . . . . . . . . . . . . . . . . . . . . . . . . . . . . . . . . . . . . . . . . . . . . . . . . . . . . . . . . . . . . . . . . . . . . . . . .
JDBC Drivers . . . . . . . . . . . . . . . . . . . . . . . . . . . . . . . . . . . . . . . . . . . . . . . . . . . . . . . . . . . . . . . . . . . . . . . . .
Apache Ant . . . . . . . . . . . . . . . . . . . . . . . . . . . . . . . . . . . . . . . . . . . . . . . . . . . . . . . . . . . . . . . . . . . . . . . . . .
File Descriptors (on Linux) . . . . . . . . . . . . . . . . . . . . . . . . . . . . . . . . . . . . . . . . . . . . . . . . . . . . . . . . . . . . . . .
40
40
40
41
42
Chapter 4 Installation . . . . . . . . . . . . . . . . . . . . . . . . . . . . . . . . . . . . . . . . . . . . . . . . . . . . . . . . . . . 45
Installing the Product. . . . . . . . . . . . . . . . . . . . . . . . . . . . . . . . . . . . . . . . . . . . . . . . . . . . . . . . . . . . . . . . . . . . . . .
Installing in GUI mode . . . . . . . . . . . . . . . . . . . . . . . . . . . . . . . . . . . . . . . . . . . . . . . . . . . . . . . . . . . . . . . . . .
Installing in Console mode. . . . . . . . . . . . . . . . . . . . . . . . . . . . . . . . . . . . . . . . . . . . . . . . . . . . . . . . . . . . . . .
Install in Silent mode . . . . . . . . . . . . . . . . . . . . . . . . . . . . . . . . . . . . . . . . . . . . . . . . . . . . . . . . . . . . . . . . . . .
46
46
50
50
Setting up a Highly Available, Fault Tolerant System . . . . . . . . . . . . . . . . . . . . . . . . . . . . . . . . . . . . . . . . . . . . . .
Using A Third-Party Solution . . . . . . . . . . . . . . . . . . . . . . . . . . . . . . . . . . . . . . . . . . . . . . . . . . . . . . . . . . . . .
Using Active-Active Clustering. . . . . . . . . . . . . . . . . . . . . . . . . . . . . . . . . . . . . . . . . . . . . . . . . . . . . . . . . . . .
Pre-Installation . . . . . . . . . . . . . . . . . . . . . . . . . . . . . . . . . . . . . . . . . . . . . . . . . . . . . . . . . . . . . . . . . . . . . . . .
Installing the Product . . . . . . . . . . . . . . . . . . . . . . . . . . . . . . . . . . . . . . . . . . . . . . . . . . . . . . . . . . . . . . . . . . .
Create a TIBCO ActiveMatrix Administrator on Machine 1 . . . . . . . . . . . . . . . . . . . . . . . . . . . . . . . . . . . . . .
Create a TIBCO ActiveMatrix Administrator on Machine 1 . . . . . . . . . . . . . . . . . . . . . . . . . . . . . . . . . . . . . .
Create a TIBCO ActiveMatrix BPM Server on Machine 1 . . . . . . . . . . . . . . . . . . . . . . . . . . . . . . . . . . . . . . .
Create a TIBCO ActiveMatrix Administrator Replica on Machine 2. . . . . . . . . . . . . . . . . . . . . . . . . . . . . . . .
Create a TIBCO ActiveMatrix BPM Server Replica on Machine 2. . . . . . . . . . . . . . . . . . . . . . . . . . . . . . . . .
Distribute ActiveMatrix BPM Applications . . . . . . . . . . . . . . . . . . . . . . . . . . . . . . . . . . . . . . . . . . . . . . . . . . .
Edit LDAP Shared Resources . . . . . . . . . . . . . . . . . . . . . . . . . . . . . . . . . . . . . . . . . . . . . . . . . . . . . . . . . . . .
54
54
56
60
62
62
70
71
75
79
82
84
Setting up a Distributed System . . . . . . . . . . . . . . . . . . . . . . . . . . . . . . . . . . . . . . . . . . . . . . . . . . . . . . . . . . . . . . 85
PART THREE
CONFIGURATION . . . . . . . . . . . . . . . . . . . . . . . . . . . . . . . . . . . . . . . . . . . . . . . . 91
Chapter 5 Creating and Configuring Runtime Objects . . . . . . . . . . . . . . . . . . . . . . . . . . . . . . . . 92
Configuration Modes . . . . . . . . . . . . . . . . . . . . . . . . . . . . . . . . . . . . . . . . . . . . . . . . . . . . . . . . . . . . . . . . . . . . . . . 93
TIBCO Configuration Tool Requirements . . . . . . . . . . . . . . . . . . . . . . . . . . . . . . . . . . . . . . . . . . . . . . . . . . . . . . . 94
Default Ports . . . . . . . . . . . . . . . . . . . . . . . . . . . . . . . . . . . . . . . . . . . . . . . . . . . . . . . . . . . . . . . . . . . . . . . . . 95
Running the TIBCO Configuration Tool. . . . . . . . . . . . . . . . . . . . . . . . . . . . . . . . . . . . . . . . . . . . . . . . . . . . . . . . . 97
Recommended Order to Run Wizards for ActiveMatrix BPM . . . . . . . . . . . . . . . . . . . . . . . . . . . . . . . . . . . 100
TIBCO ActiveMatrix BPM Configuration Example . . . . . . . . . . . . . . . . . . . . . . . . . . . . . . . . . . . . . . . . . . . . . . . 101
Chapter 6 TIBCO Configuration Tool Wizard Reference. . . . . . . . . . . . . . . . . . . . . . . . . . . . . . 110
Configure Third-Party Driver Wizard Reference . . . . . . . . . . . . . . . . . . . . . . . . . . . . . . . . . . . . . . . . . . . . . . . . . 111
TIBCO ActiveMatrix BPM Installation and Configuration
Contents v
|
Create TIBCO Host Instance Wizard Reference . . . . . . . . . . . . . . . . . . . . . . . . . . . . . . . . . . . . . . . . . . . . . . . . . 112
Create TIBCO ActiveMatrix Administrator Server Wizard Reference . . . . . . . . . . . . . . . . . . . . . . . . . . . . . . . . . 117
Create TIBCO ActiveMatrix BPM Server Reference . . . . . . . . . . . . . . . . . . . . . . . . . . . . . . . . . . . . . . . . . . . . . . 145
Configure TIBCO ActiveMatrix BPM Server Node Type Reference. . . . . . . . . . . . . . . . . . . . . . . . . . . . . . . . . . . 149
Chapter 7 TIBCO Configuration Tool Configurations. . . . . . . . . . . . . . . . . . . . . . . . . . . . . . . . .152
TIBCO Configuration Tool Configuration . . . . . . . . . . . . . . . . . . . . . . . . . . . . . . . . . . . . . . . . . . . . . . . . . . . . . . . 153
Saving a TIBCO Configuration Tool Configuration . . . . . . . . . . . . . . . . . . . . . . . . . . . . . . . . . . . . . . . . . . . . 155
Reusing a TIBCO Configuration Tool Configuration . . . . . . . . . . . . . . . . . . . . . . . . . . . . . . . . . . . . . . . . . . . 156
Replicating a TIBCO ActiveMatrix Administrator Server . . . . . . . . . . . . . . . . . . . . . . . . . . . . . . . . . . . . . . . . . . . 162
Chapter 8 Configuring BPM in Silent Mode. . . . . . . . . . . . . . . . . . . . . . . . . . . . . . . . . . . . . . . . .166
Configuring BPM in Silent Mode . . . . . . . . . . . . . . . . . . . . . . . . . . . . . . . . . . . . . . . . . . . . . . . . . . . . . . . . . . . . . 167
Machine 1: Install and run TCT in GUI mode . . . . . . . . . . . . . . . . . . . . . . . . . . . . . . . . . . . . . . . . . . . . . . . . 167
Machine 2: Install product in silent mode . . . . . . . . . . . . . . . . . . . . . . . . . . . . . . . . . . . . . . . . . . . . . . . . . . . 168
Machine 2: Copy CONFIG_HOME directory . . . . . . . . . . . . . . . . . . . . . . . . . . . . . . . . . . . . . . . . . . . . . . . . 168
Machine 2: Run silentinstall utility. . . . . . . . . . . . . . . . . . . . . . . . . . . . . . . . . . . . . . . . . . . . . . . . . . . . . . . . . 168
PART FOUR
UPGRADE . . . . . . . . . . . . . . . . . . . . . . . . . . . . . . . . . . . . . . . . . . . . . . . . . . . . . . .171
Chapter 9 Upgrading Your System . . . . . . . . . . . . . . . . . . . . . . . . . . . . . . . . . . . . . . . . . . . . . . . .172
Overview . . . . . . . . . . . . . . . . . . . . . . . . . . . . . . . . . . . . . . . . . . . . . . . . . . . . . . . . . . . . . . . . . . . . . . . . . . . . . . . 173
Runtime Object State . . . . . . . . . . . . . . . . . . . . . . . . . . . . . . . . . . . . . . . . . . . . . . . . . . . . . . . . . . . . . . . . . . 174
Upgrade Impact . . . . . . . . . . . . . . . . . . . . . . . . . . . . . . . . . . . . . . . . . . . . . . . . . . . . . . . . . . . . . . . . . . . . . . 174
Checks Before Performing an Upgrade . . . . . . . . . . . . . . . . . . . . . . . . . . . . . . . . . . . . . . . . . . . . . . . . . . . . . . . . 176
Backup Procedure for TIBCO Workspace . . . . . . . . . . . . . . . . . . . . . . . . . . . . . . . . . . . . . . . . . . . . . . . . . . 177
The upgrade Utility. . . . . . . . . . . . . . . . . . . . . . . . . . . . . . . . . . . . . . . . . . . . . . . . . . . . . . . . . . . . . . . . . . . . . . . . 179
Performing an Upgrade of TIBCO ActiveMatrix BPM . . . . . . . . . . . . . . . . . . . . . . . . . . . . . . . . . . . . . . . . . . . . . 181
Troubleshooting . . . . . . . . . . . . . . . . . . . . . . . . . . . . . . . . . . . . . . . . . . . . . . . . . . . . . . . . . . . . . . . . . . . . . . . . . . 184
PART FIVE
POST INSTALLATION . . . . . . . . . . . . . . . . . . . . . . . . . . . . . . . . . . . . . . . . . . . . . .185
Chapter 10 Post-Installation Tasks. . . . . . . . . . . . . . . . . . . . . . . . . . . . . . . . . . . . . . . . . . . . . . . .186
Install the Mediation Product Application . . . . . . . . . . . . . . . . . . . . . . . . . . . . . . . . . . . . . . . . . . . . . . . . . . . . . . . 187
Reconfigure Your JVM . . . . . . . . . . . . . . . . . . . . . . . . . . . . . . . . . . . . . . . . . . . . . . . . . . . . . . . . . . . . . . . . . . . . . 188
Using Transaction Recovery with Oracle . . . . . . . . . . . . . . . . . . . . . . . . . . . . . . . . . . . . . . . . . . . . . . . . . . . . . . . 189
Set Transaction Verification Property for Microsoft SQL Server . . . . . . . . . . . . . . . . . . . . . . . . . . . . . . . . . . . . . 190
TIBCO ActiveMatrix BPM Installation and Configuration
vi
| Contents
Chapter 11 Recovering from a Failed Installation . . . . . . . . . . . . . . . . . . . . . . . . . . . . . . . . . . . 191
Sanitizing After a Failed Installation . . . . . . . . . . . . . . . . . . . . . . . . . . . . . . . . . . . . . . . . . . . . . . . . . . . . . . . . . . 192
Chapter 12 Uninstalling TIBCO ActiveMatrix BPM . . . . . . . . . . . . . . . . . . . . . . . . . . . . . . . . . . 193
Uninstalling TIBCO ActiveMatrix BPM . . . . . . . . . . . . . . . . . . . . . . . . . . . . . . . . . . . . . . . . . . . . . . . . . . . . . . . . 194
Using the Uninstaller . . . . . . . . . . . . . . . . . . . . . . . . . . . . . . . . . . . . . . . . . . . . . . . . . . . . . . . . . . . . . . . . . . 194
Using Add/Remove Programs (Windows Only) . . . . . . . . . . . . . . . . . . . . . . . . . . . . . . . . . . . . . . . . . . . . . . 197
Appendix A Creating a Clustered Environment With SSL . . . . . . . . . . . . . . . . . . . . . . . . . . . . 199
Appendix B Securing Communication Channels . . . . . . . . . . . . . . . . . . . . . . . . . . . . . . . . . . . 203
Appendix C TIBCO Enterprise Message Service Server Configuration Required for Non-Admin
Users . . . . . . . . . . . . . . . . . . . . . . . . . . . . . . . . . . . . . . . . . . . . . . . . . . . . . . . . . . . . . . . . . . . . . . . . 207
Appendix D Troubleshooting . . . . . . . . . . . . . . . . . . . . . . . . . . . . . . . . . . . . . . . . . . . . . . . . . . . 211
Index . . . . . . . . . . . . . . . . . . . . . . . . . . . . . . . . . . . . . . . . . . . . . . . . . . . . . . . . . . . . . . . . . . . . . . . . 213
TIBCO ActiveMatrix BPM Installation and Configuration
| vii
Preface
This software may be available on multiple operating systems. However, not
all operating system platforms for a specific software version are released at the
same time. Please see the readme file for the availability of this software
version on a specific operating system platform.
TIBCO ActiveMatrix BPM is TIBCO’s next-generation business process
management platform. This guide provides the information needed to install and
configure the product.
Topics
•
Changes from the Previous Release of this Guide, page viii
•
Typographical Conventions, page ix
•
Connecting with TIBCO Resources, page xii
TIBCO ActiveMatrix BPM Installation and Configuration
viii
| Changes from the Previous Release of this Guide
Changes from the Previous Release of this Guide
This section itemizes the major changes from the previous release of this guide.
Sizing Configuration for TIBCO ActiveMatrix BPM
You can now set the initial system sizing values when configuring your TIBCO
ActiveMatrix BPM Server in TIBCO Configuration Tool (TCT). See Chapter 5,
Creating and Configuring Runtime Objects, on page 92 for details.
Certified and Compatible Software
The installation guide provides a list of the certified and compatible combinations
of operating systems and databases, and browsers.
Universal Installer to Uninstall Products
The location of the Universal Installer to uninstall products has been moved to
installation_environment\tools\universal_installer. To uninstall the product,
run TIBCOUniversalInstaller.exe available at this location. See Chapter 12,
Uninstalling TIBCO ActiveMatrix BPM, on page 193 for details.
TIBCO ActiveMatrix BPM Installation and Configuration
Preface ix
|
Typographical Conventions
The following typographical conventions are used in this manual.
Table 1 General Typographical Conventions
Convention
Use
ENV_NAME
TIBCO products are installed into an installation environment. A product
installed into an installation environment does not access components in other
installation environments. Incompatible products and multiple instances of the
same product must be installed into different installation environments.
TIBCO_HOME
BPM_HOME
An installation environment consists of the following properties:
•
Name Identifies the installation environment. This name is referenced in
documentation as ENV_NAME. On Microsoft Windows, the name is
appended to the name of Windows services created by the installer and is a
component of the path to the product shortcut in the Windows Start > All
Programs menu.
•
Path The folder into which the product is installed. This folder is referenced
in documentation as TIBCO_HOME.
TIBCO ActiveMatrix BPM installs into a directory within a TIBCO_HOME. This
directory is referenced in documentation as BPM_HOME. The default value of
BPM_HOME depends on the operating system. For example on Windows
systems, the default value is C:\Program Files (x86)\tibco\amx-bpm\1.3
CONFIG_HOME
The directory that stores the TIBCO ActiveMatrix BPM configuration
information, such as property and log files. The value of CONFIG_HOME depends
on the operating system. For example, on Windows systems, the default value is
C:\ProgramData\amx-bpm\tibco\data.
code font
Code font identifies commands, code examples, filenames, pathnames, and
output displayed in a command window. For example:
Use MyCommand to start the foo process.
TIBCO ActiveMatrix BPM Installation and Configuration
x
| Typographical Conventions
Table 1 General Typographical Conventions (Cont’d)
Convention
Use
bold code
Bold code font is used in the following ways:
font
•
In procedures, to indicate what a user types. For example: Type admin.
•
In large code samples, to indicate the parts of the sample that are of
particular interest.
•
In command syntax, to indicate the default parameter for a command. For
example, if no parameter is specified, MyCommand is enabled:
MyCommand [enable | disable]
italic font
Key
combinations
Italic font is used in the following ways:
•
To indicate a document title. For example: See TIBCO ActiveMatrix
BusinessWorks Concepts.
•
To introduce new terms For example: A portal page may contain several
portlets. Portlets are mini-applications that run in a portal.
•
To indicate a variable in a command or code syntax that you must replace.
For example: MyCommand PathName
Key name separated by a plus sign indicate keys pressed simultaneously. For
example: Ctrl+C.
Key names separated by a comma and space indicate keys pressed one after the
other. For example: Esc, Ctrl+Q.
The note icon indicates information that is of special interest or importance, for
example, an additional action required only in certain circumstances.
The tip icon indicates an idea that could be useful, for example, a way to apply
the information provided in the current section to achieve a specific result.
The warning icon indicates the potential for a damaging situation, for example,
data loss or corruption if certain steps are taken or not taken.
TIBCO ActiveMatrix BPM Installation and Configuration
Preface xi
|
Table 2 Syntax Typographical Conventions
Convention
Use
[ ]
An optional item in a command or code syntax.
For example:
MyCommand [optional_parameter] required_parameter
|
A logical OR that separates multiple items of which only one may be chosen.
For example, you can select only one of the following parameters:
MyCommand para1 | param2 | param3
{ }
A logical group of items in a command. Other syntax notations may appear
within each logical group.
For example, the following command requires two parameters, which can be
either the pair param1 and param2, or the pair param3 and param4.
MyCommand {param1 param2} | {param3 param4}
In the next example, the command requires two parameters. The first parameter
can be either param1 or param2 and the second can be either param3 or param4:
MyCommand {param1 | param2} {param3 | param4}
In the next example, the command can accept either two or three parameters.
The first parameter must be param1. You can optionally include param2 as the
second parameter. And the last parameter is either param3 or param4.
MyCommand param1 [param2] {param3 | param4}
TIBCO ActiveMatrix BPM Installation and Configuration
xii
| Connecting with TIBCO Resources
Connecting with TIBCO Resources
How to Join TIBCOmmunity
TIBCOmmunity is an online destination for TIBCO customers, partners, and
resident experts. It is a place to share and access the collective experience of the
TIBCO community. TIBCOmmunity offers forums, blogs, and access to a variety
of resources. To register, go to http://www.tibcommunity.com.
How to Access TIBCO Documentation
You can access TIBCO documentation here:
http://docs.tibco.com
How to Contact TIBCO Support
For comments or problems with this manual or the software it addresses, contact
TIBCO Support as follows:
•
For an overview of TIBCO Support, and information about getting started
with TIBCO Support, visit this site:
http://www.tibco.com/services/support
•
If you already have a valid maintenance or support contract, visit this site:
https://support.tibco.com
Entry to this site requires a user name and password. If you do not have a user
name, you can request one.
TIBCO ActiveMatrix BPM Installation and Configuration
|1
PART ONE
INTRODUCTION
TIBCO ActiveMatrix BPM Installation and Configuration
2
| Chapter 1
Introduction
Chapter 1
Introduction
This chapter explains installation modes, requirements, and other options you
should be aware of before starting the installation.
Topics
•
Installation Overview, page 3
•
Installation Requirements, page 7
TIBCO ActiveMatrix BPM Installation and Configuration
Installation Overview 3
|
Installation Overview
The installation and configuration of the product involves the following steps:
1. Complete the pre-installation tasks which includes fulfilling the hardware and
software requirements, and setting up and configuring all the required third
party software.
2. Install TIBCO ActiveMatrix BPM. Depending on the architecture, the
installation process may involve repeating the basic installation on different
machines in one of the installation modes.
3. Configure the product using TIBCO Configuration Tool (TCT). Depending on
the architecture, you may need to configure the installation on more than one
machine.
4. Perform the post-installation tasks.
Before performing the pre-installation or the actual installation process, you must:
•
determine the architecture for your system based on your requirements. For
example, you can choose to have a highly available, fault tolerant (HA-FT)
system, a distributed system, or a basic system.
•
decide the approach for the installation process - GUI, console, or silent
installation.
The above factors decide the tasks that need to be performed to install and
configure a BPM system to suit your requirements.
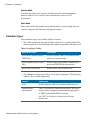
Installation Modes
Three installation modes are available: GUI, console, and silent.
GUI Mode
In the GUI mode, the installer presents panels that allow you to make choices
about product selection, product location, and so on. To invoke the installer in
GUI mode, double-click the executable.
In the GUI mode only, the TIBCO Configuration Tool runs after the installer
completes if the checkbox Launch TIBCO Configuration Tool on the Summary
screen is not unchecked. See Running the TIBCO Configuration Tool for details.
TIBCO ActiveMatrix BPM Installation and Configuration
4
| Chapter 1
Introduction
Console Mode
Console mode allows you to run the installer from the command prompt or
terminal window. This is useful if your machine does not have a GUI
environment.
Silent Mode
Silent mode installs the product using either default or custom settings that are
saved in a response file and does not prompt for inputs.
Installation Types
Two installation types are available: Profile or Custom.
•
The Profile installation type installs all the software for a specific profile. The
following table lists the available profiles and the components that they install
Table 3: Installation Profiles
Installation Profile
Description
Install BPM, Administrator &
TIBCO Host
Installs complete TIBCO ActiveMatrix BPM
software on your machine.
Install Administrator & TIBCO
Host
Installs TIBCO ActiveMatrix Administrator
server and TIBCO Host software only.
Install TIBCO Host Only
Installs TIBCO Host software only.
•
The Custom installation type allows you to select components. The following
table lists the available components:
Feature
Description
BPM
Installs complete TIBCO ActiveMatrix BPM software.
Administration
Environment
TIBCO ActiveMatrix Administrator server is the utility
used to create, configure, monitor, and manage objects
in TIBCO ActiveMatrix BPM at runtime.
See TIBCO ActiveMatrix Administration for more
information.
TIBCO ActiveMatrix BPM Installation and Configuration
Installation Overview 5
|
Feature
Description
TIBCO Host
TIBCO Host is the runtime object that serves as the
point of contact between TIBCO ActiveMatrix BPM
nodes and Administrator server. TIBCO Host has a
staging area that contains product and custom features
available to the nodes it manages. It performs
operations such as software distribution, node creation,
node life cycling, and application deployment.
TIBCO
ActiveMatrix BPM
Documentation
Installs the TIBCO ActiveMatrix BPM documentation in
TIBCO_HOME\amx-bpm\version\doc\ where version is
the release version of the product.
Installer Account
Microsoft Windows
You must have administrator privileges for the machine on which this product is
installed. If you do not have administrator privileges, the installer exits. You must
then log out of the system and log in as a user with the required privileges, or
request your system administrator to assign the privileges to your account.
If you intend to install the product on a network drive, ensure that the account
used for installation has permission to access the network drive.
UNIX
Any type of user—regular (non-root) user and super-user (root)—can install this
product. While installing this product on UNIX platforms, ensure that the same
installer account is used to install all TIBCO ActiveMatrix products.
A graphic environment such as CDE or X Windows is required to run the installer
in GUI mode.
Installer Log File
The installer log file, tibco_universal_installer.username_install.log, is
written to the .TIBCO/install_timestamp folder of the user’s home directory. To
change the location of the installer log file, specify the option -V
logFile="myLogFile" when you run the installer.
The installer log file captures the following information:
TIBCO ActiveMatrix BPM Installation and Configuration
6
| Chapter 1
Introduction
•
Installation environment details such as user that invoked the installer,
operating system details, installer mode, host name, JAVA_HOME and the
Java version available in that environment, and so on.
•
List of assemblies installed.
•
Information related to the Ant scripts that are executed by the installer is
logged in separate log files antTask_log_scriptname_timestamp under the folder
install_timestamp.
Installation Directory
TIBCO recommends that you install TIBCO ActiveMatrix BPM into a new, empty
installation environment (separate from other TIBCO products).
To do this, install TIBCO ActiveMatrix BPM as described in Installing the Product
on page 46. Specify a new, empty directory as the environment location or create a
new, empty installation environment.
TIBCO ActiveMatrix BPM Installation and Configuration
Installation Requirements 7
|
Installation Requirements
This section describes the disk space requirements, system memory requirements,
software requirements, and certified and compatible versions of operating
systems and databases for this product.
Disk Space Requirement
Before installing this product, extract the contents of the installation archive to a
temporary directory. The installer files consume up to 600 MB of disk space.
Temporary Disk Space Required by the Installer
The installer requires at least 600 MB of free space in the temporary directory. On
Microsoft Windows, the temporary directory typically is:
%SystemDrive%:\Documents and Settings\user_name\Local
Settings\Temp.
If your system does not have sufficient disk space in the default temporary area,
you can run the installer with a different temporary directory by using the
following option when starting the installer:
-is:tempdir /new_temp
where /new_temp has sufficient free disk space.
Disk Space After Installation
The installer calculates the disk space required in the installation environment
directory for the selected components. The calculation is done before the actual
installation (copying of files to the system) begins. The installer will proceed only
if sufficient free disk space is available in the installation environment directory.
However, if disk space is consumed by another process while the installer is
copying the files, and if the required disk space is thereby reduced, the installer
may fail and display a failure message.
While performing installation, avoid running other processes that consume disk
space in the installation environment directory.
This product can consume up to 5 GB of free space under TIBCO_HOME.
TIBCO ActiveMatrix BPM Installation and Configuration
8
| Chapter 1
Introduction
Hardware Requirements
TIBCO recommends the following minimum server machine specification for all
platforms:
•
Two 3GHz dual processors.
•
8 GB of virtual memory available for user applications
•
5 GB of free space on the local drive where you are installing TIBCO
ActiveMatrix BPM.
Supported Platforms
Refer to the product readme file for the supported operating system platforms
and versions and required patches.
Certified and Compatible Combinations
This section describes and lists the certified and compatible combinations of
operating systems and databases for TIBCO ActiveMatrix BPM.
Certified versions are a defined set of operating systems and database
combinations that have been extensively tested and validated by TIBCO.
Typically, every release of TIBCO ActiveMatrix BPM is certified against the most
common combinations being used by customers. In the process, specific versions
of LDAP servers, browsers, and other third party software are also certified.
See Certified Versions for a list of certified operating systems and database
combinations for the current release.
Compatible versions are the set of operating systems, databases, and other third
party software that:
•
have been certified by TIBCO in one of the earlier releases, or
•
are claimed to be compatible by the vendor.
In the event of a problem with a compatible software version, TIBCO will employ
best efforts to provide support on that software version. However, TIBCO may
request that you reproduce the problem on a certified version of the software.
This may mean that you potentially downgrade to an older software version (or
upgrade to a newer version) that does not exhibit the issue; ideally only on a
temporary basis.
See Compatible Versions for the list of compatible operating systems and
databases.
TIBCO ActiveMatrix BPM Installation and Configuration
Installation Requirements 9
|
This document lists the operating systems and databases with standard support
from the vendors. If you are using an operating system or a database with an
extended support, contact TIBCO Support (How to Contact TIBCO Support) to
know if the version is compatible with TIBCO ActiveMatrix BPM.
Certified Versions
The following table lists the certified operating systems and database
combinations:
Microsoft SQL Server
(x64)
Platform
DB2
WorkGroup
Edition
Oracle 11g
2008
2008
R2
2008
R2
SP1
R2 EE
R2 SE
RAC
9.7.3
9.7.4
Windows Server 2008 x64 64bit
No
Yes
Yes
Yes
Yes
Yes
No
No
Windows Server 2008 R2 x64
64bit
No
No
No
No
No
No
Yes
No
Windows Server 2008 R2 x64
64bit SP1
Yes
No
No
No
No
No
Yes
Yes
Red Hat Enterprise Linux
Server v5.5 x64 (64 Bit)
No
No
No
Yes
No
No
No
No
Red Hat Enterprise Linux
Server v5.7 x64 (64 Bit)
Yes
No
No
No
No
Yes
No
No
SUSE Enterprise Linux Server
11 x86 64bit SP1
No
Yes
No
No
Yes
No
No
No
Solaris 10 SPARC 64bit
No
No
No
Yes
No
No
No
No
Solaris 10 x86 64bit
No
No
No
Yes
No
No
No
No
IBM Power Systems AIX v6.1
64bit
No
No
No
Yes
No
No
No
Yes
Microsoft Windows
Linux
UNIX
TIBCO ActiveMatrix BPM Installation and Configuration
10
| Chapter 1
Introduction
Compatible Versions
Vendors follow different numbering conventions for releasing patches, and major
or minor releases. See the vendor documentation for details about the release
numbering conventions for their products.
Compatibility with higher versions is indicated by appending a plus sign ’+’ to
the minimum compatible version of the operating system or database. The
footnotes at the end of the table describe how to assess the degree of compatibility
for an operating system or database supplied by a specific vendor.
A change in the major version of the operating system or database mandates a
complete validation to be done by TIBCO. Contact TIBCO Support to know if a
major version of an operating system or database released recently is certified or
compatible.
Microsoft SQL
Server
Platform
DB2 Workgroup
Edition
Oracle 11g
2008
(x64)+
2008
R2
(x64)+
Enterprise
Edition R2
11.2.0.2+2
Standard
Edition R2
11.2.0.2+
RAC
11.2.0.2+
9.7.3+3
9.7.4+
Windows Server 2008 x86
(64 Bit)+
Yes
Yes
Yes
Yes
Yes
Yes
Yes
Windows Server 2008 R2
x64 (64bit)+
Yes
Yes
Yes
Yes
Yes
Yes
Yes
Red Hat Enterprise Linux
Server v5.5+4 x64 (64 Bit)
No
No
Yes
Yes
Yes
Yes
Yes
SUSE Enterprise Linux
Server 11+5 x64 (64 Bit)
No
No
Yes
Yes
Yes
Yes
Yes
SUSE Enterprise Linux
Server 11 x86 64 Bit
SP1+
No
Yes
Yes
Yes
Yes
Yes
Yes
SPARC Solaris 10 (64
bit)+6
No
No
Yes
Yes
No
No
No
Solaris 10 x86 (64 bit)+
No
No
Yes
Yes
Yes
No
No
1
Microsoft Windows
Linux
UNIX
TIBCO ActiveMatrix BPM Installation and Configuration
Installation Requirements 11
|
Microsoft SQL
Server
Platform
2008
(x64)+
2008
R2
(x64)+
Enterprise
Edition R2
11.2.0.2+2
Standard
Edition R2
11.2.0.2+
RAC
11.2.0.2+
9.7.3+3
9.7.4+
No
No
Yes
Yes
Yes
Yes
Yes
1
IBM Power Systems AIX
v6.1 (64bit)+7
DB2 Workgroup
Edition
Oracle 11g
1. Microsoft releases service packs periodically, indicated by an alpha-numeric version number ’SPN’.
These often include previously released updates, security and performance improvements, and support for new types of hardware. TIBCO ActiveMatrix BPM is compatible with higher versions of service packs for a major release version. You can install the latest service pack to keep Windows up to
date.
2. Oracle releases patch sets, indicated by a change in the fourth digit, for example 11.2.0.N. TIBCO ActiveMatrix BPM is compatible with higher versions of patch sets for a major release version.
3. IBM releases fix packs for DB2, indicated by an alpha-numeric version number ’Fix Pack N’. TIBCO
ActiveMatrix BPM is compatible with higher versions of fix packs for a major release version.
4. Red Hat releases service packs, indicated by a change in the second digit. For example, 5.N. TIBCO
ActiveMatrix BPM is compatible with higher versions of service packs for a major release version.
5. SUSE releases service packs, indicated by an alpha-numeric version number ’SPN’. TIBCO ActiveMatrix BPM is compatible with higher versions of service packs for a major release version.
6. Oracle releases patches for Sun Solaris, indicated by the last two digits in the version number, for
example 108921-NN. TIBCO ActiveMatrix BPM is compatible with higher versions of patches for a
major release version.
7. IBM releases fix packs for AIX, indicated by an alpha-numeric version numbers ’FPN’. TIBCO ActiveMatrix BPM is compatible with higher versions of fix packs for a major release version.
Certified and Compatible Browsers
Certified Browsers
The following table lists the certified browsers for different components:
Table 4 Certified Browsers
Component
Internet Explorer
7 (only With
Google Chrome
Frame Plug-in)
Firefox 7
Chrome 14
(Google Chrome
Frame Plug-in
v14)
Form Renderer
No
Yes
Yes
TIBCO ActiveMatrix BPM Installation and Configuration
12
| Chapter 1
Introduction
Table 4 Certified Browsers
Internet Explorer
7 (only With
Google Chrome
Frame Plug-in)
Firefox 7
Chrome 14
(Google Chrome
Frame Plug-in
v14)
GWT Gadgets
No
Yes
Yes
GI Gadgets
Yes
Yes
Yes
Spotfire
No
No
No
Mobile GWT Gadgets
No
No
No
GWT Form
Yes
Yes
Yes
GI Form
Yes
Yes
Yes
No
No
Component
Openspace
Workspace1
TIBCO ActiveMatrix Administrator
Administrator
No
1. Workspace is certified with Google Chrome Frame plug-in version 14.
Compatible Browsers
Browser versions are updated frequently and often without any compatibility
issues. Unless specified otherwise, you can use a more recent version of a browser
as long as the vendor claims the recent version to be compatible.
In the event of a problem with a compatible browser version, TIBCO will employ
best efforts to provide support on that browser version. However, TIBCO may
request that you reproduce the problem on a certified version of the browser. This
may mean that you potentially downgrade to an older version (or upgrade to a
newer version) that does not exhibit the issue; ideally only on a temporary basis.
TIBCO ActiveMatrix BPM Installation and Configuration
Installation Requirements 13
|
Table 5 Compatible Browsers
Google
Chrome
Internet Explorer
Mozilla Firefox
Safari
7+
GCF*
8
9+
3.5
3.6
7+
5
iPhone
OS 4
9
14+
Yes
Yes
Yes
Yes
Yes
Yes
Yes
Yes
Yes
Yes
GWT Gadgets
Yes
Yes
Yes
Yes
Yes
Yes
Yes
No
Yes
Yes
GI Gadgets
Yes
Yes
Yes
Yes
Yes
Yes
No
No
No
Yes
Spotfire
No
Yes
No
No
No
No
No
No
No
No
Mobile GWT
Gadgets
No
No
No
No
No
No
No
Yes
No
No
GWT Form
Yes
Yes
Yes
Yes
Yes
Yes
Yes
No
No
Yes
GI Form
Yes
Yes
Yes
Yes
Yes
Yes
Yes
No
No
Yes
Yes
Yes
No
No
No
No
Yes
Component
1
Form Renderer
Openspace
Workspace
TIBCO ActiveMatrix Administrator
Administrator
No
Yes
No
1. Internet Explorer 7 is compatible with Openspace and Workspace components only when a certified
or compatible version of Google Chrome Frame Plug-in is installed.
Software Requirements
TIBCO Software
TIBCO ActiveMatrix BPM software includes the following required and optional
software components. See the readme file for the supported versions.
TIBCO Enterprise Message Service
Required. TIBCO Enterprise Message Service is used as the notification and
TIBCO ActiveMatrix BPM Installation and Configuration
14
| Chapter 1
Introduction
messaging backbone for TIBCO ActiveMatrix BPM. TIBCO ActiveMatrix BPM is
not necessarily installed on the machine on which TIBCO Enterprise Message
Service is installed. This software is distributed and installed separately from
TIBCO ActiveMatrix BPM software.
TIBCO Enterprise Message Service can also used by the TIBCO ActiveMatrix
SOAP and JMS binding types. The TIBCO ActiveMatrix BPM license does not
cover this usage of the included TIBCO Enterprise Message Service software. You
must separately license TIBCO Enterprise Message Service for this usage.
TIBCO ActiveMatrix Runtime UDDI Server
Optional. TIBCO ActiveMatrix Runtime UDDI Server is a lightweight UDDI
registry for discovering and registering services during service execution. This
software is distributed and installed separately from TIBCO ActiveMatrix BPM
software.
TIBCO ActiveMatrix Binding Type for Adapters
Optional. This software is distributed and installed separately from TIBCO
ActiveMatrix BPM software.
TIBCO ActiveMatrix Binding Type for EJB
Optional. This software is distributed and installed separately from TIBCO
ActiveMatrix BPM software.
TIBCO ActiveMatrix Implementation Type for C++
Optional. This software is distributed and installed separately from TIBCO
ActiveMatrix BPM software.
Third-party Software
See the readme file for the supported versions.
Hibernate
Required. When installing TIBCO ActiveMatrix BPM, you can choose to either:
•
Let the installer download Hibernate automatically if you have Internet
access, or
•
Specify the directory where Hibernate has been previously downloaded from
the TIBCO download site.
TIBCO ActiveMatrix BPM Installation and Configuration
Installation Requirements 15
|
If your installation machine is not connected to the Internet, you must
download the assembly containing Hibernate and save it to the assemblies
subdirectory of the temporary directory where your installer archive is
extracted (the preferred option to streamline installation) or to another
temporary directory accessible to the installation machine. On the TIBCO
download site, click
TIB_assembly_tibco_com_tibco_tpcl_org_hibernate_feature_3.2.4.001_all
html and download
assembly_tibco_com_tibco_tpcl_org_hibernate_feature_3.2.400.001
.zip.
When downloading Hibernate from the TIBCO site, the number in the
package name refers to the assembly number and not the version of
Hibernate. This can be misleading as the assembly number is not the same as
the Hibernate version number. For example, the package name when
downloading Hibernate Version 3.2.7 was
assembly_tibco_com_tpcl_ord_hibernate_feature_3.2.400.001.zip.
Eclipse LGPL Software Assemblies
Required on Linux and Solaris platforms. You can choose to either:
•
Let the TIBCO Universal Installer download Eclipse LPGL assemblies
automatically during installation.
•
Specify the directory where the Eclipse LGPL assemblies have been
previously downloaded from the TIBCO site.
If your installation machine is not connected to the Internet, you must
download the following assemblies containing required Eclipse LPGL
assemblies and save them to the assemblies subdirectory of the temporary
directory where your installer archive is extracted (the preferred option to
streamline installation) or to another temporary directory accessible to the
installation machine. On the TIBCO download site, click
TIB_product_tibco_eclipse_lgpl_3.5.2.001_OSplatform.html on the
download site and download
product_tibco_eclipse_lgpl_3.5.2.001_OSplatform.zip, where OSplatform
TIBCO ActiveMatrix BPM Installation and Configuration
16
| Chapter 1
Introduction
is one of linux24gl23_x86, linux24gl23_x86_64, sol10_x86, sol10_x86_64,
linux26gl24_s390x, sol9_sparc_64, sol9_sparc.
Java Virtual Machine
Required. JDK 1.6.0_24 (64 bit) is packaged with TIBCO ActiveMatrix BPM as a
convenience.
DBMS Software
Required. The database stores TIBCO ActiveMatrix Administration information.
For development purposes, the following DBMS software is supported:
•
HSQLDB 1.8.1
HSQLDB 1.8.1.
TIBCO ActiveMatrix BPM includes an embedded version of
For production purposes, you can use the following DBMS software:
•
Oracle 11g R2 Standard, Enterprise Editions or Oracle 11g RAC
•
Microsoft SQL Server 2008 or 2008 R2: When installing the SQL server, select
the Security Mode for your instance of the server as Mixed Mode
Authentication.
•
DB2 Workgroup Edition 9.7.3 or 9.7.4
See Certified and Compatible Combinations for certified an compatible versions
of databases.
See Setting up the Databases for additional configurations that need to be
performed on the database being used.
JDBC Drivers
Required. JDBC drivers are used by:
•
TIBCO ActiveMatrix BPM to access the database,
•
TIBCO ActiveMatrix Administrator to access the TIBCO ActiveMatrix
database, and
•
Services to access JDBC resources.
TIBCO ActiveMatrix HSQLDB, Microsoft SQL Server, and Oracle drivers as
provided by the DBMS vendors for their respective database management
systems.
Before beginning with the installation, ensure that you have a valid JDBC driver
for the database type you plan to use as you need to supply the location of the
JDBC driver during the installation.
TIBCO ActiveMatrix BPM Installation and Configuration
Installation Requirements 17
|
You must package the Microsoft SQL and Oracle JDBC drivers into TIBCO
ActiveMatrix Administrator before creating an ActiveMatrix Administrator
server.
Web Browsers
Required. A web browser is required to run TIBCO ActiveMatrix Administrator
GUI and the TIBCO ActiveMatrix BPM clients - TIBCO Workspace and TIBCO
Openspace. See Certified and Compatible Browsers for details
Safari 5 can be used at runtime to access the Workspace client application, or other
custom application created with TIBCO Workspace components (known as WCC
components). However, Safari is not supported by TIBCO General Interface
Builder, therefore it cannot be used at design-time to create applications with
WCC components.
Apache Ant
Required. It is required to run TIBCO Configuration Tool and TIBCO
ActiveMatrix Administrator CLI scripts.
LDAP Servers
Required. All users that access TIBCO ActiveMatrix BPM must exist in an
external LDAP directory.
When running TIBCO Configuration Tool to configure BPM, you can choose to
either:
•
deploy the internal LDAP directory that is provided with TIBCO ActiveMatrix
BPM, or
•
specify an external LDAP directory server.
If you specify an external LDAP directory server:
—specify an LDAP username and password for the tibco-admin user. See
Configuring the BPM Admin user (if using an external LDAP directory
server) for details.
—the LDAP server must be running before you install TIBCO ActiveMatrix
BPM.
TIBCO ActiveMatrix BPM is compatible with any LDAP Server that uses the
Lightweight Directory Access Protocol (LDAP) version 3. TIBCO ActiveMatrix
BPM has been specifically tested with:
TIBCO ActiveMatrix BPM Installation and Configuration
18
| Chapter 1
Introduction
•
Apache Directory Server 1.5.5
•
Microsoft Active Directory 2008
TIBCO ActiveMatrix BPM Installation and Configuration
| 19
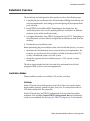
Chapter 2
Pre-install Considerations
This chapter describes the factors to be considered before installing the product.
Topics
•
Determine the Architecture for Your System, page 20
•
Disaster Recovery, page 27
•
Backup and Restore, page 29
•
Decide the Approach to Create the Databases, page 31
TIBCO ActiveMatrix BPM Installation and Configuration
20
| Chapter 2
Pre-install Considerations
Determine the Architecture for Your System
The architecture of a system depends on various factors such as:
•
Number of users for the system (includes registered, concurrent, and active
users).
•
Scalability
•
Performance expectations
•
Typical work volumes such as the number of work items, pageflows, business
services, or enterprise processes that need to be processed per minute.
Depending on your requirements, you can choose one of the following:
High availability, fault-tolerant (HA-FT) System
In the event of a hardware failure resulting in the failure of TIBCO ActiveMatrix
BPM, a highly available, fault tolerant system starts TIBCO ActiveMatrix BPM on
another machine, thus ensuring limited service interruption and no loss of data or
messages. Setting up this architecture also involves distributing the components
over different machines. See Highly Available and Fault Tolerant System for
details.
Setting up a Highly Available, Fault Tolerant System describes how to set up a
highly available, fault tolerant system using a third-party solution or active-active
clustering.
Distributed System (without HA-FT features)
Logical nodes can also be distributed to different physical noes, to provide
specialization and horizontal scalability capabilities according to the enterprise’s
needs. A distributed system enables you to scale only certain components of the
BPM runtime so as to boost the performance of your system. See Distributed
System for details.
For example, if your services exercise the Process Manager component the most,
you can configure the Process Manager component on a different host. You can
then scale it up by adding more Process Manager components (or scale it down by
removing some Process Manager components) on that host without affecting the
rest of the system.
Setting up a Distributed System describes how to set up a distributed system.
TIBCO ActiveMatrix BPM Installation and Configuration
Determine the Architecture for Your System 21
|
Basic System
A basic system consists of a simple installation with all the components installed
on a single machine that can be used for validation purposes. This type of setup is
not suitable nor recommended for production purposes. However, you can use
this for testing or demonstration purposes. Installing the Product describes how
to install a basic system.
Setting up the advanced architectures may involve repeating one or many of the
steps of setting up a basic system along with some additional configurations.
Highly Available and Fault Tolerant System
In the event of a hardware failure resulting in the failure of TIBCO ActiveMatrix
BPM, a highly available, fault tolerant system starts TIBCO ActiveMatrix BPM on
another machine, thus ensuring limited service interruption and no loss of data or
messages.
This is achieved by configuring TIBCO ActiveMatrix BPM using either:
•
A third party solution such as Microsoft Cluster, HP ServiceGuard, or Oracle
RAC, or
•
Active-active clustering.
TIBCO ActiveMatrix BPM Installation and Configuration
22
| Chapter 2
Pre-install Considerations
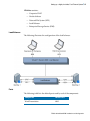
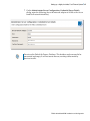
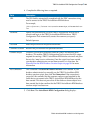
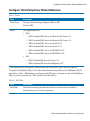
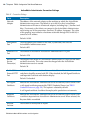
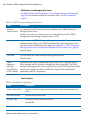
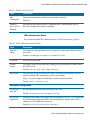
Using Third Party Solution
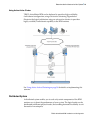
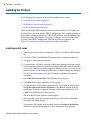
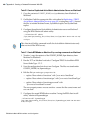
Figure below illustrates the use of third-party solutions to provide highly
available, fault tolerant capabilities to your BPM runtime.
The setup requires at least three machines, say M1, M2, and M3, where:
•
TIBCO ActiveMatrix BPM (or at least the data folder) is on the shared file
system which is only available to the machine that has a fully operational
TIBCO ActiveMatrix BPM node installed and running.
•
TIBCO ActiveMatrix BPM and TIBCO ActiveMatrix Administrator are
installed and running on one machine (M1).
•
The other machines (M2 and M3) are:
— connected to a shared file system
— a part of an active-passive clustering setup. At any given time, one of the
machines will have access to the shared file system on which the TIBCO
ActiveMatrix BPM Node is installed/running.
In case of any catastrophic event such as power loss, hardware failure,
network disruption, or operating system crash, the cluster software detects
it and fails over to the next available server.
— One of these two machines should have a fully operational TIBCO
ActiveMatrix BPM node installed and running.
See Using A Third-Party Solution on page 54 for details on implementing this
scenario.
TIBCO ActiveMatrix BPM Installation and Configuration
Determine the Architecture for Your System 23
|
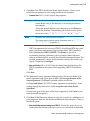
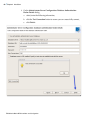
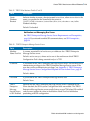
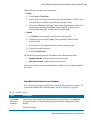
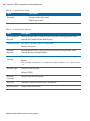
Using Active-Active Cluster
TIBCO ActiveMatrix BPM can be deployed to provide a high-availability,
fault-tolerant configuration, using active-active clustering. Figure below
illustrates the logical architecture using an active-active clusters to provide a
highly available, fault tolerant capability to the BPM runtime.
See Using Active-Active Clustering on page 56 for details on implementing this
scenario.
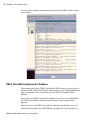
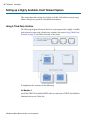
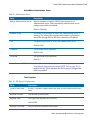
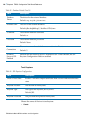
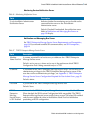
Distributed System
A distributed system enables you to scale only certain components of the BPM
runtime so as to boost the performance of your system. The logical nodes can be
distributed to different physical nodes, thus enabling horizontal scalability to suit
the needs of an enterprise.
TIBCO ActiveMatrix BPM Installation and Configuration
24
| Chapter 2
Pre-install Considerations
Some example scenarios that a distributed system can cater to include:
•
an enterprise whose focus is on straight-through processing and enterprise
integration may want to direct more resources to Process Manager nodes.
•
a call center-based enterprise may require more Work Manager nodes.
A distributed configuration requires homogenous software configuration. Each
member of the cluster must use the same TIBCO ActiveMatrix BPM logical node
type.
For more information about TIBCO ActiveMatrix BPM logical nodes, see TIBCO
ActiveMatrix BPM Concepts.
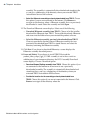
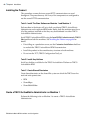
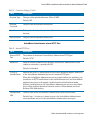
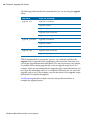
Consider an example where TIBCO ActiveMatrix BPM Nodes A, B, and C are
distributed between three machines, such that:
•
Node A runs a logical node of type BPM Node.
•
Node B runs a logical node of type BPM Node.
•
Node C runs a logical node of type Work Manager.
TIBCO ActiveMatrix BPM Installation and Configuration
Determine the Architecture for Your System 25
|
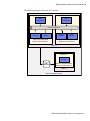
The following diagram illustrates this scenario:
Machine 1
Machine 2
Web
Components
Web
Components
Service virtualization
Process
Manager
Work
Manager
Process Service virtualization
Work
Manager
Manager
TIBCO Active Matrix BPM
Node A on Host instance 1
TIBCO Active Matrix BPM
Node B on Host instance 2
Cluster 1
Machine 3
Work
Manager
BPM
database
TIBCO Active Matrix BPM
Node C on Host instance 3
Cluster 2
TIBCO ActiveMatrix runtime
TIBCO ActiveMatrix BPM Installation and Configuration
26
| Chapter 2
Pre-install Considerations
In such a distributed environment:
•
The capacity of each part of the system - web tier, process management, or
work management - can be scaled up or down as requirements change by
adding or removing further logical nodes to the relevant cluster (subject to the
underlying capabilities of the cluster itself).
•
Nodes can be hosted on individual clusters, single machines, or all parts of the
system on non-clustered machines.
•
Users need not be aware of the topology of TIBCO ActiveMatrix BPM when
deploying applications. An application is simply deployed to the TIBCO
ActiveMatrix BPM runtime, which automatically deploys the relevant parts of
the application to all the logical nodes where it is required.
See Setting up a Distributed System on page 85 for details on implementing this
scenario.
TIBCO ActiveMatrix BPM Installation and Configuration
Disaster Recovery 27
|
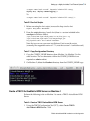
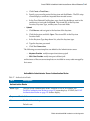
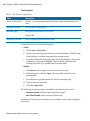
Disaster Recovery
TIBCO recommends replicating the key parts of the BPM runtime to ensure that
your system can be recovered in the event of a disaster.
The data from following parts of a TIBCO ActiveMatrix BPM system must be
replicated on a separate system such that all data sources are consistent.
•
TIBCO_HOME and CONFIG_HOME directories for the TIBCO ActiveMatrix
BPM installation. If the BPM configuration files are in a different location, you
must replicate them as well.
•
TIBCO ActiveMatrix BPM database
•
TIBCO ActiveMatrix Administrator database
•
TIBCO Enterprise Message Service server
•
Corporate LDAP system.
The method for replicating this data depends on your specific company practices
and policies.
The following diagram shows an example of this type of configuration.
TIBCO ActiveMatrix BPM Installation and Configuration
28
| Chapter 2
Pre-install Considerations
Highly Available ActiveActive System
Third-party software solution to
replicate essential system data
Replicated Backup System
TIBCO ActiveMatrix BPM Installation and Configuration
Backup and Restore 29
|
Backup and Restore
A backup of your system ensures that a stable version of your system is available
for use in case the running system runs into problems and gets corrupted. In such
a case, you can restore your system using the backup to the last backed up stable
state. Depending on the backup mechanism employed, there may be some
amount of data loss.
Back Up Your System
Before taking a backup, ensure that the system is in a state where a back-up can be
performed. This means that the system needs to be in a stable state, and either
shutdown or offline as applicable.
Ensure that you preserve the file timestamps when taking a backup. This is
important when restoring from a backup because the file timestamps are used to
decide the right order to recreate components.
Backing up your BPM runtime involves saving the following components or
folders of your system:
•
Installation folders on all the machines where TIBCO ActiveMatrix BPM has
been installed. If you have a distributed or a HA-FT system, ensure that you
repeat the process for all the machines in the cluster that have TIBCO
ActiveMatrix BPM installed on them.
•
TIBCO_HOME and CONFIG_HOME directories
•
TIBCO ActiveMatrix BPM database
•
TIBCO ActiveMatrix Administration database
•
TIBCO Enterprise Message Service (EMS) server
If you are using a Workspace custom configuration, you may need to back up the
TIBCO Workspace configuration files to ensure that the custom configuration is
not lost when you upgrade the software. Also, if you are running a custom WCC
application, you may need to repackage and redeploy your applications to pick
up any changes in the upgraded software. See Backup Procedure for TIBCO
Workspace for details.
Restore from a Backup
To restore TIBCO ActiveMatrix BPM from a backup, do the following:
TIBCO ActiveMatrix BPM Installation and Configuration
30
| Chapter 2
Pre-install Considerations
1. Shutdown TIBCO ActiveMatrix BPM. Refer to TIBCO ActiveMatrix BPM
Administration Guide for information.
2. Shutdown the TIBCO Enterprise Message Service server. Refer to the
documentation supplied with TIBCO Enterprise Message Service for
information.
3. Copy the contents of TIBCO_HOME and CONFIG_HOME directories from
the backup to their original location.
4. Recover the TIBCO ActiveMatrix BPM database and make sure the database is
online. Refer to the documentation provided with your database for
information.
5. Recover the TIBCO ActiveMatrix Administrator database. Refer to the
documentation provided with TIBCO ActiveMatrix Administrator for
information.
6. Recover the TIBCO Enterprise Message Service server. Refer to the
documentation supplied with TIBCO EMS for information.
7. Restart the TIBCO Enterprise Message Service server. Refer to the
documentation supplied with TIBCO EMS Server for information.
8. Restart TIBCO ActiveMatrix BPM. Refer to TIBCO ActiveMatrix BPM
Administration Guide for information.
9. Check that all the TIBCO ActiveMatrix BPM components are running. To do
this:
a. Login to TIBCO Administrator.
b. Click Applications.
— Make sure the TIBCO ActiveMatrix BPM applications have a status of
Running.
— Make sure your project applications are in the correct state (in other words,
in the same state as they were at the time of back-up).
TIBCO ActiveMatrix BPM Installation and Configuration
Decide the Approach to Create the Databases 31
|
Decide the Approach to Create the Databases
The ActiveMatrix BPM database and Administrator database are required for the
successful installation of the product. You can choose to use one of the following:
•
HSQLDB that is bundled with the software, or
•
An external database.
If you decide to use the external databases, ensure that the databases are created
and any required configurations are completed. See Setting up the Databases for
details.
TIBCO ActiveMatrix BPM Installation and Configuration
32
| Chapter 2
Pre-install Considerations
TIBCO ActiveMatrix BPM Installation and Configuration
| 33
PART TWO
INSTALLATION
TIBCO ActiveMatrix BPM Installation and Configuration
34
| Chapter 3
Pre-Installation Tasks
Chapter 3
Pre-Installation Tasks
This chapter describes the tasks that need to be performed to configure the third
party software before installing TIBCO ActiveMatrix BPM.
Topics
•
Setting up the Databases, page 35
•
Configuring Other Third Party Software, page 40
TIBCO ActiveMatrix BPM Installation and Configuration
Setting up the Databases 35
|
Setting up the Databases
Depending on the approach chosen to setup the database, you may need to
configure the database before installing the product.
The pre-install configurations are not required if you choose to allow TIBCO
Configuration Tool to create the TIBCO ActiveMatrix BPM database. However, if
you choose to use an external database, configure the database as described here:
TIBCO ActiveMatrix BPM Database
If you select a database other than HSQLDB for your TIBCO ActiveMatrix BPM
database and you have not configured the external database before running the
Create TIBCO ActiveMatrix BPM wizard, then the Create TIBCO ActiveMatrix
BPM wizard will fail.
Using Microsoft SQL Server 2008
Mixed Mode Authentication
Ensure that the security mode for your instance of the server is set to Mixed
Mode Authentication.
Enable Port 1433
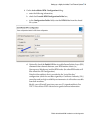
Ensure that port 1433 is enabled. If it is not enabled already, do the following:
1. In the SQL Server Configuration Manager’s console pane, expand SQL Server
Network Configuration.
2. In the console pane, click Protocols for <instance_name> where instance_name is
the name of the TIBCO ActiveMatrix BPM database.
3. In the Details page, right-click TCP/IP and click Enable.
Support for XA Transactions is Enabled
Ensure that your database supports XA transactions. To enable support for XA
transactions, do the following:
1. If you have not already done so, download the JDBC driver for the version of
Microsoft SQL Server you are using. JDBC Drivers on page 40 provides the
location to download the JDBC drivers.
2. Follow the instructions to install the driver.
TIBCO ActiveMatrix BPM Installation and Configuration
36
| Chapter 3
Pre-Installation Tasks
3. Connect to SQL Server 2008 Management Studio as an administrator of the
SQL Server Instance.
4. From the location where you installed the Microsoft SQL Server JDBC Driver,
run the sqljdbc_n.n\enu\xa\xa_install.sql script against the master database
where n.n is the version number of the Microsoft SQL Server JDBC Driver you
are using. The first time you run this you may see errors about failing to drop
procedures. These errors may be ignored as the procedures do not exist yet.
5. Depending on your operating system, from the location where you installed
the Microsoft SQL Server JDBC Driver, copy either
— sqljdbc_n.n\enu\xa\x86\sqljdbc_xa.dll, or
— sqljdbc_n.n\enu\xa\IA64\ sqljdbc_xa.dll, or
— sqljdbc_n.n\enu\xa\x64\ sqljdbc_xa.dll file
to the Binn folder of the SQL server being used (for example, C:\Program
Files\Microsoft SQL Server\MSSQL10.MSSQLSERVER\MSSQL\Binn)
where n.n is the version number of the Microsoft SQL Server JDBC Driver you
are using.
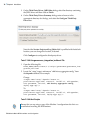
6. Click Control Panel > Administrative Tools.
7. Double-click Component Services. The Component Services dialog is
displayed.
8. Drill down to Component Services > Computer > My Computer >
Distributed Transaction > Local DTC.
9. Right-click Local DTC and select Properties. The Local DTC Properties
dialog is displayed.
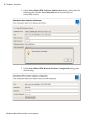
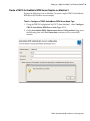
Click Security. Make sure the Enable XA transactions check box is selected.
Using Oracle 11g
Create Database Instance with Character Set AL32UTF8 for Multilingual
Data
When creating the Oracle database instance, ensure that you select the AL32UTF8
character set for multilingual data.
AL32UTF8 supports the latest version of the Unicode standard and provides a full
supplementary character support. (Examples of supplementary characters
include Chinese, Japanese, Korean, gothic, mathematical, or musical.)
TIBCO ActiveMatrix BPM Installation and Configuration
Setting up the Databases 37
|
Set OPEN CURSORS for the Database
Login to the TIBCO ActiveMatrix BPM database as the DBA and set the
maximum open cursors for the database to at least 400 using the following:
ALTER SYSTEM SET OPEN_CURSORS=400 SID=db_name
Using DB2
Create User To Grant Permissions on The Database
Identify an operating system user, or create a new operating system user if
needed who can be granted the ActiveMatrix BPM database user permissions.
When configuring the ActiveMatrix BPM server, the database user permissions
will be granted to an operating system user. You must have an operating system
user already created before installing the BPM runtime.
Create Database and Set Pagesize to 16384
You must create a database manually as DB2 installation does not create a default
database.
Create a database using either the DB2 Control Center, or the DB2 Command Line
Processor (CLP), and set the database pagesize to 16384.
Access to SYSTOOLSPACE
Ensure that the SYSTOOLSPACE tablespace has been created before proceeding
to configure the TIBCO ActiveMatrix BPM Server. This is necessary as some
scripts require access to the SYSTOOLSPACE tablespace to run successfully. See
the vendor’s documentation for details on how to create the tablespace manually.
Set the Statement Termination Character to ’/’
This setting is required only if you are manually creating or running the database
scripts.
Not all the scripts use the same termination character. For example, the
termination character for WorkManagerCreate.sql is ’/’ and for
createdb-admin.sql and ProcessManagerCreate.sql scripts is ’;’.
Ensure that you examine the scripts and set the appropriate termination character
using the DB2 Control Center. Doing so ensures that the scripts can be used from
either the DB2 Control Center or the DB2 Command Line Processor.
TIBCO ActiveMatrix BPM Installation and Configuration
38
| Chapter 3
Pre-Installation Tasks
You can set the statement termination character from the DB2 Control Center as
shown below:
TIBCO ActiveMatrix Administrator Database
When running the Create TIBCO ActiveMatrix BPM wizard, you must specify a
database for the TIBCO ActiveMatrix Administrator server. The default database
type is the database that you selected for your TIBCO ActiveMatrix BPM
database.
If you want your TIBCO ActiveMatrix Administrator server to use HSQLDB as
the TIBCO ActiveMatrix Administrator database, no pre-configuration is
required.
However, if you want TIBCO ActiveMatrix Administrator database to use an
external database other than HSQLDB then, configure the external database as
TIBCO ActiveMatrix BPM Installation and Configuration
Setting up the Databases 39
|
described before running the Create TIBCO ActiveMatrix BPM wizard or Create
TIBCO ActiveMatrix Administrator Server wizard:
Oracle 11gR2 database: Ensure that the Oracle user specified when configuring
the TIBCO ActiveMatrix Administrator server does not possess the "dba"
privileges. However, the user must have connect and resource privileges, and be
assigned to the default schema.
Microsoft SQL Server: Before creating the TIBCO ActiveMatrix Administrator
server:
•
Set READ_COMMITTED_SNAPSHOT
ON
by running the command:
alter database DBName set read_committed_snapshot on
•
Ensure that the database user is assigned the default database and has the
db_owner role.
•
Ensure that you are using the case insensitive collation setting.
The Microsoft SQL Server must be configured for XA Transactions and must
support mixed mode authentication; see Using Microsoft SQL Server 2008 for
details..
DB2 Workgroup Edition 9.7.3/9.7.4: See Using DB2 for details on creating and
configuring a DB2 database.
•
Configure the database with a 32KB page size (instead of the default 4KB).
TIBCO ActiveMatrix BPM Installation and Configuration
40
| Chapter 3
Pre-Installation Tasks
Configuring Other Third Party Software
This section describes the considerations and any additional configurations that
need to be performed on the third party software before installing ActiveMatrix
BPM.
LDAP Server
If you want to specify an external LDAP directory server then, before you install
TIBCO ActiveMatrix BPM, you must:
•
specify an LDAP username and password for the tibco-admin user, see below.
•
ensure that the LDAP server is running.
Configuring the BPM Admin user (if using an external LDAP directory server)
This only applies if you decide to use an external LDAP directory server rather than the
internal LDAP directory server provided with TIBCO ActiveMatrix BPM.
All users that access TIBCO ActiveMatrix BPM must exist in an external LDAP
directory. TIBCO ActiveMatrix BPM requires a single user to be configured as the
tibco-admin user. When running the TIBCO Configuration Tool to configure
BPM, if you decide to use the internal LDAP directory server, the tibco-admin
user is created automatically.
If you decide to use an existing LDAP directory server, you are asked to specify
the full DN for an existing LDAP user and the password. This information defines
the real user when logging in as tibco-admin. The LDAP user must be an existing
LDAP user.
JDBC Drivers
To connect with the database, TIBCO ActiveMatrix BPM requires a JDBC driver
for the database you are using. During installation, you are asked for the location
of the JDBC Driver. Therefore, you need to have a local copy of the JDBC Driver
for the database you are using before you start installing TIBCO ActiveMatrix
BPM.
If you are using:
TIBCO ActiveMatrix BPM Installation and Configuration
Configuring Other Third Party Software 41
|
•
SQL Server 2008 with Service Pack 1 or later:
a. Depending on the version of the Microsoft SQL Server JDBC Driver you
want to use, download either:
—Microsoft SQL Server JDBC Driver 3.0 from
http://www.microsoft.com/download/en/details.aspx?id=21599
—Microsoft SQL Server JDBC Driver 2.0 from
http://www.microsoft.com/download/en/details.aspx?id=2505
b. Follow the instructions to install the driver.
•
Oracle 11g Release 2, 32-bit and 64-bit
When installing TIBCO ActiveMatrix BPM, specify ojdbc6.jar from your
Oracle installation.
•
IBM DB2 9.7.2 Workgroup Edition or later:
Download the JDBC driver labelled 9.7 FP4 which is available as part of the
IBM Data Server Driver Package.
Apache Ant
Required to run TIBCO Configuration Tool scripts, TIBCO ActiveMatrix runtime
objects upgrade, or TIBCO ActiveMatrix Administrator CLI scripts.
You can either download and install Apache Ant (Version 1.7.1 is required) or use
the version of Apache Ant that is supplied with TIBCO ActiveMatrix BPM.
TIBCO recommends that you use the version of Apache Ant supplied with TIBCO
ActiveMatrix BPM. To do this:
1. Create an environment variable that points to TIBCO_HOME.
TIBCO ActiveMatrix BPM Installation and Configuration
42
| Chapter 3
Pre-Installation Tasks
2. Run the following lines from a command shell:
On Windows
set JAVA_HOME=%TIBCO_HOME%\tibcojre\1.6.0
set CLASSPATH=%TIBCO_HOME%\tools\lib\antpackage.jar
set RUN_ANT="%JAVA_HOME%/bin/java" -XX:MaxPermSize=1024m -cp
"%CLASSPATH%" org.apache.tools.ant.Main
set ANT_OPTS=-Xmx1024m -XX:MaxPermSize=1024m -Xms256
On UNIX/Linux
JAVA_HOME=$TIBCO_HOME/tibcojre64/1.6.0
CLASSPATH=$TIBCO_HOME/tools/lib/antpackage.jar
RUN_ANT="$JAVA_HOME/bin/java -XX:MaxPermSize=1024m -cp
$CLASSPATH org.apache.tools.ant.Main"
ANT_OPTS="-Xmx1024m -XX:MaxPermSize=1024m -Xms256"
export JAVA_HOME RUN_ANT ANT_OPTS
3. Before executing CLI scripts from the command prompt, confirm:
— the value of ANT_OPTS
— the version of Apache Ant you are using
4. Invoke Apache Ant from a command line as follows:
On Windows
%RUN_ANT%
On UNIX/Linux
$RUN_ANT
File Descriptors (on Linux)
This only applies to Red Hat Enterprise Linux v5.4 and SUSE Enterprise Linux 11 (64 Bit)
The maximum number of open files/file descriptors that a user can open is
controlled by the operating system. The threshold on Linux is typically too low
and has to be increased. The exact number depends on the features selected
during installation and the size of the workspace but our experience is that 10000
is plenty. You can find out the number on your system by running ulimit -n
from a terminal window. To increase the max number of files that can be opened:
1. Edit the /etc/security/limits.conf file and add the following line:
* hard nofile 10000
2. Log out of the system and log back in.
3. On machines on which TIBCO Business Studio is installed, add the following
parameter to your TIBCOBusinessStudio.ini file.
-Dorg.eclipse.swt.browser.XULRunnerPath=/usr/lib/xulrunner
TIBCO ActiveMatrix BPM Installation and Configuration
Configuring Other Third Party Software 43
|
The xulrunner folder might have a version attached to it. In that case make sure
you specify the correct folder name.
TIBCO ActiveMatrix BPM Installation and Configuration
44
| Chapter 3
Pre-Installation Tasks
TIBCO ActiveMatrix BPM Installation and Configuration
| 45
Chapter 4
Installation
This chapter describes how to install TIBCO ActiveMatrix BPM in one of the
installation modes: GUI, console, or silent.
Topics
•
Installing the Product, page 46
•
Setting up a Highly Available, Fault Tolerant System on page 54
•
Setting up a Distributed System on page 85
TIBCO ActiveMatrix BPM Installation and Configuration
46
| Chapter 4
Installation
Installing the Product
Install the product using one of the modes described in the sections:
•
Installing in GUI mode on page 46
•
Installing in Console mode on page 50
•
Install in Silent mode on page 50
When installing the Administration or Runtime Host profiles in GUI mode, the
installer allows you to invoke the TIBCO Configuration Tool, a utility to create an
ActiveMatrix Administrator server, TIBCO Host instances, and a BPMNode node,
and package third-party drivers. If you are installing in console or silent mode
you must run TIBCO Configuration Tool after installation completes. See
Chapter 5, Creating and Configuring Runtime Objects for details.
Installing in GUI mode
1. Open the physical media or download the TIBCO ActiveMatrix BPM archive
file.
2. Extract the TIBCO ActiveMatrix BPM archive file to a temporary directory.
3. Navigate to the temporary directory.
4. If your machine will not be connected the Internet during installation, ensure
that the required software assemblies are downloaded and saved to either the
assemblies subdirectory of the temporary directory in step 2. on page 46 (the
preferred option to streamline installation) or to another temporary directory.
See Software Requirements on page 13 for details regarding the required
assemblies.
5. Run TIBCOUniversalInstaller. The Welcome screen displays.
6. Click Next. The License Agreement screen appears.
7. Review the terms of the license agreement and, if you agree to them, click I
accept the terms of the license agreement. Click Next to proceed with the
installation. If you do not agree to the terms of the license agreement, click
Cancel to exit from the installation process.
The Installation Profile Selection screen displays.
8. Select a profile on the left. The right pane displays the features selected by
default for the chosen profile.
To customize the features to be installed, check the Customize Installation
checkbox and check the checkboxes next to the features to be installed.
TIBCO ActiveMatrix BPM Installation and Configuration
Installing the Product 47
|
9. Click Next. The TIBCO Installation Home screen displays. Choose a new
installation environment or an existing installation environment:
— Create a New TIBCO_HOME Specify the properties:
Directory
The directory into which the product is installed. The directory
cannot be the same as the directory of an existing installation
environment.
Accept the default location, type a directory, or click Browse to
choose the directory. The directory path cannot contain special
characters such as "*", "#", "?", ">", "<", "%", "&", "$", "`" or "|".
Identifies the installation environment.
Name
The name cannot contain special characters such as "*", "?", ">",
"<", ":", "|", "/", "\", or quotes (").
TIBCO recommends that you install TIBCO ActiveMatrix BPM into a new,
empty installation environment (separate from other TIBCO products).
Select Create a new TIBCO_HOME. Click Browse to specify an
environment location (a directory path to an empty folder where the
software will be installed), or accept the default environment location. The
installer automatically creates an environment name for the location you
specify. The default is amx-bpm.
— Use an Existing TIBCO_HOME Select the home from the drop-down list.
TIBCO recommends this option when upgrading TIBCO ActiveMatrix
BPM.
Click Next.
10. The Hibernate License Agreement dialog displays. Review the terms of the
license agreement and, if you agree to them, click I accept the terms of the
license agreement. Click Next to proceed with the installation.
On Linux and Solaris The LPGL License Agreement screen displays. After
reading through the license text, click I accept the terms of the license
agreement.
If you do not agree to the terms of the license agreement, click Cancel to exit
from the installation process.
11. Click Next. If the Hibernate software is not in the assemblies subdirectory of
your temporary directory, the Download Hibernate screen displays. Choose a
download option:
— Download Hibernate assembly from TIBCO Choose this option if you are
connected to the Internet or do not want to use a previously downloaded
TIBCO ActiveMatrix BPM Installation and Configuration
48
| Chapter 4
Installation
assembly. The assembly is automatically downloaded and stored into the
assemblies subdirectory of the directory where you extracted TIBCO
ActiveMatrix Service Grid software.
— Select the Hibernate assembly previously downloaded from TIBCO Choose
this option if you are not connected to the Internet. Click Browse to
navigate to the directory where a Hibernate assembly that was previously
downloaded is stored. Select the assembly and click Open.
12. The Download Hibernate screen displays. Select one of the following:
— Download Hibernate assembly from TIBCO: Choose to let the installer
download the Hibernate from TIBCO. The installer downloads Hibernate
and stores into the folder where you extracted the product software.
— Select the Hibernate assembly previously downloaded from TIBCO:
Choose to provide the location where a Hibernate assembly that was
previously downloaded from TIBCO is stored. Browse and select the
directory containing the Hibernate assembly.
13. Click Next. If you chose to download Hibernate, a screen displays the
Hibernate assembly download process.
14. Linux and Solaris If you choose to install TIBCO Host and the
product_tibco_eclipse_lgpl_3.5.2.001 assembly is not in the assemblies
subdirectory of your temporary directory, the LPGL Assembly Download
screen displays. Choose a download option:
— Download Gnome Binding assembly from TIBCO Choose this option if you
are connected to the Internet or do not want to use a previously
downloaded assembly. The assembly is automatically downloaded and
stored into the assemblies subdirectory of the directory where you
extracted TIBCO ActiveMatrix BPM software.
— Provide the location for the assembly previously downloaded from
TIBCO Choose this option if you are not connected to the Internet. Click
Browse to navigate to the directory where the
TIBCO ActiveMatrix BPM Installation and Configuration
Installing the Product 49
|
product_tibco_eclipse_lgpl_3.5.2.001 assembly that was previously
downloaded is stored.
Select the assembly and click Open.
15. Linux and Solaris Click Next. If you chose to download the assembly, a
screen displays the assembly download process.
16. The TIBCO Configuration Directory screen displays. The configuration
directory (CONFIG_HOME) stores BPM configuration information, for
example, the properties for Workspace and Openspace. Click Next to accept
the default location or Browse and select the directory where you want your
configuration information to be stored. Ensure that the selected directory is
not the configuration directory for another TIBCO installation environment.
Note that the TIBCO Configuration Directory specifies a different default location
for the configuration directory than the actual location. For example,
c:\ProgramData\amx-bpm\tibco\cfgmgt when the actual location is
c:\ProgramData\amx-bpm\tibco\data.This is because the TIBCO
Configuration Tool specifies a different location for the configuration folder than
the TIBCO ActiveMatrix BPM installer. The TIBCO Configuration Tool will use
the location you have specified in the TIBCO ActiveMatrix BPM installer
17. The Pre-Install Summary screen displays. Verify the list of
products/components selected for install.
TIBCO ActiveMatrix BPM Installation and Configuration
50
| Chapter 4
Installation
To change any of your choices, click Back to navigate back to the appropriate
point. You can then restart the installation process from that point.
18. Click Install. While the installer performs the necessary installation tasks, the
Installing Component n of NN screen displays, where NN is the total number
of components to be installed. After all the components are installed, the
Running Product ANT Tasks screen displays. Click Show Details on the
dialog to see the tasks that the installer is performing.
19. Once the installer completes the installation tasks, the Post-Install summary
screen is displayed. Review the list of features that have been installed.
The Launch TIBCO Configuration Tool checkbox is selected by default. TCT
provides a set of wizards that allow you to configure the runtime objects and
drivers required by TIBCO ActiveMatrix BPM. Uncheck the checkbox if you
do not want to configure the product right away.
20. Click Finish to complete the installation process and close the installer
window. If you left the Launch TIBCO Configuration Tool checkbox
checked, the TIBCO Configuration Tool is launched. See Chapter 5, Creating
and Configuring Runtime Objects for details on using the tool.
There is a slight delay while the installer deletes the temporary files before closing
the installer window.
Installing in Console mode
1. Open the physical media or download the TIBCO ActiveMatrix BPM package.
2. Extract the archive file to a temporary directory.
3. Using a console window, navigate to the temporary directory.
4. Run TIBCOUniversalInstaller -console.
5. Complete the installation by responding to the console window prompts.
6. Once the installation completes, you can create the TIBCO ActiveMatrix BPM
server and TIBCO ActiveMatrix Administrator server using TIBCO
Configuration Tool (TCT). See Chapter 5, Creating and Configuring Runtime
Objects for details.
Install in Silent mode
In silent mode, the universal installer does not prompt for any inputs during
installation. Instead, the installer uses the values specified in the
TIBCOUniversalInstaller-amx-bpm_1.3.0.silent file.
TIBCO ActiveMatrix BPM Installation and Configuration
Installing the Product 51
|
The TIBCOUniversalInstaller-amx-bpm_1.3.0.silent file is packaged in the
directory that contains the universal installer. Edit the file with information for
your environment before launching the silent installation. The .silent file
includes comments that describes the installation properties that you can set.
It is a good practice to make a copy of the original
TIBCOUniversalInstaller-amx-bpm_1.3.0.silent
file before making any
changes to it.
To install the product in silent mode:
1. Download the TIBCO ActiveMatrix BPM package.
2. Extract the contents of the package to a temporary directory.
3. Using a console window, navigate to the temporary directory.
4. Make a copy of the TIBCOUniversalInstaller-amx-bpm_1.3.0.silent file
and rename it.
5. Using a text editor, open the
TIBCOUniversalInstaller-amx-bpm_1.3.0.silent
file and specify the
following properties::
You must make sure that all drive letters are in upper case, otherwise the
silent installation may fail. The
TIBCOUniversalInstaller-amx-bpm_1.3.0.silent file uses lower case
drive letters by default.
Parameter
Value
Description
installationRoot
Default:
Directory where the product is to be installed.
C:\tibco\amx-bpm
environmentName
Default: amx-bpm
Name of the TIBCO installation environment.
entry
key="BPM_bpm">true
</entry
Default: BPM_bpm
Key to specify the product features to be
installed. Valid choices are:
•
BPM_bpm - installs the full ActiveMatrix
BPM software.
•
Administration Environment_bpm installs the ActiveMatrix Administrator
Server and TIBCO Host software.
•
TIBCO Host - installs TIBCO Host
software only.
TIBCO ActiveMatrix BPM Installation and Configuration
52
| Chapter 4
Installation
Parameter
Value
Description
configDirRoot
Default:
Location of the configuration files for the
given installation environment.
C:\ProgramData\amx-b
pm
6. If the installation machine is not connected to the Internet, you must
download the assembly containing Hibernate and save it to the assemblies
subdirectory of the temporary directory where your installer archive is
extracted (the preferred option to streamline installation) or to another
temporary directory accessible to the installation machine. See Software
Requirements on page 13 for details.
By default, the silent file is configured to download Hibernate automatically.
<entry key="downloadHibernate">false</entry>
<entry key="hibernatePath">folder containing downloaded
assembly</entry>
Hibernate
You can update the following entries to specify the absolute path of the
previously downloaded assembly:
<entry key="downloadHibernate">false</entry>
<entry key="hibernatePath">folder containing downloaded
assembly</entry>
Hibernate
7. On Linux ans Solaris platforms, you must also update the entries to download
the required Eclipse LGPL software assemblies. See Software Requirements
on page 13 for details. By default, the silent file is configured to download the
assemblies automatically.
<entry key="LGPLAssemblyLicenseAccepted">true</entry>
<entry key="LGPLAssemblyDownload">true</entry>
<entry key="LGPLAssemblyPath"></entry>
You can update the following entries to specify the absolute path of the
previously downloaded assemblies on the system instead:
<entry key="LGPLAssemblyLicenseAccepted">true</entry>
<entry key="LGPLAssemblyDownload">false</entry>
<entry key="LGPLAssemblyPath">folder containing downloaded LPGL
assemblies</entry>
8. Run the following:
On Windows - TIBCOUniversalInstaller.exe
On UNIX\Linux - TIBCOUniversalInstaller
-silent
-silent
When installation completes, a line similar to the following is written to the
installer log file:
Install, com.tibco.installer.util.TIBCOInstaller, dbg.Debug,
The installation has completed. Please check the log file for
additional information.
TIBCO ActiveMatrix BPM Installation and Configuration
Installing the Product 53
|
When you install the product in silent mode, it also creates the .silentinstall
file that can be used to configure TIBCO ActiveMatrix BPM in the silent mode.
The silentinstall script file is created under the
TIBCO_HOME\bpm\1.3\scripts\silent directory as:
• on Windows: silentinstall.bat
• on UNIX/Linux: silentinstall
You can run the silentinstall utility to run the scripts that set up the third
party driver and configure and deploy TIBCO ActiveMatrix BPM. See Creating
and Configuring Runtime Objects, page 92 for details about configuring your
BPM installation in the silent mode.
You can create a clustered environment configured to use SSL (including a
replicated ActiveMatrix Administrator) in the silent mode. See Appendix A,
Creating a Clustered Environment With SSL for details.
TIBCO ActiveMatrix BPM Installation and Configuration
54
| Chapter 4
Installation
Setting up a Highly Available, Fault Tolerant System
This section describes setting up a highly available, fault tolerant system using
either a third party system or a clustered environment.
Using A Third-Party Solution
The following diagram illustrates the basic setup required for a highly available,
fault tolerant system using a third-party solution. See section Using Third Party
Solution on page 22 for a brief overview of this setup.
To implement this scenario, do the following:
On Machine 1
Install the TIBCO ActiveMatrix BPM software and create a TIBCO ActiveMatrix
Administrator server. To do this:
TIBCO ActiveMatrix BPM Installation and Configuration
Setting up a Highly Available, Fault Tolerant System 55
|
1. Install TIBCO ActiveMatrix BPM using the Install BPM, Administrator &
TIBCO Host profile. See Running the TIBCO Configuration Tool on page 97
for details.
If you wish to enable secure sockets layer (SSL) for the communication
channels on the HTTP connector used by TIBCO ActiveMatrix BPM, select
Configure to Secure All Communication with SSL option when running the
wizards in the TIBCO Configuration Tool before creating the second BPM
node. The other BPM nodes then inherit the SSL configuration.
Note that the certificate that is provided in the "out-of-the-box" configuration
(which has not been signed by a Certificate Authority (CA)) cannot be used in
a high availability environment as it will not be accessible from both
machines.
Ideally, you will install/provision your own CA signed certificate. See TIBCO
ActiveMatrix BPM Administration guide for more information.
2. Using TIBCO Configuration Tool, run the Create TIBCO ActiveMatrix
Administrator Server wizard to create a TIBCO ActiveMatrix Administrator
server. See Create TIBCO ActiveMatrix Administrator Server Wizard
Reference on page 35.
On Machine 2 or 3
Install a fully operational TIBCO ActiveMatrix BPM server. To do this:
1. Install TIBCO ActiveMatrix BPM using the Install BPM, Administrator &
TIBCO Host profile, see Running the TIBCO Configuration Tool on page 97.
2. Using TIBCO Configuration Tool:
a. Run the Create TIBCO Host Instance wizard to create a TIBCO Host. See
Create TIBCO Host Instance Wizard Reference on page 30. From the
TIBCO Host Instance Configuration: Administrator Server dialog, select
Bind this TIBCO Host instance with an existing Administrator server
box and enter the details of TIBCO ActiveMatrix Administrator server that
you created on machine 1.
b. Run the Configure Third-Party Driver wizard to register the JDBC drivers
for your BPM database. See Configure Third-Party Driver Wizard
Reference on page 29.
c. Run the Create TIBCO ActiveMatrix BPM Server wizard. See Create
TIBCO ActiveMatrix BPM Server Reference on page 145.
—From the Administrator Server Configuration: Details dialog, in the
Server Name: box, select Use existing ActiveMatrix Administrator
TIBCO ActiveMatrix BPM Installation and Configuration
56
| Chapter 4
Installation
server and use the details of the TIBCO ActiveMatrix Administrator
server you created on machine 1.
—From the Administrator Server Configuration: TIBCO Host
Configuration dialog in the Enterprise Name: box, type the name and
port number of the TIBCO Host on the machine where you created the
TIBCO ActiveMatrix Administrator (in this scenario, machine 1).
Using Active-Active Clustering
Naming Assumptions for this Example
The following shows the names used for the machines in this example of a high
availability, active-active cluster:
LINPorthos (Machine 1) contains:
— TIBCO ActiveMatrix Administrator System Node
— TIBCO ActiveMatrix BPM Node
LINAramis (Machine 2) contains:
— TIBCO ActiveMatrix Administrator System Node Replica
— TIBCO ActiveMatrix BPM Node Replica
TIBCO ActiveMatrix BPM Installation and Configuration
Setting up a Highly Available, Fault Tolerant System 57
|
LINAthos contains:
— Corporate LDAP
— Oracle database
— Network File System (NFS)
— Load Balancer
— Enterprise Message Service (EMS)
Load Balancer
The following illustrates the configuration of the load balancer:
Ports
The following table lists the default ports used by each of the components:
Component
Default Port
Work Presentation
8080
TIBCO ActiveMatrix BPM Installation and Configuration
58
| Chapter 4
Installation
Component
Default Port
TIBCO ActiveMatrix Administrator
(external HTTP)
8120
Internal ADS
10801
Host Instance JMX
6051
BPM Node
6031
System Node
6021
Internal HTTP
19767
HSQL
1234
Credential Server
6041
The ports configured for the Work Presentation Component, TIBCO ActiveMatrix
Administrator (external HTTP port), and the Internal HTTP port, need to be
configured for load balancing across Machines 1 and 2.
If you are using the Internal LDAP Server provided with TIBCO ActiveMatrix
BPM, port 10801 will also need to be added to the load balancer. If you are using a
corporate or external LDAP, it should be configured in a highly available manner.
LDAP is key to the proper functioning of TIBCO ActiveMatrix BPM (you will not
be able to authenticate without it).
Replication
The approach taken to enable a highly available TIBCO ActiveMatrix
Administrator and BPM environment is replication. It is important to note that
while replication enables fault tolerance, it is a different concept than DR (Disaster
Recovery) or a distributed environment. All components are replicated across
multiple machines, thus enabling high-availability. It is also worth noting that this
configuration is deployed in an active-active fashion, that is, load may be
distributed between the various machines in the cluster, also offering a level of
scalability.
A distributed BPM environment is a technique in which logical nodes are
distributed to physical nodes to achieve horizontal scaling. For example, if
processing is important, you may wish to distribute the Process Manager
composite to multiple nodes, while Work Manager, for example, is distributed
only to a single node. The ability to scale only the components that are relevant to
the Business Process is the advantage of a distributed BPM environment.
TIBCO ActiveMatrix BPM Installation and Configuration
Setting up a Highly Available, Fault Tolerant System 59
|
Disaster Recovery on the other hand is really a different topic entirely and is the
ability to recover from a catastrophic disaster. While replication may play a part in
a disaster recovery plan, it is not the only concept that must be leveraged; an
enterprise must have a business continuity plan in place that defines key metrics
(for example, recovery point objective, recovery time, etc). These can then be
taken into consideration for building a BPM and TIBCO ActiveMatrix
infrastructure capable of being recovered in the event of a failure. For more
information, see Disaster Recovery on page 27.
TIBCO ActiveMatrix BPM Installation and Configuration
60
| Chapter 4
Installation
Pre-Installation
The following subsections describe pre-installation tasks that must be performed
or taken into consideration.
Also note that this example assumes a UNIX-based installation.
Time Synchronization
All the servers in a highly available environment must have their time and date
synchronized with each other. If the time is offset by even a few seconds, you may
see one of following (or similar) messages in the BPM.log file. If you see a large
number of such entries in the log, check that the time is synched on all the hosts in
the highly available environment.
•
05 Jun 2011 14:12:02,465 [QuartzScheduler_PVM:Quartz
Scheduler-LINAramis1307296618457_ClusterManager] [WARN ]
com.tibco.pvm.persist.quartz.jdbcjobstore.IpmQuartzJobStoreTX This scheduler instance (LINAramis1307296618457) is still active
but was recovered by another instance in the cluster. This may
cause inconsistent behavior
•
25 Jan 2012 01:33:48,698 [QuartzScheduler_PVM:Quartz
Scheduler-mjkmssqlbe1327088686491_ClusterManager] [INFO ]
com.tibco.pvm.persist.quartz.jdbcjobstore.IpmQuartzJobStoreTX ClusterManager: Scanning for instance
"threemjkv121327089184017"'s failed in-progress jobs.
•
25 Jan 2012 01:33:56,200 [QuartzScheduler_PVM:Quartz
Scheduler-mjkmssqlbe1327088686491_ClusterManager] [INFO ]
com.tibco.pvm.persist.quartz.jdbcjobstore.IpmQuartzJobStoreTX ClusterManager: detected 1 failed or restarted instances.
•
30 Jan 2012 09:43:38,067 [QuartzScheduler_PVM:Quartz
Scheduler-twomjkv121327596401015_ClusterManager] [WARN ]
com.tibco.pvm.persist.quartz.jdbcjobstore.IpmQuartzJobStoreTX This scheduler instance (twomjkv121327596401015) is still active
but was recovered by another instance in the cluster. This may
cause inconsistent behavior.
Shared File System
There must be a shared file system available to both machines that are mounted in
identical locations. The following items will be stored on the shared file system:
•
Shared Repository for TIBCO ActiveMatrix Administrator
•
Shared Work Folder for TIBCO ActiveMatrix Administrator
•
BPM Properties
TIBCO ActiveMatrix BPM Installation and Configuration
Setting up a Highly Available, Fault Tolerant System 61
|
•
Internal LDAP Configuration (optional - held within the BPM directory)
•
Keystores for SSL and WSS authentication. See TIBCO ActiveMatrix BPM
Administration guide for details about enabling SSL and configuring TIBCO
ActiveMatrix BPM to use SSO for authentication.
File Descriptors
The file descriptor hard limit for the TIBCO user should be 10000:
[tibco@LINAthos ~]$ ulimit -Hn
10000
Create a TIBCO ActiveMatrix Administrator Database
Create a TIBCO ActiveMatrix Administrator database and user in your database
of choice. This should not be in the same tablespace as your BPM database.
The HSQL In-Process Database cannot be used for a production environment.
Other Pre-Requisites for High Availability
To achieve true High Availability / Fault Tolerance, the foundation technologies
that TIBCO ActiveMatrix BPM and Platform rely on must be configured in a fault
tolerant manner as well. This includes EMS, Database, Shared File System, and
LDAP. You lose the gains of having a fault tolerant system, if the technologies that
it relies on are not fault tolerant as well.
Check for LBNs (Late Breaking News)
Be sure that you have checked for all LBNs for both TIBCO ActiveMatrix BPM
and the Platform on support.tibco.com.
TIBCO ActiveMatrix BPM Installation and Configuration
62
| Chapter 4
Installation
Installing the Product
This procedure assumes that non-secure HTTP communications are used
throughout. The procedure may fail if any of the components are configured to
use the secure HTTPS communication.
Task A Install The Base Software on Machine 1 and Machine 2
Each machine in the cluster will act as both a replicated TIBCO ActiveMatrix
Administrator and a replicated BPM node. Hence, both the machines must have
all of the products installed so that they may be distributed via either TIBCO
ActiveMatrix Administrator.
Install TIBCO ActiveMatrix BPM using the Install BPM, Administrator & TIBCO
Host profile on both the machines. See Installing the Product on page 46 for
details.
•
If installing on a production server, use the Customize Installation check box
to uncheck the TIBCO ActiveMatrix BPM Documentation.
•
Install the product in the same directory structure on both machines.
•
Do not run the TCT (TIBCO Configuration Tool) yet.
Task B Install Any Hotfixes
Install any hotfixes available for the TIBCO ActiveMatrix Platform or TIBCO
ActiveMatrix BPM.
Task C Create Shared Directories
Create three directories on the shared file system on which the TIBCO user has
read and write permissions.
•
BPM
•
SharedRepo
•
SharedWorkFolder
Create a TIBCO ActiveMatrix Administrator on Machine 1
Perform the following tasks on Machine 1 to create a TIBCO ActiveMatrix
Administrator.
TIBCO ActiveMatrix BPM Installation and Configuration
Setting up a Highly Available, Fault Tolerant System 63
|
Task A Configure the JDBC Driver
1. Using the TIBCO Configuration Tool (TCT), select Configure Third-Party
Driver.
2. On the Third-Party Driver: Details dialog, select the following:
3. On the Third-Party Driver: JAR Folder dialog, select the directory containing
the JDBC driver and then click on Finish.
4. On the Third-Party Driver: Summary dialog, enter or browse to the
appropriate directory, and select the Configure Third-Party Driver box:
Note that the Session Scripts and Log Folder field is prefilled with the default
location; you can change this location, if desired.
Click Configure to configure the third-party driver.
Task B Configure TIBCO ActiveMatrix Administrator Server
1. Using the TIBCO Configuration Tool (TCT), select Create TIBCO
ActiveMatrix Administrator Server - V3.1.
TIBCO ActiveMatrix BPM Installation and Configuration
64
| Chapter 4
Installation
2. On the Administrator Server Configuration: Details dialog, enter the
following:
3. On the Administrator Server Configuration: TIBCO Host Configuration
dialog, enter the following. Also, uncheck the Create Development Node box:
TIBCO ActiveMatrix BPM Installation and Configuration
Setting up a Highly Available, Fault Tolerant System 65
|
4. On the Administrator Server Configuration: Connection Settings dialog,
enter the following:
5. On the Administrator Server Configuration: Internal HTTP Settings dialog:
a. Enter the URL for the Internal HTTP Port that was configured on the load
balancer. Depending on the configuration and behavior of the load
balancer, Machine 2 may need to be temporarily removed from the pool
(until it is installed with the replica TIBCO ActiveMatrix Administrator
later).
b. Check Use Load Balancer for Internal HTTP Communication.
TIBCO ActiveMatrix BPM Installation and Configuration
66
| Chapter 4
Installation
6. On the Administrator Server Configuration: Notification and Messaging
Bus Server dialog, enter the following, then click the Test Connection button
to ensure you can get a successful connection:
TIBCO ActiveMatrix BPM Installation and Configuration
Setting up a Highly Available, Fault Tolerant System 67
|
7. On the Administrator Server Configuration: Credential Server Details
dialog, enter the following (leave the network adapter at 0.0.0.0 so that it can
bind to all network interfaces):
Do not use the Default In-Process Database. This database and user need to be
pre-created and empty. It will not create the user, nor drop tables made by
previous installs.
TIBCO ActiveMatrix BPM Installation and Configuration
68
| Chapter 4
Installation
8. On the Administrator Server Configuration: Database Authentication
Realm Details dialog:
a. select/enter the following information,
b. click the Test Connection button to ensure you can successfully connect,
c. click Finish:
TIBCO ActiveMatrix BPM Installation and Configuration
Setting up a Highly Available, Fault Tolerant System 69
|
9. On the Administrator Server Configuration: Summary dialog:
a. uncheck Deploy Monitoring Service,
b. uncheck Deploy Log Service,
c. click Save to save the Ant scripts for this configuration:
10. Close the TIBCO Configuration Utility (do not have TCT do the
configuration).
Task C Edit Configuration Scripts
Perform the following steps on Machine 1:
1. Change directories to CONFIG_HOME/tct/admin/date-time/scripts.
TIBCO ActiveMatrix BPM Installation and Configuration
70
| Chapter 4
Installation
2. Edit the integration_create_admin_data.xml file:
a. Set the sharedWorkFolder attribute of the AdminConfigFolders element
to a folder in the shared file system. For example:
<AdminConfigFolders
instanceWorkFolder="/home/tibco/amx-bpm/WorkFolder"
sharedWorkFolder="/opt/tibco/properties/SharedWorkFolder"
productStagingFolder="${TIBCO_HOME}"/>
b. Set the location attribute of the SCMDetails element to the same value as
sharedWorkFolder attribute.
<SCMDetails type="filesystem"
location="${admin.enterprise.dir}/shared/repo"/>
For example:
<SCMDetails type="filesystem"
location="/opt/tibco/properties/SharedWorkFolder"/>
c. Set value of the Svar element named
ArtifactServerInternalSharedLocationSvar
sharedWorkFolder
to the same value as
attribute.
<SVar description="admin shared folder svar" type="String"
name="ArtifactServerInternalSharedLocationSvar"
xsi:type="amxdata_base:SubstitutionVariable"
value="${tibco.config.mgmt.home}/admin/${admin.enterprise.na
me}/shared"/>
For example:
<SVar description="admin shared folder svar" type="String"
name="ArtifactServerInternalSharedLocationSvar"
xsi:type="amxdata_base:SubstitutionVariable"
value="/opt/tibco/properties/SharedWorkFolder"/>
d. Save the file.
Create a TIBCO ActiveMatrix Administrator on Machine 1
Perform the following steps on Machine 1 to create a TIBCO ActiveMatrix
Administrator:
Task A Edit build.xml
3. Remove "deploy-mcr" and "deploy-commonlogging" from the end-to-end
target:
Change:
TIBCO ActiveMatrix BPM Installation and Configuration
Setting up a Highly Available, Fault Tolerant System 71
|
<target name="end-to-end" depends="admin-full-setup,
deploy-mcr, deploy-commonlogging"/>
To:
<target name="end-to-end" depends="admin-full-setup"/>
Task B Run Ant Scripts
1. Before executing the Ant scripts, increase the heap size for Ant:
export ANT_OPTS=-Xmx1024m
2. From the scripts directory, launch Ant (there is a version included in the
amx-bpm installation folder):
/opt/tibco/amx-bpm/tibcojre64/1.6.0/bin/java -cp
/opt/tibco/amx-bpm/tools/lib/antpackage.jar
org.apache.tools.ant.launch.Launcher
Note that you can use your own installation of Ant to run the scripts
(currently, the supported version is 1.7.1; note that version 1.8 cannot be used).
Task C Copy Configuration Directory
1. Copy the CONFIG_HOME directory from Machine 1 to Machine 2, in the
same location. The two directories within the CONFIG_HOME that are
required are admin and tct.
2. On Machine 2, delete the tibcohost directory from the CONFIG_HOME copy.
Create a TIBCO ActiveMatrix BPM Server on Machine 1
Perform the following tasks on Machine 1 to create a TIBCO ActiveMatrix BPM
Server.
Task A Create a TIBCO ActiveMatrix BPM Server
1. Using the TIBCO Configuration Tool (TCT), select Create TIBCO
ActiveMatrix BPM Server - V1.3.
TIBCO ActiveMatrix BPM Installation and Configuration
72
| Chapter 4
Installation
2. On the ActiveMatrix BPM: Database Administrator dialog, select/enter the
following, then click the Test Connection button to ensure you can
successfully connect:
3. On the ActiveMatrix BPM: Runtime Database Configuration dialog, enter
the following:
TIBCO ActiveMatrix BPM Installation and Configuration
Setting up a Highly Available, Fault Tolerant System 73
|
4. On the ActiveMatrix BPM: Configuration dialog:
a. enter the following information,
b. check the Override BPM Configuration Folder box,
c. in the Configuration Folder field, enter the BPM folder from the shared
file system.
d. Optionally, check the Enable SSL box to enable Secure Sockets Layer (SSL)
communication channels between your BPM runtime clients (i.e.,
Openspace or Workspace) and the BPM nodes (the other BPM nodes will
then inherit the SSL configuration).
Note that the certificate that is provided in the "out-of-the-box"
configuration (which has not been signed by a Certificate Authority (CA))
cannot be used in a high availability environment as it will not be accessible
from both machines.
Ideally, you will install/provision your own CA signed certificate. See
TIBCO ActiveMatrix BPM Administration guide for more information.
TIBCO ActiveMatrix BPM Installation and Configuration
74
| Chapter 4
Installation
5. On the ActiveMatrix BPM: Administrator Server Configuration dialog:
a. check the Use Existing ActiveMatrix Administrator Server box,
b. complete the remaining fields,
c. click the Test Connection button to ensure you can successfully connect.
6. On the ActiveMatrix BPM: Host and Node Configuration dialog, enter the
following:
TIBCO ActiveMatrix BPM Installation and Configuration
Setting up a Highly Available, Fault Tolerant System 75
|
7. Click Finish, and then click ’Configure’ to create the ActiveMatrix BPM
Server.
Create a TIBCO ActiveMatrix Administrator Replica on Machine 2
Perform the following steps on Machine 2 to create a replica TIBCO ActiveMatrix
Administrator.
Task A Edit the instance-mgmt.xml File
1. Open the following file:
TIBCO_HOME/administrator/3.1/scripts/instance-mgmt.xml
2. Locate the "deploy-admin" target, and remove "configure.tcs" and "start.tcs"
from the depends attribute. For example:
Change:
<target name="deploy-admin" depends="-define-macros,
create-dir-structure, bootstrap.admin.archive.th,
configure.tcs, start.tcs, updateCallbackUrlTrustConfig,
create.admin.cli.keystore, install.artifact.server,
deploy.admin.ui.dashboard"/>
To:
<target name="deploy-admin" depends="-define-macros,
create-dir-structure, bootstrap.admin.archive.th,
updateCallbackUrlTrustConfig, create.admin.cli.keystore,
install.artifact.server, deploy.admin.ui.dashboard"/>
Task B Configure the JDBC Driver
1. Using the TIBCO Configuration Tool (TCT), select Configure Third-Party
Driver.
2. On the Third-Party Driver: Details dialog, select the following:
TIBCO ActiveMatrix BPM Installation and Configuration
76
| Chapter 4
Installation
3. On the Third-Party Driver: JAR Folder dialog, select the directory containing
the JDBC driver and then click on Finish.
4. On the Third-Party Driver: Summary dialog, enter or browse to the
appropriate directory for the logs, and select the Configure Third-Party
Driver box:
Note that the Session Scripts and Log Folder field is prefilled with the default
location; you can change this location, if desired.
Click Configure to configure the third-party driver.
Task C Edit the governance_integration_build.xml File
1. Open the following file:
TIBCO_HOME/administrator/3.1/scripts/governance/governance_inte
gration_build.xml
2. Locate the "setup" target, and remove "add.factory.aggregator.config " from
the depends attribute. For example:
Change:
<target name="setup" depends="create.rt,
provision.mcr.aggr.node, create.ri, install.ri, add.appender,
init.govcommon, init.mcr, add.factory.aggregator.config,
deploy.aggr.app"/>
To:
<target name="setup" depends="create.rt,
provision.mcr.aggr.node, create.ri, install.ri, add.appender,
init.govcommon, init.mcr, deploy.aggr.app"/>
Task D Edit Ant Scripts
Ensure that you are using a copy of the Machine 1 configuration data that was
saved before installing the BPM runtime.
TIBCO ActiveMatrix BPM Installation and Configuration
Setting up a Highly Available, Fault Tolerant System 77
|
1. Change directories to:
CONFIG_HOME/tct/admin/date-time/scripts
For example:
[tibco@LINAramis scripts]$ pwd
/home/tibco/amx-bpm/tibco/data/tct/admin/2011-06-23-17-46-41/sc
ripts
2. Open the admin-envt-data.xml file and comment out the Environment
element. For example:
<!-- Environment description="Development environment"
xsi:type="amxdata:Environment" name="DevEnvironment">
<Node contact="TIBCO" description="Development node"
xsi:type="amxdata:Node" hostName="SystemHost" name="DevNode"
portNumber="6031"/>
<Host name="SystemHost"/>
<Application description="TIBCO ActiveMatrix Mediation
Implementation Type" contact="TIBCO Software Inc."
name="com.tibco.amx.it.mediation.app"
xsi:type="amxdata:Application">
<Node name="DevNode" environmentName="DevEnvironment"/>
<ApplicationTemplate name="com.tibco.amx.it.mediation.apt"
xsi:type="amxdata_reference:ApplicationTemplate_reference"/>
</Application>
</Environment-->
</amxdata_base:Enterprise>
3. Open the build.properties file and replace the hostname in the th.jmx.host,
th.jmx,url, and admin.instance.name entries with Machine 2's hostname.
(Note that if you did not remove the tibcohost directory in CONFIG_HOME
as mentioned in Copy Configuration Directory on page 71, your build will
fail, stating that the instance already exists.)
For example, change:
# Administrator Server Configuration: Details
admin.enterprise.name=AMXBPM
# Administrator Server Configuration: TIBCO Host Configuration
th.jmx.host=LINPorthos
To:
# Administrator Server Configuration: Details
admin.enterprise.name=AMXBPM
# Administrator Server Configuration: TIBCO Host Configuration
th.jmx.host=LINAramis
TIBCO ActiveMatrix BPM Installation and Configuration
78
| Chapter 4
Installation
4. Ensure the tcs.host entry in build.properties is set to 0.0.0.0:
# Administrator Server Configuration: Credential Server Details
tcs.host=0.0.0.0
5. Open the cl_logservice_data.xml file and replace all instances of
SystemNode with SystemNodeReplica.
:%s/SystemNode/SystemNodeReplica/g
6. Open the cl_payloadservice_data.xml file and replace all instances of
SystemNode with SystemNodeReplica.
:%s/SystemNode/SystemNodeReplica/g
7. Open the governance_integration_data.xml file and replace all instances
of SystemNode with SystemNodeReplica.
:%s/SystemNode/SystemNodeReplica/g
8. Open the integration_create_admin_data.xml file and replace all
instances of SystemNode with SystemNodeReplica and SystemHost with
SystemHostReplica.
:%s/SystemNode/SystemNodeReplica/g
:%s/SystemHost/SystemHostReplica/g
9. Open the admin-instance.properties file and change adminURL to
include Machine 2’s hostname. For example:
# AMX Administrator instance specific properties
adminURL=http://LINAramis:8120
username=root
Task E Run Ant Scripts
1. Before executing the Ant scripts increase the heap size for Ant.
export ANT_OPTS=-Xmx1024m
2. From the scripts directory launch Ant (there is a version included in the
amx-bpm installation folder):
/opt/tibco/amx-bpm/tibcojre64/1.6.0/bin/java -cp
/opt/tibco/amx-bpm/tools/lib/antpackage.jar
org.apache.tools.ant.launch.Launcher
TIBCO ActiveMatrix BPM Installation and Configuration
Setting up a Highly Available, Fault Tolerant System 79
|
Create a TIBCO ActiveMatrix BPM Server Replica on Machine 2
Perform the following tasks on Machine 2 to create a replica TIBCO ActiveMatrix
BPM Server (LINAramis in our example).
#
Task A Configure a TIBCO ActiveMatrix BPM Server Node Type
1. Using the TIBCO Configuration Tool (TCT) from Machine 1, select Configure
TIBCO ActiveMatrix BPM Server Node Type - V1.3.
2. On the ActiveMatrix BPM: Administrator Server Configuration dialog, enter
the following, then click Test Connection to ensure you can successfully
connect:
TIBCO ActiveMatrix BPM Installation and Configuration
80
| Chapter 4
Installation
3. On the ActiveMatrix BPM: Host and Node Configuration dialog:
a. change the Node Name to BPMNodeReplica,
b. change the Host to SystemHostReplica,
c. check the Override the BPM Configuration Folder box, and
d. in the Configuration Folder field, enter the same directory on the Shared
File System that was used for the first BPM Server (see Create a TIBCO
ActiveMatrix BPM Server on Machine 1 on page 71).
4. On the ActiveMatrix BPM: Summary dialog, enter the following, then click
Configure:
TIBCO ActiveMatrix BPM Installation and Configuration
Setting up a Highly Available, Fault Tolerant System 81
|
TIBCO ActiveMatrix BPM Installation and Configuration
82
| Chapter 4
Installation
Distribute ActiveMatrix BPM Applications
Perform the following to distribute the ActiveMatrix BPM components:
1. Log into TIBCO ActiveMatrix Administrator (you can log in on either
machine, or through the load balancer).
2. Distribute the following applications to BPMNode and BPMNodeReplica:
— amx.bpm.app
— amx.bpm.auth.system
— amx.bpm.auth.easyAs
— amx.bpm.auth.wss.asp
— amx.bpm.apacheds
a. In the Applications pane, click on the application,
b. in the lower pane, click on the Distribution tab,
c. in the Available Nodes section, select BPMNodeReplica and add it to the
Selected Nodes section,
d. click Save,
e. click Apply, then refresh the application list.
The nodes should appear "Out of Sync".
TIBCO ActiveMatrix BPM Installation and Configuration
Setting up a Highly Available, Fault Tolerant System 83
|
3. In the Applications panel, select both amx.bpm.app and
amx.bpm.sysorgmodel and click Deploy. When they have been fully
deployed to your BPMNodeReplica node (that is, they are shown as being "In
Sync" and "Running", not "Partially Running"), deploy amx.bpm.auth.* and
amx.bpm.apacheds. (Note that this can take quite some time, depending on
the system load.)
TIBCO ActiveMatrix BPM Installation and Configuration
84
| Chapter 4
Installation
Edit LDAP Shared Resources
If you are using the internal Apache DS instance, you are also required to edit the
LDAP shared resources to reflect the load balancer hostname, as opposed to a
single machine. This is required to ensure that either instance of Apache DS is
used in the event one machine fails.
Log into TIBCO ActiveMatrix Administrator, navigate to Shared Resource
Templates, and edit the hostname for the following resources:
•
DELDAP1ConnShared
•
EASYASConnShared
•
LdapAspRT
The hostname should be set to "LINAthos", rather than the original value of
"LINPorthos".
You can now re-install the resource instances on both the BPMNode and
BPMNodeReplica nodes. Navigate to Infrastructure, Hosts and reinstall the "Out
of Sync" instances.
TIBCO ActiveMatrix BPM Installation and Configuration
Setting up a Distributed System 85
|
Setting up a Distributed System
To implement the distributed system illustrated in the figure below, perform the
following steps.
Machine 1
Machine 2
Web
Components
Web
Components
Service virtualization
Process
Manager
Work
Manager
Process Service virtualization
Work
Manager
Manager
TIBCO Active Matrix BPM
Node A on Host instance 1
TIBCO Active Matrix BPM
Node B on Host instance 2
Cluster 1
Machine 3
Work
Manager
BPM
database
TIBCO Active Matrix BPM
Node C on Host instance 3
Cluster 2
TIBCO ActiveMatrix runtime
1. On machine 1: Install TIBCO ActiveMatrix BPM using the Install BPM,
Administrator & TIBCO Host profile. See Installing the Product for details.
TIBCO ActiveMatrix BPM Installation and Configuration
86
| Chapter 4
Installation
2. On machine 1: Using TIBCO Configuration Tool:
If you wish to enable secure sockets layer (SSL) for the communication
channels on the http connector used by TIBCO ActiveMatrix BPM, select
Configure to Secure All Communication with SSL option when running the
wizards in TIBCO Configuration Tool before creating the second BPM node.
The other BPM nodes then inherit the SSL configuration.
Note that the certificate that is provided in the "out-of-the-box" configuration
(which has not been signed by a Certificate Authority (CA)) cannot be used in
a high availability environment as it will not be accessible from both
machines.
However, if you do this, the "out-of-the-box" configuration provides you with
a certificate that has not been signed by a Certificate Authority (CA). Ideally,
you will install/provision your own CA signed certificate. See TIBCO
ActiveMatrix BPM Administration guide for more information.
a. Run the Configure Third-Party Driver wizard to register the JDBC drivers
for your BPM database. See Configure Third-Party Driver Wizard
Reference on page 111 for details.
b. Run the Create TIBCO ActiveMatrix BPM Server wizard to create a
TIBCO ActiveMatrix BPM server. See Create TIBCO ActiveMatrix BPM
Server Reference on page 145 for details.
3. On machines 2 and 3: Install TIBCO ActiveMatrix BPM using the Install
Administrator & TIBCO Host profile. See Running the TIBCO Configuration
Tool on page 97 for details.
4. On machines 2 and 3: Using TIBCO Configuration Tool:
a. Run the Configure Third-Party Driver wizard to register the JDBC drivers
for your BPM database. See Configure Third-Party Driver Wizard
Reference on page 111 for details.
TIBCO ActiveMatrix BPM Installation and Configuration
Setting up a Distributed System 87
|
b. Run the Create TIBCO Host Instance wizard to create a TIBCO Host, see
Create TIBCO Host Instance Wizard Reference on page 30. From the
TIBCO Host Instance Configuration: Administrator Server dialog, select
Bind this TIBCO Host instance with an existing Administrator server
box and enter the details of TIBCO ActiveMatrix Administrator server that
you created on machine 1. On the TIBCO Host Instance Configuration:
Details dialog, the properties should be as follows:
—Name: Type in the name of this new TIBCO host. The name must be
unique for the enterprise.
—Enterprise Name: Type in the name of the enterprise that the TIBCO
ActiveMatrix BPM node is using on machine 1.
—Machine Name: The machine name of machine 2 and 3, depending on
which machine you are running the wizard on.
—Management Port: Type the port number that you want this TIBCO Host
to use.
On the TIBCO Host instance Configuration: Notification Server, you
need to specify the details of the TIBCO EMS Server that your TIBCO
ActiveMatrix enterprise is using. The details should match what you
entered on machine 1. The properties should be as follows:
—Machine Name Port List: Type in the machine name and port number of
the TIBCO EMS server that your Enterprise is using.
—Username: Type in the name of the user that the TIBCO EMS server is
using.
—Password: Type in the password for the user that the TIBCO EMS server
is using.
On the TIBCO Host Instance Configuration: Administrator Server dialog,
you need to specify the details of the TIBCO Administrator Server that you
created on machine 1. Therefore, the details should match what you
entered on machine 1. The properties should be as follows:
—Select the Bind to Administrator server checkbox.
—Machine Name: Type in the machine name of machine 1.
—Management Port: Type the port number that the TIBCO Administrator
Server is using on machine 1.
—Username: Type in the name of the TIBCO Administrator server
superuser on machine 1.
—Password: Type in the password for the TIBCO Administrator server
superuser on machine 1.
TIBCO ActiveMatrix BPM Installation and Configuration
88
| Chapter 4
Installation
5. On machine 1: You must run the Configure TIBCO ActiveMatrix BPM
Server Node Type wizard twice to create:
— a BPM Node Type
— a Work Manager Node Type
On the ActiveMatrix BPM: Administrator Server Configuration: dialog, the
properties should be as follows:
—Machine Name: Type the machine name of machine 1.
—Port: Type the port number the TIBCO Administrator server is using on
machine 1.
—Username: Type the username of the TIBCO Administrator server
superuser on machine 1.
—Password: Type the username of the TIBCO Administrator server
superuser on machine 1.
On the ActiveMatrix BPM: Host and Node Configuration dialog, the
properties should be as follows:
—Node Type: Select the node type, depending on the node type you are
creating. Work Manager Node Type.
—Node Name: Type a unique name for the BPM Node. The name should
be unique to the BPM environment. In this example, you need to create
a two new nodes, NodeB and NodeC.
—Node Port: Specify a port number for the BPM Node on the machine.
—Host: Type the name of the TIBCO Host you created in step b.
—Environment Name: Type the name of the BPM environment on
machine 1.
—Override BPM Configuration Folder: Select this to specify the shared
network folder where you want to store the TIBCO ActiveMatrix BPM
properties files. See TIBCO ActiveMatrix BPM Administration guide for
details.
—Configuration Folder: This is enabled if the Override BPM
Configuration Folder checkbox is enabled. Type in the location of the
shared network folder where you want to store the TIBCO
ActiveMatrix BPM properties files.
TIBCO ActiveMatrix BPM Installation and Configuration
Setting up a Distributed System 89
|
6. Using TIBCO Administrator on machine 1, redistribute the following TIBCO
ActiveMatrix BPM applications to the new node.
— amx.bpm.app
— any TIBCO ActiveMatrix BPM LDAP Authenticator applications. For
example, if you are using the internal LDAP server provided with TIBCO
ActiveMatrix BPM, these would be:
—amx.bpm.auth.system
—amx.bpm.auth.easyas
a. Select Applications. From the Environment drop-down list, select the
Environment name that you specified on machine 1. The default is
BPMEnvironment for example.
b. Select the TIBCO ActiveMatrix BPM application and click Distribution.
c. From Available Nodes, the new node is now listed. Depending on which
node you are configuring, select
—BPM Node and drag NodeB from Available Nodes to Selected Nodes.
—WorkManager and drag NodeC from Available Nodes to Selected
Nodes.
d. Click Save.
e. Click Refresh. The TIBCO ActiveMatrix BPM application is displayed as
Out of Sync.
f.
Click Deploy to redeploy theTIBCO ActiveMatrix BPM application.
g. Click Refresh. The TIBCO ActiveMatrix BPM application is displayed as
In Sync.
h. Repeat these steps for every TIBCO ActiveMatrix BPM application that
needs to be redistributed to the new node.
TIBCO ActiveMatrix BPM Installation and Configuration
90
| Chapter 4
Installation
TIBCO ActiveMatrix BPM Installation and Configuration
| 91
PART THREE
CONFIGURATION
TIBCO ActiveMatrix BPM Installation and Configuration
92
| Chapter 5
Creating and Configuring Runtime Objects
Chapter 5
Creating and Configuring Runtime Objects
This chapter describes how to create and configure ActiveMatrix BPM servers,
ActiveMatrix BPM node types, ActiveMatrix Administrator servers, TIBCO Host
instances, and install (configure) third party drivers using TIBCO Configuration
Tool (TCT).
Topics
•
Configuration Modes, page 93
•
TIBCO Configuration Tool Requirements, page 94
•
Running the TIBCO Configuration Tool, page 97
•
TIBCO ActiveMatrix BPM Configuration Example on page 101
TIBCO ActiveMatrix BPM Installation and Configuration
Configuration Modes 93
|
Configuration Modes
You configure ActiveMatrix BPM servers and node types, ActiveMatrix
Administrator servers, and TIBCO Host instances, and install third-party drivers
using one of the following modes:
•
GUI Run TIBCO Configuration Tool and configure objects using wizards. See
Running the TIBCO Configuration Tool on page 97.
•
Script Edit and run TIBCO Configuration Tool scripts:
a. Obtain a configuration:
— Run TIBCO Configuration Tool in GUI mode once and save the
configuration according to the instructions in Saving a TIBCO
Configuration Tool Configuration on page 155.
— Use one of the sample configurations described in TIBCO Configuration
Tool Sample Configurations on page 155.
b. Edit and run the configuration according to the instructions in Reusing a
TIBCO Configuration Tool Configuration on page 156.
TIBCO ActiveMatrix BPM Installation and Configuration
94
| Chapter 5
Creating and Configuring Runtime Objects
TIBCO Configuration Tool Requirements
TIBCO Enterprise Message Service Server Requirements and Prerequisites
A TIBCO Enterprise Message Service server acts as a notification server for the
ActiveMatrix Administrator servers and TIBCO Host instances within an
enterprise. The enterprise is defined by the enterprise name that you specify
when you run the Create TIBCO ActiveMatrix Administrator Server and Create
TIBCO Host Instance wizards and the TIBCO Enterprise Message Service server
you specify. Ensure the following requirements and prerequisites are satisfied:
•
Each enterprise must use a different TIBCO Enterprise Message Service server.
•
If the TIBCO Enterprise Message Service user does not have administrator
privileges, see Appendix C, TIBCO Enterprise Message Service Server
Configuration Required for Non-Admin Users.
•
The TIBCO Enterprise Message Service server must be running before you
run the Create TIBCO ActiveMatrix Administrator Server and Create TIBCO
Host Instance wizards.
•
If you manually start the TIBCO Enterprise Message Service server, make sure
you use the same configuration files as the Windows service. Use the
following command that uses the -config option:
TIBCO_HOME/ems/version number/bin/tibemsd -config
EMS_CONFIG_HOME/tibco/cfgmgmt/ems/data/tibemsd.conf, where
EMS_CONFIG_HOME is the Configuration Directory for TIBCO Enterprise
Message Service.
•
The clocks of machines within the same enterprise must be synchronized to
within to 30 minutes. Synchronization can be achieved by running an NTP
synchronization daemon on each machine.
SSL Prerequisites
If you intend to enable SSL communications, ensure the following prerequisites
are satisfied.
TIBCO Enterprise Message Service Server
The TIBCO Enterprise Message Service server must be enabled with SSL and
configured with a certificate file that contains both the server and issuer
certificates before you run the Create TIBCO ActiveMatrix Administrator Server
and Create TIBCO Host Instance wizards.
TIBCO ActiveMatrix BPM Installation and Configuration
TIBCO Configuration Tool Requirements 95
|
Database and LDAP Servers
Database and LDAP servers must be enabled with SSL before you run the Create
TIBCO ActiveMatrix Administrator Server wizard.
Default Ports
Figure 1 on page 95 illustrates the default ports configured in TIBCO
Configuration Tool. For information on how to change the ports after you have
configured them, see Administration.
Figure 1 Default Ports
Administrator
Command-Line
Interface
TIBCO
Business Studio
Administrator
Web UI
www
I/HTTP
P
TT
P
TT
H
E/
H
E/
E/HTTP
System
Host
TIBCO
Credential Server (6041)
Standalone
JMX
Host
(6001)
X
JM
(19767)
Administrator Server
(7222)
(7222)
TIBCO Enterprise
Message Service Server
X
JM
(8120)
(6051)
(7222)
(6031)
I/HTTP
(19767)
LDAP
JD
Oracle (1521)
BC
Microsoft SQL (1433)
DB2 (5000)
Node
JDBC
(389)
(389) Database
LDAP
Authentication
Realm
TIBCO ActiveMatrix BPM Installation and Configuration
96
| Chapter 5
Creating and Configuring Runtime Objects
Table 6 lists the default ports for the TIBCO ActiveMatrix runtime objects
configured in TIBCO Configuration Tool.
Table 6 Runtime Object Default Ports
Runtime Object
Default Port
SystemHost TIBCO Host instance management
6051
Standalone TIBCO Host instance management
6001
System node management
6021
Development node management
6031
TIBCO ActiveMatrix Administrator external HTTP
8120
TIBCO ActiveMatrix Administrator internal HTTP
19767
TIBCO Credential Server
6041
Table 7 lists the default ports for the server objects configured in TIBCO
Configuration Tool.
Table 7 Server Default Ports
Server Object
Default Port
Enterprise Message Service server
7222 or 7243 (SSL)
Database
Oracle 1521
Microsoft SQL 1433
IBM DB2 5000
LDAP
TIBCO ActiveMatrix BPM Installation and Configuration
389
Running the TIBCO Configuration Tool 97
|
Running the TIBCO Configuration Tool
This section describes running TCT to create the runtime objects required for an
ActiveMatrix BPM setup.
1. Execute TIBCO_HOME/tct/1.1/TIBCOConfigurationTool. The TIBCO
Configuration Folder dialog displays.
A TIBCO configuration folder stores configuration data generated by TIBCO
products. Configuration data can include sample scripts, session data,
configured binaries, logs, and so on. The configuration folder is referred to as
CONFIG_HOME.
2. Accept the default folder, type a folder name, or click Browse to select a folder.
3. Click OK. TIBCO Configuration Tool displays with links to the configuration
wizards listed Table 8.
Table 8 Configuration Wizards
Wizard
Function
Configure TIBCO
ActiveMatrix BPM Server
Node Type - V1.3
Allows you to create an TIBCO ActiveMatrix BPM Node. You can
create the following node types:
•
BPM Node Type
•
Process Manager Node Type
•
Work Manager Node Type
•
Web Components Node Type
See Configure TIBCO ActiveMatrix BPM Server Node Type
Reference on page 149 for details
Create TIBCO ActiveMatrix
BPM Server - V1.3
Allows you to configure the TIBCO ActiveMatrix BPM database
and runtime clients for TIBCO ActiveMatrix BPM.
See Create TIBCO ActiveMatrix BPM Server Reference on page 145
for details.
TIBCO ActiveMatrix BPM Installation and Configuration
98
| Chapter 5
Creating and Configuring Runtime Objects
Table 8 Configuration Wizards (Cont’d)
Wizard
Function
Create TIBCO ActiveMatrix
Administrator Server - V3.1
In this wizard you:
•
Specify the properties of an ActiveMatrix Administrator server
and optionally create the server. The TIBCO Host instance
named SystemHost and SystemNode node that runs
ActiveMatrix Administrator server and the development node
will be started.
•
Optionally specify a development environment and node and
start the node.
•
Specify the properties of monitoring, logging, and payload
services running on SystemNode and optionally deploy the
monitoring and logging services.
•
Specify the database that serves as a persistent store for
ActiveMatrix Administrator server and the monitoring,
logging, and payload services.
See Create TIBCO ActiveMatrix Administrator Server Wizard
Reference on page 117 for details.
Create TIBCO Host Instance V3.1
Specify the communication and management properties of a
standalone TIBCO Host instance and optionally create and launch
the TIBCO Host instance. See Create TIBCO Host Instance Wizard
Reference on page 112 for details.
Configure Third-Party Driver
Package and install third-party client driver libraries that
implement APIs such as JDBC and JMS into the ActiveMatrix
Administrator server software repository.
See Configure Third-Party Driver Wizard Reference on page 111 for
details.
4. Choose a wizard and configure according the wizard reference.
5. Click Load... to load the values saved from a previous configuration session.
See Saving a TIBCO Configuration Tool Configuration on page 155.
6. Optionally check the Configure to Secure All Communication with SSL
checkbox. When checked, the wizards containing communication channels
display SSL configuration fields. For information on the supported
communication channels, see Appendix B, Securing Communication
Channels, on page 203.
TIBCO ActiveMatrix BPM Installation and Configuration
Running the TIBCO Configuration Tool 99
|
7. On any screen, click Finish to accept default values (see Default Ports on
page 95) for all the configuration properties and jump to the Summary screen.
8. In the Summary screen, the wizard reports the configuration tasks it will
perform.
— Click Save to save a configuration. See Saving a TIBCO Configuration Tool
Configuration on page 155.
— Click Cancel to return to the wizard selector screen.
— Execute the configuration tasks:
a. Uncheck the checkboxes next to tasks you do not want executed.
b. Uncheck the checkboxes next to the product applications you do not want
deployed to the development node.
c. Click Configure to execute the tasks and save the configuration settings.
The wizard reports the status of tasks as it completes them. On Windows
systems, after the TIBCO Host instance is started, click Unblock if you see
the following dialog pop up:
TIBCO ActiveMatrix BPM Installation and Configuration
100
| Chapter 5
Creating and Configuring Runtime Objects
Recommended Order to Run Wizards for ActiveMatrix BPM
The following table describes the recommended order to run the wizards for
ActiveMatrix BPM which depends on the installation profile you chose during
installation:
Installation Profile
Wizard
Install BPM, Administrator &
TIBCO Host
•
Configure Third-Party Driver to configure the JDBC
Drivers for your database.
•
Create TIBCO ActiveMatrix BPM Server - V1.3 to
configure TIBCO ActiveMatrix BPM. 1
This wizard not only contains the configuration dialogs
for TIBCO ActiveMatrix BPM but also incorporates the
wizard Create TIBCO ActiveMatrix Administrator
Server. This allows you to configure your TIBCO
Administrator Server and TIBCO Host.
Install Administrator & TIBCO Host
Install TIBCO Host Only
•
Configure Third-Party Driver to configure the JDBC
Drivers for your database.
•
Create TIBCO ActiveMatrix Administrator Server V3.1to configure your TIBCO ActiveMatrix
Administrator Server.
•
Configure Third-Party Driver to configure the JDBC
Drivers for your database.
•
Create TIBCO Host Instance - V3.1 to configure your
TIBCO Host.
1. You can however choose to create the runtime objects in a different order. For example, after
installing using the Install BPM, Administrator & TIBCO Host profile, you can create the
ActiveMatrix Administrator server first and then create the ActiveMatrix BPM server. In this case, if
you plan to use the existing Administrator Server, you must select the option Use Existing
ActiveMatrix Administrator Server on the Administrator Server Configuration screen. Before
clicking Configure on the Summary screen, ensure that the option Create TIBCO ActiveMatrix
Administrator server is unchecked.
You can ignore wizards that are not relevant to the profile you selected.
The wizard Configure TIBCO ActiveMatrix BPM Server Node Type - V1.3 helps
configure a new ActiveMatrix BPM server node type on an existing ActiveMatrix
Administrator server.
TIBCO ActiveMatrix BPM Installation and Configuration
TIBCO ActiveMatrix BPM Configuration Example 101
|
TIBCO ActiveMatrix BPM Configuration Example
This section describes the steps to configure the TIBCO ActiveMatrix BPM server
following the recommended order of running the wizards.
This example uses the following third-party software:
•
DBMS Software: Microsoft SQL Server 2008
•
JDBC Driver: JDBC driver Version 2.0
•
Internal LDAP
Task A Configure the Third-Party Driver
1. Click Configure Third-Party Driver. The Configure Third-Party Driver
Welcome dialog displays.
2. Click Next. The Third-Party Driver: Details dialog displays.
3. Enter the following values:
Field
Value
Driver Type
JDBC
Driver
TIBCO enabled JDBC driver for Microsoft SQL Server 2.0.0
4. Click Next. The Third-Party Driver: JAR Folder dialog displays.
5. Either click Browse or type in the location of the folder containing the client
driver JARs to install in TIBCO ActiveMatrix BPM.
6. Click Finish. The Third Party: Summary dialog displays.
Alternately, you can click Save and save the configuration to be run later. See
Saving a TIBCO Configuration Tool Configuration on page 155 for details.
7. Click Close to exit the Configure Third-Party Driver wizard.
Task B Create TIBCO ActiveMatrix BPM Server
1. Click Create TIBCO ActiveMatrix BPM Server. The Create TIBCO
ActiveMatrix BPM Server Welcome dialog displays.
Optionally, check the Configure to Secure All Communication with SSL
checkbox to enable secure sockets layer (SSL) for the communication channels
TIBCO ActiveMatrix BPM Installation and Configuration
102
| Chapter 5
Creating and Configuring Runtime Objects
between your BPM runtime clients (Openspace, Workspace), and the BPM
runtime.
Click Next. The ActiveMatrix BPM: Database Administrator dialog displays.
2. Complete the following fields:
Field
Description
Create BPM
Database Instance
Select the checkbox for TIBCO Configuration Tool to create the TIBCO
ActiveMatrix BPM database.
Deselect this if you want to manually create the TIBCO ActiveMatrix BPM
database.
Database Driver
The database driver you want to use for the TIBCO ActiveMatrix BPM
database. TIBCO enabled JDBC driver for Microsoft SQL Server 2.0.0
URL
Once you have selected the database driver, the Admin JDBC URL field is
automatically completed with the connection string used in the JDBC
connection to the TIBCO ActiveMatrix BPM database.
For example,
jdbc:sqlserver://uk-n2-base:1433;DatabaseName=master;SelectMeth
od=curder
DBA Username
The user name of the login that you want BPM to use to connect to the TIBCO
ActiveMatrix BPM database. For example, the default DBA Username for the
JDBC driver for Microsoft SQL Server 2.0.0 is ’sa’.
DBA Password
The password for the DBA username. For example, ’sa’.
Tablespace Name
The name of the tablespace that is used to store the TIBCO ActiveMatrix BPM
tables.
The default tablespace name is bpm_tablespace.
Test Connection
Click Test Connection to test the connection to your database.
3. Click Next. The ActiveMatrix BPM: Runtime Database Configuration dialog
displays.
TIBCO ActiveMatrix BPM Installation and Configuration
TIBCO ActiveMatrix BPM Configuration Example 103
|
4. Complete the following items as required:
Field
Description
URL
The URL field is automatically completed with the JDBC connection string
used to connect to the TIBCO ActiveMatrix BPM database.
For example,
jdbc:sqlserver://hostname:1433;DatabaseName=bpm;SelectMethod=cur
sor
Username
Specify the username that you want TIBCO ActiveMatrix BPM to use to
connect and log in to the TIBCO ActiveMatrix BPM database. TIBCO
Configuration Tool automatically creates the username you specify.
Default: bpmuser.
Password
Enter the password for the specified username.
Confirm Password
Re-enter the password for the specified username.
Generate Scripts
Click this if you want to manually create the TIBCO ActiveMatrix BPM
database. This enables TIBCO Configuration Tool to extract the SQL scripts
required for creating a TIBCO ActiveMatrix BPM database instance and place
them in the /BPM/database directory. Once the scripts have been created,
your database administrator can run them manually at a later time. See
Manually Run the BPM Database Creation Scripts on page 108 for more
information.
Test Connection
This is enabled if Create BPM Database Instance is not selected. If your
database administrator has manually run the TIBCO ActiveMatrix BPM
database creation scripts, then click Test Connection. If the connection is
successful, this confirms that the username and password supplied in the
fields above can connect to the TIBCO ActiveMatrix BPM database that has
been created. This does not prove that all the database schema objects have
been created, but it does confirm that the TIBCO ActiveMatrix BPM database
creation scripts have been run.
5. Click Next. The ActiveMatrix BPM: Configuration dialog displays.
TIBCO ActiveMatrix BPM Installation and Configuration
104
| Chapter 5
Creating and Configuring Runtime Objects
6. Complete the following items as required:
Field
Description
HTTP Work
Presentation Host
The machine name that hosts Workspace. If the machine is different from the
machine where you are running TIBCO ActiveMatrix BPM, then enter the
fully qualified domain name or IP address in this field.
The machine name specified here is also used in the default security
certificate.
Default: localhost
HTTP Port
The port number for Workspace.
Default: 8080.
Enable SSL
Select the checkbox to enable secure HTTP communication for Workspace
and Openspace.
SMTP Host
The machine name that hosts the SMTP server that is used by Workspace. If
the machine is different from the machine where you are running TIBCO
ActiveMatrix BPM, then enter the fully qualified domain name or IP address
in this field.
Default: localhost.
SMTP Port
The port number used by the SMTP server.
Default: 25.
Override BPM
Configuration
Folder
Check this checkbox if you wish to override the default location of the BPM
configuration folder.
Configuration
Folder
This field is displayed only when the checkbox Override BPM
Configuration Folder is checked.
This field displays the default configuration folder location. You can choose
to override this by specifying the absolute path of the required configuration
folder.
7. Click Next. The ActiveMatrix BPM: Sizing Configuration dialog displays.
TIBCO ActiveMatrix BPM Installation and Configuration
TIBCO ActiveMatrix BPM Configuration Example 105
|
8. Complete the following items as required:
Field
Description
Environment
Choose the type of environment you are setting up.
The drop-down list provides two options:
Development and Production. The environment you
choose in this field determines the default values
provided for the remaining fields on this screen.
Database Connection
Pool Size
Defines the number of database connections that will
be available for each of the ActiveMatrix BPM
DataSource resource templates.
Development default: 10
Production default: 50
Database Statement
Cache Size
Defines the number of prepared statements that can be
cached by each connection in the DataSource resource
template pool. Caching prepared statements improves
the performance but it uses more memory.
Development default: 0
Production default: 100
Number of Process
Engine Threads
Defines the number of threads in the Process Engine
background thread pool.
Development default: 5
Production default: 18
Max Java PermGen
Size
Specifies the maximum size for Java PermGen.
Development default: 256
Production default: 1024
Number of Message
Threads
Specifies the range for the message threads.
Development default: Core: 5 Maximum: 10
Production default: Core: 10 Maximum: 20
Java Heap Size
Specifies the range for the Java heap size.
Development default: Minimum: 512 Maximum: 1024
Production default: Minimum: 1024 Maximum: 4096
TIBCO ActiveMatrix BPM Installation and Configuration
106
| Chapter 5
Creating and Configuring Runtime Objects
For more details about these parameters, see Tuning ActiveMatrix BPM.
9. Click Next. The ActiveMatrix BPM: LDAP Configuration dialog displays.
10. Complete the following items as required:
Field
Description
Use Internal
LDAP Server
Select this if you want to use the internal LDAP Directory Server provided with
TIBCO ActiveMatrix BPM. If checked the Port field is displayed; see LDAP Server
on page 40.
Default: Checked.
Port
The port number used by the Internal LDAP Server.
Default: 10801
Use External
LDAP Server
Select this if you want to use an external LDAP Directory Server. If checked, the
LDAP provider details are displayed.
Default: Unchecked.
URL
The URL used to log in to the external LDAP Server.
Default: ldap\localhost:10389
Base DN:
The TIBCO ActiveMatrix Administrator user’s distinguished name.
Default: OU=system
Username:
The username of the TIBCO ActiveMatrix Administrator user, see Configuring
the BPM Admin user (if using an external LDAP directory server) on page 40.
Default:uid=admin,OU=system
Password:
The password of the TIBCO ActiveMatrix Administrator user.
Test
Connection
Click Test Connection to confirm connection to the LDAP Server.
11. You can either:
— Click Finish to accept the defaults for the rest of the dialogs.
— Click Next to amend the details in the following dialogs which create or
configure an ActiveMatrix Administrator server. You may wish to do this
if you are creating a high availability implementation, for example.
TIBCO ActiveMatrix BPM Installation and Configuration
TIBCO ActiveMatrix BPM Configuration Example 107
|
12. Once you have completed the Create TIBCO ActiveMatrix BPM Server
wizard, the Summary dialog displays, then:.
If you deselected the Create BPM Database Instance checkbox, the Summary
dialog should say Create ActiveMatrix BPM [Not Creating Database
Instance].
If...
Do this...
Your database administrator has
manually run the TIBCO
ActiveMatrix BPM database
creation scripts to create the
database
Click Configure to configure TIBCO ActiveMatrix BPM. Make
sure the following are unchecked:
•
Deploy Monitoring Service
•
Deploy Log Service
This is because these services adversely effect the performance
of TIBCO ActiveMatrix BPM. Click Close to exit the Create
TIBCO ActiveMatrix BPM Server wizard.
The wizard reports the status of tasks as it completes them.
Once the status is Successful! Click Close to exit TIBCO
Configuration Tool. The installation and configuration of
TIBCO ActiveMatrix BPM is complete.
Your database administrator has
not yet run the TIBCO
ActiveMatrix BPM database
creation scripts
Click Save to save the configuration information in a session
script that can be used by TIBCO Configuration Tool to
configure TIBCO ActiveMatrix BPM at a later date. Click
Cancel to exit the Create TIBCO ActiveMatrix BPM Server
wizard.
Once your database administrator has manually run the
TIBCO ActiveMatrix BPM database creation scripts (see
Manually Run the BPM Database Creation Scripts on
page 108), you will need to run the Create TIBCO
ActiveMatrix BPM Server wizard again and from the
Summary dialog, click Configure to complete the
configuration of TIBCO ActiveMatrix BPM.
You are performing a silent install,
you may wish to save the
configuration information in a
session script that can be used by
TIBCO Configuration Tool to
configure TIBCO ActiveMatrix
BPM at a later date.
Click Save to save the configuration information in a session
script that can be used by TIBCO Configuration Tool to
configure TIBCO ActiveMatrix BPM at a later date. For more
information, see TIBCO Configuration Tool Configuration on
page 153,
TIBCO ActiveMatrix BPM Installation and Configuration
108
| Chapter 5
Creating and Configuring Runtime Objects
Manually Run the BPM Database Creation Scripts
(This only applies to Oracle)
If you need to manually amend any of the BPM database creation scripts, make
sure that you do not include any blank lines. If there are any blank lines, you will
receive an error similar to the ones below:
SP2-0734: unknown command beginning "CONSTRAINT..."
SP2-0042: unknown command ")"
and the rest of the line is ignored. To resolve this, you can:
•
remove all blank lines from the script
•
set sqlblanklines on
on the sqlplus session
The structure of the /BPM/database directory is shown below:
The admin directory contains the database administrator scripts that contain the
commands needed to create the schema itself. In Oracle, this means creating the
tablespaces and in SQL Server, creating the logins that will own the schema and
database.
The rest of the directories contain the SQL scripts required to create and/or
upgrade the tables for each BPM component. These are for reference only.
Your database administrator needs to run the following scripts in the order shown
to manually create the BPM database:
Script
Description
Run As
/BPM/database/admin/setup-a
These scripts contain the commands needed
prior to creating the schema itself. On Oracle
this means creating the tablespaces and in
SQL Server this means creating the logins
that own the schema and database.
Database
Administrator
These scripts contain the commands required
to create the database and/or schema.
Database
Administrator
dmin.sql
/BPM/database/admin/created
b-admin.sql
TIBCO ActiveMatrix BPM Installation and Configuration
TIBCO ActiveMatrix BPM Configuration Example 109
|
Script
Description
Run As
/BPM/database/ProcessManage
These scripts create the schema objects
required for the process manager
component.
BPM User
These scripts create the schema objects
required for the work manager component.
When running this script manually to create
schema objects in DB2, you must set the
statement termination character to ’/’
(forward-slash) rather than a ’;’(semi-colon).
See Set the Statement Termination Character
to ’/’ on page 37 for details.
BPM User
rCreate.sql
/BPM/database/WorkManagerCr
eate.sql
TIBCO ActiveMatrix BPM Installation and Configuration
110
| Chapter 6
TIBCO Configuration Tool Wizard Reference
Chapter 6
TIBCO Configuration Tool Wizard
Reference
Topics
•
Configure Third-Party Driver Wizard Reference, page 111
•
Create TIBCO Host Instance Wizard Reference, page 112
•
Create TIBCO ActiveMatrix Administrator Server Wizard Reference, page 117
•
Create TIBCO ActiveMatrix BPM Server Reference, page 145
•
Configure TIBCO ActiveMatrix BPM Server Node Type Reference, page 149
•
Replicating a TIBCO ActiveMatrix Administrator Server, page 162
TIBCO ActiveMatrix BPM Installation and Configuration
Configure Third-Party Driver Wizard Reference 111
|
Configure Third-Party Driver Wizard Reference
Table 9 Details
Field
Description
Driver Type
The type of driver being configured: JDBC or JMS.
Default: JDBC.
Driver
The supported drivers:
•
JDBC
— TIBCO enabled JDBC driver for Microsoft SQL Server 2.0
— TIBCO enabled JDBC driver for Microsoft SQL Server 3.0
— TIBCO enabled JDBC driver for Oracle 10.2.0
— TIBCO enabled JDBC driver for Oracle 11.1.0
— TIBCO enabled JDBC driver for IBM DB2 2.3.631
— TIBCO enabled JDBC driver for IBM DB2 4.12.55
•
JMS
— TIBCO enabled JMS client for Sonic 6.1.0
— TIBCO enabled JMS client for WebSphere 7.0.02
1. Not supported for ActiveMatrix Administrator and ActiveMatrix JDBC resource templates.
2. Support for WebSphere MQ 6.0 is based on the backward compatibility of the WebSphere MQ 7.0
client library. When a JMS binding is configured with JMS topics and needs to work with WebSphere
MQ 6.0, you must provide the 7.1.0.3 version of the client library.
Table 10 JAR Folder
Field
Description
JAR Folder
The folder containing the client driver JARs to install in the ActiveMatrix
Administrator server software repository.
TIBCO ActiveMatrix BPM Installation and Configuration
112
| Chapter 6
TIBCO Configuration Tool Wizard Reference
Create TIBCO Host Instance Wizard Reference
Table 11 Welcome
Field
Description
Configure to Secure
All Communication
with SSL
Indicate that all communication channels will be secured with SSL. When
checked, the Enable SSL checkbox on the TIBCO Enterprise Message
Service Server and ActiveMatrix Administrator Server screens are checked.
See SSL Prerequisites, page 94.
TIBCO Host Instance
Table 12 TIBCO Host Instance Details
Field
Description
Name
The name of the TIBCO Host instance. The name must be unique within the
enterprise.
Default: None.
Enterprise
Name
The name of the communication group for notification messages sent between
ActiveMatrix Administrator server and the hosts that are bound to the server.
Default: amxadmin.
Machine
Name
The name of the machine on which the TIBCO Host instance will run. The value
of this property must either be a hostname resolvable through DNS or 0.0.0.0; it
cannot be an IP address.
Default: machineName, where machineName is the machine on which TIBCO
Configuration Tool is being executed.
Management
Port
The management port of the TIBCO Host instance.
Register as
Windows
Service
Indicate whether the TIBCO Host instance should be registered as a Windows
service named TIBCO ActiveMatrix instanceName, where instanceName is the name
you specified in the Name field, with startup type Automatic. The service is not
started.
Default: 6001.
Default: Unchecked.
TIBCO ActiveMatrix BPM Installation and Configuration
Create TIBCO Host Instance Wizard Reference 113
|
Table 12 TIBCO Host Instance Details (Cont’d)
Field
Description
Create
Windows
Shortcut
Indicate whether to create a shortcut named instanceName, where instanceName is the
name you specified in the Name field, that points to
CONFIG_HOME\tibcohost\instanceName\host\bin\tibcohost.exe, to the
Windows desktop.
Default: Unchecked.
Notification and Messaging Bus Server
See TIBCO Enterprise Message Service Server Requirements and Prerequisites,
page 94. If you intend to enable SSL communications, see SSL Prerequisites,
page 94.
Table 13
TIBCO Enterprise Message Service Server
Field
Description
Machine
Name Port List
A comma separated list of machinename:port addresses for a TIBCO Enterprise
Message Service server.
Default: machinename:port, where machinename is the machine on which TIBCO
Configuration Tool is being executed and port is 7222.
Username
A username for the TIBCO Enterprise Message Service server. The user must have
administrator privileges in the TIBCO Enterprise Message Service server. If the
user does not have administrator privileges, see Appendix A, TIBCO Enterprise
Message Service Server Configuration Required for Non-Admin Users, page 99.
Default: admin.
Password
A password for the TIBCO Enterprise Message Service user.
Default: None.
TIBCO
Enterprise
Message
Service Server
is SSL Enabled
Indicate that the TIBCO Enterprise Message Service server is enabled for SSL.
When checked, the SSL Keystore Configuration fields are enabled. The TIBCO
Enterprise Message Service server usually listens on port 7243 when SSL-enabled
and you must update the value in the Machine Name Port List field before
proceeding with SSL configuration.
TIBCO ActiveMatrix BPM Installation and Configuration
114
| Chapter 6
TIBCO Configuration Tool Wizard Reference
Trust Keystore
Table 14 SSL Keystore Configuration
Field
Description
Create a Trust Store...
Invokes a wizard to import certificates from a server and create the trust
store.
Keystore Location
The location of the keystore.
Keystore Type
The type of the keystore: JKS or JCEKS.
Default: JKS.
Keystore Password
The password that protects the keystore.
Choose the source of the trust store keystore:
•
Create
a. Click Create a Trust Store....
b. Specify a password to protect the keystore and click Next >. The SSL setup
wizard displays certificates imported from trusted servers.
c. In the Trust Selected Certifications area, check the checkboxes next to the
certificates to trust and click Finish. The wizard fills in the Keystore
Location, Keystore Type, and Keystore Password fields.
•
Upload
a. Click Browse and navigate to the location of the keystore.
b. Click the keystore and click Open. The wizard fills in the Keystore
Location field.
c. In the Keystore Type drop-down list, select the keystore type.
d. Type the keystore password.
e. Click Test Connection.
The following resource templates are added to the Administrator server:
— Keystore Provider notify.transport.truststore.csp.jndi
— SSL Client Provider notify.transport.sslclient.jndi
and instances of these resource templates are installed on every node managed by
that server.
TIBCO ActiveMatrix BPM Installation and Configuration
Create TIBCO Host Instance Wizard Reference 115
|
ActiveMatrix Administrator Server
Table 15 Administrator Server
Field
Description
Bind to Administrator Server
Indicate whether to bind the TIBCO Host instance to an
Administrator server. When checked the Administrator server
configuration fields are enabled.
Default: Checked.
Machine Name
The name of the machine on which the Administrator server is
running. The value of this property must either be a hostname
resolvable through DNS or 0.0.0.0; it cannot be an IP address.
Port
The browser port used to access the Administrator server.
Default: 8120.
Username
The ID of the initial superuser.
Default: root.
Password
The password of the superuser.
Default: t.
Admin Server is SSL Enabled
Indicate that the Administrator server internal port (see
ActiveMatrix Administrator Internal HTTP Port on page 123) is
enabled for SSL. When checked, the SSL Keystore Configuration
fields are enabled.
Trust Keystore
Table 16 SSL Keystore Configuration
Field
Description
Create a Trust Store...
Invokes a wizard to import certificates from a server and create the trust
store.
Keystore Location
The location of the keystore.
Keystore Type
The type of the keystore: JKS or JCEKS.
Default: JKS.
Keystore Password
The password that protects the keystore.
TIBCO ActiveMatrix BPM Installation and Configuration
116
| Chapter 6
TIBCO Configuration Tool Wizard Reference
Choose the source of the trust store keystore:
•
Create
a. Click Create a Trust Store....
b. Specify a password to protect the keystore and click Next >. The SSL setup
wizard displays certificates imported from trusted servers.
c. In the Trust Selected Certifications area, check the checkboxes next to the
certificates to trust and click Finish. The wizard fills in the Keystore
Location, Keystore Type, and Keystore Password fields.
•
Upload
a. Click Browse and navigate to the location of the keystore.
b. Click the keystore and click Open. The wizard fills in the Keystore
Location field.
c. In the Keystore Type drop-down list, select the keystore type.
d. Type the keystore password.
e. Click Test Connection.
TIBCO ActiveMatrix BPM Installation and Configuration
Create TIBCO ActiveMatrix Administrator Server Wizard Reference 117
|
Create TIBCO ActiveMatrix Administrator Server Wizard Reference
The Create TIBCO ActiveMatrix Administrator Server wizard takes 15 minutes or
more to complete depending on the configuration options.
Database Requirements
When running the wizard you specify a database for ActiveMatrix Administrator
server and several system services. If you are using an external database other
than HSQLDB, before running the wizard:
1. Package and install the database driver using the Configure Third-Party
Driver Wizard Reference.
2. Configure the external database:
•
Oracle 11gR2
— The database user cannot have dba privileges, must have connect and
resource privileges, and be assigned to the default schema
•
Microsoft SQL Server
— Run the command
alter database
DB Name set read_committed_snapshot on
— The database user must be assigned the default database and have the
db_owner role
— Use the case insensitive collation setting
•
IBM DB2
— Configure the database with a 32KB page size (instead of default 4KB)
If you use an HSQLDB external database, concurrent user access to Administrator
server is not supported.
3. Start the database server.
TIBCO ActiveMatrix BPM Installation and Configuration
118
| Chapter 6
TIBCO Configuration Tool Wizard Reference
The following table summarizes the components that are configured in the Create
TIBCO ActiveMatrix Administrator Server wizard, their function, and the
decisions you must make, the information you must gather, and actions you must
perform before running the wizard.
Table 17 TIBCO ActiveMatrix Administrator Server Wizard Reference
Component
Function
Options and Actions
TIBCO Host
Instance
The TIBCO Host instance
that manages the
SystemNode node on
which the ActiveMatrix
Administrator server
runs.
Provide configuration details for the TIBCO
Host instance.
A node on which to
deploy BPM applications.
Provide the name and management port of the
BPM node and the name of the environment that
contains the node.
Administers TIBCO
ActiveMatrix
applications and
infrastructure.
Provide the name of the communication group
within which status messages are exchanged
and the name of the ActiveMatrix Administrator
server.
See TIBCO Host
Instance on
page 121
BPM Node
See TIBCO Host
Instance on
page 121.
ActiveMatrix
Administrator
Server
Provide communication properties for the
ActiveMatrix Administrator server.
Notification and
Messaging Bus
Server
Propagates status
messages between hosts,
nodes, and the
ActiveMatrix
Administrator server and
messaging between
applications.
Provide configuration details for the TIBCO
Enterprise Message Service server.
ActiveMatrix
Administrator
Server Database
Stores ActiveMatrix
Administrator
configuration data.
Choose an internal or external database. If the
latter, provide configuration details for the
database server. See Database Requirements on
page 117.
TIBCO ActiveMatrix BPM Installation and Configuration
Create TIBCO ActiveMatrix Administrator Server Wizard Reference 119
|
Table 17 TIBCO ActiveMatrix Administrator Server Wizard Reference (Cont’d)
Component
Function
Options and Actions
ActiveMatrix
Administrator
Server
Authentication
Realm
Stores user and group
data.
Choose a database or LDAP authentication
realm. Provide configuration details for the
authentication realm.
A database authentication realm stores user and
group authentication data in a database. Users
and groups in this realm can be edited within
ActiveMatrix Administrator. You have the
option to use the same database for
authentication and administration data.
An LDAP authentication realm uses user and
group authentication data stored in an LDAP
server. Users and groups in this realm can only
be edited with LDAP server management tools.
If you choose database, and are using a database
different than the one the ActiveMatrix
Administrator server uses, provide
configuration details for the database server. See
Database Requirements on page 117. If you
choose an LDAP realm, the LDAP server must
be running.
TIBCO Credential
Server
Provides credentials to
enable secure interactions
between ActiveMatrix
Administrator servers,
hosts, and nodes.
Choose an autogenerated or external keystore. If
you choose an external keystore, provide
configuration details for the keystore.
Monitoring Service
Notification Server
Aggregates monitoring
data.
Choose the ActiveMatrix Administrator
notification server and database or another
notification server and database. If the latter,
provide the notification server and database
configuration details according to Database
Requirements on page 117.
Choose whether the monitoring system should
capture enhanced statistics.
TIBCO ActiveMatrix BPM Installation and Configuration
120
| Chapter 6
TIBCO Configuration Tool Wizard Reference
Table 17 TIBCO ActiveMatrix Administrator Server Wizard Reference (Cont’d)
Component
Function
Options and Actions
Log Service
Aggregates and stores log
entry data.
Choose the ActiveMatrix Administrator
database or another database. If you are using a
database different than the one the ActiveMatrix
Administrator server uses, see Database
Requirements on page 117.
Payload Service
Stores large payloads
associated with log
entries.
Choose the ActiveMatrix Administrator
database or another database. If you are using a
database different than the one the ActiveMatrix
Administrator server uses, see Database
Requirements on page 117.
Table 18 Welcome
Field
Description
Configure to Secure
All Communication
with SSL
Check to indicate that all communication channels will be secured with
SSL. When checked, the SSL enabled checkboxes on the Browser Port,
Internal HTTP Port, TIBCO Enterprise Message Service, database, and
LDAP screens are checked. See SSL Prerequisites, page 94.
ActiveMatrix Administrator Server
Table 19 ActiveMatrix Administrator Server
Field
Description
Enterprise
Name
Defines a communication group for notification messages sent between
ActiveMatrix Administrator server, the hosts that are bound to the server, and the
nodes that are managed by those hosts.
Default:AMX BPM.
Server Name
The name of the ActiveMatrix Administrator server.
Default: AMXBPM Server.
TIBCO ActiveMatrix BPM Installation and Configuration
Create TIBCO ActiveMatrix Administrator Server Wizard Reference 121
|
TIBCO Host Instance
Table 20 TIBCO Host Instance
Field
Description
Machine
Name
The name of the machine on which the TIBCO Host instance runs. The value of
this property must either be a hostname resolvable through DNS or 0.0.0.0; it
cannot be an IP address.
Default: machineName, where machineName is the machine on which TIBCO
Configuration Tool is being executed.
Port
The management port of the TIBCO Host instance.
Default: 6051.
Register as
Windows
Service
Indicate whether the TIBCO Host instance should be registered as a Windows
service named TIBCO ActiveMatrix Admin-enterpriseName-serverName with startup
type Automatic. The service is not started.
Default: Unchecked.
Create
Windows
Shortcut
Indicate whether a shortcut named TIBCO ActiveMatrix
Admin-enterpriseName-serverName that points to
CONFIG_HOME\tibcohost\Admin-enterpriseName-serverName\host\bin\tibcohos
t.exe should be added to the Windows desktop.
Default: Unchecked.
Customize
BPM Node
Indicate whether to customize the BPM environment and node. When checked,
the Environment Name, Node Name, and Node Management Port fields display.
Default: Checked.
Environment
Name
The name of the environment that contains the node.
Node Name
The name of the BPM node.
Default: BPM Environment.
Default: BPMNode.
Node
Management
Port
The management port of the node.
Default: 6031.
TIBCO ActiveMatrix BPM Installation and Configuration
122
| Chapter 6
TIBCO Configuration Tool Wizard Reference
ActiveMatrix Administrator Connection Settings
Table 21 Connection Settings
Field
Description
Network
Adapter
The address of the network adapter on the machine on which the ActiveMatrix
Administrator server runs. The default is set to 0.0.0.0 so that ActiveMatrix
Administrator will listen on all network adapters (including http://localhost and
http://hostname) so that clients can connect to the ActiveMatrix Administrator
server using any of the conventions (localhost, IP address, hostname). The value
of this property must either be a hostname resolvable through DNS or 0.0.0.0; it
cannot be an IP address.
Default: 0.0.0.0.
Management
Port
The management port number of the node, SystemNode, that runs the
ActiveMatrix Administrator server.
Default: 6021.
External HTTP
Port
The number of the external ActiveMatrix Administrator HTTP port.
Browser Idle
Session
Timeout(m)
The length of time before an ActiveMatrix Administrator GUI login session times
out due to inactivity. This value cannot be changed after the ActiveMatrix
Administrator server is created.
Default: 8120.
Default: 30.
Enable SSL for
External HTTP
Port
Indicate whether communication between ActiveMatrix Administrator server
and clients should be secured with SSL. When checked, the Self-Signed Certificate
and Imported Certificate radio buttons display.
Default: Unchecked.
Self-Signed
Certificate
Indicate that ActiveMatrix Administrator server will identify itself to clients with
a self-signed certificate generated by TIBCO Credential Server (see TIBCO
Credential Server on page 133). This option is selected by default.
A self-signed certificate should not be employed in production environments.
Imported
Certificate
Indicate that ActiveMatrix Administrator server will identify itself to clients with
a certificate imported into ActiveMatrix Administrator server. When selected, the
Keystore fields are enabled.
Keystore
Location
The location of the keystore to import.
TIBCO ActiveMatrix BPM Installation and Configuration
Create TIBCO ActiveMatrix Administrator Server Wizard Reference 123
|
Table 21 Connection Settings (Cont’d)
Field
Description
Keystore Type
The type of the uploaded keystore: JKS or JCEKS.
Default: JKS.
Keystore
Password
The password that protects the keystore.
Key Alias
The key alias that identifies the ActiveMatrix Administrator server entry in the
keystore.
Key Password
The password that protects the key alias.
ActiveMatrix Administrator Internal HTTP Port
Table 22 Internal HTTP Port
Field
Description
Internal HTTP
Port
The number of the internal ActiveMatrix Administrator HTTP port.
Enable SSL
Indicate whether communication between ActiveMatrix Administrator server
and hosts and nodes is secured with SSL.
Default: 19767.
Default: Unchecked.
Use HTTP
Load Balancer
Indicate that an HTTP load balancer will be used to distribute requests from hosts
to the ActiveMatrix Administrator server’s internal HTTP port.
When the ActiveMatrix Administrator server is replicated on two machines, you
should use an HTTP load balancer so that traffic between hosts and ActiveMatrix
Administrator server will support a load-balanced and fault-tolerant mode.
Without a load balancer if one ActiveMatrix Administrator server is unavailable,
hosts will be unable to download software artifacts. When checked, the Load
Balancer URL field displays.
Load Balancer
URL
The base URL for the ActiveMatrix Administrator server load balancer.
Default: http://hostname:port, where hostname is the ActiveMatrix Administrator
server hostname and port is the ActiveMatrix Administrator server port.
TIBCO ActiveMatrix BPM Installation and Configuration
124
| Chapter 6
TIBCO Configuration Tool Wizard Reference
Notification and Messaging Bus Server
See TIBCO Enterprise Message Service Server Requirements and Prerequisites,
page 94. If you intend to enable SSL communications, see SSL Prerequisites,
page 94.
Table 23
TIBCO Enterprise Message Service Server
Field
Description
Machine
Name Port List
A comma separated list of machinename:port addresses for a TIBCO Enterprise
Message Service server.
Default: machinename:port, where machinename is the machine on which TIBCO
Configuration Tool is being executed and port is 7222.
Username
A username for the TIBCO Enterprise Message Service server. The user must have
administrator privileges in the TIBCO Enterprise Message Service server. If the
user does not have administrator privileges, see Appendix A, TIBCO Enterprise
Message Service Server Configuration Required for Non-Admin Users, page 99.
Default: admin.
Password
A password for the TIBCO Enterprise Message Service user.
Default: None.
TIBCO
Enterprise
Message
Service Server
is SSL Enabled
Indicate that the TIBCO Enterprise Message Service server is enabled for SSL.
When checked, the SSL Keystore Configuration fields are enabled. The TIBCO
Enterprise Message Service server usually listens on port 7243 when SSL-enabled
and you must update the value in the Machine Name Port List field before
proceeding with SSL configuration.
Trust Keystore
Table 24 SSL Keystore Configuration
Field
Description
Create a Trust Store...
Invokes a wizard to import certificates from a server and create the trust
store.
Keystore Location
The location of the keystore.
Keystore Type
The type of the keystore: JKS or JCEKS.
Default: JKS.
Keystore Password
The password that protects the keystore.
TIBCO ActiveMatrix BPM Installation and Configuration
Create TIBCO ActiveMatrix Administrator Server Wizard Reference 125
|
Choose the source of the trust store keystore:
•
Create
a. Click Create a Trust Store....
b. Specify a password to protect the keystore and click Next >. The SSL setup
wizard displays certificates imported from trusted servers.
c. In the Trust Selected Certifications area, check the checkboxes next to the
certificates to trust and click Finish. The wizard fills in the Keystore
Location, Keystore Type, and Keystore Password fields.
•
Upload
a. Click Browse and navigate to the location of the keystore.
b. Click the keystore and click Open. The wizard fills in the Keystore
Location field.
c. In the Keystore Type drop-down list, select the keystore type.
d. Type the keystore password.
e. Click Test Connection.
The following resource templates are added to the Administrator server:
— Keystore Provider notify.transport.truststore.csp.jndi
— SSL Client Provider notify.transport.sslclient.jndi
and instances of these resource templates are installed on every node managed by
that server.
ActiveMatrix Administrator Server Database
If you are using an external database, see Database Requirements on page 117. If
you intend to enable SSL communications, see SSL Prerequisites, page 94.
Table 25 Database Details
Field
Description
Use Default
In-Process
Database
Indicate that the ActiveMatrix Administrator server database is an embedded
in-process database. If unchecked, the external database configuration fields
display.
Default: Checked.
TIBCO ActiveMatrix BPM Installation and Configuration
126
| Chapter 6
TIBCO Configuration Tool Wizard Reference
Table 25 Database Details (Cont’d)
Field
Description
Database
Driver
The driver for the external database.
Database URL
The URL of the external database.
Default: org.hsqldb.jdbcDriver.
Default: jdbc:hsqldb:hsql://localhost:1234/amx.
Username
The external database username.
Default: sa.
Password
The external database password.
Default: None.
Max
Connections
The maximum number of database connections to allocate.
Database
Server is SSL
Enabled
Indicate that the database server is enabled for SSL. When checked, the SSL
Keystore Configuration fields are enabled.
Default: 5.
Trust Keystore
Table 26 SSL Keystore Configuration
Field
Description
Create a Trust Store...
Invokes a wizard to import certificates from a server and create the trust
store.
Keystore Location
The location of the keystore.
Keystore Type
The type of the keystore: JKS or JCEKS.
Default: JKS.
Keystore Password
The password that protects the keystore.
Choose the source of the trust store keystore:
•
Create
TIBCO ActiveMatrix BPM Installation and Configuration
Create TIBCO ActiveMatrix Administrator Server Wizard Reference 127
|
a. Click Create a Trust Store....
b. Specify a password to protect the keystore and click Next >. The SSL setup
wizard displays certificates imported from trusted servers.
c. In the Trust Selected Certifications area, check the checkboxes next to the
certificates to trust and click Finish. The wizard fills in the Keystore
Location, Keystore Type, and Keystore Password fields.
•
Upload
a. Click Browse and navigate to the location of the keystore.
b. Click the keystore and click Open. The wizard fills in the Keystore
Location field.
c. In the Keystore Type drop-down list, select the keystore type.
d. Type the keystore password.
e. Click Test Connection.
The following resource templates are added to the Administrator server:
— Keystore Provider notify.transport.truststore.csp.jndi
— SSL Client Provider notify.transport.sslclient.jndi
and instances of these resource templates are installed on every node managed by
that server.
ActiveMatrix Administrator Server Authentication Realm
Table 27 Authentication Realm
Field
Description
Authentication Realm
Realm Type
The type of the authentication realm: Database or LDAP. If Database, the
Database Authentication Realm on page 128 screen displays. If LDAP, the LDAP
Authentication Realm on page 129 screens display.
Superuser Credentials
Username
The ID of the initial superuser.
Default: root.
TIBCO ActiveMatrix BPM Installation and Configuration
128
| Chapter 6
TIBCO Configuration Tool Wizard Reference
Table 27 Authentication Realm
Field
Description
Password
The password of the superuser.
Default: t.
Database Authentication Realm
Table 28 Database Authentication Realm Details
Field
Description
Use
ActiveMatrix
Administrator
Database
Specify whether the database authentication realm should use the same database
as the ActiveMatrix Administrator server.
Default: Checked. If unchecked, the database configuration fields in Database
Details on page 128 display.
Database Details
If you are using an external database, see Database Requirements on page 117.
Table 29 Database Details
Field
Description
Use Default
In-Process
Database
Indicate that the ActiveMatrix Administrator server database is an embedded
in-process database. If unchecked, the external database configuration fields
display.
Default: Checked.
Database
Driver
The driver for the external database.
Database URL
The URL of the external database.
Default: org.hsqldb.jdbcDriver.
Default: jdbc:hsqldb:hsql://localhost:1234/amx.
Username
The external database username.
Default: sa.
Password
The external database password.
Default: None.
TIBCO ActiveMatrix BPM Installation and Configuration
Create TIBCO ActiveMatrix Administrator Server Wizard Reference 129
|
Table 29 Database Details (Cont’d)
Field
Description
Max
Connections
The maximum number of database connections to allocate.
Database
Server is SSL
Enabled
Indicate that the database server is enabled for SSL. When checked, the SSL
Keystore Configuration fields are enabled.
Default: 5.
LDAP Authentication Realm
If you intend to enable SSL communications, see SSL Prerequisites, page 94.
Table 30 LDAP Authentication Realm Details
Field
Description
Bind DN
Name
The superuser's distinguished name or superuser's name to be used to connect to
the server.
Default: uid=Manager,ou=people,dc=example,dc=com.
Password
LDAP server password.
Context
Factory
The factory object that provides the starting point for resolution of names within
the LDAP server.
Default: com.sun.jndi.ldap.LdapCtxFactory.
Server URL
The URL used to log in to the LDAP server. To achieve fault tolerance, you can
specify multiple URLs separated by spaces. For example,
ldaps://server1.example.com:686 ldaps:server2.example.com:1686.
Default: ldap://localhost:389.
User Search Configuration
User Search
Base DN
Base distinguished name from which the search starts.
User Search
Expression
The expression used for searching a user. For example: (CN=%U). '%U' is replaced
by the username being searched for. You can define any complex filter such as
(&(cn=%U)(objectClass=account)).
Default: ou=people,ou=na,dc=example,dc=org.
Default: (&(uid={0})(objectclass=person)).
TIBCO ActiveMatrix BPM Installation and Configuration
130
| Chapter 6
TIBCO Configuration Tool Wizard Reference
Table 30 LDAP Authentication Realm Details (Cont’d)
Field
Description
Attribute
Name to Get
User's Name
The name of the attribute in the user object that represents the user's name.
Search
Timeout (ms)
The time to wait for a response from the LDAP directory server.
Default: uid.
Default: -1, which means to use the provider’s default.
Table 31 Group Settings
Field
Description
Group Search Base DN
Base distinguished name from which the search for the group
starts.
Default: ou=groups,ou=na,dc=example,dc=org.
Group Search Expression
Search by matching this expression against potential groups.
Default: uniquemember={0}.
Group Attribute Users Name
The name of the attribute in each group object denoting its users.
Example: uniqueMember (OpenLDAP) or member
(ActiveDirectory).
Default: uniqueMember.
Group Attribute Groups
Name
The name of the attribute in each group object that contains the
name of the group.
Example: cn (OpenLDAP) or sAMAccountName
(ActiveDirectory).
Default: cn.
Group Attribute Subgroup
Name
The name of the attribute in each group denoting subgroups.
Example: uniqueMember (OpenLDAP) or member
(ActiveDirectory).
Default: uniqueMember.
TIBCO ActiveMatrix BPM Installation and Configuration
Create TIBCO ActiveMatrix Administrator Server Wizard Reference 131
|
Table 31 Group Settings (Cont’d)
Field
Description
Group Indication
Specifies how a user’s group memberships are found. Group
information is used by the Administrator when a user, once
authenticated, performs other activities in the system.
Options:
•
Group Has User Members— A list of users that belong to the
group.
•
User Has Group Memberships— A list of groups to which the
user belongs.
Default: Group Has User Members.
Group Search Scope Subtree
When searching the group, indicate whether to traverse into the
subtree or to search only under the group base distinguished
name.
Default: Checked.
Table 32 LDAP Server Settings
Field
Description
LDAP Realm
User Search
Scope Subtree
(optional)
Search the entire subtree starting at the base DN, otherwise search only the nodes
one level below the base DN.
Security
Authentication
Security protocol to be used by JNDI.
Default: Checked.
•
Simple—Username and password are required.
•
Strong—SSL with client-side authentication is enabled.
•
None—No log-in is performed, any other settings are ignored, and the LDAP
client is anonymous.
Default: Simple.
TIBCO ActiveMatrix BPM Installation and Configuration
132
| Chapter 6
TIBCO Configuration Tool Wizard Reference
Table 32 LDAP Server Settings (Cont’d)
Field
Description
LDAP Authentication
User DN
Template
The template by which the User DN, used to connect to the LDAP server, is
generated. Because the full DN is always supplied, the template should always be
0 (zero).
Default: uid={0},ou=people,ou=na,dc=org
User
Attributes
Extra
(optional)
An optional list of user attributes to retrieve from the LDAP directory during
authentication.
Enable SSL
Indicate that the LDAP server is enabled for SSL. When checked, the SSL Keystore
Configuration fields are enabled.
Default: Empty (no additional attributes will be retrieved for the user).
Trust Keystore
Table 33 SSL Keystore Configuration
Field
Description
Create a Trust Store...
Invokes a wizard to import certificates from a server and create the trust
store.
Keystore Location
The location of the keystore.
Keystore Type
The type of the keystore: JKS or JCEKS.
Default: JKS.
Keystore Password
The password that protects the keystore.
Choose the source of the trust store keystore:
•
Create
a. Click Create a Trust Store....
b. Specify a password to protect the keystore and click Next >. The SSL setup
wizard displays certificates imported from trusted servers.
c. In the Trust Selected Certifications area, check the checkboxes next to the
certificates to trust and click Finish. The wizard fills in the Keystore
Location, Keystore Type, and Keystore Password fields.
TIBCO ActiveMatrix BPM Installation and Configuration
Create TIBCO ActiveMatrix Administrator Server Wizard Reference 133
|
•
Upload
a. Click Browse and navigate to the location of the keystore.
b. Click the keystore and click Open. The wizard fills in the Keystore
Location field.
c. In the Keystore Type drop-down list, select the keystore type.
d. Type the keystore password.
e. Click Test Connection.
The following resource templates are added to the Administrator server:
— Keystore Provider notify.transport.truststore.csp.jndi
— SSL Client Provider notify.transport.sslclient.jndi
and instances of these resource templates are installed on every node managed by
that server.
TIBCO Credential Server
Table 34 Credential Server Details
Field
Description
Bind to Network Adapter
The address of the network adapter on the machine on which the
Credential Server runs. The default is set to 0.0.0.0 so that the
Credential Server will listen on all network adapters (including
http://localhost and http://hostname) so that clients can connect to
the Credential Server using any of the conventions (localhost, IP
address, hostname). The value of this property must either be a
hostname resolvable through DNS or 0.0.0.0; it cannot be an IP
address.
Default: 0.0.0.0.
Port
The management port number of the node, SystemNode, that runs
the TIBCO Credential Server.
Default: 6041.
Username
A user identifier for TIBCO Credential Server clients.
Default: user1.
TIBCO ActiveMatrix BPM Installation and Configuration
134
| Chapter 6
TIBCO Configuration Tool Wizard Reference
Table 34 Credential Server Details
Field
Description
Password
The password for the client.
Default: password1.
Table 35 Credential Server Keystore
Field
Description
Auto-generated
Keystore
Indicate that the TIBCO Credential Server keystore will be generated. When
selected, the Common Name field displays.
Common Name
The TIBCO Credential Server’s issuer name.
Default: amxadmin.
Provided
Keystore
Indicate that the TIBCO Credential Server keystore will be provided. When
selected, the keystore fields display.
Keystore
Location
The location of the keystore.
Default:
TIBCO_HOME/tibcohost/1.2/templates/admin.default.ssl.trust.store
.ts.
Keystore Type
The type of the keystore.
Default: JCEKS.
Keystore
Password
The password for the keystore.
Key Alias
The name of the alias used to access the identity.
Key Password
The password for the alias.
TIBCO ActiveMatrix BPM Installation and Configuration
Create TIBCO ActiveMatrix Administrator Server Wizard Reference 135
|
Monitoring Service Notification Server
Table 36 Monitoring Notification Server
Field
Description
Use ActiveMatrix Administrator
Notification Server
Indicate whether the monitoring service should use the
same notification server as the ActiveMatrix
Administrator server.
Default: Checked. If unchecked, the notification server
fields in Notification and Messaging Bus Server on
page 135 display.
Notification and Messaging Bus Server
See TIBCO Enterprise Message Service Server Requirements and Prerequisites,
page 94. If you intend to enable SSL communications, see SSL Prerequisites,
page 94.
Table 37
TIBCO Enterprise Message Service Server
Field
Description
Machine
Name Port List
A comma separated list of machinename:port addresses for a TIBCO Enterprise
Message Service server.
Default: machinename:port, where machinename is the machine on which TIBCO
Configuration Tool is being executed and port is 7222.
Username
A username for the TIBCO Enterprise Message Service server. The user must have
administrator privileges in the TIBCO Enterprise Message Service server. If the
user does not have administrator privileges, see Appendix A, TIBCO Enterprise
Message Service Server Configuration Required for Non-Admin Users, page 99.
Default: admin.
Password
A password for the TIBCO Enterprise Message Service user.
Default: None.
TIBCO
Enterprise
Message
Service Server
is SSL Enabled
Indicate that the TIBCO Enterprise Message Service server is enabled for SSL.
When checked, the SSL Keystore Configuration fields are enabled. The TIBCO
Enterprise Message Service server usually listens on port 7243 when SSL-enabled
and you must update the value in the Machine Name Port List field before
proceeding with SSL configuration.
TIBCO ActiveMatrix BPM Installation and Configuration
136
| Chapter 6
TIBCO Configuration Tool Wizard Reference
Trust Keystore
Table 38 SSL Keystore Configuration
Field
Description
Create a Trust Store...
Invokes a wizard to import certificates from a server and create the trust
store.
Keystore Location
The location of the keystore.
Keystore Type
The type of the keystore: JKS or JCEKS.
Default: JKS.
Keystore Password
The password that protects the keystore.
Choose the source of the trust store keystore:
•
Create
a. Click Create a Trust Store....
b. Specify a password to protect the keystore and click Next >. The SSL setup
wizard displays certificates imported from trusted servers.
c. In the Trust Selected Certifications area, check the checkboxes next to the
certificates to trust and click Finish. The wizard fills in the Keystore
Location, Keystore Type, and Keystore Password fields.
•
Upload
a. Click Browse and navigate to the location of the keystore.
b. Click the keystore and click Open. The wizard fills in the Keystore
Location field.
c. In the Keystore Type drop-down list, select the keystore type.
d. Type the keystore password.
e. Click Test Connection.
The following resource templates are added to the Administrator server:
— Keystore Provider notify.transport.truststore.csp.jndi
— SSL Client Provider notify.transport.sslclient.jndi
and instances of these resource templates are installed on every node managed by
that server.
TIBCO ActiveMatrix BPM Installation and Configuration
Create TIBCO ActiveMatrix Administrator Server Wizard Reference 137
|
Monitoring Service Database
Table 39 Monitoring Service Database
Field
Description
Use ActiveMatrix Administrator
Database
Indicate that the monitoring service should use the same
database as the ActiveMatrix Administrator server.
Default: Checked. If unchecked, the notification server
fields in Database Details on page 137 display.
Database Details
If
you
are using
an external
database, see Database
Requirements page
on page
you
intend
to enable
SSL communications,
see SSL Prerequisites,
94. 117. In
Table 40 Database Details
Field
Description
Use Default
In-Process
Database
Indicate that the ActiveMatrix Administrator server database is an embedded
in-process database. If unchecked, the external database configuration fields
display.
Default: Checked.
Database
Driver
The driver for the external database.
Database URL
The URL of the external database.
Default: org.hsqldb.jdbcDriver.
Default: jdbc:hsqldb:hsql://localhost:1234/amx.
Username
The external database username.
Default: sa.
Password
The external database password.
Default: None.
Max
Connections
The maximum number of database connections to allocate.
Default: 5.
TIBCO ActiveMatrix BPM Installation and Configuration
138
| Chapter 6
TIBCO Configuration Tool Wizard Reference
Table 40 Database Details (Cont’d)
Field
Description
Database
Server is SSL
Enabled
Indicate that the database server is enabled for SSL. When checked, the SSL
Keystore Configuration fields are enabled.
Trust Keystore
Table 41 SSL Keystore Configuration
Field
Description
Create a Trust Store...
Invokes a wizard to import certificates from a server and create the trust
store.
Keystore Location
The location of the keystore.
Keystore Type
The type of the keystore: JKS or JCEKS.
Default: JKS.
Keystore Password
The password that protects the keystore.
Choose the source of the trust store keystore:
•
Create
a. Click Create a Trust Store....
b. Specify a password to protect the keystore and click Next >. The SSL setup
wizard displays certificates imported from trusted servers.
c. In the Trust Selected Certifications area, check the checkboxes next to the
certificates to trust and click Finish. The wizard fills in the Keystore
Location, Keystore Type, and Keystore Password fields.
•
Upload
a. Click Browse and navigate to the location of the keystore.
b. Click the keystore and click Open. The wizard fills in the Keystore
Location field.
c. In the Keystore Type drop-down list, select the keystore type.
d. Type the keystore password.
e. Click Test Connection.
TIBCO ActiveMatrix BPM Installation and Configuration
Create TIBCO ActiveMatrix Administrator Server Wizard Reference 139
|
The following resource templates are added to the Administrator server:
— Keystore Provider notify.transport.truststore.csp.jndi
— SSL Client Provider notify.transport.sslclient.jndi
and instances of these resource templates are installed on every node managed by
that server.
Monitoring Configuration
Table 42
Monitoring Configuration
Field
Description
Enable
Extended
Monitoring
Indicate that the monitoring system should capture extended statistics. Basic
statistics include the 1 hour and since started time windows and a selected
number of important metrics such as status, hits, faults, response time. Extended
statistics provide more time windows and additional metrics and thus impose a
larger processing burden.
Default: Unchecked.
Log Service
Table 43 Log Service Database
Field
Description
Use ActiveMatrix Administrator
Database
Indicate that the log service should use the same
database as the ActiveMatrix Administrator server.
Default: Checked. If unchecked, the database server
fields in Database Details on page 139 display.
Database Details
If you are using an external database, see Database Requirements on page 117. If
TIBCO ActiveMatrix BPM Installation and Configuration
140
| Chapter 6
TIBCO Configuration Tool Wizard Reference
you intend to enable SSL communications, see SSL Prerequisites, page 94.
Table 44 Database Details
Field
Description
Use Default
In-Process
Database
Indicate that the ActiveMatrix Administrator server database is an embedded
in-process database. If unchecked, the external database configuration fields
display.
Default: Checked.
Database
Driver
The driver for the external database.
Database URL
The URL of the external database.
Default: org.hsqldb.jdbcDriver.
Default: jdbc:hsqldb:hsql://localhost:1234/amx.
Username
The external database username.
Default: sa.
Password
The external database password.
Default: None.
Max
Connections
The maximum number of database connections to allocate.
Database
Server is SSL
Enabled
Indicate that the database server is enabled for SSL. When checked, the SSL
Keystore Configuration fields are enabled.
Default: 5.
Trust Keystore
Table 45 SSL Keystore Configuration
Field
Description
Create a Trust Store...
Invokes a wizard to import certificates from a server and create the trust
store.
Keystore Location
The location of the keystore.
TIBCO ActiveMatrix BPM Installation and Configuration
Create TIBCO ActiveMatrix Administrator Server Wizard Reference 141
|
Table 45 SSL Keystore Configuration (Cont’d)
Field
Description
Keystore Type
The type of the keystore: JKS or JCEKS.
Default: JKS.
Keystore Password
The password that protects the keystore.
Choose the source of the trust store keystore:
•
Create
a. Click Create a Trust Store....
b. Specify a password to protect the keystore and click Next >. The SSL setup
wizard displays certificates imported from trusted servers.
c. In the Trust Selected Certifications area, check the checkboxes next to the
certificates to trust and click Finish. The wizard fills in the Keystore
Location, Keystore Type, and Keystore Password fields.
•
Upload
a. Click Browse and navigate to the location of the keystore.
b. Click the keystore and click Open. The wizard fills in the Keystore
Location field.
c. In the Keystore Type drop-down list, select the keystore type.
d. Type the keystore password.
e. Click Test Connection.
The following resource templates are added to the Administrator server:
— Keystore Provider notify.transport.truststore.csp.jndi
— SSL Client Provider notify.transport.sslclient.jndi
and instances of these resource templates are installed on every node managed by
that server.
TIBCO ActiveMatrix BPM Installation and Configuration
142
| Chapter 6
TIBCO Configuration Tool Wizard Reference
Payload Service
Table 46 Payload Service Database
Field
Description
Use ActiveMatrix Administrator
Database
Indicate that the payload service should use the same
database as the ActiveMatrix Administrator server.
Default: Checked. If unchecked, the database server
fields in Database Details on page 142 display.
Database Details
If you are using an external database, see Database Requirements on page 117. If
you intend to enable SSL communications, see SSL Prerequisites, page 94.
Table 47 Database Details
Field
Description
Use Default
In-Process
Database
Indicate that the ActiveMatrix Administrator server database is an embedded
in-process database. If unchecked, the external database configuration fields
display.
Default: Checked.
Database
Driver
The driver for the external database.
Database URL
The URL of the external database.
Default: org.hsqldb.jdbcDriver.
Default: jdbc:hsqldb:hsql://localhost:1234/amx.
Username
The external database username.
Default: sa.
Password
The external database password.
Default: None.
Max
Connections
The maximum number of database connections to allocate.
Default: 5.
TIBCO ActiveMatrix BPM Installation and Configuration
Create TIBCO ActiveMatrix Administrator Server Wizard Reference 143
|
Table 47 Database Details (Cont’d)
Field
Description
Database
Server is SSL
Enabled
Indicate that the database server is enabled for SSL. When checked, the SSL
Keystore Configuration fields are enabled.
Trust Keystore
Table 48 SSL Keystore Configuration
Field
Description
Create a Trust Store...
Invokes a wizard to import certificates from a server and create the trust
store.
Keystore Location
The location of the keystore.
Keystore Type
The type of the keystore: JKS or JCEKS.
Default: JKS.
Keystore Password
The password that protects the keystore.
Choose the source of the trust store keystore:
•
Create
a. Click Create a Trust Store....
b. Specify a password to protect the keystore and click Next >. The SSL setup
wizard displays certificates imported from trusted servers.
c. In the Trust Selected Certifications area, check the checkboxes next to the
certificates to trust and click Finish. The wizard fills in the Keystore
Location, Keystore Type, and Keystore Password fields.
•
Upload
a. Click Browse and navigate to the location of the keystore.
b. Click the keystore and click Open. The wizard fills in the Keystore
Location field.
c. In the Keystore Type drop-down list, select the keystore type.
d. Type the keystore password.
e. Click Test Connection.
TIBCO ActiveMatrix BPM Installation and Configuration
144
| Chapter 6
TIBCO Configuration Tool Wizard Reference
The following resource templates are added to the Administrator server:
— Keystore Provider notify.transport.truststore.csp.jndi
— SSL Client Provider notify.transport.sslclient.jndi
and instances of these resource templates are installed on every node managed by
that server.
TIBCO ActiveMatrix BPM Installation and Configuration
Create TIBCO ActiveMatrix BPM Server Reference 145
|
Create TIBCO ActiveMatrix BPM Server Reference
Table 49 Welcome
Field
Description
Configure to Secure
All Communication
with SSL
Check to indicate that all communication channels will be secured with
SSL. When checked, the SSL enabled checkboxes on the Browser Port,
Internal HTTP Port, TIBCO Enterprise Message Service, database, and
LDAP screens are checked. See SSL Prerequisites, page 94.
Table 50 ActiveMatrix BPM: Database Administrator
Field
Description
Create BPM
Database Instance
Indicate that you want TIBCO Configuration Tool to create your TIBCO
ActiveMatrix BPM database. Deselect if you want to manually create the
database. If checked, the Test Connection button on the ActiveMatrix BPM:
Runtime Database Configuration dialog is enabled.
Default: Checked.
Database Driver
The database driver you want to use for the TIBCO ActiveMatrix BPM
database.
URL
The connection string used in the JDBC connection to the Administrator
database. Once you have selected the database driver, the URL field is
automatically completed.
DBA Username
The username of the login that you want TIBCO ActiveMatrix BPM to use to
connect to the TIBCO ActiveMatrix BPM database. TIBCO Configuration Tool
automatically creates the username you specify.
DBA Password
The password for the specified username.
Confirm Password
The password for the specified username again to confirm it.
Tablespace Name
The name of the tablespace that is used to store the TIBCO ActiveMatrix BPM
tables.
Default: bpm_tablespace.
Test Connection
Click Test Connection to test the connection to your database.
TIBCO ActiveMatrix BPM Installation and Configuration
146
| Chapter 6
TIBCO Configuration Tool Wizard Reference
Table 51 ActiveMatrix BPM: Runtime Database Configuration
Field
Description
URL
The URL used to connect to the TIBCO ActiveMatrix BPM database, depends
on the third party driver installed.
Username
The username that you want TIBCO ActiveMatrix BPM to use to connect to
the TIBCO ActiveMatrix BPM database. TIBCO Configuration Tool
automatically creates the username you specify.
Default: bpmuser.
Password
The password for the specified user login.
Confirm Password
The password for the specified user login again to confirm it.
Test Connection
Enabled if Create BPM Database Instance is not selected. Click to check that
the supplied username and password can connect to the TIBCO ActiveMatrix
BPM database.
Generate Scripts
Click if you want TIBCO Configuration Tool to extract the SQL scripts
required for creating an TIBCO ActiveMatrix BPM database instance to the
TIBCO configuration folder.
Table 52 ActiveMatrix BPM: Client Configuration
Field
Description
HTTP Work
Presentation Host
The machine name that hosts Workspace. If the machine is different from the
machine where you are running TIBCO ActiveMatrix BPM, then this should
be a fully qualified domain name or IP address. The machine name you
specify is also the name used in the default security certificate.
Default: localhost
HTTP Port
The port for Workspace.
Default: 8080.
Enable SSL
Specify to enable secure communication for Workspace and Openspace.
SMTP Host
The machine name that hosts the SMTP server that is used by Workspace. If
the machine is different from the machine where you are running TIBCO
ActiveMatrix BPM, then this should be a fully qualified domain name or IP
address.
Default: localhost.
TIBCO ActiveMatrix BPM Installation and Configuration
Create TIBCO ActiveMatrix BPM Server Reference 147
|
Table 52 ActiveMatrix BPM: Client Configuration
Field
Description
SMTP Port
The port number used by the SMTP server.
Default: 25.
Override BPM
Configuration
Folder
Check if you want to override the default BPM configuration folder.
Configuration
Folder
The location of the BPM configuration folder.
Table 53 ActiveMatrix BPM: SizingConfiguration
Field
Description
Environment
The type of environment being set up. Choose from the options: Development
and Production.
The environment you choose in this field determines the default values provided
for the remaining fields on this screen.
Database
Connection
Pool Size
Specifies the number of database connections available for each of the
ActiveMatrix BPM DataSource resource templates.
Development default: 10
Production default: 50
Database
Statement
Cache Size
Specifies the number of prepared statements that can be cached by each
connection in the DataSource resource template pool. Caching prepared
statements improves the performance but it uses more memory.
Development default: 0
Production default: 100
Number of
Process Engine
Threads
Specifies the number of threads in the Process Engine background thread pool.
Development default: 5
Production default: 18
Max Java
PermGen Size
Specifies the maximum size for Java PermGen.
Development default: 256
Production default: 1024
TIBCO ActiveMatrix BPM Installation and Configuration
148
| Chapter 6
TIBCO Configuration Tool Wizard Reference
Table 53 ActiveMatrix BPM: SizingConfiguration (Cont’d)
Field
Description
Number of
Message
Threads
Specifies the range for the message threads.
Development default: Core: 5 Maximum: 10
Production default: Core: 10 Maximum: 20
Java Heap Size
Specifies the range for the Java heap size.
Development default: Minimum: 512 Maximum: 1024
Production default: Minimum: 1024 Maximum: 4096
Table 54 ActiveMatrix BPM: LDAP Configuration
Field
Description
Deploy
Internal LDAP
Server
Indicate that you want to use the internal LDAP Directory Server provided with
TIBCO ActiveMatrix BPM. If checked the Port field is displayed.
Port Number
The port number used by the internal LDAP server.
Default: Checked.
Default: 10801
Use External
LDAP Server
Indicate that you want to use an existing LDAP Directory Server. If checked, the
LDAP provider details display.
Default: Unchecked.
URL
The URL used to log in to the LDAP server.
Default: ldap\localhost:10389
Base DN
The TIBCO ActiveMatrix Administrator user’s distinguished name.
Default: OU=system
Username:
The username of the TIBCO ActiveMatrix Administrator user.
Default:uid=admin,OU=system
Password:
The password of the TIBCO ActiveMatrix Administrator user.
Test
Connection
Click Test Connection to confirm connection to the LDAP Server.
TIBCO ActiveMatrix BPM Installation and Configuration
Configure TIBCO ActiveMatrix BPM Server Node Type Reference 149
|
Configure TIBCO ActiveMatrix BPM Server Node Type Reference
Table 55 Welcome
Field
Description
Configure to Secure
All Communication
with SSL
Check to indicate that all communication channels will be secured with
SSL. When checked, the SSL enabled checkboxes on the Browser Port,
Internal HTTP Port, TIBCO Enterprise Message Service, database, and
LDAP screens are checked. See SSL Prerequisites, page 94.
Table 56 ActiveMatrix BPM: Administrator Server Configuration
Field
Description
Machine Name
The name of the machine on which the Administrator server is running.
Default: hostname, where hostname is the machine on which TIBCO
Configuration Tool is being executed.
Port
The port for the Administrator server.
Default: 8120.
Username
The ID of the Administrator superuser.
Default: root.
Password
The password of the Administrator superuser.
Default: t.
Admin Server is
SSL Enabled
Indicate that the Administrator server is SSL enabled and you want the
TIBCO ActiveMatrix BPM node to use the same trust store that the
Administrator server is using.
Default: Unchecked.
TIBCO ActiveMatrix BPM Installation and Configuration
150
| Chapter 6
TIBCO Configuration Tool Wizard Reference
Table 57 ActiveMatrix BPM: Host and Node Configuration
Field
Description
Node Type
The type of the node to create. One of:
•
BPM Node Type
•
Process Manager Node Type
•
Work Manager Node Type
•
Web Components Node Type
Default: BPM Node Type
Node Name
The name of the TIBCO ActiveMatrix BPM node.
Default: 8120.
Node Port
The port number used by the TIBCO ActiveMatrix BPM node.
Default: 6031.
Host
The name of the machine running the TIBCO Host instance that TIBCO
ActiveMatrix BPM node should use.
Default: hostname, where hostname is the name of the machine that you
specified when you ran the Create TIBCO ActiveMatrix BPM Server wizard.
HTTP Port
The number for the HTTP Port.
Default: 8080
Environment
Name
The name of the environment that contains the TIBCO ActiveMatrix BPM
node.
Default: environmentname where environmentname is the name of the
environment you specified when you ran the Create TIBCO ActiveMatrix
BPM Server wizard.
Override BPM
Configuration
Folder
Select this to specify the shared network folder where you want to store the
TIBCO ActiveMatrix BPM properties files.
Configuration
Folder
Enabled if the Override BPM Configuration Folder checkbox is enabled. Type
in the location of the shared network folder where you want to store the
TIBCO ActiveMatrix BPM properties files.
Default: Checked.
TIBCO ActiveMatrix BPM Installation and Configuration
Configure TIBCO ActiveMatrix BPM Server Node Type Reference 151
|
Table 58 Summary
Field
Description
Session Scripts and
Log Folder
The location where the server scripts and log folders are stored.
Create New
ActiveMatrix BPM
Server Node Type
Che ck to create a New ActiveMatrix BPM Server Node Type.
TIBCO ActiveMatrix BPM Installation and Configuration
152
| Chapter 7
TIBCO Configuration Tool Configurations
Chapter 7
TIBCO Configuration Tool Configurations
Topics
•
TIBCO Configuration Tool Configuration, page 153
•
Replicating a TIBCO ActiveMatrix Administrator Server on page 162
TIBCO ActiveMatrix BPM Installation and Configuration
TIBCO Configuration Tool Configuration 153
|
TIBCO Configuration Tool Configuration
A TIBCO Configuration Tool configuration consists of Ant build and property
files. The files are stored in CONFIG_HOME/tct/subfolder/date-time/scripts, where
CONFIG_HOME is the folder you specified in step 2. on page 97, and subfolder and
the files are listed in Table 59. The settings in the property files are listed in
Table 60.
Table 59 Configuration Subfolders and Files
Subfolder
tpclshells
tibcohost
admin
Files
•
build.xml Ant build file
•
build.properties Driver specification and JAR file location
•
build.xml Ant build file
•
build.properties Property settings and locations of configuration files
•
tibcohost-instance.properties TIBCO Host instance configuration
•
build.xml Ant build file
•
build.properties Property settings and locations of configuration and
property files
•
integration_create_admin.xml ActiveMatrix Administrator server bootstrap
configuration
•
admin-instance.properties ActiveMatrix Administrator server configuration
•
admin-tibcohost-instance.properties TIBCO Host instance configuration that
manages the node running the ActiveMatrix Administrator server
•
admin-envt-data.xml ActiveMatrix development environment configuration
•
cl_logservice_data.xml Log service configuration file
•
cl_payloadservice_data.xml Payload service configuration file
•
governance_integration_data.xml Monitoring service configuration file
TIBCO ActiveMatrix BPM Installation and Configuration
154
| Chapter 7
TIBCO Configuration Tool Configurations
Table 59 Configuration Subfolders and Files
Subfolder
Files
bpm
•
admin-envt-data.xml: ActiveMatrix development environment configuration
•
admin-instance.properties: ActiveMatrix Administrator server configuration
•
admin-tibcohost-instance.properties: TIBCO Host instance configuration that
manages the node running the ActiveMatrix Administrator server
•
bpm-installer.properties: BPM installation configuration
•
build.properties: property settings and locations of configuration and
property files
•
build.xml: Ant build file
•
cl_logservice_data.xml: log service configuration file
•
cl_payloadservice_data.xml: payload service configuration file
•
data.xml:
•
governance_integration_data.xml: monitoring service configuration file
•
hpa-log4j.xml_template:
•
integration_create_admin.data.xml: ActiveMatrix Administrator server
bootstrap configuration
•
node-log4j.xml_template
Table 60 Configuration Settings
Property
Description
TIBCO_HOME
ActiveMatrix installation location
tibco.config.mgmt.home
ActiveMatrix runtime configuration data folder
tcs.host
ActiveMatrix Administrator machine name
adminURL
ActiveMatrix Administrator server base URL
admin.enterprise.name
ActiveMatrix Administrator enterprise name
admin.ems.url
TIBCO Enterprise Message Service server URL for
ActiveMatrix Administrator
admin.db.url
ActiveMatrix Administrator database URL
TIBCO ActiveMatrix BPM Installation and Configuration
TIBCO Configuration Tool Configuration 155
|
Table 60 Configuration Settings (Cont’d)
Property
Description
admin.instance.name
TIBCO Host instance name for ActiveMatrix Administrator
th.jmx.host
Name of the JMX host.
amx.th.hpa.jmx.port
TIBCO Host instance management port
tibcohost.qin.server.url
TIBCO Enterprise Message Service server URL for
standalone TIBCO Host instance
tibcohost.trinity.tcs.url
TIBCO Credential Server URL for standalone TIBCO Host
instance
Saving a TIBCO Configuration Tool Configuration
1. Run a wizard in TIBCO Configuration Tool (see Running the TIBCO
Configuration Tool on page 97).
2. Specify configuration settings.
3. In the Session Scripts and Log Folder field of the Summary screen, accept the
location of the configuration folder or click Browse to specify a new location.
4. Click the Save button. A confirmation dialog displays. The configuration is
saved in the specified folder. The default folder is
CONFIG_HOME/tct/subfolder/date-time/scripts, where CONFIG_HOME is the
folder you specified in step 2. on page 97, and subfolder is tpclshells, bpm,
tibcohost, or admin.
5. Click OK to dismiss the dialog.
TIBCO Configuration Tool Sample Configurations
Several sample configurations generated from running TIBCO Configuration Tool
are available in subfolders of TIBCO_HOME/amx/3.1/samples/configuration:
•
create-admin-nossl
Creates an ActiveMatrix Administrator server using
an in-process database.
•
create-admin-ssl
•
create-tibcohost
Creates an ActiveMatrix Administrator server with SSL
enabled on for all communication channels.
Creates a TIBCO Host instance that is not bound to any
ActiveMatrix Administrator server.
TIBCO ActiveMatrix BPM Installation and Configuration
156
| Chapter 7
TIBCO Configuration Tool Configurations
•
Configures an Oracle driver for use by an
application deployed to an ActiveMatrix node.
configure-thirdparty-driver
Reusing a TIBCO Configuration Tool Configuration
A TIBCO Configuration Tool configuration can be reused on different machines
and operating system platforms after you update the property files to account for
the following differences between the originating machine and the target
machine: machine name, ActiveMatrix installation location, ActiveMatrix
runtime configuration data location, ActiveMatrix enterprise name, and
operating system. Since the property files specify the machine name, you must
always update the property files with the target machine name.
Running TIBCO Configuration Tool Scripts
1. Make the required changes in the property files.
2. Install and configure Ant.
3. Open a command line window in one of the configuration subfolders.
4. Run ant [-logfile logfile]
following subfolders:
—
tpclshells
–f build.xml.
The actions occur in the
Adds plug-ins to
TIBCO_HOME\components\shared\1.0.0\plugins.
—
tibcohost Creates the tibcohost\hostName data folder, where hostName is
the name you specified for the TIBCO Host instance.
—
admin
Creates the admin\enterpriseName data folder and the
data folder, where hostName is the name you specified
for the TIBCO Host instance and enterpriseName is the name you specified for
the enterprise.
tibcohost\hostname
Configure Third-Party Driver Properties
To configure drivers, set the following properties in
tpclshells/build.properties:
Properties
Description
shell.name
Package name of the driver. See Table 61 on page 157.
shell.version
Driver version.
source.jar.folders
Driver JAR file location.
TIBCO ActiveMatrix BPM Installation and Configuration
TIBCO Configuration Tool Configuration 157
|
Properties
Description
machine.model.location
Machine model file.
TIBCO_HOME
ActiveMatrix installation location
Table 61 Shell Names and Versions
Driver
Shell Name
Shell Version
Oracle Database 11g
com.tibco.tpcl.gen.oracle.jdbc
11.1.0.112100
Oracle Database 10g
com.tibco.tpcl.gen.oracle.jdbc
10.2.0.112100
Microsoft SQL Server 2.0.0
com.tibco.tpcl.gen.sqlserver.jdbc
2.0.0.210
JMS Sonic
com.tibco.tpcl.gen.sonic.jms
6.1.0.620
JMS WebSphere
com.tibco.tpcl.gen.websphere.jms
7.0.0.001
EJB JBoss 4.2.2
com.tibco.tpcl.gen.jboss.ejb
4.2.2.510
EJB JBoss 5.0.1
com.tibco.tpcl.gen.jboss.ejb
5.0.1.510
EJB WebLogic 9.2.0
com.tibco.tpcl.gen.weblogic.ejb
9.2.0.1010
EJB WebLogic 10.0.0
com.tibco.tpcl.gen.weblogic.ejb
10.0.0.1010
EJB WebSphere 6.1.0
com.tibco.tpcl.gen.websphere.ejb
6.1.0.710
EJB WebSphere 7.0.0
com.tibco.tpcl.gen.websphere.ejb
7.0.0.710
In general, you must modify the folder locations in the following properties:
TIBCO_HOME, source.jar.folders, and Machine.model.location.
Update the following properties to conform to target operating system path
conventions.
Property
Description
source.jar.folders
Driver JAR file location.
TIBCO_HOME
ActiveMatrix installation location.
machine.model.location
Machine model file.
TIBCO ActiveMatrix BPM Installation and Configuration
158
| Chapter 7
TIBCO Configuration Tool Configurations
Create TIBCO Host Instance Properties
Use the scripts in the folder tibcohost to create a TIBCO Host instance on a new
machine or an additional TIBCO Host instance on the machine where an
ActiveMatrix Administrator server is running.
For creating an instance on a new ActiveMatrix machine, only
needs to be updated. Otherwise, you must modify
configuration properties in tibcohost-instance.properties. For example, to
create an additional TIBCO Host instance on the same machine, update the
amx.th.hpa.jmx.port from the default port number 6001.
build.properties
The changes described here are for a specific individual differences. In an
environment with multiple differences, the property changes are additive. For
example, to create an additional TIBCO Host instance with a different enterprise
name, include all the property changes listed in Additional TIBCO Host Instances
on page 158 and Enterprise Name on page 158.
First TIBCO Host instance
To create a standalone TIBCO Host instance, update the following properties
before running the script.
File Name
Property
Description
build.properties
amx.th.instance.name
TIBCO Host instance name
tibcohost.jmx.host
TIBCO Host instance machine name
Additional TIBCO Host Instances
File Name
Property
Description
build.properties
amx.th.instance.name
TIBCO Host instance name
tibcohost-instance.properties
amx.th.hpa.jmx.port
TIBCO Host instance management
port
Enterprise Name
File Name
Property
Description
build.properties
tibcohost.enterprise.name
ActiveMatrix enterprise name
TIBCO ActiveMatrix BPM Installation and Configuration
TIBCO Configuration Tool Configuration 159
|
Installation Location
Update the following property when ActiveMatrix software is not installed onto
the default location.
File Name
Property
Description
build.properties
TIBCO_HOME
ActiveMatrix installation location
Configuration Folder Location
Update following property when using a different configuration data folder
location.
File Name
Property
Description
build.properties
tibco.config.mgmt.home
ActiveMatrix runtime data configuration
location
TIBCO ActiveMatrix BPM Installation and Configuration
160
| Chapter 7
TIBCO Configuration Tool Configurations
In addition to the changes listed in Additional TIBCO Host Instances on page 158,
update the following properties to conform to target operating system path
conventions.
File Name
Property
Description
build.properties
TIBCO_HOME
ActiveMatrix installation location
tibco.config.mgmt.home
ActiveMatrix runtime data configuration
location
Create ActiveMatrix Administrator Server Properties
Machine Name
Update the following properties with the correct machine name.
File Name
Property
Description
build.properties
tcs.host
Machine on which ActiveMatrix Administrator
runs.
admin-instance.properties
adminURL
ActiveMatrix Administrator server URL
Enterprise Name
Update the following property if the ActiveMatrix enterprise name has changed.
File Name
Property
Description
build.properties
admin.enterprise.name
ActiveMatrix enterprise name
Installation Location
Update following property when ActiveMatrix software is installed in a different
location.
File Name
Property
Description
build.properties
TIBCO_HOME
ActiveMatrix installation location
TIBCO ActiveMatrix BPM Installation and Configuration
TIBCO Configuration Tool Configuration 161
|
Configuration Folder Location
Update following property when using a different configuration data folder
location.
File Name
Property
Description
build.properties
tibco.config.mgmt.home
ActiveMatrix runtime data configuration
location
Update the following properties in addition to the changes required for machine
name to conform to target operating system path conventions.
File Name
Property
Description
build.properties
TIBCO_HOME
ActiveMatrix installation location
tibco.config.mgmt.home
ActiveMatrix runtime data configuration
location
TIBCO ActiveMatrix BPM Installation and Configuration
162
| Chapter 7
TIBCO Configuration Tool Configurations
Replicating a TIBCO ActiveMatrix Administrator Server
Administrator server requirements:
•
Use an external Oracle or Microsoft SQL server database.
Machine requirements:
•
TIBCO_HOME is the same location.
For example, if the location of TIBCO_HOME on the primary machine is
C:\Program File\tibco\amx then the location of TIBCO_HOME on the
replication machine should also be C:\Program File\tibco\amx.
Primary Machine
•
A shared file system is mounted with the same path.
•
Ant is installed and configured.
1. Run TIBCO Configuration Tool and choose the Create TIBCO ActiveMatrix
Administrator Server Wizard Reference wizard.
a. In the Internal HTTP Settings screen, select the Use HTTP Load Balancer
for Internal HTTP Communication checkbox and specify the load
balancer URL. The load balancer should have sticky connections so that
the client session context is maintained.
b. In the Database Details screen, uncheck the checkbox for Use Default
In-Process Database checkbox and select the appropriate driver for
your database from the Database Driver drop down list. Specify the
external database details making sure that the Database URL field
contains a DNS name. See ActiveMatrix Administrator Server Database
for more information.
c. In the Credential Server Details screen, ensure the Machine Name is set to
0.0.0.0.
2. Save the configuration (see Saving a TIBCO Configuration Tool Configuration
on page 155).
3. Open a terminal window.
4. Change to CONFIG_HOME/tct/admin/date-time/scripts.
TIBCO ActiveMatrix BPM Installation and Configuration
Replicating a TIBCO ActiveMatrix Administrator Server 163
|
5. Edit integration_create_admin_data.xml as follows:
a. Set the sharedWorkFolder attribute of the AdminConfigFolders element
to a folder in the shared file system.
b. Set the location attribute of the SCMDetails element to the same value as
sharedWorkFolder attribute.
c. Set value of the Svar element named
ArtifactServerInternalSharedLocationSvar
sharedWorkFolder
to the same value as
attribute.
d. Save the file.
6. Copy the CONFIG_HOME/tct/admin/date-time/scripts folder from the
primary machine to the same location on the replicated machine.
It is recommended that you create an additional backup copy of this folder
incase you need to use it when recovering from configuration errors during
the replication process.
7. Run ant
[-logfile
logfile].
A TIBCO Host instance named SystemHost is created and started. A node
named SystemNode is created in the environment named
SystemEnvironment and started.
Replicated
Machine
8. If you have installed third-party drivers on the primary machine before
running the Create TIBCO ActiveMatrix Administrator Server Wizard
Reference wizard, install the drivers on the replicated machine using the
Configure Third-Party Driver Wizard Reference.
9. Open a terminal window.
10. Edit TIBCO_HOME/administrator/3.1/scripts/instance-mgmt.xml:
a. Remove the configure.tcs and start.tcs targets from the
deploy-admin target's depends attribute; replace the following line:
<target name="deploy-admin" depends="-define-macros, create-dir-structure,
bootstrap.admin.archive.th, configure.tcs, start.tcs, updateCallbackUrlTrustConfig,
create.admin.cli.keystore, install.artifact.server, deploy.admin.ui.dashboard"/>
with
<target name="deploy-admin" depends="-define-macros, create-dir-structure,
bootstrap.admin.archive.th, updateCallbackUrlTrustConfig,
create.admin.cli.keystore, install.artifact.server, deploy.admin.ui.dashboard"/>
11. Edit
TIBCO_HOME/administrator/3.1/scripts/governance/governance_int
egration_build.xml:
TIBCO ActiveMatrix BPM Installation and Configuration
164
| Chapter 7
TIBCO Configuration Tool Configurations
Remove the target add.factory.aggregator.config from the setup
target’s depends attribute.
12. Navigate to the CONFIG_HOME/tct/admin/date-time/scripts folder.
13. Edit the files:
a.
admin-envt-data.xml
b.
build.properties
c.
cl_logservice_data.xml, cl_payloadservice_data.xml,
Comment out the Environment element.
Update the th.jmx.host and th.jmx.url properties
with the host name of the replicated instance. Ensure that the tcs.host
property is set to 0.0.0.0.
governance_integration_data.xml,
and
integration_create_admin_data.xml
Replace all instances of SystemNode with another node name (for example,
SystemNodeReplica) and all instances of SystemHost with another host
name (for example, SystemHostReplica).
d. admin-instance.properties Update the adminURL property with the host
name of the replicated instance.
14. Run ant
[-logfile
logfile].
A TIBCO Host instance named SystemHostReplica is created and started. A
node named SystemNodeReplica is created in the environment named
SystemEnvironment and started. The replicated Administrator server runs on
SystemNodeReplica.
When you log in to either of the Administrator servers (or access the load
balancing URL if one is configured for the external HTTP connection), there will
be two hosts in the Infrastructure > Hosts screen and two nodes in the
SystemEnvironment environment in the Infrastructure > Nodes screen. Requests
can be processed by either of servers. If one node is unavailable, the other will
able to process requests.
In case of configuration errors during the replication process, you have to first
delete the replicated TIBCO ActiveMatrix Administrator server instance before
re-trying the replication process. See Deleting a TIBCO ActiveMatrix
Administrator server instance for more informtion.
TIBCO ActiveMatrix BPM Installation and Configuration
Replicating a TIBCO ActiveMatrix Administrator Server 165
|
Deleting a TIBCO ActiveMatrix Administrator server instance
Follow these steps to delete a TIBCO ActiveMatrix Administrator server instance:
1. Make sure you have permission to force delete applications. See
Administration for more information.
2. These steps should not be performed on the same machine that is running the
replicated instance that you want to delete. For example, if the Administrator
server instance to be deleted is running on MachineA, you must perform these
steps on a different machine.
a. On the primary machine, edit
CONFIG_HOME/admin/EnterpriseName/samples/deleteAdminInstance_d
ata.xml.
Specify the host name, ${host.name} and the node name, ${node.name}
for the replicated instance that you want to delete.
b. From the primary machine, navigate to the
CONFIG_HOME/admin/EnterpriseName/samples folder and execute
ant -f deleteAdminInstance_build.xml.
The TIBCO ActiveMatrix Administrator server instance is deleted and the
host unbound.
3. On the replicated machine, manually stop the tibcohost process.
When re-attempting the replication process make sure you use the copy of the
scripts saved in step 6 of the Replicating a TIBCO ActiveMatrix Administrator
Server process and follow the replication process as outlined.
TIBCO ActiveMatrix BPM Installation and Configuration
166
| Chapter 8
Configuring BPM in Silent Mode
Chapter 8
Configuring BPM in Silent Mode
Topics
•
Configuring BPM in Silent Mode, page 167
TIBCO ActiveMatrix BPM Installation and Configuration
Configuring BPM in Silent Mode 167
|
Configuring BPM in Silent Mode
To configure BPM in the silent mode, you must install the product in the silent
mode.
Configuring the product in silent mode requires two machines and involves the
following:
1. Running TCT in the GUI mode on machine 1 and creating the required
configuration.
2. Installing the product in silent mode on Machine 2 to generate the silentinstall
utility. Ensure that the TIBCO_HOME and CONFIG_HOME you specify on
Machine 1 and Machine 2 are exactly the same.
3. Coping the configuration from machine 1 to Machine2
4. Running the silentinstall utility to complete the configuration on Machine 2.
Ensure that you meet the following criteria when preparing to perform a silent
install and config: (In other words, when you are performing the install and
config on Machine 1 in GUI mode, ensure that the values you specify are those
that will be used by Machine 2.)
•
The TIBCO_HOME and CONFIG_HOME directories on both the machines
must be the same.
•
Specify the path of the JDBC driver on the target machine. Machine 2
•
Specify the machine name of the target machine. Machine 2
•
Use the TIBCO ActiveMatrix BPM database that will be used by Machine 2.
Machine 1: Install and run TCT in GUI mode
Do the following:
1. Install TIBCO ActiveMatrix BPM using the Install BPM, Administrator &
TIBCO Host profile. See Installing the Product on page 46 for details.
2. Using TIBCO Configuration Tool:
TIBCO ActiveMatrix BPM Installation and Configuration
168
| Chapter 8
Configuring BPM in Silent Mode
a. Run the Configure Third-Party Driver wizard to register the JDBC drivers
for your TIBCO ActiveMatrix BPM database. From the Summary dialog:
—click Save to save the configuration information in the TIBCO
Configuration folder. The configuration information is stored in
\tct\tpclshells. See Running the TIBCO Configuration Tool on
page 97 for information on how to run the wizard.
—click Configure. You must click Configure as well as Save, otherwise
you will not be able to complete some of the dialogs when you run the
Create TIBCO ActiveMatrix BPM Server wizard as some of the fields
will be empty.
b. Run the Create TIBCO ActiveMatrix BPM Server wizard to create TIBCO
ActiveMatrix BPM; see Create TIBCO ActiveMatrix BPM Server Reference
on page 145 for details. From the Summary dialog:
—click Save. The TIBCO Configuration Tool saves the configuration
information in the TIBCO Configuration folder, for example
\tct\bpm.
—click Cancel to exit the wizard.
The location of the configuration information is used during the silent installation
of TIBCO ActiveMatrix BPM.
Machine 2: Install product in silent mode
1. Create the AMX BPM database, if it has not been created earlier.
2. Edit the silent file and Install the product in silent mode by invoking
TIBCOUniversalInstaller -silent on a console window. See Install in Silent
mode on page 50 for details.
Machine 2: Copy CONFIG_HOME directory
1. Copy the CONFIG_HOME directory to Machine 2. Ensure that the absolute
path is exactly the same on both the machines.
2. Check the scripts are located in the folder where you stored config info.
Machine 2: Run silentinstall utility
1. Navigate to the location of the silentinstall utility on a console window.
TIBCO ActiveMatrix BPM Installation and Configuration
Configuring BPM in Silent Mode 169
|
2. Run the following commands in the order specified:
a.
tct_configuration_folder where
is the path to the folder that stores the
scripts created when you ran the Configure Third-Party Driver wizard in
step 2, for example \tct\tpclshells\date-time\scripts
silentinstall tpcl
tct_configuration_folder
b.
tct_configuration_folder where
is the path to the folder that stores the the
scripts created when you ran the Create TIBCO ActiveMatrix BPM
Server wizard in step 2, for example \tct\bpm\date-time\scripts
slientinstall bpm
tct_configuration_folder
The first command sets up the third party driver and the second command
configures and deploys TIBCO ActiveMatrix BPM.
Once these scripts have run, Build Successful should be returned and the
silent installation of TIBCO ActiveMatrix BPM is complete.
TIBCO ActiveMatrix BPM Installation and Configuration
170
| Chapter 8
Configuring BPM in Silent Mode
TIBCO ActiveMatrix BPM Installation and Configuration
| 171
PART FOUR
UPGRADE
TIBCO ActiveMatrix BPM Installation and Configuration
172
| Chapter 9
Upgrading Your System
Chapter 9
Upgrading Your System
This chapter describes how to upgrade TIBCO ActiveMatrix BPM using the
upgrade utility.
Topics
•
Overview, page 173
•
Checks Before Performing an Upgrade, page 176
•
The upgrade Utility, page 179
•
Performing an Upgrade of TIBCO ActiveMatrix BPM, page 181
•
Troubleshooting, page 184
TIBCO ActiveMatrix BPM Installation and Configuration
Overview 173
|
Overview
Upgrading TIBCO ActiveMatrix BPM to 1.3.0 involves upgrading the runtime
objects: TIBCO ActiveMatrix BPM application (amx.bpm.app), BPMNode, TIBCO
Host instances, TIBCO ActiveMatrix Administrator servers, and TIBCO
ActiveMatrix BPM Database.
This chapter describes how to upgrade TIBCO ActiveMatrix BPM 1.2.0 runtime
objects to release 1.3.0. If your current installation is not 1.2.0, you must first
upgrade to release 1.2.0. Refer to the upgrade instructions provided in the TIBCO
ActiveMatrix BPM Installation and Configuration guide for release 1.2.0.
Upgrade will fail if you have reconfigured the Administrator server in any of the
following ways since creating the server with TIBCO Configuration Tool:
•
Deleted the initial superuser or changes the superuser password.
•
Changed the port of the external HTTP connector or enabled or disabled SSL
for the connector.
Upgrading a Distributed Component Implementation of TIBCO ActiveMatrix BPM
If you have a distributed component implementation of TIBCO ActiveMatrix
BPM, you must:
1. On each remote machine in the cluster that has TIBCO ActiveMatrix BPM
installed on it, you must upgrade the TIBCO Host.
On a machine that has TIBCO ActiveMatrix Administrator installed, you need
not upgrade the TIBCO Host separately as the TIBCO Host on this machine
will be upgraded when you upgrade the Administrator.
Perform an upgrade as described in Performing an Upgrade of TIBCO
ActiveMatrix BPM on each of the machines in the cluster that have TIBCO
ActiveMatrix BPM installed on them.
You must use the upgrade all command to perform the upgrade. See
Performing an Upgrade of TIBCO ActiveMatrix BPM on page 181 for details.
TIBCO ActiveMatrix BPM Installation and Configuration
174
| Chapter 9
Upgrading Your System
Runtime Object State
Runtime object state consists of configuration data and binary executables. An
upgrade process converts the format of runtime object to the current version
(1.3.0/3.1.5). The locations of runtime object state are:
•
TIBCO Host Instance
— SystemHost
BPM_CONFIG_HOME/tibcohost/Admin-enterpriseName-serverName
— Standalone CONFIG_HOME/tibcohost/instanceName
•
ActiveMatrix Administrator Server CONFIG_HOME/admin/enterpriseName,
contains Administrator server files and the in-process database (if selected as
the Administrator server database).
•
BPMNode CONFIG_HOME/tibcohost/instanceName/nodes/nodeName and
CONFIG_HOME/admin/enterpriseName where,
— enterpriseName and serverName are the names you specified when you created
the Administrator server,
— instanceName is the name you specified when you created the TIBCO Host
instance, and
— nodeName is the name specified when you created the node.
Upgrade Impact
You can upgrade to this version of TIBCO ActiveMatrix BPM from an existing
installation of TIBCO ActiveMatrix BPM. No configuration is required prior to an
upgrade and upgrade does not affect any of the configuration of your existing
installation. For example, if an upgrade is performed:
•
All existing process instances deployed on your existing installation will still
be available.
•
Process instances and work items with a status of In Progress continue to be
processed.
•
Configured LDAP containers, users and organization memberships will still
be available.
Depending on the size of your system, upgrade can take some time. You should
allow sufficient time for the upgrade to be performed.
This section describes the operational impact of upgrading the ActiveMatrix
Administrator Server, nodes (BPMNode), amx.bpm.app application,
ActiveMatrix BPM Database and TIBCO Host instances.
TIBCO ActiveMatrix BPM Installation and Configuration
Overview 175
|
•
ActiveMatrix Administrator Server While the ActiveMatrix Administrator
server is being upgraded, deployed application will continue to run without
service interruption. However, the Administrator server itself will be
unavailable, which means you cannot perform functions such as deploying
new applications and managing existing applications, and managing
infrastructure.
•
TIBCO Host Instances and Nodes While a TIBCO Host instance and its
nodes are being upgraded, the applications deployed on the nodes will be
stopped. As a result, clients of those applications will experience service
interruption.
•
ActiveMatrix BPM Database
TIBCO ActiveMatrix BPM Installation and Configuration
176
| Chapter 9
Upgrading Your System
Checks Before Performing an Upgrade
Ensure that you check the following before upgrading TIBCO ActiveMatrix BPM:
•
Installer account - The installer account used to perform an upgrade must
have the appropriate privileges required for that platform. Installer Account
on page 5 describes the installer account you should use when upgrading
TIBCO ActiveMatrix BPM.
•
Installer log file - The location of the upgrade log files. See Installer Log File on
page 5 for details.
•
Shutdown the existing TIBCO ActiveMatrix BPM server that you wish to
upgrade.
It is important that you shutdown the existing TIBCO ActiveMatrix BPM
before upgrading, otherwise the upgrade will fail.
•
Remove any indexes added to the BPM Database.
If you have added any indexes to your BPM database, these should be
removed before you upgrade. This is because, as part of the upgrade, a new
database schema is supplied that may include new indexes. If the new indexes
have the same name as your original indexes, this could result in duplicate
indexes which, in turn, would adversely effect the performance of TIBCO
ActiveMatrix BPM.
•
Optionally, back up your TIBCO Workspace configuration files. See Backup
Procedure for TIBCO Workspace, page 177 for details.
•
Back up your system. See Backup and Restore for detailed instructions to back
up your ActiveMatrix BPM system and restore the system from a backup.
To back up your ActiveMatrix BPM system, copy the following to a different
location (possibly on a different machine):
Make sure that the following are in a state where a back-up can be performed.
This means they should be either shutdown or offline, as applicable.
— the machine(s) where TIBCO ActiveMatrix BPM has been installed.
— the TIBCO_HOME and CONFIG_HOME directories for the TIBCO
ActiveMatrix BPM installation. If the BPM configuration files are on a
different location, you must back up these files as well.
— the TIBCO ActiveMatrix BPM database. You must back up all the databases
that contain BRM, EC, WP, PVM, and DE database tables. Refer to the
TIBCO ActiveMatrix BPM Installation and Configuration
Checks Before Performing an Upgrade 177
|
documentation supplied with your database for information on to take a
backup.
— the TIBCO ActiveMatrix Administrator database. Refer to the
documentation supplied with TIBCO ActiveMatrix Administrator for
information on how to do this.
— the TIBCO EMS server. Refer to the documentation supplied with TIBCO
EMS for information on performing back-ups.
Repeat the process for all the machines in the cluster that have TIBCO
ActiveMatrix BPM installed on them.
Backup Procedure for TIBCO Workspace
If you are using a Workspace custom configuration, you may need to back up the
TIBCO Workspace configuration files to ensure that the custom configuration is
not lost when you upgrade the software. Also, if you are running a custom WCC
application, you may need to repackage and redeploy your applications to pick
up any changes in the upgraded software.
The procedure differs depending on whether you are using the default Workspace
application or a custom WCC application, as outlined in the following sections.
Default Workspace Application on the Runtime Machine
When you choose to upgrade your software, the installer overwrites all the
existing Workspace configuration files on the runtime machine. If you are using
the default Workspace application, you need to back up files before running the
installer to upgrade the software, as described:
•
If you had made configuration changes to Workspace using the Configuration
Administrator, these changes are saved in the database. Consequently, you
need NOT back up any files. When you start Workspace after upgrading the
software, it will read the configuration from the database.
•
If you had made configuration changes by directly modifying files on the
runtime machine (for example, config.xml, userAccess.xml, and so on), you
must back up those files prior to running the installer. After completing the
upgrade, replace the installed configuration files with the backed up
configuration files.
TIBCO ActiveMatrix BPM Installation and Configuration
178
| Chapter 9
Upgrading Your System
Custom WCC Application on Your Development Machine
When you upgrade the software, the installer installs the design-time WCC
software on your development machine. Upgrading the design-time WCC
software will not affect any custom WCC applications that were previously
developed. However, to pick up the changes available in the upgraded software,
you need to perform the following tasks:
1. Create a new WAR file for your custom application.
2. Copy the WAR file to TIBCO Business Studio.
3. Create a DAA for the application.
4. Undeploy the previously deployed custom application using TIBCO
Administrator.
5. Deploy the DAA created in Step 3. to the runtime node using TIBCO
Administrator.
See TIBCO Workspace Configuration and Customization guide for details on how to
deploy a custom application.
TIBCO ActiveMatrix BPM Installation and Configuration
The upgrade Utility 179
|
The upgrade Utility
The upgrade utility is called:
•
On Windows: upgrade.bat
•
On UNIX/Linux: upgrade
and is located in \bpm\1.3\scripts\upgrade and is created when you install
the new version of TIBCO ActiveMatrix BPM.
You must install the new version of TIBCO ActiveMatrix BPM in the existing
installation directory of the TIBCO ActiveMatrix BPM that you want to upgrade,
using the Install BPM, Administrator & TIBCO Host profile.
The upgrade utility uses the configuration information from your existing
installation of TIBCO ActiveMatrix BPM to configure the upgraded TIBCO
ActiveMatrix BPM. The configuration information is located in the TIBCO
Configuration Folder that stores the scripts that are generated by TIBCO
Configuration Tool. For example, \tct\bpm\date-time\scripts where
date-time is the date and time the scripts were created when you first installed
TIBCO ActiveMatrix BPM.
The upgrade utility provides a script that allows you to upgrade the individual
components of TIBCO ActiveMatrix BPM. The table below describes the
components that are updated using the upgrade script. The components should
be upgraded in the order specified below:
Component
Upgrade Command
TIBCO Host
upgrade tibcohost
TIBCO Administrator
upgrade admin
TIBCO ActiveMatrix BPM Node
upgrade bpmnodes
TIBCO ActiveMatrix BPM
Database
upgrade bpm-database
TIBCO ActiveMatrix BPM
Application
upgrade bpm-app
If you are upgrading from release version 1.0.3, you must run the
manual_upgrade_1.0.3.sql after upgrading to release version 1.1.1. You can
then proceed to manually upgrade your system to 1.2.0 and finally to 1.3.0.
TIBCO ActiveMatrix BPM Installation and Configuration
180
| Chapter 9
Upgrading Your System
The following table describes the commands that you can run using the upgrade
utility:
Command
Runs the following...
upgrade all
upgrade tibcohost
upgrade admin
upgrade bpmnodes
upgrade bpm-database
upgrade bpm-app
upgrade platform
upgrade tibcohost
upgrade admin
upgrade bpmnode
upgrade bpm
upgrade bpm-database
upgrade bpm-app
TIBCO recommends that you use the upgrade all command and allow the
upgrade utility to upgrade all the components at the same time. However, you
can run the upgrade commands individually. This may be necessary, for example,
if a problem occurs during upgrade that causes an upgrade script to exit. For
example, when you are prompted by the upgrade script to enter information, you
must type the information exactly as it is required. Otherwise, this can cause the
upgrade script to exit. If this happens, you can run the rest of the upgrade scripts
individually to complete the upgrade.
Troubleshooting describes example scenarios and possible resolutions to
complete the upgrade process.
TIBCO ActiveMatrix BPM Installation and Configuration
Performing an Upgrade of TIBCO ActiveMatrix BPM 181
|
Performing an Upgrade of TIBCO ActiveMatrix BPM
This section describes performing an upgrade using the upgrade all command.
However, you can run the upgrade scripts individually, see The upgrade Utility,
page 179.
Depending on the configuration and the number of applications deployed,
upgrade can take varying amounts of time to complete.
For example, upgrading a lightly-loaded, single node could take about an hour.
And a lightly-loaded, high availability system could take anything in the range of
2 - 3 hours to complete.
Ensure that you allow sufficient time for the upgrade to be completed.
On the machine that requires upgrading, do the following:
1. Install TIBCO ActiveMatrix BPM using the Install BPM, Administrator &
TIBCO Host profile; see Installing the Product on page 46 for details. During
installation, ensure that you select the following to successfully upgrade your
system:
— In the TIBCO Installation Home dialog, select Choose an Existing
TIBCO_HOME. Browse to the existing installation directory of the TIBCO
ActiveMatrix BPM that you want to upgrade.
— Choose to run TIBCO Configuration Tool, so make sure that Launch
TIBCO Configuration Tool is checked before clicking Finish to install
TIBCO ActiveMatrix BPM.
2. Restart all instances of TIBCO ActiveMatrix BPM after the installation
completes.
3. Open a command prompt and navigate to the location of your upgrade file,
for example \bpm\1.3\scripts\upgrade
4. Run the following:
upgrade all tct_output_folder
where tct_output_folder is the TIBCO Configuration Folder that stores the
scripts that are generated by TIBCO Configuration Tool. For example,
\tct\bpm\date-time\scripts where date-time is the date and time the
scripts were created when you first installed TIBCO ActiveMatrix BPM.
TIBCO ActiveMatrix BPM Installation and Configuration
182
| Chapter 9
Upgrading Your System
5. The script prompts you to shutdown the TIBCO Host instances and all node
processes
[input] stop processes? (yes|no) :
Enter yes to continue. Upgrade shuts down TIBCO Host, upgrades and
restarts it. The script informs you when this has completed.
[echo] TIBCO Host instance has been upgraded.
6. The script prompts you to confirm that your system is running before it
continues.
[input] Please wait for system to finish starting then press return to continue:
If you can login to your TIBCO Administrator web interface and all TIBCO
ActiveMatrix BPM applications are listed with a status of Running, you can
continue with the upgrade. Press Return.
7. The script prepares to upgrade TIBCO ActiveMatrix Administrator. Upgrade
has to interrupt service for the applications running on the nodes.
[input] interrupt service? (yes|no) :
8. Type yes to continue. Upgrade shuts down TIBCO ActiveMatrix
Administrator, upgrades and restarts it. The script prompts you to confirm
that the TIBCO ActiveMatrix BPM nodes are running before it continues.
[input] Please wait for all the AMX BPM Nodes to finish starting then press return
to continue:
TIBCO ActiveMatrix BPM Installation and Configuration
Performing an Upgrade of TIBCO ActiveMatrix BPM 183
|
9. Press Return. Upgrade now needs to upgrade the TIBCO ActiveMatrix BPM
database.
Automatically upgrade database? (yes, no)
To:
— allow the script to automatically upgrade
BPM database, type yes. Go to step 10.
the
TIBCO ActiveMatrix
— manually upgrade the TIBCO ActiveMatrix BPM database, type no. If you
type no, the upgrade utility generates the two required SQL upgrade
scripts:
—/bpm/database/WorkManagerUpgrade.sql
—/bpm/database/ProcessManagerUpgrade.sql
and prompts you as follows:
[input] Database upgraded? (yes, no) :
Your DBA must execute these scripts as the BPM User against the TIBCO
ActiveMatrix BPM database before you can continue with the upgrade
process. Once your TIBCO ActiveMatrix BPM database has been
upgraded, type yes.
10. Upgrade upgrades the TIBCO ActiveMatrix BPM application.
11. Once these scripts have run, Build Successful should be returned and the
upgrade of TIBCO ActiveMatrix BPM is complete.
12. In TIBCO ActiveMatrix Administrator, select Infrastructure > Nodes. The
BPMNode may show an Out of Sync status after the upgrade. In the
Configuration > Features section for the BPMNode, one or more features may
have a status Marked for Uninstall. Click Apply to synchronize the node.
TIBCO ActiveMatrix BPM Installation and Configuration
184
| Chapter 9
Upgrading Your System
Troubleshooting
When running the upgrade utility, if the script exits with an error on or before
upgrading all the components, depending on the error, it may be possible to
complete the upgrade process by running the individual commands rather than
running an upgrade all again. Following example scenarios describe the scripts to
be run when the upgrade scripts exits before completion.
Scenario 1
If you have run upgrade all, and the script exits after upgrading TIBCO Host
but before upgrading TIBCO Administrator, you could run the following
commands in the order specified below:
1.
upgrade admin
- to upgrade TIBCO Administrator
2. upgrade bpmnodes - to upgrade TIBCO ActiveMatrix BPM Node
3.
- to upgrade TIBCO ActiveMatrixDatabase and TIBCO
ActiveMatrix Application
upgrade bpm
Scenario 2
If you have run upgrade all, and the script exits after upgrading TIBCO
ActiveMatrix BPM Node but before upgrading TIBCO ActiveMatrix BPM
Database, you could run the following commands in the order specified below:
1.
upgrade bpm-database
2.
upgrade bpm-app
- to upgrade TIBCO ActiveMatrix BPM Database
- to upgrade TIBCO ActiveMatrix BPM Application
Scenario 3
After running upgrade all, the logs show that the upgrade failed. However, the
TIBCO ActiveMatrix Administrator lists the newer version of the BPMNode,
indicating that the BPMNode has been upgraded successfully.
Sometimes, previously failed user application undeployments result in old
features or applications that cannot be removed in the final cleanup, and cause the
product upgrade to fail.
TIBCO ActiveMatrix BPM Installation and Configuration
| 185
PART FIVE
POST INSTALLATION
TIBCO ActiveMatrix BPM Installation and Configuration
186
| Chapter 10
Post-Installation Tasks
Chapter 10
Post-Installation Tasks
This chapter describes the post-installation tasks you must perform once you
have finished installing TIBCO ActiveMatrix BPM.
Topics
•
Install the Mediation Product Application, page 187
•
Reconfigure Your JVM, page 188
•
Using Transaction Recovery with Oracle, page 189
•
Set Transaction Verification Property for Microsoft SQL Server, page 190
TIBCO ActiveMatrix BPM Installation and Configuration
Install the Mediation Product Application 187
|
Install the Mediation Product Application
The Mediation product application is not deployed by default on the BPMNode
when you install ActiveMatrix BPM. It implements mediation for ActiveMatrix
BPM. Once you have installed ActiveMatrix BPM, you must manually deploy the
Mediation product application.
Mediation involves virtualizing and managing service interactions between
communicating participants. Refer to the Administration documentation for your
runtime environment for more information on mediation.
To do this:
1. From the Administrator interface in BPM runtime, go to Applications.
2. Add a new application named com.tibco.amx.it.mediation.app using the
TIBCO ActiveMatrix Mediation Implementation Type Application
Template.
3. Distribute the application to the BPM Node.
4. Deploy the application by selecting Deploy with Start.
Once the above application is running, you can deploy the mediation samples to
check that mediation is now available.
Refer to the Administration documentation for your runtime environment for
more information on adding, distributing and starting your application.
TIBCO ActiveMatrix BPM Installation and Configuration
188
| Chapter 10
Post-Installation Tasks
Reconfigure Your JVM
To reconfigure your JVM:
1. Increase the JVM permgen size:
— Windows Add set
ANT_OPTS=-Xmx1024m -XX:MaxPermSize=256m
-XX:PermSize=128m
— UNIX Add export
to %USERPROFILE%\antrc_pre.bat
ANT_OPTS="-Xmx1024m -XX:MaxPermSize=256m
-XX:PermSize=128m
to ~/.antrc
2. Confirm the value of ANT_OPTS before executing CLI scripts from the
command prompt.
TIBCO ActiveMatrix BPM Installation and Configuration
Using Transaction Recovery with Oracle 189
|
Using Transaction Recovery with Oracle
(This only applies to Oracle)
If you want to use transaction recovery, you must grant the BPM user the correct
privileges. To do this, ask your Oracle database administrator to execute the
following commands as a user that has the SYSDBA permission:
GRANT SELECT ON sys.dba_pending_transactions TO user
GRANT EXECUTE ON sys.dbms_xa TO user
GRANT SELECT ON sys.dba_2pc_pending TO user
For more information, see the SOA documentation about Transaction Recovery.
TIBCO ActiveMatrix BPM Installation and Configuration
190
| Chapter 10
Post-Installation Tasks
Set Transaction Verification Property for Microsoft SQL Server
Microsoft SQL Server currently cannot handle the scenario where commits return
successfully (in XA mode) even when the transaction has not completed.
Consequently, duplicate work items can occur when the BPM runtime is running
against a Microsoft SQL Server.
There is a case open with Microsoft for this issue (Case Reference
112010377500682). You must set the following property until Microsoft provides a
fix for this issue. Once the fix is applied, this property must be removed.
1. Log in to TIBCO ActiveMatrix Administrator as root user and select
Infrastructure > Nodes.
2. Select the node BPMNode and click the Configuration tab.
3. Select the link JVM Arguments.
4. Under the Properties heading, click Add to add a new JVM property.
5. Enter the property name as com.tibco.pvm.txVerification.enable and
value as true.
6. Click Save to save the changes.
7. Stop and Restart the BPMNode
TIBCO ActiveMatrix BPM Installation and Configuration
Recovering from a Failed Installation 191
|
Chapter 11
Recovering from a Failed Installation
This chapter describes the steps to sanitize your machine and recover from a
failed installation.
Topics
•
Sanitizing After a Failed Installation, page 192
TIBCO ActiveMatrix BPM Installation and Configuration
192
| Chapter 11
Recovering from a Failed Installation
Sanitizing After a Failed Installation
An installation process can fail at various stages and the installer may not be able
to clean up the environment before exiting. It is recommended that you clean up
the environment manually before trying to re-install the product.
Consider a simple environment with a single node (BPMNode) on a single host.
To sanitize this environment after a failed installation, perform the following
steps in the specified order.
1. Shutdown TIBCO Configuration Tool (TCT).
2. Stop any processes running from CONFIG_HOME. For example, tibcohost,
tibamx_SystemNode, and tibamx_BPMNode.
3. Delete the BPM configuration directory specified during the installation. For
example, if you chose to use the default configuration directory when
installing on Windows, delete the folder
C:\ProgramData\amx-bpm\tibco\data.
The above steps are applicable for a single node environment. Similar steps may
be applied to clean up an active-active or a distributed environment. The actual
steps however will have to be customised to the environment that needs to be
cleaned.
TIBCO ActiveMatrix BPM Installation and Configuration
| 193
Chapter 12
Uninstalling TIBCO ActiveMatrix BPM
This chapter explains how to uninstall TIBCO ActiveMatrix BPM from your
computer.
Topics
•
Uninstalling TIBCO ActiveMatrix BPM on page 194
TIBCO ActiveMatrix BPM Installation and Configuration
194
| Chapter 12
Uninstalling TIBCO ActiveMatrix BPM
Uninstalling TIBCO ActiveMatrix BPM
If you want to uninstall TIBCO ActiveMatrix BPM from your system, perform the
following steps:
1. Stop the TIBCO Host instance, node processes, and TIBCO Business Studio.
2. Use one of the methods described below to uninstall TIBCO ActiveMatrix
BPM:
— UNIX/Linux: Use the uninstaller provided with TIBCO ActiveMatrix BPM.
— Windows, either:
—Use the uninstaller provided with TIBCO ActiveMatrix BPM, see Using
the Uninstaller on page 194 or
—Remove the installation using the Add/Remove Programs option on
your PC, see Using Add/Remove Programs (Windows Only) on
page 197.
3. Manually delete the TIBCO ActiveMatrix BPM directories under
TIBCO_HOME.
4. Manually delete the TIBCO ActiveMatrix BPM directories under
CONFIG_HOME.
Using the Uninstaller
To use the uninstaller:
1. Log in to the system on which you want to uninstall software.
— On Windows: log in as a user with Administrator privileges. You must
have Administrator privileges to uninstall this software.
— On UNIX/Linux: you should uninstall as the same user who did the
installation. If more than one product installation has been made to the
same environment and you want to uninstall them all, you should uninstall
using the root user.
2. Do one of the following:
On Windows:
— Go to Start > All Programs > TIBCO > env_name and click on Uninstall.
Alternately, you can navigate to the
installation_environment\tools\universal_installer folder and run
TIBCOUniversalInstaller.exe.
TIBCO ActiveMatrix BPM Installation and Configuration
Uninstalling TIBCO ActiveMatrix BPM 195
|
On UN IX/Linux:
— Navigate to the installation_environment/tools/universal_installer folder
and run ./TIBCOUniversalInstaller-platform_id.extension
You can choose to uninstall the product in either GUI or console mode.
Uninstalling the product in the silent mode is not supported.
3. The TIBCO Installation Manager screen is displayed. Choose the option
Uninstall Products from Selected TIBCO Home Location and then choose
the location of TIBCO Home from the drop-down. Click Next.
4. The TIBCO Universal Uninstaller is launched and the Welcome screen is
displayed. Click Next.
5. Select either Custom Uninstall (to select the products in this environment to
be uninstalled) or Typical Uninstall to uninstall all products in this
environment.
If you selected Typical Uninstall, continue with step 7.
If you selected Custom Uninstall, continue with the next step.
6. The Product Uninstall Selection screen is displayed.
Select the products (for example, TIBCO ActiveMatrix BPM 1.3.0) you want to
uninstall and click Next.
7. The Pre-Uninstall Summary screen is displayed.
If you want to change any of your choices, click Back to step back through the
screens to the appropriate point. You can then restart the uninstallation
process from that point.
8. When you are satisfied with your choices, click Uninstall.
The uninstaller removes the software product you specified.
9. The Running ANT Tasks screen is displayed while the selected components
are uninstalled. When prompted for the clean up of the /tools directory, click
Yes, clean it up.
10. The Post Uninstall Summary is displayed. Review the information and then
click Finish. The uninstaller exits and cleans up any temporary files.
TIBCO ActiveMatrix BPM Installation and Configuration
196
| Chapter 12
Uninstalling TIBCO ActiveMatrix BPM
The TIBCO ActiveMatrix BPM entries in the Start menus may appear after the
uninstallation. To correct this log out, then log in again.
•
(UNIX/Linux only) - If an error message similar to the following is displayed
after uninstallation, log out and log in again for the uninstaller changes to take
effect:
TIBCO ActiveMatrix BPM Installation and Configuration
Uninstalling TIBCO ActiveMatrix BPM 197
|
Using Add/Remove Programs (Windows Only)
To remove the installation using the Add/Remove Programs option on your PC:
1. Log in to Windows as a user with system administrator privileges. You must
have system administrator privileges to uninstall this software.
2. In the Control Panel, double-click the Add or Remove Programs.
3. In the Add/Remove Programs dialog, select TIBCO Universal Installer
(installation_environment_n), where installation_environment_n is the
directory corresponding to the installation environment you want to uninstall.
If you have installed more than one TIBCO product, there will be multiple
entries in Add/Remove programs (for example, TIBCO Universal Installer_1
(c:\tibco\env_1), TIBCO Universal Installer_2 (c:\tibco\env_2), and so on).
4. Click Change/Remove.
The uninstaller launches. Follow the uninstallation steps in Using the
Uninstaller on page 194.
TIBCO ActiveMatrix BPM Installation and Configuration
198
| Chapter 12
Uninstalling TIBCO ActiveMatrix BPM
TIBCO ActiveMatrix BPM Installation and Configuration
| 199
Appendix A
Creating a Clustered Environment With SSL
You can use the silent mode to create a clustered ActiveMatrix BPM environment
configured with SSL, including a replicated ActiveMatrix Administrator. The
following sections describe the tasks to be performed for the same:
1. Create the BPM server on Machine1, including the ActiveMatrix
Administrator Server.
2. Create the replicated ActiveMatrix Administrator Server on Machine2.
3. Create the BPMNode on Machine2 by running the commands on Machine1.
4. Distribute the BPM applications to the BPMNode on Machine2.
Task A Create the BPM Server and ActiveMatrix Administrator Server on
Machine 1
1. Run TIBCO Configuration Tool on Machine 1 and select "Create TIBCO
ActiveMatrix BPM Server - V1.3"
2. Go through the configuration and set all necessary SSL keystores and override
the BPM Configuration folder. See Chapter 5, Creating and Configuring
Runtime Objects for details.
3. Save the configuration, but do not run Configure. The files are stored under
CONFIG_HOME/tct/bpm.
4. In the CONFIG_HOME/tct/bpm/date-time/scripts directory, edit the file
integration_create_admin_data.xml as follows:
a. Set the sharedWorkFolder attribute of the AdminConfigFolders element
to a folder in the shared file system.
b. Set the location attribute of the SCMDetails element to the same value as
sharedWorkFolder attribute.
c. Set value of the Svar element named
ArtifactServerInternalSharedLocationSvar
sharedWorkFolder
to the same value as
attribute.
d. Save the file.
5. Run the BPM configure using the BPM silentinstall utility command:
./silentinstall bpm
/opt/amx-bpm/config_dir/tibco/data/tct/bpm/2011-04-07-20-59-20/
scripts
TIBCO ActiveMatrix BPM Installation and Configuration
200
| Appendix A
Creating a Clustered Environment With SSL
Task B Create a Replicated ActiveMatrix Administrator Server on Machine2
1. Copy the contents of CONFIG_HOME/tct/bpm directory from Machine1 to
Machine2.
2. On Machine2 edit the appropriate files as described in Replicating a TIBCO
ActiveMatrix Administrator Server on page 162, starting from step 10. Amend
the files to include Machine2 name, SystemHost replica and SystemNode
replica.
3. Configure the replicated ActiveMatrix Administrator server on Machine 2
using the BPM silentinstall admin utility:
./silentinstall admin
/opt/amx-bpm/config_dir/tibco/data/tct/bpm/2011-04-07-20-59-20/
scripts
This silent install utility command installs the ActiveMatrix Administrator only
(does not install the BPM server).
Task C Create BPMNode on Machine 2 by running commands on Machine1
1. Transfer / copy the contents of the CONFIG_HOME/bpm directory from
Machine1 to Machine2.
2. Run the TCT on Machine1 and select "Configure TIBCO ActiveMatrix BPM
Server Node Type - V1.3".
3. Save the configuration but do not run Configure. The files are stored under
CONFIG_HOME/tct/bpmnodetype.
4. Edit the file bpm-nodetype.properties to:
— replace "tibco.admin.ssl.truststore" with "javax.net.ssl.trustStore"
— replace "tibco.admin.ssl.truststoretype" with "javax.net.ssl.trustStoreType"
— replace "tibco.admin.ssl.truststorepassword" with
"javax.net.ssl.trustStorePassword"
The new property names are case sensitive - ensure that the correct name and
case are used.
5. Configure the second BPMNode on machine 2 using the BPM silent install
utility: silentinstall bpmnodetype
./silentinstall bpmnodetype
/opt/amx-bpm/config_dir/tibco/data/tct/bpmnodetype/2011-04-08-00-1
8-03/scripts
TIBCO ActiveMatrix BPM Installation and Configuration
Creating a Clustered Environment With SSL 201
|
Task D Distribute BPM Applications to Machine 2
Using TIBCO Administrator on machine 1, redistribute the following TIBCO
ActiveMatrix BPM applications to the new node.
•
amx.bpm.app
•
any TIBCO ActiveMatrix BPM LDAP Authenticator applications. For
example, if you are using the internal LDAP server provided with TIBCO
ActiveMatrix BPM, these would be:
—amx.bpm.auth.system
—amx.bpm.auth.easyas
1. Select Applications. From the Environment drop-down list, select the
Environment name that you specified on machine 1. The default is
BPMEnvironment for example.
2. Select the TIBCO ActiveMatrix BPM application and click Distribution.
3. From Available Nodes, the new node is now listed. Depending on which
node you are configuring, select
•
BPM Node and drag NodeB from Available Nodes to Selected Nodes.
•
WorkManager and drag NodeC from Available Nodes to Selected Nodes.
4. Click Save.
5. Click Refresh. The TIBCO ActiveMatrix BPM application is displayed as Out
of Sync. Click Deploy to redeploy theTIBCO ActiveMatrix BPM application.
6. Click Refresh. The TIBCO ActiveMatrix BPM application is displayed as In
Sync.
7. The Oracle database driver must be provisioned using the Third Party Driver
wizard in TCT. On Machine 2 the appropriate files under BPM_HOME must
be amended:
BPM_HOME/administrator/3.1/scripts/instance-mgmt.xml
BPM_HOME/administrator/3.1/scripts/governance/governance_integr
ation_build.xml
Repeat these steps for every TIBCO ActiveMatrix BPM application that needs to
be redistributed to the new node.
TIBCO ActiveMatrix BPM Installation and Configuration
202
| Appendix A
Creating a Clustered Environment With SSL
TIBCO ActiveMatrix BPM Installation and Configuration
| 203
Appendix B
Securing Communication Channels
The TIBCO ActiveMatrix BPM platform is partitioned across many components.
These components communicate with each other and with third-party
applications over various communication protocols. The components and
communication channels are illustrated in Figure 2 on page 203.
Figure 2 TIBCO ActiveMatrix Communication Channels
By default, these communication channels are not secure. However, they can be
secured by configuring the channels to use the Secure Sockets Layer (SSL)
protocol. SSL is a cryptographic protocol that provides security and data integrity
for communications over TCP/IP networks. SSL encrypts the segments of
point-to-point connections at the Transport Layer.
TIBCO ActiveMatrix BPM Installation and Configuration
204
| Appendix B
Securing Communication Channels
An SSL client and server negotiate a stateful connection by using a handshaking
procedure. During this handshake, the client and server agree on various
parameters to establish the connection's security. The handshake begins when a
client connects to an SSL-enabled server requesting a secure connection. The
server sends back its identification in the form of a digital certificate. The
certificate usually contains the server name, the trusted certificate authority (CA),
and the server's public encryption key.
You can specify the SSL configuration of the communication channels at various
times in the life cycle of a TIBCO ActiveMatrix BPM enterprise. Table 62 on
page 204 lists how to perform the initial SSL configuration and how to upgrade,
downgrade, and change the configuration of each channel. Detailed steps for each
procedure are provided in Chapter 5, Creating and Configuring Runtime Objects,
on page 92 and TIBCO ActiveMatrix Administration guide.
Table 62 SSL Configuration Summary
Upgrade, Downgrade or
Change Configuration
Key
Channel
Initial Configuration
1
TIBCO ActiveMatrix
Administrator server
(external HTTP port) web and CLI clients
When creating ActiveMatrix
Administrator server in
TIBCO Configuration Tool.
Upgrade or downgrade:
ActiveMatrix Administrator CLI
TIBCO ActiveMatrix
Administrator server
(internal HTTP port) hosts and nodes
When creating ActiveMatrix
Administrator server in
TIBCO Configuration Tool.
Upgrade or downgrade:
ActiveMatrix Administrator web
UI or CLI
TIBCO ActiveMatrix
Administrator server
- TIBCO Enterprise
Message Service
server
When creating ActiveMatrix
Administrator server in
TIBCO Configuration Tool.
TIBCO Host instance
- TIBCO Enterprise
Message Service
server
When creating ActiveMatrix
Administrator server or
TIBCO Host instance in
TIBCO Configuration Tool.
2
3
4
Change SSL configuration:
ActiveMatrix Administrator CLI
Change SSL configuration:
ActiveMatrix Administrator web
UI or CLI
Upgrade or downgrade:
ActiveMatrix Administrator web
UI or CLI
Change SSL configuration:
ActiveMatrix Administrator web
UI or CLI
TIBCO ActiveMatrix BPM Installation and Configuration
Upgrade or downgrade:
ActiveMatrix Administrator CLI
Change SSL configuration:
ActiveMatrix Administrator CLI
Securing Communication Channels 205
|
Table 62 SSL Configuration Summary (Cont’d)
Upgrade, Downgrade or
Change Configuration
Key
Channel
Initial Configuration
5
TIBCO ActiveMatrix
Administrator server
- external database
and LDAP servers
When creating ActiveMatrix
Administrator server in
TIBCO Configuration Tool.
Change SSL configuration:
ActiveMatrix Administrator CLI
6
TIBCO ActiveMatrix
Administrator server
- hosts and nodes
(management)
When creating ActiveMatrix
Administrator server in
TIBCO Configuration Tool.
Upgrade: ActiveMatrix
Administrator web UI
1. Manually import the
UDDI server certificate
into the ActiveMatrix
Administrator server trust
store using keytool.
Same procedure as initial
configuration
7
TIBCO ActiveMatrix
Administrator server
-UDDI server
Change SSL configuration:
ActiveMatrix Administrator CLI
2. Enable secure
communication in
ActiveMatrix
Administrator web UI or
CLI.
8
9
TIBCO ActiveMatrix
Administrator server
(external HTTP port) TIBCO Business
Studio
ActiveMatrix Administrator When creating ActiveMatrix
Administrator server in
TIBCO Configuration Tool.
Resource instances
(JMS, SMTP, LDAP,
JDBC, HTTP) external servers
ActiveMatrix Administrator
web UI or CLI
TIBCO Business Studio When you connect to
ActiveMatrix Administrator.
ActiveMatrix Administrator
Upgrade or downgrade:
ActiveMatrix Administrator CLI
Change SSL configuration:
ActiveMatrix Administrator CLI
ActiveMatrix Administrator web
UI or CLI
TIBCO ActiveMatrix BPM Installation and Configuration
206
| Appendix B
Securing Communication Channels
TIBCO ActiveMatrix BPM Installation and Configuration
| 207
Appendix C
TIBCO Enterprise Message Service Server
Configuration Required for Non-Admin
Users
This section describes the configuration changes that are required if your TIBCO
ActiveMatrix BPM infrastructure connects to its TIBCO Enterprise Message
Service servers with users that do not have administrator privileges. It presents
the most restrictive permissions necessary.
1. Set permissions for the Administrator servers.
In the following commands, replace username and password with the username
and password values appropriate for each bus.
•
Messaging Bus
delete queue >
delete topic >
create user username "Description of the user" password=password
create queue AMX_SV.>
grant queue AMX_SV.> user=username create, delete, modify, send,
receive
•
Notification Bus, propagates status messages between Administrator, hosts,
and nodes
delete queue >
delete topic >
create user username "Description of the user" password=password
create topic EMSGMS.>
grant topic EMSGMS.> user username create, modify, subscribe,
publish
grant topic $sys.monitor.connection.* user=<username> subscribe
grant admin user=username view-connection
•
Management Bus, which handles the internal Administrator queues, currently
grouped with the Notification Bus
delete queue >
delete topic >
create user username "Description of the user" password=password
create queue com.tibco.amf.admin.deploymentServerQueue.>
grant queue com.tibco.amf.admin.deploymentServerQueue.>
user=username create, delete, send, receive
•
Common Logging and Payload Bus
delete queue >
TIBCO ActiveMatrix BPM Installation and Configuration
208
| Appendix C
TIBCO Enterprise Message Service Server Configuration Required for Non-Admin Users
delete topic >
create user username "Description of the user" password=password
create queue cl_logservice_queue.physical
create queue cl_payload_queue.physical
grant queue cl_logservice_queue.physical user=username send,
receive
grant queue cl_payload_queue.physical user=username send, receive
create jndiname cl_logservice_queue queue
cl_logservice_queue.physical
create jndiname cl_payload_queue queue
cl_payload_queue.physical
•
Monitoring Bus
delete queue >
delete topic >
create user username "Description of the user" password=password
create queue amx.governance.stats
grant queue amx.governance.stats user=username send, receive
2. However, the Notification, Management, and Messaging Buses are initially
grouped together as are the Monitoring, Common Logging, and Payload
Buses. As a result, their constraints need to be grouped before they are
manually separated, if required.
•
Messaging, Notification, and Management Buses
delete queue >
delete topic >
create user username "Description of the user" password=password
create queue AMX_SV.>
grant queue AMX_SV.> user=username create, delete, modify, send,
receive
create topic EMSGMS.>
grant topic EMSGMS.> user=username create, modify, subscribe,
publish
grant topic $sys.monitor.connection.* user=username subscribe
grant admin user=username view-connection
create queue com.tibco.amf.admin.deploymentServerQueue.>
grant queue com.tibco.amf.admin.deploymentServerQueue.>
user=username create, delete, send, receive
•
Monitoring, Common Logging, and Payload Buses
delete queue >
delete topic >
create user username "Description of the user" password=password
create queue cl_logservice_queue.physical
create queue cl_payload_queue.physical
create queue amx.governance.stats
grant queue cl_logservice_queue.physical user=username send,
receive
grant queue cl_payload_queue.physical user=username send, receive
grant queue amx.governance.stats user=username send, receive
create jndiname cl_logservice_queue queue
cl_logservice_queue.physical
create jndiname cl_payload_queue queue cl_payload_queue.physical
TIBCO ActiveMatrix BPM Installation and Configuration
TIBCO Enterprise Message Service Server Configuration Required for Non-Admin Users 209
|
3. Create the Administrator server and TIBCO Host instance using TIBCO
Configuration Tool, see Chapter 5, Creating and Configuring Runtime
Objects.
TIBCO ActiveMatrix BPM Installation and Configuration
210
| Appendix C
TIBCO Enterprise Message Service Server Configuration Required for Non-Admin Users
TIBCO ActiveMatrix BPM Installation and Configuration
| 211
Appendix D
Troubleshooting
When creating an instance of the ActiveMatrix Administrator server using
TIBCO Configuration Tool and when using IBM DB2 as the external
database server, the following errors are seen:
ERROR - Error while creating Admin CLI Keystore.
com.tibco.trinity.runtime.core.provider.identity.trust.TrustRuntim
eException: javax.security.auth.login.LoginException:
com.tibco.trinity.runtime.core.provider.credential.trinity.Trinity
RuntimeException:
com.tibco.trinity.server.credentialserver.exception.CAException:
java.io.IOException: java.lang.ClassNotFoundException:
com.ibm.db2.jcc.am.SqlSyntaxErrorException
These errors are caused when the required pagesize setting of 32KB is not
configured for the IBM DB2 server instance.
To recover from this error:
1. Configure the pagesize setting for the IBM DB2 server instance.
2. Stop the tibcohost and tibamx_SystemNode processes.
3. Delete the folders CONFIG_HOME/admin/EnterpriseName and
CONFIG_HOME/tibcohost/EnterpriseName.
4. Delete and then recreate the IBM DB2 database and tablespace.
5. Run TIBCO Configuration Tool to recreate an ActiveMatrix Administrator
server instance.
TIBCO ActiveMatrix BPM Installation and Configuration
212
| Appendix D
Troubleshooting
TIBCO ActiveMatrix BPM Installation and Configuration
| 213
Index
C
changes from the previous release viii
Console Mode 4
customer support xii
G
GUI Mode 3
I
Installation Modes
Console Mode 4
GUI Mode 3
Silent Mode 4
Installation Type
Custom 4
Profile 4
S
securing communication channels 203
Silent Mode 4
support, contacting xii
T
technical support xii
TIBCO_HOME ix
TIBCO ActiveMatrix BPM Installation and Configuration