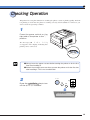
1
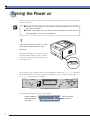
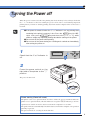
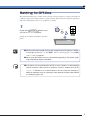
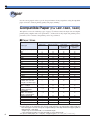
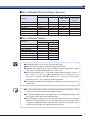
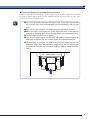
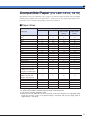
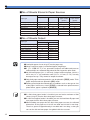
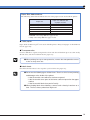
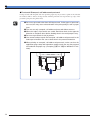
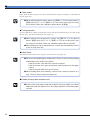
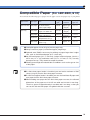
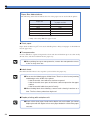
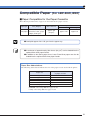
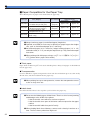
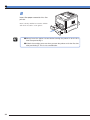
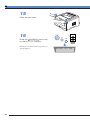
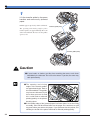
The illustrations in this manual may differ from the product you are using.
Table of Contents
Turning the Power on ................................................................ 2
Turning the Power off ................................................................ 3
On-line and Off-line ..................................................................... 4
Setting to On-line ................................................................................................ 4
Setting to Off-line ............................................................................................... 5
Paper ............................................................................................... 6
Compatible Paper [For LBP-1820, 1620] ................................................ 6
Compatible Paper [For LBP-1810, 1610] ............................................. 11
Compatible Paper [For LBP-870] .............................................................. 16
Compatible Paper [For LBP-880, 910] ................................................... 19
Compatible Paper [For LBP-840, 850] ................................................... 21
Printable Areas ................................................................................................. 24
Incompatible Paper .......................................................................................... 25
Printing from a Paper Cassette .......................................... 26
Paper Jams (How to Remove Jammed Paper) ............. 31
Removing jammed paper ............................................................................... 31
Canceling Printing (Job Cancel) ......................................... 47
Checking Operation ................................................................. 49
1
Turning the Power on
When you turn the power on, the status of the printer and optional device(s) is checked before
printing is enabled.
● Always insert the paper cassette before turning the printer on for the first
time after installing it.
● A blank sheet might come out when you turn the printer on for the first time
after installing it. This is not a malfunction.
1
Press the power switch on the
right side of the printer to the“|”
position.
The printer is turnd on, the operation panel
indicators and the display comes on, and the
status of the printer and optional device(s)
is self-diagnosed.
If the results of the self-diagnosis are normal, printing is enabled. The オンライン indicator,
the 印刷可 indicator and the selected paper feed indicator come on and the message [00 イン
サツ カノウ], appears on the display.
動作モード
オンライン
00 インサツ カノウ
印刷可
A4
ジョブキャンセル
ユーティリティ
セットアップ
排出
メッセージ
両面
ジョブ
給紙選択
リセット/実行
The following information appears on the display.
Printing enabled, no
printing data being
processed
2
00 インサツ カノウ
A4
Currently selected
paper feed size
Turning the Power off
When the power is turned off, all of the printing data in the memory is lost. Always check that
the ジョブ indicator is off before turning the power off in order to avoid deleting important
printing data by accident or deleting printing data from another computer when connected to a
network.
● If the power is turned off when the ジョブ indicator is on, any printing data
remaining in the printer’s memory is lost. Press the 排出 key (for LBP1820, 1620, press リセット key and then select [ハイシュツ]) while
offline to output any important printing data before turning off the power.
● Do not turn off the power while printing.
● Do not turn off the power during the self-diagnosis carried out immediately
after turning the power on.
1
動作モード
00 インサツ カノウ
印刷可
A4
ジョブキャンセル
ユーティリティ
セットアップ
メッセージ
Check that the ジョブ indicator is
off.
ジョブ
リセット/実行
Off
2
Press the power switch on the
right side of the printer to the“○”
position.
The power is turned off.
Power saving (Panel off mode)
The printer can be set to panel off mode in order to reduce the power consumed. When the
printer is set to panel off mode, all of the indicators except the 印刷可 indicator go off if no
operations are carried out and no data is sent from the computer for a set time.
The panel off mode is automatically canceled if data is sent from the computer or an operation
panel key is pressed.
The panel off mode is set using the menu function.
3
On-line and Off-line
On-line means the status of the printer when it can receive data from a computer and print. Offline means its status when it is disconnected from a computer and cannot receive data. Set the
printer to offline before operating the menu with the operation panel.
Setting to On-line
When printing from the computer, the printer must be on-line. Check that the printer is on-line
when printing. If it is not on-line, follow the instructions below to set it to on-line. When the
power is turned on, the printer is automatically set to on-line.
1
オンライン
Press the オンライン key to turn
on the オンライン indicator.
排出
両面
給紙選択
Printing can be carried out.
00 インサツ カノウ
A4
● The printer is not on-line when there is a printer error (when the メッセージ
indicator is on or the numbers in the message are flashing). Remove the
cause of the error and then set the printer to on-line.
● The printer is not on-line during operations such as selecting a menu function
or paper feed method, setting the paper size or cleaning the fixing assembly.
Complete the operation and then set the printer to on-line.
● Never open the printer cover or cassette during printing. The printer might
stop and printing might be disabled.
● If the printer is set to panel off mode, the オンライン indicator goes out
when the printer moves to panel off mode even if the printer is still on-line.
The オンライン indicator automatically comes back on when printing data
is sent or an operation panel key is pressed.
4
Setting to Off-line
The printer must always be off-line when selecting a menu operation or paper feed method or
setting the paper size from the printer’s operation panel. When using the operation panel keys,
follow the instructions below to set the printer to off-line.
1
オンライン
Press the オンライン key to turn
off the オンライン indicator.
排出
両面
給紙選択
Setting can be carried out using the operation
panel.
00 インサツ カノウ
A4
● Printing cannot be carried out from the computer when the printer is offline.
A message such as [プリンタの準備ができていません] or [プリンタが接続
されていません] appears.
● Never open the printer cover or cassette during printing. The printer might
stop and printing might be disabled.
● If the printer is not touched while off-line for over 5 minutes, it automatically
returns to on-line. It does not do so, however, if there is a printer error (if the
メッセージ indicator is on or the numbers in the message are flashing) or
during an operation such as selecting a menu function or paper feed method
or setting the paper size.
5
Paper
Use the correct paper in order to get the best performance from your printer. Using incompatible
paper can lead to reduced printing quality and paper jamming.
Compatible Paper [For LBP-1820, 1620]
This printer can use the following types of paper. ◎ indicates that both single-side and duplex
printing using a duplex unit can be performed, ○ indicates that only single-side printing can be
performed, and × indicates that printing cannot be performed.
■ Paper Sizes
Paper type
Plain paper (64-90 g/m2)
B6*1
A5
A5R
B5
B5R
A4
A4R
B4
A3
A3 full breed
Letter
Letter R
Executive
Executive R
Legal
Ledger
Ledger full breed
User paper*1 *2
width: 76.2-312 mm
length: 127-469.9 mm
Thick paper (91-128 g/m2)
B6*1 ∼ Ledger
A3 full breed
Ledger full breed
User Paper
width: 100-297mm
length: 148-469.9mm
Transparencies A4
Label sheet A4
Postcard
Stamped, self-addresed postcard
Envelope Youkei No.4
6
Paper tray
Paper source
Paper cassette
250-sheet
paper feeder
(option)
500-sheet
paper feeder
(option)
○
◎
○
◎
○
◎
◎
◎
◎
○
◎
◎
◎
○
◎
◎
○
×
◎
×
◎
×
◎
◎
◎
◎
×
◎
×
◎
×
◎
◎
×
×
◎
×
◎
×
◎
◎
◎
◎
×
◎
×
◎
×
◎
◎
×
×
◎
×
◎
×
◎
◎
◎
◎
×
◎
◎
◎
×
◎
◎
×
○
×
×
○
○*3
×
×
×
○*3
×
×
×
○*3
×
×
×
○
○
○
○
○
×
×
×
×
×
×
×
×
×
×
×
×
×
×
×
*1 Can only be used with lengthwise feed.
*2 Plain paper of the following size can be used. However, the side paper guide inside the
500-sheet paper cassette is only set to approximately 2 mm deep and the rear paper guide to
approximately 1 mm deep.
・ Paper tray: 76.2-312mm width, 127-469.9mm length
・ 500-sheet paper feeder: 210-297mm width, 210-431.8mm length
*3 If you use thick paper (91 ∼ 105g/m2), set paper type to 「フツウシ」 or 「フツウシ L」 .
■ No. of Sheets Stored in Paper Sources
Paper type
Plain paper (64 g/m2)
Thick paper (128 g/m2)
Transparencies
Label sheet
Postcard
Stamped, self-addresed postcard
Envelope Youkei No.4
Paper tray
approx. 100
approx. 50
approx. 50
approx. 40
approx. 40
approx. 40
approx. 10
Paper source
Paper cassette
250-sheet
paper feeder
(option)
approx. 250
approx. 250
×
×
×
×
×
×
×
×
×
×
×
×
500-sheet
paper feeder
(option)
approx. 500
×
×
×
×
×
×
■ No. of Sheets Output
Output
Face-down tray Face-up tray
Plain paper (64 g/m2)
approx. 250
approx. 50
Thick paper (128 g/m2)
approx. 150
approx. 25
A3 full breed
×
approx. 25
Ledger full breed
×
approx. 25
Transparencies
approx. 100
1
Postcard
approx. 100
approx. 20
Stamped, self-addresed postcard
approx. 100
approx. 20
Envelope Youkei No.4
approx. 100
approx. 10
Paper type
● Load plain paper of over 90 g/m2 into the paper tray.
● Always load user paper (user defined paper) lengthways.
● Optional extra RAM is necessary for printing on paper larger than Ledger
size, such as A3 full breed paper (312 × 440 mm).
● A3 full breed paper (312 × 440 mm), ledger full breed paper (304.8 ×
457.2 mm; 12" × 18"), user paper (grater than 297 × 431.8mm or less
than 100 × 148.5mm) and index cards (76.2 × 127 mm; 3" × 5") can only
be output face up. They cannot be output face down.
● Printing speed might be reduced due to conditions such as the type or size
of the paper.
● If a 500-sheet paper feeder is installed, you can load a maximum of 500
sheets (64 g/m2) into the 500-sheet paper cassette.
● If a 500-sheet paper feeder is installed, you can also load letter R paper and
user paper into the 500-sheet paper cassette.
● When loading user paper into the 500-sheet paper cassette, the allowed
dimensions of the paper are 210-297 mm wide and 127-432 mm long. There
is a groove of approximately 2 mm wide and 1 mm long, so that you can set
the side and rear paper size guide inside the cassette.
7
Paper Size Abbreviations
The following abbreviations indicate the size of the paper cassette used with the printer.
Paper size
Ledger
Legal
Letter
Executive
Letter R**
User paper**
Paper size indicator dial
of paper cassette
11 × 17
LGL
LTR*
EXEC
LTR-R**
CUSTOM**
*LETTER when using 500-sheet paper feeder
**Only when using 500-sheet paper feeder
● Plain paper
You can use A3-, B4-, A4-, B5- A5-, B6-, Ledger-, Legal-, Letter- and Executive-size plain
paper of 76.2 - 312.0 mm width, 127 - 469.9 mm length and 64 - 90 g/m2 weight with this
printer. Plain paper can be fed from the paper cassette or paper tray. Automatic duplex printing
is possible only with standard size paper other than B6.
● Thick paper
You can use A3-, B4-, A4-, B5-, A5-, B6-, Ledger-, Legal-, Letter- and Executive-size thick
paper of 100 - 297 mm width, 148 - 432 mm length and 91 - 128 g/m2 weight with this printer.
Thick paper can be fed from the paper tray.
● Transparencies
It can be difficult to separate transparencies from each other. Pick them up one at a time and by
all four sides, and then load them into the paper tray.
● When printing face up on transparencies, remove the transparencies one at
a time as they come out.
● Label sheet
Check that the label sheet is face up when you load it into the paper tray.
● Do not use the following types of label sheet. There is a risk of severe jamming
and damage to the inside of the printer.
・ Label sheet with some adhesive surfaces exposed
・ Label sheet with some parts of the lower surface exposed on the upper
surface
・ Label sheet with labels that peel off easily
● When feeding label sheet sideways, remove each sheet by hand one at a
time. The first sheets printed out might curl.
8
● Postcards/Stamped, self-addressed postcard
Load postcards with the print side face up in the paper tray. If you want to print on the side that
the address will be written, load postcards with the print side face up and the top edge of the
postcards going into the printer first.
● Do not use postcards other than official postcards. If other types of postcards
are used, this may cause a deterioration in the print quality as well as paper
jams.
● You can use only stamped, self-addressed postcard without creases.
● When the edges of postcards are curled, bend them back in the opposite
direction to straighten them before loading them in the multi-purpose tray.
● Do not use postcards for ink jet printers.
● You cannot load postcards and stamped, self-addressed postcards in the
landscape orientation. Be sure to load them in the portrait orientation.
● When printing on stamped, self-addressed postcards, make sure that the
application page setup and orientation settings match the way the postcard
are loaded in the paper tray. (Example: [往復はがき横] for Windows NT 4.0/
2000)
9
● Envelopes
Press the envelope with your hands to expel any air pockets and press down on the edges. Then
load it with the print side face up in the paper tray.
Youkei No.4 (105 mm × 235 mm)
(Envelope Y401 for Canon
LBP/recommended)
* You cannot use envelopes
with a flap along the short edge.
● Never use the following types of envelopes. If envelopes that do not conform
to specifications are used, this may cause hard to clear paper jam or a
printer malfunction.
- Envelopes with fasteners or snaps.
- Envelopes with a window cut.
- Self-adhesive envelopes
- Envelopes with wrinkles or creases.
- Envelopes with very irregular thickness at the folds or overlaps.
- Envelopes with irregular shapes not rectangle.
● Do not print on the back of envelopes.
● Be sure to load envelopes in the landscape orientation.
● Load envelopes with the flap on the left.
10
Compatible Paper [For LBP-1810, 1610]
This printer can use the following types of paper. ◎ indicates that both single-side and duplex
printing using a duplex unit can be performed, ○ indicates that only single-side printing can be
performed, and × indicates that printing cannot be performed.
■ Paper Sizes
Paper type
Plain paper (64-105 g/m2)
B6*3
A5
A5R
B5
B5R
A4
A4R
B4*2
A3*2
A3 full breed*3
Letter
Letter R
Executive
Executive R
Legal*2
Ledger*2
Ledger full breed*3
User paper
width: 76.2-312 mm
length: 127-469.9 mm
Thick paper (106-128 g/m2)
width: 100-297 mm
length: 148-432 mm
Transparencies A4
Label sheet A4
Postcard
Stamped, self-addresed postcard
Envelope Youkei No.4
Paper tray
Paper source
Paper cassette
250-sheet
paper feeder
(option)
500-sheet
paper feeder
(option)
○
◎
○
◎
○
◎
◎
◎
◎
○
◎
◎
◎
○
◎
◎
○
×
◎*1
×
◎*1
×
◎*1
◎*1
◎*1
◎*1
×
◎*1
×
◎*1
×
◎*1
◎*1
×
×
◎*1
×
◎*1
×
◎*1
◎*1
◎*1
◎*1
×
◎*1
×
◎*1
×
◎*1
◎*1
×
×
◎*1
×
◎*1
×
◎*1
◎*1
◎*1
◎*1
×
◎*1
◎*1
◎*1
×
◎*1
◎*1
×
○*3
×
×
○*1,*3,*4
○*3
×
×
×
○
○
○
○
○
×
×
×
×
×
×
×
×
×
×
×
×
×
×
×
*1 Only plain paper 64-90 g/m2 can be loaded into a paper cassette.
*2 If optional extra RAM is installed, duplex printing can be performed.
*3 Can only be used with lengthwise feed.
*4 Paper 210-297 mm wide and 210-431.8 mm long can be used. However, the side paper guide
inside the cassette is only set to approximately 2 mm deep and the rear paper guide to
approximately 1 mm deep.
11
■ No. of Sheets Stored in Paper Sources
Paper type
Plain paper (64 g/m2)
Thick paper (128 g/m2)
Transparencies
Label sheet
Postcard
Stamped, self-addresed postcard
Envelope Youkei No.4
Paper tray
approx. 100
approx. 50
approx. 50
approx. 40
approx. 40
approx. 40
approx. 10
Paper source
Paper cassette
250-sheet
paper feeder
(option)
approx. 250
approx. 250
×
×
×
×
×
×
×
×
×
×
×
×
500-sheet
paper feeder
(option)
approx. 500
×
×
×
×
×
×
■ No. of Sheets Output
Output
Face-down tray Face-up tray
Plain paper (64 g/m2)
approx. 250
approx. 50
Thick paper (128 g/m2)
approx. 150
approx. 25
A3 full breed
×
approx. 25
Ledger full breed
×
approx. 25
Transparencies
approx. 100
1
Postcard
approx. 100
approx. 20
Stamped, self-addresed postcard approx. 100
approx. 20
Envelope Youkei No.4
approx. 30
approx. 10
Paper type
● Load plain paper of over 90 g/m2 into the paper tray.
● Always load user paper (user defined paper) lengthways.
● If [トレイ用紙サイズ] is set, postcards stamped, self-addressed postcars
and envelopes are automatically printed in their respective print mode.
● A3 full breed paper (312 × 440 mm), ledger full breed paper (304.8 ×
457.2 mm; 12" × 18") and index cards (76.2 × 127 mm; 3" × 5") can only
be output face up. They cannot be output face down.
● Only plain paper and transparencies can be printed in [高階調] mode. Thick
paper and postcards are printed in [標準] mode.
● Printing speed might be reduced due to conditions such as the type or size
of the paper. In that case, even if [高階調] is selected in the printer menu or
printer driver, paper is printed in [標準階調].
● If a 500-sheet paper feeder is installed, you can load a maximum of 500
sheets (64 g/m2) into the 500-sheet paper cassette.
● If a 500-sheet paper feeder is installed, you can also load letter R paper and
user paper into the 500-sheet paper cassette.
● When loading user paper into the 500-sheet paper cassette, the allowed
dimensions of the paper are 210-297 mm wide and 210-431.8 mm long.
There is a groove of approximately 2 mm wide and 1 mm long, so that you
can set the side and rear paper size guide inside the cassette.
12
Paper Size Abbreviations
The following abbreviations indicate the size of the paper cassette used with the printer.
Paper size
Ledger
Legal
Letter
Executive
Letter R**
User paper**
Paper size indicator dial
of paper cassette
11 × 17
LGL
LTR*
EXEC
LTR-R**
CUSTOM**
*LETTER when using 500-sheet paper feeder
**Only when using 500-sheet paper feeder
● Thick paper
Paper which is 106-128 g/m2 can be used with this printer. Always load paper of this thickness
into the paper tray.
● Transparencies
It can be difficult to separate transparencies from each other. Pick them up one at a time and by
all four sides, and then load them into the paper tray.
● When printing face up on transparencies, remove the transparencies one at
a time as they come out.
● Label sheet
Check that the label sheet is face up when you load it into the paper tray.
● Do not use the following types of label sheet. There is a risk of severe jamming
and damage to the inside of the printer.
・ Label sheet with some adhesive surfaces exposed
・ Label sheet with some parts of the lower surface exposed on the upper
surface
・ Label sheet with labels that peel off easily
● When feeding label sheet sideways, remove each sheet by hand one at a
time. The first sheets printed out might curl.
13
● Postcards/Stamped, self-addressed postcard
Load postcards with the print side face up in the paper tray. If you want to print on the side that
the address will be written, load postcards with the print side face up and the top edge of the
postcards going into the printer first.
● Do not use postcards other than official postcards. If other types of postcards
are used, this may cause a deterioration in the print quality as well as paper
jams.
● You can use only stamped, self-addressed postcard without creases.
● When the edges of postcards are curled, bend them back in the opposite
direction to straighten them before loading them in the multi-purpose tray.
● Do not use postcards for ink jet printers.
● You cannot load postcards and stamped, self-addressed postcards in the
landscape orientation. Be sure to load them in the portrait orientation.
● When printing on stamped, self-addressed postcards, make sure that the
application page setup and orientation settings match the way the postcard
are loaded in the paper tray. (Example: [往復はがき横] for Windows NT 4.0/
2000)
14
● Envelopes
Press the envelope with your hands to expel any air pockets and press down on the edges. Then
load it with the print side face up in the paper tray.
Youkei No.4 (105 mm × 235 mm)
(Envelope Y401 for Canon
LBP/recommended)
* You cannot use envelopes
with a flap along the short edge.
● Never use the following types of envelopes. If envelopes that do not conform
to specifications are used, this may cause hard to clear paper jam or a
printer malfunction.
- Envelopes with fasteners or snaps.
- Envelopes with a window cut.
- Self-adhesive envelopes
- Envelopes with wrinkles or creases.
- Envelopes with very irregular thickness at the folds or overlaps.
- Envelopes with irregular shapes not rectangle.
● Do not print on the back of envelopes.
● Be sure to load envelopes in the landscape orientation.
● Load envelopes with the flap on the left.
● Duplex printing with a duplex unit
● If both a 500-sheet paper feeder and a duplex unit are installed, you cannot
duplex print with the duplex unit on user paper loaded in a 500-sheet paper
cassette.
15
Compatible Paper
[For LBP-870]
This printer can use the following types of paper. ◎ indicates that both single-side and duplex
printing using a duplex unit can be performed, ○ indicates that only single-side printing can be
performed, and × indicates that printing cannot be performed.
■ Paper Sizes
Paper type
Plain paper (64-105 g/m2)
B6*4
A5
A5R
B5
B5R
A4
A4R
B4*2
A3*2
A3 full breed*3
Letter
Letter R
Executive
Executive R
Legal*2
Ledger*2
Ledger full breed*3
User paper
width: 76.2-312 mm
length: 127-469.9 mm
Thick paper (106-128 g/m2)
width: 100-297 mm
length: 148-432 mm
Transparencies A4
Label sheet A4
Paper tray
Paper source
Paper cassette
250-sheet
paper feeder
(option)
500-sheet
paper feeder
(option)
○
◎
○
◎
○
◎
◎
◎
◎
○
◎
◎
◎
○
◎
◎
○
×
◎*1
×
◎*1
×
◎*1
◎*1
◎*1
◎*1
×
◎*1
×
◎*1
×
◎*1
◎*1
×
×
◎*1
×
◎*1
×
◎*1
◎*1
◎*1
◎*1
×
◎*1
×
◎*1
×
◎*1
◎*1
×
×
◎*1
×
◎*1
×
◎*1
◎*1
◎*1
◎*1
×
◎*1
◎*1
◎*1
×
◎*1
◎*1
×
○*4
×
×
○*1,*4,*5
○*4
×
×
×
○
○
×
×
×
×
×
×
*1 Only plain paper 64-90 g/m2 can be loaded into a paper cassette.
*2 If optional extra RAM is installed, duplex printing can be performed.
*3 If optional extra RAM is installed, printing can be performed.
*4 Can only be used with lengthwise feed.
*5 Paper 210-297 mm wide and 210-431.8 mm long can be used. However, the side paper guide
inside the cassette is only set to approximately 2 mm deep and the rear paper guide to
approximately 1 mm deep.
16
■ No. of Sheets Stored in Paper Sources
Paper tray
Paper type
Plain paper (64 g/m2)
Thick paper (128 g/m2)
Transparencies
Label sheet
approx. 100
approx. 50
approx. 50
approx. 40
Paper source
Paper cassette
250-sheet
paper feeder
(option)
approx. 250
approx. 250
×
×
×
×
×
×
500-sheet
paper feeder
(option)
approx. 500
×
×
×
■ No. of Sheets Output
Paper type
Plain paper (64 g/m2)
Thick paper (128 g/m2)
A3 full breed
Ledger full breed
Transparencies
Label sheet
Output
Face-down tray Face-up tray
approx. 250
approx. 50
approx. 150
approx. 25
×
approx. 25
×
approx. 25
approx. 100
1
approx. 100
approx. 20
● Optional extra RAM is necessary for printing in super-fine mode or highspeed super-fine mode.
● Optional extra RAM is necessary for printing on paper larger than ledger
size, such as A3 full breed paper (312 × 440 mm), or double side printing on
paper larger than A4.
● Printing speed might be reduced due to conditions such as the type or size
of the paper.
Paper Size Abbreviations
The following abbreviations indicate the size of the paper cassette used with the printer.
Paper size
Ledger
Legal
Letter
Executive
Letter R**
User paper**
Paper size indicator dial
of paper cassette
11 × 17
LGL
LTR*
EXEC
LTR-R**
CUSTOM**
*LETTER when using 500-sheet paper feeder
**Only when using 500-sheet paper feeder
17
● Thick paper
Paper which is 106-128 g/m2 can be used with this printer. Always load paper of this thickness
into the paper tray.
● When printing with thick paper, always set [用紙タイプ] in the printer driver’s
[給紙] sheet (or [デフォルト用紙タイプ] in the set-up menu if you are using
an OS which cannot run a Windows printer driver) to [厚紙].
● Transparencies
It can be difficult to separate transparencies from each other. Pick them up one at a time and by
all four sides, and then load them into the paper tray.
● When printing on transparencies, always set [用紙タイプ] in the printer
driver’s [給紙] sheet (or [デフォルト用紙タイプ] in the set-up menu if you
are using an OS which cannot run a Windows printer driver) to [OHP].
● When printing face up on transparencies, remove the transparencies one at
a time as they come out.
● Label sheet
Check that the label sheet is face up when you load it into the paper tray.
● Do not use the following types of label sheet. There is a risk of severe jamming
and damage to the inside of the printer.
・ Label sheet with some adhesive surfaces exposed
・ Label sheet with some parts of the lower surface exposed on the upper
surface
・ Label sheet with labels that peel off easily
● When feeding label sheet sideways, remove each sheet by hand one at a
time. The first sheets printed out might curl.
● Duplex printing with a duplex unit
● If both a 500-sheet paper feeder and a duplex unit are installed, you cannot
duplex print with the duplex unit on user paper loaded in a 500-sheet paper
cassette.
18
Compatible Paper
[For LBP-880, 910]
You can load the following types of paper into the paper cassette and paper tray of your printer.
Weight
(g/m2)
Max.
sheet no.
Default paper
type set
Paper cassette Plain paper
64-90
approx. 250
(64 g/m2)
フツウシ
Paper tray
64-105
Paper source
Paper type
Size
A5, B5, A4, A4R,
B4, A3, Executive,
Letter, Legal, Ledger
width: 76.2-312 mm
Plain paper
length: 127-469.9 mm
width: 100-297 mm
Thick paper
length: 148-432 mm
A4 (Canon domestic LBP
Transparencies
transparencies: 8.7 g)
A4 (Canon domestic label
Label sheet
sheet: 7.8 g)
106-128
approx. 100
(64 g/m2)
approx. 50
(128 g/m2)
フツウシ
アツガミ
_
approx. 50
OHP
_
approx. 40
フツウシ
● Load plain paper of over 90 g/m2 into the paper tray.
● Always load user paper (user defined paper) lengthways.
● Optional extra RAM is necessary for printing on paper larger than Ledger
size, such as A3 full breed paper (312 × 440 mm).
● A3 full breed paper (312 × 440 mm), ledger full breed paper (304.8 ×
457.2 mm; 12" × 18") and index cards (76.2 × 127 mm; 3" × 5") can only
be output face up. They cannot be output face down.
● Printing speed might be reduced due to conditions such as the type or size
of the paper.
● If a 500-sheet paper feeder is installed, you can load a maximum of 500
sheets (64 g/m2) into the 500-sheet paper cassette.
● If a 500-sheet paper feeder is installed, you can also load letter R paper and
user paper into the 500-sheet paper cassette.
● When loading user paper into the 500-sheet paper cassette, the allowed
dimensions of the paper are 210-297 mm wide and 210-431.8 mm long.
There is a groove of approximately 2 mm wide and 1 mm long, so that you
can set the side and rear paper size guide inside the cassette.
19
Paper Size Abbreviations
The following abbreviations indicate the size of the paper cassette used with the printer.
Paper size
Ledger
Legal
Letter
Executive
Letter R**
User paper**
Paper size indicator dial
of paper cassette
11 × 17
LGL
LTR*
EXEC
LTR-R**
CUSTOM**
*LETTER when using 500-sheet paper feeder
**Only when using 500-sheet paper feeder
● Thick paper
Paper which is 106-128 g/m2 can be used with this printer. Always load paper of this thickness
into the paper tray.
● Transparencies
It can be difficult to separate transparencies from each other. Pick them up one at a time and by
all four sides, and then load them into the paper tray.
● When printing face up on transparencies, remove the transparencies one at
a time as they come out.
● Label sheet
Check that the label sheet is face up when you load it into the paper tray.
● Do not use the following types of label sheet. There is a risk of severe jamming
and damage to the inside of the printer.
・ Label sheet with some adhesive surfaces exposed
・ Label sheet with some parts of the lower surface exposed on the upper
surface
・ Label sheet with labels that peel off easily
● When feeding label sheet sideways, remove each sheet by hand one at a
time. The first sheets printed out might curl.
● Duplex printing with a duplex unit
● If both a 500-sheet paper feeder and a duplex unit are installed, you cannot
duplex print with the duplex unit on user paper loaded in a 500-sheet paper
cassette.
20
Compatible Paper
[For LBP-840, 850]
■ Paper Compatible for the Paper Cassette
The following standard sizes of paper can be loaded into the paper cassette.
Paper type
Size (Weight)
A5, B5, A4, A4R, B4, A3,
Plain paper Executive, Letter, Legal,
Ledger (64-90 g/m2)
Max. sheet no.
approx. 250
(64 g/m2)
Output sheet no.
Face down
Face up
approx. 250
approx. 50
● Load plain paper of 91-105 g/m2 into the paper tray.
● A maximum of approximately 500 sheets (64 g/m2) can be loaded into the
optional 500-sheet paper feeder.
● In addition to the above paper sizes, Letter R and User paper can also be
loaded into the optional 500-sheet paper feeder.
Paper Size Abbreviations
The following abbreviations indicate the size of the paper cassette used with the printer.
Paper size
Ledger
Legal
Letter
Executive
Letter R**
User paper**
Paper size indicator dial
of paper cassette
11 × 17
LGL
LTR*
EXEC
LTR-R**
CUSTOM**
*LETTER when using 500-sheet paper feeder
**Only when using 500-sheet paper feeder
21
■ Paper Compatible for the Paper Tray
The following sizes of paper can be loaded into the paper tray.
Paper type
Size (Weight)
width: 76.2-312 mm, length:
127-469.9 mm (64-105 g/m2)
width: 100-297 mm, length:
Thick paper
148-432 mm (106-128 g/m2)
A4 (Canon domestic LBP
Transparencies
Transparencies: 8.7 g)
A4 (Canon domestic label
Label sheet sheet: 7.8 g)
Plain paper
Max. sheet no.
approx. 100
(64 g/m2)
approx. 50
(128 g/m2)
Output sheet no.
Face down
Face up
approx. 250
approx. 50
approx. 150
approx. 30
approx. 50
approx. 100
1
approx. 40
approx. 100
approx. 20
● Always load user paper (user defined paper) lengthwise.
● Optional extra RAM is necessary for printing on paper larger than ledger
size, such as A3 full breed paper (312 × 440 mm).
● A3 full breed paper (312 × 440 mm), ledger full breed paper (12" × 18")
and index cards (3" × 5") can only be output face up. They cannot be output
face down.
● When printing with thick paper, always set [デフォルト用紙タイプ] to [アツ
ガミ] (printer driver: paper sheet media).
● Thick paper
Paper which is 106-128 g/m2 can be used with this printer. Always load paper of this thickness
into the paper tray.
● Transparencies
It can be difficult to separate transparencies from each other. Pick them up one at a time and by
all four sides, and then load them into the paper tray.
● When printing face up on transparencies, remove the transparencies one at
a time as they come out.
● Label sheet
Check that the label sheet is face up when you load it into the paper tray.
● Do not use the following types of label sheet. There is a risk of severe jamming
and damage to the inside of the printer.
・ Label sheet with some adhesive surfaces exposed
・ Label sheet with some parts of the lower surface exposed on the upper
surface
・ Label sheet with labels that peel off easily
● When feeding label sheet sideways, remove each sheet by hand one at a
time. The first sheets printed out might curl.
22
● Duplex printing with a duplex unit
● If both a 500-sheet paper feeder and a duplex unit are installed, you cannot
duplex print with the duplex unit on user paper loaded in a 500-sheet paper
cassette.
23
Printable Areas
This printer can print over areas of paper within the following ranges.
● Plain paper, thick paper,
transparencies, label sheet
(except full breed)
● A3 full breed paper, ledger full
breed paper
5.3 mm
5 mm
4.7 mm
4.3 mm
5 mm
5 mm
5 mm
5.7 mm
* The printer may not be able to print correctly in
areas 5 mm from the top, 10 mm from the
bottom and 7.5 mm from each side.
● Postcard/Stamped, self-addressed post card
(LBP-1820, 1620, 1810, 1610 only)
100 mm
200 mm
5 mm
148 mm
5 mm
148 mm
5 mm
5 mm
5 mm
5 mm
5 mm
5 mm
● Envelope (LBP-1820, 1620, 1810, 1610 only)
10 mm
235 mm
10 mm
10 mm
105 mm
24
10 mm
Incompatible Paper
In order to avoid paper jams and damaging the printer, do not use the following kinds of paper.
● Paper that jams easily
・Paper that is too thick or too thin
・Non-standard size paper
・Wet or damp paper
・Torn paper
・Coarse or extremely smooth paper
・Paper with binder holes, serrated paper
・Curled paper, creased paper
・Specially coated paper
・Label sheet with labels that peel off easily
・Paper which has already been used for photocopying or laser printing (reverse side also
incompatible)
・Paper which has raised surfaces
・Wrinkled paper
・Folded paper
● Heat-sensitive paper
・Paper with ink that melts, burns or gives off toxic vapours in the heat of the fixing assembly
。
(approx. 150 C)
・Thermal paper
・Color paper with a processed surface
・Specially coated paper
・Paper with adhesive on it
● Paper that can cause printer malfunction or damage
・Carbon paper
・Paper with staples, clips, ribbons or tape attached
・Paper which has already been used for photocopying or laser printing (reverse side also
incompatible)
● Paper on which toner cannot fix easily
・Coarse paper such as pulp paper and Japanese writing paper
・Paper with rough fibers
・Specially coated paper
25
Printing from a Paper Cassette
250-sheet paper cassette and 500-sheet paper cassette can be loaded with A5, B5, A4, A4R, B4,
A3, Executive, Letter, Legal and Ledger size plain (64-90 g/m2) paper. 500-sheet paper cassette
can also be loaded with Letter R and User paper. Each type of paper is loaded as shown below.
Sideways feed
A4
B5
A5
Executive
Letter
Lengthways feed
A3
B4
A4R
Letter R
(500-sheet paper cassette only)
Legal
Ledger
Follow the precautions below in order to avoid paper jamming.
● Do not remove the paper cassette during printing. Doing so can lead to
paper jamming or damage.
● Only load plain paper (64-90 g/m2).
● Do not load paper which has raised parts, creases or curled edges.
● Do not load paper beyond the paper limit mark. The number of plain
(64 g/m2) sheets that can be loaded are approximatey 250 in the 250-sheet
paper cassette and approximatey 500 in the 500-sheet paper cassette.
● See p. 6 to 13 for details of the kinds of paper that can be used.
● Refill with paper after the loaded paper has run out. Refilling with paper
before it has run out can lead to incorrect paper feeding.
● Duplex printing cannot be performed on user paper (user defined paper).
26
■ 250-sheet paper cassette
Paper is loaded into the 250-sheet paper cassette by the same procedure as loading the standard
paper cassette into the printer.
■ 500-sheet paper cassette
Follow the instructions below when loading paper into the 500-sheet paper cassette. When loading
paper, remove the paper cassette from the paper feeder.
1
Hold the rear paper size guide lever
and slide it to the mark indicating
the new paper size.
LTR
A4
Rubber roller
● Never touch the rubber roller at the front of the paper cassette. Doing so
could lead to a paper feed malfunction.
2
A5
LGL/LTR-R
B4/B5
EXE
11 17/LTR
A3/A4
Hold the left paper size guide lever
and slide it to the mark indicating
the new paper size loaded.
The side paper guide levers operate together.
27
3
Fan the paper, then straighten the
edges.
4
Paper limit mark
Load the paper up to the paper limit
mark on the rear paper size guide
and push the front edge of the
paper down so that both sides are
under the retaining clips.
Retaining clips
● Make sure that stack is not higher than the paper limit mark on the paper
size guide.
5
Stack the paper against the left
paper size guide.
Left paper
size guide
● Always stack the paper against the left paper size guide. If you do not,
printing quality will be impaired.
28
6
The pressure control lever is
pushed to the front when ● is
displayed and to the back when ○
is displayed.
● The pressure control lever can regulate the lifting power of the paper between
two levels. Various quantities of paper can be smoothly fed by setting the
pressure control lever to ● or ○, depending on the quantity and weight of
the loaded paper.
7
Set the paper series lever and
paper size indicator dial according
to the size of the loaded paper.
Paper size
indicator dial
Paper series
lever
The factory setting is A4. When nonJapanese paper such as Letter paper or Legal
paper is loaded, switch the paper series lever
before adjusting the paper size indicator dial.
Size indicator
● Always check that the loaded paper size is the same as that shown on the
paper size indicator before inserting the paper cassette into the printer. If
the indicated size is different, there will be a malfunction.
29
8
Insert the paper cassette into the
printer.
Insert it slowly until its front surface is flush
with the front surface of the printer.
● Always insert the paper cassette before turning the printer on for the first
time after purchasing it.
● A blank sheet might come out when you turn the printer on for the first time
after purchasing it. This is not a malfunction.
30
Paper Jams (How to Remove Jammed Paper)
If a paper jam occurs inside the printer for any reason during printing, an alarm sounds and the
message [13 ヨウシガ ツマリマシタ] appears on the display.
When a paper jam occurs, follow the instructions below to remove it and restart printing. If the
message does not disappear even when the jammed paper is removed according to this procedure,
there may be some scraps of paper left inside the printer. Inspect each part of the printer again
and remove all jammed paper.
Removing jammed paper
When a paper jam occurs, remove the toner cartridge first and then lower the fixing assembly
pressure release levers. Then remove the paper. Make sure that you have a toner cartridge
protective bag or thick cloth on hand to protect the toner cartridge.
● Always remove the toner cartridge before you try to remove any jammed
paper. This makes it easier to remove the jammed paper.
● Leave the printer on while removing the jammed paper. If you turn the printer
off, the data that is being printed will be lost.
● If you try to remove the paper by force, the paper may tear or the inside of
the printer may be damaged. When you remove the jammed paper, make
sure you pull it in the proper direction according to its position.
● If the jammed paper is torn, make sure you look for any remaining scraps of
paper and remove them.
31
■ How to remove jammed paper
1
Appears when paper
jams.
Check all messages on the display.
If there is more than one message, each
message will be displayed in turn. Check all
messages. Messages will no longer be
displayed after one of the printer covers has
been opened so make a note of them as
necessary.
13 ヨウシガ ツマリマシタ
ウエ カバー エリア
The location of the jamming is
displayed.
If there is jamming at more than
one location, they are all
displayed in sequence.
The messages indicate the area where the paper jam has occurred. The list below shows the
messages that can be displayed. If more than one message is displayed, make a note of all of
them and check them in the order indicated.
Display messages
Location of paper jam
[ウエ カバー エリア]
[ハイシ エリア]
[キュウシ エリア]
[リョウメン ユニット]
[カミヅマリ ショリ トレイ]
Top cover area
Output area
Paper feed area
Duplex unit area
Jamming treatment tray area
2
Pull the opening levers on each
side of the top cover forward to
open the cover.
3
Remove the toner cartridge.
32
Order of inspection
1
2
3
4
5
4
Put the toner cartridge into the
protective bag.
● Do not expose the toner cartridge to bright light such as direct sunlight. If
you do not have a protective bag, wrap it in a thick cloth.
5
Press the two levers on the left
and right of the rear cover inwards
and open the rear cover.
When the duplex unit is attached, pull the
rear unit back first to separate it from the
main unit.
6
Lower the left and right green fixing
assembly pressure release levers
to release the fixing assembly
pressure.
33
7
If the message [ウエ カバー エリ
ア] appears on the display, follow
the steps on p. 27 and remove any
jammed paper from the top cover
side.
8
If the message [ハイシ エリア]
appears on the display, follow the
steps on p. 29 and remove any
jammed paper from the rear cover
side.
9
If the message [キュウシ エリア]
appears on the display, follow the
steps on p. 31 and remove any
jammed paper from the paper
cassette side.
10
If the message [リョウメン ユニッ
ト] appears on the display, follow
the steps on p. 33 and remove any
jammed paper from the rear unit
of the duplex unit and the jamming
treatment tray.
11
If the message [カミヅマリ ショリ
トレイ] appears on the display,
follow the steps on p. 35 and
remove any jammed paper from the
rear unit of the duplex unit and the
jamming treatment tray.
34
12
Raise the left and right green fixing
assembly pressure release levers.
13
Close the rear cover.
When the duplex unit is attached, return the
rear unit to its original position after you
close the rear cover.
● When you return the rear unit to its original position, check that the upper
cover of the duplex unit is closed. If the upper cover of the duplex unit is not
completely closed, this could lead to a paper jam.
14
Insert the toner cartridge.
35
15
Close the top cover.
16
Press the オンライン key to turn
on the オンライン indicator.
Printing is restarted from the page where it
was interrupted.
36
オンライン
排出
両面
給紙選択
00 インサツ カノウ A4
■ [ウエ カバー エリア] (Top Cover Area)
If the message [ウエ カバー エリア] appears on the display, check the top cover area.
Caution
● Do not put your hands inside the top cover immediately after using the
printer. The fixing assembly and surrounding area are extremely hot. Take
care not to touch any parts inside the top cover except those specified. If
you do, you may get burned.
● Never touch the high pressure contact points inside the top cover. This
may damage the printer.
High pressure
contact points
37
1
Lift the transfer guide by the green
handles and remove any jammed
paper.
Pull the paper up slowly with both hands.
The opening and closing angles of the
。
transfer guides are approximately 90 both
at the front and back. Do not force the guides
open too far.
Transfer guide (rear)
Transfer guide (front)
Caution
● If your hands or clothes get dirty from touching the toner, wash them
immediately in cold water. Do not use hot water. If you do, the toner may
stain permanently.
● The opening and closing
angles of the transfer guides
。
are approximately 90 both at
the front and back. The guides
may become distorted if you
force them open too far and
this could lead to reduced
printing quality or the printer Transfer guide
breaking down.
● If the leading edge of the jammed paper has been fed as far as the fixing
assembly, there will be unfixed toner on the paper. Be careful not to spill
any toner when you remove the paper. If you spill toner into the printer, this
will dirty the inside of the printer and lead to reduced printing quality.
38
2
Return the transfer guide to its
original position.
Caution
● Replacing the toner cartridge without returning the transfer guide to its
original position could damage the printer and the toner cartridge.
3
If you cannot remove the paper
from the top cover side, continue
from step 8 on p. 24.
4
If you cannot remove all of the
paper and scraps of paper from the
top cover side, continue from step
12 on p. 25 and return the printer
to on-line status.
■ [ハイシ エリア] (Output Area)
If the message [ハイシ エリア] appears on the display, check the rear cover area or the output
tray area.
1
If the message [ウエ カバー エリ
ア] also appears on the display,
follow the steps on p. 27 to remove
any jammed paper from the top
cover area.
2
If paper has jammed in the facedown tray and you want to remove
it without removing the tray, pull
the paper out slowly with both
hands.
39
3
If paper has jammed in the face-up
tray and you want to remove it
without removing the tray, pull the
paper out slowly with both hands.
If you cannot remove the paper by pulling
it, do not try to force it out. Go to step 4 and
remove the paper from the rear cover side.
Caution
● Do not touch the fixing
assembly or surrounding area
because they are extremely
hot immediately after printing.
If you do, you may get burned.
4
Slowly pull out any jammed paper
from the fixing assembly with both
hands.
5
If you cannot remove the paper from
the rear cover side, follow step 9 on
p. 24 and remove the paper.
6
When you have removed all of the
paper and scraps of paper, continue
from step 12 on p. 25 and return
the printer to on-line status.
40
■ [キュウシ エリア] (Paper Feed Area)
If the message [キュウシ エリア] appears on the display, check the paper cassette or paper
tray area.
1
If the message [ウエ カバー エリ
ア] also appears on the display,
follow the steps on p. 27 and
remove any jammed paper from the
top cover area.
2
Pull out the standard paper
cassette, optional paper cassette
and paper jamming treatment tray.
41
3
Slowly pull out any jammed paper
with both hands.
When the optional paper feeder is attached,
slowly pull out any jammed paper with both
hands.
If you are duplex-printing, pull the paper out
slowly with both hands.
4
If the paper has jammed in the
paper tray, slowly pull out any
jammed paper with both hands.
5
Load paper, the paper cassette
and the jamming treatment tray.
6
When you have removed all of the
paper and scraps of paper, continue
from step 12 on p. 25 and return
the printer to on-line status.
42
■ [リョウメン ユニット] (Duplex Unit Area)
If the message [リョウメン ユニット] appears on the display, check the rear unit of the
duplex unit or the jamming treatment tray in the main unit.
1
If the message [ウエ カバー エリ
ア] also appears on the display,
follow the steps on p. 27 and
remove any jammed paper from the
top cover area.
2
Open each transfer guide in the
rear unit and remove any jammed
paper.
As shown in the three diagrams, open the
cover and transfer guide of each part and pull
out any jammed paper with both hands.
43
3
Pull out the standard paper
cassette, optional paper cassette
and jamming treatment tray.
4
Slowly pull out any jammed paper
with both hands.
5
Load paper, the paper cassette
and jamming treatment tray.
6
When you have removed all of the
paper and scraps of paper,
continue from step 12 on p. 25
and return the printer to on-line
status.
44
■ [カミヅマリ ショリ トレイ] (Jamming Treatment Tray Area)
If the message [カミヅマリ ショリ トレイ] appears on the display, check the jamming
treatment tray inside the front of the duplex unit.
(NB: Except LBP-850. Only LBP-840, 870, 880 and 910.)
1
If the message [ウエ カバー エリ
ア] also appears on the display,
follow the steps on p. 27 and
remove any jammed paper from the
top cover area.
2
Pull out the standard paper
cassette, optional paper cassette
and jamming treatment tray.
3
Slowly pull out any jammed paper
with both hands.
45
4
Load paper, the paper cassette
and jamming treatment tray.
● When you return the rear unit to its original position, check that the top
cover of the duplex unit is closed. If the top cover of the duplex unit is not
completely closed, this could cause a paper jam.
5
When you have removed all of the
paper and scraps of paper,
continue from step 12 on p. 25
and return the printer to on-line
status.
46
Canceling Printing (Job Cancel)
(NB: Except LBP-850.)
To cancel printing currently being performed, carry out job cancel. Job cancel lets you cancel a
job while data is being received or processed. It does not affect the printing data for the next job
or any other interface jobs for which data processing has not begun.
● Carry out job cancel offline when data is being processed (when the ジョブ
indicator is on or flashing). If you press the ユーティリティ / ジョブキャンセル key
when the ジョブ indicator is off, it functions as the ユーティリティ key.
For LBP-1820, 1620, if you press the ジョブキャンセル key when the
ジョブ indicator is off, the job cancel cannot be performed.
● Data that has already been processed and is currently being printed (when
paper feeding has begun) cannot be canceled. In this case, be careful
because carrying out job cancel might cancel the next printing data.
● If printing data is sent from a printer driver not compatible with this printer,
multiple printing data might be canceled.
Follow the instructions below to job cancel. Only carry out job cancel when the ジョブ indicator
is on or flashing (when the data of the job you want to cancel is being received or processed).
オンライン
1
排出
両面
Press the オンライン key to turn
off the オンライン indicator.
給紙選択
00 LIPS
A4
● The above display is an example of a job in LIPS mode being processed.
The display changes with the conditions of use. During job processing, the
operation mode is shown in the top line and data such as user name or
printer status is shown in the bottom line.
47
2
動作モード
Press the ユーティリティ / ジョブキャンセル (for LBP-1820, 1620,
ジョブキャンセル ) key.
The message [03 ジョブ キャンセル]
appears on the display, and the data being
processed is canceled.
When processing takes time, such as when
receiving data, the message on the display
changes to [00 ジョブ スキップ].
When the message [00 インサツ カノウ]
is displayed, job cancel is complete.
ジョブキャンセル
ユーティリティ
セットアップ
リセット/実行
03 ジョブ キャンセル
00 ジョブ スキップ
セントロニクス
00 インサツ カノウ
A4
● When the message [00 ジョブ スキップ] appears on the display, you can
press the リセット key to carry out a soft reset or hard reset. If you do
so, any printing data being received or other interface printing data is lost,
so carry out printing again.
● When the message [03 ジョブ キャンセル] appears on the display, you
cannot carry out a soft reset or hard reset. Wait until job cancel is complete
or the message [00 ジョブ スキップ] appears on the display.
48
Checking Operation
This printer has a test print function for checking the printer’s status or printing quality. Perform
test printing to check that the printer is working correctly after installation or whenever you
want to check its operating condition.
1
Press the power switch on the
right side of the printer to the“|”
position.
The message [00 インサツ カノウ]
soon appears on the display, indicating that
printing can be carried out.
● Always insert the paper cassette before turning the printer on for the first
time after installing it.
● A blank sheet might come out when you turn the printer on for the first time
after installing it. This is not a malfunction.
2
オンライン
排出
Press the オンライン key to turn
off the オンライン indicator.
両面
給紙選択
00 インサツ カノウ
A4
49
3
Press the ユーティリティ / ジョブキャンセル (for LBP-1820, 1620,
ユーティリティ ) key.
動作モード
ジョブキャンセル
ユーティリティ
セットアップ
リセット/実行
The message [ステータス プリント]
appears on the display.
ユーティリティ
ステータス プリント
→
4
● LBP-1810, 1610, 910, 880,
870, 850, 840
Press the < and > keys
to select [テスト プリント], then
press the V key.
動作モード
ジョブキャンセル
ユーティリティ
セットアップ
リセット/実行
The message [01 テスト プリント]
appears on the display and test printing
begins.
ユーティリティ
テスト プリント
● LBP-1820/1620
Press 実行 key.
The message [01 ステータス プリント]
appears on the display and the status print
begins.
5
When test printing is finished, turn
the power off by pressing the
power switch to the“○”position.
50
01 テスト プリント
→
■ Test Print Contents
If the printer is working correctly, the following page will be printed.
This is an example of a LBP-870 printout.
51