1
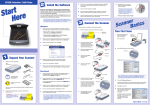
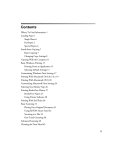
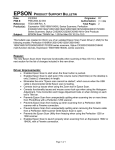
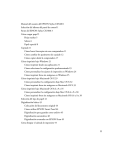
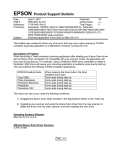
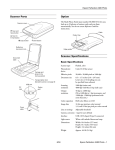
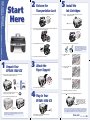
®
EPSON 1000 ICS
Start
Here
2 Release the
Transportation Lock
5 Install the
Ink Cartridges
1
1
Transportation Lock
Press the release button on the right side, then lift up the scanner, as shown.
Ink Cartridges
Press the
Operate button. The
Operate light comes on and the
scanner carriage and print head move.
Operate button
2
3
Peel off the tape and remove the plastic piece from the front of the ink cartridge holders.
Remove the packing tape from the transportation lock.
2
Press the release button on the right side, then lift up the scanner.
Slide the transportation lock to the left.
3
Unwrap the ink cartridges and remove the yellow tape.
Warning: Keep ink cartridges out of the
reach of children. If ink gets on your skin,
wash the area thoroughly with soap and
water. If ink gets in your eyes, flush them
immediately with water.
4
1 Unpack Your
EPSON 1000 ICS
EPSON 1000 ICS
1
4
Lift up the ink cartridge
clamps.
5
Insert the ink cartridges with
the labels face-up.
6
Press down the ink cartridge
clamps until they snap shut.
7
Carefully lower the scanner back down into place.
8
Press the
Carefully lower the scanner back down into place.
3 Attach the
Paper Support
Paper Support
Make sure you have all the parts shown here. If any parts are missing,
contact EPSON as described in your Basics book.
Insert the paper support into its three slots.
You’ll also need a USB cable (not included) to connect
the EPSON 1000 ICS to your computer.
2
Remove any tape and packing materials, as shown.
4 Plug In Your
EPSON 1000 ICS
EPSON 1000 ICS
Do not remove
sticker from USB
port.
Note: There may be additional packing materials or tape in locations
different from the ones shown in these illustrations. Do not remove
the sticker covering the USB port.
Copy button to begin charging the ink delivery system.
Charging takes about two minutes.
The Operate light flashes and
the EPSON 1000 ICS makes various
sounds. Don’t turn it off while the
Operate light is flashing or you’ll
waste ink.
Caution: Don’t open the clamps to remove a cartridge except to replace it with a
new one. Once you remove a cartridge, you can’t reuse it, even if it contains ink.
You must install both cartridges and leave them installed for all types of printing.
To avoid damaging the EPSON 1000 ICS, never move the print head by hand.
Plug the EPSON 1000 ICS into a grounded electrical outlet.
Do not connect the USB cable yet.
Turn over
6 Load Paper
1
5
When you see this screen telling you to connect your EPSON 1000 ICS, make sure
it is turned on, then remove the sticker from the USB port on the back. Connect
the
square end of the USB cable to your EPSON 1000 ICS’s USB port, then
connect the
flat end of the cable to your computer’s USB port.
Place a stack of paper against the right side of the feeder.
Note: After you plug in your EPSON 1000 ICS, Windows displays several
messages as it detects your device.
2
1
Raise the document cover and place a photo face-down on the
document table glass.
2
Position the photo so the horizontal and vertical edges are aligned with the
guides on the top and left sides of the document table.
3
Double-click the
4
You see EPSON Smart Panel. Click the Scan to File button.
Slide the left edge guide against the paper.
6
7 Install the Software
1
8 Your First Scan
Continue following the instructions on the screen to install the rest of your software.
Note: It will take several minutes to install the remaining software. Don’t cancel
the installation.
7
When you see this screen, follow the steps to install ArcSoft™ PhotoImpression.™
Make sure the EPSON 1000 ICS is not connected to your computer,
then turn on your computer.
Click to start
scanning.
Note: If your EPSON 1000 ICS is turned on and connected to your computer,
you may see several New Hardware Wizard screens. Click Cancel for each
of these screens and disconnect your EPSON 1000 ICS. You can’t install
your software that way.
Smart Panel starts EPSON TWAIN, which automatically scans your photo.
8
2
Insert your EPSON 1000 ICS CD-ROM in your CD-ROM or DVD drive.
3
The Software Installation screen opens automatically. Click Install.
EPSON Smart Panel icon on your desktop.
9
10
When you see this screen, follow the steps to begin installing EPSON Smart Panel.™
5
After your photo is scanned, the Scan to File dialog box opens. If you want to
scan another photo, place it on the document table glass, close the cover,
and click Scan More. Otherwise, click Finish.
6
Select a folder and file format, then click Save to save your file.
The Smart Panel installation also launches separate installations for EPSON Copy Utility,
EPSON Photo Print, and ScanToWeb. These are necessary components of
EPSON Smart Panel. Follow the steps on screen and do not cancel their installations.
When you see the final screen, make sure the EPSON 1000 ICS is still on
and paper is loaded. Click Print Test Page to test your printer driver.
Note: If the install screen doesn’t open automatically, do the following:
®
for Windows XP: click Start >
the
EPSON CD-ROM icon.
My Computer. Then double-click
for Windows 98, Windows 2000, or Windows Me: double-click
My Computer. Then double-click the
EPSON CD-ROM icon.
4
Click to print
a test page.
When you see the license agreement, read it and click Agree, then follow the
instructions on the screen to install EPSON TWAIN and your printer driver.
Congratulations! You’ve finished setting up your EPSON 1000 ICS and
scanning your first photo. Now you can see you Basics book to print
your photo. Your Basics book also explains copying and scanning
and includes other important information.
Note: If the test page doesn’t print, see the Problem Solving section
of your Basics book.
11
Click Register and follow the instructions on the screen to register your product.
At the last screen, click Done.
12
Click Exit, then click Yes and remove the CD-ROM. Restart your computer.
EPSON is a registered trademark and EPSON Smart Panel is a trademark of SEIKO EPSON CORPORATION.
General Notice: Other product names used herein are for identification purposes only and may be
trademarks of their respective owners. EPSON disclaims any and all rights in those marks.
Copyright © 2002 by Epson America, Inc.
continue
Printed on recycled paper. 4/02
Printed in USA
CPD-13964