1
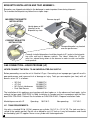
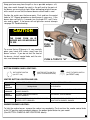
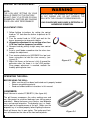
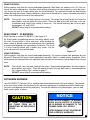
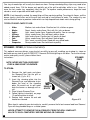
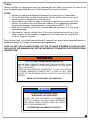
PASTE SERIAL NUMBER
LABEL IN THIS LOCATION
BARBEQUE SERIAL NUMBER LABEL:
2
NOTES:
ALFRESCO™ Gourmet Grills
A division of Superior Equipment Solutions, Inc.
3020914
7039 East Slauson Avenue
Commerce, CA. 90040
Ph.: (888) 383-8800
Fax: (323) 726-4700
Web: www.alfrescogrills.com
GENERAL SAFETY PRECAUTIONS:
WARNING
ELECTRICAL PARTS
AND COMPONENTS
DISCONNECT ALL POWER
SUPPLIES AND BATTERIES
BEFORE SERVICING
WARNING
FLAMMABLE GAS
DISCONNECT ALL PROPANE
OR NATURAL GAS SUPLIES TO
THIS UNIT BEFORE SERVICING
WARNING:
If the information in this manual is not followed exactly, a fire or explosion may
result causing property damage, personal injury or death.
WARNING:
Do not try lighting this appliance without reading the LIGHTING INSTRUCTIONS
section of this manual.
WARNING:
For outdoor use only. This cooking appliance is not intended to be installed in or
on recreational vehicles and / or boats.
FOR YOUR SAFETY:
•
•
Do not store or use gasoline or other flammable vapors and liquids in the vicinity
of this or any other appliance.
An LP cylinder not connected for use shall not be stored in the vicinity of this or
any other appliance.
TESTED IN ACCORDANCE WITH:
ANSI Z21.58a-1995 STANDARD FOR OUTDOOR COOKING GAS APPLIANCES.
Check your local building codes for the proper method of installation. In the absence of local codes,
this unit should be installed in accordance with the National Fuel Gas Code No. Z223.1 1988, or CAN/
CGA-B149-1 National Gas Installation code, or CAN/CGA-B149.2, Propane Installation code. All
components must be grounded in accordance with local codes or with the National Electrical Code
ANSI/NFPA 70-990 or Canadian Electrical code CSA C22.1
CALIFORNIA PROPOSITION 65 - WARNING
The burning of gas cooking fuel generates toxic by-products, which are on the list of substances which
are known by the State of California to cause cancer or reproductive harm. California law requires
businesses to warn customers of potential exposure to such substances. To minimize exposure to
these substances, always operate this unit according to the use and care manual, ensuring you
provide good ventilation when cooking with gas. This warning is issued pursuant to California Health &
Safety Code Sec. 25249.6
3
READ THIS CARE AND USE MANUAL CAREFULLY AND COMPLETELY BEFORE USING YOUR
GRILL TO REDUCE THE RISK OF FIRE, BURN HAZARD OR OTHER INJURY. KEEP THIS MANUAL FOR FUTURE REFERENCE.
When properly cared for, your ALFRESCO™ Gourmet Grill will give safe, reliable service for many
years. However, extreme care must be used since the grill produces intense heat, which can increase
accident potential. When using this appliance, basic safety practices must be followed, including but not
limited to the following:
•
Begin by ensuring proper assembly. A qualified technician should perform all other service.
•
Do not repair or replace any part of the grill unless specifically recommended in this manual.
•
All other service should be referred to and performed by a qualified technician.
•
For personal safety, wear proper apparel while barbequing.
•
Loose fitting garments or sleeves should never be worn while using this appliance.
•
Some synthetic fabrics are highly flammable and should not be worn while cooking.
•
Never let clothing, pot holders or other flammable materials come in contact with or too close to any
grate, burner or hot surface until it has cooled down sufficiently. Fabrics may ignite and result in personal injury.
•
Use only dry potholders: moist or damp potholders on hot surfaces may cause personal burns from
steam. Do not use a towel or bulky cloth in place of potholders. Do not let potholders touch hot portions of the grill rack.
•
Only certain types of glass, heatproof glass ceramic, earthenware, or other glazed utensils are suitable for grill use. These types of materials may break with sudden temperature changes. Use only on
low or medium heat settings and according to their manufacturer’s directions.
•
Grease is flammable. Let hot grease cool before attempting to handle it.
•
Avoid letting grease deposits collect in the bottom of the grill by cleaning the grease tray often.
•
Do not use aluminum foil to line the grill racks, nor to line the drip tray. This can severely upset combustion airflow or trap excessive heat in the control area. The result of this can be melted knobs, igniters and increased chance of personal injury. Never grill without the drip pan in place and pushed
all the way to the back of the grill. Without the drip pan, hot grease can leak downward creating a fire
or explosion hazard.
•
Children should not be left alone or unattended in an area where the grill is being used. Never allow
them to sit, stand or play on or around the grill. Do not store items of interest to children around or
below the grill or in the cart. Never allow children to crawl inside of the cart.
•
Do not heat unopened food containers that may cause the container to build-up pressure and burst.
•
Protect your hand when opening a hot grill lid. Never lean over an open hot grill.
4
(Safety, cont.)
•
When lighting a burner, always pay close attention to what you are doing. Be certain you are depressing the correct igniter button labeled for the burner you intend on using.
•
When using the grill: do not touch the grill rack, burner grate, hood or immediate surrounding area as
these areas become extremely hot and could cause burns. Use only the handles and knobs provided
for operation of the grill.
•
For proper lighting and performance of the burners keep the ports clean. It is necessary to clean
them periodically for Optimum performance. The burners will only operate in one position and must
mounted correctly for safe operation.
•
Clean the grill with caution. Avoid steam burns; do not use a wet sponge or cloth to clean the grill
while it is hot. Some cleaners produce noxious fumes or can ignite when applied to a hot surface.
•
INSECT WARNING: Spiders and insects can nest in the burners of this and other grills, and cause
the gas to flow from the front of the burner. This is a very dangerous condition, which can cause a fire
to occur behind the valve panel, thereby damaging the grill and making it unsafe to operate. Inspect
the grill at least twice a year.
•
Be sure all grill controls are turned off and the grill is cool before using any type of aerosol cleaner on
or around the grill. The chemical that produces the spraying action could, in the presence of heat, ignite or cause metal parts to corrode.
•
Do not operate the grill under unprotected combustible construction. Use only in well ventilated areas. Do not use in buildings, garages, sheds, breezeways or any enclosed areas.
•
Keep the area surrounding the grill free from combustible materials, trash, or combustible fluids and
vapors such as gasoline or charcoal lighter fluid. Do not obstruct the flow of combustion gases and
ventilation airways.
•
Keep the back of the cart free and clear from debris.
•
If the unit is stored indoors ensure that it is cool. If propane is used, the cylinder must be unhooked
and the propane cylinder stored outside in a well-ventilated area, out of reach of children.
•
Never use the grill in windy conditions. If located in a consistently windy area, oceanfront, mountaintop, etc... a windbreak will be required. Always adhere to the specified clearances.
•
Keep any electrical supply cord, away from the heated areas of the grill.
•
Do not use the grill for cooking excessively fatty meats or products, which promote flare-ups.
WARNING
WARNING
FOR OUTDOOR USE ONLY
NOT TO BE INSTALLED IN OR
ON RECREATIONAL VEHICLES
AND / OR BOATS.
NEVER USE A DENTED OR
RUSTED LIQUID PROPANE
TANK. SHUT OFF TANK
WHEN NOT IN USE.
5
LOCATING AND ASSEMBLING THE GRILL:
When determining a suitable location for your grill, take into account concerns such as exposure to wind,
rain, sprinklers, proximity to traffic paths and keeping any gas supply line runs as short as possible.
Locate the grill only in a well-ventilated area. Never locate the grill in a building, garage, breezeway,
shed or other such enclosed areas without an approved ventilation system. Never locate the grill over,
under or next to unprotected combustible construction. During heavy use, the grill will produce a lot of
smoke.
CLEARANCES:
TO NON-COMBUSTIBLE CONTRUCTIONS:
A minimum of 3-5/8” clearance from the back of the grill to non-combustible construction is required to
allow the lid to be opened fully.
TO COMBUSTIBLE CONTRUCTIONS:
This appliance should NOT be located over, under or next to unprotected combustible construction. If
your enclosure is combustible, then an INSULATED JACKET manufactured by ALFRESCO™ Gourmet
Grills, is required. For the insulated jacket information, such as cut out sizes and part numbers, please
refer to the last page of this manual.
ASSEMBLY:
BUILT-IN MODELS:
Before locating your ALFRESCO™ Gourmet Grill into your Non-Combustible enclosure, complete the
following steps:
1. Remove all packaging materials.
2. Ensure that the burners are positioned correctly on their orifices, and are fully seated onto
their supports.
3. Position the briquette trays onto their locating pins and place briquettes evenly across tray.
4. Ensure that new batteries are fitted and the igniter cap is properly installed. See Battery
installations instructions on next page.
5. Make the connection to the gas regulator according to the instructions on pages 8 & 10 for
your gas type.
6. To comply with safety and service requirements, main gas shut off valve must be accessible from front of grill without using any tools.
Your Alfresco™ Gourmet Grill has provision for mounting onto a mobile cart if you choose to do so.
Contact your Alfresco™ dealer for the appropriate cart for your grill.
FREE STANDING MODELS:
Complete the following steps:
1. Remove all packaging materials.
2. Ensure that the burners are positioned correctly on their orifices, and are fully seated onto
their supports.
3. Position the briquette trays onto their location pins and place briquettes evenly across tray.
4. Ensure that new batteries are fitted and the igniter cap is properly installed. See Battery
installations instructions on next page.
5. Make the connection to the gas regulator according to the instructions on pages 8 & 10 for
your gas type.
6. Allow a minimum of 3” clearance around all sides of grill cart for proper air movement.
7. Lock the rear casters to prevent unwanted grill movement.
6
WARNING:
To prevent harm and ensure proper operation of your grill, it is imperative that the burners are properly
installed with respect to the gas orifices. Be certain that the orifice is inserted completely into the
burner’s inlet and that the burner rests firmly on its support bracket.
The burner should not rock side-to-side nor top-to-bottom if properly installed. If excessive burner movement is present, reseat burner or contact your authorized service provider.
WARNING
IMPORTANT ELECTRICAL INSTRUCTIONS:
THE GRILL’S ROTISSERIE MOTOR AND LIGHTS ARE WIRED TO A SINGLE
THREE-PRONG (GROUNDING) PLUG FOR YOUR PROTECTION AGAINST SHOCK
HAZARD. THE GRILL SHOULD BE PLUGGED DIRECTLY INTO A PROPERLY
GROUNDED THREE-PRONG RECEPTACLE.
BATTERY INSTALLATION:
To install a new 9 Volt igniter battery please follow these steps:
1. The igniter modules are located behind the front panel and are accessed by opening the
front section of the grill. LIFT UP the front section and TILT forward until it stops.
2. Locate the igniter module, unscrew the round black cap and install a new 9V battery into
the cap.
3. Reinstall cap into the module, tightening the cap completely.
4. Close the front panel by tilting backwards and slightly lifting up. Then push down on the
front panel until it latches down on the locking tabs.
NOTE:
30” BBQ grills have only one igniter module on the right side of the grill (see figure # 1).
42”, 56” and 56” BFG BBQ grills have two igniter modules (one left and one right).
Igniter Module
LIFT Front Cover
and TILT forward.
Igniter Cap
Battery - 9 Volt
Point contacts
towards module
Figure # 1
7
BRIQUETTE INSTALLATION AND TRAY ASSEMBLY :
Briquettes are shipped uninstalled in the barbeque in order to protect them during shipment.
To assemble the briquette tray follow these simple steps:
Remove top grill.
INCORRECT BRIQUETTE
INSTALLATION
Upside down or 90°
(parallel) to the
briquette tray slots.
CORRECT BRIQUETTE
INSTALLATION
Remove briquette tray located
over the gas burners
Correctly installed briquettes should be placed at 45° angle to the briquette
tray slots and lock in between notches. The “dome” under the “A” logo
must be placed facing down to the burners in order to catch and radiate
heat upwards.
GAS CONNECTION—LIQUID PROPANE (LP)
NEVER CONNECT THE GRILL TO AN UNREGULATED GAS SUPPLY.
Before proceeding, ensure the unit is fitted for LP gas. Connecting to an improper gas type will result in
poor performance and increased risk of damage or injury. Total gas consumption (per hour) with all
burners set on “HI” is a follows:
•
•
•
•
30” Grill
42” Grill
56” Grill w/ side burners
Dual Side Burners
71,000 BTU
101,500 BTU
136,500 BTU
35,000 BTU
The installation of this appliance must conform with local codes or, in the absence of local codes, to the
national fuel gas code, ANSI Z223.1a-1988. Installation in Canada must be in accordance with the Standard CAN/ CGA-B149.1 Natural Gas Installation or CAN/CGA-B149.2, Propane Installation Code.
Manifold pressure with LP
Operating:
10.0” W.C.
Non-operating:
11.2” W.C.
L.P. TANK REQUIREMENTS:
Use only a standard 20 Lb. (5 Gal.) propane gas cylinder (18-1/4” H x 12-1/4” Ø). The tank must be installed in the upright position. Do not use a dented or rusty LP tank as it may be hazardous and should
be checked by your LP supplier. Never use a cylinder with a damaged valve.
8
The LP gas cylinder must be constructed and marked in accordance with the specifications for LP gas
cylinders of the U.S. Department of Transportation (DOT). The cylinder must be provided with a shut off
valve terminating in an LP gas supply cylinder valve outlet specified, as applicable, for connection type
QCC1 in the standard for compressed gas cylinder valve outlet and inlet connections ANSI/CGA-V-I.
LP GAS CONNECTION TO LP TANKS:
Your ALFRESCO™ Gourmet Grill for use with LP gas comes equipped with its own regulator, which
MUST NOT be removed. There is also a secondary high capacity, hose/regulator assembly for connection to a standard 20 Lb. LP cylinder. The LP gas pressure regulator and hose supplied with this unit
must be used without alteration.
If this assembly needs to be replaced use only the type specified by ALFRESCO™ Gourmet Grill for this
appliance. 30” grills require a 90,000 BTU minimum regulator / hose assembly. All other sizes require a
160,000 BTU minimum two-stage regulator / hose assembly.
To connect the regulator / hose assembly follow the next steps:
WARNING
1. Locate the regulator and gas connection point in the
rear right side of your BBQ unit (remove the rear panel
ENSURE THAT THE GAS
from the BBQ cart to gain access - in cart mounted
SUPPLY HOSE DOES
models).
2. Attach a 1/2” FPT x 1/2” MPT (male-to-female) elbow to
NOT COME IN CONTACT
the regulator (see figure # 2).
WITH THE GRILL BODY
3. Fasten the hose connection to a 1/2” MPT x 3/8” COMP
(compression flare fitting) connected to the elbow.
(see figure # 2).
CONVERTIBLE GAS PRESSURE
REGULATOR
TYPICAL ALFRESCO™ LX2
BBQ (30” MODEL SHOWN)
1/2” FPT X 3/8” COMP
BRASS FITTING
1/2” FPT X 1/2” MPT
90° ELBOW
TYPICAL LP
GAS TANK
Figure # 2
LP REGULATOR AND HOSE
ASSEMBLY (PRESET TO 10” WC)
9
CAUTION
CYLINDERS MUST BE STORED OUTDOORS IN A WELL-VENTILATED AREA OUT OF THE
REACH OF CHILDREN.
DISCONNECTED LP CYLINDERS MUST HAVE THREADED VALVE PLUGS TIGHTLY INSTALLED, AND MUST NOT
BE STORED IN A BUILDING, GARAGE OR ANY OTHER ENCLOSED AREA. THE GAS MUST BE TURNED OFF AT
THE SUPPLY CYLINDER WHEN THE UNIT IS NOT IN USE. IF THE APPLIANCE IS STORED INDOORS, THE CYLINDER MUST BE DISCONNECTED AND REMOVED FROM THE APPLIANCE.
LP GAS CONNECTION TO LP PIPED SYSTEMS:
An LP piped system is one with a large central LP tank that feeds the entire household. Those systems
are normally equipped with a high pressure regulator by the large LP tank and low pressure regulators
close to the home.
WARNING
YOUR ALFRESCO™ GOURMET GRILL’S PRESSURE
REGULATOR HAS A MAXIMUM INPUT PRESSURE
OF 14” WC. (OR APPROX. .5 PSI) , AND A SAFETY
LIMIT OF 69” WC. (2.5 PSI).
REGULATOR NOTICE
Exposure to pressures above the safety limit
of 69” WC. will permanently damage the gas
regulator requiring a replacement. OVER
PRESSURE DAMAGE IS NOT COVERED BY
YOUR ALFRESCO WARRANTY
GAS CONNECTION - NATURAL GAS (NG)
NEVER CONNECT THE GRILL TO AN UNREGULATED GAS SUPPLY.
Before proceeding, ensure the unit is fitted for natural gas. Connecting to an improper gas type will result
in poor performance and increased risk of damage or injury. The installation of this appliance must conform with local codes or, in the absence of local codes, to the national fuel gas code, ANSI Z223.1a1988. Installation in Canada must be in accordance with the Standard CAN/ CGA-B149.1 Natural Gas
Installation or CAN/CGA-B149.2, Propane Installation Code.
Manifold pressure with NG:
Operating:
4.0” W.C.
Non-operating:
4.5” W.C.
Optimum pressure: 7.0” W.C.
NOTE: To ensure proper heating performance of this appliance, verify that the gas line supply pressure
is adequate (7.0” W.C. supply pressure is preferred) to maintain 4.5” W.C. manifold pressure.
Use a minimum 1/2” ID flex hose to prevent gas starvation.
NATURAL GAS CONNECTION:
Ensure that the service pipe supplying the Grill is fitted with a shut
off valve conveniently positioned and easily accessible as an
emergency gas shutoff.
Your ALFRESCO™ Gourmet Grill for use with Natural Gas
comes equipped with it own regulator which MUST NOT be removed. If this regulator needs to be replaced use only the type
specified by ALFRESCO™ Gourmet Grill for this appliance.
10
WARNING
ENSURE THAT THE GAS
SUPPLY HOSE DOES
NOT COME IN CONTACT
WITH THE GRILL BODY
To connect the regulator / hose assembly follow the next steps:
1. Locate the regulator and gas connection point in the rear right side of your BBQ unit (remove the
rear panel from the BBQ cart to gain access - in cart mounted models).
2. Attach a 1/2” FPT x 1/2” MPT (male-to-female) elbow to the regulator (see figure # 3).
3. Fasten the hose connection to a 1/2” MPT x 3/8” COMP (compression flare fitting) connected to
the elbow. (see figure # 3).
Connect flare fitting to gas supply using a 1/2” Ø minimum flexible stainless steel gas hose, no more
than 48” in length.
TYPICAL ALFRESCO™ LX2
BBQ (30” MODEL SHOWN)
CONVERTIBLE GAS PRESSURE
REGULATOR
1/2” FPT X 1/2” MPT
90° ELBOW
NG FLEXIBLE
HOSE
INCOMING NG
GAS SUPPLY
Figure # 3
SHUT OFF HAND VALVE
MUST BE LOCATED IN
ACCESIBLE AREA
LEAK TESTING:
GENERAL:
Although all gas connections on your ALFRESCO™ Gourmet Grill are leak tested at the factory prior to
shipment, a complete gas tightness check must be performed at the installation site due to possible mishandling in shipment, or excessive pressure unknowingly being applied to the unit.
Periodically check the whole system for leaks, or immediately check if the smell of gas is detected.
BEFORE TESTING:
• Make sure that all packing material is removed from the grill.
• Make sure the burner tie-down straps are removed from the unit.
• Do not smoke while leak testing.
• Never leak test with an open flame.
11
•
•
•
Make a soap solution of one part liquid detergent and one part water for leak testing purposes.
Apply the solution to the gas fittings by using a spray bottle, or brush.
For LP units, always check with a full cylinder.
TO TEST:
• Make sure all control valves are in the “OFF” position.
• Apply the soap solution described above to all fittings.
• Turn the gas supply on.
• Check all connections from the supply line, or LP cylinder up to and including the manifold pipe
assembly.
• Soap bubbles will appear where a leak is present.
• If a leak is present, immediately turn off gas supply, tighten any leaking fittings, turn the gas supply back on, and recheck.
• If you cannot stop a gas leak turn off the gas supply and call your dealer where you purchased
your grill.
• Do not use the grill until all connections have been checked and do not leak.
• Only those parts recommended by the manufacturer should be used on the Grill.
• Substitution can void the grill’s warranty.
IMPORTANT NOTE:
ALWAYS CHECK FOR LEAKS AFTER EVERY LP TANK CHANGE.
If a leak is present, or if the connection hose shows signs of wear, these conditions must be corrected
prior to using your grill.
Check all gas supply fittings for leaks before each use. It is handy to keep a spray bottle of soapy water
near the shut-off valve of the gas supply line. Spray all the fittings. Bubbles indicate leaks.
LIGHTNING INSTRUCTIONS:
BEFORE LIGHTNING…
The pressure regulator and hose assembly supplied with the unit
must be used. Never substitute regulators for those supplied with
the grill. If a replacement is necessary, contact the factory for
proper replacement.
Screw the regulator (Type QCC1) into the LP tank. Leak check the
hose and regulator connections with a soap and water solution before operating as explained on the LEAK TESTING section of this
manual.
WARNING
HOOD MUST BE OPEN WHEN
LIGHTING GRILL.
HOOD SHOULD NOT BE
CLOSED FOR LONG PERIODS
WHEN IR BURNERS ARE IN USE.
WARNING
DO NOT ATTEMPT TO LIGHT
THE GRILL IF THE ODOR OF
GAS IS PRESENT.
GRILL BURNERS LIGHTING:
Turn all knobs to “OFF” then turn on the gas supply.
Always keep your face and body as far away from the grill as possible when lighting. Open the lid, depress the igniter button for the burner you are trying to light, and immediately push and turn the burner
control knob counter-clockwise to the “HI” position and wait for the burner to light. (See illustration on
next page)
NOTE: The first burner may take longer to light while air is purged from the gas supply system.
If the burner does not light in 4 seconds, turn knobs to “OFF” and wait 5 minutes to allow any accumulated gas to dissipate before trying again. If the burner will not light after several attempts, then it can be
lit with a match.
12
Keep your face away from the grill as far as possible and pass a lit,
long stem match through the notch in the grill rack to the ports of
the burner you are trying to light. When attempting to light a burner
with a match, ensure that the correct burner control knob is used.
Position the match near the burner ports. Push and turn the control
knob to “HI”. Repeat procedure on each burner if necessary. If the
burner does not light in 4 seconds turn the knob OFF, wait 5 minutes and try again. If the burner will not light after several attempts
see page 25: Troubleshooting.
CAUTION
IN SUNNY ENVIRONMENTS,
THE FLAME FROM AN IR
BURNER MAY BE IMPOSSIBLE
TO SEE.
PUSH TO
IGNITE
To assure that an IR burner is lit, very carefully
place your hand 8-10 inches away from the
burner surface. If you do not feel the heat of
the burner, shut off control knob, wait five minutes, and attempt to relight.
PUSH & TURN TO “HI”
BUTTON SYMBOLS AND LOCATIONS:
ROTISSERIE SWITCH
(on LEFT side)
IGNITER BUTTON SWITCH
(see use and location below)
LIGHT FIXTURES SWITCH
(on RIGHT side)
IGNITER BUTTON LOCATION AND USE:
GRILL MODEL LEFT IGNITER BUTTON USE:
RIGHT IGNITER BUTTON USE:
ALX2-30
ALX2-30 SZ
ALL BURNERS.
Not Applicable.
ALX2-42
ALX2-42 SZ
LEFT U-BURNER (or SEAR-ZONE™),
SMOKER BURNER.
CENTER & RIGHT U-BURNERS, ROTISSERIE.
ALX2-56
ALX2-56 SZ
ALL GRILL SURFACE BURNERS,
SMOKER BURNER.
ROTISSERIE, SIDE BURNERS.
ALX2-56 BFG
LEFT ROTISSERIE, SEAR-ZONE™ IR-BURNER,
CENTER / LEFT U-BURNER.
RIGHT ROTISSERIE, CENTER / RIGHT U-BURNER,
RIGHT SIDE U-BURNER, SMOKER
SMOKER BURNER LIGHTING:
To light the smoker burner, remove the smoker tray completely. Push and turn the smoker control knob
to the “HI” position and immediately depress the proper igniter button for your model.
(See BUTTON SYMBOLS AND LOCATIONS above).
13
SIDE BURNER LIGHTING (MODELS ALX2-56 & 56 SZ):
When lighting, always keep your face and body as far away as possible from the burners.
FRONT BURNER: Push and turn the side burner right hand control knob to the “HI” position and immediately depress the right hand igniter button. You’ll hear a snapping sound from spark that will be provided to both side burners.
It is necessary to keep the igniter button depressed until the burner is lit.
REAR BURNER: Repeat the same operation as explained on the front burner but using the side burner
left hand control knob this time.
If the burner does not light in 4 seconds, turn knobs to “OFF” and wait 5 minutes to allow any accumulated gas to dissipate before trying again. If the burner will not light after several attempts, then it can be
lit with a match
NOTE:To ensure proper spark ignition, do not change gap between the electrode wires and the burners.
The optimum gap is preset at the factory between 1/8” and 3/16.” Replace 9 VDC igniter batteries at the
first sign of spark weakness. 30” grills require one battery, all others require two. See page 6 for battery
replacement instructions.
ROTISSERIE BURNER LIGHTING:
Open the lid, press the proper igniter button (see chart above) and then turn the control knob to the “HI”
position. If the burner does not light within 4 seconds, turn the control knob to “Off”, wait five minutes and
attempt to relight. If the igniter does not function, you can light the burner by holding a lit match to the
burner (with the control knob at the “HI” position).
After your first use of the rotisserie burner it is likely that the stainless steel adjacent and directly above
the burner will darken to a dark blue color. This is a normal property of the non-rusting, type 304
stainless steel used on the Grill and is not detrimental to its operation.
PREHEATING THE GRILL (U-BURNERS):
Preheating the grill is important for best performance. To preheat the grill when cooking with the Uburners, close the hood after lighting the burners as described above. Set the grill control knobs on “HI”
for 15 minutes, or allow 20-25 minutes for a very high grill temperature.
PREHEATING THE GRILL (IR-BURNERS):
Preheating the IR burners is important to protect them from food drippings. After lighting the IR burners
as described above, allow to preheat on “HI” for four minutes before beginning to grill.
If your grill is equipped with a SEAR-ZONE™ IR BURNER, light and preheat the U-BURNERS first, then
light and preheat the SEAR-ZONE™ IR BURNER.
PREHEATING THE ROTISSERIE BURNER:
Light the rotisserie burner as described in the lighting instructions. Once lit, the rotisserie burner will
reach cooking temperatures in about 1 minute.
14
BURNER ADJUSTMENTS:
NOTE: Alfresco grills are available with both U-burners and IR burners. The following instructions apply
only to the U-burners. IR burners do not require adjustment and need only be checked visually for proper
performance. On high, an IR burner should glow red evenly through all its surface.
U-BURNER AIR ADJUSTMENT:
Each grill burner is tested and adjusted at the factory prior to shipment; however, variations in the local
gas supply, elevation and other factors might make it necessary to adjust the burners. The flames of the
burners should be visually checked and compared with Figure 4.
Flames should be blue and stable with no yellow tips, excessive noise or lifting.
If any of these conditions exist, check if dirt, debris, spider webs, etc., are blocking the air shutter or
burner ports. Proceed with air shutter adjustment.
AIR SHUTTER ADJUSTMENT:
A sheet metal cup at the inlet of the burner called the “AIR SHUTTER” regulates the amount of air that
enters into the burner for combustion.
The air shutter is locked in place by a set-screw, which must be loosened prior to lighting the burner for
adjustment. The air shutter adjustment screws are accessible with a flat screwdriver by removing the
burner. Loosen the set-screw of the air shutter. Reinstall the burner. Make certain that the burners are
sitting properly on the orifices taking care not to move or damage the igniter electrode.
Light the burners and adjust according to the following directions:
•
•
•
Turn the valve on “HI”, light the burner and allow it to “WARM UP” for 10 minutes.
If the flame is yellow, indicating insufficient air, turn the air shutter counter-clockwise to
allow more air to the burner.
If the flame is noisy and tends to lift away from the burner, (WITH THE BRIQUETTE
TRAYS IN POSITION) indicating too much air, turn the air shutter clockwise to reduce
the amount of air to the burner.
NOTE: Be careful, as the burner could be and / or will become very hot after lighting it.
SET-SCREW
AIR SHUTTER
ADJUSTMENT CUP
1” MAXIMUM
3
/8” MAXIMUM
FLAME SIZE
U-BURNER
Figure # 4
15
LOW HEAT SETTING ADJUSTMENT:
NOTE:
THE LOW HEAT SETTING ON YOUR
GRILL IS PRESET AT THE FACTORY.
ADJUST ONLY IF ALTITUDE OR ENVIRONMENTAL FACTORS ARE CAUSING
POOR LOW HEAT PERFORMANCE.
WARNING
NEVER ADJUST THE BURNER SO LOW THAT IT MAY
GO OUT DURING USE. DO NOT OPERATE THE
GRILL WITH THE LOW HEAT SCREW REMOVED.
GAS CAN ESCAPE AND CAUSE A POTENTIALLY
HAZARDOUS CONDITION.
ADJUSTMENT STEPS:
1. Follow lighting instructions by setting the control
knob on “HI” and allow the burner to preheat for 10
minutes.
2. Turn the control knob to “LOW” and wait for the
burner temperature to drop and stabilize.
3. Attempting adjustment at any setting other than
LOW can create a dangerous condition.
4. Remove knob by pulling straight away from control
panel.
5. Insert a small blade screwdriver into the valve stem
to begin the adjustment.
6. Turn counter-clockwise to INCREASE the low heat
flame using pliers to hold the stem securely. (see
figure # 5)
7. Adjust the flames so the burner is fully lit around the
perimeter when the know is in the LOW position.
Once proper adjustment is reached, reattach the
knob by pushing onto stem.
Figure # 5
OPERATING THE GRILL:
BEFORE USING THE GRILL:
• Make sure the grill has been leak tested and is properly located.
• Remove any packing material.
• Read and understand the instructions in this manual.
U-BURNERS:
Each U-burner is rated at 27,500 BTU. (See figure # 6).
The grill burners encompass the entire cooking area and
are side ported to minimize blockage from falling grease
and debris. Above the burners are stainless steel briquette
trays and ceramic briquettes. The briquette tray is a fundamental part for the performance of the grill. Make sure the
briquette tray is installed properly before lighting the burner.
Each grill burner has its own igniter. The igniter push buttons are located on the sides of the front control panels.
16
Figure # 6
USING THE GRILL:
Grilling requires high heat for searing and proper browning. Most foods are cooked at the “HI” heat setting for the entire cooking time. However, when grilling large pieces of meat or poultry, it may be necessary to turn the heat to a lower setting after the initial browning. This method will cook the food through
without burning the outside. Foods cooked for a long time or basted with a sugary marinade may need a
lower heat setting near the end of the cooking time.
NOTE:
The hot grill sears the food, sealing in the juices. The longer the preheat period, the faster the
meat browns and the darker the sear marks. Place the food on the grill and cook to the desired brown level. Adjust heat setting, if necessary. The control knob may be set to any position between “HI” and “LOW”.
DO NOT leave the grill unattended while cooking.
SEAR-ZONE™ - IR BURNERS:
Each U-burner is rated at 27,500 BTU. (See figure # 7).
An IR grill works by producing intense heat which quickly sears
the meat. Searing locks in flavor and juices while allowing the
outer surface to absorb smoke and food aroma that is produced
as grease and drippings are vaporized by the burner. The result
is a crisp, flavorful outside with a tender, juicy inside. Just the
result you want with most grilled foods.
Figure # 7
USING THE GRILL:
Grilling requires high heat for searing and proper browning. The intense infrared heat produced by your
Alfresco™ Gourmet Grill meets these requirements perfectly. Meat is cooked evenly throughout, juices
while grease and food particles are vaporized upon contact with the burner, giving added flavor to your
food.
NOTE:
The hot grill sears the food, sealing in the juices. Proper preheating browns the meat and produces darker sear marks. Place the food on the grill and sear both sides as recommended on
the “Infrared Grilling Tips” section on page 17.
DO NOT leave the grill unattended while cooking.
ROTISSERIE BURNERS:
Your ALFRESCO™ Gourmet Grill is capable of performing back burner rotisserie cooking. The location
of the rear burner allows the placement of the rotisserie basting pan (included) beneath the food to collect juices and drippings for basting and gravy. To flavor the contents of the basting pan, you can add
herbs, onion, garlic, or spices.
CAUTION
IN SUNNY ENVIRONMENTS,
THE FLAME FROM AN IR
BURNER MAY BE IMPOSSIBLE
TO SEE.
NOTICE
AVOID WATER DAMAGE TO BURNER
NEVER ALLOW WATER TO CONTACT
THE IR BURNER AS DAMAGE TO THE
CERAMIC PANEL WILL RESULT.
WATER DAMAGE IS NOT COVERED BY
YOUR ALFRESCO WARRANTY
17
To assure that an IR burner is lit, very carefully place your hand 8-10 inches away from the burner surface. If you do not feel the heat of the burner, shut off control knob, wait five minutes, and attempt to relight.
ROTISSERIE MOTOR:
The rotisserie motor is capable of turning up to a 25 Lb. cut of meat or poultry, with a maximum diameter
of 12”. The rotisserie motor is an integral part of the grill, mounted on the rear bottom of the unit. The
motor drives a chain and sprocket system to a skewer coupler located your upper cooking area.
The rotisserie motor is electrically grounded by the grill electrical system and plug, therefore the grill
must installed in accordance with local codes or, in the absence of local codes, with the National Electrical Code, ANSI/NFPA 70-1990.
SKEWER:
The skewer for the rotisserie is assembled into the skewer coupler (located right side of the grill) by placing the pointed end into the square opening of the coupler. The other end of the skewer (round shaft
end) rests between the rotisserie bearing wheels opposite to the skewer coupler, on the left side of the
grill.
To load the skewer, slide the meat holders with the prongs facing towards the center the skewer bar.
Push the skewer through the center of the food, and then slide the second meat holder (prongs toward
the food) onto the skewer.
Center the product to be cooked on the skewer then push the meat holders firmly together. Tighten the
thumb nuts of the meat holders with pliers. It may also be necessary to wrap the food with butcher’s
string (never use nylon or plastic string) to secure any loose portions. Once the food is secure, insert the
skewer into the coupler.
Start the motor with the switch located on the right side of the control panel.
ROTISSERIE BASTING PAN:
Your ALFRESCO™ Gourmet Grill includes a basting pan for use with the rotisserie. Place the pan onto
the grill racks (or, if necessary, directly onto the briquettes if the grill racks are removed to accommodate
large cuts of meat). This pan will catch drippings from the meat being cooked, preventing grease buildup on the briquettes or Sear-Zone™ IR Burner.
NOTE:
Never use the basting pan when any of the grill burners are lit. Basting pan is for use
with the rotisserie burner only.
ROTISSERIE GENERAL COOKING INSTRUCTIONS:
As a general rule, rotisserie cooking will take 15 ~ 20
minutes per pound of meat. Keep hood closed as much
as possible to improve performance.
NOTICE
ALWAYS USE BASTING PAN WITH
ROTISSERIE TO KEEP DRIPPINGS
OFF BURNERS AND BRIQUETTES.
DO NOT USE WHILE GRILLING.
18
INFRARED GRILLING TIPS:
Even for an experienced chef, infrared cooking can, at first, present a bit of a challenge. By following
these simple tips, you will soon be producing juicer, more flavorful foods than you have ever experienced
before. As a general rule, foods will cook in less time than they would take on an ordinary grill.
By turning food frequently (approximately every 2 minutes), excessive charring is simply avoided.
ALFRESCO RECOMMENDS THAT YOU TURN FOOD BEING GRILLED ON A SEAR
ZONE™ IR-BURNER EVERY TWO MINUTES DURING THE COOKING PERIOD.
NEVER ALLOW FOOD TO COOK MORE THAN 2 1/2 MINUTES WITHOUT TURNING.
SEARING IS THE KEY:
An infrared grill works by producing intense heat which quickly sears meats. Searing locks in flavor and
juices while allowing the outer surface to absorb smoke and food aroma that is produced as grease and
drippings are vaporized by the burner. The result is a crisp, flavorful outside with a tender, juicy inside.
Just the result you want with most grilled foods.
HOW TO GRILL WITH IR:
Properly pre-heat the grill by following the lighting instructions on page 12. Place food on grill grids and
turn every 2 to 2 1/2 minutes until food is cooked to desired taste. Do not let food cook more than 2 1/2
minutes without turning. Perfect cross sear marks can be made by rotating food 90° at each turn.
APPROXIMATE SEAR-ZONE™ COOKING TIMES:
FOOD ITEM
APPROXIMATE COOKING TIME
(MINUTES) RARE
MEDIUM
WELL
HAMBURNGER -1/2” THICK
4
5
6
STEAK - 1” THICK”
6
8
10
CHICKEN BREAST (BONELESS)
8 ~ 10
CHICKEN BREAST (BONE-IN)
20 ~ 24
These are recommended times only. Due to the variations on the cuts of meats and personal taste,
your cooking times may be different. Use your discretion when cooking with ALFRESCO™ Gourmet
Grill Sear-Zone™ IR-Burners.
WOOD CHIP SMOKER:
By using real wood chips in the smoker system of your ALFRESCO™ Gourmet Grill, you can add extra
flavor to all of your grilled foods. For good smoke performance, soak the wood chips for not less than 30
minutes, drain excess liquid and fill the smoker tray completely.
HOW TO SMOKE:
1. Fill the smoker tray with thoroughly soaked and drained wood chips.
2. Light the smoker burner according to the instructions on page 13.
Replace the smoker tray into the grill, close the hood and set the smoker burner to high. Smoke should
begin in about 20 ~ 30 minutes
19
One tray of wood chips will usually last about one hour. During extended grilling, chips may need to be
added several times. Pull the drawer only partially out of the grill to add chips while in use. Never remove the hot smoker tray completely from the grill. To improve smoke performance, keep the hood
closed as much as possible while food is grilling.
NOTE: If not thoroughly soaked, the wood chips will flare up during grilling. To extinguish flames, pull the
drawer slowly a few inches out of the grill front and add a small amount of water. The smoker tray can
also be filled with water to produce steam which can help keep delicate foods moist during grilling.
TYPES OF WOOD CHIPS TO USE:
•
•
•
•
•
•
•
•
Alder:
Maple:
Apple:
Hickory:
Mesquite:
Oak:
Pecan:
Grapevine:
Medium, tart smoke flavor. Excellent on fish, chicken or game.
Sweet, hearty smoke flavor. Best with fish, jerky or bacon.
Light, sweet smoke flavor. Superb with poultry, ham or sausage.
Heavy smoke flavor. Best with beef, pork or game.
Light smoke flavor. Excellent on fish, poultry or beef.
Heavy smoke flavor. Best with beef, lamb or pork.
Rich, sweet, versatile flavor. Good with any grilled foods.
Strong smoke flavor. Best with beef or poultry.
STEAMER / FRYER (OPTIONAL EQUIPMENT):
This optional accessory brings a new level of versatility to your grill, enabling you to deep fry, steam or
boil foods on one side of your ALFRESCO™ Gourmet Grill while grilling on the other. To ensure safe operation and quality results, please follow these
STEAMER
instructions:
FRIER
NOTE: NEVER USE THIS ACCESSORY
OVER A SEAR-ZONE™ IR-BURNER.
TO STEAM:
1. Remove the right grate and place
the Steamer/Fryer into the grill as
shown left. (figure # 8)
2. Insert the steaming plate into the
Steamer/Fryer, and add water to just
below the level of the steaming
plate. Be careful not to spill water
onto the burner as damage will result.
3. Place lid onto Steamer/Fryer.
4. Follow lighting instructions on page
12 and bring water to a boil.
5. Reduce heat, remove lid and add
food to be steamed.
REMOVE
GRATE
Figure # 8
When food is cooked to your desired taste, carefully remove the lid and remove food from Steamer/
Fryer with long-handled tongs or a slotted spoon.
NEVER ATTEMPT TO REMOVE THIS ACCESSORY FROM THE GRILL WHEN HOT.
ALLOW TO COOL COMPLETELY BEFORE MOVING OR CLEANING.
20
TO BOIL:
Follow instructions for steaming but leave the steaming plate out. Add as much water as necessary to
cover the foods being cooked, but never fill the Steamer/Fryer more than halfway.
TO FRY:
1. Remove the right grate and place the Steamer/Fryer into the grill as shown above.
2. Fill the Steamer/Fryer no more than one-third full with oil. Be careful not to spill oil
onto the burner as damage and / or fire will result.
3. Follow lighting instructions on page 12. Allow grill to preheat for no more than three
minutes, then reduce heat to no more than medium. Use an appropriate thermometer to bring oil to proper frying temperature, usually between 350 °F ~ 375 °F.
4. Place the frying basket into the oil. Carefully add food one piece at a time using
long-handled tongs.
5. After food has fried for sufficient time, lift the entire frying basket out of the oil and
allow it to drain. Remove food to an appropriate vessel and return the frying basket
to the oil. Repeat as needed.
When finished frying, turn off heat and allow the grill, Steamer/Fryer and oil to cool completely before attempting to remove unit. Dispose of used cooking oil appropriately.
NOTE: DO NOT USE LID WHEN FRYING. USE THE LID WHILE STEAMING OR BOILING ONLY.
USE ALWAYS THE MINIMUM HEAT SETTING NECESSARY TO MAINTAIN THE PROPER FRYING
TEMPERATURE.
WARNING
HOT OIL AND STEAM CAN BE DANGEROUS
ALWAYS WEAR OVEN MITTS WHEN USING THIS ACCESSORY. ALLOW
UNIT TO COOL COMPLETELY BEFORE REMOVING. OIL CAN CATCH
FIRE IF OVERHEATED.
NEVER USE THE FRYER WITH A BURNER SET TO HIGH. IF OIL BEGINS
TO SMOKE, IMMEDIATELY REDUCE HEAT. IN CASE OF FIRE, TURN
BURNER OFF AND EXTINGUISH WITH A CLASS A,B,C OR D FIRE EXTINGUISHER.
NEVER PUT WATER ON HOT OR FLAMING OIL!
NOTICE
DO NOT CLOSE THE GRILL HOOD
WHEN USING THIS ACCESSORY.
DO NOT USE THIS ACCESSORY IN COMBINATION
WITH THE GRIDDLE, OR ANY OTHER ACCESSORY
THAT WOULD RESULT IN MORE THAN 75% COVERAGE OF THE GRILLING AREA.
OVERHEATING CAN DAMAGE YOUR GRILL.
21
STAINLESS STEEL CARE:
Stainless Steel is widely used for catering and residential kitchen equipment because of its strength, its
ability to resist corrosion and its ease of cleaning. In fact, stainless steel ranks alongside glass and new
china in terms of “ease of cleaning” and in percentage removal of bacteria during washing. As a result of
these virtues, the metal is often taken for granted and it is assumed that no problems will arise during its
usage. However, some care is required to ensure that the stainless steel can live up to this reputation.
DAY TO DAY CARE:
To maintain the original appearance of your ALFRESCO™ Gourmet Grill, a regular cleaning routine
should be carried out using the following guidelines:
1. After use, following the safety precautions detailed on page 4 and 5, wipe the Grill with
a soft damp soapy cloth and rinse with clean water, preferably warm/hot water. This
should remove most substances encountered during the grilling process.
2. For more tenacious deposits, including oil, grease and water-borne deposits, use a multi
purpose cream cleanser and apply with a soft damp cloth. Rinsing with fresh water, as
described above, should follow as a last step.
3. For really stubborn dirt or burnt-on grease, a nylon-scouring pad may be used in conjunction with the cream cleanser. On no account should “wire wool” pads be used
unless they are made of stainless steel.
4. Harsh abrasives and scouring materials should not be used for cleaning stainless steel
as they will leave scratch marks in the surface and damage the appearance of the Grill.
Likewise do not use wire brushes, scrapers or contaminated scouring pads.
5. Your ALFRESCO™ Gourmet Grill has a directional polished grain, any cleaning with
abrasives should be carried out along this grain direction and not across it.
6. After use, always remove wet cleaning aids (such as cloths, pads, containers) from the
surface, to avoid formation of water marks or stains.
7. If required, dry the Grill after use with a soft dry cloth or towel.
If the preceding guidelines are adhered to, your ALFRESCO™ Gourmet Grill should offer excellent life
and should live up to its reputation of being “stainless”.
Neglect of this practice, however, can lead to deterioration of the surface and, in some extreme cases,
corrosion of the steel itself. The two most common types of corrosion that may be encountered, particularly on stainless steel, are rust marks and pitting of the surface.
RUST-BROWN MARKS:
When this type of staining occurs it is unlikely that rusting of the stainless steel itself causes the marks.
Similar marks can be found with both porcelain and plastic sinks. The rust marks are more likely to be
the result of small particles of “ordinary-steel” which have become attached to the surface; these have
subsequently rusted in the damp environment. The most common source of such particles is from “wirewool” scouring pads, but contamination may also occur from carbon steel utensils and old cast iron water supply pipes.
These brown marks are only superficial stains, which will not harm the Grill; they should be removable
using a soft damp cloth and a multi-purpose cream cleanser.
Occasionally, it may be necessary to resort to a proprietary stainless steel cleanser, to return the surface
of the Grill to its original condition. To avoid re-occurrence of any “rust-staining” it is essential that the
source of the contamination be eliminated.
PITTING:
Another form of corrosion, which occasionally occurs in stainless steel, is pitting of the surface. The reason for this corrosive attack can usually be attributed to certain household products, for example:
22
Bleaches:
Most common domestic bleaches & sterilizing solutions contain chlorine in the form of sodium hypochlorite. If used in concentrated form, bleaches can attack the stainless steel, causing pitting of the surface.
They should always be used to the strengths prescribed by the manufacturer and should be thoroughly
rinsed off with clean water immediately after use. All cleaning agents containing hypochlorite are unsuitable for long term contact with stainless steel and, even when used in the highly diluted form, they can
give pitting under certain conditions.
Foodstuffs:
In general stainless steel is fully resistant to all foodstuffs in common use. Only in isolated cases, such
as when concentrated salt and vinegar mixtures are allowed to remain in contact with the steel for a long
period, can any surface marking result.
CARE & MAINTENANCE OF YOUR GRILL:
GRILL RACK:
The easiest way to clean the round wire grill racks is immediately after cooking is completed and after
turning off the flame. Wear a barbeque mitt to protect your hand from the heat and steam. Dip a brass
bristle barbeque brush in hot soapy water and scrub the hot grill rack. Dip the brush frequently in the
bowl of water. Steam, created as water contacts the hot grill, assists the cleaning process by softening
any food particles. The food particles will fall and burn. If the grill is allowed to cool before cleaning, then
cleaning will be harder.
The V-grate used for the IR burner will primarily selfclean during the 5 minute IR burner cleaning period
(Rear IR-Burner cleaning below). After the grate has
cooled, remove it from the grill and brush off burned
debris.
NOTICE
NEVER CLEAN THE V-GRATE WITH
ANY TYPE OF LIQUID WHILE IT IS ON
THE GRILL. LIQUID CAN PERMANENTLY DAMAGE THE IR-BURNER.
STAINLESS STEEL:
The Grill is made from commercial quality type 304 non-rusting and non-magnetic stainless steel, and
the cleaning information shown on Page 22 should be followed.
DRIP TRAY:
The drip tray should be cleaned after every usage of the
grill. After allowing the grill to cool completely, remove the
drip tray by pulling it out from the grill until it stops, then
lifting the front edge about 45° to remove from grill.
Reinstall by placing rear of tray into guides, then lifting
front edge 45° to re-insert the tray.
Slide completely into grill.
WARNING
DO NOT ALLOW EXCESS GREASE
OR LIQUIDS TO ACCUMULATE IN
THE DRIP TRAY AS THIS WILL CREATE A FIRE HAZARD.
GRILL BURNERS:
Before removing the burners, make sure that the gas supply is OFF and the control knobs are in the
OFF position. Allow grill to cool completely, then lift off the grill racks and briquette trays. To remove
burners, lift the rear of the burner out of the bracket. Angle the burner slightly to clear the igniter electrode and opening at the front of the grill. Slide burner straight off the orifice tip.
Great care should be used when installing a burner, as it must be correctly centered and secured on the
orifice before any attempt is made to relight the grill. The burner should lie flat and not have any side-toside movement. Frequency of cleaning will depend on grill use.
23
U-BURNER CLEANING:
Clean the exterior of the burner with a brass wire brush. Clear any stubborn scale with a metal scraper.
Clear any clogged ports with a thin wire. Never use a wooden toothpick as it may break off and clog the
port. Shake out any debris through the air shutter. Use a flashlight to inspect the burner inlet to ensure it
is not blocked, if obstructions can be seen, use a stiff wire to clean out the burner throat.
IR-BURNER CLEANING:
AFTER EACH USE, IT IS NECESSARY TO BURN ALL IR
BURNERS WITH THE HOOD OPEN FOR AT LEAST FIVE
MINUTES TO VAPORIZE ANY FOOD DRIPPINGS OR PARTICLES. It may occasionally be necessary to brush, blow
or vacuum accumulated ash from the burner surface. Do
so carefully and only when the burner is cool.
NOTICE
FAILURE TO PERFORM THIS STEP
WILL DAMAGE THE IR-BURNER
ORIFICE CLEANING:
With the burner removed, remove the orifice and shine a flashlight through the openings to ensure there
is no blockage. Use a needle to clear any debris. Be extremely careful not to enlarge the hole or break
off the needle.
TO REASSEMBLE THE BURNERS:
Replace the burner by sliding the air shutter over the brass orifice, centering it in the hole and resting the
rear of the burner onto its supporting bracket.
IT IS EXTREMELY IMPORTANT TO CENTER THE BURNER ON THE ORIFICE PROPERLY.
Be careful not to upset the air shutters’ original position (unless readjusting). Make sure the burner is
level and does not rock. Special care must be taken not to hit or damage the electrode wire while replacing the burners.
ELECTRODE GAPS:
The right gap must be maintained to ensure a proper spark. The gap should be 1/8” to 3/16”. To adjust
gap, hold the base of the wire rod tightly with a pair of pliers, and with another set of pliers, twist the tip
of the wire to achieve the correct gap. Igniter batteries should be replaced at least once a year, following
the instructions on page 7.
NOTE: Rough handling of the electrode can crack the ceramic body, causing all of the igniters to fail.
Replace the briquette trays, ensuring that they sit level and do not rock. Light all of the burners and
check for proper flame characteristics.
CLEANING THE BRIQUETTES AND TRAYS: After allowing the grill to cool completely, turn the briquettes upside-down and operate the grill on high for 30 minutes. After allowing to cool again, return the
briquettes to their proper (flat side down) position. The trays can occasionally be scrubbed clean when
needed after allowing them to cool completely. Never handle hot trays.
ADDITIONAL CONSIDERATIONS:
Always keep the area around the grill free of obstructions and debris. Maintain at least 3” of space
around grill to ensure proper airflow, and keep all ventilation openings clear and free of debris. Visually
check flame characteristics and compare to description on page 15. Adjust if needed. Clean appliance
after each use, and check for blockages, especially at the burner orifices, after periods of prolonged nonuse. To maintain the appearance of your ALFRESCO™ Gourmet Grill for many years, keep it covered
when not in use. Backyard environments are harsh on your grills’ finish. Long exposure to sun, water,
yard chemicals and the elements will reduce the appearance of the stainless steel. This is especially applicable in ocean front locations, or locations subject to sea mists. ALFRESCO™ Gourmet Grills strongly
recommends that you cover your Grill when not in use.
24
TROUBLESHOOTING:
BEFORE CALLING FOR SERVICE:
If your ALFRESCO™ Gourmet Grill does not function properly use the following checklist before contacting your dealer for service. You may save the cost of a service call and the inconvenience of being without your grill. Additional troubleshooting tips can be found on our website at www.alfrescogrills.com.
SPIDER AND INSECT WARNING:
Spiders and insects can nest in the burners of this or any other grill, and cause the gas to flow from the
front of the burner. This is a very dangerous condition, which can cause a fire to occur behind the valve
panel, thereby damaging the grill and making it unsafe to operate.
WHEN TO LOOK FOR SPIDERS: You should inspect the burners at least twice a year or immediately if
any of the following conditions occur:
1. The smell of gas in conjunction with the burner flames appearing yellow.
2. The Grill does not reach temperature.
3. The Grill heats unevenly.
4. The burners make popping noises.
GRILL WON’T LIGHT:
First determine if the spark igniters are functioning properly. You should hear a rapid snapping sound
when the igniter button is depressed. If no sound is heard, try replacing the igniter batteries according to
the instructions on page 7. If the batteries are good, ensure that the proper gap exists between the
burner and electrode wire, according to the procedure on page 24.
If the spark igniters are working correctly, next determine if gas is reaching the burners. Ensure the gas
supply is turned on, and that there are no leaks according to the procedure on page 11. Attempt to
match-light a burner according to the procedure on page 12.
If the burner will light with a match, then the spark igniter may not be functioning correctly, or may not be
adjusted correctly. Adjust according to the procedure on page 24 or call for service. If the burner will not
match light, and the gas supply has been confirmed, then check the burner for blockages according to
the procedure on page 23.
FLAME IS YELLOW / GAS SMELL:
IF YOU SMELL GAS WHILE THE GRILL IS OPERATING, IMMEDIATELY TURN OFF ALL BURNERS.
Perform a leak test and check for blockages according to the procedure on page 24. Also check the air
shutter adjustment according to the procedure on page 15.
NOTE: If the grill is operating in a dusty area or if heavy grease is present, some orange tips on the
burner flame should be considered normal.
LOW / INSUFFICIENT HEAT:
Ensure that adequate preheat time has elapsed. U-burners should preheat for at least 15 minutes with
the hood closed (20 ~ 25 minutes for high heat); IR burners should be allowed to preheat for at least five
minutes with the hood open.
If adequate preheat time was allowed, check the gas supply for a damaged and/or kinked supply line.
Replace if necessary. On LP units, a mostly empty tank may not have sufficient pressure to run the grill
at high heat. Replace with a full tank. Make sure that the regulator/hose assembly being used is the
unit supplied with the grill. On NG units, ensure that the flexible supply line is at least 1/2” diameter.
Check the gas supply pressure to ensure at least 7” W.C. for NG and 11” W.C. for LP.
If gas supply is adequate, check burners for blockages according to the procedure described above.
Check flame characteristics according to the procedure on page 15 and adjust air shutter if needed.
Check that there is no pressure being applied to the regulator attached to the back of the grill. This regulator contains a flexible diaphragm and should not touch the grill body or any surrounding objects.
25
Check to make sure that the burners and the drip tray are clean and free from obstructions.
Clean if necessary.
NOTE: No part of the grill should ever be lined with aluminum foil as it will interfere with airflow and can
cause a low heat condition in the firebox and a high heat condition on the control panel.
BURNER BLOWS OUT:
First determine if the problem is being caused by location. If location is subject to high winds, reposition
grill to provide some protection by placing the back of the grill toward the wind.
Check the gas supply and flame characteristic according to the procedure under Low / Insufficient Heat.
Check to ensure that burners are correctly positioned in the grill according to the procedure on page 15.
Correctly installed burners should be seated firmly with no side-to-side movement.
ROTISSERIE WON’T LIGHT:
Follow the same procedure as described above for the grill burners to diagnose problems with the Rotisserie IR burner. The IR burner flame may be hard to see in bright sunny conditions.
SMOKER BURNER WON’T LIGHT:
Follow the same procedure as described above for the grill burners to diagnose problems with the
Smoker burner. Remove the wood chip tray to better see the smoker burner flame.
When using the smoker with the main grill burners, the smoker burner should be lit first and allowed to
preheat before lighting the grill burners.
GRILL GETS TOO HOT:
IF THE GRILL GETS TOO HOT, TURN IT OFF IMMEDIATELY AND ALLOW IT TO COOL.
Perform a leak test according to the procedure on page 11. If leaks cannot be corrected, call for service
before attempting to use the grill.
LIGHT BULB REPLACEMENT:
NOTE: Disconnect all power to your Alfresco™ Gourmet grill before any service or light bulb replacement is performed.
Light bulbs are located on the left and right side of the rear hood above the cooking area. The area
around the light fixtures and the light fixtures themselves become extremely hot during grill operation
with or without the lights being turned on.
BEFORE REPLACING ANY LIGHT BULB, ALLOW SUFFICIENT TIME FOR THE FIXTURES TO COOL
DOWN IF THE LIGHTS OR THE GRILL WAS TURNED ON, OR BOTH.
Light bulbs can reach several hundred degrees when operating, so allow plenty of time to cool down.
There are two lamps available on your ALX2 grill depending on the model, but both lamps have the
same replacement procedure.
26
Figure # 9
Figure # 10
75T3QCL – R7 Base
75W - 120 VAC
Part # 210-0310
G940120 - G9 Base
40 W - 120 VAC
Part # 210-0317
Should you need to replace light bulbs in you Alfresco™ Gourmet Grill, please refer to the following
steps :
REMOVE THE
LIGHT COVER
LIGHT COVER
The light covers are supported by a spring
mechanism on the light fixture. Simply pry
open the light cover from the left or right
sides by hand only.
DO NOT USE ANY TOOLS as you might
chip the tempered glass cover.
REMOVE THE
LIGHT BULB
Reach inside the light fixture and remove the light
bulb by pulling it straight out of the socket.
INSTALLING A NEW LIGHT BULB:
NOTE: When replacing light bulbs, use a soft clean
cloth (cotton or paper towels) when handling lights.
Always keep halogen lights free of fingerprints and
grease when replacing. Because of the light bulb’s
very high operating temperature, grease or fingerprints left on the light bulb might reduce the bulb’s
life.
Insert a new light bulb using a clean cloth and do not force the light bulb in the socket. Very little effort is
required for the bulb to “SNAP” and lock into place.
Look at the bulb and verify that no fingerprints are left on it. Wipe off any fingerprints and or grease that
might have accidentally come in contact with the glass of the light bulb.
Replace the light cover by inserting it into the light fixture at a slight angle until it “SNAPS” into place.
Power up your Alfresco™ Gourmet Grill and verify the light bulb operation by turning on the light switch.
27
HOW TO OBTAIN SERVICE
WARRANTY SERVICE ONLY:
For warranty service, please contact our regional Alfresco™ Gourmet Grills authorized service agency
according to your location on the following map:
Please provide:
•
•
•
•
Model Number & Serial Number:
• Grills - Located under the drip pan.
• Refrigerators - Located inside on the upper left corner.
Gas Type
Date of installation
A brief description of the problem.
CALL (800) 241-9152
IN THIS AREA ONLY
ALL OTHER AREAS CALL (866) 203-5607
INQUIRIES AND INFORMATION:
For all other Alfresco™ Gourmet Grill information such as power, installation, cut-out requirements, or
any other product inquiries, please contact:
Alfresco Gourmet Grills.
Customer Service Department.
7039 East Slauson Avenue
Commerce, CA 90040.
(888) 383-8800 or (323) 722-7900
(323) 726-4700. (fax)
Or visit us on the WEB at: www.alfrescogrills.com
28
Gourmet Grills Limited Warranty
This warranty covers the following: ALFRESCO™ GOURMET GRILLS (All Models)
DURATION OF WARRANTY
Alfresco Gourmet Grills, (a division of SES, Inc.) warrants all grill components to the original purchaser
to be free of factory defects in material and workmanship for a period of one (1) year from the original
date of purchase. This does not apply if the unit was subject to other than normal household use.
Lifetime warranty covers the structural integrity of the exterior and interior body parts, stainless steel
cooking grates and stainless steel briquette trays. Should structural deterioration occur to the degree of
non-performance, a replacement will be furnished FOB Commerce, California. This does not apply if the
unit was subject to other than normal household use.
Lifetime warranty to the original purchaser, covers the main grill burners. This does not apply if the unit
was subject to other than normal household use.
Alfresco™ Gourmet Grills, Will Cover:
All repair labor and replacement parts for one year, for parts found to be defective due to materials or
workmanship. An Authorized Factory Agent must provide service during normal working hours. No
charge will be made for repair or replacement at the factory for parts returned pre-paid, through the
dealer and claimed within the warranty period, and found by ALFRESCO™ GOURMET GRILLS to be
defective.
Alfresco™ Gourmet Grills, WILL NOT Cover:
•
•
•
•
•
•
•
•
•
•
Installation or start-up Normal adjustment to burners, gas regulators, etc.
Damage resulting from accident, alteration, misuse, abuse, hostile environments,
improper installation or installation not in accordance with local codes.
Cleaning of igniters and/or general maintenance.
Shipping damage
Service by an unauthorized agency.
Damage or repairs due to service by an unauthorized agency.
The use of unauthorized parts.
Overtime, weekends, holidays
Improper installation, such as: no regulator, improper hook-up, etc.
Service visits to:
• Correct the installation. (You are responsible for providing electrical wiring,
gas installation and other connecting facilities.)
• Repairs due to other than normal use.
• Supply the user with operational assistance on site.
Replacement will be FOB Alfresco™ Gourmet Grills, Commerce California, and Alfresco™ Gourmet
Grills, will not be liable for any transportation and labor costs, or export duties. This warranty shall not
apply, nor can we assume responsibility for damage that might result from failure to follow manufacturers
instructions or local codes, where the appliance has been tampered with or altered in any way or which,
in our judgment, has been subjected to misuse, negligence, or accident.
Implied warranty shall not extend beyond the duration of this written warranty. This warranty is in lieu of
all other warranties expressed or implied and all other obligations or liability, in connection with the sale
of this appliance.
29
30