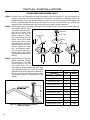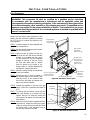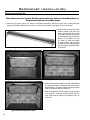
1
SHERWOOD INDUSTRIES IS AN ENVIRONMENTALLY RESPONSIBLE COMPANY. THIS MANUAL IS PRINTED ON RECYCLED PAPER.
PLEASE KEEP THESE INSTRUCTIONS FOR FUTURE REFERENCE
Westport
BY: SHERWOOD INDUSTRIES LTD
OWNER’S MANUAL
WHAT TO DO IF YOU SMELL GAS
• Open windows/Extinguish any open flame.
• Do not try to light any appliance.
• Do not touch any electrical switch or use any phone in your
building.
• Immediately call your gas supplier from a neighbour’s phone.
Follow the gas supplier’s instructions.
• If you cannot reach your gas supplier, call the fire department.
This appliance may be installed in an after
market permanently located, manufactured
(mobile) home, where not prohibited by local
codes.
This appliance is only for use with the type of
gas indicated on the rating plate. This appliance
is not convertible for use with other gases, unless
a certified kit is used.
WARNING
If the information in this manual is not followed exactly, a fire or explosion may result causing
property damage, personal injury or loss of life. Installation and service must be performed by a
qualified installer, service agency or the gas supplier.
FOR YOUR SAFETY
Do not store or use gasoline or other Flammable vapours and liquids in the
vicinity of this or any other appliance.
Massachusetts installations (Warning): This product must be installed by a licensed plumber or gas fitter when
installed within the Commonwealth of Massachusetts. Other Massachusetts code requirements:-Flexible connector
must not be longer than 36 inches, shut off valve must be a “T” handle gas cock, only direct vent sealed combustion
products are approved for bedroom/bathrooms, fireplace dampers must be removed or welded in the open position
prior to the installation of a fireplace insert or gas log.
50-1033
Safety Precautions
FOR SAFE INSTALLATION AND OPERATION OF YOUR “ENVIRO” HEATER,
PLEASE CAREFULLY READ THE FOLLOWING INFORMATION:
• All ENVIRO gas-fired appliances must be installed
in accordance with their instructions. Carefully read all
the instructions in this manual first. Consult the building
authority having jurisdiction to determine the need for
a permit prior to commencing the installation.
• NOTE: Failure to follow these instructions could
cause a malfunction of the fireplace, which could
result in death, serious bodily injury, and/or property
damage.
• Failure to follow these instructions may also void
your fire insurance and/or warranty.
GENERAL
• Installation and repair should be done by a
qualified service person. The appliance should
be inspected before the first use and, annually
thereafter by a qualified service person. More frequent
cleaning may be required due to excessive lint from
carpeting, bedding material, etc. It is imperative the
control compartments, burners and circulating air
passageways of the appliance be kept clean.
• Due to high temperatures, the appliance should
be located out of high traffic areas and away from
furniture and draperies.
Children and adults should be alerted to the
hazards of high surface temperatures and
should stay away to avoid burns or clothing
ignition.
Young children should be carefully supervised
when they are in the same room as the
appliance.
FOR YOUR SAFETY
• Installation and service must be performed by a
qualified installer, service agency or gas supplier.
• This installation must conform to local codes or,
in the absence of local codes, to the current CAN/CGA
2.17-M91 installation code (Canada) or National Fuel
Gas Code ANSI Z21.88a.2003/CSA 2.33a.2003 (USA)
• To prevent injury, do not allow anyone who is
unfamiliar with the stove to operate it.
2
• To prevent injury, if the pilot or pilot and
burners have gone out on their own, open the
glass door and wait 5 minutes to air out before
attempting to re-light the stove.
• Always keep the area around this appliance clear
of combustible material, gasoline and other flammable
liquids and vapours.
• This appliance should not be used as a drying
rack for clothing or for hanging Christmas stockings/
decorations.
• Due to the paint curing on the stove, a faint odor
and slight smoking will likely be noticed when the
stove is first used. Open a window until the smoking
stops.
Always connect this gas stove to a vent system and
vent to the outside of the building envelope. Never
vent to another room or inside the building. Make sure
the specified vent pipe is used; properly sized and of
adequate height to provide sufficient draft. Inspect
the venting system annually for blockage and signs of
deterioration.
WARNING: Failure to position the parts in accordance
with the diagrams in this booklet, or failure to use only
parts specifically approved with this appliance may
result in property damage or personal injury.
WARNING: Do not operate with the glass front
removed, cracked or broken. Replacement of the
glass must be done by a licensed or qualified service
person.
• Never use solid fuels such as wood, paper,
cardboard, coal, or any flammable liquids, etc., in this
appliance.
• Do not use this heater if any part has been under
water. Immediately call a qualified service technician
to inspect the heater and to replace any part of the
control or gas control systems that have been under
water.
• Do not abuse the glass by striking it or slamming
the door shut.
Table of Contents
Safety Precautions..........................................................................................2
Table of Contents...........................................................................................3
Codes And Approvals......................................................................................4
Specifications.................................................................................................5
Dimensions........................................................................................5
Clearances to Combustibles.................................................................5
Initial Installation...........................................................................................6
Vent Termination Restrictions..............................................................6
Vent Parts..........................................................................................7
Planning Your Installation....................................................................7
Horizontal Installation.........................................................................9
Corner Installations...........................................................................11
Vertical Installation...........................................................................11
Cathedral Ceiling Installation.............................................................14
Freestanding Direct Vent Kit With Coupler.........................................14
Venting into a Class ‘A’ Chimney.........................................................17
Converting Top Vented into Rear Vented.............................................17
Installation of Rear Vented Appliance.................................................18
Installation of Top Vented; Vertical Termination...................................19
Installation of Top Vented; Horizontal Termination...............................19
Freestanding Drafthood Adaptor........................................................20
Vent Configurations and Restrictor Settings........................................23
Electrical Requirements For Gas Valve and Optional Blower..................24
Installing Optional Blower..................................................................24
Fuel Conversion................................................................................25
Air Shutter........................................................................................26
Gas Line Connection and Testing........................................................27
Secondary Installation..................................................................................28
Installation of Log Set and Embers.....................................................28
Installation of Panel Set....................................................................30
Operating Instructions..................................................................................31
Lighting Instructions.........................................................................31
Turning Gas Off To Appliance.............................................................31
Routine Maintenance and Service..................................................................32
Trouble Shooting..........................................................................................34
Parts List - Cast............................................................................................35
Parts Diagram - Cast.....................................................................................37
Parts List - Components................................................................................38
Parts Diagram - Components.........................................................................40
Warranty......................................................................................................41
Installation Data Sheet..................................................................................42
3
Codes And Approvals
DIRECT VENT: This type is identified by the suffix DV. This appliance draws all of its’ air for
combustion from outside the dwelling, through a specially designed vent pipe
system.
TOP VENT DV Certified for installation from 0-4500 ft (0-1372 m)
REAR VENT DV Certified for installation from 0-4500 ft (0-1372 m) with 36” (915
mm)
snorkel (refer to ‘Converting Top Vented into Rear Vented’).
In the USA:
The appliance may be installed at higher altitudes. Please refer to your American Gas Association
guidelines which state: the sea level rated input of Gas Designed Appliances installed at
elevations above 2000 feet is to be reduced 4% for each 1000 feet (305 m) above sea level.
Refer also to local authorities or codes which have jurisdiction in your area regarding the derate guidelines.
In Canada:
When the appliance is installed at elevations above 4500 feet (1372 m), the certified high altitude
rating shall be reduced at the rate of 4% for each additional 1000 feet (305 m).
• This appliance has been tested by INTERTEK (Warnock Hersey) and found to comply
with the established VENTED GAS FIREPLACE HEATER standards in CANADA and the USA as
follows:
VENTED GAS FIREPLACE HEATER (WESTPORT DV) (NG/LPG)
TESTED TO: ANSI Z21.88a.2003 CSA 2.33a.2003 VENTED GAS FIREPLACE HEATER
CAN/CGA 2.17-M91 GAS FIRED APPLIANCES FOR HIGH ALTITUDES
This ENVIRO WESTPORT Fireplace:
•Has been certified for use with either natural or propane gases. (See rating label.)
•Is not for use with solid fuels.
•Is approved for bedroom or bed sitting room. (Canada: must install an approved wall
thermostat)
•Must be installed in accordance with local codes. If none exist, use current installation code
CAN/CGA B149 in Canada or ANSI Z223.1/NFPA 54 in the USA.
•Must be properly connected to a venting system and not connected to a chimney flue
serving a separate solid-fuel burning appliance.
IMPORTANT NOTICE: (RE: FIRST FIRE UP): When the unit is turned on for the first time, it should
be turned onto high without the fan on for the first 4 hours. This will cure the paint, logs, gasket material
and other products used in the manufacturing process. It is advisable to open a window or door, as the
unit will start to smoke and can irritate some people. After the unit has gone through the first burn turn
the unit off including the pilot, let the unit get cold then remove the glass door and clean it with a good
gas fireplace glass cleaner, available at your local ENVIRO dealer.
4
Specifications
WARNING:
Operation of this heater when not connected to a properly installed and maintained venting system can result in
carbon monoxide (CO) poisoning and possible death.
DIMENSIONS:
�� �� ��������
�� ���� ��������
���
��������
���
��������
�� �� ��������
�� �� ��������
�� ���� ��������
Floor to center of flue REAR VENT
231⁄2” (59.7 cm)
�� ����
��������
�� �� ��������
Figure 1: Westport Exterior Dimensions.
CLEARANCES TO COMBUSTIBLES:
Minimum Alcove Dimensions:
Width
48 inches (121.9 cm)
Depth
24 inches (60.96 cm)
Height
60 inches (152.4 cm)
�������� ����
�
�����
�
�
��
��
�
�
�������� ����
���� ����
���� ����
A. Sidewall to unit
11 inches (27.9 cm)
B. Backwall to unit
2.5 inches (6.35 cm)
C. Corner to unit
2.5 inches (6.35 cm)
D. Cieling
60 inches above floor (152.4 cm)
E. Floor
(hard wood and linoleum) 0 inches
Note: Carpeted surfaces must use a non combustible hearth pad.
Figure 2: Clearances to combustibles.
CLEARANCES MUST BE SUFFICIENT TO ALLOW ACCESS FOR MAINTENANCE AND SERVICE
5
Initial Installation
QUALIFIED INSTALLERS ONLY
VENT TERMINATION RESTRICTIONS:
N
O
H
D E
L
B
C
B
B
Fixed
Closed
F
G
Fixed
Openable Closed
Openable
B
A
Termination Cap
G
M
J
Air Supply Inlet
G
Gas Meter
K
I
Restriction Zone
A
(Termination not allowed)
Figure 3: Exterior Vent Termination Locations, use in conjunction with Table 1.
Letter
Canadian Installation 1
A
B
US Installation2
12 in (30 cm)
12 in (30 cm)
Description
Clearance above grade, verandah, porch, deck, or balcony.
9 in (23 cm)
Clearance from window or door that may be opened.
C
12 in (30 cm)*
Clearance from permanently closed window (to prevent
condensation).
D
24 in (60 cm)*
Vertical clearance to ventilated soffit located above the
terminal, within a horizontal distance of 2 ft (60 cm) from
center line of terminal.
E
18 in (45 cm)*
Clearance to unventilated soffit.
F
12 in (30 cm)*
Clearance to outside corner.
12 in (30 cm)*
Clearance to inside corner.
G
H
3 ft (91 cm) within a height of
15 ft (4.5 m) above the meter/
regulator assembly
3 ft (91 cm) within a height of
15 ft (4.5 m) above the meter/
regulator assembly*
Clearance to each side of center line extended above
meter/regulator assembly.
I
3 ft (91 cm)
3 ft (91 cm)*
Radial clearance around service regulator vent outlet.
J
12 in (30 cm)
9 in (23 cm)
Clearance to non-mechanical air supply inlet to building, or
the combustion air inlet to any other appliance.
K
6 ft (1.83 m)
L
7 ft (2.13 m)t
3 ft (91 cm) above if within 10
ft (3 m) horizontally
7 ft (2.13 m)*t
M
12 in / 30 cm+
12 in / 30 cm*+
N
O
Clearance to mechanical air supply inlet.
Clearance above paved sidewalk or paved driveway located
on public property.
Clearance under verandah, porch, deck, or balcony.
12 in (30 cm)*
Clearance horizontally to any surface (such as an exterior
wall) for vertical terminations.
12 in (30 cm)
Clearance above roof line for vertical terminations.
Table 1: Exterior Vent Termination Locations, use in conjunction with Figure 3.
1 In accordance with the current CSA B149, Natural Gas and Propane Installation Code.
2 In accordance with the current ANSI Z223.1 NFPA 54, National Fuel Gas Code.
* These numbers are only estimates. Clearance in accordance with installation codes and the requirements of the gas supplier.
t A vent shall not terminate directly above a side walk or paved driveway that is located between two single family dwellings
and it serves both dwellings.
+ Permitted only if verandah, porch, deck, or balcony is fully open on a minimum of two sides beneath the floor.
NOTE: Venting terminals shall not be recessed into walls or siding.
6
Initial Installation
QUALIFIED INSTALLERS ONLY
VENT PARTS:
Simpson Duravent (SD), Selkirk (SEL), and Security Chimneys (SC), must state if galvanized or black wanted, PART NUMBERS:
SD
SEL
SC
Description
SD
908
4DT-6
SV4L6
6” pipe length
911
907
4DT-9
906
4DT-12
SV4L12
12” pipe length
904
4DT-24
SV4L24
24” pipe length
943
4DT-AF6
Flashing, 0/12 to 6/12 roof pitch
903
4DT-36
SV4L36
36” pipe length
943S
4DT-AF12
Flashing, 7/12 to 12/12 roof pitch
9” pipe length
SEL
SC
Description
11” to 14 5/8” pipe, adjustable
4DT-AJ
4” to 10” pipe , adjustable
SV4LA12
11⁄2” to 12” pipe , adjustable
902
4DT-48
SV4L48
48” pipe length
SV4FA
Flashing, 1/12 to 7/12 roof pitch
945
4DT-EL45
SV4EBR45
45° elbow, black
SV4FB
Flashing, 8/12 to 12/12 roof pitch
990
4DT-EL90
SV4EBR90
90° elbow, black
943F
SV4F
Flat flashing
950
4DT-VS
SV4VS
Vinyl siding standoff/sheild
980
4DT-VC
942
4DT-WT
SV4RSN
Wall thimble
991
4DT-HVC
Cathedral Support Box
984
4DT-HC
36” Snorkel Termination
985
4DT-HHC
SV4CGV
Vertical termination
High wind vertical termination
941
4DT-CSS
SV4CSB
981
4DT-ST36
SV4STC36
SV4CHC
Horizontal square termination
953
4DT-SC
SV4FC
Storm collar
978
4DT-VKC
SV0FAK
Vertical termination kit
963
4DT-FS
SV4BF
Fire stop
970
4DT-HKA
SV0SHK
988
4DT-WS/B
SV4BM
Wall strap/support/band
Horizontal termination kit
SD: Basic Kit, SEL: Kit A, SC: Standard Kit
971
4DT-HKB
SV0SHK2
Horizontal termination kit
SD: Kit A, SEL: Kit B, SC: Kit
High wind horizontal termination
Table 2: Vent Pipe Types with Part Numbers.
This fireplace have been tested and certified for use with SIMPSON DURAVENT TYPE GS PIPE FOR GAS STOVES.
SELKIRK DIRECT-TEMP SYSTEM SECURITY CHIMNEY’S “SECURE VENT DIRECT VENT SYSTEM” and SELKIRK
“METALBESTOS MDV VENT SYSTEM” kits are available for horizontal venting. When using Simpson Duravent, it is
recommended that, before installation, a bead of RTV High Temperature Silicone should be applied to each outer
vent joint, and Mil-Pac to each inner joint. When planning an installation, it will be necessary to select the proper
length of vent pipe for the particular requirements.
A MINIMUM VERTICAL LENGTH OF 24” (61 cm) TO THE FIRST 90° ELBOW IS REQUIRED. WITH THIS
MINIMUM VERTICAL RISE, HORIZONTAL RUNS OF FROM 1 FT (30.5 cm) to 3 FT (91.5 cm) ARE PERMITTED TO
REACH THE OUTSIDE VENT TERMINATION.
BEFORE BEGINNING THE INSTALLATION TAKE CARE TO ENSURE AN APPROPRIATE OUTSIDE LOCATION FOR THE
VENT TERMINATION CAN BE ACCOMMODATED. FOLLOW THE VENT LENGTH DIAGRAM PRECISELY.
VENTING TERMINALS CANNOT BE RECESSED INTO A WALL OR SIDING.
If extra elbows are being used, overall allowable length will be reduced by 3 ft (91.5 cm) per
additional elbow.
PLANNING YOUR INSTALLATION:
When planning your installation, it will be necessary to select the proper length of vent pipe for your particular
requirements. It is important to note when passing through a wall, the maximum allowable wall thickness is
10 inches (25.4 cm), 11⁄2 inches (3.8 cm) clearance to combustibles must be maintained. Select the amount of
vertical rise desired for “vertical-to-horizontal” type installations. To determine the length of vent pipe required for
vertical installations, measure the distance from the appliance flue outlet to the ceiling, the ceiling thickness, the
vertical rise through the attic or second story, and allow for sufficient vent height above the roofline. For two story
applications, a fire stop is required at each floor level. If an offset is needed in the attic, additional pipe and elbows
will be required. To connect the venting system to the appliance flue outlet, a twist-lock adapter is built into the
appliance at the factory. Refer to ‘Vent Configuration and Restrictor Settings’ for venting parameters.
7
Initial Installation
QUALIFIED INSTALLERS ONLY
Your total vent pipe length must be within the
shaded area of Figure 36. If a 90° elbow is used
in the horizontal plane, 36” (91.4 cm) must be
subtracted from the allowable horizontal run.
Round Support
Box/Wall Thimble
Horizontal
Termination
There are three (3) basic types of Direct Vent
System installations. The three (3) types of
installations are:
Pipelength
90° Elbow
Vertical
Termination
Storm Collar
Flashing
Pipelength
Ceiling Firestop
Figure 4: Common Horizontal Installation.
Round Support
Box/Wall Thimble
36" (915 mm)
Snorkel
Cathedral Ceiling
Support Box
Pipelength
Round Support
Box/Wall Thimble
Pipelength
Figure 5: Common Vertical Installation.
2 ft (610 mm)
Pipelength
45° Elbow
Figure 6: Common Snorkel Installation.
8
Initial Installation
HORIZONTAL INSTALLATION:
QUALIFIED INSTALLERS ONLY
STEP 1. Set the appliance in the desired location. Check to determine if wall studs or roof rafters are in the way
when the venting system is attached. If this is the case, you may want to adjust the location of the
appliance.
STEP 2. Direct vent pipe and fittings are designed with special twist-lock connections. Assemble the desired
combination of black pipe and elbows to the appliance adapter with pipe seams oriented towards the wall
or floor, as much out of view as possible.
Female
Locking
Lugs
Sealant
Male
Locking
Lugs
Place a bead of Mil-Pac on the
outer edge of the inner exhaust
pipe (non-flared end). Place a bead
of high temperature silicone on the
male edge of the outer pipe. Push
the pipe sections completely together,
then twist-lock one section clockwise
approximately 1⁄4 turn, until the two
sections are fully locked. The female
locking lugs will not be visible from the
outside, on black pipe. They may be
located by examining the inside of the
female ends as shown in Figure 7.
Figure 7: Twist-Lock Connection
���
�������
���
�������
Figure 8: Wall Framing Hole for
Horizontal Installation.
Notes:
(1) Twist-lock procedure: four indentations, located on the female end of the pipes and fittings, are designed to
slide straight onto the male ends of adjacent pipes and fittings, by orienting the four pipe indentations so they
match and slide into the four entry slots on the male end.
(2) Horizontal runs of vent pipe must be supported every three feet. Wall straps are available for this purpose, also
when running horizontal pipe minimum clearances to combustibles must be maintained; 2 inches (5.1 cm) at
top, 11⁄2 inches (3.8 cm) at sides, 11⁄2 inches (3.8 cm) at bottom.
STEP 3. With the pipe attached to the stove in the correct location, mark the wall for a 10” (25.4 cm) x 10” (25.4
cm) square hole. The center of the square hole should match the centerline of the horizontal pipe. Cut
and frame the 10” (25.4 cm) x 10” (25.4 cm) hole in the exterior wall where the vent will be terminated.
Refer to Figure 8. If the wall being penetrated is constructed of non-combustible material i.e. masonry or
concrete, a 7 inches (17.8 cm) hole is acceptable.
11/4"
(3.2cm)
Woodscrews
Fold strap
here
Sheet metal
screws
Wall Thimble
Strap
Figure 9: Installing Decorative Wall Thimble.
9
Initial Installation
QUALIFIED INSTALLERS ONLY
STEP 4. Position the horizontal vent termination in the center of the 10” (25.4 cm) x 10” (25.4 cm) hole, and attach
to the exterior wall with the four screws provided. Before attaching the vent termination to the exterior
wall, run a bead of non-hardening mastic around the edges, so as to make a seal between the termination
and the wall. The arrow on the vent termination should be pointing up, insure that the proper clearances
to combustible materials are maintained.
STEP 5. Before connecting the horizontal run of the vent pipe to the vent termination, slide the black decorative
wall thimble cover over the vent pipe.
STEP 6. Slide the appliance and vent assembly towards the wall, carefully inserting the vent pipe into the cap
assembly. It is important that the vent pipe extend into the vent cap a sufficient distance with a minimum
of 11⁄4” (3.2 cm) overlap. Secure the connection between the vent cap pipe and the vent cap by attaching
the two sheet metal straps extending from the vent cap assembly into the outer wall of the vent pipe. Use
the two sheet metal screws provided to connect the straps to the vent pipe. Bend any remaining portion
of the sheet metal straps back towards the
vent cap, so the decorative wall thimble will
conceal it (see left image in Figure 9).
Cut vinyl siding
STEP 7. Slide the decorative wall thimble up to the
wall surface and attach with the screws
provided. Apply decorative brass or chrome
trim if desired (see right image in Figure 9).
NOTES:
(1) The four wood screws provided should be replaced
with the appropriate fasteners for stucco, brick,
concrete, or other types of siding.
away to fit standoff
Nut (x4)
required
Wood screw
(x4) required
Bolt (x4)
required
(2) For buildings with vinyl siding, a vinyl siding
standoff, should be installed between the vent cap
and the exterior wall (see Figure 10). Attach the
vinyl siding standoff to the horizontal termination.
The vinyl siding standoff prevents excessive heat
from possibly melting the vinyl siding material. Figure 10: Installing Vent Cap with Vinyl Siding Stand-Off.
Note that the horizontal vent termination bolts
onto the flat portion of the vinyl siding standoff
Wood screws (x4)
(shaded area in Figure 10), so that an air space will
exist between the wall and the vent termination.
NOTES:
(1) The horizontal run of vent pipe must be level and
should have a 1⁄4 inch rise for every one foot
of run towards the termination. Never allow
the vent to run downward. This could cause high
temperature and may present the possibility of a
fire.
(2) The location of the horizontal vent termination
on the exterior wall must not be easily blocked
or obstructed. Refer to “Initial Installation - Vent
Termination Restrictions” section.
(3) When installing a vent pipe in a chase the minimum
clearance to combustibles is 2” (5 cm).
Figure 11: Installing Horizontal Vent Termination.
10
Initial Installation
QUALIFIED INSTALLERS ONLY
CORNER INSTALLATIONS:
Do not interfere with the structural integrity of the walls.
For installations with a 36” (915 mm) snorkel refer to Figure 12 and ‘Initial Installation - Installation of Rear
Vented’.
For other corner installations refer to Figure 13, ‘Restrictor Setting vs Vent Pipe Length’, and ‘Vent Restrictor and
Settings’.
36” (915 mm)
Snorkel
Inside Wall
Outside Wall
Outside Wall
Outside Wall
21/2”
(67 mm)
21/2”
(67 mm)
Figure 12: Corner installation rear vented with snorkel.
Figure 13: Corner installation top vented.
VERTICAL INSTALLATION:
STEP 1. Check the instructions for required clearances (air spaces) to combustibles when passing through ceilings,
walls, roofs, enclosures, attic rafters, or other nearby combustible surfaces. Do not pack air spaces with
insulation.
STEP 2. Set the gas appliance in the desired location.
Drop a plumb bob down from the ceiling to the
position of the appliance flue exit, and mark
the location where the vent will penetrate the
ceiling. Drill a small hole at this point. Next,
drop a plumb bob from the roof to the hole
previously drilled in the ceiling, mark the
spot where the vent will penetrate the roof.
Determine if ceiling joists, roof rafters, or
other framing will obstruct the venting system.
You may wish to relocate the appliance, or to
offset, to avoid cutting load bearing members.
STEP 3. To install the Round Support Box/Wall Thimble
in a flat ceiling, cut a 10” square hole in the
ceiling, centered in the hole drilled in Step 2.
Frame the hole as shown in Figure 14.
STEP 4. Assemble the desired lengths of black pipe and
elbows necessary to reach from the appliance
adapter up through the Round Support Box.
Insure that all pipe and elbow connections are
in their fully twist-locked position.
Ceiling Joist
Framing
10” (25.4cm) x 10” (25.4cm)
inside framing
1 1/2” (4cm) long
wood screw (x4)
Figure 14: Wall Framing for 10” (25.4 cm) x 10” (25.4
cm) Hole for Vertical Installation.
11
Initial Installation
QUALIFIED INSTALLERS ONLY
STEP 5. Cut hole in the roof centered on the small hole placed in the roof from Step 2. The hole should be of
sufficient size to meet minimum requirements for Clearance to Combustibles, as specified. Continue to
assemble lengths of pipe and elbows necessary to reach from the ceiling support box up through the
roofline. Galvanized pipe and elbows may be utilized in the attic, as well as above the roofline. The
galvanized finish is desirable above the roofline, due to the higher corrosion resistance.
STEP 6. Once the pipe sections have been joined, and run up through the hole in the roof, slip an elbow strap over
the exposed sections, bend
Vertical
the support straps outwards,
Termination
and push the elbow strap
down to the roof level, as
Storm Collar
Elbow Strap
shown in Figure 15. Tighten
the clamp around the pipe
Flashing
section. Use a level to make
sure the pipe is truly vertical.
With roofing nails, secure the
Roofing nails
support straps to the roof.
Seal the nails holes heads
with non-hardening mastic.
Trim the excess length of the
support straps that extend
out beyond the edge of the
flashing.
STEP 7. Slip the flashing over the pipe
section protruding through
the roof. Secure the base
of the flashing to the roof
Figure 15: Vertical Vent Termination Installation.
with roofing nails. Use a
non-hardening sealant between the uphill edge
of the flashing and the roof. Insure the roofing
Roof Pitch
Minimum Height
material overlaps the top edge of the flashing as
shown in Figure 15. Verify that you have at least
Feet
Meters
the minimum clearance to combustibles at the
Flat to 7/8
1
0.3
roofline.
Over 7/12 to 8/12
1.5
0.46
Dimension ‘H’ obtained
from table below.
H
Figure 16: Height of Vertical Termination;
Reference Table 3.
12
Over 8/12 to 9/12
2
0.61
Over 9/12 to 10/12
2.5
0.76
Over 10/12 to 11/12
3.25
0.99
Over 11/12 to 12/12
4
1.22
Over 12/12 to 14/12
5
1.52
Over 14/12 to 16/12
6
1.83
Over 16/12 to 18/12
7
2.13
Over 18/12 to 20/12
7.5
2.29
Over 20/12 to 21/12
8
2.44
Table 3: Minimum ‘H’ for Figure 16
Initial Installation
QUALIFIED INSTALLERS ONLY
STEP 8. Continue to add pipe sections until the height of the vent
cap meets the minimum code requirements. Refer to
Figure 16 and Table 3. Note that for steep roof pitches, the
vent height must be increased. In high wind conditions,
nearby trees, adjoining roof lines, steep pitched roofs,
and other similar factors can result in poor draft, or down
drafting. In these cases, increasing the vent height may
solve the problem.
plumber’s tape
connected to
wall strap
STEP 9. Slip the storm collar over the pipe, and push it down to
the top of the roof flashing as shown in Figure 15. Use
the non-hardening sealant around the joint between the
pipe and the storm collar.
Wall strap
45° elbows (x2)
STEP 10. Twist-lock the vent cap.
NOTES:
(1) If an offset is necessary in the attic to avoid obstructions, it
is important to support the vent pipe every 3 feet (91 cm), to
avoid excessive stress on the elbows, and possible separation.
Wall straps are available for this purpose (see Figure 17).
Figure 17: Use of Wall Straps.
(2) When ever possible, use 45° degree elbows instead of 90°
degree elbows. The 45° degree elbow offers less restriction to
the flow of flue gases and intake air.
NOTES:
(1) For multi story installations. A ceiling firestop is
required at the second floor, and any subsequent
floors (see Figure 14). The opening should be framed
to 10” (25.4 cm) x 10” (25.4 cm) inside dimensions,
in the same manner as shown in Figure 14.
(2) Any occupied areas above the first floor, including
closets and storage spaces, which the vertical vent
passes through, must be enclosed. The enclosure
may be framed and sheetrocked with standard
building materials. However consult the appliance
manufactures installation instructions for the
minimum allowable clearance between the outside
of the vent pipe, and the combustible surfaces of the
enclosure. Do not fill any required air spaces with
insulation.
Nails
Ceiling firestop
Ceiling
Use clearances to as
defined by appliance and
vent pipe manufacturers.
Second floor
Figure 18: Multi-Story Vent Pipe Installation.
13
Initial Installation
QUALIFIED INSTALLERS ONLY
CATHEDRAL CEILING INSTALLATION:
STEP 1. Follow installation steps 1 & 2 under ‘Vertical Installation’.
STEP 2. Using the plumb bob, mark the centerline of the venting
system on the ceiling and drill a small hole through the
ceiling and roof at this point. From the roof, locate the drill
hole and mark the outline of the “Cathedral Ceiling Support
Box”.
STEP 3. Remove shingles or other roof coverings as necessary to
cut the rectangular hole for the “Support Box”. Cut the hole
1⁄8” larger than the “Support Box” outline.
STEP 4. Lower the “Support Box” through the hole in the roof
until the bottom of the “Support Box” protrudes at least 2
inches (5 cm) below the ceiling. Align the “Support Box”
both vertically and horizontally with a level as shown in
Figure 19. Temporarily tack the “Support Box” in the place
through the inside walls and into the roof sheathing.
STEP 5. Using tin snips, cut the “Support Box” from the top corners
down to the roofline, and fold the resulting flaps over the
roof sheathing (Figure 20). Before nailing it in to the roof,
run a bead of non-hardening mastic around the top edges
of the “Support Box”, to make a seal between the box and
the roof. Clean out any combustible material from the
inside of the “Support Box”.
Figure 19: Cathedral Ceiling Support Box
Leveling.
STEP 6. Complete the cathedral ceiling installation by following the
same procedures outlined in Steps 4 through 9 for “Vertical
Installation”.
Figure 20: Cathedral Ceiling Support Box
Installation.
FREESTANDING DIRECT VENT KIT WITH COUPLER:
KIT COMPONENTS:
Quantity Description
Quantity Description
1
Horizontal direct vent termination cap
1
Ø65⁄8” (17 cm) 90° elbow
2
Flue collar adapters (only one used)
4
Wire spacers
4
T20 Torx screws
3
Decorative rings
1
Wall thimble
1
4 oz tube RTV silicone
1
Inside finish trim collar
20
1
5’ (190 cm) length of Ø4” (10 cm) double walled flex pipe
8
11⁄2” wood screws
2
24” (61 cm) section of Ø65⁄8” (17 cm) straight pipe
1
Vinyl siding deflector
9/16”
tech screws
Please ensure that all components are supplied with this kit. If components are missing or have been damaged,
contact your dealer, distributor, or courier company. Do not attempt the installation if components are missing or
damaged.
14
Initial Installation
QUALIFIED INSTALLERS ONLY
INSTALLATION INSTRUCTIONS:
1. Decide on a location for the unit that will meet any or all local code requirements. Refer “Planning Your
Installation” and “Clearances to Combustibles”.
2. Set the appliance in the desired location. Determine if any wall studs, electrical wiring, or plumbing pipes are
in the way of the venting system as it passes through the wall. If obstructions are found in the wall it may be
necessary to adjust the location of the appliance.
3. Set the appliance in the desired location. Temporarily place a 24” (61 cm) section with the non-crimped end on
the unit
4. Install the 90° elbow onto the vertical pipe on the stove pointing in the direction that the vent will exit the
structure.
5. Project a level line from the center point of the elbow. Using this center point, scribe
a 10” (25.4 cm) hole or square on the wall. Cut the hole out on both the interior and
exterior wall surface.
6. Frame the hole as shown in Figure 8.
7. Install the wall thimble and secure the thimble to the inner wall surface.
8. With the appliance still in place install the 24” (61 cm) horizontal section on the elbow
and let this section of pipe protrude through the exterior surface. Mark the pipe so
that when it is cut it will be flush with the exterior wall.
����
�������
9. Dismantle the outer pipe sections.
10. Remove the 4” (10 cm) flue collar from the unit and remove any loose sealant. Install
the new Ø 4” (10 cm) by 5” (12.5 cm) flue collar provided in this kit.
11. Stretch the liner out. Attach the flexible liner to the vent termination cap by placing
a small bead of high temperature silicone on the vent termination and slide the flex
liner onto the vent terminal and secure with three (3) sheet metal screws evenly
spaced.
12. Dress the flex liner through the wall thimble and attach the vent terminal to the
outside of the house using four (4) wood screws provided. The use of non-hardening
mastic should be used around the vent to ensure a watertight seal.
Figure 21: Cut away of
spacers on Flex Pipe.
13. Install two (2) wire spacer around the flex pipe. Slide the horizontal section of pipe over the flexible liner. Ensure
the wire spacers are positioned at either end of the pipe (refer to Figure 21 and 22).
14. Install the horizontal section of pipe through the wall thimble, ensure
that this portion of pipe slides onto the vent termination cap.
15. Slide the inside finished collar over the horizontal section of pipe and
secure to wall using the screw provided.
16. Slide the 90° elbow over the flex pipe. Do not slip the outer
sections of pipe together, you will require some movement
in these pipe section in order to secure the flex pipe to the
flue outlet on the appliance.
17. Stretch the flex liner to a length long enough to ensure the flex liner
can be easily connected to the flue outlet of the appliance.
Figure 22: Top view of spacers on Flex
Pipe.
18. Install the remaining wire spacers over the flexible liner and install
the vertical section of pipe. Ensure the wire spacers are positioned
at either end of the pipe (refer to Figure 21 and 22).
15
Initial Installation
QUALIFIED INSTALLERS ONLY
19. Place a bead of high temperature silicone on the flue pipe and slide the flex liner over the collar, secure the flex
liner with three (3) sheet metal screws evenly spaced.
20. Align all straight sections of pipe, slipping all joints together and installing with three (3) sheet metal screws
evenly spaced.
21. Install the brass decorative rings around each joint making sure this decorative ring covers the sheet metal
screws that secure each section of pipe together and secure to vent pipe in the slotted tab on the backside of
the pipe so that the fastener would not be seen.
22. Secure the horizontal section of pipe to the inside finished collar by installing a screw in the tab on the inside
finished collar. This will prevent the pipe from being disconnected at the vent terminal.
23. Light the appliance and ensure proper operation.
���� �������
���� ����
���������� ����
�����������
���� �������
������ �������� ������
����������
����� �����
������� ��
���� ����
���������� ���
� ���� ����� ����
����
Figure 23: Assembly of Venting Kit.
16
Initial Installation
QUALIFIED INSTALLERS ONLY
VENTING INTO A CLASS ‘A’ CHIMNEY:
This model is also certified and tested to vent into CLASS ‘A’
wood stove chimneys.
Place the freestanding direct vent appliance in the desired
location.
Use a conversion kit from Simpson Duravent (931, 932, or
933), or Security Chimney (SV4CCK1, SV4CCK2, or SV4CCK1).
Which kit is used will depending on the inner diameter of the
CLASS ‘A’ chimney that this appliance is to be vented into.
Simpson GS
Dura Vent Cap
Cap Adapter
Class ‘A’
Chimney
Place a bead of high temperature silicone or mil-pac at each
connection to ensure a tight seal.
NOTE: An approved 4” (10 cm) diameter flex liner must be
used in the application.
Roof Flashing
NOTE: Use Simpson Dura Vent from the top of the appliance
until this vent reaches the CLASS ‘A’ chimney. Install the retro
adapter to the top section of GS direct vent pipe and install the
flex liner to the retro adapter.
Fully line the CLASS ‘A’ chimney with a minimum 4” (10 cm)
flex liner to the top of the CLASS ‘A’ chimney.
Place a bead of high temperature silicone to the Simpson Cap
adapter and securely attach the flex liner to the adapter.
4” (10cm) Flex Liner
Inside Class ‘A’ Chimney
Secure the cap adapter to the CLASS ‘A’ chimney ensuring an
airtight seal.
Install the vertical termination cap.
Light the unit and ensure proper operation.
Ceiling Rafters
THE USE OF ANY EXISTING CHIMNEY AS AN AIR INTAKE
IS NOT COVERED UNDER THE ANSI Z21.88-2002 CSA
2.33a-2002 TEST METHODS AND THE RESULTING ITS/WH
PRODUCT CERTIFICATION. THE CODE AUTHORITY HAVING
JURISDICTION MUST BE CONSULTED PRIOR TO PROCEEDING
WITH THIS INSTALLATION METHOD.
GS Simpson Dura
Vent Pipe 4” x 6 5/8”
Figure 24: Assembly of Venting into a Class ‘A’
Chimney.
CONVERTING TOP VENTED INTO REAR VENTED:
This unit has been shipped as a 30,000 Btu/hr top-vented freestanding unit. This unit can be converted to a rear
vented unit with a 36” (915 mm) snorkel for some installation applications.
1. To convert this unit to a rear vented model you must remove the flue pipe adapter and turn to the rear vent
position. See sections ‘Installation of Rear Vented Appliance’.
2. Carefully remove the trivet and the stovetop. Place on a soft surface as not to damage the porcelain finishes.
3. Remove the four (4) screws that hold the flue connection to the unit body (see Figure 25). Carefully remove the
elbow being sure not to damage the gasket that is glued to the flue collar elbow.
4. Turn the elbow to the rear vent position and re-fasten with the screws removed form the previous step (see
Figure 26).
17
Initial Installation
QUALIFIED INSTALLERS ONLY
������� ���
���� ������
�������
�������� ���� ������ ����� ��� ���� ���� ��������������
����� ��� ����� �� ��� ���� ���� ��� ����� ��������
�������� ����� ��������� ��� ���� ������ ������� ����
��� �������� ����� ���� ������� ��������� ���� ���
������ �� ��� ����� ������ �� ��� ������� ������
��������������
���� ���� ��
������ ���� ���� ����
������ ����� �� �����
��� ������� ��� ��
������ ��� ������
���� ����� ��� ���� ��
��� ���������
Figure 25: Step 3 of Converting Top Vented into Rear
Vented.
Figure 26: Step 4 of Converting Top Vented into Rear
Vented.
INSTALLATION OF REAR VENTED APPLIANCE:
Place the unit into position.
Attach a small section of pipe on the unit and mark exterior wall
where vent would pass through the wall.
Cut a 10” (25.4 cm) minimum hole in the wall to maintain clearances
to combustibles. Frame hole as shown in Figure 8.
Install a wall thimble.
Install interior finished collar.
Install the vent section through the wall.
THIS UNIT MUST BE VENTED WITH A 36” (91 cm) SNORKEL KIT IF
UNIT IS RATED FOR 30,000 Btu/hr NG and 26,000 Btu/hr LP.
������� ����
�������� ��� ��������
���� ������� ����
������
�������� ����
�������
���� �������
������ �������� ������
���� ����
Seal around the vent terminal to the structure using a non hardening
mastic.
Can not be used for 45° corner installations. See ‘Installation of
Top Vented; Horizontal Termination’ and ‘Installation of Top Vented;
Vertical Termination’ for corner installations.
Figure 27: Installation for Rear Vented;
30,000 Btu/hr.
18
Initial Installation
QUALIFIED INSTALLERS ONLY
INSTALLATION OF TOP VENTED; HORIZONTAL TERMINATION:
This is the most common type of installation style.
�����������
Set the unit in place.
Install a minimum 24” (61 cm) vertical chimney.
������ �������� ������
Install a 90° elbow, and mark the exterior wall where the vent would
pass through.
���� �������
Cut a 10” (25.4 cm) minimum hole in the wall to maintain clearances to
combustibles around vent pipe. Frame hole if as shown in Figure 7.
Install wall thimble.
Install interior finished collar
���� ����
�������
�������� ����
������
Install the vent section through the wall and then install the vent
termination.
Seal around the termination using a non hardening mastic.
CORNER INSTALLATION:
This type of installation can be used in a corner installation. If a 90°
elbow is used in the horizontal plane, 36” (91.4 cm) must be subtracted
from the allowable horizontal run shown in Figure 36.
INSTALLATION OF TOP VENTED; VERTICAL TERMINATION:
Place the unit in place.
Drop a plumb bob from the ceiling to the center point of the flue
outlet.
Cut a 10” (25.4 cm) hole in the ceiling and the roof. Refer to Figure
14.
Figure 28: Installation for Top Vented;
Horizontal Termination.
���� ���
���� ��������
���� �����
���������� �����
Install the ceiling support and insulation guard.
Install the roof flashing. Ensure that the roof flashing is installed
under the roofing material so that a watertight seal is created.
Install the flue pipe from the top of the unit through the roof.
������� �������
������ ��������
������
Ensure that all flue pipe and unit maintain required clearances to
combustibles.
���� ����
CORNER INSTALLATION:
������
��������
This type of installation can be used in a corner installation. If a
90° elbow is used in the horizontal plane, 36” (91.4 cm) must be
subtracted from the allowable horizontal run shown in Figure 36.
Figure 29: Installation for Top Vented;
Vertical Termination.
19
Initial Installation
QUALIFIED INSTALLERS ONLY
FREESTANDING DRAFTHOOD ADAPTOR:
This Drafthood Adaptor is a complete assembly and is ready to fit onto your Westport in a vertical vent application
only. With the Drafthood Adaptor correctly installed and wired to the gas control valve. Your Direct Vent Fireplace
can be vented like a B-Vent Fireplace.
INSTALLATION:
WARNING: This Freestanding Drafthood Adaptor must be fitted by a qualified service technician.
Step 1
Remove the Drafthood Adaptor from the packaging. Ensure the unit and wire harness are undamaged. If there is
damage contact your dealer, distributor, or courier company before starting this installation.
Step 2
Install the adaptor so the wires exit to the rear of the fireplace. Slide the Drafthood Adaptor over the outlet pipe of
the fireplace until the bottom of the adaptor collar stops on the top of the outlet. The Drafthood Adaptor must be
safely secured to the vent flanges with either self-tapping screws and/or high temperature sealant.
WARNING: During the fitting of the Drafthood Adaptor, ensure that the wires are not pinched between the adaptor
and the collar and/or flue outlet. Ensure that the opening of the Drafthood Adaptor is not blocked or obstructed.
Step 3
Being careful not to run any wiring tight across metal edges; connect them to the valve and “ON/OFF” switch (refer
to Figure 30).
Step 4
Adjust the restrictor plate to position 2.5 of 5. See the vent restrictor settings in the instruction manual.
Step 5
Adjust the embers on the burner so they don’t cover the burner ports.
WIRING DIAGRAM:
The fireplace connections are
labelled in Figure 30. When
installing the Drafthood Adaptor
onto a fireplace fitted with an
optional wall switch or an optional
thermostat, remove one wire from
the switch to the gas valve and
connect the Drafthood Adaptor
harness as shown in Figure 30.
Figure 30: Wiring Diagram for Electrical Connection.
20
Initial Installation
QUALIFIED INSTALLERS ONLY
GENERAL VENTING INFORMATION:
Canadian Installations
The venting system must be installed in accordance with the current CSA B149 installation code and/or local codes
having jurisdiction.
U.S.A. Installations
The venting system must be installed in accordance with the current National Fuel Gas Code, ANSI Z223.1, and/or
local codes having jurisdiction.
The minimum clearance to combustibles is 6” (150 mm) when using single wall venting and 1” (25 mm) when using
“B-vent” venting.
We strongly recommend installing an approved chimney liner in an existing brick chimney. This will maximize the
potential draft of the chimney and lessen the effects of slow chimney start-up.
VENTING OF A FIREPLACE FITTED WITH THE DRAFTHOOD ADAPTOR:
Note: Please refer to the chimney manufacturer’s installation
instructions prior to commencing the installation.
�� ������
��������
����������
�����
�� ������
����
Figure 31: Unit top venting styles.
This unit may be vented to an existing
masonry chimney, or where no masonry
chimney is available, an approved “Bvent” chimney, or any other approved
constructed chimney/vent system (see
Figure 31 & 32).
In either case, the fireplace may be
connected to the chimney/vent using a 4”
(10 cm) single wall vent connector.
When an existing masonry chimney is
utilized for the venting, we recommend
the vent connector be connected to an
approved 4” (10 cm) diameter flue liner Figure 32: Unit rear
running the full height of the chimney. In
venting style.
many jurisdictions this flue liner may be
mandatory.
If 4” (10 cm) single wall vent is used, a minimum of 6” (15 cm) must be maintained between the vent connector
and any combustibles.
If 4” (10 cm) “B-vent” is used a minimum of 1” (25 mm) must be maintained
between the vent connector and any combustibles.
CAUTION: A minimum vent height of 12’ (3.6 m) from the floor is required to
effectively vent this fireplace.
����� ���� �����
�� ��� ��� ��� ��
��������
SPILLAGE TEST:
A spillage test must be performed prior to leaving the installed fireplace with the
customer. Perform this test in the following manner:
1. Close all windows and doors in the room.
2. Start all exhaust fans in the house and the furnace blower.
3. Light the fireplace and set to maximum flame adjustment.
Figure 33: Draft test place.
4. After a minimum of 10 minutes operation, test the chimney draft with a smoke match at the top row of the
pattern to confirm that there is adequate draft or ‘pull’ at the openings around the body of the Drafthood Adaptor,
as shown in Figure 33.
21
Initial Installation
QUALIFIED INSTALLERS ONLY
AUTOMATIC SAFETY SHUT DOWN:
If the spill switch is activated and shuts off the main burner the following procedure should be followed.
• Is the pilot flame still on? If not, the reason for the fireplace shut down is not the spill switch.
• Turn off the pilot flame and turn off all controls. Let fireplace to cool down. Refer to Owner’s Manual.
• Check for blockages or restrictions in the flue and venting components.
• Restart the fireplace and check for vent draft as described earlier.
• Operate the fireplace in a normal manner.
• If the main burner shuts down again after a period of operation, turn off the fireplace and contact your service
technician.
SPILL SWITCH REPLACEMENT:
Use the following instructions to replace the Safety
Spill Switch.
1. Turn the unit off and allow it to cool.
2. Disconnect the spill switch wires from the valve
and on/off/remote rocker switch wire (see Figure
30).
3. Remove the four mounting screws holding the
spill switch bracket and remove the bracket (see
Figure 34).
4. Remove and replace the spill switch with a 50885 Spill Switch Assembly using a T-20 torx type
driver.
5. Follow the reverse of the previous steps.
Figure 34: Spill switch installation.
OPTIONAL FINISHING:
In installations where the flue connector is running from the drafthood into a non-combustible chimney the following
optional finishing technique can be used.
CAUTION: Installations where the flue connector or venting connects to, or passes through,
combustible walls or ceilings, the inner vent components must be ‘B-vent’. It is not allowable in
these applications to use single wall inner vent components.
For decorative purposes a 6” (15 cm) single wall black stove pipe may be installed over the 4” (10 cm) single wall
or ‘B-Vent’.
Note: The use of these components is for aesthetic purposes only and does not effect the fact that the
fireplace, when fitted with the Drafthood Adaptor, is a Natural Vent appliance and therefore draws air
in through the Drafthood Adaptor intake ports.
22
Initial Installation
QUALIFIED INSTALLERS ONLY
VENT CONFIGURATIONS AND RESTRICTOR SETTINGS:
Figures 36 shows the range of venting options, it shows possible
vent configurations if the unit is top vented, for vertical and
horizontal terminations, any layout that remains within the
shaded area is acceptable. Having the fewest number of elbows
is ideal, as they tend to disrupt air movement. Using 45˚ elbows
is preferable to using 90˚ elbows. Also, a shorter vent system will
perform better than a longer one.
The ENVIRO WESTPORT has been designed with a built in
restrictor plate. The restrictor is designed to enhance flame
appearance when installing this unit with vertical chimneys as
well as installations with longer horizontal vent applications. It
does this by controlling the amount of air moving through the
vent pipe.
NOTE: The total length of the vent pipes can not exceed 30
feet (9.14 m). Any combination of rise and run can be used
as long as it lays within the shaded area (a total of three
(3) 90° elbows or six (6) 45° elbows can be used). In
addition to what is shown, if a 90° elbow is used
in the horizontal plane, 3 feet (91.4 cm) must
be subtracted from the allowable horizontal
run (for each 45° elbow, 11⁄2 feet must
be subtracted from the allowable
horizontal run).
30’
(9.14 m)
25’
(7.62 m)
20’
(6.10 m)
5
4
15’
(4.57 m)
3
2
1
10’
(3.05 m)
V
e
n
t
R
e
s
t
r
i
c
t
o
r
P
o
s
i
t
i
o
n
s
���� ������� �����
������ ���������� �����
5 4
3
1
2
���� ������� �����
���� ���������� �����
5 4
3
1
2
Figure 35: Restrictor plate settings.
Figure 36 shows the vent restrictor position
required, relative to the length of vent pipe.
Longer vertical vent lengths necessitate greater
restriction; position 1 is open and position 5 is
maximum restriction (refer to Figure 35). To
avoid injury, it is best to make this adjustment
when the fireplace is cool or use welder’s gloves
or oven mitts.
To access vent restrictor remove the valve cover
plate from the right rear corner of the unit by
undoing the two fastening screws.
Loosen the 1⁄4” hex head bolt and adjust to the
correct setting.
Slide the hex head bolt to the next setting and
re-tighten the bolt to secure in place.
The numbers in this chart represent the actual
vent restrictor settings. Although the numbers
do not appear on the unit use this as a guide
to follow.
Undo the setscrew and adjust the restrictor to
the correct setting.
Ensure that the setscrew is re tightened and the
unit is checked for proper operation.
5’
(1.52 m)
Wait for unit to warm up to operating
temperature to ensure proper and clean burning
unit.
0’
(0 m)
0’
(0 m)
5’
(1.52 m)
10’
(3.05 m)
15’
(4.57 m)
18’
(5.49 m)
Figure 36. Possible Vent Configurations for Top Vented;
Vertical and Horizontal Terminations.
Note: 0,0 in Figure 36 represents a 90˚ bend
directly off the outlet of the unit, in all horizontal
instances except when using Selkirk and having
less than a 4 ft (1.22 m) rise and 8 ft (2.44 m)
horizontal offset. In this case, a 1 foot (30.5 cm)
rise must be added below the 90˚ bend.
23
Initial Installation
QUALIFIED INSTALLERS ONLY
ELECTRICAL REQUIREMENTS FOR GAS VALVE AND OPTIONAL BLOWER:
70 ° F
O
O N
FF
The ENVIRO WESTPORT will operate without
electrical power. This model has a millivolt gas
control, which uses the pilot flame to generate
enough electricity to operate the main burners.
The appliance when equipped with an optional
blower must be electrically connected and
grounded in accordance with local codes or in the
absence of local codes, with the current CSA C22.1
CANADIAN ELECTRICAL CODE Part 1, SAFETY
STANDARDS FOR ELECTRICAL INSTALLATIONS,
OR THE NATIONAL ELECTRICAL CODE ANSI /
NFPA 70 in the U.S.
70 ° F
WARNING: Electrical grounding instructions.
This appliance is equipped with a three-prong
(grounding) plug for your protection against
shock hazard, and must be plugged directly into
a properly grounded three-prong outlet.
Figure 37: Gas Control Valve and Optional Thermostat Wiring.
UP
DOWN
COOL / HEAT
PROGRAM
DO NOT cut or remove the grounding prong from this plug.
CAUTION: Label all wires prior to disconnection when
servicing controls. Wiring errors can cause improper and
dangerous operation. Verify proper operation after servicing.
�����
���
Table 4. Recommended Thermostat Wire Size.
Wire Size
Max. Length
14 gauge
100 ft (30.48 m)
16 gauge
60 ft (18.29 m)
18 gauge
40 ft (12.00 m)
20 gauge
25 ft (7.62 m)
22 gauge
18 ft (5.49 m)
�����
�����
�����
���
�����������
������
����� ������
���
����������
Figure 38: Optional Blower (Fan) Wiring.
INSTALLING OPTIONAL BLOWER:
1. Remove the pre-assembled blower from the packaging.
Inspect the blower for damage. If damage is noticed
call your dealer, distributor or courier company and have
components replaced.
������� �����
���� ������� ���������
����� ����
����� �����
��� ��������
Figure 39: Optional Blower (Fan) Installation.
24
2. Ensure the temperature sensor will touch the unit when
mounted. If it does not touch, adjust the sensor so it
does.
2. Place the fan assembly behind the unit and secure with the
three screws provided, (as shown in Figure 39).
3. Open the gas valve cover. Carefully cut the decal portion on
the control panel and install the fan control switch in this
location. See Figure 38 for wiring of optional blower.
4. Plug the fan assembly into the wall outlet and turn the unit
on to ensure fan operation.
Initial Installation
FUEL CONVERSION:
WARNING: This conversion kit shall be installed by a qualified service technician
in accordance with the manufacturer’s instructions and all applicable codes and
requirements of the authority having jurisdiction. If the information in these instructions
is not followed exactly, a fire, explosion or CO poisoning may result. The qualified service
agency is responsible for the proper installation of this kit. The installation is not proper
or complete until the operation of the converted appliance is checked as specified in the
owner’s conversion kit.
Please read and follow these instructions. Also
please read the instruction guidelines provided
by S.I.T on how to remove and install the HILOW regulator.
������ �������
��� ������ ���
���� ��� ������
STEP 1. Carefully inspect all parts supplied with
this conversion kit.
STEP 2. Shut the gas off and disconnect the main
gas line from the unit.
����� ��������
����� ����
������� ��� ��������
STEP 3. Open the door by lifting the cast iron
top off of the unit. Pull the two handles
straight up to unlatch the door. Using
the two latches lift the door assembly
straight up and out of the unit. Swing
the front cast doors open or remove
them for access to the inside of the
firebox. Refer to “Routine Maintenance
and Service - Opening the Door”.
STEP 4. Carefully remove the log set and ember
material if they are installed.
STEP 5. Remove the two (2) screws (located on
the outside edges of the burner) that
hold the burner to the chassis inside
the fire box, see Figure 40. Remove the
���� ��� ��� �����
���� ��� �������
���� ������ �����
������� ��� ����
���� �� �� �����
����� � �� ���� ������
���������������� ���
���� ������ ��������
������� ���������� ��������
���� ��� ���
������ ����
���� ������
�� ��� ��������
Figure 40: Unit burner shown apart.
burner tray from the firebox.
STEP 6. Change the regulator on the top of the gas
valve. (Follow the instructions provided by
S.I.T)
STEP 7. To change the pilot orifice, simply pull the
pilot hood straight up to access the pilot
injector. Using a 5/32” Allen key remove the
pilot injector and replace with the proper fuel
type needed.
STEP 8. Install the new pilot injector supplied with this
conversion kit, simply screw the new injector
inside the pilot hood and reinstall pilot hood
by placing hood on the assembly lining up
the key way and snap into place.
��� �����
���������
��� �����
������� ���
���������� ���
Figure 41: Gas Valve In Place on Unit.
25
Initial Installation
STEP 9. Remove the main burner orifice, at the rear of the unit, with a 1⁄2” deep socket.
STEP 10. Install the new orifice supplied. Be sure to put a bead of pipe thread sealant or approved Teflon tape on
the orifice before installing into the burner assembly.
STEP 11. Re-install burner tray, log set and door. Pay special attention when installing the burner that the venturi
adjustment rod is properly installed into the venturi adjustment piece welded to the burner venturi tube.
Also refer to “Installing Log Set and Embers.”
STEP 12. Reconnect the gas line to the unit. Do a leak check using soap and water solution or an approved method
on the gas supply line.
STEP 13. Re-light the appliance to ensure proper operation and proper flame appearance.
STEP 14. MAKE SURE that the sticker provided by S.I.T is installed to signify that this valve has been converted to
a different type of fuel. Also make sure that the rating plate has a conversion label to show that this unit
has been converted to a different fuel type.
A VISUAL CHECK OF THE REGULATOR KNOB IS NECESSARY TO DETERMINE WHETHER OR NOT THE REGULATOR
IS THE CORRECT PART. A 50% TURN DOWN REGULATOR WILL HAVE ONLY ONE CORNER ON THE KNOB.
1 - 50% turn down HI-LOW Regulator with three (3) T-20 Torx screws
1 - pilot injector
1 - Main orifice
Conversion instructions.
Labels to show conversion.
Pilot Orifice
Natural Gas
Propane
.62 mm
.35 mm
Burner Orifice Top
#39 DMS
#53 DMS
Venturi Setting
1/16”
3/16”
min.
min.
Table 5: Orifice Information.
AIR SHUTTER:
The air shutter is controlled with the primary air adjustment rod located behind the gas valve shown in Figure 41.
The air shutter allows the amount of air coming into the fireplace to be adjusted in order to accommodate different
climates and venting arrangements. Start the pilot and then the burner. Make sure the pilot flame is burning
normally and none of the burner ports are plugged. Let the fireplace burn for roughly fifteen minutes and then
examine the flames, compare the flames to Figure 50.
The ideal flame will be blue at the base and light orange above. The flames should be of medium height. If the
flames look like this, no venturi adjustment is needed. If the flames are fairly short and mostly blue, the fireplace
is getting too much air. Therefore, the air shutter should be closed slightly until the correct flames are achieved.
Flames that are very orange, with tall, dark, stringy tips, are not getting enough air. Open the venturi until the
flames clean up. If the venturi is opened, or closed all the way, and the correct flames cannot be attained, turn off
the gas and contact the dealer.
Warning: Incorrect venturi adjustment may lead to improper combustion, which is a safety hazard. Contact the
dealer if there is any concern about the venturi adjustment.
26
Initial Installation
GAS LINE CONNECTION AND TESTING:
WARNING: Only persons licensed to work with gas piping may make the necessary gas connections to this
appliance.
GAS LINE CONNECTION
•
This stove is equipped with a certified flexible pipe located on the right side of the unit terminating in a 3⁄8” male
NPT fitting. Consult your local authorities codes or the CAN/CGA B 149 (1 or 2) installation code in Canada, or
in the USA gas installations follow either local codes or the current edition of the National Fuel Gas Code ANSI
Z223.1.
•
The efficiency rating of this appliance is a product thermal efficiency rating determined under continuous
operating conditions and was determined independently of any installed system.
The appliance and its shutoff valves must be disconnected
from the gas supply piping system during any pressure
testing where the pressure exceeds 1⁄2 PSIG (3.45 kpa)
or damage will occur to the valve.
The appliance must be isolated from the gas supply
piping system by closing its individual manual shutoff
valve during any pressure testing of the gas supply
piping system at test pressures equal to or less than 1⁄2
psig (3.45 kpa).
Always check for gas leaks with a soap
and water solution after completing the
required pressure test.
TO TEST VALVE PRESSURES
Figure 42: Fully Labeled Gas Valve.
The pressure taps are located on the left side of the valve
• Turn set screw 1 turn counter clockwise to loosen,
• Place 5/16” (8 mm) I.D. hose over pressure tap system.
• Check pressures using a manometer.
• When finished, release pressure, remove hose & tighten setscrew.
Main Burner
Manifold Pressure
Min. Manifold Pressure
Max Supply Pressure
Min. Supply Pressure
Max BTU/hr Input
Min. BTU/hr Input
Natural Gas
#39 DMS
3.8” W.C. (0.95 KPa)
1.1” W.C. (0.27KPa)
7.0” W.C. (1.74KPa)
5.0” W.C. (1.24KPa)
30,000 BTU/hr (8.80KW)
17,000 BTU/hr (4.98 KW)
Propane
#53 DMS
11.0” W.C. (2.7KPa)
2.7” W.C. (0.67KPa)
13.0” W.C. (3.28KPa)
12.0” W.C. (2.98KPa)
26,500 BTU/hr (7.76KW)
14,000 BTU/hr (4.10KW)
Table 6: Pressure and BTU Information.
NEVER USE AN OPEN FLAME FOR LEAK TESTING.
27
Secondary Installation
INSTALLATION OF LOG SET AND EMBERS:
The placement of the logs is not arbitrary.
If they are positioned incorrectly, the
flames can be “pinched” and will not burn
correctly. The burner come with four (4)
locator pins, and the right log has two (2)
ledges which make alignment easier. Using
the pictures provided, carefully set the logs
in place.
NOTE: The logs are fragile and should
be handled gently.
Figure 43: Step 1 of Log Placement.
Ledge for Left Rear Log
CAUTION: Use only the type of ember
material supplied with this appliance. Due
to the irregular size of the ember material
there may be more than required. The use
of other foreign materials on the burners
may create dangerous conditions.
Placement Pin for Left Rear Log
If over time, through cleaning and
servicing,
these
embers
require
replacement, contact the nearest ENVIRO
dealer for replacement embers.
1. Carefully remove logs from box. Check
to ensure there is no damage. It is very
important to install all logs in their proper
position to insure safe, optimum operating
conditions.
Figure 44: Step 2 of Log Placement.
Ledge for
Center Log
Placement Pin
for Center Log
2. Place the log set into the firebox.
Locate each log by seating it down onto
the burner tray support pins. Follow
Figures 43 to 49 proper log placement.
Figure 45: Step 3 of Log Placement.
Placement for
Front Left Log
Figure 46: Step 4 of Log Placement.
28
Secondary Installation
3. A bag of ceramic fiber embers and rock wool
embers is provided gently remove the ember
material from the plastic bag. Spread a layer loosely
in a random manner across the burner tray. Do not
allow any embers to rest against pilot assembly. (See
diagram provided for proper ember placement.)
DO NOT pack this ember material as this could
create an unsafe condition, leave embers loose.
Figure 47: Complete Log Placement.
Figure 48: Log Placement with Rock Wool.
Figure 49: Log Placement with Rock Wool & Embers.
4. Upon the first light up, watch for ignition to ALL burner ports. If a long delay is noted: First, wait for the
appliance to cool down.
• Open the front door of the appliance.
• Check to carefully reposition the embers making sure that burner ports are not plugged solid or blocked.
Important note: When the
unit is turned on for the first
time, It should be turned onto
high without the fan on for the
first 4 hours. This will cure the
paint, logs, gasket material
and the other products used in
the manufacturing process. It
is advisable to open a window
or door, as the unit will start to
smoke and can irritate some
people. After the unit has gone
through the first burn turn the unit
off including the pilot, let the unit
get cold then remove the glass
door and clean it with a good gas
fireplace glass cleaner, available at
your local ENVIRO dealer.
See Routine Maintenance And
Service on how to remove door to
clean glass.
Figure 50: Appliance Burning.
CAUTION: NEVER OPERATE THIS APPLIANCE WITH THE GLASS DOOR REMOVED.
29
Secondary Installation
INSTALLATION OF PANEL SET:
The brick panel set is fragile. Handle panels with care and avoid knocking them on
the placement pins or any other object.
1. Insert two (2) screws, using a 1⁄4” socket or a flat head screwdriver, half way in to the two (2) holes along the
bottom of the baffle. Slide the slots of one (1) of the s-bent brackets (see Figure 51) over the screws.
Figure 51: Brick panel s-bent bracket, slots shown.
Figure 52: Top brick panel in place, screws shown.
2. Slide the top brick panel into the
bottom bracket and place the
other s-bent bracket over the top
of the panel and line up the slots
on the bracket with the holes at
the top of the baffle. Use two
(2) screws to hold the bracket
in place. Ensure the top panel
is centered before tightening the
four (4) screws completely. Refer
to Figure 52.
Figure 53: Back brick panel in place.
3. Slide the bottom brick panel into place under/behind
the top panel bracket, notched side is to rest on the
firebox bottom. The panel should rest flush with the
back of the firebox. Refer to Figure 53.
4. Slide each side brick panel into place along the sides
of the firebox. The panels should rest flush with the
back panel and the sides of the firebox. Refer to
Figure 54.
Figure 54: Side brick panels in place.
30
Operating Instructions
FOR YOUR SAFETY READ COMPLETELY BEFORE OPERATING.
WARNING: IF YOU DO NOT FOLLOW THESE INSTRUCTIONS EXACTLY, A FIRE OR EXPLOSION
MAY RESULT CAUSING PROPERTY DAMAGE, PERSONAL INJURY OR LOSS OR LIFE.
A) This appliance is equipped with a pilot that must be lit by hand by following these instructions exactly.
B) BEFORE LIGHTING smell all around the appliance area for gas, and next to the floor because some gas is heavier
than air and will settle on the floor.
WHAT TO DO IF YOU SMELL GAS:
• Do not try to light any appliance.
• Do not touch any electrical switch; do not use any phone in your building.
• Immediately call your gas supplier from a neighbor’s phone. Follow the gas supplier instructions.
• If you cannot reach your gas supplier, call the fire department.
C) Use only your hand to push in or turn the gas control knob. Never use tools. If the knob will not push in or turn
by hand, do not attempt to repair it. Call a qualified service technician. Force or attempted repair may result in
a fire or explosion.
D) Do not use this appliance if any part has been under water. Immediately call a qualified service technician to
inspect the appliance and to replace any part of the control system and any gas control which has been under
water.
LIGHTING INSTRUCTIONS:
1. STOP! Read the safety information above.
2. Turn off all electrical power to the appliance.
3. Turn the gas control knob clockwise
to the “off’ position.
4. Open door. Wait five (5) minutes to clear out any gas. Close door.
If you smell gas including near the floor, STOP! Follow “B” in
the above safety information. Leak test all gas joints with soapy
water NEVER USE AN OPEN FLAME FOR LEAK TESTING. If
you don’t smell gas go to next step.
5. Find the pilot located to the right rear corner, behind the right rear log.
6. Turn gas control knob counter-clockwise
Figure 55: Gas Valve.
to “PILOT”.
7. Push the gas control knob in fully and hold. A BATTERY operated electronic igniter
will light the pilot. Keep knob depressed for about 30 seconds after pilot is lit. Check
that the pilot flame has fully engulfed the thermocouple assembly (see
Figure 56). Release knob. If pilot goes out, repeat steps 4 through 6.
����������
������������
WARNING: The gas valve has an lockout device which will not allow the pilot burner
to be re-lit until the thermocouple has cooled.
Figure 56: Pilot Burning.
If the knob does not pop up when released, stop and immediately call your service technician or gas supplier.
If the pilot will not stay lit after several tries, turn the gas control knob to “OFF” and call your service technician
or gas supplier.
8. Turn gas control knob counter-clockwise
to the “ON” position. Flip burner switch to “ON”. Turn “HI / LO”
knob to the desired setting. Turn on all electrical power to the unit. Check that all burner ports have flame.
9. Leak test all gas joints again.
TURNING GAS OFF TO APPLIANCE:
1. Flip burner switch to off, to turn off burners only.
2. Turn the gas control knob clockwise
to “OFF”. DO NOT FORCE
3. Turn off all electrical power to the appliance if service is to be performed.
31
Routine Maintenance and Service
Periodically check to ensure that your system is clean.
Periodically check the pilot and burner. Check to see that all the burner ports are clean and clear. Check the pilot
head for blockage. Check to ensure the pilot flame is blue with no or very small yellow tips.
OPENING THE DOOR
Turn unit off and wait until the appliance has cooled down.
Remove the unit top from the unit by lifting straight up.
Lift the two door handles located on either side of the door and
lift the glass door assembly straight up and out (see Figure 57
and 58).
Carefully open the two cast doors or remove if necessary.
Ensure the door is properly fastened after cleaning before
attempting to re-light the appliance.
CLEANING THE GLASS
Allow the glass to cool before cleaning.
It will be necessary to clean the ceramic glass periodically. During
a cold start up, condensation will sometimes form on the glass.
This is a normal condition with all gas fireplaces and stoves.
However, this condensation can allow dust and lint to cling to
the glass surface. Initial paint curing of the appliance can leave
behind a slight film on the glass. This is a temporary problem. It
is therefore recommended that the glass be cleaned initially after
about the first two weeks of use.
Figure 57: Handles for Removing Door.
Depending upon the amount of use, cleaning should be required
no more than two or three times per season.
To clean the door, use a mild glass cleaner and a soft cloth.
Abrasive cleaners will damage the glass and gold surfaces.
TO REPLACE DOOR
The glass in this appliance is ceramic. If the glass is damaged or
broken a factory door with glass replacement must be used.
• Open door following above instructions.
• Door with glass must be purchased from an ENVIRO dealer (part
#: 50-463). Do not use a substitute materials; it will void
the warranty.
32
Figure 58: Removing of Door.
Routine Maintenance and Service
CLEANING THE INSIDE OF THE FIREBOX
Turn off the unit and allow it to cool down completely.
Remove the log carefully from the firebox. Gently remove the embers and place on a piece of paper towel, until
ready to replace.
Vacuum the bottom of the firebox thoroughly. Carefully clean off any dust on the logs and remove any lint from the
main burner and pilot burner.
After carefully replacing the log and embers in their correct positions, and the door has been resealed, re-light the
pilot, following the instructions on the attached label.
WARNING: Failure to position the parts in accordance with these diagrams or failure to use only parts specifically
approved with this appliance may result in property damage or personal injury.
ELECTRONIC IGNITION (BATTERY REPLACEMENT)
If the unit does not spark when lighting, the battery in the
electronic ignition could need replacing.
Located on the left hand rear corner of the unit is a small
rectangular hole. Located here is the electronic ignition
module.
Remove the battery cover and replace battery using one
AA battery.
Reinstall the battery cover and check for spark by
depressing the pilot knob located on the control panel.
���������� ��������
������
Figure 59: Electronic Ignition Module Location.
33
Trouble Shooting
Problem
Possible Cause
Spark will not light the
Defective piezo ignitor.
pilot after repeatedly
pressing the spark ignitor
• Check connections to ignitor.
• If ignitor connections are good but no spark, replace
ignitor.
Broken spark electrode.
• Check for broken ceramic insulation.
• Replace electrode if broken.
Low battery or bad
electronic module.
• Replace the electronic module.
• Replace the battery in module.
Misaligned spark electrode.
• If spark is not arcing from electrode to pilot - adjust
by loosening the screws on the pilot base. Adjust
away from burner and retighten.
Problem with thermocouple
circuit.
• Check for proper connection of the thermocouple to
the rear of the valve. If loose, fully tighten lightly.
• Check pilot for full flame impingement around
thermocouple. If flame is too small, check gas
pressure, adjust pilot rate screw, check pilot head for
damage or blockage.
• Check thermocouple voltage at rear of valve. It must
be greater than 7 mV. If low, replace thermocouple.
Air in gas line (pilot dies
while knob is depressed).
• Bleed line.
• Check gas line pressure.
• Contact dealer.
Burners will not remain
lit
Problem with thermopile
circuit.
• Check gas line pressure .
• Check for flame impingement on thermopile. If low,
see “Pilot will not remain lit”.
• Check thermopile for minimum of 200 mV when
burner is switched on.
• Check wiring to thermostat for breaks.
Flame lifting
Leak in vent pipe.
• Check for leaks in vent connections.
Improper vent
configuration.
• Check vent configuration with manual.
Terminal may be
recirculating flue gases.
• Check to see if terminal is on correctly.
• May need to install high wind termination cap.
• Contact dealer.
Improperly set vent
restrictor plate.
• See venting section for proper restrictor setting.
Pilot will not remain lit
34
Solution
Glass fogs up
Normal Condition: after the appliance warms up the glass will clear.
**Due to additives in gas, glass may get hazy during operation** Clean as needed.
Blue Flames
Normal during start up: flames will yellow as the fireplace heats up.
Flames are burning
“dirty” or sooting
Flame impingement
•
•
•
•
Check log positioning.
Check vent restrictor for proper setting.
Increase primary air by opening venturi shutter.
See also “Burners will not remain lit.”
Parts List - Cast
Referance Number
Part Description
Part Number
1
Top Vent Insert Piece - Painted
EGWP-503
1
Top Vent Insert Piece - Antique White
EGWP-503AW
1
Top Vent Insert Piece - Diamond Black
EGWP-503DB
1
Top Vent Insert Piece - Inferno Red
EGWP-503IR
1
Top Vent Insert Piece - Pearl Grey
EGWP-503PG
1
Top Vent Insert Piece - Wedgewood Blue
EGWP-503WB
1
Top Vent Insert Piece - Westport Green
EGWP-503WG
1
Top Vent Insert Piece - Antique Chestnut
50-870
2
Top Grate - Painted
EGWP-502
2
Top Grate - Antique White
EGWP-502AW
2
Top Grate - Diamond Black
EGWP-502DB
2
Top Grate - Inferno Red
EGWP-502IR
2
Top Grate - Pearl Grey
EGWP-502PG
2
Top Grate - Wedgewood Blue
EGWP-502WB
2
Top Grate - Westport Green
EGWP-502WG
2
Top Grate - Antique Chestnut
50-869
3
Top Only (No Grate Or Vent Insert) - Painted
50-368
3
Top Only (No Grate Or Vent Insert) - Diamond Black
50-369
3
Top Only (No Grate Or Vent Insert) - Antique White
50-370
3
Top Only (No Grate Or Vent Insert) - Inferno Red
50-371
3
Top Only (No Grate Or Vent Insert) - Pearl Grey
50-372
3
Top Only (No Grate Or Vent Insert) - Wedgewood Blue
50-373
3
Top Only (No Grate Or Vent Insert) - Westport Green
50-374
3
Top Only (No Grate Or Vent Insert) - Antique Chestnut
50-906
4
Side Panel (Left) - Painted
EGWP-504
4
Side Panel (Left) - Antique White
EGWP-504AW
4
Side Panel (Left) - Diamond Black
EGWP-504DB
4
Side Panel (Left) - Inferno Red
EGWP-504IR
4
Side Panel (Left) - Pearl Grey
EGWP-504PG
4
Side Panel (Left) - Wedgewood Blue
EGWP-504WB
4
Side Panel (Left) - Westport Green
EGWP-504WG
4
Side Panel (Left) - Antique Chestnut
50-871
5
Side Panel (Right) - Painted
EGWP-505
5
Side Panel (Right) - Antique White
EGWP-505AW
5
Side Panel (Right) - Diamond Black
EGWP-505DB
5
Side Panel (Right) - Inferno Red
EGWP-505IR
5
Side Panel (Right) - Pearl Grey
EGWP-505PG
5
Side Panel (Right) - Wedgewood Blue
EGWP-505WB
5
Side Panel (Right) - Westport Green
EGWP-505WG
5
Side Panel (Right) - Antique Chestnut
50-872
35
Parts List - Cast
Referance Number
36
Part Description
Part Number
6
Cast Leg (Each) - Painted
EGWP-508
6
Cast Leg (Each) - Antique White
50-375
6
Cast Leg (Each) - Diamond Black
50-376
6
Cast Leg (Each) - Inferno Red
50-377
6
Cast Leg (Each) - Pearl Grey
50-378
6
Cast Leg (Each) - Wedgewood Blue
50-379
6
Cast Leg (Each) - Westport Green
50-380
6
Cast Leg (Each) - Antique Chestnut
50-875
7
Ash Shelf - Painted
EGWP-507
7
Ash Shelf - Antique White
EGWP-507AW
7
Ash Shelf - Diamond Black
EGWP-507DB
7
Ash Shelf - Inferno Red
EGWP-507IR
7
Ash Shelf - Pearl Grey
EGWP-507PG
7
Ash Shelf - Wedgewood Blue
EGWP-507WB
7
Ash Shelf - Westport Green
EGWP-507WG
7
Ash Shelf - Antique Chestnut
50-874
8
Cast Front Complete (Doors & Ash Shelf) - Painted
EGWP-506
8
Cast Front Complete (Doors & Ash Shelf) - Antique White
EGWP-506AW
8
Cast Front Complete (Doors & Ash Shelf)- Diamond Black
EGWP-506DB
8
Cast Front Complete (Doors & Ash Shelf) - Inferno Red
EGWP-506IR
8
Cast Front Complete (Doors & Ash Shelf) - Pearl Grey
EGWP-506PG
8
Cast Front Complete (Doors & Ash Shelf)- Wedgewood Blue
EGWP-506WB
8
Cast Front Complete (Doors & Ash Shelf)- Westport Green
EGWP-506WG
8
Cast Front Complete (Doors & Ash Shelf) - Antique Chestnut
50-873
Top Complete (Top, Vent Insert, & Grate) - Painted
EGWP-501
Top Complete (Top, Vent Insert, & Grate) - Antique White
EGWP-501AW
Top Complete (Top, Vent Insert, & Grate) - Diamond Black
EGWP-501DB
Top Complete (Top, Vent Insert, & Grate) - Inferno Red
EGWP-501IR
Top Complete (Top, Vent Insert, & Grate) - Pearl Grey
EGWP-501PG
Top Complete (Top, Vent Insert, & Grate) - Wedgewood Blue
EGWP-501WB
Top Complete (Top, Vent Insert, & Grate) - Westport Green
EGWP-501WG
Top Complete (Top, Vent Insert, & Grate) - Antique Chestnut
50-868
Complete Cast Body - Painted
50-562
Complete Cast Body - Antique White
50-563
Complete Cast Body - Diamond Black
50-564
Complete Cast Body - Inferno Red
50-565
Complete Cast Body - Pearl Grey
50-566
Complete Cast Body - Wedgewood Blue
50-567
Complete Cast Body - Westport Green
50-568
Complete Cast Body - Antique Chestnut
50-876
Parts Diagram - Cast
�
�
�
�
�
�
Westport Castings
June 2004
�
�
37
Parts List - Components
Referance Number
Part Description
Part Number
Conversion Kit LP to NG (Top & Rear Vent)
30-001
Conversion Kit NG to LP (Top & Rear Vent)
30-002
Levelling Bolts
30-013
Door Knob Clip
30-029
Door Latch Assembly - Nickel
30-033
9
Valve Mounting Bracket
30-047
10
Rear Shield
30-048
11
Rating Plate (Label)
30-049
12
Gas Valve Cover
30-050
Flue Connection
30-051
13
Inner Door Handles (2 per set)
30-052
14
Venturi Adjustment Rod
30-053
15
Firebox
30-054
16
Burner
30-055
17
45° Elbow & Gasket
50-040
18
Fan Kit 180 C.F.M.
50-173
Door Knob - Brushed Nickel
50-262
Electronic Ignition Module Switch
50-329
Blank Orifice #73 - All Gas Models
50-343
Wiring Harness
50-348
Pressure Relief Door With Gasket, Rod & Brackets
50-366
Control Panel Decal
50-461
Inner Door Complete (With Glass & Handles)
50-463
Embers
50-491
4” Flex Coupler
50-497
Dual Convection Blower 115 V (No Mount)
50-512
Firebox Baffle
50-533
Valve Extension Rod With Knob (1 per set)
50-555
21
Electronic Ignition Module
50-589
22
Control Panel
50-690
19
20
38
Parts List - Components
Referance Number
Part Description
Part Number
Drafthood Adapter
50-841
3 Flame Pilot Hood
50-925
Owner’s Manual
50-1033
Brick Panel Set
50-1038
Log Set With Embers - Complete
50-1041
24
120° Ceramic Fan Temperature Sensor
EC-001
25
S.I.T. Nova Valve NG (50% Turn Down)
EC-006
25
S.I.T. Nova Valve LP (50% Turn Down)
EC-007
26
Thermocouple
EC-009
26
Spark Electrode with Ignitor Cable
EC-011
26
Thermopile
EC-012
26
Pilot Orifice NG Threaded
EC-019
26
Pilot Orifice LP Threaded
EC-020
Pilot Gasket
EC-021
S.I.T. Piezo Ignitor
EC-023
27
Burner Switch
EC-026
28
Fan Controller 115 V With Knob
EC-039A
28
Fan Controller Knob
EC-040
HEYCO Strain Relief
EC-044
DV Vent Kit With Coupler
EC-061
29
Relief Door Gasket Only
EGWP-087
29
Window Channel Tape
EGWP-089
29
1 Piece Glass With Tape
EGWP-090
29
Inner Door Only - Painted
EGWP-092
Burner Control Assembly LP
EGWP-099
Burner Control Assembly NG
EGWP-100
Door Hinge Pin - Silver
EGWP-510
Fireplace Screen
EGWP-513
Shoulder Bolt, Hardened Bushing & Nut (Set of 2)
EF-124
23
39
Parts Diagram - Components
��
��
��
��
��
��
��
��
��
��
��
��
��
��
��
��
�
��
��
��
Westport Body
June 2004
40
��
Warranty
Sherwood Industries Ltd. offers a Limited Lifetime Warranty on this gas product. This limited lifetime
warranty covers the appliance for a period of seven years from the date of installation. This warranty
applies only to the original owner in the original location
Covered under the lifetime warranty are, Surround Panels and Chassis and Heat Exchanger. These steel
components are covered against manufacturer’s defects for 7 years and labor for the first year. (A) The
following exclusions apply:- over-firing due to incorrect setup or tampering, damage caused by incorrect
installation, usage or abuse. The unit must be properly installed by a qualified technician or installer, and
must meet all local and national gas and building code requirements.
We also cover against manufacture defects under our Limited Lifetime warranty for the following
components: Gold Plating, Log Set, Burners and Glass
The following exclusions apply:
Porcelain finishes- Damage caused by chipping, scratching, marring, chemicals, fingerprints, abrasive
cleaners or discoloration with age.
Glass- use of harsh or abrasive cleaners, striking the glass or surface contaminates. Log set- Damage
caused by incorrect handling or misuse.
Burners- damage caused by improper or continuous operation under incorrect conditions.
Sherwood Industries Ltd. offers a 2-year warranty on all the Electrical Components and Gas Components
against manufacturing defects. Paint is covered against flaking. This offer includes parts and labor for 1
year and for parts only thereafter.
Your dealer shall make all claims under this warranty in writing.
WHEN FILING A WARRANTY CLAIM PLEASE COMPLETE THE FOLLOWING INFORMATION ON
AN OFFICIAL WARRANTY CLAIM FORM:
TO THE DEALER
Name, address and telephone number of purchaser and date of purchase.
Date of installation. Name of installer and dealer. Serial number of the appliance. Nature of complaint,
defects or malfunction, description and part # of any parts replaced.
TO THE DISTRIBUTOR
Sign and verify that work and information are correct.
This warranty covers defects in materials and workmanship only if the product has been installed according
to the manual’s instructions. If the product is damaged or broken as a result of misuse or mishandling the
warranty does not apply. The warranty does not cover removal and re-installation costs.
Sherwood Industries Ltd. reserves the right to repair or to replace the defective product. The shipping
costs are to be paid by the consumer. All warranties by the manufacture are set forth herein and no claim
shall be made against the manufacturer on any oral warranty or representation.
Sherwood Industries Ltd. and its employees or representatives will not assume any damages, either
directly or indirectly caused by improper usage, operation, installation, servicing or maintenance of this
appliance.
Sherwood Industries Ltd. reserves the right to make changes without notice. Please complete and mail
the warranty registration card and have the installer fill in the installation data sheet in the back of the
manual for warranty and future reference.
41
Installation Data Sheet
The following information must be recorded by the installer for warranty purposes and future reference.
NAME OF OWNER:
NAME OF DEALER:
_________________________________________
_________________________________________
ADDRESS:
ADDRESS:
_________________________________________
_________________________________________
_________________________________________
_________________________________________
_________________________________________
_________________________________________
PHONE:___________________________________
PHONE:___________________________________
MODEL:___________________________________
NAME OF INSTALLER:
SERIAL NUMBER:___________________________
DATE OF PURCHASE: _____________
DATE OF INSTALLATION:___________(dd/mm/yyyy)
� NATURAL GAS (NAT)
_________________________________________
(dd/mm/yyyy)
� PROPANE(LPG)
ADDRESS:
_________________________________________
_________________________________________
_________________________________________
INLET GAS PRESSURE:_________in wc
PHONE:___________________________________
MAIN BURNER ORIFICE:__________# DMS
PILOT ORIFICE #_________OR________in diam.
INSTALLER’S SIGNATURE:
_________________________________________
MANUFACTURED BY:
SHERWOOD INDUSTRIES LTD.
6782 OLDFIELD RD. SAANICHTON, BC, CANADA V8M 2A3
www.envirofire.biz
June 23, 2004
C-10362
42