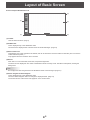
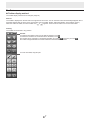
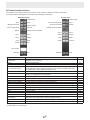
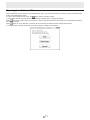
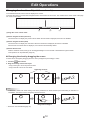
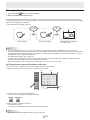
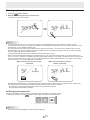
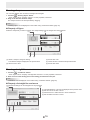
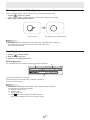
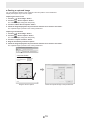
1
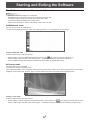
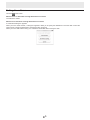
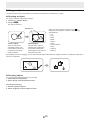
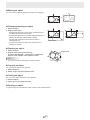
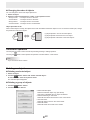
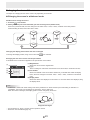
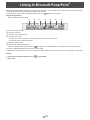
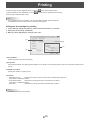
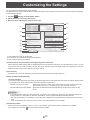
SHARP Pen Software
OPERATION MANUAL
Version 2.5
Contents
Importing a Document as an Image
(Pen Software Printer Driver).........................................26
Acquiring an Image From a Multifunction Machine....27
Using the Network Scanner Tool to acquire an image....27
Acquiring an image from a TWAIN device...........................28
Linking to Microsoft PowerPoint®.................................29
Printing............................................................................30
Customizing the Settings...............................................31
Installing/Uninstalling the Software..............................34
Installing the Pen Software.........................................34
Installing the Network Scanner Tool............................35
Introduction.......................................................................3
Starting and Exiting the Software...................................4
Pen Software modes and how to start the modes........4
Exiting the software.......................................................5
Layout of Basic Screen....................................................6
Toolbar..........................................................................7
Saving and Opening a File.............................................10
Saving data.................................................................10
Opening the whiteboard file........................................ 11
Edit Operations...............................................................12
Changing the sheet to edit (whiteboard mode)...........12
Drawing with a Pen.....................................................14
Erasing a drawn line....................................................15
Drawing shapes..........................................................16
Drawing straight lines or arrows..................................16
Drawing a shape with the figure pen...........................17
Inputting text................................................................17
Importing and pasting an image..................................18
Editing an object..........................................................20
Undo/redo operation...................................................22
Deleting an object.......................................................22
Enlarging the view of the screen ................................23
Using the background image......................................24
Displaying the Pen Software in a half-screen.............25
E
2
Introduction
This software is intended to facilitate effective meetings and presentations.
• Letters can be created directly so that the computer screen can be used as a whiteboard.
• Any document can be converted into an image and imported for display.
• An image can be acquired from a multifunction machine for display.
• The contents being edited can be printed out or saved.
This software is for the PN-L601B/PN-L602B/PN-L702B/PN-L802B. The PN-ZC01 is also supported.
Important Information
•This software has been shipped after strict quality control and product inspection. If, however, you find any failure, contact
your product dealer.
•Please understand that SHARP CORPORATION bears no responsibility for errors made during use by the customer or a
third party, nor for any other malfunctions or damage to this software arising during use, except where indemnity liability is
recognized under law.
•Transcribing or duplicating part or all of this manual and/or this software without permission from our company is not
permitted.
•As a part of our policy of continuous improvement, SHARP reserves the right to make design and specification changes for
product improvement without prior notice.
•This software uses the ImageKit7 technology. ImageKit7 Copyright © 2005 Newtone Corp.
•The contents or details may vary depending on the screen configuration and OS version, etc.
•This manual does not contain basic operating instructions for Windows.
•The paths used in this manual assume the case where this software being installed in the default folder. The actual path may
vary depending on the folder specified during installation.
Trademarks
•Microsoft, Windows, Windows Vista and PowerPoint are either registered trademarks or trademarks of Microsoft Corporation
in the United States and/or other countries.
•Names of products and other proper nouns are the registered trademarks or trademarks of their respective copyright holders.
Caution
•Dual-touch cannot be used with the PN-L601B.
•If SHARP Pen Software is started with the touch panel driver in single-touch mode, a warning message will appear.
E
3
Starting and Exiting the Software
Pen Software modes and how to start the modes
TIPS
• The use of a secondary display is not supported.
• Whiteboard mode and overlay mode cannot be started at the same time.
To change modes, exit the current mode and start the other mode.
• To prevent the Windows taskbar from moving, lock it.
• Set the screen resolution to 1920 x 1080 and the screen color to 32 bits.
n Whiteboard mode
You can use the screen as a whiteboard.
The work area is displayed for each “sheet”. By changing the sheet, you can edit data on another screen.
Starting whiteboard mode
Follow the steps below to start the software.
) twice quickly (or double-click the icon).
• On the desktop, touch the “SHARP Pen Software” shortcut icon (
• Click the “Start” button, and then select “All Programs” - “SHARP Pen Software” - “SHARP Pen Software”.
• Touch a whiteboard file (a file saved in the SWS format) twice quickly (or double-click the file).
n Overlay mode
The board is shown as transparent.
The work area consists of a single screen.
Your drawing will appear on the transparent board placed over the screen, so that you can write comments directly on the items
displayed on the screen. Note, however, that you cannot operate the screen shown behind the transparent board.
Starting overlay mode
Follow the steps below to start the software.
) twice quickly (or double‑click the icon).
• On the desktop, touch the “SHARP Pen Software (Overlay mode)” shortcut icon (
• Click the “Start” button, and then select “All Programs” - “SHARP Pen Software” - “SHARP Pen Software (Overlay mode)”.
E
4
Exiting the software
Touch the
“Quit” button.
When there is no data which is being edited and is not saved
The software is exited.
When there is data which is being edited and is not saved
A confirmation dialog box appears.
When you touch “Save and exit”, a dialog box appears to allow you to specify the destination to save the data. Confirm the
saving format, specify the destination, and save the data. (Page 10)
When you touch “Exit without saving”, the software is terminated without saving the data.
E
5
Layout of Basic Screen
Screen example: Whiteboard mode
(3)
(1)
(4)
(2)
(5)
(1) Toolbar
Used to switch functions. (Page 7)
(2) SHEET LIST
This is displayed only in the whiteboard mode.
Touch this tab to display the list of sheets shown as thumbnail images. (Page 13)
(3) Move toolbar icon
This appears on the side opposite to the toolbar, and can be touched to move the toolbar to that side. (The icon and the
toolbar will switch places.)
Only appears when the toolbar is set to “Docked”.
(4) Board
Work area. You can write letters, draw lines, and paste images here.
The board can be displayed in two modes: whiteboard mode and overlay mode. The latter is transparent, showing the
background.
TIPS
• The background color and grid used in the whiteboard mode can be changed. (Page 31)
(5) Sheet navigation buttons/Page No.
This is displayed only in the whiteboard mode.
Touch the sheet navigation button to change the displayed sheet. (Page 12)
The number shown at the center is the page No. of the current sheet.
E
6
Toolbar
n Toolbar display method
The toolbar display method can be changed. (Page 33)
Docked
The toolbar is displayed on the left side or the right side of the screen. You can have the toolbar automatically disappear after a
fixed time elapses after the touch pen is moved away from the toolbar. (Select “Hide automatically” in the settings screen.)
When the toolbar is hidden, the show toolbar icon (
or
) appears. Touch the show toolbar icon to show the toolbar.
Floating
The toolbar can be moved to any position.
Title bar
To minimize the toolbar so that only the title bar appears, touch .
To restore the toolbar to its normal size when minimized, touch .
The toolbar can be changed to a horizontal orientation by touching
. Each time you touch
the toolbar changes between the vertical orientation and horizontal orientation.
To move the toolbar, drag this part.
E
7
,
n Toolbar function buttons
The functions of the toolbar are shown as buttons. Touch a button to select the function of that button.
The function buttons that appear on the toolbar vary depending on the mode.
Whiteboard mode
Overlay mode
Toolbar Help
Open
Save
Background image
Import images
Print Current Sheet
Print All
Delete
Toolbar Help
Turn off Overlay mode
Print Current Sheet
Save
Delete
Settings of Pen Software
Settings of Pen Software
Pen 1
Pen 2
Pen 1
Pen 2
Pen 3
Eraser
Pen 3
Eraser
Undo
Redo
Undo
Redo
Select
Select
Zoom In
Pan
Pan window
Minimize
Button
Toolbar Help
Open*
Save
Quit
Minimize
Quit
Function
The name of each function button appears next to the button. To make the name
disappear, touch anywhere.
1
Open a whiteboard file.
Save the data being edited.
Turn off overlay mode.
By disabling the board function temporarily, you can operate something other than
Turn off Overlay mode*2
the software (files, other application software, etc.).
Set the background (template) of the whiteboard.
Background image*1
Paste an image file acquired from the Pen Software printer driver, a multifunction
Import images*1
machine or TWAIN device onto the board.
Print Current Sheet
Print the displayed sheet.
Print All*1
Print all sheets.
Delete
Delete an object.
Settings of Pen Software
Set this software according to the user’s preference.
Pens 1 to 3
Draw lines.
Eraser
Erase hand-drawn lines.
Undo
Cancel the immediately preceding operation.
Redo
Redo the immediately preceding canceled operation.
Select
Select an object.
Pan*1
Enlarge the view of the whiteboard, change the display position, and change pages.
Zoom In*2
Enlarge part of the screen in overlay mode.
This shows a thumbnail image of the displayed sheet. Operate inside this window to
Pan window*1
enlarge the view of the board or move the display position.
Minimize
The software will be minimized in the task tray.
Quit
Exit this software.
*1 Only appears in whiteboard mode.
*2 Only appears in overlay mode.
E
8
Page
11
10
24
26 - 28
30
30
22
31
14
15
22
22
20
12, 23
24
23
5
n Function buttons displayed with “Customize toolbar”.
“Customize toolbar” (page 33) can be used to change the function buttons that appear on the toolbar.
Button
Save PDF/image
Save to the same file*
Save as a new file*
Open as a new SWS file*
Add to the current sheet*
Split screen*
Text box
Drawing Object
Figure pen
Insert Image
Insert an image file
Screen Capture*
Line/Arrow
Function
Save the data as other than a Whiteboard file (SWS file).
Save the data to the same Whiteboard file (SWS file).
Save the data as a new Whiteboard file (SWS file).
Open a new Whiteboard file (SWS file).
Open a Whiteboard file (SWS file) as a newly added sheet.
Show Pen Software in a half-screen.
Enter text.
Enter a shape.
Automatically form a shape drawn by hand.
The “Screen Capture”* or “Insert an image file” selection screen appears.
Paste an image on a sheet.
Capture the currently displayed image and paste it on a sheet.
Draw a line / arrow.
* Only appears in whiteboard mode.
E
9
Page
10
10
10
11
11
25
17
16
17
18
18
19
16
Saving and Opening a File
Saving data
Data can be saved in the following file formats:
File format
SWS
(Whiteboard file)
PDF, BMP, JPEG, PNG
Description
Data on the whiteboard is saved in the SWS format. The saved data can be re-edited with this
software.
The working screen is saved as a screen shot. The data is converted into the different file
format so that it cannot be re-edited with the software.
In the whiteboard mode
Data can be saved inSWS, PDF, BMP, JPEG, or PNG format.
All sheets will be saved. (A sheet without data will not be saved.)
When data is saved in BMP, JPEG, or PNG format, each sheet is saved in a separate file.
In the overlay mode
Data can be saved in PDF, BMP, JPEG, or PNG format.
1. Touch the
“Save” button.
“Save as a new file” or
2. To save a whiteboard file, touch
format, touch
“Save PDF/image”.
“Save to the same file”. To save in a different file
3. Specify the destination and touch “Save”.
n Automatic backup
This function automatically saves the whiteboard file at regular intervals. In the event that the Pen Software suddenly stops due
to a power outage or other problem, the automatically saved file is restored the next time the Pen Software is started.
(The automatic backup cannot be used for the data in the overlay mode.)
You can change whether to enable/disable the automatic backup and the backup interval time. (Page 31)
Caution
• The backup data is deleted when the Pen Software is exited normally.
E
10
Opening the whiteboard file
When whiteboard mode is started, a new whiteboard file opens. (If you start the software by directly touching a whiteboard file
(SWS), the whiteboard file opens.)
To open a saved whiteboard file, touch the
“Open” button and select the file.
If a new whiteboard file is opened while a whiteboard file is already open, a dialog box appears.
When
“Add to the current sheet” is touched, the current sheets are retained and the content of the selected file is added to
the end of the sheets.
When
“Open as a new SWS file” is touched, all current sheets are deleted and the selected file is loaded.
If a whiteboard file is already open when a new file is opened, a dialog box will appear.
E
11
Edit Operations
Changing the sheet to edit (whiteboard mode)
In the whiteboard mode, each screen is displayed on a sheet.
To change the sheet, touch the sheet navigation button at the bottom of the screen. The number shown at the center is the page
No. of the current sheet.
(1)
(3)
(2)
(4)
(1) Page No. of the current sheet
(2) Sheet navigation button (Previous)
Touch this button to display the previous sheet. When the first sheet is displayed, this button is disabled.
(3) Sheet navigation button (Next)
Touch this button to display the next sheet. When the last sheet is displayed, this button is disabled.
When the last non-blank sheet is displayed, a new sheet is automatically added.
(4) Sheet advance area
With the sheet list closed, area (4) can be dragged left/right to move forward or backward through the sheets.
This operation can be prohibited. (Page 32)
n Changing the sheet by dragging the screen
A sheet can be changed by dragging when the zoom (enlargement percentage) is 100%.
“Pan” button.
1. Touch the
2. Drag horizontally with the touch pen.
•Drag to the right to show the previous sheet.
•Drag to the left to show the next sheet.
Right edge of sheet
TIPS
• In Windows 7, if the touch mode setting of the touch panel driver is “Dual” and the input mode setting is “Standard” or
“HandWrite”, the sheets can be changed by dual touch action.
Drag with two fingers
• Dual touch can be disabled (page 32).
E
12
n Changing the sheet by referring to thumbnail images / Editing the sheet
When “SHEET LIST” is touched in the bottom left corner of the screen, thumbnails of each sheet appear. A thumbnail can be
touched to change to that sheet. The sheets can be edited, including adding, deleting, copying, and moving sheets.
The method of displaying thumbnails when “SHEET LIST” is touched can be changed. (sheet view: Page 32)
Tiled View
1. Touch “SHEET LIST” in the lower left corner of the screen.
The list of the thumbnail images of the sheets is displayed.
2. Quickly touch the thumbnail image of the sheet that you want to display twice (double-click).
“SHEET LIST” closes and the selected sheet appears.
(1)
(6)
(8)
(2)
(3)
(4)
(5)
(8)
(7)
(1) Currently selected sheet
(6) Scroll the thumbnails screen.(Previous)
(2) Thumbnail images
(7) Scroll the thumbnails screen.(Next)
(3) Delete the selected sheet.
(8) Touch this button to close the sheet list.
(4) Add a new sheet to the right of the selected sheet.
(5) Copy the selected sheet and insert it on the right of
the selected sheet.
TIPS
• The sheet list can be dragged vertically to move through the thumbnails.
Filmstrip View
1. Touch “SHEET LIST” in the lower left corner of the screen.
The list of the thumbnail images of the sheets is displayed.
2. Touch the thumbnail image of the sheet you want to display.
The screen changes to the selected sheet.
(1)
(7)
(2)
(6)
(3)
(4)
(1) SHEET LIST
(5)
(7)
(2) Currently selected sheet
(3) Thumbnail navigation button (Previous)
(4) Thumbnail images
(5) Thumbnail navigation button (Next)
(6) Touch this button to close the sheet list.
: Add a new sheet to the right of the selected sheet.
: Delete the selected sheet.
: Copy the selected sheet and insert it on the right of
the selected sheet.
: Move the selected sheet one to the left.
: Move the selected sheet one to the right.
TIPS
• The sheet list can be dragged horizontally to move through the thumbnails.
E
13
Drawing with a Pen
1. Touch any of the
“Pen 1” to “Pen 3” buttons.
2. Draw on the board with the touch pen.
The drawn shape will be determined as an object 0.5 second* after you lift the touch pen from the board. If you start drawing
another object within 0.5 second* after you lift the touch pen from the board, the drawn shapes will be determined to be a single
object even though they are separate.
* This period can be changed. (Page 31)
Less than
0.5 second
Draw a shape.
After
0.5 second
Draw another shape.
Both shapes are determined
as a single object.
TIPS
• You can switch through “Pen 1” to “Pen 3” and “Eraser” by repeatedly pressing Function Button 2 of the touch pen.
(You will not be able to switch to functions that have been hidden due to the factory default settings or toolbar customization.)
To change functions using Function Button 2, select the touch panel driver “Properties”, and set “Function Button 2” to “Pen
Software Link” on the “Operation Setting” tab.
• For details about objects, refer to page 20.
• In certain cases, such as when a button on the toolbar is touched, the drawn shape will be fixed as an object before the
specified time elapses after the touch pen is lifted from the board.
• When “Pen Drawing” is set to “Both touch pen and finger”, you can draw with your finger.
n Changing the color and thickness of the pen
The “Pen 1” to “Pen 3” palettes can be used to change the pen function settings.
To display the palette, touch the button of the selected pen once again.
(2)
(1)
(3)
(1) Check this box to make the line transparent.
The pen icon changes when this setting is enabled.
Normal Transparent
(2) Set the color and thickness of the line.
The palette is closed.
To use a pen of a different color and thickness, click (3) and select.
TIPS
• The method of closing the palette can be changed. (Page 31)
E
14
Erasing a drawn line
1. Touch the
“Eraser” button.
2. With the pen touching the screen, move the pen.
The part you move over is erased.
TIPS
• You can switch through “Pen 1” to “Pen 3” and “Eraser” by repeatedly pressing Function Button 2 of the touch pen.
To change functions using Function Button 2, select the touch panel driver “Properties”, and set “Function Button 2” to “Pen
Software Link” on the “Operation Setting” tab.
• The eraser function can erase only the objects drawn with the pen function. You cannot use the “Eraser” button to erase
pasted images. You cannot use it either to erase the edges of a line to make the line thinner. Even if you erase the edges
only, the entire width of the line will be erased.
• An object drawn with the pen function cannot be erased if it is part of a group.
• When “Auto Pen/Eraser Mode Switching” is enabled (page 31), you can erase with the eraser or your finger when one of
“Pen 1” to “Pen 3” or “Eraser” is selected. Touch the screen with the eraser or your finger, and after the cursor changes to the
eraser, move the eraser or your finger. You can set the eraser size for erasing with the eraser or your finger to the touched
area of the screen, or to the size selected on the palette.
When "The area you touch (or cover)"
When “The selected size in Eraser
is selected
Palette” is selected
• With Windows Vista/Windows 7, the display changes as follows when the “Eraser” button is selected in the overlay mode.
The display returns to normal when the function other than the “Eraser” button is selected.
-The computer screen in the background is hidden even by translucent objects.
-An object is surrounded with a white line.
n Changing the eraser size
The size of the eraser can be changed by selecting it from the palette for the “Eraser” button.
“Eraser” button again while it is in the selected state.
To display the palette, touch the
TIPS
• The method of closing the palette can be changed. (Page 31)
E
15
Drawing shapes
You can draw shapes such as circles, rectangles and triangles.
1. Touch the
“Drawing Object” button.
* Touch again to show “Property of figure”. For the properties, see below.
2. Drag on the board to draw the shape.
The shape is drawn in the area specified by dragging.
TIPS
• “Drawing Object” can be displayed on the toolbar using “Customize toolbar” (page 33).
n Property of figure
Select the shape that you want to change. The shape settings can be changed from the properties.
(1)
(2)
(3)
(4)
(5)
(3) Set the line color.
(1) Select a shape to change its setting.
(4) Check this box to make the shape translucent.
The selected shape is displayed in the preview area.
(5) Set the line width.
(2) Set the color to fill in.
Drawing straight lines or arrows
1. Touch the
“Line/Arrow” button.
* Touch again to show “Property of straight line and arrow”. For the properties, see below.
2. Draw a line from the starting point to the ending point with the touch pen.
TIPS
• “Line/Arrow” can be displayed on the toolbar using “Customize toolbar” (page 33).
n Property of straight line and arrow
The line/arrow settings can be changed from the properties.
(1)
(2)
(1) The selected lines or arrows are displayed in the preview area.
(2) Set the color of the line or arrow.
(3) Check this box to make the line or arrow translucent.
(4) Set the width of the line or arrow.
(3)
(4)
E
16
Drawing a shape with the figure pen
Circles, squares, triangles, and lines drawn by hand can be automatically formed.
1. Touch the
“Figure pen” button.
* Touch again to display a palette with pen color, thickness, and translucent settings.
2. Draw a shape on the board with the pen.
Draw a shape
The shape that you drew is formed.
TIPS
• The “Figure pen” can be displayed on the toolbar using “Customize toolbar” (page 33).
• Some drawn shapes may not be formed and will remain hand-drawn.
• Arrow lines are not formed.
Inputting text
1. Touch the
“Text box” button.
2. Drag the area to input text.
3. Input text in the displayed text box.
n Changing text
You can select text that you want to change and change the settings.
(1)
(2)
(3)
(1) Set the font and the size of the text.
(2) Set the style of the text (bold, italics, underline, translucent).
(3) Set the color of the text.
TIPS
• “Text box” can be displayed on the toolbar using “Customize toolbar” (page 33).
• To modify the text, follow the steps below:
(1) Touch the “Select” button.
(2)Touch the text.
The text is selected.
(3) Touch
with the text selected, and select “Property”
The text box is displayed to allow you to modify the text.
E
17
Importing and pasting an image
An image file can be imported, and the current display can be pasted.
n Inserting an image file
A BMP, JPEG, or PNG image can be imported.
1. Touch the
“Insert Image” button.
2. Touch the
“Insert a image file” button.
3. Select the image you want to insert.
The image is inserted.
TIPS
• “Insert Image” and “Insert a image file” can be displayed on the toolbar using “Customize toolbar” (page 33).
• The inserted image is not affected if the original file is changed or the file is moved to a different location.
E
18
■ Pasting a captured image
You can capture the display on the computer screen and paste it on the whiteboard.
Display the image that you want to capture.
Capturing the entire screen
1. Touch the
“Insert Image” button.
2. Touch the
“Screen Capture” button.
The software display disappears temporarily.
3. Touch the “Whole Screen Capture” button.
4. Check the image displayed in the preview area and then touch “Paste to this sheet”.
The captured image is pasted on the working whiteboard.
Capturing a selected area
1. Touch the
“Insert Image” button.
2. Touch the
“Screen Capture” button.
The software display disappears temporarily.
3. Touch the “Capture selection” button.
4. Drag the area which you want to capture.
5. Check the image displayed in the preview area and then touch “Paste to this sheet”.
The captured image is pasted on the working whiteboard.
Corporate Profile - Internet Explorer
http://www.xxxxxxxxxxxxxxxxx
Corporate Profile - Internet Explorer
Corporate Profile
Company Name Date of Establishment
Location
XXXXXXXX
XXXXXXXX
XXXXXXXX
Done
Drag the area to capture.
Check the captured image in the preview area.
E
19
Editing an object
The drawn lines and the images pasted on the board are handled in the software as an “object”.
n Selecting an object
You need to select an object before editing it.
“Select” button.
1. Touch the
2. Touch an object.
The object is selected.
Select point
Touch an object.
Selected object
Touch an area where
something is drawn. You
cannot select an object by
touching the area where
nothing is drawn.
The area of the object is
indicated with a dotted line,
and symbols called select
points appear on the vertices
and sides of the area.
When you select an object and then touch , the
expansion menu appears to allow you the following
edit operations:
• Cut
• Copy
• Paste
• Delete
• Rotate
• Order
• Cancel selection
• Group
• Ungroup
• Property
By specifying an area by dragging, you can select several objects inside the area. (Objects which are not entirely included in the
area are not selected.)
n Grouping objects
You can edit several selected objects as one object.
1. Select objects to be grouped.
2. Select “Group” from the expansion menu.
Canceling the grouping
1. Select the grouped objects.
2. Select “Ungroup” from the expansion menu.
E
20
n Moving an object
You can move an object by selecting the object and dragging it.
n Enlarging/reducing an object
1. Select an object.
2. Drag the select point.
• Dragging the select point on the vertex enlarges/reduces
the object with the same aspect ratio.
• Dragging the select point on the side enlarges/reduces the
object in the direction of either width or height.
• The line width remains the same after the object is
enlarged/reduced.
• The font size remains the same even if the text box is
enlarged or reduced.
Select point
n Rotating an object
1. Select an object.
Select point
2. Drag the select point at the center top.
Or, select “Rotate Right”, “Rotate Left” or “Rotate 180
degrees” from “Rotate” in the expansion menu.
TIPS
• You can also rotate by specifying an angle of rotation.
n Copying an object
You can copy an object to the clipboard.
1. Select an object.
2. Select “Copy” from the expansion menu.
n Cutting an object
You can cut an object and save it to the clipboard.
1. Select an object.
2. Select “Cut” in the expansion menu.
n Pasting an object
To paste the object in the clipboard, select “Paste” in the expansion menu.
E
21
n Changing the order of objects
You can change the order of the object placement.
1. Select an object.
2. Select the object placement from “Order” in the expansion menu.
• Bring to Front
• Send to Back
• Bring forward
• Send backward
: The object moves to the front.
: The object moves to the back.
: The object moves one forward.
: The object moves one backward.
Object placement order
When several objects overlap, the objects at the back are hidden behind the objects in front. To show the hidden part, change
the placement order of the objects.
(3)
(1)
(2)
(1) Object placed in front of the other objects
(1)
(2) Object placed second from the front object
(3) Object placed at the back of the other objects
(3)
(2)
Undo/redo operation
Touching the
“Undo” button cancels the preceding drawing or editing operation.
Touching the
“Redo” button repeats the operation canceled with the “Undo” button.
TIPS
• Up to 50 actions can be undone.
Deleting an object
n Deleting a selected object
1. Select an object.
2. Touch the
“Delete” button and “Delete selected object”.
Or select “Delete” from the expansion menu.
The selected object disappears.
n Deleting a group of objects
1. Touch the
“Delete” button.
2. Touch the deletion method.
• Delete selected object:
Delete the selected object only. (See above)
This button is disabled when no object is selected.
• Delete handwriting on this sheet:
Delete all hand-drawn lines drawn on the current sheet.
• Clear this sheet:
Delete all objects shown in the current sheet.
• Delete all sheets:
Delete all sheets and create new 8 sheets.
E
22
Enlarging the view of the screen
The steps for enlarging the view of the screen vary depending on the mode.
n Enlarging the screen in whiteboard mode
Double-click to enlarge the screen
1. Touch the
“Pan” button.
2. Quickly touch the part of the board that you want to enlarge twice (double-click).
Each time you double-click, the view changes in the order 100% > 150% > 200%, centered on the click position.
Double-clicking at 200% returns the view to 100%.
150%
200%
100%
Changing the display position when the view is enlarged
To change the display position, drag on the screen with
“Pan” selected.
Enlarging the view of the screen with the pan window
A thumbnail of the current sheet appears in the pan window on the toolbar.
(1)
(2)
(3)
(4)
(1) Magnification
Shows the current screen magnification.
(2) [-] [+]
Touch to enlarge or reduce the view between 100% and 400% in increments of 50%.
(3) Pan window
Shows a thumbnail of the current sheet. Each time you double-click inside the display
frame, the zoom changes in the order 100% > 150% > 200%, centered on the clicked
point.
(4) Display frame
Shows the area that is displayed on the screen. To move the area that is displayed, drag
the display frame.
TIPS
• In Windows 7, if the touch mode setting of the touch panel driver is “Dual” and the input mode setting is “Standard” or
“HandWrite”, the screen can be enlarged or reduced by “Zoom” dual touch.
When the screen is enlarged, the display position can be changed by dual touch.
Drag with two fingers
• For information on “Zoom”, see the monitor operation manual.
• Dual touch can be disabled (page 32).
E
23
n Enlarging the screen in overlay mode
You can enlarge part of the screen and display it.
1. Touch the
“Zoom In” button.
2. Touch the board.
The area around the touched point is enlarged and displayed.
Touch the point to enlarge.
The area around the point is enlarged.
Using the background image
You can show a template image such as a monthly schedule sheet or a calendar as the background of the whiteboard. (The
background image can be set individually for each sheet.)
Touching the
“Background image” button displays a dialog box.
(1)
(3)
(4)
(2)
(1) Selection of whether to show or hide the background image
(2) Preview
The selected background image is displayed.
(3) Reference
Select a file to use for the background image.
This button is disabled when “Don’t show background image” is selected.
(4) Display method
Select the method to display the background image.
• Center: Display the image in the center of the screen.
• Stretch: Display the image so that it fits the screen.
• Tile: Display several images side by side.
TIPS
• Image files in JPEG, BMP, or PNG format can be used as the background image.
• The sample background images are stored in the following folder: (When installed in the default folder)
C:\Program Files\SHARP\SHARP Pen Software\Background
E
24
Displaying the Pen Software in a half-screen
The Pen Software can be displayed in a half-screen.
Touch
“Split screen” to change from full-screen display to half-screen display.
TIPS
•
•
•
•
This can only be used in whiteboard mode.
“Split screen” can be displayed on the toolbar using “Customize toolbar” (page 33).
The screen is the half of the screen in which the toolbar appears.
The screen zoom is fixed at 100%. If the zoom was changed in the full screen, the zoom will revert to 100% when the display
is changed to split screen.
• In split screen, the following functions can be used.
• Pen 1 to Pen 3, Eraser, Drawing Object, Line/Arrow, Text box, Select, Figure pen, Undo, Redo, Delete (excluding “Delete
all sheets”).
E
25
Importing a Document as an Image
(Pen Software Printer Driver)
A document of any application can be converted into an image and displayed on the whiteboard.
A document is imported as an image similar to an image printed by a printer.
n In the software application
1. In the software application, open the document that you wish to import.
2. Select the print command and open the print settings screen.
For details, see the manual for the software application.
3. Change the printer to “Send print data to SHARP Pen Software”, and select print settings.
•“Paper Size”, “Orientation”, and “Resolution” can be selected.
•When you have finished selecting settings, touch “OK”.
4. Execute printing.
The printed document will be converted into an image and sent to the Pen Software.
n In the Pen Software (whiteboard mode)
When the image has been sent, the
“Import images” button will blink.
5. Touch the
“Import images” button.
The first sheet of the acquired image appears.
TIPS
• It may not be possible to correctly convert documents from some software applications.
• If the “Resolution” setting of the Pen Software printer driver is set too high, enlargement, reduction, and scrolling of sheets
may not be smooth.
E
26
Acquiring an Image From a Multifunction Machine
If a SHARP multifunction machine is connected to the same network as the computer on which the Pen Software is installed, an
image scanned on the multifunction machine can be acquired onto the whiteboard.
TIPS
• Supports the Network Scanner Tool 3.3 or higher (as of July 2012).
• For details, contact your dealer or nearest authorized service representative for the multifunction machine.
• For the procedures for using the multifunction machine, see the manual for the multifunction machine.
Using the Network Scanner Tool to acquire an image
The first time you use the Network Scanner Tool, install the Network Scanner Tool on the computer on which the Pen Software
has been installed and configure the Network Scanner Tool settings. (Page 35)
To acquire an image from a multifunction machine, the Network Scanner Tool must be running on your computer.
Use JPEG for the scan send format.
n In the multifunction machine
1. Place the document in the multifunction machine.
2. Select a destination stored in the Network Scanner Tool.
3. Select JPEG for the scan send format.
4. Execute scanning in the color mode.
The document will be scanned and sent to the Pen Software.
n In the Pen Software (whiteboard mode)
When the image has been sent, the
“Import images” button will blink.
5. Touch the
“Import images” button.
The first sheet of the acquired image appears.
E
27
Acquiring an image from a TWAIN device
When a scanner or other TWAIN device is connected to the computer on which the Pen Software is installed, an image scanned
on the TWAIN device can be acquired to the Whiteboard. Before starting, make sure that
“Import images” is not blinking.
TIPS
• For the procedure for using the TWAIN device, see the manual for the TWAIN device.
1. Place the original in the TWAIN device
2. Touch the
“Import images” button.
The acquire image screen of your scanner or other TWAIN device will appear.
After acquiring the image, close the acquire image screen. The last sheet of the acquired image appears.
E
28
Linking to Microsoft PowerPoint®
When the slideshow display of Microsoft PowerPoint® is detected, a control toolbar that makes it easy to operate the Microsoft
PowerPoint® slideshow and Pen Software appears automatically.
The presentation support tool automatically starts and an icon ( ) appears on the taskbar.
Supported applications
• Microsoft PowerPoint 2007/2010
(1)
(2)
(3)
(4)
(5)
(6)
(7)
(1) Show the previous slide.
(2) Show the next slide.
(3) Change to arrow (select) mode.
(4)Change to pen mode.
®
•The pen color can be changed in “Set Up Slide Show” in Microsoft PowerPoint .
•The pen thickness cannot be changed.
(5) Change to eraser mode.
(6) Start the Pen Software whiteboard.
When the Whiteboard is running, the icon ( ) that appears on the Whiteboard can be clicked to return to the slideshow.
(7) End the displayed slideshow and close the control toolbar.
If draw screen is performed in pen mode, a confirmation screen asking “Do you want to keep your ink annotations?” will appear.
Exiting
1. Click the presentation support tool icon (
2. Click “Exit”.
) on the taskbar.
E
29
Printing
To print only the currently displayed sheet, touch the
To print all sheets on the whiteboard, touch the
Store the print settings ahead of time.
“Print Current Sheet” button.
“Print All” button. (Whiteboard mode only)
TIPS
• The operation tools of the software, such as the toolbars and tabs will not be printed.
• In the whiteboard mode, a sheet with no data will not be printed.
n Register the settings for printing
1. In the “Settings” dialog box (page 31), touch “Print Current Sheet” or “Print All”.
2. Specify the print settings. (See below.)
3. When you finish adjusting the settings, touch “OK”.
(1)
(2)
(4)
(3)
(1) Printer Name
Select the printer to be used for printing.
(2) Properties
Set the printer details. The setting options depend on the printer. For the setting options, refer to the instruction manual of the
printer.
(3) Number of Copies
Specify the number of copies to print.
(4) Options
•Print Background
:Select this to print the color that is set for the whiteboard background.
(Only when in whiteboard mode)
•Print Sheet Number
:Select this to print page numbers, and select the “Position”.
(Only when in whiteboard mode)
•Print Date
:Select this to print the print date, and select the “Position”.
TIPS
• “Sheets to Print” cannot be changed.
E
30
Customizing the Settings
You can customize various settings of this software.
The settings are the same in both whiteboard mode and overlay mode. However, the contents of the screen will vary depending
on which mode is started.
1. Touch the
“Settings of Pen Software” button.
2. Set the options as necessary. (See below.)
3. When you finish adjusting the settings, touch “OK”.
(10) *1
(1)
(11) *2
(2)
(12) *1
(3)
(13) *1
(4)
(14) *3
(5)
(6)*1
(15)
(7)*1
(8)
(9)
(16)
*1 Only whiteboard mode can be selected.
*2 For “Print All”, only whiteboard mode can be selected.
*3 Only overlay mode can be selected.
(1) Default settings for the Pen/Eraser/Text/Figure/Figure Pen/Line/Arrow
Set the following default settings that are applied when the Pen Software is started: the color and thickness of “Pen 1” to “Pen
3” and “Figure pen”, the size of “Eraser”, the font, size, style, and color of text, the shape and fill color of figures, the color and
thickness of lines, and the color, thickness, and type of lines.
(2) Pen Drawing
Set whether or not you can draw with your finger when the pen function is selected (page 14).
(3) Auto Pen/Eraser Mode Switching
Use auto switching
To use this function, select this to have the pen automatically switch to the eraser when the screen is touched with the eraser
or your finger in pen mode. Set the eraser size that is applied in “Eraser Size”.
• The area you touch (or cover)
:When using an eraser or other object and the area of contact on the screen is at
least 1-9/16 inch (4 cm) x 1-9/16 inch (4 cm), erase the area of contact.
• The selected size in Eraser Palette :Erase with the selected eraser size regardless of the amount of contact on the
screen.
IMPORTANT
• To use this function, select the touch panel driver “Properties”, and configure the settings on the “Operation Setting” tab
as shown below. For information on the touch panel driver, see the Touch Panel Driver Operation Manual.
-Set “Input Mode Setting” to “Standard”. If set to other than “Standard”, the pen/eraser auto switching function cannot be
used.
-If you have selected “The area you touch (or cover)”, set “Detect Eraser Area” to “Enable”.
(4) Pen/Eraser palette
Select this to have the palettes of “Pen 1” to “Pen 3” and “Eraser” close when a pattern is selected from a palette.
If the checkmark is removed, must be clicked to close the palette.
E
31
(5) Pen Cursor
Set whether to show a cursor when you draw with the pen function.
(6) Sheet view
Set the sheet list display method. (Page 13)
(7) Flick Sheet
To disable moving to the previous/next sheet by flicking the sheet advance area (page 12), remove the checkmark.
(8) About
The version information of this software is displayed.
(9) Default
Reset the settings to the initial values.
(10) Background setting of whiteboard
• Preview
: The image of the whiteboard with the current setting is displayed.
• Background color : Set the background color of the whiteboard.
• Show the grid lines: Select to show the grid on the whiteboard.
(11) Printer setting
Register the settings for printing. (Page 30)
(12) Dual Touch
Set whether dual touch is enabled. When enabled, the following actions are possible:
• “Zoom” can be used to change the sheet display magnification, and two-finger drag can be used to change the display
position (page 23).
• Two-finger left/right drag can be used to change the sheet (page 12).
IMPORTANT
• Dual touch cannot be used in Windows XP/Windows Vista.
• The touch mode setting of the touch panel driver must be set to “Dual” and the input mode setting must be set to “Standard”
or “HandWrite”.
• Dual touch may not operate correctly in the following cases:
Touching is too quick.
The distance between the two points is too short.
The two points intersect.
The points are aligned horizontally or vertically.
(13) Automatic backup settings
Specify whether to back up data automatically in the whiteboard mode.
To use the automatic backup, specify the interval.
(14) Zoom Setting
Specify the size and magnification of the zoom display.
(15) Toolbar Customize
Set the toolbar display method and show/hide function buttons. (Page 33)
(16) Interval until object is captured
Set the period until a hand-drawn line is determined as an object.
E
32
n Customizing the toolbar
You can set the toolbar display method and show/hide function buttons.
1. In the “Setting” dialog box (page 31), touch the “Customize toolbar” button for “Toolbar Customize”.
2. Set the options as necessary. (See below.)
3. When you finish adjusting the settings, touch “OK”.
(1)
(2)
(3)
(4)
(1) Style
Set the toolbar display type. (Page 7)
The display format is the same in Whiteboard and Overlay mode.
(2) Docked style settings
Set the toolbar display method when the toolbar display type is set to “Docked”.
• Icon size: The size of the toolbar icon can be set.
• Hide automatically: Select to automatically hide the toolbar.
(3) Hide the following functions
Function buttons that are not shown on the toolbar are listed.
(4) Show the following functions
Function buttons that are shown on the toolbar are listed.
To include a function button in the toolbar
Select the function to add from “Hide the following functions” and then touch “Add >>”.
Caution
• When the display format is fixed position display, an added command may not always appear on the toolbar.
To exclude a function button from the toolbar
Select the function to exclude from the “Show the following functions” list and then touch “<< Remove”.
* You cannot exclude the
“Minimize”,
“Quit” and
“Toolbar Help” buttons from the toolbar.
To change display order in the toolbar
Select the function to change its display order from the “Show the following functions” list and then touch either “Up” or “Down”.
To restore the default function button display order and show/hide settings
Touch “Default” and then touch “OK”.
E
33
Installing/Uninstalling the Software
The operations in this section require administrator privilege.
Installing the Pen Software
n Installing the Pen Software
1. Exit all running software applications.
2. Insert the supplied CD-ROM into the CD-ROM drive of the computer.
3. Double-click the setup program.
32-bit/64-bit operating system: \PenSoftware\setup.exe
4. For the remainder of the procedure, follow the instructions shown on the screen.
•When the “User Account Control” dialog box appears, click “Yes” (or “Allow”).
•When a security warning screen (The publisher could not be verified.) appears, click “Allow”.
When installation is finished, shortcut icons for whiteboard mode (
The Pen Software printer driver will also be added. (Page 26)
) and overlay mode (
) will be created on the desktop.
n Uninstalling
1. Exit all running software applications.
2. Click the “Start” button and select “Control Panel”.
3. Click “Uninstall a program”.
•If you are using icon view (Classic View), double-click “Programs and Features”.
•When Windows XP is used, click “Add or Remove Programs”. (In the classic view, double-click “Add or Remove
Programs”.)
4. Select “SHARP Pen Software” and click “Uninstall”.
When Windows XP is used, click “Remove”.
5. For the remainder of the procedure, follow the instructions shown on the screen.
When the “User Account Control” dialog box appears, click “Continue”.
This completes the uninstallation process.
E
34
Installing the Network Scanner Tool
The Network Scanner Tool is used to acquire an image from a SHARP multifunction machine connected to the same network.
n Installing the Network Scanner Tool
The Network Scanner Tool is not included on the provided CD-ROM. Use the Network Scanner Tool (Version 3.3 or later) that is
provided with the multifunction machine. (If already installed, there is no need to reinstall.)
For details on installing and using the Network Scanner Tool, see the Network Scanner Tool user’s guide. For questions
on the compatibility of your multifunction machine or the Network Scanner Tool, contact your dealer or authorized service
representative.
n Configuring settings for the Network Scanner Tool
The folder that will be used to acquire images scanned from the multifunction machine must be stored as a destination in
the multifunction machine’s address book. When creating a profile, select “Move File to Folder” and set the folder (below) for
acquiring images in “Details”.
• Windows Vista/Windows 7:
Startup drive:\ProgramData\SHARP\PenSoftware\JPEG
• Windows XP:
Startup drive:\Documents and Settings\All Users\Application Data\SHARP\PenSoftware\JPEG
If the above directories cannot be located, please confirm that ‘Show hidden files, folders, and drives’ is selected in the Folder
and Search options tab. This tab can be located under the Windows 7 ‘Organize’ menu, or under the ‘Tools’ menu in Windows
XP.
n Uninstalling
Exit the Network Scanner Tool from the taskbar, open the uninstall screen as explained on page 34, and remove “Network
Scanner Tool” (or “Sharpdesk”).
E
35
V2.5 EN 12H(1)