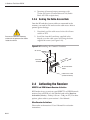
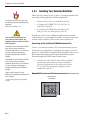
1
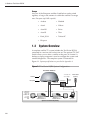
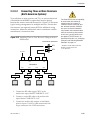
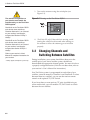
Satellite Television
A Guide to TracVision R5/R4
•
•
Installation Instructions
User’s Guide
Technical Manual
®
•
KVH TracVision R5/R4
owner’s
manual
TracVision R4/R5 Owner’s
Manual Addendum
(ECO #7564)
The following information applies to Revision J of the
TracVision R4/R5 Owner’s Manual (KVH Part Number 54-0157).
5.3
Replaceable Parts
Table 5-1 has been updated to show the new part number for the RF
PCB.
Table 5-1 Field Replaceable Units
Part Name
Part Number
Baseplate Assembly (TracVision R5)
02-1498-01*
02-1498-03**
Baseplate Assembly (TracVision R4)
02-1498-02*
02-1498-04**
Radome Assembly (TracVision R5)
02-0953-12†
Radome Assembly (TracVision R4)
02-0953-11†
Data/Power Cable
32-0730-28
RF Cable
32-0417-28
PC Cable
32-0628-06
CPU PCB
02-1043-02
RF PCB
02-1524
Antenna Gyro (TracVision R5 only)
02-1433
Antenna Gyro Gasket (TracVision R5 only)
24-0139
System Fuses
16-0017-3150
LNB (European System)
19-0346
LNB (N. American System)
19-0056
Switchplate
02-1023-01
TV/SAT Switch (optional)
01-0245
* Baseplate assembly with single-output LNB (European systems)
** Baseplate assembly with dual-output LNB (North American systems)
†
Specify color when ordering
54-0157 Addendum to Rev. J
1
Congratulations!
You have selected one of the most advanced land-mobile satellite
tracking systems available today. KVH® Industries’
TracVision® R5/R4 is designed for use with European and North
American DVB®-compatible satellite services, as well as
DIRECTV®. This manual provides detailed instructions on the
proper installation, use, and maintenance of your
TracVision R5/R4 system. Before using this manual, be sure to
check for any addenda, which might detail changes to the
manual’s information.
Throughout this manual, important information is marked for
your attention by these icons:
A helpful tip that either directs you to
a related area within the manual or
offers suggestions on getting the
highest quality out of your system.
An alert to important information
regarding procedures, product
specifications, or product use.
Information about installation,
maintenance, troubleshooting, or
other mechanical issues.
An electrical safety warning to help
identify electrical issues that can be a
hazard to either this KVH product or
a user.
Direct questions, comments, or suggestions to:
KVH Industries, Inc.
50 Enterprise Center
Middletown, RI 02842-5279 USA
Tel: +1 401 847-3327
Fax: +1 401 849-0045
E-mail: [email protected]
Internet: www.kvh.com
KVH Europe A/S
Kokkedal Industripark 2B
2980 Kokkedal, Denmark
Tel: +45 45 160 180
Fax: +45 45 160 181
E-mail: [email protected]
Internet: www.kvh.com
If you have any comments regarding this manual, please e-mail
them to [email protected]. Your input is greatly appreciated!
KVH Part # 54-0157 Rev. J
© 2006, KVH Industries, Inc.
TracVision R5/R4 Serial Number
This serial number will be required
for all troubleshooting or service
calls made regarding this product.
TracVision® and KVH® are registered trademarks of
KVH Industries, Inc.
The unique light-colored dome with dark contrasting base is a registered trademark of KVH Industries, Inc.
DVB® (Digital Video Broadcasting) is a registered trademark of the DVB Project.
DIRECTV® is an official trademark of DIRECTV, Inc.
DISH Network™ is an official trademark of
EchoStar Communications Corporation.
ExpressVu is a property of Bell ExpressVu, a wholly owned
subsidiary of Bell Satellite Services.
Table of Contents
1
Introduction . . . . . . . . . . . . . . . . . . . . . . . . . . . . . . . . .1-1
1.1
Digital Satellite Television . . . . . . . . . . . . . . . . . . . . . . . . . . . . . . .1-1
1.2
System Overview . . . . . . . . . . . . . . . . . . . . . . . . . . . . . . . . . . . . . .1-2
1.2.1 TracVision R5/R4 Components . . . . . . . . . . . . . . . . . . . . . . .1-3
1.2.2 Satellite TV Receiver . . . . . . . . . . . . . . . . . . . . . . . . . . . . . . .1-3
1.3
Materials Provided with TracVision R5/R4 . . . . . . . . . . . . . . . . . .1-4
1.3.1 Additional Materials Required for TracVision R5/R4 Use . . .1-5
2
Installation . . . . . . . . . . . . . . . . . . . . . . . . . . . . . . . . .2-1
2.1
Choosing the Best Location . . . . . . . . . . . . . . . . . . . . . . . . . . . . .2-3
2.2
Mounting the Antenna Unit . . . . . . . . . . . . . . . . . . . . . . . . . . . . . .2-4
2.3
Connecting System Components . . . . . . . . . . . . . . . . . . . . . . . . .2-8
2.3.1 Connecting the Antenna Data/Power Cable . . . . . . . . . . . . .2-9
2.3.2 Connecting to Vehicle Power . . . . . . . . . . . . . . . . . . . . . . . .2-10
2.3.3 Connecting the Receiver Ground Wire . . . . . . . . . . . . . . . .2-11
2.3.4 Installing the Switchplate . . . . . . . . . . . . . . . . . . . . . . . . . . .2-11
2.3.5
Connecting the Antenna RF Signal Cable to
the Receiver . . . . . . . . . . . . . . . . . . . . . . . . . . . . . . . . . .2-12
2.3.5.1
Installing Two Receivers and TVs
(North American Systems Only) . . . . . . . . . . . . . . . . . . .2-12
2.3.5.2
Connecting Three or More Receivers and TVs
(North American Systems Only) . . . . . . . . . . . . . . . . . . .2-13
2.3.6 Sealing the Cable Access Hole . . . . . . . . . . . . . . . . . . . . . .2-14
2.4
Activating the Receiver . . . . . . . . . . . . . . . . . . . . . . . . . . . . . . . .2-14
2.5
Selecting the Active Satellite . . . . . . . . . . . . . . . . . . . . . . . . . . . .2-15
2.5.1 Installing Your Selected Satellites . . . . . . . . . . . . . . . . . . . .2-16
2.5.2 Programming User-defined Satellites . . . . . . . . . . . . . . . . .2-18
2.6
Setting the Skew Angle (European Systems Only) . . . . . . . . . .2-24
2.7
Testing the System . . . . . . . . . . . . . . . . . . . . . . . . . . . . . . . . . . . .2-26
2.8
Configuring TracVision R5/R4 for Remote
Satellite Dish Operation . . . . . . . . . . . . . . . . . . . . . . . . . . . . . . . .2-27
2.9
Changing Geographic Location . . . . . . . . . . . . . . . . . . . . . . . . .2-28
54-0157 Rev. J
i
3
Using Your TracVision R5/R4 . . . . . . . . . . . . . . . . . . . . .3-1
3.1
Turning On the System . . . . . . . . . . . . . . . . . . . . . . . . . . . . . . . . .3-1
3.2
Changing Channels and Switching Between Satellites . . . . . . .3-2
3.2.1 Using the TV/SAT Switch to Switch Between Satellites . . . .3-4
3.2.2 DISH 500 Mode . . . . . . . . . . . . . . . . . . . . . . . . . . . . . . . . . . .3-6
3.3
Watching Television . . . . . . . . . . . . . . . . . . . . . . . . . . . . . . . . . . . .3-8
4
Troubleshooting . . . . . . . . . . . . . . . . . . . . . . . . . . . . . .4-1
4.1
Causes and Remedies for Common Operational Issues . . . . . .4-2
4.1.1 Improper Wiring . . . . . . . . . . . . . . . . . . . . . . . . . . . . . . . . . . .4-2
4.1.2 Insufficient Power . . . . . . . . . . . . . . . . . . . . . . . . . . . . . . . . .4-2
4.1.3 Incorrect Satellite Configuration . . . . . . . . . . . . . . . . . . . . . .4-2
4.1.4 Satellite Signal Blocked . . . . . . . . . . . . . . . . . . . . . . . . . . . . .4-3
4.1.5 Dew or Rain Pooling on Dome . . . . . . . . . . . . . . . . . . . . . . .4-3
4.1.6 Satellite Coverage Issue . . . . . . . . . . . . . . . . . . . . . . . . . . . .4-3
4.1.7 Vehicle Turning During Startup (TracVision R5 only) . . . . . .4-3
4.1.8 Incorrect or Loose RF Connectors . . . . . . . . . . . . . . . . . . . .4-4
4.1.9 Type of Multiswitch Used
(North American Systems Only) . . . . . . . . . . . . . . . . . . . . . .4-4
4.1.10 Stationary Use Only (TracVision R4 only) . . . . . . . . . . . . . . .4-4
4.2
Receiver Troubleshooting . . . . . . . . . . . . . . . . . . . . . . . . . . . . . . .4-4
4.2.1 Receiver Wiring . . . . . . . . . . . . . . . . . . . . . . . . . . . . . . . . . . .4-4
4.2.2 Receiver Faulty . . . . . . . . . . . . . . . . . . . . . . . . . . . . . . . . . . .4-4
ii
4.3
Antenna Faults . . . . . . . . . . . . . . . . . . . . . . . . . . . . . . . . . . . . . . . .4-5
4.4
Computer Diagnostics . . . . . . . . . . . . . . . . . . . . . . . . . . . . . . . . . .4-5
5
Maintenance . . . . . . . . . . . . . . . . . . . . . . . . . . . . . . . .5-1
5.1
Warranty/Service Information . . . . . . . . . . . . . . . . . . . . . . . . . . . .5-1
5.2
Preventive Maintenance . . . . . . . . . . . . . . . . . . . . . . . . . . . . . . . . .5-1
5.3
Replaceable Parts . . . . . . . . . . . . . . . . . . . . . . . . . . . . . . . . . . . . . .5-2
5.4
Reshipping the Antenna . . . . . . . . . . . . . . . . . . . . . . . . . . . . . . . .5-3
Appendix A
System Specifications . . . . . . . . . . . . . . . . . . .A-1
Appendix B
Switchplate Template . . . . . . . . . . . . . . . . . . .B-1
54-0157 Rev. J
iii
Introduction
1
Introduction
1.1
Digital Satellite Television
Your TracVision R5/R4 satellite TV antenna is fully compatible
with the Digital Video Broadcasting (DVB) satellites, as well as
Digital Satellite Services (DSS), such as DIRECTV. As a result,
you will be able to receive and decode signals from your chosen
satellite services with the proper programming and hardware
(e.g., the satellite TV receiver).
Your TracVision R5/R4 comes with a pre-programmed “satellite
library” of North American and European satellite services.
When configuring the TracVision R5/R4, you may choose a pair
of satellites from the library to be active in the system and with
your receiver. If the satellite service you wish to receive is not already
in the satellite library, you may also add two additional satellites of
your choice to the library.
Available Satellite Pairs
North America
Any two of the North American satellites listed below can be
paired together, as long as the antenna is within the satellite’s
coverage area (U.S.-style LNB required):
•
DSS_72
•
Echo_119
•
DSS_101
•
Echo_148
•
DSS_119
•
ExpressVu (82)
•
Echo_61
•
ExpressTV (91)
•
Echo_110
54-0157 Rev. J
You can also receive and decode
signals from the DSS_110 satellite
if a KVH HDTV converter
(KVH Part #01-0260-05) is
installed.
1-1
A Guide to TracVision R5/R4
Europe
Any two of the European satellites listed below can be paired
together, as long as the antenna is within the satellite’s coverage
area (European-style LNB required):
1.2
•
Arabsat
•
Hotbird
•
Astra1
•
Nilesat
•
Astra2N
•
Sirius
•
Astra2S
•
Thor
•
Eutel_W3A
•
Turksat1C
•
Hispasat
System Overview
A complete satellite TV system includes the TracVision R5/R4
connected to a receiver and a television set. The optional TV/SAT
Switch allows you to select a satellite at the press of a button. A
desktop or laptop computer is used to configure the system and
conduct diagnostics. The complete system is illustrated in
Figure 1-1. System specifications are provided in Appendix A.
Figure 1-1 TracVision R5/R4 System Configuration
TracVision Antenna
11-16 Volts DC
2.5-3.5 Amps
Radome
TV/SAT Switch
(optional)
Sat A Error
Sat B
Select
Baseplate
Switchplate
Vehicle
Power
Data/Power
PC Maintenance
Second TV
and receiver
option only
available with
U.S.-style,
dual output
LNB.
RF2
TV 2
Satellite Receiver 2
RF1
Satellite Receiver 1
Options Purchased Separately
1-2
TV 1
Laptop PC
Changing Satellites:
1. Push Select button
2. Wait while Sat A or
B blinks green
3. Ready when Sat A
or Sat B stays
solid green
Other Indicators:
• Both blinking
green: initializing
• Error light
blinking red:
system problem
Introduction
In-motion Tracking (TracVision R5 only)
The TracVision R5 employs a state-of-the-art actively stabilized
antenna system. Once the satellite is acquired, the antenna gyro
continuously measures your vehicle’s motion and transmits
commands to the antenna motors to keep the antenna pointed at
the satellite at all times.
1.2.1 TracVision R5/R4 Components
The antenna unit includes the antenna positioning mechanism,
signal front end, power supply, and control elements. The
antenna is a parabolic dish mounting a low noise block (LNB)
converter with a built-in preamplifier. The European
configuration includes a single-output LNB, while the North
American system uses a dual-output LNB. A molded ABS
radome encloses the fiberglass baseplate and is secured in place
with standard fasteners. Connectors on the back of the baseplate
join the power, signal, and control cabling from units inside the
vehicle.
1.2.2 Satellite TV Receiver - Sold Separately
The receiver (purchased separately) receives satellite signals from
the antenna unit for signal processing and channel selection, and
sends the signals to the TV set for viewing. Please refer to the
receiver’s User’s Manual for complete operating instructions.
KVH offers an upgrade kit (KVH
Part #02-1026) that adds in-motion
tracking capability to the
TracVision R4, allowing you to
receive satellite signals while on
the move.
The dual-output LNB in the North
American systems allows two
receiver/TV pairs to be connected
directly to the antenna. Three or
more pairs can be connected to the
system if an active multiswitch is
installed. See Section 2.3.5,
“Connecting the Antenna RF Signal
Cable to the Receiver” on page
2-12 for details.
Before you can start watching
satellite TV using your TracVision
antenna, you will need to activate
your receiver. Refer to Section 2.4,
“Activating the Receiver” on
page 2-14 for more details.
54-0157 Rev. J
1-3
A Guide to TracVision R5/R4
1.3
Materials Provided with
TracVision R5/R4
Table 1-1 lists the units, cables, and materials packed in the
TracVision R5/R4 package by name and KVH part number.
Table 1-1 TracVision R5/R4 Packing List
Cables for the TracVision R5/R4 are
stored beneath the antenna unit
during shipping.
Component
KVH Part No.
Antenna Unit (TracVision R5), comprising:
01-0266-01†
01-0266-02††
01-0266-03†††
01-0266-04††††
Antenna Unit (TracVision R4), comprising:
01-0267-01†
01-0267-02††
01-0267-03†††
01-0267-04††††
RF Cable (28 ft/8.5 m)
32-0417-28
Data/Power Cable (28 ft/8.5 m)
32-0730-28
PC Data Cable (6 ft/1.8 m)
32-0628-06
Kitpack*
72-0101
Owner’s Manual
54-0157
Receiver Ground Wire
32-0583-50
Switchplate
02-1023-01
TV/SAT Switch (optional)
01-0245
North American TracVision R5/R4 system (set to DIRECTV)
North American TracVision R5/R4 system (set to DISH Network)
†††
North American TracVision R5/R4 system (set to ExpressVu)
††††
European TracVision R5/R4 system
* A complete listing of kitpack contents is provided in Table 2-2.
†
††
1.3.1 Additional Materials Required for
TracVision R5/R4 Use
To make full use of your new TracVision R5/R4 and receive
satellite TV on the road, you will need to provide/purchase the
following:
In North America, you can
purchase and/or activate a receiver
directly from KVH. Call KVH at
1-888-584-4163 for details.
1-4
•
Television
•
Appropriate receiver for your selected satellite
TV service
Installation
2
Installation
Your TracVision R5/R4 is designed for simple installation and
setup. Just follow these easy steps:
Table 2-1 Installation Process
Step
Refer to Section...
1. Choose the hardware locations
2.1
2. Mount the antenna unit
2.2
3. Connect system components
2.3
4. Activate the receiver
2.4
5. Select active satellite
2.5
6. Set the skew angle (Europe only)
2.6
7. Check out system
2.7
8. Configure for remote dish use
2.8
Tools and Materials Required
•
Electric drill
•
3
•
1
•
#2 Phillips and #0 flat tip screwdrivers
•
RG-6 or RG-11 (75 ohms) RF cable (if installing
two RF cables - refer to Section 2.3.5 on page 2-12
for details)
•
Silicone sealant, RTV, or Sikaflex
•
7
•
Construction adhesive (e.g., Liquid Nails)
•
Rivet gun and 3⁄16" (5 mm) rivets (or other fastener
suitable for your specific roof construction)
•
PC with Windows HyperTerminal or, if you are a
KVH-authorized dealer, download the KVH Flash
Update Wizard
⁄16" (5 mm), 5⁄32" (4 mm), and 3⁄32" (2.5 mm) drill bits
and 3⁄4" (19 mm) hole saw and auger bit
Plan the entire installation before
proceeding! Take into account
component placement, cable
running distances between units,
and accessibility to the equipment
after installation.
⁄2" wrench
⁄16" open end wrench
54-0157 Rev. J
The Flash Update Wizard is
available to KVH-authorized dealers
through the KVH Partner Portal.
2-1
A Guide to TracVision R5/R4
Kitpack Contents
Table 2-2 lists the materials provided in the kitpack.
Table 2-2 Kitpack Contents
Part
KVH Part No.
Tie-wraps
5
22-0013
Clamshell ventilator
1
19-0230
#6 x 3⁄4" thread-forming screws
3
14-0298-12
⁄4"-20 x 5⁄8" hex screws
4
14-0250-10
⁄4" flat washers
4
14-0251
⁄8" hole plugs
2
19-0282-06
1
1
3
2-2
Qty.
Installation
2.1
Choosing the Best Location
•
Since the TracVision antenna requires a clear view
of the southern sky to receive satellite signals, the
ideal antenna site has an unobstructed view of the
horizon/satellite all around.
•
Keep the antenna clear of any obstructions on the
roof (e.g., air conditioners). The antenna requires a
15º to 75º look angle to receive satellite signals (see
Figure 2-1).
Figure 2-1 Antenna Blockage
Blocked!
TracVision Antenna
Air Conditioner
Vehicle Roof
•
Consider the location of the antenna relative to the
location of any equipment or necessary wiring
within the vehicle.
•
Be sure to mount the antenna on a horizontal
surface. When placed flat on the mounting surface,
the mounting plates should be less than 7⁄16" above
the mounting surface (see Figure 2-2). Any larger
gap will warp the baseplate and seriously damage
the antenna.
Figure 2-2 Maximum Mounting Surface Slope
7 "
16
54-0157 Rev. J
Maximum Gap
2-3
A Guide to TracVision R5/R4
2.2
Always lift the antenna unit by the
gray baseplate, never by the
radome or any portion of the
antenna assembly!
Mounting the Antenna Unit
1. Make sure that you have chosen a suitable
mounting location based upon the guidelines in
Section 2.1, “Choosing the Best Location” on page 2-3.
2. Remove the antenna unit from its shipping carton.
3. Position the antenna unit in the desired location
on the centerline of the vehicle with the antenna’s
mounting plate arrows facing the front or rear of
the vehicle. The proper orientation is illustrated in
Figure 2-3.
The mounting plate arrows may
face either forward (standard
installation) or backward (alternate
installation) along the centerline of
the vehicle for more convenient
installation.
Figure 2-3 Proper Orientation of the Antenna Unit
Vehicle
Centerline
Baseplate
Connectors
V
Ce ehic
nte le
rlin
e
Front/Rear
of Vehicle
Top View
Mounting Plate
(1 of 4)
Fro
o f n t/R e
Ve
h ic a r
le
Side View
Mounting Plate
Arrows
4. While the antenna is in place, mark a location on
the roof for the 3⁄4" (19 mm) cable access hole to
permit convenient cable access to the antenna’s
baseplate connectors.
5. Using the four mounting plates and each set of
five holes as templates, drill 20 3⁄16" (5 mm) holes
through the roof of the vehicle.
6. Set aside the antenna unit and clean the roof’s
surface to remove any debris.
2-4
Installation
7. Seal the two baseplate holes with the plugs
provided in the kitpack (see Figure 2-4).
Figure 2-4 Antenna Baseplate (Bottom View)
Baseplate Holes
8. Apply construction adhesive to the bottom of the
antenna’s four mounting plates. If using a liquid
construction adhesive, apply beads to the
mounting plates in a zig-zag pattern.
9. Reposition the antenna, lining up the mounting
plate holes with the holes in the roof. Attach the
mounting plates to the roof using 3⁄16" (5 mm)diameter rivets (or appropriate fasteners). Seal all
rivet heads and edges with silicone.
If the roof’s mounting surface is not
perfectly flat as KVH recommends,
make sure the baseplate does not
warp when you attach the
antenna’s mounting plates. Refer to
Section 2.1, “Choosing the Best
Location” on page 2-3 for further
details.
10. Remove and save the eight pan head screws and
flat washers that secure the radome to the
baseplate. Carefully lift the radome straight up
until clear of the antenna assembly and set aside.
54-0157 Rev. J
2-5
A Guide to TracVision R5/R4
11. (Standard Installation) When the antenna unit is
installed with the connectors facing the rear of the
vehicle, the drain holes are located as shown in
Figure 2-5.
Figure 2-5 (Standard Installation) Baseplate Connectors Facing
Rear of Vehicle - Factory-drilled Drain Holes
Front of
Vehicle
Factory-drilled
Drain Hole Positions
(Alternate Installation) If the antenna unit is
installed with the connectors facing the front of the
vehicle, you MUST drill out 3⁄16" (5 mm)-drain holes
in the rear-facing side of the baseplate (see
Figure 2-6). Then plug the existing factory-drilled
drain holes with silicone sealant (shown in Figure
2-5).
(Alternate Installation Only) You
MUST drill out the drain holes as
indicated to ensure that any
moisture that enters the baseplate
is able to drain. Ensure that factorydrilled holes are completely sealed.
Figure 2-6 (Alternate Installation) Baseplate Connectors Facing
Front of Vehicle - Recommended Drain Holes
Angle of Hole, relative to front
Front of
Vehicle
Recommended
3/16" (5 mm)
Drain Hole Positions
Drain Hole Angle
(relative to baseplate)
Angle of Hole, relative to front
2-6
Installation
12. Cut the tie-wraps holding the antenna unit to the
forward shipping restraint (see Figure 2-7).
Figure 2-7 Forward Shipping Restraint
2 tie-wraps used
to secure LNB arm
Shipping Restraint
Nuts and Washers
Shipping Restraint
13. Remove the nuts and washers securing the
shipping restraints to the baseplate (see
Figure 2-8).
Figure 2-8 TracVision R5/R4 Shipping Restraints (Top View)
Rotating Plate
Shipping Restraint
Forward Shipping
Restraint for
LNB Bracket
Rotating Plate
Shipping Restraint
14. Remove the shipping restraints and replace the
nuts and washers into their original positions. All
nuts and washers removed in Step 13 must be
reinstalled. These nuts and washers secure the
baseplate to the mounting plates.
15. Place the radome onto the baseplate (labels facing
the sides of the vehicle) and secure in place using
the eight pan head screws and flat washers
removed in Step 10.
Save the shipping restraints,
washers, and nuts in case the
antenna unit needs to be removed
and shipped to another location.
Four 1⁄4˝ x 5⁄8˝ hex head screws have
been provided in the kitpack for
shipping as the bolts used to hold
the shipping restraints during initial
shipping are integral parts of the
mounting plates.
16. Drill the cable access hole (marked in Step 4) in the
vehicle’s roof.
54-0157 Rev. J
2-7
A Guide to TracVision R5/R4
2.3
Connecting System Components
The following sections provide instructions for properly wiring
the antenna unit to the components inside the vehicle.
Be sure to consider the 28' length
of the power and data cables when
choosing a location for the
switchplate. If you require longer
cabling, an additional power supply
MUST be used. Failure to install an
additional power supply can result
in serious damage to the antenna
unit. KVH offers several cable
packages:
45' Cables with Power Supply
KVH Part #72-0143-45
60' Cables with Power Supply
KVH Part #72-0143-60
45' Cables without Power Supply
KVH Part #32-0730-45
60' Cables without Power Supply
KVH Part #32-0730-60
Power Supply
KVH Part #19-0297
Locating the Switchplate
A switchplate has been provided to serve as the hub of the
TracVision R5/R4 wiring (with the exception of the RF cable,
which will be connected to the receiver). This switchplate
includes an ON/OFF switch and a DB9 maintenance port for
easy access to the antenna unit’s software and diagnostics.
Follow the steps below to select and prepare the switchplate
mounting location.
1. Select a location to mount the TracVision R5/R4
switchplate. It should be installed in a dry, flat
location within reach of the cables that will
connect to the antenna unit.
2. Once you’ve decided on a suitable location, create
a panel cutout in the mounting surface.
Figure 2-9 illustrates the mounting dimensions
and a full-scale template has been provided in
Appendix B. The connecting cables will be routed
through this cutout.
Figure 2-9 Switchplate Panel Cutout Dimensions
A full-scale panel cutout template
has been provided in Appendix B.
3.82"
(97 mm)
.32" (8 mm)
2.36"
(60 mm)
.16" (4 mm)
2-8
Panel Cutout
3.19"
(81 mm)
3/32"
(2.5 mm) dia
2.05"
(52 mm)
Installation
2.3.1 Connecting the Antenna Data/Power
Cable
1. Connect one end of the antenna data/power cable
to the antenna’s data/power connector and lock in
place (see Figure 2-10).
Figure 2-10 Antenna Data/Power Connector
Data/Power
2. Route the other end of the data/power cable down
through the cable access hole in the vehicle’s roof
and out through the switchplate panel cutout.
3. Connect the data/power cable to the switchplate’s
data/power connector and lock in place (see
Figure 2-11).
Figure 2-11 Switchplate Data/Power Connector
Data/Power
54-0157 Rev. J
2-9
A Guide to TracVision R5/R4
2.3.2 Connecting to Vehicle Power
Recommended Power Wiring
Short circuits may result in severe electrical shock or burns.
Remove the appropriate vehicle fuse and test the circuit to ensure
that no power is present before connecting the power cable.
The switchplate requires an 11-16 VDC power input. A quicktripping circuit breaker or fuse should be installed between the
switchplate and vehicle power. Circuit overload protection
should be rated for 5 amps. If vehicle power fluctuates widely or
is noisy, a 12 VDC 5-amp AC/DC power supply should be
installed. Test the voltage and polarity before making connections to
vehicle power.
Connecting the Power Cable to the Switchplate
Before connecting the antenna unit
to vehicle power, remove the
appropriate vehicle fuse to prevent
a short circuit.
1. Disconnect vehicle power by removing the
appropriate vehicle fuse.
2. Connect the switchplate to vehicle power as
pictured in Figure 2-12.
Figure 2-12 Switchplate Power Wiring
+12 VDC – Vehicle Power
Ground
2-10
Installation
2.3.3 Connecting the Receiver Ground Wire
A grounding wire (Cable #32-0583-50) has been provided to
connect your receiver to a suitable ground and protect the
system. Attach the grounding wire to any suitable screw on the
rear panel of the receiver with a good contact with the receiver
chassis. The other end should be connected to a suitable ground.
2.3.4 Installing the Switchplate
After completing the switchplate wiring process, you must install
the switchplate itself. This process, detailed in the following
steps, is illustrated in Figure 2-13.
Figure 2-13 Mounting the Switchplate
! 1. Fit the switchplate assembly and support frame
into the panel cutout made in Step 2 of Section 2.3,
“Connecting System Components” on page 2-8 and
flush to the mounting surface.
2. Drill out four 5⁄32" (4 mm) holes in the countersunk
settings in the switchplate support frame.
Before securing the switchplate to
the mounting surface, be sure to
strain-relieve the wires connecting
to the switchplate connectors.
Several tie-wraps have been
provided to aid in strain-relieving
the wires.
3. Drill four 3⁄32" (2.5 mm) holes in the mounting
surface using the countersunk holes in the support
frame as the template. Secure the support frame
and switchplate assembly to the mounting surface
using four #6 self-cutting screws.
54-0157 Rev. J
2-11
A Guide to TracVision R5/R4
4. Snap the front cover into place to cover the screws
and support frame.
5. Reinstall the vehicle fuse removed in Step 1 of
Section 2.3.2, “Connecting to Vehicle Power” on
page 2-10.
2.3.5 Connecting the Antenna RF Signal
Cable to the Receiver
When shipped from the factory, the
antenna’s RF connectors are
protected with caps. Leave the cap
installed on the RF2 connector
unless you are going to connect a
second RF cable to the
TracVision R5/R4.
1. Route an RF cable up through the roof’s cable
access hole.
2. Connect the RF cable to the antenna’s RF1
connector (see Figure 2-14). Once the cable is
securely connected, loosen the sealing nut at the
base of the RF1 connector and tighten it onto the
end of the RF cable.
Figure 2-14 Antenna RF Connectors
RF2
RF1
3. Connect the other end of the RF cable to the
receiver’s SATELLITE IN connector.
2.3.5.1
KVH recommends the use of
RG-6 or RG-11 (75 ohms) cable
for RF wiring. Use of non-RG-6
or RG-11 (75 ohms) cables will
result in degraded performance.
The KVH warranty does not cover
degraded performance due to
improper wiring.
2-12
Connecting Two Receivers
(North American Systems Only)
To connect a second receiver and TV to the TracVision R5/R4
system, you must connect a second RF cable to the antenna’s RF2
connector (see Figure 2-14). Route the other end of the RF cable
down into the vehicle and connect it directly to the second
receiver.
Installation
2.3.5.2
Connecting Three or More Receivers
(North American Systems)
To install three or more receivers and TVs, an active multiswitch
(Channel Master #6214IFD or equivalent) must be placed
between the antenna unit and the receivers. Figure 2-15 illustrates
typical wiring arrangements for multiple receivers. If more than
four receivers are required, contact KVH for additional wiring
instructions. Mount the multiswitch unit in accordance with the
manufacturer’s instruction sheet.
Figure 2-15 Installing Three or Four Receivers Using an Active
Multiswitch
TracVision RF Connectors
RF1
RF2
TracVision R5/R4 has the capability
to switch from one satellite to
another when you choose TV
channels that are carried by your
two selected satellites. However,
the use of an active multiswitch
may interfere with communication
from the receivers to the antenna.
In this case, you will need to use
the optional TV/SAT Switch* as
described in Section 3.2, “Changing
Channels and Switching Between
Satellites” on page 3-2.
* To order a TV/SAT Switch (KVH Part
Number 01-0245), please call
+1 401 847-3327.
DC Power
DC In
RHCP
+13V
VHF/UHF
LHCP
+18V
Multiswitch
Out 1
Receiver #1
Out 2
Receiver #2
Out 3
Receiver #3
Out 4
Receiver #4
1. Connect the RF cable tagged “RF1” to the
multiswitch input labeled “LNB RHCP +13V.”
2. Connect a second RF cable to the multiswitch
input labeled “LNB LHCP +18V.”
3. Connect the multiswitch outputs to individual
receiver inputs. Use RG-6 cable terminated with
F-type connectors for all RF connections.
54-0157 Rev. J
2-13
A Guide to TracVision R5/R4
4. Terminate all unused output connectors with
75 ohm DC blocks (Channel Master #7184, Radio
Shack #15-1259 or equivalent).
2.3.6 Sealing the Cable Access Hole
Once the RF and data/power cables are connected to the
antenna, you need to seal and cover the cable access hole to
protect against leakage.
1. Completely seal the cable access hole with silicone
sealant or RTV.
Ensure the clamshell mounting
screws do not puncture the cables
inside the vehicle.
2. Install the clamshell ventilator, supplied in the
kitpack, over the cable access hole using the three
supplied #6 screws (see Figure 2-16).
Figure 2-16 Installing the Clamshell Ventilator
#6 Screws
Clamshell
Ventilator
n
is io
acV
r
T
To nna
e
A nt
RF & Data/Power
Cables
Cable Access Hole
(in Roof of Vehicle)
2.4
Activating the Receiver
DIRECTV and DISH Network Receiver Activation
KVH makes it easy to activate your DIRECTV or DISH Network
receiver. Just call KVH at 1-888-584-4163 and ask for Receiver
Activation (Monday - Friday, 8:30 a.m. - 5:00 p.m. ET). For other
options, please refer to your receiver’s User Manual.
Other Receiver Activations
Please refer to the receiver’s User’s Manual for activation
instructions.
2-14
Installation
2.5
Selecting the Active Satellite
As noted previously, TracVision R5/R4 can track a variety of
DVB-compatible and DSS (DIRECTV) satellites. The system
contains a preprogrammed library of North American and
European satellites. The satellites listed in the TracVision R5/R4
satellite library will be sufficient for most users. However, you
can install up to two user-defined satellites. To install a userdefined satellite, proceed to Section 2.5.2, “Programming
User-defined Satellites” on page 2-18.
Available Satellite Pairs
North America
Any two of the North American satellites listed below can be
paired together, as long as the antenna is within the satellite’s
coverage area (U.S.-style LNB required):
•
DSS_72
•
Echo_119
•
DSS_101
•
Echo_148
•
DSS_119
•
ExpressVu (82)
•
Echo_61
•
ExpressTV (91)
•
Echo_110
You can also receive and decode
signals from the DSS_110 satellite
if a KVH HDTV converter
(KVH Part #01-0260-05) is
installed.
Europe
Any two of the European satellites listed below can be paired
together, as long as the antenna is within the satellite’s coverage
area (European-style LNB required):
•
Arabsat
•
Hotbird
•
Astra1
•
Nilesat
•
Astra2N
•
Sirius
•
Astra2S
•
Thor
•
Eutel_W3A
•
Turksat1C
•
Hispasat
54-0157 Rev. J
2-15
A Guide to TracVision R5/R4
2.5.1 Installing Your Selected Satellites
When you first connect to the system, it is preprogrammed with
one of the following default satellite assignments:
To receive DISH 500 service, you
will need to install the following two
satellites:
Echo_119 & Echo_110
•
Europe: Astra 1 (Sat. A) and Hotbird (Sat. B)
•
N. America (US DIRECTV): DSS_101 (Sat. A)
and DSS_119 (Sat. B)
•
N. America (US DISH Network/ExpressVu):
Echo_119 (Sat. A) and Expressvu (Sat. B)
Should you wish to track a different satellite (either from the
satellite library or a user-defined satellite), you must instruct the
antenna which satellites will be in the active satellite pair.
The satellite configuration on
your receiver must match the
satellite setting on the TracVision
R5/R4 system.
Connecting to the TracVision R5/R4 Maintenance Port
Satellite A on the TracVision R5/R4
must be the same satellite as
Receiver Alternative 1 (or A, based
on your receiver and must be
assigned the Receiver DiSEqC 1
setting.*
To do so, you need to connect a PC to the maintenance port on
the front of the switchplate. To configure the antenna, you will
need a PC with Windows HyperTerminal installed, or if you are a
KVH-authorized dealer, download the KVH Flash Update
Wizard through the KVH Partner Partner Portal.
Satellite B on the TracVision R5/R4
must be the same satellite as
Receiver Alternative 2 (or B, based
on your receiver) and must be
assigned the Receiver DiSEqC 2
setting.*
Refer to your receiver’s User
Manual for complete instructions for
your receiver.
* DiSEqC settings apply only to European
systems.
2-16
1. Connect one end of the PC data cable to the DB9
maintenance port connector on the switchplate.
Connect the other end to the serial port on your
PC (a 9-pin/25-pin connector adapter may be
needed for some PCs).
Figure 2-17 TracVision R5/R4 Maintenance Port
Maintenance
Port (DB9)
Installation
2. If you are using HyperTerminal, open it and
establish the following settings:
• Bits per second: 9600
• Data bits: 8
• Parity: None
Table 2-3
Satellite Installation Names
• Stop bits: 1
Satellite
• Flow control: None
North American Satellites
If you are using the KVH Flash Update Wizard,
double-click the “KVH Flash Update Wizard”
shortcut on your computer’s desktop to start the
wizard. You do not need to flash the antenna to install
the satellites; simply enter commands in the
“TracVision Antenna Comms” window.
3. Apply power to the TracVision R5/R4 system and
the receiver(s). Allow the system to complete full
initialization (about 1 minute). Data should be
scrolling on the PC display to identify any system
problems detected. If no data is seen, recheck your
connections and setup.
Installing the Satellite of Choice from the Satellite Library
Once the data connection has been made between the PC and the
TracVision R5/R4, you must assign the satellites you wish to
have in the satellite pair by entering the following commands.
1. Type HALT then press Enter to place the antenna
in Idle Mode.
2. Select which preprogrammed satellites you wish
to assign. Table 2-3 lists the satellite names that are
in the preprogrammed North American and
European satellite library.
3. Type the following command (see the Key below)
then press Enter.
SATINSTALL, <sat_a_name>, <sat_b_name>
Key:
<sat_a_name> = the name of your choice for
Satellite A
<sat_b_name> = the name of your choice for
Satellite B (type None as the name of Satellite
B if you wish to install only one satellite)
54-0157 Rev. J
Install Name
DSS 72ºW
DSS_72
DSS 101ºW
DSS_101
DSS 119ºW
DSS_119
EchoStar 61ºW
Echo_61
EchoStar 110ºW
Echo_110
EchoStar 119ºW
Echo_119
EchoStar 148ºW
Echo_148
ExpressVu (82)
Expressvu
ExpressTV (91)
ExpressTV
European Satellites
ARABSAT 26°E
ARABSAT
ASTRA1 19.2ºE
ASTRA1
ASTRA2N 28.2ºE
ASTRA2N
ASTRA2S 28.2ºE
ASTRA2S
Eutel_W3A 7°E
Eutel_W3A
Hispasat 30.0ºW
HISPASAT
Hotbird 13.0ºE
HOTBIRD
Nilesat 101 7°W
NILESAT
Sirius 5.0ºE
SIRIUS
Thor 0.8ºW
THOR
Turksat1C 40°E
TURKSAT
Other Installation Designations
User-defined 1
USER1*
User-defined 2
USER2*
None
None
* USER1 and USER2 will only be
available if one or two user-defined
satellites have been added to the
library.
2-17
A Guide to TracVision R5/R4
4. Type ZAP then press Enter to restart the system.
Wait for the antenna to initialize (about 1 minute).
Be sure the receiver’s satellite configuration
matches your chosen TracVision R5/R4 settings.
Example:
To assign Astra 2S and Hotbird for your satellite pair, (where
Astra2S is designated as Satellite A and Hotbird is designated as
Satellite B):
Type HALT then press Enter.
Type SATINSTALL,ASTRA2S,HOTBIRD then press Enter.
Type ZAP then press Enter.
2.5.2 Programming User-defined Satellites
The TracVision R5/R4 satellite library has two open slots that
you may use to program two user-defined satellites in case you
want to install/watch a satellite that is not in the KVH
predefined satellite library. To configure a user satellite, you will
need to obtain the following satellite information from your
satellite service provider or from sites on the Internet, such as
www.satcodx.com:
•
Satellite name
•
Satellite position (longitude)
•
Transponder information for each of the following
polarizations/frequencies:
- vertical high & vertical low
- horizontal high & horizontal low
or
- right
- left
•
Transponder information includes:
- frequency
- symbol rate
- FEC code, and
- network ID (in hexadecimal format)
•
2-18
Decoder type
Installation
Entering User-defined Satellite Data
Once the link between the PC and the TracVision R5/R4 is
established as described in Section 2.5.1, “Installing your Selected
Satellites” on page 2-16, follow the steps below to begin entering
the data for your user-defined satellite.
1. Type HALT then press Enter.
2. Type the following command (see the Key below)
then press Enter.
SATCONFIG,USERX,YYY,Z,D,L
Key:
X = 1 or 2 (This represents the first or second userdefined satellite. Your TracVision system allows
up to two user-defined satellites.)
YYY = longitude (0-180)
Z = E (East) or W (West)
D = decoding type (0 = test, 1 = DSS-A,
2 = DSS-B, 3 = DVB)
L = LNB polarization (C = circular, L = linear)
The main board has now been configured to recognize the userdefined satellite. Next, the RF board must be configured.
54-0157 Rev. J
2-19
A Guide to TracVision R5/R4
3. Type @DEBUGON then press Enter.
4. Type the following command (see the Key below)
then press Enter.
@SATCONFIG,X,N,F,S,C,ID,P,B,D
Key:
@SATCONFIG = directs data to the RF Board
X = satellite location A or B
N = satellite table # (98 & 99 are slots for userconfigured satellites)
F = frequency in MHz (either 00000 or a range from
10700 - 12700)
S = the satellite transponder symbol rate in
Mbit/second (01000 - 29999)
C = the FEC code (e.g., 12, 23, 34, 56, 67, 78)
ID = the satellite network ID in hexadecimal format
(0x####)
P = the LNB polarization (v = vertical,
h = horizontal, r = right, l = left)
B = the LNB down conversion frequency (l = low,
h = high, u = USA)
D = decoding type (0 = test, 1 = DSS-A,
2 = DSS-B, 3 = DVB)
This information has to be entered for each of the following
polarizations:
•
vertical high
•
vertical low
•
horizontal high
•
horizontal low
right
•
left
or
•
2-20
Installation
TracVision R5/R4 requires that the data fields for all transponder
categories be filled in. If the selected satellite does not have
information for one or more of the transponder categories,
default information should be entered in the fields as follows:
Table 2-4 Default Transponder Values
Transponder Data
Default Value
Frequency
00000
Symbol Rate
27500
FEC Code
the same value as provided for those
transponders with data
Network ID
0x0000
Polarity and Band
whichever combinations are not
already provided
5. Type @SAVE,A then press Enter to save your
settings (or @SAVE,B if data is for the User2
satellite.)
6. Type @DEBUGOFF then press Enter.
7. Type ZAP then press Enter to restart the system.
One of your user-defined satellites has now been added to the
TracVision R5/R4 satellite library. This satellite will now be
available the next time you use the SATINSTALL command.
54-0157 Rev. J
2-21
A Guide to TracVision R5/R4
An Example of Configuring a User-defined Satellite (Europe)
The following is an example of configuring the fictional
YOURSAT 101 as the USER1 configured satellite. Prior to
configuring this satellite or any others, be certain to get the most
up-to-date information from one of the sources previously
discussed.
Table 2-5 Sample User-defined Satellite Configuration (Europe)
YOURSAT 101 at 71 West, DVB decoder, Circular Polarization LNB
Horizontal High
Frequency
11.966 GHz
Symbol Rate
27500
FEC Code
3/4
Network ID
2048 (dec) = 0x0800
Vertical High
Frequency
11.823 GHz
Symbol Rate
27500
FEC Code
3/4
Network ID
2048(dec) = 0x0800
Vertical Low
Data Listed
Horizontal Low
No Data Listed
Example:
Based on this information, the data entered via the PC would
look like this, assuming that YOURSAT 101 would be Satellite A:
SATCONFIG,USER1,7,W,3,L
@DEBUGON
@SATCONFIG,A,98,11966,27500,34,0x0800,H,H,3
@SATCONFIG,A,98,11823,27500,34,0x0800,V,H,3
@SATCONFIG,A,98,00000,27500,34,0x0000,V,L,3
@SATCONFIG,A,98,00000,27500,34,0x0000,H,L,3
@SAVE,A
@DEBUGOFF
ZAP
2-22
Installation
An Example of Configuring a User-defined Satellite (N. America)
The following is an example of configuring the fictional
YOURSAT 101 as the USER1 configured satellite. Prior to
configuring this satellite or any others, be certain to get the most
up-to-date information from one of the sources previously
discussed.
Table 2-6 Sample User-defined Satellite Configuration
(North America)
YOURSAT 101 at 71 West, DVB decoder, Circular Polarization LNB
Right
Frequency
11.966 GHz
Symbol Rate
27500
FEC Code
3/4
Network ID
2048 (dec) = 0x0800
Frequency
11.823 GHz
Symbol Rate
27500
FEC Code
3/4
Network ID
2048(dec) = 0x0800
Left
Example:
Based on this information, the data entered via the PC would
look like this, assuming that YOURSAT 101 would be Satellite A:
SATCONFIG,USER1,71,W,3,C
@DEBUGON
@SATCONFIG,A,98,11966,27500,34,0x0800,R,U,3
@SATCONFIG,A,98,11823,27500,34,0x0800,L,U,3
@SAVE,A
@DEBUGOFF
ZAP
54-0157 Rev. J
2-23
A Guide to TracVision R5/R4
2.6
Table 2-7
Approximate Latitude/Longitude
Grid #
Latitude
Longitude
1
67ºN
7ºW
2
67ºN
7ºE
3
67ºN
22ºE
4
65ºN
45ºE
5
63ºN
7ºW
6
63ºN
7ºE
7
63ºN
22ºE
8
57ºN
7ºW
9
57ºN
7ºE
10
57ºN
22ºE
11
55ºN
40ºE
12
53ºN
7ºW
13
53ºN
7ºE
14
50ºN
22ºE
15
47ºN
7ºW
16
47ºN
7ºE
17
43ºN
7ºW
18
43ºN
7ºE
19
43ºN
22ºE
20
43ºN
37ºE
21
36ºN
7ºW
22
36ºN
7ºE
23
36ºN
22ºE
24
36ºN
37ºE
2-24
Setting the Skew Angle
(European Systems Only)
The Antenna LNB skew angle must be adjusted to optimize
channel reception. Refer to your satellite service provider for the
proper skew angle for the selected satellite service and
geographical location. The skew angle for satellites in the KVH
library can also be obtained by entering your latitude and
longitude into the antenna. Determine your grid number in
Figure 2-18 to find your corresponding latitude and longitude
listed in Table 2-7.
Figure 2-18 European Position Grid
1
2
3
4
5
6
8
9
12
15
17
21
7
10
13
11
14
16
18
22
19
23
20
24
Installation
Finding the Skew Angle for a Predefined Satellite
1. Type HALT then press Enter.
2. Type DEBUGON then press Enter.
3. Type the following command (see the Key below)
then press Enter.
GPS,XX,D,YYY,E
Key:
XX = latitude (0 - 90)
D = S (South) or N (North)
YYY = longitude (0 - 180)
E = E (East) or W (West)
4. Type SKEWANGLE then press Enter. The system
will respond with the skew angle for whichever
satellite is currently selected.
Adjusting the LNB Skew Angle
1. Determine the skew angle for the selected satellite
and region.
2. Loosen the wing nut on the LNB clamp so that the
LNB can be moved (see Figure 2-19).
Figure 2-19 LNB Skew Angle Adjustment
Skew Angles
LNB Clamp
& Wing Screw
30
LNB
30
Scribe
Mark
3. Carefully rotate the LNB so that the scribe mark
on the LNB clamp is aligned with the proper angle
measurement.
4. Tighten the wing nut and LNB clamp to secure
the LNB.
54-0157 Rev. J
2-25
A Guide to TracVision R5/R4
2.7
Testing the System
Now all you need to do is turn the system on and ensure
everything works properly. Follow the steps below to test the
TracVision system.
1. Park the vehicle in a blockage-free area. The
antenna requires an unobstructed view of the
southern sky to receive satellite signals.
2. Turn on the receiver(s) and TV(s). For instructions
on operating the receiver, refer to the receiver’s
User’s Manual.
3. Turn on the TracVision antenna.
4. Within a few minutes, a picture should appear on
the TV.
5. (TracVision R5 only) Take a road test and verify that
the antenna tracks the satellite while the vehicle is
moving.
6. When you have finished testing, shut down the
system.
2-26
Installation
2.8
Configuring TracVision R5/R4 for
Remote Satellite Dish Operation
In some campground locations, dense foliage will block the
satellite signal. In these situations, a remote portable antenna
may be the only solution to satellite signal reception.
The wiring option for the remote dish is very simple and should
be installed when the TracVision R5/R4 is installed. A highquality “A/B switch” should be used to change from
TracVision R5/R4 dish reception to remote antenna operation.
The recommended wiring arrangement for remote dish operation
is illustrated in Figure 2-20.
Figure 2-20 Remote Dish Wiring Configuration
Antenna
TV Out
Receiver
SAT In
RF Cable
RF Cable
RF Cable
Common
A
B
A/B Switch
A
B
Remote Dish
54-0157 Rev. J
2-27
A Guide to TracVision R5/R4
2.9
Changing Geographic Location
If you move from Europe to the U.S., or from the U.S. to Europe,
you will need to modify your TracVision R5/R4 system to receive
satellite TV signals in the new geographic area.
To begin receiving satellite signals in the new area, perform the
following steps.
Swap LNBs
To receive the proper satellite signals in the new geographic
location, your TracVision antenna must be equipped with the
appropriate LNB for that location. If moving from Europe to the
U.S., you will need to install a North American-style LNB. If
moving from the U.S. to Europe, you will need to install a
European-style LNB. Table 2-8 lists the part numbers for ordering
these LNB options.
Table 2-8 LNB Part Numbers
Part Name
Part Number
European-style LNB
19-0196
North American-style LNB
19-0056
Install New Satellites
When you move to a new area, the list of available satellites
changes. If you’re moving to Europe, you will need to choose a
new satellite pair from the list of available European satellites. If
you’re moving to the U.S., you will need to choose a new satellite
pair from the list of available North American satellites (refer to
Section 2.5, “Selecting the Active Satellite” on page 2-15). For details
on installing these new satellites, refer to Section 2.5.1, “Installing
Your Selected Satellites” on page 2-16.
Replace the Receiver
You may also need to replace your
television when changing
geographic location. In North
America, your TV must support the
NTSC video standard. In Europe,
your TV must support the PAL
video standard.
2-28
In order to receive satellite TV service in your new geographic
location, you will need to purchase a receiver designed for that
location. Refer to your satellite TV service provider for more
information.
Using Your TracVision R5/R4
3
Using Your
TracVision R5/R4
For TracVision R5/R4 to receive the satellite signals, the antenna
must have a clear line of sight to the satellite. If you only receive
intermittent signals or the antenna cannot find the satellite, check
around your vehicle for any objects that could be blocking the
signal, such as trees, buildings, highway overpasses, etc.
Figure 3-1 Example of Satellite Blockage
You must also be located within the selected satellite’s coverage
area in order to receive its signal. Refer to your satellite television
service manual to check the viable coverage area. For your
convenience, KVH provides links to several web sites that offer satellite
coverage information. Simply go to our web site at: www.kvh.com/
footprint.
3.1
Turning On the System
To minimize the time it takes the
antenna to acquire the satellite, do
not change the channel during the
startup process or cable unwrap.
The TracVision R5/R4 system is easy to use. Antenna unit
initialization and satellite acquisition are completely automatic.
1. (TracVision R4 only) Park your vehicle.
2. Turn on the receiver and television. (Refer to your
receiver’s User Manual for complete receiver
operating instructions.)
54-0157 Rev. J
The TracVision R4 is for stationary
use only.
3-1
A Guide to TracVision R5/R4
3. Turn on the antenna using the switchplate (see
Figure 3-2).
The satellite configuration on
your receiver must match the
satellite setting on the TracVision
R5/R4 system.
Figure 3-2 Turning on the TracVision R5/R4
Satellite A on the TracVision R5/R4
must be the same satellite as
Receiver Alternative 1 (or A, based
on your receiver) and must be
assigned the Receiver DiSEqC 1
setting.*
Satellite B on the TracVision R5/R4
must be the same satellite as
Receiver Alternative 2 (or B, based
on your receiver) and must be
assigned the receiver DiSEqC 2
setting.*
Refer to your receiver’s User’s
Manual for complete instructions for
your receiver.
* DiSEqC applies to European systems only
4. (TracVision R5 only) If the vehicle is moving, avoid
turning the vehicle for 60 seconds after turning on
the antenna to allow the antenna gyro to initialize
properly.
3.2
Changing Channels and
Switching Between Satellites
During installation, your system should have been set to the
satellite pair of your choice and the system should have
downloaded the appropriate channel guides. You must also have
a properly configured receiver (if this has not been done, refer to
your receiver’s User’s Manual for instructions).
Your TracVision system is programmed to track either of two
satellites, stored in memory as Satellite A and Satellite B. To select
between these two satellites, you can use the receiver remote
control or the optional TV/SAT Switch.
If you have three or more receiver/TV pairs installed using an
active multiswitch, you will need the TV/SAT Switch to switch
between the two satellites.
3-2
Using Your TracVision R5/R4
European Services
When the TracVision R5/R4 system and the receiver have
matching configurations, switching from one satellite to the other
is as easy as changing the channel using the remote control.
TracVision R5/R4 will automatically switch from Satellite A to B
and back again as necessary to receive your selected channel.
DIRECTV
DIRECTV subscribers in certain regions of the United States will
require a DSS Plus receiver to receive broadcasts from multiple
satellites. If connected to the antenna’s RF1 connector, the DSS
Plus receiver allows you to switch satellites using the remote
control. If you are a DIRECTV subscriber, but do not have a DSS
Plus receiver, or you are using a multiswitch, use the optional
TV/SAT Switch (see Section 3.2.1, “Using the TV/SAT Switch to
Switch Between Satellites” on page 3-4).
ExpressVu
ExpressVu subscribers need to use the optional TV/SAT Switch
to switch between satellties (see Section 3.2.1, “Using the TV/SAT
Switch to Switch Between Satellites” on page 3-4).
DISH Network
DISH Network subscribers will need to configure the TracVision
R5/R4 system to use DISH 500 mode (see Section 3.2.2, “DISH
500 Mode” on page 3-6), which allows automatic switching
between the 119 and 110 satellites. Or you can manually switch
satellites using the optional TV/SAT Switch (see Section 3.2.1,
“Using the TV/SAT Switch to Switch Between Satellites” on page 3-4).
54-0157 Rev. J
3-3
A Guide to TracVision R5/R4
3.2.1 Using the TV/SAT Switch to Switch
Between Satellites
To order a TV/SAT Switch (KVH
Part Number 01-0245), please call
+1 401 847-3327.
If you’re unable to switch between satellites using the receiver
remote control, you can use the optional TV/SAT Switch to
easily select between Satellite A and Satellite B (see Figure 3-3).
Figure 3-3 TV/SAT Switch
LED Indicators
Sat A Error
Sat B
Select
Changing Satellites:
1. Push Select button
2. Wait while Sat A or
B blinks green
3. Ready when Sat A
or Sat B stays
solid green
Other Indicators:
• Both blinking
green: initializing
• Error light
blinking red:
system problem
3-4
Select Button
Using Your TracVision R5/R4
TV/SAT Switch Controls and Indicators
The Select button is used for all operator controls. The TV/SAT
Switch also has three LED indicators that show its current status.
Table 3-1 explains the function of each indicator.
Table 3-1 TV/SAT Switch LED Indicators
Indicator
Status
Meaning
Sat A
Blinking green
Wait – Searching for satellite
Solid green
Tracking Satellite A
Error
Blinking red
System problem – Refer to
Section 4, “Troubleshooting,”
to find the possible cause
Sat B
Blinking green
Wait – Searching for satellite
Solid green
Tracking Satellite B
Connecting the TV/SAT Switch
To use the TV/SAT Switch, you must first connect it to the
TracVision system.
1. Connect the TV/SAT Switch’s data cable to the
maintenance port on the switchplate (see
Figure 3-4).
Figure 3-4 Switchplate Maintenance Port
Maintenance Port
(DB9 Connector)
2. The Sat A and Sat B indicators blink while the
system initializes.
3. Either the Sat A or Sat B indicator will turn solid
green, denoting which satellite is currently being
tracked.
54-0157 Rev. J
3-5
A Guide to TracVision R5/R4
Using the TV/SAT Switch
The TV/SAT Switch is very easy to use. All operations are
controlled through a single button.
To select the second satellite, perform the following steps:
1. Press the Select button on the TV/SAT Switch.
2. The indicator for the current satellite (Sat A or
Sat B) extinguishes, while the indicator for the
other satellite starts blinking.
3. Once the indicator for the other satellite turns
solid green, the TracVision system is tracking the
newly selected satellite. You can now use your
receiver to choose a channel on the new satellite.
3.2.2 DISH 500 Mode
N E T W O R K
DISH Network customers will need to configure the TracVision
R5/R4 system to use DISH 500 mode, which allows automatic
switching between the 119 and 110 satellites, or manually switch
satellites using the optional TV/SAT Switch (see Section 3.2.1,
“Using the TV/SAT Switch” on page 3-4).
Configuring the Antenna for DISH 500 Mode
To configure the TracVision antenna for DISH 500 mode, you will
need to run the receiver’s Check Switch function twice. You do
not need a laptop computer.
To configure the TracVision antenna for DISH 500 mode, follow
the steps below.
1. Park your vehicle in a blockage-free area and do
not move the vehicle until you have completed the
entire configuration process.
2. Turn on the master receiver (the receiver that is
connected to the antenna’s RF1 connector) and the
television.
3. Turn on the TracVision antenna using the
switchplate’s power switch.
4. Wait one minute for the antenna to initialize.
5. Using the receiver’s remote control, go to the
“Point Dish/Signal Strength” screen (press Menu,
6, 1, 1 on most models).
3-6
Using Your TracVision R5/R4
6. Using the remote control’s arrow buttons,
highlight “Check Switch” then press the Select
button.
7. Highlight “Test” then press Select.
8. Wait a minimum of 15 minutes for the Check
Switch function to complete and for the antenna to
restart and configure itself for DISH 500 mode.
If the Check Switch function fails (the receiver locks
up), disconnect power from the receiver, restart the
antenna, then restore power to the receiver and try the
Check Switch function again.
9. Run the Check Switch function a second time. This
allows the receiver to configure itself for automatic
satellite switching.
10. Wait until the Check Switch function is complete
(it will take a couple minutes).
11. Ensure that the TV display matches Figure 3-5:
Figure 3-5 Check Switch Screen
Installed Switch: SW42
Input:
1
1
2
2
Satellite:
119
119
110
110
Polarity:
Odd
Even
Odd
Even
Status:
Satellite reception verified
This indicates that the receiver is configured
properly. If this information is not displayed
exactly as shown above, try running the Check
Switch function again.
12. Exit the menu and allow the receiver to download
the program guide.
13. Once the program guide has loaded, you can start
enjoying satellite TV. The antenna will now switch
between satellites automatically as you change
channels using the receiver’s remote control.
54-0157 Rev. J
3-7
A Guide to TracVision R5/R4
3.3
Watching Television
TracVision R5 is designed to operate whether your vehicle is in
motion or parked. TracVision R4 is designed to operate only
while your vehicle is parked.
Using Your TracVision R5/R4 When Parked
(TracVision R5 only) Don’t forget to
turn the system back on before you
start driving again. The antenna
must be turned on to track the
satellite while you are moving.
When your vehicle is stopped, it is not necessary for the
TracVision R5/R4 to be turned on. After parking your vehicle
and confirming that the antenna is receiving the satellite signal,
you may turn off the TracVision R5/R4 unit to avoid unnecessary
use of power. Because the LNB receives its power from the
receiver, the antenna will continue to receive the satellite TV
signals and relay them to the receiver.
However, if you plan to change to a channel that is broadcast by
another satellite, TracVision R5/R4 must be turned on so the
antenna can search for, identify, and lock onto the different
satellite.
Cable Unwrap
The antenna unit can rotate a full 720° before coming to the end
of its cable. If it does so, the system automatically unwraps the
cable by quickly rotating the dish in the opposite direction.
During this process, your television transmission will be frozen
momentarily while the cable unwraps and the antenna reacquires
the satellite.
Sleep Mode (TracVision R5 only)
Unlike turning the power off, the
antenna will still be operational and
will draw power while in Sleep
Mode. If you are going to be parked
for an extended period of time,
turning off the antenna will
conserve power while still allowing
you to receive the TV signal.
3-8
When the vehicle has come to a stop and the antenna holds its
position for 1 minute, the antenna unit enters Sleep Mode, which
turns off the conical scan tracking, reducing motor noise. When
the vehicle moves again, Sleep Mode will automatically turn off
and the system will resume tracking. This convenient feature is
ideal if the vehicle is parked briefly and passengers want to
watch TV.
Using Your TracVision R5/R4
KVH recognizes that some customers may not want to take
advantage of this convenient feature. In this case, it is possible to
disable Sleep Mode using a simple software command as follows:
1. Connect a laptop computer to the system using the
maintenance port and open the KVH Flash Update
Wizard or HyperTerminal, as described in
Section 2.5.1, “Installing Your Selected Satellites” on
page 2-16.
2. Turn on the antenna. When the limit switch test is
complete:
a. Type HALT then press Enter.
b. Type DEBUGON then press Enter.
c. Type SLEEPOFF then press Enter.
3. Turn the antenna off by pressing its power button.
4. Wait 30 seconds then press the antenna’s power
button to turn the antenna back on. Sleep Mode is
now disabled. To reactivate Sleep Mode, follow this
same process, typing SLEEPON instead of
SLEEPOFF during Step c.
Using your TracVision R5 While Moving (TracVision R5 Only)
The antenna unit uses conical scanning to maintain peak signal
strength to the receiver and to update the satellite’s position.
When conical scan tracking is active, the antenna moves
continually with a circular motion to sweep across the satellite’s
peak signal. The signal strength is then fed back to the control
circuits to keep coming back to the direction of the strongest
signal.
54-0157 Rev. J
3-9
Troubleshooting
4
Troubleshooting
The troubleshooting matrix shown in Table 4-1 identifies some
trouble symptoms, their possible causes, and references to
troubleshooting solutions.
ctio
X
X
Inco
ffici
ent
i r in g
er w
rop
Insu
Antenna non-functional
Imp
SYMPTOM
PO
SSI
BLE
CAU
SE
(Se
(AN
DS
OLU
TIO
n 4.
N)
Pow
1.1)
er (
rrec
Sec
t sa
tion
telli
Sat
4.1.
te c
ellit
2)
onfi
e si
g
g
u
nal
ratio
Dew
b
n
l
o
(Se
or r
cke
ctio
ain
d (S
n 4.
poo
e
Sat
c
t
1.3)
i
ling
on 4
ellit
on d
e co
.1.4
v
o
)
era
me
Veh
ge i
(Se
icle
ssu
ctio
tur n
e
n 4.
ing
(Se
Inco
1.5)
ctio
dur
rrec
i
n
n
t or
g st
4.1.
loos
ar tu
6)
Typ
e of
p (S
eR
F co
ecti
mul
on 4
nne
tisw
Sta
ctor
itch
.1.7
tion
s (S
)
use
ar y
e
d
u
c
(Se
se o
tion
Rec
ctio
nly
eive
4
.1.8
n 4.
(Se
r wi
)
1.9)
ctio
r in g
Rec
n 4.
(Se
eive
1
.
c
1
tion
r fa
0)
ulty
4.2.
Ant
(Se
1)
enn
c
a gy
tion
ro f
4.2.
LNB
ault
2)
ass
y
(Se
emb
ctio
ly fa
n
4.3)
ulty
(Se
ctio
n 4.
3)
Table 4-1 Troubleshooting Matrix
Antenna not switching channels/satellites
X
No picture on TV set
X
Intermittent picture for short intervals
X
X
System works at rest but not on the move
X
X
System will not find satellite
X
X
Snowy television picture
X
Picture jumbled, parts missing, freezing
X
TV/SAT Switch Error LED blinking
X
54-0157 Rev. J
X
X
X
X
X
X
X
X
X
X
X
X
X
X
X
X
X
X
X
X
X
X
X
X
X
X
X
X
X
X
4-1
A Guide to TracVision R5/R4
4.1
If you need technical assistance,
please contact KVH Technical
Support:
Phone: 1-401-847-3327
E-mail: [email protected]
Internet: www.kvh.com/help
Causes and Remedies for
Common Operational Issues
There are a number of common issues that can affect the signal
reception quality or the operation of the TracVision R5/R4. The
following sections address these issues and potential solutions.
4.1.1 Improper Wiring
If the antenna unit is installed but entirely non-responsive, there
are two key factors to check as part of the troubleshooting
process:
1. Vehicle Power Fuse – Ensure that the vehicle
power fuse is installed and intact.
The TracVision R5/R4 antenna
contains two fuses located inside
the antenna. Only KVH-authorized
service technicians should perform
repairs. Unauthorized repairs on the
antenna unit may void the warranty.
Contact KVH Technical Support for
details.
2. Wiring – If the system has been improperly wired,
the antenna unit will not operate correctly. Refer to
Section 2.3, “Connecting System Components” on
page 2-8 for complete system wiring information.
4.1.2 Insufficient Power
The TracVision system requires an 11-16 VDC power input in
order to work properly. If vehicle power fluctuates widely, or is
noisy, a 12 VDC 5-amp AC/DC power supply should be
installed.
4.1.3 Incorrect Satellite Configuration
Ground loops can also cause the
TracVision system to work
improperly. To check for a ground
loop, disconnect the negative lead
from the antenna. If the antenna
continues to function, a ground loop
is present. KVH recommends
installing a 12 VDC 5-amp isolated
AC/DC power supply when a
ground loop is present.
The satellite configuration on your receiver must match the
satellite setting on the TracVision R5/R4 system.
•
Satellite A on the TracVision R5/R4 must be the
same satellite as Receiver Alternative 1 (or A,
based on your receiver) and must be assigned the
Receiver DiSEqC 1 setting.*
•
Satellite B on the TracVision R5/R4 must be the
same satellite as Receiver Alternative 2 (or B,
based on your receiver) and must be assigned the
Receiver DiSEqC 2 setting.*
*
The DiSEqC settings only apply to European systems.
Refer to your receiver’s User’s Manual for complete instructions
on configuring your receiver.
4-2
Troubleshooting
4.1.4 Satellite Signal Blocked
Satellite signals can be blocked or degraded by trees and
branches, buildings, mountains, overpasses, or equipment on the
vehicle itself. Refer to Section 2.1, “Choosing the Best Location” on
page 2-3 to make certain that the TracVision R5/R4 unit is in the
optimal location. Simply moving the vehicle to clear an external
obstruction will also restore signal quality.
4.1.5 Dew or Rain Pooling on Dome
Dew or rain can occasionally pool on the top of the radome.
While this moisture will usually be dispersed when the vehicle is
in motion, it can disrupt the signal while the vehicle is parked.
This issue can be minimized with two approaches:
1. Spray the dome with hosed water to remove the
dew from the dome surface.
2. Periodically apply liquid dish detergent to the
dome surface. Wipe the full-strength detergent on
the dome and allow it to dry. This treatment will
provide a film that will help shed moisture from
the dome.
4.1.6 Satellite Coverage Issue
TracVision R5/R4 will provide outstanding reception throughout
the entire coverage area for your satellite television service of
choice. However, signal quality can be degraded as you approach
the fringe coverage areas. Refer to your satellite television service
manual to check the viable coverage area.
For your convenience, KVH
provides links to several web sites
that offer satellite coverage
information. Simply go to our web
site at www.kvh.com/footprint.
4.1.7 Vehicle Turning During Startup
(TracVision R5 only)
If the vehicle turns during the 60-second startup and
initialization sequence that occurs immediately after turning
on the power to the TracVision R5 unit, the antenna gyro will
record that variable motion as “standing still.” This may cause
the antenna to track improperly. To solve this problem, turn
TracVision R5 off for at least 10 seconds. Turn the system back
on, making certain that the vehicle is either motionless or
traveling in a straight line for the 60 seconds immediately
following power-up.
54-0157 Rev. J
4-3
A Guide to TracVision R5/R4
4.1.8 Incorrect or Loose RF Connectors
As part of preventive maintenance (as described in Section 5,
“Maintenance” on page 5-1), KVH recommends checking the
antenna unit cable connections. A loose RF connector can reduce
signal quality. In addition, if you are unable to switch to the other
programmed satellite, make sure that you have connected your
RF signal cable to the antenna baseplate connector labeled “RF1”
(see Section 2.3.5, “Connecting the Antenna RF Signal Cable to the
Receiver” on page 2-12).
4.1.9 Type of Multiswitch Used
(North American Systems Only)
An active multiswitch must always be used to connect the
TracVision R5/R4 system to more than two receivers. Refer to
Section 2.3.5.2, “Connecting Three or More Receivers” on page 2-13
for directions on proper multiswitch/multiple receiver cabling.
4.1.10 Stationary Use Only (TracVision R4 only)
KVH offers an upgrade kit (KVH
Part #02-1026) that adds in-motion
tracking capability to the
TracVision R4, allowing you to
receive satellite signals while on
the move.
The TracVision R4 antenna was designed for stationary use only.
As such, the antenna will track the desired satellite while your
vehicle is parked, but not while the vehicle is in motion.
4.2
Receiver Troubleshooting
The receiver that was provided with your satellite television
service may also be the cause of less-than-ideal operation.
4.2.1 Receiver Wiring
Refer to Section 2.3.5, “Connecting the Antenna RF Signal Cable to
the Receiver,” on page 2-12, and your receiver’s User’s Manual to
confirm that the receiver is properly connected to the antenna
unit and the television.
4.2.2 Receiver Faulty
In the case of a faulty receiver, refer to your receiver’s User’s
Manual for service, replacement, and warranty information.
4-4
Troubleshooting
4.3
Antenna Faults
Only KVH-authorized service technicians should perform repairs
on the TracVision antenna. Unauthorized repairs on the antenna
unit may void the warranty. Contact KVH Technical Support for
details.
4.4
Computer Diagnostics
TracVision R5/R4 has been designed to provide diagnostic
readouts on a PC with a RS-232 serial communication port. If you
are unable to isolate a system problem with the foregoing
troubleshooting tools, set up a laptop to carry out computer
diagnostics as described below. System problems might be found
somewhere through the diagnostic readouts.
This procedure requires a PC with Windows HyperTerminal or
KVH Flash Update Wizard installed.
The Flash Update Wizard is
available to KVH-authorized dealers
through the KVH Partner Portal.
1. Connect one end of the PC data cable to the
maintenance port on the switchplate (see
Figure 4-1). Connect the other end to the serial
port on your PC (a 9-pin/25-pin connector adapter
may be needed for some PCs).
Figure 4-1 Switchplate Maintenance Port
Maintenance Port
(DB9 Connector)
54-0157 Rev. J
4-5
A Guide to TracVision R5/R4
2. If you are using HyperTerminal, open it and
establish the following settings:
• Bits per second: 9600
• Data bits: 8
• Parity: None
• Stop bits: 1
• Flow control: None
If you are using the KVH Flash Update Wizard,
double-click the “KVH Flash Update Wizard”
shortcut on your computer’s desktop to start the
wizard. You do not need to flash the antenna to view
diagnostic readouts; you will simply view the data in
the “TracVision Antenna Comms” window.
3. Apply power to the TracVision R5/R4 system and
allow the system to complete full initialization.
Observe the data scrolling on the PC display to
identify any system problems detected. If no data
is seen, recheck your connections and setup.
4-6
Maintenance
5
Maintenance
5.1
Warranty/Service Information
For information on KVH warranty, repair, and liability policies,
please refer to the complete warranty statement provided with
your KVH product. If you have any questions, please call your
local authorized dealer/installer or distributor, or contact KVH or
KVH Europe directly.
5.2
Preventive Maintenance
TracVision R5/R4 requires minimal preventive maintenance. The
following tasks are sufficient to maintain peak performance.
Monthly
•
Wash the exterior of the radome and baseplate
assembly with fresh water; a mild detergent may
be added to remove grime. Do not spray the
radome directly with high-pressure water.
•
Do not apply abrasive cleaners or volatile solvents
such as acetone to the ABS radome.
If a need arises to paint the
radome, ONLY use non-metallic
automotive paint to avoid
degrading the RF signal strength
and the reception quality.
When cleaning the radome, avoid
any compounds that react with
plastic.
Annually
•
Remove the radome and examine the interior of
the antenna unit for signs of corrosion, loose
connections, or frayed or broken wires.
•
Visually inspect the elevation drive shaft to be
certain that it moves easily and is clear of grit and
debris.
54-0157 Rev. J
5-1
A Guide to TracVision R5/R4
5.3
The serial number of your
TracVision R5/R4 will be required
during any troubleshooting or
service calls. You will find the
serial number at the front of this
manual.
Replaceable Parts
TracVision R5/R4 has been designed with durability and low
maintenance in mind. If you experience an operating problem or
otherwise require technical assistance, contact your local
authorized TracVision R5/R4 dealer/distributor first. Have the
antenna unit serial number ready, along with a list of the trouble
symptoms. If an authorized dealer/distributor is not located
nearby, contact the factory directly at the telephone, fax, or e-mail
listings inside the front cover.
Replacement part numbers for units that can be serviced in the
field are listed in Table 5-1. These parts can be replaced by any
KVH-authorized dealer/distributor.
To help us continually improve the
quality and reliability of our
systems, please return any failed
component to KVH or KVH Europe
(care of the mailing address listed
at the front of this manual) after you
receive your replacement part.
Table 5-1 Field Replaceable Units
Part Name
Part Number
Baseplate Assembly (TracVision R5)
02-1498-01*
02-1498-03**
Baseplate Assembly (TracVision R4)
02-1498-02*
02-1498-04**
Radome Assembly (TracVision R5)
02-0953-12†
Radome Assembly (TracVision R4)
02-0953-11†
Data/Power Cable
32-0730-28
RF Cable
32-0417-28
PC Cable
32-0628-06
CPU PCB
02-1043-02
RF PCB
02-1342
Antenna Gyro (TracVision R5 only)
02-1433
Antenna Gyro Gasket (TracVision R5 only)
24-0139
System Fuses
16-0017-3150
LNB (European System)
19-0346
LNB (N. American System)
19-0056
Switchplate
02-1023-01
TV/SAT Switch (optional)
01-0245
* Baseplate assembly with single-output LNB (European systems)
** Baseplate assembly with dual-output LNB (North American systems)
†
Specify color when ordering
5-2
Maintenance
5.4
Reshipping the Antenna
If you need to repack the antenna unit for shipment, the shipping
restraints removed during installation must be reinstalled. Follow
these steps to reinstall the restraints.
1. Remove the radome.
2. Rotate the antenna unit so that the LNB is facing
away from the baseplate connectors.
3. Attach the three restraints to the baseplate using
the 1⁄4"-20 x 5⁄8" hex screws and washers (provided in
the kitpack) and nuts (removed from the restraints
during installation) as pictured in Figure 5-1.
When rotating the azimuth
mechanism by hand, go slowly!
Hitting the mechanical stops with
excessive force will damage the
azimuth limit switch.
Figure 5-1 Attaching the Shipping Restraints to the Antenna
Baseplate
4. Place the antenna bracket on the forward shipping
restraint.
54-0157 Rev. J
5-3
A Guide to TracVision R5/R4
5. Secure the forward restraint and bracket by
wrapping two tie-wraps around the bend in the
forward restraint and the antenna bracket (at the
end of the LNB bracket) as illustrated in
Figure 5-2.
IMPORTANT! Before returning
the antenna, be sure to obtain an
RMA number from KVH’s
Technical Support Department
and write the number on the
outside of the box. Shipments
received without an RMA number
will be returned to you at your
expense.
Figure 5-2 Securing the Forward Shipping Restraint
2 tie-wraps used
to secure LNB arm
Forward Shipping Restraint
Nuts and Washers
Forward Shipping Restraint
Hex Screws and Washers
6. Replace the radome.
KVH is not liable for damage
caused by improper shipping.
5-4
7. Place the entire antenna unit into its shipping box
using the original packaging material. Secure the
box to a pallet to ensure upright transport to KVH.
System Specifications
Appendix A
System Specifications
Table A-1 TracVision R5/R4 System Specifications
Physical Characteristics
Power
11-16 volts DC @ 2.5 amps nominal,
3.5 amps peak
Dimensions/Weight
32" (81 cm) wide x 14.8" (38 cm) high,
33 lbs (15 kg)
LNB
European system: Single output
N. American system: Dual output
Tracking (TracVision R5 only)
Better than 30º/sec
Maintenance Port
9600 bps, 8,N,1,EIA, RS232
Pointing System
Elevation Range
15º to 75º
Azimuth Range
720º
Position Repeatability
0.1º
Environmental
Operating Temperature
-25ºC to +55ºC (-13ºF to +131ºF)
Storage Temperature
-40ºC to +85ºC (-40ºF to +185ºF)
Humidity
to 100 percent
54-0157 Rev. J
A-1
54-0157 Rev. J
.16" (4 mm)
2.36"
(60 mm)
3.19"
(81 mm)
Panel Cutout
3.82"
(97 mm)
.32" (8 mm)
(2.5 mm) dia
2.05"
(52 mm)
3/32"
Switchplate Template
Appendix B
Switchplate Template
B-1
TVR5/R4OM_Cover11.05
®
KVH Europe A/S
KVH Industries, Inc.
50 Enterprise Center Middletown, RI 02842 U.S.A.
Phone: +1 401 847-3327 Fax: +1 401 849-0045
E-mail: [email protected] Internet: www.kvh.com
Kokkedal Industripark 2B 2980 Kokkedal Denmark
Phone: +45 45 160 180 Fax: +45 45 160 181
E-mail: [email protected] Internet: www.kvh.com
KVH® and TracVision® are registered trademarks of KVH Industries, Inc.