1
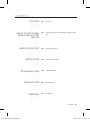
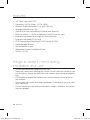
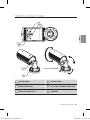
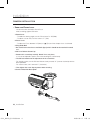
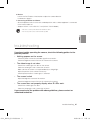
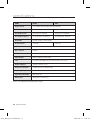
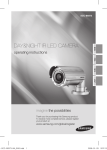
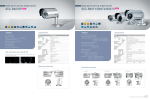
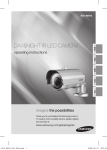
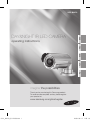
SCC-B9373
operating instructions
FRA
GER
SPA
ITA
1-SCC_B9373_EU-ENG.indd 1
ENG
DAY&NIGHT IR LED CAMERA
imagine the possibilities
Thank you for purchasing this Samsung product.
To receive more complete service, please register
your product at
www.samsung.com/global/register
2008-04-17 오후 1:4
safety precautions
CAUTION
RISK OF ELECTRIC SHOCK.
DO NOT OPEN
CAUTION: TO REDUCE THE RISK OF ELECTRIC SHOCK,
DO NOT REMOVE COVER (OR BACK) NO USER-SERVICEABLE PARTS
INSIDE REFER SERVICING TO QUALIFIED SERVICE PERSONNEL
This symbol indicates that dangerous voltage consisting a risk of electric shock is present
within this unit.
This symbol indicates that there are important operating and maintenance instructions in
the literature accompanying this unit.
WARNING
•
To reduce the risk of fire or electric shock, do not expose this appliance to rain or moisture.
WARNING
1. Be sure to use only the standard adapter that is specified in the specification sheet.
Using any other adapter could cause fire, electrical shock, or damage to the product.
2. Incorrectly connecting the power supply or replacing battery may cause explosion,
fire, electric shock, or damage to the product.
3. Do not connect multiple cameras to a single adapter. Exceeding the capacity may
cause abnormal heat generation or fire.
4. Securely plug the power cord into the power receptacle. Insecure connection may
cause fire.
5. When installing the camera, fasten it securely and firmly. A falling camera may cause
personal injury.
6. Do not place conductive objects (e.g. screwdrivers, coins, metal things, etc.) or
containers filled with water on top of the camera.
Doing so may cause personal injury due to fire, electric shock, or falling objects.
7. Do not install the unit in humid, dusty, or sooty locations.
Doing so may cause fire or electric shock.
8. If any unusual smells or smoke come from the unit, stop using the product.
In such case, immediately disconnect the power source and contact the service
centre. Continued use in such a condition may cause fire or electric shock.
9. If this product fails to operate normally, contact the nearest service centre.
Never disassemble or modify this product in any way. (SAMSUNG is not liable for
problems caused by unauthorized modifications or attempted repair.)
10.When cleaning, do not spray water directly onto parts of the product.
Doing so may cause fire or electric shock.
1-SCC_B9373_EU-ENG.indd 2
2008-04-17 오후 1:4
CAUTION
1. Do not drop objects on the product or apply strong shock to it.
Keep away from a location subject to excessive vibration or magnetic interference.
2. Do not install in a location subject to high temperature (over 122°F), low temperature
(below 14°F), or high humidity. Doing so may cause fire or electric shock.
3. If you want to relocate the already installed product, be sure to turn off the power
and then move or reinstall it.
4. Remove the power plug from the outlet when then there is a lightning.
Neglecting to do so may cause fire or damage to the product.
5. Keep out of direct sunlight and heat radiation sources. It may cause fire.
6. Install it in a place with good ventilation.
7. Avoid aiming the camera directly towards extremely bright objects such as sun,
as this may damage the CCD image sensor.
8. Apparatus shall not be exposed to dripping or splashing and no objects filled with
liquids, such as vases, shall be placed on the apparatus.
9.The mains plug is used as a disconnect device and shall stay readily operable at any
time.
1-SCC_B9373_EU-ENG.indd 3
2008-04-17 오후 1:4
important safety instructions
1. Read these instructions.
2. Keep these instructions.
3. Heed all warnings.
4. Follow all instructions.
5. Do not use this apparatus near water.
6. Clean only with dry cloth.
7. Do not block any ventilation openings.
Install in accordance with the manufacturer’s instructions.
8. Do not install near any heat sources such as radiators, heat registers,
or other apparatus (including amplifiers) that produce heat.
9.
Do not defeat the safety purpose of the polarized or grounding-type plug.
A polarized plug has two blades with one wider than the other.
A grounding type plug has two blades and a third grounding prong.
The wide blade or the third prong is provided for your safety.
If the provided plug does not fit into your outlet, consult an electrician for replacement
of the obsolete outlet.
10.Protect the power cord from being walked on or pinched particularly at plugs,
convenience receptacles, and the point where they exit from the apparatus.
11.Only use attachments/accessories specified by the manufacturer.
12.Use only with cart, stand, tripod, bracket, or table specified by the manufacturer,
or sold with the apparatus.
13.Unplug this apparatus. When a cart is used, use caution when moving the cart/
apparatus combination to avoid injury from tip-over.
14.Refer all servicing to qualified service personnel.
Servicing is required when the apparatus has been damaged in any way,
such as power-supply cord or plug is damaged, liquid has been spilled or objects
have fallen into the apparatus, the apparatus has been exposed to rain or moisture,
does not operate normally, or been dropped.
1-SCC_B9373_EU-ENG.indd 4
2008-04-17 오후 1:4
contents
FEATURES
02
Features
THINGS TO KEEP IN MIND
DURING INSTALLATION
AND USE
02
Things to keep in mind during installation and
use
NAME OF EACH PART
03
Name of each part
INSTALLATION
04
Camera Installation
TROUBLESHOOTING
05
Troubleshooting
SPECIFICATIONS
06
Specifications
DIMENSION
07
Dimension
02
02
03
04
1-SCC_B9373_EU-ENG.indd 1
05
06
07
contents _01
2008-04-17 오후 1:4
features
•
•
•
•
•
•
•
•
•
•
•
•
•
/3” Sony super HAD CCD
1
Resolution: 540TVL (Color), 570TVL (B/W)
Minimum Scene Illumination 0 Lux (with LED On)
IR range Distance up to 70m
Color & B/W Auto switchable by Photocell and Sensitivity
Built-in 6~50mm / F1.6 Day & Night Vary-focal DC Auto Iris Lens
Externally Adjustable Focal Length & Focus with Lever
Externally Adjustable DC Iris Level
CDS Photocell Auto Switching IR- LED Control 42 LEDs
Cable Managed Bracket
Service Monitor Output
Waterproof Outdoor Installation (IP-66)
AC24V / DC12V
things to keep in mind during
installation and use
Do not disassemble the camera on your own.
Always be careful when handling the camera. Do not strike the camera by your
fists or shake it. Please be careful not to be careless when storing and operating it.
• Do not place or operate the camera in any wet environment such as rain or
wet surfaces.
• Do not clean the camera with rough sandpaper. Please always use a dry cloth
when cleaning it.
• Put the camera in a cool area free from direct sunlight. Otherwise, the camera
may be damaged.
•
•
02_ features
1-SCC_B9373_EU-ENG.indd 2
2008-04-17 오후 1:4
name of each part
3
4
ENG
1
2
5
PAN TILT ADJUSTMENT
6
1
ZOOM LEVER
2
FOCUS LEVER
3
RING GUIDE BOLT
4
DC LEVEL VOLUME SCREW CAP
5
SERVICE VIDEO PORT
6
BRACKET
1-SCC_B9373_EU-ENG.indd 3
name of each part _03
2008-04-17 오후 1:4
installation
CAMERA INSTALLATION
• Zoom and Focus Lever
- Loosen the Levers and adjust Zoom/Focus
After controlling, tighten each lever.
1.Zoom Lever
- To widen the viewing angle, turn the “Zoom Lever” to “W”(Wide)
- To obtain a closer view, turn this Lever to “T” (Tele).
2.Focus Lever
- To adjust the Focus between “N” (Near) or “
” (Far) until the sharpest focus is achieved.
3.Ring Guide Bolt
•Be carefull not to lose these small bolts (3pcs) which should not be touched in normal
use.
4.DC Level Volume Screw Cap
• Remove this screw Cap carefully. Retain it in a safe place,
as it must be replaced to protect from water entering the camera body.
• The DC level volume for the adjustment in the screw hole.
- For a bright screen, turn the DC Level Volume slowly towards “H” (counter-clockwise) with the
driver provided.
- For a dark screen, turn it towards “L” (clockwise).
• Then tighten the screw Cap to protect water entering
5.Service Video Port Description
250m
m
04_ installation
1-SCC_B9373_EU-ENG.indd 4
2008-04-17 오후 1:4
6.Bracket
Loosen the Pan/Tilt bolts of the bracket to adjust the camera direction.
In reference to page 3.
7.Connecting to Monitor and Power
-Set the impedance switch to the 75Ω standard position unless a video equipment is connected
to the monitor video out.
- Adaptor: AC24V / 1.5A or DC12V / 1.5A (AC24V / DC12V Model)
• Be sure to connect power after all the installation is done.
• Do not use power sources other than that specified.
ENG
troubleshooting
If you have trouble operating the camera, check the following guides for the
possible problem.
• Nothing appears on the screen.
- Check the power connection and video signal line connection.
- Check the brightness level of DC Auto Iris volume of the camera.
•
The video image is not clear.
- Check if the camera glass has dust on the surface.
Clean the camera glass with a clean cloth or brush.
- Make sure that the screen is not exposed directly to a bright light.
Adjust the position of the camera if necessary.
- Check if protective film of camera glass is removed.
•
The screen is dark
- Adjust the brightness feature of the monitor.
- Check the brightness level of DC Auto Iris volume of the camera.
•
The screen does not properly display when IR LEDs work.
- Check if the camera glass has dust.
- Clean the camera glass with a clean cloth or brush.
If you cannot solve the problem with above guidelines, please contact an
authorized technician.
1-SCC_B9373_EU-ENG.indd 5
troubleshooting _05
2008-04-17 오후 1:4
specifications
ITEM
NTSC
Image Sensor
1/3" Interline transfer type color CCD (SONY)
PAL
Effective Pixels
768H × 494V (380K pixels)
752H × 582V (440K pixels)
Scanning System
525 Lines 2:1 Interlace
625 Lines 2:1 Interlace
Scanning Frequency
15.734KHz (H), 59.94Hz (V)
15.625KHz (H), 50Hz (V)
Resolution
540TVL (Color), 570TVL (B/W)
Shutter Speed
1/60 sec.
S/N Ratio
More than 48dB (AGC Off)
Sync. System
Internal
Min. Illumination
0 Lux with IR-LED (42 pcs)
Video Output
VBS 1.0 Vp-p (75 ohm Load)
Lens
6~50mm Day&Night Vary-Focal DC Auto Iris Lens (F1.6)
Power Supply(*)
AC24V / DC12V ± 10%
Power Consumption
2.5W (LED Off)/ 14.4W (LED On)
Operating Temp.
14˚F~122˚F (-10˚C~50˚C)
Operational Humidity
Max. 90% RH
Dimensions
98mm (Ø) x 162.4mm (L)
1/50 sec.
(*) Must use regulated & specified power supply.
06_ specifications
1-SCC_B9373_EU-ENG.indd 6
2008-04-17 오후 1:4
dimension
ENG
1-SCC_B9373_EU-ENG.indd 7
dimension _07
2008-04-17 오후 1:4
1-SCC_B9373_EU-ENG.indd 8
Correct Disposal of This Product
(Waste Electrical & Electronic Equipment)
(Applicable in the European Union and other European countries with separate
collection systems)
This marking shown on the product or its literature, indicates that it should not be
disposed with other household wastes at the end of its working life. To prevent
possible harm to the environment or human health from uncontrolled waste
disposal, please separate this from other types of wastes and recycle it responsibly
to promote the sustainable reuse of material resources.
Household users should contact either the retailer where they purchased this
product, or their local government office, for details of where and how they can take
this item for environmentally safe recycling.
Business users should contact their supplier and check the terms and conditions
of the purchase contract. This product should not be mixed with other commercial
wastes for disposal.
2008-04-17 오후 1:4