1
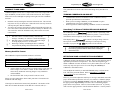
CUDDEBACK™ OWNERS MANUAL Longest Battery Life Thank you for purchasing a Cuddeback™ Digital Camera. To properly use your Cuddeback you must read this manual. Cuddeback Image Storage A Quick Start guide begins on page 5 CAUTION ! ! DO NOT remove or install batteries or a memory card when: “Cam Busy” is displayed on LCD “Picture” is displayed on LCD Images are being displayed on a TV or camcorder Removing or installing batteries or memory card during the above conditions can permanently damage the memory card and render it unusable. Images taken with your Cuddeback camera are stored in Cuddeback’s internal memory or in an optional Compact Flash card. Cuddeback does not include a Compact Flash card. Cards are readily available from most computer/TV stores and some “mart” stores. Your dealer may also carry Compact Flash cards. You can also purchase Compact Flash cards directly from us. Call for availability and pricing. Using Cuddeback without a Compact Flash card When Cuddeback is used without a Compact Flash card images are stored in Cuddeback’s internal image memory. Approximately 20 to 40 images can be saved. (You may get more or less images depending upon the size of the image file. Size of image file is determined by image content. Day time images will be larger than night images). Image resolution is 640 x 480 pixels when Cuddeback is operated without a Compact Flash card. Using Cuddeback with a Compact Flash card When Cuddeback is used with a Compact Flash card images are stored in the Compact Flash card. See page 3 for more information. STAY UP TO DATE Image resolution is 1280 x 1024 when Cuddeback is used with a Compact Flash card. Visit www.cuddebackdigital.com for the latest information and owners manuals for your Cuddeback Digital Camera. Viewing Saved Images You can view and clear images on a TV or camcorder connected to Cuddeback’s video out connector. Viewing images is the same whether images are stored on a Compact Flash card or are saved in internal memory. This method is described latter in this manual. Digital Buck Hunt PHOTO CONTEST We want to see your images and video clips. Email them to [email protected] for automatic entry into our “Digital Buck Hunt”. We will select the best photos & videos and winners could receive a free Cuddeback Digital Camera or other prizes. More details on this contest will be published at www.cuddebackdigital.com. Images and video clips become the property of Non Typical, Inc. Submission grants permission for use. ! Note – this email is for contest entry only. Do not send general correspondence to this email address. Fastest Trigger Time ! Saving Internal Images to a Compact Flash card You can transfer the images stored in internal image memory to a Compact Flash card. Simply insert a Compact Flash card into Cuddeback’s Card Holder (located on right side of Cuddeback), and press the Mode Key numerous times until CAM BUSY appears on the LCD display. The image files will automatically be copied from internal memory to the Compact Flash card. After the images are copied to the Compact Flash card they will automatically be erased from internal memory. ! ! Do not insert or remove a Compact Flash card when • “Cam Busy” is displayed on LCD • “Picture” is displayed on LCD • Images are being displayed on a TV or camcorder Page 2 of 37 ! ! Longest Battery Life Fastest Trigger Time Image Storage on Compact Flash card Images are stored on industry standard Compact Flash cards. Card sizes of 8 MB to 512 MB are readily available at most retailers that sells digital cameras. Images are saved in standard JPG format and are compatible with personal computers, printers, and some digital cameras. Select card sized based upon how many images you wish to save. CARD SIZE 8 MB 16 MB 32 MB 64 MB 128 MB 256 MB 512 MB Longest Battery Life Fastest Trigger Time We recommend using your PC to view, print, email, and archive images. Using 2 Compact Flash cards you can 1) remove the 1st Compact Flash card from Cuddeback, 2) insert your 2nd Compact Flash card into Cuddeback, and then 3) take the 1st card home for image viewing on your PC. By using 2 Compact Flash cards you can leave Cuddeback installed in the field, while you are able to view and archive recorded images at home using you computer and printer. APPROXIMATE NUMBER of IMAGES 25 50 100 200 400 800 1600 Note: Image size will vary greatly with image content. You may be able to save more or less images than shown. Quantity and length of video clips will reduce the number of images that can be saved. Viewing Images 1. 2. 3. 4. 5. 6. Use a portable TV or Camcorder. Attach a standard portable TV or camcorder to Cuddeback’s Video Our Port for image viewing. Your TV or camcorder must have a video in port. Use a TV Viewer. The SanDisk Digital Photo Viewer can be used to view images on your TV; a computer is not required (see www.sandisk.com). Use a compatible camera. Some digital cameras that use Compact Flash cards may be able to view images taken with the Cuddeback Digital Camera. You should have your retailer test the camera before purchasing to assure that the camera will read images taken with your Cuddeback Digital Camera. Use a PC. Using a Compact Flash card reader Cuddeback images can be read by personal computers. You can then email, print, enhance, and archive the images using common PC software. Compact Flash card readers are available at most computer stores, or at www.sandisk.com. Use a printer equipped with an image viewer. Many of the personal printers by Epson, H-P, and others feature built in Compact Flash card readers. These printers can be used to view and print images from your Cuddeback Digital Camera. Video clips can only be viewed using a PC with appropriate software. Quick Time player is installed on many newer PCs. If not installed on your PC, Quick Time player can be downloaded via the internet at no cost (see www.quicktime.com). Page 3 of 37 Page 4 of 37 Longest Battery Life Fastest Trigger Time Quick Start & E-Z Mode Follow these steps to quickly learn to use Cuddeback in its E-Z Operating Mode. STEP 1 – BATTERIES and USER INTERFACE 1) Install batteries. Always use 4 brand new alkaline D cell batteries. We recommend Duracell or Energizer brand batteries only! 2) You may use rechargeable batteries but battery life will be significantly lower. You will need to experiment to determine battery life when using rechargeable batteries. 3) Immediately after batteries are correctly installed, the message [E-Z Mode / Change?] will appear on the LCD display. 4) Do not press any key at this time. In a few seconds the date and time will appear on the LCD display. 5) The Cuddeback features a 2 line 16-character LCD display and 5 pushbutton keys. The keys are: Mode (M), Down (↓), Up (↑), Setup (S), and C Line 1 of LCD display Line 2 of LCD display M ↓ ↑ S C M or Mode Key – Use this key for viewing information. Every time you press the (MODE Key) a different menu will be displayed. S or Setup Key – Use this key to change Cuddeback parameters. Every time you press the (S KEY) a different parameter menu will be displayed. The displayed parameter can be changed by pressing the (UP KEY) or (DOWN KEY). Up/Down Keys – Use these keys to select a new sub-task, change viewed information, or to change a setting. C Key – This key performs a variety of operations depending upon what operation that is being performed. Think of this key as the <Enter> key on a personal computer. “C” indicates Change, Confirm, Clear. Longest Battery Life Fastest Trigger Time STEP 2 – CUDDEBACK SETUP Press the Setup Key (S KEY) to set Cuddeback’s operating parameters. With each press of the (S KEY) a different parameter will be displayed. When a parameter is displayed the (UP KEY) and (DOWN KEY) will change the parameter. 1) Camera Delay a) Camera Delay is the amount of time Cuddeback will wait after taking a photo before it will take another photo. b) Displayed as [Camera Delay] on line 1, with the length of the delay on line 2 (the delay is in minutes). c) Pressing the (UP KEY) or (DOWN KEY) will change the setting. d) The range is 1 minute to 60 minutes. 2) Set Date a) Displayed as [Set Date] on line 1, and the date on line 2. b) Pressing the (DOWN KEY) will increment the month. c) Pressing the (UP KEY) will increment the day. 3) Set Year a) Displayed as [Set Year] on line 1, and the year on line 2. b) Pressing the (DOWN KEY) will decrement the year. c) Pressing the (UP KEY) will increment the year. 4) Set Time a) Displayed as [Set Time] on line 1, and the setting on line 2. b) Pressing the (DOWN KEY) will increment the hour. As the hours change the am/pm indicator will change to indicate an AM or PM hour. c) Pressing the (UP KEY) will increment the minutes. STEP 3 – CONTROLLING CUDDEBACK Press the Mode Key (M KEY) to view images and to control/set Cuddeback’s operating mode. With each press of the (M KEY) one of three mode menus will be displayed, date/time, images, and operating mode. 1) Date / Time - Press the (M KEY) until the date/time is displayed on the LCD display. This is the date and time of Cuddeback’s clock. 2) Images - Press the (M KEY) again. The LCD will display [Cam Busy] as the memory card is read. In a few seconds the LCD will display the Page 5 of 37 Page 6 of 37 Longest Battery Life Fastest Trigger Time number of images saved on the memory card as [Images Saved] on line 1 and the number of images saved on line 2 of the LCD. a) To view images saved on the memory card: i) Attach a TV or camcorder to the Video Out connector on the Cuddeback. See the section TV Requirements for more information about using a TV with your Cuddeback. ii) When [Images Saved] is on the display, press the (UP) or (DOWN KEY) to view the images. As the image is being displayed on the TV the message [Cam Busy] will appear on line 2 of the LCD display. iii) You can continue to view images by pressing the (UP) or (DOWN KEY). iv) Pressing the (M KEY) while viewing images will redisplay the number of images saved on the memory card. b) To clear an image on the memory card: i) To erase the image that is being displayed on the TV, press the (C KEY). The LCD will prompt [Clear Image?] on line 1, and [C = Yes] on line 2. ii) To clear the image press the (C KEY) a second time. To continue without clearing the image, press the (UP), (DOWN), or (M KEY). c) To erase all images on the memory card: i) When [Images Saved] is on the display you can clear all images on the memory card. If [Images Saved] is not on the display, press the (M KEY) until it is. ii) To erase all the images saved on the memory card press the (C KEY). The LCD will prompt [Clear All Images?] on line 1, and [C = Yes] on line 2. iii) To clear all the images press the (C KEY) a second time. To continue without clearing the images, press the (UP), (DOWN) or (M KEY). iv) To prevent accidentally clearing all the images you will be required to enter a password before all the images will be cleared. (1) The LCD will prompt [Enter LPW to Clear All Images] on line 1, and [<0---->] on line 2. (2) The default password in E-Z Mode is 0-0-0-0-0. This is entered by pressing the (UP KEY) four times (you can change this password in Advanced Mode). (3) After the five 0s are entered press the (C KEY) to clear all images. (4) If you do not want to clear all the images press the (M KEY) during any of the above steps. 3) Operating Mode –Using the operating mode you can arm, disarm, and test Cuddeback’s motion/heat sensor. Page 7 of 37 Longest Battery Life Fastest Trigger Time a) Press the (M KEY) until [Standby] appears on the LCD display. b) Press the (UP) or (DOWN KEY) to change the operating mode. There are four selections available: c) Standby – In this mode Cuddeback will not trigger the camera. This state is used when you are programming and viewing images. Cuddeback will automatically activate Live Camera mode if left in the Standby Mode. d) Test Mode – Cuddeback is in test and align mode. In this mode the Cuddeback LED will illuminate when activity is sensed. This mode is used to verify Cuddeback’s detection zone and to assist in aligning Cuddeback to trigger where you desire. Cuddeback will automatically activate Live Camera mode if left in Test Mode. e) Live Mode – Cuddeback is placed in Live Camera mode and will trigger the camera when activity is sensed. It is only in this state that the Cuddeback will trigger the camera. When Live Camera mode is initiated there will be a 45 second delay before the motion sensor starts. This provides you with enough time to replace the battery cover and move away from the camera. The LCD display will clear when the motion sensor activates. f) Cuddeback Disarmed – In this state Cuddeback is off and will not trigger the camera. This mode is useful for transporting the Cuddeback without having Cuddeback trigger the camera. Before disarming the LCD will prompt [C to Disarm]. You must press the (C KEY) to disarm the Cuddeback. The Cuddeback will then prompt [Disarmed]. To rearm Cuddeback press you press the (UP) or (DOWN KEY) to change the operating mode to Standby, Test, or Live Camera as desired. g) If you press the (M KEY) or (S KEY) during any of the above displays, Cuddeback will remain in the operating mode displayed. h) Automatic Operation. To prevent Cuddeback from being left in the field in the wrong mode Cuddeback features automatic operation. About ten minutes after your last key press Cuddeback will automatically activate Live Camera mode. This automatic operation is disabled when Cuddeback is disarmed. STEP 4 – CUDDEBACK IN THE FIELD Installing • • • Attach Cuddeback to a tree with the supplied cable and/or security screw (see figures 1 and 2). Initialize the date/time and camera delay as required (refer to step 2 above). You can check the detection zone using Cuddeback’s test mode (refer to Step 3 above). Page 8 of 37 Longest Battery Life • • Fastest Trigger Time Turn on LIVE MODE (refer to Step 3 above). Replace the Cuddeback’s battery cover and attach a padlock if desired. Longest Battery Life • Use one or both of these methods to attach Cuddeback to a tree This is required to prevent insects from entering through the open holes. STEP 5 – WHAT ELSE TO READ You now should understand the basic operation of your Cuddeback Digital Camera. We recommend that you read the Detailed Instructions beginning on page 12 for more information. After you feel comfortable using the E-Z Operating Mode you can enable ADVANCED Mode which will enable additional features. Once you learn how to use E-Z Mode you will find ADVANCED Mode very similar. However, if EZ Mode accomplishes everything you need, you can continue to use E-Z Mode. This is required to prevent insects from entering through the open holes. When to Use Advance Mode Advanced Mode enables the following additional features you may find beneficial: Checking Cuddeback Remove your padlock and Cuddeback’s battery cover. Press the (C KEY) and wait until the date/time is displayed. Press the (M KEY) to see how many images have been saved on the memory card. You can view and clear the images in the field as described above (refer to Step 3 above). Page 9 of 37 ! ! If you do not use the security screw make sure to install the phillips-head screw. Figure 2: Using the supplied security screw • Do not insert or remove a Compact Flash card when • “Cam Busy” is displayed on LCD • “Picture” is displayed on LCD • Images are being displayed on a TV or camcorder ADVANCED OPERATING MODE Figure 1: Using the supplied security cable • • • Or, you can take your Cuddeback images home by removing the memory card and inserting a second memory card. ! ! If you do not use the security cable you must keep the eye-bolt & wing nut installed. Fastest Trigger Time • • • • • • • • Enable event recording (an event is the date/time of activity that is stored in memory. You can send the events to the Compact Flash card, and subsequently transfer them to a PC). Enable selected time of day operation: day only, night only, or hours of day. Enable password protection. Write your name and phone number into Cuddeback’s memory. Enable recording of video clips. Turn the camera’s flash off or on as desired. Enable time lapse photography. Plus many more features, see Appendix A for details. To enable Advanced Mode: 1) Remove the batteries from Cuddeback 2) Install the batteries 3) When the display prompts [E-Z Mode / Change?] immediately press the (C KEY). Page 10 of 37 Longest Battery Life Fastest Trigger Time 4) The display will prompt [ADV Mode] and then display the date/time. 5) Refer to Appendix A – Cuddeback Advanced Mode for instructions on using the Advanced Mode To re-enable E-Z Mode: 1) Remove the batteries from Cuddeback 2) Install the batteries 3) When the display prompts [ADV Mode / Change?] immediately press the (C KEY). 4) The display will prompt [E-Z Mode] and then display the date/time. Notes on Advanced and E-Z Mode You can use Advanced Mode to program your name, phone number, and password into Cuddeback. After which you can re-enable E-Z Mode and the Cuddeback will remember the name, phone number, and password that you programmed. This allows you to take advantage of Cuddeback’s TheftStop™ Plus system and still take advantage of the simple operation of E-Z Mode. If you elect to do this carefully read the appropriate sections in Appendix A – Cuddeback Advanced Mode before proceeding. In E-Z Mode Cuddeback will automatically set the following parameters: • • • • • Video clip recording will be turned OFF Cuddeback will take pictures 24 hours a day Camera flash is set to AUTO Time Lapse photography is turned OFF Image viewing quality (on TV) is set to HIGH quality If you need to alter any of these settings you will need to operate Cuddeback in ADVANCE Mode. Longest Battery Life Fastest Trigger Time • Cuddeback Detailed Instructions DEFINITIONS & CONVENTIONS Event – an event occurs when Cuddeback™ sees an animal and saves the date and time in Cuddeback’s® electronic memory. The Cuddeback® stores 475 events (events can only be viewed in Advanced Mode). Count – a count occurs when Cuddeback sees an animal and increments an electronic counter. Unlike an event, the date/time is not stored. The Cuddeback® keeps a tally of over 65,000 counts (counts can only be viewed in Advanced Mode). Image – an image is the name used to describe a digital photograph. The events and counts are each cleared separately as described later. Clearing counts does not clear events and vice versa. LCD Display – in this manual the information that is displayed on the LCD will be written as [LCD Display] Keypad – in this manual key pad keys will be written as (KEY) TV – in this manual TV refers to a user supplied TV or camcorder with a built in video-in port that is attached to the Cuddeback’s Video Out connector. An appropriate interface cable will be required (see section TV Requirements for more details). BATTERY SELECTION Cuddeback requires 4 D Cell batteries. Always use BRAND NEW ALKALINE batteries! We recommend Duracell or Energizer brand batteries only. Battery life will vary and is difficult to predict. Always look at the Battery Level Indicator to estimate battery life and replace batteries when the reading is 1. Battery life is primarily a factor of battery quality, temperature, amount of images/videos taken, and amount of time spent viewing the images. You may get 1000 or more images from one set of Duracell or Energizer batteries. Most other brand batteries will not last as long, especially in cold temperatures (battery level is only displayed in Advanced Mode). When you first install batteries the LCD will energize and a message will appear on the LCD display. If this does not happen loosen one D Cell battery and allow it to snap into place. Page 11 of 37 Page 12 of 37 Longest Battery Life Fastest Trigger Time Longest Battery Life COMPACT FLASH CARD CDY_0001.MOV will be the video taken when image CDY_0001.JPG was taken). Cuddeback Digital Camera uses a Compact Flash card to store images and video clips. In addition you can save the events on the card as well. The Compact Flash card is accessed through an opening on the right side of the Cuddeback enclosure. • Install the card by inserting the connector end into the slot. The card will only insert one way so do not force. When the card is correctly inserted it will snap into place. DO NOT FORCE. To remove the card press the small eject button located directly below the card. This button is tucked inside the enclosure and may be difficult to see. You can use the end of the included security cable to better access the release button. • • ! ! ! • • ! ! ! DO NOT remove or install a memory card while the message “Cam Busy” or “Picture” is on the LCD display. DO NOT remove or install a memory card while images are being displayed on a TV or camcorder. Removing a memory card during the above conditions can permanently damage the card and render it unusable. The Cuddeback Compact Flash folder structure is as follows: 1. 2. TURNING CUDDEBACK ON AND OFF • • • Cuddeback does not have an ON/OFF switch. Cuddeback is always powered up when batteries are installed. When you are not using Cuddeback you can DISARM it to place Cuddeback into a low power standby mode. Removing batteries when transporting Cuddeback is NOT recommended. “Cam Busy” & “Picture!” DISPLAYED ON LCD DISPLAY The LCD display shows [Cam Busy] when the camera is performing a task. During this time the camera will not respond to key strokes. You will need to wait until the camera completes its task before you can continue. If the display shows [Picture!] the camera is saving an image. This can take up to 30 seconds for still images and longer if video clips are being recorded. If you press the (C KEY) the picture will be canceled. ! Memory Card File Format \DCIM\100CUDDY \DCIM\101CUDDY \DCIM\102CUDDY \event.txt Fastest Trigger Time 1 First archive directory 1 Event file is saved in the root folder 2 Archive folders are only created if you archive images. Each time you archive images a new folder is created. Archive folder names are consecutively numbered. Archiving images is only available in Advanced Mode. The file EVENT.TXT is only created if events are saved. Images saved are named in the format CDY_0001.JPG. The number will increment with each image. Video clips are named in the format CDY_0001.MOV. The number of the MOV file will match the number of the JPG file it coincides with (i.e. ~ Page 13 of 37 ! DETECTION ZONE & SENSITIVITY ADJUSTMENT Directory of active images Second archive directory To avoid corrupting the memory card, DO NOT remove the memory card or batteries when these messages are on the LCD. Cuddeback can detect an animal up to 100 feet. However, this detection range is dependant upon ambient air temperatures. The cooler the temperatures the farther Cuddeback can sense an animal. In very hot weather (above 80O F) the sensor may only sense up to 20 feet. You can change the sensitivity of Cuddeback’s motion/heat sensor. You can adjust the sensitivity in ADVANCED Mode using a software menu item. This is the preferred method. Refer to Appendix A – Cuddeback Advanced Mode for more information. However, you can also adjust the sensitivity be moving a small black removable jumper located directly below the video out (TV) connector. When this jumper is in the lower position, standard sensitivity is selected. When this jumper is in the upper position, high sensitivity is selected. We recommend leaving the jumper in the lower position. However, in hot weather (above 80O F) you may want to use the upper position to increase detection distances. You may need to Page 14 of 37 Longest Battery Life Fastest Trigger Time Longest Battery Life use a small tweezers to access the jumper. If you lose the jumper your Cuddeback will still function properly with the sensitivity set to standard. If you are getting false detections lower the sensitivity using the jumper or software menu. The built in strobe flash has an effective range of about 30 feet. To assure night images are properly exposed we recommend aiming Cuddeback at a tree 30 to 40 feet away. This will limit Cuddeback’s detection zone to the range of the camera flash and camera lens. Best images will be taken when the animal is 10 to 15 feet from the Cuddeback. INSTALLING CUDDEBACK IN THE FIELD We recommend mounting Cuddeback to the largest tree in the area, about 10 feet from where you expect the animal to appear. Place Cuddeback about 3 to 4 feet off the ground, aiming slightly down. You can use Cuddeback’s Test Mode to verify the detection distance. We strongly recommend using the supplied Torx® screw to secure Cuddeback to a tree. You will need a #25 Torx screwdriver. This assures solid mounting and you will never have to worry about a bear, deer, or vandal knocking Cuddeback off the tree. In addition, the supplied security cable can also be used. We also recommend using a padlock to secure the battery cover – even if you are on private property. This will assure that nobody tampers with your Cuddeback Digital Camera. ! WE STRONGLY RECOMMEND THAT YOU ONLY USE THE TORX SCREW SUPPLIED. ! Using a Torx screw eliminates the possibility of stripping the head. A Phillips head or slotted head screw is very likely to strip and prevent you from removing Cuddeback from the tree. Note: if you do not use the security cable you should still attach the supplied eye-bolt and wing nut to prevent insects from entering Cuddeback. Note: if you do not use the Torx screw, install the supplied Phillips-head screw to prevent insects from entering Cuddeback. FIELD CHECKING CUDDEBACK Page 15 of 37 Fastest Trigger Time There are two methods you can use to field check your Cuddeback camera. Using the a-switch method as described next, or you can follow this method. 1) To check Cuddeback remove the padlock (if installed), loosen the thumb screw, and remove the battery cover. 2) Press (C KEY) to suspend Live Camera mode. The owner name (default is Non Typical, Inc) will scroll across the LCD. You can skip this by pressing the (C KEY). (This text can be changed, refer to the TheftStop section in the Advanced Mode instructions). 3) If you programmed a lock password, you will be required to enter it to access the menu systems. If you fail to enter the correct password, Cuddeback will stop operating. 4) You should press the (M KEY) to determine if any images are saved. 5) If you have images taken, you can either 1) exchange the memory card to view your images at home, or 2) attach a portable TV or camcorder to view images. 6) We also recommend checking the battery level and free memory space (you must be using Advanced Mode to do this). 7) You may want to archive the images to save time viewing images the next time you check Cuddeback (in Advanced Mode only). 8) When you are finished you can 1) attach the battery cover and leave the area; Cuddeback will automatically enter Live Camera mode within ten minutes, or 2) activate Live Camera mode, replace the battery cover, and leave the area. 9) If you want to move Cuddeback to a new location, we recommend disarming Cuddeback to prevent erroneous images from being taken during storage and movement. THE A-SWITCH Cuddeback’s a-switch (short for air-switch) allows you to determine how may images Cuddeback has taken without opening the enclosure. How to Activate the A-Switch The ambient light level is the small center hole on the Cuddeback enclosure. It is surrounded by a small ring that allows you to recognize it by feel. To use the a-switch follow these steps: 1) Place your finger tightly over the a-switch opening for at least 9 seconds. Observe the LED indicator as you do this. 2) The LED will illuminate for 1 second after the light is blocked for 9 seconds. 3) When the LED goes OFF immediately remove your finger. You must remove your finger within ½ second of the light going off for the a-switch to be recognized. Page 16 of 37 Longest Battery Life Fastest Trigger Time Longest Battery Life Fastest Trigger Time 4) If the above two steps are done properly the following will happen: a. The LCD display will display [New ##] on line 1, and [Free ###] on line 2. This indicates the number of images taken since you last checked your Cuddeback, and also indicates the amount of free memory (in Megabytes) that is remaining on the Compact Flash card. b. In addition the Live Camera mode is suspended and Cuddeback will no longer record images. Cuddeback is placed in the Standby mode. 5) If the above does not occur you must repeat steps 1 and 2. a. NOTE: The a-switch was deliberately designed to require a precise procedure to activate. This was done to prevent accidental and unintentional activation. 6) Activating the a-switch again will clear the display and resume Live Camera mode, or you can allow automatic operation to rearm Cuddeback in 10 minutes. best TVs will use a TFT screen (thin-film transistor and will provide a better image. NOTE: The a-switch DOES NOT work in dark and dim light levels! In these situations you must open the enclosure and press a key to determine Cuddeback image status. COMPUTER REQUIREMENTS When to use the A-Switch The a-switch allows you to check Cuddeback without requiring you to enter your password. Using the a-switch you can: 1) Quickly determine if any images were recorded without opening the Cuddeback enclosure. 2) Determine how much memory is available on the Compact Flash card. 3) Exchange Compact Flash cards (of course, you must open the enclosure for this step). 4) Then re-enable Live Camera. TV REQUIREMENTS You can also use a camcorder to view images in the field. You will need: 1) a camcorder with a built in video-in port, 2) a patch cord to attach the camcorder to the Cuddeback’s video–out port. The patch cord must have an RCA jack on one end to attach to Cuddeback, and the opposite cable end must have a connector compatible with the camcorder you have. Most camcorders use an RCA jack for the video-in port. Typically, you will need an RCA to RCA cable. We recommend you bring your Cuddeback to the TV retailer so he can assist in getting you the correct cable. Radio Shack has a selection of cables that will work with your Cuddeback. Images displayed on the TV/camcorder will be at a low resolution. Best image resolution will be obtained on your computer display or on printed images. You can use a personal computer, or PC, or printer to view images saved on Cuddeback’s Compact Flash card. Your computer or printer will require a Compact Flash card reader. Your computer retailer will be able to help you determine what you require. To view the video clips you will need QuickTime® Player installed on your computer. If this software is not installed on your computer you can download it at www.quicktime.com. QuickTime is a trademark of Apple Computer, Inc. CAMERA ERRORS If your Cuddeback encounters an error, a message will be displayed on the LCD display. Card Full You can use a portable TV to view images in the field. You will need: 1) a portable TV with a built in video-in port, 2) a patch cord to attach the TV to the Cuddeback’s video–out port (both are available at Radio Shack and other electronic stores). The patch cord must have an RCA jack on one end to attach to Cuddeback, and the opposite cable end must have a connector compatible with the portable TV you select. We recommend you bring your Cuddeback to the TV retailer so he can assist in getting you the correct cable. Radio Shack has a selection of TVs and cables that will work with your Cuddeback. No Card Memory card is full No card installed CamError Other error Install a different Compact Flash card or delete some images. Install a Compact Flash card. If card is installed, remove it and reinstall it. Press (M KEY), if nothing happens, remove batteries, wait 30 seconds, then reinstall batteries. To clear the error, press the (M KEY) to restart Cuddeback. You will need to enter your password again to allow Cuddeback to re-initialize. When selecting a TV to use keep these things in mind: a bigger screen will provide a better image and allow you to more easily identify animals. Also, the Page 17 of 37 Page 18 of 37 Longest Battery Life Fastest Trigger Time Appendix A: Cuddeback Advanced Mode POWER UP SEQUENCE When batteries are first installed in Cuddeback the following will be displayed: 1) [E-Z Mode / Change?] or [ADV Mode / Change?] will be displayed to reflect Cuddeback’s selected operating mode. Refer to Advanced Operating Mode on page 5 for more information. 2) [Non Typical Inc] You can program your own name to appear on this display. You can bypass this menu by pressing the (C KEY). 3) Password verification occurs next. The display will only appear if you have a password programmed. a. [Enter LPW] i. You will be required to enter a 5 digit password to continue. Reference the TheftStop Plus section of this manual for instructions. ii. When you first turn on Cuddeback a password is NOT programmed so this display will not appear. 4) The date and time is displayed next as described in the next section. MODE KEY FUNCTIONS The mode key is used to view data stored inside the Cuddeback and to control/set the Cuddeback’s operating mode. With each press of the (M KEY) one of four mode menus will be displayed (referred to as Mode:Stats, Mode:Image, Mode:Event, and Mode:Operate). Mode:Stats Longest Battery Life e. Fastest Trigger Time To access additional Mode Key Menus press the (M KEY). 2) New Images a. This is the number of photographs taken since you last checked your Cuddeback camera. This counter is incremented every time Cuddeback triggers a photograph. b. Displayed as [New Images] on the top line, with the number of images on the bottom line. c. This counter is automatically cleared every time Live Camera Mode is activated. 3) Free Memory a. This display shows the available space on the Compact Flash card. b. Displayed as [Free Memory] on the top line, with space in Mega Bytes on the bottom line. 4) Master Counter a. This display is the number of counts Cuddeback has detected. b. Maximum number of counts is over 65,000 c. Pressing the (C KEY) will clear this counter to 0 d. Displayed as [Master Counter] on the top line, with number of counts on the bottom line. 5) Battery Level a. This display shows the battery level of the 4 D Cell batteries. b. Battery level reading is a number 1, 2, 3, or 4 c. Fully charged battery is 4, weak battery is 1. d. Replace your batteries when the reading is 1. e. Displayed as [Battery Level] on the top line, with the level number on the bottom line. The Mode:Stats menu is automatically displayed when Cuddeback energizes the display. You may not have to use the (M KEY) to activate this display. The STATS menu allows you to view various statistic information stored inside the Cuddeback. Press the (UP KEY) or (DOWN KEY) to view a variety of statistical information. 6) Run Days a. This is the number of days the Cuddeback has been operating since the batteries were installed. b. This counter is automatically cleared when batteries are installed in the Cuddeback. c. Displayed as [Run Days] on the top line, with the number on the bottom line. 1) Date/Time a. This is the first menu that is displayed. b. Displayed in the format month/day/year hour/minute, an example display is [03/13/02 11:10 AM]. c. This is the setting of Cuddeback’s internal clock. d. To access additional submenus press the (UP KEY) or (DOWN KEY). 7) Run Images a. This is the number of images the Cuddeback has taken since the batteries were installed. b. This counter is automatically cleared when batteries are installed in the Cuddeback. Page 19 of 37 Page 20 of 37 Longest Battery Life c. Fastest Trigger Time Longest Battery Life Lock Image, Unlock Image, Clear Image, and View in High Resolution. When the desired task is displayed pressing the (C KEY) will cause the task to be performed. Displayed as [Run Images] on the top line, with the number on the bottom line. 8) Lifetime Run Days a. This is the number of days the Cuddeback has been operating since unit was manufactured. b. Displayed as [Lifetime Run Days] on the top line, with the number on the bottom line. c. This counter can never be cleared. 9) Lifetime Images a. This is the number of images the Cuddeback has taken since the unit was manufactured. b. Displayed as [Lifetime Images] on the top line, with the number on the bottom line. c. This counter can never be cleared. b. Lock Image – [Lock Image?] will appear on the top line, and [C = Yes] will appear on line 2. Pressing the (C KEY) will lock this image. Locking the image prevents this image from being erased by the CLEAR ALL IMAGE operation described later. c. Unlock Image – [Unlock Image?] will appear on the top line, and [C = Yes] will appear on line 2. Pressing the (C KEY) will unlock this image. Unlocking the image will allow this image to be erased by the CLEAR ALL IMAGE operation described later. d. Clear Image – [Clear Image?] will appear on the top line, and [C = Yes] will appear on line 2. Pressing the (C KEY) will clear this image. If a video clip was recorded it will also be deleted when you clear the image. e. View in High Resolution – [View in Hi Res?] will appear on the top line, and [C = Yes] will appear on line 2. Pressing the (C KEY) will cause the currently displayed low-resolution image to appear in a higher resolution. If you have HIGH RESOLTION viewing enabled this menu does not appear (see SETUP:CAMERA:VIEWQUALITY for more details). Mode:Images The Mode.Images menus is used to determine the number of images saved, archive images, delete images, and view images on an external TV or camcorder. A TV needs to be attached to Cuddeback’s video-out port using the appropriate cable (see section TV Requirements for more details). 1) Press the (M KEY) until [Images Saved] is displayed on the top line. The number of images saved will be displayed on the bottom line. From this display you can view images or activate submenus (see item 4 later). Fastest Trigger Time 2) Viewing Images a. To view images you must attach a TV or camcorder to the TV port on Cuddeback camera. Use a RCA video cable that is compatible with your TV or camcorder. Refer to the documentation that came with the TV or camcorder for details. b. Press the (UP KEY) or (DOWN KEY) to display images on the TV. c. You can select image options by pressing the (C KEY) as described next. d. Images are displayed in a low-resolution or high-resolution format depending on the global setting Setup:Camera:ViewQuality (see ViewQuality later in this manual for more details). 4) Images Saved Submenus: a. Submenus allow you to Clear All Images, Archive Images, or View Images i. When [Images Saved] is being displayed you can access the submenus by pressing the (C KEY). If [Images Saved] is not displayed press the (M KEY) until it is. ii. Press the (UP KEY) or (DOWN KEY) to select the appropriate submenu. iii. Press the (C KEY) again to perform the desired submenu action. 3) Viewing Image Options a. When viewing images you can select three or four optional tasks by pressing the (C KEY). Then you select one of these tasks by pressing the (UP KEY) or (DOWN KEY). These options are 5) Archive Images a. This task allows you to save all images to an archive folder on the Compact Flash card. When Cuddeback records an image it is saved in the folder \DCIM\CUDDY100. This task will move all images in the \DCIM\CUDDY100 to a new folder named Page 21 of 37 Page 22 of 37 Longest Battery Life Fastest Trigger Time \DCIM\CUDDY101. The images in the folder \DCIM\CUDDY100 will be erased. This task allows you to archive images after viewing them. Doing this will speed access to images and prevent having to scroll through previously viewed images to view new images. b. CAUTION: Once images are archived you CAN NOT view them with Cuddeback. The only way to retrieve these images is with a Personal Computer. c. Each time images are archived a new folder is generated; they will be named CUDDY101, CUDDY102, etc. This becomes a very effective way to separate images as you move Cuddeback from place to place and acquire images over time. d. This submenu will be displayed as [Archive Images?] on line 1, and [C = Yes] on line 2. To perform this task press the (C KEY). To cancel the task press any other key, or press the (UP KEY) or (DOWN KEY) to go to the next submenu. e. To prevent accidental activations of this task you will be required to enter your lock password to complete the archive task. The display will prompt [Enter LPW to Archive Images] on line 1, and <0 > on line 2. f. To archive the images enter your lock password as described in the section TheftStop Plus, Password Entry. If you make a mistake when entering the password or press a wrong key this task will be cancelled. 6) Clear All Images a. This task allows you to erase all images in the active image folder \DCIM\CUDDY100. b. CAUTION: Once images are cleared you CAN NOT recover them! c. This submenu will be displayed as [Clear All Images?] on line 1, and [C = Yes] on line 2. To perform this task press the (C KEY). To cancel the task press any other key, or press the (UP KEY) or (DOWN KEY) to go to the next submenu. d. To prevent accidental activations of this task you will be required to enter your lock password to complete the Clear All operation. The display will prompt [Enter LPW to Clear ALL Images] on line 1, and <0 > on line 2. e. To clear the images enter your lock password as described in the section TheftStop Plus, Password Entry. If you make a mistake when entering the password or press a wrong key this task will be cancelled. Page 23 of 37 Longest Battery Life Fastest Trigger Time Mode:Event The Mode:Event menu displays events stored in Cuddeback. An event is the date/time activity was sensed. You can clear individual events, all events, or save events to the Compact Flash card. 1) When the MODE KEY is pressed Cuddeback will display the number of events saved. a. Displayed as [Events Saved] on the top line, with the number of events saved on the bottom line. b. From this display you can activate 2 submenus as follows: i. Press the (C KEY) to access the submenus ii. Press the (UP KEY) or (DOWN KEY) to select the appropriate submenu iii. To perform the desired submenu action press the (C KEY) c. Submenu 1: Save Events to Memory Card i. This task allows you to save all the events to the Compact Flash card in a format that will allow you to view the events on a personal computer. The file name is EVENT.TXT and is located in the Compact Flash card’s root folder. ii. Displayed as [Save All Events?] on line 1, and [C = Yes] on line 2 iii. If you press the (C KEY) the events will be written to the Compact Flash card. See the appendix for a file description and how the file is formatted. iv. If you do not want to save the events to the Compact Flash card you can press the (UP KEY) or (DOWN KEY) to display the next submenu, or press the (M KEY) or (S KEY). v. If an EVENT.TXT file is not already on the Compact Flash card this file will be created. If this file already exists the new events will be appended to the file. vi. Maximum file size is about 1 MB. vii. You can open this file with a text editor (Notepad) or a spreadsheet program (Excel). viii. To erase this file you must use your computer or the Format Card command discussed on page 33 in this manual. d. Submenu 2: Clear All Events i. This menu allows you to clear all the events. Page 24 of 37 Longest Battery Life Fastest Trigger Time ii. Displayed as [Clear All Events?] on line 1, and [C = Yes] on line 2 iii. If you press the (C KEY) the events will be cleared. iv. If you do not want to clear all the events press any other key. 2) Viewing Events a. Events can be viewed from the [Events Saved] display be pressing the UP KEY or the DOWN KEY. b. Events are displayed in the following format: i. Top line of display will show [Event <number>] for a few seconds, then switch to show the date of the event. ii. Bottom line of the display will show the time of the event. iii. To clear this events press the (C KEY). As an event is being cleared a progress counter will be displayed, you must wait until this is finished before you can perform additional operations. Depending upon the number of events saved it can take up to 45 seconds to clear an event. iv. To display the next event press the (UP KEY). v. To display the previous event press the (DOWN KEY). vi. Pressing and holding the (UP KEY) or (DOWN KEY) will advance the displayed event by 10. This allows you to rapidly access events. vii. To return to the [Events Saved] display press the (M KEY). Mode:Operate Longest Battery Life Fastest Trigger Time 3) Live Mode – Cuddeback is placed in Live Camera mode and will trigger the camera when activity is sensed. It is only in this state that the Cuddeback will save events and trigger the camera. Line 2 of the LCD will display the programmed camera mode as either Motion, TimeLpse, or Both. (Refer to the section Setup, Camera Mode for details on the camera operating mode). When Live Camera mode is initiated there will be a 45 second delay before the motion sensor activates. This provides you with enough time to replace the battery cover and move away from the camera. The LCD display will clear when the motion sensor activates. You can force the LCD display to clear by pressing the (C KEY). 4) Cuddeback Disarmed – In this state Cuddeback is effectively off and will not trigger the camera. This state is useful for transporting the Cuddeback without having Cuddeback trigger the camera or store events. Before disarming the LCD will prompt [C to Disarm]. You must press the (C KEY) to disarm the Cuddeback. The Cuddeback will then prompt [Disarmed]. To rearm Cuddeback press you press the (UP) or (DOWN KEY) to change the operating mode to Standby, Test, or Live Camera as desired. If you press the (M KEY) or (S KEY) during any of the above displays, Cuddeback will remain in the operating mode displayed. Automatic Operation. To prevent Cuddeback from being left in the field in the wrong state Cuddeback features automatic operation. About ten minutes after your last key press Cuddeback will automatically activate Live Camera mode. This automatic operation is disabled when Cuddeback is disarmed. Cuddeback has four operating modes: STANDBY, TEST, LIVE CAMERA, or DISARMED. Pressing the (UP KEY) or (DOWN KEY) will cycle through the various operating states. 1) Standby On – In this mode Cuddeback will not trigger the camera. This state is used when you are programming and viewing events. Cuddeback will automatically activate Live Camera mode if left in the Standby Mode. 2) Test Mode – Cuddeback is in test and align state. In this mode the Cuddeback LED will illuminate when activity is sensed. This state is used to verify Cuddeback’s detection zone and to assist in aligning Cuddeback to trigger where you desire. Cuddeback will automatically activate Live Camera mode if left in the Test Mode. Page 25 of 37 Page 26 of 37 Longest Battery Life Fastest Trigger Time SETUP KEY FUNCTIONS Longest Battery Life Fastest Trigger Time The (S KEY) is used to alter Cuddeback operating parameters. With each press of the (S KEY) a different parameter will be displayed. When a parameter is display the (UP KEY) and (DOWN KEY) will change the parameter, the (C KEY) can be used to restore the previous setting. 4) Set Date a) Displayed as [Set Date] on the top line, and the date on the bottom line. b) Pressing the (DOWN KEY) will increment the month. c) Pressing the (UP KEY) will increment the day. d) Pressing the (C KEY) will restore the previous setting 1) Camera Delay a) Camera Delay is the amount of time Cuddeback will wait after taking a photo before it will take another photo. b) Displayed as [Camera Delay] on the top line, with the length of the delay on line 2 (the delay is in minutes). c) Pressing the (UP KEY) or (DOWN KEY) will change the setting. d) The range is 1 minute to 60 minutes. e) Pressing the (C KEY) will restore the previous setting. 5) Set Year a) Displayed as [Set Year] on the top line, and the year on the bottom line. b) Pressing the (DOWN KEY) will decrement the year. c) Pressing the (UP KEY) will increment the year. d) Pressing the (C KEY) will restore the previous setting. 2) Event Delay a) Event Delay is the amount of time Cuddeback will wait after recording an event before it will record another event. b) Displayed as [Event Delay] on the top line, with the length of the delay on line 2 (the delay is in minutes or seconds). c) Pressing the (UP KEY) or (DOWN KEY) will change the setting. d) The range is 5 seconds to 60 minutes. The “sec” or “min” indicates if the delay is in minutes or seconds. e) Pressing the (C KEY) will restore the previous setting 3) Camera Window a) The Camera Window allows you to program the time of day you want the camera to trigger. You can program ALL DAY, DAY ONLY, NIGHT ONLY, or SELECTED HOURS. b) Displayed as [Camera Window] on the top line, and the setting on the bottom line. c) The bottom line will display either: i) [All Day] when the camera will trigger 24 hours a day. ii) [Dark Only] when the camera will trigger only in darkness. iii) [Day Only] when the camera will trigger only in day light. iv) The selected hours will be displayed in the form [<on hour> > <off hour>] d) Pressing the (DOWN KEY) will increment the <on hour>. e) Pressing the (UP KEY) will increment the <off hour>. f) When the <on hour> is the same as <off hour> the camera is set to trigger 24 hours a day and the display will show [All Day]. g) To enable [Dark Only] or [Day Only] press the (UP KEY) or (DOWN KEY) numerous times until the desired setting is displayed. h) Pressing the (C KEY) will restore the previous setting Page 27 of 37 6) Set Time a) Displayed as [Set Time] on the top line, and the setting on the bottom line b) Pressing the (DOWN KEY) will increment the hour. As the hours change the am/pm indicator will change to indicate an AM or PM hour. c) Pressing the (UP KEY) will increment the minutes. d) Pressing the (C KEY) will restore the previous setting. 7) Camera Setup. This menu allows you to control various operating parameters related to the camera and picture taking process. The display will show [Camera Setup?] on line 1, and [C=YES] on line 2. Press the (C KEY) to advance to these menus as described next. After you press the (C KEY) pressing the (S KEY) will advance to the next submenu. To skip these menus press the (S KEY). The submenus all work the same: press the (UP KEY) or (DOWN KEY) to change the setting. Press the (C KEY) to restore the previous setting. Press the (S KEY) to advance to the next menu. The menus are described next. a) Camera Mode – This selects Cuddeback’s operating mode. You can select Motion, Time Lapse, Both. i) Motion – Cuddeback will activate the camera when it senses an animal/person with its motion sensor. ii) Time Lapse – Cuddeback will activate the camera on a time lapse interval. In this mode the motion sensor is not used. (See section Time Lapse Photography for more information). iii) Both – Cuddeback will activate the camera when it senses an animal and on the programmed time lapse interval. Page 28 of 37 Longest Battery Life Fastest Trigger Time Longest Battery Life b) Time Lapse Interval – This is the duration between photos in hours. The range is 1 hour to 96 hours (4 days) in increments of 1 hour. This menu will only be displayed if Time Lapse is turned on. c) e) View Quality – This setting controls how images are displayed on an external TV that is attached to Cuddeback’s video-out port. Choices are Standard and High. i) Standard – When Standard view quality is selected images are displayed very fast, but at a very low resolution. This allows you to scroll through images very fast. If you have an image that you would like to see in high resolution you can use the image view command to display the current displayed image in high resolution. We recommend using the Standard setting. ii) High – When High view quality is selected images are displayed at a high resolution, but at a slower rate. This allows you to get a better look at the images, but it will require more time to view images. NOTE: Images viewed on a TV are lower quality then when viewed on a PC. f) i) Off – Video clip will not be recorded. ii) On – Video clips will be recorded when there is ample ambient light to do so. Video clips will NOT be recorded in darkness. iii) On+Light – Video clips will be recorded, and if there is not sufficient light the L-Port will energize to activate an external video light source. A Cuddeback Video Light will be available in 2005. Time Lapse Start Hour – This is the start time hour you want the time lapse sequence to start. The range is 12AM to 12PM and NextHour. This menu will only be displayed if Time Lapse is turned on. (See section Time Lapse Photography for more information). d) Flash Mode – This selects if you want to utilize Cuddeback’s built in strobe flash. You can select Auto or Off i) Auto – Cuddeback will use the flash if needed. Essentially, if it is dark the flash will be used, if there is ample ambient light the flash will not be used. This is the recommended setting. ii) Off – Cuddeback will NOT use the flash. Daylight images will be taken, however, images that require the flash will NOT be taken. Video Mode – This will enable the recording of video clips. Choices are Off, On, On+Light. If you choose to record video clips you will still record a still image. Cuddeback is unique in that it is the only (that we know of) digital camera that will simultaneously record a still image and a video clip! Note: You CAN NOT view video clips in the field. Video clips can only be viewed with a personal computer and appropriate software. See section COMPUTER REQUIREMENTS for more information. Page 29 of 37 Fastest Trigger Time g) Video Time – This selects the length of the video clips. The range is from 10 seconds to 60 seconds. 8) TheftStop Setup TheftStop Plus is a simple to use security system for your Cuddeback Digital Camera. It features Password Protection and Electronic Branding of your name and phone number into Cuddeback’s electronics. In addition, the text you program into the Owner Name is written onto the image. Password Protection prevents an unauthorized person from using your Cuddeback. Cuddeback features two passwords, an owner password and a lock password. Having 2 passwords allows you to let a friend use your Cuddeback camera, yet you prevent them from altering your passwords or changing the owner name and phone number. This is accomplished by telling your friend your Lock Password only, do not tell them your Owner Password! Owner Password – this password is required to 1) program/change the lock password, 2) program/change the owner name, and 3) program/change the owner phone number. When shipped from the factory this password is 00000 (five zeros). If you do not change the owner password, you will still need to enter the 5 zeros when required. Lock Password – if enabled, this password is required to 1) unlock Cuddeback, and 2) activate various commands (clearing all images, Formatting the Compact Flash, archiving images). When shipped from the factory this password is 00000 (five zeros). When the lock password is 00000 the Unlock Cuddeback feature is disabled (you will not be prompted to enter a password to use your Cuddeback). Unlock Cuddeback. When the Cuddeback LCD display first energizes you will be required to verify Cuddeback’s password. If the Lock Password is not entered correctly Cuddeback will cease to operate. This unlock operation will be required when you check your Cuddeback in the field. ! Note – The first time you program an Owner Password you must enter the default password of <00000>. Page 30 of 37 ! Longest Battery Life ! ! ! Fastest Trigger Time The first time you program an Owner Password you must enter the default password of <00000>. If you do not change the Owner Password you must still enter the default password of <00000> to change the Lock Password, Owner Name, and Owner Phone Number. Always write your passwords down and keep them in a safe place. Longest Battery Life ! ! ! Entering a Password using the Keypad– When prompted to enter a password follow these procedures. Note: that on the LCD display LPW refers to Lock Password, and OPW refers to Owner Password. 1) When you are prompted for a password, line 2 of the LCD will display [<0 >]. Passwords consist of five digits. 2) To enter a password follow these steps. (Do not change any password until after you clearly understand the TheftLock system as explained in this manual). a) To increment the right most displayed digit (0 in the above example) press the (DOWN KEY). b) After correctly setting the right most digit, you advance to the next digit by pressing the (UP KEY). A 0 will appear to the right of the last entered digit. This digit can be incremented by pressing the (DOWN KEY). c) Repeat the above two steps until all 5 digits are entered. d) When all 5 digits are entered pressing the (C KEY) will cause this password to be programmed into Cuddeback. e) To cancel entering a password you can press the (M KEY) or (S KEY) at any time before you press the confirmation (C KEY) as describe in step d. f) The message [Saved!] will appear on the LCD if you have programmed a password correctly. Press the (S KEY) to continue. Entering the Owner Name and Phone Number using the Keypad – The procedures for entering your name and phone number are similar. When prompted to enter your user name or phone number follow these procedures. 1) When you are required to enter the user name or phone number the LCD display will clear with only the first digit displayed. If you are entering your name an “A” will be displayed, if you are entering your phone number, the “(”character will be displayed. 2) To enter the characters follow these steps. a) To increment the right most displayed digit press the (DOWN KEY). Page 31 of 37 Fastest Trigger Time b) After correctly setting the right most digit, you advance to the next digit by pressing the (UP KEY). This digit can be incremented by pressing the (DOWN KEY). c) Repeat the above two steps until the required digits are entered. You can enter up to 16 characters. d) When you are finished, pressing the (C KEY) will cause the displayed characters to be programmed into Cuddeback. You only need to enter as many characters as required; you DO NOT need to enter all 16 characters. e) To cancel entering characters and cancel this operation press the (M KEY) or (S KEY) at any time before you press the confirmation (C KEY) as describe in step d. f) The message [Saved!] will appear on the LCD if you have programmed the owner name and phone number correctly. Press the (S KEY) to continue. There are 4 menus for setting up TheftStop Plus protection. They all work about the same, with just different data being entered. Follow these steps for each menu that you want to change: a) The LCD display will show text on line 1, and [Change?] on line 2. b) Press the (C KEY) if you want to change this setting. You can press the (S KEY) to advance to the next menu without changing this setting. c) The LCD display will clear and you can begin entering information as described above. d) The 4 menus items are: i) Owner Password – LCD line 1 will display [Owner PW], line 2 will show [Change?]. ii) Lock Password – LCD line 1 will display [Lock PW], line 2 will show [Change?]. iii) Owner Name – LCD line 1 will display [<the programmed name>], line 2 will show [Change?]. iv) Owner Phone Number – LCD line 1 will display [<the programmed phone number>], line 2 will show [Change?]. e) Before you change any of the above 4 items you will first have to press the (C KEY), and then you will be prompted to enter the Owner Password. You must enter the correct owner password to change these setting. The default owner password is 00000 (five zeros). f) When you enter a password, name, or phone number correctly, the message [Saved!] will appear on the LCD . Press the (S KEY) to continue. Page 32 of 37 Longest Battery Life Fastest Trigger Time 9) Utiltities – These menus are used for special tasks. Use the (S KEY) to advance through the tasks. a) Unit ID i) The Unit ID number allows you to program an identification number into your Cuddeback Digital Camera. This allows you to identify each unit. Numbers from 1 to 99 can be entered. ii) Displayed as [Unit ID] on the top line, and the setting on the bottom line. iii) Pressing the (DOWN KEY) will decrement the ID number. iv) Pressing the (UP KEY) will increment the ID number. v) Pressing the (C KEY) will restore the previous setting. b) Motion/Heat Sensor Sensitivity i) You can change the sensitivity of Cuddeback’s motion/heat sensor. This allows you to optimize Cuddeback for various conditions and requirements. ii) Displayed as [Sense Level] on the top line, and the setting of [Low], [Standard], [High], or [Auto] on the bottom line. iii) Press the (UP KEY) or (DOWN KEY) to select the appropriate level. iv) We recommend that you use Standard level for most situations. However, in hot weather High level can be used to extend detection distances. Low level can be used to reduce detection distance to help keep night photos within the range of the flash. v) Auto level will program Cuddeback to automatically change the sensitivity level for day or night activity. During daylight standard sensitivity is used. During dark periods low sensitivity is used. This limits Cuddeback’s detection range to the distance of the camera’s flash. c) Take a Picture – This command allows you to manually trigger an image in either a delayed timer mode, or instantly. i) Delayed Timer Photo. Pressing the (C KEY) will start the time delay, the LED will begin to flash and in about 20 seconds the image will be taken. This provides time for you to put yourself in the photo. This feature can be used to photograph yourself with your trophy. ii) Instant Photo. Pressing the (C KEY) twice will cause Cuddeback to instantly take a photo. d) Format Card – This command allows you to format the Compact Flash card. This will completely erase all files from the Compact Flash card. CAUTION: ONCE FILES ARE ERASED THEY CAN NEVER BE RECOVERED! You will be required to enter your Lock Password to complete this task. Page 33 of 37 Longest Battery Life e) Fastest Trigger Time Diagnostics – This display diagnostic information that you and our technical staff can use to troubleshoot your Cuddeback and to verify the camera is operating correctly. The display shows a variety of data as described here: M – motion sensor field B – battery level field A – ambient sensor field Day & Flash indicators The motion sensor field is a 3 digit number that will change as activity is sensed. A reading around 125 indicates no activity, readings above and below 125 indicates activity. The ambient sensor field is a 3 digit number that indicates the amount of ambient light – 0 indicates dark and 255 indicates full light. The battery level field is a 3 digit number that indicates the condition of the batteries, the larger the number the stronger the batteries. Range is 0 to about 200. The day & flash indicators will display a “D” if it is day light and an “F if the flash is charged. 10) Model Number and Version Display – This display shows the Cuddeback model number on line 1 of the display, and the model version on line 2. TIME LAPSE PHOTOGRAPHY Cuddeback Digital Camera allows you to do time lapse photography; the camera will automatically take images at the desired interval. This can be used to take daily images of a construction project (building a house), or to take images of a food plot. Cuddeback can automatically take an image every day of your food plot, at the time you specify. For example, every day you take an image at 3 in the afternoon. This allows you to record the growth and utilization of the plants. In addition, by using Cuddeback’s Camera Window feature you can take images in a wide variety of ways. The Time Lapse images will be controlled by the Camera Window, here’s some examples that will help clarify this: 1) Take images twice a day during daylight hours, at 9 AM and 3 PM: a. Program the Time Lapse Interval to 6 hours b. Program the Time Lapse Start Hour to 9 AM or 3 PM c. Program the Camera Window to < 08AM to 04 PM >. This will prevent Cuddeback from triggering images at the night hours of 9 PM and 3 AM. Page 34 of 37 Longest Battery Life Fastest Trigger Time 2) Take images every other day at noon: a. Program the Time Lapse Interval to 48 hours b. Program the Time Lapse Start Hour to 12PM c. Program the Camera Window to <All Day> 3) Take images every 2 hours all day long: a. Program the Time Lapse Interval to 2 hours b. Program the Time Lapse Start Hour to <Next Hour> c. Program the Camera Window to <All Day> When you have Time Lapse enabled you can select to enable or disable motion activated images using the Camera Mode setting. Select <TimeLapse> to disable the motion activated images, select <Both> to enable Time Lapse and motion activated images. Longest Battery Life Fastest Trigger Time APPENDIX B: CUDDEBACK™ SPECIFICATIONS Image Sensor: Full color Micron CMOS sensor with 1.3 Million Pixels (1280 1024) Lens: Sunnex all glass multi-element, aperture equivalent to F3.5, focal length equivalent to 44mm Flash: 1.5 inch flash tube with 25 foot range Media: Compact Flash cards, 8 MB to 512 MB available Image Format: EDIF 2.2 JPEG files on PC file system1 Video: 320 x 240 pixels at 4 frames per second, QuickTime *.MOV file format Data Imprinting: Owner’s name2 and image date/time printed on images Activity Sensor: PIR motion/heat sensor with 8 sensitivity settings for animal detection distance up to 100 feet Camera Delays: 1 minute to 1 hour in 1 minute increments Operation Time: all day, day only, night only, user selected hours Time Lapse Operation: automatic time lapse images with delay between images selectable from 1 hour to 96 hours. User can also program what hour the time lapse sequence will start. Event Recording: records event activity (date/time), 475 events with user selectable delay from 5 seconds to 1 hour. Event Archiving: Events can be saved to memory card in a comma delimited ASCII text file for reading by PC spread sheet software. Battery Requirements: 4 D Cell batteries will record up to 1500 images. Features battery level readout, low battery warning, and battery fail shutdown. User Interface: 16 character (2 line by 8) LCD display and 5 position keypad. Video Out Port: NTSC compatible with RCA jack for image viewing O O Recommended Operating Temperature: 0 to 100 F Recommended Operating Humidity: 5% to 90% non-condensing 1 Images can be read by PCs with appropriate Compact Flash card reader User can program 16 characters that will print on image. We recommend this be the owner’s name. 3 Battery life estimate; actual battery life will vary depending upon battery quality, camera usage, temperature and other factors. 2 Cuddeback is protected by United States patent number 6,744,980 Page 35 of 37 Page 36 of 37 Longest Battery Life Fastest Trigger Time WARRANTY & SERVICE Cuddeback is warranted for one (1) year. If during normal use the product becomes defective in material or workmanship, Non Typical, Inc. will repair or replace the product at our option. This warranty gives you specific legal rights and you may also have rights, which vary from state to state. Disassemble, improper use, or abuse voids this warranty. If your Cuddeback requires technical service or repairs please call Non Typical at (715) 762-2039, do not contact your dealer. RETURN INSTRUCTIONS ! ! ! You must call our technical service department before returning your Cuddeback Digital Camera. Returning a camera without first calling will significantly delay service! For service call (715) 762-2039 ! ! ! 1) For service call Non Typical at (715) 762-2039 during our normal business hours of M~F 7:00 AM to 3:30 PM. During the months August thru December service hours are extended to M~F 7 AM to 5 PM. 2) If you are instructed to return the item you will be given an RMA number. This number must be written on the outside of the shipping carton. Packages without an RMA number will incur a significant processing delay. 3) If your Cuddeback is out of warranty an estimate will be mailed to you before repairs are completed. 4) During the off-season please allow 2 weeks for repairs. During the hunting season please allow additional time for repairs. 5) Ship your equipment in a sturdy carton with plenty of packaging. Place packing material (newspaper, foam, etc) around your equipment. We are not responsible for products damaged due to ineffective packaging. Do not include batteries unless instructed by the technician. 6) For warranty repair you MUST include a copy of your dated sales receipt. Non Typical, Inc. 860 Park Lane, Park Falls, WI 54552 Phone (715) 762-2260 - Fax (715) 762-2719 www.cuddebackdigital.com Page 37 of 37