1
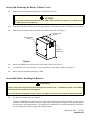
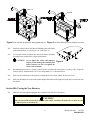
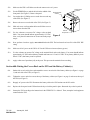
TIP 755
24
January 20, 1997
Replacing the Batteries in FERRUPS
FE and QFE 10, 12.5, and 18 KVA
This Technical Information Publication (TIP) describes the procedure for replacing the batteries in FERRUPS FE and QFE
10, 12.5, and 18 KVA units. A qualified service person familiar with the FERRUPS unit must install the batteries. If you
encounter any problems during this procedure, call Best Power Worldwide Service at 1-800-356-5737 (U.S. and Canada only),
1-608-565-2100, or call your local Best Power office.
Tools Needed — Use Insulated Tools:
Phillips Screwdriver
True RMS Voltmeter
Standard Screwdriver
Torque Wrench
Electrical Tape
Petroleum Jelly or Battery Terminal Spray
3/8- and 7/16-inch Open-end Wrenches
Safety Equipment Required by Local Codes
CAUTION!
This procedure must be performed by qualified service personnel ONLY! FERRUPS units are designed to provide power
under a variety of operating conditions. Dangerous voltages may be present even if AC line or DC voltage is removed.
TEST BEFORE TOUCHING!
Turn off the FERRUPS according to the procedure describing “How (and When) to Shut Down Your FERRUPS” in the
FERRUPS User Manual (Section 308). Make sure that the FERRUPS batteries and the AC input are off or disconnected
before you replace the batteries.
This unit contains electrostatic-sensitive devices. If you do not follow proper ESD procedures, you may cause
severe damage to the electrical circuitry.
FERRUPS batteries are high current sources. Shorting battery terminals can cause severe arcing, equipment damage,
and injury. A short circuit can cause a battery to explode.
Best Power recomments the following for qualified service personnel servicing the FERRUPS unit:
A)
Remove rings, watches, and other jewelry before servicing the FERRUPS unit.
B)
Always wear protective clothing and eye protection and use insulated tools when working near batteries.
C)
Whenever servicing an energized unit with the doors open, electric shock is possible; follow all local safety
codes.
Section 100: Removing the Battery Cabinet Covers . . . . . . . . . . . . . . . . . . . . . . . . . . . . . . . . . . . . . . . . . . . . . . . . . . . . . .
Section 200: Before Installing the Batteries . . . . . . . . . . . . . . . . . . . . . . . . . . . . . . . . . . . . . . . . . . . . . . . . . . . . . . . . . . . .
Section 300: Removing the Batteries . . . . . . . . . . . . . . . . . . . . . . . . . . . . . . . . . . . . . . . . . . . . . . . . . . . . . . . . . . . . . . . . .
Section 400: Replacing the Batteries . . . . . . . . . . . . . . . . . . . . . . . . . . . . . . . . . . . . . . . . . . . . . . . . . . . . . . . . . . . . . . . . .
Section 500: Testing the New Batteries . . . . . . . . . . . . . . . . . . . . . . . . . . . . . . . . . . . . . . . . . . . . . . . . . . . . . . . . . . . . . . .
Section 600: Putting the Covers Back on the UPS and the Battery Cabinet(s) . . . . . . . . . . . . . . . . . . . . . . . . . . . . . . . . .
LPT-0755B
Copyright 1997, Best Power. All rights reserved.
3
3
4
4
5
6
RESTRICTED
IMPORTANT SAFETY INSTRUCTIONS - SAVE THESE INSTRUCTIONS
CAUTION!
Full voltage and current are always present at the battery terminals. The batteries in this system can produce
dangerous voltages, extremely high currents and a risk of electric shock. Batteries may cause severe injury if the
terminals are shorted together or to ground (earth). You must be extremely careful to avoid electric shock and burn
caused by contacting battery terminals or shorting terminals during battery installation. Do not touch uninsulated
battery terminals.
A qualified electrician who is familiar with battery systems and required precautions must install and service the
batteries. Any battery used with this UPS shall comply with the applicable requirements for batteries in the
standard for emergency light and power equipment, UL 924. Cabinets are designed to be used with, and batteries
must be replaced with, Best Power battery number BAT-XXXX or equivalent. The installation must conform to
national and local codes as well. Keep unauthorized personnel away from batteries.
The electrician must take the following precautions:
1. Wear protective clothing and eye wear. For 120-volt battery systems, wear rubber gloves and boots. Batteries
contain caustic acids and toxic materials and can rupture or leak if mistreated. Remove rings and metal
wristwatches or other metal objects and jewelry. Don't carry metal objects in your pockets where the objects
can fall into the battery cabinet.
2. Tools must have insulated handles and must be insulated so that they will not short battery terminals. Do not
allow a tool to short a battery terminal to another battery terminal or to the cabinet at any time. Do not lay tools
or metal parts on top of the batteries, and do not lay them where they could fall onto the batteries or into the
cabinet.
3. Install the batteries as shown on the drawing provided with the batteries. When connecting cables, never allow
a cable to short across a battery's terminals, the string of batteries, or to the cabinet.
4. Align the cables on the battery terminals so that the cable lug will not contact any part of the cabinet even if the
battery is moved. Keep the cable away from any sharp metal objects.
5. Install the battery cables so they cannot be pinched by the battery cabinet or UPS doors.
6. Make sure the fuse is positioned so that it will not contact any cabinet parts or other battery posts if the batteries
should move. Make sure that there is enough clearance when the cabinet door closes.
7. Battery cabinet chassis (ground or earth) must be connected to the UPS chassis (ground or earth). If you use
conduit, this ground conductor must be routed in the same conduit as the battery conductors.
8. Where conductors may be exposed to physical damage, protect the conductors in accordance with NEC NFPA
70.
9. If you are replacing batteries or repairing battery connections, follow the procedure in the FERRUPS User
Manual to shut off the UPS and remove both AC and DC power.
TIP 755
January 20, 1997
RESTRICTED
2
Section 100: Removing the Battery Cabinet Covers
101.
Shut down all load equipment plugged into, or hardwired to, the UPS.
CAUTION!
Make sure the On/Off switch on the front of the UPS is OFF, and follow the steps below to make sure all
AC and DC power to the unit is off.
102.
Turn off the UPS. If the UPS has an AC input plug, unplug it. If not, make sure the unit cannot receive AC power.
103.
Turn the DC disconnect switch on the front of the battery cabinet off. (See Figure 1.)
Loosen these
screws
Remove these
screws
Turn DC
switch “off”
Figure 1
104.
Remove the Phillips screws from the side of the battery cabinet. (See Figure 1.)
105.
Loosen, but do not remove, the three (3) screws along the top of the battery cabinet. (See Figure 1.)
106.
Remove the side panels from the battery cabinet.
Section 200: Before Installing the Batteries
CAUTION!
A battery can present a risk of electrical shock and high short circuit current. A qualified electrician who is familiar
with battery systems should service the batteries.
Review all of the safety instructions on page 2 before you replace any batteries; then follow the instructions below.
201.
Use the Same Number and Type of Battery.
To ensure continued superior performance of your UPS and to maintain proper charger operation, you must replace
the batteries in the UPS or its battery cabinets or racks with the same number of batteries. These batteries must be
the same type as the original batteries: valve-regulated, low maintenance. The replacement batteries should have
the same voltage and amp-hour rating as the original batteries.
3
January 20, 1997
TIP 755
RESTRICTED
202.
Do You Need to Remove Ground from the Battery Terminal?
If your local or national code requires you to ground either battery terminal, remove the connection from the terminal
to ground (earth) before you work on the batteries. If any battery terminal is inadvertently grounded, remove the
source of the ground. Contacting any part of a grounded battery can cause a risk of electric shock. An electric shock
will be less likely if you disconnect the grounding connection before you work on the batteries.
203.
Handle Used Batteries with Care!
Assume that old batteries are fully charged. Use the same precautions you would use when handling a new battery.
Do not short battery terminals or the battery string with a cable or tool when you disconnect the batteries! Batteries
contain lead. Please dispose of old batteries properly. For help, call Best Power Worldwide Service at 1-800-3565737 (U.S. and Canada only), 1-608-565-2100, or call your local Best Power office.
CAUTION!
204.
Do not dispose of batteries in a fire because the batteries could explode. Do not open or
mutilate batteries. Released electrolyte is harmful to the skin and eyes. It may be toxic.
Dispose of Batteries Properly.
CAUTION!
Batteries contain lead. Many state and local governments have regulations about disposing of used
batteries. Please dispose of the batteries properly. For more help, call Best Power Worldwide Service.
Section 300: Removing the Batteries
CAUTION!
Assume that old batteries are fully charged. Use the same precautions you would use when handling a new battery.
Do not short battery terminals or the battery string with a cable or tool when you disconnect the batteries! Batteries
contain lead. Please dispose of old batteries properly. For help, call call Best Power Worldwide Service or call your
local Best Power office.
301.
Disconnect the negative (–) battery cable first; then, disconnect the positive (+) battery cable.
302.
Remove the cables from the batteries. Replace any cables that are worn and/or frayed.
303.
Remove the old batteries from the cabinet. Dispose of old batteries properly. Follow the guidelines in Section 404
of the FERRUPS Service Manual.
Section 400: Replacing the Batteries
401.
Place the new batteries, with the terminals facing out, on the shelves in the battery cabinet. (See Figure 2 if your
batteries amp-hour rating is greater than 33, or Figure 3 if your batteries amp-hour rating is 33 or less. These
Figures are on the next page.)
TIP 755
January 20, 1997
RESTRICTED
4
DC FUSE
DC FUSE
Figure 2 For units with an amp-hour rating greater than 33 Figure 3 For units with an amp-hour rating of 33 or less
402.
Attach the cables between the batteries. Do not connect the cables
to the terminal block yet. (See Figure 2 or 3 and Figure 4.)
403.
Use a torque wrench to tighten the cables to the battery terminals
according to the manufacturer’s torque specifications.
CAUTION!
If you tighten the cables with improper
torque, you may damage the terminal posts Figure 4
and/or batteries. Do not over-tighten the
cables to the terminals.
404.
Reconnect the most positive (+) battery cable first; then, reconnect the most negative (–)battery cable. Torque the
cables to the DC terminal block to 20.3-30.4 inch/pounds (2.3-3.4 Newton/meters).
405.
Make sure all connections to the batteries, terminal blocks, DC switch, and the DC fuse are secure.
406.
Make sure all batteries are secure in the cabinet. Replace all brackets and/or tighten all straps that you removed from
the cabinet.
Section 500: Testing the New Batteries
501.
Make sure all load equipment plugged into, or hardwired to, the UPS is shut down.
CAUTION!
Make sure the On/Off switch on the front of the UPS is OFF, and follow the steps below to make sure all
AC and DC power to the unit is off.
5
January 20, 1997
TIP 755
RESTRICTED
502.
Make sure the UPS is off. Make sure the unit cannot receive AC power.
503.
Use the FERRUPS key to unlock the lock in the middle of the
front panel. (See Figure 5.) Remove the panel.
504.
Loosen the three (3) Philips screws on the bar across the top
of the UPS. (See Figure 5.)
505.
Remove the screws on each side of the UPS. (See Figure 5.)
506.
Slide each cover out from under the bar and lift the covers to
remove them from the UPS.
507.
Use the voltmeter to measure DC voltage at the terminal
block. Your meter should indicate approximately 125 VDC;
if not, verify that all connections are secure and to the proper
torque.
Loosen these
screws
Remove these
screws
Lock for
front panel
Figure 5
508.
Next, perform a load test. Apply a non-critical load to the UPS. The load must be at least 50% of the UPS’ KW
rating.
509.
Make sure all AC power to the UPS is off. Let the UPS run on inverter (battery power).
510.
Use the voltmeter to measure DC voltage at the terminal block and at each battery. Your meter should indicate
approximately 125 VDC and each battery should read between 11.5 and 12.5 VDC. If any battery differs by more
than 0.5 VDC, that battery must be replaced.
511.
Apply a thin coat of petroleum jelly to the posts. This prevents the terminals from corroding.
Section 600: Putting the Covers Back on the UPS and the Battery Cabinet(s)
601.
Put the side covers back in place and reattach the screws on each side of the battery cabinet (see Figure 1 on page
3) and each side of the UPS (see Figure 5).
602.
Tighten the screws on the bar across the top of the battery cabinet (see Figure 1 on page 3) and across the top of
the UPS (see Figure 5).
603.
Reapply AC power to the UPS. Reconnect the battery cable to the UPS and turn on the DC switch.
604.
Replace the front panel to the UPS and turn the key to lock the panel in place. Return the key to the keyswitch.
605.
Startup the UPS according to the instructions in the FERRUPS User Manual. Then, startup the load equipment
connected to the UPS.
TIP 755
January 20, 1997
RESTRICTED
6