1
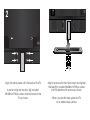
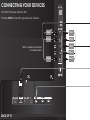
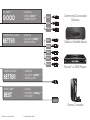
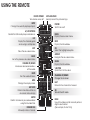
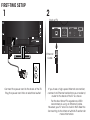
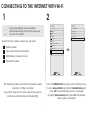
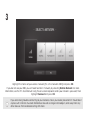
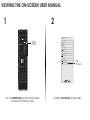
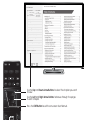
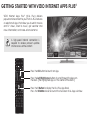
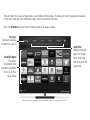
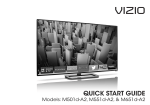
VIZIO
QUICK START GUIDE
Model: M801d-A3
IMPORTANT SAFETY INSTRUCTIONS
Your TV is designed and manufactured to operate within defined design limits. Misuse may result in electric shock or fire. To prevent
your TV from being damaged, the following instructions should be observed for the installation, use, and maintenance of your TV.
Read the following safety instructions before operating your TV. Keep these instructions in a safe place for future reference.
To reduce the risk of electric shock or component damage, switch off the power before connecting other components to your TV.
•
Read these instructions.
•
Keep these instructions.
•
Heed all warnings.
•
Follow all instructions.
•
Do not use this apparatus near water.
•
Clean only with a dry cloth.
•
Do not block any ventilation openings. Install in accordance with the manufacturer’s instructions.
•
Do not install near any heat sources such as radiators, heat registers, stoves, or other apparatus (including amplifiers) that
Do not overload power strips and extension cords. Overloading can result in fire or electric shock.
•
The wall socket should be installed near your TV and easily accessible.
•
Only power of the marked voltage can be used for your TV. Any other voltage than the specified voltage may cause fire or
electric shock.
•
Do not touch the power cord during lightning. To avoid electric shock, avoid handling the power cord during electrical storms.
•
Unplug your TV during a lightning storm or when it will not be used for long period of time. This will protect your TV from damage
due to power surges.
•
Do not defeat the safety purpose of the polarized or grounding-type plug. A polarized plug has two blades and a third
consult an electrician for replacement of the obsolete outlet.
Protect the power cord from being walked on or pinched, particularly at plugs, convenience receptacles, and the point where
they exit from the apparatus.
•
Only use attachments/accessories specified by the manufacturer.
•
Use only with the cart, stand, tripod, bracket, or table specified by the manufacturer, or sold with the apparatus. When
a cart is used, use caution when moving the cart/apparatus combination to avoid injury from tip-over.
WARNING: Keep your TV away from moisture. Do not expose your TV to rain or moisture. If water penetrates into your TV, unplug
the power cord and contact your dealer. Continuous use in this case may result in fire or electric shock.
•
•
Unplug this apparatus during lightning storms or when unused for long periods of time.
•
Refer all servicing to qualified service personnel. Servicing is required when the apparatus has been damaged in any way,
such as when the power-supply cord or plug is damaged, liquid has been spilled or objects have fallen into the apparatus, the
apparatus has been exposed to rain or moisture, does not operate normally or has been dropped.
Do not use your TV if any abnormality occurs. If any smoke or odor becomes apparent, unplug the power cord and contact your
dealer immediately. Do not try to repair your TV yourself.
•
Avoid using dropped or damaged appliances. If your TV is dropped and the housing is damaged, the internal components
may function abnormally. Unplug the power cord immediately and contact your dealer for repair. Continued use of your TV may
grounding prong. The wide blade or the third prong are provided for your safety. If the provided plug does not fit into your outlet,
•
Do not attempt to repair or service your TV yourself. Opening or removing the back cover may expose you to high voltages,
electric shock, and other hazards. If repair is required, contact your dealer and refer all servicing to qualified service personnel.
•
produce heat.
•
•
cause fire or electric shock.
•
Do not install your TV in an area with heavy dust or high humidity. Operating your TV in environments with heavy dust or high
humidity may cause fire or electric shock.
•
Follow instructions for moving your TV. Ensure that the power cord and any other cables are unplugged before moving your TV.
•
When unplugging your TV, hold the AC/DC power adapter, not the cord. Pulling on the power cord may damage the wires inside
the cord and cause fire or electric shock. When your TV will not be used for an extended period of time, unplug the power cord.
•
To reduce risk of electric shock, do not touch the connector with wet hands.
•
Insert batteries in accordance with instructions. Incorrect polarities may cause the batteries to leak which can damage the
remote control or injure the operator. Do not expose batteries to excessive heat such as sunshine, fire or the like.
•
If any of the following occurs, contact the dealer:
- The power cord fails or frays.
•
Unplug the power cord before cleaning your TV.
•
When moving your TV from an area of low temperature to an area of high temperature, condensation may form in the housing.
- Your TV is exposed to rain or other moisture.
Wait before turning on your TV to avoid causing fire, electric shock, or component damage.
- Your TV is dropped or damaged in any way.
•
cabinet unless proper ventilation is provided.
•
•
This apparatus shall not be exposed to dripping or splashing and no objects filled with liquids, such as vases, shall be placed
on the apparatus.
•
The mains plug or appliance coupler is used as the disconnect device, the disconnect device shall remain readily operable.
•
CAUTION - These servicing instructions are for use by qualified service personnel only. To reduce the risk of electric shock, do not
Never push any object into the slots and openings on your TV cabinet. Do not place any objects on the top of your TV. Doing so
could short circuit parts causing a fire or electric shock. Never spill liquids on your TV.
•
•
Slots and openings in the back and bottom of the cabinet are provided for ventilation. To ensure reliable operation of your TV
and to protect it from overheating, be sure these openings are not blocked or covered. Do not place your TV in a bookcase or
•
- The performance of your TV changes substantially.
A distance of at least three feet should be maintained between your TV and any heat source, such as a radiator, heater, oven,
amplifier etc. Do not install your TV close to smoke. Operating your TV close to smoke or moisture may cause fire or electric shock.
•
- Liquid sprays or any object drops into your TV.
perform any servicing other than that contained in the operating instructions unless you are qualified to do so.
h
The lightning flash with arrowhead symbol within an equilateral triangle is
Your TV should be operated only from the type of power source indicated on the label. If you are not sure of the type of power
supplied to your home, consult your dealer or local power company.
Do not apply pressure or throw objects at your TV. This may compromise the integrity of the display. The manufacturer’s warranty
does not cover user abuse or improper installations.
The exclamation point within an equilateral triangle is intended to alert the user
The power cord must be replaced when using different voltage than the voltage specified. For more information, contact your
to the presence of important operating and maintenance (servicing) instructions
in the literature accompanying the product.
dealer.
•
When connected to a power outlet, power is always flowing into your TV. To totally disconnect power, unplug the power cord.
•
The lightning flash with arrowhead symbol within an equilateral triangle is intended to alert the user to the presence of
un-isolated, dangerous voltage within the inside of your TV that may be of sufficient magnitude to constitute a risk of electric
shock to persons.
intended to alert the user to the presence of uninsulated DANGEROUS VOLTAGE
within the product’s enclosure that may be of sufficient magnitude
to constitute a risk of electrical shock to persons.
You may experience discomfort while watching 3D content. You may feel symptoms
of eye strain, vision fatigue, color or depth distortion, motion sickness, nausea, dizziness,
disorientation, or other discomforts. If you experience any of these symptoms, stop
watching and take a break for at least thirty minutes before resuming. If the symptoms
are severe or continue even after you have stopped watching 3D content, consult a
doctor.
Take care to monitor children’s watching of 3D content. Children (including teenagers)
may be more at risk of experiencing discomfort while watching 3D content and less
likely to report symptoms. Monitor children’s 3D content viewing and watch for signs of
discomfort.
Some viewers may be susceptible to epileptic seizures or strokes when viewing 3D
images, even if those conditions have not been previously diagnosed. If you or anyone
in your family has a history of seizures or strokes, or if you have any other reason to think
you or someone under your supervision may be susceptible to epileptic seizures or
strokes, consult a doctor before watching 3D content.
Even if you do not experience any of the above symptoms, take regular breaks from
watching 3D content.
DO YOU HAVE QUESTIONS?
LET US HELP!
YOUR PRODUCT INCLUDES FREE LIFETIME TECH SUPPORT
The VIZIO support team is highly
trained and is based in the
United States.
We can help with:
• New Product Setup
• Connecting Your Devices
• Technical Problems
• And More
Phone: (877) 878-4946 (TOLL-FREE)
Email: [email protected]
Web: http://store.VIZIO.com/support
Hours of operation: Monday - Friday: 5 am to 8 pm (PST)
Saturday - Sunday: 7 am to 4 pm (PST)
We speak English • Se habla Español • Nous parlons Français
PACKAGE CONTENTS
INPUT
LIST
MENU
EXIT
INFO
BACK
GUIDE
VOL
CH
3D
VIZIO LED HDTV with Stand
1
2
3
4
5
6
7
8
9
ENTER
0
Remote Control
and Batteries
Power Cord
4 x M5 20mm
Phillips Screws
This Quick Start Guide
Theater 3D Glasses
Glasses may vary slightly from those shown.
5 x M6 28mm
Phillips Screws
INSTALLING THE BASE
1
It is recommended that two people take part in the base installation.
Place the TV screen-down on a clean, flat surface. To prevent scratches or damage to the screen,
place the TV on a soft surface, such as a blanket.
2
Align the neck piece with the back of the TV.
Insert and tighten the four (4) included
M5 20mm Phillips screws into the back of the
TV as shown.
Align the base with the neck. Insert and tighten
the five (5) included M6 28mm Phillips screws
into the bottom of the base as shown.
When you are finished, place the TV
on a stable, level surface.
CONNECTING YOUR DEVICES
Connect all of your devices first.
Choose ONE connection type for each device.
Red
Red
White
White
Red
Match colored connectors
to colored ports.
Blue
Yellow
BACK OF TV
Green
AV CABLE*
GOOD
• ANALOG
• VIDEO (480i)**
• STEREO AUDIO
Red
White
Commonly-Connected
Devices:
Yellow
COMPONENT CABLE*
BETTER
• ANALOG
• HD VIDEO (1080i)**
• STEREO AUDIO
Red
Cable or Satellite Boxes
White
Red
Blue
Green
COAXIAL CABLE*
• ANALOG
• HD VIDEO (1080i)**
• STEREO AUDIO
HDMI CABLE*
• DIGITAL
• HD VIDEO (1080p)**
• HD AUDIO
BETTER
BEST
Blu-ray™ or DVD Players
Game Consoles
*Cables are not included ** Maximum Resolution
USING THE REMOTE
DEVICE POWER
Turn devices on or off.
INPUT
Change the currently-displayed input.
APP LAUNCHER
Quickly launch the pictured App.
POWER
Turn TV on or off.
INPUT
A/V CONTROLS
Control the USB media player and devices.
LIST
Display the channel guide
when using a set-top box.
MENU
Display the on-screen menu.
LIST
MENU
EXIT
INFO
OK
Select the highlighted option.
EXIT
Close the on-screen menu.
BACK
Go to the previous on-screen menu.
VOLUME UP/DOWN
Increase or decrease loudness
of the audio.
BACK
GUIDE
HOT KEYS
Perform functions within an
on-screen menu or app.
ENTER
Confirm channel or passcode entered
using the Number Pad.
NUMBER PAD
Manually enter a channel.
ARROW
Navigate the on-screen menu.
GUIDE
Display the info window.
VOL
CH
MUTE
Turn the audio off or on.
WIDE
Change the display mode.
INFO
Display the info window.
V BUTTON
Open the V.I.A. Plus dock.
CHANNEL UP/DOWN
Change the channel.
3D
1
2
3
4
5
6
7
8
9
ENTER
0
LAST
Return to the channel last viewed.
3D
Turn on the 3D mode.
DASH
Use with number pad to manually enter a
digital sub-channel.
(For example, 18-4 or 18-5.)
FIRST-TIME SETUP
1
2
Back of TV
Ethernet
Cable
Connect the power cord to the back of the TV.
Plug the power cord into an electrical outlet.
If you have a high-speed Internet connection,
connect an Ethernet cable from your modem/
router to the back of the TV as shown.
For the best Smart TV experience, VIZIO
recommends using an Ethernet cable.
However, your TV also has built-in Wi-Fi. See the
Connecting to the Internet with Wi-Fi section for
more information.
3
4
Choose your mode.
Select Store Demo for in-store display.
Select Home Use for in-home use.
Choisissez "Home Use" pour Mode Domicile ou "Store Demo" pour Démonstration en Magasin.
Seleccione "Home Use" por Modo de Casa o "Store Demo" por Demostración de Tienda.
Store Demo
Remove the battery cover by pressing gently
on the back cover and sliding away from
the remote in the direction of the arrow.
Insert the included batteries.
Gently slide the battery cover back into place.
Home Use
Turn the TV on by pressing the Power Button on
the remote. The Setup App is displayed.
Use the Arrow Buttons on the remote to highlight
Home Use and press OK.
5
Use the Arrow buttons on the remote to select
your preferred language and country
and press OK.
6
Press and Hold the Red Record button and
Green Hotkey button for 5 seconds to pair the
Wi-Fi Direct remote.
Follow the on-screen instructions to complete
the First-time setup.
CONNECTING TO THE INTERNET WITH Wi-Fi
1
2
VIZIO
VIZIO
If you have already set up a wireless
connection during the first-time setup, you
can skip this section.
GUIDED SETUP
TV Settings
Picture
Wide
Tuner Setup
Timers
Device Setup
Tuner
CC
Remote Normal
Setup
Audio
Network
To connect to a wireless network you will need:
Zoom
Panoramic
Wide
Network Setup
Exit
2D
3D
Exit
Closed Captions
Wireless Router
Devices
High-speed Internet connection
Guided Setup
ABC
System
Input
Wide
CC
Input
Sleep
Timer
Picture
Audio
Sleep
Timer
Network
Settings
Help
User Manual
SSID (Wireless network name)
Network Password
For streaming video, your Internet connection speed
should be 1.5 Mbps or higher.
If you don’t know how fast your connection speed is,
contact your Internet Service Provider (ISP).
Press the MENU Button to display the TV Settings menu.
Use the Arrow Buttons to highlight Guided Setup and
press OK. The Guided Setup menu is displayed.
Highlight Network Setup and press OK. The Network
Setup guide is displayed.
Networ
3
Highlight the name of your wireless network (this is the network’s SSID) and press OK.
If you do not see your SSID, you will need to enter it manually by selecting Hidden Network. For more
information, see the TV’s User Manual. Using the on-screen keyboard, enter your network’s password, then
highlight Connect and press OK.
If you are having trouble connecting to your network, check your router placement. It should be in
a place with minimal structural interference like walls or large metal objects, and away from any
other devices that are broadcasting at 2.4GHz.
VIEWING THE ON-SCREEN USER MANUAL
1
2
INPUT
VIZIO
LIST
MENU
EXIT
INFO
MENU
Button
TV SETTINGS
Picture
Wide
Zoom
Normal
Exit
2D
3D
Audio
Timers
Network
Tuner
BACK
GUIDE
CC
Closed Captions
Devices
ABC
System
VOL
CH
Guided Setup
User Manual
User
Manual
Input
Wide
CC
Sleep
Timer
Picture
Audio
Network
Settings
Help
3D
1
2
3
4
5
6
7
8
9
ENTER
0
Press the MENU Button on the Remote Control
to display the TV Settings menu.
Highlight User Manual and press OK.
Panoramic
USER MANUAL
HDTV WITH VIZIO INTERNET APPS®
USE YOUR REMOTE
PAGE NUMBER
1 OF 53
To skip to page, use
Number Pad,
Open TV Menu
then press OK.
Previous Page
Next Page
Menu
Table of Contents
Installing the TV
Controls and Connections
Connecting your Devices
Completing the First-Time Setup
Using the On-Screen Menu
Using the USB Media Player
Using VIZIO Internet Apps
How to View 3D
Troubleshooting & Technical Support
Specifications
Limited Warranty
Legal & Compliance
INPUT
LIST
EXIT
MENU
INFO
Use the Up and Down Arrow Buttons to select the chapter you want
to view.
Use the Left and Right Arrow Buttons to browse through the pages
in each chapter.
BACK
GUIDE
Press the EXIT Button to exit the on-screen User Manual.
GETTING STARTED WITH VIZIO INTERNET APPS PLUS®
VIZIO Internet Apps Plus® (V.I.A. Plus) delivers
popular online content to your TV. V.I.A. Plus features
a selection of Apps that allow you to watch movies
and TV shows, listen to music, get weather and
news information, and more–all on demand.
A high-speed Internet connection is
required to receive product updates
and to access online content.
INPUT
LIST
MENU
EXIT
INFO
BACK
GUIDE
VOL
CH
3D
1
2
3
4
5
6
7
8
9
ENTER
0
Press the OK button to launch an App.
Press the Left/Right Arrow buttons to scroll through the Apps on
the dock. (The highlighted App is in the center of the dock.)
Press the V Button to display the V.I.A. Plus App Dock.
Press the V Button twice to launch the fullscreen V.I.A. Apps window.
The fullscreen V.I.A. Apps window allows you to add and store apps. The Apps on the first page are displayed
in the Dock and Apps on additional pages can be moved to the Dock.
Press the V Button twice to launch the fullscreen V.I.A. Apps window.
My Apps
Features the apps
installed on your TV.
App Tabs
Browse through
apps on these
tabs and add
them to your My
Apps tab.
Installed Apps
The Apps
displayed here
are also available
in the V.I.A. Plus
App Dock.
EXIT Return to TV
Note: App location, appearance, and availability subject to change without notice.
HOW TO VIEW 3D
A.
B.
You will need:
VIZIO Theater
3D Glasses
C.
3D-ready Player + Media*
3D-ready
HDMI cable*
(Blu-ray™, Game Console, etc.)
For the best 3D experience, try to view
the TV straight-on, as shown here. Do
not view the TV at an extreme angle, as
some of the 3D effect will be lost. Sit at
least 8 feet from the TV.
t
ee
8F
A.
C.
B.
*Sold Separately
Sound Bar is sold separately
HELP TOPICS
•
How do I return to the
Setup App?
There is a picture, but
there is no sound.
The TV displays
“No Signal.”
•
The on-screen menu has guided setup. Press MENU, then select Guided Setup. Select the type of setup
you need and press OK. The Setup App will begin.
To reset the TV to factory defaults, press MENU > System > Reset & Admin > Reset TV to Factory Defaults. If
you have changed the default Parental Control Passcode, enter it now. Select Reset. Remember that all of
your settings will be lost.
•
•
•
•
Press the VOLUME UP button on the remote.
Press the MUTE button on the remote to ensure that mute is off.
Press MENU, then select Audio. Be sure TV Speakers is set to On.
INPUT
If you have an audio device connected to your TV, press MENU > Audio
and set Volume Control
to External.
•
•
Be sure your connected devices are turned on.
Press the INPUT button on the remote and select the input to which your device is connected
(HDMI-1, HDMI-2, COMP, etc.).
•
•
Note that some television channels add black bars to the picture.
EXIT
INFO
Set the TV to Wide or Zoom mode. Press the Wide button and highlight
Wide or Zoom
and
press OK.
Adjust the video settings of your external device
LIST
There are black/gray bars
on the top/bottom/sides
of the screen.
•
•
MENU
•
•
Be sure the power cord is securely connected to the AC socket on the TV and to a working
BACK
GUIDE
electrical outlet.
Press the POWER button on the remote or on the side of the TV.
If the above steps do not work, try plugging the power cord into a different outlet.
The V.I.A. App is
not working.
•
•
•
Be sure your TV is connected to the Internet.
Restart the App by pressing the EXIT button to close the App, then open the App.
Reboot your TV by pressing the POWER button on the remote, then turn it back
on.
3D
I am having trouble
connecting to
my network.
•
•
•
•
If you are using an Ethernet cable, ensure it is securely connected to your router/modem and the TV.
If you are connecting wirelessly, try repositioning your router for the best connection.
Turn off all devices. Restart your router/modem.
1
2
3
INPUT
Try to use another internet-connected device. If it is not working, call your Internet Service Provider (ISP).
•
•
•
•
Make sure the batteries are properly inserted, matching the - and + symbols.
7
8
9
Replace the batteries with fresh ones.
0
Reset the remote: Press and hold the Fast-Forward
and Enter ENTER buttons
for 10 seconds.
Remove and replace the batteries, then
re-pair the remote using the remote Guided Setup menu.
LIST
MENU
Press MENU > Guided Setup > Remote Setup and follow the on-screen instructions.
There is no power.
The remote is
not responding.
VOL
4
CH
5
6
LEGAL / COMPLIANCE
FCC Class B Radio Interference Statement
NOTE: This equipment has been tested and found to comply with the limits for a Class B digital device, pursuant to Part 15 of the FCC Rules. These
limits are designed to provide reasonable protection against harmful interference in a residential installation. This equipment generates, uses
and can radiate radio frequency energy, and if not installed and used in accordance with the instructions, may cause harmful interference to
radio communications. However, there is no guarantee that interference will not occur in a particular installation. If this equipment does cause
harmful interference to radio or television reception, which can be determined by turning the equipment off and on, the user is encouraged to
try to correct the interference by one or more of the following measures:
• Reorient or relocate the receiving antenna.
• Increase the separation between the equipment and receiver.
• Connect the equipment into an outlet on a circuit different from that to which the receiver is connected.
• Consult the dealer or an experienced radio/TV technician for help.
This device complies with Part 15 of the FCC Rules. Operation is subject to the following two conditions: (1) this device may not cause harmful
interference, and (2) this device must accept any interference received, including interference that may cause undesired operation.
Notice
The changes or modifications not expressly approved by the party responsible for compliance could void the user’s authority to operate the
equipment.
Shielded interface cables and AC power cord, if any, must be used in order to comply with the emission limits.
The manufacturer is not responsible for any radio or TV interference caused by unauthorized modification to this equipment. It is the responsibilities of the user to correct such interference.
FCC warning
Changes or modifications not expressly approved by the party responsible for compliance with the FCC Rules could void the user’s authority to
operate this equipment.
Caution
Always use an AC/DC power adapter that is properly grounded. Use the AC cords listed below for each area.
Germany: VDE
Japan: Electric Appliance Control Act
USA: UL
Canada: CSA UK: BASE/BS
Other
Image(s) used under license from Shutterstock.com
LIMITED WARRANTY
ON PARTS AND LABOR
Covers units purchased as new in United States and Puerto Rico Only.
VIZIO provides a warranty to the original purchaser of a new Product against
defects in materials and workmanship for a period of one (1) year of
non-commercial usage and ninety (90) days of commercial use. If a Product
covered by this warranty is determined to be defective within the warranty period,
VIZIO will either repair or replace the Product at its sole option and discretion.
To obtain warranty service, contact VIZIO Technical Support via e-mail:
[email protected] or via phone at 877 MY VIZIO (877.698.4946) from
5:00AM to 8:00PM Monday through Friday and 7:00AM to 4:00PM Saturday
and Sunday, Pacific Time, or visit www.VIZIO.com. PRE-AUTHORIZATION MUST BE
OBTAINED BEFORE SENDING ANY PRODUCT TO A VIZIO SERVICE CENTER. Proof of
purchase in the form of a purchase receipt or copy thereof is required to show
that a Product is within the warranty period.
Parts and Labor
There will be no charge for parts or labor during the warranty period.
Replacement parts and Products may be new or recertified at VIZIO’s option
and sole discretion. Replacement parts and Products are warranted for the
remaining portion of the original warranty or for ninety (90) days from warranty
service or replacement, whichever is greater.
Type of Service
Defective Products must be sent to a VIZIO service center to obtain warranty
service. VIZIO is not responsible for transportation costs to the service center, but
VIZIO will cover return shipping to the customer. PRE-AUTHORIZATION IS REQUIRED
BEFORE SENDING ANY PRODUCT TO A VIZIO SERVICE CENTER FOR WARRANTY
SERVICE.
Product returns to VIZIO’s service centers must utilize either the original carton box
and shipping material or packaging that affords an equal degree of protection.
VIZIO Technical Support will provide instructions for packing and shipping the
covered Product to the VIZIO service center.
Limitations and Exclusions
VIZIO’s one-year limited warranty only covers defects in materials and
workmanship. This warranty does not cover, for example: cosmetic damage,
normal wear and tear, improper operation, improper voltage supply or power
surges, signal issues, damages from shipping, acts of God, any type of customer
misuse, modifications or adjustments, as well as installation and set-up issues
or any repairs attempted by anyone other than by a VIZIO authorized service
center. Products with unreadable or removed serial numbers, or requiring routine
maintenance are not covered. This one year limited warranty does not cover
Products sold “AS IS”, “FACTORY RECERTIFIED”, or by a non-authorized reseller.
THERE ARE NO EXPRESS WARRANTIES OTHER THAN THOSE LISTED OR DESCRIBED
ABOVE. ANY IMPLIED WARRANTIES, INCLUDING ANY IMPLIED WARRANTY OF MERCHANTABILITY AND FITNESS FOR A PARTICULAR PURPOSE, SHALL BE LIMITED IN
DURATION TO THE PERIOD OF TIME SET FORTH ABOVE. VIZIO’S TOTAL LIABILITY FOR
ANY AND ALL LOSSES AND DAMAGES RESULTING FROM ANY CAUSE WHATSOEVER
INCLUDING VIZIO’S NEGLIGENCE, ALLEGED DAMAGE, OR DEFECTIVE GOODS,
WHETHER SUCH DEFECTS ARE DISCOVERABLE OR LATENT, SHALL IN NO EVENT
EXCEED THE PURCHASE PRICE OF THE PRODUCT. VIZIO SHALL NOT BE RESPONSIBLE
FOR LOSS OF USE, LOSS OF INFORMATION OR DATA, COMMERCIAL LOSS, LOST
REVENUE OR LOST PROFITS, OR OTHER INCIDENTAL OR CONSEQUENTIAL DAMAGES.
SOME STATES DO NOT ALLOW LIMITATIONS ON HOW LONG AN IMPLIED WARRANTY
LASTS OR THE EXCLUSION OF INCIDENTAL OR CONSEQUENTIAL DAMAGES, SO
THE ABOVE LIMITATIONS OR EXCLUSIONS MAY NOT APPLY TO YOU. THIS WARRANTY
GIVES YOU SPECIFIC LEGAL RIGHTS, AND YOU MAY ALSO HAVE OTHER RIGHTS,
WHICH VARY FROM STATE TO STATE. THIS WARRANTY IS SUBJECT TO CHANGE
WITHOUT NOTICE.
CHECK WWW.VIZIO.COM FOR THE MOST CURRENT VERSION.
Personal Data
If your VIZIO product is capable of storing personal data and other information,
ALL CONTENTS AND INFORMATION WILL BE DELETED IN THE COURSE OF SOME
IN-HOME AND ALL SHIP-IN WARRANTY SERVICE. If this occurs, your product will be
restored to you configured as originally purchased. You will be responsible for
restoring all applicable data and passwords. Recovery and reinstallation of user
data is not covered under this Limited Warranty. In order to protect your personal
information, VIZIO recommends that you always clear all personal information
from the unit before it is serviced, regardless of the servicer.
Zero Bright Pixel Defect Guarantee
This policy covers “zero bright pixel” defects for the duration of the limited
“ONE YEAR WARRANTY” on select new product purchases. To determine if this
guarantee applies to your product, refer to the “DETAILS” tab of the model’s
product information page (www.VIZIO.com) or look for the “zero bright pixel”
guarantee on the box.
© 2013 VIZIO INC. ALL RIGHTS RESERVED.
131217OC-B