1
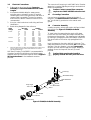
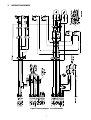
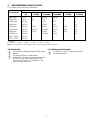
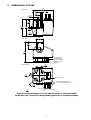
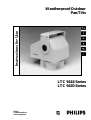
Weatherproof Outdoor
Pan/Tilts
LTC 9418 Series
LTC 9420 Series
Philips
Communication &
Security Systems
IMPORTANT SAFEGUARDS
13.
Power Lines - An outdoor system should not be located in the vicinity
of overhead power lines or other electric light or power circuits, or
where it can fall into such power lines or circuits. When installing an
outdoor system, extreme care should be taken to keep from touching
such power lines or circuits as contact with them might be fatal. U.S.A.
models only - refer to the National Electrical Code Article 820
regarding installation of CATV systems.
1.
Read Instructions - All the safety and operating instructions should be
read before the unit is operated.
2.
Retain Instructions - The safety and operating instructions should be
retained for future reference.
3.
Heed Warnings - All warnings on the unit and in the operating
instructions should be adhered to.
14.
Overloading - Do not overload outlets and extension cords as this can
result in a risk of fire or electric shock.
4.
Follow Instructions - All operating and use instructions should be
followed.
15.
5.
Cleaning - Unplug the unit from the outlet before cleaning. Do not use
liquid cleaners or aerosol cleaners. Use a damp cloth for cleaning.
Object and Liquid Entry - Never push objects of any kind into this unit
through openings as they may touch dangerous voltage points or shortout parts that could result in a fire or electric shock. Never spill liquid
of any kind on the unit.
6.
Attachments - Do not use attachments not recommended by the
product manufacturer as they may cause hazards.
16.
Servicing - Do not attempt to service this unit yourself as opening or
removing covers may expose you to dangerous voltage or other
hazards. Refer all servicing to qualified service personnel.
7.
Water and Moisture - Do not use this unit near water - for example,
near a bath tub, wash bowl, kitchen sink, or laundry tub, in a wet
basement, near a swimming pool, in an unprotected outdoor
installation, or any area which is classified as a wet location.
17.
Damage Requiring Service - Unplug the unit from the outlet and refer
servicing to qualified service personnel under the following conditions:
8.
Accessories - Do not place this unit on an unstable stand, tripod,
bracket, or mount. The unit may fall, causing serious injury to a person
and serious damage to the unit. Use only with a stand, tripod, bracket,
or mount recommended by the manufacturer, or sold with the product.
Any mounting of the unit should follow the manufacturer's instructions,
and should use a mounting accessory recommended by the
manufacturer.
An appliance and cart combination should be moved with
care. Quick stops, excessive force, and uneven surfaces may
cause the appliance and cart combination to overturn.
9.
10.
11.
12.
a.
When the power-supply cord or plug is damaged.
b.
If liquid has been spilled, or objects have fallen into the unit.
c.
If the unit has been exposed to rain or water.
d.
If the unit does not operate normally by following the operating
instructions. Adjust only those controls that are covered by the
operating instructions, as an improper adjustment of other
controls may result in damage and will often require extensive
work by a qualified technician to restore the unit to its normal
operation.
e.
If the unit has been dropped or the cabinet has been damaged.
f.
When the unit exhibits a distinct change in performance--this
indicates a need for service.
Ventilation - Openings in the enclosure, if any, are provided for
ventilation and to ensure reliable operation of the unit and to protect it
from overheating. These openings must not be blocked or covered.
This unit should not be placed in a built-in installation unless proper
ventilation is provided or the manufacturer's instructions have been
adhered to.
18.
Power Sources - This unit should be operated only from the type of
power source indicated on the marking label. If you are not sure of the
type of power supply you plan to use, consult your appliance dealer or
local power company. For units intended to operate from battery
power, or other sources, refer to the operating instructions.
Replacement Parts - When replacement parts are required, be sure the
service technician has used replacement parts specified by the
manufacturer or have the same characteristics as the original part.
Unauthorized substitutions may result in fire, electric shock or other
hazards.
19.
Safety Check - Upon completion of any service or repairs to this unit,
ask the service technician to perform safety checks to determine that
the unit is in proper operating condition.
Grounding or Polarization - This unit may be equipped with a polarized
alternating-current line plug (a plug having one blade wider than the
other). This plug will fit into the power outlet only one way. This is a
safety feature. If you are unable to insert the plug fully into the outlet,
try reversing the plug. If the plug should still fail to fit, contact your
electrician to replace your obsolete outlet. Do not defeat the safety
purpose of the polarized plug.
20.
Coax Grounding - If an outside cable system is connected to the unit,
be sure the cable system is grounded. U.S.A. models only--Section 810
of the National Electrical Code, ANSI/NFPA No.70-1981, provides
information with respect to proper grounding of the mount and
supporting structure, grounding of the coax to a discharge unit, size of
grounding conductors, location of discharge unit, connection to
grounding electrodes, and requirements for the grounding electrode.
Alternately, this unit may be equipped with a 3-wire grounding-type
plug, a plug having a third (grounding) pin. This plug will only fit into a
grounding-type power outlet. This is a safety feature. If you are unable
to insert the plug into the outlet, contact your electrician to replace
your obsolete outlet. Do not defeat the safety purpose of the
grounding-type plug.
21.
Lightning - For added protection of this unit during a lightning storm, or
when it is left unattended and unused for long periods of time, unplug it
from the wall outlet and disconnect the cable system. This will prevent
damage to the unit due to lightning and power-line surges.
Power-Cord Protection - Power-supply cords should be routed so that
they are not likely to be walked on or pinched by items placed upon or
against them, paying particular attention to cords and plugs,
convenience receptacles, and the point where they exit from the
appliance.
2
SAFETY PRECAUTIONS
TABLE OF CONTENTS
1 INSTALLATION.......................................................... 4
CAUTION
1.1 Model Designation ....................................................................................4
1.2 Recommended Controls.........................................................................4
1.3 Recommended Mounting Equipment ..................................................4
1.4 Wall Mounting............................................................................................4
1.5 Camera/Lens/Enclosure Mounting .......................................................4
1.6 Electrical Connections.............................................................................5
1.7 Grounding Connection............................................................................5
1.8 Connector Assembly ...............................................................................5
1.9 Pan Stops (345° Models).........................................................................7
RISK OF ELECTRIC
SHOCK. DO NOT OPEN!
CAUTION: TO REDUCE THE RISK OF ELECTRICAL SHOCK,
DO NOT OPEN COVERS. NO USER SERVICEABLE PARTS
INSIDE. REFER SERVICING TO QUALIFIED SERVICE
PERSONNEL.
This label may appear on the bottom of the unit due to
space limitations.
The lightning flash with an arrowhead symbol, within
an equilateral triangle, is intended to alert the user
to the presence of uninsulated "dangerous voltage"
within the product's enclosure that may be of
sufficient magnitude to constitute a risk of electric
shock to persons.
The exclamation point within an equilateral triangle
is intended to alert the user to presence of
important operating and maintenance (servicing)
instructions in the literature accompanying the
appliance.
2 OPERATION ................................................................ 7
2.1 Manual Pan Operation (345° Models).................................................7
2.2 Auto-Pan Operation (345º Models) ....................................................7
2.3 Pan Stop Adjustment (345° Models)...................................................7
2.4 Pan Operation (360° Models) ...............................................................7
2.5 Tilt Stop Adjustment (All Models) .......................................................8
2.6 Pre-Position Models .................................................................................8
3 WIRING DIAGRAMS.................................................. 9
4 RECOMMENDED APPLICATIONS....................... 11
5 DIMENSIONAL OUTLINE ...................................... 12
WARNING
TO PREVENT FIRE OR SHOCK HAZARD, DO NOT EXPOSE
UNPROTECTED COMPONENTS TO RAIN OR MOISTURE.
UNPACKING
Unpack carefully. This is mechanical equipment and should
be handled with care.
Check for the following items:
• Verify the unit model number.
• 3/32-inch Allen wrench.
If an item appears to have been damaged in shipment,
replace it properly in its carton and notify the shipper. If any
items are missing, notify your Philips Communication &
Security Systems Inc. Sales Representative or Customer
Service.
The shipping carton is the safest container in which the unit
may be transported. Save it for possible future use.
SERVICE
If the unit ever needs repair service, the customer should
contact the nearest Philips Communication & Security
Systems Inc. Service Center for authorization to return and
shipping instructions.
Service Centers
U.S.A. & Canada: 800-366-2283
Mexico & Central America: 52-5-564-2726
Europe & Middle East: 44-1932-765666
South America: 54-1-956-0837
Australia: 61-2-888-9000
New Zealand: 64-4-237-7297
3
1
1.2
INSTALLATION
LTC 5133 Series
LTC 5134 Series
TC8561A Series
This installation should be made by a qualified
service person and conform to all local codes.
Always disconnect power to unit at controller
prior to connecting or disconnecting pan/tilt
electrical connector. Pan/tilt to be mounted
away from unauthorized access [3 meters (10
feet) high minimum]
The LTC 9418 Series and LTC 9420 Series
units are designed for either upright or
inverted installations. To maintain
weatherproof integrity when mounting
outdoors in an inverted position, the unit
must be installed in a weatherproof enclosure
(e.g., weatherproof domed housing) or a
protected outside area.
Pan/tilts and associated equipment should be tested prior to
field installation to verify proper wiring and operation of
components.
The maximum load is 80.5 kg-cm (70 in-lb) torque or 10 kg
(22 lb) at a distance of 63.5 mm (2.5 in) from the center of
mass of the camera/lens/housing assembly to the center of
the tilt table. The combined weight of the
enclosure/camera/lens should be centered equally, front to
back, on the tilt table surface for best pan/tilt operation. See
RECOMMENDED APPLICATIONS.
1.1
Recommended Controls
1.3
Recommended Mounting Equipment
TC9216WM
TC9222WM
TC9214CM
TC9224CM
TC9218RM
TC9300 Series
Domes
Model Designation
Model
Rated Motor
Voltage
Pan
1
No.
Voltage
Range
Range
Standard Models
LTC 9418/60
110 VAC, 60 Hz
108 to 132
0° to 345°
LTC 9418/20
24 VAC, 60 Hz
21.6 to 26.4
0° to 345°
LTC 9418/10
24 VAC, 50 Hz
21.6 to 26.4
0° to 345°
LTC 9418/502
220 VAC, 50 Hz
207 to 253
0° to 345°
110 VAC, 60 Hz
108 to 132
0° to 345°
LTC 9420/602
LTC 9420/202
24 VAC, 60 Hz
21.6 to 26.4
0° to 345°
24 VAC, 50 Hz
21.6 to 26.4
0° to 345°
LTC 9420/102
LTC 9420/50
220 VAC, 50 Hz
207 to 253
0° to 345°
Pre-Position Models
LTC 9418/61
110 VAC, 60 Hz
108 to 132
0° to 345°
LTC 9418/21
24 VAC, 60 Hz
21.6 to 26.4
0° to 345°
LTC 9418/11
24 VAC, 50 Hz
21.6 to 26.4
0° to 345°
LTC 9418/512
220 VAC, 50 Hz
207 to 253
0° to 345°
110 VAC, 60 Hz
108 to 132
0° to 345°
LTC 9420/612
LTC 9420/212
24 VAC, 60 Hz
21.6 to 26.4
0° to 345°
LTC 9420/112
24 VAC, 50 Hz
21.6 to 26.4
0° to 345°
LTC 9420/51
220 VAC, 50 Hz
207 to 253
0° to 345°
Continuous Pan Models
2
24 VAC, 60 Hz
21.6 to 26.4
0° to 360°
LTC 9420/222
LTC 9420/12
24 VAC, 50 Hz
21.6 to 26.4
0° to 360°
1.
The total power for all models, with both motors running, is 24 W.
1.4
Desktop Pan/Tilt/Lens Control via
hardwired connections.
Remote Receiver/Driver for a
balanced line system. For use with
LTC 8600, LTC 8800, and LTC 8900
Series systems.
Medium duty wall mount designed to
support up to 45.3 kg (100 lb).
Heavy duty wall mount designed to
support up to 90.6 kg (200 lb).
Heavy duty 336 mm (14 inch) column
mount for ceiling or pedestal.
Heavy duty 610 mm (24 inch) column
mount for ceiling or pedestal use.
Parapet/Roof mount designed to
support up to 68 kg (150 lb).
Indoor and outdoor domes designed
to contain both pan/tilt and
camera/lens combinations. Contact
your local Philips Communication and
Security Systems Inc. Sales
Representative for correct dome,
pan/tilt, camera combinations.
Wall Mounting
Follow the instructions provided with mounts. Mount and
mounting surface must be able to support the weight of the
pan/tilt, camera/lens, and enclosure (if used). The
camera/lens/enclosure must be properly mounted and
balanced on the pan/tilt bracket.
Caution: The LTC 9418 Series and LTC 9420
Series pan/tilt can only be mounted upright
or inverted; never horizontally.
1.5
Camera/Lens/Enclosure Mounting
Mount the camera/lens/enclosure to the pan/tilt bracket as
follows:
1. Balance the camera/lens/enclosure and adjust unit to
align with mounting holes. Fasten with a minimum of
two (2) 1/4-20 x 1/2-inch long fasteners and lock
washers.
2. Make all electrical connections. Leave sufficient loops of
cable between camera/enclosure and pan/tilt to allow
for tilting and panning.
Caution: Do Not Exceed 30 VAC Input on 24
VAC models. Operation above 30 VAC
violates low voltage operation (Class 2
Specifications). Normal operation is 24 VAC.
cUL Approved 24 VAC Models.
Caution: Connect to Class 2 Power Supply
only. Total current through electrical
connector is 4 A maximum. Pan/tilt current is
1 A maximum. Allowable camera/housing is 3
A maximum. Use only 24 VAC cameras and
housings on feed-thru models.
4
1.6
1.
2.
3.
4.
The connector will accept up to a #16 AWG wire. If heavier
gauge wire is required, pigtailing according to local electrical
codes is recommended.
Caution: Contact removal from connector
requires use of AMP #305183 extraction tool.
Electrical Connections
Cable must be wired according to Connector
Assembly and Recommended Maximum Cable
Lengths.
Use separate shielded cables for camera power,
enclosure power, and pan/tilt control. If required,
combining lens control wiring and video coax within a
common cable is acceptable. The use of a common
multiconductor cable to combine all functions is not
recommended.
Use color coded conductors to aid wiring and future
identification.
Retain wiring diagram for later reference.
1.7
Grounding Connection
A ground screw is located on the base to the right of
connector. See DIMENSIONAL OUTLINE. Connect a 1
mm2 (No.18 AWG) ground wire to the nearest earth
ground.
1.8
Connector Assembly
A mating connector, sockets and a strain relief are included
with the unit. See Figure 1: Shield/Strain Relief
Assembly.
To install, select the appropriate size strain relief clamp.
Choose one of the two strain relief clamps enclosed with
the sleeve and the extender. The clamping area is adjustable
by inverting or changing the strain relief clamps. Discard the
four strain reliefs on the carrier strip packaged with the
shield.
Insert the clamp into the strain relief until it bottoms. The
clamp should bottom on the wire bundle, not on the shield’s
shoulder. If the wire diameter is too small, temporarily
wrap the wire with electrical tape until proper clamping is
obtained. Secure the clamp with the two (2) screws
provided.
Caution: Make sure the wire bundle is
properly secured. Do NOT pinch the wires.
Model
Voltage
24 VAC
Wire Size
Distance
2
mm
AWG
Feet
Meters
0.5
20
140
43
1
18
230
70
1.5
16
360
110
2.5
14
590
180
4
12
940
287
110 VAC
0.5
20
2200
671
1
18
3500
1067
1.5
16
5500
1677
2.5
14
9000
2744
220 VAC
0.5
20
13400
4085
1
18
21200
6463
1.5
16
33300
10152
2.5
14
54400
16585
1.
Values calculated at 20 ºC (68 ºF) using stranded tinned copper wire, a
common ground (neutral), and with both PAN and TILT motors
operating simultaneously.
AMP Hand Crimping Tool #58495-1 is recommended for
crimping of sockets. Model listings on the following page
detail the electrical connections required. Refer to Figure 2:
Wiring Instructions for the numbered connector
positions.
Screws (2)
Strain Relief Clamp
Strain Relief Slot
Shield
Washer
Wire Bundle
Strip Length
.156 ± .015
Sleeve
Contact
Extender
W9609410AE
Connector
Figure 1: Shield/Strain Relief Assembly
5
WIRE DESIGNATION AND PIN CONNECTIONS
S928A18AE
Figure 2: Pin Outs
LTC 9420/60, LTC 9420/20, LTC
9420/505, and LTC 9420/10
345° Non-Pre-Position Models6
Pin Number
1
1: NC
1
2: NC
1
3: NC
1
4: NC
5: Lens Common
6: Zoom
7: Focus
8: Unused
9: Unused
10. Accessory
11. Accessory
12. Accessory
1
13: NC
1
14: NC
1
15: NC
16: Pan Left
17: NC1
18: Pan Right
19: P/T Common
20: Tilt Up
21: Tilt Down
22: Ground
23: Camera AC-Line
24: Camera AC-Neutral
Color
2
Green
2
Blue
2
Violet
2
Brown
2
Black
2,3
White
2,3
Red
2,3
Yellow
White
Violet
Blue
Brown
White/Yellow
Green/Yellow
2,4
Black
2,4
White
LTC 9420/61, LTC 9420/21, LTC
9420/515, and LTC 9420/116 345°
Pre-Position Models
Pin Number
1: PP Supply (+)
2: Pan Position
3: PP Return (-)
4: Tilt Position
5: Lens Common
6: Zoom
7: Focus
8: Zoom Position
9: Focus Position
10. Accessory
11. Accessory
12. Accessory
1
13: NC
1
14: NC
1
15: NC
16: Pan Left
1
17: NC
18: Pan Right
19: P/T Common
20: Tilt Up
21: Tilt Down
22: Ground
23: Camera AC-Line
24: Camera AC-Neutral
Color
2
Orange
2
Yellow
2
Gray
2
White/Black
2
Green
2
Blue
2
Violet
2
Brown
2
Black
2,3
White
2,3
Red
2,3
Yellow
White
Violet
Blue
Brown
White/Yellow
Green/Yellow
2,4
Black
2,4
White
LTC 9418/60, LTC 9418/20, LTC
9418/505, and LTC 9418/10
345° Non-Pre-Position Models6
Pin Number
1
1: NC
1
2: NC
1
3: NC
1
4: NC
1
5: NC
1
6: NC
1
7: NC
1
8: NC
1
9: NC
1
10. NC
1
11. NC
1
12. NC
1
13: NC
1
14: NC
1
15: NC
16: Pan Left
1
17: NC
18: Pan Right
19: P/T Common
20: Tilt Up
21: Tilt Down
22: Ground
1
23: NC
1
24: NC
Color
White
Violet
Blue
Brown
White/Yellow
Green/Yellow
LTC 9418/61, LTC 9418/21, LTC
9418/515, and LTC 9418/116 345°
Pre-Position Models
Pin Number
1: PP Supply (+)
2: Pan Position
3: PP Return (-)
4: Tilt Position
1
5: NC
1
6: NC
1
7: NC
1
8: NC
1
9: NC
1
10. NC
1
11. NC
1
12. NC
1
13: NC
1
14: NC
1
15: NC
16: Pan Left
1
17: NC
18: Pan Right
19: P/T Common
20: Tilt Up
21: Tilt Down
22: Ground
1
23: NC
1
24: NC
Color
2
Orange
2
Yellow
2
Gray
2
White/Black
White
Violet
Blue
Brown
White/Yellow
Green/Yellow
6
LTC 9420/22 and
LTC 9420/12
360° Non-Pre-Position Models7
Pin Number
1
1: NC
1
2: NC
3: NC1
1
4: NC
5: Lens Common
6: Zoom
7: Focus
1
8: NC
1
9: NC
10. Accessory
11. Accessory
12. Accessory
1
13: NC
1
14: NC
1
15: NC
16: Pan Left
1
17: NC
18: Pan Right
19: P/T Common
20: Tilt Up
21: Tilt Down
22: Ground
23: Camera AC-Line
24: Camera AC-Neutral
Color
2
Green
2
Blue
2
Violet
2,3
White
2,3
Red
2,3
Yellow
White
Violet
Blue
Brown
White/Yellow
Green/Yellow
2,4
Black
2,4
White
Notes
1.
NC -- No Connection, do not use.
2.
(Color Codes) indicate feed-thru wiring to
camera/housing.
3.
Apply to 24 volt models only. Pins 10 thru
12 are not used in 110 volt or 220 volt
models.
4.
(Color Codes) shown are for 24 volt and
110 volt models. For 220 volt models, color
codes are (23) Brown, and (24) Blue.
5.
The conductors for pins 16 thru 24 (where
applicable) on 220 volt models should be
isolated from other wiring with reinforced
insulation requirements of DIN VDE
0860/05.89, IEC 65, 1985. The conductors
for pins 16 thru 24 (where applicable) must
be in HAR cord
minimum cross sectional
2
area 0.75 mm (H05 VV-F).
6.
Refer to Figure 6 under Wiring Diagrams
for the wiring schematic.
7.
Refer to Figure 7 under Wiring Diagrams
for the wiring schematic.
1.9
2.2
Pan Stops (345° Models)
Auto-Pan Operation (345º Models)
Use of the auto-pan function requires wiring connections to
pin 16 (Pan Left), pin 18 (Pan Right), and pin 19 (Common).
See Figure 6: Wiring Diagram (0º - 345º Models). The
auto-pan function is achieved by the controller unit sensing
changes in current flow through the pan motor. When a pan
stop is reached, the current flow stops and internal circuitry
of the controller unit reverses the auto-pan direction.
Note: The pan/tilt controller must be equipped with special
current sensing circuitry to operate the auto-pan function in
this mode.
The pan stops or the fixed stop establish the limits for autopan.
Locate the three (3) limit stops on the base of the unit. The
red limit stop is the Fixed Stop. It is not adjustable and
should not be removed. The remaining two (2) stops are
called the Pan Stops. These are positioned on each side of
the pan switch lever.
The two (2) pan stops are adjustable and secured with a set
screw. The screws can be accessed through the hole in the
end of each stop. Use a 3/32-inch Allen wrench (supplied) to
loosen and tighten the set screw. See Figure 3: Pan Stop
Locations (345° Models).
Top View Of Base
Front
Top View Of Base
Front
Left
(CCW)
Pan
Stops
Fixed Stop (Red)
Right
(CW)
S928A19CE
Rear
Figure 3: Pan Stop Locations (345º Models)
2
2.1
Fixed Stop
(Red)
S928A20CE
Figure 4: Maximum Manual Pan and Maximum
Auto-Pan (345º Models)
OPERATION
Manual Pan Operation (345° Models)
2.3
The pan stops establish the limits for manual pan. The two
(2) adjustable pan stops may be repositioned or removed
depending on the desired operation. The maximum pan
range setup is shown in Figure 4: Maximum Manual Pan
and Maximum Auto-Pan (345º Models).
Caution: Never move or remove the fixed
stop. It must always be in place for proper
operation of the pan function.
1.
2.
3.
2.4
Pan Stop Adjustment (345° Models)
Loosen the pan stops and adjust to the desired range for
manual pan and auto-pan. A recessed area in the pan
head allows enough clearance to remove a stop from
the base.
When all the stops are in place, check to see that they
are secure.
Operate the unit from the controller to confirm that
the limits are set properly. Readjust if required.
Pan Operation (360° Models)
These models allow 360 degree rotational (pan) operation.
They have no pan stops. These units can be manually panned
left or right or they can be panned continuously left or right
by auto-pan activation. Auto-Pan activation requires wiring
connections to pin 16 (Pan Left), pin 18 (Pan Right), and pin
19 (Common). See Figure 7: Wiring Diagram (360°
Models).
7
2.5
Tilt Stop Adjustment (All Models)
After the unit is installed and all wire connections are made,
apply proper power to the control unit. Refer to Figure 5:
Tilt Stops (Side View - Plug Removed) and adjust the
tilt stops as follows:
1. With the front of the pan/tilt facing you, remove the left
hub cap. The tilt stop adjustment screws are now
exposed.
2. Using the control unit, tilt the bracket up to the desired
position and stop the unit. Use the 3/32-inch Allen
wrench to loosen the Tilt Up stop. Slide the stop Up
until a faint click is heard (indicating switch actuation).
Tighten the Tilt Up limit stop screw.
3. Using the control unit, tilt the bracket to the desired
position and stop the unit. Use the 3/32-inch Allen
wrench to loosen the Tilt Down stop. Slide the stop
Down until a faint click is heard. Tighten the Tilt Down
limit stop screw.
4. Operate the control unit to verify proper tilt stop range
and operation. Repeat above sequence if necessary.
Make certain both tilt stop screws are snug. Replace the
hub cap.
REAR
FRONT
Tilt Down (CW) Stop
Tilt Up (CCW) Stop
S928A21CE
Figure 5: Tilt Stops (Side View - Plug Removed)
2.6
Pre-Position Models
The 345° models with pre-position capability have “P” suffix
in the model number. These models require wiring
connections to pins 1 through 4, 8 and 9, and the use of a
controller or receiver/driver with the pre-position function.
Pan and tilt operation and limit stop adjustments, function
the same as the previous models described.
Caution: Do not operate pan/tilt unit without
stops. Limit stops should not be adjusted
while unit is operating.
8
3
WIRING DIAGRAMS
Figure 6: Wiring Diagram - 0º to 345º Models
9
W9502400CE
Figure 7: Wiring Diagram - 360º Models
10
4
RECOMMENDED APPLICATIONS
CCD Camera, Lens, and Housing Combinations
Lens Models
Camera Model
Fixed
All
1/3-inch - 6X
TC9938
1/2-inch - 6X
TC9948A
1/2-inch - 6X 1/3-inch - 10X 1/2-inch - 10X
TC1848B
TC9958
TC9970A
TC380 Series
1, 2,3,5
---
2,3,4,5,6
2,3,4,5,6
---
2,3
TC390 Series
1,2,3,4,5
2,3,5
2,3,5
2,3
2,3
2,3
TC350A Series
1,2,3,4,5,6
---
1,2,3,5
1,2,3
---
2,3
TC360 Series
1,2,3,4,5,6
---
1,2,3,4,5
1,2,3
---
1,2,3
TC370 Series
1,2,3,4,5,6
1,2,3,4,5
1,2,3,4,5
1,2,3,4
1,2,3,4
1,2,3
TC550A Series
1,2,3,4,5,6
1,2,3,4,5,6
1,2,3,4,5,6
1,2,3,4
1,2,3,4
1,2,3
TC590 Series
1,2,3,4,5,6
1,2,3,4,5
1,2,3,4,5
1,2,3
1,2,3,4
1,2,3
TC650B Series
1,2,3,4,5,6
---
1,2,3,4,5,6
1,2,3,4
---
1,2,3
TC952, TC952X
1,2,3,4,5,6
---
---
---
---
---
TC972, TC972X
1,2,3,4,5,6
---
---
---
---
---
Housing Code:
1 - TC9340A 2 - TC9385
3 - TC9388
4 - TC9383
5 - TC9358
6 - TC9353
Note: 24 volt model cameras used. Combinations shown include the weight of applicable accessories.
LTC 9420 Series 24 Volt Models
To maintain cUL and TUV Approval, use only 24
volt cameras/housings.
360° Models Only
Use only 24 volt cameras/housings with 360° model
pan/tilts.
The maximum power for heater/blower
combinations is 75 watts to prevent overloading the
slip ring. This load must be powered by pin 10,
(white feed-thru) and pin 11 (red feed-thru). See
Figure 1: Wiring Instructions.
11
5
DIMENSIONAL OUTLINE
231.6
9.12
TOP VIEW
2x 9.53
0.375
2x 77.55
3.053
19.05
2x 0.750
2x 16.67
0.656
90.2
3.55
191.1
7.52
183.4
7.22
7.1
0.28
Ø 7.14
0.281
82.6
3.25
SIDE VIEW
85.2
3.38
226.2
8.91
Ground Screw
(On Other Side Of
Multipin Connector)
Multipin Connector
Pan Stop
120.7
4.75
BOTTOM VIEW
ID Label
13.91
0.547
BNC Connector
BNC Connector And Leads
For LTC 9420 Series Models Only
10.60
0.417
Power
mm
in
Video
Lens
W9601402CE
Figure 8: Dimensional Outline For All LTC 9418 Series and LTC 9420 Series Models
Except Note That The Feed-Thru Wiring Shown Applies to the LTC 9420 Series Models
12