1
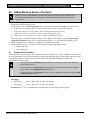
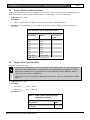
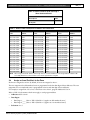
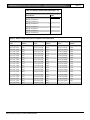
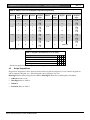
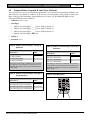
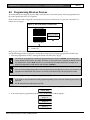
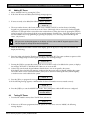
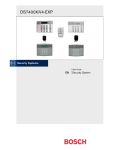
DS7400XiV4-EXP
Wireless Reference Guide
EN
Control Panel
DS7400XiV4-EXP | Wireless Reference Guide | Contents
Contents
1.0
1.1
1.1.1
1.1.2
1.2
2.0
2.1
2.1.1
2.1.2
2.2
2.2.1
2.2.2
3.0
3.1
3.2
3.3
3.4
4.0
4.1
4.2
4.3
4.4
4.5
4.6
4.7
4.8
5.0
5.1
5.2
5.3
5.4
5.5
5.6
5.7
5.8
6.0
6.1
6.2
6.3
6.4
6.5
Introduction.......................................................4
Documentation Conventions ............................4
Type Styles Used ................................................4
Notes, Cautions, and Warnings ........................4
Scope of Document ............................................4
Programming the Control Panel ..................5
RF Receiver Setup..............................................5
Address ................................................................5
Supervision ..........................................................5
Receiver Programming ......................................5
Number of Receivers .........................................5
RF Receiver Jam Detection Level ....................6
Adding Wireless Sensors/Contacts ..............7
Program Zone Functions ...................................7
Assign a Zone Function to the Zone ..............10
Assign a Zone Type to the Zone.....................10
Assign an Area (Partition) to the Zone...........11
Adding RF3341 Keypads ..............................13
Set RF Keypad Supervision.............................13
Assign Keypad Type ........................................13
Assign Keypad Area.........................................14
Program Wireless Keypads .............................15
Program Wireless Keypad A, B, and C Keys
(Optional) ..........................................................16
Program the On-Board Outputs (Optional) ..17
On-Board Output Area Assignment and Chirp
Control (Optional) ............................................18
Program Output Functions to Follow the
Wireless Keypad Option Key (Optional) ......19
Adding Keyfobs ..............................................20
Assign a Zone Type..........................................20
Program a Zone ................................................21
Assign Keyfobs to an Area ..............................22
Program Wireless Keyfobs ..............................22
Program the Wireless Keyfob Panic Function
(Optional) ..........................................................23
Program On-Board Outputs for the
RF3334/RF3334E Keyfob (Optional) ............23
On-Board Output Area (Partition) Assignment
and Chirp Control (Optional) .........................24
Program Output Functions to Follow the
Keyfob Output Buttons (Optional) .................24
Programming Wireless Devices..................26
Adding RF Zones .............................................27
Testing RF Zones..............................................27
Removing RF Zones (and RF Keypads) ........28
RF Zone Troubles.............................................29
Receiver Trouble Delays .................................29
EN | 2
Figures
Figure 1:
Figure 2:
Figure 3:
Tables
Table 1:
Table 2:
Table 3:
Table 4:
Table 5:
Table 6:
Table 7:
Table 8:
Table 9:
Table 10:
Table 11:
Table 12:
Table 13:
Table 14:
Table 15:
Table 16:
Table 17:
Table 18:
Table 19:
Table 20:
Table 21:
Table 22:
Table 23:
Table 24:
Table 25:
Table 26:
Table 27:
Table 28:
Bosch Security Systems | 6/05 | 4998154962B
Supervision Jumper .................................. 13
Emergency Keys ....................................... 16
Bar Code Sticker or Number Set ............ 26
Document Overview .................................. 4
Address 2731, Data Digit 1........................ 5
Address 2731, Data Digit 2........................ 5
Zone Function Programming (Address
0001 to 0030, Data Digit 1)........................ 8
Zone Function Programming (Address
0001 to 0030, Data Digit 2)........................ 8
Address 0001 to 0030, Data Digit 1, if
Data Digit 2 = 9 .......................................... 8
Address 0001 to 0030 Default Values ...... 9
Address 0031 to 0278 Default Values .... 10
Address 0483 to 0538, Data Digit 1 (OddNumbered Zones) ..................................... 10
Address 0483 to 0538, Data Digit 2 (EvenNumbered Zones) ..................................... 11
Address 0483 to 0538, Zone-to-Address
Cross Reference ........................................ 11
Address 0355 to 0410, Data Digits 1 & 212
Address 0355 to 0410, Zone-to-Address
Cross Reference ........................................ 12
Address 3131 to 3138 Keypad Assignment
Programming............................................. 14
Keypad Type (Addresses 3131 to 3138) 14
Address 3139 to 3146 Keypad Partition
Assignment ................................................ 15
Address 3139 to 3146 Keypad Partition
Assignment Selections .............................. 15
Address 3147 Data Digit 1, Fire Key A
Selections ................................................... 16
Address 3147 Data Digit 2, Emergency
Key B Selections ....................................... 16
Address 3148 Data Digit 1, Panic Key C
Selections ................................................... 16
Address 2734 to 2736, Data Digit 2 When
Data Digit 1 = *0 ...................................... 17
Address 2734 to 2736 Defaults................ 17
Address 2737 to 2738, Data Digit 1, and
Address 2737 Data Digit 2....................... 18
Address 2738, Data Digit 2...................... 18
Address 2734 to 2738 On-Board Output
Defaults ...................................................... 18
Output Function to Follow the Wireless
Keypad, Data Digit 2................................ 19
Output Functions and Program Addresses
.................................................................... 19
Address 0483 to 0538, Data Digit 1 (OddNumbered Zones) ..................................... 20
DS7400XiV4-EXP | Wireless Reference Guide | Contents
Table 29:
Table 30:
Table 31:
Table 32:
Table 33:
Table 34:
Table 35:
Table 36:
Table 37:
Table 38:
Table 39:
Table 40:
Address 0483 to 0538, Data Digit 2 (EvenNumbered Zones)......................................20
Address 0483 to 0538, Zone-to-Address
Cross Reference.........................................21
Zone Programming (Addresses 0167 to
0278, Data Digit 2) ....................................21
Assigning Keyfobs to a Partition (Address
0355 to 0410, Data Digits 1 & 2) .............22
Panic Key C Selections (Address 3148
Data Digit 1)...............................................23
Programming On-Board Keyfob Outputs
(Address 2734 to 2736, Data Digit 2 When
Data Digit 1 = *0)......................................23
Address 2734 to 2736 Defaults ................23
Address 2737 to 2738, Data Digit 1, and
Address 2737 Data Digit 2 .......................24
Address 2738, Data Digit 2 ......................24
Address 2734 to 2738 Defaults ................24
Output Function to Follow Wireless
Keyfob Output Buttons, Data Digit 2 .....25
Output Functions and Program Addresses
.....................................................................25
Bosch Security Systems | 6/05 | 4998154962B
EN | 3
DS7400XiV4-EXP | Wireless Reference Guide | 1.0
1.0 Introduction
1.1
Documentation Conventions
1.1.1
Type Styles Used
To help identify important items in the text, the
following type styles are used:
Bold text
Italicized text
[#][9][1]
1.1.2
Indicates important text or
terms that you should note.
Introduction
1.2
EN | 4
Scope of Document
See below for an overview of this document and other
documents related to the DS7400Xi Control Panel:
Table 1: Document Overview
Document
User’s Guide
Part Number
4998154961
Reference
Guide
4998154963
Wireless
Reference
Guide (this
document)
4998154962
Release Notes
4998154798
Refers you to a drawing, table,
or other section of this
document.
Bracketed numbers represent
keypad keys. When next to one
another, they represent the key
sequence to press for a
particular function. For this
example, pressing the [#] key
followed by the [9] key and [1]
key begins the keypad test
function.
Notes, Cautions, and Warnings
Throughout this document there are important notes
that address personal and/or equipment safety issues,
system operation issues, and so on. They are set off as
follows:
The Important Note identifies information
intended for successful operation.
The Caution Note identifies information
intended to prevent an incident that may
prohibit the functionality of the
program/equipment.
The Warning Note identifies information
intended to prevent an incident that may
prohibit the functionality of the
program/equipment and/or personal injury.
Bosch Security Systems | 6/05 | 4998154962B
Description
Contains keypad
operation instructions
for the end-user. Covers
use of the LCD (text)
keypad and the LED
keypad.
Contains all wiring and
setup instructions, and
programming
parameters with
descriptions.
Troubleshooting
information also
included.
Contains all
programming
parameters related to
the wireless devices that
are compatible with the
DS7400Xi Control
Panel.
Contains issues and
features with the control
panel that were found or
added after printing of
the documentation.
DS7400XiV4-EXP | Wireless Reference Guide | 2.0
Programming the Control Panel
2.0 Programming the Control
Panel
2.1
RF Receiver Setup
2.1.1
Address
Each DS7400Xi Control Panel can accept up to two
receivers. The appropriate receiver address (#1 or #2)
is selected at the receiver. The default setting is #1. Use
Setting #1 if this is the only receiver on the control
panel. Use Setting #2 if a second receiver is used. Refer
to the receiver’s documentation for configuration
information.
2.1.2
Supervision
The receiver expects to receive periodic status from
each installed transmitter, and reports to the control
panel when it has not heard from a specific transmitter
for the interval selected at the receiver (typically 12 or
4 hours). Refer to the receiver’s documentation for
configuration information.
2.2
Receiver Programming
2.2.1
Number of Receivers
•
Address: 2731
•
Data Digits:
•
•
•
Data Digit 1: ____ (refer to Table 2);
default = 0
Data Digit 2: ____ (refer to Table 3);
default = 0
Selections: 0 to 9; *0 to *3 (hexadecimal values
that display as A to D respectively at the keypads)
Program the control panel for the number of receivers
used, and which zones are assigned to each receiver.
Data Digit 1 defines if there are 0, 1, or 2 receivers.
Data Digit 2 defines the zones covered by Receiver #1
and Receiver #2. If there is only one receiver, Data Digit
2 must be 0. If two receivers are programmed, Data
Digit 2 should not be 0.
Do not program two receivers if you are not
programming zones to both receivers. Also,
do not install a second receiver without first
programming it properly.
Bosch Security Systems | 6/05 | 4998154962B
EN | 5
Table 2: Address 2731, Data Digit 1
Number of Receivers Options
Value
No Receiver
One Receiver
Two Receivers
0
2
4
Table 3: Address 2731, Data Digit 2
Select Option
Value
One receiver
Receiver #1 = Zones 137 to 144
Receiver #2 = Zones 145 to 248
Receiver #1 = Zones 137 to 152
Receiver #2 = Zones 153 to 248
Receiver #1 = Zones 137 to 160
Receiver #2 = Zones 161 to 248
Receiver #1 = Zones 137 to 168
Receiver #2 = Zones 169 to 248
Receiver #1 = Zones 137 to 176
Receiver #2 = Zones 177 to 248
Receiver #1 = Zones 137 to 184
Receiver #2 = Zones 185 to 248
Receiver #1 = Zones 137 to 192
Receiver #2 = Zones 193 to 248
Receiver #1 = Zones 137 to 200
Receiver #2 = Zones 201 to 248
Receiver #1 = Zones 137 to 208
Receiver #2 = Zones 209 to 248
Receiver #1 = Zones 137 to 216
Receiver #2 = Zones 217 to 248
Receiver #1 = Zones 137 to 224
Receiver #2 = Zones 225 to 248
Receiver #1 = Zones 137 to 232
Receiver #2 = Zones 233 to 248
Receiver #1 = Zones 137 to 240
Receiver #2 = Zones 241 to 248
0
1
2
3
4
5
6
7
8
9
*0
*1
*2
*3
DS7400XiV4-EXP | Wireless Reference Guide | 2.0
2.2.2
RF Receiver Jam Detection Level
The Jam Detection Level determines the level of
ambient RF noise at which a Jam Trouble is reported.
A higher programmed value requires a higher noise
level before a Jam Trouble is reported.
Adjusting this setting from its default value
can severely degrade control panel
performance. Do not adjust this setting
without first contacting Bosch Technical
Support.
Data Digit 1 configures the Jam Detection Level for
Receiver 1, and Data Digit 2 configures the Jam
Detection Level for Receiver 2.
•
Address: 4039
•
Data Digits:
•
•
Data Digit 1: ____ (default = 6)
•
Data Digit 2: ____ (default = 6)
Selections: 0 to 9; *0 to *5 (hexadecimal values
that display as A to F respectively at the keypads)
Bosch Security Systems | 6/05 | 4998154962B
Programming the Control Panel
EN | 6
DS7400XiV4-EXP | Wireless Reference Guide | 3.0
Adding Wireless Sensors/Contacts
EN | 7
3.0 Adding Wireless Sensors/Contacts
Program all zones used by RF devices as RF zones before activating the wireless devices. This is
accomplished by programming for an RF receiver in Address 2731. Refer to Section 2.2 Receiver
Programming.
Perform the following procedure to install and program an RF (wireless) sensor or contact:
1. Program the control panel’s RF zones.
Programming a zone is a four-step process. These steps must be performed, in order, to program a zone:
2.
3.
a.
Program the Zone Functions (what the zone does in alarm). Refer to Section 3.1 Program Zone Functions.
b.
Assign a Zone Function to the zone. Refer to Section 3.2 Assign a Zone Function to the Zone.
c.
Assign a Zone Type to the zone. Refer to Section 3.3 Assign a Zone Type to the Zone.
d.
Assign the zone to a partition. Refer to Section 3.4 Assign an Area (Partition) to the Zone.
These steps allow you to define the RF (wireless) zone’s address (zone number), its type (always a single
input zone, selection 0), which zone or output function it follows (1 to 30), and its area (partition; 1 to 8).
Install the RF Sensor(s) or Contact(s) according to its installation Instructions.
Program the RF Sensor(s) or Contact(s) (refer to Section 6.0 Programming Wireless Devices).
3.1
•
Add the RF zones.
•
Test the RF zones.
Program Zone Functions
A zone function is the description of how a zone behaves when an alarm occurs. Up to 30 different zone functions
can be programmed. You can use the default values already programmed into the control panel and skip this step,
or change the defaults, or add new zone functions. Refer to the DS7400Xi-EXP Reference Guide (P/N:
4998154963) for further details.
•
The zone functions for RF Sensors must always be set for “Alarm on Short” and “Trouble on
Open” (Options 4 to 7).
•
The zone functions for RF Contacts must always be set for “Alarm on Short” and “Trouble on
Open” when using the Magnet Only (Options 4 to 7).
•
The Zone Functions for RF Contacts can be set for any appropriate value when using the Input
Loop Only (options 0 to *5).
•
Addresses: 0001 to 0030
•
Data Digit:
•
•
Data Digit 1: ____ (refer to Table 4; refer to Table 7 for defaults)
•
Data Digit 2: ____ (refer to Table 5; refer to Table 7 for defaults)
Selections: 0 to 7, *2 to *5 (hexadecimal values that display as C through F at the keypads)
Bosch Security Systems | 6/05 | 4998154962B
DS7400XiV4-EXP | Wireless Reference Guide | 3.0
Adding Wireless Sensors/Contacts
EN | 8
Table 4: Zone Function Programming (Address 0001 to 0030, Data Digit 1)
Select Options
0
Invisible Alarm
•
1
2
3
Selections for Data Digit 1
4 5 6 7 8 9 *0 *1 *2 *3 *4 *5
•
•
Silent Alarm
•
•
•
Steady Alarm Output
•
•
•
Pulsing Alarm Output
Alarm on Short
•
•
•
•
Alarm on Open
•
•
•
•
Trouble on Open1
•
•
•
•
•
•
•
•
•
•
Trouble on Short
1
•
•
•
•
•
•
•
•
•
Only when disarmed. When armed, this becomes Alarm on Open or Short for non-24-hour zones.
NOTE: Multiplex contacts should not be programmed for Trouble on Open.
Table 5: Zone Function Programming (Address 0001 to 0030, Data Digit 2)
Select Options
Interior Delayed
Perimeter Instant
24-Hour
Entry/Exit Delay #1
Entry/Exit Delay #2
Interior Entry/Exit Follower
Interior Home/Away
Interior Instant
2
Value
0
1
2
3
4
5
6
7
Select Options
Day Monitor
Keyswitch2
Fire Zone with Verification
Fire Zone without Verification
Waterflow
Supervisory
Entry/Exit Delay Cancel 1
Entry/Exit Delay Cancel 2
If Data Digit 2 = 9 (keyswitch), refer to Table 6 to determine the value for Data Digit 1.
Table 6: Address 0001 to 0030, Data Digit 1, if
Data Digit 2 = 9
Select Options
Value
Single Partition – No Force Arm
Single Partition – Can Force Arm
All Partitions – No Force Arm
All Partitions – Can Force Arm
0
1
2
3
Bosch Security Systems | 6/05 | 4998154962B
Value
8
9
*0
*1
*2
*3
*4
*5
DS7400XiV4-EXP | Wireless Reference Guide | 3.0
Adding Wireless Sensors/Contacts
EN | 9
Table 7: Address 0001 to 0030 Default Values
Value
(fill in)
Zone
Function
Address
1
0001
2
0002
3
0003
4
0004
5
0005
6
0006
7
0007
8
0008
9
0009
10
0010
11
0011
12
0012
13
0013
14
0014
15
0015
16 to
30
0016 to
0030
Default Values
(forced to different values when in Commercial Fire Mode; refer to the
DS7400Xi-EXP Reference Guide (P/N: 4998154963) for further details.)
2 = Steady alarm output, alarm on short and open.
3 = Entry/exit delay 1.
2 = Steady alarm output, alarm on short and open.
4 = Entry/exit delay 2.
2 = Steady alarm output, alarm on short and open.
1 = Perimeter Instant.
2 = Steady alarm output, alarm on short and open.
5 = Interior entry/exit follower.
2 = Steady alarm output, alarm on short and open.
6 = Interior home/away.
2 = Steady alarm output, alarm on short and open.
7 = Interior Instant.
2 = Steady alarm output, alarm on short and open.
2 = 24-Hour.
7 = Pulsing alarm output, alarm on short, trouble on open.
3 = Entry/exit delay 1.
2 = Steady alarm output, alarm on short and open.
1 = Perimeter Instant.
2 = Steady alarm output, alarm on short and open.
1 = Perimeter Instant.
2 = Steady alarm output, alarm on short and open.
1 = Perimeter Instant.
2 = Steady alarm output, alarm on short and open.
1 = Perimeter Instant.
2 = Steady alarm output, alarm on short and open.
1 = Perimeter Instant.
2 = Steady alarm output, alarm on short and open.
1 = Perimeter Instant.
2 = Steady alarm output, alarm on short and open.
1 = Perimeter Instant.
2 = Steady alarm output, alarm on short and open.
1 = Perimeter Instant.
NOTE: An open loop always produces a steady alarm response.
Bosch Security Systems | 6/05 | 4998154962B
DS7400XiV4-EXP | Wireless Reference Guide | 3.0
3.2
Adding Wireless Sensors/Contacts
EN | 10
Assign a Zone Function to the Zone
Assign a zone function to a zone. For example, if you want Zone 137 to be an Entry/Exit 2 zone that produces a
steady alarm output on short or open conditions, enter “2” in Data Digit 1, and “3” in Data Digit 2.
•
Addresses: 0167 to 0278
•
Data Digits:
•
•
Refer to the first column of Table 7 for zone functions; refer to Table 8 for defaults.
Selections: 00 (zone disabled), or 01 to 30. Refer to the first column of Table 7 for the pre-defined zone
functions.
Table 8: Address 0031 to 0278 Default Values
Zone Number
Address
137
138
139
140
141
142
143
144
145 to 248
0167
0168
0169
0170
0171
0172
0173
0174
0175 to 0278
Zone Function
Default
00
00
00
00
00
00
00
00
00
HINT: Address = Zone Number + 30
3.3
Assign a Zone Type to the Zone
Assign a zone type to the zone.
For RF sensors/contacts, enter “0” for the zone type. For RF keyfobs, enter a “5” for the zone type. The
zone type for odd numbered zones is programmed in the first data digit of these addresses. The zone
type for even numbered zones is programmed in the second data digit of these addresses. Refer to
Table 11 for zone numbers and addresses.
For example, if Zones 137 and 138 are both RF sensors/contacts, enter a “0” in Data Digit 1 and Data
Digit 2.
•
Addresses: 0483 to 0538
•
Data Digit:
•
•
Data Digit 1: ____ (refer to Table 9)
•
Data Digit 2: ____ (refer to Table 10)
Selections: 0 or 5
Table 9: Address 0483 to 0538, Data Digit 1
(Odd-Numbered Zones)
Select Option
Value
RF Sensors/Contacts
RF Keyfobs
0
5
Bosch Security Systems | 6/05 | 4998154962B
DS7400XiV4-EXP | Wireless Reference Guide | 3.0
Adding Wireless Sensors/Contacts
EN | 11
Table 10: Address 0483 to 0538, Data Digit 2
(Even-Numbered Zones)
Select Option
Value
RF Sensors/Contacts
RF Keyfobs
0
5
Table 11: Address 0483 to 0538, Zone-to-Address Cross Reference
Zones
Address
Zones
Address
Zones
Address
Zones 137 & 138
0483
Zones 175 & 176
0502
Zones 213 & 214
0521
Zones 139 & 140
0484
Zones 177 & 178
0503
Zones 215 & 216
0522
Zones 141 & 142
0485
Zones 179 & 180
0504
Zones 217 & 218
0523
Zones 143 & 144
0486
Zones 181 & 182
0505
Zones 219 & 220
0524
Zones 145 & 146
0487
Zones 183 & 184
0506
Zones 221 & 222
0525
Zones 147 & 148
0488
Zones 185 & 186
0507
Zones 223 & 224
0526
Zones 149 & 150
0489
Zones 187 & 188
0508
Zones 225 & 226
0527
Zones 151 & 152
0490
Zones 189 & 190
0509
Zones 227 & 228
0528
Zones 153 & 154
0491
Zones 191 & 192
0510
Zones 229 & 230
0529
Zones 155 & 156
0492
Zones 193 & 194
0511
Zones 231 & 232
0530
Zones 157 & 158
0493
Zones 195 & 196
0512
Zones 233 & 234
0531
Zones 159 & 160
0494
Zones 197 & 198
0513
Zones 235 & 236
0532
Zones 161 & 162
0495
Zones 199 & 200
0514
Zones 237 & 238
0533
Zones 163 & 164
0496
Zones 201 & 202
0515
Zones 239 & 240
0534
Zones 165 & 166
0497
Zones 203 & 204
0516
Zones 241 & 242
0535
Zones 167 & 168
0498
Zones 205 & 206
0517
Zones 243 & 244
0536
Zones 169 & 170
0499
Zones 207 & 208
0518
Zones 245 & 246
0537
Zones 171 & 172
0500
Zones 209 & 210
0519
Zones 247 & 248
0538
Zones 173 & 174
0501
Zones 211 & 212
0520
NOTE:
3.4
When using premises RF: 1) Zones 129 through 136 are reserved, and 2) Zones 137 through 248 are available as RF
zones only. Wired zones cannot reside in zones 137 through 248 when using RF.
Assign an Area (Partition) to the Zone
Each zone is assigned to an area. By default, all zones are assigned to Area 1.
The area assignment for odd numbered zones is programmed in the first data digit of these addresses. The area
assignment for even numbered zones is programmed in the second data digit of these addresses.
For example, to assign Zone 137 to Area 1 and Zone 138 to Area 2, program Address 0355 as 01.
Refer to Table 13 to determine which zones apply to each program address.
•
Addresses: 0355 to 0410
•
Data Digits:
•
•
Data Digit 1: ____ (refer to Table 12; default = 0; applies to odd-numbered zones)
•
Data Digit 2: ____ (refer to Table 12; default = 0; applies to even-numbered zones)
Selections: 0 to 7
Bosch Security Systems | 6/05 | 4998154962B
DS7400XiV4-EXP | Wireless Reference Guide | 3.0
Adding Wireless Sensors/Contacts
EN | 12
Table 12: Address 0355 to 0410, Data Digits 1 & 2
Select Option
Value
Belongs to Partition 1
Belongs to Partition 2
Belongs to Partition 3
Belongs to Partition 4
Belongs to Partition 5
Belongs to Partition 6
Belongs to Partition 7
Belongs to Partition 8
0
1
2
3
4
5
6
7
Table 13: Address 0355 to 0410, Zone-to-Address Cross Reference
Zones
Address
Zones
Address
Zones
Address
Zones 137 & 138
0355
Zones 175 & 176
0374
Zones 213 & 214
0393
Zones 139 & 140
0356
Zones 177 & 178
0375
Zones 215 & 216
0394
Zones 141 & 142
0357
Zones 179 & 180
0376
Zones 217 & 218
0395
Zones 143 & 144
0358
Zones 181 & 182
0377
Zones 219 & 220
0396
Zones 145 & 146
0359
Zones 183 & 184
0378
Zones 221 & 222
0397
Zones 147 & 148
0360
Zones 185 & 186
0379
Zones 223 & 224
0398
Zones 149 & 150
0361
Zones 187 & 188
0380
Zones 225 & 226
0399
Zones 151 & 152
0362
Zones 189 & 190
0381
Zones 227 & 228
0400
Zones 153 & 154
0363
Zones 191 & 192
0382
Zones 229 & 230
0401
Zones 155 & 156
0364
Zones 193 & 194
0383
Zones 231 & 232
0402
Zones 157 & 158
0365
Zones 195 & 196
0384
Zones 233 & 234
0403
Zones 159 & 160
0366
Zones 197 & 198
0385
Zones 235 & 236
0404
Zones 161 & 162
0367
Zones 199 & 200
0386
Zones 237 & 238
0405
Zones 163 & 164
0368
Zones 201 & 202
0387
Zones 239 & 240
0406
Zones 165 & 166
0369
Zones 203 & 204
0388
Zones 241 & 242
0407
Zones 167 & 168
0370
Zones 205 & 206
0389
Zones 243 & 244
0408
Zones 169 & 170
0371
Zones 207 & 208
0390
Zones 245 & 246
0409
Zones 171 & 172
0372
Zones 209 & 210
0391
Zones 247 & 248
0410
Zones 173 & 174
0373
Zones 211 & 212
0392
Bosch Security Systems | 6/05 | 4998154962B
DS7400XiV4-EXP | Wireless Reference Guide | 4.0
Adding RF3341 Keypads
4.2
4.0 Adding RF3341 Keypads
If using wireless keypads, observe the following:
•
There must be at least one wired keypad in the
system.
•
If only one wired keypad is used, it must be
Keypad #1.
•
Wireless keypads must not be assigned as master
keypads.
•
The system supports up to five wireless keypads.
•
Wireless keypads can only be assigned as Keypads
1 to 5.
•
Both a wired and a wireless keypad can be
assigned to the same address.
•
If both a wired and a wireless keypad are assigned
to the same address, select the option for the
appropriate wired keypad in Addresses 3131 to
3133.
•
If a wireless keypad without a wired counterpart is
desired, program the data digit as 0 (Disabled).
•
Wireless keypads can be assigned to any area.
4.1
Set RF Keypad Supervision
If the control panel supervises the keypad, set the
Supervision Jumper to ON. See Figure 1. Select ON
(Supervised) only if the keypad will always be in radio
range of the control panel receivers. If the keypad is
moved beyond the range of the receivers, a keypad
fault condition appears on the wired keypads. Select
OFF (Unsupervised) if the keypad will be removed
from the premises.
Figure 1: Supervision Jumper
3
1
1234-
2
3 V battery
Supervision Jumper
Off position
On position
Bosch Security Systems | 6/05 | 4998154962B
4
EN | 13
Assign Keypad Type
Keypad type is either wired or wireless. If both a wired
and a wireless keypad are sharing an address, program
the data digit for the wired keypad type.
Data Digit 1 defines the first keypad in the address.
Data Digit 2 defines the second keypad in the address.
•
Addresses: 3131 to 3138
•
Data Digit: Refer to Table 14.
•
Defaults: Refer to Table 14. If using only one
keypad, the default is an Alpha keypad belonging
to Area 1. Otherwise, the default is 0.
•
Selections: 0 to 3 (refer to Table 15)
DS7400XiV4-EXP | Wireless Reference Guide | 4.0
Adding RF3341 Keypads
EN | 14
Table 14: Address 3131 to 3138 Keypad Assignment Programming
Address
3131
Data
Digit
1
Keypad
Default
Assigned
Value
Address
1
1
3135
2
2
0
1
3
0
2
4
0
1
5
0
2
1
6
0
11
7
0
21
8
0
❒
❒
❒
❒
❒
❒
❒
❒
3132
3133
3134
1
3136
Data
Digit
11
Keypad
Default
Assigned
Value
9
0
21
10
0
1
11
0
1
12
0
1
13
0
2
1
14
0
11
15
0
❒
❒
❒
❒
❒
❒
❒
1
2
3137
3138
1
21
Must = 0
0
Not available for wireless keypads.
Table 15: Keypad Type (Addresses 3131 to 3138)
Select Options
0
Disabled or Wireless Only Keypad
•
Alpha (LCD) Keypad
2
2
•
3
•
•
LED Keypad
Master Keypad
1
2
•
Wireless keypads must not be assigned as master keypads.
4.3
Assign Keypad Area
Keypad Area Assignment is where both wired and wireless keypads are assigned to an area. Wireless keypads can
only be assigned as Keypads 1 to 5. Wireless keypads can be assigned to any area.
Data Digit 1 defines the first keypad in the address. Data Digit 2 defines the second keypad in the address.
•
Addresses: 3139 to 3146
•
Data Digit: Refer to Table 16
•
Default: 0
•
Selections: Refer to Table 17
Bosch Security Systems | 6/05 | 4998154962B
DS7400XiV4-EXP | Wireless Reference Guide | 4.0
Adding RF3341 Keypads
EN | 15
Table 16: Address 3139 to 3146 Keypad Partition Assignment
Address
3139
3140
3141
3142
1
Data
Digit
1
Keypad
Default
Assigned
Value
Address
1
0
❒
❒
❒
❒
❒
❒
❒
❒
3143
2
2
0
1
3
0
2
4
0
1
5
0
2
1
6
0
11
7
0
21
8
0
Data
Digit
11
Keypad
Default
Assigned
Value
9
0
1
10
0
1
11
0
1
12
0
1
13
0
2
1
14
0
11
15
0
❒
❒
❒
❒
❒
❒
❒
2
3144
1
2
3145
1
3146
21
Must = 0
0
Not available for wireless keypads.
Table 17: Address 3139 to 3146 Keypad
Partition Assignment Selections
4.4
Select Option
Value
Belongs to Partition 1
Belongs to Partition 2
Belongs to Partition 3
Belongs to Partition 4
Belongs to Partition 5
Belongs to Partition 6
Belongs to Partition 7
Belongs to Partition 8
0
1
2
3
4
5
6
7
Program Wireless Keypads
Once the Keypad Assignment Programming (Addresses 3131 to 3138) and Keypad Area Assignment
Programming (Addresses 3139 to 3146) is complete, program the wireless keypads into the system. The keypads
appear as Zones 130 (for Keypad #1) through Zone 134 (for Keypad #5). Refer to Section 6.0 Programming Wireless
Devices for programming the keypads.
Bosch Security Systems | 6/05 | 4998154962B
DS7400XiV4-EXP | Wireless Reference Guide | 4.0
4.5
Adding RF3341 Keypads
EN | 16
Program Wireless Keypad A, B, and C Keys (Optional)
The A, B and C keys are only operational if programmed in your control panel. Programming Addresses 3147
and 3148 allow you to disable or enable the A, B, and C keys on the keypad for silent, pulsed, or steady alarm.
Refer to Emergency Key Programming: Program Addresses 3147-3148 in your DS7400Xi-EXP Reference Guide
(P/N: 4998154963) for more information.
•
Addresses: 3147 to 3148
•
Data Digit:
•
Address 3147, Data Digit 1: ____ (refer to Table 18; default = 0)
•
Address 3147, Data Digit 2: ____ (refer to Table 19; default = 0)
•
Address 3148, Data Digit 1: ____ (refer to Table 20; default = 0)
•
Address 3148, Data Digit 2: Must = 0
•
Default: 0
•
Selections: 0 to 3
Table 18: Address 3147 Data Digit 1, Fire Key A
Selections
Select Option
Value
Fire Key Disabled
Fire Key = Disabled
Fire Key = Steady Alarm
Fire Key = Pulsed Alarm
0
1
2
3
This setting can be forced to a different value when the
control panel is in Commercial Fire Mode. Refer to the
DS7400Xi-EXP Reference Guide (P/N: 4998154963) for
further details.
Table 19: Address 3147 Data Digit 2, Emergency
Key B Selections
Select Option
Value
Special Emergency Key Disabled
Special Emergency Key = Silent Alarm
Special Emergency Key = Steady Alarm
Special Emergency Key = Pulsed Alarm
0
1
2
3
Table 20: Address 3148 Data Digit 1, Panic Key C
Selections
Select Option
Value
Panic Key Disabled
Panic Key = Silent Alarm
Panic Key = Steady Alarm
Panic Key = Pulsed Alarm
0
1
2
3
This setting can be forced to a different value when the
control panel is in Commercial Fire Mode. Refer to the
DS7400Xi-EXP Reference Guide (P/N: 4998154963) for
further details.
Figure 2: Emergency Keys
2
3
4
5
6
8
9
0
#
7
A
Bosch Security Systems | 6/05 | 4998154962B
1
B
C
DS7400XiV4-EXP | Wireless Reference Guide | 4.0
4.6
Adding RF3341 Keypads
EN | 17
Program the On-Board Outputs (Optional)
The operation of the Option Key is the same on all keypads that are assigned to the same area.
The RF3341 Keypad has an Option key that can be programmed to drive any of the control panel’s three outputs,
or any of the 24 custom programmable outputs. Refer to Table 22.
•
Addresses: 2734 to 2736
•
Data Digits:
•
•
Data Digit 1: Must = *0 for outputs driven by a wireless keypad
•
Data Digit 2: ____ (refer to Table 21)
Selections: 0 to 9; *0, *1, *3 (hexadecimal values that display as A , B, and D respectively at the keypads)
Table 21: Address 2734 to 2736, Data Digit 2
When Data Digit 1 = *0
Options
Disabled
Momentary
Toggle
RF3341
Value
Option Key
Option Key
0
1
2
Bosch Security Systems | 6/05 | 4998154962B
Table 22: Address 2734 to 2736 Defaults
Output
Address
Default
Alarm
Programmable Output 1
Programmable Output 2
2734
2735
2736
6 3
3 3
2 3
DS7400XiV4-EXP | Wireless Reference Guide | 4.0
4.7
Adding RF3341 Keypads
EN | 18
On-Board Output Area Assignment and Chirp Control (Optional)
On-board outputs can be assigned to follow the Option Key in one or all areas in the Output Area Assignment
Addresses 2737 to 2738.
On-board outputs can also be programmed to “chirp” (a 1/2 second sounder output when the controlpanel is
armed, or two 1/2 second sounder outputs when the control panel is disarmed).
•
Addresses: 2737 to 2738
•
Data Digits:
•
•
Data Digit 1: ____ (refer to Table 23; refer to Table 25 for defaults)
•
Data Digit 2: ____ (refer to Table 23 for Address 2737 Data Digits 1 and 2; refer to Table 23 for Address
2738 Data Digit 1 and Table 24 for Address 2738 Data Digit 2; refer to Table 25 for defaults)
Selections: 0 to 8
Table 24: Address 2738, Data Digit 2
Table 23: Address 2737 to 2738, Data Digit 1,
and Address 2737 Data Digit 2
Select Option
Value
Belongs to Partition 1
Belongs to Partition 2
Belongs to Partition 3
Belongs to Partition 4
Belongs to Partition 5
Belongs to Partition 6
Belongs to Partition 7
Belongs to Partition 8
Follows all Partitions
0
1
2
3
4
5
6
7
8
Bosch Security Systems | 6/05 | 4998154962B
Chirp Options
Value
Chirp Disabled
Bell Output
Programmable Output 1
Programmable Output 2
0
1
2
3
Table 25: Address 2734 to 2738 On-Board
Output Defaults
Output
Address
Default
Alarm
Programmable Output 1
Programmable Output 2
2737 DD1
2737 DD2
2738 DD1
8
8
8
DS7400XiV4-EXP | Wireless Reference Guide | 4.0
4.8
Adding RF3341 Keypads
EN | 19
Program Output Functions to Follow the Wireless Keypad Option Key (Optional)
Output functions can be assigned to off-board devices, multiplex (MUX) devices, and so on. Refer to Table 27 for
output function numbers and program addresses.
•
Addresses: 2772 to 2841
•
Data Digits:
•
•
Data Digit 1: Must = *0 to follow wireless keypad option key
•
Data Digit 2: ____ (refer to Table 26)
Selections: 0 to 2, *0 (hexadecimal value that displays as “A” at the keypads)
Table 26: Output Function to Follow the
Wireless Keypad, Data Digit 2
Table 27:
Options
RF3341
Value
Output Function
Program Address 1
Disabled
Momentary
Toggle
Option Key
Option Key
0
1
2
1
2
3
4
5
6
7
8
9
10
11
12
13
14
15
16
17
18
19
20
21
22
23
24
2772
2775
2778
2781
2784
2787
2790
2793
2796
2799
2802
2805
2808
2811
2814
2817
2820
2823
2826
2829
2832
2835
2838
2841
Bosch Security Systems | 6/05 | 4998154962B
Output Functions
Addresses
and
Program
DS7400XiV4-EXP | Wireless Reference Guide | 5.0
Adding Keyfobs
EN | 20
5.0 Adding Keyfobs
Keyfobs are zone inputs. They do not require keypad assignment programming.
If the system is using two receivers, please note the following: Because keyfobs are assigned to a zone
and zones are assigned to a receiver, the coverage of the keyfob is limited to the assigned receiver.
Each RF3332/RF3332E (2-Button) or RF3334/RF3334E (4-Button) Keyfob occupies 1 RF zone. It is possible to
have up to 112 keyfobs on a system. The RF3334/RF3334E Keyfob can also operate programmed outputs.
5.1
Assign a Zone Type
The zone type for odd numbered zones is programmed in the first data digit of these addresses. The zone type for
even numbered zones is programmed in the second data digit of these addresses. Refer to Table 30 for zone and
address cross reference.
•
Each zone that is used for a keyfob must be programmed as Zone Type 5.
•
Each keyfob must be assigned to a zone.
•
Data Digit 1 and/or Data Digit 2 must be set to 5.
Any zones used by RF devices must be programmed as RF zones before the wireless devices can be
activated. This is done by programming for an RF receiver in Address 2731. Refer to Section 2.2
Receiver Programming. Refer to the DS7400Xi-EXP Reference Guide (P/N: 4998154963) for more
information.
•
Addresses: 0483 to 0538
•
Data Digit:
•
•
Data Digit 1: ____ (refer to Table 28)
•
Data Digit 2: ____ (refer to Table 29)
Selections: 0 or 5
Table 28: Address 0483 to 0538, Data Digit 1
(Odd-Numbered Zones)
Select Option
Value
RF Sensors/Contacts
RF Keyfobs
0
5
Table 29: Address 0483 to 0538, Data Digit 2
(Even-Numbered Zones)
Select Option
Value
RF Sensors/Contacts
RF Keyfobs
0
5
Bosch Security Systems | 6/05 | 4998154962B
DS7400XiV4-EXP | Wireless Reference Guide | 5.0
Adding Keyfobs
EN | 21
Table 30: Address 0483 to 0538, Zone-to-Address Cross Reference
Zones
Address
Zones 137 & 138
0483
Zones 175 & 176
0502
Zones 213 & 214
0521
Zones 139 & 140
0484
Zones 177 & 178
0503
Zones 215 & 216
0522
Zones 141 & 142
0485
Zones 179 & 180
0504
Zones 217 & 218
0523
Zones 143 & 144
0486
Zones 181 & 182
0505
Zones 219 & 220
0524
Zones 145 & 146
0487
Zones 183 & 184
0506
Zones 221 & 222
0525
Zones 147 & 148
0488
Zones 185 & 186
0507
Zones 223 & 224
0526
Zones 149 & 150
0489
Zones 187 & 188
0508
Zones 225 & 226
0527
Zones 151 & 152
0490
Zones 189 & 190
0509
Zones 227 & 228
0528
Zones 153 & 154
0491
Zones 191 & 192
0510
Zones 229 & 230
0529
Zones 155 & 156
0492
Zones 193 & 194
0511
Zones 231 & 232
0530
Zones 157 & 158
0493
Zones 195 & 196
0512
Zones 233 & 234
0531
Zones 159 & 160
0494
Zones 197 & 198
0513
Zones 235 & 236
0532
Zones 161 & 162
0495
Zones 199 & 200
0514
Zones 237 & 238
0533
Zones 163 & 164
0496
Zones 201 & 202
0515
Zones 239 & 240
0534
Zones 165 & 166
0497
Zones 203 & 204
0516
Zones 241 & 242
0535
Zones 167 & 168
0498
Zones 205 & 206
0517
Zones 243 & 244
0536
Zones 169 & 170
0499
Zones 207 & 208
0518
Zones 245 & 246
0537
Zones 171 & 172
0500
Zones 209 & 210
0519
Zones 247 & 248
0538
Zones 173 & 174
0501
Zones 211 & 212
0520
5.2
Zones
Address
Zones
Address
Program a Zone
Zone Programming (Program Addresses 0167 to 0278) is different when programming keyfobs. Data
Digit 1 is always 0, and Data Digit 2 can only be 1, 2, 3, or 4.
Keyfob function programming starts at Program Address 0167.
Hint: Zone number + 30 = The Program Address (for example: Zone 137 + 30 = Program Address 0167)
•
Addresses: 0167 to 0278
•
Data Digit:
•
•
Data Digit 1: Must = 0
•
Data Digit 2: ____ (refer to Table 31)
Selections: 0 to 4
Table 31: Zone Programming (Addresses 0167 to 0278,
Data Digit 2)
Select Options
Selections
for Data
Digit 2
1 2 3 4
Single Partition No Force Arming Allowed
•
Single Partition Force Arming is Allowed
All Partitions No Force Arming Allowed
All Partitions Force Arming is Allowed
Bosch Security Systems | 6/05 | 4998154962B
•
•
•
DS7400XiV4-EXP | Wireless Reference Guide | 5.0
5.3
Adding Keyfobs
EN | 22
Assign Keyfobs to an Area
Each keyfob must be assigned to one or all areas. If one of the “All Partitions” options was selected for the zone
(refer to Section 5.2 Program a Zone), you do not need to assign an area to the zone.
The area assignment for odd numbered zones is programmed into the first data digit of these addresses. The area
assignment for even numbered zones is programmed into the second data digit.
For partition assignment addresses, refer to Section 3.4 Assign an Area (Partition) to the Zone of this Guide, or refer to
the DS7400Xi-EXP Reference Guide (P/N: 4998154963).
•
Addresses: 0355 to 0410
•
Data Digits:
•
•
Data Digit 1: ____ (refer to Table 32; default = 0; applies to odd-numbered zones)
•
Data Digit 2: ____ (refer to Table 32; default = 0; applies to even-numbered zones)
Selections: 0 to 7
Table 32: Assigning Keyfobs to a Partition (Address
0355 to 0410, Data Digits 1 & 2)
5.4
Select Option
Value
Belongs to Partition 1
Belongs to Partition 2
Belongs to Partition 3
Belongs to Partition 4
Belongs to Partition 5
Belongs to Partition 6
Belongs to Partition 7
Belongs to Partition 8
0
1
2
3
4
5
6
7
Program Wireless Keyfobs
When the Keyfob Zone Programming (Addresses 0167-0278) and Keyfob Partition Assignment Programming
(Addresses 0355 to 0410) is completed, the wireless keyfobs can be programmed into the system. Refer to Section
6.0 Devices for programming the keyfobs.
Bosch Security Systems | 6/05 | 4998154962B
DS7400XiV4-EXP | Wireless Reference Guide | 5.0
5.5
Adding Keyfobs
EN | 23
Program the Wireless Keyfob Panic Function (Optional)
The Panic function only operates if programmed in the control panel. Programming Address 3148 (“C” key) allows
you to disable or enable the Panic key on the keyfob for silent, pulsed, or steady alarm. Refer to Emergency Key
Programming: Program Addresses 3147-3148 in the DS7400Xi-EXP Reference Guide (P/N: 4998154963) for more
information.
If the control panel is set for Commercial Fire Mode, the values for the Panic Key might be forced to
different values. For more information, refer to Commercial Fire Mode Programming: Program Address
2733 in the DS7400Xi-EXP Reference Guide (P/N: 4998154963).
•
Address: 3148
•
Data Digit:
•
Address 3148, Data Digit 1: ____ (refer to Table 33; default = 0)
•
Address 3148, Data Digit 2: Must be 0
•
Default: 0
•
Selections: 0 to 3
Table 33: Panic Key C Selections (Address 3148 Data Digit 1)
5.6
Select Option
Value
Panic Key Disabled
Panic Key = Silent Alarm
Panic Key = Steady Alarm
Panic Key = Pulsed Alarm
0
1
2
3
Program On-Board Outputs for the RF3334/RF3334E Keyfob (Optional)
The RF3334/RF3334E Keyfob has two key outputs which you can program to drive the control panel’s on-board
outputs. Use either key to drive any of the three on-board outputs, or any of the 24 custom programmable
outputs.
The operation of the Option key is the same on all keypads and keyfobs if they are assigned to the same area.
•
Addresses: 2734 to 2736
•
Data Digits:
•
•
Data Digit 1: Must = *0 for wireless keyfob outputs (refer to Table 35 for default values)
•
Data Digit 2: ____ (refer to Table 34 for options; refer to Table 35 for default values)
Selections: 0 to 4
Table 34: Programming On-Board Keyfob
Outputs (Address 2734 to 2736,
Data Digit 2 When Data Digit 1 = *0)
Options
RF3334/RF3334E
Value
Disabled
Momentary
Toggle
Momentary
Toggle
Option Key
Option Key
Auxiliary Key
Auxiliary Key
0
1
2
3
4
Bosch Security Systems | 6/05 | 4998154962B
Table 35: Address 2734 to 2736 Defaults
Output
Address
Default
Alarm
Programmable Output 1
Programmable Output 2
2734
2735
2736
6 3
3 3
2 3
DS7400XiV4-EXP | Wireless Reference Guide | 5.0
5.7
Adding Keyfobs
EN | 24
On-Board Output Area (Partition) Assignment and Chirp Control (Optional)
You can assign outputs to follow the Option Key in one or all areas in the Output Area Assignment Addresses
2737 and 2738. You can also program outputs to “chirp” (a ½-second sounder output when the control panel is
armed, or two ½-second sounder outputs when the control panel is disarmed).
•
Addresses: 2737 to 2738
•
Data Digits:
•
•
Data Digit 1: ____ (refer to Table 36; refer to Table 38 for defaults)
•
Data Digit 2: ____ (refer to Table 36 for Address 2737 and Table 37 for Address 2738; refer to Table 38 for
defaults)
Selections: 0 to 8
Table 36: Address 2737 to 2738, Data Digit 1,
and Address 2737 Data Digit 2
Select Option
Value
Belongs to Area 1
Belongs to Area 2
Belongs to Area 3
Belongs to Area 4
Belongs to Area 5
Belongs to Area 6
Belongs to Area 7
Belongs to Area 8
Follows all Areas
0
1
2
3
4
5
6
7
5.8
8
Table 37: Address 2738, Data Digit 2
Keyfob Chirp Options
Value
Chirp Disabled
Bell Output
Programmable Output 1
Programmable Output 2
0
1
2
3
Table 38: Address 2734 to 2738 Defaults
Output
Address
Default
Alarm
Programmable Output 1
Programmable Output 2
Keyfob Chirp Options
2737 DD1
2737 DD2
2738 DD1
2738 DD2
8
8
8
0
Program Output Functions to Follow the Keyfob Output Buttons (Optional)
You can assign output functions to off-board devices, multiplex (MUX) devices, and so on. Refer to Table 40 for
output function numbers and Program Addresses.
•
Addresses: 2772 to 2841
•
Data Digit:
•
•
Data Digit 1: Must = *0 to follow wireless keyfob output buttons
•
Data Digit 2: ____ (refer to Table 39)
Selections: 0 to 4
Bosch Security Systems | 6/05 | 4998154962B
DS7400XiV4-EXP | Wireless Reference Guide | 5.0
Table 39:
Adding Keyfobs
Output Function to Follow Wireless Keyfob Output
Buttons, Data Digit 2
Select Option
RF3334/RF3334E
Disabled
Momentary
Toggle
Momentary
Toggle
Option Key
Option Key
Auxiliary Key
Auxiliary Key
Table 40:
EN | 25
Selections for
Data Digit 2
0
1
2
3
4
Output Functions and Program Addresses
Output Function
Program Address 1
1
2
3
4
5
6
7
8
9
10
11
12
13
14
15
16
17
18
19
20
21
22
23
24
2772
2775
2778
2781
2784
2787
2790
2793
2796
2799
2802
2805
2808
2811
2814
2817
2820
2823
2826
2829
2832
2835
2838
2841
Bosch Security Systems | 6/05 | 4998154962B
DS7400XiV4-EXP | Wireless Reference Guide | 6.0
Programming Wireless Devices
EN | 26
6.0 Programming Wireless Devices
All wireless RF devices (keypads, keyfobs, PIRs, smoke detectors, and contact points) must be programmed into
the control panel before they are recognized.
Each wireless device has a unique ID code attached to the device in the form of a two-part bar code sticker or a
number set. See Figure 3.
Figure 3: Bar Code Sticker or Number Set
167770187
167770187
167770187
2
167770187
1
1 - Bar code sticker
2 - Number set
Keep one part of the sticker for your records and leave the second part attached to the device.
Use the following procedure to program a wireless device after the control panel is programmed for RF zones:
1. Enter the programmer’s mode by entering the default code followed by [#] [0].
The code for the programmer’s mode is preprogrammed at the factory as 987654. The control panel’s
factory default for PIN length is four digits. Therefore, as the control panel is shipped, the default code for
the programmer’s mode is 9876. However, if you change the PIN length default from four digits to six
digits, the programmer’s mode default code changes to 987654.
You can exit the programming mode at any time by pressing and holding the [*] key for two seconds. If no
keystrokes are detected for thirty minutes, the control panel automatically exits programmer’s mode.
2.
Enter the RF programming mode by pressing [9] [9] [9] [0] [#].
If you make an entry mistake while in RF programming mode, you can clear the mistake by pressing the [*]
key twice.
Exit RF programming mode by pressing [Off].
3.
If no RF zones are programmed into the control panel, the following message displays:
No RF Zones
Press Off
4.
If the control panel is programmed with RF zones, the RF Installer’s Menu appears:
Add RF Zone?
Press 1
Test RF Zone?
Press 2
Remove RF Zone?
Press 3
Bosch Security Systems | 6/05 | 4998154962B
DS7400XiV4-EXP | Wireless Reference Guide | 6.0
6.1
1.
2.
Programming Wireless Devices
EN | 27
Adding RF Zones
Select “Add RF Zone” by pressing the [1] key.
If all of the RF zones are added, the following message appears:
Last RF Zone
Press Off
3.
If zones are ready to be added, the following display appears:
Add Zone ###
Press #
4.
The zone number shown is the lowest number zone available to add. If no wireless devices (including
keypads) are programmed, the zone shown is 130. Zones 130 through 134 are reserved for wireless keypads,
and Zones 137 through 248 are reserved for other wireless devices. Select other zones by pressing the [ON] key
on the keypad. If you step through all the zones and the message “Last RF Zone - Press Off” appears, return to
the first available zone for programming by pressing the [On] key. You cannot step backward through the
zones - only forward.
RF input zones and keyfobs appear on the display as Zones 137 to 248. RF keypads appear as Zone
130 (for Keypad 1) through Zone 134 (for Keypad 5).
5.
When the desired zone number is shown in the display, press the [#] key to accept that zone number and
display the following:
Enter ID Zn ###
6.
Enter the 9-digit code from the ID sticker on the device, followed by [#]. The system confirms acceptance of the
device with a single beep from the keypad, and displays the following message:
Added Zone ###
Press On
7.
8.
Pressing the [On] key prompts the system to the next zone that is ready to be added to the system, or displays
the message “No Zones To Add Press Off” if there are no zones to add.
A three beep tone from the keypad indicates that the device was not accepted by the system.
If the display shows the following message, it indicates that the sensor code was already added to the system.
The sensor shown can be removed from the system (refer to Section 6.3 Removing RF Zones (and RF Keypads)),
or another sensor can be added to the system.
Duplicate Zn ###
Press #
9. Press the [#] key to program the zone again.
10. If the following message appears, it indicates that the device ID number was not entered correctly:
ID Entry Error
Press #
11. Press the [Off] key to exit the Add RF Zone mode. The system pauses while the RF zones are configured.
Configuring RF
Please Wait
6.2
1.
Testing RF Zones
From the RF Installer’s menu, select Test RF Zone (selection 2).
Test RF Zone?
Press 2
2.
If there are no RF zones programmed into the system, or if the zones were not “Added”, the following
message displays:
Bosch Security Systems | 6/05 | 4998154962B
DS7400XiV4-EXP | Wireless Reference Guide | 6.0
Programming Wireless Devices
EN | 28
No RF Zones
Press Off
3.
If RF zones are programmed into the system and the sensors were “Added”, the display identifies the first RF
sensor available for testing:
Test Zone ###
Press #
4.
Test the zone shown by pressing the [#] key, or advance to another zone by pressing the [On] key. When a
zone is selected, you are prompted to activate the point. You can activate the point by creating an alarm or
tamper condition.
Zone XXX
Activate Point
5.
The test values display.
Zn XXX Marginal
P:XX L:XXX A:XXX
The information displayed is the zone number (“Zn”) and the packet count (“P”). When sending information,
the transmitter sends the same information 4 or 8 times in “packets”, and the receiver must receive at least 1 of
these packets. The number of packets sent depends on the device sending the information and the type of
information. The number of packets does not reflect the actual strength of the signal.
“Good,” “Marginal,” or “Relocate” also appear, depending on the relative signal strength. The keypad beeps:
6.
6.3
•
Eight times if the signal is “Good”
•
Four times if the signal is “Marginal”
•
Once if the signal is “Relocate”
The “L” represents the relative signal strength above the ambient noise level, and is displayed as a value of 0
to 99. The “A” represents the ambient noise level and is displayed as a value of 0 to 99.
Pressing the [#] key allows you to select another zone. Pressing the [Off] key exits test mode.
Removing RF Zones (and RF Keypads)
Removing RF zones is a two-step process. First, the zone must be removed from the receiver using the
following procedure. After the zone is removed from the receiver, remove the zone from its zone
programming address (0167 to 0278) by setting the appropriate zone programming address to 00.
Perform the following procedure to remove an RF zone. Because z o n e a d d r e s s e s f o r R F keypads a r e
already s e t t o zero, they d o n o t n e e d t o be changed.
1. Press [3] to select “Removing RF Zones”.
Remove RF Zone?
Press 3
2.
If no RF zones are programmed, the following message displays:
No RF Zones
Press Off
3.
If there are RF zones to remove, the first available zone is displayed:
Remove Zone ###
Press #
4.
Select the zone displayed, or advance to another zone by pressing the [On] key.
If the [#] key is pressed, the control panel scans the receiver to remove the ID for the specified sensor. When
completed, the display shows the following message:
Zone Removed ###
Press #
5.
Press the [#] key to view the next zone, or press the [Off] key to exit Remove Zone mode.
Bosch Security Systems | 6/05 | 4998154962B
DS7400XiV4-EXP | Wireless Reference Guide | 6.0
6.4
Programming Wireless Devices
EN | 29
RF Zone Troubles
RF Zone Troubles only appear on the display after a user code followed by [#] [8] [7] is entered into the keypad.
One or more of the following messages appear if there is a problem with a RF Zone:
•
Missing Zone: Indicates the sensor zone failed to receive a report from the sensor during the supervisory
period of 4 or 12 hours.
Missing Zone ###
(Zone Text)
•
Trouble Zone: Indicates that the RF sensor detected a trouble. Not all types of sensors have the ability to
report troubles.
Trouble Zone ###
(Zone Text)
•
Zone Trouble: Might indicate a loop trouble condition.
Zone Trouble ###
(Zone Text)
•
Tamper Zone: The cover tamper indicates that the sensor cover was removed or tampered with.
Tamper Zone ###
(Zone Text)
•
Low Battery: Indicates that the sensor battery is low.
Low Bat Zone ###
(Zone Text)
6.5
Receiver Trouble Delays
Receiver #1 refers to the receiver with the lower zone numbers. Receiver #2 refers to the receiver
with the upper zone numbers. Refer to the receiver’s Installation Guide for additional information.
The RF keypad can display the following receiver troubles:
•
RF Receiver Tamper: Indicates that one of the receiver’s covers was removed or tampered with. Receiver
#1 refers to the receiver with the lower zone numbers.
Control Trouble
Tamper RF Rcvr #
•
RF Receiver Jammed: Indicates that the receiver might be receiving interference from outside sources. Older
cell phones, multichannel cordless phones, some business/police/fire band radios, “walkie talkies,” and so on
can cause interference. Receiver #1 refers to the receiver with the lower zone numbers.
Control Trouble
Jammed RF Rcvr #
•
RF Receiver Trouble: Indicates that the receiver did not receive any supervisory signals from any of the
sensors during the supervision interval. Check the receiver antennas and test all the sensors. If the sensor tests
are unsuccessful, the problem is likely with the receiver. Receiver #1 refers to the receiver with the lower
zone numbers.
Control Trouble
Trouble RF Rcvr #
•
RF Receiver Communications: Indicates that the receiver is not communicating with the multiplex interface
module at the control panel. Check for open, shorted, reversed, or miswired connections between the
multiplex interface module and the receiver. Make sure the receiver has +12 VDC power from the control
panel. The multiplex module or the receiver might also be at fault.
Control Trouble
Radio RX# Comm
Bosch Security Systems | 6/05 | 4998154962B
DS7400XiV4-EXP | Wireless Reference Guide | Notes
Notes
Bosch Security Systems | 6/05 | 4998154962B
EN | 30
DS7400XiV4-EXP | Wireless Reference Guide | Index
EN | 31
Index
A
O
A, B, and C Keys ..........................................................16
Assigning Keyfobs to a Partition ..................................22
On-Board Output Partition Assignment .................18, 24
On-Board Outputs...................................................17, 23
Output Function ......................................................19, 24
C
Cautions ..........................................................................4
Chirp Control ..........................................................18, 24
P
Partition...............................................................7, 11, 22
Programming the Control Panel .....................................5
D
Documentation Conventions...........................................4
E
Emergency Keys ...........................................................16
F
Follow the Keyfob Output Buttons...............................24
Follow the Wireless Keypad Option Key .....................19
I
Introduction.....................................................................4
J
Jam Detection Level .......................................................6
K
Keypad
Type ..........................................................................14
Keypad Partition ...........................................................14
Keypad Supervision ......................................................13
Keypad Type.................................................................13
R
Receiver Programming ...................................................5
Receiver Setup ................................................................5
Receiver Trouble Delays ..............................................29
Removing RF zones......................................................28
RF Receiver Communications ......................................29
RF Receiver Jam Detection Level ..................................6
RF Receiver Jammed ....................................................29
RF Receiver Tamper .....................................................29
RF Receiver Trouble.....................................................29
RF Zone Troubles .........................................................29
RF Zones.......................................................................27
Testing.......................................................................27
RF3334..........................................................................23
RF3341..........................................................................13
S
Scope of Document.........................................................4
Single Zone Input..............................................10, 11, 20
T
Tamper Zone.................................................................29
Trouble Zone.................................................................29
L
W
Low Battery ..................................................................29
Warnings .........................................................................4
Wireless Keyfob Panic Function ..................................23
Wireless Keyfobs ..........................................................22
Wireless Keypads..........................................................15
wireless RF devices.......................................................26
Wireless RF Sensors/Contacts ........................................7
M
Missing Zone ................................................................29
Multiple Zone Input ..........................................10, 11, 20
N
Notes ...............................................................................4
Bosch Security Systems | 6/05 | 4998154962B
Z
Zone Function ...........................................................7, 10
Zone Programming .......................................................21
Zone Trouble.................................................................29
Zone Type ...........................................................7, 10, 20
Bosch Security Systems
www.boschsecuritysystems.com
© 2005 Bosch Security Systems
4998154962B