1
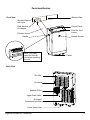
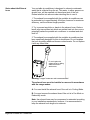
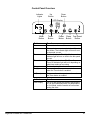
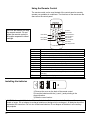
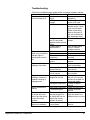
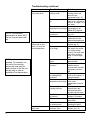
Portable Air Conditioner AP10001B Owner’s Manual For more information on other great EdgeStar products on the web, go to http://www.edgestar.com Important Safety Information Improper handling can cause serious damage to the appliance and/or to the user. Please read the following safety information. Electrical Safety This unit is designed for indoor use only. Do not use the unit in extremely humid or wet environments. Do not spray water and wet the housing or control panel. Do not pull the unit by the cord. Always turn the unit off and unplug it from the outlet when cleaning. Unplug the unit if it is not going to be used for a long period of time. Do not operate the unit with a damaged plug or a loose socket. Use only the correct power supply with appropriate amperage. If the power cord is damaged, it must be replaced by the manufacturer, a service agent, or qualified technician. Do not remove any part of the casing unless instructed by an authorized technician. General Safety This portable air conditioner is not intended to be used by children. Children should be supervised to ensure that they do not play with this product. Do not allow children to play with the controls or drop any objects into the air outlets or vents. Do not place objects or let any person sit on top of the unit. Only use in the upright position on a flat, level surface and provide at least 20 inches of clearance from any walls or objects. Route the power cord carefully to avoid a tripping hazard. This unit is intended for domestic use only. Do not use the portable air conditioner for industrial or commercial use. Any other use may invalidate the warranty. You must open the front louver when using the portable air conditioner. RESET TEST Your portable air conditioner is supplied with a Leakage-Current Detection and Interruption (LCDI) safety plug. This device provides protection to reduce the risk of fire due to arcing faults in the power supply cord. Before using your portable air conditioner, follow the instructions below to ensure that the LCDI plug is working properly: 1. Plug the power cord to a grounded outlet. 2. Press the TEST button on the LCDI plug. This should trip the plug and cut the power to the air conditioner. If the plug does not trip and you are able to turn on the unit, please contact technical support. DO NOT USE YOUR PORTABLE AIR CONDITIONER IF THE TEST FAILS. Press the RESET button to start using your air conditioner. Do not use the TEST and RESET buttons as an ON/OFF switch. Electrical products should not be disposed of with household waste. Please contact your local recycling center for more information on how to recycle electronic waste. i Table of Contents IMPORTANT SAFETY INFORMATION ................................................................. I INTRODUCTION ................................................................................................... 1 PARTS IDENTIFICATION ..................................................................................... 2 BACK VIEW .......................................................................................................... 2 FRONT VIEW ........................................................................................................ 2 INSTALLING THE CARBON FILTER ................................................................... 3 WINDOW KIT INSTALLATION INSTRUCTIONS ................................................. 4 PREPARATIONS FOR INSTALLING THE WINDOW KIT .................................................. 4 INSTALLING THE WINDOW PLATES .......................................................................... 5 ATTACHING THE OVAL ADAPTER TO THE EXHAUST HOSE ......................................... 6 CONNECTING THE EXHAUST HOSE TO THE UNIT ...................................................... 7 CONNECTING THE OVAL ADAPTER TO THE WINDOW KIT ........................................... 7 NOTES ABOUT THE EXHAUST HOSE ....................................................................... 8 DRAINING THE UNIT............................................................................................ 9 DIRECT DRAINAGE ................................................................................................ 9 MANUAL DRAIN .................................................................................................... 9 CONTROL PANEL OVERVIEW.......................................................................... 10 OPERATING THE CONTROL PANEL ............................................................... 11 POWER ............................................................................................................. 11 AUTO-RESTART: ................................................................................................ 11 COOLING MODE ................................................................................................. 11 DEHUMIDIFYING MODE ....................................................................................... 11 AUTOMATIC MODE ............................................................................................. 11 FAN ONLY MODE ............................................................................................... 11 FAN BUTTON ..................................................................................................... 12 TIMER BUTTON .................................................................................................. 12 How to set the unit to automatically turn on ................................................ 12 How to set the unit to automatically turn off ................................................ 12 LED DISPLAY .................................................................................................... 12 Error Codes ................................................................................................. 12 SLEEP BUTTON .................................................................................................. 12 USING THE REMOTE CONTROL ...................................................................... 13 INSTALLING THE BATTERIES ................................................................................ 13 NORMAL SOUNDS ............................................................................................. 14 ENERGY SAVING GUIDE................................................................................... 14 MAINTENANCE .................................................................................................. 14 CLEANING THE UNIT ........................................................................................... 15 CLEANING THE PRE-FILTERS ............................................................................... 15 PREPARATION FOR STORAGE ............................................................................. 15 TROUBLESHOOTING ........................................................................................ 16 TROUBLESHOOTING CONTINUED ......................................................................... 17 SPECIFICATIONS ............................................................................................... 18 EDGESTAR LIMITED WARRANTY ................................................................... 19 EdgeStar Portable Air Conditioner ii Introduction Thank you for purchasing this EdgeStar portable air conditioner. We are glad you chose us. We believe that your purchase of this product opens a relationship between you and EdgeStar. We will provide the customer support needed to nurture that relationship. This manual contains important information regarding the proper installation, use and maintenance of your portable air conditioner. Following this manual will ensure that your product will work at its peak performance and efficiency. Please save the original product packaging in case you need to safely transport your portable air conditioner. For Your Records: Please write down the model number and serial number below for future reference. Both numbers are located on the ratings label on the back of your unit and are needed to obtain warranty service. You may also want to staple your receipt to this manual as it is the proof of your purchase, and is also needed for service under your warranty. Model Number: Serial Number: Date of Purchase: To better serve you, please do the following before contacting customer service: If you received a damaged product, immediately contact the dealer that sold you the product. Read and follow this instruction manual carefully to help you install, use and maintain your portable air conditioner. Read the troubleshooting section of this manual as it will help you diagnose and solve common issues. Visit us on the web at http://www.edgestar.com to register your product, download product guides, additional troubleshooting resources and up-to-date information. If you need warranty service, our friendly customer service representatives are available via email at [email protected] or by telephone at 1 (866) 319-5473. First Time Operating Instructions Before use, make sure all packaging labels and materials are all removed from the unit. Be sure to keep track of all included parts and pieces before discarding packaging materials. It is advised that you keep the original box and packaging materials in case you are ever to move or ship the unit in the future. Let the unit stand for at least 24 hours before you use it; this allows the cooling components time to settle from transit. The instruction manual should be read before use. This owner’s manual is provided for reference use only. Specifications may change without prior notice. Refer to the product label on the back of your portable air conditioner for the latest technical information. 1 Parts Identification Front View Window Plate Window Plate with Hole Control Panel Oval Window Kit Adapter Front Air Vent/ Louver Exhaust Hose Remote Sensor Handle Note: You must open the front air vent when operating the unit. Caster Back View Pre-filter Air Intake Exhaust Outlet Upper Drain Valve Air Intake/ Compressor pre-filter Lower Drain Valve EdgeStar Portable Air Conditioner 2 Installing the Carbon Filter Your EdgeStar portable air conditioner ships with a pre-filter and an activated carbon filter. The carbon filter will help remove contaminates and odors from the air. It is recommended you replace the carbon filter every two to three months, or as needed. It is necessary to clean the pre-filter periodically. Follow the steps below to install the carbon filter: CAUTION: Never operate the air conditioner without the pre-filter attached. 1. Pull the pre-filter straight up. Filter frame Pre-filter Note: The size of the carbon filter may vary. 3 Activated carbon filter 2. Separate the filter frame from the pre-filter. 3. Place the activated carbon filter on the pre-filter. 4. Reattach the filter frame. 5. Insert the assembled pre-filter into the back of the unit. Window Kit Installation Instructions Preparations for installing the window kit You must vent your portable air conditioner when running in it cooling mode. Your unit includes a window exhaust kit that can be used to vent the unit out a window. Before you begin, make sure you have all the parts necessary for installation. Window Kit Parts: NOTE: Some models may ship with foam strips to minimize air gaps and for insulation purposes. Window Plate with Hole Window Plate Oval Window Kit Adapter Exhaust Hose NOTE: You may need to contact your electrician if your room’s circuit is not able to power your unit. If you have multiple windows, choose one that is near an electrical outlet that will be able to provide sufficient power to your unit. See the power requirements listed on the product label printed on the side, or on the back of your portable air conditioner. Your window kit can be installed on a horizontal or vertical sliding window as shown in the following pictures: Follow the instructions on the next pages to install the window kit. EdgeStar Portable Air Conditioner 4 Installing the window plates 1. Open your window and place the window kit with grooved side facing outward on the window sill. Then, slide the window kit plate to fit the width of the window. You can use screws to secure the window kit plate from sliding. CAUTION: Secure your window by using window locks. Please contact your retailer to purchase window locks. 5 2. Lower the window to secure the window kit in place. You may need to use duct tape to better secure the window kit. Attaching the oval adapter to the exhaust hose 3. Attach the oval adapter to the hose: A. Extend the end of the exhaust hose B. Thread the duct connector onto the hose by turning it clockwise until it stops. Caution: The unit is designed to be used indoors and freestanding, and not be used outdoors, or be built-in to a cabinet or used under a counter. 20” 4. Roll the unit towards the window kit. Leave a space that is at least 20 inches to the wall. EdgeStar Portable Air Conditioner 6 Connecting the exhaust hose to the unit 5. Align the slots on the hose connector to the tabs and snap into the back of the unit. Connecting the oval adapter to the window kit 6. Push the oval adapter through the window kit hole until it snaps in place. After you have installed the exhaust hose and window kit, you can plug in your portable air conditioner and start using it. 7 Notes about the Exhaust hose Your portable air conditioner is designed to exhaust condensate water that is collected from the air. This water, in either gaseous or droplet form, will be expelled out the exhaust port of the unit. Please take this into account when deciding how to vent it. 1. The exhaust hose supplied with the portable air conditioner can be extended up to approximately 48 inches; however for maximum efficiency, use the shortest length possible. 2. Try to prevent any kinks or bends in the exhaust hose. Kinks or bends may trap exhaust air which can radiate heat into the room or potentially cause the portable air conditioner to overheat and shut itself off. 3. The exhaust hose supplied with the portable air conditioner has been specifically designed for this air conditioner. Do not lengthen the hose by adding additional hoses or attachments. Do not replace it with any other hose. Do not lengthen the exhaust hose by adding additional hoses or attachments. Warning: Longer hoses are not recommended. The exhaust hose must be installed or removed in accordance with the usage modes: A: You must install the exhaust hose if the unit is in Cooling Mode. B: You must remove the exhaust hose if the unit is in Fan Mode or Dehumidify mode. Note: the exhaust hose may be compressed or extended according to your installation requirements; however, it is recommended to keep the exhaust hose length at a minimum. EdgeStar Portable Air Conditioner 8 Draining the Unit The unit will need to be drained if set to dehumidify mode. When the portable air conditioner is in cooling mode, it will remove moisture from the air. The condensed water from the air will be collected in an internal reservoir and will be evaporated and exhausted out of the exhaust hose. However, in very humid conditions, the internal reservoir may fill completely. This causes the air conditioner to turn off to avoid overflowing the internal reservoir. The unit will beep 8 times and the LCD will show a “P1” error code on the Control Panel if the reservoir is full of water. The fan motor will continue to run, but the air conditioner/ dehumidifier will stop running. Direct drainage For continuous use you can connect a drain hose to the upper drain port of the portable air conditioner. 1. Remove the rubber drain plug from the upper drain port. 2. Connect a drain hose to the upper drain port. (Some models may have a threaded valve for a garden hose. You may need to purchase an adapter.) The portable air conditioner will now drain through the drain hose. Please note that this unit has no drain pump; all water will drain with gravity only, i.e., only “downhill.” Manual Drain You may need to manually drain the unit if your unit stops running and displays a “P1” error. 1. Roll the unit to a location suitable for draining. 2. Remove the lower drain plug and allow the unit to drain completely. 3. Insert the lower drain plug to the lower drain port and restart the unit. 9 Control Panel Overview Indicator Lights Up Button Down Button LED Display HI A UTO COOL F DRY TIMER ON M ODE Timer Button Power Button Sleep Button FA N LOW Fan Speed Button Button Function Power Powers the unit on or off. Mode Changes between auto, cool, dehumidify and fan modes. The indicator light will turn on next to the mode you set. Fan Sets the fan speed. The High, Medium, or Low indicator light will turn on next to the fan speed you set. Used to enable the timer. The Timer On or Timer Off indicator light will be lit depending on what timer mode you are using. Enables the sleep function. Increases the set temperature or the time when the Timer button is enabled. Decreases the set temperature or time when the Timer button is enabled. Timer Sleep (Up) (Down) EdgeStar Portable Air Conditioner MED SLEEP TIMER OFF FAN Mode Button C Indicator Function LED Display The LED can display the ambient temperature in Fan and Dehumidify Mode, set temperature in Cool Mode, and the number of hours when setting the timer. 10 Operating the Control Panel Power Use the Power button to turn the portable air conditioner on and off. Auto-Restart: If power to the unit is interrupted, the air conditioner will restart itself in its last used mode/settings once power is restored. The compressor will restart after 3 minutes. Cooling Mode NOTE: The exhaust hose must be used in Cooling mode in order to cool a room. Dehumidifying Mode Cooling mode cools and dehumidifies the air. If the ambient temperature drops below the temperature you selected, the compressor turns off and the unit functions with the fan only. When the temperature rises above the temperature you selected, the compressor turns on again. Whether your desired temperature can actually be reached depends on the ambient conditions. The room temperature remaining above the set temperature is normal. To operate the unit in cooling mode: 1) Make sure the power cord is plugged into a power outlet. 2) Press the Power button. 3) Press the Mode button until the LED indicator next to “Cool” lights up. 4) Select the fan speed by using the Fan button. 5) Set the thermostat by using the Up and Down buttons. The thermostat is adjustable between 62°F - 88°F in two degree increments. During the Dehumidifying mode, the unit will condense water out of the air and accumulate the water in the reservoir. In this mode, you will not be able to select a different fan speed or adjust the temperature. The fan motor operates at Low speed. To operate the unit in dehumidifying mode: 1) Make sure the power cord is plugged into a power outlet. 2) Remove the exhaust hose from the back of the unit. 3) Press the Power button. 4) Press the Mode button until the LED indicator next to “Dry” lights up. NOTES: While in Dehumidifying mode, you must manually drain the water from the unit. Additionally, the ambient temperature in the room will probably rise by a few degrees. You will not be able to change the thermostat temperature while in Dehumidifying Mode. Keep windows and doors closed for the best dehumidification performance. Automatic Mode When the portable air conditioner is set to auto mode, it will automatically select cooling or fan only operation depending on what temperature you have selected and what the room temperature is near the unit. You cannot change the fan speed. To operate the unit in Auto mode: 1. Make sure the unit is powered on. Press the Mode button until the LED indicator next to “Auto” lights up. Fan Only Mode NOTE: Fan Only mode requires that the exhaust hose be removed. 11 Fan Only mode is used to circulate the air in your room. No temperature setting is needed. To operate the unit in Fan Only mode: 1) Plug in the unit to a power outlet and press the Power Button. 2) Press the Mode button until the LED indicator next to “Fan” lights up. 3) Press the Fan button to select the fan speed. You can choose between High, Medium and Low. The LED indicator next to the speed will light up. The Fan button is used to change the fan speed between High Medium, Low and Auto while in Cooling and Fan Only modes. Fan Button Press the Fan button to select the fan speed. The LED indicator light next to the High, Medium, or Low will light up. The Automatic Fan speed setting does not have a light. The timer can be used to either turn the unit on or off after a number of elapsed hours. The timer is adjustable between 1-10 hours in half-hour increments and from 10-24 hours in one hour increments. Timer Button How to set the unit to automatically turn on: 1) Press the Timer button while the unit is powered off. The Timer On indicator LED will light up. 2) Use the Up and Down buttons to set the time (displayed in hours). The unit will count down the time remaining. After the selected time passes, the unit will automatically turn on. How to set the unit to automatically turn off: NOTE: To cancel the timer, press the Power button or set the timer to 0.0. 1) Press the Timer button while the unit is powered on. The Timer Off indicator LED will light up. 2) Use the Up and Down buttons to set the time (displayed in hours). The unit will automatically count down and turn off after the selected time elapses. Note: If the unit displays an E1 or E2 error code, the timer is cancelled. LED Display The LED Display will show the set temperature by default. It will show the set temperature while in Dehumidify and Fan Only modes. You can switch between Fahrenheit and Celsius by holding both the Up and Down Buttons simultaneously for 5 seconds. If you enabled the Timer, the LCD Display will show the hour(s) set. Error Codes The display may show the following error codes: E1 – Room temperature sensor error. E2 – Evaporator temperature sensor error. E4 – Display panel communication error. If the unit displays the error codes E1, E2, or E4, power the unit off, and then unplug the unit for 15 minutes. Plug in and power on. If the issue persists, please contact customer service. P1 – Bottom reservoir is full. If the unit displays a P1 error code, drain the unit by following the “Draining the Unit” section. Sleep Button The Sleep Button is used to enable the Sleep mode. During the Sleep mode, the set temperature will increase by 2 degrees after 30 minutes, then it will increase by another 2 degrees after an additional 30 minutes and maintain this temperature for 7 hours before it returns to the original temperature and ends the Sleep mode. The Sleep mode is not available in Dehumidify and Fan Only modes. EdgeStar Portable Air Conditioner 12 Using the Remote Control The remote control can be used instead of the control panel to remotely operate your portable air conditioner. The functions on the remote are the same as on the control panel. NOTES: Be careful not drop the remote control. Do not place the remote control in a location exposed to direct sunlight. Up Button Power Button Mode Button Fan Speed Button Swing Button Timer On Button Sleep Button Reset Button Timer Off Button Lock Button LED Display Button Button On/Off Mode Speed Timer On Timer Off Temp Up Temp Down Swing Economy Reset Lock LED Function Powers the unit on or off. Changes between auto, cool, dehumidify and fan modes. Sets the fan speed between low, medium, high, or auto. Used to enable the On timer and set the timed hours. Used to enable the Off timer and set the timed hours. Increases the set temperature by 2 degree increments Decreases the set temperature by 2 degree increments *Not an option on this model Enables the Sleep mode Used to cancel all controller settings Used to lock all controller settings and prevent settings from changing Used to light the display Installing the batteries 1) Remove the cover on the back of the remote control. 2) Insert the batteries with the (+) and (-) ends pointing in the correct direction. 3) Slide the cover back on. CAUTION: Use only AAA batteries. Remove the batteries if the remote control will not be used for one month or longer. Do not attempt to recharge batteries not designed to be recharged. All batteries should be replaced at the same time. Do not mix old and new batteries. Do not dispose of batteries in a fire as they may explode. 13 Normal Sounds Your new portable air conditioner may make sounds that are not familiar to you. Most of the sounds that are made are normal. Hard surfaces like the floor, walls can make the sounds seem louder than they actually are. The following describes the kinds of sounds that might be new to you and what may be making them. The compressor may make a pulsating or high-pitched sound. Water running from the evaporator to the water bin may make a splashing sound. You may hear a gurgling sound due to the refrigerant flowing. You will hear fan noise from the exhaust and front vents. Energy Saving Guide Read and follow the guide below to get the best performance and efficiency from your portable air conditioner: Do not cover the air outlet (exhaust) while in use. Do not place the unit in front of curtains or drapes- to ensure they do not obstruct the air intake. Minimize the length of the exhaust hose. Make sure the exhaust hose is as straight as possible and avoid kinks or bends. Keep curtains, blinds or drapes closed during the sunniest part of the day and close all windows and doors. Use the timer to operate the unit before it is needed. For example, set the timer to turn on the unit in cooling mode for 3 or more hours to cool the room before you arrive. You may want to operate the unit all day if you live in a warmer climate. Minimize the heat sources (direct sunlight, computers, servers, people, etc.) in the room. Use the unit in a contained room. For example, a room with four walls and a ceiling, instead of a partitioned studio, or warehouse. Make sure the unit is on a level surface. Minimize the amount of humidity in the room. For example, run the unit as a dehumidifier. To prolong the compressor's life, please wait at least 3 minutes before turning the unit back on after shutting it off. Inspect and keep the pre-filters clean by cleaning regularly. Inspect and replace the activated carbon filters regularly. Perform routine maintenance. Maintenance Clean the air conditioner and filters regularly to maximize performance and efficiency, and prolong the unit’s life. Be sure to always unplug the air conditioner from the power outlet before cleaning. Follow the instructions on the next page to clean the portable air conditioner. EdgeStar Portable Air Conditioner 14 Cleaning the unit Use a soft dry cloth to wipe the body clean. If necessary, use lukewarm water to dampen a cloth to clean the unit. Use a soft bristle brush to clean between the vents. Carefully use a vacuum cleaner to clean the condenser coils Never use abrasive chemicals, volatile substances, gasoline, detergents, chemically treated cloths, or other cleaning solvents that may damage the cabinet exterior. Never spray water directly on the unit. Cleaning the pre-filters Clean the pre-filters periodically to prolong the unit’s life, and keep the unit running efficiently. Lint, dust, and dirt can clog the unit and reduce its performance and effectiveness. If the unit is used in a dusty environment you may need to clean it on a weekly basis. To clean the pre-filters, follow the steps below: 1) Power off the unit and remove the pre-filters. NOTE: The activated carbon filter is not washable. You should replace it every 2-3 months or as needed. Contact EdgeStar retailers for replacement filters. 2) Remove the activated carbon filter from the top pre-filter, if present. 3) Use a vacuum cleaner or tap the filter lightly to remove loose dust and dirt, then rinse thoroughly under lukewarm running water (below 104°F). You may use a mild soap and water solution if needed. Allow the pre-filter to air dry in a cool and shaded place. Dry thoroughly before reinstalling. Warning: Never operate the unit without the filters. Preparation for Storage If you are not going to be using the unit for an extended period of time, follow the instructions below before storing your unit: 1) Drain all the water from the unit’s reservoir. Operate the unit in fan mode for a few hours to thoroughly dry any moisture left on the coils inside the unit. 2) Power off the unit, and clean or change the filters. 3) Unplug and carefully wind the power cord. 4) Remove the exhaust hose and duct connectors and keep them in a safe place. 15 Troubleshooting Follow the troubleshooting guide below to resolve common issues. Issue My air conditioner is not functioning at all Possible Cause Unit is not receiving power LCDI power cord is tripped Insufficient power Water reservoir is full and P1 error code appears on the control panel Control panel is disconnected My remote control does not work and the indicator light on remote does not turn on My air conditioner is making a loud noise My air conditioner is making a continuous metallic knocking or pinging sound Batteries not installed Bad batteries Batteries installed incorrectly A defective remote control The unit is not level. A foreign object has jammed the fan. The floor below the unit is uneven Unit may have been shipped on its side Damaged compressor My air conditioner is leaking Drain plug is removed Cracked base pan My air conditioner runs for a little while and then it trips the power cord or the circuit breaker The control panel lights blink randomly The air conditioner may be plugged into an outlet that can not supply the correct amount of current Unit may have a faulty control panel EdgeStar Portable Air Conditioner Solution Make sure the unit is plugged in Press the Reset button on the LCDI cord Move the unit to another outlet. Check your circuit breaker. (Refer to the rating label on the back of the unit to determine the Amperage draw) Drain the unit and restart If no indicator lights turn on, contact customer service Install new batteries Replace the batteries Reinstall the batteries correctly Contact customer service Make sure the unit is on a level surface Remove the object from the fan Move the unit to a level surface Shut off the unit. Let the unit sit on a level surface for at least 24 hours and restart. Contact customer service Attach the drain plug Contact customer service Contact an electrician if the unit works in a different room or circuit Contact customer service 16 Troubleshooting continued Issue Possible Cause My air conditioner is not cooling at all Unit is not operating in cooling mode NOTE: If the ambient temperature is above 90°F the unit may not blow cold air. My air conditioner blows cold air, but does not lower the room temperature TIP: Run the unit before it is needed. For example, run the unit in the morning before the area gets hot, and continue to run the unit all day long in order to maintain a low temperature. My unit displays an error code 17 Solution Set the unit to be in cooling mode, and lower the set temperature (pg. 11) The compressor is not The compressor may on take up to 3 minutes to turn on, or longer if it is too warm The ambient Lower the room temperature is too high temperature to be below 90°F degrees The filter may be dusty Clean the filters. or blocked (pg. 15) Blocked exhaust port Remove any obstructions in the exhaust hose and port The unit is not vented The unit must be vented. (pg. 4) The area of the room Minimize the size of is too large the area to be cooled, i.e. adding a drop ceiling. Use more than one unit to cool the area, or use a larger unit Open windows and Close any open doors doors and windows Too many heat Remove or shut off sources additional heat sources such as radio equipment, servers, etc. The room/garage may Properly insulate the be inadequately room to be cooled, i.e. insulated using fiberglass The ambient The unit may not work temperature is too high if the room temperature is above 90°F Direct sunlight is Close curtains or pull heating the room down blinds, and minimize the direct sunlight into the room The filter may be dusty Clean the filter and or blocked replace it if needed Dirty condenser coils Carefully vacuum the coils clean Obstructed air intake Remove anything or exhaust ports blocking the ports Sensor error or water Read “Error Codes” reservoir is full section. (pg. 12) Specifications Description of product: Portable Air Conditioner Model: AP10001B Voltage/Frequency: AC 115V~60Hz Input Power: 1125W Current: 10.1A Color: Black and Gray Coolant: R410A Timer: 24 Hour Dimensions WxHxD: 16 ¾” x 26 ½” x 13 ½” Weight: 66 lbs EdgeStar Portable Air Conditioner 18 EdgeStar Limited Warranty One (1) Year Parts & Ninety (90) Days Labor This product is warranted by EdgeStar to be free from defective workmanship and materials, subject to any conditions set forth as follows: WHAT IS COVERED: LABOR: For a period of NINETY (90) DAYS from the date of original purchase, labor will be performed free of charge at an authorized EdgeStar repair facility. At its option, EdgeStar will repair the product with new or remanufactured parts, or exchange the defective product with a new, refurbished, or remanufactured product. If a product is replaced, it will carry the remaining warranty of the original product. After the ninety (90) day period, EdgeStar will no longer be responsible for labor charges incurred. All defective products and parts covered by this warranty will be repaired or replaced on a mail-in basis to an EdgeStar authorized repair facility. PARTS: For a period of ONE (1) YEAR from the date of original purchase, EdgeStar will supply new, rebuilt, or refurbished parts free of charge. EdgeStar may request a defective part be returned in exchange for the replacement part. All replacement parts or products will be new, remanufactured, or refurbished. All products and parts replaced by EdgeStar under warranty service become the property of EdgeStar. This warranty applies to the original purchaser only, and only covers defects in workmanship experienced during operation of the product under normal service, maintenance, and usage conditions. This warranty applies to the purchase and use of this product in residential settings within the United States of America. WHAT IS NOT COVERED: The following limitations apply to the coverage of this warranty. This warranty does not cover: Labor charges for installation, setup or training to use the product. Shipping damage, and any damage caused by improper packaging for shipment to an authorized service center, and any damaged caused by improper voltage or any other misuse, including abnormal service, handling, or usage. Cosmetic damage such as scratches and dents. Normal wear and tear on parts or replacement of parts designed to be replaced, e.g. filters, cartridges, batteries. Service trips to deliver, pick-up, or repair, install the product, or to instruct in proper usage of the product. Damages or operating problems resulting from misuse, abuse, operation outside environmental specifications, uses contrary to instructions provided in the owner’s manual, accidents, acts of God, vermin, fire, flood, improper installation, unauthorized service, maintenance negligence, unauthorized installation or modification, or commercial use. Labor charges incurred 91 days or more after the date of original purchase. The use of EdgeStar products in commercial settings. Optional accessories, attachments, and appearance items. Products that have been modified to perform outside of specifications without the prior written permission of EdgeStar. Products lost in shipment, or theft. Products sold AS IS or from an unauthorized reseller. Products that have had their serial numbers removed or defaced. Products with serial numbers that have been invalidated. OBTAINING WARRANTY SERVICE: If you believe your product is defective, contact EdgeStar Customer Support for troubleshooting assistance and warranty service at 1-866-319-5473. Please have your serial number and proof of purchase available. Once an EdgeStar authorized representative has confirmed that your product is defective and eligible for warranty service, the product must be returned to an EdgeStar repair facility. The purchaser is solely responsible for prepaying all shipping related costs to and from the repair facility. EdgeStar is not responsible for damage resulting from shipper mishandling or improper packaging. Do not return a defective product to the place of purchase. Products received without a return authorization number will be refused. THIS WARRANTY IS IN LIEU OF ANY OTHER WARRANTY, EXPRESS OR IMPLIED, INCLUDING WITHOUT LIMITATION, ANY WARRANTY OF MERCHANTABILITY OR FITNESS FOR A PARTICULAR PURPOSE. TO THE EXTENT ANY IMPLIED WARRANTY IS REQUIRED BY LAW, IT IS LIMITED IN DURATION TO THE EXPRESS WARRANTY PERIOD ABOVE. NEITHER THE MANUFACTURER NOR ITS DISTRIBUTORS SHALL BE LIABLE FOR ANY INCIDENTAL, CONSEQUENTIAL, INDIRECT, SPECIAL, OR PUNITIVE DAMAGES OF ANY NATURE, INCLUDING WITHOUT LIMITATION, LOST REVENUES OR PROFITS, OR ANY OTHER DAMAGE WHETHER BASED IN CONTRACT, TORT, OR OTHERWISE. SOME STATES DO NOT ALLOW THE EXCLUSION OF INCIDENTAL OR CONSEQUENTIAL DAMAGES, SO THE ABOVE EXCLUSION MAY NOT APPLY TO YOU. THIS WARRANTY GIVES YOU SPECIFIC LEGAL RIGHTS. YOU MAY HAVE OTHER RIGHTS THAT VARY FROM STATE TO STATE. 19 EdgeStar Products Box 81336 Austin, TX 78708-1336 Toll Free: 1-866-319-5473 Web: http://www.edgestar.com E-mail: [email protected] Register your product, download owner’s manuals, access additional troubleshooting resources, and obtain more information on other great EdgeStar products on the web at: http://www.edgestar.com Product contents and specifications may change without notice. Copyright © 2010 Living Direct, Inc. All rights reserved.