1
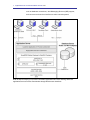
PegaRULES Process Commander Release V6.1 SP2 Installing on JBoss Application Server— Community Edition (jboss.org) September 28, 2010 Copyright 2010 Pegasystems Inc., Cambridge, MA All rights reserved. This document and the software describe products and services of Pegasystems Inc. It may contain trade secrets and proprietary information. This information should not be disclosed to third parties unless otherwise provided for by a contract or business agreement with Pegasystems. This document and the software are protected by federal copyright law, international laws, and/or applicable treaties. This document is current as of the date of publication only. Changes in the document may be made from time to time at the discretion of Pegasystems. This document remains the property of Pegasystems and must be returned to it upon request. This document does not imply any commitment to offer or deliver the products or services provided. This document may include references to Pegasystems product features that have not been licensed by your company. If you have questions about whether a particular capability is included in your installation, please consult your Pegasystems service consultant. Other brand or product names are trademarks of their respective holders. This document is the property of: Pegasystems Inc. 101 Main Street Cambridge, MA 02142-1590 Phone: (617) 374-9600 Fax: (617) 374-9620 www.pega.com PegaRULES Process Commander Document: Installation Guide Software Version: 6.1 SP2 Updated: September 28, 2010 Contents Introduction..................................................................................................................................... 1 Process Commander Deployment Architecture ............................................................ 1 Overview of the Installation Procedure ................................................................................. 3 Process Commander Core Component Versions ................................................................ 5 Step 1: Environment Considerations........................................................................................... 6 Prerequisites ............................................................................................................................ 6 Supported Process Commander Platforms ................................................................... 7 Check the Pega Developer Network for the Latest Information ................................... 7 A Note for PRPC 4.2 Users .............................................................................................. 8 Step 2: Database Preparation ....................................................................................................... 9 Database Prerequisites ........................................................................................................... 9 Creating a PRPC Database ................................................................................................... 10 Creating Access to the Database ......................................................................................... 10 User Permissions for the Microsoft SQL Database..................................................... 11 User Privileges for the Oracle Database ...................................................................... 12 User Privileges for the UDB Database.......................................................................... 12 Create the Schema in Process Commander Database ...................................................... 12 Using a SQL Script to Create the Schema ................................................................... 13 Next Steps .............................................................................................................................. 13 Step 3: Preparing the Application Server .................................................................................. 14 Setting up the Operating Environment ................................................................................ 14 Verify the JBoss Environment ...................................................................................... 15 Create a Process Commander Server ................................................................................. 16 Set up default Pega credentials for the server ................................................................... 17 Edit conf\login-config.xml ............................................................................................. 17 Create users.properties and roles.properties files ..................................................... 17 Modify the JBoss JCA service's handling of unclosed connections ............................... 18 Configuring Database support on your Application Server .............................................. 18 Confirm that the appropriate JDBC driver jar files are installed ................................ 18 Create a DataSource configuration file ........................................................................ 19 Deploying Process Commander .......................................................................................... 22 Deploying the PRPC Application Archive .................................................................... 22 Deploying prsysmgmt_jboss4.war or .ear .......................................................................... 23 iv Pegarules Process Commander Installation Guide V6.1 SP2 Deploying the Online Help Application ............................................................................... 24 Assigning the PegaDiagnosticUser Role to your System Management Application Users ................................................................................................................................................ 24 Next Steps ....................................................................................................................... 25 Steps 4 - 9: Rulebase Setup........................................................................................................ 26 Install the Process Commander Schema and Rules in the Database............................... 26 Step 10: Final Settings in Process Commander ....................................................................... 40 Configure your environment ......................................................................................... 41 Enable Developer Help and the System Management Application ............................ 42 Create an Organization .................................................................................................. 43 Create a Systems Management Node........................................................................... 45 Install Solution Frameworks................................................................................................. 49 Appendix A: Command-line Interfaces for Installation, Upgrade, and Utilities ..................... 50 Prerequisites................................................................................................................... 51 Installation and Upgrade Setup..................................................................................... 51 Running the Install and Upgrade Scripts ..................................................................... 54 Advanced Properties ..................................................................................................... 54 Other Environment Properties ...................................................................................... 55 Introduction This document describes how to install a new instance of PegaRULES Process Commander 6.1 SP2 on JBoss Application Server—Community Edition (jboss.org) 4.2.2. Note: A separate Installation Guide is provided for installing Process Commander on the JBoss server distributed with the Red Hat Enterprise Application Platform. For installing on the Red Hat platform, see Installing on JBoss Application Server—Red Hat EAP 4.3. For information about upgrading an existing Process Commander 5 installation to 6.1 SP2 see the PegaRULES Process Commander Upgrade Guide 5.x to 6.1 SP2, released with Process Commander 6.1 SP2. To upgrade an existing Process Commander 6.1 installation to 6.1 SP2, see the PegaRULES Process Commander Upgrade Guide 6.1 to 6.1 SP2, released with Process Commander 6.1 SP2. These documents and any updates to existing Process Commander documentation are available on the Pega Developer Network (pdn.pega.com). Please check this site for the latest installation and configuration information. Process Commander Deployment Architecture Process Commander is a Java EE enterprise application. As shown in the diagram below, it runs on top of two main platform sub-systems: 1. A database system to store the rules and work objects used and generated by Process Commander. 2. An application server that supports the Java EE specification. The application server provides a run-time environment and other services, 2 PegaRULES Process Commander Installation Guide v6.1 SP2 such as database connections, Java Messaging Services (JMS) support, and connector and services interfaces to other external systems. Both developers working on Process Commander applications and users working with those applications access Process Commander through Web browser interfaces. 3 Overview of the Installation Procedure The following outline details the steps in the 6.1 SP2 installation process: Preparation Phase Step 1 – Environment Considerations Step 2 – Database Preparation Step 3 – Application Server Preparation Rulebase Setup Phase Step 4 - License Agreement Step 5 - Type of Setup Step 6 - Database Configuration Step 7 - Database Connection Step 8 - Temporary Directory Step 9 - Rulebase Loading PRPC Configuration Phase Step 10 – Final Settings in PRPC Installing Process Commander includes 10 steps organized into three phases: 1. Preparation Phase You complete the Preparation Phase following the procedures in this guide. ■ Step 1: Environment Considerations, page 6 . Make sure that your environment meets the requirements for PRPC 6.1 SP2 in terms of: Hardware, OS, JVM, JDBC Driver, Application Server, Database Server, PRPC, and their respective settings. 1. Review the current Platform Support Guide, which is available on the Pega Developer Network (PDN) or from your Pega account executive. This document lists the recommended software components needed to support Process Commander, and any special requirements or known issues with particular vendors or versions. 2. Review your site’s deployment requirements with your IT representatives. 3. Consult with your Pegasystems representative about your installation plans. Pegasystems’ prior experience with various platforms and deployment architectures can help your installation go smoothly. 4 PegaRULES Process Commander Installation Guide v6.1 SP2 ■ Step 2: Database Preparation, page 9. Create and configure a blank database for Process Commander to use. You can use SQL scripts provided by Pegasystems to create the schema required by Process Commander in the database, or you can choose to have the Installation and Upgrade Assistant create the schema when you run that tool. You provide connection information for this database to the Installation and Upgrade Assistant used in the Rulebase Setup Phase and to specify the data source in your application server. The connection information you will need includes the location of the JDBC driver file, the driver class name, the database connection URL, and the database user's username and password. Note: When the Database Preparation is complete, Step 3, the Application Server Preparation, and Steps 4-9 in the Rulebase Setup Phase can be performed in either order or simultaneously. You can, for example, launch the Rulebase Setup process in Step 9 of the Assistant and then configure your Application Server while the Rulebase load process is running. However, you must configure the application server and deploy the Process Commander applications before you can complete Step 10, PRPC Final Settings. Important: You must be careful not to start the deployed Process Commander applications while the Rulebase loading process is still running on the database. Note that your application server may start the application automatically when it is deployed. If the Process Commander application attempts to connect to the database while the Rulebase is loading, the database loading will not complete correctly. ■ Step 3: Application Server Preparation, page 14. Configure your application server to support the Process Commander application, including: 1. Configure the right Database Driver for your Database 2. Configure the PRPC Data Source 3. Configure other Application Server settings 4. Deploy the Process Commander application (WAR or EAR) 5. Deploy the online help application (prhelp.war) and System Management Application (prsysmgmt_jboss4.war or .ear for JBossCE 4.2.x). 2. Rulebase Setup Phase You complete the Rulebase Setup Phase by running steps 4 to 9 in the Installation and Upgrade Assistant (PRPC_Setup.jar). This tool is covered in this guide in the section Steps 4-9, Rulebase Setup Phase on page 26 . 5 The Installation Assistant optionally creates the Process Commander schema in the database instance you provide, and installs the initial set of rules and classes Process Commander needs to run into the database. 3. PRPC Configuration Phase You complete the PRPC Configuration Phase after finishing the Installation by logging into Process Commander. The setup steps you should complete in Process Commander are described in section Step 10: Final PRPC Configuration Steps, page 41. Process Commander Core Component Versions The Process Commander core application is packaged in four different versions to support deployment into different Java EE environments. The following table summarizes which packages provided and their use: Type of deployment PRPC package to use All Tomcat deployments prweb.war New deployments on WebSphere 6.1.x, 7.0.x. prweb.war or prpc_j2ee14_ws.ear New deployments on WebLogic 9.x, 10.3.1, 11g (10.3.2); JBoss CE 4.2.x, 4.3.x, 5.0.x prweb.war or prpc_j2ee14.ear New deployments on JBoss EAP 4.3.x, 5.0.x (Red Hat) prpc_j2ee14_jbossJBM.ear Tomcat users should install the WAR in all cases. If you have any questions regarding the correct package to deploy, contact Pega Support. 6 PegaRULES Process Commander Installation Guide v6.1 SP2 Step 1: Environment Considerations Prerequisites The prerequisites for installing Process Commander are: ■ An application server host computer with adequate memory and disk space for the installation. Process Commander requires a minimum of one GB of free memory. This is in addition to any memory allocated for the operating system or other applications on the server. The memory required for your system may need to be higher, depending on the number of users and your specific configuration. ■ A working installation of the application server. Process Commander Installation Guides for each supported application server are available with your Pegasystems software distribution and on the Deployment page of the Pega Developer Network (http://pdn.pega.com). ■ A configured relational database available for Process Commander use, and support in your organization for the installation and configuration of relational databases. The database and application server platforms may be either UNIX or Windows systems. However, a Windows system is required for the Pegasystems developer and end-user clients and for some of the Pegasystems monitoring tools, specifically, PegaRULES® Process Analyzer™, Process Simulator™. The environment for your initial Process Commander system should include at least one Windows platform. 7 Note: If you have difficulty installing any of the third-party software required by Process Commander, contact the other software vendor to resolve the issues before installing Process Commander. Supported Process Commander Platforms Because Process Commander is developed to industry standards — Java and J2EE technologies, J2EE compliant application servers, SQL databases, web browsers, XML, and HTML— a Process Commander system can be successfully deployed on a wide range of hardware and software platform combinations. However, careful selection of your platform components can make your installation and deployment of Process Commander easier. To determine the right platform components for your Process Commander deployment: 1. Review the current Platform Support Guide, which is available on the Pega Developer Network (PDN) or from your Pega account executive. This document lists the recommended software components needed to support Process Commander, and any special requirements or known issues with particular vendors or versions. 2. Review your site’s deployment requirements with your IT representatives. 3. Consult with your Pegasystems representative about your installation plans. Pegasystems’ prior experience with various platforms and deployment architectures can help your installation go smoothly. For additional information see the Platform Support Guide, which is available as a PDF file on the Pega Developer Network (PDN), located at http://pdn.pega.com. Check the Pega Developer Network for the Latest Information Before beginning your installation procedure, check the Pega Developer Network (PDN), located at http://pdn.pega.com, for the latest information. The installation guides are updated whenever new information becomes available. Be sure to check for the latest version. Pegasystems Documentation The latest Process Commander documentation, including Installation, Upgrade, and Platform Support guides is available on the Documentation page of the Pega Developer Network. Visit http://pdn.pega.com and select Guides -> Process Commander V6 Deployment Deployment information and updates Check the Deployment page on the Pega Developer Network for information, updates, and platform bulletins on deploying Process Commander including links to the latest Knowledge Base articles. 8 PegaRULES Process Commander Installation Guide v6.1 SP2 Visit http://pdn.pega.com and select Browse -> Deployment -> About This Topic Pegasystems Training A range of Pegasystems course offerings are available to increase the effectiveness of your deployment and development team members. For more information, visit http://www.pega.com/Services/EducationalServices A Note for PRPC 4.2 Users This installation procedure differs from earlier installation procedures in significant ways. Please review the instructions carefully. In particular, please be aware of two changes: ■ Pegasystems now recommends using data sources defined in your application server to establish connections to your database instead of the Process Commander connection pooling sometimes used in earlier installations. ■ Be sure to create and configure a temporary directory that Process Commander can use to store static data. See the section “Setting the Explicit Temporary Directory” in the chapter that describes deployment with your application server. 9 Step 2: Database Preparation To prepare your database server to use with Process Commander, you must complete the following tasks: ■ Create a blank database. ■ Create an appropriate user that Process Commander can use to access the database. ■ Create a database schema that defines the data objects (tables, indexes, views, triggers and procedures) required by Process Commander. You can either have your DBA, or someone with similar permissions, use your database tools to run a SQL script provided by Pegasystems to create the schema objects, or, in Step 6 of the Assistant, you can select a Create Schema option to have the Assistant create the schema automatically before loading the Rulebase. Running the SQL script allows you to review and, if necessary, customize the schema for your environment. Database Prerequisites Process Commander requires a working installation of one of the supported databases, as described below. For additional information, see the Platform Support Guide, which is available as a PDF file on the Pega Developer Network (PDN). Go to http://pdn.pega.com and select Guides -> Process Commander V6 Deployment. 10 PegaRULES Process Commander Installation Guide v6.1 SP2 Install and configure the relational database according to vendor directions. This database may reside on the same server as the Process Commander software, or it may be on a different server. Creating a PRPC Database Create a database with a minimum of 4GB for the user tablespace and allow the database to grow. For a typical development environment, expect the database to grow to at least 10GB over time. The space required for your system may need to be higher, depending on your use of Process Commander and the number of users. Be sure to record: ■ Database server name ■ Database port number The Process Commander system requires this information to access this database. Additional UDB Requirement When using UDB, for each schema that contains Process Commander tables, Process Commander requires a 32K bufferpool, a 32K user regular tablespace, and a 32K user temporary tablespace. By default, the UDB database create process creates a bufferpool and temporary tablespace with only a 4K page size. Creating Access to the Database Create a user for this database with full read and write permissions. At a minimum this “base” Process Commander user must have appropriate read and write permissions to be able to run SQL scripts on the database. In addition, a small number of Process Commander functions require permission to run CREATE_TABLE and ALTER_TABLE operations. You can assign permissions that include these operations to the base user, or you can create a second Admin DB user with these extended permissions which Process Commander uses only for these special functions. For details, see “Creating Base and Admin Database Users,” below. When you configure data access in your application server, you must provide the user name and password for the user or users you have created to access the Process Commander database. Be sure to record this information and have it available when configuring the application server. Creating Base and Admin Database Users If possible, it is best to create a single Process Commander user with full permissions. If you want to restrict users’ access to the Process Commander database, you can create two users: ■ A “base” user with only read and write permissions. ■ An Admin user with full access including permission for CREATE_TABLE and ALTER_TABLE operations. 11 To implement two users, you configure access to the database in your application server by creating two data sources: ■ One datasource referencing the JNDI location jdbc/PegaRULES that specifies the username and password for the base DB user. This user must have at least read and write permissions for the database. ■ A second datasource referencing the JNDI location jdbc/AdminPegaRULES specifying the username and password for the DB Admin user. This user must have full access including permission for CREATE_TABLE and ALTER_TABLE operations. How Process Commander Uses the two Database Accounts If you configure a second datasource for the Admin user, Process Commander uses that user when performing a small number of functions that require altering the database, specifically: ■ Using the Database Schema Management tool (Tools > Database > Modify Database Schema). ■ Creating any new Circumstance Definition rule or defining a single circumstance on a rule. The extended permissions are needed to support reporting on circumstanced properties. (On the Pega Developer Network, see PRKB-25173: How to create a rule with multiple circumstance properties.) ■ Exposing embedded properties for selection and reporting. (On the Pega Developer Network, see PRKB-25278: How to create Declarative indexes for embedded properties.) For all other functions, Process Commander uses the base DB user which only requires read and write permissions. If you do not provide ALTER TABLE and CREATE TABLE permissions to any user, Process Commander generates a warning when you use these features. The warning includes SQL script that you can provide to your DBA to manually make the necessary database changes. Follow the guidelines for the appropriate database in the following sections User Permissions for the Microsoft SQL Database Set the user account for the Process Commander database user with public and db_owner roles with all corresponding System Permissions granted. 12 PegaRULES Process Commander Installation Guide v6.1 SP2 User Privileges for the Oracle Database Set the user account for the Process Commander database user with the default RESOURCE and CONNECT roles with all corresponding system privileges granted. In particular, be sure that the user has the Create View system privilege. Note: On the Oracle 10g HTML-based Enterprise Manager console there are separate tabs for setting the user’s roles and system privileges. When editing the properties for the Pega user, be sure to go to the Roles tab to set the RESOURCE and CONNECT roles, and then to the System Privileges tab to set the Create View system privilege. Important: Do not grant DBA access to the user, as this may cause problems with the installation. User Privileges for the UDB Database Create a user account for the Process Commander database user with at least SYSADM privileges. Create the Schema in Process Commander Database Before you load the initial Process Commander rules into the database in Steps 4-9 below, you must create the database schema that defines the data objects (tables, indexes, views, triggers and procedures) required by Process Commander. You can create the schema in two ways: 1. In the Install and Upgrade Assistant user interface, you can select the Create Schema option. The Assistant then creates a default schema in the database automatically before loading the Rulebase. If you want the Assistant to create the schema, skip the following section “Using a SQL Script to Create the Schema”, and continue with the Assistant as described in Steps 4-9 below. 2. Your database administrator (DBA), or someone with appropriate permissions, can run a SQL script, provided by Pegasystems, to create the schema in your Process Commander database. Process Commander V6.1 SP2 includes SQL scripts for each supported database: mssql, oracle (oracledate), and udb, for example, oracledate_install_6.1SP2.sql. Running the SQL script allows you to review and, if necessary, customize the schema for your environment. To create the schema in the database using the SQL script, follow the procedure described in the next section. 13 Using a SQL Script to Create the Schema If you choose not to select the Create Schema option in the Installation and Upgrade Assistant your database administrator (DBA), or someone with appropriate permissions, must run a SQL script to create the schema in your Process Commander database. 1. In the software distribution directory for Process Commander find the install SQL script for your database type. C:\PRPC_distro\schema\oracledate\install\oracledate_install_6.1SP2.sql 2. You or your DBA should review this script to make sure it is appropriate for your environment. You can customize the script if necessary. For example, the default scripts create an ASCII database. Modify the scripts if you require Unicode. In most cases, the SQL script can be used without modification. If you are unsure about whether the script can be run in your environment, contact Pegasystems Customer Support. 3. Use your database tools to run the appropriate SQL script against your Process Commander database. Note: For MS-SQL installations only, the following message may appear: Warning: The table 'pr4_rule' has been created but its maximum row size (8506) exceeds the maximum number of bytes per row (8060). INSERT or UPDATE of a row in this table will fail if the resulting row length exceeds 8060 bytes. You may ignore this message. This warning message relates to a known limitation of Microsoft SQL Server. Process Commander does not exceed the maximum row size in this table. Next Steps You can continue either with Step3, Application Server Configuration, or Steps 4-9, Rulebase Setup. These two procedures are independent and can be completed in either order or simultaneously. Note, however, that you cannot run Process Commander successfully until the database setup is complete. If you deploy and start the Process Commander application before the database is complete, the application generates errors. 14 PegaRULES Process Commander Installation Guide v6.1 SP2 Step 3: Preparing the Application Server This section first describes the tasks you must complete on your application server before beginning to deploy the PRPC application: ■ Setting up the Operating Environment ■ Create a Process Commander Server ■ Set up default Pega credentials for the server ■ Modify the JBoss JCA service's handling of unclosed connections ■ Configuring Database support on your Application Server ■ Create a DataSource configuration file To complete deploy the Process Commander system, you deploy three applications: ■ the Process Commander core application, prweb.war or prpc_j2ee14.ear ■ the System Management Application, prsysmgmt_jboss4.war ■ the Developer Online Help application, prhelp.war Setting up the Operating Environment Verify the Java Environment 15 1. Confirm that the Java JDK environment used by your application server is Java JDK 1.5.0_07 or higher. 2. Confirm or set a JAVA_HOME environment variable to point to the directory where Java is installed. Important: During installation, Process Commander requires access to the directory specified by the java.io.tmpdir setting in the JVM. Confirm that there is write access to this directory before installing Process Commander. Verify the JBoss Environment 1. Confirm that you have a working installation of JBoss. Open the JBoss console. 2. Set up the JBOSS_HOME environment variable to point to the JBoss installation directory. Edit JBOSS_HOME/bin/run.conf 1. Open the file run.conf in the JBOSS_HOME/bin directory in a text editor. 2. Uncomment and set the JAVA_HOME property. – Find the following entry in run.conf: # # Specify the location of the Java home directory. If set then $JAVA will # be defined to $JAVA_HOME/bin/java, else $JAVA will be "java". # #JAVA_HOME="/opt/java/jdk" – Remove the hash mark at the beginning of the JAVA_HOME line and set the value of the property to the path to your JDK installation. For example: JAVA_HOME="/usr/java/jdk1.5.0_07" 3. Modify JAVA_OPTS – Find the JAVA_OPTS property in run.conf: JAVA_OPTS="-Xms128m -Xmx512m -Dsun.rmi.dgc.client.gcInterval=3600000 Dsun.rmi.dgc.server.gcInterval=3600000" – Set the initial Java heap size (Xms) to at least 768M and maximum heap size (Xmx) to at least 1024M. You must set the JVM memory options to increase the amount of system memory allocated to the server running PRPC. If the server does not have enough memory allocated to run Process Commander, the system may hang without an error message. 16 PegaRULES Process Commander Installation Guide v6.1 SP2 – If your application server is using the Sun JVM, add the PermSize and MaxPermSize settings as well: – • –XX:PermSize=64m • –XX:MaxPermSize=384m Append the command -Djava.awt.headless=true to the JAVA_OPTS values. You must add the “headless” AWT setting to the JAVA options to allow the system to render graphics. PRPC requires this setting in order to display graphical reports. Your modified JAVA_OPTS setting should look similar to the following: JAVA_OPTS="-Xms768m –Xmx1024m –XX:PermSize=64m –XX:MaxPermSize=384m -Dsun.rmi.dgc.client.gcInterval=3600000 -Dsun.rmi.dgc.server.gcInterval=3600000 -Djava.awt.headless=true" 4. Save and close run.conf. Create a Process Commander Server 1. Go to the <jboss_home>\server folder. There should be three configurations present (minimal, default, and all). 2. Add a custom configuration by making a copy of the folder named default. Rename your copy – this doc will use the name pega. # cp -R $JBOSS_HOME/server/default $JBOSS_HOME/server/pega 3. Test your new ‘pega’ server. To start the server from a the command line, navigate to the $JBOSS_HOME/bin directory and enter the following command: # sh $JBOSS_HOME/bin/run.sh -c pega 4. Once the server is started, you can verify that it is running by opening a Web browser and going to the JBoss web server URL, by default: http://localhost:8080. (You may need to replace the port number, 8080, with the port number assigned to your JBoss installation.) You should see the JBoss Welcome window and be able to access the JBoss console. 5. Stop the server by typing Ctrl-C in the command window in which the run script is running, or by running the shutdown script in the bin directory: # sh $JBOSS_HOME/bin/shutdown.sh 17 Set up default Pega credentials for the server Complete the following procedures to provide the default credentials that match the JBoss specific deployment descriptors shipped with PegaRULES. This is necessary to avoid exceptions during EJB deployment. Edit conf\login-config.xml 1. Open the file $JBOSS_HOME/server/pega/conf/login-config.xml in a text editor. 2. Search for '"other"' (with quotation marks) 3. Change the definition of that UsersRolesLoginModule to include the unauthenticated identity name ”anonymous”. Replace the login-module element with the following: <login-module code = "org.jboss.security.auth.spi.UsersRolesLoginModule" flag = "required"> <module-option name="unauthenticatedIdentity">anonymous</module-option> </login-module> The entire authentication element should look like the following: <authentication> <login-module code = "org.jboss.security.auth.spi.UsersRolesLoginModule" flag = "required"> <module-option name="unauthenticatedIdentity">anonymous</module-option> </login-module> </authentication> Create users.properties and roles.properties files In order to resolve a reference to the PegaAuthUser role in the Process Commander deployment files, you must create users.properties and roles.properties files as described in the following procedure. In the $JBOSS_HOME/server/pega/conf/ directory: 1. Create a text file named users.properties 2. Enter the following sample username and password pair in the file: 18 PegaRULES Process Commander Installation Guide v6.1 SP2 pegatest=pega0123 3. Save and close the file. 4. Create a text file named roles.properties. 5. Enter a property that assigns the PegaAuthUser role to the pegatest user: pegatest=PegaAuthUser 6. Save and close the file. Note: By default, the PegaAuthUser role is not required for users accessing Process Commander. If you want to implement container-managed authentication, you assign the role to your users using the users.properties and roles.properties files. For details about how to implement containermanaged authentication of the Process Commander application, see the manual Authentication in PegaRULES Process Commander available on the Integration Services page of the Pega Developer Network. See: http://pdn.pega.com/DevNet/PRPCv5/IntegrationServices/docs/53/pdf/authent ication53_.pdf Modify the JBoss JCA service's handling of unclosed connections 1. Open the file $JBOSS_HOME/server/pega/deploy/jbossjca-service.xml in a text editor. 2. Search for "CachedConnectionManager" and find the "Debug" attribute in the mbean element: <attribute name=”Debug”>true</attribute> 3. Change the value of "debug" to "false", so that setting reads: <!-- Enable connection close debug monitoring --> <attribute name="Debug">false</attribute> Configuring Database support on your Application Server Confirm that the appropriate JDBC driver jar files are installed Verify that the JDBC drivers required by your database are installed in $JBOSS_HOME/server/pega/lib. Microsoft SQL Server Use the drivers provided by your application server or download the latest drivers from the Microsoft website. 19 For both SQL Server 2005 and 2008, use the appropriate driver for your JVM – For Java 5: sqljdbc.jar – For Java 6: sqljdbc4.jar Oracle Use the drivers provided by your application server or download the latest drivers from the Oracle website. The appropriate file depends on the version of your JVM: – For Java 5: ojdbc5.jar – For Java 6: ojdbc6.jar If you are using the OCI (thick) driver, this directory must also contain the Oracle Client software. Note: Pegasystems recommends use of the Thin Client driver. UDB Follow the IBM instructions for installing the client software and the JDBC drivers to make the db2jcc.jar available. This JDBC driver is the Type 4 universal driver. Create a DataSource configuration file Create a DataSource for the new server. DataSource configuration file names end with the suffix -ds.xml so that they will be recognized correctly by the JCA deployer. Copy the sample datasource, -ds.xml file from the directory $JBOSS_HOME/docs/examples/jca to the deploy directory of your server: – Oracle: oracle-ds.xml – IBM DB/2: db2-ds.xml – SQL Server 2005 and 2008: mssql-ds.xml For example: #cp $JBOSS_HOME/docs/examples/jca/mssql-ds.xml $JBOSS_HOME/server/pega/deploy/mssql-ds.xml The following is a sample of what your datasource definition could look like for a SQL Server datasource. <datasources> <local-tx-datasource> <jndi-name>jdbc/PegaRULES</jndi-name> <connection-url> 20 PegaRULES Process Commander Installation Guide v6.1 SP2 jdbc:microsoft:sqlserver://<your_host_name>:1433;SelectMethod=cursor;SendString ParametersAsUnicode=false;DatabaseName=<Your_database_name> </connection-url> <driver-class>com.microsoft.sqlserver.jdbc.SQLServerDriver</driver-class> <user-name>DB_username</user-name> <password>DB_user_password</password> <metadata> <type-mapping>sqlserver</type-mapping> </metadata> </local-tx-datasource> </datasources> To create the datasource, follow these steps: 1. Enter exactly the JNDI name jdbc/PegaRULES: <jndi-name>jdbc/PegaRULES</jndi-name> 2. Modify the <connection-url> element, to specify the connection information for your Process Commander database and add connection properties as described for your database below. SQL Server 2005 and 2008: <connectionurl>jdbc:microsoft:sqlserver://localhost:1433;DatabaseName=MyDatabase</ connection-url> – Replace localhost with the hostname of your database server. – Confirm the port number of the server. – Replace MyDatabase with the name of the database you created for Process Commander. – Add the following connection strings as URL parameters : SelectMethod=cursor; SendStringParametersAsUnicode=false; For example, your connection URL might look like the following: jdbc:sqlserver://PRPCServer:1433; DatabaseName=pega>;SendStringParametersAsUnicode=false;SelectMethod=cursor; Oracle <connection-url>jdbc:oracle:thin:@youroraclehost:1521:yoursid</connection-url> – Replace youroraclehost with the hostname of your database server. – Confirm the port number of your database server. – Replace yoursid with the name of your Process Commander database. 21 – If you are using Java 5 and the ojdbc5.jar driver file, add a connection property element defining the property oracle.jdbc.V8Compatible=true. For example: <connection-property name="oracle.jdbc.V8Compatible">true</connection-property> Note: If you are using Java 6 and the ojdbc6.jar driver file, the V8Compatible setting is not required. UDB <connectionurl>jdbc:db2://[hostname]:[port]/yourdatabase</connectionurl> – Replace [hostname] with the hostname of your database server. – Replace [port] with the port number of your database server. – Replace yourdatabase with the name of your Process Commander database. – Add connection property elements for the following 6 properties: <connection-property name="currentSchema">[SCHEMANAME]</connection-property> Replace [SCHEMANAME]with the user schema name for your Process Commander database. <connection-property name="currentFunctionPath"> SYSIBM,SYSFUN,[SCHEMANAME]</connection-property> Replace [SCHEMANAME] with the user schema name for your Process Commander database. SYSIBM and SYSFUN are system schemas provided by DB2. They are required because Process Commander 6.1 SP2 makes use of some functions made available in these schemas. Note: Be sure to enter the schema name in all capital letters. <connection-property name="fullyMaterializeLobData">true</connection-property> <connection-property name="fullyMaterializeInputStreams">true</connectionproperty> <connection-property name="progressiveStreaming">2</connection-property> <connection-property name="progressiveLocators">2</connection-property> 3. In the element <driver-class>, change the value to reference he fully qualified Java class name of the appropriate JDBC driver:: – Oracle 9i/10g: oracle.jdbc.OracleDriver – IBM DB/2 Type 4: com.ibm.db2.jcc.DB2Driver 22 PegaRULES Process Commander Installation Guide v6.1 SP2 – SQL Server 2005 and 2008: com.microsoft.sqlserver.jdbc.SQLServerDriver 4. In the user-name and password elements, enter the user name and password for the account you created for your Process Commander database. 5. In the type-mapping element, enter your database type: – Oracle 10g, 11g: Oracle9i (Applies to 9i and later. Make sure that you have the latest Oracle 10g version of ojdbc14.jar) – IBM DB/2 Type 4: – SQL Server 2005 and 2008: DB2 sqlserver 6. Save and close the –ds.xml file. Deploying Process Commander This chapter provides instructions for deploying the four Process Commander software components to your JBoss application server. Deploying the PRPC Application Archive 1. Deploy the Process Commander archive file, prweb.war or prpcj2ee14.ear. Make sure the server is stopped. 2. Create a folder with the name or the archive “prweb” or “prpcj2ee14” in $JBOSS_HOME\ server\ <your_server_name>\ deploy\ # cd $JBOSS_HOME/server/pega/deploy # mkdir prpcj2ee14.ear or # mkdir prweb.war 3. Copy the archive from the PegaRULES/archives directory in your Pegasystems software distribution to the directory: # cp /PegaRULES/archives/prpcj2ee14.ear $JBOSS_HOME/server/pega/deploy/ prpcj2ee14.ear # cp /PegaRULES/archives/prweb.war $JBOSS_HOME/server/pega/deploy/prweb.war 4. Extract the archive into the folder. # jar -xvf prpcj2ee14.ear or 23 # jar -xvf prweb.war Specify explicit temp directory in prconfig.xml 1. In the application directory, open the Process Commander configuration file, $JBOSS_HOME/server/pega/deploy/prweb.war/WEBINF/classes/prconfig.xml. 2. Find the env element for the temporary directory: <env name="Initialization/explicitTempDir" value="$(pega.tmpdir)" /> 3. Replace $(pega.tmpdir) with the complete path to a directory that Process Commander can use for static content and other temporary storage, for example: <env name="Initialization/explicitTempDir" value="/temp/Pega_temp" /> Note: If the directory you specify does not exist, Process Commander will attempt to allocate it. It is good practice to allocate the directory on the system before specifying it here. The directory names you enter here are case sensitive. Be sure to enter the names of the directories exactly as they have been created on your system. It is also important to make sure that the Process Commander user on the system has the appropriate permissions, including write access, to use this directory. In particular, if you have J2SE security enabled, ensure that this directory is accessible under your security policy. Deploying prsysmgmt_jboss4.war or .ear The System Management Application is distributed both as a WAR file and an EAR file and in two versions: – prsysmgmt_jboss.war or .ear for JBoss EAP 5 deployments – prsysmgmt_jboss4.war or .ear for JBoss EAP 4 deployments Be sure to use prsysmgmt_jboss4.war or prsysmgmt_jboss4.ear for JBoss EAP 4 deployments. The System Management Application must be deployed in an expanded deployment. 1. Make sure the server is stopped. 2. Create a folder with the name of the application file, for example ‘prsysmgmt_jboss4.war’ in <jboss_home>\ server\ <your_server_name>\ deploy\ # cd $JBOSS_HOME/server/pega/deploy 24 PegaRULES Process Commander Installation Guide v6.1 SP2 # mkdir prsysmgmt_jboss4 3. Copy the application archive, for example prsysmgmt_jboss4.war, to the directory: # cp /PegaRULES/archives/prsysmgmt_jboss4.war $JBOSS_HOME/server/pega/deploy 4. Extract the application archive into the folder. # jar -xvf prsysmgmt_jboss4.war For more details on the System Management Application, refer to the System Management Application Reference Guide. Deploying the Online Help Application Deploy the online help application (prhelp.war) in the same manner as the System Management Application (prsysmgmt_jboss4.war). Assigning the PegaDiagnosticUser Role to your System Management Application Users Users accessing the System Management Application in Process Commander must be assigned the role PegaDiagnosticUser. If the user does not have this role they will be challenged for authentication when they attempt to access the System Management Application from Process Commander. The role PegaDiagnosticUser is associated with the System Management Application through a security-constraint element on the Diagnostic Data servlet defined in the prweb.war application’s web.xml file: - <security-constraint> - <web-resource-collection> <web-resource-name>Diagnostic Data</web-resource-name> <description>Serves diagnostic files generated by the JMX client</description> <url-pattern>/DiagnosticData</url-pattern> <http-method>GET</http-method> <http-method>POST</http-method> </web-resource-collection> - <auth-constraint> <role-name>PegaDiagnosticUser</role-name> </auth-constraint> </security-constraint> If you do not want to restrict access to the System Management Application, edit the web.xml file in the WEB-INF directory of the prweb.war deployment in your application server and delete this security constraint element. 25 Note: Changing this setting in the web.xml file may require redeployment of the PegaRULES Web Application. If you want to restrict access to the System Management Application, edit the users.properties and roles.properties files to assign the PegaDiagnosticUser role to any users that must be able to access the System Management Application. For information about creating the users.properties and roles.properties files, see “Create users.properties and roles.properties files” on page 17. Add Users to users.properties and roles.properties files In the $JBOSS_HOME/server/pega/conf/ directory: 1. In the users.properties file, add username and password pairs for each user you want to access the System Management application, for example: Admin_user=Admin_password Save and close the file. 2. Create a text file named roles.properties that assigns each user to the PegaDiagnosticUser role: Admin_user= PegaDiagnosticUser Save and close the file. Next Steps If you have not completed the Rulebase Loading phase, continue with the next section: Steps 4-9 Rulebase Setup Phase. Be sure that the Process Commander applications are not started. If you have completed the Rulebase Loading phase, start the Process Commander applications and continue with Step 10, Final Settings in PRPC. 26 PegaRULES Process Commander Installation Guide v6.1 SP2 Steps 4 – 9: Rulebase Setup Install the Process Commander Schema and Rules in the Database Run the Process Commander Installation and Upgrade Assistant to create the Process Commander schema in the database, and load the Process Commander application rules. Note: The following procedure describes the use of the user-interface to the installer to create the schema in the database and load the base Process Commander rules. The 6.1 SP2 distribution also includes scripts to support these tasks through a command-line interface. Support is provided through install.bat and install.ksh files configured through a properties file, setupDatabase.properties. To use the scripted option, see “Chapter 6: Command-line Interfaces for Installation, Upgrade, and Utilities.” 1. Download the Process Commander image, PRPC_DistributionImage.zip, or copy it from your CD, to the computer on which you will run the installation assistant. The computer on which you run the assistant must have access to allow a database connection to the Process Commander database. This computer should also have 1GB of RAM and at least 2.5 GB of disk space available to the system temporary directory. Note: On a 64-bit system, running PRPC_Setup.jar requires up to 1.6 GB memory. To avoid memory errors, use one of the following methods: 27 1. Use a 32-bit JVM to run PRPC_Setup.jar, or 2. Increase the memory allocated to the JVM: – In the scripts directory of your Process Commander software distribution, open the file setupDatabase.xml in a text editor. – In the file find the following element: <!-- Misc. Properties to tweak processing profile --> <property name="jvm.arg.mem.max" value="-Xmx1024m"/> – Increase the value of –Xmx to 2048. – Save and close the file 2. Extract PRPC_DistributionImage.zip to a directory, to create the following directory structure: 3. Double click on the PRPC_Setup.jar file or right-click the file and click Open With > Java, to launch the Installer. If JAR files are not associated with Java commands on your system, launch the installer at the commandline. In a command-line console, change to the directory containing PRPC_Setup.jar, and type in the following command: Java –jar PRPC_Setup.jar Note: On Windows systems you may see the following error when you try to launch PRPC_Setup by double-clicking the JAR file. Could not extract JAR file to directory: C:\Windows\System32\pegaGUIInstallerTemp 28 PegaRULES Process Commander Installation Guide v6.1 SP2 In this case, use the command-line jar command as described above. 4. Click Next to display the Environment Considerations. See “Step 1, Environment Considerations in this guide for more information on completing this step. 5. Click Next to display the Database Preparation page. 29 6. Review this page to confirm that you have prepared the database as required. See “Step 2, Database Preparation” in this guide for more information on completing this step. These tasks are completed outside of the Assistant. You must complete this preparation before running the Rulebase Load phase. You can exit from this tool to complete them, and then restart to continue beyond this point. 7. When your Database Preparation is complete, click Next to display Application Server Preparation. 30 PegaRULES Process Commander Installation Guide v6.1 SP2 8. Review this page to learn about the tasks you complete to prepare your application server before deploying the Process Commander applications. These tasks are completed outside this Assistant. You can exit from this tool to complete them, and then restart to continue beyond this point, or you can continue with the Rulebase Setup phase immediately and complete the Application Server Preparation later. Note: When the Database Preparation is complete, Step 3, the Application Server Preparation, and Steps 4-9 in the Rulebase Setup Phase can be performed in either order or simultaneously. You can, for example, launch the Rulebase Setup process in the Assistant and then configure your Application Server while the Rulebase load process is running. However, you must configure the application server and deploy the Process Commander applications before you can complete Step 10, PRPC Final Settings. Important: You must be careful not to start the deployed Process Commander applications while the Rulebase loading process is still running on the database. Note that your application server may start the application automatically when it is deployed. If the Process Commander application attempts to connect to the database while the Rulebase is loading, the database loading will not complete correctly. 31 9. If you have completed your Application Server Preparation or you want to continue with the Rulebase Setup in the database before completing the Application Server Preparation, click Next to display the License Agreement. 10. Review the License agreement and click Accept to continue. 32 PegaRULES Process Commander Installation Guide v6.1 SP2 11. Select Installation and click Next to display the Database Configuration page. 12. Complete this page as follows: Database Type – Select the type of your Process Commander database. Note: Instructions to install using a database on DB2 on z/OS are not covered in this guide. See the Installation Guide for DB2 on z/OS and WebSphere for information on this platform. Create Database Schema – Leave Create Database Schema checked to allow the Assistant to create the appropriate schema in the database as part of the Rulebase Load process. You database should be empty. – Uncheck Create Database Schema if you used your database tools to create the schema using the SQL scripts provided in the schema directory of your software distribution. See “Using a SQL Script to Create the Schema” in this guide for more information. Note: If you run the Assistant with Create Database Schema selected on a database that already has the schema installed, the Rulebase Load process fails with an error message. 33 Click Next to display the Database Connection page. If your database type is Oracle or MS SQL, you specify the JDBC driver class name, the location of the driver JAR file, the database connection URL, and the database user name and password. If your database type is IBM UDB, you also specify the user schema name: 34 PegaRULES Process Commander Installation Guide v6.1 SP2 13. Complete the fields to specify the database connection to your Process Commander database: – JDBC Driver Class Name – Enter the name of the appropriate database driver class: • Oracle 10g/11g: oracle.jdbc.OracleDriver • IBM DB/2 Type 4: com.ibm.db2.jcc.DB2Driver • SQL Server 2005 and 2008: com.microsoft.sqlserver.jdbc.SQLServerDriver – Driver JAR file – Enter the full path to the appropriate driver file for your database type and version: Use additional fields if your database requires more than one JAR file. – Database JDBC URL – Enter the JDBC connection URL for your Process Commander database. The formats for each database type are as follows: • Oracle 10g/11g (Native OCI Client): jdbc:oracle:oci:@your_tns_name • Oracle 10g/11g (Thin Client): jdbc:oracle:thin:@yourServer:1521:yourDatabase • DB/2 (Universal Driver): jdbc:db2://serverName:port/dbName • SQL Server 2005 and 2008: • jdbc:sqlserver://<your_sql_server_host>:1433;SendS tringParametersAsUnicode=false;SelectMethod=cursor Note: The port number for MS SQL 2008 may be different than the typical default for 2005. In the URL for MS SQL, be sure to include the SendStringParametersAsUnicode and Select Method parameters as in the example. In the URL for UDB, be sure to include the following parameters: - fullyMaterializeLobData=true; - fullyMaterializeInputStreams=true; - progressiveStreaming=2; - progresssiveLocators=2; – Username and Password – Enter the user name and password you created for the Process Commander user on your database 35 – UDB Schema Name—For UDB databases, enter the schema name assigned to the Process Commander database when it was created. 14. When you have completed entering the database connection information, click Test Connection. The Installation Assistant tests whether it is able to make a connection to the database you have specified and displays the result: Click OK to close the window. If the connection is not successful, review your connection information, correct any errors, and retest. If the connection is successful, click Next to continue. 15. Enter or Browse to select a temporary directory for the Installation Assistant to use while loading the Process Commander rules. By default, the Assistant uses a directory, pegaGuiInstallerTemp, created in the directory from which the tool is run. If you leave the field blank, the Installation Assistant uses the user system temporary directory. Important: The Assistant requires at least 3 GB of space during the installation process. Be sure there is enough disk space to allow the 36 PegaRULES Process Commander Installation Guide v6.1 SP2 directory to grow to this size. The Assistant deletes all temporary files at the end of the process. – Click Next to display the Rulebase Loading page. 16. Press START to begin loading the database with the rules. The Assistant shows the progress through the stages of the installation: 37 Click Show Logs to see the log detail as the process is running. The Assistant displays the following window when complete: Note: A typical installation can take 20 to 60 minutes depending on the speed of your system. If you choose to pre-load the assembled rules cache, the process takes an additional 90 minutes. 38 PegaRULES Process Commander Installation Guide v6.1 SP2 When processing the larger files, the log can appear inactive for some minutes. Please allow the Assistant to finish. If the process does not complete: – Review information on the logs in the Output and Error tabs, and correct the problems. – Exit from the Assistant. – Clear the Process Commander database: Using your database tools, run the drop SQL script in the schema\<dbtype>\util directory for your database type in the Process Commander software distribution, for example: C:\PRPC_distribution\schema\oracledate\util\oracledate_drop_6.1.sql – Restart this Installation and Upgrade Assistant and complete the steps again as directed above. 17. When the process completes, the instructions for Step 10—Final Settings in PRPC opens in a browser window: 39 18. Click Exit in the Assistant and continue with the procedures in the next section “Step 10—Final Settings in PRPC. 40 PegaRULES Process Commander Installation Guide v6.1 SP2 Step 10: Final Settings in Process Commander Access the Process Commander servlet, PRServlet, through a browser. Type in the URL for Process Commander application: http://<server>:<portnumber>/<context_root>/PRServlet. For example: http://prpc-server:8080/prweb/PRServlet The PegaRULES login screen (PRServlet) will be displayed: 41 Login to Process Commander: – User Name: [email protected] – Password: install The Process Commander Developer portal displays with a welcome message in the What’s Happening section of thepage: Process Commander automatically launches a process to index the Process Commander rules in the system to support full-text search in the Developer environment. While this process is running, you may notice some delay in the responsiveness of the Process Commander user interface. Depending on your system, the indexing will complete in 10 to 15 minutes. Note: This indexing process starts as soon as you start the Process Commander application. Before you login, you may notice this activity in your application server administrative console. If you want to monitor the progress of the process, click here in the What’s Happening message. Configure your environment Use the Process Commander Landing pages, accessed from the Pega button, to configure your initial environment: 42 PegaRULES Process Commander Installation Guide v6.1 SP2 Enable Developer Help and the System Management Application To enable Help and the System Management Application, you must set the URLs that are used to access them. 1. On the Landing pages, select System -> Settings -> URLs 43 2. Complete this page to specify the URLs to access the Help (prhelp.war) and System Management (prsysmgmt_jboss4.war or prsysmgmt_jboss4.ear) applications – In the field Online Help URL, enter the URL for the prhelp.war file: Provide the name of your Process Commander server and the port number, for example, http://prpc_server:8080/prhelp – In the field for SMA URL, enter the URL for the System Management Application, for example, http://prpc_server:8080/prsysmgmt. – Click Submit Note: If you specify only localhost as the server name, only users logged into the same server on which the applications are deployed are able to access the applications. Replace localhost with the actual server name if you want to allow access to the applications from other Process Commander nodes. These applications are accessed from the Process Commander interface. Either application can be deployed to a different application server than the core Process Commander application. Create an Organization 1. Open the Org and Security > Organization Setup landing page: 44 PegaRULES Process Commander Installation Guide v6.1 SP2 2. In the Organization Name field, enter the name of your organization, leave the Action control set to Preview and click Run to review the objects and users that will be created: – Right-click in the window and select Print to print a record of this page. Important: Be sure to preview and record the information on this page. The organization name you provide will be used to create the initial users and access groups for your Process Commander system. You will need to know the user names to log on and begin using your Process Commander installation. 3. Set the Action to Create and click Run to create the organizational structure. 4. Stop and restart the application server. Continue with the next section to enable the System Management Application for your installation. 45 Create a Systems Management Node Identify a node for your Process Commander system in Pegasystems’ System Management application to enable monitoring of the installation. For more details on the System Management Application, refer to the System Management Application Reference Guide available on the Pega Developer Network (http://pdn.pega.com). 1. Login as an Administrator. 2. Open the System Management application: From the Developer menu near the search field, click Tools > System Management Application: In build 400: Open the Landing page: System > Tools > System Management Application: 46 PegaRULES Process Commander Installation Guide v6.1 SP2 The System Management Console opens. No nodes are set up initially. 3. Click on the + button at the top of the left pane to open the form for creating a new node: 47 4. Complete this form by entering the information appropriate to your installation of Process Commander. You must complete all required fields. The example values above show the basic configuration for a Process Commander instance on the same server as the prsysmgmt_jboss4.war application. You can also use this application to connect to remote instances of Process Commander by supplying the appropriate information for the remote server machine. 5. Click on the Submit button to create your node: 48 PegaRULES Process Commander Installation Guide v6.1 SP2 6. To view data on this node, click the host name, in this case localhost, in the navigation pane on the left. The console displays current data on this system: 49 For information on all the functionality of the System Management Application, refer to the System Management Application Reference Guide available on the Pega Developer Network (http://pdn.pega.com). Click PRPC System Tools in the navigation menu on the left of the PDN home page to find a link to the guide. Install Solution Frameworks If you are installing one of Pegasystems Solution Frameworks as part of your Process Commander development environment, install the framework now. Follow the instructions in the Installation Guide for the framework. 50 PegaRULES Process Commander Installation Guide v6.1 SP2 Ap p e n d ix A: Command-line Interfaces for Installation and Upgrade Process Commander 6.1 SP2 provides a command-line interface for installing or upgrading Process Commander databases. You can call t mander Schema and Database This section describes the command-line interface to the Process Commander Installation and Upgrade Assistant. To install the Process Commander database, you 1. Create a database using your DB vendor's tools 2. Specify the database connection information in the setupDatabase.properties file 3. Run the script install.bat or install.ksh to create the Process Commander schema in the database and load the initial Process Commander rules and classes. To complete the Process Commander installation, you must also configure your application server and deploy the Process Commander applications. These scripts do not perform any application server operations. For complete information on installing Process Commander, see the Process Commander Installation Guide v6.1 SP2 for your database and application server. This guide is available in the Doc directory in your software distribution and on the Pega Developer Network, pdn.pega.com. To upgrade a Process Commander database, you 51 1. Use your database tools to run SQL scripts that Pegasystems provides to update the database schema 2. Specify the database connection information in the setupDatabase.properties file. 3. Run upgrade.bat or upgrade.ksh to update the Process Commander rules and classes Note: Executing upgrade.bat or upgrade.ksh does not update the database to the 6.1 SP2 schema. You must apply the SQL scripts provided by Pegasystems to your Process Commander database before running the upgrade script. For complete information on upgrading Process Commander, see the PegaRULES Process Commander Release V6.1 SP2 Upgrade Guide 5.x to 6.1 SP2. This guide is available in the Doc directory of your software distribution and on the Pega Developer Network, pdn.pega.com. Prerequisites Before running these scripts, you must complete the following prerequisites: 1. You must have a JDK installed (Java 5 or later), and the path to that JDK must be defined in a JAVA_HOME environment variable. 2. You must have the JDBC driver JAR file for your target database available. 3. For an installation, you must create a database with a minimum of 2GB for the user tablespace and allow the database to grow. Create a user for this database with full read and write permissions to create tables, procedures, and views. You provide connection information for this database to the script, including the location of the driver file, the driver class name, the database connection URL and the user's username and password. Installation and Upgrade Setup Complete these steps before either installing or upgrading Process Commander. 1. Extract the contents of the coreBuildDistributionImage.zip into a directory. 2. Open the command-line console for your platform and change directory into the “scripts” subdirectory. 3. Edit the file setupDatabase.properties to provide the following property values: 52 PegaRULES Process Commander Installation Guide v6.1 SP2 – pega.jdbc.driver.jar= The full path to the JDBC driver file for your database The driver required for each database type is: Oracle 10g/11g: • For Java 5: ojdbc5.jar • For Java 6: ojdbc6.jar DB/2 UDB: db2jcc.jar SQL Server 2005,2008: – • For Java 5: sqljdbc.jar • For Java 6: sqljdbc4.jar. pega.jdbc.driver.class= The class name of the JDBC driver for your database. The class required for each database type is: Oracle 10g/11g: oracle.jdbc.OracleDriver IBM DB/2 Type 4: com.ibm.db2.jcc.DB2Driver SQL Server 2005, 2008: com.microsoft.sqlserver.jdbc.SQLServerDriver – pega.database.type= The type of database: – Oracle 10g/11g: oracledate DB/2 UDB: udb SQL Server 2005, 2008: mssql pega.jdbc.url= The connection URL for your database, for example: Oracle 10g/11g (Native OCI Client): jdbc:oracle:oci:@your_tns_name Oracle 10g/11g (Thin Client): jdbc:oracle:thin:@myServer:1521:myDatabase DB/2 UDB: jdbc:db2://serverName:port/dbName SQL Server 2005, 2008: 53 jdbc:sqlserver:// <your_sql_server_host>:1433; databaseName=<yourDBname>;SelectMethod=cursor; SendStringParametersAsUnicode=false; Note: Be sure to include the SelectMethod and SendStringParametersAsUnicode parameters for SQL Server. – pega.jdbc.username= pega.jdbc.password= The user name and password to use when connecting to your database. – user.temp.dir= The full path to a temporary directory for the script process to use while loading the Process Commander rules. If not specified, the installer uses the user system temporary directory. Important: At least 3 GB of space is required during the installation process. – run.assembler=true/false If true, the installer pre-assembles the Process Commander Classes and makes them available in a cache. If false, classes are assembled as they are requested during Process Commander use, slowing response time for users. Pre-loading the cache makes the system perform better for the initial Process Commander users but adds up to 90 minutes to the installation process. – #bypass.pega.schema= (Install only) To skip schema creation in the Installation Assistant, remove the hash mark, #, at the beginning of this line in the setupDatabase.properties file. Use this option if you have previously created the schema in the database using the SQL scripts provided by Pegasystems. Setting this property corresponds to clearing the Create Schema checkbox in the Install Assistant user interface. Important: The bypass.pega.schema property is ignored by the upgrade script. Before upgrading the database, you must apply SQL scripts, provided by Pegasystems, to your the Process Commander database to update the data schema. See your Upgrade Guide for more information. 54 PegaRULES Process Commander Installation Guide v6.1 SP2 Running the Install and Upgrade Scripts After entering the settings in setupDatabase.properties, run the appropriate install or upgrade script for your platform: ■ install.bat for Windows, install.ksh for Unix systems ■ upgrade.bat for Windows, upgrade.ksh for Unix systems You can pass up to six arguments to either script to override the properties set in the setupDatabase.properties file. These arguments are required for any of the properties not defined in the properties file: – driverClass – driverJAR – dbType – dbURL – dbUser – dbPassword Enter each argument on the command-line followed by the value as described above. Separate each argument with a space. For example: ./install.ksh --driverClass oracle.jdbc.OracleDriver --driverJAR D:\ojdbc6.jar --dbType oracledate --dbURL jdbc:oracle:thin:@dbServer:1521:prpc_database -dbUser username --dbPassword password The scripts run an Ant project which installs or upgrades the Process Commander target database as specified. A log of the transactions is written to the command-line console and to a file in the scripts\logs directory. Advanced Properties You should not need to set the following properties under normal use. However, they may be useful in certain circumstances. – pegarules.config Path to prconfig.xml file – prbootstrap.config Path to a prbootstrap.properties file The Install and upgrade scripts create their own configuration files based on the settings you specify. Set these two properties if you want the scripts to instead use configuration files you have created. For details on these files see your installation or upgrade guide. 55 Notes: If you wish to use configuration files, you must create both files and set the corresponding properties. If either of the properties is not set, the script will generate both configuration files. You must always set the "pega.jdbc.driver.jar” property in setupDatabase.properties. Neither prconfig.xml or prbootstrap.properties contains the location of the DB driver file. – bypass.load.engine.classes If set to any value, the Rules Engine classes are not loaded into the database. Use this property if you want to load rules without changing the engine classes. – bypass.load.rules If set, the rules are not loaded into the database. Use this property if you want to load the engine classes without changing the rules. Other Environment Properties Ant Property Default value Notes jvm.arg.mem.max -Xmx1024m Maximum memory allocated to Java tools which are run by this script. pega.install.root ${basedir} Path to the scripts directory of the distribution image pega.archives ${pega.install.root}/../archives/ Path to the PRPC application archives in the distribution image, like prweb.war. pega.rules ${pega.install.root}/../rules/ Path to the PARs (Pega archives) which will be loaded pega.schemas ${pega.install.root}/../schema/ Path to a directory named “DDL”, containing vendor specific content to be loaded. Each vendor directory must contain a “statements” subdirectory.