1
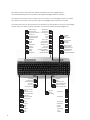
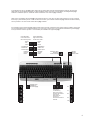
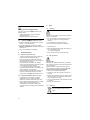
Bedienungsanleitung
Operating Manual
Mode d’emploi
CyMotion Pro Keyboard
CyMotion Master XPress
CyMotion Master Linux
G85-20050, G86-21050, G86-21070
6440385-02 DE, US, FR Mär 2009
CyMotion Pro Keyboard
Hotkeys
Die HotKeys der Tastatur funktionieren unter Windows XP (teilweise auch unter WinME und 2000) auch ohne KeyM@n-Software.
Unter anderen Betriebssystemen ist es erforderlich, die beiliegende KeyM@n-Software zu installieren.
Ausnahme: "CD-/DVD Auswerfen" und "@-Taste" – diese Tasten funktionieren nur mit KeyM@n-Software.
Hotkeys
The HotKeys on the keyboard function on Windows XP (as well as on WinME and 2000 in some cases), even if the KeyM@n software
is not installed. The HotKeys will only function on other operating systems if the KeyM@n software included here is installed.
Exception: “Eject CD/DVD” and “@ key” – this keys only work with KeyM@n software.
Touches d'accès direct
Les touches d'accès direct du clavier fonctionnent sous Windows XP (en partie également sous WinME ou 2000), même si le logiciel
KeyM@n n'est pas installé. Avec d'autres systèmes d'exploitation, il est nécessaire d'installer le logiciel KeyM@n fourni.
Exception : les touches « Ejection CD/DVD » et « Touche @ » ne fonctionne qu'avec le logiciel KeyM@n.
Browser zurück
(Browser) Back
Navigateur précédent
Start/Pause
Play/Pause
Lecteur/pause
Browser vor
(Browser) Forward
Navigateur suivant
Stopp
Stop
Stop
Abbrechen
Cancel
Quitter
Voriger Titel
Previous title
Titre précédent
Aktualisieren
Refresh
Actualiser
Nächster Titel
Next title
Titre suivant
Suchen
Search
Rechercher
CD-/DVD Auswerfen
CD/DVD eject
Ejecter CD/DVD
Ton leiser
Volume down
Volume plus bas
Ton aus
Mute
Coupure du son
Ton lauter
Volume up
Volume plus fort
Auswahl Multimedia
Select mulitmedia
Sélection Mulitmédia
@-Taste
@ key
Touche @
2
Standby
Standby
Veille
Hotkeys und KeyM@n-Taste
In Kombination mit der sog. KeyM@n-Taste (neben der strg-Taste) haben manche Tasten Mehrfach-Funktionen. Sie erkennen
diese Tasten an den umrahmten Symbolen. Um diese Funktionen nutzen zu können, ist es erforderlich, die beiliegende KeyM@nSoftware zu installieren (die mit * markierten Tasten funktionieren auch ohne KeyM@n-Software).
Hotkeys and KeyM@n key
When used in combination with the KeyM@n key (beside the Ctrl key), many keys can have several functions. You can recognise
these keys by their framed symbols. In order to use these functions, you must first install the KeyM@n software included in delivery.
The keys marked * can also function without the KeyM@n software.
Touches d'accès direct et touche KeyM@n
En combinaison avec la touche KeyM@n (placée à côté de la touche Ctrl), certaines touches ont des fonctions multiples. Ces touches
sont reconnaissables à leurs symboles encadrés. Pour avoir accès à ces fonctions, il est nécessaire d'installer le logiciel KeyM@n
fourni (les touches suivies du symbole * ne nécessitent pas l'installation du logiciel KeyM@n).
Linke Maustaste...
Left mouse button...
Dé de souris gauche...
Rechte Maustaste...
Right mouse button...
Dé de souris droite...
...klicken
...click
...cliquer
...doppelklicken
...double-click
...double-cliquer
...doppelklicken
...double-click
...double-cliquer
...festhalten
...depress
...retenir
...festhalten
...depress
...retenir
KeyM@n-Taste
KeyM@n key
Touche KeyM@n
Nach oben scrollen
Scroll up
Défiler vers le haut
Nach unten scrollen
Scroll down
Défiler vers le bas
Ausschneiden
Cut
Couper
Einfügen
Paste
Coller
Kopieren
Copy
Copier
Pause*
...klicken
...click
...cliquer
F11*
F12*
NumLOCK-Status*
NumLOCK status*
Le statut NumLOCK*
Rollen*
Scroll*
Défiler*
Pos1*
Home*
Pos1*
Ende*
End*
Fin*
Bewegung des Mauszeigers
in Pfeilrichtung
Move of the mouse pointer in
the direction of the arrow
Mouvement du pointeur de
souris dans le sens de la flèche
KeyM@n-Lock
Durch die sog. KeyM@n-Lock Funktion können Sie die
Ebenen der seitlichen XPress-Tasten tauschen.
D. h. die Funktionen Kopieren, Einfügen... sind direkt
zu erreichen. Drücken Sie hierzu gleichzeitig die
KeyM@n-Taste und die Feststell-Taste.
Using the KeyM@n lock function, you can exchange
the levels of the XPress keys on the side. This will
allow you to access functions such as Copy, paste
etc. directly. To do this, press the KeyM@n key and
the Caps Lock key simultaneously.
La fonction de verrouillage KeyM@n permet d'inverser
les fonctions des touches Xpress placées sur le côté,
de façon à ce que les fonctions Copier, Coller… soient
directement accessibles. Pour cela, appuyer
simultanément sur la touche KeyM@n et la touche
de verrouillage.
XPressList 1
XPressList 2
XPressList 3
Wiederholen
Repeat
Répéter
Rückgängig
Undo
Annuler
3
CyMotion Master XPress, CyMotion Master Linux
Hotkeys
Die HotKeys der Tastatur funktionieren unter Windows XP (teilweise) auch ohne KeyM@n-Software.
Unter anderen Betriebssystemen ist es erforderlich, die beiliegende KeyM@n-Software zu installieren.
Hotkeys
The HotKeys on the keyboard function on Windows XP (in some cases), even if the KeyM@n software is not installed.
The HotKeys will only function on other operating systems if the KeyM@n software included here is installed.
Touches d'accès direct
Les touches d'accès direct du clavier fonctionnent sous Windows XP (en partie également), même si le logiciel KeyM@n
n'est pas installé. Avec d'autres systèmes d'exploitation, il est nécessaire d'installer le logiciel KeyM@n fourni.
Browser zurück
(Browser) Back
Navigateur précédent
Browser vor
(Browser) Forward
Navigateur suivant
Abbrechen
Cancel
Quitter
Aktualisieren
Refresh
Actualiser
Suchen
Search
Rechercher
Stopp
Stop
Stop
PC starten
Wake up
Mise en veille
Voriger Titel
Previous title
Titre précédent
Taschenrechner
Calculator
Calculatrice
Nächster Titel
Next title
Titre suivant
E-Mail Programm
E-Mail Program
Programme E-Mail
Browser/Startseite
Browser/Home
Navigateur/Démarrage
CD-/DVD Auswerfen
CD/DVD eject
Ejecter CD/DVD
Ton leiser
Volume down
Volume plus bas
Ton aus
Mute
Coupure du son
Ton lauter
Volume up
Volume plus fort
Auswahl Multimedia
Select mulitmedia
Sélection Mulitmédia
Nach oben scrollen
Scroll up
Défiler vers le haut
Nach unten scrollen
Scroll down
Défiler vers le bas
4
Start/Pause
Play/Pause
Lecteur/pause
@-Taste
@ key
Touche @
XPressList 1
XPressList 2
Ausschneiden
Cut
Couper
XPressList 3
Einfügen
Paste
Coller
Wiederholen
Repeat
Répéter
Kopieren
Copy
Copier
Rückgängig
Undo
Annuler
Hotkeys und KeyM@n-Taste
In Kombination mit der sog. KeyM@n-Taste (neben der strg-Taste) haben manche Tasten Mehrfach-Funktionen. Sie erkennen
diese Tasten an den umrahmten Symbolen. Um diese Funktionen nutzen zu können, ist es erforderlich, die beiliegende KeyM@nSoftware zu installieren (die mit * markierten Tasten funktionieren auch ohne KeyM@n-Software).
Hotkeys and KeyM@n key
When used in combination with the KeyM@n key (beside the Ctrl key), many keys can have several functions. You can recognise
these keys by their framed symbols. In order to use these functions, you must first install the KeyM@n software included in delivery.
The keys marked * can also function without the KeyM@n software.
Touches d'accès direct et touche KeyM@n
En combinaison avec la touche KeyM@n (placée à côté de la touche Ctrl), certaines touches ont des fonctions multiples. Ces touches
sont reconnaissables à leurs symboles encadrés. Pour avoir accès à ces fonctions, il est nécessaire d'installer le logiciel KeyM@n
fourni (les touches suivies du symbole * ne nécessitent pas l'installation du logiciel KeyM@n).
Linke Maustaste...
Left mouse button...
Dé de souris gauche...
...klicken
...click
...cliquer
...doppelklicken
...double-click
...double-cliquer
...festhalten
...depress
...retenir
F1*
F2*
F3*
F4*
F5*
Rechte Maustaste...
Right mouse button...
Dé de souris droite...
...klicken
...click
...cliquer
...doppelklicken
...double-click
...double-cliquer
...festhalten
...depress
...retenir
Währungs-Taste
Devise key
Touche monnaie
KeyM@n-Taste
KeyM@n key
Touche KeyM@n
Standby*
Standby*
Mise en veille*
F6*
Bewegung des
Mauszeigers
in Pfeilrichtung
Move of the mouse
pointer in the direction
of the arrow
Mouvement du
pointeur de
souris dans le sens de
la flèche
F7*
F8*
F9*
F10*
5
Bedienungsanleitung
1
Informationen auf Papier, als
Direkthilfe und auf CD
Informationen zu Inbetriebnahme, Bedienung und
Konfiguration erhalten Sie in der vorliegenden
Bedienungsanleitung, als Direkthilfe und als
zusätzliche Information für die Software KeyM@n.
• Die Bedienungsanleitung beschreibt im
Wesentlichen die Inbetriebnahme des Geräts und
die Installation der Software.
• Die Direkthilfe ist Bestandteil der Software, die auf
CD beigelegt ist. Sie bietet Ihnen Informationen zur
Bedienung dort, wo Sie diese benötigen, und wird
mit der F1-Taste aufgerufen. Sie erreichen sie
auch über Start/Programme/Cherry Keyboard
Manager/Dokumentation.
• Zusätzliche Informationen zur Bedienung und
Konfiguration der Software KeyM@n erhalten Sie
auf der beiliegenden CD (CD-ROM/Manuals). Hier
können Sie die gewünschten Inhalte am Bildschirm
lesen oder ausdrucken.
Dadurch, dass wir Ihnen nur die wichtigsten
Informationen gedruckt liefern, verringern wir den
Papierverbrauch und leisten einen Beitrag zum
Umweltschutz.
Bitte beachten Sie die allgemeinen Anwenderhinweise
und die Lizenzvereinbarungen.
2
Tastatur an den PC anschließen
2.1 Tastatur an der PS/2-Schnittstelle
anschließen
1 Schalten Sie den PC aus.
2 Stecken Sie ggf. den beiliegenden USB-PS/2Adapter auf das USB-Kabel der Tastatur.
3 Stecken Sie die Tastatur am PS/2-Anschluss des
PCs an.
4 Schalten Sie den PC ein.
2.2 Tastatur an der USB-Schnittstelle
anschließen
1 Entfernen Sie ggf. den beiliegenden USB-PS/2Adapter vom USB-Kabel der Tastatur.
2 Stecken Sie die Tastatur am USB-Anschluss des
PCs an.
3
Installation der Cherry-Software
KeyM@n
Die Cherry-Software KeyM@n ist ein leistungsfähiges
und umfangreiches Programm. Mit ihr können Sie die
Zusatztasten der Tastatur und der Maus mit Links,
Programmen, Systemfunktionen und sogar mit
beliebigem Text belegen. So können Sie häufig
benutzte Funktionen per Tastendruck aufrufen.
➤ Schließen Sie erst das Gerät an und installieren Sie
dann die Software.
3.1 Befindet sich bereits Software für eine
Tastatur/Maus auf dem PC?
Wenn auf dem PC bereits Software für eine Tastatur/
Maus von Cherry oder einem anderen Hersteller
installiert ist, sollten Sie diese zur Sicherheit zunächst
deinstallieren.
➤ Deinstallieren Sie die Software (über das
Windows-Startmenü/Einstellungen/
Systemsteuerung/Software).
3.2 Software KeyM@n unter Windows
98/ME/2000/XP/Vista installieren
Aktuelle Cherry-Software KeyM@n im Internet
Die Cherry-Software KeyM@n wird ständig
weiterentwickelt. Die aktuelle Version können Sie von
Cherry über das Internet herunterladen:
www.cherrycorp.com
Hinweis!
Wollen Sie alle Funktionen der Tastatur nutzen, so ist
es erforderlich, die beiliegende Cherry KeyM@nSoftware zu installieren.
Wenn Sie die Tastatur über einen elektronischen
KVM-Umschalter anschließen, so kann es zu
Fehlfunktionen der Tastatur bzw. der Cherry
KeyM@n-Software kommen.
1 Legen Sie die Cherry-CD in Ihr CD-ROM-Laufwerk.
Die CD-ROM startet automatisch. Das Fenster
Installation erscheint.
2 Wenn die CD-ROM nicht automatisch startet,
doppelklicken Sie im Windows-Explorer auf das
CD-ROM-Laufwerk und dann auf die Startdatei
Start.exe.
Das Fenster Installation erscheint.
6
3 Klicken Sie auf das Cherry-Produkt, für das Sie die
Software installieren möchten.
Die Installation beginnt.
4 Folgen Sie den Installationsanweisungen auf dem
Bildschirm.
4.2 Installation der Software funktioniert
nicht
•
Die Cherry-Software KeyM@n ist installiert.
•
Cherry-Software KeyM@n aufrufen
Die Cherry-Software KeyM@n können Sie über
folgende Wege aufrufen:
• Start/Programme/Cherry Keyboard Manager/
Eigenschaften von Tastaturen
• Start/Einstellungen/Systemsteuerung/Tastatur
3.3 Software KeyM@n unter Linux
installieren
1 Legen Sie die im Lieferumfang enthaltene CD in Ihr
CD-ROM-Laufwerk ein.
2 Im Ordner drivers/Linux befindet sich die Datei
INSTALL bzw. README mit einer
Installationsanleitung. Öffnen Sie diese Datei.
3 Führen Sie die Installation wie beschrieben durch.
4
Hilfe im Problemfall
4.1 Tastatur funktioniert nicht
•
•
•
•
•
Um sicherzustellen, dass kein Defekt der Tastatur
vorliegt, testen Sie diese nach Möglichkeit an
einem anderen PC/Notebook.
Bei Anschluss der Tastatur am PS/2-Anschluss:
Entfernen Sie den Adapter und schließen Sie die
Tastatur am USB-Anschluss des Rechners an.
Bei Anschluss der Tastatur am USB-Anschluss:
Schließen Sie die Tastatur mit Hilfe des Adapters
am PS/2-Anschluss des Rechners an. Siehe
Kap. 2.1 "Tastatur an der PS/2-Schnittstelle
anschließen".
Bei Anschluss der Tastatur am USB-Anschluss:
Verwenden Sie einen anderen USB-Anschluss am
PC/Notebook.
Bei Anschluss der Tastatur am USB-Anschluss:
Setzen Sie im BIOS des PCs die Option "USB
Keyboard Support" bzw. "USB Legacy Mode" auf
enabled.
•
5
Wenn auf dem PC bereits Software für eine
Tastatur bzw. Maus installiert ist, muss diese
vorher deinstalliert werden. Ansonsten kann es zu
Fehlfunktionen kommen.
Überprüfen Sie, ob der angemeldete Benutzer am
Rechner die Rechte hat, die Software zu
installieren (z. B. Administratorrechte bei Windows
2000 bzw. XP).
Überprüfen Sie, ob Ihr Betriebssystem von der
Software unterstützt wird.
Tipps
5.1 Reinigung der Tastatur
Vorsicht!
Beschädigung durch aggressive Reinigungsmittel
oder Flüssigkeit in der Tastatur
1 Verwenden Sie zur Reinigung keine Lösungsmittel
wie Benzin oder Alkohol und keine Scheuermittel
oder Scheuerschwämme.
2 Verhindern Sie, dass Flüssigkeit in die Tastatur
gelangt.
3 Entfernen Sie nicht die Tastkappen der Tastatur.
1 Schalten Sie den PC aus.
2 Reinigen Sie die Tastatur mit einem leicht feuchten
Tuch und etwas mildem Reinigungsmittel
(z. B.: Geschirrspülmittel).
3 Trocknen Sie die Tastatur mit einem fusselfreien,
weichen Tuch.
5.2 Entsorgung
Entsorgen Sie das Altgerät über eine
Sammelstelle für elektronischen Abfall
oder Ihren Händler.
7
5.3 RSI-Syndrom
RSI-Syndrom
RSI steht für "Repetitive Strain Injury" = "Verletzung
durch wiederholte Beanspruchung". RSI entsteht
durch kleine, sich ständig wiederholende
Bewegungen über einen längeren Zeitraum.
Typische Symptome sind Beschwerden in den
Fingern oder im Nacken. Weitere Informationen finden
Sie unter: www.cherry.de/deutsch/service/
service_rsi.htm
1 Richten Sie Ihren Arbeitsplatz ergonomisch ein.
2 Verändern Sie die Neigung der Tastatur durch die
hinteren Stellfüße.
3 Positionieren Sie Tastatur und Maus so, dass sich
Ihre Oberarme und Handgelenke seitlich vom
Körper befinden und ausgestreckt sind.
4 Machen Sie mehrere kleine Pausen, ggf. mit
Dehnübungen.
5 Ändern Sie oft Ihre Körperhaltung.
6
Technische Daten
Bezeichnung
Wert
Versorgungsspannung
5,0 V/DC ± 5 % SELV
Stromaufnahme
typ. 20 mA
Lagertemperatur
−20 °C bis +60 °C
Betriebstemperatur
0 °C bis +50 °C
7
Kontakt
ZF Electronics GmbH
Cherrystraße
91275 Auerbach
www.cherrycorp.com
www.cherry.de
E-Mail: [email protected]
Telefon:
Vertrieb: +49 (0) 180 5 243779* (0180 5 CHERRY*)
Technischer Support: +49 (0) 180 5 919108*
(*14 Cent/Min. aus dem deutschen Festnetz,
abweichende Preise für Anrufe aus Mobilfunknetzen
möglich.)
Bitte halten Sie bei Anfragen an den Technischen
Support folgende Informationen bereit:
• Artikel- und Serien-Nr. des Produkts
• Bezeichnung und Hersteller Ihres PCs/Notebooks
oder Motherboards
• Betriebssystem und ggf. installierte Version eines
Service Packs
8
Allgemeiner Anwenderhinweis
Cherry, eine Marke der ZF Electronics GmbH,
optimiert seine Produkte ständig im Zuge der
Entwicklung von neuen Technologien. Technische
Änderungen behalten wir uns deshalb vor. Die
Ermittlung der Zuverlässigkeit sowie die Definition von
technischen Angaben erfolgen gemäß interner
Prüfung, um international anerkannte Vorschriften
bzw. Normen zu erfüllen. Davon abweichende
Anforderungen können durch gegenseitige
Zusammenarbeit erfüllt werden. Unsachgemäße
Behandlung, Lagerung und äußere Einflüsse können
zu Störungen und Schäden im Einsatz führen.
Wir übernehmen keinerlei Gewährleistung für Mängel,
die auf einer anwenderseitigen Veränderung des
Produkts beruhen, und haften nicht im Falle
unbefugter Veränderungen. Alle Reparaturen müssen
durch uns oder eine offiziell berechtigte Person oder
Organisation durchgeführt werden.
Etwaige Schadensersatzansprüche gegen die
ZF Electronics GmbH oder ihre eingesetzten Vertreter
– gleich aus welchem Rechtsgrund (einschließlich
stressbedingte körperliche Schäden) – sind
ausgeschlossen, soweit uns nicht Vorsatz, grobe
Fahrlässigkeit oder die Nichtbeachtung zwingender
Produkthaftungsbestimmungen treffen oder bei
Verletzungen von Leben, Körper oder Gesundheit.
Die vorliegende Anleitung ist nur gültig für das
mitgelieferte Produkt.
Weitere Informationen darüber sind bei den jeweiligen
Distributoren oder direkt über uns erhältlich.
9
CE-Konformitätserklärung
Wir, ZF Electronics GmbH, erklären, dass die
Produkte CyMotion Pro Keyboard (20050),
CyMotion Master XPress (21050) und
CyMotion Master Linux (21070) mit folgender
Anforderung übereinstimmen:
• EMC-Richtlinie (Richtlinie zur elektromagnetischen
Verträglichkeit) 2004/108/EC, geprüft nach
EN 55022 und EN 55024
Getestet gemäß ZF Electronics-Standard-Testverfahren.
8
Operating Manual
1
Information available as hardcopy,
direct help and on CD
Information on setup, operation and configuration can
be obtained in these operating manual, as direct help
and as additional information for the KeyM@n
software.
• The operating manual essentially describes the
setup of the device and software installation.
• The direct help is a component of the software
included on the CD. It provides you with
information on operation where you need it. It is
called up via F1. You can also access it via Start/
Programs/Cherry Keyboard Manager/
Documentation.
• Additional information on operation and
configuration of the KeyM@n software is available
on the included CD (CD-ROM/Manuals). You can
read the desired content on the screen or print it
out here.
By supplying only the most essential information as a
printout, we are reducing the unnecessary use of
paper and thus making our contribution towards
environmental protection.
Please observe the general user information and the
license agreements.
2
Connecting keyboard
2.1 Connecting keyboard to the PS/2 port
1 Switch off the PC.
2 If necessary, plug the accompanying USB-PS/2
adapter on to the USB cable of the keyboard.
3 Connect the keyboard to the PS/2 port of the PC.
4 Switch on the PC.
Note!
If you wish to use all the functions of the keyboard,
you have to install the accompanying Cherry
KeyM@n software.
If you connect the keyboard via an electronic monitor/
keyboard switch box, the keyboard or the Cherry
KeyM@n software may not function properly.
3
Installation of the Cherry KeyM@n
software
The Cherry KeyM@n software is a powerful and
extensive program. By using this software, you can
assign links, programs, system functions and even
any text you desire to the additional keys of the
keyboard and mouse. You can thereby call up
frequently used functions by pressing a key.
➤ First connect the device and then install the
software.
3.1 Is software for a keyboard/mouse
already installed on the PC?
If software for a keyboard/mouse from Cherry or
another manufacturer is already installed on the PC,
you should uninstall it first for safety purposes.
➤ Uninstall the software (via Windows Start menu/
Settings/Control Panel/Add/Remove Programs).
3.2 Installing KeyM@n software in
Windows 98/ME/2000/XP/Vista
Current Cherry KeyM@n software on the Internet
The Cherry KeyM@n software is constantly being
developed and updated. The current version can be
downloaded from Cherry via the Internet:
www.cherrycorp.com
1 Place the Cherry CD in your CD-ROM drive.
The CD-ROM starts automatically. The Installation
window is displayed.
2 If the CD-ROM does not start automatically, doubleclick the CD-ROM drive in Windows Explorer and
then the Start.exe start file.
The Installation window is displayed.
3 Click on the Cherry product for which you would like
to install the software.
The installation begins.
4 Follow the installation instructions on the screen.
The Cherry KeyM@n software is installed.
2.2 Connecting keyboard to the USB port
1 If necessary, remove the accompanying USB-PS/2
adapter from the USB cable of the keyboard.
2 Connect the keyboard to the USB port of the PC.
9
5
Tips
5.1 Cleaning
Running the Cherry KeyM@n software
You can run the Cherry KeyM@n software by the
following means:
• Start/Programs/Cherry Keyboard Manager/
Keyboard properties
• Start/Settings/Control Panel/Keyboard
Caution!
Damage may be caused by harsh cleaning agents or
liquids in the keyboard
3.3 Installing KeyM@n software in Linux
1 Do not use solutions such as gasoline or alcohol
and scouring agents or scouring sponges for
cleaning.
1 Place the installation CD, included in the scope of
delivery, in your CD-ROM drive.
2 In the folder drivers/Linux there is a file called
INSTALL or README with installation instructions.
Open this file.
2 Prevent fluids from entering the devices.
3 Do not remove the keycaps of the keyboard.
3 Carry out the installation as described.
1 Switch off the PC.
2 Clean the keyboard with a slightly damp cloth and
some mild cleaning agent
(e. g.: dishwashing liquid).
4
3 Dry off the devices with a soft, lint-free cloth.
Troubleshooting
4.1 Keyboard does not work
•
•
•
•
•
To make sure that the keyboard is not defective,
test it if possible with another PC/laptop.
If the keyboard is connected to the PS/2 port:
Remove the adapter and connect the keyboard to
the USB port of the computer.
If the keyboard is connected to the USB port:
Connect the keyboard using the adapter to the PS/
2 port of the computer. See Chapter
2.1 "Connecting keyboard to the PS/2 port".
If the keyboard is connected to the USB port: Use
another USB port on the PC/laptop.
If the keyboard is connected to the USB port: Set
the option "USB Keyboard Support" or "USB
Legacy Mode" to enabled in the BIOS of the PC.
4.2 Software installation does not work
•
•
•
If a keyboard or mouse software is already
installed on the PC, it must be uninstalled
beforehand. Otherwise malfunctions can result.
Check whether the user logged-in at the computer
has the rights to install the software (e.g.
administrator rights in Windows 2000 or XP).
Check whether your operating system supports the
software.
5.2 RSI syndrome
RSI syndrome
RSI stands for "Repetitive Strain Injury". RSI arises
due to small movements continuously repeated over a
long period of time.
Typical symptoms are discomfort in the fingers or
neck. For further information see: www.cherry.de/
english/service/servicedownload_rsi.htm
1 Set up your workspace ergonomically.
2 Change the angle of the keyboard using the rear
supports.
3 Position the keyboard and mouse in such a manner
that your upper arms and wrists are outstretched
and to the sides of your body.
4 Take several short breaks, with stretching exercises
if necessary.
5 Change your posture often.
5.3 Disposal
Dispose of the old unit via a collecting
point for electronic scrap or via your
dealer.
10
6
Technical data
Designation
Value
Supply voltage
5.0 V/DC ±5 % SELV
Current consumption
typ. 20 mA
Storage temperature
−20 °C to +60 °C
Operating temperature
0 °C to +50 °C
7
Contact
ZF Electronics GmbH
Cherrystraße
91275 Auerbach
Germany
www.cherrycorp.com
www.cherry.de
E-mail: [email protected]
Telephone:
Sales: +49 (0) 180 5 243779* (0180 5 CHERRY*)
Technical support: +49 (0) 180 5 919108*
(*14 euro cent/min. from German landlines, prices
may vary for calls made from mobile networks.)
Please have the following information on hand when
contacting technical support:
• Item and serial no. of the product
• Name and manufacturer of your system
• Operating system and, if applicable, installed
service pack version
8
General advice
Cherry, a brand of ZF Electronics GmbH, continuously
optimizes its products as new technologies are
developed. For this reason we reserve the right to
make technical alterations. The evaluation of product
reliability and the definition of the product's technical
performance are carried out according to our own
requirements in order to meet internationally
recognized regulations and standards. Requirements
in addition to these can be met through mutual
cooperation. Improper usage, handling, storage and
external influences could lead to faults and defects
during use.
We do not accept warranty for defects caused by
alterations to our product by the user and shall not be
held liable for unauthorized modifications. All repairs
must be made by us or an officially appointed
organization or person.
Possible compensation claims against
ZF Electronics GmbH or its nominated officers –
whatever the legal justification including physical or
stress related injuries – are excluded. Exceptions to
this exist in the case of intent or gross negligence on
the part of ZF Electronics GmbH, infringements of
Product Liability Law or in cases of injury, bodily harm
or risk to health. These operating instructions only
apply to the accompanying product.
Full details can be obtained from your distributor or
direct from us.
9
Certifications
9.1 Federal Communications Commission
(FCC) Radio Frequency Interface
Statement
Information to the user: This equipment has been
tested and found to comply with the limits for Class B
digital device, pursuant to Part 15 of the FCC Rules.
These limits are designed to provide reasonable
protection against harmful interference in a residential
installation. This equipment generates, uses and can
radiate radio frequency energy and, if not installed
and used in accordance with the instructions, may
cause harmful interference to radio communications.
However, there is no guarantee that interference will
not occur in a particular installation. If this equipment
does cause harmful interference to radio or television
reception, which can be determined by turning the
equipment off and on, the user is encouraged to try to
correct the interference by one or more of the
following measures:
• Reorientate or relocate the receiving antenna.
• Increase the separation between the equipment
and receiver.
• Connect the equipment into an outlet on a circuit
different from that to which the receiver is
connected.
• Consult the dealer or an experienced radio/
TV technician for help.
Caution: Any changes or modifications not expressly
approved by the party responsible for compliance
could void the user's authority to operate the
equipment.
9.2 For UL
For use with Listed Personal Computers only!
9.3 CE Declaration of Conformity
We, ZF Electronics GmbH, hereby declare that the
products CyMotion Pro Keyboard (20050),
CyMotion Master XPress (21050) und
CyMotion Master Linux (21070) fulfill the following
requirement:
• EMC Directive 2004/108/EC (directive on
electromagnetic compatibility), tested in
accordance with EN 55022 and EN 55024
Tested in accordance with ZF Electronics standard
test procedure.
11
Mode d´emploi
1
Informations sur papier, comme
aide contextuelle et sur CD
Vous trouverez les informations concernant la mise en
service, la manipulation et la configuration dans le
présent mode d’emploi, comme aide contextuelle et
sous forme d’informations complémentaires pour le
logiciel KeyM@n.
• Le mode d’emploi décrit essentiellement la mise en
service de l’appareil et l’installation du logiciel.
• L’aide contextuelle fait partie du logiciel joint sur
CD. Elle vous donne des informations sur la
commande là où vous en avez besoin et vous
l’appelez avec la touche F1. Vous y accédez
également via Démarrer/Programmes/Cherry
Keyboard Manager/Documentation.
• Des informations complémentaires concernant la
commande et la configuration du logiciel KeyM@n
vous sont fournies sur le CD annexé (CD-ROM/
Manuals). Vous pouvez lire ce qui vous intéresse
à l’écran ou l’imprimer.
En vous donnant seulement les informations
essentielles sur papier, nous réduisons la
consommation de feuilles et contribuons à la
protection de l’environnement.
Veuillez tenir compte des remarques générales pour
l’utilisateur et des conventions de licence.
2
3
Installation du logiciel Cherry
KeyM@n
Le logiciel Cherry KeyM@n est un programme
puissant et très complet. Il vous permet d’affecter des
liens, des programmes, des fonctions système et
même du texte quelconque aux touches
supplémentaires du clavier. Vous pouvez ainsi
appeler d’un actionnement de touche des fonctions
fréquemment utilisées.
➤ Raccordez d’abord l’appareil et installez ensuite le
logiciel.
3.1 Y a-t-il déjà un logiciel pour un clavier
ou une souris sur le PC?
Si un logiciel pour un clavier ou une souris de Cherry
ou d’un autre fabricant est déjà installé, vous devriez
d’abord le désinstaller par sécurité.
➤ Désinstallez le logiciel (via le menu Windows
Démarrer/Panneau de configuration/AjoutSuppression de programmes).
3.2 Installation du logiciel KeyM@n sous
Windows 98/ME/2000/XP/Vista
Raccorder le clavier
2.1 Raccorder le clavier à l’interface PS/2
1 Mettez le PC hors service.
2 Connectez le cas échéant l’adaptateur USB-PS/2
joint au câble USB du clavier.
3 Raccordez le clavier via la connexion PS/2 du PC
Logiciel Cherry KeyM@n actualisé sur internet
Le logiciel Cherry KeyM@n est en développement
permanent. Vous pouvez télécharger la dernière
version de Cherry via l’internet:
www.cherrycorp.com
4 Allumez votre PC.
1 Placez le CD Cherry dans votre lecteur de CDROM.
Le CD-ROM démarre automatiquement. La fenêtre
Installation apparaît.
Remarque!
Si vous voulez utiliser toutes les fonctions du clavier, il
est nécessaire d’installer le logiciel Cherry KeyM@n
joint.
Si vous raccordez le clavier via un commutateur
électronique KVM (commutateur clavier/moniteur/
souris), il peut se produire des dysfonctionnements du
clavier ou du logiciel KeyM@n.
2.2 Raccorder le clavier à l’interface USB
1 Enlevez le cas échéant l’adaptateur USB-PS/2 joint
du câble USB du clavier.
2 Raccordez le clavier via la connexion USB du PC.
12
2 Si le CD-ROM ne démarre pas automatiquement,
faites un double clic sur le lecteur de CD-ROM
dans l’Explorateur et ensuite sur le fichier de
démarrage Start.exe.
La fenêtre Installation apparaît.
3 Cliquez sur le produit Cherry pour lequel vous
voulez installer le logiciel.
L’installation commence.
4 Suivez les instructions d’installation à l’écran.
Le logiciel Cherry KeyM@n est installé.
5
Conseils
5.1 Nettoyage
Appeler le logiciel Cherry KeyM@n
Vous pouvez appeler le logiciel Cherry KeyM@n par
les voies suivantes:
• Démarrer/Programmes/Cherry Keyboard Manager/
Propriétés de Clavier
• Démarrer/Réglages/Panneau de configuration/
Clavier
3.3 Installation du logiciel KeyM@n sous
Linux
1 Placez le CD compris dans la livraison dans votre
lecteur de CD-ROM.
2 Dans le dossier drivers/Linux se trouve le fichier
INSTALL ou README avec des instructions
d’installation. Ouvrez ce fichier.
3 Effectuez l’installation comme décrit.
4
Aide en cas de problème
4.1 Le clavier ne fonctionne pas
•
•
•
•
•
Afin de s’assurer de l’absence de défaut du clavier,
testez celui-ci si possible sur un autre PC/portable.
En cas de raccordement du clavier à la connexion
PS/2: Enlevez l’adaptateur et raccordez le clavier
via la connexion USB de l’ordinateur.
En cas de raccordement du clavier à la connexion
USB: Raccordez le clavier via la connexion PS/2 de
l’ordinateur à l’aide de l’adaptateur. Voir Chapitre
2.1 "Raccorder le clavier à l’interface PS/2".
En cas de raccordement du clavier à la connexion
USB: Utilisez une autre connexion USB du PC/
portable.
En cas de raccordement du clavier à la connexion
USB: Dans le BIOS du PC, réglez l’option "USB
Keyboard Support" ou "USB Legacy Mode" sur
enabled.
4.2 L’installation du logiciel ne fonctionne
pas
•
•
•
Si un logiciel pour un clavier ou une souris est déjà
installé sur le PC, celui-ci doit d’abord être
désinstallé. Sinon, il peut se produire des
dysfonctionnements.
Vérifiez si l’utilisateur sous lequel la session est
ouverte sur l’ordinateur possède les droits
d’installer le logiciel (p. ex. droits d’administrateur
pour Windows 2000 ou XP).
Vérifiez si votre système d’exploitation est
supporté par le logiciel.
Attention!
Détérioration en cas d’utilisation de produits de
nettoyage agressifs ou de pénétration de liquide dans
le clavier
1 Pour le nettoyage, n’utilisez pas de solvants tels
que l’essence ou l’alcool ni aucun produit ou
éponge abrasif.
2 Empêchez tout liquide de pénétrer dans les
appareils.
3 N’enlevez pas les capuchons des touches du
clavier.
1 Mettez le PC hors service.
2 Nettoyez le clavier avec un chiffon légèrement
humide et un produit de nettoyage doux (p. ex.:
détergent vaisselle).
3 Séchez les appareils avec un chiffon doux non
peluchant.
5.2 Syndrome RSI
Syndrome RSI
RSI signifie "Repetitive Strain Injury" = "blessure par
sollicitation répétée". Le syndrome RSI apparaît suite
à de petits mouvements se répétant en permanence
durant une longue période.
Des symptômes typiques sont des douleurs dans les
doigts ou la nuque. Pour plus d'informations visitez:
www.cherry.de/french/service/lmr.htm
1 Organisez votre poste de travail de manière
ergonomique.
2 Modifiez l’inclinaison du clavier à l’aide des pieds
réglables arrières.
3 Positionnez le clavier et la souris de telle façon que
vos bras et vos poignets se trouvent latéralement
par rapport au corps et soient étendus.
4 Faites plusieurs petites pauses, le cas échéant
accompagnées d’exercices d’étirement.
5 Modifiez souvent votre attitude corporelle.
13
5.3 Elimination
Eliminer l’appareil usé via un point de
collecte pour déchets électroniques ou
via le point de vente.
6
Caractéristiques techniques
Désignation
Valeur
Alimentation
5,0 V/DC ±5 % SELV
Consommation de
courant
en général 20 mA
Température de
stockage
−20 °C à +60 °C
Température de
fonctionnement
0 °C à +50 °C
7
Contact
ZF Electronics GmbH
Cherrystraße
91275 Auerbach
Allemagne
www.cherrycorp.com
www.cherry.de
E-mail: [email protected]
Téléphone:
Distribution: +49 (0) 180 5 243779*
(0180 5 CHERRY*)
Support technique: +49 (0) 180 5 919108*
(*14 cents/min depuis le réseau fixe allemand,
différences de tarifs possibles pour les appels depuis
les réseaux mobiles.)
Lors de demandes, veillez à disposer des
informations suivantes à portée de main:
• N° d'article et n° de série du produit
• Désignation et fabricant de votre système
• Système d'exploitation et le cas échéant version
installée d'un Service Pack
8
Généralités
Cherry, une marque de ZF Electronics GmbH,
optimise continuellement ses produits en fonction des
progrès technologiques. Par conséquent, nous nous
réservons le droit de faire des modifications
techniques. L'évaluation de la fiabilité ainsi que la
définition des détails techniques sont le résultat des
tests internes conformes aux normes internationales
en vigueur. D'autres spécifications peuvent être
appliquées suite à une coopération mutuelle. Des
mauvaises conditions d'utilisation, de stockage, ou
14
d'environnement peuvent entraîner des
dysfonctionnements ou des dommages lors de
l'utilisation.
Nous insistons sur le fait que nous ne pouvons
accorder quelque garantie que ce soit causée par une
modification du matériel par l'utilisateur. Tous les
travaux de réparation doivent être réalisés par nos
soins ou une personne/organisation officiellement
agréée.
Toute demande d'indemnisation éventuelle contre
ZF Electronics GmbH ou ses représentants – quoi
que soit la cause (ainsi que des dommages corporels
dus a une réaction émotionnelle) – sera rejetée dans
la mesure où elle n'est pas la conséquence d'une
négligence de notre part. Les restrictions ci-dessus ne
s'appliquent pas dans le cadre de la loi sur la
Responsabilité Produit allemande ainsi qu'en cas de
blessures corporelles ou d'atteintes à la santé. Les
conditions d'utilisation ci-dessus ne sont valables que
pour le produit livré avec cette notice.
Pour tout complément d'information, veuillez contacter
les distributeurs correspondants ou nos services.
9
Déclaration de conformité CE
Nous, ZF Electronics GmbH, déclarons que les
produits CyMotion Pro Keyboard (20050),
CyMotion Master XPress (21050) et
CyMotion Master Linux (21070) sont conformes aux
exigences suivantes:
• Directive CEM (directive sur la compatibilité
électromagnétique) 2004/108/EC, contrôle suivant
EN 55022 et EN 55024
Testé suivant la procédure d'essai standard de
ZF Electronics.