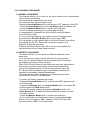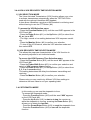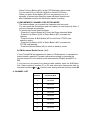
1
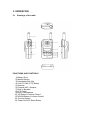
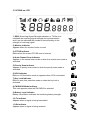
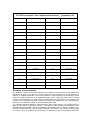
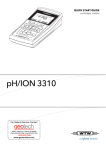
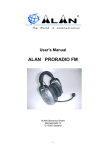
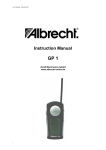
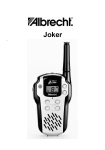
Tectalk(FM)
USER MANUAL
2-WAY PORTABLE
PMR 446 RADIO
WITH FM BROADCAST
RECEIVER
ALAN Electronics GmbH
CONTENT
1. GENERAL
1.1 General
1.2 Characteristic
1.3 Composition
2. SPECIFICATION
2.1 General Specification
2.2 Electrical Specification
3. OPERATION
3.1 Drawings of the radio
3.2 ICONS on LCD
3.3 Key Functions
3.4 Setting and Operation
4. CHANNEL DATA (With Sub-Channel data)
1. GENERAL
1.1 GENERAL
This equipment, Tectalk(FM) is called 2 way PMR 446 portable handheld radios.
The frequency range is 446.00625 ~ 446.09375MHz, UHF operating
Channels for European PMR 446 2 way portable radios.
Also, this unit have built-in FM Radio which receives FM Broadcast Radio
frequencies in the 87.5 ~ 108MHz band.
1.2 CHARACTERISTIC
a) All active device in this radio is composed of semiconductor and
high density IC.
b) To design this radio in compact and weight approximately 130g
including battery.
C) CPU of this equipment is HD404889 from HITACHI.
d) You can use PMR 446 and FM Radio with this unit at the same time.
e) It's power can operate by use of ALCALINE 4 cell(1.5V AAA) battery
1.3 COMPOSITION
This radio is composed of following.
a) Transmitter(W/Antenna)
b) Belt clip
2. SPECIFICATION
2.1 GENERAL SPECIFICATIONS
a) Frequency Range : 446.00625 to 446.09375 MHz
b) Output Impedance : 50 Ohms (internal) unbalanced
c) Modulation Type : 8K50F3E
d) Communication Mode : Simplex
e) Channel Capacity : 8 channel
f) Channel spacing : 12.5 KHz
g) Power : 6.0V(Alkaline)
h) Battery Life : Alcaline 1000mAh > about 35hours
NI-MH 600mAh
> about 22hours
( Tx5%, Rx5%, Stand-by 90% )
i) Operating Temperature : -20°C to +55 °C
j) Dimension : 95.5(H)x 50(W)x 26(D)mm
k) Weight : 130g(with Battery)
2.2 ELECTRICAL SPECIFICATION
a) TRANSMITTER
1) Output power : Max. 0.5 W
2) Frequency Stability : +/- 5 ppm(-20°C to +55°C)
3) Modulation Method : FM
4) Oscillation Method : PLL SYNTHESIZER
5) Max. Frequency Deviation : < +/- 2.5 KHz (with tone)
6) Cooling Method : air-cooling Method
7) Spurious Emission TX: < -36dBm
8) FM Hum/Noise : > 40dB(1kHz 60% modulation)
9) Distortion : < 5% (1kHz 60% modulation)
10) Tx Audio Response : 6dB /OCT +/- 3dB preemphasis (300Hz to 2.5kHz)
b) RECEIVER
1) Receive Method : Double Super Heterodyne
2) Receive Sensitivity : -118dBm up (20dB SINAD W/CCITT)
3) Squelch Sensitivity : -120dBm to -130dBm (AUDIO On/Off Point)
4) Bandwidth : > 8.5KHz
5) Selectivity : > 55dB
6) Local Frequency Stability : +/-5ppm(-20°C to +55°C)
7) Spurious Response Rejection : > 65dB
8) Audio output : 200mW (8 Ohms load THD 10%)
9) Distortion : < 5% (1kHz 60% Modulation)
10) RX Audio Response : 6dB/OCT +1/-10dB deemphasis (300Hz -2.5kHz)
11) S/N Ratio : < 40dB(1kHz 60% Modulation)
12) IF :
1'st IF = 21.7MHz
2'nd IF = 450kHz
13) Local Frequency :
1’st Local Frequency = fc - 21.7MHz
2’nd Local Frequency = 21.25MHz
c) FM Broadcast Radio
1) Receive Method : Heterodyne
2) Receive Sensitivity : Min –90dBm(12dB SINAD)
3) Local Frequency : 1’st Local Frequency = fc – 75KHz
3. OPERATION
3.1
Drawings of the radio
FUNCTIONS AND CONTROLS
1) Battery Door
2) Monitor Button
3) Detachable Belt Clip
4) Push-To-Talk (PTT) Button
5) Antenna
6) External MIC / Speaker
7) Built-in Speaker
8) LCD Panel
9) Built-in Microphone
10) UP Button & Volume Control
11) DOWN Button & Volume Control
12) Function Button
13) Power On/Off & Enter Button
3.2 ICONS on LCD
1. RSSI (Receiving Signal Strength Indicator) or TX Bar Icon
Indicates the receiving signal strength during transmission
and it can be indicated the number of bar according to the
strength of receiving signal.
2) Monitor Indicator
Appears when the monitor button is used.
3) CTCSS Indicator
Blinks when the correct CTCSS tone is entered.
4) Auto Channel Scan Indicator
Appears in the normal scan mode or when the normal scan mode is
activated.
5) Priority Scan Indicator
Appears in priority scan mode or when the priority scan mode is
activated.
6) VOX Indicator
Blinks in VOX selection mode or appears when VOX is activated.
7) Key Lock Indicator
Blinks in auto lock selection mode or when the key lock is
activated.
8) FM RADIO Mode Indicator
This icon appears when the FM RADIO is selected.
9) Battery Level Indicator
Battery Level Meter indicates the remaining battery strength.
10) Tx Indicator
Appears when a signal is being transmitted.
11) Rx Indicator
Appears when a signal is being received.
12) Large Segment Display
Indicates the channel number in use at the
normal mode. When the Function Button is pressed,
it Displays the function menu in sequence:
Ch / rdo / Sc / Uo / H00 / Sub / CAL / bEP / rog /
tAL / [1] / [2] / [3] / P1 / P2 / P3 / P4 / P5
13) Small Segment Display
Displays the FM frequency at the FM mode.
Displays the SUBMENU of each MENU in the function
mode.
13.1 Main Menu
CH: 1~8 , 0-38 (ctcss channels)
rdo : OFF, ONLY, PLUS
SC : nr, Pr(1-8), OFF
VO : Hi, nr, Lo, OFF / 1, 2, 3, 5 sec (Vox Delay Time)
H00 : 00-99, 00-99
13.2 Sub Menu
Sub : yES, NO
CAL : 1-7, OFF
bEP : On, OFF
rog : On, OFF
tAL : On, OFF
[1],[2],[3]: 1-8, 1-38
P1,P2,P3,P4,P5 : 87.5-108
3.3 Key Functions
3.3-1 POWER ON/OFF & SHIFT BUTTON (#13)
1) Short Touch - Power On
a) When FM RADIO is OFF
Press this button (#13) briefly to turn the unit on.
A short confirming melody will play.
A momentary press of this button is not effected to any function
in the Function edit mode and stand-by mode except in the specific mode.
b) When FM radio is on
Pressing this button allows you to shift to next preset FM radio
Broadcasting.
2) Long Touch - Power Off
Press this button (#13) for longer than 1.5 seconds to turn the
unit off.
A momentary press of this button is also used to shift to the
other small segment display during the function edit mode and
reset the stopwatch counter in the stopwatch mode.
3.3-2 FUNCTION BUTTON (#12)
1) Short Touch
- Press this button briefly to enter function edit mode in standby
mode.
2) Long Touch
- Press for longer than 1.5 seconds to activate the KEY LOCK in the
standby mode.
Please note all buttons will be disabled except the Monitor
Button (#2) and PTT Button (#4) will remain fully operational.
3.3-3 UP BUTTON (#10)
1) Short Touch
- In the standby mode, press this button briefly to move to the
next higher main volume level.
- In the function edit mode, press briefly to shift from the
current option in each submenu to the next option in the same
submenu.
2) Long Touch
- Pressing this button for more than 1.5 seconds will allow you to
navigate at a more rapid rate through different volume level in
the standby mode or through different menus in the function edit
mode.
3.3-4 DOWN BUTTON (#11)
1) Short Touch
- In the standby mode, press this button briefly to move to the
previous lower main volume level.
In the function edit mode, press briefly to shift from the
current option in each submenu to the previous option in the same
submenu.
2) Long Touch
- Pressing this button for more than 1.5 seconds will allow you to
navigate at a more rapid rate through different volume level in
the standby mode or through different menus in the function edit
mode.
3.3-5 PUSH-TO-TALK (PTT) BUTTON (#4)
- Press it firmly and speak into the Built-in Microphone (#9) to
transmit.
The red Tx LED Indicator at the right side of the LCD Panel (#8)
will light.
- Release it to revert to standby mode.
When an incoming call is received, the green Rx LED Indicator on
the left side of the LCD Panel (#8) will light.
2-Way Call Ringer
Press the PTT Button twice quickly to call another party on the
same channel and pressing the button once during and pressing
the button once during a calling stops the calling and then
returns to the standby mode.
The user selected call ringer melody will play.
3.3-6 MONITOR BUTTON (#2)
- Press it to check activity on the current channel before you try
to transmit.
- Adjust the Volume Control (#10, #11) if necessary.
- When you press the Monitor Button, the LCD Panel (#8) will be
illuminated with an amber color back-light and both the Tx and
Rx LED Indicators will light.
- If you press and hold the monitor button for more than 3 seconds,
the monitor appears on the LCD panel and monitor the receiving
signal continuously.
- To stop the monitoring press the Monitor Button (#2) and return
to the standby mode.
Press it to confirm the required option for respective functions
during function edit mode.
3.3-7 EXTERNAL MIC/SPEAKER (#6)
- This jack accepts an optional headset/microphone for
handsfree operation.
- Please refer to the Albrecht catalogue or homepage to see
the variety of available accessories.
See also section regarding VOX SELECTION MODE.
3.4 Setting and Operation
3.4-1 CHANNEL SELECTION
1) BASIC CHANNEL SELECTION
In order to communicate with other PMR units, both you and the
receiving party must be on the same channel.
Tectalk FM has 8 channels (1-8) as indicated by the large digits
in the LCD Display Panel (#8).
Before, trying to transmit on the selected channel, you should
press the Monitor Button (#2) to check the activity on that
channel.If someone is already on the selected channel, you should try
another channel that is clear.To change the basic channel,
In the standby mode, press the Up Button (#10) briefly to move
to the next higher main channel number.
Press the Down Button (#11) briefly to move to the next lower
main channel number.
Press the Monitor Button (#2) to return to standby mode.
2) CTCSS (Coded Tone Controlled Squelch System) SUB-CHANNEL
SELECTION MODE
This feature allows you to utilize a less used channel range
(00-38) within a main channel. This enables you to communicate
with another party on the same main channel using the same subcode.
This helps to avoid congestion on the main channel and filters
out unwanted noise and static.
There are 38 CTCSS sub-channels for each main channel.
To change the CTCSS sub-channel,
-press the Function Button (#12) until the word “Ch” appears in
the LCD Panel (#8).
-Press the Shift Button (#13) and the two small number on the
right side will blink on the LCD Panel (#8).
- Press the Down Button (#11) or the Up Button (#10) to choose the
desired sub-channel to use.
- The corresponding sub-code frequency will be displayed in the
lower right corner.
- Press the Monitor Button (#2) to confirm your selection and
return to standby mode.
NOTE: To communicate with other PMR units, they must be switched to
the same channel and CTCSS sub-code.
To communicate with other PMR units that do not have sub-codes,
switch your unit to the same channel with the sub-code set to
OFF.
3.4-2 FM RADIO Mode
1) FM Only : You can receive the FM Radio only
2) FM plus : You can receive the FRS signal even while you listen to
the FM Radio.
3) When the FM only or FM plus is selected on the FM selection mode,
FM icon( )appears on LCD Panel (#8).
And you can choose the channel by pressing the Up Button (#10)
and the Down Button (#11).
4) When the FM only or FM plus is selected on the FM selection,
you can select the way of channel selection in seek scan and tune
scan by pressing the Enter Button (#13).
5) If you select seek scan, you can select the FM radio channel by
carrier detect way and if you select tune scan you can select the
FM radio channel
3.4-3 CHANNEL SCAN MODE
1) NORMAL SCAN MODE
This feature allows you to scan for an active channel and communicate
with the party transmitting.
The power saver is disabled in this mode.
To access the Auto Channel Scan menu,
Press the Function Button (#12) until the word “SC” appears in the LCD.
- Press the Down Button (#11) or the Up Button (#10) to choose “nr”.
- Press the Monitor Button (#2) to confirm your selection.
The unit will begin scanning for an active main channel.
If a transmission is detected, the Rx and RSSI icons will appear
in the LCD Panel (#8).
To turn off the auto channel scan feature return to the Scan mode
by pressing the Function Button (#12) and choose ”OFF”.
You can pause on any channel while in the Auto Channel Scan Mode
by pressing the the PTT Button (#4) during the reception of a
signal for 5 seconds afterward.
Pressing the Monitor Button (#2) will resume scanning and eliminate that channel from those being scanned.
2) PRIORITY SCAN MODE
This feature allows you to monitor two different channels at the
same time.
If you pre-set any priority channel other than the current channel in use, the pre-set channel will be scanned every 0.5 second
and signals you when a call is received.
While in the Priority Channel Scan Mode you may hear transmission
from either a primary or secondary channel when transmitting.
The unit will always transmit on the primary channel unless the
PTT Button (#4) is pressed during or immediately following the
reception of secondary channel transmission.
The power saver mode is disabled in the Priority channel scan
mode and the volume is not adjustable.
To access the Priority channel scan mode.
- Press the Function Button (#12) until the word “SC” appears in the
LCD Panel (#8).
- Press the Up Button (#10) or the Down Button (#11) to choose “Pr”
and then press the Shift Button (#13).
- Choose the priority channel by pressing Up Button (#10) and
Down Button (#11) to select the desired channel number you wish
to closely monitor.
- Press the Monitor Button (#2) to confirm your selection.
-To turn off the Priority channel scan feature, press the Function
Button (#12) until the word “SC” appears on the LCD Panel (#8)
and then choose “OFF” in the scan mode.
3.4-4 VOX & VOX RECOVERY TIME SELECTION MODE
1) VOX SELECTION MODE
The Voice Activated Transmission (VOX) function allows your voice
to activate transmission automatically when the TECTALK FM is
used with the optional Handsfree MIC/headset.
It also allows Handsfree use when a MIC/headset is not being used
without having to use the PTT Button (#4).
To access the VOX Selection menu,
- Press the Function Button (#12) until the word “UO” appears in the
LCD Panel (#8).
- Press the Down Button (#11) or the Up Button (#10) to select from
Hi, nr, Lo or OFF.
- The High, normal or low setting determines VOX response sensitivity.
- Press the Monitor Button (#2) to confirm your selection.
- To turn off the VOX feature, enter the VOX selection mode and
then select OFF.
2) VOX RECOVERY TIME SELECTION MODE
This allows the response characteristics of the VOX function to
be precisely adjusted to suit individual needs.
To access the VOX Recovery Time Selection menu,
- Press the Function Button (#12) until the word “UO” appears in the
LCD Panel (#8).
- Press the Power/Shift Button (#13) to confirm your selection and
switch to VOX recovery time selection.
- Press the Down Button (#11) or the Up Button (#10) to select from
5, 3, 2 or 1 second setting.
This setting determines the delay time between transmitting and
receiving.
- Press the Monitor Button (#2) to confirm your selection.
Please note you may need to try different VOX time settings to
determine the best value to suit your speaking habit.
3.4-5 STOPWATCH MODE
In this mode you can use the stopwatch to time.
To access the Stopwatch mode :
- Press the Function Button (#12) until the word “H00” appears
on the LCD Panel (#8).
- Press the Up Button (#11) to start and stop the counter up
while the stopwatch is running, pressing the Down Button (#11)
allows you to obtain the lap time.
- Press the Power/Enter Button (#13) to reset the stopwatch time.
- Press the Function Button (#12) to turn off the stopwatch
function.
3.4-6 SUB OPTION SELECTION MODE
This mode allows you to enter the sub option selection mode.
-Press the Function Button (#12) until the word “Sub” appears in the LCD.
You can now select between “yes” or “No”.
-If you press the Function Button (#12) when “yes” blinks on the
LCD Panel (#8), you enter into the Sub Function edit menu.
- Pressing the Function Button (#12) when, “no” blinks, returns to standby.
Access to following SUB Menu points is only possible when You have
avtivated the SUB menu by setting to “Yes”
1) CALL RINGER MELODY SELECTION MODE
This feature provides 7 user selectable call ringer melodies to
alert you of a calling party.
To select your favorite Call Ringer melody,
- In the Sub option selection mode, press the Function Button
(#12) when the “yes” blinks.
- Press the Down Button (#11) or Up Button (#10) to preview the
seven available melodies.
- Press the Monitor Button (#2) to confirm your selection.
2) BEEP TONE SELECTION MODE
This feature allows you to program beeping or not beeping with
key selection.
If the Key beep off is chosen no beep sound when you press the
button The call signal, power on/off beep and roger beep make a
sound regardless of the beep.
- Press the Function Button (#12) from the Call selection mode.
- Press the Up Button (#10) or Down Button (#11) to select from
on or off.
- Press the Monitor Button (#2) to confirm your selection and
return to standby mode.
- When you press Enter button (#13) or do not press any key within 5
seconds, it returns back to stand-by.
3) ROGER BEEP SELECTION MODE
If Roger Beep option is on, when you finish the transmitting automatically the TECTALK FM will produce a beep sound and transmit a
sub-code tone to the partner.
To access the Roger Selection Mode :
- Press the Function Button (#12) from the Key beep selection mode.
- Press the Up Button (#10) or Down Button (#11) to select from
Roger on or off.
- Press the monitor Button (#2) to confirm your selection and
return to standby mode.
4) SQUELCH TAIL SELECTION MODE
This feature allows you to set option mode of CTCSS squelch tail
elimination.
- Press Function Button (#12) at the CTCSS display option mode,
You can select On or Off with Up(#10) or Down(#11) button.
- When you press Enter Button (#13) or not press any key in 5
seconds, it returns back Stand-by mode with back beep sound
after installation squelch tail elimination option its setting.
5) PMR MEMORY CHANNELS SELECTION MODE
This feature allows you to preset the frequency and sub code.
You can preset the frequencies and sub codes you use frequently. Max. 3
memory channels are possible.
To access the Preset selection Mode
- Press the Function Button (#12) from the Roger selection Mode.
- Press the Up Button (#10) or Down Button (#11) to preset the
channel.
- Press the Power & Shift Button (#13) to shift into CTCSS code
selection option.
- Press the Up Button (#10) or Down Button (#11) to preset the
CTCSS code desired.
- Press the Monitor Button (#2) to return to stand by mode.
6) FM Broadcast Radio Preset 1 to 5
If Your Tectalk FM is programmed to listen to FM broadcast, it is possible to
select beween maximum 5 preset radio stations simply by pressing the
function button F in the receive mode subsequently (Display shows P 1 to
P5).
If You have not yet preset Your desired radio stations, enter the SUB Menu
first. Select memory location P1 to P5 and select the frequencies with up
and down buttons
or . Confirm each setting with the memory button M.
4. CHANNEL LIST
Channel
Frequency MHz
1
446.00625
2
446.01875
3
446.03125
4
446.04375
5
446.05625
6
446.06875
7
446.08125
8
446.09375
CTCSS (Continuous Tone Coded Squelch System) Frequency List
Sub Channel
Tone Frequency
Sub Channel
Tone Frequency
1
67.0 Hz
21
136.5 Hz
2
71.9 Hz
22
141.3 Hz
3
74.4 Hz
23
146.2 Hz
4
77.0 Hz
24
151.4 Hz
5
79.7 Hz
25
156.7 Hz
6
82.5 Hz
26
162.2 Hz
7
85.4 Hz
27
167.9 Hz
8
88.5 Hz
28
173.8 Hz
9
91.5 Hz
29
179.9 Hz
10
94.8 Hz
30
186.2 Hz
11
97.4 Hz
31
192.8 Hz
12
100.0 Hz
32
203.5 Hz
13
103.5 Hz
33
210.7 Hz
14
107.2 Hz
34
218.1 Hz
15
110.9 Hz
35
225.7 Hz
16
114.8 Hz
36
233.6 Hz
17
118.8 Hz
37
241.8 Hz
18
123.0 Hz
38
250.3 Hz
19
127.3 Hz
20
131.8 Hz
European 2 years warranty
The distributor, dealer or retail shop warrants to the original retail purchaser of this product that
should this product or any part of it, under normal use and conditions, be proven defective in
material or workmanship within 2 years from the date of original purchase, such defect(s) will be
repaired or replaced with new or reconditioned product (at the company's option) without charge
for parts and repair labor. To obtain repair or replacement within the terms of this warranty, the
product is to be delivered with proof of warranty coverage (e.g. dated bill of sale), specification of
defect(s), to the distributor, dealer or his authorized repair center.
The Company disclaims liability for communications range of this product. The warranty does not
apply to any product or part there of which, in the opinion of the company, has suffered or been
damaged through alteration, improper installation, mishandling, misuse, neglect, accident, or by
removal or defacement of the factory serial number/bar code label(s). The warranty does not apply
to accessory parts or problems caused through not authorized or not recommended accessories
like of the units like batteries, external power supplies and over voltage caused through external
power supplies, light bulbs, broken antennas, broken swivel belt clips, broken or damaged acrylic
glass windows and cabinet parts.
Please contact the dealer or person where You have purchased Your Tectalk FM.
Where to find service hints and documentation
The complete technical documentation is updated regularly. You can download the latest versions
of user manuals, technical documents and conformity declaration, as well as service hints or
FAQ’s any time from our server under
http://www.albrecht-online.de/service
If You should have a problem, please have a look to the service hints or frequently asked
questions (FAQ) before You send Your Tectalk FM back to the service center.
CE- Declaration of Conformity
Albrecht Tectalk-FM / JDP-408 HF
This unit complies to all relevant European Standards and Regulations for PMR 446 radio service.
This radio may be used only in EU countries and some other states applying the R&TTE directive
of the European Community. However, there are still some restrictions (as of date of this user
manual) to use PMR 446 in following countries:
Italy and Norway:
PMR 446 is not yet established in these countries. Other radio services
are still legally using these frequencies. Travellers may take the radios
with them, but not operate them. Please ask local authorities for further
informations!
France:
Channels 1 and 2 are not yet allowed to be used.
Belgium:
No restrictions for travellers using the radio in Belgium free of charge
and licence for less than 3 months. Residents of Belgium must apply
for a radio operating licence according to Belgian regulations.
Eastern Europe
Please ask the local authorities before using the radio, because only
few countries outside EU apply already the european R&TTE directive.
Following countries still apply special national approval regulations, not
(yet) valid for PMR 446 radio:
Poland, Estonia, Letavia, Lithuania, Ukraine, Russia, Belarus, Slowenia
and some others.
This unit fully complies to the following European standards: Radio& Spectrum engineering:
EN 300 296-2 (2001), EN 55013 +A12, 13, 14 (1990-99) (FM radio part 87.5-108 MHz)
Electromagnetic Compatibility (EMC): EN 301 489-0 and EN 301 489-5 (2000), Electrical
safety: EN 60 065. The notified body 0681 (ETS) had been involved for the expert’s opinion
about the conformity of this radio. The unit is intended to be used in following european (EU and
non EU countries):
A, B, CH, D, DK, E, F, FIN, GB, GR, H, IS, IR, L, NL, P, S, TR (JDP-408HF)
Lütjensee, 13.05.2002
ALAN Electronics GmbH , Dovenkamp 11, D- 22952 Lütjensee
Note: The latest actual version of our „EC Declaration of Conformity“ may be downloaded from our
Internet server under http://www.albrecht-online.de/service .