1
Working Material
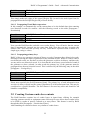
The Regulatory Authority Information System
RAIS 3.0 with SQL Server Extensions
Programmer’s Guide
Part I – Advanced Customization
Document version 1/12/2006
RAIS 3.0 Programmer’s Guide – Part I : Advanced Customization
Contents
1
2
3
4
Introduction......................................................................................................................1
1.1
Overview....................................................................................................................1
RAIS Advanced Customizations ....................................................................................4
2.1
Creating Custom Protectors .......................................................................................4
2.2
Creating Custom Evaluators ....................................................................................11
2.3
Creating Custom Consistency Checks .....................................................................16
2.4
Creating Custom Preselection Values......................................................................21
2.5
Creating Custom combo box contents .....................................................................22
2.6
Creating Custom Preselection lists ..........................................................................24
2.7
Creating Custom Functions and Modules................................................................25
2.8
Creating Custom Forms ...........................................................................................29
2.9
Creating Custom Tables...........................................................................................30
2.10 Creating Custom Menu entries ................................................................................31
2.11 Creating Custom Queries and Statistics...................................................................38
2.12 Customizing Search Functionality ...........................................................................43
2.13 Multiple selection (junction forms) .........................................................................44
Copying customizations from a front-end to the creator ...........................................46
3.1
Copying Queries ......................................................................................................46
3.2
Copying forms and reports.......................................................................................47
3.3
Copying tables .........................................................................................................49
3.4
Copying modules .....................................................................................................50
Entity Relationship Diagrams.......................................................................................51
4.1
Facilities and Departments.......................................................................................52
4.2
Sources.....................................................................................................................53
4.3
Authorizations..........................................................................................................55
4.4
Workers....................................................................................................................57
4.5
Inspections ...............................................................................................................57
4.6
Enforcements ...........................................................................................................58
4.7
Incidents...................................................................................................................58
4.8
Service Providers .....................................................................................................59
RAIS 3.0 Programmer’s Guide – Part I : Advanced Customization
1 Introduction
This document is part of the official programmer’s guide of RAIS 3.0 with SQL Extensions,
released May 2006. This part is intended to assist RAIS 3.0 Administrators and Developers in
advanced customizations of RAIS 3.0.
1.1 Overview
The programmer’s guide consists of two parts:
•
•
Part I: Advanced customizations
Part II: Technical details
Part I (Advanced customizations) details how highly specialized functionality may be
included in RAIS 3.0. Part II (Technical details) gives an overview of internal functioning of
the RAIS Creator.
1.1.1 General approach for advanced customization
The RAIS 3.0 system is defined through a set of tables, fields inside tables and relationships
between tables. The user interface is a combination of forms and queries to allow data input
and data retrieval from the tables. Complementary parts of the system consist of modules of
Visual Basic code.
Customization of the RAIS 3.0 model and interface is possible to a certain extend through the
interface or through the creator (see RAIS 3.0 Administrator Guide). Advanced
customization can be performed through the modification of existing objects (tables, queries,
forms) or through the addition of new objects.
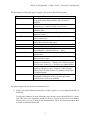
The description of the main types of tables are given in the following table
Type of table
Data tables
Evaluator tables
Propagator tables
Protector tables
System tables
Treeview
Description, Content
contain defaults values for selection menus or input
data;
contain IDs of system data that match a certain
condition ( for example primary key of Boolean record
that means “yes”), is used by system for consolidation
and queries
link data with forms by IDs, determines which queries
to be shot when a form opens, are responsible for how
data looks in a form or report;
contain primary keys of specific data to be protected
against deletion or renaming and error message text;
contain local system settings, search tool SQL
expressions, system error messages;
determines the contents of the tree-view menu;
1
RAIS 3.0 Programmer’s Guide – Part I : Advanced Customization
The descriptions of the main types of queries are given in the following table.
Type of query
Allocation –
Calculation –
Consistency Check –
Display –
Entry Filter –
Helper –
Item Selection –
Menu Selection –
Mini Display –
Preselection Filter –
Preselection List –
Query –
Statistics –
UnAllocation –
Description, Function
Is used by the system (forms with multiple selection),
are system queries that normally don’t need to be
modified
Queries that contain any type of mathematical
calculation (e.g. current activity of an isotope)
Checks whether data entered by user meets the defined
validation rule
Return records that are currently being displayed, used
further in queries
Determine a recordset that should appear in a dropdown (combo) box
Helper queries that are used when its hard to obtain the
needed data with one SQL query
System query that normally don’t need to be modified
Reads current location of the user in the interface
Contains all the data to be shown in main window, later
to be filtered by “Preselection List –“ query
Used to fill drop-down boxes, contain two fields: ID
and one more
Reads the values chosen by the user in menus and
filters records to show
One of the most relevant types for customization
(together with statistics) – displays list of items (report)
based on user choices (e.g. facilities w/o authorization)
One of the most relevant types for customization
(together with query-type) – displays counts of items
(report) based on user choices (e.g. number of facilities
w/o authorization)
Is used by the system (forms with selection and
assignment of multiple values). System query that
normally don’t need to be modified
The general approach for advanced customization is:
•
Design, test and validate custom objects (forms, queries etc.) in an unlocked RAIS 3.0
front-end:
Testing and validation is most efficiently done directly in an unlocked RAIS 3.0 frontend. This allows for immediate testing of the new objects in their final environment.
Please refer to section 4 in the RAIS Administrator Guide for instructions about how
to create an unlocked front-end.
2
RAIS 3.0 Programmer’s Guide – Part I : Advanced Customization
•
Copy custom objects into the RAIS 3.0 Creator:
After custom objects have been validated, they need to be copied into the RAIS
Creator in order to be automatically included in the RAIS 3.0 front-end upon next
creator runs. If custom objects would not be copied into the creator, they clearly
would be lost.
•
Eventually adjust the RAIS 3.0 Creator to automatically create new custom objects
upon next run:
For some objects to be fully integrated into the RAIS 3.0 front-end, slight
modifications of the RAIS 3.0 Creator source code and record appending in RAIS 3.0
System Tables are required. Please refer to Section 3 for more details on how to copy
custom objects into the creator and how to adjust the creator.
The following notes are important pre-requisites before doing any advanced customization of
RAIS 3.0
•
It is important to be familiar with the RAIS 3.0 system and its associated
documentation before doing any customization.
•
To make an unlocked front-end, select the appropriate option before running the
creator.
•
To open the creator in design mode, hold down the “shift” key when clicking the
“OK” button on the Logon window.
1.1.2 Structure of the document
Section 2 details how advanced customizations may be implemented in RAIS, as for example
specialized queries and reports, new forms and functions. RAIS administrators will find most
of required information in this section. The reader is required to be familiarized with Visual
Basic for Applications (VBA) and Structured Query Language (SQL).
3
RAIS 3.0 Programmer’s Guide – Part I : Advanced Customization
2 RAIS Advanced Customizations
This section describes advanced customization of RAIS 3.0. The RAIS 3.0 Creator has been
designed to allow for customizations of the RAIS 3.0 back-end (i.e. adding tables and fields)
and appropriately adjusting the RAIS 3.0 Input Forms. Advanced customizations, for
example new queries or new consistency checks, require manual intervention on parts of the
RAIS 3.0 Creator Source Code as well as RAIS 3.0 System Tables.
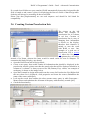
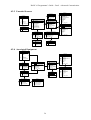
2.1 Creating Custom Protectors
Protectors are data tables of a special type used in RAIS 3.0 to prevent deletion of records
required for the good and deterministic functioning of the RAIS 3.0 Interface. Examples of
such records are all [unknown] records; these exist in the tables [Generator Model],
[Generator Type], [Manufacturers] and many more. These records exist in the default values
database of RAIS 3.0, distributed by the IAEA.
Protectors allow for preventing deletion by simply creating a record in a protection table and
making this record point (by means of a foreign key) to the record to be protected in some
other table. As foreign keys have to be entered for protection, it is clear that a protection table
has to be set up for each table containing records to be protected.
Protectors are stored in tables as for instance [Protector Generator Type], which has the
following table definition:
PK Protector Generator Type ID
FK Generator Type ID
Deleting Text
Renaming Text
Operation Code
RAIS_TIME_STAMP
Primary key, auto-number
Primary key of the record in the table [Generator Type]
to be protected
Error text to be displayed when deletion is attempted
Warning text to be displayed when modification is
engaged
Unused (insert 1 if you create new record)
Time stamps automatically updated by RAIS, do not
touch
Protectors have a foreign key relating a record to be protected in a RAIS table, in this
example the table [Generator Type]. Protected records in this table may not be deleted, upon
an attempt, the corresponding deleting text is displayed as an error message, and deletion is
aborted. To prevent unattended renaming of protected records, the feature for displaying a
warning text upon modification has been provided. Modification of protected records is
however allowed.
4
RAIS 3.0 Programmer’s Guide – Part I : Advanced Customization
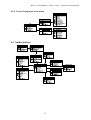
2.1.1 Examples
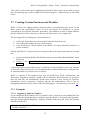
2.1.1.1 Protecting deletion of important facilities
This example shows how to prevent deletion of an important facility, called Waste
Management. This type of facility will be required in most countries to allow for storage of
sources managed as waste.
The standard installation of RAIS 3.0 does not provide for a protector table for facilities. So,
in a first step, we have to create this table. If the table has already been created in an earlier
step, we may of course skip this section and continue at.
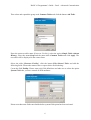
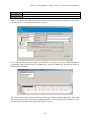
Please make the field [Design Master] visible in the main form of the creator. To do so, open
the RAIS Creator in design mode, open the form [Model] in design mode and set the
visibility property of the control [Master Design]. Next, close the creator, and open it again in
normal mode, activate the Master Design Mode by ticking the corresponding box.
5
RAIS 3.0 Programmer’s Guide – Part I : Advanced Customization
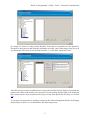
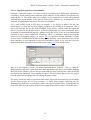
Then select and expand the group node Common Tables and click the button Add Table.
Enter the protector table name [Protector Facility], select the option Simple Table (without
History), select the menu Setup and the menu node Common Tables and click Apply. The
new table will be displayed in the creator form.
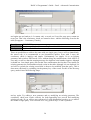
Select the table [Protector Facility], click the button Edit Selected Table and add the
following fields. Please take utmost care to respect below field ordering:
Create the field Facility. Please enter only field definitions and take care to select the option
System Field after you have entered all field attributes.
Please note that some fields turn disabled after system field option has been activated.
6
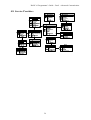
RAIS 3.0 Programmer’s Guide – Part I : Advanced Customization
This is to prevent unintended modification of system fields. If you need to correct field
attributes, disable the system field option, modify appropriately and enable the system field
option again. Click the Apply button to continue.
Create the field Deleting Text. Please check spelling and system field option.
Create the field Renaming Text. Please check spelling and system field option.
7
RAIS 3.0 Programmer’s Guide – Part I : Advanced Customization
Create the field Operation Code. Please check spelling and system field option.
Close the table properties form in order to return to the RAIS Creator main form. Accept the
table group and create a new RAIS 3.0 front-end and back-end. Please take care to create an
unlocked front-end.
Open the RAIS 3.0 front-end after creation has been completed. Expand the menu node
Common Tables in the Regulatory System menu; the new protector appears.
8
RAIS 3.0 Programmer’s Guide – Part I : Advanced Customization
It’s empty, of course, we only created the table. Next step is to populate our new protector.
Navigate to the protector and click the Add button to create a new protecting record, just as if
you create any other new record in RAIS and add “1” to the field “Operation Code”.
After the new protection record has been created, the left side list box displays by default the
primary key value of the facility to be protected. If you want the facility name to be displayed
here, please create a new preselection list query for the form [Protector Facility] (see section
2.6)
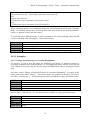
To test that your protection is working, navigate to the waste management facility in the Input
menu and try to delete it. You should have the following screen:
9
RAIS 3.0 Programmer’s Guide – Part I : Advanced Customization
Test also the behavior when modifying the record.
Please note that only a warning message is displayed, hence modifications are allowed.
2.1.2 Hiding protector tables from the Regulatory System menu
The new protector we have been creating appears in the Regulatory System menu. Protectors
defined by default in the standard version of RAIS 3.0 are not displayed; they are hidden.
This hiding feature has been introduced because it might be dangerous to modify, or even
delete protector records.
After we have defined and validated our new protector, we should also protect this protector
by hiding it from the Regulatory System menu. Open the table [Treeview] in the RAIS backend. Search for the record having the field value [Protector Facility] in the field [PDI].
Lookup the associated value of the field [Key]; it will usually be something starting with the
10
RAIS 3.0 Programmer’s Guide – Part I : Advanced Customization
letter M. This letter makes the menu node for our protector appear under the menu group
Common Tables. A hidden menu group exists in RAIS for hiding all protectors, having the
key prefix Y. Rename the key of the new protector to something like Y99, meanwhile taking
care that this key is not yet used.
2.1.3 Comments
It is allowed to extend the table definition of protectors to include for instance a category of
facilities to be protected. Values for this category could be Management or Administration.
However, the basic field mentioned above must exist for protection to be executed upon
record operations.
Although such extensions are possible, it is highly recommended to move fields such as
above mentioned category field to the RAIS tables (in above example the facility). The
preselection lists for the form [Protector Facility] may then be extended in such a way to
include that category field (see section 2.6).
Protectors may be created to protect for deletion of departments, instead of facilities. This
would prevent for direct deletion of protected departments, of course, but not for cascaded
deletions by deleting the facilities protected departments belong to. To avoid cascaded
deletions, protectors must be created for both facilities and departments. Cascaded deletions
have to be considered when protecting any information items.
Note
We have defined the protector for protecting the waste management facility to be called
[Protector Facility]. We did not call it [Protector Waste Management] as it might be useful
to protect other facilities as well. Records for those facilities may simply be appended to this
protector, and the naming convention still is meaningful and correct.
Take utmost care not to introduce duplicate key values. Take care that all key values must
comply with the format L99, a letter followed by two digits.
2.2 Creating Custom Evaluators
Some records in RAIS 3.0 have special functions, and the existence of those records is
required for the good functioning of RAIS 3.0. Examples of such records are all [unknown]
records; these exist in the tables [Generator Model], [Generator Type], [Manufacturers] and
many more. These records exist in the default values database of RAIS 3.0, distributed by the
IAEA. [unknown] records have a primary key value of 1 in the default value database of the
IAEA. Queries could then use a filter value of 1 to retrieve all generators where the model is
unknown:
Select * from [generator] where [fk model id] = 1
As long as [unknown] records are associated the primary key value of 1, above mentioned
query will function correctly. However, we must keep in mind that many countries will use
consolidation, and that during consolidation records are appended. From this observation, it
may happen that primary keys are shifted during append in the destination database, so that
the [unknown] records will have a new primary key value.
11
RAIS 3.0 Programmer’s Guide – Part I : Advanced Customization
To compensate for shifting of primary keys, the concept of evaluators has been introduced in
RAIS 3.0. Evaluators are tables containing primary key values of special records. The
evaluator table [Evaluator Unknown GM] for instance only contains one record, relating the
[unknown] record in the table [Generator Model]. Additionally, a relationship between both
tables is defined. During consolidation, records that are appended at the destination will have
a new primary key inside the destination. The RAIS 3.0 Consolidator has been designed to
compensate for this, and update foreign keys referring to that record. In clear words, if
records are appended into a new destination database, foreign key values of relating records
in other tables are updated to match primary keys of appended records. By means of this, the
table [Evaluator Unknown GM] will always contain one value, correctly pointing to the
record [unknown] in the table [Generator Model].
Safely retrieving generators with unknown models may then be done by means of below
query, explicitly using the evaluator [Evaluator Unknown GM]
Select * from [generator] where [generator].[fk model id] in (select [Evaluator Unknown
GM].[fk Generator Model id] from [Evaluator Unknown GM])
2.2.1 Examples
2.2.1.1 Evaluator for waste management facility
The standard installation of RAIS 3.0 does not provide for an evaluator table for waste
management facilities. So, in a first step, we have to create this table. If the table has already
been created in an earlier step, we may of course skip this section and continue at.
The same hidden functionality of the RAIS Creator is required as for creating new protectors.
So, please make again the field [Design Master] visible in the main form of the creator (see
section 2.1.1). Next, select and expand the group node Common Tables and click the button
Add Table.
Enter the evaluator table name [Evaluator Waste Management], select the option Simple
Table (without History), select the menu Setup and the menu node Common Tables and
click Apply. The new table will be displayed in the creator form.
12
RAIS 3.0 Programmer’s Guide – Part I : Advanced Customization
Select the table [Evaluator Waste Management], click the button Edit Selected Table and
add the following fields.
Create the field Facility. Please enter only field definitions and take care to select the option
[System Field] after you have entered all field attributes.
Please note that some fields turn disabled after system field option has been activated.
13
RAIS 3.0 Programmer’s Guide – Part I : Advanced Customization
This is to prevent unintended modification of system fields. If you need to correct field
attributes, disable the system field option, modify appropriately and enable the system field
option again. Click the Apply button to continue.
Close the table properties form in order to return to the RAIS Creator main form. Accept the
table group and create a new RAIS 3.0 front-end and back-end. Please take care to create an
unlocked front-end.
Open the RAIS 3.0 front-end after creation has been completed. Expand the menu node
Common Tables in the Regulatory System menu; the new evaluator appears.
It’s empty, of course, we only created the table. Next step is to populate our new evaluator.
Navigate to the evaluator and click the Add button to create a new evaluating record, just as if
you create any other new record in RAIS.
Note:
After the new evaluator record has been created, the left side list box displays by default the
primary key value of the facility to be protected. If you want the facility name to be displayed
14
RAIS 3.0 Programmer’s Guide – Part I : Advanced Customization
here, please create a new preselection list query for the form [Evaluator Waste Management]
(see section 2.5).
To test that our evaluator is working, please create the following query and execute it.
Select * from [Facility] where [Facility].[PK Facility ID] in (select [Evaluator Waste
Management].[FK Facility ID] from [Evaluator Waste Management])
Now consolidate your backend with any other backend. Open the destination backend and
check the record of the waste management facility. Its primary key hopefully does differ from
the primary key in the source database, and you will notice that above query still produced
the correct result.
The new evaluator we have been creating appears in the Regulatory System menu, evaluators
defined in the standard version of RAIS 3.0 are not displayed; they are hidden. This hiding
feature has been introduced because it might be dangerous to modify, or even delete
evaluator records.
After we have defined and validated our new evaluator, we should also protect this evaluator
by hiding it from the Regulatory System menu. Open the table Treeview in the RAIS backend. Search for the record having the field value [Evaluator Waste Management] in the field
[PDI]. Lookup the associated value of the field [Key]; it will usually be something starting
with the letter M. This letter makes the menu node for our protector appear under the menu
group Common Tables. A hidden menu group exists in RAIS for hiding all evaluators,
having the key prefix X. Rename the key of the new protector to something like X99,
meanwhile taking care that this key is not yet used.
2.2.2 Comments
We have defined the protector for protecting the waste management facility to be called
[Protector Facility]. We did not call the evaluator for the waste management facility
[Evaluator Facility], but we gave it name [Evaluator Waste Management]. This evaluator
shall not be used for any other purpose than retrieving waste management facilities. If more
than one record is appended to this evaluator, we must take care that queries – using this
evaluator – do not produce unintended duplicate records.
Another example of an evaluator that contains IDs of sources that are considered to be “in”
is shown in the picture below . As it is seen, query and statistics results depend very much on
evaluators, therefore, if any query is not producing the desired result (omitting certain type of
records, or vise versa, showing irrelevant records), one should turn to evaluators for possible
resolution.
As it is seen, query and statistics results depend very much on evaluators, therefore, if any
query is not producing the desired result (omitting certain type of records, or vise versa,
showing irrelevant records), one should turn to evaluators for possible resolution.
15
RAIS 3.0 Programmer’s Guide – Part I : Advanced Customization
As it is seen, query and statistics results depend very much on evaluators. For example, a
query default query shows all sources in the country using the evaluator from the example
above, depends on it very much. If a new status for source would be added by user in setup,
this query may show incorrect results as new status is not considered by the evaluator.
Therefore if any query is not producing the desired result (omitting certain type of records, or
vise versa, showing irrelevant records), one should turn to corresponding evaluators for
possible resolution.
2.3 Creating Custom Consistency Checks
Consistency checks are fired upon saving records, either after appending a new record or
updating a modified record within an input form. Consistency checks are regular SQL
statements, returning rows of records. A consistency check is considered non successful if no
record row is returned, else the consistency check is considered to be successful. If the
consistency check is not successful (evaluates to FALSE) an appropriate message is
displayed. This message only is a warning message, users are allowed to skip this message
and continue saving the record.
As consistency checks are fired upon saving records, they need to evaluate data users have
entered into fields on the input forms before the record is stored. Fields in input forms may
easily be evaluated within SQL expression by statements as for example
Forms("Input").Controls("ChildForm").Controls("Details").Controls(“Serial No”)
to retrieve the value entered in the field [Serial Number] of a generator or sealed source. To
find out the field name of a form field, open the form in design mode and have a look at the
property “Name” in the form designer of Microsoft Access. To find the name of the form to
16
RAIS 3.0 Programmer’s Guide – Part I : Advanced Customization
open in design mode, please lookup the table name and open the form called “SUB EDIT
table name”.
Consistency checks are stored in the table [Propagator – Consistency Checks]
Form Name
Query Name
Message
Name of the form that will trigger the consistency check
Query that will be evaluated
Message to be displayed upon non successful evaluation
2.3.1 Examples
2.3.1.1 Ensuring selection of a generator type
Let us have the simple example of checking that a generator type has been selected for
radiation generators. Generator types have been defined to be optional in RAIS 3.0; the field
may be left blank and we may even select the generator type to be unknown.
Have a look at the input form for generators; the field for generator types is a combo box.
Open the input form for generators in design mode (that form is called [SUB EDIT
Generator] and select the control for generator types. Look at its properties; it is bound to the
table field [FK Type ID] and has the name [COMBO Type]. We may refer to that control in
queries as if they where constants or table fields, simply with the statement [COMBO Type]
(don’t forget the square brackets). This is possible due to the fact that consistency checks are
executed within the context of the input forms (clever, isn’t it).
If we want to enforce RAIS Regulators to enter the generator type, we have to design a
consistency check like this one
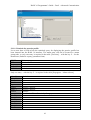
or in SQL view
SELECT IsNull([COMBO type]) AS Expr1, [FK Generator Type ID]<>[COMBO type] AS
Expr2
FROM [Evaluator Unknown GT]
WHERE (((IsNull([COMBO type]))=True)) OR ((([FK Generator Type ID]<>[COMBO
type])=False));
Save this query as [Consistency Check – Generator Type] and append the following record to
the table [Propagator – Consistency Checks]
17
RAIS 3.0 Programmer’s Guide – Part I : Advanced Customization
Form Name
Query Name
Message
SUB EDIT Generator
Consistency Check – Generator Type
No Generator Type selected.
Now let’s test this: open the RAIS Interface and enter a new generator, without specifying the
generator type. You will have about below screen
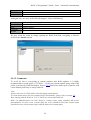
If you want to allow generator types to be unknown, but want to ‘motivate’ RAIS Regulators
to explicitly specify that the type is unknown by selecting [unknown], modify the query to
make it have this shape
We simply removed the check that the generator type may not equal [unknown]. Microsoft
Access requites at least one table for outputting fields, so let’s just keep the evaluator; it will
not degrade performance and usually has only one record.
18
RAIS 3.0 Programmer’s Guide – Part I : Advanced Customization
2.3.1.2 Duplicate generator serial number
Example 1 was really simple. Let’s have a look at something more challenging: implement a
consistency check warning about duplicate serial numbers. Serial numbers are optional only
within RAIS 3.0. They hence may not be unique, as this would allow for only one generator
with unknown serial number to be entered in the whole database. So, as uniqueness is not
enforced, it is possible to enter twice the same serial number.
Let’s come quickly back to the query in example 1. Its design is simple, but has one
disadvantage: we may not test it by simply executing it and looking at its result set. This is
due to the fact that we use the field [COMBO Type] directly, which works fine when the
query is executed by the RAIS Interface. It does not work when we want to execute the query
in parallel to a running RAIS Interface, without saving the record. If we are in the unfortunate
situation to face a more complicated consistency check, we definitely want to preview the
result set for debugging purpose. In section 2.6, we introduce custom functions to easily
access control elements in the RAIS Interface, called Interface Access Functions. We will use
those Interface Access Functions in the next consistency check, so be sure that you have
implemented those functions as described in that section 2.6. Then, try this query:
Save it as [Consistency Check – Generator Duplicate Serial Number – Step 1]. Open the
RAIS Interface and enter a new generator. Run and analyze the query, meanwhile changing
the field [Serial Number] (please always assure that you have pressed enter after modifying
the field [Serial Number]). After running the query, you will realize that you do not need to
save the generator record any more for seeing the query results.
The query checks the table of generators and returns all records that match the serial number
we are about to enter for our new generator, i.e. above query returns conflicting records.
Remember the definition of consistency checks: they are successful if they return at least one
record. So what we want to have in fact is the complement of above query. Create this query:
19
RAIS 3.0 Programmer’s Guide – Part I : Advanced Customization
and again run and analyze it. It returns only a record set if our first step query returns no
record set. That’s the consistency check we wanted to have. Add the following record to the
table [Propagator – Consistency Checks]
Form Name
Query Name
Message
SUB EDIT Generator
Consistency Check – Generator Duplicate Serial Number
Duplicate Serial Number.
There are possibilities to achieve the same with one single query, but we will see immediately
the reason why it is recommended to use hierarchical queries. Even with 2 steps, the
consistency check is intuitive and simple. Unfortunately, too simple. Go to an existing
generator, and switch to EDIT mode. Now, without doing any modifications, click APPLY to
save and you will see that the warning message for duplicate serial number appears, although
it should not. Our simple query did not take into consideration the fact that if we modify an
existing generator the serial number already exists in the table, although it is not duplicate. So
we have to exclude the existing record that is about to be modified from the query. This is
done most efficiently by excluding via the primary key of the record. Do this in the first step
query, make it have the following shape:
and try again. Try adding a new generator and try modifying an existing generator. The
consistency check now works correctly for both appending new records and modifying
existing records. If you still are not convinced of using hierarchical queries, try to achieve
this within a single query. You will need to be very good in SQL, or lots of patience.
20
RAIS 3.0 Programmer’s Guide – Part I : Advanced Customization
2.3.2 Comments
No restrictions apply on how many consistency checks may be attached to one form, one
consistency check may even be reused throughout different forms.
To avoid for loss or overwriting of custom consistency checks after RAIS updates, it is highly
recommended to use the prefix “CUSTOM - ” for all your custom consistency checks names;
this prefix is not used by RAIS developers. Section 3.1.3 details how bulk copies of queries
with a user define prefix may be easily achieved.
Consistency checks may only evaluate stored records and data modified by the current user;
consistency checks are not able to check other users on screen data, possibly being modified
at that moment too.
Consistency checks usually take into account unmodified data of the record having just been
modified, as that data still is stored in the underlying table. So usually the record being
modified has to be excluded from consistency checks by appropriately filtering upon primary
key. This applies especially to consistency checks checking for duplicates.
Take care to optimize consistency checks with respect to speed.
2.4 Creating Custom Preselection Values
Propagators are used in RAIS 3.0 for setting preselected values of fields when a new record is
about to be created. Use of Preselection values can speed up the performance of users becaue
less data is needed to be entered. Propagators are not triggered when an existing record is
modified or when modifications are to be saved.
When selecting information items in RAIS 3.0, as for example facilities, we have the
possibility to reduce the amount of data visualized by means of pre-selection filters; we may
for example select only facilities working within a given region. If we have set this
preselection filter, and enter a new facility, the selected region is automatically set. This is
done in RAIS by means of propagating preselection values into input forms of information
items. RAIS not only is able to propagate preselected values. Any type of value may be
propagated, a simple constant as well as the result of a complex Visual Basic function.
Propagators also are used to automatically set foreign keys pointing to the correct generator
record when entering new generator history records
Propagation of preselected values is defined in the table [Propagator – Preselection], having
the following table definition:
Form Name
Field Name
Parameter Name
Parent
Name of the form that will use this preselection propagation
Field that will receive the value of the propagator
Name of the control element containing the value to be propagated
Not used any more
2.4.1 Examples
2.4.1.1 Propagating Preselection Values
Let us start with the example of an existing preselection propagator, above mentioned
propagation of the selected region. This is the entry in the table [Propagator – Preselection]
Form Name
SUB EDIT Facility
21
RAIS 3.0 Programmer’s Guide – Part I : Advanced Customization
Field Name
Parameter Name
Parent
FK Region ID
Region ID
Not used any more
This simply makes the value of the control [Region ID] (located in the main input form) be
propagated into the field [FK Region ID] of a new facility.
2.4.1.2 Propagating Visual Basic expressions
In this example, we automatically set the current date to be the default date when entering
new historical records for workers. Add the following record to the table [Propagator –
Preselection]
Form Name
Field Name
Parameter Name
Parent
SUB EDIT Person History
Status Date
=Now()
Now open the RAIS Interface and add a new worker history. You will notice that the current
date is automatically inserted into the status date field. Note that you may overwrite this
default value. Also note that you may use any Visual Basic expression that evaluates to a
simple type (string or value).
2.4.1.3 Propagating primary keys
RAIS 3.0 has a very extensive concept of history records. Generators have historical records,
allowing for tracing the status of generators at any moment in time. When we want to enter a
new historical record, we first have to select the generator, switch to its history, and then only
we may add a new historical record. It is clear that this new history record must be bound to
the generator we have selected, in other words the primary key of the generator must be
propagated into the new historical record. This is achieved by the following entry in the table
[Propagator – Foreign Keys]
Form Name
Field Name
Parameter Name
Parent
SUB EDIT Generator History
FK Generator ID
Parameter 0
Please note especially the field [Parameter Name]. The primary key of each information item
we select is always copied into the control [Parameter 0] of the main input form. This may be
considered as a general identifier. The field Parent is not used any more and should be left
blank for compatibility.
2.5 Creating Custom combo box contents
The RAIS Interface contains lots of combo boxes in input forms, offering for example
selecting generator models or equipment status. Microsoft Access allows these combo boxes
to be filled by results of queries, referred to as entry filters. This feature is used by RAIS
through the table [Propagator – Preselection Filters]
Add something on custom list boxes very similar to combo boxes
22
RAIS 3.0 Programmer’s Guide – Part I : Advanced Customization
Form Name
Field Name
Query Name
Replacements
Name of the form that contains the combo box
Name of the combo box
Name of the query used to fill the combo box
Replaces expressions in the original SQL statement. This has been removed
in RAIS 3.0 SQL Server Extensions version
Queries used to fill combo boxes always must have the following column layout
Foreign key: the foreign key to be stored in the underlying field of the combo box
Label: the name to be displayed for the foreign key value (shall be unique)
The first field must always be a foreign key, which must comply with the relationship of the
combo box’s underlying field, i.e. if the underlying field of the combo box is generator
model, the relationship of this field clearly points to the table of generator models. The
foreign keys returned by the preselection query may only be keys of generator models, not
from any other information item. The first column is not displayed in combo boxes, but the
value of the first column is stored in the underlying field.
The second field shall be a human readable name, in the above example the generator
model’s name. It may be a combination from many other fields, it may for example include
the amperage and voltage. However you should take care that its value may always clearly be
identified, so displaying only amperage values for models to be selected would be a bad idea.
Only the second column is displayed in combo boxes, its value however is not stored.
2.5.1 Examples
2.5.1.1 Generator models for generators
Form Name
SUB EDIT Generator
Field Name
COMBO Model
Query Name Entry Filter – Generator Model
Replacements
2.5.1.2 Facility and department for generator history
Form Name
SUB EDIT Generator History
Field Name
COMBO Facility
Query Name Entry Filter – Facility
Replacements
Form Name
SUB EDIT Generator History
Field Name
COMBO Department
Query Name Entry Filter – Department
Replacements
2.5.2 Comments
Please take care that each input field shall only have one single query attached.
23
RAIS 3.0 Programmer’s Guide – Part I : Advanced Customization
If a combo box field has no query attached, RAIS automatically detects the foreign table this
field is bound to and creates a query for displaying the first two fields of that foreign table.
Ordering will always be ascending on the second field.
Please note that [Replacements] are not used anymore and should be left blank for
compatibility.
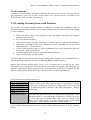
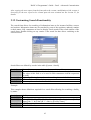
2.6 Creating Custom Preselection lists
The picture on the left
shows and example of
preselection list, it is shown
in red box. Creation of
preselection lists is a way of
changing how information
is shown on the display,
therefore their function is
mainly to ease the work
with RAIS to user. One
example of a good use of
Preselection List is section
2.1, where the list showed
only primary key of Facility
instead of its Name, whereas the latter would be much easier for user to interpret. To
customize this kind of display, one should:
• Open the RAIS Front end in Design Mode
• Create a new query that would contain all information that should be displayed in the
preselection window (please note that the actual value that will be displayed should be in
column nr.2, column 1 is always reserved for PK (Primary Key) values). An example of
such query is shown on the image below
• Open the Frontend in design mode and locate the source for Preselection List (Right-click
the area where list is displayed, click properties and locate the source) Remember the
name of the source table/query
• Look up the record that contains the above meant source query in table Propogator –
Menu selector and substitute the old name of the query with the newly created query
• Check the functionality
24
RAIS 3.0 Programmer’s Guide – Part I : Advanced Customization
The red box in the picture above highlights the field that will be shown in the main screen if
the corresponding query will be added to the table Propogator – Menu Selector as described
before.
2.7 Creating Custom Functions and Modules
RAIS 3.0 allows for adding functions und procedures, according Microsoft Access Visual
Basic syntax and requirements. RAIS 3.0 does not impose any limitations or special
conventions to be respected; functions, procedures, class modules as well as simple modules
may be defined just in the same way as for any other Microsoft Access Application.
The best approach for creating new custom modules is:
•
•
•
Create and design the new custom module in an unlocked front-end
Test, debug and validate the new custom module
Copy the final new custom module in the RAIS 3.0 Creator (hereafter referred to as
[source module])
Modify the RAIS 3.0 Creator for the new custom module to be created upon the next creation
run:
•
•
Locate the function [Public Sub ModuleCreate] in the module [RAIS Module Creator
Functions]
Include a line DoCmd.CopyObject d, "destination module", acModule, "source
module"
Custom functions (and procedures) may be declared in custom modules, just as any function
is declared in Microsoft Access. We recommend that all custom functions are declared only
in custom modules to avoid for loss or overwrite.
RAIS 3.0 contains a few functions that may be modified by RAIS Administrator and
Developers: Regulatory Authority Number (RAN) functions. RAN functions are special in
that way that they are automatically invoke upon creation of new records for facilities,
departments, sources, inspections, incidents, persons and authorizations. This is done by
propagating default values by means of the table [Propagator – Preselection] (see section 2.4)
2.7.1 Examples
2.7.1.1 Regulatory Authority Numbers
Let us redefine the RAN function for new facilities. Have a look at how the default RAN for
facilities (and other RAN functions) is defined. Open the RAIS 3.0 front-end in design mode,
open the module [RAIS Regulatory Authority Number Functions] and locate the function
[BuildFacilityRAN()]
Public Function BuildFacilityRAN()
BuildFacilityRAN = ""
25
RAIS 3.0 Programmer’s Guide – Part I : Advanced Customization
Exit Function
Dim r
Dim d
Dim k
Dim a
Dim m
r = DFirst("[System Region]", "[System - State]")
If r <> "" Then r = "-" & r
d = DFirst("[System district]", "[System - State]")
If d <> "" Then d = "-" & d
Forms.input.Form.[ChildForm].Form.[Details].Controls("Regulatory Authority Number")
=""
k = Forms.input.Form.[ChildForm].Form.[Details].Controls("PK Facility ID")
a = DFirst("[v]", "RAN - Facility")
If IsNumeric(a) Then
If a + 1 > k Then k = a + 1
End If
k = "-" & k
BuildFacilityRAN = "FAC" & r & d & k
End Function
As we can see, the function simply returns an empty string, i.e. no calculation is executed.
Please ignore the rest of RAN functions, this is old code resulting from an abandoned
approach. For setting up RAIS 3.0 in a multi-site environment, a first approach was to match
sites with both regions and districts. As this approach was not fully compliant with all
countries and neither developers nor the IAEA did want to impose the structure of RANs to
countries, earlier implementations of RANs have been disabled. Hence, these functions in
fact contain no code at all in the original RAIS 3.0 distribution, all RAN functions return
empty strings.
Let us however come back to this approach, just for the purpose of an example. Let us
assume that RANs for facilities shall contain identifiers of region and districts
When entering new facilities, the RAIS 3.0 Interface expects us to have already selected for a
region and a district (if applicable). Both of these values are stored in the variables
forms![input]![region id] and forms![input]![district id] respectively. Then our RAN for
facilities can be defined like this:
FAC-r-d-n
where r is the code of the region, d the code of the district and n an automatic number of the
facility.
26
RAIS 3.0 Programmer’s Guide – Part I : Advanced Customization
Retrieving r is done by looking up the region identifier upon the primary key of the region,
thus
r= forms![input]![region id]
or as an equivalent:
r = Forms("Input").Controls("region id”)
Similar, we may retrieve the district code
d=forms![input]![district id]
or as an equivalent:
r = Forms("Input").Controls("district id”)
Let us say that retrieving n equals retrieving the primary key of the facility that is about to be
created. This may than be simply achieved by
n= Forms.input.Form.[ChildForm].Form.[Details].Controls("PK Facility ID")
with one problem: the primary key is empty, as the record has not yet been created. With MS
Access back-ends, there is a simple trick for enforcing the record to be allocated by simply
calling this line of code ahead
Forms.input.Form.[ChildForm].Form.[Details].Controls("Regulatory Authority
Number")=" "
Please note that a blank is quoted at the end of above statement. This is just like typing a
blank in the field [Regulatory Authority Number]. This makes MS Access allocate a new
record and thus create a primary key, which we may then use. Please note that this does not
work on SQL Servers, as they usually generate primary keys only after successful
transactions.
By default, the RAN function is disabled by writing
BuildFacilityRAN = ""
Exit Function
So the final code of our facility RAN function will then have this appearance:
Public Function BuildFacilityRAN()
Dim r
Dim d
Dim n
r = Forms("Input").Controls("region id”)
If r <> "" Then r = "-" & r
d = Forms("Input").Controls("district id”)
27
RAIS 3.0 Programmer’s Guide – Part I : Advanced Customization
If d <> "" Then d = "-" & d
Forms("Input").Controls("ChildForm").Controls("Details").Controls("Regulatory
Authority Number") = " "
n = Forms("Input").Controls("ChildForm").Controls("Details").Controls ("PK Facility ID")
n = "-" & n
BuildFacilityRAN = "FAC" & r & d & n
End Function
Let us check this function by creating a new facility. As we can see, the computed value is
automatically inserted into the field [Regulatory Authority Number] if we go for creating a
new facility. This value may be considered to be only a suggested value, i.e. we may replace
it.
After we have defined, tested and validated our RAN, we must copy it to the RAIS 3.0
Creator in order to be included on next creation run. This is done most easily by simply
copying the module [RAIS Regulatory Authority Number Functions] into the creator.
2.7.1.2 Helper functions
The expression
Forms("Input").Controls("ChildForm").Controls("Details").Controls("PK Facility ID")
has been used in the previous chapter to retrieve the primary key of a new record. We may
retrieve the contents of any field of the input form in a similar manner, even regardless what
input form currently is loaded (i.e. facilities, generators, workers etc.) Always writing down
this whole expression is annoying and error prone, so let us define a helper function to make
developers life more comfortable.
RAIS Input Values
Public Function RAIS_IV(a)
RAIS_IV = Forms("Input").Controls("ChildForm").Controls("Details").Controls(a).Value
End Function
You may easily test these functions. Open the RAIS interface and select any facility. Switch
to edit mode and keep it there. Now open a new blank module and enter the following code
Public Sub test()
MsgBox RAIS_IV("regulatory authority number")
End Sub
Place the cursor at the line containing the statement “Public Sub test” and press F5. You will
see a message box popping up and displaying the authority number of that facility. Now
switch to the input form of the facility and modify the authority number. Be sure to press
enter. Switch back to the module and run again the test function: the modified authority
number is displayed.
28
RAIS 3.0 Programmer’s Guide – Part I : Advanced Customization
Another way to test is by means of queries. Create a new query, having the following SQL
statement
SELECT RAIS_IV("regulatory authority number") AS Expr1;
Run this query in datasheet view, and you will see that again the new authority number is
displayed. Later sections in this document will make use of especially this functionality.
2.7.2 Comments
When implementing new functions or procedures, we should take care not to introduce
naming conflicts. Such conflicts will arise when a function, procedure or variable is defined
twice. To avoid duplicates and overwrites, it is highly recommended to use the prefix
“CUSTOM_” for all your custom function definitions; this prefix is not used by IAEA RAIS
Developers in any code part. In addition, we recommend saving all custom definition in
custom code modules. All custom code modules should again have the prefix “CUSTOM – “
(RAIS developers will not use this prefix).
Helper functions, as implemented in example 2, shall only be used in early development
phases of new queries. Please keep in mind that future development of RAIS will point into
the direction of SQL Servers. Helper functions will then degrade performance of execution
times of queries, as these helper functions will be executed locally.
Functions and procedures are stored in modules (stand alone modules or form modules)
within Microsoft Access. To avoid for loss or overwriting of custom functions and
procedures, it is highly recommended to store them in separate stand alone modules.
Note:
Avoid defining global variables, side effects are inherent.
Define local variables as well as sub level functions and procedures to be private.
Avoid using DLL functions directly by using Declare statements, CreateObject is to be
preferred for compatibility to future releases of Microsoft Office.
2.8 Creating Custom Forms
The best approach for creating new custom forms is:
•
•
•
Create and design the new custom form in an unlocked front-end
Test, debug and validate the new custom form
Copy the final new custom form in the RAIS 3.0 Creator (hereafter referred to as
[source form])
The next step is to make your new custom form accessible via the treeview menu
•
Create the record entries to bind the new form to a new menu point (see section 2.10)
Modify the RAIS 3.0 Creator for the new custom form to be created upon the next creation
run. See section 3.2 for details
29
RAIS 3.0 Programmer’s Guide – Part I : Advanced Customization
Custom forms, as well as standard RAIS forms, allow for public access of all of their control
elements as well as public variables and functions or procedures. The general syntax for
accessing control elements is:
forms![form name].controls[control name]
This is used for example when accessing filtering parameters for queries
To avoid for loss or overwriting of custom forms after RAIS updates, it is highly
recommended to use the prefix “CUSTOM_” for all custom form names; this prefix is not
used by RAIS developers.
2.8.1 Example
In general, creating forms is facilitated by the creator by means of creating a table (creator
will automatically create the form for new table) and should be avoided otherwise. However,
it is mentioned here to complete the description of creating objects in RAIS 3.0.
Custom Forms can be created same way as normally in MS Access, however to be able so
use them, one should take care to make the form appear by entering appropriate information
to the treeview table (section 2.10), and making sure that the form will be created on the next
creator run (section 3.2).
Note:
Follow the guidelines for creating custom functions and modules (see section 2.6)
2.9 Creating Custom Tables
In general, creating custom tables is facilitated by the creator and should be avoided
otherwise. However, it is mentioned here just to complete the description of creating objects
in RAIS 3.0.
Custom tables may be useful to store information which is not directly related to the
management scope of RAIS, as for example law texts or ISO codes; these tables may be
created just as any other table in Microsoft Access. These tables should however only be used
by custom functions in RAIS, they should not be related to any standard RAIS table; data
integrity problems may occur. Custom forms (see section 2.8) shall manage updates and
deletions as well as data visualization.
After custom tables have been created and tested in the RAIS Front-End, you need to modify
the RAIS 3.0 Creator for the new custom table to be created upon the next creation run. The
creator has to be modified in order to create both the new table in the back-end and a table
link in the front-end.
2.9.1 Comments
Do not manually create any relations between custom tables and RAIS tables
30
RAIS 3.0 Programmer’s Guide – Part I : Advanced Customization
Manual creation of RAIS tables shall be avoided as the RAIS 3.0 Creator is fully covering
this task. Only creation of static tables – tables where no fields are added by the creator –
was discussed in this section.
To avoid loss or overwriting of static tables after RAIS updates, it is highly recommended to
use the prefix “CUSTOM -” for all static table names; this prefix is not used by RAIS
developers. When creating new tables through the interface of the RAIS Creator, the prefix
“CUSTOM – “ shall of course be avoided
2.10 Creating Custom Menu entries
Separate this section between general considerations and examples (2.9.1) by just copy and
paste the following
RAIS 3.0 provides for two major types of menus:
•
•
Treeview menus
Standard menus
2.10.1 Examples
2.10.1.1 Creating Treeview Menus
Treeview menus are menus displayed at the left side of the forms Regulatory System, Input,
Queries and Satistics.
Entries for the treeview menu are stored in the table [Treeview], having the following table
definition:
PDI ID
PDI
Key
Primary key, auto-number field (please do not modify)
Menu text to be displayed
Key for menu ordering, a single letter followed by two digits. Letters A, D,
X,Y and Z are reserved
Image Index Index of image to be used
Menu Name Menu group, may be either setup, input, query or statistic
RAIS provides for several images indexed from 1 to 9.
Note:
Letter A is reserved for facilities and departments. Special RAIS functions are called
automatically when users navigate inside menus whose keys start with the letter A.
Letter D is reserved for authorizations. Again, special RAIS functions are called
automatically when users navigate inside menus whose keys start with the letter D.
Letter X and Y are reserved for evaluators and protectors respectively. Menus starting with
these letters are hidden, only if they belong to the setup menu group.
31
RAIS 3.0 Programmer’s Guide – Part I : Advanced Customization
Letter Z is reserved for future RAIS development.
Example:
Open the table Treview and create a new record with the following field values
PDI ID
PDI
Key
Image Index
Menu Name
N/A
Test Menu
P
1
Input
Next create a new record with these field values
PDI ID
PDI
Key
Image Index
Menu Name
N/A
Test Sub Menu
P01
2
Input
Result
The new menu now appears in our treeview. If we click on it, nothing happens, a blank
screen is displayed because the form to be displayed has not been assigned yet. To do so open
the table called [Propagator – Menu Selector], having the following table definition.
Menu Form
Menu Name
Tab Position
Tab Name
Type
Menu group, may be either setup, input, query or statistics
Key, referring a record in the table [Treeview]
The tab number, zero based
Tab text to be displayed, may be empty
Menu type (see below)
32
RAIS 3.0 Programmer’s Guide – Part I : Advanced Customization
Label 5
Query 5
Label 4
Query 4
Label 3
Query 3
Label 2
Query 2
Label 1
Query 1
Label 0
Query 0
Form
Image Index
Text for label 5
Query for filling combo box 5
Text for label 4
Query for filling combo box 4
Text for label 3
Query for filling combo box 3
Text for label 2
Query for filling combo box 2
Text for label 1
Query for filling combo box 1
Currently unused
Query for filling list box 0
Name of the form to be loaded when this menu point (or tab) becomes active
Number of image to be used in the treeview
The field [Type] indicates the type of form to be used.
0 for a preselection form
1 for a selection list with record details (see manufacturers for example)
2 for a combo box with record details (currently not used)
3 for a details form (see input of generators, generator history and calibration for example)
4 for query and statistics parameter form
5-999 reserved for future use
1000 for custom use
Create a custom form (see section 2.8) called [Custom – Hello World] and add a simple label
to it “Hello World”. Then open the table [Propagator – Menu Selector] and enter a new
record having the following field values:
Menu Form
Menu Name
Tab Position
Tab Name
Type
Label 5
Query 5
Label 4
Query 4
Label 3
Query 3
Label 2
Query 2
Label 1
Query 1
Label 0
Query 0
Form
Input
P01
0
1000
Custom – Hello World
33
RAIS 3.0 Programmer’s Guide – Part I : Advanced Customization
Image Index
If this is the first menu entry for use with custom forms, the RAIS Creator must be enhanced
to cope with custom forms. Locate the function ShowTab(n As Long) in the module section
of the form [Input]. Locate the last select statement in that function and replace the code
section
Case 5:
SecureSetSubForm [ChildForm], "Selection Help"
End Select
by this code section
Case 5:
SecureSetSubForm [ChildForm], "Selection Help"
Case 1000:
SecureSetSubForm [ChildForm], [tab settings].column(17, n)
End Select
Locate the VB statement directly after End Select. It looks like:
if [ChildForm].SourceObject <> “” Then
Replace it by the following statement:
if [ChildForm].SourceObject <> “” And [Tab Settings].column(4,n) <> 1000 Then
Locate the function Form_Unload(Cancel as integer). The first line looks like:
if [ChildForm].SourceObject <> “” Then
Replace it by
if [ChildForm].SourceObject <> “”And [Tab Settings].column(4,0) <> 1000 Then
Result
34
RAIS 3.0 Programmer’s Guide – Part I : Advanced Customization
After the new menu has been validated, records that have been added to both the [Propagator
– Menu Selector] and [Treeview] tables need be copied to the RAIS 3.0 Creator. The new
form created [Custom – Hello World] also needs to be copied to the Creator (see section 3.2
for more details).
Notes:
Do not modify any of the menu entries created by the RAIS Creator. No data in the RAIS
back-end will be destroyed, but entering new data may become impossible.
2.10.1.2 Creating Standard Menus
Standard menus are menus displayed at the very top of the RAIS main window; they are
standard MS Windows menus. Menu points may either be located in the menu bar or in a
drop down.
Creating standard menus is not as tricky as creating treeview menus. The usual practice for
creating new objects is to create them first in the front-end and then copy them into the
creator. For standard menus, the best practice is doing all modifications directly in the RAIS
Creator.
Let’s create a new menu Custom Menu, with a sub menu called “Hello World” used to open
the custom form “Custom – Hello World”. Refer to section 2.7 for creating custom forms.
Open the RAIS Creator in design mode, and locate the function MenuCreate() in the module
[RAIS Menu Creator Functions]. Replace the code section
Set v = AddPopupMenu(m, "Tools")
AddExecutableMenu v, "Search Tool", "Search"
35
RAIS 3.0 Programmer’s Guide – Part I : Advanced Customization
AddExecutableMenu v, "Calculations", "Calculations"
AddExecutableMenu v, "Local Settings", "Options"
AddExecutableMenu v, "Backend Connection", "Connection"
AddExecutableMenu v, "About RAIS 3.0", "About"
Set v = Nothing
by this code section
Set v = AddPopupMenu(m, "Tools")
AddExecutableMenu v, "Search Tool", "Search"
AddExecutableMenu v, "Calculations", "Calculations"
AddExecutableMenu v, "Local Settings", "Options"
AddExecutableMenu v, "Backend Connection", "Connection"
AddExecutableMenu v, "About RAIS 3.0", "About"
Set v = AddPopupMenu(m, "Custom Menu")
AddExecutableMenu v, "Custom – Hello World", "Custom – Hello World"
Set v = Nothing
Next locate the function Menu_Loader() in the module [RAIS Loader]. Replace the code
section
ElseIf s = "About" Then
DoCmd.OpenForm "About", , , , , acDialog
Else
by this code section
ElseIf s = "About" Then
DoCmd.OpenForm "About", , , , , acDialog
ElseIf s = "Custom – Hello World" Then
DoCmd.OpenForm "Custom – Hello World", , , , , acDialog
Else
The new standard menu we have created in the previous section is accessible to everyone,
because no permissions have been defined. Let us assume this menu point shall only be
accessible to RAIS Regulators. RAIS Administrators Users and Guest shall not be allowed to
activate this menu point and thus load the custom form. Open the RAIS Creator in design
mode and locate the function EnableMenusToGroups(b As Boolean) in the module [RAIS
Settings]. Replace the code sections
CommandBars("RAIS Menu Bar").Controls(1).Enabled = Not b
CommandBars("RAIS Menu Bar").Controls(2).Enabled = Not b
CommandBars("RAIS Menu Bar").Controls(3).Enabled = Not b
36
RAIS 3.0 Programmer’s Guide – Part I : Advanced Customization
CommandBars("RAIS Menu Bar").Controls(5).Controls(1).Enabled = Not b
CommandBars("RAIS Menu Bar").Controls(5).Controls(2).Enabled = Not b
CommandBars("RAIS Menu Bar").Controls(5).Controls(3).Enabled = Not b
CommandBars("RAIS Menu Bar").Controls(5).Controls(4).Enabled = Not b
If BelongsToGroup(CurrentUser, "RAIS Regulators") Then
CommandBars("RAIS Menu Bar").Controls(3).Enabled = b
CommandBars("RAIS Menu Bar").Controls(2).Enabled = b
CommandBars("RAIS Menu Bar").Controls(5).Controls(1).Enabled = b
CommandBars("RAIS Menu Bar").Controls(5).Controls(2).Enabled = b
CommandBars("RAIS Menu Bar").Controls(5).Controls(3).Enabled = b
End If
by these sections
CommandBars("RAIS Menu Bar").Controls(1).Enabled = Not b
CommandBars("RAIS Menu Bar").Controls(2).Enabled = Not b
CommandBars("RAIS Menu Bar").Controls(3).Enabled = Not b
CommandBars("RAIS Menu Bar").Controls(6).Enabled = Not b
CommandBars("RAIS Menu Bar").Controls(5).Controls(1).Enabled = Not b
CommandBars("RAIS Menu Bar").Controls(5).Controls(2).Enabled = Not b
CommandBars("RAIS Menu Bar").Controls(5).Controls(3).Enabled = Not b
CommandBars("RAIS Menu Bar").Controls(5).Controls(4).Enabled = Not b
If BelongsToGroup(CurrentUser, "RAIS Regulators") Then
CommandBars("RAIS Menu Bar").Controls(6).Enabled = b
CommandBars("RAIS Menu Bar").Controls(3).Enabled = b
CommandBars("RAIS Menu Bar").Controls(2).Enabled = b
CommandBars("RAIS Menu Bar").Controls(5).Controls(1).Enabled = b
CommandBars("RAIS Menu Bar").Controls(5).Controls(2).Enabled = b
CommandBars("RAIS Menu Bar").Controls(5).Controls(3).Enabled = b
End If
37
RAIS 3.0 Programmer’s Guide – Part I : Advanced Customization
2.10.2 Comments
If forms are opened with the parameter acDialog, they may not loose focus. You may remove
this parameter if you want to allow custom forms to be opened and user switching to the
RAIS Interface forms or other custom forms.
2.11 Creating Custom Queries and Statistics
The process of creating custom queries or statistics is among the complicate tasks of
advanced customizations of RAIS. Let us briefly outline steps to be executed, before coming
to some examples.
•
•
•
•
•
•
•
Define the query, using static parameters only, meanwhile identifying all required
parameters for later use,
Test and validate the query,
Add a new record to the table “Treeview” in order for query to appear in the interface
Link query parameters to the Query Parameter Form by entering new record to the
table Propogator – Menu Selector
Create report definition entry as well as parameters for record grouping in the table
Propogator – Report Definitions
Test and validate how the query works through the interface
Copy customizations into the creator
It is clear that all queries and statistics need testing and validation. We recommend this as
often as possible, especially when we are handling highly complex queries.
Queries and statistics within RAIS 3.0 are to be designed just as queries in any other
Microsoft Access Application. However, queries most often will require some filtering to be
applied on parameters. These parameters are retrieved from a special form, designed for this
purpose, called [Query Parameter form]. This form offers a total of 7 parameters:
(tables already described in section 2.9)
Combo box that may be populated by underlying record sets. Each
List 5
of these combo boxes may again be used as a parameter for other
List 4
combo boxes underlying record sets. Combo boxes only are visible
List 3
if an underlying table is defined in the table [Propagator – Report
List 2
Definitions]
List 1
List 0
Start Date / End Date Start and end dates that define the time period for the query. Note
that these shall be converted using the function CVDate() to avoid
for date conversion problems. Date fields only are visible if the
value of the field [Query 0] of the relevant record in the table
[Propagator – Menu Selector] has three leading dashes “---”.
Each of these parameters may easily be used in SQL statements, such as in the example
below:
38
RAIS 3.0 Programmer’s Guide – Part I : Advanced Customization
Select * from [generators history] where (
([fk generator type id] = forms![query parameter form]![list 5])
and
([status date] between
CVDate(forms![query parameter form]![start date])
and
CVDate(forms![query parameter form]![end date])));
When designing queries, we recommend using only static filtering in a first step. Note that
RAIS 3.0 currently allows only for foreign keys and date values to be used as parameter
values, i.e. numeric values and date values.
To create the report definition entry as well as parameters for record grouping, open and add
a new record in the table [Propagator – Report definitions].
Menu Item
Query
Title
Grouping
Widths
Identifier of the menu item
Name of the query to be loaded to retrieve the result set
Title to be displayed
Field grouping, semi colon separated list (i.e. 3;4;2)
Field widths, semi colon separated list (i.e. 3;4;2) currently not supported
2.11.1 Examples
2.11.1.1 Query unsealed sources to associated equipment
Let us have a look at how the query for displaying the history of unsealed sources to
associated equipment was created in RAIS 3.0. The appropriate query already exists and has
been validated, so we may skip the first two steps and immediately jump to creating the menu
entry.
Our entry, called “History of unsealed Sources to associated Equipment”, is located in the
menu group node called “History”. Two entries hence are required in the table [Treeview]:
one entry – with the key L – for the menu group node (not linked to a query parameter form)
PDI ID
PDI
Key
Image Index
Menu Name
N/A
History
L
1
Query
and one entry – with the key L13 –for the menu leave (linked to a query parameter form).
PDI ID
PDI
Key
Image Index
Menu Name
N/A
History of unsealed Sources to associated Equipment
L13
2
Query
39
RAIS 3.0 Programmer’s Guide – Part I : Advanced Customization
As only the second menu entry is linked to the query parameter form, only one entry – with
the key L13 – is required in the table [Propagator – Menu selector] for defining query
parameters
Menu Form
Menu Name
Tab Position
Tab Name
Type
Label 5
Query 5
Label 4
Query 4
Label 3
Query 3
Label 2
Query 2
Label 1
Query 1
Label 0
Query 0
Form
Image Index
Query
L13
0
L10 (not used)
4
Associated Equipment
Preselection Filter – Asso All
Query Parameter Form
1
One entry only again is required for defining style and layout of the report to be printed. This
entry again refers to the menu item L13 in the table [Propagator – Report Definitions]
Menu Item
Query
Title
Grouping
Widths
L13
Query - History | Asso Unsealed
Asso Unsealed History
0
0
We may check the result by simply opening the RAIS Front-End, navigating to History in the
Query menu.
40
RAIS 3.0 Programmer’s Guide – Part I : Advanced Customization
2.11.1.2 Statistic for practice profile
Let us now have a look at how the statistical query for displaying the practice profile has
been inserted into the RAIS 3.0 interface. The menu entry will not be located in a menu
group node, so only one entry is required in the table [Treeview] – with the key P – for the
menu leave (linked to a query parameter form).
PDI ID
PDI
Key
Image Index
Menu Name
N/A
Practice Profile
P
1
Statistics
Only one entry – with the key P – is required in the table [Propagator – Menu selector]
Menu Form
Menu Name
Tab Position
Tab Name
Type
Label 5
Query 5
Label 4
Query 4
Label 3
Query 3
Label 2
Query 2
Label 1
Query 1
Label 0
Statistics
P
0
P
4
Practice Category
Practice Category
Practice
Preselection Filter - Practice by Category
41
RAIS 3.0 Programmer’s Guide – Part I : Advanced Customization
Query 0
Form
Image Index
Query Parameter Form
0
And again only one entry in the table [Propagator – Report Definitions]
Menu Item
Query
Title
Grouping
Widths
P
Statistics - Practice Profile
Practice Profile
0
0
We may check the result by simply opening the RAIS Front-End, navigating to Practice
Profile in the Statistics menu.
2.11.2 Comments
To avoid for loss or overwriting of custom statistics after RAIS updates, it is highly
recommended to use the prefix “CUSTOM - ” for all your custom statistic query names; this
prefix is not used by RAIS developers. Section 3.1.3 details how bulk copies of queries with
a user defined prefix may be easily achieved.
Note
Always take care at NULL values when designing custom queries
To create menu entries for your custom queries and statistics, please refer to section 2.9.
Keys starting with the letters A, D, X, Y and Z are reserved for RAIS use.
RAIS 3.0 Administrators can also design a custom report using standard MS Access
functionalities. In such a case, a menu entry has to be created to select this custom report
from the treeview. Such custom report shall be based on a custom query.
42
RAIS 3.0 Programmer’s Guide – Part I : Advanced Customization
After copying the new report from the front end to the creator, modification of the creator is
necessary for the new report to be created upon the next creation run See section 3.2 for
details.
2.12 Customizing Search Functionality
The search form allows for searching of information items as for instance facilities, sources
and workers. Information items may be searched by parts of the regulatory authority number
or their names. SQL statements are used to display search results in the result window of the
search form. Double-clicking on any entries of the result list then allows switching to the
selected record.
Search filters are defined by records in the table [System - Search]
Search Item
Search Field
Search SQL
Result Menu
Result Form
Name of the item to search for (need not match any table name)
Name of the data field to be searched for (need not match any field name).
The value of this field is to be used in filter statements with the expression
[NAME]
SQL string filtering for search results matching the search field value.
Menu to load on double-click
Data entry form to load on double-click
Example:
This example shows definitions required for a search filter allowing for searching a facility
by name:
Search Item
Search Filed
Search SQL
Result Menu
Result Form
Facility
Name
select [PK Facility ID], [Facility Name] from [Facility] where [Facility
Name] like "*" & [Value] & "*" order by [Facility Name]
INPUT
SUB EDIT Facility
43
RAIS 3.0 Programmer’s Guide – Part I : Advanced Customization
Please note that SQL statements shall always return search result in the form Primary Key,
Name. Also note that the field Search SQL may contain either an SQL statement or a named
query.
Search Item
Search Filed
Search SQL
Result Menu
Result Form
Facility
Name
Facility Name Search List
INPUT
SUB EDIT Facility
where the query named [Facility Name Search List] would contain the statement
select [PK Facility ID], [Facility Name] from [Facility] where [Facility Name] like "*" &
[Value] & "*" order by [Facility Name]
2.13 Multiple selection (junction forms)
The lists on the junction forms are fed by “Unallocation” and “Allocation” queries for the left
hand side and right hand side list respectively (see the picture below). Those queries and
forms are easily created with the Creator (selecting “Multiple lookup” field when creating
new field on a form).
Field Name
query
Allocation – query
Unallocation – query
Lookup in OnDblClick Event
The general approach for customization applies also to multiple selection form queries:
The best approach for creating new custom forms is:
44
RAIS 3.0 Programmer’s Guide – Part I : Advanced Customization
•
•
•
Design the needed customization in an unlocked front-end
Test, debug and validate the new customization
Copy the final new custom form in the RAIS 3.0 Creator
Note:
When modifying the way how multiple selection form appears, one should be aware that
all modifications should be done both in Unallocation and Allocation forms. Also, please
consider that junction functions are very complex by nature; one should not usually
modify them.
45
RAIS 3.0 Programmer’s Guide – Part I : Advanced Customization
3 Copying customizations from a front-end to the creator
3.1 Copying Queries
Queries are most easily copied by a simple Drag-and-Drop operation from the Front-End into
the Creator. If the query to be copied already exists in the Creator, MS Access will ask for a
new name. This may easily be avoided by first deleting the query to be copied from the
creator, as a new query from the Front-End is going to supersede that very query. Please note
that both Front-End and Creator need to be opened in design mode in order to execute Dragand-Drop operations.
Queries to be copied from the Front-End usually contain both tables and relations. When
copying queries by Drag and Drop operations into the Creator, these relationships generally
are broken if the query is run, due to the fact that the Creator does not “know” about those
relationships. The results of this unfortunate behavior are non-working queries.
To avoid for this, we recommend linking the RAIS Creator to a RAIS backend, possibly a
test backend only. This is easily achieved by opening the form [Backend Selector] manually
within the Creator and selecting a RAIS Backend to “connect to” just the same way as within
the RAIS User Interface.
Above mentioned procedure allows MS Access to preserve relationships within SQL
Statements during Copy/Paste operations.
Another possibility is to open the query to be copied in SQL view, copy the text of the SQL
statement and paste it in a new blank query opened in the creator in SQL view. Save this new
query in the creator with the same name as the one in the front end.
3.1.1 Simple static SQL Statements
The RAIS creator uses bulk copies to copy all SQL statement having a specific prefix into the
created Frontend. Below is a list of SQL Statement prefixes that are copied during creation.
Prefix
[Consistency Check - ]
[Preselection Filter - ]
[Preselection List - ]
[Entry Filter - ]
[Allocation Filter - ]
[Report Queries]
[Helper - ]
[Display - ]
[Mini Display - ]
[Item Selection - ]
[Query - ]
[Statistics - ]
46
RAIS 3.0 Programmer’s Guide – Part I : Advanced Customization
[RAN - ]
[Calculation - ]
[Export Selection - ]
[Exportable Selection - ]
[Exported Selection - ]
[Exported Overall Selection - ]
[Import Selection - ]
[Importable Selection - ]
[Imported Selection - ]
[Imported Overall Selection - ]
[Menu Selection – ]
3.1.2 Complex, multiple selection managing queries
Allocation and un-allocation queries are required for managing multiple selection fields.
These SQL statements are generated only during the creation process of the RAIS User
Interface. Only simple default definition of allocation and un-allocation queries are
generated, which might not necessarily always fit the demands. Hence, developers have been
granted the possibility to overload automatically generated allocation and un-allocation
queries by predefining them inside the RAIS Creator. The RAIS Creator will generate only
those allocation and un-allocation queries that have not yet been defined inside the creator. If
queries already exist, the Creator will simply copy them into the Front-End.
Prefix
[Allocation - ]
[UnAllocation - ]
3.1.3 Completing the integration of the new queries in RAIS
In order for the new queries that have a prefix different from the two lists above (for example
"CUSTOM - ") to be created upon next run of the creator, it is necessary to modify the
creator source code as described below:
•
•
Open RAIS 3.0 Creator in design mode
Locate the function [Public Function CreateQueries] in the module [RAIS Database
Creator Functions]
Include a line CreateQueriesRange db, "CUSTOM - "
3.2 Copying forms and reports
Forms are most easily copied by a simple Drag-and-Drop operation from the Front-End into
the Creator. If the form to be copied already exists in the Creator, MS Access will ask for a
47
RAIS 3.0 Programmer’s Guide – Part I : Advanced Customization
new name. This may easily be avoided by first deleting the form to be copied from the
creator, as a new form from the Front-End is going to supersede that very form.
Please note that both Front-End and Creator need be opened in design mode in order to
execute Drag-and-Drop operations. Please note that the RAIS Creator often uses form
templates. These form templates have different names in both the Front-End and the Creator,
hence manual renaming is required for templates.
Below is a matching table for form template names to forms, Front-End forms are copied
during creation. Modifying these forms modifies the general behavior of all selection forms
or treeview forms respectively.
Front-End Form Name
Preselection
Query Parameter Form
Selection Help
Selection List
Selection Print
Selection Tab
Input
Sub Edit [table name]
[table name] [table name] (multiple select
forms)
Creator Form Template Name
Template Preselection Form
Template Query Parameter Form
Template Selection Help Form
Template Selection List Form
Template Selection Print Form
Template Selection Tab Form
Template Treeview Form
Template Sub View Form
Template Junction Form
Below is a list of forms copied into the Front-End without renaming during creation. Neither
one of below forms is used as template. These forms may be modified without side effects on
any other functionality except the form itself.
Form Name
Sealed Source Activity
Options
Backend Selector
Search
About
Datasheet
Below is a list of reports copied into the Front-End, without renaming during creation. These
reports are of general use; they are used for displaying results of all reports and statistics from
within RAIS. These reports may be modified without side effects on any other functionality
except the display of reports itself.
Report Name
Report - Query – Portrait
Report - Query – Landscape
Report - Query – Flat Portrait
Report - Query – Flat Lanscape
.
48
RAIS 3.0 Programmer’s Guide – Part I : Advanced Customization
In order for the custom forms to be created upon next run of the creator, it is necessary to
modify the creator source code as described below:
•
•
•
Open the RAIS Creator in design mode
Locate the function [Public Sub FormCreateTemplates] in the module [RAIS Form
Creator Functions]
Include a line DoCmd.CopyObject d, "destination form", acForm, " source form"
In order for the custom reports to be created upon next run of the creator, it is necessary to
modify the creator source code as described follows:
•
•
•
Open the RAIS Creator in design mode
Locate the function [Public Sub FormCreateTemplates] in the module [RAIS Form
Creator Functions]
Include a line DoCmd.CopyObject d, "destination report", acReport, " source report"
3.3 Copying tables
Only Propagator Tables and System Tables can be copied from the Front-End into the
Creator because none of those tables has relationships to other tables, so that a simple copy
operation even with records does not introduce data integrity failures. RAIS tables
(generators, sources etc.) should never be copied from the Front-End into the creator.
Tables are most easily copied by a simple Drag-and-Drop operation from the Front-End into
the Creator. If the table to be copied already exists in the Creator, MS Access will ask for a
new name. This may easily be avoided by first deleting the table to be copied from the
creator, as a new table from the Front-End is going to supersede that very table.
Please note that both Front-End and Creator need be opened in design mode in order to
execute Drag-and-Drop operations. Also note that no renaming of destination objects is
required when copying tables. Take care not to copy any linked tables from the Front-End
into the Creator, do only copy internal tables, RAIS does not use any template tables.
To ensure custom tables, not made using the Creator, are reproduced on the next creator run,
do the following:
• Locate the function [Public Sub FormCreatePDITable] in the module [RAIS Form
Creator Functions]
• Include a line DoCmd.CopyObject d, "destination table", acTable, "source table"
• Locate the function [Public Sub CreatePDILinks] in the module [RAIS Database
Creator Function]
• Include a line CreatePDILink db, d, "source table"
49
RAIS 3.0 Programmer’s Guide – Part I : Advanced Customization
3.4 Copying modules
Copying modules from the Front-End into the Creator is most easily achieved by a simple
Drag-and-Drop operation from the Front-End into the Creator. If the module to be copied
already exists in the Creator, MS Access will ask for a new name. This may easily be avoided
by first deleting the module to be copied from the creator, as a new module from the FrontEnd is going to supersede that very module.
Please note that both Front-End and Creator need be opened in design mode in order to
execute Drag-and-Drop operations. Also note that no renaming of destination objects is
required when copying modules, RAIS does not use any template modules.
Modify the RAIS 3.0 Creator for the new custom module to be created upon the next creation
run:
• Locate the function [Public Sub ModuleCreate] in the module [RAIS Module Creator
Functions]
• Include a line DoCmd.CopyObject d, "destination module", acModule, "source
module"
• Save the module
50
RAIS 3.0 Programmer’s Guide – Part I : Advanced Customization
4 Entity Relationship Diagrams
The following Entity-Relationship Diagrams are based on the database model contained in
the original distribution of RAIS, common to all official IAEA languages. Only the major
entities (information items) and their relations are detailed in the following sections. The
reader should be aware that these diagrams may vary, depending upon customizations of
database tables with the RAIS Creator.
Following relationship structures are used in RAIS 3.0 database model:
1. Multiple (Double) path structure: as, for example in the following figure:
This structure allows for example to enter generator models, or generator manufacturer or
both and correctly preserving their relationship. This feature contributes to the “reality
attribute” of RAIS 3.0. i.e. the ability of dealing with incomplete data.
2. Junction tables: as in the following figure
Those tables provide for n-n relationships and correspond at the Front-End level to multiple
selection fields. In RAIS 3.0 Creator, those fields are called “multiple lookup” fields.
3. “Static” vs. “Dynamic” data: For many information items, e.g. sources,
authorizations, inspections and workers, RAIS database model make a differentiation
between data which are fixed attributes of the item itself, such as serial number or
type, and data which change with time and are rather attributed to the status of the
item in its workplace as for example source status or the stage of the authorization
process. The former are called “static” and are stored in tables with no date reference
while the later are called “dynamic” and are stored in “History tables”.
Note that multiple history tables may exist for the same information item. This is the case, for
example, for sealed sources. They have two history tables: [sealed history] and [sealed asso
history].
51
RAIS 3.0 Programmer’s Guide – Part I : Advanced Customization
4. Authorization Types: are defined by relationship from the authorization table to a
type-defining table (see section 4.3). Should authorization type specific data be
necessary, then they are embedded in the particular type defining table. This is the
case, for example, for import, export, transport and transfer authorizations.
4.1 Facilities and Departments
4.1.1 Facilities
4.1.2 Departments
52
RAIS 3.0 Programmer’s Guide – Part I : Advanced Customization
4.2 Sources
4.2.1 Radiation Generators
4.2.2 Sealed Sources
Manufacturer
PK
PK Manufacturer ID
FK1,I1
Name
Address
Phone
Fax
eMail
Contact Person
FK Country ID
RAIS_TIME_STAMP
Source Status
PK
PK Source Status ID
Source Status
RAIS_TIME_STAMP
Sealed Model
PK
PK Sealed Model ID
FK1,I1
Sealed Model Name
FK Manufacturer ID
RAIS_TIME_STAMP
Sealed Category
PK
PK Sealed Category ID
Category Name
RAIS_TIME_STAMP
Security Group
PK
PK Security Group ID
Sealed
PK
PK Sealed ID
U1
Regulatory Authority Source No
Serial No
FK Activity ID
Activity
Activity Date
FK Manufacturer ID
FK Sealed Model ID
FK Sealed Category ID
FK Security Group ID
FK ISO Compliance ID
FK Recommended Working Life ID
Recommended Working Life
RAIS_TIME_STAMP
FK5,I5
FK2,I2
FK3,I3
FK4,I4
FK1,I1
FK6,I6
FK7,I7
Name
RAIS_TIME_STAMP
Sealed History
PK
PK Sealed History ID
FK4,I4
FK3,I3
FK2,I2
FK Sealed ID
FK Facility ID
FK Department ID
Status Date
FK Source Status ID
Facility Audit Date
FK Security Plan ID
Comments
RAIS_TIME_STAMP
FK5,I5
FK1,I1
Sealed Nuclide
Sealed History Physical Barrier
PK
PK Sealed Nuclide ID
PK
PK Sealed History Physical Barrier ID
FK1,I1
FK2,I2
RAIS_TEMP
FK Sealed ID
FK Nuclide ID
RAIS_TIME_STAMP
FK1,I1
FK2,I2
RAIS_TEMP
FK Sealed History ID
FK Physical Barrier ID
RAIS_TIME_STAMP
Nuclide
PK
FK1,I1
Physical Barrier
PK Nuclide ID
PK
Isotope
FK Half Life ID
Half Life
RAIS_TIME_STAMP
PK Physical Barrier ID
Barrier Name
RAIS_TIME_STAMP
53
Department
PK
PK Department ID
U1
Regulatory Authority Number
Department Name
Legal Person
FK Department Status ID
FK Facility ID
FK Region ID
FK District ID
Address
Phone
Fax
RAIS_TIME_STAMP
FK4,I4
FK3,I3
FK1,I1
FK2,I2
Facility
PK
PK Facility ID
U1
Regulatory Authority Number
Facility Name
Legal Person
FK Facility Status ID
FK Region ID
FK District ID
Address
Phone
Fax
RAIS_TIME_STAMP
FK3,I3
FK2,I2
FK1,I1
RAIS 3.0 Programmer’s Guide – Part I : Advanced Customization
4.2.3 Unsealed Sources
Source Status
PK
Manufacturer
PK
Name
Address
Phone
Fax
eMail
Contact Person
FK Country ID
RAIS_TIME_STAMP
FK1,I1
Physical Form
PK
PK Physical Form ID
PK Source Status ID
Source Status
RAIS_TIME_STAMP
PK Manufacturer ID
Unsealed
PK
PK Unsealed ID
U1
FK3,I3
Regulatory Authority Source No
FK Maximum Activity ID
Maximum Activity
FK Activity Period ID
Activity Period
Facility Audit Date
FK Manufacturer ID
FK Physical Form ID
RAIS_TIME_STAMP
FK4,I4
FK1,I1
FK2,I2
Unsealed History
PK
PK Unsealed History ID
FK4,I4
FK2,I2
FK1,I1
FK Unsealed ID
FK Facility ID
FK Department ID
Status Date
FK Source Status ID
Comments
RAIS_TIME_STAMP
FK3,I3
Form
RAIS_TIME_STAMP
Unsealed Nuclide
Unsealed History Physical Barrier
PK
PK Unsealed Nuclide ID
PK
PK Unsealed History Physical Barrier ID
FK1,I1
FK2,I2
RAIS_TEMP
FK Unsealed ID
FK Nuclide ID
RAIS_TIME_STAMP
FK1,I1
FK2,I2
RAIS_TEMP
FK Unsealed History ID
FK Physical Barrier ID
RAIS_TIME_STAMP
Nuclide
PK
PK Department ID
U1
Regulatory Authority Number
Department Name
Legal Person
FK Department Status ID
FK Facility ID
FK Region ID
FK District ID
Address
Phone
Fax
RAIS_TIME_STAMP
FK4,I4
FK3,I3
FK1,I1
FK2,I2
Facility
PK
PK Facility ID
U1
Regulatory Authority Number
Facility Name
Legal Person
FK Facility Status ID
FK Region ID
FK District ID
Address
Phone
Fax
RAIS_TIME_STAMP
FK3,I3
FK2,I2
FK1,I1
Physical Barrier
PK Nuclide ID
FK1,I1
Department
PK
PK
Isotope
FK Half Life ID
Half Life
RAIS_TIME_STAMP
PK Physical Barrier ID
Barrier Name
RAIS_TIME_STAMP
4.2.4 Associated Equipment
Manufacturer
PK
PK Manufacturer ID
FK1,I1
Department
Name
Address
Phone
Fax
eMail
Contact Person
FK Country ID
RAIS_TIME_STAMP
Asso Model
PK
PK Asso Model ID
FK1,I1
FK2,I2
Asso Model Name
FK Asso Type ID
FK Manufacturer ID
RAIS_TIME_STAMP
Asso History
Asso
PK
PK Asso ID
U1
Regulatory Authority Asso No
Serial Number
FK Asso Type ID
FK Manufacturer ID
FK Asso Model ID
RAIS_TIME_STAMP
FK2,I2
FK3,I3
FK1,I1
PK
PK Asso History ID
FK1,I1
FK2,I2
FK3,I3
FK Asso ID
FK Facility ID
FK Department ID
Status Date
FK Source Status ID
Comments
RAIS_TIME_STAMP
FK4,I4
Asso Type
PK
PK Asso Type ID
Source Status
PK
Type Name
RAIS_TIME_STAMP
PK Source Status ID
Source Status
RAIS_TIME_STAMP
Asso Type Practice
Practice
PK
PK Asso Type Practice ID
PK
FK1,I1
FK2,I2
RAIS_TEMP
FK Asso Type ID
FK Practice ID
RAIS_TIME_STAMP
FK2,I2
FK1,I1
PK Practice ID
Practice Name
FK Inspection Frequency ID
Inspection Frequency
FK Practice Category ID
RAIS_TIME_STAMP
54
PK
PK Department ID
U1
Regulatory Authority Number
Department Name
Legal Person
FK Department Status ID
FK Facility ID
FK Region ID
FK District ID
Address
Phone
Fax
RAIS_TIME_STAMP
FK4,I4
FK3,I3
FK1,I1
FK2,I2
Facility
PK
PK Facility ID
U1
Regulatory Authority Number
Facility Name
Legal Person
FK Facility Status ID
FK Region ID
FK District ID
Address
Phone
Fax
RAIS_TIME_STAMP
FK3,I3
FK2,I2
FK1,I1
RAIS 3.0 Programmer’s Guide – Part I : Advanced Customization
4.2.5 Source-Equipment Association
4.3 Authorizations
55
RAIS 3.0 Programmer’s Guide – Part I : Advanced Customization
4.3.1 Authorization Types
PK Import Authorization Asso ID
FK1,I1
FK2,I2
RAIS_TEMP
FK Import Authorization ID
FK Asso ID
RAIS_TIME_STAMP
PK Import Authorization Generator ID
FK1,I1
FK2,I2
RAIS_TEMP
FK Import Authorization ID
FK Generator ID
RAIS_TIME_STAMP
PK Import Authorization ID
FK1,I1
FK Authorization ID
Import Date
FK Security Plan ID
Customs No
Bill of Lading No
Bill of Lading Date
RAIS_TIME_STAMP
Import Authorization Sealed
PK Import Authorization Sealed ID
FK1,I1
FK2,I2
RAIS_TEMP
FK Import Authorization ID
FK Sealed ID
RAIS_TIME_STAMP
FK1,I1
FK2,I2
FK Authorization ID
FK Recepient Facility ID
Transfer Date
FK Recipient Authorization ID
FK Transfer Type ID
FK Transfer Duration ID
Transfer Duration
FK Return Confirmation ID
Return Date
RAIS_TIME_STAMP
Import Authorization
FK2,I2
PK
PK Transfer Authorization ID
FK6,I6
PK
PK Import Authorization Unsealed ID
FK1,I1
FK2,I2
RAIS_TEMP
FK Import Authorization ID
FK Unsealed ID
RAIS_TIME_STAMP
PK
PK Export Authorization Asso ID
FK1,I1
FK2,I2
RAIS_TEMP
FK Export Authorization ID
FK Asso ID
RAIS_TIME_STAMP
Transfer Type Name
RAIS_TIME_STAMP
Transport Mode
PK
PK Transport Authorization ID
FK1,I1
FK8,I8
FK Authorization ID
FK Consigner Facility ID
Origin
Date of Shipment
FK Consignee Facility ID
FK Consignee Authorization ID
Destination
Date of Receipt
FK Carrier Facility ID
FK Package Type ID
Transport Index
FK Package Category ID
FK Exclusive Use ID
FK Special Arangements ID
FK Security Plan ID
RAIS_TIME_STAMP
FK7,I7
FK2,I2
FK3,I3
FK4,I4
FK5,I5
FK6,I6
Authorization
PK
PK Authorization ID
U1
FK2,I2
FK1,I1
Authorization Process Number
FK Facility ID
FK Department ID
Date
Expiry Date
Authorization Type
RAIS_TIME_STAMP
Storage Authorization
PK
PK Storage Authorization ID
FK1,I1
FK Authorization ID
RAIS_TIME_STAMP
Export Authorization Generator
PK
PK Export Authorization Generator ID
FK1,I1
FK2,I2
RAIS_TEMP
FK Export Authorization ID
FK Generator ID
RAIS_TIME_STAMP
Export Authorization Sealed
PK
PK Export Authorization Sealed ID
FK1,I1
FK2,I2
RAIS_TEMP
FK Export Authorization ID
FK Sealed ID
RAIS_TIME_STAMP
Export Authorization
PK
PK Export Authorization ID
FK1,I1
FK Authorization ID
Customs Export Date
FK Security Plan ID
FK Recipient Country Approval ID
Customs No
RAIS_TIME_STAMP
FK3,I3
FK2,I2
Operation Authorization
PK
PK Operation Authorization ID
FK1,I1
FK Authorization ID
RAIS_TIME_STAMP
Export Authorization Unsealed
PK
PK Export Authorization Unsealed ID
FK1,I1
FK2,I2
RAIS_TEMP
FK Export Authorization ID
FK Unsealed ID
RAIS_TIME_STAMP
56
PK Transport Mode ID
Transport Mode
RAIS_TIME_STAMP
PK
FK9,I9
FK10,I10
Export Authorization Asso
PK Transfer Type ID
Transport Authorization
Import Authorization Unsealed
PK
PK
PK
FK3,I3
FK5,I5
FK4,I4
Import Authorization Generator
PK
Transfer Type
Transfer Authorization
Import Authorization Asso
PK
Transport Authorization Transport Mode
PK
PK Transport Authorization Transport Mode ID
FK1,I1
FK2,I2
RAIS_TEMP
FK Transport Authorization ID
FK Transport Mode ID
RAIS_TIME_STAMP
Isotope Product Authorization
PK
PK Isotope Product Authorization ID
FK1,I1
FK Authorization ID
RAIS_TIME_STAMP
RAIS 3.0 Programmer’s Guide – Part I : Advanced Customization
4.4 Workers
Monitoring Status
PK
Department
Person Status
PK Monitoring Status ID
Status
RAIS_TIME_STAMP
PK
PK Person Status ID
Status
RAIS_TIME_STAMP
PK Person Professional Degree ID
FK1,I1
FK2,I2
FK Person ID
FK Professional Degree ID
RAIS_TIME_STAMP
Person Academic Degree
PK
PK Person Academic Degree ID
FK1,I1
FK2,I2
FK3,I3
FK4,I4
FK Person ID
FK Field ID
FK Branch ID
FK Academic Qualification Degree ID
RAIS_TIME_STAMP
PK Department ID
U1
Regulatory Authority Number
Department Name
Legal Person
FK Department Status ID
FK Facility ID
FK Region ID
FK District ID
Address
Phone
Fax
RAIS_TIME_STAMP
FK4,I4
FK3,I3
FK1,I1
FK2,I2
Person Professional Degree
PK
PK
Person History
Person
PK
PK Person ID
U1
Regulatory Authority Number
Name
Birth Date
FK Sex ID
RAIS_TIME_STAMP
FK1,I1
PK
PK Person History ID
FK4,I4
FK2,I2
FK1,I1
FK Person ID
FK Facility ID
FK Department ID
Status Date
FK Worker Status ID
FK Monitoring Status ID
Experience
FK Trustworthiness ID
RAIS_TIME_STAMP
FK5,I5
FK3,I3
FK6,I6
Facility
PK
PK Facility ID
U1
Regulatory Authority Number
Facility Name
Legal Person
FK Facility Status ID
FK Region ID
FK District ID
Address
Phone
Fax
RAIS_TIME_STAMP
FK3,I3
FK2,I2
FK1,I1
Person History Person Task
Practice
PK
Practice Name
FK Inspection Frequency ID
Inspection Frequency
FK Practice Category ID
RAIS_TIME_STAMP
FK1,I1
PK
PK Person Task Practice ID
FK1,I1
FK2,I2
RAIS_TEMP
FK Person Task ID
FK Practice ID
RAIS_TIME_STAMP
4.5 Inspections
Facility
PK
PK Facility ID
U1
Regulatory Authority Number
Facility Name
Legal Person
FK Facility Status ID
FK Region ID
FK District ID
Address
Phone
Fax
RAIS_TIME_STAMP
FK3,I3
FK2,I2
FK1,I1
PK Department ID
U1
Regulatory Authority Number
Department Name
Legal Person
FK Department Status ID
FK Facility ID
FK Region ID
FK District ID
Address
Phone
Fax
RAIS_TIME_STAMP
FK4,I4
FK3,I3
FK1,I1
FK2,I2
Inspection Status
PK
PK Inspection Status ID
Inspection Status
RAIS_TIME_STAMP
FK1,I1
FK2,I2
RAIS_TEMP
FK Person History ID
FK Person Task ID
RAIS_TIME_STAMP
Person Task
PK
PK Person Task ID
Task
RAIS_TIME_STAMP
Non-Compliance
PK
PK Non-Compliance ID
FK1,I1
Name
FK Category ID
RAIS_TIME_STAMP
Inspection Asso
Inspection Non-Compliance
PK
PK Inspection Non-Compliance ID
FK1,I1
FK2,I2
RAIS_TEMP
FK Inspection ID
FK Non-Compliance ID
RAIS_TIME_STAMP
PK
PK Inspection Asso ID
FK1,I1
FK2,I2
RAIS_TEMP
FK Inspection ID
FK Asso ID
RAIS_TIME_STAMP
Inspection Generator
Inspection
Department
PK
PK Person History Person Task ID
Person Task Practice
PK Practice ID
FK2,I2
PK
PK
PK Inspection ID
U1
FK2,I2
FK1,I1
FK3,I3
FK4,I4
FK5,I5
Inspection No
FK Facility ID
FK Department ID
FK Regular Inspection ID
FK Full Inspection ID
FK Announced Insption ID
RAIS_TIME_STAMP
PK
PK Inspection Generator ID
FK1,I1
FK2,I2
RAIS_TEMP
FK Inspection ID
FK Generator ID
RAIS_TIME_STAMP
Inspection Sealed
PK
PK Inspection Sealed ID
FK1,I1
FK2,I2
RAIS_TEMP
FK Inspection ID
FK Sealed ID
RAIS_TIME_STAMP
Inspection Unsealed
Inspection History
PK
PK Inspection History ID
FK2,I2
FK Inspection ID
Status Date
FK Inspection Status ID
Comments
RAIS_TIME_STAMP
FK1,I1
Officer
Inspection History Officer
PK
PK Officer ID
PK
PK Inspection History Officer ID
FK2,I2
FK1,I1
Officer Name
FK Sex ID
FK Authority ID
RAIS_TIME_STAMP
FK1,I1
FK2,I2
RAIS_TEMP
FK Inspection History ID
FK Officer ID
RAIS_TIME_STAMP
57
PK
PK Inspection Unsealed ID
FK1,I1
FK2,I2
RAIS_TEMP
FK Inspection ID
FK Unsealed ID
RAIS_TIME_STAMP
RAIS 3.0 Programmer’s Guide – Part I : Advanced Customization
4.6 Enforcements
4.7 Incidents
Incident Type
PK
PK Incident Type ID
Name
RAIS_TIME_STAMP
Incident Asso
Incident Incident type
Facility
PK
PK Facility ID
U1
Regulatory Authority Number
Facility Name
Legal Person
FK Facility Status ID
FK Region ID
FK District ID
Address
Phone
Fax
RAIS_TIME_STAMP
FK3,I3
FK2,I2
FK1,I1
PK
PK Incident Incident type ID
FK1,I1
FK2,I2
RAIS_TEMP
FK Incident ID
FK Incident type ID
RAIS_TIME_STAMP
PK
PK Department ID
U1
Regulatory Authority Number
Department Name
Legal Person
FK Department Status ID
FK Facility ID
FK Region ID
FK District ID
Address
Phone
Fax
RAIS_TIME_STAMP
FK4,I4
FK3,I3
FK1,I1
FK2,I2
Incident
PK Incident ID
U1
FK2,I2
FK1,I1
Incident No
FK Facility ID
FK Department ID
Date
Location
Description
Consequences
Lessons
Remedial Actions
Followup Actions
RAIS_TIME_STAMP
IAEA Notification
PK
PK IAEA Notification ID
FK1,I1
FK Incident ID
Notification Date
FK Notified ID
Support
Support Date
Comments
Authority Notification Date
FK Authority Notified ID
RAIS_TIME_STAMP
FK3,I3
FK2,I2
PK Incident Asso ID
FK1,I1
FK2,I2
RAIS_TEMP
FK Incident ID
FK Asso ID
RAIS_TIME_STAMP
Incident Generator
PK
Department
PK
58
PK
PK Incident Generator ID
FK1,I1
FK2,I2
RAIS_TEMP
FK Incident ID
FK Generator ID
RAIS_TIME_STAMP
Incident Sealed
PK
PK Incident Sealed ID
FK1,I1
FK2,I2
RAIS_TEMP
FK Incident ID
FK Sealed ID
RAIS_TIME_STAMP
Incident Unsealed
PK
PK Incident Unsealed ID
FK1,I1
FK2,I2
RAIS_TEMP
FK Incident ID
FK Unsealed ID
RAIS_TIME_STAMP
PK
PK Incident Person ID
FK1,I1
FK2,I2
FK3,I3
FK Incident ID
FK Person ID
FK Accidential Dose ID
Accidential Dose
RAIS_TIME_STAMP
Incident Person
RAIS 3.0 Programmer’s Guide – Part I : Advanced Customization
4.8 Service Providers
59