1
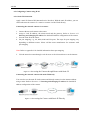
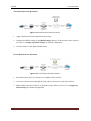
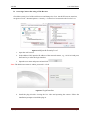
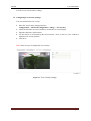
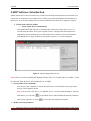
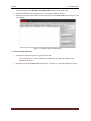
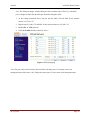
www.Advidia.com Quick Setup Guide Advidia A-46 Mini Dome Table of Contents A. Network Connection .................................................................................................................... 4 A.1 Configuring Camera using LAN ........................................................................................... 4 A.1.1 Detecting and Changing IP Address ................................................................................... 5 A.2 Configuring Camera using WAN .......................................................................................... 6 A.2.1 Static IP Connection .......................................................................................................... 6 A.2.2 Dynamic IP Connection ..................................................................................................... 7 B. Accessing Camera Site using a Web Browser ............................................................................... 9 B.1 Camera Site Live View ....................................................................................................... 11 B.2 Recording and Capturing Snapshots .................................................................................... 13 B.3 Operating PTZ.................................................................................................................... 13 B.3.1 Setting/Calling a Preset ................................................................................................... 14 C. Configuring Live View Parameters ............................................................................................ 16 D. Configuring Network Settings .................................................................................................... 16 D.1 Configuring TCP/IP Settings .............................................................................................. 16 D.2 Configuring Port Settings ................................................................................................... 17 E. Configuring Video and Audio Settings ....................................................................................... 18 E.1 Configuring Video Settings ................................................................................................. 18 E.2 Configuring Audio Settings ................................................................................................ 19 F. Configuring Display Settings ..................................................................................................... 20 G. Configuring OSD Settings.......................................................................................................... 22 H. Configuring Text Overlay Settings ............................................................................................. 23 I. General Maintenance ................................................................................................................. 24 I.1 Managing User Accounts ..................................................................................................... 24 I.2 Configuring RTSP Authentication........................................................................................ 25 I.3 Viewing Device Information ................................................................................................ 25 I.4 Rebooting the Camera .......................................................................................................... 27 I.5 Restoring Default Settings ................................................................................................... 27 10/16/2012 Page 2 Advidia A-46 Mini Dome I.6 Upgrading the System .......................................................................................................... 27 J. Accessing Camera using Monitor Station ................................................................................... 28 SADP Software Introduction ..................................................................................................... 29 Port Mapping ............................................................................................................................ 31 10/16/2012 Page 3 Advidia A-46 Mini Dome A. Network Connection o o To set the network camera via a LAN (Local Area Network), please refer to Section A.1 Configuring Camera using LAN. To set the network camera via a WAN (Wide Area Network), please refer to Section B.2 Configuring Camera using WAN. A.1 Configuring Camera using LAN To view and configure the camera via a LAN, you need to connect the network camera in the same subnet with your computer, and install the SADP or iVMS-4200 software to search and change the IP of the network camera. Note: For the detailed introduction of SADP, please refer to Appendix 1. The following figures show the two ways of cable connection of a network camera and a computer: o o To test the network camera, you can directly connect the network camera to the computer with a network cable as shown in Figure 2-1. Refer to the Figure 2-2 to set the network camera over the LAN via a switch or a router. Figure 1-1 Connecting Directly Figure 1-2 Connecting via a Switch or a Router 10/16/2012 Page 4 Advidia A-46 Mini Dome A.1.1 Detecting and Changing IP Address 1. To get the IP address, choose either of the following methods: o Use SADP, a software tool which can automatically detect the online network cameras in the LAN and list the device information including IP address, subnet mask, port number, device serial number, and device version, etc., shown in Figure 2-3. o Use the client software to list the online devices; refer to section B below. 2. Change the IP address and subnet mask to the same subnet as that of your computer. 3. Enter the IP address of network camera in the address field of the web browser to view the live video. Notes: o o The default IP address is 192.0.0.64 and the port number is 8000. The default user name is admin, and password is 12345. For accessing the network camera from different subnets, please set the gateway for the network camera after you logged in. For detailed information, please refer to Section 5.3.1 Configuring TCP/IP Settings. Figure 1-3 SADP Interface 10/16/2012 Page 5 Advidia A-46 Mini Dome A.2 Configuring Camera using WAN A.2.1 Static IP Connection Apply a static IP from an ISP (Internet Service Provider). With the static IP address, you can connect the network camera via a router or connect it to the WAN directly. Connecting the network camera via a router: 1. Connect the network camera to the router. 2. Assign a LAN IP address, the subnet mask and the gateway. Refer to Section A.1.1 Detecting and Changing IP Address for detailed IP address configuration of the camera. 3. Save the static IP in the router. 4. Set port mapping, e.g., 80, 8000, 8200 and 554 ports. The steps for port mapping vary depending on different routers. Please call the router manufacturer for assistance with port mapping. Note: Refer to Appendix 2 for detailed information about port mapping. 5. Visit the network camera through a web browser or the client software over the internet. Figure 2-4 Accessing the Camera through Router with Static IP Connecting the network camera with static IP directly You can also save the static IP in the camera and directly connect it to the internet without using a router. Refer to Section A.1.1 Detecting and Changing IP Address for detailed IP address configuration of the camera. Figure 2-5 Accessing the Camera with Static IP Directly 10/16/2012 Page 6 Advidia A-46 Mini Dome A.2.2 Dynamic IP Connection Apply a dynamic IP from an ISP. With the dynamic IP address, you can connect the network camera to a modem or a router. Connecting the network camera via a router 1. Connect the network camera to the router. 2. In the camera, assign a LAN IP address, the subnet mask and the gateway. Refer to Section A.1.1 Detecting and Changing IP Address for detailed LAN configuration. 3. In the router, set the PPPoE user name, password and confirm the password. 4. Set port mapping. E.g. 80, 8000, 8200 and 554 ports. The steps for port mapping vary depending on different routers. Please call the router manufacturer for assistance with port mapping. Note: Refer to Appendix 2 for detailed information about port mapping. 5. Apply a domain name from a domain name provider. 6. Configure the DDNS settings in the setting interface of the router. 7. Visit the camera via the applied domain name. Connecting the network camera via a modem This camera supports the PPPoE auto dial-up function. The camera gets a public IP address by ADSL dial-up after the camera is connected to a modem. You need to configure the PPPoE parameters of the network camera. Refer to Section D.3.3 Configuring PPPoE Settings for detailed configuration. Figure 2-1 Accessing the Camera with Dynamic IP Note: The obtained IP address is dynamically assigned via PPPoE, so the IP address always changes after rebooting the camera. To solve the inconvenience of the dynamic IP, you need to get a domain name from the DDNS provider (E.g. DynDns.com). Follow below steps for normal domain name resolution and private domain name resolution to solve the problem. 10/16/2012 Page 7 Advidia A-46 Mini Dome Normal Domain Name Resolution Figure 2-2 Normal Domain Name Resolution 1. Apply a domain name from a domain name provider. 2. Configure the DDNS settings in the DDNS Settings interface of the network camera. Refer to Section D.3.4 Configuring DDNS Settings for detailed configuration. 3. Visit the camera via the applied domain name. Private Domain Name Resolution Figure 2-3 Private Domain Name Resolution 1. Install and run the IP Server software in a computer with a static IP. 2. Access the network camera through the LAN with a web browser or the client software. 3. Enable DDNS and select IP Server as the protocol type. Refer to Section D.3.4 Configuring DDNS Settings for detailed configuration. 10/16/2012 Page 8 Advidia A-46 Mini Dome B. Accessing Camera Site using a Web Browser Check the security level of the web browser and change it to Low. On the IE browser menu bar, navigate to Tools > Internet Options > Security > Custom level to customize the level to Low. Figure 2-4 Adjust the Security Level 1. Open the web browser. 2. In the address field, input the IP address of the network camera, e.g., 192.0.0.64 and press the Enter key to enter the login interface. 3. Input the user name and password and click . Note: The default user name is admin, password is 12345. Figure 2-5 Login Interface 4. Install the plug-in before viewing the live video and operating the camera. Follow the installation prompts to install the plug-in. 10/16/2012 Page 9 Advidia A-46 Mini Dome Figure 2-6 Download and Install Plug-in Figure 2-7 Install Plug-in (1) Figure 2-8 Install Plug-in (2) 10/16/2012 Page 10 Advidia A-46 Mini Dome Figure 2-9 Install Plug-in (3) Note: You may have to close the web browser to install the plug-in. Please reopen the web browser and log in again after installing the plug-in. B.1 Camera Site Live View The live video page allows you to view live video, capture images, use PTZ control, set/call presets and configure video parameters. Log in the network camera to enter the live view page, or you can click on the menu bar of the main page to enter the live view page. Descriptions of the live view page: Figure 2-10 Live View Page 10/16/2012 Page 11 Advidia A-46 Mini Dome Menu Bar: Click each tab to enter Live View, Playback, Log and Configuration page respectively. Live View Window: Display the live video. Toolbar: Operations on the live view page, e.g., live view, capture, record, audio on/off, two-way audio, etc. PTZ Control: Panning, tilting and zooming actions of the camera and the lighter and wiper control (if it supports PTZ function or an external pan/tilt unit has been installed). Preset Setting/Calling: Set and call the preset for the camera (if supports PTZ function or an external pan/tilt unit has been installed). Live View Parameters: Configure the image size and stream type of the live video. In the live view window as shown in Figure 4-2, click on the toolbar to start the live view of the camera. Figure 2-11 Start Live View 10/16/2012 Page 12 Advidia Icon A-46 Mini Dome Descriptions of the Toolbar Description Start/Stop live view Manually capture the pictures displayed in live view mode and then save it as a JPEG file. Manually start/stop recording. Audio on and adjust volume /Mute Turn on/off microphone Note: Before using the two-way audio function or recording with audio, please set the Stream Type to Video & Audio. Full-screen Mode You can double-click on the live video to switch the current live view into full-screen or return to normal mode from the full-screen. B.2 Recording and Capturing Snapshots In the live view interface, click on the toolbar to capture the live pictures or click to record the live video. The local saving paths of the captured pictures and clips can be set on the Configuration > Local Configuration page. Note: The captured image will be saved as a JPEG file in your computer. B.3 Operating PTZ On the live view page, click to show the PTZ control panel or click to hide it. Click the direction buttons to control the pan/tilt movements. Figure 2-1 PTZ Control Panel 10/16/2012 Page 13 Advidia A-46 Mini Dome Click the zoom/iris/focus buttons to use lens control. Notes: o There are 8 direction arrows o when you click and drag the mouse in the relative positions. For the cameras which support lens movements only, the direction buttons are invalid. Button in the live view window Table 2-2 Descriptions of PTZ Control Panel Description Zoom in/out Focus near/far Iris open/close Light on/off Wiper on/off One-touch focus Initialize lens Adjust speed of pan/tilt movements B.3.1 Setting/Calling a Preset Setting a Preset: 1. In the PTZ control panel, select a preset number from the preset list. Figure 2-2 Setting a Preset 2. Use the PTZ control buttons to move the lens to the desired position. o Pan the camera to the right or left. 10/16/2012 Page 14 Advidia o o o A-46 Mini Dome Tilt the camera up or down. Zoom in or out. Refocus the lens. 3. Click to finish the setting of the current preset. 4. You can click to delete the preset. Note: You can configure up to 128 presets. Calling a Preset: This feature enables the camera to point to a specified preset scene manually or when an event takes place. For the defined preset, you can call it at any time to the desired preset scene. In the PTZ control panel, select a defined preset from the list and click to call the preset. Figure 2-3 Calling a Preset Linking to Alarm: The preset can also be linked to the alarm input when there is an alarm event occurring. Figure 2-4 PTZ Linking 10/16/2012 Page 15 Advidia A-46 Mini Dome C. Configuring Live View Parameters You can select the stream type and adjust the image size on the live view page. 1. Click or tab under the menu bar of the live view interface to select the stream type as main stream or sub-stream for live viewing. 2. Click each tab to set the image size to 4:3, 16:9, original or auto. D. Configuring Network Settings D.1 Configuring TCP/IP Settings TCP/IP settings must be properly configured before you operate the camera over network. 1. Enter TCP/IP Settings interface: Configuration > Basic Configuration > Network > TCP/IP Or Configuration > Advanced Configuration > Network > TCP/IP Figure 2-1 TCP/IP Settings 2. Configure the NIC settings, including the NIC Type, IPv4 Address, IPv4 Subnet Mask, IPv4 Default Gateway, MTU settings and Multicast Address. 3. If the DHCP server is available, you can check DHCP checkbox to automatically obtain an IP address and other network settings from that server. 4. If the DNS server settings are required for some applications (e.g., sending email), you should properly configure the Preferred DNS Server. 10/16/2012 Page 16 Advidia A-46 Mini Dome Notes: o o The valid value range of MTU is 500 ~ 9676. The Multicast sends a stream to the multicast group address and allows multiples clients to acquire the stream at the same time by requesting a copy from the multicast group address. Before utilizing this function, you have to enable the Multicast function of your router. Figure 2-1 DNS Server Settings 5. Click to save the above settings. D.2 Configuring Port Settings You can set the port No. of the camera, e.g. HTTP port, RTSP port and HTTPS port. 1. Enter the Port Settings interface: Configuration > Basic Configuration > Network > Port Or Configuration > Advanced Configuration > Network > Port Figure 2-1 Port Settings 2. Set the HTTP port, RTSP port and HTTPS port of the camera. HTTP Port: The default port number is 80. RTSP Port: The default port number is 554. HTTPS Port: The default port number is 443. 3. Click to save the settings. 10/16/2012 Page 17 Advidia A-46 Mini Dome E. Configuring Video and Audio Settings E.1 Configuring Video Settings 1. Enter the Video Settings interface: Configuration >Basic Configuration > Video / Audio > Video Or Configuration > Advanced Configuration > Video / Audio > Video Figure 2-1 Configure Video Settings 2. Select the Stream Type of the camera to main stream (normal) or sub-stream. 3. The main stream is usually for recording and live viewing with good bandwidth, and the substream can be used for live viewing when the bandwidth is limited. Refer to the Section Configuring Local Parameters for switching the main stream and sub-stream for live viewing. 4. You can customize the following parameters for the selected main stream or sub-stream: Video Type: Select the stream type to video stream, or video & audio composite stream. The audio signal will be recorded only when the Video Type is Video & Audio. Resolution: Select the resolution of the video output. Bitrate Type: Select the bitrate type to constant or variable. Video Quality: When bitrate type is selected as Variable, 6 levels of video quality are selectable. Frame Rate: 10/16/2012 Page 18 Advidia A-46 Mini Dome Set the frame rate to 1/16~25 fps. The frame rate is to describe the frequency at which the video stream is updated and it is measured by frames per second (fps). A higher frame rate is advantageous when there is movement in the video stream, as it maintains image quality throughout. Max. Bitrate: Set the max. bitrate to 32~16384 Kbps. The higher value corresponds to the higher video quality, but the higher bandwidth is required. Video Encoding: When the Stream Type of the camera is main stream, the Video Encoding standard can be set to H.264 or MPEG4. When the Stream Type of the camera is sub-stream, the Video Encoding standard can be set to H.264, MJPEG. I Frame Interval: Set the I-Frame interval to 1~400. 5. Click to save the settings. E.2 Configuring Audio Settings 1. Enter the Audio Settings interface Configuration > Basic Configuration > Video / Audio > Audio Or Configuration > Advanced Configuration > Video / Audio > Audio Figure 2-1 Audio Settings 2. Configure the following settings. Audio Encoding: G.711 ulaw, G.711alaw and G.726 are selectable. Audio Input: MicIn and LineIn are selectable. Select MicIn to connect the microphone and select LineIn to connect the pickup. 3. Click to save the settings. 10/16/2012 Page 19 Advidia A-46 Mini Dome F. Configuring Display Settings You can set the image quality of the camera, including brightness, contrast, saturation, hue, sharpness, etc. Note: The Display parameters vary depending on the camera model. 1. Enter the Display Settings interface: Configuration > Basic Configuration> Image> Display Settings Configuration > Advanced Configuration> Image> Display Settings 2. Set the image parameters of the camera. Figure 2-2 Display Settings Descriptions of parameter configuration: Exposure Time: Speeds from 1/25 to 1/100,000 are selectable. Iris Mode: Auto and Manual are selectable. Video Standard: 50 Hz and 60 Hz are selectable. Day/Night Switch: Day, Night and Auto are selectable. 10/16/2012 Page 20 Advidia A-46 Mini Dome Sensitivity The Sensitivity of Day/Night switch can be set Low, Normal or High. Switch Time: Day/Night switch time is to adjust the time of day/night switch. Mirror: For the image mirror effect, Close, Center, Up/Down and Left/Right are selectable. White Balance: Auto white balance 1. /AWB1, Auto white balance 2. /AWB2 and Auto are selectable. Digital Noise Reduction: Close, Normal Mode and Expert Mode are selectable. Noise Reduction Level: From 0 to 100 are adjustable (0 stands for DNR closed and 100 stands for DNR function fully open). Indoor/Outdoor Mode: Select Indoor for indoor use or Outdoor for outdoor use. 10/16/2012 Page 21 Advidia A-46 Mini Dome G. Configuring OSD Settings You can customize the camera name and time on the screen. 1. Enter the OSD Settings interface: Configuration > Advanced Configuration > Image > OSD Settings Figure 2-1 OSD Settings 2. Check the corresponding checkbox to select the display of camera name, date or week if required. 3. Edit the camera name in the text field of Camera Name. 4. Select from the drop-down list to set the time format, date format and display mode. 5. You can use the mouse to click and drag the text frame <Network Camera 01> in the live view window to adjust the OSD position. Figure 2-1 Adjust OSD Location 10/16/2012 Page 22 Advidia A-46 Mini Dome 6 Click save to activate above settings. H. Configuring Text Overlay Settings You can customize the text overlay. 1. Enter the Text Overlay Settings interface: Configuration > Advanced Configuration > Image > Text Overlay 2. Check the checkbox in front of textbox to enable the on-screen display. 3. Input the characters in the textbox. 4. Use the mouse to click and drag the red text frame <Text> in the live view window to adjust the text overlay position. 5. Click Save. Note: There are up to 4 configurable text overlays. Figure 2-1 Text Overlay Settings 10/16/2012 Page 23 Advidia A-46 Mini Dome I. General Maintenance I.1 Managing User Accounts 1. Access the User Management interface: Configuration >Basic Configuration> Security > User Or Configuration > Advanced Configuration> Security > User The admin user has access to create, modify or delete other accounts. Up to 15 user accounts can be created. Figure 2-1 User Information Add a User 1. 2. Click <Add> to add a user. Input the new User Name, select Level and input Password. Note: The level indicates the permissions you give to the user. You can define the user as Operator or User. 3. 4. In the Basic Permission field and Camera Configuration field, you can check or uncheck the permissions for the new user. Click <OK> to save the new user. Figure 2-1 Add a User 10/16/2012 Page 24 Advidia A-46 Mini Dome I.2 Configuring RTSP Authentication You can specifically secure the stream data of live view. 1. Enter the RTSP Authentication interface: Configuration> Advanced Configuration> Security > RTSP Authentication Figure 2-1 RTSP Authentication 2. 3. Select the Authentication type basic or disable in the drop-down list to enable or disable the RTSP authentication. Click to save the settings. I.3 Viewing Device Information 1. Enter the Device Information interface: Configuration > Basic Configuration> System > Device Information Or Configuration > Advanced Configuration> System > Device Information 2. In the Device Information interface, you can edit the Device Name. Figure 2-1 Device Information Other information of the network camera, such as Model, Serial No., Firmware Version, Encoding Version, Number of Channels, Number of HDDs, Number of Alarm Input and 10/16/2012 Page 25 Advidia A-46 Mini Dome Number of Alarm Output are displayed. The information cannot be changed in this menu. It is the reference for maintenance or modification in future. 10/16/2012 Page 26 Advidia A-46 Mini Dome I.4 Rebooting the Camera 1. Enter the Maintenance interface: Configuration > Basic Configuration> System > Maintenance Or Configuration > Advanced Configuration> System > Maintenance: 2. Click <Reboot> to reboot the network camera. Figure 2-1 Reboot the Device I.5 Restoring Default Settings 1. Enter the Maintenance interface: Configuration > Basic Configuration> System > Maintenance Or Configuration > Advanced Configuration> System > Maintenance 2. Click <Restore> or <Default> to restore the default settings. Figure 2-1 Restore Default Settings I.6 Upgrading the System 1. Enter the Maintenance interface: Configuration > Basic Configuration> System > Maintenance Or Configuration > Advanced Configuration> System > Maintenance 2. Click <Browse> to select the local upgrade file and then click <Upgrade> to start remote upgrade. Note: The upgrading process will take 1 to 10 minutes. Please don't disconnect power of the camera during the process. The camera reboots automatically after upgrading. Figure 2-1 Remote Upgrade 10/16/2012 Page 27 Advidia A-46 Mini Dome J. Accessing Camera using Monitor Station Using Auto discovery, enter the default credentials described above and click Start. Using Manual add on, choose to add a camera and select the following from the dropdown: 10/16/2012 Page 28 Advidia A-46 Mini Dome SADP Software Introduction SADP (Search Active Devices Protocol) is a kind of user-friendly and installation-free online device search tool. It searches the active online devices within your subnet and displays the information of the devices. You can also modify the basic network information of the devices using this software. Search active devices online o Search online devices automatically After launch the SADP software, it automatically searches the online devices every 15 seconds from the subnet where your computer locates. It displays the total number and information of the searched devices in the Online Devices interface. Device information including the device type, IP address, port number, gateway, etc. will be displayed. Figure A.1.1 Searching Online Devices Note: Device can be searched and displayed in the list in 15 seconds after it is online; it will be removed from the list in 45 seconds after it is offline. Search online devices manually You can also click <Refresh> to refresh the online device list manually. The newly found devices will be added to the list. Note: You can click <UP Arrow> or <DOWN Arrow> on each column heading to order the information; you can click panel on the right side, or click to expand the device table and hide the network parameter to show the network parameter panel. Modify network parameters 1. Select the device to be modified in the device list and the network parameters of the device 10/16/2012 Page 29 Advidia A-46 Mini Dome will be displayed in the Modify Network Parameters panel on the right side. 2. Edit the modifiable network parameters, e.g. IP address and port number. 3. Enter the password of the admin account of the device in the Password field and click to save the changes. Figure A.1.2 Modify Network Parameters Restore default password 1. Contact our technical engineers to get the serial code. Note: Serial code is a series of characters combined by the start time and the serial number of the device. 2. Input the code in the Serial code field and click <Confirm> to restore the default password. . 10/16/2012 Page 30 Port Mapping The following settings are for TP-LINK router (TL-R410). The settings vary depending on different models of routers. 1. Select the WAN Connection Type, as shown below: Figure A.2.1 Select the WAN Connection Type 2. Set the LAN parameters of the router as in the following figure, including IP address and subnet mask settings. Figure A.2.2 Set the LAN parameters 3. Set the port mapping in the virtual severs of Forwarding. By default, camera uses port 80, 8000, 554 and 8200. You can change these ports value with web browser or client software. Example: When the cameras are connected to the same router, you can configure the ports of a camera as 80, 8000, 554 and 8200 with IP address 192.168.1.23, and the ports of another camera as 81, 8001, 555, 8201 with IP 192.168.1.24. Refer to the steps as below: Advidia A-46 Mini Dome Camera Note: The 8200 port changes with the 8000 port with a constant value of 200. E.g. if the 8000 port is changed to 8005, then the 8200 port should be changed to 8205. 1. As the settings mentioned above, map the port 80, 8000, 554 and 8200 for the network camera at 192.168.1.23 2. Map the port 81, 8001, 555 and 8201 for the network camera at 192.168.1.24. 3. Enable ALL or TCP protocols. 4. Check the Enable checkbox and click <Save>. Figure A.2.3 Port Mapping Note: The port of the network camera cannot conflict with other ports. For example, some web management port of the router is 80. Change the camera port if it is the same as the management port. 10/15/2012 Page 32