1
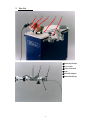
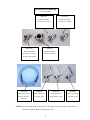
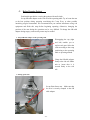
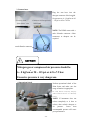
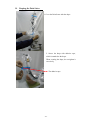
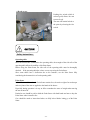
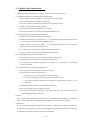
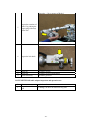
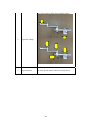
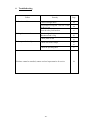
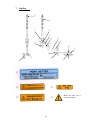
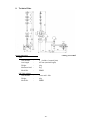
Operating / User’s Manual
MITAKA KOHKI Co., Ltd.
POINT SETTER
MODEL: PSMS2
PSMS2-M01
Last update February 14, 2010
INTRODUCTION
Thank you for purchasing the MITAKA Point Setter (holding system for surgical
instruments). MITAKA KOHKI Co., Ltd. has been producing many products in the
area of astronomical instruments, industrial measuring instruments, and medical instruments
since 1966. The pride of true workmanship goes into each component of all our products.
We believe that you will fully recognize the high quality of our products with the
use of the Point Setter. MITAKA KOHKI originally created the Point Setter as a holder
arm to retain a brain spatula. Since its original creation, there have been a number of
improvements made to the Point Setter, including its expanded use as a holder for various
other surgical instruments. It is especially valuable for the holding of an endoscope, which
has lately attracted considerable attention in the endoscopy field. Other uses for the Point
Setter include the holding of a retractor, a respirator tube, a CCD camera, and a magnetic
stimulation coil.
Note: In the USA, the Point Setter is FDA 510k approved only for use in holding an
endoscope. MITAKA KOHKI asks its USA customers to contact Mitaka USA at
(888) 244-6173 regarding other possible FDA approved uses for the Point Setter.
Furthermore, if you have any questions regarding its intended use, please contact us; we are
eager to help our customers in any way that we can.
-2-
SAFETY GUIDELINES (Read carefully before use)
IMPORTANT:
◆ The POINT SETTER was designed according to standard IEC 6001-1/EN 60601-1.
◆
Repair, remodeling, maintenance and other technical services must be performed
exclusively by an appointed service person of MITAKA KOHKI or those technicians
trained by MITAKA KOHKI. MITAKA KOHKI’s guarantee will not cover any
mechanical failure or liability caused by an act not in accordance with this instruction.
◆
All the parts necessary for technical services or repair must be replaced with MITAKA
KOHKI products only.
◆
Please use this instrument carefully in accordance with the instructions contained in
this Operating/User’s Manual.
◆
Special attention should be given to the following warnings:
CAUTION:
In the USA, Federal law restricts this device to sale or use by or on
the order of a physician.
!
DANGER!
This indicates possible death or
serious injury in case of misuse.
!
CAUTION!
This indicates possible damage to property or
injury of persons in case of misuse.
!
WARNING!
This indicates possible failure to make full use of the Point
Setter.
-3-
!
CAUTION!
Conditions of installation and operation must correspond to microsurgical
requirements and standards:
◆
Careful handling
◆
Clean environment
◆
Avoidance of extreme mechanical stress or impact
◆
Low vibration
◆
Check for proper condition of the unit and its accessories prior to start up
◆
Do not pull on the cable
◆
Do not hold objects which exceed the maximum permissible weight of 2kg (4.4 lbs)
◆
In case of mechanical failure, contact the manufacturer or the distributor
◆
Never disassemble or overhaul the apparatus
◆
Never modify, alter or disassemble the apparatus in any way
◆
If malfunction or damage of the Point Setter occurs, display an “Out of Order” sign
on the instrument and immediately contact the manufacturer or its agent
◆
Monthly perform Operational Test shown in Section 5 of this document
-4-
TABLE OF CONTENTS
Page
Introduction ---------------------------------------------------------------------------------------Safety Guidelines----------------------------------------------------------------------------------Table of Contents --------------------------------------------------------------------------------1. Summary--------------------------------------------------------------------------------------
2
3
5
6
2. Parts List---------------------------------------------------------------------------------------3. Handling Instructions-----------------------------------------------------------------------A.
Sterilization ------------------------------------------------------------------B.
General care of Point Setter Surfaces-------------------------------------
7
9
9
12
C.
D.
E.
F.
4.
5.
6.
7.
Before Draping Patient --------------------------------------------------- 13
Draping the Point Setter ---------------------------------------------------- 15
Attaching the Endoscope to the Point Setter ----------------------------- 16
OR Table Adapter Brake Knobs ------------------------------------------- 18
Further Safety Instructions --------------------------------------------------------------Operational Test -----------------------------------------------------------------------------Troubleshooting ---------------------------------------------------------------------------Labeling --------------------------------------------------------------------------------------
19
20
23
24
8. Technical Data ------------------------------------------------------------------------------- 25
9. Addresses ------------------------------------------------------------------------------------ 27
Annex:
EC DECLRATION OF CONFORMITY
EDITION
PSMS2-M01
December 26, 2007
-5-
1. SUMMARY
The Point Setter acts as a third arm that can firmly
hold an endoscope for a surgeon. Surgeons can operate it quite
easily with only one switch required to allow it to be free or to
be locked. Surgeons can position their surgical instruments in
the desired angle with the use of the Point Setter. The Point
Setter has a lock knob and guard panels for its switch to
prevent it from coming out of the locked mode, allowing
surgeons to use it with confidence. The Point Setter’s arm can
be attached on either side rail of the operating table through an
OR table adapter. The OR table adapter can be adjusted to
allow the arm to be at the best position for the surgeon. The
Point Setter has a reliable safety mechanism which causes the
arm to be locked when the power or nitrogen gas pressure is
down.
-6-
2.
Part List
①
③
②
③
②
①
④
⑤
①Endoscope holder
②Free switch
③Safety lock knob
④Arm
⑤OR table adapter
⑥Manual ball joint
⑥
-7-
Accessories for Endoscope
“endoscope holder”
PSBU-045
PSSU-040
Endoscope Holder
Endoscope Holder
(Universalφ10~15mm)
(Universalφ5~10mm)
PSBU-046
PSFS-070
Endoscope Holder
Endoscope Holder
(Universalφ10~15mm,
Karl Storz Flexible
Pediatric 7mm width)
PSNS-060
PSWH-050
PSZH-060
PSGH-055
Nitrogen hose with
Endoscope Holder
Endoscope Holder
Endoscope Holder
Shrader connector,
(for Wolf scope)
(for Zamorano scope)
(for Gaab scope)
6m length
NOTE: There are many kinds of accessories. The surgeon can choose these accessories in
accordance with the kind of endoscope he uses.
-8-
3. Handling Instructions
A. Sterilization of Endoscope Holder
Warning:
The Point Setter arm and OR table adapter are never sterilized. Instead
they are covered by a sterile drape as referenced in 3. D. (page 15).
Sterilize the endoscope holder using the following instructions. Please follow these
instructions carefully.
CLEANING AND STERILIZATION OF REUSABLE ACCESSORIES
FOR THE MITAKA POINT SETTER (“ENDOSCOPE HOLDER”)
NOTE:
Throughout this sterilization section, the reusable sterilizable accessories that
are attached to the Point Setter arm through the sterile drape, as shown on page
10, are collectively referred to as “endoscope holder” for purposes of
simplification.
Warning:
The endoscope holder must be thoroughly cleaned and sterilized according to
validated infection control procedures prior to use and subsequent reuse.
Caution:
Any deviations from the recommended parameters for cleaning and sterilization
should be validated by the user.
■ Preparation for Cleaning and Sterilization
Place the endoscope holder in a container and soak with a neutral pH (pH
5.0 to 8.0) enzymatic cleaning solution (e.g., Enzol, Metrizyme, or
equivalent per manufacturer’s instructions) immediately after use to
prevent blood, protein and other contaminants from drying onto the
endoscope holder.
■ Water Quality Requirements
Distilled water is recommended for cleaning and rinsing of the endoscope
holder.
-9-
■ Cleaning Instructions for the Endoscope Holder
Caution:
Wear protective gloves, clothing, and a face mask for cleaning
of contaminated endoscope holder.
Caution:
Hot water (greater than 49 degrees C or 120 degrees F) will
alter organic materials (blood and tissue), making them
difficult to remove.
1.
The endoscope holder should be disassembled.
2.
Thoroughly rinse all parts to remove all gross debris.
3.
Manual cleaning is recommended. However, difficult to reach areas can be
cleaned using an ultrasonic cleaner. It is important to follow the manufacturer’s
instructions for operating the ultrasonic cleaner.
4.
Completely immerse the endoscope holder in a neutral pH enzymatic cleaning
solution (e.g., Enzol, Metrizyme or equivalent per manufacturer’s instructions)
and distilled water. Use water that is less than 49 degrees C or 120 degrees F to
clean the endoscope holder; blood and tissue will become difficult to remove
using hot water. Mitaka does not recommend the use of detergents alone, as they
contain high concentrations of surfactants which can leave a film on the
endoscope holder.
5.
Remove any residual blood, protein material and contaminants from the
endoscope holder with brushes, sponges, soft cloths or a cotton cloth applicator.
6.
Clean the inside of the sheaths and outer tubes with the appropriate size cleaning
brushes.
7.
Cleaning brushes should be cleaned and subjected to high level disinfectant or
sterilization daily.
8.
Triple rinse the endoscope holder with distilled water for a minimum of one
minute for each rinse. The rinse water should be discarded at the end of each
rinse, as it will be contaminated with the cleaning solution. Thorough rinsing of
the endoscope holder is necessary for removing any debris or detergent which
could interfere with sterilization.
9.
Dry the endoscope holder with a lint-free soft cloth or filtered compressed air.
-10-
10.
After cleaning, inspect the endoscope holder for cleanliness and damage.
11.
Before sterilization, lubricate all moving parts of the endoscope holder with a
non-silicone water soluble instrument milk or lubricant (e.g., Codman Preserve
per manufacturer’s instructions). Silicon- or oil-based lubricants are not
recommended for use because sterilants cannot penetrate the silicone or oil.
■ Steam Sterilization
Caution:
The recommended sterilization parameters are only valid with
sterilization equipment that is properly maintained and
calibrated.
Caution: Any deviations from the recommended parameters for
sterilization should be validated by the user.
1.
Place the endoscope holder in a sterilization tray.
2.
Mitaka has validated the following steam sterilization methods:
a.
Pre-Vacuum
Pre-vacuum or high vacuum sterilization consists of four basic phases: A
conditioning phase, an exposure phase, an exhaust phase, and a drying phase.
The conditioning phase removes air form the chamber by pulling a vacuum and
then warms the endoscope holder by injecting steam. Sterilization occurs during
the exposure phase when the chamber reaches a temperature of 270 degrees F
and pressure of 27 psi. The exposure phase in a pre-vacuum type of sterilizer is
4.0 minutes. The exhaust phase removes the steam from the chamber. The
drying phase is accomplished by pulling an additional vacuum and allowing the
endoscope holder to dry under vacuum for approximately 20 minutes. The
following conditions have been used to validate sterilization procedures in a
pre-vacuum sterilizer:
Temperature:
Pressure:
132.2 to 133.3 degrees C or 270 to 272 degrees F
1.85 bar or 27 psi
Exposure time:
4 minutes
-11-
b.
Flash Sterilization
Flash sterilization can be accomplished in either a pre-vacuum or gravity
displacement type of sterilization unit. Flash sterilization in a gravity
displacement unit proceeds without a drying phase. We have validated flash
sterilization using a gravity displacement unit and the following conditions:
Temperature:
132.2 to 133.3 degrees C or 270 to 272 degrees F
Pressure:
1.85 bar or 27 psi
Exposure Time: 10 minutes
3.
Trays should be positioned in the sterilizer so that there is adequate circulation
and penetration of steam, air removal and condensate drainage.
4.
At the completion of the steam sterilization cycle, the endoscope holder should
remain untouched until adequately cooled.
B. General Care of Point Setter Surfaces –
1. Caution: Any form of grease should never be used on the Point Setter.
2. Care should be given to not touch black ball joints with your hands as there may be
some grease on your skin that can be transferred to the Point Setter.
3. The Point Setter is best cleaned by the use of pure alcohol. Operating rooms often
have individually packaged alcohol pads that can be rubbed on all of the surfaces
of the Point Setter.
4. If one is cleaning the black ball joints then it will be required to move the arm to
different positions to expose entire surface of black ball to the alcohol.
There are
One manual black ball joint
and
three pneumatic black ball joints
-12-
C.
Before Draping Patient
Perform this part before covering the patient with sterile cloth.
Set up OR table adapter on the side rail of the operating table. Try to locate the arm
at the best position during operating considering the C-arm X-ray or other possible
interfering surgical instruments. We recommend that you confirm interference using real
equipment and finish this setup before beginning operating. Otherwise, changing the
position of the arm during the operation can be very difficult. To change the OR table
adapter during surgery a non-sterile person may be needed.
1. Setup OR table adapter to the operating table
Disengaging the cap (right
and left) enables you to
replace each part. Select the
order according to the setup
positioning to the operating
table or operating method.
Clamp the OR table adapter
firmly to the side rail. Shake
unit to insure that it is
secured firmly to the side
rail.
2. Setting up the arm
Set up Point Setter arm. Make sure that
the arm is securely clamped to the OR
table adapter.
-13-
3. Connect hoses
Connector from
Connector of Nitrogen hose
“Point Setter” arm
Plug the arm hose into the
nitrogen connector of the hospital.
2
Set pressure to 6 ~ 8 kgf/cm or 90
~ 115 psi or 6.2 to 7.9 bar.
(PSNS-060)
NOTE: The PSMS comes with a
male Schrader connector. Other
connectors or adapters can be
acquired.
a male Shrader connector
(PSNS-060)
!
CAUTION!
Nitrogen gas or compressed air pressure should be
2
6 ~ 8 kgf/cm or 90 ~ 115 psi or 6.2 to 7.9 bar.
Excessive pressure is very dangerous.
4. Operational check
Perform operational check of the
Point Setter and make sure the
range of motion is appropriate.
Do this before starting surgery
and follow Section 5 on a monthly
basis.
NOTE: If instrument does not
release completely or is slow to
release, then recheck nitrogen or
air
pressure.
Lower
than
recommended pressure will cause
poor performance.
-14-
D.
Draping the Point Setter
1. Cover the Point Setter with the drape.
2. Secure the drape with adhesive tape,
which is attached to the drape.
When securing the drape, do not tighten it
excessively.
The adhesive tape
-15-
E. Attaching the Endoscope to the Point Setter
1. Installing an endoscope
Attach the endoscope to the endoscope holder after
sterilization in advance.
Use the appropriate endoscope holder for each
endoscope. Secure firmly so no movement is
present.
Install an endoscope holder after sterilization
over the drape.
Secure firmly so no movement is present.
NOTE: When the endoscope holder is installed
on the tip of Point Setter, do not tear drape.
The endoscope holder goes over the sterile
drape.
NOTE: The surgeon may choose to connect the
endoscope before or during surgery.
2. Adjustment of manual ball joint
For optimal positioning, adjust
the angle with a manual ball joint
adjust knob.
3. Safety lock knob
!
CAUTION!
During operation
the safety lock knob must
remain in the "LOCK" position
except when moving the arm.
NOTE: When safety lock knob is
in the “Lock” position, it prevents
accidental release of the arm.
-16-
4. Ready to use
Pushing free switch (which is
colored gold) allows the arm
to move freely.
The arm will remain locked at
the point by releasing the free
switch.
!
CAUTION!
Safety instructions
Operating table
Since the Point Setter is attached to the operating table, the strength of the side rails of the
operating table affects the stability of the Point Setter.
Before using the Point Setter, the side rails of the operating table must be thoroughly
checked. If the operating table has a loose screw, stop using the Point Setter.
Since some tables have a deflection due to the structure, use the Point Setter fully
considering the characteristics of each operating table.
Point Setter
It should be noted that when the Point Setter remains free, the entire weight of an endoscope
and two joints of the arm are applied to the hands of the doctor.
Especially during operation it is easy to fail to remember the sense of weight when moving
the arm at intervals.
Particular care should be paid to hold the Point Setter with both hands and not to drop the
Point Setter when it remains free.
Care should be made to insure that brakes are fully locked before letting go of the Point
Setter.
-17-
F.
OR Table Adapter Brake Knobs – Special Function
This knob enables the fitting to rotate.
When the knob is in the way, Pull it straight out and rotate.
When the knob causes interference.
The position of the knob can be
adjusted by pulling straight out and
rotating the knob.
-18-
4. Further Safety Instructions
1. The apparatus must be operated only by an expert. (USA requires a physician approval.)
2. In installing the apparatus pay attention to the following matters:
(1) Do not install on a wet place and be sure not to splash water or other liquid.
(2) Do not use this apparatus outside the operating room.
(3) Great care is necessary in handling the apparatus to avoid a dent or a scrape.
(4) Be sure to firmly tighten all clamps and brakes.
(5) The maximum permissible weight must not exceed 2kg.
(6) Do not use parts which are not products of MITAKA KOHKI Co. Ltd.
3. Pay careful attention to the following matters before use:
(1) Be sure to perform operational check before operation.
(2) Handling of the apparatus requires great care.
In case of knocking or hitting the apparatus in use, be
sure to stop using it and contact MITAKA KOHKI Co. Ltd.
(3) Make sure that each cable has no damage. In case of finding defects, be sure to stop using the
apparatus and contact MITAKA KOHKI Co. Ltd.
(4) Use nitrogen gas or pressurized air with designated operating pressure.
(5) Be sure to securely connect hoses of nitrogen gas or pressurized air.
4. Pay careful attention to the following matters in use:
(1) Care must be taken not to exceed time needed for diagnosis and treatment.
(2) Constant observation is required over the apparatus and the patient.
(3) The operating room temperature should be 15~29 degrees C or 59~84 degrees F, and humidity
45~90%, respectively.
5. Pay careful attention to the following matters after use:
(1) Do not disconnect hoses by pulling out with excessive force.
(2) The storage place requires the following care:
a.
Store in a dry place. Do not splash with water or other liquid.
b.
Do not store the apparatus in a place susceptible to vibration or shock.
c.
The storage temperature should be room temperature (approximately 20 degrees C or 68
degrees F).
(3) Attachments and hoses should be stored together after cleaning.
(4) Do not use an organic solvent to clean the apparatus.
(5) If you recognize damage or deformation on the surface of the hose, stop using the apparatus and
contact MITAKA KOHKI for inspection.
6. Failure:
In the event of a failure, indicate the problem properly. An appointed MITAKA KOHKI Co. Ltd. technical
service person or those who are trained by MITAKA KOHKI Co. Ltd. must repair the apparatus.
7. Maintenance:
Be sure to perform an operational check before use and make sure the unit has no damage or malfunction.
In additional to an operational check each use Mitaka Kohki recommends that the Point Setter inspection
and operation test in Section 5 below be performed at least monthly.
-19-
5. POINT SETTER inspection & operation test (Recommend Monthly
Test)
No
1
Measures
inspect the outside look
2
inspect the air hoses
and connectors
3
inspect the nitrogen gas
or air pressure supply
4
Inspect the retention. If
Point Setter does not
hold 2 kg or more
before brakes slip
return the unit to
factory for repair
required result
no damage, no dirt or no looseness any parts
no damage
all connectors are connected accurately
6kgf/cm2~8kgf/cm2 or 6.2 to 7.9 bar
(or 90 – 115 psi) Never exceed maximum pressure
Retention >2kg or greater of brake 2, 3, 4, & 5
-20-
Retention > 2 kg or greater of Brake 1
5
Inspect the retention of
brake 1 by pushing the
torque gauge sideways
on the arm
switch is inactivated when the knob is at LOCK
6
inspect the lock knob
7
8
9
switch on
switch off
switch off slowly
all brakes get free
all brakes get fixed immediately
all brakes get fixed
POINT SETTER OR table adapter inspection and operation test
No
1
Measures
inspect the outside
look
required result
no damage, no dirt or no looseness any parts
-21-
these parts must be firmly fixed with the clamps
2
inspect the clamps
3
inspect firmness
the entire system must be able to be firmly fixed
-22-
6.
Troubleshooting
Failure
No function at all
Remedy
Connect Nitrogen Hose
Page
14
2
Holding force too weak
Use pressure 6~8 kg/cm or 6.2 to 7.9 bar
Or 90-115 psi
14
Turn the safety lock knob on
16
Check weight of the instrument,
Maximum load is 2 kg
4
19
14
Check joints of arm
Endoscope or device slips
19
13
Check each of the clamps
16
18
Check the operating table
17
If failures cannot be remedied, contact our local representative for service.
-23-
24
7.
Labeling
④
⑤
①
②
③
⑤
①
⑤
⑤
⑤
⑤
⑤
⑤
⑤
⑤
①
②
④
③
⑤
-24-
Make sure that part is
securely clamped.
8.
Technical Data
POINT SETTER
Arm
Joint number
Arm length
Catalog No. PSMS2
:
:
Weight
:
Maximum load :
Model No.
:
OR Table Adapter
Joint number
Weight
Model No.
:
:
:
6 (includes 1 manual joint)
650 mm (nominal length)
6 kg
2kg
PSMS2
3 axes and 1 slide
6 kg
PSMS2
-25-
Instrument holders
Standard holders :
Catalog No.
Universal holder, small (φ5~10mm)
PSSU-040
Universal holder, large (φ10~15mm)
PSBU-045
Universal holder, pediatric (φ10~15mm) PSBU-046
Flexible Storz endoscope
PSFS-070
Optional holders :
Holder for endoscope
Wolf
Zamorano
PSWH-050
PSZH-060
Gaab
PSGH-055
Holder for brain spatula
PSBH-075
Others
Special holder, ordered
(Inquire with local representative for service)
Other parts
Nitrogen Hose – Shrader Connecter
Sterile Drape (Japan)
PSNS-060
Sterile Drape (Outside Japan)
4667
-26-
9. Address as of December 26, 2007
Manufacturer of POINT SETTER
Mitaka Kohki Co., LTD.
1-18-8 Nozaki, Mitaka,
Tokyo 181-0014 Japan
Work: 81-422-49-1491
Fax: 81-422-49-1117
Local representatives for service
EUROPE, other Countries
(including USA):
KARL STORZ GMBH & CO.
Mittelstrasse 8, D-78532 Tuttlingen, Germany
phone:
fax:
+49 – 7461 – 7080
+49 – 7461 – 76874
USA,:
MITAKA USA, Inc.
2337 Lucky John Drive, Park City, Utah 84060, USA
phone:
+1 – 888 – 244 – 6173
fax:
+1 – 435 – 649 – 2236
JAPAN:
MITAKA KOHKI CO., LTD.
1-4, Ohsawa 5-chome, Mitaka-shi, Tokyo, 181-0015, Japan
phone:
fax:
+81 – 422 – 32 – 1491
+81 – 422 – 31 – 1117
-27-
MITAKA KOHKI CO., LTD.
1-18-8 Nozaki, Mitaka,
Tokyo 181-0014 Japan
Work: 81-422-49-1491
Fax: 81-422-49-1117
e-mail: [email protected]
http://www.mitakakohki.co.jp
-28-