1
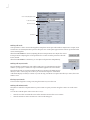
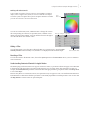
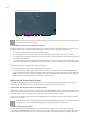
•
•
• 1
•
Using Boris Continuum Complete
with Apple® Motion®
Installing in Apple Motion . . . . . . . . . . . . . . . . . . . . . . . . . . . . . . . . . . . . . . . . . . . . . . .2
Technical Support . . . . . . . . . . . . . . . . . . . . . . . . . . . . . . . . . . . . . . . . . . . . . . . . . . . . . . 2
Supported Hosts . . . . . . . . . . . . . . . . . . . . . . . . . . . . . . . . . . . . . . . . . . . . . . . . . . . . . . . . 2
Installing Boris Continuum Complete into Apple Motion . . . . . . . . . . . . . . . . . . . . . . . 2
Setting the Path for the Continuum Complete Filters . . . . . . . . . . . . . . . . . . . . . . . . . . . 3
Understanding Real-Time Performance in Motion . . . . . . . . . . . . . . . . . . . . . . . . . . . . . 3
Working in Apple Motion . . . . . . . . . . . . . . . . . . . . . . . . . . . . . . . . . . . . . . . . . . . . . . . .4
Applying BCC Effects as Filters . . . . . . . . . . . . . . . . . . . . . . . . . . . . . . . . . . . . . . . . . . . . . 4
Adjusting BCC Effects . . . . . . . . . . . . . . . . . . . . . . . . . . . . . . . . . . . . . . . . . . . . . . . . . . . . 4
Applying BCC Effects as Transitions . . . . . . . . . . . . . . . . . . . . . . . . . . . . . . . . . . . . . . . . . 4
Working with Parameter Groups . . . . . . . . . . . . . . . . . . . . . . . . . . . . . . . . . . . . . . . . . . . 5
Hiding a Filter . . . . . . . . . . . . . . . . . . . . . . . . . . . . . . . . . . . . . . . . . . . . . . . . . . . . . . . . . . 7
Resetting a Filter . . . . . . . . . . . . . . . . . . . . . . . . . . . . . . . . . . . . . . . . . . . . . . . . . . . . . . . . 7
Understanding Contextual Controls in Apple Motion . . . . . . . . . . . . . . . . . . . . . . . . . . . 7
Working with the Motion Tracker Parameter Group . . . . . . . . . . . . . . . . . . . . . . . . . . .8
Setting Up your Effect . . . . . . . . . . . . . . . . . . . . . . . . . . . . . . . . . . . . . . . . . . . . . . . . . . . . 9
Understanding Tracking on the Fly . . . . . . . . . . . . . . . . . . . . . . . . . . . . . . . . . . . . . . . . . 9
Working with the Tracker Center KF Control . . . . . . . . . . . . . . . . . . . . . . . . . . . . . . . . . 10
Tracking Part of an Effect . . . . . . . . . . . . . . . . . . . . . . . . . . . . . . . . . . . . . . . . . . . . . . . . 11
Tips for Setting Up the Target Area . . . . . . . . . . . . . . . . . . . . . . . . . . . . . . . . . . . . . . . . 11
Known Motion Tracker Issues in Motion . . . . . . . . . . . . . . . . . . . . . . . . . . . . . . . . . . . . 12
Known Issues with Motion . . . . . . . . . . . . . . . . . . . . . . . . . . . . . . . . . . . . . . . . . . . . . .12
•
•
2 ••
Installing in Apple Motion
Welcome to Boris Continuum Complete 3.0.3 for Apple Motion. This document contain information on installing and
using BCC in Apple Motion. For information on the BCC Þlters, see your User Guide. For information about Boris
Continuum Complete software updates, other Boris products, and additional resources, visit our web site at
www.borisfx.com.
This section provides information on installing the Boris Continuum Complete 3.0.3 Try and Buy version into the Apple
Motion user interface.
Technical Support
For technical support, contact Boris Continuum technical support specialists:
web: http://www.borisfx.com/support/
e-mail: [email protected]
phone: 617-451-9900
hours: 9am-5pm Eastern Time (United States & Canada, GMT –05:00)
Supported Hosts
Boris Continuum Complete supports the following Macintosh host applications.
Adobe® After Effects® 5.5 and later
Apple® Final Cut Pro® 4.1 and later
Apple® Motion® 1.01 and later
Boris Red® 3GL and later
Discreet® Combustion® 2.1 and 3.0.x
Minimum System Memory Requirements
We recommend the following memory requirements for Macintosh users.
•
•
Minimum 512 MB (assigned to host application)
Recommended 512 MB (assigned to host application)
Supported Operating Systems
Boris Continuum Complete 3.0.3 supports Macintosh OS™ X 10.2.8 and above.
Installing Boris Continuum Complete into Apple Motion
The Boris Continuum Complete 3.0.3 Try and Buy version is a full featured version of BCC which works for 14 days
after you install it. After 14 days, images render with an X over them.
To successfully install BCC, you must log on as an Administrator or have Administrator (read/write) privileges.
Multiple users logging into the same Macintosh OS X system must each perform a separate installation of BCC. Users
logged into the system who have not separately installed BCC under their login will get an error message attempting
to use the plug-ins.
1.
Visit the BorisFX web site (www.borisfx.com).
2.
Click the Downloads menu and choose Try and Buy Versions.
3.
Locate the Continuum Family section and click Download.
4.
Enter your information on the next page. Make sure to enter a valid email address. An Installer Serial Number
will be sent to the email address you supplied.
5.
Download the Try and Buy Installer.
6.
Log on as an Administrator or make sure that you have Administrator (read/write) privileges. Enter your
Administrator Name and Password. Click Ok.
•
•
Using Boris Continuum Complete with Apple® Motion® • 3
•
7.
When you run the Try and Buy installer, enter the Installer Serial Number sent to your email address.
8.
At the Boris Continuum Complete splashscreen, click Continue.
9.
Read the Software License Agreement. Click Accept.
10. Choose a host from the list in the installer menu. Because Motion does not have a default location for third party
Þlters, Motion is not an option. Choose Boris Red. The installer places the plug-ins in the default plug-ins folder
for your Red, even if you do not have it installed. It also installs all of the necessary supporting Þles and
documentation. To install into multiple hosts, select your other hosts as well.
If you already have BCC installed for Final Cut Pro, you do not need to run the Try and Buy installer. Skip to
step 4 in the following section “Setting the Path for the Continuum Complete Filters” and point Motion to the
location of the Final Cut Pro plug-ins folder. However, because of custom modiÞcations in BCC for Final Cut
Pro, when you use BCC in Motion two effect categories (Generators and Wipe Transitions) will display Þlters
twice.
11. Click Continue.
12. When installation is complete, a dialog appears allowing you to register BCC via the internet, by mail or fax. Follow
the online instructions to register your copy.
13. A dialog appears telling you that the installation is complete. Follow the onscreen instructions to either perform an
additional installation of BCC, or quit the installer.
14. Follow the steps in the next section.
Setting the Path for the Continuum Complete Filters
You need to specify the location of third-party plug-ins. Once you set this preference, the Þlters appear in the 3rd Party
Filters category of the Library.
1.
Choose Motion > Preferences or press Command-comma.
2.
Click the General tab.
3.
In the 3rd Party Plug-ins group, click the Choose button next to the Search Path menu.
4.
Navigate to the folder that contains your BCC plug-ins. Use the following path to point to the plug-ins folder for
Red.
Library/Application Support/BorisFX/BorisPlugins/Boris Continuum Complete 3.0
If you already have BCC installed for Final Cut Pro, point Motion to the location of the Final Cut Pro plug-ins
folder instead. However, because of custom modiÞcations in BCC for Final Cut Pro, when you use BCC in
Motion two effect categories (Generators and Wipe Transitions) will display Þlters twice.
A dialog box informs you that the path change will take effect the next time you launch Motion.
5.
Quit and relaunch Motion.
Understanding Real-Time Performance in Motion
Unlike Motion’s native Þlters, third-party Þlters do not beneÞt from Motion’s real-time performance. Clips will play
without rendering, but not at their full frame rate. Instead, you must use the Preview to RAM command to playback
your projects at full frame rate.
1.
To preview your Þlters, use one of the following commands.
•
•
•
Choose Mark > RAM Preview > Play Range or press Command-R to preview all tracks in the chosen Play
Range.
Choose Mark > RAM Preview > Selection or press Command-Option-R to preview the selection. Using RAM
Preview on a selection, previews all visible layers of the selection.
Choose Mark > RAM Preview > All or press Shift-Command-Option-R to preview the entire timeline.
A progress dialog displays as the frame being rendered, how many frames remain and an approximation of the
time remaining. When the RAM preview is complete, the dialog closes. The Timeline and the mini-Timeline turn
green to indicate which frames are stored.
2.
The frames stored in RAM are automatically cleared if you modify them. To manually clear the RAM, choose Mark
>RAM Preview > Clear RAM Preview.
•
•
4 ••
Working in Apple Motion
This section provides information on installing Boris Continuum Complete into the Apple Motion user interface.
Applying BCC Effects as Filters
The Boris Continuum Complete Þlters are divided into eight categories: Color & Blurs, Distortion & Perspective,
Effects, Generators, Keys & Matte, Lights, Time and Wipe Transitions Þlters. The Þlters appear in the 3rd party Filters
category in the Library.
1.
Click the Library tab in the File Browser, press Command-2 or
choose Window> Library to open the Library.
2.
Click the 3rd Party Filters category on the left side of the
window.
3.
Click the appropriate Þlter category on the right side of the
window.
The Þlters in the chosen category display at the bottom of the
Library.
4.
Drag the appropriate Þlter thumbnail to the Canvas or the
Layers Pane.
You can now adjust the Þlters in the Inspector or the Dashboard.
See the next section for details.
5.
Click here.
Choose the
category.
Render BCC effects the way you would any other effect in
Motion.
Choose the
filter.
Adjusting BCC Effects
Once you apply Boris Continuum Complete Þlters, you can adjust
the Þlters in the Filters tab in the Inspector or the Dashboard.
•
•
Click the Inspector tab or press Command-3 to view the Þlter parameters in the Inspector.
You can also adjust the most common parameters in the Dashboard. If the
Dashboard does not automatically display, choose Window > Dashboard
or press F7.
Applying BCC Effects as Transitions
BCC Þlters can also be used to transition between clips. Several BCC Þlters such as the Wipe Transitions animate
automatically. The other effects apply as static transitions and you need to manually keyframe the transition from the
unÞltered outgoing shot to the unÞltered incoming shot.
Some transitions can be created by applying a single effect. This method only works with some effects, for example the
Wipe Transitions and effects that include a foreground and background. Since many effects do not auto animate, you
must keyframe parameters to transition from the unÞltered outgoing shot to the unÞltered incoming shot.
For example, a single Page Turn Þlter can animate so that the Page peels away to reveal the incoming shot. For effects
that do not include a foreground and background, for example a Ripple, you can animate from no ripple to a rippled
image on the outgoing shot. Animating the Layer Opacity will then fade the rippling clip to reveal the incoming shot.
•
•
Using Boris Continuum Complete with Apple® Motion® • 5
•
To create most transitions, overlap two clips and apply a BCC Þlter effect to each clip. This method provides greater
control over effect parameters since you can animate the incoming and outgoing shots separately. You can animate the
Layer Opacity to reveal the incoming shot.
1.
Place the outgoing shot above the incoming shot. Overlap the clips for the duration that you want your transition.
The outgoing shot must be on a track higher in the Layers Pane and the Timeline to properly reveal the
incoming shot.
2.
Apply the appropriate BCC effect to the top track and trim it to only apply to the overlapping section. Select the
effect to load it into the Inspector. In this example, a BCC Ripple is added.
3.
Click the Inspector tab in the Library window to display the Þlter controls.
In this example, you want the Racers clip to start unrippled, then gradually ripple as it dissolves out. In most
instances, you want the clip to start unÞltered and then gradually animate.
4.
Position the playhead at the beginning of the Þlter. Add a keyframe for the Height and Wave Width parameters and
set their values to 0. This sets the parameters so that the clip is unaffected by the effect, which prevents the effect
from jumping.
5.
Create a keyframe at the last frame in the effect and increase Height and Wave Width to 35 and 40 respectively.
6.
Create a keyframe in the middle of the Þlter and move the playhead to the keyframe.
7.
In the Inspector, set the Opacity parameter to 100. Move the playhead to the last frame in the effect and set Opacity
to 0. The effect now animates from fully opaque at the middle keyframe to fully transparent at the last keyframe.
8.
Apply the same BCC effect to the bottom track and trim it to only apply to the overlapping section. Select the effect
to load it into the Inspector.
9.
In the Inspector, create a keyframe in the middle of the effect. Set Opacity to 50.
10. Select the last keyframe and set Opacity to 100.
11. Create keyframes at the Þrst frame of the effect for Height and Wave Width. Leave the values at their default
settings of 35 and 40.
12. Create keyframes at the last frame. Set these two parameters to 0 so that no effect is visible. This prevents the effect
from jumping.
Time 00:00:00:00
Time 00:00:00:10
Time 00:00:00:20
Time 00:00:01:00
13. Render the two effects just as you would any Motion effects.
Working with Parameter Groups
Each Continuum Complete Þlter has a number of parameter controls which are categorized into groups. Groups of
parameters appear under a text header. The illustration below includes one parameter group—Source Edges.
•
•
6 ••
Click to hide/display the filter
Load/Save Controls
Parameter Group
Parameters
Working with Locks
Some parameters’ values can be locked together to keep their values equal when either is adjusted. For example, Scale
X and Scale Y are locked by default to preserve the aspect ratio. A lock option appears before each set of parameters that
can be locked together.
When the Lock checkbox is selected, adjusting the Þrst locked parameter also adjusts the second
locked parameter. Adjusting the second parameter has no affect on either parameter when the
lock is selected.
When the Lock checkbox is deselected, you can adjust each parameter independently.
Working with Layer Controls
Many of the Þlters include image wells which enable you to use information from other
media in your project to control some aspect of the Þlter applied to the source media.
Drag media here
Drag the desired clip or sequence from the File Browser window to the Media Pane in
the Layers Pane. or the Layer pane to the Layer control in the Inspector. A thumbnail
of the media displays in the layer control. If you do not drag a media Þle or sequence into the Layer control, the source
media is used.
Clearing Layer Controls
To clear media assigned to an image well, drag the media away from the well.
Working with Point Controls
Many Boris Continuum Complete Þlters use point controls to specify locations along the X and Y axis in the source
image.
You can enter and edit point control values in two ways:
•
•
Click the cross-hair and click the mouse at the desired location in the Canvas window.
Click the numerical values and enter new values in the dialog box.
•
•
Using Boris Continuum Complete with Apple® Motion® • 7
•
Working with Color Controls
Color controls are used to choose a color for some attribute of a Þlter or
object, such as a light source, border, or text face. Click the color chip to
access the system color picker. The system color picker includes a tool that
you can use to choose a color from the screen.
You can also use the Red, Green, and Blue sliders to change the value in
the corresponding color channel, or input Red, Green, and Blue values
directly into the numerical Þelds. You must click the Disclosure triangle to
view the individual color channel values.
Color
Picker tool
Disclosure Triangle Color Chip
Hiding a Filter
You can hide a Þlter to view the effect without the Þlter or to speed previews. Click the Filter
Visibility checkbox. When visibility is off, the Þlter is not displayed in the rendered output.
Click to hide the filter
Resetting a Filter
To reset a BCC Þlter to the default values, choose the default preset from the Preset menu. See in your User Guide for
more information.
Understanding Contextual Controls in Apple Motion
The Motion plug-in architecture does not support contextual controls, so parameters that do not apply are not dimmed
in the Inspector. This means that a parameter in the Inspector may not apply unless other parameters are met. For
example, the Stretch/Direction parameter in the PixelChooser Region parameter group has no affect if the Shape menu
is set to Clock Wipe.
Because many Þlters use contextual controls, some parameters may not appear to work. Consult the documentation for
individual Þlters to determine whether a parameter is contextually dependent on another parameter. You can also click
the Help button in a Þlters banner to open its help Þle.
•
•
8 ••
Working with the Motion Tracker Parameter Group
The Motion Tracker parameter group allows you to track the motion of an object in a media Þle. You can then use the
motion path data to control another aspect of the effect. The parameters that can be affected depend upon the Þlter. For
example, apply a Pyramid Blur Þlter to a clip and use the Motion Tracker parameters to track a logo on a t-shirt. Use
the PixelChooser parameters to apply the Pyramid Blur to obscure the logo.
The Motion Tracker parameter group is included in many Þlters that include the PixelChooser parameter group. This
allows you to apply the Þlter to an area using a shape choice in the PixelChooser Region parameter group’s Shape
menu.
Due to a problem in the Apple Motion plug-in architecture, Version 1.0 does not support the Motion Tracker.
If you attempt to use the Motion Tracker, an error message displays. You must use Motion Version 1.01 to use
the Motion Tracker.
The Wire Remover Þlter includes two Motion Tracker parameter groups so that you can track both ends of the wire that
you want to remove. The Witness Protection Þlter allows you to apply a mosaic, blur, tint or brightness/contrast effect
to the speciÞed area.
The Light Zoom, Rays Light Þlters and the Lens Flare Þlters also include a Motion Tracker parameter group. This allows
you to track the Light Source, with one exception. In the case of the Radiant Spotlight, the Spotlight Target is tracked.
The Twirl, Radial Blur, and Spiral Blur Þlters also include a center option. This allows you to track the center point of
the effect.
Presets do not save Motion Tracker data. If you open a new preset, motion tracking data saved with it will be
lost. Loading a preset will overwrite existing motion tracker data.
The Motion Tracker parameter group includes the following controls.
Selecting the Reset button resets the parameters in the Motion Tracker parameter group.
If you reset the Motion Tracker, BCC must recompute the entire track, which could take time on a long clip
with a large search region.
Pressing the Help button opens a .pdf format help Þle that is speciÞc to your host.
We strongly recommend you reference the online Motion Tracker .pdf help Þles when you use the Motion
Tracker. The help Þles offer in-depth tips on using the Motion Tracker in your speciÞc host.
The Tracking Source Layer sets the layer to track, which may be different from the source of the Þlter.
When the Track On-the-Fly checkbox is selected and you press Play, the Þlter calculates the tracking data. When you
select this checkbox, the chosen effect does not display. Once you Þnish tracking, deselect this checkbox to play the
applied effect.
The Tracker Center KF position controls set up the area to track. However, in general it is easier to use the onscreen point
controls. Then use the position controls for Þnetuning.
Target Width sets the size of the area to track. Increasing this value increases preview time but can increase the accuracy
of the tracking. A white outline indicates the selected area.
The Apply menu determines the parameter that the Motion Tracker data affects. The choices depend on the Þlter.
•
•
When None is chosen, the Motion Tracker data has no affect.
In many Þlters that include the PixelChooser, choosing PixelChooser allows you to use a choice in the PixelChooser
Region’s Shape menu to track the Þlter within the speciÞed area. You must explicitly set the Shape menu to one of
the following choices: Inside Rectangle, Outside Rectangle, Inside Oval, Outside Oval, Distance to Point, Clock
Wipe, Linear Gradient, or Custom. The Motion Tracker does not work with Distance to Edge. The point speciÞed
by the Point 1 position controls is tracked.
•
In the Lens Flare, Lens Flare Advanced and Rays Light suite Þlters, choosing Light Source tracks the source of the
light.
•
•
In the Rays Radiant Spotlight, choosing Spotlight Target tracks the target of the spotlight.
In the Wire Remover Þlter, choosing End Point 1 or End Point 2 tracks the corresponding end point. Alternatively,
you can choose PixelChooser.
•
•
Using Boris Continuum Complete with Apple® Motion® • 9
•
The Offset X and Offset Y parameters, allow you to offset the effect on the X and Y axis respectively. This is useful if you
want to track one area, then apply the effect to a different area. For example, you want to blur out an athlete’s name on
a t-shirt but don’t want to blur the player’s number. However, the player’s number offers more contrast and is therefore
easier to track. You would track the number, then offset the effect to obscure the name.
Setting Up your Effect
The Þrst step in motion tracking is to set up your tracker region in Track on the Fly mode. The process outlined below
differs slightly in each host. Refer to the online help Þle in the Motion Tracker section of each Þlter for steps you need
to follow in the host you are using. When you apply a Þlter that contains the Motion Tracker, press the Help button in
the Motion Tracker banner to open its help Þle.
The implementation of the Motion Tracker has speciÞc limitations in each host. Be sure to read the Motion
Tracker section for your speciÞc host.
1.
Place the playhead on the Þrst frame of your effect.
2.
Select the Track on the Fly checkbox.
3.
At the Þrst frame, create a keyframe for the Tracker Center KF. This is important if the Tracker loses focus later in
the effect and you need to adjust it.
4.
Use the onscreen Tracker Center control or type in the Tracker Center KF numerical Þelds to set the center of the
object you want to track.
5.
Adjust the other Motion Tracking parameters as necessary, for example to set up the target region. See “Tips for
Setting Up the Target Area” for more information. A good Target region includes a high-contrast object with good
vertical and horizontal edge deÞnition. Set the Target Width large enough to accommodate a good Target object.
6.
Click Play to track your effect.
7.
If necessary, add additional keyframes later in the effect, for example if the Þlter loses the track. For details, see
“Adjusting Tracking with Hold Keyframes” on page 11.
8.
You must render in the same session that you track. If you open a saved project that uses the tracker, you must
retrack.
Understanding Tracking on the Fly
When the Track On-the-Fly checkbox is selected and you click Play, the Þlter calculates the tracking data.
Understanding the Onscreen Tracking Marks
When Track on the Fly is enabled, a line along the bottom of the window indicates the location of tracked frames. The
line references either the length of the original source clip (AE, Combustion, Red) or the edited source clip in the
timeline (Motion, Final Cut Pro and Premiere Pro). It is important to note that this line is actually rendered onto the
image when in Track on the Fly mode. You must turn off Track on the Fly before you render to disk.
•
•
A red mark along the bottom of the window indicates the position of the current-time indicator.
Blue marks indicate keyframe locations. A keyframe location is any frame whose position differs from that of the
previous frame. A frame where the center position differs from the previous frame is also considered a keyframe.
The blue onscreen marks are internal to the Motion Tracker. While the Motion Tracker considers these frames
“keyframes,” these are different than the keyframes that are visible in your timeline.
•
Green marks indicate tracked frames that are current (the location of the tracker center has not changed since the
tracking data was generated).
•
Magenta marks indicates tracked frames for which the tracker center has changed. This usually indicates a region
that needs retracking (unless you are manually positioning the Tracker Center KF without making keyframes in
your timeline).
•
•
10 ••
Track On the Fly marks on the bottom of the window
Tracked
Frames
Region that needs Tracked
Frames
to be retracked
Playhead
Keyframe
When you track an effect, marks for each tracked frame draw on the left of the current-time indicator because
tracking data exists for these frames.
Understanding Error Messages when Tracking on the Fly
The most common error you will see during tracking is a “Please Move the Current-Time Indicator...” message. The
following situations can cause this error message to appear. Some scenarios only apply to certain hosts.
•
•
•
•
If you move the playhead past the end of the tracked region.
If you don't play every frame (for example, you play with the Space bar instead of playing every frame).
If you partially track an effect and deselect Track on the Fly, then move the playhead past the tracked region before
re-enabling Track on the Fly.
If you press the Space bar to stop playback. When this happens, this interrupts the tracker render for the current
frame. Move the playhead back one frame and clear the cache to continue. Clearing the cache is described below.
When you get this error message, perform the following steps.
1.
Move the playhead to a previously tracked frame in your effect.
2.
Clear the cache that your host application created for the effect. To clear the cache, press the Reset button then
toggle a checkbox off and on, change an unused parameter in the effect or follow the directions in the dialog that
appears. If you try to retrack without completely clearing the cache, the motion tracker will not work correctly
because the frame that displayed the error message is already cached.
Working with the Tracker Center KF Control
The Tracker Center KF position controls set up the area to track. Use the Tracker Center KF control to set up your
tracking region, then adjust the Tracker Center KF position control if necessary for Þnetuning.
Understanding How Keyframes Work in the Motion Tracker
If the Motion Tracker tracks incorrectly, you can keyframe the Tracker Center KF control. The motion tracker treats any
frame as keyframed if the Tracker Center position at that frame is different from the track center at the previous frame.
Keyframes appear in blue along the bottom of the preview when Track on the Fly is selected.
If you create two Tracker Center KF keyframes with different values, the tracker will treat each point between these
keyframes as a keyframe.
The blue onscreen marks are internal to the Motion Tracker. While the Motion Tracker considers these frames
to be “keyframes,” these are different than the keyframes that are visible in your timeline.
Adjusting Tracking During the Effect
You may need to adjust the tracking if the tracked object changes orientation or is obscured by another object.
Keyframing the Track Center KF control is the best way to correct this. The onscreen Tracker Center KF crosshair control
does not follow the tracked object, but you can reset it to the location of the tracked object at any point in the effect
•
•
Using Boris Continuum Complete with Apple® Motion® • 11
•
Adjusting Tracking without Keyframes
You can also adjust tracking without using keyframes. However you should be careful working this way because if you
make a mistake your effect could jump.
Move the playhead to the point where BCC lost tracking, adjust the Tracker Center KF, and continue tracking. Notice
that the tracked frame markers turn from green to magenta. This indicates that the Tracker Center KF is different from
the current value.
This method works unless you move the playhead to an earlier frame with the Track on the Fly checkbox selected. If
you go back, the tracker retracks that frame using the new (incorrect for that frame) value of Tracker Center KF, and the
Þnal render will jump. Since you haven't saved the Tracker Center KF value for the start of the effect, you have to reenter a value and retrack.
If you use this method, we recommend closing the Motion Tracker group as soon as you Þnish tracking, so you
don't inadvertently change the tracker data.
Adjusting Tracking with Hold Keyframes
We recommend that you set keyframes to Hold interpolation for most adjustments. At the frame where the effect loses
tracking, create a new Hold keyframe and set the Tracker Center KF at the location of the object. Then continue tracking.
If the object goes behind another object for several frames, you can create a Hold keyframe at each frame where the
object is obscured.
You can also put a Linear keyframe where an object becomes obscured and a Hold keyframe where the object becomes
visible again. The tracker will use the interpolated values as the location of the tracked object while it is invisible. You
can add new keyframes in your timeline as needed to adjust the motion while the object is concealed.
Trimming Motion Tracked Effects
When you trim or slide a clip that has been motion tracked, the Þlters do not purge the tracked data. This means that if
a clip is trimmed from the end, you do not need to do anything. If a clip is trimmed from the beginning (or if you slide
the clip, which is the equivalent of trimming from the beginning and end), you should press the Reset button to
invalidate all of the motion tracker data and retrack your effect.
Motion users must change or toggle a control in the effect after clicking the Reset button to purge the cache.
Tracking Part of an Effect
At times you may want the track an object for only part of the effect. To track the object to a certain point and then hold
at that point, simply stop the tracking when it reaches that point. The rendered effect will follow the object for as long
as it has tracked, and then hold.
If you want the effect to hold for a while, then start tracking the object at a particular frame, follow the steps below.
1.
Move the current-time indicator to the frame where you want to start tracking and add a Linear Tracker Center KF
keyframe.
2.
Create a Linear keyframe at the beginning of the effect, setting its value to a fraction of a pixel different from the
value in step 1.
3.
Track your effect. The tracker will assume that there are keyframes at every frame up to the one you set in step 1,
so it won't track at that point in the effect. Once it reaches the second keyframe, it will track normally.
Tips for Setting Up the Target Area
• A good Target area contains a high-contrast object with good vertical and horizontal edge deÞnition. Ideally, you
should Þnd a pattern that is visible in every frame.
•
The Target Width should be large enough to accommodate a good target image. However, processing time
increases as the size increases, so do not make the Target Width unnecessarily large.
•
If your image does not contain a high-contrast object and you have trouble tracking, apply the BCC Unsharp Mask
or BCC Brightness Contrast Þlter to the Source track to increase the contrast for better results.
•
Tracking is more accurate when you preview in Full Quality rather than Draft Mode.
•
•
12 ••
Known Motion Tracker Issues in Motion
• Don't try to track with another plug-in Þlter before (below in the timeline) the Motion tracker Þlter or you will
hang Motion.
•
Don't try to track with a native Motion Þlter before (below in the timeline) the Motion tracker Þlter, you will see a
color shift in the source media.
•
•
Don't try to track a processed layer, as this is likely to hang Motion.
Be sure you are at the start of the clip when start tracking. If you accidentally start tracking when not at the start,
you must clear the cache before proceeding. To clear the cache, move to the start and change a parameter.
Known Issues with Motion
•
When Motion renders an image of smaller resolution than the image’s original size, the result appears cropped
instead of scaled. This includes the Inspector tab’s thumbnail and other icon images. Full size images and Þnal
renders are not affected by this issue.
•
Clicking the About button, Options button or Test OpenGL button while playing or rendering can freeze or crash
Motion.
•
Time Þlters (that require non-current frames) display swapped color channels if they are applied downstream. To
Þx this, apply the Þlter directly to a clip. Time Þlters can also crash if applied to a text layer. Time Þlters crash or
hang when applied downstream with Þltered media upstream or when a Time Þlter is downstream from another
Þlter.
•
Sequence data is lost when a Þle is reopened. This means that projects that use Þlters with sequence data (for
example motion tracking and the Grain Þlters) must be rendered in the session in which they are created. These
Þlters may also not render correctly when exporting with Compressor.
•
Applying a Þlter to an object in a layer that is in a well (for example, attempt to use a Þltered object as a layer in
the Z-Space Þlter) hangs immediately.
•
Motion applied to a nested layer doesn't affect the well, so you cannot apply transformed media to wells. For
example, you could not use BCC Composite to mix a layer with a transformed layer.
•
•
•
Motion does not pass the project's pixel aspect ratio to plug-ins, so rendered circles may appear squished.
Dragging a Þltered object into a new layer can result in a crash.
Motion’s known Þeld issues (which affect animation and alternate layers) make the use of movie media in wells
and all Time Þlters render in limited quality, as the source media is Þeld doubled.
•
Current time is passed to the Þlters based on the start of the project, not the start of the Þlter or the start of the
object. So particle Þlters applied to media that does not start at the beginning of the timeline need adjusting. This
also means that the wipe transition’s auto animation does not work correctly unless the clip is the same duration
as the timeline; manually animate the transitions to work around this limitation.
•
•
Grain settings and preset names are not remembered when a Þle is reopened.
•
•
You must select All Documents in the dialog box to load Grain presets. This problem only occurs with pre-installed
presets, not with custom presets created in Motion.
All auto-animated effects behave as if the layer or media they are applied to started at the start of the project.
The Þrst plug-in applied after a feathered mask shape may have the areas of partial transparency darkened
incorrectly.
•
By default Motion will not apply an effect beyond the borders of a clip or graphic. This can cause an effect to appear
clipped at the edge, for example if you applied a Ray Puffy Þlter, the rays would end at the edge of the clip. To
solve this, insert a color solid from the Generators tab in the Library to the back of the layer you want to affect.
•
There are some known issues with Time Þlters in Motion. Motion will only provide one Þeld of a frame when
asking for the layer at an alternate time. So for time remapping you must accept Þeld-doubled output, or export
your media to 59.94pi, work in Motion at59.94p, and then use another application to convert the output to 29.97.
•
When you load presets, use the L or Load button. The preset menu does not work in Motion.