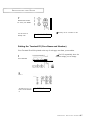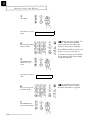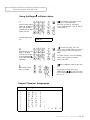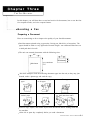
1
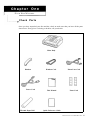
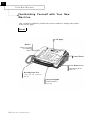
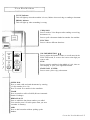
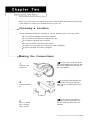
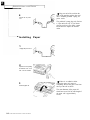
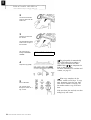
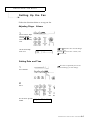
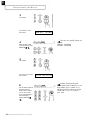
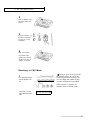
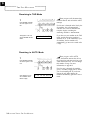
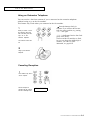
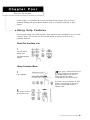
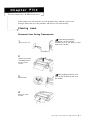
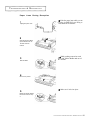
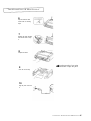
Operator’s Guide
FACSIMILE FX100
Please read this guide before you use this equipment.
Thank You for Choosing Samsung
Thank you for choosing Samsung! Your new fax machine represents the very latest in fax
machine technology. The FX100 is a full-featured, high-performance machine built to strict
quality standards set by Samsung-the highest in the industry. We’re proud to offer you a
product that will provide convenient, dependable service for years to come.
Important Safety Information
Always be careful when using the machine. To reduce the risk of fire, electrical shock,
and other injuries, keep these safety considerations in mind when installing, using, and
maintaining your machine:
Stability: Place the machine on a secure, stable surface. The machine can cause serious
damage if it falls.
Power Supply: Provide the correct power to the machine, as listed on its back. If you
are not sure of the type of power that is supplied to your home or office, call your
electric company.
Grounding: It must be plugged into a grounded outlet for your safety. If you can’t
insert the plug into your wall outlet easily, the outlet should be inspected by a qualified
electrician.
Overload: Don’t plug too many electrical devices into a wall outlet or extension cord.
An overloaded outlet is a fire and electrical shock hazard.
Cleaning: Before cleaning the machine, unplug it from both the power outlet and the
telephone jack. Clean exposed parts with a soft cloth slightly dampened with water.
Thunderstorms: Unplug electrical appliances during thunderstorms. Avoid using any
telephone (except a cordless model) during a thunderstorm, since there’s a small chance
you could get an electrical shock from lightning.
Gas Leaks: Never use a telephone close to a gas leak. If you think gas is leaking, call the
gas company immediately, but use a telephone far away from the leak area. A small
electrical spark in the telephone could cause a fire.
P REFACE
FCC Information
The following information is only applicable to facsimile machines installed in the United
States of America.
Label Identification
This equipment complies with Part 68 of the FCC rules. On the rear of this equipment is a
label that contains, among other information, the FCC Registration Number and Ringer
Equivalence Number (REN) for this equipment. You may need to provide this
information to your telephone company.
Type of Service
This equipment is designed to be used on standard device telephone lines. Connection to
a telephone company-provided coin service (central office implemented systems) is
prohibited. Connection to party-line service is subject to state tariffs.
Telephone Company Procedure
The goal of the telephone company is to provide you with the best service possible. In
order to do this, it may occasionally be necessary for it to make changes in this equipment,
operation, or procedures. If these changes affect your service or the operation of the
equipment, the telephone company will give you notice in writing, to allow you to make
any changes necessary to maintain uninterrupted service.
If you have any questions about your telephone line, such as how many pieces of
equipment you can connect to it, the telephone company will provide this information
upon request.
In certain circumstances, it may be necessary for the telephone company to request
information from you concerning the equipment you have connected to your telephone
line. Upon request of the telephone company, provide the FCC Registration Number and
the Ringer Equivalence Number (REN) of the equipment that is connected to your line;
both of these items are listed on the equipment label. The sum of all of the RENs on your
telephone line should be less than five in order to ensure proper service from the
telephone company. In some cases, a sum of five may not be usable on a given line.
About Interference
This equipment has been tested and found to comply with the limits for a Class B digital
device, pursuant to Part 15 of the FCC Rules. These limits are designed to provide
reasonable protection against harmful interference in a residential installation. This
equipment generates, uses, and can radiate radio frequency energy and, if not installed
and used in accordance with the instructions, may cause harmful interference to radio
communications. However, there is no guarantee that interference will not occur in a
particular installation. If this equipment does cause harmful interference to radio or
P REFACE
i
P REFACE
television reception, which can be determined by turning the equipment off and on, the
user is encouraged to try to correct the interference by one or more of the following
measures:
Reorient or relocate the receiving antenna.
Increase the separation between the equipment and the receiver.
Connect the equipment into an outlet on a circuit different from that to which the
receiver is connected.
Consult the dealer or an experienced radio/TV technician for help.
The Telephone Consumer Protection Act of 1991 makes it unlawful for any person to use a
computer or other electronic device to send any message via a telephone fax machine
unless such message clearly contains in a margin at the top or bottom of each transmitted
page or on the first page of the transmission, the date and time it is sent and an
identification of the business or other entity, or other individual sending the message and
the telephone number of the sending machine or such business, other entity, or
individual. In order to program this information into your fax machine, you should
complete the steps on page 2.7.
If a Problem Arises
If any of your telephone equipment is not operating properly, you should immediately
remove it from your telephone line, as it may cause harm to the telephone network. If the
telephone company notes a problem, it may temporarily discontinue service. When
practical, the telephone company will notify you in advance of the disconnection. If
advance notice is not feasible, you will be notified as soon as possible. When you are
notified, you will be given the opportunity to correct the problem and informed of your
right to file a complaint with the FCC.
Hearing Aid compatible
The telephone handset attached to this equipment is hearing aid compatible.
Lightning
Your unit has built-in protection circuits, which meet or exceed FCC requirements, to
reduce the risk of damage from surges in telephone line currents. However, lightning
striking near or on these lines can cause an excessive surge of voltage that can damage the
phone.
Lightning damage is uncommon. However, if you are concerned about it or live in an area
with frequent and/or severe electrical storms, we suggest that you unplug your electronic
equipment during the storms.
ii P R E F A C E
P REFACE
IC Information
The following information is applicable only to facsimile machines installed in Canada.
Notices
The Industry Canada (IC) label identifies certified equipment. This certification means
that the equipment meets certain telecommunications network protective, operational,
and safety requirements. The Department does not guarantee the equipment will operate
to the user’s satisfaction.
Before installing this equipment, user should ensure that it is permissible to be connected
to the facilities of the local telecommunications company. The equipment must also be
installed using an acceptable method of connection. In some cases, the company’s inside
wiring associated with a single line individual service may be extended by means of a
certified connector assembly (telephone extension cord). The customer should be aware
that compliance with the above conditions may not prevent degradation of service in
some situations.
Repairs to certified equipment should be made by an authorized Canadian maintenance
facility designated by the supplier. Any repairs or alterations made by the user to this
equipment or equipment malfunctions may give the telecommunications company cause
to request the user to disconnect the equipment.
Users should ensure for their own protection that the electrical ground connections of the
power utility, telephone lines, and internal metallic water pipe system, if present, are
connected together. This precaution may be particularly important in rural areas.
Caution
Users should not attempt to make such connections themselves, but should contact the
appropriate electric inspection authority, or electrician, as appropriate.
The Load Number (LN) assigned to each terminal device denotes the percentage of the
total load to be connected to a telephone loop which is used by the device, to prevent
overloading. The termination on a loop may consist of any combination of devices subject
only to the requirement that the total of the load numbers of all devices does not exceed
100. The Load Number of this unit is #6.
Class B
This Digital Apparatus does not exceed the Class B limits for Radio Frequency noise from
Digital Apparatus set out in the Radio Interference Regulations of the Industry Canada.
PREFACE iii
P REFACE
Renseignements du Industrie Canada
Les renseignements suivants ne s’appliquent qu’aux télécopieurs installés au Canada.
Avis
L’étipuette du Industrie Canada (IC) est une marque d’identification d’appareil certifié.
Cette certification signifie que l’appareil répond à certains critères de sécurité et
d’utilisation. Cependant, le Ministère ne peut pas garantir que l’appareil rencontrera les
exigences de son utilisateur.
Avant de faire l’installation de l’appareil, l’utilisateur devrait s’assurer qu’il paurra
brancher son appareil en utilisant les services généralement offerts par la compagnie
téléphoneque de sa region. If faut s’assurer de brancher convenablement l’appareil. Dans
certains cas, le système interne de communication d’une compagnie possède aussi une
ligne individuelle qu’il vous sera possible d’utiliser avec un dipositif d’assemblage certifié
(rallonge de téléphone). L’utilisateur devrait se renseigner afin de faire une bonne
utilisation de son appareil et de ne pas nuire au système interne de communication de la
compagnie.
Toute réparation d’un appareil certifié devrait être effechée dans un centre d’entretien
approuvé par le fournisseru. Toute réparation ou modification apportée par l’utilisateur à
son appareil ou tout problème de fonctionnement purrait forcer votre compagnie
téléphonique àdébrancher votre appareil.
L’utilisateur devrait s’assurer que les raccordements de mise à la terre de l’alimentation,
des lignes téléphoniques et du système de tuyauterie hydraulique, si présent, soient tous
reliés ensembles. Cette mesure de sécurité est important surtout en milieu rural.
Misc en gard
L’utilisateur ne devrait pas essayer de faire de tels raccordements seul, il devrait faire
appel à du personnel qualifié ou à un électricien selon le cas.
Le numéro de raccordement (LN) se rapporte à chaque appareil et détermine le nombre
maximum de raccordements afin d’éviter une surcharge. La boucle peut comprendre
plusieurs choix différents tant et aussi longtemps que le total des numéros de
raccordement noe dépasse pas la somme de 100. Le numéro de raccordement de votre
appareil est: #6.
Classe B
Cet appareil n’excede pas les limites de la classe B pur les émissions de parasites radio à
partir d’un appareil numérique établies par le règlement sur les parasites radio du
Industrie Canada.
iv PREFACE
C ONTENTS
Chapter 1: Your New Machine
Check Parts
Familiarizing Yourself with Your New Machine
Front
Rear
Control Panel
1.1
1.2
1.2
1.3
1.4
Chapter 2: Installation and Setup
Choosing a Location
Making the Connections
Installing Paper
Making a Copy
Setting up the Fax
Adjusting Ringer Volume
Setting Date and Time
Setting the Terminal ID (Your Name and Number)
Using the Keypad to Enter Letters
Keypad Character Assignments
Checking Dial Type
2.1
2.1
2.2
2.3
2.5
2.5
2.5
2.7
2.9
2.9
2.10
Chapter 3: The Fax Machine
Sending a Fax
Preparing a Document
Setting Resolution and Contrast
Loading a Document
Dialing a Number
Confirming the Transmission
Canceling Transmission
Receiving a Fax
Reception Modes
Receiving in TEL Mode
Receiving in FAX Mode
Receiving in TAD Mode
Receiving in AUTO Mode
Using an Extension Telephone
Canceling Reception
Using Voice Request
Sending a Voice Request
Answering a Voice Request
Using Polling
1 C ONTENTS
3.1
3.1
3.2
3.3
3.3
3.5
3.5
3.6
3.6
3.6
3.7
3.8
3.8
3.9
3.9
3.10
3.10
3.11
3.11
C ONTENTS
Chapter 4:
Special Features
Using Help Features
Print Out the Help List
Using Function Menu
Using Automatic Dialing
Storing a Number for One-Touch Dialing
Storing a Number for Speed Dialing
Dialing a One-Touch Number
Speed Dialing a Number
Searching Memory for a Number (Directory Dialing)
Using Chain Dialing
Using REDIAL/PAUSE
Using TONE
Using FLASH
User Options
Setting an Option
Setting Fax Options
User Reports
Printing Reports
Clearing Memory
4.1
4.1
4.1
4.3
4.3
4.4
4.6
4.6
4.7
4.8
4.9
4.10
4.11
4.12
4.12
4.13
4.14
4.14
4.16
Chapter 5: Troubleshooting & Maintenance
Clearing Jams
Document Jams During Transmission
Paper Jams During Reception
Understanding Error Messages
Cleaning the Roller and Thermal Head
Purchasing and Storing Paper
5.1
5.1
5.3
5.5
5.6
5.8
Appendix
Specifications
Warranty
A.1
A.2
CONTENTS
2
C h a p t e r
O n e
Y OUR N EW M ACHINE
Check Parts
Once you have unpacked your fax machine, check to make sure that you have all the parts
shown here. If any piece is missing or broken, call your dealer.
Main Body
Handset
Power Cord
Thermal Paper Roll
Handset Cord
Phone Line Cord
This Manual
Name Card
Quick Reference Guide
CHAPTER ONE: YOUR NEW MACHINE
1. 1
1
Y OUR N EW M ACHINE
Familiarizing Yourself with Your New
Machine
Take a moment to familiarize yourself with your new machine by looking at the pictures
on the next few pages.
Front
LCD display
Handset
Use this as you would
use a telephone
handset.
Control Panel
fax or copy
Cover Release Lever
Slide upward to open the
paper cover.
Recording Paper Exit
Copy and fax printouts
this slot.
Feed the document to
fax or copy.
1.2 CHAPTER ONE: YOUR NEW MACHINE
Y OUR N EW M ACHINE
Rear
AC Power Socket
The power cord connects
to this socket.
Speaker
Phone Socket (TEL LINE)
The telephone line cord connects to
Handset Socket
This is where you connect the Handset to
the machine.
Extension Socket (EXT.LINE)
Connect a normal phone or an answering
machine, whichever you need.
CHAPTER ONE: YOUR NEW MACHINE 1 .3
Y OUR N EW M ACHINE
Control Panel
RECEIVE
Press to choose the appropriate receive
mode. The indicator will light up to show
you which setting you have chosen.
LCD
Shows the date and time,
or what the machine
is doing.
FINE/PHOTO
Press to improve the clarity of a poorly
printed document.
You can also press it to send or copy
photographs or documents printed in color.
CONTRAST
Press to compensate for light or dark
documents.
Number Keypad
Press to dial numbers
manually.
Name Card
Attach this card and write down the names
and numbers stored in the One-Touch
buttons.
One-Touch Buttons (1-5)
Press to make calls and send documents
simply by pressing one button.
INS
Press to insert one letter or number when
editing a number or name.
DEL
Press to delete one letter or number when
editing a number or name.
1. 4 CHAPTER ONE: YOUR NEW MACHINE
TONE
Press to temporarily switch from
pulse to tone dialing.
HELP
Press to print the HELP LIST.
The HELP LIST shows the
machine’s basic functions and
commands. Use it as a quick
reference guide.
Y OUR N EW M ACHINE
IN USE Indicator
This will light up when the machine is in use, flashes when receiving or sending a document.
ERROR Indicator
This will light up when something is wrong.
V.REQ./POLL
Press to make a Voice Request after sending or receiving
documents. Or,
Press to poll a document loaded on another fax machine.
FUNCTION
Press to choose different functions.
VOLUME/DIRECTION I/)
Press to adjust the Speaker volume, to scroll menu in the
FUNCTION mode, or to move the cursor to the digit you
want to edit.
STOP
Press to stop the machine in the middle of a job, clear an
error display, or eject your original document.
START/COPY (ENTER)
Press to start a job or copy a document.
SPEED DIAL
Press to make calls and send documents by entering
a 2-digit number (01 to 30).
Press to search for a number in the autodialer.
FLASH
Press to transfer a call in a PABX (Private Automatic
Branch Exchange).
REDIAL/PAUSE
Press to redial the last phone number you called.
You can also press it to add a pause when you store
a number in memory.
OHD
Press to dial a number without picking up the
handset.
CHAPTER ONE YOUR NEW MACHINE 1 .5
Chapter
Two
INSTALLATION
AND
SETUP
Please review the safety precautions at the front of this manual, then follow the directions
in this chapter to connect your machine and set it up for use.
Choosing a Location
To help guarantee trouble-free operation of your fax machine, place it in a spot where:
It’s not in direct sunlight or excessive humidity.
It is not close to heating or air conditioning vents.
Its ventilation openings aren’t blocked.
It’s at least 4 inches away from other objects.
Its cords won’t get in the way of people or other equipment.
It can’t be knocked off a table or dropped.
Making the Connections
1
-+ Plug one end of coiled cord into the
jack on the Handset. Then plug the other
end into the HANDSET jack on the left
side of the machine.
2
4 Plug one end of the telephone line
cord into the TEL LINE jack and the
other end into a standard phone jack in
your wall.
3
4 Plug the cord of your extension
telephone or answering machine into
the EXT. LINE jack on the back of the
machine
Connect the coiled
Handset cord.
Connect the telephone
line.
Connect an extension
phone or answering
machine, if desired.
CHAPTER T WO: INSTALLATION AND SETUP 2. 1
INSTALLATION
AND
SETUP
4
Connect the AC power
cord.
+I Plug one end of the cord into the
back of the machine and the other end
into a standard grounded 3-prong AC
power outlet.
The polarized 3-prong plug only fits into
a 3-pin outlet one way. If you cannot
plug the cord into your outlet, contact
an electrician to replace the obsolete
outlet.
Installing Paper
1
Unplug the power cord.
2
Open the Cover by lifting
the Release Lever on the
side of the fax machine.
3
Insert the paper roll.
4 If there is an adhesive sticker
sealing the paper roll, remove it
completely. Be sure the paper exits from
the top of the roll as shown.
The outer diameter of the paper roll
should not exceed 2.05 in (total length of
the paper roll is approximately
98.4 ft).
2.2 CHAPTER Two: INSTALLATION AND SETUP
INSTALLATION
AND
SETUP
4
Pull the paper end past the
edge of the fax machine.
5
4 Press down on the Cover using
both hands until it snaps into place.
Close the Cover.
Tear off the excess paper.
6
Connect the AC power
cord.
Making a Copy
Copy a document to make sure that the machine is working properly.
1
+ For information on preparing a
document, see page 3.1.
Choose a document you
want to copy.
CHAPTER Two: INSTALLATION AND SETUP
2.3
INSTALLATION
AND
SETUP
2
Turn the document face
down and slide it into the
Feeder Slot.
3
Feed the document into
the machine.
The Automatic Document
Feeder seizes and pulls in
the document.
The LCD shows the
message “DOCUMENT
LOADING.”
4
Adjust the copy quality.
5
Press START/COPY.
The document feeds
through the machine as a
copy is made.
2.4 CHAPTER TWO: INSTALLATION AND SETUP
DOCUMENT LOADING
+I The print quality is automatically
set to FINE when you are making a
copy. Press CONTRAST and then
DIRECTION 4 or ) to compensate for
light or dark documents.
For more information on resolution and
contrast, see page 3 2.
4 When copy completes, the fax
machine sounds several beeps. To copy
more documents, insert the next sheet
while the fax machine is beeping. The
fax machine makes a copy of the next
sheet.
If the next sheet does not feed, two short
ending beeps will sound.
INSTALLATION
AND
S ETUP
Setting Up the Fax
Follow the directions below to set up your fax.
Adjusting Ringer Volume
1
Set the machine's Ringer
volume by pressing
VOLUME 4 of ) on the
Control Panel in Standby
mode.
The LCD shows Ringer
volume level.
RING [**------]
4 The $ indicates the current Ringer
volume level.
Pressing ) increases the volume, and
4 decreases it.
Setting Date and Time
4 The LCD sequentially shows the
different settings you can change.
1
Press FUNCTION.
2
Press 2.
The LCD shows "[2] DATE
& TIME”.
[2] DATE & TIME
CHAPTER T WO : INSTALLATION
AND
SETUP 2. 5
INSTALLATION
AND
SETUP
3
Press ENTER.
The LCD asks you for a
date format.
[MM-DD]
DD-MM
4 There are two possible formats for
the date:
MM-DD : Month-Day
DD-MM : Day-Month
4
Select the type of date
format you want by using
DIRECTION 4 or ).
5
Press ENTER.
The LCD shows the preset
date and time.
6
Use the Number Keypad to
enter date and time
through Number Keypad.
You can also move the
cursor under the digit you
want to change by
pressing DIRECTION 4
or b.
2.6 CHAPTER T WO: INSTALLATION
AND
SETUP
10-03 95 07:05
4 In either format, the day and
month should each be entered as a twodigit number (01 to 31 and 01 to 12),
and time should be entered as 24-hour
format; that is, to set 7 o’clock p.m.,
press 1900.
INSTALLATION
AND
SETUP
7
When the date and time
are correct, press ENTER.
B Standby mode : Machine is idle.
The LCD returns to
Standby mode.
11-15 10:30 FAX
Setting the Terminal ID (Your Name and Number)
Your Terminal ID will be printed at the top of each page sent from your machine.
a# The LCD sequentially shows the
different settings you can change.
1
Press FUNCTION.
2
Press 1.
The LCD asks you if you
want to set the Terminal
ID.
[1] TERM.ID
CHAPTER TWO: INSTALLATION
AND
SETUP 2. 7
INSTALLATION
AND
SETUP
3
Press ENTER.
The LCD asks you for your
number.
TEL.:_
4 You may enter up to 20 digits. You
can also include special characters
(space, hyphen, or plus sign) in the
number to help improve readability.
4
Using the Number Keypad,
enter your number.
Press REDIAL/PAUSE for a space, # for
hyphen (-), and * for plus sign (+).
If you have previously set the Terminal
ID, the machine displays the currently
set number and name.
5
Press ENTER when the
number in the LCD IS
correct.
The LCD asks you for the
name.
6
Enter your name by using
the Number Keypad.
7
Press ENTER when the
name is correctly entered.
2 .8 CHAPTER TWO: INSTALLATION AND SETUP
NAME:-
4 You can enter up to 20 letters.
For information using the Number
Keypad to enter letters, see page 2.9.
INSTALLATION
AND
SETUP
Using the Keypad to Enter Letters
4 For example, if you want to enter
an M, press 6 (labeled MNO).
Each time you press 6, the display
shows a different letter - first M, then N,
O, and finally 6.
1
Press the Number Keypad
labeled with the letter you
want - press the button
repeatedly until the letter
appears in the LCD.
The letter appears in the
LCD.
NAME:M
4 To insert one letter, move the
cursor to the position where you want to
insert, and press INS, then enter new
letter.
2
When the letter you want
appears in the display,
move the cursor to right
by pressing DIRECTION ),
or press other button and
repeat Step 1.
To delete one letter, move the blinking
cursor to the position you want to
delete, press DEL.
3
4 Select additional letters in the same
way.
When finished entering
letters, press ENTER..
If you enter a wrong letter, press
DIRECTION 4 or ) to move the cursor
to the incorrect letter, then enter the new
one over it.
Keypad Character Assignments
Number
1
2
3
4
5
6
7
8
9
0
Assigned numbers, letters, or characters
Space 1
A B C
D E F
G H I
J K L
M N O
P Q R
T U V
W X Y
,
+ -
2
3
4
5
6
S
8
Z
7
9
/
*
# &
C
0
H A P T E R
T
W O : A N D
S
E T U P
2 .9
INSTALLATION
AND
S ETUP
Checking Dial Type
In order to provide compatibility with most telephone systems, your FX100 can be set to
either Pulse Dialing (same as rotary), or Tone Dialing (Touch-Tone).
In some cases, you may not be sure which kind of dialing service is provided on your line, since
a rotary phone generally works, even though the line has Touch-Tone service.
To determine the type of service you have, refer to pages 4.12 (User Options), and 4.13
(Setting Fax Options), and set the Dial Type to “MF” (Tone). Then:
1
Pick up the Handset and dial any digit between 2 and 9.
2
If the dial tone disappears, you have properly set your machine’s dial type option, and
hang up the phone.
If the dial tone is still present, hang up the Handset and proceed to step 3, below.
3
If the dial tone did not disappear in step 2, set the Dial Type to “DP” (Pulse).
4 See page 4.10, Using Tone, for information on temporarily setting your machine to tone dial, in
order to access banking and other interactive services requiring Touch-Tones.
2.10 CHAPTER Two: INSTALLATION
AND
SETUP
Chapter Three The Fax Machine
T HE F AX M A C H I N E
In this chapter, you will learn how to send and receive fax documents, how to use the four
fax reception modes, and voice request features.
Sending a Fax
Preparing a Document
Here are some things to do to improve the quality of your faxed documents:
Send documents printed using a typewriter, felt tip pen, black ink, or laserwriter. The
paper should be white or very light and of normal weight - not cardboard. Blue lines on
a ruled pad don’t fax well.
The unit can transmit documents with the following sizes:
8.5”
Maximum
up to a maximum
of 59”
DO NOT attempt to feed the following document types into the unit, as they may jam.
Instead, make a photocopy and send the copy
Wrinkled or creased
paper
Curled or rolled paper
or fax paper
Carbon or carbonbacked paper
Coated paper
Torn paper
Too thin (less than 0.003”) or
too thick (more than 0.006”)
paper
Remove clips, staples, and similar objects from documents before feeding them into
the machine.
Allow ink or paste dry completely before you send a document.
CHAPTER THREE : THE FAX MACHINE 3.1
T HE F AX M A C H I N E
Setting Resolution and Contrast
To set the Resolution/Contrast when sending or copying a document, insert the
document face down, and do one of these:
Press FINE/PHOTO to increase sharpness and clarity. You can choose NORMAL,
FINE, or PHOTO mode.
NORMAL works well for normal handwritten, typed, or printed documents.
FINE is good for documents containing a lot of detail. When FINE is selected, the
indicator lights.
PHOTO is used for faxing photographs or other documents containing color or shades
of gray. When PHOTO is selected, the indicator flashes.
Press CONTRAST and then DIRECTION 4 or ) to compensate for light or dark
documents.
If you press the CONTRAST button with a document loaded, the indicator lights. While
the LCD display shows “DARK [ * * * _ _ _ _]", press DIRECTION 4 or ) to
change the contrast. The number of * 's indicates the level of brightness.
3.2
CHAPTER THREE:
THE FAX M ACHINE
T HE F AX M A C H I N E
Loading a Document
1
Turn the document face
down.
4 The Automatic Document Feeder
seizes and pulls in the document.
2
Insert the leading edge of
the document into the
feeder Slot.
The LCD shows the
message “DOCUMENT
LOADING”.
DOCUMENT LOADING
The resolution and
contrast settings appear in
the LCD.
4
NORMAL
For more information on resolution
and contrast, see page 3. 2.
Dialing a Number
+I For hands-free operation, you can
use OHD.
1
Pick up the handset.
The LCD shows the
message “PHONE.”
PHONE
CHAPTER THREE : THE FAX MACHINE
3.3
T HE F AX M A C H I N E
4 You can store One-Touch or Speed
Dial numbers into your machine so that
you can dial frequently used numbers
with a touch of a button. For more
information, see pages 4.3 -4- 4 .
2
Using the Number Keypad,
enter the number of the
remote fax machine.
The LCD shows the
number you are dialing.
4 If a person answers the telephone,
ask him/her to press the START button
so that you can send the document.
7301234
3
Press START/COPY when
you hear the fax tone
(high-pitched tone).
4 You can send or receive a Voice
Request while sending a fax. For more
information on the Voice Request
feature, see page 3. 10.
4
Hang up the Handset.
If you want to send more documents,
insert the next sheet while the fax
machine is beeping.
The LCD shows the
message "SENDING".
3.4 CHAPTER THREE: THE FAX MACHINE
SENDING
P.01
4 You can cancel the transmission of
a document at any time by pressing
STOP. For more information, see page
3. 5.
T HE F AX M A C H I N E
Confirming the Transmission
When your document has
been sent successfully, the
machine beeps and returns
to Standby mode.
11-15 10:30 FAX
4 If something went wrong during
transmission, an error message appears
in the LCD. For a listing of error
messages and their meanings, see page
5. 5.
If you get an error message, press STOP
to clear the message and try to send the
document again.
You can set your machine to print a
Confirmation Report automatically after
each transmission. For more
information, see page 4.12.
Canceling Transmission
1
Press STOP at any time to
cancel transmission.
The fax transmission is
canceled and the machine
returns to Standby mode.
STOP
PRESSED
CHAPTER THREE: THE FAX MACHINE 3. 5
T HE F AX M A C H I N E
Receiving a Fax
Reception Modes
Your machine has four reception modes:
In TEL mode, automatic fax reception is turned off. You can receive a fax only by
manually pressing START/COPY.
In FAX mode, the machine answers an incoming call and immediately goes into receive
mode.
In TAD mode, the caller can leave a message on your answering machine. If a fax tone
is detected, your fax machine begins reception automatically, overriding the answering
machine’s announcement.
This mode is available only when you have connected an answering machine to the
EXT. LINE jack on the rear of the machine.
In AUTO mode, the machine answers incoming faxes automatically. If no fax signal is
detected, the machine gives a secondary ringing tone to advise you of an incoming call.
When the machine is in Standby mode, the LCD shows the current reception mode.
If you rarely use the fax line for voice conversation, set the fax machine to receive faxes
automatically by selecting either FAX or AUTO mode.
Receiving in TEL Mode
4 When you are using the TEL mode
and an answering machine is installed,
you must switch off the answering
machine, otherwise the OGM from the
answering machine will interrupt your
telephone conversation.
1
Press RECEIVE repeatedly
until TEL appears in the
LCD.
TEL appears in the LCD
and the RECEIVE indicator
light is off.
3.6 C HAPTER T H R E E : THE F AX M ACHINE
11-15 10:30 TEL
T HE F AX M A C H I N E
2
When the telephone rings,
pick up the Handset and
answer it.
3
If you hear a fax tone, or if
the person on the other
end asks you to, press
START/COPY.
4
Hang up the Handset.
The machine begins
receiving, and returns to
Standby mode when the
reception is complete.
Receiving in FAX Mode
4 When you get a call in FAX mode,
the machine answers the call on the
second ring and starts receiving a fax.
You can change this number of rings.
For more information, see page 4.12.
1
Press RECEIVE repeatedly
until FAX appears in the
LCD.
When reception is complete, the
machine returns to Standby mode.
FAX appears in the LCD
and the RECEIVE indicator
lights.
11-15 10:30 FAX
CHAPTER THREE : THE FAX MACHINE 3.7
T HE F AX M A C H I N E
Receiving in TAD Mode
4 When you get a call, the answering
machine answers and records the caller’s
message.
1
Press RECEIVE repeatedly
until TAD appears in the
LCD.
TAD appears in the LCD
and the RECEIVE indicater
flashes,
If a fax tone is detected on the line by the
fax machine, the call automatically
switches over to the fax machine and
reception begins overriding the
answering machine’s announcement.
11-15 10:30 TAD
If you have set your machine to the TAD
mode, and the answering machine is
switched off, or is not connected to your
fax machine, the fax machine will
automatically go into receive mode after
6 rings.
Receiving in AUTO Mode
-a When you get a call in AUTO
mode, the machine answers the call on
the second ring and starts receiving a fax
when detected fax tone. You can change
this number of rings. For more
information, see page 4.12.
1
Press RECEIVE repeatedly
until AUTO appears in the
LCD.
AUTO appears in the LCD
and the RECEIVE indicator
flashes rapidly.
3.8 CHAPTER THREE: THE FAX MACHINE
11-15 10:30 AUTO
If no fax tone is detected, the machine
gives a secondary ringing tone to advise
you of an incoming call. If you do not
answer the call while ringing, the
machine automatically goes into receive
mode.
T HE F AX M A C H I N E
Using an Extension Telephone
You can receive a fax from someone if you‘ve answered on the extension telephone
without having to go to the fax machine.
This feature only works when you connected to the fax machine.
Q Press the buttons slowly in
sequence. If you still hear the fax tone
from the remote machine, try pressing
"* 9 * " once again.
1
When you receive a call on
the extension pbone and
hear a fax tone, press the
keys *9* on the
extension telephone.
" * 9 * " is the Remote Receive Start Code
preset at the factory.
The first and the last asterisks are fixed,
but you can change the middle digit to
whatever you want. For more
information, see page 4. 12.
The machine receives the
fax.
2
Hang up the extension
telephone.
Canceling Reception
1
Press STOP at any time to
cancel reception.
The fax reception is
canceled and the machine
returns to Standby mode.
STOP PRESSED
CHAPTER THREE : THE FAX MACHINE
3.9
T HE F AX M A C H I N E
Using Voice Request
If you’re sending or receiving a document and need to speak to the other person during
the same phone call, use Voice Request to alert the person at the remote end.
You can also respond to a Voice Request made by the person on the remote end.
Sending a Voice Request
1
Press V.REQ./POLL while a
document is being sent or
received.
The V.REQ./POLL indicator
lights, and a Voice Request
signal is sent to the
remote fax machine when
transmission/reception
finished.
2
When the phone rings pick
up the Handset and answer
it.
3
When you are finished,
hang up the Handset.
3.10 CHAPTER T HREE : THE FAX MACHINE
4 You can’t talk with the other person
and send a fax at the same time.
If you can’t seem to alert the other
person, it may be because the remote fax
machine doesn’t have the Voice Request
feature.
The person on the remote end has 15
seconds to pick up the Handset. If no
one answers, your machine returns to
Standby mode.
4 When you’re finished talking, if
you have another document to send,
load the document and tell the other
person to press START. When you hear
the fax tone, press START/COPY.
4 You can cancel a Voice Request by
pressing V.REQ./POLL again.
The V.REQ./POLL indicator light goes
out.
T HE F AX M A C H I N E
Answering a Voice Request
1
When the phone rings, pick
up the Handset and answer
it.
4 If you don’t answer the Voice
Request within 15 seconds, the machine
prints the “CALL BACK MESSAGE”
which has the number that made the
Voice Request, and the time and date
the request was made.
2
When finished, hang up the
Handset.
Using Polling
Polling is when one fax machine requests another machine to send a document. This is
useful when the person with the original document is not in the office. The person who
wants to receive the document calls the machine holding the original and requests that the
document be sent. In other words, it “polls” the machine holding the original.
1
Lift the Handset or press
OHD.
2
Enter the number of the
remote machine.
4 There should be no documents
loaded in your machine, and the remote
machine must be ready for your call,
that is: remote machine must be in TXPOLL mode.
When polling another fax machine to
retrieve a document, the remote
machine may be secured with a poll
code. In this case, you cannot poll the
document.
CHAPTER T HREE: T HE FAX MACHINE
3. 11
T HE F AX M A C H I N E
d Not all fax machines have polling
capability, and polling incompatibility
sometimes occurs between fax machines
from different manufacturers. Therefore,
polling may fail in some cases, even
when poll code is not used.
3
When you hear a fax tone
from the remote machine,
press V.REQ./POLL.
Your machine starts to
receive the document.
The LCD shows “POLLING”.
3.12 CHAPTER T HREE: T HE FAX MACHINE
Your fax machine cannot be polled, so
other fax machines cannot poll a
document from your machine.
POLLING
Chapter Four
S PECIAL F EATURES
In this chapter, you will learn how to use the built-in help features, how to use the
automatic dialing and special phone features, how to set options, and how to print
reports.
Using Help Features
You can print a Help List of the machine’s basic functions and commands to use as a quick
reference guide. You can also use the Function Menu to remind you how to set a
particular function.
Print Out the Help List
1
Press HELP while in
Standby mode.
The machine prints the
Help list.
Using Function Menu
1
Press FUNCTION.
4 If you press a button while the LCD
is cycling through the function menu,
the machine assumes you want to
change the function setting
corresponding to that button choice.
If you don’t press any buttons, the LCD
display cycles through all choices for
about 60 seconds, then returns to
Standby mode.
2
Press STOP at any time to
exit the function menu.
CHAPTER FOUR: SPECIAL FEATURES 4. 1
S PECIAL F EATURES
Scrolling Through the Function Menu
Instead of waiting for the function menu to cycle through each choice, you can manually
scroll through to view your choices quickly.
4 If you press a button while the LCD
is cycling through the function menu,
the machine assumes you want to
change the function setting
corresponding to that button choice.
1
Press Direction
while the function menu is
displayed.
If you don’t press any buttons, the LCD
display cycles through all choices for
about 60 seconds, then returns to
Standby mode.
Each time you press the
button, the LCD shows the
next function.
2
When the function you
want appears in the LCD,
press ENTER.
You will be guided through
the setup choices.
3
Press STOP at any time to
exit the function menu.
4.2 CHAPTER FOUR: SPECIAL FEATURES
[2] DATE & TIME
S PECIAL F EATURES
Using Automatic Dialing
There are two ways in storing numbers for automatic dialing: One-Touch Dialing and
Speed Dialing. One-Touch Dialing lets you touch any one of five One-Touch buttons
located on the left of the machine’s Control Panel to dial your number automatically.
Speed Dialing allows you to enter two digits to dial a number. To use this feature, follow
these instructions:
Storing a Number for One-Touch Dialing
4 If there is a number or name
already assigned in the selected OneTouch button, the number or name is
displayed. If you want to change the
number or name, enter new number or
name over the old. If not, press STOP.
1
Press and hold the One
Touch button that you
want to assign.
The LCD momentarily
displays the One-Touch
button number you are
going to assign.
STORE ONE TOUCH 3
The LCD asks you for a
te!ephone number.
TEL.:-
4 You can enter up to 34 digits into a
One-Touch button. To insert a pause
between digits, press REDIAL/PAUSE;
a "P" appears in the display. This "P"
will cause a few seconds’ pause when
dialing.
2
Enter the number you
want to store by using the
Number Keypad.
TONE
4 If you make a mistake, use
DIRECTION 4 or ) to move the cursor
to the incorrect digit and enter new one
over it. You can also use INS or DEL
buttons.
3
When the number appears
correctly in the LCD, press
ENTER.
The LCD asks you for a
name.
NAME:-
CHAPTER FOUR: SPECIAL FEATURES 4. 3
S PECIAL F EATURES
4 If you assign a name to the number,
you can take advantage of the Directory
dialing feature of your machine. For
information about Directory dialing, see
page 4.7
4
To assign a name to the
number, enter the name,
If you don’t want a name,
skip to step 5.
You can enter up to 20 letters. For more
information on how to enter letters
using the Number Keypad, see page 2.9.
4 If you want to cancel the operation,
press STOP at any time. The fax
machine returns to Standby mode. If
necessary, start over again.
5
Press ENTER when the
name appears correctly in
the LCD.
Storing a Number for Speed Dialing
4 You can store up to 30 telephone or
fax numbers into 2-digit Speed Dial
memory.
1
Press and hold SPEED DlAL
until “STORE SPEED DIAL”
appears in the LCD.
The LCD asks you for the
Speed Dial number you
wish to assign.
If there is a number or name already
assigned to the selected Speed Dial
button, the number or name is
displayed. If you want to change the
number or name, enter new number or
name over the old. If not, press STOP.
SPD. NO[01-30] _?
?
2
Enter a 2-digit Speed Dial
number (01 through 30)
to which you want to
assign the telephone or fax
number.
The LCD asks you for the
telephone number.
4 .4
CHAPTER FOUR: SPECIAL FEATURES
TEL. : __
S PECIAL F EATURES
4 You can enter up to 34 digits into
the Speed Dial number.
To insert a pause between digits, press
REDIAL /PAUSE ; a "P" appears in the
display. This "P" will cause a few
seconds’ pause when dialing.
3
Enter the number you
want to store.
If you make a mistake, use DIRECTION
4 or ) to move the cursor to the
incorrect digit and enter new one over it.
You can also use INS or DEL buttons.
4
When the number appears
correctly in the LCD, press
ENTER.
The LCD asks you for a
name.
5
To assign a name to the
number, enter the name.
if you don’t want a name,
skip to step 6.
6
Press ENTER when the
name appears correctly in
the LCD display.
NAME:
4 If you assign a name to the number,
you can take advantage of the Directory
dialing feature of your machine. For
information on Directory dialing, see
page 4.7.
You can enter up to 20 letters. For
information on how to enter letters
using the Number Keypad, see page 2.9.
4 If you want to cancel the operation,
press STOP at any time. The fax
machine returns to Standby mode. If
necessary, start over again.
CHAPTER FOUR: SPECIAL FEATURES
4. 5
S PECIAL F EATURES
Dialing a One-Touch Number
4 For hands-free operation, use OHD.
If there is no number stored, “NOT
ASSIGNED” appears in the LCD. To
store a number, see page 4.3.
1
Press a One-Touch button
with or without picking up
the Handset.
The LCD shows the
message "DIALING"; as the
machine automatically dials
the number stated for that
One-Touch button. You
hear the dialing through
the Speaker.
DIALING
7301234
4 If you picked up the Handset or
pressed OHD, "DIALING" will not be
shown in LCD. It directly dials the
number stored in that button.
If a document is loaded, and you press a
One-Touch button without pressing
OHD or picking up the Handset, the
machine automatically sends the
document.
Speed Dialing a Number
4 For hands-free operation, use OHD.
If there is no number stored, "NOT
ASSIGNED" appears in the LCD. To
store a number, see page 4.4.
1
Press SPEED DIAL with or
without picking up the
Handset.
The LCD asks you to enter
the Speed Dial number.
SPD.NO[01-30]
4 If a document has been loaded, and
you press a SPEED DIAL without
pressing OHD or picking up the
Handset, the machine automatically
sends the document.
2
Enter the 2-digit Speed
Dial number.
If there is no number stored, “NOT
ASSIGNED” appears in the LCD
display.
The LCD shows the
message “DIALING” as the
machine automatically
dials. You hear the dialing
on the speaker.
4. 6 CHAPTER FOUR: SPECIAL
FEATURES
DIALING
17301234
4 If you picked up the handset or
pressed OHD, “DIALING” will not be
shown in LCD display. It directly dials
the number stored in that button.
S PECIAL F E A T U R E S
3
If you are making a phone
call, pick up the Handset
when the other person
answers.
Searching Memory for a Number (Directory Dialing)
If you don’t remember the 2-digit speed number, you can search for numbers in memory.
1
Press SPEED DIAL.
The LCD asks you to enter
the Speed Dial number.
2
Press DIRECTION
or
to move backward or
forward through the
SPD.N0[01-30] ??
Q Pressing ) allows you to search
forward through the memory in Speed
Dial number order (from 01 to 30) and
4 allows you to search in reverse order.
directory until you find the
number you want.
3
When the number you
want appears, press ENTER
to dial the number.
CHAPTER FOUR SPECIAL FEATURES
4. 7
S PECIAL F EATURES
Using Chain Dialing
When using special services, such as alternate long-distance or bank-by-phone, you must
enter the telephone number of the service and wait for the computer to answer before
continuing. Enter the phone number of the special service first. Then, when the computer
answers, enter the rest of the information, such as a long-distance number. We call this
procedure Chain Dialing. You can combine manual dialing using Number Keypad, Speed
Dialing and/or One-Touch Dialing for Chain Dialing.
4 To send a document using Chain
Dialing, load a document face down into
the Document Feeder.
If you have pulse-dialing service, be
sure to include a pulse-to-tone mode
change in front of the numbers that you
want to dial after the computer service
answers.
1
Pick up the Handset or
press OHD.
The LCD shows the
message “PHONE” .
PHONE
4 For example, your long-distance
carrier’s number, using either Number
Keypad, One-Touch button, or 2-digit
Speed Dial number.
2
Enter a telephone number.
You cannot use redial for Chain Dialing.
The LCD shows the
number you entered.
7301234
3
When the service answers,
enter the additional
numbers using number
keypad, or One-Touch
button, or 2-digit Speed
Dial number.
The LCD shows the
additional number(s) you
entered.
4.8 CHAPTER FOUR: SPECIAL FEATURES
73012349879543
S PECIAL F EATURES
4
When you hear the highpitched tone, press
START/COPY to send the
document.
Using REDIAL/PAUSE
The REDIAL/PAUSE button has two functions. It can be used to redial the number you
last called or it can be used to insert a pause in a number when you’re setting up a OneTouch or Speed dial number.
To redial the number you last called:
4
For hands-free operation, use OHD.
1
Press REDIAL/PAUSE with
or without picking up the
Handset.
The number is
automatically dialed.
NU There is an exception to redialing:
a number dialed after pressing FLASH
does not remain in memory, so it cannot
be redialed by pressing
REDIAL/PAUSE.
For example: you dialed 1234 and
<conversation>, FLASH, 5678 and
<conversation>, and hung up the phone.
After a moment, when you press
REDIAL/PAUSE to redia1 5678, your fax
machine will actually dial 1234 not 5678.
4 If a document is loaded, and you
press a REDIAL/PAUSE without
pressing OHD or picking up the
Handset, the machine automatically
sends the document.
With some telephone systems, you must dial an access code (“9”, for example) and listen
for a second dial tone before you can dial an outside number. In such cases, you must
insert a pause in the number.
To insert a pause when storing an automatic dial number
1
4 For more information on storing
automatic dial numbers, see page 4. 3.
When entering the number,
press REDIAL/PAUSE
CHAPTER FOUR : SPECIAL FEATURE
4 .9
S PECIAL F E A T U R E S
A “P” appears in the LCD.
73OPT234
Using TONE
You may often need to use tone signals to perform special operations by phone. Bank-byphone and voice mail are two examples of systems that require tone signals.
If you have pulse service, you can still send tone signals by following steps:
1
Dial the number using
pulse dialing.
2
When the special service
answers, press TONE.
Any numbers you press are
sent by tone, not pulse,
for the remainder of the
call.
4 .10 CHAPTER FOUR: SPECIAL FEATURES
4 TONE can be stored in memory.
(One-Touch, Speed Dial, Redial)
When you dial the number in memory,
dialing stops at the TONE entry. To dial
the remaining numbers, press
REDIAL/PAUSE.
S PECIAL F EATURES
Using FLASH
Some special phone services require a switch-hook signal for proper operation. For
example, if you have Call Waiting*, you can put a call on hold and take a second call on
the same line by pressing the switch-hook button. Pressing FLASH performs the
equivalent to a switch-hook operation.
1
When you are on the
telephone and hear the call
waiting signal, press
FLASH.
4 If you don’t subscribe to a special
service that uses the switch-hook signal,
don’t press FLASH during a call - you
could disconnect the line.
The first caller is on hold
and you may speak to the
second caller.
2
Press FLASH again to talk
to the first caller again.
When your line is an extension of PABX, you can transfer the call by pressing FLASH
without hanging up the Handset and dialing the number of that person.
* Call Waiting
Call Waiting service offered by most U.S. and Canadian telephone companies allows you
to hear an alert tone, or beep, when a third party dials your number and you are already
in a conversation with another party. If you happen to be conduction a regular voice
conversation, and hear the alert tone in the telephone receiver or on the speaker, depress
FLASH. This will place the current call on HOLD and allow you to converse with the new
party. You may switch between two callers any number of times by flashing the line, or
momentarily depressing the switchhook.
If the alert tone occurs while sending or receiving a fax, it may interrupt or terminate the
fax call in progress. You can temporarily block the alert tone on the telephone line by
dialing “*70” before dialing the area code and/or number when placing a call. This will
ensure that your fax call will not be interrupted.
CHAPTER FOUR SPECIAL FEATURES
4. 11
S PECIAL F EATURES
User Options
Your fax machine has various user-selectable features. These options are preset at the
factory, but you may need to change them. To find out how the options are currently set,
print the System Data List. For more information on printing a report, see page 4 .14.
Setting an Option
1
Press FUNCTION.
2
Press 3 on the Number
Keypad for user options.
The LCD shows "(3)
SYSTEM DATA”.
[3] SYSTEM DATA
3
Press ENTER to set user
options.
The LCD shows the
message
“COMFlRM.REPORT”.
4.12 CHAPTER FOUR: SPECIAL FEATURES
CONFIRM.REPORT
S PECIAL F EATURES
4
Press DIRECTON 4 or B
repeatedly until you find
the option you want.
When you found the
option, press ENTER.
4 You can exit from setup mode at
any time by pressing STOP. When you
press STOP, the machine stores the
options you’ve already changed and
returns to Standby mode.
Setting Fax Options
These instructions assume you’ve followed the steps above under “Setting an Option” and
the machine is asking if you want to change one of the fax options listed here.
Confirmation Report - A Confirmation Report shows whether the transmission was
successful or not, how many pages were sent, etc.
Select YES to print it automatically each time you send a fax.
Select NO to not print it.
Select ERROR to print it automatically only when a transmission error occurs.
Use DIRECTION ( or ) button to select, then press ENTER.
Ring Count - Select the number of times your machine rings before answering an
incoming call. If you are using your machine as both a telephone and a fax machine, we
suggest you set the ring count to at least 4 to give you time to answer.
Enter a number from 1 through 7 on the Number Keypad, then press ENTER.
Remote Receive Code - The Remote Receive Code allows you to initiate a fax receive
from an extension phone plugged into the EXT. LINE jack. If you pick up the extension
and hear a fax tone, you can enter the Remote Receive Code and the fax will start
receiving. The password is preset to " * 9 * " at factory. The first and the last % ‘s are
fixed, but you can change the middle character from 0 to 9.
Enter the number you want to use, then press ENTER.
Auto Print - Your fax machine keeps records of communications. You can get a
transmission or reception journal printout automatically.
Select YES if you want the TX/RX (transmission/reception) Journal printed out
automatically after every 30 fax sessions.
Select NO if you do not want it printed automatically.
Use DIRECTION ( or ) button to select, then press ENTER.
Dial Type - Select the type of dial mode your fax machine is connected to.
Select MF if the fax machine is connected to a tone dial telephone line.
Select DP if the fax machine is connected to a pulse dial telephone line.
Use DIRECTION ( or ) button to select, then press ENTER.
Ring - Use this feature to turn off the Ringer.
Select ON to allow the Ringer to ring.
Select OFF to inhibit the Ringer. (If you don’t want to be disturbed by sound of ringing,
select OFF.)
Use DIRECTION 4 or ) button to select, then press ENTER.
CHAPTER FOUR : SPECIAL FEATURES
4.13
SPECIAL FEATURES
S PECIAL F E A T U R E S
User Reports
Your fax machine can print reports containing useful information - transmission and
reception verification, option settings, etc. The following reports are available :
Confirmation Report - This report can be printed on command, or by selecting the
appropriate user option.
TX/RX Journal - This report gives specific information concerning transmission and
reception activities: the time and dates of the most recent transmissions and receptions,
the phone numbers that were called, etc.
System Data List - This list shows the status of the user-selectable options. After you
change the settings, print this list to confirm your changes.
Tel. Number List - This list shows all numbers currently stored in One-Touch and
Speed Dial numbers. Before changing or adding automatic dial numbers, print this
report to check which numbers are currently stored. Print this report after making
changes to confirm the new settings.
Printing Reports
1
Press FUNCTION.
2
Press 4.
The LCD shows the
message "[4] REPORT".
4.14 CHAPTER FOUR: SPECIAL FEATURES
[4] REPORT
S PECIAL F E A T U R E S
3
Press ENTER.
The LCD shows
“CONFIRM.REPORT”.
CONFIRM.REPORT
4
Select the report by
pressing DIRECTION or
The LCD shovvs the name
of the report you have
selected.
TX/RX JOURNAL
Lists available
CONFIRM. REPORT
TX/RX JOURNAL
SYSTEM DATA LIST
TEL. NUMBER LIST
5
Press ENTER.
The specific list is printed.
CHAPTER FOUR: SPECIAL FEATURES
4.15
S PECIAL F EATURES
Clearing Memory
You can clear the information in your fax machine’s memory.
1
Press FUNCTION.
2
Press 5.
The LCD shows"[5]
MEMORY CLEAR".
3
Press ENTER.
4
Select the desired menu by
using DIRECTION 4 or b .
The LCD shows the menu
you have selected.
4.16 CHAPTER FOUR: SPECIAL FEATURES
TERM.ID
Menus available :
TERM.ID
TX/RX JOURNAL
SYSTEM DATA
ONE TOUCH DIAL
SPEED DIAL
S PECIAL F EATURES
5
When the desired menu
appears, press ENTER.
The LCD asks if you are
sure you want to clear the
memory.
ARE YOU SURE?
6
If you want to clear the
memory, press ENTER.
The LCD shows the
message "MEMORY
CLEARED!".
4
MEMORY CLEARED!
Then the machine returns to Step 4,
you can select other memory
locations to clear.
SO that
Press STOP to return to Standby mode.
CHAPTER FOUR : SPECIAL FEATURES
4 .17
T ROUBLESHOOTING & MAINTENANCE
In this chapter you will learn how to clear document jams, what the various error
messages mean, how to fix fax problems, and where to call for more help.
Clearing Jams
Document Jams During Transmission
1
Unplug the power cord.
4 If a document jams during
transmission, do NOT pull the
document out of the slot. Doing so could
harm the fax machine.
2
Open the Cover by lifting
up the Release lever on
the side of the fax
machine.
3
Raise the Roller.
4 While pushing outward on each
white tab, lift the Roller up and out of
the machine.
4
Remove the jammed
document.
CHAPTER FIVE: TROUBLESHOOTING & MAINTENANCE
5 .1
T ROUBLESHOOTING & MAINTENANCE
5
-#
Make sure it locks into place.
Replace the Roller following
the reverse order of step
3.
6
Close the Cover firmly.
7
Plug in the power cord.
5.2 CHAPTER FIVE: T ROUBLESHOOTING & MAINTENANCE
4 Press down on the Cover using
both hands until it snaps into place.
T ROUBLESHOOTING & MAINTENANCE
Paper Jams During Reception
+ If the fax paper jams while you are
receiving, do NOT pull it out. Doing so
could harm the fax machine.
1
Unplug the power cord.
2
Open the Cover by lifting
up the Release Lever on
the side of the fax
machine.
.
3
Raise the Roller.
4 While pushing outward on each
white tab, lift the Roller and out of
the machine.
4
Remove the jammed
5
-a! Make sure it locks into place.
Replace the Roller following
the reverse order of step
3.
CHAPTER FIVE T ROUBLESHOOTING & MAINTENANCE
5.3
T ROUBLESHOOTING
&
M AINTENACE
6
Close the Cover firmly.
7
Plug in the power cord.
5.4 CHAPTER FIVE: T ROUBLESHOOTING & MAINTENANCE
Press down on the Cover using
both hands until it snaps into place.
T ROUBLESHOOTING & MAINTENANCE
Understanding Error Messages
LCD Message
COMM.ERROR
I
NO ANSWER
POLLING ERROR
DOCUMENT JAM
NO PAPER
OVERHEAT
CHECK HANDSET
LINE ERROR
CAM JAM
Meaning
There is a problem with facsimile communication during
transmission or reception. Press STOP and try again.
The machine you tried to call does not answer.
The remote fax machine you want to poll is not ready to
respond to your poll. If the remote machine is secured by
passcode, it is not possible to poll a document.
Original document is jammed in the Feeder.
Machine is out of recording paper, or Cover is open.
This may happen when several all-black copies are received.
When the machine cools down, it will automatically return to
Standby mode.
The Handset has been accidentally lifted after sending or
receiving is completed. Alarm tone sounds along with the
error message. Replace the Handset, or press STOP.
Your unit cannot connect with the called machine, or has lost
contact because of a problem on the phone line.
Press STOP and try again. If failure persists, wait an hour or
so far the line to clear, then try again.
Machine does not change Gears properly. Turn the power off
for 10 seconds. If problem continues, call Service
Representative.
CHAPTER FIVE: TROUBLESHOOTING & MAINTENANCE 5. 5
T ROUBLESHOOTING & MAINTENANCE
Cleaning
the
Roller
and
Thermal
Head
To keep your machine working properly, occasionally clean the white roller and thermal
head as shown below. If they are dirty, documents sent to other fax machines won’t be
clear.
1
Unplug the power cord
2
Open the Cover.
3
Release the Guide using
both hands by pulling it in
the direction of arrow.
4
Raise the Roller.
5
Wipe the Roller surface
with fax cleaning wipes.
5 .6 CHAPTER FIVE: TROUBLESHOOTING & MAINTENANCE
4 While pushing outward on each
white tab, lift the Roller up and out of
the machine.
T ROUBLESHOOTING & MAINTENANCE
6
Wipe the Thermal Head
surface with fax cleaning
wipe.
7
Replace the Roller following
the reverse order of step
4.
8
Replace the Guide.
9
4 Press down on the Cover using
both hands until it snaps into place.
Close the Cover firmly.
10
Plug the power cord back
in.
CHAPTER FIVE: TROUBLESHOOTING & MAINTENANCE 5. 7
T ROUBLESHOOTING & MAINTENANCE
Purchasing and Storing Paper
Purchase replacement rolls of coated thermal fax paper with an outer diameter of 2.05 in.
(Total length of the paper roll is approximately 98.4 ft) Coated paper has a shiny surface,
and will print better than uncoated.
4 We recommend that you use only authorized recording paper. Other types of paper
can produce poor results, and even damage your fax machine.
Contact your dealer for more information on paper.
Store rolls in a cool, dark place, at or below 76°F, and avoid humidity higher than 65%.
To keep fax pages from darkening and fading, keep them out of direct sunlight. Avoid
temperatures above 105°F . Don’t let them come in contact with blueprints (diazo copies),
plastic films, or transparent tape. Keep stored page from touching each other face to face.
If they touch, print can transfer from one to another.
5. 8 CHAPTER FIVE: T ROUBLESHOOTING & MAINTENANCE
Appendix
Specifications
Type of unit
Communication System
Compatibility
Compression Scheme
Modem Speed
Resolution
Scanning Method
Printer
Input Document Width
Effective Scanning Width
Recording Width
Thermal Paper Roll Size
Power Requirement
Power Consumption
Temperature Range
Humidity Range
Dimensions (WxDxH)
Weight
Desktop Facsimile Transceiver
Public Switched Telephone Network
and PABX
CCITT Group 3
MH, MR
9600/7200/4800/2400 bps
97.79 line/in, 195.58 line/in
(3.85 lines/mm, 7.7 lines/mm)
Flat-Bed scanning using CIS
(Contact Image Sensor)
Thermal Print Head
8.5 in (216mm)
8.27 in (210mm) f 1%
8.5 in (216mm)
98.4ft x 8.5 in (30m x 216mm) wide,
0.5 in (12.7mm) diameter core
120V AC, 60 Hz
Standby : 5 Watt
Maximum when in use : 120.8 Watt
50 to 95ºF (10 to 35ºC)
20 to 80% RH (non-condensing)
11.4 x 9.6 x 4.2 in
(289.6 x 243.8 x 106.7mm)
6.6 lb (3.0 kg)
APPENDIX A.1
Warranty Information
Limited Warranty
Samsung Electronics America Inc. (SEA) warrants that this product is free from defective
material and workmanship.
SEA further warrants that if this product fails to operate properly within the specified
warranty period and the failure is due to improper workmanship or defective material,
SEA will repair or replace the product at its option.
All warranty repairs must be performed by an SEA Authorized Service Center.
The name and address of the service location nearest you can be obtained by calling
tollfree:
l-800-SAMSUNG
(l-800-726-7864)
Samsung consumer Affairs
Samsung Electronics American Inc.
One Samsung Place
Ledgewood, NJ 07852
Terms
Labor — ninety (90) days
Parts —one (1) year
On carry-in models, transportation to and from the service center is the customer’s
responsibility.
The original dated sales receipt must be retained by the customer and is the only
acceptable proof of purchase. It must be presented to the authorized service center at the
time service is requested.
Exclusions
This warranty does not cover damage due to accident, fire, flood and/or other acts of
God: misuse, incorrect line voltage, improper or unauthorized repairs, commercial use, or
damage that occurs in shipping. Exterior and interior finish, batteries, lamps, and glass are
not covered under this warranty.
Customer adjustments that are explained in the Operator’s Guide are not covered under
the items of warranty. This warranty will automatically be void for any unit found with a
missing or altered serial number. This warranty is valid only on products purchased and
used in the United States and Puerto Rico. Some states do not allow the exclusions or
limitations of incidental or consequential damages, or allow limitations on how long an
implied warranty lasts, so the above limitations or exclusions may not apply to you. This
warranty gives you specific legal rights and you may also have other rights which vary
from state to state.
A. 2
APPENDIX
Printed in Korea
P/N. JF68-60011A