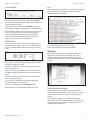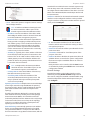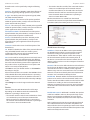
1
AirRouter User Guide Table of Contents Table of Contents Chapter 1: Product Overview . . . . . . . . . . . . . . . . . . . . . . . . . . . . . . . . . . . . . . . . . . . . . . . . . . . 1 Package Contents. . . . . . . . . . . . . . . . . . . . . . . . . . . . . . . . . . . . . . . . . . . . . . . . . . . . . . . . . . . . . . . . 1 System Requirements . . . . . . . . . . . . . . . . . . . . . . . . . . . . . . . . . . . . . . . . . . . . . . . . . . . . . . . . . . . . 1 Top View. . . . . . . . . . . . . . . . . . . . . . . . . . . . . . . . . . . . . . . . . . . . . . . . . . . . . . . . . . . . . . . . . . . . . . . . . 1 Rear View . . . . . . . . . . . . . . . . . . . . . . . . . . . . . . . . . . . . . . . . . . . . . . . . . . . . . . . . . . . . . . . . . . . . . . . . 1 Chapter 2: Installation . . . . . . . . . . . . . . . . . . . . . . . . . . . . . . . . . . . . . . . . . . . . . . . . . . . . . . . . . . 2 Hardware Installation. . . . . . . . . . . . . . . . . . . . . . . . . . . . . . . . . . . . . . . . . . . . . . . . . . . . . . . . . . . . . 2 Connecting a Wireless Client to the AirRouter. . . . . . . . . . . . . . . . . . . . . . . . . . . . . . . . . . . . . 3 Chapter 3: AirOS™ . . . . . . . . . . . . . . . . . . . . . . . . . . . . . . . . . . . . . . . . . . . . . . . . . . . . . . . . . . . . . . 4 Navigation. . . . . . . . . . . . . . . . . . . . . . . . . . . . . . . . . . . . . . . . . . . . . . . . . . . . . . . . . . . . . . . . . . . . . . . 4 Main. . . . . . . . . . . . . . . . . . . . . . . . . . . . . . . . . . . . . . . . . . . . . . . . . . . . . . . . . . . . . . . . . . . . . . . . . . . . . 4 Wireless. . . . . . . . . . . . . . . . . . . . . . . . . . . . . . . . . . . . . . . . . . . . . . . . . . . . . . . . . . . . . . . . . . . . . . . . . . 8 Network. . . . . . . . . . . . . . . . . . . . . . . . . . . . . . . . . . . . . . . . . . . . . . . . . . . . . . . . . . . . . . . . . . . . . . . . . 13 Advanced. . . . . . . . . . . . . . . . . . . . . . . . . . . . . . . . . . . . . . . . . . . . . . . . . . . . . . . . . . . . . . . . . . . . . . . 25 Services. . . . . . . . . . . . . . . . . . . . . . . . . . . . . . . . . . . . . . . . . . . . . . . . . . . . . . . . . . . . . . . . . . . . . . . . . 27 System. . . . . . . . . . . . . . . . . . . . . . . . . . . . . . . . . . . . . . . . . . . . . . . . . . . . . . . . . . . . . . . . . . . . . . . . . . 29 Tools. . . . . . . . . . . . . . . . . . . . . . . . . . . . . . . . . . . . . . . . . . . . . . . . . . . . . . . . . . . . . . . . . . . . . . . . . . . . 30 Appendix A: Specifications. . . . . . . . . . . . . . . . . . . . . . . . . . . . . . . . . . . . . . . . . . . . . . . . . . . . . . . 34 Appendix B: Warranty . . . . . . . . . . . . . . . . . . . . . . . . . . . . . . . . . . . . . . . . . . . . . . . . . . . . . . . . . . . 35 General Warranty. . . . . . . . . . . . . . . . . . . . . . . . . . . . . . . . . . . . . . . . . . . . . . . . . . . . . . . . . . . . . . . . 35 Appendix C: Contact Information. . . . . . . . . . . . . . . . . . . . . . . . . . . . . . . . . . . . . . . . . . . . . . . . 36 Ubiquiti Networks Support. . . . . . . . . . . . . . . . . . . . . . . . . . . . . . . . . . . . . . . . . . . . . . . . . . . . . . 36 Ubiquiti Networks, Inc. i AirRouter User Guide Chapter 1: Product Overview Chapter 1: Product Overview Internet LED Displays solid green when the AirRouter is connected to the Internet. Flashes to indicate Internet activity. Thank you for purchasing the Ubiquiti AirRouter. Package Contents Wireless LAN LED Displays solid green when the wireless LAN is enabled. It will flash to indicate wireless activity. Power LED Displays solid green once the AirRouter is connected to the power adapter and the power adapter is connected to a power outlet. AirRouter Power Adapter Ethernet Cable Quick Start Guide Rear View System Requirements • Microsoft Windows XP, Windows Vista, Windows 7, Linux, or Mac OS X • Java Runtime Environment 1.6 (or above) for the AirView utility • Web Browser: Mozilla Firefox, Apple Safari, or Microsoft Internet Explorer Top View Main Ethernet Port Functions as the WAN port in SOHO Router mode and connects your AirRouter to your broadband modem or Internet connection using a standard Ethernet cable. LAN Ports (1-4) Connects devices to your AirRouter using standard Ethernet cables. Reset Button Resets the AirRouter to the factory default settings. Note: Resetting the AirRouter to factory default settings will erase custom settings you have made. You can backup your configuration from System > Backup Configuration > Download in the browser-based management interface. USB Port Reserved for future use. Power Port The power adapter connects here to provide power to the AirRouter. LAN LEDs (1-4) Displays the status of the wired connections to Ethernet ports 1-4. Solid green indicates a good connection. Flashing indicates activity on the specific port. Main Ethernet LED Displays the status of the Main Ethernet port connection. Solid green indicates a good connection. Flashing indicates activity. Ubiquiti Networks, Inc. 1 AirRouter User Guide Chapter 2: Installation Chapter 2: Installation 4. Launch your Web browser and type http://192.168.1.1 in the address field and press enter (PC) or return (Mac). Hardware Installation To install the AirRouter, perform the following steps: 1. Connect the power adapter to the port labeled Power on the AirRouter. Connect the other end to of the power adapter to a power outlet. Note: Your computer needs to be on the 192.168.1.x subnet. If you have DHCP enabled on your Ethernet adapter, it should receive an address automatically. If not, you will need to set a static IP address in the 192.168.1.2 - 192.168.1.254 range. 5. The login screen will appear. Enter ubnt in the Username and Password fields and click Login. 2. Connect an Ethernet cable to Ethernet port 1. 6. The AirOS interface will appear. Go to the Wireless tab. Wireless tab 3. Connect the other end of the Ethernet cable to your computer. Ubiquiti Networks, Inc. 2 AirRouter User Guide 7. Customize your wireless network and secure your network by entering the basic wireless network information: Chapter 2: Installation Connecting a Wireless Client to the AirRouter Windows 1. Go to Connect to Network. Windows 7 Right-click on the Network icon. Windows Vista Go to Start > Connect To. Windows XP Right-click the Wireless Network icon in the System Tray (lower right corner of the screen) and then click View Available Wireless Networks. 2. Select the wireless network (SSID) that you entered in the SSID field in step 7a and then click Connect. 3. Type the passphrase that you entered in the WPA Preshared Key field in step 7c and click OK or Connect. a. Enter a name for your wireless network in the SSID field. 4. Launch your web browser to begin browsing the web. b. Select the type of security that you want to use for your wireless network from the Security drop-down. Mac Note: WPA2-AES security is the srongest wireless security method. If all of your devices support this option, it is recommended that you select it. c. Enter a passphrase in the WPA Preshared Key field. You can click the Show option to see the characters that you are typing. d. Click Change. You will be prompted to apply the changes. To proceed, click Apply. 8. If necessary, disconnect the power and Ethernet cables to move the router so that you can connect it to your Internet connection. 1. Click the AirPort of the screen). icon in the menu bar (top left side 2. Select the wireless network (SSID) that you entered in the SSID field in step 7a. 3. Type the passphrase that you entered in the WPA Preshared Key field in step 7c and click OK. 4. Once connected the AirPort icon will change from gray to solid black. The number of black lines indicates the signal strength. Launch your web browser to begin browsing the web. 9. Connect an Ethernet cable from your broadband modem or other Internet connection to the port labeled <···> on the back of the AirRouter. Congratulations! Basic router installation is complete. Proceed to Connecting a Wireless Client to the AirRouter for information on connecting wireless clients. Ubiquiti Networks, Inc. 3 AirRouter User Guide Chapter 3: AirOS™ AirOS™ is an advanced operating system that is capable of powerful wireless and routing features. AirOS is built upon a simple and intuitive user interface. AirOS allows you to maximize the wireless performance of Ubiquiti products which are based on IEEE 802.11n. To access the interface, perform the following steps: 1. Launch your Web browser and type http://192.168.1.1 in the address field and press enter (PC) or return (Mac). Chapter 3: AirOS™ Each page also contains network administration and monitoring tools: • Align Antenna • Site Survey • Ping • Traceroute • Speed Test • AirView Main The Main tab displays a summary of the link status information, current values of the basic configuration settings (depending on the operating mode), network settings and information, and traffic statistics. 2. The login screen will appear. Enter ubnt in the Username and Password fields and click Login. Navigation The interface contains six main tabs: • Main The Main tab displays AirRouter status information and provides network monitoring links. Status • Wireless The Wireless tab allows you to configure the wireless mode, the basic wireless settings and the wireless security settings for the AirRouter. • Network The Network tab covers the configuration of the network operating mode, IP settings, packet filtering routines and network services. • Advanced The Advanced tab settings are available for additional wireless interface controls. The AirMax feature and advanced wireless settings can be configured in this tab. The Advanced tab also includes advanced Ethernet and traffic shaping settings. • Services The Services tab covers the configuration of system management services like SNMP, NTP, System Log, Ping Watchdog and SSH/Telnet server. • System The System tab contains controls for system maintenance routines, administrator account management, device customization, firmware upgrade and configuration backup. The interface language can also be selected here. Ubiquiti Networks, Inc. Device Name Displays the customizable name (ID) of the AirRouter. The Device Name (Host Name) is displayed in registration screens and discovery tools. Network Mode Displays the network mode that the AirRouter is operating in. There are three modes available: Bridge, Router, and SOHO router. SOHO router is the default setting. This setting is configured on the Network tab. Wireless Mode Displays the radio interface operating mode. Access Point (or Access Point WDS) and Station (or Station WDS) operating modes can be set depending on the network topology requirements. 4 AirRouter User Guide SSID Displays the wireless network name (SSID). The wireless network name is dependent upon the wireless mode selected: • While operating in Station mode, displays the SSID of the Access Point the AirRouter is associated with. • While operating in Access Point mode, this displays the SSID configured on the AirRouter. The SSID is configured on the Wireless tab. Security Displays the wireless security method being used on the AirRouter. If None is displayed, then wireless security has been disabled. Version Displays the version of the AirOS software. Uptime This is the total time the AirRouter has been running since last power up (reboot) or software upgrade. The time is displayed in days, hours, minutes and seconds. Date Displays the current system date and time. The date and time are displayed in YEAR-MONTH-DAY HOURS:MINUTES:SECONDS format. The system date and time is retrieved from the Internet using NTP (Network Time Protocol). NTP Client is enabled by default on the Services tab. The AirRouter doesn’t have an internal clock and the date and time may be inaccurate if NTP Client is disabled or the AirRouter isn’t connected to the Internet. Channel/Frequency Displays the channel number and corresponding operating frequency. The AirRouter uses the channel/radio frequency specified to transmit and receive data. Valid channel/frequency range will vary depending on local country regulations. Channel Width This is the spectral width of the radio channel used by the AirRouter. 5, 10, 20 and 40 MHz channel spectrum widths are supported. In Station (or Station WDS) 20/40 MHz is the value by default. ACK/Distance Displays the current timeout value for ACK frames. ACK Timeout can be set manually or self-adjusted automatically. The ACK Timeout (Acknowledgement frame Timeout) specifies how long the AirRouter should wait for an acknowledgement from a partner device confirming packet reception before concluding there must have been an error and resending the packet. Chapter 3: AirOS™ WAN/LAN Indicates the current status of the WAN and LAN Ethernet port connections. This can indicate that a cable is not plugged into a device and there is no active Ethernet connection. AP MAC Displays the MAC address of the AirRouter in Access Point or Access Point WDS mode. In Station or Stations WDS mode, this displays the MAC address of the Access Point the AirRouter is associated with. Connections Displays the number of wireless devices connected to the AirRouter when the device is operating in Access Point or Access Point WDS mode. This value is not displayed while operating in Station or Station WDS mode. Noise Floor Displays the current value of the noise level in dBm. Noise Floor is taken into account while evaluating the signal quality (Signal-to-Noise Ratio SNR, RSSI). Transmit CCQ This is an index of which evaluates the wireless Client Connection Quality. The level is based on a percentage value where 100% corresponds to a perfect link state. TX Rate and RX Rate Displays the current 802.11 data transmission (TX) and data reception (RX) rate when operating in Station or Station WDS mode. Airmax Indicates the AirMax status (Ubiquiti’s proprietary TDMA polling technology) when operating in Access Point or Access Point WDS mode. If AirMax is enabled, the AirRouter will only accept AirMax clients. (Disable AirMax for legacy 802.11bgn device compatibility). AirMax also features advanced QoS Autodetection settings. Airmax Quality This displays the AirMax Connection Quality. The level is based on a percentage value where 100% corresponds to a perfect link state. Airmax Capacity This is an index of maximum data rate the link is operating at. A Lower Capacity number indicates a unit that is bogging the system down. Monitor There are various monitoring tools accessible via the links on the Main tab. The default selection is Throughput which is displayed as soon as you open the Main tab. TX/RX Chains Displays the number of independent spatial data streams the AirRouter is transmitting/ receiving simultaneously within one spectral channel of bandwidth. This ability is specific for 802.11n devices which rely on multiple-input multiple-output (MIMO) technology. Multiple chains increase data transfer performance significantly. The number of chains Ubiquiti device uses is hardware specific. Every TX/RX chain requires a separate antenna. Throughput WLAN MAC Displays the MAC address of the AirRouter as seen on the wireless network. Shows a visual representation of the current data traffic on the LAN and WLAN in both graphical and numerical form. The chart scale and throughput dimension (Bps, Kbps, Mbps) changes dynamically according to the mean throughput value. The statistics are updated automatically. Throughput statistics can be updated manually using the Refresh button. LAN MAC Displays the MAC address of the AirRouter as seen on the LAN (Local Area Network). WAN MAC Displays the MAC address of the AirRouter as seen on the WAN interface. This is the AirRouter’s MAC address that is seen over the Internet. Ubiquiti Networks, Inc. 5 AirRouter User Guide Stations This selection lists the stations which are connected to the AirRouter while operating in Access Point or Access Point WDS mode. Chapter 3: AirOS™ Noise Floor Displays the current value of the noise level in dBm. Noise Floor is taken into account while evaluating the signal quality (Signal-to-Noise Ratio SNR, RSSI) while value mean depends on signal strength above the noise floor. CCQ Value represents the quality of the connection to the Station. Last IP Displays the last station’s IP address. The following statistics for each station are displayed in the station statistics window: Station MAC MAC address of the associated station. This is a clickable link that will display additional station info. Device Name Displays the client’s host name (if defined). Signal/Noise, dBm Signal value represents the last received wireless signal level, and Noise displays the value of the noise level. Tx/Rx, Mbps Tx value represents the data rates, in Mbps, of the last transmitted packets, and Rx value represents the data rates, in Mbps, of the last received packets; CCQ, % This is an index that evaluates the wireless Client Connection Quality (CCQ). The level is a percentage value where 100% corresponds to a perfect link state. TX/RX Rate Represents the data rates, in Mbps, of the last transmitted and received packets; TX/RX Packets Value represents the total amount of packets transmitted and received from the Station during the connection uptime. TX/RX Packet Rate, pps Represents the mean value of the transmitted and received packet rate. Bytes Transmitted Value represents the total amount of data (in bytes) transmitted during the connection. Bytes Received Value represents the total amount of data (in bytes) received during the connection. Negotiated Rate/Last Signal (dBm) Table values represent the received wireless signal level along with the data rates of recently received packets. N/A is displayed if no packets were received on that particular data rate. Connection Time Displays the connection time of each station connected to the AirRouter. The time is expressed in days, hours, minutes and seconds. Refresh The information in the Station Info window can be updated using this button. Last IP Displays the station’s IP address. Available only when operating in Station or Station WDS mode. Action Shows available options for this station, e.g.: kicking a station for a few seconds to identify any problematic stations. AP Information Refresh The information in the station statistics window can be updated using the Refresh button. Station Info Detailed information is displayed when you click on a specific MAC address: • Access Point Shows the MAC address of the Access Point the station is associated with. Device Name Displays the client’s host name. Connection time Displays the amount of time the station has been connected to the AirRouter. The time is expressed in days, hours, minutes and seconds; Signal Strength Value represents, in dBm, the last received wireless signal level. Ubiquiti Networks, Inc. • Device Name Displays the host name of the Access Point the station is associated with. • Connection time Value represents the running total of time the AirRouter has been associated with the Access Point. The time is expressed in days, hours, minutes and seconds. • Signal Strength Value represents the last received wireless signal level. 6 AirRouter User Guide • Noise Floor Displays the current value of the noise level in dBm. Noise Floor is taken into account while evaluating the signal quality (Signal-to-Noise Ratio SNR, RSSI) while value mean depends on signal strength above the noise floor. • CCQ Value represents the quality of the connection to the Access Point. • Tx/Rx Rate Represents the data rates of the last transmitted and received packets. • Tx/Rx Packets Displays the total number of packets transmitted and received during the connection. • Tx/Rx Packet Rate (packets per second) Represents the mean value of the transmitted and received packet rate. Chapter 3: AirOS™ Total Lease Time Shows the total time (validity) of the leased IP address assigned by the external DHCP server. Remaining Lease Time Displays the remaining time of the IP address leased by the external DHCP server. ARP table Lists all the entries of the ARP (Address Resolution Protocol) table currently recorded on the device. ARP is used to associate each IP address to the unique hardware address (MAC) of each device. It is important to have unique IP addresses for each MAC or else there will be ambiguous routes in the network. • Bytes transmitted/received Value represents the total amount of data (in bytes) transmitted and received during the connection. • Negotiated Rate/Last Signal (dBm) table Values represent the received wireless signal level along with the all data rates of recently received packets. “N/A” value is represented as the Last Signal if no packets were received on that particular data rate. To reconnect to the AP press the Reconnect button, in order to reestablish the wireless link. The list can be updated using the Refresh button. DHCP Client (Applicable for Router and SOHO Router in DHCP mode only.) Shows the device’s WAN IP address, Netmask, DNS servers and Gateway while operating in DHCP Router mode. IP Address Displays the assigned IP address. MAC Address Displays the MAC address of the device. Interface Displays the interface that the device is on. The list can be updated using the Refresh button. Bridge Table Displays the entries in the system bridge table when the device is operating in Bridge mode. The list can be updated using the Refresh button. The Bridge table shows which bridge port the particular station is associated with - in other words from which interface (Ethernet or wireless ) the network device (defined by MAC address) is reachable from. The AirRouter will forward the packets to that port only (thus saving a lot of redundant copies and transmits). The aging timer shows the aging time for each address entry (in seconds) - after particular time out, not having seen a packet coming from a certain address, the bridge will delete that address from the Bridge Table. IP Address Displays the device’s WAN IP address while operating in DHCP Client mode. Netmask Displays the device’s netmask when operating in DHCP Client mode. It is assigned automatically by the DHCP server (not the AirRouter’s DHCP server), which assigns the WAN IP address to the device. Routes Lists all the entries in the system routing table, while the device is operating in Router mode. Gateway Displays the device’s gateway when operating in DHCP Client mode, which is assigned automatically by the DHCP server (not the AirRouter’s DHCP server). Primary/Secondary DNS IP Domain Name System (DNS) is an Internet “phone book” which translates domain names to IP addresses. These fields identify the server IP addresses that the AirRouter uses for translation. DHCP Server Displays the IP address of the DHCP Server assigning the WAN IP Address to the AirRouter. Domain Displays the domain name. Ubiquiti Networks, Inc. The list can be updated using the Refresh button. AirOS examines the destination IP address of each data packet traveling through the system and chooses the appropriate interface to forward the packet to. The system choice depends on static routing rules – entries, which are registered in the system routing table. Static routes to specific hosts, networks or default gateway are set up automatically according to the IP configuration of all the AirOS interfaces. 7 AirRouter User Guide Port Forward Chapter 3: AirOS™ Log When logging is enabled (Services > System Log > Enable Log) this option lists all registered system events. By default, logging isn’t enabled. Lists active port forward entries in the PORTFORWARD chain of the standard iptables nat table, while the device is operating in Router mode. The list can be refreshed using the Refresh button. Port forwarding is enabled and configured on the Network tab. Port forwarding allows you to connect to a specific service such as an FTP server or Web server. Port Forwarding creates a transparent tunnel through a firewall/NAT, granting access from the WAN side to the particular network service running on the LAN side. DHCP leases Shows the current status of the leased IP addresses by the device’s DHCP server. This option is available if DHCP Server is enabled while the device is operating in Router mode. MAC Address Displays the client’s MAC address, which is connected to the Access Point. Clear Deletes all entries in the system log. Refresh The System Log content is updated. Wireless The Wireless Page contains everything needed by the operator to setup the wireless part of the link. This includes regulatory requirements, SSID, channel and frequency settings, device mode, data rates, and wireless security. IP Address Displays the client’s IP address leased by the device’s DHCP server. Remaining Lease Time Shows for how long the leased IP address will be valid and reserved for particular DHCP client. Hostname Displays the device name (hostname) of the client receiving an IP lease. Interface Name Displays the interface to which the specific MAC address is connected. The list can be updated using the Refresh button. More information is provided in the Wireless section. Basic Wireless Settings The general wireless settings, such as wireless mode, wireless network name(SSID), country code, 802.11 mode, output power and data rates can be configured in this section. Wireless Mode Allows you to specify the operating mode of the device. The mode depends on the network topology requirements. There are 4 operating modes supported on the AirRouter: Ubiquiti Networks, Inc. 8 AirRouter User Guide • Station This is a client mode, which connects the AirRouter to an Access Point. In Station mode, the AirRouter acts as the subscriber Station while connecting to the Access Point. The SSID of the Access Point is used and all the traffic to/from the network devices connected to the Ethernet interface is forwarded. Subscriber Station is using the arpnat technique which may result in a lack of transparency while passingthrough broadcast packets in bridge mode. • Station WDS WDS stands for Wireless Distribution System. Station WDS should be used while connecting to an Access Point that is operating in WDS mode. This mode is compatible with WPA/WPA2 encryption. Station WDS mode enables packet forwarding at the layer 2 level. The benefit of Station WDS is improved performance and faster throughput. Station WDS - Bridge mode is fully transparent for all Layer 2 protocols. • Access Point This is an 802.11 Access Point. • Access Point WDS This is an 802.11 Access Point which allows for layer 2 bridging with Station WDS devices using the WDS protocol. Access Point WDS is not fully compatible with WPA/WPA2 encryption. WDS allows you to bridge wireless traffic between devices which are operating in Access Point mode. Access Point is usually connected to a wired network (Ethernet LAN) allowing wireless connection to the wired network. By connecting Access Points to one another in an extended service set using the WDS, distant Ethernet connections can be bridged into a single LAN. It is very important that network loops should not be created with either WDS bridges or combinations of wired (Ethernet) connections and WDS bridges. Tree or Star shape network topology should be used in all WDS use-cases (i.e. if AP2 and AP3 are specified as the WDS peers of AP1, AP2 should not be specified as the WDS peer of AP3 and AP3 should not be specified as the WDS peer of AP2 in any case). Mesh and Ring network topologies are not supported by WDS and should be avoided in all the use cases. Note: Station WDS and Access Point WDS mode use the WDS protocol which is not defined as the standard thus compatibility issues between equipment from different vendors may arise. Ubiquiti Networks, Inc. Chapter 3: AirOS™ Note: When connecting devices in AP-WDSto-AP-WDS mode, the WPA/WPA2 security methods will not function. When connecting AP-WDS devices to another AP-WDS device use none or the WEP security method. However, this may compromise the security of your network. When connecting STA-WDS clients to an AP‑WDS device, all security methods are available and work properly. WDS Peers (Only applicable in Access Point WDS mode.) WDS Stations and/or WDS Access Points connected to the AirRouter should be specified in this list to create a wireless network infrastructure - Wireless Distribution System. Enter the MAC address of the paired WDS device in the WDS Peer entry field. One MAC address should be specified for Point-to-Point connection use case, up to six WDS Peers can be specified for Point-to-Multi-Point connection use case. Auto (Only applicable in Access Point WDS mode.) Option should be enabled in order to establish WDS connections between Access Points if WDS Peers are not specified. If the Auto option is enabled, the AirRouter will choose WDS Peers (Access Points) according to the SSID setting. Access Point operating in WDS mode should have the same SSID as the WDS Peer in order to establish the connection automatically while the Auto option is enabled. This configuration is also known as repeater mode. AP WDS Auto option can not be selected if any type of WPA or WPA2 security is used as WPA requires different roles on AP configuration (authenticator or supplicant). Note: Access Point operating in WDS mode and all the WDS Peers must operate on the same frequency channel, use the same channel spectrum width and the same security settings. SSID The wireless network name or SSID (Service Set Identifier) used to identify your 802.11 wireless LAN should be specified while operating in Access Point or Access Point WDS mode. All the client devices within range will receive broadcast messages from the access point advertising this SSID. While operating in Station or Station WDS mode, you should specify the SSID of the Access Point the AirRouter is associated with. There can be several Access Points with an identical SSID. If the SSID is set to “Any” the station will connect to any available AP. Select (Only applicable in Station and Station WDS mode.) The list of the available Access Points can be retrieved using the Select button. This control activates Site Survey tool which is used for the AP selection. Site Survey will search for the available wireless networks in range on all supported channels and allows you to select one for association. In case the selected network uses encryption, you’ll need to set security parameters in the Wireless Security section. Select the Access Point from the list and click Select button for association. 9 AirRouter User Guide Click Scan to refresh the list of available wireless networks. The Site Survey channel scan list can be modified using the Channel Scan List control. Hide SSID (Only applicable in Access Point and Access Point WDS mode.) When this option is enabled, the SSID (wireless network name) will not be broadcast to wireless stations. Lock to AP MAC (Only applicable in Station and Station WDS mode.) This allows the station to always maintain a connection to a particular AP with a specific MAC address. This is useful as sometimes there can be multiple access points using the same SSID. With AP lock on, the station will lock to a specific MAC address and not roam between several Access Points with the same SSID. Country Code Each country has their own power level and frequency regulations. To ensure the AirRouter operates under the necessary regulatory compliance rules, be sure to select the country where your device will be used. The channel list, output power limits, IEEE 802.11 and Channel Spectrum Width modes will be tuned according to the regulations of the selected country. IEEE 802.11 Mode Displays the radio standards used for the AirRouter. Channel Width Displays the spectral width of the radio channel. Supported wireless channel spectrum widths: • 5 MHz is the channel spectrum with the width of 5 MHz (known as Quarter-Rate mode). • 10 MHz is the channel spectrum with the width of 10 MHz (known as Half-Rate mode). • 20 MHz is the standard channel spectrum width (selected by default). Chapter 3: AirOS™ The benefits of this are private networking and inherent security. Using channel-shifting, networks instantly become invisible to the millions of Wi-Fi devices in the world. Frequency, MHz (Only applicable in Access Point or Access Point WDS mode.) Select the wireless channel while operating in Access Point mode. Multiple frequency channels are available to avoid interference between nearby access points. The channel list varies depending on the selected country code, IEEE 802.11 mode and Channel Spectrum Width and Channel Shifting option. Obey regulatory Rules Option must remain enabled while it will force the transmit output power to be compliant with the regulations of the selected country. In this case, it will not be possible to set equivalent isotropic radiated power (EIRP) above the amount allowed per regulatory domain (different maximum output power levels and antenna gains are allowed for each IEEE 802.11b/g/n regulatory domain thus country). Extension Channel (Only applicable in Access Point or Access Point WDS mode with 40 MHz channel width.) Indicates the use of channel bonding that allows the AirMax network to use two channels at once. Using two channels improves the performance of the Wi-Fi connection. It is automatically selected by the system. Channel Scan List, MHz (Only applicable in Station or Station WDS mode.) This will confine scanning only to the selected channels. The benefits of this are faster scanning as well as filtering out unwanted AP’s in the results. Site Survey tool will look for the Access Points in selected channels only. Once enabled, click Edit to open the Channel Scan List window. • 40 MHz is the channel spectrum with the width of 40 MHz. • Auto 20/40MHz (Only applicable in Station or Station WDS mode.) It offers better compatibility. Note: Laptops cannot connect to the AirRouter when the channel width is set to 5/10 MHz. Some devices may not be able to connect using the 40 MHz setting. Channel Shifting Enables special channels which have the frequency offset from the standard 802.11b/g/n channels. This is a proprietary Ubiquiti Networks developed feature. While 802.11 networks have standard channels spaced every 5 MHz apart, channel shifting uses non-standard channels offset from the standard channels. All the channels can be shifted by 5 MHz (in 802.11n) or 2 MHz (in 802.11bgn) from the default central channel frequency. Note: Channel shifting is not compatible with legacy products. Ubiquiti Networks, Inc. Select the channels that you want to scan and click OK or click Close to close the window without any selections. Output Power This defines the maximum average transmit output power (in dBm) of the AirRouter. The output power can be specified using the slider. When entering the output power value manually, the slider position will change according to the entered value. The transmit power level maximum is limited according to the country regulations. Output power is the output power delivered to the internal antenna. Max Data Rate, Mbps This defines the data rate (in Mbps) at which the device should transmit wireless packets. You can fix a specific data rate between MCS 0 and MCS 7. It is recommended that you use the automatic option, especially if you are having trouble getting connected or losing data at a higher rate. In this case, the lower data rates will be used automatically. If you select 20 MHz 10 AirRouter User Guide Channel Spectrum width, the maximum data rate is MCS7 (65Mbps). If you select 40 MHz Channel Spectrum width the maximum data rate is MCS7 (150 Mbps). Automatic When selected, the rate algorithm will select the best data rate, depending on link quality conditions. It is recommended that you use this option, especially if you are having trouble getting connected or losing data at a higher rate. Refer to the Advanced section for detailed information about rate algorithms. Wireless Security In Access Point and Access Point WDS mode, this is where you configure the wireless security settings that will be used by the devices on your wireless network. In Station or Station WDS mode, you will need to match the security settings of the Access Point that the AirRouter is associated with. Security The AirRouter supports the following wireless security methods: • WEP WEP (Wired Equivalent Privacy) is the oldest and least secure security algorithm. WPA™/WPA2™ security methods should be used when possible. • WPA WPA™ or Wi-Fi Protected Access was developed as a stronger encryption method over WEP. • WPA-TKIP WPA™ (Wi-Fi Protected Access) security mode with TKIP support only. TKIP (Temporal Key Integrity Protocol) uses the RC4 encryption algorithm. • WPA-AES WPA™ (Wi-Fi Protected Access) security mode with AES support only. AES (also known as CCMP) - Counter Mode with Cipher Block Chaining Message Authentication Code Protocol which uses the Advanced Encryption Standard (AES) algorithm. • WPA2 WPA2™ was developed to strengthen wireless encryption security and is stronger than WEP and WPA™. • WPA2-TKIP WPA2™ (Wi-Fi Protected Access) security mode with TKIP support only. Temporal Key Integrity Protocol which uses RC4 encryption algorithm. • WPA2-AES WPA2™ (Wi-Fi Protected Access) security mode with AES support only. AES (also known as CCMP) - Counter Mode with Cipher Block Chaining Message Authentication Code Protocol which uses the Advanced Encryption Standard (AES) algorithm. This is the strongest security option available. If all of the wireless devices on your network support this option, it is recommended that you select it. Chapter 3: AirOS™ WEP Authentication Type One of the following authentication methods should be selected if WEP security is used: • Open The station is authenticated automatically by the AP (selected by default). • Shared Key Station is authenticated after the challenge, generated by the AP. WEP Key Length This determines the length of the WEP security key. Select one of the two key length options: • 64-bit This option is selected by default. A 64-bit key is 10 HEX or 5 ASCII characters in length. • 128‑bit The 128-bit option provides a little more security and is 26 HEX or 13 ASCII characters in length. Key Type Specifies the character format for the WEP key: • HEX Selected by default, this option uses hexadecimal characters. 0-9, A-F or a-f are valid characters. • ASCII ASCII uses the standard English alphabet and numeric characters. WEP Key Enter the WEP encryption key adhering to the selections you made for key length and key type: Type HEX ASCII 64-bit 10 Hexadecimal Characters (0-9, A-F or a-f ) Example: 00112233AA 5 ASCII Characters Example: ubnt1 128-bit 26 Hexadecimal Characters (0-9, A-F or a-f ) Example: 00112233445566778899AABBCC 13 ASCI characters Example: ubntproducts1 Key Index Specifies the Index of the WEP Key used. 4 different WEP keys can be configured at the same time, but only one is used. The effective key is set by choosing 1, 2, 3 or 4. WPA™/WPA2™ The configuration options are the same for all of the WPA™ and WPA2™ options. WPA2-AES is the strongest security method. If all of the wireless devices on your network support this option, it is recommended that you select it. If you want an open network without wireless security, select None. WPA Authentication One of the following WPA™ key selection methods should be specified if WPA™ or WPA2™ security method is used: • PSK Pre-shared Key method (selected by default). Ubiquiti Networks, Inc. 11 AirRouter User Guide • EAP EAP (Extensible Authentication Protocol) IEEE 802.1x authentication method. This method is commonly used in Enterprise networks. PSK WPA Pre-shared Key A passphrase needs to be specified when the Pre‑shared Key method is selected. The pre‑shared key is an alpha‑numeric password between 8 and 63 characters long. Chapter 3: AirOS™ Note: When connecting devices in AP-WDS-toAP-WDS mode, the WPA/WPA2 security methods will not function. When connecting AP-WDS devices to another AP-WDS device use none or the WEP security method. However, this may compromise the security of your network. In case of connecting STA-WDS clients to an AP-WDS device, all security methods are available and work properly. MAC ACL EAP EAP - Station Mode MAC ACL (Only applicable in Access Point and Access Point WDS mode) MAC Access Control List (ACL) lets you allow or deny clients connectivity to the AirRouter. When enabled, select one of the policies: WPA Anonymous Identity (Only applicable in Station or Station WDS mode with EAP-TTLS.) Identification credential (also known as identity) used by the supplicant for EAP authentication. WPA User Name (Only applicable in Station and Station WDS mode.) Identification credential (also known as anonymous identity) used by the supplicant for EAP tunneled authentication (EAP-TTLS) in unencrypted form. WPA User Password (Only applicable in Station and Station WDS mode.) Password credential used by the supplicant for EAP authentication. EAP- Access Point Mode • Allow Wireless clients in the list have access to the AirRouter. Any wireless clients that have not been added to the list will not have access to the AirRouter. • Deny Wireless clients in the list will be denied access to the AirRouter. Any wireless client that is not in the list can access the AirRouter. The MAC addresses of the wireless clients can be added and removed using the Add and Remove buttons. Note: MAC Access Control should be used in combination with a security method such as WPA™ or WPA2™. It should not be used as the only method of security on your network. Click Change to save the changes. Radius Server IP Specifies the RADIUS Server’s IP address. RADIUS is a networking protocol providing centralized Authentication, Authorization, and Accounting (AAA) management for computers in order to connect to, and use a network service. Radius Server Port Specifies the RADIUS Server’s UDP port. The most commonly used port is 1812, but that depends on the RADIUS Server you are using. Radius Server Secret Specifies the password. A shared secret is a case-sensitive text string used to validate communication between two RADIUS devices. Ubiquiti Networks, Inc. 12 AirRouter User Guide Network The Network tab allows the administrator to setup bridge or routing functionality. The IP configuration is required for device management purposes. IP addresses can either be retrieved from a DHCP server or configured manually. Use the Network tab to configure the IP settings. Chapter 3: AirOS™ The AirRouter can act as DHCP server and use Network Address Translation (Masquerading) feature which is widely used by Access Points. NAT will act as the firewall between LAN and WLAN networks. Additional firewall settings can be configured for Layer 3 packet filtering and access control in Router mode. • SOHO Router SOHO (Small Office/Home Office) Router is basically a derivation from Router mode. In SOHO Router mode, the Main Ethernet port labeled <···> functions as the WAN port. The WLAN and LAN ports function as the local network (LAN). This is the default operating mode of the AirRouter. Disable Network This option can be used to disable the WLAN, LAN or WAN interface. This setting should be used with caution as no L2 or L3 connection can be established through the disabled interface. It will be impossible to access the AirRouter from the wireless/wired network which is connected to the disabled interface. Disable WAN is only applicable while operating in SOHO Router mode. Bridge Network Role The AirRouter can operate in Bridge, Router or SOHO Router mode. Network Mode Specify the operating network mode for the device. There are three modes: Bridge, Router and SOHO Router. The default setting for the AirRouter is SOHO Router. The mode depends on the network topology requirements: • Bridge In this mode the device will act as a transparent bridge and will operate in Layer 2. There will be no network segmentation and the broadcast domain will be the same. Bridge mode will not block any broadcast or multicast traffic. Additional firewall settings can be configured for Layer 2 packet filtering and access control in Bridge mode. • Router This operating mode can be configured in order to operate in Layer 3 to perform routing and enable network segmentation – wireless clients will be on a different IP subnet. Router mode will block broadcasts while it is not transparent. In Bridge mode, the AirRouter forwards all network management and data packets from one network interface to the other without any intelligent routing. For simple applications this provides an efficient and fully transparent network solution. WLAN (wireless) and LAN (Ethernet) interfaces belong to the same network segment and share the same IP address space. WLAN and LAN interfaces form the virtual bridge interface while acting as the bridge ports. The bridge has assigned IP settings for management purposes. Network Settings Bridge IP Address The device can be set for static IP or can be set to obtain an IP address from the DHCP server it is connected to. One of the IP assignment modes must be selected: • DHCP Choose this option to assign the dynamic IP address, Gateway and DNS address by the local DHCP server. -- DHCP Fallback IP Enter the IP address for the AirRouter to use if a DHCP server is not found. -- DHCP Fallback Netmask Enter the netmask for the AirRouter to use if a DHCP server is not found. The AirRouter supports Multicast packet pass-through in Router mode. Ubiquiti Networks, Inc. 13 AirRouter User Guide Chapter 3: AirOS™ intended for use within the same network segment only. Auto IP always starts with 169.254.X.Y while X and Y are last 2 digits from the MAC address of the device (i.e. if the MAC is 00:15:6D:A3:04:FB, Generated unique Auto IP will be 169.254.4.251). • Static Choose this option to assign the static IP settings for the bridge interface. IP Aliases IP aliases for the internal and external network interface can be configured. IP Aliases can be specified using the IP Aliases configuration window which is opened when you click Configure. Note: IP Address and Netmask settings should be consistent with the address space of the network segment where the AirRouter resides. -- IP Address Enter the IP address of the device while Static Bridge IP Address mode is selected. This IP will be used for AirRouter management purposes. -- Netmask This is a value which when expanded into binary provides a mapping to define which portions of IP address groups can be classified as host devices and network devices. Netmask defines the address space of the network segment where the AirRouter resides. 255.255.255.0 (or /24) Netmask is commonly used on many C Class IP networks. -- Gateway IP Typically, this is the IP address of the host router which provides the point of connection to the Internet. This can be a DSL modem, Cable modem, or a WISP gateway router. The AirRouter will direct the packets of data to the gateway if the destination host is not within the local network. Note: In Bridge mode, the Gateway IP address should be from the same address space (on the same network segment) as the AirRouter. -- Primary DNS IP Enter the IP address of the Primary DNS (Domain Name System) server. -- Secondary DNS IP Enter the IP address of the Secondary DNS (Domain Name System) server. This entry is optional and only used if the primary DNS server is not responding. • IP The alternative IP address for the LAN or WLAN interface, which can be used for the routing or device management purposes. • Netmask The network address space identifier for the particular IP Alias. • Comments Field used for a brief description of the purpose of the alias. • Enabled Enables or disables the particular IP Alias. All added IP Aliases are saved in the system configuration file, however only the enabled IP Aliases are active on the AirRouter. Newly IP Aliases can be saved by click the Save button or discarded by clicking the Cancel button in the Aliases configuration window. Firewall Settings Firewall functionality on the bridge interface can be enabled by selecting Enable Firewall. Bridge Firewall rules can be configured, enabled or disabled while using Firewall configuration window which opens when you click Configure. Spanning Tree Protocol Multiple interconnected bridges create larger networks using the IEEE 802.1d Spanning Tree Protocol (STP), which is used for finding the shortest path within network and to eliminate loops from the topology. If enabled, the AirRouter Bridge will communicate with other network devices by sending and receiving Bridge Protocol Data Units (BPDU). STP should be turned off (selected by default) when the AirRouter is the only bridge on the LAN or when there are no loops in the topology as there is no need for the bridge to participate in the Spanning Tree Protocol in this case. Auto IP Aliasing Automatically generates an IP Address for the corresponding WLAN/LAN interface if enabled. The generated IP address is a unique Class B IP address from the 169.254.X.Y range (Netmask 255.255.0.0) which is Ubiquiti Networks, Inc. 14 AirRouter User Guide Firewall entries can be specified by using the following criteria: Interface The interface (WLAN or LAN) where filtering of the incoming/passing-through packets are processed. IP Type Sets which particular L3 protocol type (IP, ICMP, TCP, UDP) should be filtered. Source IP/Mask The source IP of the packet (specified within the packet header), usually it is the IP of the host system which sends the packets. Chapter 3: AirOS™ • The wireless interface and all of the connected wireless clients are considered part of the external network and all network devices on the LAN side as well as the Ethernet interface itself are considered as part of the internal network when the AirRouter is operating in Station or Station WDS mode. Wireless/wired clients are routed from the internal network to the external one by default. Network Address Translation (NAT) functionality works the same way. Src Port The source port of the TCP/UDP packet (specified within the packet header), usually it is the port of the host system application which sends the packets. Destination IP/Mask The destination IP of the packet (specified within the packet header), usually it is the IP of the system which the packet is addressed to. Dst Port The destination port of the TCP/UDP packet (specified within the packet header), usually it is the port of the host system application which the packet is addressed to. Comment Field used to enter a brief description of the firewall entry. On Enables or disables the effect of the particular firewall entry. All added firewall entries are saved in system configuration file, however only the enabled firewall entries will be active on the AirRouter. Not Can be used for inverting the Source IP/mask, Source Port, Destination IP/mask and Destination Port filtering criteria (i.e. if not is enabled for the specified Destination Port value 443, the filtering criteria will be applied to all the packets sent to any Destination Port except the 443 which is commonly used by HTTPS). Click Save to save your firewall entries or click Cancel to discard your changes. All active firewall entries are stored in the FIREWALL chain of the ebtables filter table, while the device is operating in Bridge mode. Please refer to the ebtables manual for a detailed description of the firewall functionality in Bridge mode. Click Change to save the changes made in the Network tab. Router The role of the LAN and WLAN interface will change depending on the Wireless Mode selected while the AirRouter is operating in Router mode: • The wireless interface and all connected wireless clients are considered as part of the internal LAN and the Ethernet interface is dedicated for the connection to the external network while the AirRouter is operating in Access Point or Access Point WDS mode. Ubiquiti Networks, Inc. WLAN Network settings IP Address This is the IP address to be represented by the WLAN interface which is connected to the internal network according to the wireless operation mode described above. This IP will be used for the routing of the internal network (it will be the Gateway IP for all the devices connected on the internal network). This IP address can be used to access the management interface of the AirRouter. Netmask This is used to define the device IP classification for the chosen IP address range. 255.255.255.0 is a typical netmask value for Class C networks, which support IP address range 192.0.0.x to 223.255.255.x. Class C network Netmask uses 24 bits to identify the network (alternative notation “/24”) and 8 bits to identity the host. Enable NAT Network Address Translation (NAT) enables packets to be sent from the wired network (LAN) to the wireless interface IP address and then sub-routed to other client devices residing on the local network while the AirRouter is operating in Access Point or Access Point WDS mode and in the reverse direction in Station and Station WDS mode. Enable NAT Protocol While NAT is enabled, data packets could be modified in order to allow pass-through to the Router. To avoid packet modification of some specific packets, like: SIP, PPTP, FTP, RTSP; uncheck the respective checkbox. NAT is implemented using the masquerade type firewall rules. NAT firewall entries are stored in the iptables nat table, while the device is operating in Router mode. Please refer to the iptables tutorial for detailed description of the NAT functionality in Router mode. 15 AirRouter User Guide Static routes should be specified in order for the packets to pass-through the AirRouter if NAT is disabled in while operating in Router mode. Chapter 3: AirOS™ Port Forwarding rules can be set in the Port Forwarding window, which is opened by enabling Port Forwarding and then clicking Configure. Enable DHCP Server Dynamic Host Configuration Protocol (DHCP) Server assigns IP addresses to clients which will associate to the wireless interface while the AirRouter is operating in Access Point or Access Point WDS mode and assigns IP addresses to clients which will connect to the LAN interface while the AirRouter is operating in Station or Station WDS mode. • Range Start/End This range determines the IP addresses given out by the DHCP server to client devices on the internal network which use dynamic IP configuration. • Netmask This is used to define the device IP classification for the chosen IP address range. 255.255.255.0 is a typical netmask value for Class C networks, which support IP address range 192.0.0.x to 223.255.255.x. Class C network Netmask uses 24 bits to identify the network (alternative notation “/24”) and 8 bits to identity the host. • Lease Time The IP addresses given out by the DHCP server will only be valid for the duration specified by the lease time. Increasing the time ensures client operation without interruption, but could introduce potential conflicts. Lowering the lease time will avoid potential address conflicts, but might cause more slight interruptions to the client while it acquires a new IP addresses from the DHCP server. The time is expressed in seconds. Enable DNS Proxy The DNS Proxy forwards the Domain Name System requests from the hosts which reside in the internal network to the DNS server while the AirRouter is in operating in Router mode. A valid Primary DNS Server IP needs to be specified for DNS Proxy functionality. The internal network interface IP of the AirRouter should be specified as the DNS server in the host configuration in order for the DNS Proxy to be able to get the DNS requests and translate domain names to IP addresses afterwards. Port Forwarding Port forwarding allows specific ports of the hosts residing in the internal network to be forwarded to the external network. This is useful for number of applications such as FTP servers, gaming, etc. where different host systems need to be seen using a single common IP address/port. Ubiquiti Networks, Inc. Port Forwarding entries can be specified by using the following criteria: • Private IP The IP of the host which is connected to the internal network and needs to be accessible from the external network. • Private Port The TCP/UDP port of the application running on the host which is connected to the internal network. The specified port will be accessible from the external network. • Type The L3 protocol (IP) type which needs to be forwarded from the internal network. • Public Port The TCP/UDP port of the AirRouter which will accept and forward the connections from the external network to the host connected to the internal network. • Comments Enter a brief description of the port forwarding functionality such as FTP server, Web server, or game server. • Enabled Enables or disables the effect of the particular port forwarding entry. All the added firewall entries are saved in the system configuration file, however only the enabled port forwarding entries are used on the AirRouter. Save your port forwarding entries by clicking Save or discard your changes by clicking Cancel. 16 AirRouter User Guide LAN Network Settings LAN IP Address This is the IP address to be represented by the LAN or WLAN interface which is connected to the external network according to the wireless operation mode described previously. This IP address can be used for routing and device management purposes. The external network interface can be set for static IP or can be set to obtain an IP address from the DHCP server which should reside in the external network. One of the IP assignment modes must be selected for the external network interface: Chapter 3: AirOS™ • DMZ IP Enter the IP address of the internal network device and the device will be completely exposed to the external network. Auto IP Aliasing Automatically generates an IP Address for the corresponding WLAN/LAN interface if enabled. The generated IP address is a unique Class B IP address from the 169.254.X.Y range (Netmask 255.255.0.0) which is intended for use within the same network segment only. Auto IP always starts with 169.254.X.Y while X and Y are last 2 digits from the MAC address of the device (i.e. if the MAC is 00:15:6D:A3:04:FB, Generated unique Auto IP will be 169.254.4.251). IP Aliases IP aliases for the internal and external network interface can be configured. IP Aliases can be specified using the IP Aliases configuration window which is opened when you click Configure. • DHCP Choose this option to obtain the IP address, Gateway and DNS address dynamically from the external DHCP server. • PPPoE Choose this option to obtain the IP address, Gateway and DNS address dynamically from the external PPPoE server. • Static Choose this option to assign the static IP settings for the external interface. DHCP • IP The alternative IP address for the LAN or WLAN interface, which can be used for the routing or device management purposes. • Netmask The network address space identifier for the particular IP Alias. • Comments Field used for a brief description of the purpose of the alias. DHCP Fallback IP If the AirRouter is set to Dynamic IP Address mode (DHCP) and is unable to obtain an IP address from a valid DHCP server, it will fall back to the static IP address listed here. DHCP Fallback Netmask If the AirRouter is set to Dynamic IP Address mode (DHCP) and unable to obtain an IP address from a valid DHCP server, it will fall back to the static Netmask listed here. Enable DMZ The Demilitarized zone (DMZ) can be enabled and used so that services such as Web Servers, Proxy Servers, and E-mail Servers can still serve the local network and are at the same time isolated from it for additional security. DMZ is commonly used with NAT functionality as an alternative to Port Forwarding but DMZ opens all ports of the host network device to the external network. • DMZ Management Port Web Management Port for the AirRouter (TCP/IP port 80 by default) will be used for the host device if the DMZ Management Port option is enabled. Ubiquiti Networks, Inc. • Enabled Enables or disables the particular IP Alias. All added IP Aliases are saved in the system configuration file, however only the enabled IP Aliases are active on the AirRouter. Newly IP Aliases can be saved by click the Save button or discarded by clicking the Cancel button in the Aliases configuration window. Change MAC Address When enabled, the MAC address of the respective interface can be changed. This is especially useful if your ISP only assigns one valid IP address and it is associated to a specific MAC address; usually used by Cable operators or some WISPs. PPPoE Point-to-Point Protocol over Ethernet (PPPoE) is a virtual private and secure connection between two systems which enables encapsulated data transport. It is commonly used as the medium for subscribers to connect to Internet Service Providers (typically DSL). 17 AirRouter User Guide Select the IP Address option PPPoE to configure a PPPoE tunnel in order to connect to an ISP. Only the external network interface can be configured as a PPPoE client as all the traffic will be sent via this tunnel. The IP address, Default gateway IP and DNS server IP address will be obtained from the PPPoE server after PPPoE connection is established. The broadcast address is used for the PPPoE server discovery and tunnel establishment. A valid username and password are required for the PPPoE connection: PPPoE Username Username to connect to the server (must match the configured on the PPPoE server). Chapter 3: AirOS™ • DMZ Management Port Web Management Port for the AirRouter (TCP/IP port 80 by default) will be used for the host device if the DMZ Management Port option is enabled. • DMZ IP Enter the IP address of the internal network device and the device will be completely exposed to the external network. Auto IP Aliasing Automatically generates an IP Address for the corresponding WLAN/LAN interface if enabled. The generated IP address is a unique Class B IP address from the 169.254.X.Y range (Netmask 255.255.0.0) which is intended for use within the same network segment only. Auto IP always starts with 169.254.X.Y while X and Y are last 2 digits from the MAC address of the device (i.e. if the MAC is 00:15:6D:A3:04:FB, Generated unique Auto IP will be 169.254.4.251). IP Aliases IP aliases for the internal and external network interface can be configured. IP Aliases can be specified using the IP Aliases configuration window which is opened when you click Configure. PPPoE Password Password to connect to the server (must match the configured on the PPPoE server). Show Check this box to display the PPPoE password characters. PPPoE MTU/MRU The size (in bytes) of the Maximum Transmission Unit (MTU) and Maximum Receive Unit (MRU) used for data encapsulation while transferring through the PPP tunnel; (MTU/MRU default value: 1492) PPPoE Encryption Enables the use of MPPE encryption. The IP address of the PPP interface will be displayed on the Main tab next to the PPP interface statistics if it is obtained through the established PPPoE connection, otherwise a Not Connected message will be displayed. A PPPoE tunnel reconnection routine can be initiated using the Reconnect button which is located in the Main tab next to the PPP interface statistics. • IP The alternative IP address for the LAN or WLAN interface, which can be used for the routing or device management purposes. • Netmask The network address space identifier for the particular IP Alias. • Comments Field used for a brief description of the purpose of the alias. • Enabled Enables or disables the particular IP Alias. All added IP Aliases are saved in the system configuration file, however only the enabled IP Aliases are active on the AirRouter. Newly IP Aliases can be saved by click the Save button or discarded by clicking the Cancel button in the Aliases configuration window. Enable DMZ The Demilitarized zone (DMZ) can be enabled and used so that services such as Web Servers, Proxy Servers, and E-mail Servers can still serve the local network and are at the same time isolated from it for additional security. DMZ is commonly used with NAT functionality as an alternative to Port Forwarding but DMZ opens all ports of the host network device to the external network.. Ubiquiti Networks, Inc. Change MAC Address When enabled, the MAC address of the respective interface can be changed. This is especially useful if your ISP only assigns one valid IP address and it is associated to a specific MAC address; usually used by Cable operators or some WISPs. 18 AirRouter User Guide Static IP Address and Netmask settings should be consistent with the address space of the network segment where the AirRouter resides. If the IP of the AirRouter and the IP of the administrator PC use a different address space, the AirRouter will become unreachable. (Applicable for Static mode only) Netmask This is used to define the device IP classification for the chosen IP address range. 255.255.255.0 is a typical netmask value for Class C networks, which support IP address range 192.0.0.x to 223.255.255.x. A Class C network Netmask uses 24 bits to identify the network (alternative notation “/24”) and 8 bits to identity the host. (Applicable for Static mode only) Gateway IP The IP address of the host router which resides on the external network and provides the point of connection to the next hop towards the Internet. This can be a DSL modem, Cable modem, or a WISP gateway router. The AirRouter will direct all the packets to the gateway if the destination host is not within the local network. (Applicable for Static mode only) The Gateway IP address should be from the same address space (on the same network segment) as the AirRouter’s external network interface (Wireless interface in the Station or Station WDS mode and the LAN interface in Access Point or Access Point WDS mode). (Applicable for Static mode only) Primary DNS IP Enter the IP address of the Primary DNS (Domain Name System) server. Secondary DNS IP Enter the IP address of the Secondary DNS (Domain Name System) server. This entry is optional and only used if the primary DNS server is not responding. Auto IP Aliasing Automatically generates an IP Address for the corresponding WLAN/LAN interface if enabled. The generated IP address is a unique Class B IP address from the 169.254.X.Y range (Netmask 255.255.0.0) which is intended for use within the same network segment only. Auto IP always starts with 169.254.X.Y while X and Y are last 2 digits from the MAC address of the device (i.e. if the MAC is 00:15:6D:A3:04:FB, Generated unique Auto IP will be 169.254.4.251). Ubiquiti Networks, Inc. Chapter 3: AirOS™ IP Aliases IP aliases for the internal and external network interface can be configured. IP Aliases can be specified using the IP Aliases configuration window which is opened when you click Configure. • IP The alternative IP address for the LAN or WLAN interface, which can be used for the routing or device management purposes. • Netmask The network address space identifier for the particular IP Alias. • Comments Field used for a brief description of the purpose of the alias. • Enabled Enables or disables the particular IP Alias. All added IP Aliases are saved in the system configuration file, however only the enabled IP Aliases are active on the AirRouter. Newly IP Aliases can be saved by click the Save button or discarded by clicking the Cancel button in the Aliases configuration window. Change MAC Address When enabled, the MAC address of the respective interface can be changed. This is especially useful if your ISP only assigns one valid IP address and it is associated to a specific MAC address; usually used by Cable operators or some WISPs. SOHO Router In SOHO (Small Office/Home Office) Router mode, the main Ethernet port becomes the WAN port, and the WLAN (Wireless LAN) and other LAN ports become the local network (LAN). SOHO router mode only works properly in Access Point or Access Point-WDS mode, since it has not been designed to act as a wireless client. 19 AirRouter User Guide Chapter 3: AirOS™ DHCP Fallback IP If the AirRouter is set to DHCP but is unable to obtain an IP address from a valid DHCP server, it will fall back to the static IP address listed here. DHCP Fallback Netmask If the AirRouter is set to DHCP but is unable to obtain an IP address from a valid DHCP server, it will fall back to the static Netmask listed here. Enable DMZ The Demilitarized zone (DMZ) can be enabled and used so that services such as Web Servers, Proxy Servers, and E-mail Servers can still serve the local network and are at the same time isolated from it for additional security. DMZ is commonly used with NAT functionality as an alternative to Port Forwarding but DMZ opens all ports of the host network device to the external network.. • DMZ Management Port Web Management Port for the AirRouter (TCP/IP port 80 by default) will be used for the host device if the DMZ Management Port option is enabled. • DMZ IP Enter the IP address of the internal network device and the device will be completely exposed to the external network. WAN Network Settings WAN IP Address This is the IP address to be represented by the WAN interface which is connected to the external network. This IP address can be used for routing and device management purposes. The WAN interface can be set for static IP or can be set to obtain an IP address from the DHCP server which should reside on the external network. One of the IP assignment modes must be selected for the external network interface: Auto IP Aliasing Automatically generates an IP Address for the corresponding WLAN/LAN interface if enabled. The generated IP address is a unique Class B IP address from the 169.254.X.Y range (Netmask 255.255.0.0) which is intended for use within the same network segment only. Auto IP always starts with 169.254.X.Y while X and Y are last 2 digits from the MAC address of the device (i.e. if the MAC is 00:15:6D:A3:04:FB, Generated unique Auto IP will be 169.254.4.251). IP Aliases IP aliases for the internal and external network interface can be configured. IP Aliases can be specified using the IP Aliases configuration window which is opened when you click Configure. • DHCP Choose this option to obtain the IP address, Gateway and DNS address dynamically from an external DHCP server. • PPPoE Choose this option to obtain the IP address, Gateway and DNS address dynamically from an external PPPoE server. • Static Choose this option to assign static IP settings for the external interface. DHCP • IP The alternative IP address for the LAN or WLAN interface, which can be used for the routing or device management purposes. • Netmask The network address space identifier for the particular IP Alias. • Comments Field used for a brief description of the purpose of the alias. • Enabled Enables or disables the particular IP Alias. All added IP Aliases are saved in the system configuration file, however only the enabled IP Aliases are active on the AirRouter. Ubiquiti Networks, Inc. 20 AirRouter User Guide Newly IP Aliases can be saved by click the Save button or discarded by clicking the Cancel button in the Aliases configuration window. Change MAC Address When enabled, the MAC address of the respective interface can be changed. This is especially useful if your ISP only assigns one valid IP address and it is associated to a specific MAC address; usually used by Cable operators or some WISPs. PPPoE Point-to-Point Protocol over Ethernet (PPPoE) is a virtual private and secure connection between two systems which enables encapsulated data transport. It is commonly used as the medium for subscribers to connect to Internet Service Providers (typically DSL). Select the IP Address option PPPoE to configure a PPPoE tunnel in order to connect to an ISP. Only the external network interface can be configured as a PPPoE client as all the traffic will be sent via this tunnel. The IP address, Default gateway IP and DNS server IP address will be obtained from the PPPoE server after PPPoE connection is established. The broadcast address is used for the PPPoE server discovery and tunnel establishment. Chapter 3: AirOS™ Enable DMZ The Demilitarized zone (DMZ) can be enabled and used so that services such as Web Servers, Proxy Servers, and E-mail Servers can still serve the local network and are at the same time isolated from it for additional security. DMZ is commonly used with NAT functionality as an alternative to Port Forwarding but DMZ opens all ports of the host network device to the external network.. • DMZ Management Port Web Management Port for the AirRouter (TCP/IP port 80 by default) will be used for the host device if the DMZ Management Port option is enabled. • DMZ IP Enter the IP address of the internal network device and the device will be completely exposed to the external network. Auto IP Aliasing Automatically generates an IP Address for the corresponding WLAN/LAN interface if enabled. The generated IP address is a unique Class B IP address from the 169.254.X.Y range (Netmask 255.255.0.0) which is intended for use within the same network segment only. Auto IP always starts with 169.254.X.Y while X and Y are last 2 digits from the MAC address of the device (i.e. if the MAC is 00:15:6D:A3:04:FB, Generated unique Auto IP will be 169.254.4.251). IP Aliases IP aliases for the internal and external network interface can be configured. IP Aliases can be specified using the IP Aliases configuration window which is opened when you click Configure. A valid username and password are required for the PPPoE connection: PPPoE Username Username to connect to the server (must match the configured on the PPPoE server). PPPoE Password Password to connect to the server (must match the configured on the PPPoE server). Show Check this box to display the PPPoE password characters. PPPoE MTU/MRU The size (in bytes) of the Maximum Transmission Unit (MTU) and Maximum Receive Unit (MRU) used for data encapsulation while transferring through the PPP tunnel; (MTU/MRU default value: 1492) PPPoE Encryption Enables the use of MPPE encryption. The IP address of the PPP interface will be displayed on the Main tab next to the PPP interface statistics if it is obtained through the established PPPoE connection, otherwise a Not Connected message will be displayed. A PPPoE tunnel reconnection routine can be initiated using the Reconnect button which is located in the Main tab next to the PPP interface statistics. Ubiquiti Networks, Inc. • IP The alternative IP address for the LAN or WLAN interface, which can be used for the routing or device management purposes. • Netmask The network address space identifier for the particular IP Alias. • Comments Field used for a brief description of the purpose of the alias. • Enabled Enables or disables the particular IP Alias. All added IP Aliases are saved in the system configuration file, however only the enabled IP Aliases are active on the AirRouter. Newly IP Aliases can be saved by click the Save button or discarded by clicking the Cancel button in the Aliases configuration window. 21 AirRouter User Guide Change MAC Address When enabled, the MAC address of the respective interface can be changed. This is especially useful if your ISP only assigns one valid IP address and it is associated to a specific MAC address; usually used by Cable operators or some WISPs. Static IP Address This is the IP address to be represented by the WAN interface which is connected to the external network. This IP address can be used for the routing and device management purposes. Netmask This is used to define the device IP classification for the chosen IP address range. 255.255.255.0 is a typical netmask value for Class C networks, which support IP address range 192.0.0.x to 223.255.255.x. A Class C network Netmask uses 24 bits to identify the network (alternative notation “/24”) and 8 bits to identity the host. Gateway IP The IP address of the host router which resides on the external network and provides the point of connection to the next hop towards the Internet. This can be a DSL modem, Cable modem, or a WISP gateway router. The AirRouter will direct all the packets to the gateway if the destination host is not within the local network. Primary DNS IP Enter the IP address of the Primary DNS (Domain Name System) server. Secondary DNS IP Enter the IP address of the Secondary DNS (Domain Name System) server. This entry is optional and only used if the primary DNS server is not responding. Chapter 3: AirOS™ • DMZ Management Port Web Management Port for the AirRouter (TCP/IP port 80 by default) will be used for the host device if the DMZ Management Port option is enabled. • DMZ IP Enter the IP address of the internal network device and the device will be completely exposed to the external network. Auto IP Aliasing Automatically generates an IP Address for the corresponding WLAN/LAN interface if enabled. The generated IP address is a unique Class B IP address from the 169.254.X.Y range (Netmask 255.255.0.0) which is intended for use within the same network segment only. Auto IP always starts with 169.254.X.Y while X and Y are last 2 digits from the MAC address of the device (i.e. if the MAC is 00:15:6D:A3:04:FB, Generated unique Auto IP will be 169.254.4.251). IP Aliases IP aliases for the internal and external network interface can be configured. IP Aliases can be specified using the IP Aliases configuration window which is opened when you click Configure. • IP The alternative IP address for the LAN or WLAN interface, which can be used for the routing or device management purposes. • Netmask The network address space identifier for the particular IP Alias. • Comments Field used for a brief description of the purpose of the alias. • Enabled Enables or disables the particular IP Alias. All added IP Aliases are saved in the system configuration file, however only the enabled IP Aliases are active on the AirRouter. Newly IP Aliases can be saved by click the Save button or discarded by clicking the Cancel button in the Aliases configuration window. Enable DMZ The Demilitarized zone (DMZ) can be enabled and used so that services such as Web Servers, Proxy Servers, and E-mail Servers can still serve the local network and are at the same time isolated from it for additional security. DMZ is commonly used with NAT functionality as an alternative to Port Forwarding but DMZ opens all ports of the host network device to the external network.. Ubiquiti Networks, Inc. Change MAC Address When enabled, the MAC address of the respective interface can be changed. This is especially useful if your ISP only assigns one valid IP address and it is associated to a specific MAC address; usually used by Cable operators or some WISPs. 22 AirRouter User Guide LAN Network Settings IP Address This is the IP address to be represented by the LAN (including WLAN) interface which is connected to the internal network. This IP will be used for the routing of the internal network (it will be the Gateway IP for all the devices connected on the internal network). This IP address is used for the management of the AirRouter. Netmask This is used to define the device IP classification for the chosen IP address range. 255.255.255.0 is a typical netmask value for Class C networks, which support IP address range 192.0.0.x to 223.255.255.x. A Class C network Netmask uses 24 bits to identify the network (alternative notation “/24”) and 8 bits to identity the host. Enable NAT Network Address Translation (NAT) enables packets to be sent from the external network (WAN) to the local interface IP address and then sub-routed to other client devices residing on the local network while the AirRouter is operating in Access Point or Access Point WDS wireless mode. Enable NAT Protocol While NAT is enabled, data packets could be modified in order to allow pass-through to the Router. To avoid packets modification of some specific packets, like: SIP, PPTP, FTP, RTSP; uncheck the respective checkbox. Chapter 3: AirOS™ • Netmask This is used to define the device IP classification for the chosen IP address range. 255.255.255.0 is a typical netmask value for Class C networks, which support IP address range 192.0.0.x to 223.255.255.x. A Class C network Netmask uses 24 bits to identify the network (alternative notation “/24”) and 8 bits to identity the host. • Lease Time The IP addresses given out by the DHCP server will only be valid for the duration specified by the lease time. Increasing the time ensures client operation without interruption, but could introduce potential conflicts. Lowering the lease time will avoid potential address conflicts, but might cause more slight interruptions to the client while it will acquire new IP addresses from the DHCP server. The time is expressed in seconds. Enable DNS Proxy The DNS Proxy forwards the Domain Name System requests from the hosts which reside in the internal network to the DNS server while AirRouter is operating in SOHO Router mode. A valid Primary DNS Server IP needs to be specified for DNS Proxy functionality. The internal network interface IP of the AirRouter should be specified as the DNS server in the host configuration in order for the DNS Proxy to be able to get DNS requests and translate domain names to IP addresses afterwards. Port Forwarding Port forwarding allows specific ports of the hosts residing in the internal network to be forwarded to the external network (WAN). This is useful for a number of applications such as FTP servers, VoIP, gaming, etc. where different host systems need to be seen using a single common IP address/port. Port Forwarding rules can be set in the Port Forwarding window, which is opened by enabling Port Forwarding and then clicking Configure. NAT is implemented using the masquerade type firewall rules. NAT firewall entries are stored in the iptables nat table, while the device is operating in Router mode. Please refer to the iptables tutorial for detailed description of the NAT functionality in Router mode. Static routes should be specified in order for the packets to pass-through the AirRouter if NAT is disabled while operating in SOHO Router network mode. Enable DHCP Server Dynamic Host Configuration Protocol (DHCP) Server assigns IP addresses to clients connected to the wireless interface and LAN interface while the AirRouter is operating in Access Point or Access Point WDS wireless mode. IP addresses are assigned to clients that connect to the LAN interface while the AirRouter is operating in Station or Station WDS mode. • Range Start/End This range determines the IP addresses given out by the DHCP server to client devices on the internal network which use dynamic IP configuration. Ubiquiti Networks, Inc. Port Forwarding entries can be specified by using the following criteria: • Private IP The IP of the host which is connected to the internal network and needs to be accessible from the external network. 23 AirRouter User Guide • Private Port The TCP/UDP port of the application running on the host which is connected to the internal network. The specified port will be accessible from the external network. • Type The L3 protocol (IP) type which needs to be forwarded from the internal network. • Public Port The TCP/UDP port of the AirRouter which will accept and forward the connections from the external network to the host connected to the internal network. • Comments Enter a brief description of the port forwarding functionality such as FTP server, Web server, or game server. • Enabled Enables or disables the effect of the particular port forwarding entry. All the added firewall entries are saved in the system configuration file, however only the enabled port forwarding entries are used on the AirRouter. Save your port forwarding entries by clicking Save or discard your changes by clicking Cancel. Auto IP Aliasing Automatically generates an IP Address for the corresponding WLAN/LAN interface if enabled. The generated IP address is a unique Class B IP address from the 169.254.X.Y range (Netmask 255.255.0.0) which is intended for use within the same network segment only. Auto IP always starts with 169.254.X.Y while X and Y are last 2 digits from the MAC address of the device (i.e. if the MAC is 00:15:6D:A3:04:FB, Generated unique Auto IP will be 169.254.4.251). IP Aliases IP aliases for the internal and external network interface can be configured. IP Aliases can be specified using the IP Aliases configuration window which is opened when you click Configure. • IP The alternative IP address for the LAN or WLAN interface, which can be used for the routing or device management purposes. • Netmask The network address space identifier for the particular IP Alias. • Comments Field used for a brief description of the purpose of the alias. • Enabled Enables or disables the particular IP Alias. All added IP Aliases are saved in the system configuration file, however only the enabled IP Aliases are active on the AirRouter. Ubiquiti Networks, Inc. Chapter 3: AirOS™ Newly IP Aliases can be saved by click the Save button or discarded by clicking the Cancel button in the Aliases configuration window. Multicast Routing Settings With a multicast design, applications can send one copy of each packet and address it to a group of computers that want to receive it. This technique addresses packets to a group of receivers rather than to a single receiver. It depends on the network to forward the packets to the hosts which need to receive them. Common routers isolate all the broadcast (thus multicast) traffic between the internal and external networks, however the AirRouter provides the multicast traffic pass-through functionality. Enable Multicast Routing Option enables multicast packet pass-through between internal and external networks while the AirRouter is operating in Router mode. Multicast intercommunication is based on Internet Group Management Protocol (IGMP). Multicast Upstream Specify the source of Multicast traffic, i.e. defines where multicast traffic comes from. Firewall Settings Firewall functionality on any router interface can be enabled using the Enable Firewall option. Router Firewall rules can be configured, enabled or disabled in the Firewall configuration window which is opened by clicking Configure. Firewall entries can be specified by using the following criteria: • Interface The interface (WLAN, LAN or PPP) where filtering of the incoming/passing-through packets is processed. • IP Type Sets which particular L3 protocol type (IP, ICMP, TCP, UDP, P2P) should be filtered. • Source IP/Mask The source IP of the packet (specified within the packet header), usually it is the IP of the host system which sends the packets. 24 AirRouter User Guide • Src Port The source port of the TCP/UDP packet (specified within the packet header), usually it is the port of the host system application which sends the packets. • Destination IP/mask The destination IP of the packet (specified within the packet header), usually it is the IP of the system which the packet is addressed to. • Dst Port The destination port of the TCP/UDP packet (specified within the packet header), usually it is the port of the host system application which the packet is addressed to. • Comment Field used to enter a brief description of the firewall entry. Chapter 3: AirOS™ For each entry you must specify a valid Target Network IP, Netmask, Gateway IP, and optionally a comment. Select On to enable the rule. Click Save to save your entries or Cancel to discard them. Advanced The Advanced tab handles advanced routing and wireless settings. The advanced wireless settings should be used by technically advanced users who have a sufficient knowledge about wireless LAN technology. These settings should not be changed unless you know the effect the changes will have on your AirRouter. • On Enables or disables the effect of the particular firewall entry. All the added firewall entries are saved in the system configuration file, however only the enabled firewall entries will be active during AirRouter operation. • Not Can be used for inverting the Source IP/mask, Source Port, Destination IP/mask and Destination Port filtering criteria (i.e. if not is enabled for the specified Destination Port value 443, the filtering criteria will be applied to all the packets sent to any Destination Port except the 443 which is commonly used by HTTPS). Firewall entries can be saved by clicking Save or discarded by clicking Cancel in the Firewall configuration window. All active firewall entries are stored in the FIREWALL chain of the iptables filter table, while the device is operating in Router mode. Please refer to the iptables tutorial for detailed description of the firewall functionality in Router mode. Click Change to save the changes made on the Network tab. Advanced Wireless Settings The 802.11n data rates include MCS0, MCS1, MCS2, MCS3, MCS4, MCS5, MCS6, MCS7 for 1x1 chain devices and MCS8, MCS9, MCS10, MCS11, MCS12, MCS13, MCS, MCS15 for 2x2 chains devices. The ACK timeout has a critical impact on performance in 802.11n outdoor links. Static Routes In this section you can manually add static routing rules to the System Routing Table, this allows you to specify that a specific target IP address (es) passes through a determined gateway. Click Configure to add an entry. RTS Threshold Determines the packet size of a transmission and, through the use of an access point, helps control traffic flow. The range is 0-2346 bytes, or word “off”. The default value is 2346 which means that RTS is disabled. RTS/CTS (Request to Send/Clear to Send) are the mechanisms used by the 802.11 wireless networking protocol to reduce frame collisions introduced by the hidden terminal problem. RTS/CTS packet size threshold is 0-2346 bytes. If the packet size the node wants to transmit is larger than the threshold, the RTS/CTS handshake gets triggered. If the packet size is equal to or less than threshold the data frame gets sent immediately. Ubiquiti Networks, Inc. 25 AirRouter User Guide System uses Request to Send/Clear to Send frames for the handshake which provide collision reduction for access point with hidden stations. The stations are sending a RTS frame first while data is send only after handshake with an AP is completed. Stations respond with the CTS frame to the RTS which provides clear media for the requesting station to send the data. CTS collision control management has a time interval defined during which all other stations hold off transmission and wait until the requesting station finishes transmission. Fragmentation Threshold Specifies the maximum size for a packet before data is fragmented into multiple packets. The range is 256-2346 bytes, or word “off”. Setting the Fragmentation Threshold too low may result in poor network performance. The use of fragmentation can increase the reliability of frame transmissions. When sending smaller frames, collisions are much less likely to occur. However lower values of the Fragmentation Threshold will result in lower throughput as well. It is recommended that you only make slight modifications or none at all to the Fragmentation Threshold value. The default setting of 2346 is optimum in most wireless network use cases. The AirRouter has a new auto-acknowledgement timeout algorithm which dynamically optimizes the frame acknowledgement timeout value without user intervention. This is a critical feature required for stabilizing long-distance 802.11n outdoor links. The user also has the ability to enter the value manually, but it’s not recommended. Distance Specify the distance value in miles (or kilometers) using the slider or entering the value manually. The signal strength and throughput falls off with range. Changing the distance value will change the ACK Timeout to the appropriate value of the distance. ACK Timeout Specify the ACK Timeout. Every time the station receives the data frame it sends an ACK frame to the AP (if transmission errors are absent). If the station receives no ACK frame from the AP within set timeout it re-sends the frame. The performance drops because if too many data frames are re-sent, thus if the timeout is set too short or too long, it will result poor connection and throughput performance. Changing the ACK Timeout value will change the Distance to the appropriate distance value for the ACK Timeout. Auto Adjust Control will enable the ACK Timeout Self‑Configuration feature. If enabled, ACK Timeout value will be derived dynamically using an algorithm similar to the Conservative Rate Algorithm (used in AirOS v3.4). It is very recommended to use the Auto Adjust option for 802.11n. Chapter 3: AirOS™ Aggregation A part of the 802.11n standard that allows sending multiple frames per single access to the medium by combining frames together into one larger frame. It creates the larger frame by combining smaller frames with the same physical source and destination end points and traffic class (i.e. QoS) into one large frame with a common MAC header. • Frames Determines the number of frames combined on the new larger frame. • Bytes Determines the size (in Bytes) of the larger frame. Multicast Data This option allows all the Multicast packet pass-through functionality. By default this option is disabled. Enable Extra Reporting Feature will report additional information (i.e. Device Name) in the 802.11 management frames. This information is commonly used for system identification and status reporting in discovery utilities and Router operating systems. Enable Client Isolation This option allows packets only to be sent from the external network to the CPE and vice verse (applicable for Access Point and Access Point WDS mode only). If Client Isolation is enabled, wireless stations connected to the same AP will not be able to interconnect on both the layer 2 (MAC) and layer 3 (IP) level. This is effective for associated stations and WDS peers as well. Advanced Ethernet Settings Enable Autonegotiation When enabled, the device will automatically negotiate transmission parameters with the counterpart, such as speed and duplex. In this process, the connected devices first share their capabilities and then choose the fastest transmission mode they both support. If you want to specify the values manually, disable the Enable Autonegotiation option and select the values: • Link Speed, Mbps Selects the maximum transmission link speed. There are two options: 10Mbps or 100Mbps. If running extra long Ethernet cables, a link speed of 10Mbps could help to achieve better stability. • Enable Full Duplex Selects the duplex mode; if enabled, the device operates in Full Duplex (allowing bidirectional communication in both directions simultaneously). While disabled, the device operates in Half-Duplex mode (allowing bidirectional communication in both directions, but not simultaneously and only in one direction at a time. If two or more stations are located at a considerably different distance from the Access Point they are associated with, the highest ACK Timeout for the farthest station should be set on the AP side. The AirRouter includes an improved ACK Timeout algorithm. Ubiquiti Networks, Inc. 26 AirRouter User Guide Chapter 3: AirOS™ Traffic Shaping Ping Watchdog Wireless Traffic shaping is dedicated to upstream and downstream bandwidth control while looking from the client (connected on the Ethernet interface) perspective. Ping Watchdog sets the AirRouter to continuously ping a user defined IP address (it can be the Internet gateway for example). If it is unable to ping under the user defined constraints, the AirRouter will automatically reboot. This option creates a kind of “fail-proof” mechanism. The traffic can be limited at the AirRouter in the upload and download direction based on a user defined rate limit. This is layer 3 QoS. Ping Watchdog is dedicated for continuous monitoring of the particular connection to remote host using the Ping tool. The Ping works by sending ICMP “echo request” packets to the target host and listening for ICMP “echo response” replies. If the defined number of replies is not received, the tool reboots the device. Enable Traffic Shaping This option will enable bandwidth control on the device. • Incoming Traffic Limit Specify the maximum bandwidth value (in kilobits per second, Kbps) for traffic passing from the wireless interface to the Ethernet interface. • Incoming Traffic Burst Specify the data volume (in kilobytes) to which the Incoming Traffic Limit will not be effective afterwards data connection is initiated. • Outgoing Traffic Limit Specify the maximum bandwidth value (in kilobits per second, Kbps) for traffic passing from the Ethernet interface to the wireless interface. • Outgoing Traffic Burst Specify the data volume (in kilobytes) to which the Outgoing Traffic Limit will not be effective after data connection is initiated. Services The Services tab covers the configuration of system management services SNMP, SSH, System Log and Ping Watchdog. Enable Ping Watchdog Enables the Ping Watchdog tool. • IP Address To Ping Specify the IP address of the target host which to be monitored by the Ping Watchdog tool. • Ping Interval Specify time interval (in seconds) between the ICMP “echo requests” are sent by the Ping Watchdog Tool. The default value is 300 seconds. • Startup Delay Specify initial time delay (in seconds) until the first ICMP echo requests are sent by the Ping Watchdog tool. The default value is 300 seconds. The value of Startup Delay should be at least 60 seconds as the network interface and wireless connection initialization takes a considerable amount of time if the device is rebooted. • Failure Count to Reboot Specify the number of ICMP echo response replies. If the specified number of ICMP echo response packets is not received continuously, the Ping Watchdog tool will reboot the device. The default value is 3. SNMP Agent Simple Network Monitor Protocol (SNMP) is used in network management systems to monitor network‑attached devices for conditions that warrant administrative attention. The AirRouter contains an SNMP agent which allows it to communicate to SNMP manage applications for network provisioning. Ubiquiti Networks, Inc. 27 AirRouter User Guide The SNMP Agent provides an interface for device monitoring using the Simple Network Management Protocol (an application layer protocol that facilitates the exchange of management information between network devices). SNMP Agent allows network administrators to monitor network performance, find and solve network problems. For the purpose of equipment identification, it is always a good idea to configure SNMP agents with contact and location information: Chapter 3: AirOS™ Enable SSH Server This option enables SSH access to the AirRouter. • Server Port SSH service TCP/IP port setting. • Enable Password Authentication When enabled, you must authenticate using Administrator credentials in order to grant SSH access to the device, otherwise an Authentication Key will be required. • Authorized Keys Click Edit to import a public key file working to get SSH access to the device instead of using an admin password. Click Browse to locate and select the key file, then click Import. Click Save to save your changes or Close to discard your changes. Telnet Server Enable SNMP Agent Enables the SNMP Agent. • SNMP Community Specify the SNMP community string. It is required to authenticate access to MIB objects and functions as an embedded password. The device supports a Read-only community string that gives read access to authorized management stations to all the objects in the MIB except the community strings, but does not allow write access. The AirRouter supports SNMP v1. The default SNMP Community is public. • Contact Specify the contact who that should be notified in case an emergency situation arises. • Location Specify the physical location of the device. Web Server The following Web Server parameters can be set: Use Secure Connection (HTTPS) If checked Web server will use secure HTTPS mode. HTTPS mode is unchecked by default. • Secure Server Port Defines the Web Server TCP/IP port Use Secure Connection (HTTPS) is enabled. The following Telnet Server parameters can be set: Enable Telnet Server This option activates the Telnet access to the AirOS Device. Server Port Telnet service TCP/IP port setting. NTP Client The Network Time Protocol (NTP) is a protocol for synchronizing the clocks of computer systems over packet-switched, variable-latency data networks. It can be used to set the AirRouter system time. System Time is reported next to the every System Log entry while registering system events if the Log option is enabled. Enable NTP Client Enables the AirRouter to obtain the system time from a time server on the Internet. • NTP Server Specify the IP address or domain name of the NTP Server. System Log Server Port Web Server TCP/IP port setting while using HTTP mode. Session timeout Specifies the maximum timeout before the session expires. Once a session expires, you must login again using the username and password. SSH Server The following SSH Server parameters can be set: Enable Log This option enables the registration routine of the system log messages. By default it is disabled. • Enable Remote Log Enables the syslog remote sending function while System log messages are sent to a remote server specified in the Remote Log IP Address and Remote Log Port fields. -- Remote Log IP Address The host IP address where syslog messages should be sent. Remote host should be configured properly to receive syslog protocol messages. Ubiquiti Networks, Inc. 28 AirRouter User Guide -- Remote Log Port The TCP/IP port of the host syslog messages should be sent. 514 is the default port for the commonly used system message logging utilities. Every logged message contains at least a System Time and a Host Name. Usually a particular service name which generates the system event is specified also within the message. Messages from different services have different context and different level of the details. Usually error, warning or informational system service messages are reported, however more detailed Debug level messages can be reported also. The more detailed system messages are reported, the greater volume of log messages will be generated. System The System tab contains administrative options. This page enables the administrator to reboot the device, set it back to factory defaults, upload new firmware, backup or update the configuration and configure the administrator account. Chapter 3: AirOS™ Date Settings Timezone Specifies the timezone according to GMT (Greenwich Mean Time). Enable Startup Date When enabled, you are able to modify the device’s startup date. • Startup Date Specifies the device’s startup date. You can select a date by clicking the Calendar icon or typinh it in manually. Type the date in the following format: 2 digit month/2 digit day/4 digit year. An example would be for May 20th, 2010 your would type 05/20/2010 System Accounts In this section you can modify the administrator password to protect your device from unauthorized configuration. The default administrator’s password should be changed on the very first system setup: Administrator Username Specifies the name of the system user. Key button Press this button in order to change the administrator password. • Current Password Enter the current password associated with the administrator account. It is required to change the Password or Administrator Username. Device Device Name (Host name) is the system wide device identifier. It is reported by the SNMP Agent to authorized management stations. Device Name will be represented in popular Router Operating Systems registration screens and discovery tools. Device Name Specifies the system identity. Interface Language Allows you to select the language displayed in the management interface. English is the default language. Additional language profiles may be uploaded. Refer to our wiki page at the following URL: www.ubnt.com/wiki/How_to_import_Language_Profile • New Password Enter the new password for the administrator account. • Verify New Password Re-enter the new password for the administrator account. Note: Password length is 8 characters maximum, passwords exceeding 8 characters will be truncated. Enable Read-Only Account Click to enable the read-only account and configure the username and password to protect your device from unauthorized access. The default option is disabled. • Read-Only Username Specifies the name of the system user. • Key button Press this button in order to change the Read-only password. -- New Password New password used for read-only administrator authentication should be specified. -- Show Check this to display the read-only password characters you have typed. Change Click to save changes to any of the fields on the System tab. Ubiquiti Networks, Inc. 29 AirRouter User Guide Configuration Management The AirRouter configuration is stored in plain text file (cfg file). Use the Configuration Management controls to backup, restore or update the system configuration file: Backup Configuration Click Download to download the current system configuration file. Upload Configuration Click Browse to navigate to and select the new configuration file or specify the full path to the configuration file location. Click Upload to use a previously downloaded configuration file to the system. The settings of the new configuration will be visible in the Wireless, Network, Advanced, Services and System tabs of the Web Management Interface. Note: The new configuration is active after clicking Apply and the system reboot cycle is completed. The previous system configuration is deleted after you click Apply. It is highly recommended to backup the system configuration before uploading the new configuration. Device Maintenance The controls in this section are dedicated for the device maintenance routines: rebooting, resetting, generating of the support information report. Firmware Version Shows the current firmware version. Build Number Displays the build number of the firmware version loaded. Chapter 3: AirOS™ Do not switch off, do not reboot and do not disconnect the device from the power supply during the firmware upgrade process as these actions will damage the device! It is highly recommended that you backup the system configuration and the Support Info file before uploading the new configuration. Close this window At this point, closes the firmware upgrade window if activated. This action will not cancel the firmware upgrade process. Reboot Activate Reboot control in order to initiate full reboot cycle of the device. Reboot is the same as the hardware reboot which is similar to the power off - power on cycle. The system configuration is not modified after the reboot cycle completes. Any non-applied changes will be lost. Reset to Defaults Use this to reset the AirRouter to the factory default settings. This option will reboot the AirRouter and all factory default settings will be restored. You may want to use the Backup Configuration option to download your current settings before selecting this option. Support Info This will generate a support information file that the Ubiquiti support engineers can use when providing customer support. This file only needs be generated at their request. Tools Site Survey The Site Survey tool will search for wireless networks in range on all supported channels while the device is operating in Access Point or Station mode. In Station mode, the channel list can be modified. Refer to the section Link Setup for details on channel list customization. Site Survey reports the MAC Address, SSID, Device Name, Encryption type (if any), Signal Strength/Noise in dBm, Frequency in GHz and the wireless channel of all surrounding Access Points. Update Click to update the device with new firmware. The device firmware update is compatible with all configuration settings. System configurations are preserved while the device is updated with a new firmware version. • Current Firmware Displays the version of the AirOS firmware which is currently operating. Refresh the window using the Scan button. • Firmware File Click Browse to locate new firmware file. Select the file and click Open. Once you’ve selected a new firmware file, click Upload to upload the new firmware to the device. Click Close this window to cancel the new firmware upload process. Update The Update button should be activated in order to proceed with firmware upgrade routine (new firmware image should be uploaded into the system first). Please be patient, as the firmware upgrade routine can take 3-7 minutes. The AirRouter will be inaccessible until the firmware upgrade routine is completed. Ubiquiti Networks, Inc. 30 AirRouter User Guide Chapter 3: AirOS™ Ping Start The test is started using this button. The Ping tool is used to check the preliminary link quality and packet latency estimation between two network devices using ICMP packets. Speed Test Network Ping Select Destination IP A remote system IP can be selected from the list which is generated automatically or can be specified manually. Packet Count Enter the number of packets to send for the ping test. Packet Size The size of the ICMP packets can be specified in this field. Start The test is started using this button. Packet loss statistics and latency time evaluation is provided after the test is completed. Traceroute The TraceRoute tool allows tracing the hops from the AirRouter to a selected outgoing IP address. It should be used for finding the route taken by ICMP packets across the network to the Destination host. This utility allows you to test the connection speed between two UBNT devices that are using firmware version 5.2 or above. It should be used for a preliminary throughput estimation between two network devices. Select Destination IP A remote system IP can be selected from the list, which is generated automatically (Select destination IP) or may be specified manually. Remote system access credentials (administrator username - User and Password) should be provided for the communication between two AirOS powered devices. This is required in order to establish the TCP/IP based throughput test. Remote WEB port The remote Web port the AirOS powered device should be specified in order to establish TCP/IP based throughput test (i.e. 443 port should be specified if HTTPS is enabled in the remote system). The ICMP throughput measurement routine will be initiated if the WEB port of the remote system is incorrect. Show Advanced Options Enables additional Speed Test utility options. There are 3 options available for the traffic direction while estimating the throughput maximum: Direction There are three directions to choose from: • Duplex Estimates the incoming (Rx) and the outgoing (Tx) throughput at the same time. • Receive Estimates the incoming (Rx) throughput. • Transmit Estimates the outgoing (Tx) throughput. Test Results Displays three result categories: • Rx Displays the estimated incoming throughput. • Tx Displays the estimated out-coming throughput. Destination Host Enter the IP address of the destination host to which you want to find the route. Resolve IP Addresses Resolution of the IP addresses (symbolically rather than numerically) can be enabled by selecting this option. • Total Displays the aggregated throughput. AirView AirView is a Spectrum Analyzer allowing you to see the crowdedness of the radio spectrum. You need to run this tool on a system connected to the AirRouter via Ethernet. All wireless connections will be disconnected from the AirRouter. Note: Launching AirView will terminate all wireless connections on the device. Ubiquiti Networks, Inc. 31 AirRouter User Guide Note: Java Runtime Environment 1.6 (or above) is required to use the Airview tool. Chapter 3: AirOS™ Preferences In this section you can modify AirView Settings, such as enabling or disabling charts, or specifying the frequency interval. Main View Preferences Device Displays the device name, MAC and IP Address of the device running AirView. Charts Total RF Frames Displays the total number of RF frames gathered for as long as AirView has been running or since the “Reset All Data” button was pressed. FPS Indicates the total number of frames gathered per second. The wider the interval amplitude, the fewer frames per second will be gathered. Reset All Data Press this button to reset all gathered data. Use this function when you want to analyze the spectrum for another place or address. Enable Top Chart Select the chart to be displayed in the top chart on the main view. There are two options: • Waterfall This is a time-based graph showing the aggregate energy collected over time for each frequency while AirView has been running. The color of energy designates its amplitude. Colder colors stand for lower energy levels (with blue representing the lowest levels) at that frequency bin, whereas warmer colors (like yellow, orange or red) mean higher energy levels at that frequency bin. View Enable Chart Panel 1 (top) Enable this option to display the top chart, Waterfall or Channel Usage, depending on which you have selected in Preferences. These are time‑based graphs showing the aggregate energy collected or Channel Usage over time for each frequency for as long as AirView has been running. Enable Chart Panel 2 (middle) Enable this option to display the middle chart, Waveform. This a time-based graph showing the aggregate energy collected for each frequency over time. The color of the energy designates its amplitude: colder colors stand for lower energy levels (with blue representing the lowest levels) at that frequency bin, whereas warmer colors (like yellow, orange or red) mean higher energy levels at that frequency bin. Enable Chart Panel 3 (bottom) When enabled, this graph displays a traditional Spectrum Analyzer in which energy (in dBm) is shown in real-time as a function of frequency. Clear All Markers Press to reset all previously assigned markers. Markers are assigned by clicking a point, which corresponds with a frequency, on the third chart. Ubiquiti Networks, Inc. The Waterfall View’s legend (top-right corner) provides a numerical guide associating the various colors to power levels (dBm). The low end of that legend (left) is always adjusted to the calculated noise floor, and the high end (right) is set to the highest detected power level since the start of the session. • Channel Usage In this graph, each 2.4GHz Wi-Fi channel is represented by a bar displaying a percentage showing the relative “crowdedness” of that specific channel. This percentage is calculated by analyzing both the popularity and the strength of RF energy in that channel since the start of an AirView session. Enable Waveform chart (middle) Like the Waterfall chart, this a time-based graph showing the aggregate energy collected for each frequency over time while AirView has been running. The color of the energy designates its amplitude: colder colors stand for lower energy levels (with blue representing the lowest levels) at that frequency bin, whereas warmer colors (like yellow, orange or red) mean higher energy levels at that frequency bin. The spectral view over time will essentially display the steady-state RF energy signature of a given environment. Enable Real-time chart (bottom) This graph displays a traditional Spectrum Analyzer in which energy (in dBm) is shown in real time as a function of frequency. There are three traces in this view: 32 AirRouter User Guide Chapter 3: AirOS™ • Current (Yellow) Shows the real-time energy seen by the AirRouter as a function of frequency. • Average (Green) Shows the running average energy across frequency. • Maximum (Blue) This trace will update and hold maximum power levels across the frequency since the start of an AirView session. Realtime Traces The following settings apply only to the Real-time chart: Current Real-time Trace When enabled, the real-time trace will be turned on. This is the yellow outline on the Real-time chart, which represents real-time power level of each frequency. The refresh speed depends on the FPS. Averages Trace This is the green area on the Real-time chart, which represents the average received power level and considers data for as long as AirView has been running. You can disable this graph by unchecking the Enable checkbox. You may enable only a green outline, without the shaded area, by unchecking the Shaded Area checkbox. Maximum Power Trace This is the blue area on the third chart, which represents the maximum received power level and considers data for as long as AirView has been running. You can disable this graph by unchecking the Enable checkbox. You may enable only a blue outline, without the shaded area, by unchecking the Shaded Area checkbox. Frequency Range Here you can select the amplitude of the frequencies interval to be scanned. There are some pre-defined ranges for the most popular bands. However, you can specify a custom range according to your needs. Ubiquiti Networks, Inc. 33 AirRouter User Guide Appendix A: Specifications Appendix A: Specifications Dimensions 162 X 132 X 30 mm Weight 221 g Ports 5 10/100 Ethernet Ports 1 USB Port 1 Power Port Buttons 1 Reset Button LEDs 4 LAN 1 Main (WAN by default) 1 Internet 1 WLAN (Wireless LAN) 1 Power Wireless Security WEP, WPA, and WPA2 Bands 2.4 GHz AntennasIntegrated Power 5V, 2A Operating Temperature -20 to 60° C Storage Temperature -40C to 70° C Certifications CE, FCC, IC Ubiquiti Networks, Inc. 34 AirRouter User Guide Appendix B: Warranty General Warranty UBIQUITI NETWORKS, Inc (“UBIQUITI NETWORKS”) represents and warrants that the Products furnished hereunder shall be free from defects in material and workmanship for a period of one (1) year from the date of shipment by UBIQUITI NETWORKS under normal use and operation. UBIQUITI NETWORKS sole and exclusive obligation under the foregoing warranty shall be to repair or replace, at its option, any defective Product that fails during the warranty period. The expense of removal and reinstallation of any item is not included in this warranty. Appendix B: Warranty Disclaimer. UBIQUITI NETWORKS does not warrant that the operation of the products is error-free or that operation will be uninterrupted. In no event shall UBIQUITI NETWORKS be responsible for damages or claims of any nature or description relating to system performance, including coverage, buyer’s selection of products for buyer’s application and/or failure of products to meet government or regulatory requirements. The foregoing warranty is exclusive and in lieu of all other warranties, express or implied, including the implied warranties of merchantability and fitness for a particular purpose and any warranties arising from a course of dealing, usage or trade practice with respect to the products. Repair or replacement in the manner provided herein shall be the sole and exclusive remedy of Buyer for breach of warranty and shall constitute fulfillment of all liabilities of UBIQUITI NETWORKS with repect to the quality and performance of the Products. UBIQUITI NETWORKS reserves the right to inspect all defective Products (which must be returned by Buyer to UBIQUITI NETWORKS factory freight prepaid). No Products will be accepted for replacement or repair without obtaining a Return Materials Authorization (RMA) number from UBIQUITI NETWORKS. Products returned without an RMA number will not be processed and will be returned to Buyer freight collect. UBIQUITI NETWORKS shall have no obligation to make repairs or replacement necessitated by catastrophe, fault, negligence, misuse, abuse, or accident by Buyer, Buyer’s customers or any other parties. The warranty period of any repaired or replaced. Product shall not extend beyond its original term. Warranty Conditions The foregoing warranty shall apply only if: (I) The Product has not been subjected to misuse, neglect or unusual physical, electrical or electromagnetic stress, or some other type of accident. (II) No modification, alteration or addition has been made to the Product by persons other than UBIQUITI NETWORKS or UBIQUITI NETWORK’S authorized representatives or otherwise approved by UBIQUITI NETWORKS. (III) The Product has been properly installed and used at all times in accordance, and in all material respects, with the applicable Product documentation. Ubiquiti Networks, Inc. 35 AirRouter User Guide Appendix C: Contact Information Appendix C: Contact Information Ubiquiti Networks Support Ubiquiti Support Engineers are located in the U.S. and Europe and are dedicated to helping customers resolve software, hardware compatibility, or field issues as quickly as possible. We strive to respond to support inquiries within a 24 hour period. Email: [email protected] Phone: 408-942-1153 (9 a.m. - 5 p.m. PST) Skype: Ubiquiti_Support Online Resources Wiki Page: www.ubnt.com/wiki Support Forum: www.ubnt.com/forum Knowledge Base: www.ubnt.com/kb Downloads: www.ubnt.com/support/downloads 91 E. Tasman Drive San Jose, CA 95134 www.ubnt.com © 2010 Ubiquiti Networks, Inc. All rights reserved. Ubiquiti Networks, Inc. 36