1
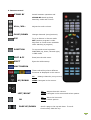
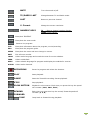
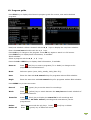
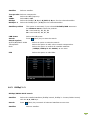
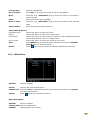
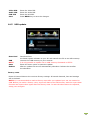
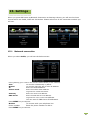
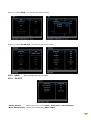
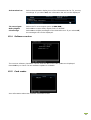
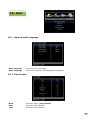
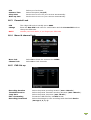
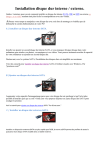
English
2
TABLE OF CONTENTS
WARNING/REMEMBER/CAUTION ---------------------------------------------------------------------- 6
SAFETY MEASURES----------------------------------------------------------------------------------------7
ABOUT THE INSTRUCTION MANUAL --------------------------------------------------------------------8
MARKETING AND SIGNS APPLIED TO THE RECEIVER ------------------------------------------------8
BASIC INFORMATION ABOUT THE RECEIVER ---------------------------------------------------------9
1. MAIN FEATURES
2.
CONTENTS OF BOX
3.
IMPORTANT INSTRUCTIONS CONCERNING HANDLING THE RECEIVER
4.
REMOTE CONTROL ------------------------------------------------------------------------10
5.
MAIN UNIT DESCRIPTION ---------------------------------------------------------------12
1) POWER
-----------------------------------------------------------------------------13
2) TUNER 1 IF INPUT
3) ETHERNET
4) USB
5) HDMI
6) IR (Infrared Sensor)
7) RS-232 (Data Interface)
8) CVBS
6.
CONNECTION OVERVIEW ----------------------------------------------------------------14
6.1
ANTENNA -------------------------------------------------------------------------15
6.2
POWER SUPPLY
6.3
ETHERNET : INTERNET LINE CONNECTION
6.4
POWER SUPPLY
6.5
HDMI & CVBS
6.6
INFRARED SENSOR
6.7
RS-232
7. POWERING ON/OFF ----------------------------------------------------------------------------------15
8. FIRST INSTALLATION --------------------------------------------------------------------------------16
8.1
OPERATING THE MENU
8.2
LANGUAGE SELECTION
8.3
SATELLITE SEARCH
9. DAILY USAGE ------------------------------------------------------------------------------------------17
9.1
VOLUME CONTROL
9.2
CHANGING CHANNELS
9.3
CHANNEL LIST
9.4
USER LISTS
9.5
ZOOM MODE
9.6
INFORMATION BAR
3
9.7
AUDIO CHANNEL ----------------------------------------------------------------18
9.8
AUDIO LANGUAGE
9.9
FREEZE MODE
9.10 TELETEXT
9.11 EDIT CHANNEL LIST, EVENT LIST
9.12 MEDIA
---------------------------------------------------------------------------19
9.12.1 RECORDINGS & MOVIES
9.12.2 MUSIC
9.12.3 PHOTOS
9.13
Jump Time ----------------------------------------------------------------------20
9.14
MULTI FEED
9.15
SUBTITLE LANGUAGE
9.16
EDIT/SEARCH WINDOW
10. PROGRAM GUIDE -----------------------------------------------------------------------------------21
11. RECORDING -----------------------------------------------------------------------------------------22
11.1
RECORDING GUIDE
11.2
INSTANT RECORDING ---------------------------------------------------------22
11.3
TIMESHIFT RECORDING ------------------------------------------------------23
11.4
TIMER RECORDING
12. MENU -------------------------------------------------------------------------------------------------23
12. 1
OPERATING THE MENU
13. CREATE & EDIT --------------------------------------------------------------------------------------24
13.1
EDIT CHANNEL
13.2
EDIT FAVORITE LISTS
13.3
DELETE SATELLITE & TRANSPONDER ----------------------------------------25
13.4
EXPORT DATA
13.5
IMPORT DATA
14. INSTALLATION
-------------------------------------------------------------------------------------26
14.1
ANTENNA
14.2
SATELLITE SEARCH
14.3
DISEQC 1.2 --------------------------------------------------------------------- 27
14.4
BLIND SCAN -------------------------------------------------------------------- 27
14.5
USB UPDATE ------------------------------------------------------------------- 29
15. SETTINGS -------------------------------------------------------------------------------------------- 30
15.1
NETWORK CONNECTION
15.2
uPnP
15.3
TV OUT -------------------------------------------------------------------------- 31
15.4
SOFTWARE VERSION ----------------------------------------------------------32
15.5
CARD READER
4
16. USER -------------------------------------------------------------------------------------------------33
16.1
MENU & AUDIO LANGUAGE
16.2
TIME & DATE
16.3
PARENTAL LOCK ---------------------------------------------------------------34
16.4
MENU & CHANNEL LOCK
16.5
PVR SET-UP
17. MULTIMEDIA ---------------------------------------------------------------------------------------35
17.1 FILE BROWSER
18. WEB----------- --------------------------------------------------------------------------------------35
SPECIFICATION ----------------------------------------------------------------------------------------36
5
WARNING !!!
Supported network features as internet radio, Youtube, etc depend on your
network connection speed and quality and the server settings (limitations,
bandwidth, location) which you are accessing.
Playback of copy protected content, damaged files, etc. may fail or be
incorrect. Video files with a resolution higher than 1920x1080i, 1280x720p
or with a video bitrate over 30Mbps may not play properly.
This satellite receivers support recording to external hard disk drives (HDDs)
and flash memories (pen drives). The correct operation of the recording
function depends on the type of connected memory! You must read the
following limitations.
REMEMBER:
1. In order to use an external USB memory, the memory must support the USB
2.0 standard. To ensure stable recording and playback, you must use a
memory with a recording speed of 20.0 MB/s or faster. Slower hard disk
drives and flash memories may not function properly, have problems with
recording (image jitter), or do not function at all!!!
2. Only memory with one basic EXT2, EXT3 or FAT32 partition (we recommend
using the FAT32 format) will function properly. If your hard disk is not formatted in
EXT2, EXT3 or FAT32, format the disk on your computer before connecting it to the
receiver.
3. Highly fragmented or used memories may also not operate smoothly or
correctly.
CAUTION
1. Under no circumstances should you disconnect the USB device from the receiver
during recording or playback. Disconnecting during operation may cause damage to
the receiver and/or flash memory, and to the recorded data.
2. Do not touch the working receiver (and in particular the USB connector) with
wet hands. Risk of electric shock and permanent damage to the receiver!
6
SAFETY MEASURES
We request that you read the instruction manual and recommendations set forward therein.
Also remember to correctly position the satellite antenna!
In order to avoid an electric shock, never open the housing. Damage to the
warranty seal shall void the warranty.
Disconnect the receiver from the mains during thunderstorms or when it is not
to be used for an extended period of time. Please remember that the warranty
does not cover damage to the equipment caused by a lightning strike.
Do not expose the receiver to direct sunlight. Place it away from sources of
heat and humidity. Do not cover ventilation ducts with items such as
newspapers, table-cloths, curtains, etc in order to ensure the correct
circulation of air.
Place the receiver horizontally on a flat, even and stable surface. Make sure
the receiver has more than 10 cm clearance around for sufficient ventilation.
If you move the receiver from a room that is warm to one that is cold (or vice
versa), wait at min. 1 hour before connecting it to the mains. Otherwise,
problems may arise.
The receiver should be placed away from vases, bottles, aquariums and other
Water containers in order to avoid damage. Do not touch the mains plug with
your bare hands.
Do not place any objects on the housing of the receiver. This may cause
overheating and reception problems. No naked flame sources such a lighted
candles should be placed on the receiver.
Before commencing maintenance or installation work, disconnect the receiver from the mains.
Do not clean the receiver with alcohol or liquids containing ammonia. If necessary, clean it with
a soft, lint-free cloth wetted with a gentle solution of water and soap.
•
Do not connect any cables when the mains plug is in the socket.
•
Check the condition of your cables. Damaged cables may cause a fire.
•
Please disconnect the receiver from the mains before connecting any cables.
•
Where the mains plug or an appliance coupler is used as the disconnect device, the
disconnect device shall remain readily operable.
7
ABOUT THE INSTRUCTION MANUAL
We have made every effort to provide the most current information about its products. We do
not grant any guarantee as to the contents of the present instruction manual and disclaims any
implied guarantees concerning market value or suitability for specific purposes. The information
contained herein is an instruction intended to enable the correct usage and maintenance of the
receiver.
We reserve itself the right to introduce amendments, changes or translations of the instruction
manual without prior notification thereof. For this reason, we recommend you regularly visit our
website in order to obtain the latest information.
MARKINGS AND SIGNS APPLIED TO THE RECEIVER
Digital signal transmission logo.
This logo informs that the receiver conforms to the Digital Video Broadcasting
standards.
Risk of electric shock -do not open.
This notice warns the user not to open the receiver housing. The housing may
be opened solely by authorized service technicians.
CE logo.
The logo informs that the receiver conforms to the terms and conditions of
Directive 89/336/EEC concerning observance by Member States of provisions
regulating electromagnetic compatibility, and to the terms and conditions of
Directives 73/23/EEC and 93/68/EEC concerning observance by Member States
of provisions regulating low voltage electricity and safety with relation to the
handling and operation of electrical equipment.
Double insulation logo.
This logo informs that the receiver is an electrically safe device, provided that it
is used in accordance with the recommendations set forward in the chapter
concerning safety.
Take an active part in protecting the natural environment!
• Your receiver is made from materials that can be processed or recycled.
• At the end of its service life, take this unit to a designated collection point.
8
BASIC INFORMATION ABOUT THE RECEIVER
1. Main features
∨
Reception of high definition channels
∨
Upscaling of PAL signals to 1080 P resolution
∨
20 programmable timers
∨
Separate favorite, TV and Radio channels list
∨
Quick channel search function (Quick Find)
∨
Teletext and subtitle display
∨
DiSEqC 1.0, 1.1 and DiSEqC 1.2, USALS
∨
MPEG-2, MPEG-4, MPEG-4 AVC/H.264 standards
∨
Compatible with DVB-S and DVB-S2 systems
∨
Card reader for pay-per-view television
∨
WIFI & 3G modem available for internet connection
2. Contents of box
Unpack the receiver and check whether all of the following elements are present
∨
1 x remote control unit (incl. 2AAA batteries)
∨
1 x instruction manual
∨
1 x hybrid satellite receiver
∨
1 x HDMI cable
∨
1 x IR sensor cable
3. Important instructions concerning handling of the receiver
The screen menu (OSD) simplifies operation of the receiver and has made it possible to reduce
the number of keys on the remote control. All of the functions are displayed on the screen and
may be controlled by means of a small number of keys. Common functions have been
connected in one "MENU". The selected function is colored. Depending on the selected option,
various "function keys" are displayed: red, yellow, green, blue and white in the form of graphics
and descriptions. The colors represent various functions in individual "Menus". The selected
function is activated by pressing a key on the remote control unit. The so-called function keys
are active only when in the appropriate field there is information about it. The user interface
makes it possible to navigate within a menu and between functions in a number of different
ways. Certain keys on the remote control allow direct access to functions. The keys are
multifunctional, i.e. their functions depend on previously activated elements.
NOTE:
Please keep in mind that new software may change the functionality of the receiver.
Photographs and descriptions included in the instruction manual are for informational
purposes only. If you should notice an error, please report it -we shall make every effort
to have it rectified.
9
4. Remote control
STAND BY
Switch between operation and
STAND-BY Stand-by/deep
Stand-by mode and to boot.
VOL+/VOL-
Adjust the audio volume.
CH UP/DOWN
Change channels (next/previous).
PIP
To go to Picture in Picture mode
PIP (another program's video
Play back in a sub screen available
while watching a program)
POSITION
To move sub screen's position
POSITION (up, down, left and right)
in POP mode
EDIT & CI
Enter/exit the edit menu.
EJECT
Eject the USB memory.
MULTI MEDIA
These colored keys have different
functions as displayed in the menus.
TV
UP/DOWN
: Change channels (next/previous).
MENU: Navigate in the menus.
TV
LEFT/RIGHT
MENU: Navigate in the menus and select options.
TV
OK
PAGE UP/DOWN
: Adjust the audio volume.
: Enter the list mode.
MENU: Select options.
Scroll a page or list up and down. To scroll
Continuously hold the key.
10
MUTE
Turn the sound on/off.
TV/RADIO LAST
Change between TV and Radio mode.
LAST
Return to previous channel.
V. Format
Change the screen resolution.
NUMERIC KEYS
TV : Enter a channel number directly.
MENU: Enter values.
Enter/exit TELETEXT
Enter/exit the zoom mode.
Pause a live program.
Info
Enter/exit information about the program, movie/recording.
EPG
Enter/exit the program guide.
MENU
Enter/exit the menu and save change in menus.
EXIT
Exit all menu modes.
LANG
Select audio language and encode the text for movie subtitles.
FEED
Select a Multifeed.
SUBT
Select subtitle language for program and display the subtitle for movies.
AUDIO
Select audio channels.
RECORDING
Record a program and select the duration.
PLAY
Start playback.
PAUSE
Start the Timeshift recording. Pause playback.
STOP
Stop playback.
SLOW MOTION
Playback in slow motion. Each time you press this key the speed
will increase (10%, 30%, 50%).
REWIND
Each time you press this key the rewind/ forward speed will
increase (2, 4, 8).
FORWARD
JUMP
Jump back or forward during playback.
11
5. Main unit description
12
① MAIN POWER ADAPTOR (DC IN)
Connect the supplied power adaptor to this socket. The flat side of the plug with the arrow
should point up. Please use only the original power adaptor supplied with the device.
② IR (Infrared Sensor)
Connect the supplied infrared sensor to this socket. It received commands from the
remote control unit and should be place near the front of you TV.
③ LNB-IN (TUNER 1 IF INPUT)
Satellite broadcasting signal 1 input socket
④ VIDEO,
L-AUDIO-R
For Supporting Audio L/R and video
⑤ HDMI
Audio and Video output socket for the high definition television set
⑥ ETHERNET
For internet line connection
⑦ USB
For connection to external USB memory stick.
⑧ DATA INTERFACE (RS-232C)
Only for advanced users and service personnel: computer interface for software update
and channel data transfer to another receiver.
⑨ SMART CARD
Insert any kind of subscription card.
13
6. Connection overview
The following illustrations show cable connections for a television and other devices connected
to the receiver. If you require any assistance in connecting individual devices, contact your local
technician. Before connecting or altering connections, disconnect the receiver from the mains.
14
6.1 Power Supply
Connect the DC cable of the mains adaptor to the DC IN jack of this receiver. Then insert the
plug of the mains adaptor into a mains socket.
6.2 IR (Infrared Sensor)
Connect the cable of the infrared sensor to the IR jack of this receiver. Place the infrared sensor
near the front of the TV set so that it can be reached unimpeded by the infrared signal of the re
mote control from your favorite seating place.
6.3 Antenna
Connect the coaxial cable of your satellite antenna to the LNB IN socket of this receiver.
6.4 VIDEO & HDMI
Plug this receiver into the HDMI or VIDEO connector of your TV set.
6.5 Ethernet (LAN)
Internet line connection
6.6 USB
Connection for external USB memory stick.
6.7 RS-232
6.8. SMART CARD
7. Powering On/Off
Power ON/Booting
Connect the power cord of your receiver to a mains socket.
Turn On the mains switch on the rear panel to start the booting.
Stand-by
Press the STAND-BY key to switch between Stand-by and operation mode.
Timer recordings will record in this mode.
Deep Stand-by
Hold the STAND-BY key pressed for 3 seconds to switch to the Deep
Stand-by mode. To switch again to operation mode, press the STAND-BY
key again.
Timer recordings will not record in this mode.
15
8. First installation
After you turned on your receiver for the first time or after a factory reset, the installation
wizard will start automatically.
8.1 Operating the menu
Select an option with the
▲/▼, ◀/▶
keys.
Enter an option with the OK key.
8.2 Language selection
Menu language
Select the menu language.
Audio language
Select the standard audio language for programs.
Subtitle language Select Subtitle language
Teletext language Select Teletext language
Press MENU key to save the selection and to continue to the satellite search.
8.3 Satellite search
Satellite
Select a satellite.
Transponder Select a transponder.
LNB
Select the LNB frequency.
22Khz
Select On or Off.
DiSEqC
Select the DiSEqC (A, B, C, D)/Mini A, B port for the selected satellite.
DiSEqC 1.1
Select the DiSEqC port (1-16) for the selected satellite.
LNB Power
Select the LNB power.
Search
Press
(blue) key to start the search.
Search options
All/FTA/NIT/FAST SCAN
MULTI
Select an option to start the search.
Select this Option to search all satellites (DiSEqC switch) at
one time.
NOTE
Press EXIT key to install an Unicable/SCD/DiSEqC 1.2/USALS
system.
16
9. DAILY USAGE
9.1 Volume control
Volume
Press VOL+/VOL-or
◀ /▶
keys (while watching a program) to adjust the
Mute
volume.
Press MUTE key to turn the sound On and Off.
9.2 Changing channels
▲/▼keys
or enter the channel number with the 0-9
Change
Press CH. UP/DOWN,
Back
numeric keys to change channels.
Press LAST
key to return to the previous channel.
9.3 Channel lists
Press OK key to display all satellite/user lists and sort options.
Operation
Select columns with the t/u keys and select a sort option or channel
with the
Search
Channel
▲/▼/OK
keys.
To search a channel name, enter first the channel list and enter the channel
name with the numeric keys.
You can search for a search term with max. 7 letters.
The search term is displayed in the 1st column at the bottom.
Press
(red) key to delete a letter.
9.4 User lists
Press USER key to display the 10 user lists.
List
Select a column with the
▲/▼/OK
Rename
Edit
◀/ ▶
keys and select an option or channel with the
keys.
Select a list and press
(yellow) key to rename.
Press
(red) key to edit.
9.5 Zoom mode
Press ZOOM key to enlarge a part of the screen.
Move the Zoom window with the
▲/ ▼, ◀/ ▶
keys to the part of the screen to enlarge.
9.6 Information bar
Press INFO key to display the channel number & name, list name, time.
The current and next program information, if available, will be displayed. If detail information
is available, press INFO key again to display them.
17
is displayed for programs in High Definition.
is displayed, if subtitle languages are available.
is displayed, if Teletext is available.
is displayed, if Multifeeds are available.
is displayed for locked channels.
is displayed for pay TV channels.
is displayed for programs in Dolby Digital.
displays the audio channels (mono, stereo).
SIGNAL
displays the signal quality and strength.
9.7 Audio channel
Press AUDIO key to select an audio channel (stereo, mono left/right).
Stereo.
Left/right channel (Mono).
9.8 Audio language
TV
Press LANG key to select an audio language, if available. Select a language
with the
Movies
▲/▼/OK
keys.
Press LANG key to select the matching subtitle text code to display all letters
correctly.
Select the text code from the list with the
▲/▼/OK
keys.
9.9 Freeze mode
Press FREEZE key to pause a live program.
9.10 TELETEXT
Press TEXT key to display TELETEXT, if available. Operate the menu with the 0-9 numeric
and colored (
) keys.
9.11 Edit channels, event list
Press
(green) key to display detail information about the channel.
Lock
Select On to lock the channel.
Descramble If 2 CAMs or a card are inserted, preset the channels to the specific
With
CAM or card for a faster decoding.
Save
Press MENU key to save the changes.
Delete
Press
(red) key to delete the channel.
Event list
Press
(blue) key to display the event list for all recordings and reservations.
18
Select an event with the
press
9.12 Media
▲/▼keys.
Press
(red) key to delete an event,
(green) key to delete all events.
Press MEDIA key to view REC, MOVIES, MUSIC and PHOTOS.
9.12.1 Recordings & movies
Recording format
Movie formats
Trp.
DivX/Xvid (.avi, .divx), FLV (.flv), PAL (50Hz),
PAL (50Hz) MPEG-2 (.mpg, .m2v, .ts, .trp), MKV.
Playback
Preview
Full screen
Select a movie or recording and press OK key.
Select a movie or recording and press OK key twice or PLAY key.
Press STOP key to stop.
Details
Press INFO key to display the title, present & total playtime.
Edit movies/recordings & folders
Sort
Press
(green) key to sort (A-Z/Z-A, Date).
Delete
Press
(red) key to delete.
Lock
Edit
NOTE
Press
(yellow) key to lock/unlock a folder or a recording.
Press INFO key to enter the file browser.
For YouTube videos and some video files rewind/forward, Jump,
slow motion does not work.
Playback of TRP recordings
To play SD or HD TRP (.trp) files recorded by other devices, select the matching codecs.
Video Codec
Select between SD and HD Recordings.
Audio Codec
Select between MPEG, AC3 and DDPLUS (Dolby Digital Plus).
NOTE
Your set will reboot, if you selected the wrong video codec.
9.12.2 Music
Format
Playback
Playlist
Soundtrack
Edit MP3 & folders
Sort
Press
Delete
Edit
MP3.
Select a song and press OK key. Press STOP key to stop.
Press PLAY key to playback the songs of a folders.
Press JUMP keys to select the previous/next song.
Press STOP key to stop.
Enter Photo Menu, MP3 songs as soundtrack.
(green) key to sort (A-Z/Z-A, Date).
Press
(red) key to delete.
Press INFO key to enter the file browser.
9.12.3 Photos
Format
Full screen
JPG
19
List
Select a photo and press OK key to preview the photo.
Press OK key again to view the photo in full screen.
Thumbnails
Select a photo and press OK key to view the photo in full screen.
Select the next/previous photo with the t/u keys.
Thumbnails/ list
Press
(yellow) key to change between thumbnails and list mode.
Slideshow
Press PLAY key to start the slideshow of a folder. Press STOP/EXIT
keys to stop.
Edit Photos & folders
Sort
Press
(green) key to sort (A-Z/Z-A, Date).
Delete
Press
(red) key to delete.
Edit
Press INFO key to enter the file browser.
9.13 Jump time
Press the Jump keys to jump from a movie position
backwards or forwards.
Select the jump time (1-10 min.) with the
▲/▼keys.
9.14 Multi-feed
Some programs offer a variety of perspectives i.e. for sport events, these are called Multifeeds.
Press FEED key to display Multifeeds for a program, if available. Select a feed with the
▲/▼/OK
keys.
9.15 Subtitle language
TV
Press SUBT key to select subtitle languages, if available for a current
program or recordings. Select a language with the
Movies
keys.
Supported formats: SRT, SMI, SUB.
Press SUBT key to display subtitles. Press this key again to deactivate subtitles.
If the subtitle and movie are asynchronous, synchronize the subtitle time. Press
the
NOTE
▲/▼/OK
◀/ ▶
keys and adjust the time from -5 seconds to +5 seconds in
0.1
second steps.
To display movie subtitles, the subtitle and menu language must be the
same and the movie file and subtitle file must have the same title.
9.16 Edit/search window
Select the edit/search window to rename (user lists, channels, recordings), to insert (address,
password, username) and to enter a search term.
Letter
Select a letter with the
Delete
A/a/…
Press
(red) key to delete a letter.
Press
(green) key to change between capital/lower case letters and to
display special letters for a language.
Press
(yellow) key to save.
Press
(blue) key to cancel.
Save
Channel
▲/▼/OK
keys.
20
10. Program guide
Press EPG key to display the electronic program guide for current, next and scheduled
programs.
Now/next schedule. Select a channel with the
Enter the now/next schedule with the
◀/ ▶
▲/ ▼
keys to display the now/next schedule.
keys.
Press OK key to change to the program. Press OK key again to watch it in full screen.
Press INFO key to display detail information, if available.
Week schedule.
Select a program with the
▲/ ▼, ◀/ ▶
keys.
Press the OK or INFO key to display detail information, if available.
Reserve
Press
(red) key to reserve programs (TV or Radio) to change to this
program at the scheduled time.
Mode
Select an option (once, daily, weekly, daily (Mon-Fri)).
Date
Enter the date with 0-9 numeric keys for programs without EPG schedule.
Begin
Enter the start time with 0-9 numeric keys for programs without EPG schedule.
Press MENU key to save the event.
Record
Press
Week
Press
(yellow) key to switch between the now/next and week schedule of
the selected channel.
Event list
Press
(blue) key to display the event list for all recordings and
reservations. 20 Timer events (recordings and reservations) can be
programmed.
Delete
Delete all
(green) key to set the timer for recordings.
Select an event with the p/q keys. Press
Press
(green) key to delete all events.
(red) key to delete.
21
11. RECORDING
11.1 Recording guide
USB memory
To record programs a storage device (USB Memory 2.0) must be connected formatted in FAT32, EXT2,
EXT3. To format an USB memory larger than 32GB with your windows PC in FAT32, download the
Fat32Formatter program from the internet to your PC.
To record HD programs the USB memory must have a minimum writing speed of 20 Mbps. It is
recommended to record HD channels to a USB hard disk. It is only possible to record to one connected
storage device. Select the Storage device to record in Multimedia (User menu).
NOTE
Ensure that there is enough free memory before recording. The recording will
not start, if there is not enough free memory. Do not disconnect the USB memory from
the receiver during recording or playback as this could cause damage to the receiver
and/or USB memory. Highly fragmented or used memory may also not operate
properly. Recording to an Storage device formatted in NTFS is not possible.
USB Eject
Press the
key to eject all connected USB memories. Always use this option before
disconnecting an USB memory. This function allows you to safely remove an USB memory
connected to your receiver to prevent loss of data.
Multi channel Recording
You can record at the same time 3 programs or record 2 programs and timeshift one program.
Channel change
While you are recording, you can watch channels of the same frequency as the recorded
channels.
Press CH UP/DOWN keys to change channels.
Press OK key to display the channels you can change to and select a channel with the
▲/▼/OK
keys.
Stand-by
Press STAND-BY key during a recording to switch the receiver to Stand-by mode after the
recording is finished. For timer recordings, the receiver will switch to operation mode and start
recording at the specific time. After the recording is finished, the receiver will switch back to
Standby mode (after 1 minute).
Timer
TV/Radio
Playback
20 Timer events (recordings and reservations) can be programmed.
Record TV and radio programs.
Enter Recordings (Multi media) to playback recordings.
11.2 Instant recording
Recording
Recording list
Press RECORDING key to start the recording.
Press EXIT, STOP or INFO keys to display the recording list.
The duration as set in Multimedia (User menu) is displayed.
22
Duration
Press the
◀/ ▶
keys to change the duration (max. 240 min.)
Stop
in 10 min. steps.
Press OK key to stop a recording.
11.3 Timeshift recording
Timeshift enables you to record and playback a program you are watching, while it is still being
broadcasted.
Start
Press PAUSE key to start the Timeshift recording and to pause the program.
Press PLAY key to start the playback.
Stop
The recording stops, if you change to another channel, or if you press
STOP key.
Playback
Press the REWIND/FORWARD/SLOW MOTION/JUMP keys to playback the
recorded part.
File
The Timeshift recording is stored in the TimeShift (tms) file in Recordings.
11.4 Timer recording
Press EPG key to program a timer.
Select a channel or program and press
(green) key.
Mode
Select an option (once, daily, weekly, daily (Mon-Fri)).
Date
Enter the date with the 0-9 numeric keys for programs without EPG schedule.
Begin
Enter the start time with the 0-9 numeric keys for programs without EPG
schedule.
Duration
Select the duration (min. 10 min., max. 240 min.) for a recording.
Press MENU key to save the event.
12. MENU
12.1 Operating the menu
Menu
Select an option with the
▲/ ▼, ◀/ ▶
keys.
Values
Enter an option with the OK key. Change values with the t/u keys.
Insert values with the 0-9 numeric keys.
Enter the edit window.
23
13.Create & Edit
13.1 Edit channel
Delete
Press
Lock/unlock Press
Move
Press
at once.
Press
Press
(red) key delete a channel.
(green) key to lock/unlock a channel.
(yellow) key to move the position of a channel or multiple channels
(yellow) key to select a channel or multiple channels.
▲/▼keys
to select the new position.
Press
(red) key to move the channel/channels.
Press OK key to preview a channel.
Rename
Press
List
Select a channel list with the
Channel
Enter the channel number.
Press OK key to preview a channel.
13.2
(blue) key to rename a channel.
◀/ ▶
keys.
Edit Favorite lists
24
Edit the 10 user lists.
List
Move between columns with the
the
Rename
Edit
13.3
▲/▼/OK
◀/ ▶
keys and select an option or channel with
keys.
Select a list and press
(yellow) key to rename the user list.
Select a list and press
(red) key to edit.
Select a list option (1st column) to display (2nd column).
Select a channels and press OK key to copy the channel to the user list (3rd
column). Enter the list and press OK key to delete a channel from the user list.
Press
(red) key to watch a channel.
Delete satellite & transponder
Select a satellite or transponder to delete.
13.4 Export data (Channels, lists)
13.5 Import data (Channels, lists)
Save your settings to an USB memory and export/import them i.e. after a factory reset.
Stored settings: All SAT/TP data and antenna settings (LNB, DiSEqC, Motor, etc.), all channel
lists (Satellite/User lists), all settings from the Settings and User menu.
Export data: Select this option to export the data with the option to rename the file.
Import data: Select this option to import the data.
25
14. Installation
14.1
Antenna
Select the Antenna type.
Antenna
Select the Antenna (A=LNB A).
Fixed
Select this option for a fixed antenna.
DiSEqC 1.2
Select this option for a DiSEqC 1.2 motor.
USALS
Select this option for an USALS motor. Enter the longitude
(East/West) and latitude (North/South) of your location.
Unicable/SCD
Select this option for a Single Cable Distribution Antenna to deliver
broadcast over a single cable to multiple users.
Select the user Band B1-B8. Select the Band frequency.
Press MENU key to save.
14.2 Satellite search
26
Satellite
Select a satellite.
Transponder
LNB
22Khz
DiSEqC
DiSEqC 1.1
Select
Select
Select
Select
Select
a transponder.
the LNB frequency.
On or Off.
the DiSEqC (A, B, C, D)/Mini A, B port for the selected satellite.
the DiSEqC port (1-16) for the selected satellite.
Satellite position
This option is activated, if you selected Unicable/SCD antenna in
the Antenna menu. Select the position.
P1: User band B1, B2, B3, B4
P2: User band B5, B6, B7, B8
LNB Power
Select
Search
Press
Search options
All/FTA/NIT/FAST SCAN
Transponder
Multi
PID
the LNB power.
(blue) key to start the search.
Select an option to start the search.
Select this option to add, edit or search transponders.
Select this option to search all installed satellites
( DiSEqC, DiSEqC 1.2 & USALS) at one time.
Select this option to edit PIDs.
14.3 DiSEqC 1.2
DiSEqC/USALS-Multi search
Satellite
Select the installed satellites (DiSEqC switch, DiSEqC 1.2 motor/USALS motor)
with the
Search
Satellite
Press
▲/▼/OK
keys.
(blue) key to search all selected satellites at one time.
Select a satellite.
27
Transponder
Go to position
Select a transponder.
Press OK key to move the motor to the stored position.
Move
Press the
Steps
position/limits.
Select the motor steps (1-127).
Move in steps
Press the
Save position
steps.
Save the selected satellite position.
◀/ ▶
◀/ ▶
(West/East) keys to move the motor to the desired
(West/East) keys to move the motor in the selected
Save limits & options
East/West limit
Select this option to save the limits.
Delete
Select this option to delete the stored limits.
Recalculate
Select this option to recalculate the positions of the satellites based on
one satellite position and to re-adjust them.
Go to center
Select this option to move the motor to the center.
Save
Press MENU key to save the Motor settings and enter the Satellite
Search menu to start the search.
Search
Press
(blue) key to search all selected satellites at one time.
14.4 Blind Scan
Satellite
Select a satellite.
Search
Select a fast scan search option.
Channel list Select to add the searched channels to the channel list (end) or to replace
the searched channels.
Search
Press
(blue) key to start the search.
Edit PID Satellite
Satellite
Select a satellite.
Transponder Select a transponder.
Channel
Rename/name the channel.
28
Video PID
Audio PID
PCR PID
Save
Enter
Enter
Enter
Press
the Video PID.
the Audio PID.
the PCR PID.
MENU key to save the changes.
14.5 USB update
Download
USB
NOTE
Start
Reboot
Download from
the latest system software to your PC and transfer the file to an USB memory.
Connect the USB memory to your receiver.
It is only possible to update via an USB memory formatted in FAT32.
Enter this menu option to start the update.
After an update the set will automatically shutdown. Reboot the set after
the shutdown.
Factory reset
Reset all channel data to the receiver factory settings. All stored channels, lists and settings
will be deleted.
NOTE: It is recommended to make a factory reset after you updated your set via network or
USB. Before you make a factory reset, export all data to the USB memory with the export data
function and import them again after the factory reset. In case the data cannot be imported,
setup your set again.
29
15. Settings
When you press OK button at Network Connection on Settings column, you will see the three
choices which are Cable, WIFI and 3G Modem. Please select one of the connection method you
will use.
15.1 Network connection
When you select Cable, you will see the below screen.
During booting your receiver will connect automatically to the network.
Auto
To connect automatically by DHCP.
Manual
To connect manually with a static IP address.
IP
Enter the fixed IP address.
Subnet mask
Enter the subnet mask address.
In general it is 255.255.255.0.
Gateway
Enter the router's IP address.
DNS Server
Enter the DNS Server's IP address.
In general it is the router's IP address.
You can enter 2 DNS Server IP addresses.
Press MENU key to connect.
Modem
To connect with your telephone line.
Phone number
Enter the phone number to dial in.
Press MENU key to connect.
30
When you select WIFI, you will see the below screen.
When you select 3G Modem, you will see the below screen.
15.2 uPnP
15.3 TV OUT
Not available at the moment.
Screen format
Select the screen format(Auto, Pan & Scan, 4:3/Letterbox).
Menu transparency Select the transparency(50%-100%).
31
Information bar
Select the automatic display time of the information bar for TV, movies,
recordings. If you select Off, the information bar will not be displayed.
TV scart signal
Dolby Digital
CI message
Select the TV scart output option (CVBS/RGB).
Select On to output dolby digital audio via S/PDIF.
Select On to display messages of the CAM and card. If you select Off,
the messages will not be displayed.
15.4 Software version
The receiver software, hardware version and the date of the last update are displayed.
Press OK key to check if a new software update is available.
15.5 Card reader
View information about the inserted subscriber's card.
32
16. User
16.1 Menu & audio language
Menu language
Audio language
Select the menu language.
Select the standard audio language for programs.
16. 2 Time & date
Mode
Date
Time
Select an option (auto/manual).
Enter the date manually.
Enter the time manually.
33
UTC
Summer Time
Sleep time
Wake up time
Select your local zone.
Select the option (On/Off).
Set the time to turn off your receiver automatically.
Set the time to turn on your receiver automatically.
16.3 Parental Lock
PIN
Change
NOTE
The 4 digit PIN code is initially set to 0000.
Enter the New PIN code twice for confirmation and the Current PIN code to
change the PIN code.
Contact your local dealer, if you forgot your PIN code.
16.4 Menu & channel lock
Menu lock
Channel lock
Select On to block the access to the MENU.
Select On to lock channels.
16.5 PVR Set up
Recording duration
Timeshift duration
Jump time
EXT 2 formatting
Recording/Download
Select the preset recording duration (max. 240 min.).
Select the preset Timeshift recording duration (max 180 min.).
Select the preset jump time (max 10 min.).
Format the USB memory in EXT2 format.
Select the storage to save recordings and downloads device
(Storage 1, 2, 3, 4)
34
17. Multi Media
Please press
button on live channel or main channel to enter Multi Media menu.
17.1 File Browser
Edit files (recordings, movies, MP3s, Photos).
New folder
Delete
Copy
Move
Rename
Sort
NOTE
Press
(yellow) key to create a new folder in the selected directory.
Press
(blue) key to delete.
Press
key to copy a file.
Press INFO key to move a file from one folder to another.
Press EPG key to rename a file.
Press USER key to sort (A-Z/Z-A, Date)
Unlock a locked recording or movie to copy/move it.
18. WEB
Please press
button on live channel or main channel to enter WEB menu.
This box supports Web facilities like internet radio, google map, News, Weather, World time,
You-Tube, FTP server, etc. Press WEB key to enter.
You can also add other web facilities you would like to have.
35
19. Specification
19.1 Operating System
Linux Kernal Version 2.6
19.2 Tuner
Frequency Range
RF Input/Output Connector
Input Signal Level
Demodulation Standard
Symbol Rate
Multi Decoding Method
LNB Power
950MHz to 2150MHz
F-type Female (75ohm)
-65 dBm~ -25 dBm
DVB-S, DVB-S2 : QPSK, 8PSK
DVB-S (QPSK) : 1~45Msps DVB-S2 (8PSK/QPSK) : 10~30Msps
LDPC/BCH DVB-S2 (1/2, 2/3, 3/4, 4/5, 5/6, 8/9, 9/10)
V:+13.5Vdc, H:18Vdc 400mA Max. with Overload Protection
19.3 Video / Audio Decoding
Transport Stream
MPEG-4 H.264 HP@L4 1920x1080i@50Hz
Profile Level
MPEG-2 MP@HL, MPEG-4 H.264 MP@L4
Input Rate
Max. 81Mbit/s
Display Aspect Ratio
16:9, 4:3, Letter Box
Video Resolution
1080p, 1080i, 720p, 576p, 576i
Algorithm
Dolby(AC-3 / 5.1CH),MPEG-1 layers 1,2,3(MP3) MPEG-2 layers
2 Sampling Frequency
32, 44.1 and 48 kHz
19.4 A/V & Data In/Out
USB 2.0
HDMI
Ethernet
1 x USB Host connector
Digital Video/Audio Output
RJ-45 10/100 Base-T
19.5 Conditional Access Interface
SMART card
1 slot
19.6 Power Supply
Input Voltage
Power Consumption
Stand-by mode
Type
12V 2A.DC, 50/60Hz
Max. 25W
Max. 1W
Adaptor type
19.7 Physical Specification
Dimension (W x H x D)
Net Weight
Operating Temperature
Storage Temperature
160 x 124 x 30(mm)
~ 0.8Kg
0°C ~ 50°C
-20°C ~ 60°C
19.8 Display & Control
Remote Control
19.9 Supported Formats
Photo
Video
Subtitle
JPEG
AVi,MKV, VOB, FLV, MPEG2 TS/TRP, MPEG1/2
SMI, SRT, SUB
With function
36