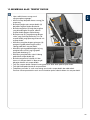
1
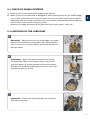
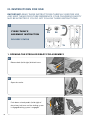
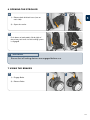
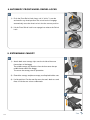
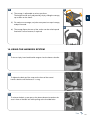
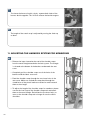
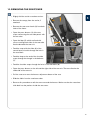
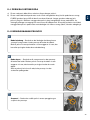
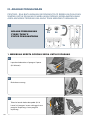
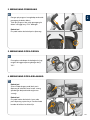
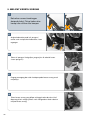
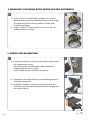
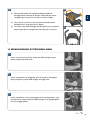
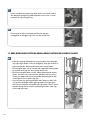
EN
MY
twinYx
EN-user guide | MY-Panduan Pengguna
1
2
EN
5 | CONTENT
MY
23 | KANDUNGAN
3
ATTENTION: Read these instructions carefully
before use and keep them for future reference. Your
child‘s safety may be affected if you do not follow
these instructions.
4
Dear Customer
EN
Thank you very much for purchasing the CYBEX TWINYX. This product is a stroller
for children suitable from birth and up to 2x15 kg. It is suitable for a maximum of two
childs only. The stroller is equipped with a canopy – all features are explained in the
instructions. In developing the CYBEX TWINYX we can assure you that our main focus
was both safety, comfort and easy operation.
The product has been developed under strict quality control and meets all relevant
safety standards. Should you have any questions, please feel free to contact us at any
time.
CONTENT
I. General Information & Safety....................................................................6
II. Instructions for maintenance and service................................... 7
III. I nstructions for use........................................................................................ 10
1. Opening the stroller ready for assembly....................................................................... 10
2. Assembling the handles....................................................................................................11
3. Assembling the front wheels............................................................................................11
4. Assembling the rear wheels.............................................................................................11
5. Folding the stroller............................................................................................................. 12
6. Opening the stroller.......................................................................................................... 13
7. Using the brakes................................................................................................................ 13
8. Automatic front wheels swivel locks.............................................................................. 14
9. Extendable Canopy........................................................................................................... 14
10. Using the harness system................................................................................................ 15
11. Adjusting the harness system for newborns................................................................ 16
12. Removing the seatcover....................................................................................................17
13. Reclining the leg rest........................................................................................................ 18
14. Reclining the seat.............................................................................................................. 18
15. Attaching The Bumper Bar.............................................................................................. 19
16. Carrying the stroller........................................................................................................... 19
17. Attaching the raincover..................................................................................................... 19
18. Warranty.............................................................................................................................. 20
19. Care instructions................................................................................................................ 20
5
I. GENERAL INFORMATION & SAFETY
Your child´s safety is your responsibility. Always use the harness system to prevent your child from
falling or sliding out of the seat. This vehicle is suitable for a maximum of two children only. Follow all
instructions carefully to avoid incorrect handling as this can impair the stroller’s correct function.
ATTENTION: The total load capacity of the stroller is 35 kg. It
is suitable for children with a weight of max. 15 kg (per seat
unit). (2x15 in the Seat + 2x2 in the Basket + 2x0,5 in the Canopy
Pocket).
Use of this stroller with a child weighing more than 15 kg will cause excessive wear and tear on the
stroller.
The harness always needs to be attached and adjusted correctly. If not adjusted correctly
according to the instructions the stability of the stroller will be affected. The harness and seat belt do
not replace the permanent supervision by an adult.
To attach an additional full harness system for safety reasons ‘D’ rings (according to EN13210 or
BS6684) are provided.
The child should be clear of any moving parts while making adjustments. Prevent children from
grabbing the stroller while folding and unfolding, as fingers can become trapped and scissoring
actions are unavoidable.
!
warning
• It may be dangerous to leave your child unattended.
• Always use the crotch strap in combination with the waist belt.
• Use a harness system as soon as the child can sit unaided.
• This product is not suitable for running or skating.
• Any load attached to the handles affects the stability of the stroller.
• Do not let your child play with this product.
• To avoid injury ensure that your child is kept away when unfolding and
folding this product.
• Always use the restraint system.
6
EN
Do not carry more than two children in the buggy. Do not hang any shopping bags onto the handle
bars. These should be stored in the stroller basket. The load per basket should not exceed 2 kg.
Overloading can result in the stroller becoming unstable. Maximum load allowed per canopy bag is 0,5
kg.
• Damages caused by the use of accessories not approved by CYBEX, such as rain covers, buggy
boards, bag hooks, etc. will not be covered by the terms of our warranty.
• It may be unsafe to use replacement parts other than those approved by CYBEX.
• Before using the stroller, always check whether the accessories are well secured.
• Please make sure that the brake is locked while placing and removing the children.
• Never lift the stroller with the child inside; never go up or down the stairs or escalators with the child
inside or when traveling on other forms of transport.
• When opening and closing the stroller, do not use force, as incorrect folding can damage or break
the stroller. Check the instruction manual if necessary.
• Drive carefully over curbs and gravel roads. The vehicle will be damaged by repeated impact.
• Make sure your child does not use the footrest to stand on.
• Do not expose the stroller to any artificial heat or direct sunlight.
• For new born babies we recomend to adjust the backreest into the lowest (flattest) recline position.
II. INSTRUCTIONS FOR MAINTENANCE
• The user is responsible for the regular maintenance of the stroller. All connecting parts and rivets
have to be tightened and secured properly. It is particularly important to ensure that the locking
mechanism and swiveling mechanism are treated regularly with Teflon spray (dry lubricant). It is
important that brakes, wheels and tyres are not impaired during use. Inspect them regularly and
repair or replace if necessary. STOP using any product that does not appear structurally sound.
• Do not make any modifications to the product. If you have any complaints or problems, please
contact your supplier or importer.
• A service should be scheduled every 12 months.
• You can also treat the other moving parts with Teflon spray (dry lubricant). After spraying on the
Teflon, wipe the product with a soft cloth.
• Use only original CYBEX replacement parts. It may be unsafe to use substitutes.
• The frame tubes covered by the locking mechanism and turning mechanism should also be regularly
cleaned and sprayed. This will ensure that you enjoy your stroller without any problems.
7
Cleaning
• Do not use abrasives to clean the frame! Use a damp cloth and a mild detergent and dry thoroughly.
• Should the stroller be exposed to salt water, please rinse it down with fresh (tap) water as soon as
possible afterwards.
• The seat cover can be machine washed at max. 30°C with a mild detergent on a gentle cycle
setting. The canopy should be washed by hand with a mild detergent (not warmer than 30°C)
• See care labels for details. Do not use the washing machine or tumble drier. Dry thoroughly before
reuse.
• All CYBEX fabrics have been tested, but when the stroller is very wet, the water may permeate the
lining through the bottom edges and seams and leave water stains on the upholstery. We advise
you to use a rain cover to avoid this. Also please do not fold or store the product while wet. If the
stroller is wet, allow to dry with the hood extended. Never store in a damp environment as this can
cause mildew to form.
!
warnIng
Please wash the cover separately before you use it the first time.
Do not tumble dry and do not expose to direct sunlight! Do not iron!
This product conforms and has been certified to safety standard
EN 1888:2012.
DISPOSAL
When you are done using your CYBEX TWINYX, a proper disposal is important. Garbage disposal
can be different in every country. Please contact your local waste management company to make
sure you are taking the right steps to dispose of the CYBEX TWINYX. Always follow the disposal
regulations of your country.
Service
In general a Cybex buggy should run smoothly without any problems. A dry and/or dusty environment
can have a negative effect on the wheel systems. To avoid this it is very important that the wheel
systems will be regularly checked, cleaned and lubricated. This will ensure a smooth operation of the
stroller in daily use. Please follow the instruction below to maintain the wheel systems (wheel axles &
suspension system).
8
II.-I Check of wheel systems
EN
a) Wheel system must be cleaned before applying the lubricant.
b) Wheel system must not be broken or damaged. To avoid squeaking noises on your CYBEX buggy
only use WD 40 and follow the instructions below. Do not use any other kind of lubricant! Before
applying the lubricant, in order to avoid any stains on the fabrics, please protect them by holding a
cloth or carton in front of them. Please pay special
attention to not apply the lubricant on any other part of the stroller (fabrics, tubes, etc.).
II.-II Applying of the lubricant
a)
Rear wheel – Spray from the rear side of the buggy in the space
between the rim and the housing on both sides. Let the lubricant
work its way into the system for approx. 10 seconds and then turn
both rear wheels.
b)
Front wheel – Spray in the space between the rim and the
housing on both sides. Let the lubricant work its way into the
system for approx. 10 seconds and then turn both front wheels.
Should this not avoid the squeaking, please remove the rim cap
and apply the spray on the axle.
c)
Suspension – Apply some lubricant between the suspension
slider and the housings.
9
III. INsTrUCTIONs fOr UsE
ImPOrTANT: rEad ThEsE iNsTruCTiONs CarEFullY BEFOrE usE
aNd kEEP ThEM FOr FuTurE rEFErENCE. YOur ChildrEN’s saFETY
MaY BE aFFECTEd iF YOu dO NOT FOllOW ThEsE iNsTruCTiONs.
!
2x
CybEx TwINyx
AssEmbly INsTrUCTION
2x
6x
1x
DElIvEry sTATUs
1x
1. OPENING ThE sTrOllEr rEADy fOr AssEmbly
a)
release both (left & right) fold lock levers.
b)
Open the stroller.
c)
Push down on both pedals (left & right) of
the primary lock lever until the locking system
is engaged.locking system is engaged.
10
2. ASSEMBLING The Handles
EN
a)
With the locking pins facing you slide the
handle into recepticle.
Push in the locking pins and push handle in
until it makes an audible „click“.
Attention!
The pins on both sides must be fully
engaged.
3. Assembling The Front Wheels
a)
Fit the front wheels to the end of the frame
until they engage with a “click”.
4. Assembling The Rear Wheels
a)
Attention!
The Wheel system with the brake pedal must
be fitted to the right side of the
buggy (viewed from behind the buggy).
Attention!
The pins on both sides of the wheel system
must be fully engaged. Ensure the bowden
cable is inserted into the clips.
11
5. Folding the Stroller
!
Remove all contents from the
baskets. Close both canopies and
remove the bumperbar.
a)
Lift both pedals of the primary lock levers to
release both stretching system.
b)
Push down the third lock lever (extended bar on the right side of
the locking system).
c)
Grip handles and push forward on the stroller in order to fold it.
d)
Press the folded stroller until the fold lock on both sides is
engaged. We recommend to fasten the harness before folding the
stroller.
12
6. Opening the Stroller
a)
2
EN
1
1) Release both fold lock levers (one on
each side).
2) Open the stroller.
b)
Push down on both pedals (left & right) of
the primary lock lever until the locking system
is engaged.
!
warning
Ensure that all locking devices are engaged before use.
7. Using The Brakes
a)
1
2
1) Engage Brake
2) Release Brake
13
8. Automatic Front Wheel Swivel Locks
a)
1
1) P
ush the Front Swivel Lock Lever until it “clicks”. It can be
activated in any wheel position.The swivel Lock will engage
automatically once the wheel swivels into the correct position.
2) Lift the Front Swivel Lock Lever up again to release the Swivel
Lock.
2
9. Extendable Canopy
a)
1
1) Attach both outer canopy clips onto the inside of the outer
frame tubes of the buggy.
The middle canopy clip attaches from the front onto the top
middle frame tube of the buggy.
To remove the canopy reverse procedure.
2) Extend the canopy and place canopy rear flap behind the seat.
2
3) Lie-flat position: Put the rear flap over the seat’s back rest and
fixate it with the two velcros underneath.
3
14
a)
4/5
EN
4) The canopy is adjustable to various positions.
The height can be easily adjusted by simply sliding the canopy
up or down on the frame.
5) For maximum coverage, unzip the extra panel on top of canopy
and pull forward.
6) The canopy flap at the rear of the stroller can be rolled up and
fixed with a velcro fastener, if required.
6
10. Using The Harness System
a)
To close simply insert both buckle tongues into the harness buckle.
b)
To tighten the belts pull the strap on the front of the central
harness buckle until the harness is snug.
c)
To release the belt system press the release button located on the
seat in front of the belt lock while pulling at the shoulder belts.
15
d)
To release the harness buckle, simply squeeze both sides of the
harness buckle together. This will then release the buckle tongues.
e)
The length of the crotch strap is adjusted by moving the slider up
or down.
11. Adjusting The Harness System for Newborns
a)
• Release the loops located at the end of the shoulder straps
from the metal triangle attached to the belt system. The triangle
is situated at the bottom of the backrest underneath the seat
cover.
• Completely pull the shoulder straps out of the holes of the
backrest and the fabric seat cover.
• Feed the shoulder straps through the two lower holes in the
seat cover. Make sure to feed the straps back through the
sloted holes of the plastic backrest mechanism and re-attach
them to the triangle.
• To adjust the length of the shoulder straps for newborns please
use the the inner loop of the shoulder strap ends and attach
them to the metal triangle. Switch back to the lower holes as
soon as the shoulder straps do no longer fit over the child´s
shoulders.
16
12. REMOVING THE SEATCOVER
a)
EN
• Slightly fold the stroller to reduce tension.
• Remove the canopy from the stroller, if
attached.
• Remove the seat cover hooks (3) from both
sides of the frame.
• Open the press buttons (4) of the two
straps connecting the seat side panels with
the rear tube.
• Open the flaps (5) which are fixed with
velcro covering both sides of the seat tube
fixed underneath the seat unit.
• Feed the strap with the slider (6) of the
central harness buckle through the hole in
the seat fabric.
• Feed the loops at the end of the shoulder
straps through the triangle in the backrest
(7).
• Feed the shoulder straps through the holes in the seat fabric (8).
• Open the press buttons on the left and the right side of the seat unit. These are fixed at the
underside of the seat unit.
• Pull the seat cover over the harness adjustment button of the seat.
• Slide the fabric from the seat base tubes.
• Reverse this procedure to refit the seat cover and the harness. Make sure that the seat tubes
slide back into the pockets inside the seat cover.
17
13. Reclining The Leg Rest
a)
1
1) Press the leg rest on both front edges and push down.
2) Simply lift the leg rest to put it back to the starting position.
2
14. Reclining The Seat
a)
Pull the recline lever at the back of the seat in order to recline the
backrest to the 4 different positions.
b)
To raise lift the complete backrest up to required position.
18
15. ATTAChING ThE bUmPEr bAr
EN
a)
To attach the bumper bar slide the left and right bumper bar
connector into the adapter located inside the seat fabric pocket.
Press the buttons on the left and right side of the bumper bar to
take it off.
16. CArryING ThE sTrOllEr
a)
Pull the flexible carrying handle on the middle rear tube and lift to
carry the stroller.
b)
additionally there is a pulling strap located at the top
end of the middle frame tube. With this pulling strap the buggy can
be pulled along when folded.
17. ATTAChING ThE rAINCOvEr (OPTIONAl)
a)
Extend the rain cover over the stroller like shown in the image.
To fit the rain cover fasten the velcro strips around the frame at the
top and bottom on both sides of the buggy.
19
18. WARRANTY
The following warranty applies solely in the country where this product was initially sold by a retailer
to a customer. The warranty covers all manufacturing and material defects, existing and appearing,
at the date of purchase or appearing within a term of two (2) years from the date of purchase from
the retailer who initially sold the product to a consumer (manufacturer’s warranty). In the event that
a manufacturing or material defect should appear, we will – at our own discretion – either repair the
product free of charge or replace it with a new product. To obtain such warranty it is required to take
or ship the product to the retailer, who initially sold this product to a customer and to submit an original
proof of purchase (sales receipt or invoice) that contains the date of purchase, the name of the retailer
and the type designation of this product. This warranty shall not apply in the event that this product is
taken or shipped to the manufacturer or any other person other than the retailer who initially sold this
product to a consumer. Please check the product with respect to completeness and manufacturing or
material defects immediately at the date of purchase or, in the event that the product was purchased
in distance selling, immediately after receipt. In case of a defect stop using the product and take or
ship it immediately to the retailer who initially sold it. In a warranty case the product has to be returned
in a clean and complete condition. Prior to contacting the retailer, please read this instruction manual
carefully. This warranty does not cover any damages caused by misuse, environmental influence
(water, fire, road accidents etc.) or normal wear and tear. It does solely apply in the event that the use
of the product was always in compliance with the operating instructions, if any and all modifications
and services were performed by authorized persons and if original components and accessories were
used. This warranty does not exclude, limit or otherwise affect any statutory consumer rights, including
claims in tort and claims with respect to a breach of contract, which the buyer may have against the
seller or the manufacturer of the product.
19. Care InstructionS
• wash separately
• gentle action wash warm
water
• do not bleach
20
• do not tumble dry
• do not iron
• do not dry clean
EN
21
PERHATIAN: Sila baca arahan ini dengan teliti
sebelum guna dan simpan untuk rujukan di masa
akan datang. Keselamatan anak anda mungkin
menerima kesan jika anda tidak mengikuti arahan ini.
22
Pelanggan yang dihormati
MY
Terima kasih kerana membeli CYBEX TWINYX. Produk ini ialah kereta sorong untuk
kanak-kanak daripada baru lahir dan sehingga 2x 15 kg. Ia sesuai untuk maksimum dua
orang kanak-kanak sahaja. Kereta sorong ini dilengkapi dengan kanopi - semua cirinya
ada diterangkan di dalam arahan. Dalam membangunkan CYBEX TWINYX kami mahu
memastikan anda bahawa tumpuan utama kami adalah keselamatan, keselesaan dan
pengendalian yang mudah.
Produk ini telah dibangunkan di bawah kawalan kualiti yang ketat dan memenuhi semua
piawaian keselamatan yang berkaitan. Sekiranya anda mempunyai sebarang pertanyaan,
sila menghubungi kami pada bila-bila.
KANDUNGAN
I. Maklumat Am & Keselamatan...................................................................... 24
II. Arahan penyelenggaraan dan servis ............................................. 25
III. A rahan penggunaan.......................................................................................... 28
1. Membuka kereta sorong sedia untuk dipasang........................................................... 28
2. Memasang pemegang...................................................................................................... 29
3. Memasang roda depan..................................................................................................... 29
4. Memasang roda belakang................................................................................................ 29
5. Melipat kereta sorong....................................................................................................... 30
6. Membuka kereta sorong....................................................................................................31
7. Menggunakan brek.............................................................................................................31
8. Mengunci pusingan roda depan secara automatik ................................................... 32
9. Kanopi Boleh Bentang...................................................................................................... 32
10. Menggunakan Sistem Abah-abah.................................................................................. 33
11. Melaraskan Sistem Abah-abah untuk Bayi Baru Lahir............................................... 34
12. Membuka alas tempat duduk.......................................................................................... 35
13. Menyandarkan alas kaki.................................................................................................... 36
14. Menyandarkan tempat duduk ......................................................................................... 36
15. Memasang bampar bar......................................................................................................37
16. Membawa kereta sorong...................................................................................................37
17. Memasang penutup hujan.................................................................................................37
18. Jaminan................................................................................................................................ 38
19. Arahan penjagaan.............................................................................................................. 38
23
I. MAKLUMAT AM & KESELAMATAN
Keselamatan anak anda adalah tanggungjawab anda. Sentiasa gunakan sistem abah-abah untuk
mencegah anak anda daripada terjatuh atau menggelongsor dari tempat duduk. Kereta sorong ini sesuai
untuk maksimum dua orang kanak-kanak sahaja. Ikuti semua arahan betul-betul untuk mengelakkan
pengendalian yang salah kerana ini boleh mendatangkan kesan kepada fungsi kereta sorong yang betul.
PERHATIAN: Jumlah kapasiti beban kereta sorong ialah 35 kg.
Ia sesuai untuk kanak-kanak dengan berat maks. 15 kg (per
unit tempat duduk). (2x15 dalam Tempat duduk + 2x2 dalam
Bakul + 2x0,5 dalam Poket Kanopi).
Penggunaan kereta sorong ini untuk kanak-kanak yang beratnya melebihi 15 kg akan menyebabkan
haus dan lusuh yang berlebihan kepada kereta sorong.
Abah-abah perlu disambungkan dan dilaraskan dengan betul. Jika tidak dilaraskan dengan betul
menurut arahan, kestabilan kereta sorong akan terganggu. Abah-abah dan tali pinggang keselamatan
tidak boleh menggantikan pengawasan sepanjang masa oleh orang dewasa.
Untuk menyambungkan sistem abah-abah penuh tambahan untuk keselamatan cincin 'D' (menurut
EN13210 atau BS6684) disediakan.
Kanak-kanak perlu jauh daripada sebarang bahagian yang bergerak semasa membuat pelarasan.
Elakkan kanak-kanak daripada memegang kereta sorong semasa melipat dan membuka lipatan, kerana
jari boleh tersangkut dan tindakan menggunting tidak dapat dielakkan.
!
Amaran
• Bahaya jika meninggalkan anak anda tanpa dijaga.
• Sentiasa gunakan tali pengikat kelangkang bersama dengan tali
pinggang.
• Gunakan sistem abah-abah sebaik sahaja kanak-kanak boleh duduk
tanpa dibantu.
• Produk ini tidak sesuai untuk berlari atau meluncur.
• Sebarang beban yang disangkut kepada pemegang akan memberi kesan
kepada kestabilan kereta sorong.
• Jangan biar anak anda bermain dengan produk ini.
• Untuk mengelak kecederaan pastikan anak anda berada jauh ketika
produk ini dilipat dan dibuka.
• Sentiasa gunakan sistem sekatan.
24
MY
Jangan bawa lebih daripada dua orang kanak-kanak di dalam kereta sorong. Jangan sangkut beg belibelah pada bar pemegang Beg beli-belah perlu disimpan di dalam bakul kereta sorong. Beban setiap
bakul tidak boleh lebih 2 kg. Muatan berlebihan boleh membuatkan kereta sorong menjadi tidak stabil.
Beban maksimum yng dibenarkan setiap beg kanopi ialah 0.5 kg.
• Kerosakan disebabkan oleh penggunaan aksesori yang tidak diluluskan oleh CYBEX, seperti
penutup hujan, papan buggy, penyangkut beg dan sebagainya tidak akan dilindungi oleh terma
jaminan kami.
• Penggunaan alat ganti selain daripada yang diluluskan oleh CYBEX mungkin tidak selamat.
• Sebelum menggunakan kereta sorong, sentiasa periksa sama ada aksesori sudah dipasang dengan
selamat.
• Sila pastikan brek dikunci semasa meletakkan dan mengangkat kanak-kanak.
• Jangan angkat kereta sorong dengan kanak-kanak berada di dalam: jangan naik atau turun
tangga atau tangga bergerak dengan kanak-kanak di dalam atau semasa bergerak dalam bentuk
pengangkutan yang lain.
• Semasa membuka dan menutup kereta sorong, jangan gunakan kekuatan, kerana melipat dengan
cara yang salah boleh merosakkan atau mematahkan kereta sorong. Baca manual arahan jika perlu.
• Sorong dengan berhati-hati apabila melalui susur jalan dan jalan kerikil. Kereta sorong akan rosak
akibat impak yang berulang.
• Pastikan anak anda tidak berdiri di atas alas kaki.
• Jangan dedahkan kereta sorong kepada sebarang haba buatan atau cahaya matahari secara terus.
• Bagi bayi baru lahir kami mengesyorkan melaraskan penyandar belakang kepada kedudukan
menyandar paling rendah (paling rata).
II. ARAHAN PENYELENGGARAAN
• Pengguna bertanggungjawab untuk kerap menyelenggarakan kereta sorong. Semua bahagian
yang bersambung serta rivet perlu diketatkan dan dipasang dengan betul. Adalah penting untuk
memastikan bahawa mekanisme kunci dan mekanisme berpusing disemburkan dengan semburan
Teflon (pelincir kering) secara kerap. Adalah penting untuk brek, roda dan tayar tidak rosak semasa
penggunaan. Periksa bahagian ini dengan kerap dan baiki atau gantikan jika perlu. BERHENTI
daripada menggunakan produk yang kelihatan tidak kukuh.
• Jangan buat sebarang pengubahsuaian kepada produk. Jika anda mempunyai sebarang aduan atau
masalah, sila hubungi pembekal atau pengimport anda.
• Servis perlu dijadualkan setiap 12 bulan.
• Anda juga boleh menggunakan semburan Teflon (pelincir kering) untuk bahagian bergerak yang lain.
Selepas semburan Teflon, lap produk dengan kain lembut.
• Gunakan hanya alat ganti CYBEX yang asli. Penggunaan alat ganti yang lain mungkin tidak selamat.
• Tiub rangka yang dilekapkan dengan mekanisme kunci dan mekanisme berpusing perlu dibersihkan
dan disemburkan dengan kerap. Ini akan memastikan anda boleh menikmati penggunaan kereta
sorong tanpa sebarang masalah.
25
Membersihkan
• Jangan gunakan penyental untuk membersihkan rangka! Gunakan kain lembap dan bahan pencuci
lembut dan keringkan betul-betul.
• Sekiranya kereta sorong terdedah kepada air masin, sila bilas dengan air tawar (air paip) dengan
segera selepas itu.
• Alas tempat duduk boleh dicuci dengan mesin pada suhu maks. 30°C menggunakan bahan pencuci
lembut pada kitaran lembut. Kanopi boleh dicuci tangan menggunakan bahan pencuci lembut
(kepanasan tidak melebihi 30°C).
• Lihat label penjagaan untuk butiran. Jangan gunakan mesin basuh atau mesin pengering. Keringkan
betul-betul sebelum digunakan semula.
• Semua fabrik CYBEX telah diuji, tetapi apabila kereta sorong terlalu basah, air mungkin meresap
ke lapisan melalui bahagian bawah dan kelim dan meninggalkan kesan air pada upholsteri. Kami
menasihatkan anda untuk menggunakan penutup hujan untuk mengelakkan perkara ini. Dan juga
jangan lipat atau simpan kereta sorong semasa basah. Jika kereta sorong basah, biarkannya kering
dengan hud dipanjangkan keluar. Jangan simpan di persekitaran yang lembap kerana ini boleh
menyebabkan kulat terbentuk.
!
amaran
Sila basuh pelapik secara berasingan sebelum anda menggunakan buat
kali pertama. Jangan gunakan mesin pengering dan jangan dedahkan
kepada cahaya matahari secara terus! Jangan seterika!
Produk ini mematuhi dan telah disahkan dengan
standard keselamatan EN 1888:2012.
PELUPUSAN
Apabila anda selesai menggunakan CYBEX TWINYX, pelupusan yang sewajarnya perlu dilakukan.
Pelupusan sisa mungkin berbeza di setiap negara. Sila hubungi syarikat pengurusan sisa tempatan
anda untuk memastikan anda mengambil langkah yang wajar dalam melupuskan CYBEX TWINYX.
Sentiasa ikut peraturan pelupusan negara anda.
Servis
Secara amnya kereta sorong Cybex akan beroperasi dengan lancar tanpa sebarang masalah.
Persekitaran yang kering dan/atau berhabuk boleh memberi kesan negatif kepada sistem roda. Untuk
mengelakkannya adalah penting untuk memeriksa, membersihkan dan melincirkan sistem roda dengan
kerap. Ini akan memastikan operasi kereta sorong yang lancar semasa penggunaan harian. Sila ikut
arahan di bawah untuk menjaga sistem roda (gandar roda dan sistem suspensi).
26
II.-I Periksa sistem roda
MY
a) Sistem roda perlu dibersihkan sebelum disapu dengan pelincir.
b) Sistem roda tidak boleh patah atau rosak. Untuk mengelakkan bunyi keriuk pada kereta sorong
CYBEX gunakan hanya WD 40 dan ikut arahan di bawah. Jangan gunakan sebarang jenis
pelincir yang lain! Sebelum menggunakan pelincir, bagi mengelakkan kesan pada fabrik, sila
lindunginya dengan memegang kain atau karton di hadapan kain. Sila ambil perhatian untuk tidak
menggunakan pelincir pada mana-mana bahagian lain kereta sorong (fabrik, tiub dan sebagainya).
II.-II Menggunakan pelincir
a)
Roda belakang – Semburkan dari bahagian belakang kereta
sorong di ruang antara rim dan penutup di kedua-dua belah.
Biarkan pelincir meresap ke dalam sistem anggaran 10 saat, dan
kemudian pusingkan kedua-dua roda belakang.
b)
Roda depan – Semburkan di ruang antara rim dan penutup
di kedua-dua belah. Biarkan pelincir meresap ke dalam sistem
anggaran 10 saat, dan kemudian pusingkan kedua-dua roda
depan.
Sekiranya bunyi keriuk masih ada, buka penutup rim dan
semburkan pada gandar.
c)
Suspensi – Semburkan sedikit pelincir antara penggelongsor
suspensi dan penutup.
27
III. ArAhAN PENGGUNAAN
PENTiNg: sila BaCa arahaN iNi dENgaN TEliTi sEBEluM guNa daN
siMPaN uNTuk ruJukaN di Masa akaN daTaNg. kEsElaMaTaN aNak
aNda MuNgkiN TErJEJas Jika aNda Tidak MENgikuTi arahaN iNi.
!
2x
ArAhAN PEmAsANGAN
CybEx TwINyx
sTATUs PENGhANTArAN
2x
6x
1x
1x
1. mEmbUKA KErETA sOrONG sEDIA UNTUK DIPAsANG
a)
lepaskan kedua-dua tuil pengunci lipatan
(kiri & kanan).
b)
Buka kereta sorong.
c)
Tekan ke bawah kedua-dua pedal (kiri &
kanan) tuil pengunci utama sehingga sistem
pengunci terpasang. sistem pengunci
terpasang.
28
2. MEMASANG Pemegang
MY
a)
Dengan pin pengunci menghadap anda tolak
pemegang ke dalam bekas.
Tolak pin pengunci dan tolak pemegang ke
dalam sehingga bunyi "klik" didengari.
Perhatian!
Pin pada kedua-dua belah perlu dipasang.
3. Memasang Roda Depan
a)
Pasangkan roda depan ke bahagian hujung
rangka sehingga terpasang dengan bunyi
"klik".
4. Memasang Roda Belakang
a)
Perhatian!
Sistem Roda dengan pedal brek perlu
dipasang di sebelah kanan kereta sorong
(pandangan daripada belakang kereta
sorong).
Perhatian!
Pin pada kedua-dua belah sistem roda
perlu dipasang sepenuhnya. Pastikan kabel
bowden diselitkan ke dalam klip.
29
5. Melipat Kereta Sorong
!
Keluarkan semua kandungan
daripada bakul. Tutup kedua-dua
kanopi dan alihkan bar bampar.
a)
Angkat kedua-dua pedal tuil pengunci
utama untuk melepaskan kedua-dua sistem
regangan.
b)
Tekan tuil pengunci ketiga (bar yang terjulur di sebelah kanan
sistem pengunci)
c)
Pegang pemegang dan tolak ke depan pada kereta sorong untuk
melipatnya.
d)
Tekan kereta sorong yang dilipat sehingga kedua-dua kunci kali
dipasang. Kami mengesyorkan untuk mengetatkan abah sebelum
melipat kereta sorong.
30
6. Membuka Kereta Sorong
a)
2
MY
1
1) Lepaskan kedua-dua tuil pengunci lipat
(satu setiap sisi).
2) Buka kereta sorong.
b)
Tekan ke bawah kedua-dua pedal (kiri &
kanan) tuil pengunci utama sehingga sistem
pengunci terpasang.
!
Amaran
Pastikan semua peranti pengunci dipasang sebelum penggunaan.
7. Menggunakan brek
a)
1
2
1) Memasang Brek
2) Melepaskan Brek
31
8. Mengunci pusingan roda depan secara automatik
a)
1
1) Tekan Tuil Kunci Pusingan Depan sehingga "klik". Ia boleh
diaktifkan dalam mana-mana kedudukan roda. Kunci pusingan
akan dipasang secara automatik apabila ia sampai pada
kedudukan yang betul.
2) Angkat Tuil Kunci Pusingan Depan ke atas sekali lagi untuk
melepaskan Kunci Pusingan.
2
9. Kanopi Boleh Bentang
a)
1
1) Pasangkan kedua-dua klip kanopi luar kepada bahagian dalam
tiub rangka kereta sorong.
Klip kanopi tengah bersambung dari depan kepada tiub
rangka tengah atas kereta sorong.
Untuk membuka kanopi terbalikkan prosedur ini.
2
2) Panjangkan kanopi dan letakkan penutup belakang kanopi ke
belakang tempat duduk.
3) Kedudukan mendatar: Letakkan penutup belakang di atas
penyandar belakang tempat duduk dan lekatkan menggunakan
dua velkro di bawah.
3
32
a)
4/5
5) Untuk liputan maksimum, buka zip panel tambahan pada
bahagian atas kanopi dan tarik ke depan.
6) Penutup kanopi pada bahagian belakang kereta sorong boleh
digulung dan diikat menggunakan kancing velkro, jika perlu.
MY
4) Kanopi boleh dilaraskan kepada pelbagai kedudukan.
Ketinggian boleh dilaraskan dengan mudah dengan hanya
menggelongsor kanopi ke atas atau ke bawah rangka.
6
10. Menggunakan Sistem Abah-abah
a)
Untuk menutup hanya selitkan kedua-dua lidah pengancing ke
dalam pengancing abah-abah.
b)
Untuk mengetatkan tali pinggang, tarik tali pengikat di bahagian
depan pengancing abah-abah tengah sehingga ketat.
c)
Untuk melepaskan sistem tali pinggang telan butang pelepas yang
terletak di atas tempat duduk di depan pengunci tali pinggang dan
tarik tali pinggang bahu.
33
d)
Untuk melepaskan pengancing abah-abah, cuma tekan keduadua bahagian pengancing abah-abah bersama-sama. Ini akan
melepaskan lidah pengancing.
e)
Panjang tali pengikat kelangkang dilaraskan dengan
menggerakkan penggelongsor ke atas dan ke bawah.
11. Melaraskan Sistem Abah-abah untuk Bayi Baru Lahir
a)
• Lepaskan gelung di bahagian hujung pengikat bahu daripada
segi tiga logam pada sistem tali pinggang. Segi tiga terletak di
bawah penyandar belakang di bawah alas tempat duduk
• Tarik pengikat bahu keluar sampai habis daripada lubang pada
penyandar belakang dan alas tempat duduk kain.
• Masukkan pengikat bahu melalui lubang bawah pada tempat
duduk. Pastikan untuk memasukkan pengikat semula melalui
lubang slot pada mekanisme penyandar belakang plastik dan
sambungkan semula pada segi tiga.
• Untuk melaraskan panjang pengikat bahu bagi bayi baru lahir
sila gunakan bahagian dalam gelung pada hujung pengikat
bahu dan pasangkannya kepada segi tiga logam. Ubah semula
kepada lubang bawah sebaik sahaja pengikat bahu tidak lagi
muat pada bahu bayi.
34
12. MEMBUKA ALAS TEMPAT DUDUK
a)
MY
• Lipat sedikit kereta sorong untuk
mengurangkan tegangan.
• Alihkan kanopi daripada kereta sorong, jika
terpasang.
• Buka penyangkut alas tempat duduk (3)
daripada rangka di kedua-dua belah.
• Buka butang tekan (4) bagi dua pengikat
yang disambungkan ke panel sebelah
tempat duduk dengan tiub belakang.
• Buka penutup (5) yang dipasang dengan
velkro yang menutup kedua-dua sisi tiub
tempat duduk yang dipasang di bawah unit
tempat duduk.
• Masukkan pengikat dengan gelongsor (6)
pengancing abah-abah tengah melalui
lubang pada fabrik tempat duduk.
• Masukkan gelung pada bahagian hujung
pengikat bahu melalui segi tiga pada
penyandar belakang (7).
• Masukkan pengikat bahu melalui lubang
pada fabrik tempat duduk (8).
• Buka butang tekan di sebelah kiri dan
kanan unit tempat duduk. Ini dipasang di
bahagian bawah unit tempat duduk.
• Tarik alas tempat duduk melepasi butang pelarasan abah-abah pada tempat duduk.
• Tarik fabrik daripada tiub dasar tempat duduk.
• Terbalikkan prosedur ini untuk memasang semula alas tempat duduk dan abah-abah.
Pastikan tiub tempat duduk masuk semula ke dalam poket sebelah dalam alas tempat duduk.
35
13. Menyandarkan Alas Kaki
a)
1
1) Tekan alas kaki di kedua-dua hujung depan dan tekan ke bawah.
2) Cuma angkat alas kaki untuk mengembalikannya kepada
kedudukan asal.
2
14. Menyandarkan Tempat duduk
a)
Tarik tuil sandar di bahagian belakang tempat duduk bagi
menyandarkan penyandar belakang kepada 4 kedudukan berbeza.
b)
Untuk mengangkat, tarik penyandar belakang kepada kedudukan
yang dikehendaki.
36
15. mEmAsANG bAmPAr bAr
MY
a)
untuk memasang bar bampar tolak penyambung bar bampar kiri
dan kanan ke dalam adapter yang terletak di dalam poket fabrik
tempat duduk.
Tekan butang di sebelah kiri dan kanan bampar bar untuk
mengeluarkannya.
16. mEmbAwA KErETA sOrONG
a)
Tarik pemegang pembawa fleksibel pada tiub tengah belakang dan
angkat kereta sorong.
b)
sebagai tambahan, terdapat tali penarik yang terletak di bahagian
atas tiub rangka tengah. dengan tali penarik ini kereta sorong
boleh ditarik selepas dilipat.
17. mEmAsANG PENUTUP hUjAN (OPsyENAl)
a)
Panjangkan penutup hujan di atas kereta sorong seperti dalam
gambar.
untuk memasang penutup hujan ketatkan kepingan velkro din
sekeliling rangka di bahagian atas dan bawah kedua-dua sisi
kereta sorong.
37
18. JAMINAN
Jaminan berikut terpakai hanya di negara di mana produk ini mula-mula dijual oleh peruncit kepada
pelanggan. Jaminan meliputi semua kerosakan pembuatan dan bahan, yang sedia ada dan muncul,
pada tarikh pembelian atau muncul dalam tempoh dua (2) tahun selepas tarikh pembelian daripada
peruncit yang mula-mula menjual produk kepada pengguna (jaminan pembuat). Sekiranya kerosakan
pembuatan atau bahan muncul, kami akan - mengikut budi bicara kami - sama ada membaiki produk
secara percuma atau menggantikannya dengan produk yang baharu. Untuk mendapatkan jaminan
ini, adalah perlu untuk mengambil atau menghantar produk kepada peruncit, yang mula-mula menjual
produk ini kepada pelanggan dan menyerahkan bukti pembelian asal (resit jualan atau invois)
yang mengandungi tarikh pembelian, nama peruncit dan jenis gelaran produk ini. Jaminan ini tidak
terpakai sekiranya produk ini diambil atau dihantar kepada pembuat atau mana-mana orang lain
selain daripada peruncit yang mula-mula menjual produk ini kepada pengguna. Sila periksa produk
berkaitan kesempurnaan dan kerosakan pembuatan atau bahan dengan segera pada tarikh pembelian,
atau sekiranya produk dibeli dengan jualan jarak jauh, sebaik sahaja selepas penerimaan. Sekiranya
rosak, berhenti menggunakan produk dan hantar atau kirimkan segera kepada peruncit yang mulamula menjualnya. Dalam kes jaminan, produk perlu dipulangkan dalam keadaan bersih dan lengkap.
Sebelum menghubungi peruncit, sila baca manual arahan ini dengan teliti. Jaminan ini tidak melindungi
sebarang kerosakan akibat salah guna, pengaruh persekitaran (air, api, kemalangan jalan raya dan
sebagainya) atau haus an lusuh yang biasa. Ia hanya terpakai dalam keadaan penggunaan produk ini
hanya mematuhi arahan pengendalian., jika ada dan semua pengubahsuaian dan servis dilakukan oleh
mereka yang layak dan hanya komponen dan aksesori asli sahaja yang digunakan. Jaminan ini tidak
mengecualikan, mengehadkan atau memberi kesan kepada mana-mana hak berkanun pelanggan,
termasuk tuntutan tort dan tuntutan berkaitan pelanggaran kontrak, yang mana pembeli mungkin ada
terhadap penjual atau pembuat produk.
19. Arahan Penjagaan
• basuh berasingan
• basuh secara lembut air suam
• jangan guna peluntur
38
• jangan guna mesin pengering
• jangan seterika!
• jangan cuci kering
MY
39
[email protected]
www.cybex-online.com – [watch instructional video here]
www.facebook.com/cybex.online
40
CY_170_0197_F0513
CYBEX GmbH
Riedinger Str. 18 | 95448 Bayreuth | Germany