1
DENON
REMOTE CONTROL UNIT
RC-7000CI
OWNER'S MANUAL
~milBJJe
• 8 *~g C. 9:f§gl)'9l-0)~~o)£!lIID&$I.8jj~(cl:5~110)CD
*
• d)~llL (fll t::. t::.'~, ets l) til c .:s ~'2l1 go
• ~'1~fflO)M(;: ~ o)If9.t&~BJ3~7t J: <d)~7C<ffo).:s;Z, lE G <~'1~ffl <t':'C5l 1o
• d)~7C<ffl=t6 J t::'1~(d:1~8 d)1~l::=j1:J~ c tJets l) gO)-C\ £\g1~1¥ GT <t':C5l 1o
*
ROMCJj)(uG TL )*cj 0
• Instructions in languages other than English and
Japanese are included on the CD-ROM.
• Die Bedienungsanleitung in anderen Sprachen als
Englisch und Japanisch finden Sie auf der CD-ROM.
• Les instructions en langues autres que Ie japonais et
I'anglais sont inclus dans Ie CD-ROM.
• Istruzioni in lingue diverse dall'inglese e dal giapponese
sono incluse nel CD-ROM.
• Las instrucciones en idiomas diferentes a Ingles y
Japones se incluyen en el CD-ROM.
• Instructies in andere talen dan het Engels en Japans
ziJn terug te vinden op de CD-ROM
• Anvisningar pa andra sprak an engelska och japanska
flnns pa den medfblJande CD-ROM-skivan.
IC Information (For Canadian customers)
FCC Information (For US customers)
1. DEVICE
RC-7000CIIC: 6963A-RC7000
This device complies with RSS-210 of Industry Canada.
Operation is subject to the following two conditions: (1) this device may not
cause harmful interference, and (2) this device must accept any interference
received, including interference that may cause undesired operation.
APPAREIL
RC-7000CIIC: 6963A-RC7000
Cet appareil est conforme ala norme CNR-210 du Canada.
Lutilisation de ce dispositif est autorisee seulement aux deux conditions
suivantes : (1) il ne doit pas produire de brouillage, et (2) I'utilisateur du
dispositif doit etre pret a accepter tout brouillage radioelectrique re<;:u, meme
si ce brouillage est susceptible de compromettre Ie fonctionnement du
dispositif
1. DEVICE
RC·7000CI FCC 10: BV2-RC7000
This device complies with Part 15 of the FCC Rules. Operation is subject to the
following two conditions: (1) this device may not cause harmful interference,
and (2) this device must accept any interference received, including interference
that may cause undesired operation.
IMPOTANT SAFETY
INSTRUCTIONS
1. Read these instructions.
2. Keep these instructions.
3. Heed all warnings.
4. Follow all instructions.
5. Do not use this apparatus near water.
6. Clean only with dry cloth.
7 Do not place near any heat sources such as radiators, heat registers, stoves, or
other apparatus (including amplifiers) that produce heat.
8. Only use attachments/accessories specified by the manufacturer.
9. Refer all servicing to qualified service personnel. Servicing
is required when the apparatus has been damaged in any
way, such as liquid has been spilled the apparatus has been
exposed to rain or moisture, does not operate normally, or
has been dropped.
10. Batteries shall not be exposed to excessive heat such as sunshine, fire or the
like.
I
2. IMPORTANT NOTICE: DO NOT MODIFY THIS DEVICE
This device, when installed as indicated in the instructions contained in this
manual, meets FCC requirements. Modification not expressly approved by
DENON may void your authority, granted by the FCC, to use the device.
3. NOTE
This device has been tested and found to comply with the limits for a Class B
digital device, pursuant to Part 15 of the FCC Rules. These limits are designed
to provide reasonable protection against harmful interference in a residential
installation.
This device generates, uses and can radiate radio frequency energy and, if
not installed and used in accordance with the instructions, may cause harmful
interference to radio communications. However, there is no guarantee that
interference will not occur in a particular installation. If this device does cause
harmful interference to radio or television reception, which can be determined
by turning the device OFF and ON, the user is encouraged to try to correct the
interference by one or more of the following measures:
• Reorient or relocate the receiving antenna.
• Increase the separation between the equipment and receiver.
• Connect the device into an outlet on a circuit different from that to which the
receiver is connected.
• Consult the local retailer authorized to distribute this type of device or an
experienced radiofTV technician for help.
A NOTE ABOUT RECYCLING:
ACERCA DEL RECICLAJE:
This product's packaging materials are recyclable and can be reused.
Please dispose of any materials in accordance with the local recycling
regulations.
When discarding the unit, comply with local rules or regulations.
Batteries should never be thrown away or incinerated but disposed of
in accordance with the local regulations concerning battery disposal.
This product and the supplied accessories, excluding the batteries,
constitute the applicable product according to the WEEE directive.
Los materiales de embalaje de este producto son reciclables y se pueden
volver a utilizar. Disponga de estos materiales siguiendo los reglamentos de
reciclaje de su localidad.
Cuando se deshaga de la unidad, cumpla con las reg las 0 reglamentos
locales.
Las pilas nunca deberan tirarse ni incinerarse. Debera disponer de elias
siguiendo los reglamentos de su localidad relacionados con los desperdicios
qufmicos.
Este producto junto con los accesorios empaquetados es el producto aplicable
a la directiva RAEE excepto pilas.
HINWEIS ZUM RECYCLING:
Das Verpackungsmaterial dieses Produktes ist zum Recyceln geeignet und kann
wieder verwendet werden. Bitte entsorgen Sie aile Materialien entsprechend
der ortlichen Recycling-Vorschriften.
Beachten Sie bei der Entsorgung des Gerates die ortlichen Vorschriften und
Bestimmungen.
Die Batterien durfen nicht in den Hausmull geworfen oder verbrannt werden;
bitte entsorgen Sie die Batterien gemalS der ortlichen Vorschriften.
Dieses Produkt und das im Lieferumfang enthaltene Zubehor (mit Ausnahme
der Batterien!) entsprechen derWEEE-Direktive.
UNE REMARQUE CONCERNANT LE RECYCLAGE:
Les materiaux d'emballage de ce produit sont recyclables et peuvent etre reutilises.
Veuillez disposer des materiaux conformement aux lois sur Ie recyclage en vigueur.
Lorsque vous mettez cet appareil au rebut, respectez les lois ou reglementations
en vigueur.
Les piles ne doivent jamais etre jetees ou incinerees, mais mises au rebut
conformement aux lois en vigueur sur la mise au rebut des piles.
Ce produit et les accessoires inclus, a I'exception des piles, sont des produits
conformes a la directive DEEE.
NOTA RElATIVA AL RICICLAGGIO:
1 materiali di imballaggio di questa prodotto sono riutilizzabili e riciclabili.
Smaltire i materiali conformemente aile normative locali sui riciclaggio.
Per 10 smaltimento dell'unita, osservare Ie normative 0 Ie leggi locali in vigore.
Non gettare Ie batterie, ne incenerirle, ma smaltirle conformemente alia
normativa locale sui rifiuti chimici.
Questo prodotto e gli accessori inclusi nell'imballaggio sono applicabili alia
direttiva RAEE, ad eccezione delle batterie.
EEN AANTEKENING MET BETREKKING TOT DE RECYCLING:
Het inpakmateriaal van dit product is recycleerbaar en kan opnieuw gebruikt
worden. Er wordt verzocht om zich van elk afvalmateriaal te ontdoen volgens
de plaatselijke voorschriften.
Voig voor het wegdoen van de speier de voorschriften voor de verwijdering van
wit- en bruingoed op.
Batterijen mogen nooit worden weggegooid of verbrand, maar moeten volgens
de plaatselijke voorschriften betreffende chemisch afval worden verwijderd.
Op dit product en de meegeleverde accessoires, m.u.v. de batterijen is de
richtlijn voor afgedankte elektrische en elektronische apparaten (WEEE) van
toepassing.
OBSERVERA ANGAENDE ATERVINNING:
Produktens emballage ar atervinningsbart och kan ateranvandas. Kassera det
enligt lokala atervinningsbestammelser.
Nar du kasserar enheten ska du gora det i overensstammelse med lokala
regler och bestammelser.
Batterier far absolut inte kastas i soporna eller brannas. Kassera dem enligt
lokala bestammelser for kemiskt avfall.
Denna apparat och de tillbehor som levereras med den uppfyller gallande
WEEE-direktiv, med undantag av batterierna.
II
• DECLARATION OF CONFORMITY
Hereby, D&M Holdings Inc., Denon Brand Company declares that this
product RC-7000CI is in compliance with the essential requirements and
other relevant provisions of Directive 1999/5/EC, in conformity with the
following standards;
EN300328, EN301489-01 and EN301489-17
The declaration of conformity may be consulted to our European
representative, DENON EUROPE.
• OSEREINSTIMMUNGSERKLARUNG
Hiermit erklart D&M Holdings Inc., Denon Brand Company, dass sich
das Gerat RC-7000CI in Ubereinstimmung mit den grundlegenden
Anforderungen und den ubrigen einschlagigen Bestimmungen der Richtlinie
1999/5/EG befindet, den folgenden Standards entspricht:
EN300328, EN301489-01 und EN301489-17
Wenden Sie sich bei Fragen zur Konformitatserklarung an unseren
europaischen Vertreter, DENON EUROPE.
• DECLARATION DE CONFORMITE
Par la presente, D&M Holdings Inc., Denon Brand Company declare que
I'appareil RC-7000CI est conforme aux exigences essentielles et aux autres
dispositions pertinentes de la directive 1999/5/CE, e conforme aile seguenti
normative:
EN300328, EN301489-01 et EN301489-17
La declaration de conformite pourra etre consultee aupres de notre
representant en Europe, DENON EUROPE.
• DICHIARAZIONE 01 CONFORMITA
Con la presente D&M Holdings Inc., Denon Brand Company dichiara che
questo RC-7000CI e con-forme ai requisiti essenziali ed aile altre disposizioni
pertinenti stabilite dalla direttiva 1999/5/CE, e conforme aile seguenti
normative:
EN300328, EN301489-01 e EN301489-17
La dichiarazione di conform ita pUG essere consultata presso il nostro
rappresentante europeo, DENON EUROPE.
QUESTO PRODOTTO E' CONFORME
AL D.M. 28/08/95 N. 548
III
• DECLARACION DE CONFORMIDAD
Por la presente, D&M Holdings Inc., Denon Brand Company, declara que
este RC-7000CI cumple con los requisitos esenciales y otras exigencias
relevantes de la Directiva 1999/5/EC, esta conforme con los siguientes
estandares:
EN300328, EN301489-01 y EN301489-17
Puede consultar a nuestro representante europeo, DENON EUROPE, acerca
de la declaraci6n de conformidad.
• EENVORMIGHEIDSVERKLARING
Hierbij verklaart D&M Holdings Inc., Denon Brand Company dat het toestel
RC-7000CI in overeenstemming is met de essentiele eisen en de andere
relevante bepalingen van richtlijn 1999/5/EG, in overeenstemming is met de
volgende normen:
EN300328, EN301489-01 en EN301489-17
De eenvormigheidsverklaring mag worden geconsulteerd aan onze Europese
vertegenwoordiger, DENON EUROPA.
• OVERENSSTAMMELSESINTYG
Denna utrustning ar i bverensstammelse med de v8sentliga kraven och andra
relevanta bestammelser i Direktiv 1999/5/EC, uppfyller foljande standarder:
EN300328, EN301489-01 och EN301489-17
EU-konformitetsintyget kan pa begaran fas fran DENON EUROPE, var
representant i Europa.
DENON EUROPE
Division of D&M Germany GmbH
An der Landwehr 19, Nettetal,
D-41334 Germany
ENGLISH
Deleting signals registered with the learning function·· ·18
Deleting signals registered with the macro function
19
Deleting favorites
·
19
Deleting the registered punch-thru function
·
·.. ·19
Operational reset···· .. ·.. ····· .. ··· .. ······· .. ·· .. ·········· ·· .. ··· .. ·· 20
User reset········ .. ·.. ·· .. ···· .. ·· .. ·.. ·· .. ····· .. ······ .. ···· .. ·· .. ·· ·.. ·· 20
Lock function
21
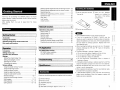
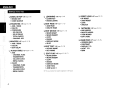
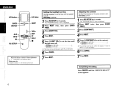
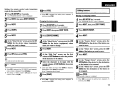
Getting Started
Thank you for purchasing this DENON product. To ensure
proper operation. please read these owner's manual carefully
before using the product.
After reading them. be sure to keep them for future
reference.
Contents
Operations using nodes
Adding nodes (1 )
Adding nodes (2)
Deleting nodes
Viewing nodes .. ·
·
· ·.. ·
Changing node labels
Setting the receiver display mode (ROM)
Checking the remote control unit version
I Getting Started
1
1
,
Operating range of the remote control unit
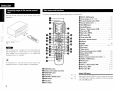
Part names and functions
·
2
2
the clasp and remove
the rear lid.
····· .. ·· ..·
···.··
·
·.. ·
Settings
Setting the screen display time
Setting the backlight on time
Adjusting the contrast
Completing the setting
Various settings
Using the preset memory function
Using the learning function
Using the Macro function
Using the delay time function
Using the code search function
Favorites settings
Using the punch through function
Editing pages
Editing devices
·
Editing buttons
4
5
5
6
6
6
·
·7
8
8, 9
9
9
·10. 11
11
11. 12
·12 - 15
15 - 18
·.. ·
·
·
23
23
24
24
25
25
25
I
·
em.
Troubleshooting
26
· 26
· 26
27
ISpecifications
··
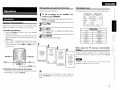
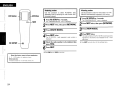
Accessories
Check that the following parts are supplied with the product.
CD Owner's Manual
1
@ Remote control
1
® LR03/AAA batteries
4
®CD-ROM
® USB cable (Cord length: Approx. 3.3 ft /1
1
27I
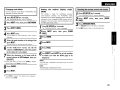
7.
·
the four batteries
properly as indicated by
the marks in the battery
compartment.
® Put the rear cover back on.
RC·7000CI Editor function
RC-7000CI Editor installation·
Using RC-7000CI Editor
·· .. ··3
Settings menu map
Operation the LCD button
@ Load
221
IPC Application
IOperation
Introduction··· .... ·· .... ·····
CD Lift
Unlock function· .. ·········· .. ··· .. ·.. ········· .. ········ .. ······· .. ······ .. ·21
INetwork function
Accessories
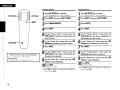
Inserting the batteries
Inserting the batteries
• Use a LR03/AAA battery for the remote control unit.
• If you try to operate the RC-7000CI / 7001 RCI near the
device you want to operate but the device does not operate.
replace the batteries with new ones. (The included batteries
are only meant for verifying operation Replace them with
new batteries soon.)
• When inserting the batteries. be sure to do so in the proper
direction. following the "®" and "e" marks in the battery
compartment.
• To prevent damage or leakage of battery fluid:
• Do not use a new battery together with an old one.
• Do not use two different types of batteries.
• Do not attempt to charge dry batteries.
• Do not short-circuit. disassemble. heat or dispose of
batteries in flames.
• If the battery fluid should leak. carefully wipe the fluid off the
inside of the battery compartment and insert new batteries.
• Remove the batteries from the remote control unit if it will
not be in use for long periods.
• When replacing the batteries. have the new batteries ready
and insert them as quickly as possible.
• "LOW BATIERY"appears on the LCD when the remaining
battery power decreases. When this happens. replace the
battery as soon as possible.
1
m)
1
1
:;t
o
c:
C"
~
tJ>
:::r
o
=.o
::J
\Q
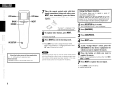
ENGLISH
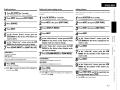
Operating range of the remote control
unit
Part names and functions
For buttons not explained here, see the page indicated in parentheses ( ).
Point the remote control unit at the remote sensor when
operating it.
0SETUP/MENUbutton
«D Cursor buttons (.t,. \7 <I
.. (11)
[ » . . . . . . (11)
Q) On-screen display button (OSDI .
f) Channel buttons (CH + -I ...
... (11)
(11)
~ HOD ~/Il button...
tJ) iPod ~/Il
.
(11)
button.....................
.
11)
f) Skip button (~)..................................
(7)
~ REC button ( . ) . . . . . . . . . .
(7, 11)
~ Function I Number buttons
. (5 - 7)
~USB port
Approx. 23 feet /
7m
@I Display
.
@) NEXT button
............
(3)
.........................
(3,5 - 7)
~ Blue button
Em.
~ Yellow button
The set may function Improperly or the remote control unit
may not operate if the remote control sensor is exposed to
direct sunlight, strong artificial light from an inverter type
fluorescent lamp or infrared light.
€9 Surround parameter button (SURRI
~ Return button (RTNI
..
.. (11)
.. (11)
.
~ ENTER button
......... (11)
@l Master volume control buttons (VOL + -I ..
@ID STATUS I HOME button.
G) MUTE button
e Skip button (~I
•
Remote control signal transmitter
•
POWER OFF button
o LCD buttons
«3 FUNCTION I DEVICE button...
o BACK b u t t o n .
•
Red button
(1) Green button
~ Stop button (-I
.. (11)
(11)
.
.
@)Tuning + I Search button (~I
o POWER ON button
.. (11)
.
.
~ EO button
For instructions on uSlllg with RF connections, refer to the
operating instructions of the RC-7001 RCI (sold separately).
2
(7)
....... (11)
~ Pause button (II) .
c
(11)
tL' Tuning - I Search button (.....)............... .. (7,
«9 Play button (~)...................
.
(11)
(7, 11)
(7, 11)
.......
(7, 11)
About USB ports
. (3,5- 7)
.
.. .. ,..
(6)
(3,5 - 7)
When editing the RC-7000CI's functions using the exclusive
"RC-7000CI Editor" application sohware, connect the included
USB cable ((1f'page 26).
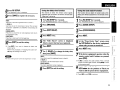
ENGLISH
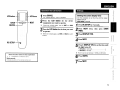
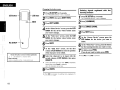
Operation
When batteries are loaded for the first time
Initial display screen
Make the setting described below.
The initial display settings are shown on the display below.
1
[Screen 1]
To use to operate an AV amplifier (AV
receiver), press [Denon1].
* [Denon2] is a function for system expansion in the future.
Introduction
Normally select [Denon1].
Operation of the LCD buttons
When buttons on the remote control unit are pressed, various
settings and operation items appear on the LCD screen.
o Operation for selecting
• Press the LCD button to the left or right of the displayed
item name to select it.
• The screen is displayed for 5 seconds. Operate while the
screen is displayed. ("Setting the screen display time"
(iGf'page 5))
• When "PAGE" is displayed at the bottom of the screen,
there are one or more other pages in addition to the one
currently displayed. Use the NEXT and BACK button to
switch screens
~
~
r .~I(. :(~,
I
-.
-!
-'
1--:
....
k)
BACK button
Press [YES].
Press
CABLE
DTU
~... :
--
I-
I-
VIRI t-veR2 t--
I-"(j,[. _
.;;
~
"",][("",,;)\r "'''
!
LCD button
"@"@f6f'@-
iPod
ZDNE3
ZONE4
VCR 2
NetAud
TUNER
CD
DVD
TV
Cable
TV
1
2
You have selected
Denon 1
Are you
sure you
want to set up
Denon1?
NO
DTU
Page 112
Initial setting
3
This process
will take afew
moments to
complete. Press
NEXT to begin
Setting up your
Denon! remote.
Denon 1 Denon2
NEXT button
VCR 1
NEXT.
The initial settings screen appears.
Please select
which type of
Denon product
you are using
below.
ZQNE2
Page 112
4 Press DEVICE.
@
DEVICE SELECT
AMP
SAT
After "PLEASE WAIT" is displayed, the default device
is set to [Denon1].
j::
PIlW(~OOi
l'OWUQff
h :~~
TV
NET
1--: oBS
iPod
LCD button
2
3
[Screen 2]
DEVICE SElECT
YES
PLEASE WAIT
4
Denon1has been set
succesfully'
Press NEXT to
continue with
more setup
choices or DEVICE
to begin using
your remote.
Hitachi
SAT
RCA
Cable
Motorola
VCR-l
Hitachi
VCR-2
SONY
Others
DENON
When using the RF two-way communication
function
Change the amplifier setting to "RF" at "Setting the remote
control code transmission mode (In the case of RF)" (iGf'page
15).
..
A DENON product compatible with the RC-7001 RCI (sold
separately) is required to use this function.
DEVICE button
o Indication of item names in this manual
In this manual, the names of items displayed on the screen
are indicated [ ]. (Example: [Denon1])
When the LCD screen in the display on screen 1 goes off,
press the AC SETUP button for 3 seconds to resume the original
screen.
3
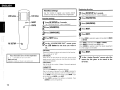
ENGLISH
Settings menu map
o BASIC SETUP (B2Fpage 7, 9)
o
• BRAND SET
• CODE SEARCH
• ADD / REDO
• DELETE
• CONFIGURE
· FAV DEVICE
· FAV IR DELAY
· TOTAL DIGITS
· CHANNEL KEY
• ADD / REDO
• DELETE
• EDIT DELAY
• ADD PAGE
• DELETE PAGE
o EDIT DEVICE (B2Fpage 11, 13)
• MOVE/SWAP
• MOVEIINSERT
• COpy
• ERASE
• DISPLAY MODE
·IR/RF
o EDIT TEXT (B2Fpage 15,18)
• DEVICE NAME
• KEY NAME
(B2Fpage 11,19)
• ADD
· CHANNEL TUNE
· TRANSPORTS
· VOLUME CONT.
· MENU NAVIG.
• CLEAR
· CHANNEL TUNE
· TRANSPORTS
· VOLUME CONT.
· MENU NAVIG.
4
o
o
EDIT FUNC
•
•
•
•
•
•
•
'*'
(B2Fpage 15, 16, 17)
MOVE/SWAP
MOVE/INSERT
COpy
ERASE
DISPLAY MODE
ADD FUNC
ADD Synth
*
This is a function for system expansion in the future.
RESET/LOCK
•
•
•
•
o EDIT PAGE (B2Fpage 11,12)
o MACROS (B2Fpage 8,9,19)
PUNCHTHRU
(B2Fpage 7, 18)
• LEARN KEY
• ERASE LEARN
o FAVORITES (B2Fpage 10, 19)
o
LEARNING
o
OP RESET
USER RESET
LOCK
UNLOCK
NETWORK
•
•
•
•
(B2Fpage 20,21)
(B2Fpage 23,24)
ADD NODES
DELETE NODES
VIEW NODES
EDIT LABEL
o USER PREF (B2Fpage 5, 6, 25)
• VERSION INFO
• CONTRAST
• DISPLAY T/0
• LIGHT T/O
·RDM
ENGLISH
LCD button
iD!
.~=
_
I
,
Operation the LCD button
=:- LCD button
I
1_
...... J
:~......-
-:
I
I
:
:
BACK --+-El@G---+- NEXT
DEVICE I ..2j
1
2
*
3
*
RC SETUP
Settings
Press DEVICE.
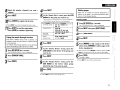
Setting.the screen display time
The "DEVICE SELECT" menu is displayed.
Use this procedure to set the time until the screen
display turnSQff.
.
,
Initialsttting: 5 seconds
Press the LCD button for the device
(equipment) you want to operate.
Ifthere are multiple pages, use the NEXT and BACK
button to switch screens.
Press the LCD button for the item you want
to operate.
Ithere are multiple pages, use NEXT and BACK to switch
screens.
1 RC SETUP
2 PREF). NEXT
Press
.•.•. •
for 3 seconds.
The "PROGRAM DEVICE" menu is displayed.
twice, then press [USER
Press
3
4
5
Press [DISPLAY T/O].
Press NEXT.
Press [-DISPLAY T/O+] to set the time until
the light turns otT.
• LCD button on right side
• LCD button on left side
+
-
* The time can be set between 1 (MIN) and 30 (MAX).
About the button names in these explanations
[
I : LCD
buttons for selection items
Button name onlv:
Indicates a button on the remote control unit
6
Press [SAVE].
7
Press
NEXT.
5
ENGLISH
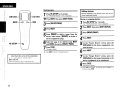
Seltir'f91;l)e b'~light on time
Adjusting the contrast
turns off; . ",
Set this if the characters on the screen are hard to see.
Initia' setting: Level 5
Use t~isp'rocedureto set the time. until the backlight
LCD button
'nitia'lllItint~ 5 secQnds
1
Press RC SETUP for 3 seconds.
~~~
~~~
RC SETUP
1
Press RC SETUP for 3 seconds.
The "PROGRAM DEVICE" menu is displayed.
2 PREF]. NEXT
3 [LIGHT T/O].
Press
2 PREF]. NEXT
3 [CONTRAST].
4
Press NEXT.
4
Press NEXT.
5
Press [-CONTRAST+] to set the contrast.
The "PROGRAM DEVICE" menu is displayed.
Press
!1+-VOL+-
..
twice, then press [USER
Press
twice, then press [USER
Press
• LCD button on right side
• LCD button on left side
SiiI
+
.
* The contrast can be set within the range of "Level 0
(MIN)" to "Level 12 (MAX)':
About the button names in these explanations
[ ) : LCD buttons for selection items
Button name onlv:
Indicates a button on the remote control unit
6
7
Press [SAVE].
6
Press [SAVE].
Press NEXT.
7
Press NEXT.
Completing the setting
Press DEVICE until the "DEVICE SELECT"
screen appears.
6
ENGLISH
Various settings
8
Use ~, -, II, ~, ~, ~, ~,
VOL+ - to check whether the device to be
added operates.
[YES]
Operates
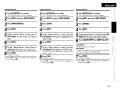
Using the preset memory function
The remote control unit can be preset to operate devices
of various brands.
1
2
3
4
5
• The IR/RF selection screen appears.
Does not operate
Press RC SETUP for 3 seconds.
• The screen switches to the next code. Find the code
that operates and set it by pressing [YES].
The "PROGRAM DEVICE" menu is displayed.
Press [BASIC SETUP].
Press [BRAND SEn.
Press NEXT.
At the "Press Device Type" screen, press
the LCD button for the device you want to
set in the preset memory.
6 NEXT.
7 button
Press
At the "Select Brand" screen, press the LCD
for the device's brand name.
[NO]
9
Press [lR] or [RF] to select the remote control
signal.
[IR]:
Infrared signals are transmitted.
[RF] :
Send RF signals to the RC-7001 RCI remote control receiver
(sold separately).
* For details on the RC-7001 RCI (sold separately),
"Network function"
(~page
see
22).
10At the "Select Position" screen, press the
LCD button for the posision at which you
want to add the preset device.
The setting is entered.
* Press [NO] to end, [YES] to continue.
Using the learning function
This function lets you register the desired remote
signals of devices by sending them to the remote
control unit.
1
2
3
4
Press RC SETUP for 3 seconds.
The "PROGRAM DEVICE" menu is displayed.
Press [LEARNING].
Press [LEARN KEY].
Press NEXT twice.
5 button
At the "Select Device" screen, press the LCD
for the device whose remote control
signals you want to register.
6 button
At the "Learn Key" screen, press the LCD
for the operation button name you
want to register.
* Signals can be "learned" at buttons other than RC SETUP.
NEXT, BACK and DEVICE.
* If the brand you want to choose is not displayed, press Gmt
Depending on
*
NEXT to switch the brand display.
If there are multiple codes, "1 of *" is displayed.
(* is the number of codes)
the product's year of manufacture and
differences in functions from model to model, there may be
some buttons that do not operate or buttons that operate
erroneously.
7
ENGLISH
7
LCD button
LCD button
8
Place the remote control units with their
signal transmitters facing each other, press
NEXT, then immediately press the button
on the remote control unit you want to
register.
"Success!" is displayed if the
code was learned successfully.
To register other buttons, press
NEXT.
* Repeat steps 6 to 8.
9
RC SETUP
5iI
Press [EXITI to exit the learning mode.
* Press [EDIn if you want to change the button name.
Perform the procedure at "Changing the button name"
(@'" page 18) starting from step 7.
&IiIt
About the button names in these explanations
[ 1 : LCD buttons for selection items
Button name only:
Indicates a button on the remote control unit
The learning function may not work for some remote control
units, and sometimes a device may not operate properly even
if its remote control signals have been learned. In this case,
use the remote control unit included with the device.
Using the Macro function
This function allows you to register a series of
operations at a single button.
With this function you can for example turn on the
amplifier, select the input source, turn on the TV's
poWer, turn on the source device's (equipment) power
and set the play mode aU by pressing a single button.
1
2
3
Press RC SETUP for 3 seconds.
The "PROGRAM DEVICE" menu is displayed.
Press [MACROS].
Press [ADDIREDO].
4 Press NEXT twice.
5 LCD button
At the "Assign Macro" screen, press the
for the device (equipment) for
which you want to register the macro.
6
Press the button at which you want to
register the macro.
* Macros can be registered at buttons other than NEXT,
BACK and DEVICE.
7
Press
NEXT to register the next signal.
* Press DEVICE to select the device.
* Repeat steps 5 to 6.
8
ENGLISH
8
9
Press RC SETUP.
The registration menu is displayed.
Press [SAVE] to register the set macro.
[TEST] :
Press this to send the registered macro to check it.
[-DELAY +]:
Use these to set the transmission interval. This can be set
to between "0.05(MINj" and "60(MAX)': (Initial setting: 0.25
seconds)
[CANCEL ENTRY] :
Press this to cancel the last code registered and return to
the registration mode.
[START OVER] :
Press this to start over from the beginning.
1
{)press [EXln to end the setting.
*
Press (EDIT] if you want to change the button name
(macro name).
Perform the procedure at "Changing the button name"
(r::t" page 18) starting from step 7.
~
The macro setting button cannot be registered in a macro.
. ~$i~g:th.:~~ S4l~fchfunc;tior;'" ',;" .
·This function. !ets"yOu"search for. .pres~t .cooiis When
Using the delay time function . . . . ; •.•.•.
•
The interval 'st. whi.Ch. the remote contrblsighals
registered with the sYstem call function are sent .(the
;." delay time:') can be set.
. ' "."'.
1
2
3
4
5
6
7
Press HC SETUP for 3 seconds.
The "PROGRAM DEVICE" menu is displayed.
Press [MACROS].
1
2
The "Edit Macro" screen is displayed.
Select a macro that has been registered.
5
NEXT.
Use [- DELAY +] to change the delay time,
then press [SAVE].
[CREATE AGAIN] :
The macro registration screen reappears.
Press [EXln to end the setting.
- -
: <"0,
:-, :
_ ~" : ~: ~ ' : _
• _.. _
,..,
;.
•
<._
_.
• _., '"
adding new deviees·;{~q~ipment) to the r~fI!ote: contr;:'l
..
. . . :0-'''''
.•....
Press NEXT twice.
Press
- ;
:u~it.~·
3
4
Press [EDIT DELAY].
[TEST] :
Press this to send the registered macro to check it.
[- DELAY +]:
Use these to set the transmission interval.
8
.
•• _ .
6
7
Press RC SETUP for 3 seconds.
The "PROGRAM DEVICE" menu is displayed.
Press [BASIC SETUP].
Press [CODE SEARCH].
Press
NEXT.
At the ''Press Device Type" screen, press
the LCD button for the device (equipment)
whose code you want to search for.
Press
r--'l:>
'''0
NEXT twice.
,"S!.
_.
""C
:~
()
~.
Hthe device (equipment) operates when the
remote control unit's buttons are pressed,
press [YES].
* If [NO] is pressed, the code switches. Press a remote
control unit button again to check. Press (BACK] to return
to the previous code.
8 LCD button
At the "Select Position" screen, press the
for the position at which you
want to add the preset device (equipment).
* Press [NO] to end, [YES] to continue.
9
.0
I::::
ENGLISH
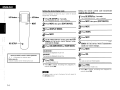
Registering favorites
Favorites settings
Use this function to register your favorite channel
numbers so they can be operated with a single button.
LCD button
~
RC SETUP
I
NEXT
ENTER
---:_~
1
Press RC SETUP for 3 seconds.
The "PROGRAM DEVICE" menu is displayed.
2 Press [FAVORITES].
3 Press [CONFIGURE].
4 Press NEXT twice.
5 At the "CONFIGURE
About the button names in these explanations
FAV" screen, press
[FAV DEVICE] :
Press this to select the device to be stored in the favorites.
This is initially set to "SAT':
[FAV IR DELAY] :
Press this to set the interval at which the remote control
signals are sent when buttons at which favorites have been
registered are pressed.
[TOTAL DIGITS] :
Use this to set the number of digits of channels registered
in the favorites.
[CHANNEL KEY] :
Set this toadd ENTER after registered favorites
(Set this for types of devices for which ENTER is pressed to
set the channel after selecting it with the number buttons.)
To add ENTER at the end of the channel, press ENTER. If you
do not want to add ENTER, press NEXT.
'*
When [EXIn is pressed, the setting is completed. Press
[CON FIG] to continue registering.
10
3
4
5
'*
the LCD button for the item you want to
set.
[ ] . LCD buttons for selection items
Button name only:
Indicates a button on the remote control unit
Press RC SETUP for 3 seconds.
The "PROGRAM DEVICE" menu is displayed.
2 Press [FAVORITES].
Favorites settings
[3----;-
1
Press [ADD/REDO].
Press NEXT.
Press [KEY].
When [PAGE) is selected, pages can be added to [MAIN]
or [DEVICE]
When [PAGE] is selected, press [MAIN] or [DEVICE)
When [MAIN) is selected, press [YES] to set.
When [DEVICE] is selected, select the device (equipment)
for which a page is to be added.
6
7
Press NEXT.
At the "Assign Favorite" screen, select the
button for the place to be stored in the
favorites.
ENGLISH
8 Input
the number (channel) you want to
4 Press NEXT.
register.
5 Atbutton
the "Punch Thru" screen, press the LCD
9 Press NEXT.
for the group you want to set.
The functions for which punch thru can be assigned in
units of groups are as shown on the table below.
1(}press [SAVE] to register the favorite.
s' ,.E
CHANNEL TUNE
* Press [EDIT] if you want to change the button name.
11 Press
Press [EXIT] to end the registration.
[ADD] to continue registering.
TRANSPORTS
VOLUME
CONTROL
MENU
NAVIGATION
Using the punch through function
Even when a different device mode is selected. it is
possible to assign the buttons below to a different device
in units of groups.
For example, the DVD play operation can be performed
even if the operating mode is set to the amplifier.
1
2
3
Press HC SETUP for 3 seconds.
..
..
.•...
CH+. CH-, STATUS, 1-9,
0/10, +10
iPod ~III,
HDD ~/II, EQ, ...., ~,
....., ~. REC, II, STOP,
VOL+, VOL-, MUTE
SETUP, SURR,OSD,RTN,
f:::.. V'<lt>, ENTER
Pages can be inserted and devices (equipment) or
buttons can be added in the device (equipment) select
menu or in the individual devices.
Inserting pages
1
Press HC SETUP for 3 seconds.
The "PROGRAM DEVICE" menu is displayed.
2 Press NEXT, then press [EDIT PAGE].
3 Press [ADD PAGE].
4 Press NEXT.
6 Press NEXT.
5 select
Press [MAIN] to add a page to the device
menu, [DEVICE] to add a page in the
device (equipment).
7 AtLCDthebutton
"Source Device" screen, press the
*
for the device of the group you
The"PROGRAM DEVICE" menu is displayed.
Press [PUNCH THRU].
/ ";"y" 'i':FuhctionF
Editing pages
want to set.
When and only when [DEVICE] is selected, press the LCD
button for the device to which you want to add a page.
8 Press NEXT.
6 Press [YES].
9 At the "Target Device" screen, press the *
j:'
'-'
-c
:::":-0
2 (',
-"'?
r;~',
:::/
The page is added.
Press NEXT to return to the setting menu.
Press
[ADD].
LCD button or the device whose group
Q
~.
selected at step 7 you want to send.
10press [YES].
*
Press NEXT to return to the setting menu.
11
ENGLISH
Deleting pages
;~101
~
LCD button
~!
;.......
I
BACK~"
LCD button
:, :
,
.. ...
1
2 Press NEXT, then press [EDIT PAGE].
Moving or swapping devices
'
I
s---;- NEXT
3
4
5
RC SETUP
Press HC SETUP for 3 seconds.
The "PROGRAM DEVICE" menu is displayed,
Editing device$
. Devices registered in the rembte control unit can be
moved, copied ana inserted.
---.:_~
Press [DELETE PAGE].
Press NEXT.
Press [MAIN] to delete a page from the
device select menu, [DEVICE] to delete a
device (equipment) page.
1
Press HC SETUP for 3 seconds.
The "PROGRAM DEVICE" menu is displayed,
2 Press NEXT, then press [EDIT DEVICE].
3 [MOVE/SWAP].
4 NEXT.
5 LCD button
Press
Press
Select the page to be deleted using NEXT
At the "Source Device" screen, press the
6 and
BACK, then press [SELECT PAGE].
for the device (equipment) you
Press [YES].
want to move.
7
6 Press NEXT.
*
7 AtLCDthebutton
"Target Device" screen, press the
for the target destination or the
The page is delete,
Press NEXT to return to the setting menu,
About the button names in these explanations
: LCD buttons for selection items
Button name only:
;t)
:../ '
device (equipment) to be substituted.
Indicates a button on the remote control unit
8
Press [YES].
The device is moved,
* When [NO] is pressed, the setting menu reappears, To
continue, press [YES],
12
ENGLISH
Inserting devices
Copying devices
Deleting devices
1
1
1
2
3
4
5
6
The "PROGRAM DEVICE" menu is displayed.
Press NEXT, then press [EDIT DEVICE].
Press [MOVE/lNSERn.
Press NEXT.
At the "Source Device" screen, press the
LCD button for the device you want to
move.
Press NEXT.
7
8
Press RC SETUP for 3 seconds.
At the "Target Device" screen, press the
LCD button in the place you want to insert.
2
'* When [NO) is pressed, the setting menu reappears. To
continue, press [YES).
The "PROGRAM DEVICE" menu is displayed.
Press NEXT, then press [EDIT DEVICE].
3 [COPY].
4 NEXT.
5 LCD button
Press
Press
At the "Source Device" screen, press the
for the device (equipment) you
want to copy.
6
The "PROGRAM DEVICE" menu is displayed.
Press NEXT, then press [EDIT DEVICE].
3
4
5
Press [ERASE].
Press NEXT.
At the "Select Device" screen, press the LCD
button for the device you want to delete.
6
Press [LEAVE EMPYT] or [SHIFT ALL UP].
[LEAVE EMPTY] :
At the "Target Device" screen, press the
LCD button for the place you want to copy.
The device at the copy destination is cleared and the
device is copied.
8
2
Press RC SETUP for 3 seconds.
Press NEXT.
7
Press [YES].
The device is moved.
Press RC SETUP for 3 seconds.
Press [YES].
The device is moved.
'* When [NO] is pressed, the setting menu reappears. To
continue, press [YES).
The device (equipment) is deleted.
(SHIFT ALL UP) :
The device is deleted and the other devices are all shifted
up, filling in the space of the deleted device.
7
Press [YES].
The device is deleted.
'* When [NO] is pressed, the setting menu reappears. To
continue. press [YES).
13
ENGLISH
LCD button
,Oi~;
~~
Setting the device display mode
Use this procedure to select the way in which the devices
(equipment) are displayed.
LCD button
:.... :'
~:,
\
.. ,,'
......
I
~NEXT
1
2
3
Press RC SETUP for 3 seconds.
The "PROGRAM DEVICE" menu is displayed.
Press NEXT, then press [EDIT DEVICE].
Press [DISPLAY MODE].
4
Press NEXT.
5 button
RC SETUP
SiI
At the "Select Device" screen, press the LCD
for the device whose display mode
you want to change.
6
Press [COLUMN MODE] or [ROW MODE].
Setting the remote control code transmission
mode (In the case of IR)
1
2
3
Press RC SETUP for 3 seconds.
The "PROGRAM DEVICE" menu is displayed.
Press NEXT, then press [EDIT DEVICE].
Press NEXT.
4
5
Press [IRIRFl.
Press NEXT.
6 button
7 NEXT.
8 [I R].
At the "Select Device" screen, press the LCD
for the device whose transmission
mode you want to change.
Press
[COLUMN MODE] :
The devices are displayed two per row.
About the button names in these explanations
[
I : LCD
[ROWMODEI:
The devices are displayed one per row.
buttons for selection items
Button name only:
Indicates a button on the remote control unit
7
Press [YES].
[lRI:
The codes are sent as infrared signals.
The display mode is set.
* When [NO] is pressed, the setting menu reappears. To
continue, press [YES).
am.
The display mode is not set in the device. Set with respect to
the LCD button position.
14
Press
9
Press [YES].
The transmission mode is set.
* When [NO] is pressed, the setting menu reappears. To
continue, press [YES).
ENGLISH
Setting the remote control code transmission
mode (In the case of RF)
1
Press HC SETUP for 3 seconds.
Editing buttons
mode is set.
* When [NO) is pressed, the setting menu reappears. To
The "PROGRAM DEVICE" menu is displayed.
2 Press NEXT, then press [EDIT DEVICE].
3 Press NEXT•.
4
5
1~~~~~~n
continue, press (YES].
Press lIRjHF].
Press NEXT, then press [EDIT TEXT].
Press NEXT.
3
Press [DEVICE NAME].
At the "Select Device" screen, press the LCD
for the device whose transmission
mode you want to change.
Press
Press
then press [YES].
[RF] :
The codes are sent as radio waves.
9 Press NEXT.
* When [RF] is selected, the RC-7001 RCI (sold separately)
node number is displayed. Press LCD button.
* The setting at "Adding nodes" (!3rpage 23) must be
made in order to add [RF].
Moving or swapping buttons
1 HC SETUP 3
2 NEXT,
[EDIT FUNC].
3 [MOVE/SWAP].
4 NEXT.
5 LCD button
Press
Changing the device name
1
2
6 button
7 NEXT.
8 [HF],
Use this procedure to move, copy and insert buttons.
Press HC SETUP for 3 seconds.
The "PROGRAM DEVICE" menu is displayed.
4 Atbutton
the "Select Device" screen, press the LCD
for the device (equipment) whose
name you want to change.
5
Press NEXT.
for
seconds.
The "PROGRAM DEVICE" menu is displayed.
Press
then press
Press
Press
At the "Source Device" screen, press the
for the device of the button you
want to move.
6 At the "Select Key" screen, press the LCD
button of the button you want to move.
At the "Edit Text" screen, use the first
7 Press NEXT.
6 column
of LCD buttons to select the position
of the character to be edited.
"Target Device" screen, press the
7 Select the character to be input with the 8 AtLCDthebutton
of the device for the destination
second column of LCD buttons, then press
[SELECT].
* Lower case letters are input when [CAPS) is displayed,
capital letters when [lower) is displayed.
Up to 12 characters can be input.
or the button to be swapped.
9 button
At the "Select key" screen, press the LCD
for the destination or the button to
be swapped.
8 Press [SAVE].
1/\Press [YES].
* When [NO) is pressed, the setting menu reappears. To
* When [NO) is pressed, the setting menu reappears. To
continue, press (YES].
UThe button moves or is replaced.
continue, press (YES].
15
ENGLISH
LCD button
~D ~
~)
--
-
E3--+-
LCD button
NEXT
Inserting buttons
Copying buttons
1
1 Press RC SETUP for 3 seconds.
2 Press NEXT, then press [EDIT FUNC].
Press RC SETUP for 3 seconds.
The "PROGRAM DEVICE" menu is displayed.
2 Press NEXT, then press [EDIT FUNC].
3 Press [COPY].
3 Press [MOVE/INSERTI.
4 Press NEXT.
4 Press NEXT.
5 AtLCDthebutton
"Source Device" screen, press the
5 AtLCDthebutton
"Source Device" screen, press the
for the device of the button you
for the device (equipment) of
want to move.
RC SETUP
~---ISiiI
6 button
7 NEXT.
At the "Select key" screen, press the LCD
for the button you want to move.
Press
About the button names in these explanations
[ ] : LCD buttons for selection items
Button name only:
Indicates a button on the remote control unit
the button you want to copy.
6 At the "Select key" screen, press the LCD
button for the button you want to copy.
7 Press NEXT.
"Target Device" screen, press the
8 At the "Target Device" screen, press the
8 AtLCDthebutton
for the device of the button for
LCD
of the device to copy to.
the place to be inserted.
Key" screen, press the LCD
9 At the "Select key" screen, press the LCD 9 At the for"Select
copy destination.
button
button
button for insert destination.
10
press [YES].
The button is inserted.
* When [NO] is pressed, the setting menu reappears. To
continue, press [YES].
16
The "PROGRAM DEVICE" menu is displayed.
1
nPress [YES].
UThe button is copied
* When [NO] is pressed, the setting menu reappears. To
continue, press [YES].
ENGLISH
Deleting buttons
Setting the button display mode
Adding buttons
1
Use this procedure to select the way in which the buttons are
displayed.
When new buttons are added, it is possible to select and add
new functions.
1
1
2
3
4
2
3
Press RC SETUP for 3 seconds.
The "PROGRAM DEVICE" menu is displayed.
Press NEXT, then press [EDIT FUNC].
Press [ERASE].
4 NEXT.
5 LCD button
Press
At the "Source Device" screen, press the
for the device of the button you
want to delete.
6 button
7
At the "Select key" screen, press the LCD
for the button you want to delete.
Press [LEAVE EMPYn or [SHIFT ALL UP].
[LEAVE EMPTY] :
The button is deleted.
2
Press HC SETUP for 3 seconds.
The "PROGRAM DEVICE" menu is displayed.
Press NEAl, then press [EDIT FUNC].
3 [DISPLAY MODE].
4 NEXT.
5 button
6 button
Press
Press
At the "Select Device" screen, press the LCD
for the device of the button whose
display mode you want to change.
7
At the "Select key" screen, press the LCD
for the button whose display mode
you want to change.
Press [COLUMN MODE] or [ROW MODE].
[SHIFT ALL UP] ;
The button is deleted and the other buttons are all shifted up,
filling in the space of the deleted button.
8
[COLUMN MODE] :
The buttons are displayed two per row.
[ROWMODE]:
Press [YES].
The buttons are displayed one per row.
The button is deleted.
* When [NO] is pressed, the setting menu reappears. To
continue, press [YES].
8
Press [YES].
The display mode is set.
* When [NO] is pressed, the setting menu reappears. To
continue, press [YES].
Press HC SETUP for 3 seconds.
The "PROGRAM DEVICE" menu is displayed.
Press NEXT, then press [EDIT FUNC].
Press NEXT, then press [ADD FUNC].
Press NEXT.
5 LCD button
6 NEXT.
7 button
At the "Source Device" screen, press the
for the device (equipment) you
want to add.
Press
At the "ADD IR" screen, press the LCD
for the function of the button you
want to add.
8 NEXT.
9 button
Press
At the "Select key" screen, press the LCD
for the position of the button you
want to add.
10press [TEST KEY], and if the operation has
been performed press [YES].
* Press [YES] to add more buttons.
17
ENGLISH
Changing the button name
1
LCD button
Press RC SETUP for 3 seconds.
The "PROGRAM DEVICE" menu is displayed,
2 Press NEXT, then press [EDIT TEm.
3 [KEY NAME].
4 button
Press
At the "Select Device" screen, press the LCD
for the device whose button name
you want to change.
RC SETUP
~
~
-',
'"
r
:~
About the button names in these explanations
8
Button name only:
Indica18s a button on the remote control unit
[SELECn.
I : LCD buttons for selection items
*
Lower case letters are input when [CAPS) is displayed,
capital letters when [lower) is displayed.
Up to 12 characters can be input.
9
Press [SAVE].
* When [NO) is pressed, the setting menu reappears. To
continue, press [YES).
18
The "PROGRAM DEVICE" menu is displayed.
for the learning function you want to erase.
At the "Edit Text" screen, use the first
column of LCD buttons to select the position
of the character to be edited.
Select the character to be input with the
second column of LCD buttons, then press
[
1 Press RC SETUP for 3 seconds.
2 Press [LEARNING].
3 Press [ERASE LEARN].
4 Press NEXT twice.
5 Atbutton
the "Select key" screen, select the LCD
5 AtLCDthebutton
"Source Device" screen, press the
for the button whose button name
for the device you want to
you want to change.
delete.
6 Press NEXT.
6 At the "Select Key" screen, press the button
7
.~
Deleting signals registered with the
learning function
7 Toyoudelete,
press [YES].
do not want to delete, press [NO].
H
* Press [NO) to end, [YES) to continue.
ENGLISH
Deleting signals registered with the
macro function
lib D....el....et....in~g....fa....v....o....rit__es
1 ....
4 Press NEXT twice.
1
2
3
4
5
At the "Source Device" screen, press the
LCD button for the device (equipment)
whose macro you want to delete.
5 LCD button
6
7
At the "Select Key" screen, press the LCD
button for the macro you want to delete.
1
2
3
Press RC SETUP for 3 seconds.
The "PROGRAM DEVICE" menu is displayed.
Press [MACROS].
Press [DELETE].
To delete, press [yES].
If you do not want to delete, press [NO].
*Press [NO] to end, [YES] to continue.
;;;;;;;;;;;;;;;11
Press RC SETUP for 3 seconds.
The "PROGRAM DEVICE" menu is displayed.
Press [FAVORITES].
Press [DELETE].
Press NEXT twice.
At the "Source Device" screen, press the
for the device (equipment) you
want to delete.
6 button
7
At the "Select key" screen, press the LCD
for the button you want to delete.
To delete, press [YES].
If you do not want to delete, press [NO].
* Press [NO) to end, [yES) to continue.
Deleting
function
the
registered
punch-thru
1 Press RC SETUP for 3 seconds.
2 Press [PUNCH THRU].
The "PROGRAM DEVICE" menu is displayed.
3
4
Press [CLEAR].
Press NEXT.
the "Punch Thru" screen, press the LCD
5 Atbutton
for the group you want to delete.
6 Press NEXT.
7 At the "Select Device" screen, press the LCD
button for the device (equipment) whose
8
punch through setting you want to delete.
To delete, press [YES].
If you do not want to delete, press [NO].
* Press NEXT to return to the settings menu.
19
J;>
~
1:
:::: "v
f; n
-
ENGLISH
,
LCD button
=iDi=
l
-,,
I
-:
-)
"
Operational:. .et '.
Th~ se~ings are' returned
purchase.
-LCD button
!-...... ::
1_
I
\
NEXT
RC SETUP
::>
~~
v
2f ;2,
~
~
About the button names in these explanations
[
I : LCD buttons for selection items
Button name onlv:
Indicates a button on the remote control unit
20
User reset
to as they were. upon
..
,,
G-+-
::..}
.
1
Press RC SETUP for 3 seconds.
The "PROGRAM DEVICE" menu is displayed.
1
Press HC SETUP for 3 seconds.
2
3
Press NEXT, then press [RESET/LOCK].
2
Press [OP RESET].
3
Press [USER
4
Press
NEXT.
Press
5
4
Press [YES].
5
Press [YES].
6
7
Press
NEXT.
"PLEASE WAIT" is displayed.
Press
NEXT.
The settings are returned to as they were upon purchase
((j"page 3).
.
This procedure deletes the macro settings added by
the user and the remote .control codes that have been
learned..It dOes not delete added devices.
6
7
The "PROGRAM DEVICE" menu is displayed.
Press NEXT, then press [RESET/lOCK].
Press
RESEn.
NEXT.
NEXT.
"PLEASE WAIT" is displayed and the setting is reset.
Press
NEXT.
The settings menu reappears.
ENGLISH
Lock function
When loded,
possible.
Unlock function
device
1 RC SETUP
2 NEXT,
3 [LOCK].
4 NEXT
5 button
Press
{equipment}
editing
is
not
for 3 seconds.
The "PROGRAM DEVICE" menu is displayed.
Press
then press [RESET/LOCK].
Press
Press
6
twice.
At the "Select Device" screen, press the LCD
for the device (equipment) you want
to lock.
Press [YES].
* When [NO) is pressed, the setting menu reappears. To
continue, press [YES].
This procedure unlocks devices (equipment) that have
been loded.
1
Press RC SETUP for 3 seconds.
The "PROGRAM DEVICE" menu is displayed.
2
3
Press [UNLOCK].
4
Press NEXT twice.
Press NEXT, then press [RESETILOCK].
5 button
6
At the "Select Device" screen, press the LCD
for the device (equipment) you want
to unlock
Press [YES].
* When [NO] is pressed, the setting menu reappears. To
o
continue, press [YES).
:J
21
ENGLISH
~
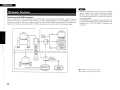
Network function
This functions uses the RC-7001RCI (sold separately).
When a wireless (RF) network is established using the RC-7001 RCI (sold separately), the RC-7001 RCI is called a node. An
individual node number is registered for each RC-7001 RCI unit. When registering devices with the RC-7001 RCI. once the RF
transmission settings are made, when a button on a device for which the node number is set is pressed, the remote control
signals are sent (wireless) and received by the RC-7001 RCI corresponding to the node number of the transmission target.
• Using the wireless function near microwave ovens, devices
using a wireless LAN, cordless telephones, Bluetooth
devices or other wireless devices could adversely affect
communications performance. In this case move away from
the interfering device.
• If the RC-7000Cl cannot properly receive radio signals due
to excessive distance between it and the RC-7001 RC1, radio
interference, etc., "RF OUT OF RANGE"is displayed on the
LCD screen.
. ···~D
Monitor
Monitor
Repeater 1
IRC-7001 RCI, sold
separately)
AVamplifier
">
::
FR
'~
:~
..............
r'
,..
,
t
Monitor
:
Remote control
lRC-7000CI)
.....
Repeater 2
IRC-7001 RCI,
sold separately)
..o
'
L.....---------i
~IO~ i?
AV amplifier
,.
I~ 1F9;~@
DVD player
~
• • • • • • • : IR (Infrared communicationsl
...... ........ : RF ITwo-way communications)
22
,
ENGLISH
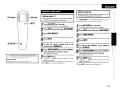
Operations using nodes
Adding nodes (1)
LCD button
Use this procedure to register a node number and add an
RC-7001 RCI (sold separatelyl to the network.
12
3
4
RC SETUP
----;---~
5
6
Press RC SETUP for 3 seconds.
The "PROGRAM DEVICE" menu is displayed.
Press NEXT twice, then press [NETWORK].
Press [ADD NODES].
Press NEXT.
To add the remote control unit to the
network, press [REMOTE].
Press RESET/CONFIG on the RC-7001RCI
(sold separately) for about 1 second.
The indicator flashes green.
About the button names in these explanations
[ I : LCD buttons for selection items
Button name only:
Indicates a button on the remote control unit
Adding nodes (2)
Use this procedure to add a second or more units of the
RC-70001CI (sold separately) to the network.
Press RESET/CONFIG on the RC-7001 RCI (sold separately) for at
least 10 seconds so that the indicator lights red.
1
2
3
4
5
6
Press RC SETUP for 3 seconds.
The "PROGRAM DEVICE" menu is displayed.
Press NEXT twice, then press [NETWORK].
Press [ADD NODES].
Press NEXT.
To add the RC-7001RCI to the network,
press [OTHER].
Press RESET/CONFIG on the RC·7001RCI
(sold separately) for about 1 second.
The indicator flashes red.
7
Press NEXT twice.
"Success!" is displayed when the device has been
added successfully.
*Press NEXT to return to the settings menu.
7
Press NEXT twice.
"Success!" is displayed when the device has been
added successfully.
* Press NEXT to return to the settings menu.
23
ENGLISH
'D'~
I_ l,:
,
LCD button
-:
I
I
-
I
I
_I
~.!
,
:,
,
LCD button
.,
Viewing nodes
Use this procedure to delete RC-7001 Rei (sold
separately) units by specifying the node number from
the current netWork,
Use this procedure to search for and display a list of RC7001 RCls (sold separately) registered in the network,
1 _
i
G---i-
RC SETUP
Deleting nodes
NEXT
----;.---J~
1
2
3
4
5
6
>
"0
'1:,
;'
:.::::
:;';' ... ,..
c'
,.
Press RC SETUP for 3 seconds.
1 : LCD buttons for selection items
Button name only:
Indicates a button on the remote control unit
24
Press RC SETUP for 3 seconds.
The "PROGRAM DEVICE" menu is displayed,
Press NEXT twice, then press [NETWORK].
2
Press NEXT twice, then press [NETWORK].
Press [DELETE NODES].
3
Press [VIEW NODES].
Press NEXT twice.
4
The "PROGRAM DEVICE" menu is displayed,
The RC-7001 RCl's
displayed,
(sold separately) node number is
Select the node number to be deleted, then
press [YES].
Press NEXT.
* Press [NO] to end. [YES] to continue,
About the button names in these explanations
1
Press NEXT twice.
The node numbers of the RC-7001 RCls (sold separately)
registered on the network are indicated with an * mark
after them,
* PressNEXT twice to return to the settings menu,
ENGLISH
Changing node labels
Setting the receiver display mode
Use this procedure to add labels to RC-7001 RCls (sold
separately) for easier distinction.
(ROM)
1
2
3
Press RC SETUP for 3 seconds.
The "PROGRAM DEVICE" menu is displayed.
Press NEXT twice, then press [NETWORK].
This setting is made for conducting two-way
communications between the RC-7001 RCI (sold
separately) and compatible DENON products. The status
information of the compatible DENON product can be
displayed on the set's screen. Use this procedure to set
the ROM page display position.
1
2 PREF]. NEXT
3 [ROM].
4 NEXT.
Press RC SETUP for 3 seconds.
Press [EDIT LABEL].
The "PROGRAM DEVICE" menu is displayed.
Press
4
5
6
7
Press NEXT twice.
The RC-7001 RCI's (sold separately) node number is
displayed.
Select the node number to be changed, then
press NEXT.
The edit screen for the selected node appears.
At the "Edit Text" screen, use the first
column of LCD buttons to select the position
of the character to be edited.
Select the character to be input with the
second column of LCD buttons, then press
[SELECn.
* Lower case letters are input when [CAPS) is displayed,
capital letters when [lower) is displayed.
8
9
Press [SAVE].
Press NEXT.
1 RC SETUP
2 PREF]. NEXT
Press
for 3 seconds.
The "PROGRAM DEVICE" menu is displayed.
Press
3
twice, then press [USER
Press [VERSION INFO].
The LCD button version information is displayed.
* PressNEXT twice to return to the settings menu.
twice, then press [USER
Press
Press
5
6
Press [YES].
\".
'1--
.~
?~
;;; ~~
~:-,
o
Use [FIRSn and [LAST] to set the position
at which you want the RDM page to be
displayed.
:::!
[FIRSn:
The ROM page is displayed at the beginning of the normal
button screen.
[LASn:
The ROM page is displayed at the end.
* Press NEXT to return to the settings menu.
* When [NO) is pressed, the setting menu reappears. To
continue, press [YES]
25
ENGLISH
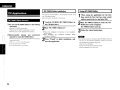
RC-7000CI Editor installation
PC Application
RC-7000CI Editor function
o You can use RC-7000CI Editor for the following
operations.
• Editing RC-7000CI setting data.
• Backing up RC-7000CI setting data on the PC.
• Remote control code database downloading.
o Recommended
devices and environment
required for using RC-7000CI Editor.
• Personal computer running Windows® XP Service Pack 2
operating system.
• HOD with sufficient free disk space.
• USB 2.0 connection terminal.
• Internet connection environment
26
Using RC-700OCIEditor
First connect the RC-7000CI to the personal computer using
the USB cable provided.
Use a computer connected to the Internet.
1
2
Load the CD-ROM (RC-7000CI Editor) in
the CD-ROM drive.
Run "RC-7000CI Editor.exe"
* Follow the installation
wizard screen.
* After installation, the
instructions on the installation
"Installation complete"
When using the application for the first
time, check the New User box, enter e-mail
address, password, etc., and press OK.
2
3
Run RC-7000CI Editor.exe from the CDROM drive in My Computer.
RC-7000CI Editor starts up.
Follow the wizard instructions.
dialog
message is displayed.
3
1
Press "Finish" to finish installation, and
start the application.
Gmt
• During data upload or download using RC-7000CI Editor do
not carry out the following operations. Failure of the main
unit and personal computer may result.
• Remove the USB cable.
• Switch off the personal computer power.
• Remove batteries from main unit.
ENGLISH
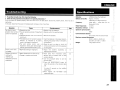
Troubleshooting
1. If a problem should arise, first check the following:
2. Is the set being operated as described in the operating instructions?
If this unit does not operate properly, check the items listed in the table below. Should the problem persist, there may be a
malfunction.
In this case, disconnect the power immediately and contact your store of purchase.
Symptom
Set does not work
properly when remote
control unit operated.
-...
Specifications
Cause
• Batteries are worn.
• You are operating outside of the specified
range.
• Obstacle between main unit and remote
control unit.
• The batteries are not inserted in the proper
direction, as indicated by the polarity
marks in the battery compartment.
• The set's remote control sensor is
exposed to strong light (direct sunlight,
inverter type fluorescent bulb light, etc.).
Countermeasure
Page
• Replace with new batteries.
• Operate within the specified range.
1
2
• Remove the obstacle.
2
• Insert the batteries in the proper direction,
following the polarity marks in the battery
compartment.
• Move the set to a place in which the
remote control sensor will not be exposed
to strong light.
2
'
:.c.
Batteries:
Battery service life:
LR03/AAA Type (four batteries)
Approx. 3 months
(depending on usage frequency)
Frequency:
Radio frequencies:
2,405 MHz - 2,475 MHz (15 chI
Bandwidth 2 MHz
2.4 GHz
Modulation method:
O-OPSK
Spectrum spread system:
DSSS
Communication distance:
2
Display screen does
not appear.
• Brightness setting is inappropriate.
• Adjust the screen's
"Adjusting the contrast':
at
6
Wireless connections
with the RC7001 RCI (sold
separately) cannot be
established.
• Radio interference with other devices.
• Change in wireless environment.
• Move away from microwave ovens,
devices using a wireless LAN, or other
wireless devices.
• Use the procedure below to set the
network again.
CD Press the RESET/CON FIG button for
about 10 seconds so the indicator lights
red.
CV Press the RESET/CONFIG button again
for about 3 seconds so the indicator
lights green.
Q) Next register the RC-7000CI (sold
separately) again.
22
brightness
30 m (varies with the environment)
Maximum external dimensions:
63 (W) x 233 (H) x 28 (D) mm
(2-31/64" x 9-11/64" x 1-7/64")
Weight:
170 g (Approx 6.0 oz)
23
27
DENON~'
LIMITED WARRANTY
(USA)
PAGE
USA (ENGLISH)
CANADA (ENGLISH)
CANADA (FRENCH)
2
3
4
USA
DENON ELECTRONICS (USA), LLC
(a D&M Holdings Company)
100 Corporate Drive
Mahwah, NJ 07430-2041
18001 497-8921
18881 544-8434 Fax
DENON REGIONAL SUPER SERVICE CENTERS (Repair only-No parts orders please)
PYRAMID AUDIO
UNITED RADIO SERVICE
AUDIO SERVICES
305 E. Braker Lane
Austin, TX 78753-2746
(512) 458-8292
(512) 453-4542 Fax
5717 Enterprise Parkway
E. Syracuse, NY 13057-2905
(8001 634-8606
(3151 446-8505 Fax
544 Central Dr., Suite 101
Virginia Beach, VA 23454-5245
(757) 498-8277
(757) 498-9554 Fax
---------------------------------------------------INNER SOUND
NORMAN'S ELECTRONICS
GOLD CROWN ELECTRONICS
1416 S.E. Morrison Street
Portland, OR 97214-2646
(503) 238-1955
1503) 238-1787 Fax
3653 Clairmont Road
Atlanta, GA 30341-4907
17701451-5057
17701 455-8337 Fax
Victoria Business Park
129 E. Savarona Way
Carson, CA 90746-1406
(310) 538-8282
(310) 538-8281 Fax
---------------------------------------------------SERVICE WIDE TECHNOLOGIES
ELECTRONICE EXPRESS
2239 Curtiss Street
Downers Grove, IL 60515-4010
(630) 969-7333
(630) 969-7330 Fax
1809 E. Fabyan Parkway
West Chicago, IL 60185
1630) 208-4600
(630) 208-4601 Fax
CANADA
D&M CANADA INC.
5-505 Apple Creek Boulevard
Markham Ontario, L3R 581
(9051475-4085
(9051475-4159 Fax
WARRANTY (HOME)
1
.... ·'I'~·"" ·'11"·.....'11'· .....,"'........'"'.......,"'........"...... ·,""·....·.1"··....·.11'··.... ·'1"· ....'11'··... ·,11" ...··,,,'··...·.111'··.... ·,II~·"" .,"h..... ·."~.·....·.'"'.·.... ·'11'··.....,11'··.....1I"·.... ·.jU··... '0l1'·· .... ·.11~·.....'11'·'....·.11'··.....11I...... ,or~.........II'........"".......
~
,
;
This warranty win be honored only in the U.S.A
:
~
•
~
U'.
,
DENON,m
:
LIMITED WARRANTY
;
Lenglh of Non-Transferable Warranly
,
This warranty on your DENON product which is distribulcd and warrantl;"d hy DENON ELECTRONICS (USA). LLC remains in effcci ror the following periods rrom
the date or the original consumer purchase rrom an AUTHORIZED DE 0 ELECTROI ICS (USA). LLC DEALER.
,
t
Product Category
,
:
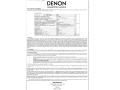
A V Controller A V Receiver AM FM Receiver
DVD Receiver DVD Home Theater Svstem
Di ital Surround Decoder
AVC AVR DRA
ADV S
AVD
:
Pre-Amplifier. Digital Pre-Amplifier
Power-Amnllfier, Head Amnlifier
PRA AVR DAR POA. HA
Tuner Intenrated Amnlifier
CD Plaver DVD Plaver
Tane Recorder CD Recorder MD Recorder
TU PMA
DCD DCM Df' DA DVD DVM
DRM DRR DRS DRW CDR CDRW DMD
t
•
•
System Audio
i
Turntable
,
2
Autolift Manual
cull Automatic
Netv.Qrk. Muttlrnedia Ser.....er
I C1ienllHard DIsc Only)
1
2
Excluded Hard DiSK Drive UM
R"ard Isk rive Unit
i
Micronhone
Control Dock for iPod®
Head hone
Cartridoe
Remote Controller
•
DP-L DP-M
DP-F
SC
DSW
NS
4
4
;
,,
D (UPA. UTU. UDCM. UOA. usc. USA. UCD. UDAAI
D-A, D-F, D-G. D-M. CDA-M. DRR.M. S
Sneaker
Sub-woofer
•
2
1
3
3
3
1
:•4
YEAR(SI
4
2
1
2
;•
1
1
;
,
DM-S
ASD
AH-D AH-C
DL
R
4
qr
f
DAYS
90
iPod is a trademark of Apple Computer. Inc .. ret'llstered in the U.S. and other countries
•
What is Covered
;
Except as specified below, this Warranty covers all defects in material and workmanship in this product occuning during the above warranty periods. The
following arc not covered by the Warranty: (I) Any product which is not distributed in the U.S.A. by DENON ELECTRONICS (USA), LLC. (2) Any product :
which is not purchased in the U.S.A. rrom an authonzcd DENON dealer. unless the product is purchased through the U.S.A. Military Exchange Service where ,
the Warranty will be One (I) year for all products listed above except in the case of Cartridges, Accessories. Remote Controller and Headphone which will I
remain al 90 days. ( are: AUTHORIZED DENON DEALERS can be iden.ified by DENON AUTHORIZED DEALER sticker displayed in rhe stores. If you •
are uncertain as to whether a dealer is a DENON AUTHORIZED DEALER. please contact DENON as listed below). (3) An) product on which the serial number has been defaced, modified or removed. (4) Damaged deterioration or malfunction resulting from: a) Accident. act of nature. abuse, misuse. neglect. ,
unauthorized product repair. opening of or modification or failure to follow instructions supplied with the product. b) Repair or attempted repair by anyone "f
not authorized by DENON. c) Any shipment of the product (claim must be presented [0 carrier). (5) hems subject to wear from normal usage (tape heads. •
cartridges. stylus. banery. cle.). (6) Periodic check-ups which do not disclose any defect. (7) Use of the product outside the U.S.A. (8) Damaged magnetic tape
or CD/DVD discs. (9) Use in industriaL commercial. and/or professional applications. (10) Any installation or removal charges resulting from product failure.
;
What We Will Pay For
If during the applicable warranty period from the date of original consumer purchase your DENON product is found to be defective by DENON.
DENON will repair. or at its option. replace with new, used or equivalent model. such defeclive product without charge for parts or labor.
-
4
How to Obtain Warranty Performance
•
If your unit ever needs service. it may be taken or shipped to any authorized DENON service station or DENON ELECTRONICS (if you arc uncertain ~
as to whether a service station is DENON authorized, please contact DENON as listed below.) In all other cases, the following procedures apply whenever •
your unit must be transported for warranty service;
~
i
a.
b.
You arc responsible for transporting your unit or arranging for its transportation.
If shipment of your unit is required;
,
You must pay the inilial shipping ch~ges. but we will pay the return shipping charges if the repairs are covered by the Warranty.
WHEN RETURNING YOUR UNIT EQR WARRANTY SERVICE A COPY OE THE ORIGINAL SALES SLIP MUST BE ATIACHEP
•
You should include the following: tour name. address. daytime telephone number. model and serial number of the product and a description
~:t~~e~r~~~~~he ~nn~~e case of a D or DVD Player. please enclose ONE (I) disc that the unit has failed with for test reasons. It Will be
t4
c.
d.
THIS WARRANTY IS VALID IN THE U.S.A. ONLY.
If your product does not require service. but you have questions regarding its operation. please contact our Technical Services Department as listed
below_
THIS WARRANTY IS EXPRESSLY MADE IN LIEU OF ALL OTHER WARRANTIES. EXPRESSED OR IMPLIED. INCLUDING WITHOUT
LIMITATION. WARRANTIES OF MERCHANTABILITY AND FITNESS FOR A PARTICULAR PURPOSE.
OUR LIABILITY IS LIMITED TO THE REPAIR OR REPLACEMENT. AT OUR OPTION, OF ANY DEFECTIVE PRODUCT AND SHALL IN
NO EVENT INCLUDE INCIDENTAL OR CONSEQUENTIAL COMMERCIAL OR PROPERTY DAMAGES OF ANY KIND. WE ARE NOT
RESPONSIBLE FOR PRODUCTS LOST, STOLEN AND/OR DAMAGED DURING SHIPPING.
SOME STATES DO NOT ALLOW LIMITATIONS ON HOW LONG AN IMPLIED WARRANTY LASTS AND/OR DO NOT ALLOW THE
EXCLUSION OF INCIDENTAL OR CONSEQUENTIAL DAMAGES. SO THE ABOVE LIMITATIONS AND EXCLUSIONS MAY NOT APPLY TO
YOU.
This warranty gives you specific legal rights, but you may also have other rights which vary from stale to state. This Warranty may not be altered other
than in a writing signed by an officer of Denon Electronics USA, LLC.
'.'II"
,I~
~tl
,",
,"
~
~
~~·· ·.I~·· "'"~·
DENON ELECTRONICS (USA), LLC
(a D&M Holdings Company)
100 Corporate Drive
Mahwah. NJ 07430-2041
(800) 497-8921
www.usa.denon.com
··,Il'··
·."~· ··ri"·· ·..I ·
··III"·
·.ril'··
·.I.'··
··,."·
··,'P··
,IP··
·.~~··
·
•;
:
i
·•4
:
:;
•;
4
4
·.,III··
·.,u·· ·.•I1'··
p··
··,.,·
·
,
··,
·
·•
·
··'I'..·
··'I ·
",..
~
2
r-
I'
II
"'""
~I'
,III'
IIII
IIII
·.. I~·,
,·11I"·
··II'··. .·.IIl"·
·.I."·
·~
·
·~rl ..·
·.I,I"·
,1'··
'II'··
·ofI'··
·.."'··. .·..'I··
·
·~· ..U..·. .·.,II..·. .·"
,
,
,.
11,
111
11'.
,
This warranty will be honored only in Canada.
,
;•
i
;•
;
•
•
•
·t
LIMITED WARRANTY
~
~
Length of Non-Transferable Warranty
¥
This warr..mty on your DEN ON produci which is distribuled and warranted by D&M CANADA INC. remains in effect for the following periods from Ihe date of the
original consumer purchase from an AUTHORIZED D&M CANADA INC. DEALER.
;
;
~
•
t
t
•
t
t
i
t
i
t
t
~
~
t
:•
t
t
3
3
1
2
1
1
1
1
AVO
NS
AVC AVR ORA
ADV S
DCD DCM Df' DA DVD DVM
ORM ORR DRS ORW CDR CORW OMO DTR
D IUPA, LlTU, UDCM, UDR, usc, USR, UCD. UDRA)
System Audio
D-M. D-A, D-G. CDR-M.DRR-M. S
Sneaker
Sub-woofer
Karaoke S stem
Micronhone
Control Dock for iPod"
HeadDhone
Cartridne Accessories
Remote Controller
SC
DSW
DCG HMA
DM-S
ASD
AH-D AH-C
DL AU DM-K DME
RC
;
;
t
,·
+
•
YEARS
f
1
2
;•;
1
1
1
qr
90
;•
DAYS
;
•·
;•
What We Will Pay For
If during the applicable warranty period from the dale of original consumer purchase your DE ON product is found 10 be defective by DENON.
0 will repair. or al its option. replace with new, used or equivalenl model. such defeclive product without charge for parts or labor.
DE
How to Obtain Warranty Performance
If your unit ever needs service. it may be laken or shipped to any authorized DENON service station or D&M CANADA INC. (if you are uncertain as to
whelher a service stalion is DENON aUlhorized. please contact D&M CANADA INC. as lisled below.) In all other cases. Ihe following procedures apply
whenever your unit must be transponed for warranty service;
You are responsible for transporting your unit or arranging for ils transportation.
If shipment of your unit is required;
a.
b.
~~;~~ITU1~N\~~ai~ifKtJgN~~a?Q~ ~~~~~~WWR~~C[F ~h¢bi;~ ~~rfHlQ~IGf~~taS~~oES'stlb~ ~u~~~nZiTACHED
c.
d.
You should include Ihe following: your name. address. daylime telephone number. model and serial number of the product and a descrip.tion
of the problem. In the case of a CD or DVD Player, please enclose ONE (I) disc that Ihe unil has failed with for test reasons. It Will be
returned with the unit.
~
t
t
;
4
2
3
3
;
t
t
PRA, AVP. DAp' POA, HA
,
What is Covered
Excepl as specified below. Ihis Warranly covers all defects in material and workmanship in Ihis product occurring during the above warranty periods, The
following are not covered by the Warranty: (I) Any product which is not distributed in Canada by D&M CANADA INC. (2) Any product which is nOI
purchased in Canada from an authorized DENON dealer. (Note: AUTHORIZED DENON DEALERS can be identified by DENON AUTHORIZED DEALER
sticker displayed in the stores. If you arc uncertain as 10 whether a dealer is a DENON AUTHOR1ZED DEALER, please conlact D&M CANADA INC. as ;.
listed below). (3) Any product on which the serial number has been defaced. modified or removed. (4) Damaged deterioration or malfunction resultjne from:
a) Accident acl of nature. abuse. misuse. neglect. unaulhorized product repair. opening of or modificalion or failure to follow instructions supplied with the
product. b} Repair or attempted repair by anyone not authorized by DENON. c) Any shipment of the product (claim must be presented to carrier). (5) Items
subjeci to wear from nonnal usage (tape heads. cartridges. stylus, battery. etc.). (6) Periodic check-ups which do not disclose any defect (7) Use of the product
outside Canada. (8) Damaged magnetic tape or CDIDVD discs. (9) Use in industrial. commercial. and/or professional applications. (10) Any inslallalion or
removal charges resulling from product failure.
t
•
Pre-Amplifier, Digital Pre-Amplifier
Power-Amplifier, Head Amplifier
1 Excluded Hard Disk Drive Unit
2
ar
lSI< nve OIt
~A V Receiver AM FM Receiver
DVD
DVD Home Theater Svstem
CD Plaver
Pia er
Tane Recor er CD Recorder MD Recorder
;
i
Tuner Intenrated Amnlifier
DP-L
DP-F
TU PMA
t-u ' Automatic
Network. Multimedia
Server I Client
;
t
Autolift
Di ital Surround Decoder
+
~
1
2
Turntable
t
t
,
Produci Category
i~
i
;i
THIS WARRANTY IS VALID IN CANADA ONLY.
If your product does not require service. bUI you have questions regarding its operation. please contact our Technical Services Department as listed
below.
THIS WARRANTY IS EXPRESSLY MADE IN LIEU OF ALL OTHER WARRANTIES, EXPRESSED OR IMPLIED, INCLUDING WITHOUT
LIMITATION, WARRANTIES OF MERCHANTABILITY AND FITNESS FOR A PARTICULAR PURPOSE.
OUR LIABILITY IS LIMITED TO THE REPAIR OR REPLACEMENT, AT OUR OPTION, OF ANY DEFECTIVE PRODUCT AND SHALL IN
NO EVENT INCLUDE INCIDENTAL OR CONSEQUENTIAL COMMERCIAL OR PROPERTY DAMAGES OF ANY KIND. WE ARE NOT
RESPONSIBLE FOR PRODUCTS LOST, STOLEN AND/OR DAMAGED DURING SHIPPING.
SOME PROVINCES DO NOT ALLOW LIMITATIONS ON HOW LONG AN IMPLIED WARRANTY LASTS AND/OR DO NOT ALLOW THE
EXCLUSION OF INCIDENTAL OR CONSEQUENTIAL DAMAGES. SO THE ABOVE LIMITATIONS AND EXCLUSIONS MAY NaT APPLY TO
YOU.
This warranty gives you specific legal rights. but you may also have Olher rights which vary from province to province. This Warranty may not be
altered other than in a writing signed by an officer of D&M Canada Inc.
"'"1' ..·,'I~
(905) 475-4085
,"~'
,"""·. .·.,"',. .·.'I
·,'II., . .,,'U'
·.,.,.·. .·.II,..·. .•
·. .
·.~~··. .· ~· . .·."'··. .·
·.~'"·
,··. .·.""··. .
dll·,
;•
t
t
;
;
;
;
t
t
,
.t
L3R 5B1
www.denon.ca
·
t
Markham, Ontario
,•
;
;
;
;
;
D&M CANADA INC.
5-505 Apple Creek Boulevard
t
t
;
··~~· . .··II
·.III..·. .··,""·. .
·. .·.' •·. .··,"'· . .·
•
"'~
~
,••d
,IlI
"'~
•
II
..J 3
Cette garantie ne sera honoree qu':.; Canada.
i
-
d
CETTE
Vous devez inc lure egalement vos nom, adresse. numero de telephone de jour, numeros de modele et de serie du produit et une descriplion
GARA~~;:I:~~::~~~::'E:~n~;~e;~~DC::Av:/Oindre un disque que I'appareil n'a pu lire pour lest 11 vous sera retoume avec I'article
ason fonctionncmcnt. contaclcz notre departement technique dont I'adresse figure
:
EST EXPRESSEMENT FAITE EN LIEU ET PLACE DE TOUTES LES AUTRES GARANTIES EXPRIMEES OU SOUSENTENDUES' Y COMPRIS, SANS SE LIMITER A CELLES-CI. LES GARANTIES MARCH ANDES ET SPECIFIQUES POUR UN USAGE
PARTlCULlER
NOTRE RESPONSABILITE SE LIMITE A LA REPARATION OU AU REMPLACEMENT, A NOTRE CHOIX,.DE TOUT PRODUIT DEFECTUEUX
,
'
•
TRNASPORT DES BIENS,
:
Si votre produit nc requicrt aucun service mais que vous avez des questions quant
t ~:~~;~ARANTIE
•
•
•
t
~
tt ~~~~I~g~'i~rE~~A~UiE~~<fN"s~gE~F~~~~~E.;'E~~~TDUdnisC~R~~0:\~I~V/~0N.?dftCI~dtlA~~TsE:d~~sDg~~~g~~sS~ERJ6A~~~~ •
A
t
LA DUREE D'UNE GARANTIE SOl}S-ENTENDUE ET/OU NE
· CERTAINES PROVINCES NE PERMETTENT PAS DE LlMITES QUANT
PERMETTENT PAS L'E{(CLUSION DE DOMMAGES FORTUITS. LES LIMITATIONS ET EXCLUSIONS MENTIONNEES PLUS HAUT PEUVENT
• NE PAS S' APPLIQUER A VOTRE CAS,
~
Celie garantie vous donne des droits legaux specifiques. mais il se pOUiTait que vous ayez d'autres droits qui varient d'une province
garantie ne pcut etre modifiee que par un documenl signe par un gestionnaire autorise de D&M Canada.
•
t.
,
•
·.1I1O.·
·.'.1.··
·.'1I1··
;
~•
(90~~:7~~~085
.i
www.denon.ca
·.'1"··~·.111'··~·.""·
La
~~~~
5-505 Apple Creek Boulevard
Markham, Ontario
t
t
'~P'~·.~"·"'·.~II··4'-".'·''''·'III~·'''·''II''·'''·',I'··~",'II'·
a rautre.
,;
•
·.'.",
·.'III··~·.'I'·,
·.'"'··
·.""·
·••II· "".111"
l
··'"'·
·.'11'·
·.'"'·
·.'11'··
·.".··
·.,11I··
··'11.··
,",
"
".'
~
'"'•...-:
4
DENON SERVICE NETWORK
•
•
•
•
•
•
•
•
Please consult the outlet where the equipment was purchased.
Bitte wenden Sie sich an den Handler, bei dem Sie das Produkt gekaufthaben.
SVP veuillez consulter votre revendeur.
Neemt u alstublieft contact op met het verkooppuntwaar u de apparatuur heeft gekocht.
Por favor con suite en el establecimiento donde compr6 el equipo.
Vanligen ta kontakt med butiken dar du ktipt utrustningen.
Rivolgetevi al rivenditore che vi ha venduto "apparecchio.
Contacte a loja onde comprou 0 equipamento.
Australia
Austria
Belgium
Canada
Czech republic
Denmark
Finland
France
Germany
Greece
Hong Kong
Hungary
Iceland
India
Indonesia
Israel
Italy
Korea
Malaysia
Mexico
Netherlands
New Zealand
Norway
Philippines
Poland
Portugal
Singapore
Slovakia
South Africa
Spain
Sweden
Switzerland
Taiwan R.O.C.
Thailand
Turkey
U.A.E.
Ukraine
United
Kingdom & Eire
U.S.A.
Vietnam
Audio Products Group Pty Ltd. 67 O'Riordan Street Alexandria NSW 2015, PO Box 150, Mascot NSW 1460 Australia
Tel: 1300134400 Fax: +61 295780159
Digital-Professional-Audio Vertriebsges.m.b.H., Seebockgasse 59, A-1160 Wien Tel: 01-480-1006 Fax: 01-485-7679
Transtel-Sabima PVB.A. Duboisstraat 48, B-2060 Antwerpen, Belgium Tel: 03-237-3607
D&M CANADA INC. 5-505 Apple Creek Blvd .. Markham, Ontario, L3R 5B1 Tel: 905-475-4085 Fax: 905-475-4159
EUROSTAR OSTRAVA s.r.o. areal Vodni stavby Praha, budova A2 Dobronicka 635,14800 Praha 4 Czech Rep.
Tel: 261-112-901 Fax: 261-112-904
Hifi Klubben NS Dali Aile 1, 9610 Noerager, Denmark Tel: 45-96 72 1000 Fax: 45-96 72 10 14
Soundata Oy Hameentle 157 5th floor 00560 Helsinki Finland Tel +358-1019-47693300 Fax: +358-(019-47693310
DENON FRANCE A division of D&M France SASTourVentose, 2 rue des Bourets, 92156 Suresnes Cedex, France
Tel:+33(0)1-41-383230 Fax +331011-41-380110
DENON DEUTSCHLAND A division of D&M Germany GmbH An der Landwehr 19, D-41334 Nenetal, Germany
Tel: +49(012157-1208-0 Fax: +491012157-1208-10
KINOTECHNIKI LTD. 14, PYRGOU STR. 16675, GLYFADA ATHENS Tel: +302109601071 Fax: +302109601072
D&M Sales and Marketing IH.K.) Ltd. Unit 501, Ocean Centre, Harbour City, 5 Canton Road, Tsimshatsui, Kowloon, Hong Kong
Tel: 852-2516-5864 Fax: 852-2516-5940
A.I.DA Audio Kft. 1112 Budapest Olt u. 37 Hungary Tel: 01-248-2030 Fax: 01-248-2039
Einar Farestveit & co hI., Borgartun 28, PBox 5440, 125 Reykjavik. Tel: +3545207900 Fax: +3545207910
Pro FX Dynamic House. 64, Church Street, Bangalore-560 001, India Tel: +91-80-5768-6722 Fax: +91-80-2559-4298
PT Autoaccindo Jaya. Cideng Barat No.7 Jakarta, Indonesia Tel: +62-21-633-2730 Fax: +62-21-632-2886
Newpan Ltd. 14 Rosansky S1. Rishon Lezion 75706, Israel. Tel: +972-3-953-5900 Fax: +972-3-961-6193
Audiodelta S.r.1.19 Via Pietro Calvi 20129 Milano Italy Tel: 39-02-5411-6008 I 39-02-5412-8253 Fax: 39-02-5412-0258
D&M Sales and Marketing Korea Ltd. Chung Jin BID., 10F. 53-5, Wonhyoro 3 Ga, Yongsan-Gu, Seoul, 140-719, Korea
Tel: 02-715-9041 Fax: 02-715-9040
Wo Kee Hong Trading Sdn Bhd. 2nd Floor, (Left Wing), Bangunan Infinite Centre, Lot 1, Jalan 13/6,46200 Petaling Jaya,
Selangor Darul Ehsan, Malaysia Tel: 03-7954-8088 Fax: 03-7954-7088
Labrador, SA de CV Callelon del Naranjo 35, Naucalpan, 53560, Edo. Mex., Mexico Tel: 52-5359-5161 Fax: 52-5357-1775
Penhold BV Poppenbouwing 58, NL-4191 NZ Geldermalsen, Netherland Tel: 31-345-588 OBO Fax: 31-345-588085
Avalon Pacific Marketing Limited. 15c Vestey Drive, Mt Wellington, Auckland, New Zealand.
PO Box 11 631 Ellerslie, Auckland, New Zealand Tel: +64-9-573-5933 Fax: +64-9-573-3720
Hi-Fi Klubben Marcus Thranes gate 4-6,0473 Oslo, Norway Tel: +47 22 806310 Fax: +4722 80 63 29
Loneworld Audio Video Systems Incorporated CET Building Mezzannine Floor NO.4 Mindanao Avenue. Barangay
BahayToro, Project 8, Quezon City, Philippines. Tel: +632-929-5334 Fax: +632-929-1343
HORN DISTRIBUTION SA Ulica Kurantow 34, 02-873 Warszawa Poland Tel: +4822331 5533 Fax +4822331 5500
Videoacustica Qta. Do Paizinho-Armazem 5-Estrada De Circunvala<;ao-Apart. 31271303 Lisboa Codex
Tel: +351214241770 Fax: +351 214188093
ALL (E&EI Service Center Pte Ltd. Machtech Industrial Building, #06-04, No.2, Kallang Pudding Road, Singapore 349307
Tel: 6747-8274 Fax: 6748-9007
BIS AUDIO s.r.o. Dobronivska cesta 1642/696001 Zvolen Tel:045-5400 703 Fax:045-5400 704
Mandarin Distributors S.A. 10 Thora Crescent, Wynberg Ext.3 Sandton, PO.Box 5137, Johannesburg Republic of South
Africa Tel: 27-11-444-8445 Fax: 27-11-444-8363
Gaplasa S.A.AV Ing. Conde de Torroja, 25, 28022 Madrid Tel: 91-746-00-45 Fax: 91-329-44-57
Hi-Fi Klubben Goteborg Skanegatan 25, 41252 Goteborg Tel:031 3351010 Fax:031 3351019
KOENIG APPARATE AG, Abteilung Elektronik. Eggbuhlstrasse 28, CH-8052 Zurich. Switzerland
Tel 01-306-1626 Fax: 01-306-1690
KOLIN-DENON Entertainment INC. 5F-3, No. 14, Shiwei Street, Sanchung City, Taipei Hsien, 241 Taiwan, R.O.C.
Realise Tech-Service Co., Ltd. 2F. No. 14, Shiwei Street, Sanchung City, Taipei Hsien, 241 Taiwan, R.O.C.
Mahajak Development Co., Ltd. 46 Mahajak Building, Sukhumvit Soi 3 (Nana-Nua) Klongtoey, Waltana, Bangkok
Thailand. 10110 Tel: 66-2-256-0020 Fax: 66-2-253-1696
Ertekin electronik tic. ve san. a.s. Galipdede Caddesi No .. 113 Kuledibi-Karakoy I Istanbul, Turkey
Tel: +90(212)293-9515 Fax: +9012121249-3512
VV & SONS L.L.C. Street No-11/B, Road NO-128, Shed No-39 AI Khabisi, Deira, Dubai, UAE
Tel: +971-4-266-2435, 268-4575 Fax +971-4-266-2052
Mirs Ltd. Osipova str. 37/0ffice 1, 65012 Odessa, Ukraine
Tel: +380(482)305530 Fax: +38014821305555
DENON UK A division of D&M Audiovisual Ltd. Moorbridge House, Padbury Oaks, 579 Bath Road.
Longford, Middlesex, UB7 OEH, United Kingdom Tel: +441011753-680568 Fax +44(0)1753-689697
DENON ELECTRONICS IUSAI, LLC la D&M Holdings Companyl
100 Corporate Drive, Mahwah. NJ 07430-2041 Tel: 800-497-8921 Fax: 888-544-8434
Anh Duy Manufacturing - Trading Co, Ltd. 170 Ung Van Kheim St., Ward 25, Blinh Thanh Dist., HCMC, Vietnam
Tel: +8488983424 Fax: +84 8 898 3425
If there IS no service center in your local area, please contact one of our overseas service centers, listed above. for follow-up service consultation.
1st kein Servlce·Center In Ihrer Nahe. selzen Sie sich bine mitelnem der hler aufgelisteten Adressen in Verbindung.
Si il n'v a pas destation technique proche de chez VOUS, veUlUez contacter nos r un de noscentres tedmiques. listes ci dessous. pour tautes demandes ted'lnlques
Als er geen servlcecenter bij uln de buurt is. neem dan contact op een een van onze bovengenoemdeservicecenters voor ondersteuning.
Si no hay un servicio tecnlCO en su zona, por favor contacte con uno de los serviclos H~cnicos centrales, Indicados abajo, para realizar un seguimlento de su consult
Om det inte fjnns nagon auktoriserad Denon·verkstad dar du bar, kontakta en av vMa internationella servicecentra (se ovan)
Se non ci sono dei centri assistenza autorizzati nella vostra zona, potete fare riferimento agli altri centri assistenza autorizzati, vedi elenco sopra. per qualslasi
consultazione tecnica
Caso nao exist a um centro de assistE'mcla tecnica na sua area, consulte urn dos centros acima apresentados
T 104-0033
~5l:3BqJ~~iiJ 111-21-2
¥fill!Jll?- 14F
TEL:
045-670-5555
[.~.~IUSlllllljlO)t.Wj;
~1-g8~rsJ
9. 30
~
?1::as1.l'l1 <t;;t!t \oJ
12 • 00, 12. 45 - 17 • 30
(~:tHfEJiJ)~UtnEH:Il#-<,
o~~~ ·1~J.~· -+j--I:::'/Zgj3BEicJLn-O)iI)F,,~L)~.bi±7t
,Ej~~B1iEJ)
(-+j--I:::'/Zt/
J;J-) C-:>L)T(ct ~j(0) URL T·:t'::£i§;2T'~*~o
http://denon.jp/info/info02.html
~8 a:>t.:/lt.> 1:~2A L., T
c!'3L) T
< to::. ~ L'0
.~~(
F.I
)
B
DENON
TOKYO, JAPAN
www.denon.com
Denon Brand Company, D&M Holdings Inc.
Printed in China OOD 511 4681 006
RC-7000CI Editor
DENON
for Windows@ XP
Version 1.1.0.39
0003991122007
Printed in Hong Kong
Copyright © 2007 O&M Holdings Inc.
r£lCOMPACT
L!!JO~ffiJ