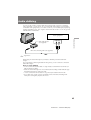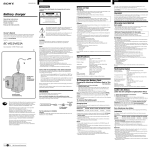
1
3-858-632-12 (1)
Digital Video
Camera Recorder
Operating Instructions
Before operating the unit, please read this manual thoroughly,
and retain it for future reference.
DCR-PC7E
©1996 by Sony Corporation
DCR-PC7E
3-858-632-12E (E32)
WARNING
To prevent fire or shock hazard, do not expose the unit to rain or
moisture.
To avoid electrical shock, do not open the cabinet. Refer servicing to qualified
personnel only.
2
DCR-PC7E
3-858-632-12E (E32)
Table of contents
—for playing back/editing—
Before you begin
Getting started
Charging and installing the battery
pack ................................................... 6
Inserting a cassette ................................. 9
Basic operations
Camera recording ................................
Using the zoom feature ................
Shooting with the LCD screen .....
Hints for better shooting .....................
Playing back a tape ..............................
Searching for the end of the picture ..
10
12
13
15
17
19
Advanced operations
Using alternative power sources ....... 20
Using the mains ............................. 20
Changing the mode settings ............... 22
—for camera recording—
Letting the subject monitor the shot ..
Shooting scenery in several short
takes .................................................
Fade-in and fade-out ...........................
Photo recording ....................................
Using the wide mode function ...........
Releasing the SteadyShot function ....
Using the PROGRAM AE function ...
Ajusting the white balance .................
Focusing manually ...............................
Locking the exposure ..........................
Watching on a TV screen .................... 38
Displaying the recording data – data
code function .................................. 39
Returning to a pre-registered
position ........................................... 40
Locating the beginning of each scene 41
Editing onto another tape ................... 42
Replacing recording on a tape – insert
editing ............................................. 44
Audio dubbing ..................................... 45
Before you begin
Using this manual .................................. 4
Checking supplied accessories ............. 5
Additional Information
Charging the vanadium-lithium battery
in the camcorder ............................. 47
Resetting the date and time ................ 48
Usable cassettes and playback modes 49
Tips for using the battery pack .......... 51
Maintenance information and
precautions .................................... 54
Using your camcorder abroad ........... 56
Trouble check ....................................... 57
Specifications ........................................ 61
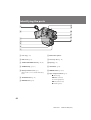
Identifying the parts ............................ 62
Warning indicators ............................. 71
Index ....................................... Back cover
25
26
27
28
30
31
32
34
36
37
3
DCR-PC7E
3-858-632-12E (E32)
Before you begin
Using this manual
Welcome !
Congratulations on your purchase of this Sony Handycam VisionΤΜ camcorder. With your
Handycam Vision, you can capture life’s precious moments with superior picture and
sound quality. Your Handycam Vision is loaded with advanced features, but at the same
time it is very easy to use. You will soon be producing home video that you can enjoy for
years to come.
As you read through this manual, buttons and settings on the camcorder are shown in
capital letters.
e.g., Set the POWER switch to CAMERA.
As indicated with
in the illustrations, you can hear the beep sound to confirm your
operation.
Note on TV colour systems
TV colour systems differ from country to country. To view your recordings on a TV,
you need an PAL system-based TV.
Precaution on copyright
Television programmes, films, video tapes, and other materials may be copyrighted.
Unauthorized recording of such materials may be contrary to the provision of the
copyright laws.
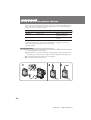
Precautions on camcorder care
• Do not let sand get into the camcorder. When you use the camcorder on a sandy
beach or in a dusty place, protect it from the sand or dust. Sand or dust may
cause the unit to malfunction, and sometimes this malfunction cannot be
repaired [a].
• Do not let the camcorder get wet. Keep the camcorder away from rain and sea
water. Letting the camcorder get wet may cause the unit to malfunction, and
sometimes this malfunction cannot be repaired [b].
• Never leave the camcorder exposed to temperatures above 60°C (140°F), such as
in a car parked in the sun or under direct sunlight [c].
[a]
[b]
[c]
4
DCR-PC7E
3-858-632-12E (E32)
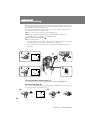
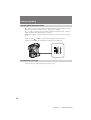
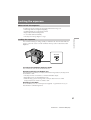
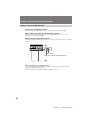
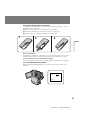
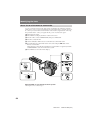
Checking supplied accessories
Check that the following accessories are supplied with your camcorder.
1
2
3
4
Before you begin
5
6
1 Wireless Remote Commander (1)
(p. 66)
2 NP-F100 battery pack (1) (p. 6)
3 AC-V100 AC power adaptor (1)
(p.6, 20)
The shape of the plug varies from
region to region.
7
8
5 S video connecting cable (1) (p. 38, 42)
6 A/V connecting cable (1) (p. 38, 42)
7 DK-626 connecting cord (1) (p. 20)
8 Battery terminal cover (1) (p. 8)
4 R6 (size AA) battery for Remote
Commander (2) (p. 67)
Note on the colour viewfinder and the LCD screen
The colour viewfinder and the LCD screen are made with high-precision technology.
However, black points or bright points of light (red, blue, or green) may appear
constantly on the colour viewfinder or the LCD screen. These points are not recorded
on the tape. This is not a malfunction. (Effective dots: more than 99.99%)
Contents of the recording cannot be compensated if recording or playback is not
made due to a malfunction of the camcorder, video tape, etc.
5
DCR-PC7E
3-858-632-12E (E32)
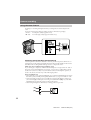
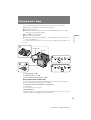
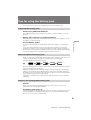
Getting started
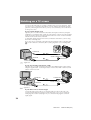
Charging and installing the battery pack
Before using your camcorder, you first need to charge and install the battery pack. To
charge the battery pack, use the supplied AC power adaptor.
This camcorder operates with the NP-F100/NP-F200 “InfoLITHIUM” battery pack.
“InfoLITHIUM” is a trademark of Sony Corporation.
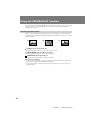
Charging the battery pack
(1) Connect the mains lead to the AC power adaptor.
(2) Align the hooks of the battery pack with the AC power adaptor. Then fit the
battery pack in the direction of the arrow.
(3) Connect the AC power cord to mains. The CHARGE lamp (orange) lights up.
Charging begins.
When the CHARGE lamp goes out, normal charge is completed (Normal charge). For a
full charge, which allows you to use the battery longer than usual, leave the battery
pack in place for approximately one hour (Full charge). Unplug the cord from the
mains, then remove the battery pack and install it into the camcorder. You can also use
the battery pack before it is completely charged.
1
3
2
CHARGE
Charging time
Battery pack
Charging time *
NP-F100 (supplied)
130 (70)
NP-F200
170 (110)
Numbers in parentheses indicate the time for a normal charge. (Normal charge)
* Approximate number of minutes to charge an empty battery pack fully using the
supplied AC power adaptor. (Full charge) (Lower temperatures require a longer
charging time.)
6
DCR-PC7E
3-858-632-12E (E32)
Battery life
While using with viewfinder
Continuous recording time **
Typical recording time ***
NP-F100
(supplied)
55 (45)
30 (25)
NP-F200
100 (85)
50 (45)
Getting started
Battery pack`
While using with LCD
Battery
pack
Continuous recording
time **
Typical recording
time ***
Playing time
with LCD
NP-F100
(supplied)
45 (40)
25 (20)
50 (45)
NP-F200
75 (70)
40 (35)
90 (80)
Numbers in parentheses indicate the time when you use a normal charged battery pack.
When using both the viewfinder and the LCD screen, the battery life is shorter.
When recording in a cold environment, the battery life is shorter.
** Approximate number of minutes to record at normal temperature
*** Approximate number of minutes when recording with repeated recording start/
stop, standby, zooming and turning the power on/off. The actual battery life may
be shorter.
Note on remaining battery time indication during recording
Remaining battery time is displayed on the LCD screen or in the viewfinder. It may not
be displayed properly, however, depending on the conditions and circumstances of use.
To remove the battery pack
While holding the battery pack firmly, press the
button on the AC power adpator and take out the
battery pack in the direction of the arrow.
When removing the battery pack
Be careful not to drop it.
Notes on charging the battery pack
• The CHARGE lamp will remain lit for a while even if the battery pack is removed
and the power cord is unplugged after charging the battery pack. This is normal.
• If the CHARGE lamp does not light, disconnect the power cord. After about one
minute, reconnect the power cord again.
• You cannot charge the battery pack while operating the camcorder using the AC
power adaptor.
• When a fully charged battery pack is installed, the CHARGE lamp will light once,
then go out.
DCR-PC7E
3-858-632-12E (E32)
7
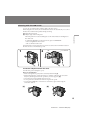
Charging and installing the battery pack
Installing the battery pack
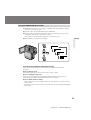
(1) Set the BATT LOCK/RELEASE switch to RELEASE.
(2) Remove the battery terminal cover.
(3) Align the hooks of the battery pack with the catches of the camcorder and
place the battery pack in place.
(4) Set the BATT LOCK/RELEASE switch to LOCK.
1
2
3
LOCK
RELEASE
LOCK
RELEASE
4
To remove the battery pack
Follow the procedure above and in step 3, remove the battery pack. When removing the
battery pack, be careful not to drop it.
Note on battery terminal cover
To protect the battery terminals, install the battery terminal cover after the battery pack
is removed.
Note on BATT LOCK/RELEASE switch
Be sure that the BATT LOCK/RELEASE switch is set to LOCK when the battery pack is
installed. Otherwise, it may drop out when you use the camcorder.
To prevent malfunction
In the following cases, make sure that the POWER switch is set to OFF first.
• Installing and removing the battery pack.
• Inserting and ejecting a cassette.
8
DCR-PC7E
3-858-632-12E (E32)
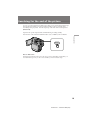
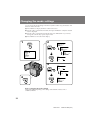
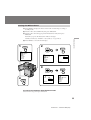
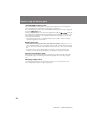
Inserting a cassette
You can use mini DV cassette with
logo* only.
Make sure that the power source is installed.
(3) Insert a cassette with the window facing out.
(4) Push the cassette compartment. The cassette compartment is automatically
pulled down.
Getting started
(1) Place the grip strap away from the lid of the cassette compartment to avoid
damaging the lid.
(2) Open the lid of the cassette compartment and push 6 EJECT inside the lid.
The cassette compartment automatically lifts up and opens.
(5) Close the lid until it clicks.
*
is a trademark.
1, 2 6EJECT
3
1
4, 5
4
3
5
2
Note
Before you close the lid of the cassette compartment, make sure the cassette
compartment is completely pulled down.
To eject the cassette
Follow the procedure above and in step 3, take out the cassette.
To Prevent Accidental Erasure
Slide and open the tab on the cassette to expose the red mark. If you try to record with
the red mark exposed, the L and 6 indicators flash on the LCD screen or in the
viewfinder, and you cannot record on the tape. To re-record on this tape, slide and
close the tab to cover the red mark.
9
DCR-PC7E
3-858-632-12E (E32)
Basic operations
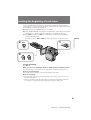
Camera recording
Make sure that the power source is installed and a cassette is inserted. When you use
the camcorder for the first time, turn it on and reset the date and time to your local date
and time before you start recording (p. 48).
Before you record one-time events, you may want to make a trial recording to make
sure that the camcorder is working correctly.
(1) Remove the lens cap and hook it onto the grip strap.
(2) While pressing the small green button on the POWER switch, set it to
CAMERA. The camcorder is set to Standby mode.
(3) Slide START/STOP MODE to
(4) Press START/STOP.
.
The camcorder starts recording. “REC” appears in the viewfinder. The camera
recording lamp on the front of the camcorder also lights up.
Do not press START/STOP strongly; if you do, the switching tone will be
recorded.
2
POWER
VTR
OFF
CAMERA
PHOTO
POWER
VTR
OFF
PHOTO
3
REC
0:00:00
60min
5
SEC
CAMERA
20min
20min
START/STOP MODE
4
1
STBY
0:00:00
60min
To stop recording momentarily [a]
Press START/STOP. The “STBY” appears in the viewfinder (Standby mode).
To finish recording [b]
Press START/STOP again to stop recording. Set the POWER switch to OFF. Then, eject
the cassette and remove the battery pack.
[a]
[b]
POWER
VTR
OFF
CAMERA
STBY
0:35:20
25min
POWER
CAMERA
PHOTO
POWER
VTR
OFF
VTR
OFF
CAMERA
PHOTO
PHOTO
20min
10
DCR-PC7E
3-858-632-12E (E32)
To focus the viewfinder lens
If you cannot see the indicators in the viewfinder clearly, or after someone else has used
the camcorder, focus the viewfinder lens. Turn the viewfinder lens adjustment dial so
that the indicators in the viewfinder come into sharp focus.
Basic operations
Note on Standby mode
If you leave the camcorder in Standby mode for 5 minutes while the cassette is inserted,
the camcorder turns off automatically. This prevents wearing down the battery and
wearing out the tape. To resume Standby mode, while pressing the small green button
on the POWER switch, set it to OFF once, and then to CAMERA. To start recording,
press START/STOP.
Note on recording mode
This camcorder records and plays back in SP (standard play) mode and in LP (long
play) mode. Select SP or LP in the menu system.
Notes on LP mode
• We recommend to use this camcorder to play back a tape recorded on this camcorder.
If a tape recorded on other camcorder is played back on this camcorder, or vice versa,
mosaic-pattern noise may appear.
• When you record in SP and LP modes on one tape or you record some scenes in LP
mode, the playback picture may be distorted or the time code may not be written
properly between scenes.
• We recommend to use a Sony ME cassette.
• You cannot make audio dubbing on a tape recorded in LP mode. Use the SP mode
for the tape to be audio dubbed.
Notes on the time code
• The time code indicates the recording or playback time, "0:00:00" (hours : minutes :
seconds) in CAMERA mode and "0:00:00:00" (hours : minutes : seconds : frames) in
VTR mode.
• Be sure not make a blank portion when recording, because the time code will start
from “0:00:00:00” again. You cannot rewrite the time code on the tape if there is a
blank portion between pictures.
Note on connecting an external microphone
You can record audio sound by connecting the VMC-LM7 adaptor (not supplied) and
an external microphone. Connect the microphone to the MIC jack of the VMC-LM7
adaptor. While recording through an external microphone, the built-in microphone of
the camcorder does not work.
Note on the beep sound
As indicated with
in the illustrations, a beep sounds when you turn the power on or
when you start recording, and two beeps sound when you stop recording, confirming
the operation. Several beeps also sound as a warning of any unusual condition of the
camcorder.
Note that the beep sound is not recorded on the tape. If you do not want to hear the
beep sound, select “OFF” in the menu system.
Note on remaining tape indicator
The indicator may not be displayed accurately depending on the tape. Though the
indicator does not appear at the time of recording, it will appear in a few seconds.
DCR-PC7E
3-858-632-12E (E32)
11
Camera recording
Using the zoom feature
Zooming is a recording technique that lets you change the size of the subject in the
scene.
For more professional-looking recordings, use the zoom function sparingly.
“T” side:
for telephoto (subject appears closer)
“W” side:
for wide-angle (subject appears farther away)
T
T
W
ZOOM
T
W
W
Zooming speed (Variable speed zooming)
Press the power zoom switch a little for a relatively slow zoom; press it still more for a
high-speed zoom. Zooming speed while the camcorder is in the Standby mode is faster
than that in the recording mode making it easier to compose the scene.
When you shoot a subject using a telephoto zoom
If you cannot get a sharp focus while in extreme telephoto zoom, press the “W” side of
the power zoom switch until the focus is sharp. You can shoot a subject that is at least
about 80 cm (about 2 5/8 feet) away from the lens surface in the telephoto position, or
about 1 cm (about 1/2 inch) away in the wide-angle position.
Notes on digital zoom
• More than 10x zoom is performed digitally, if you set the D ZOOM function to ON in
the menu system, and the picture quality deteriorates as you go toward the “T” side.
• The horizontal bar in the power zoom indicator separates the digital zooming zone
(above the bar [a]) and the optical zooming zone (under the bar [b]). If you set the D
ZOOM function to OFF, the part above the bar disappears.
• When using the digital zoom function, zooming power is up to 120x.
[a]
T
T
[b]
W
W
12
DCR-PC7E
3-858-632-12E (E32)
Shooting with the LCD screen
You can also record the picture while looking at the LCD screen.
When using the LCD screen, the viewfinder screen turns off automatically. You cannot
monitor the sound from the speaker during recording.
(1) Open the LCD panel.
To adjust the brightness of the LCD screen, press LCD BRIGHT.
+ side: to brighten the LCD screen
Basic operations
(2) Adjust angle of the LCD panel
The LCD panel moves about 90 degrees to this side and about 180 degrees to
the other side.
– side: to dim the LCD screen
The battery life is longer when the LCD panel is closed. Use the viewfinder instead of
the LCD screen to save the battery power.
1
2
LCD BRIGHT
180˚
90˚
To let the subject monitor the shot
Turn the LCD panel 180 degrees (p. 25).
Notes on the LCD panel
• When closing the LCD panel, turn it vertically until it clicks [a].
• When turning the LCD panel, turn it always vertically; otherwise, the camcorder
body may be damaged or the LCD panel may not close properly [b].
• Close the LCD panel completely when not in use.
• Do not push nor touch the LCD when moving the LCD panel.
• You may find it difficult to view the LCD screen due to glare when using the
camcorder outdoors.
[a]
[b]
13
DCR-PC7E
3-858-632-12E (E32)
Camera recording
Selecting the start/stop mode
: When you press START/STOP, the camcorder starts recording. When you press
the button again, the camcorder stops recording. (factory setting)
: As long as you keep pressing START/STOP, the camcorder records. When you
release the button, the camcorder stops recording.
5SEC: When you press START/STOP, the camcorder records for 5 seconds and stops.
(p. 26)
When you select or 5SEC, you cannot use the fade-in/fade-out function.
When you select 5SEC, the remaining tape indicator is not displayed.
START/STOP MODE
5
SEC
To attach an accessory
Attach an accessory (not supplied) to the accessory shoe.
14
DCR-PC7E
3-858-632-12E (E32)
Hints for better shooting
For hand-held shots, you will get better results by holding the camcorder according to
the following suggestions:
• Hold the camcorder firmly and secure it with the grip strap so that you can easily
manipulate the controls with your thumb. [a]
[a]
Basic operations
1
2
3
•
•
•
•
•
•
•
•
Place your elbows against your side.
Hold the camcorder with your left hand to keep it steadier.
Adjust the LCD panel angle.
Keep your fingers away from the lens.
Place your eye firmly against the viewfinder eyecup.
Be sure not to touch the built-in microphone.
Be sure not to touch the FOCUS button by accident.
Use the LCD panel frame or the viewfinder frame as a guide to determine the
horizontal plane.
• You can record in a low position to get an interesting recording angle. Lift the LCD
panel up to record from a low position. [b]
• You can also record in a high position. Lift the LCD panel down to record from a
high position. [c]
[b]
[c]
Place the camcorder on a flat surface or use a tripod
Try placing the camcorder on a table top or any other flat surface of suitable height. If
you have a tripod for a still camera, you can also use it with the camcorder. When
attaching a non-Sony tripod, make sure that the length of the tripod screw is less than
6.5 mm (9/32 inches). Otherwise, the screw may damage the inner parts of the
camcorder.
15
DCR-PC7E
3-858-632-12E (E32)
Hints for better shooting
If you wear glasses
You can bend back the eyecup to get a better view of viewfinder [d].
Cautions on the LCD panel and on the viewfinder
• Do not pick up the camcorder by the viewfinder or the LCD panel [e].
• Do not place the camcorder so as to point the viewfinder or the LCD panel toward
the sun. The inside of the viewfinder or the LCD panel may be damaged. Be careful
when placing the camcorder under sunlight or by a window [f].
• Do not point the lens toward the sun with a close-up lens attached. Doing so may
damage the camcorder.
[d]
[e]
[f]
16
DCR-PC7E
3-858-632-12E (E32)
Playing back a tape
You can monitor the playback picture on the LCD screen or in the viewfinder.
(1) Insert the recorded tape with the window facing out.
(2) Open the LCD panel.
(3) While pressing the small green button on the POWER switch, set it to VTR.
The tape transport buttons light up.
(4) Press 0 to rewind the tape.
You can also monitor the picture on a TV screen, after connecting the camcorder to a TV
or VCR.
1
Basic operations
(5) Press · to start playback.
(6) Adjust the volume using VOLUME +/– and the brightness of the LCD screen
using LCD BRIGHT +/–.
LCD BRIGHT
VOLUME
STOP
REW
PLAY
FF
PAUSE
5
STOP
REW
PLAY
FF
PAUSE
2
3
POWER
VTR
OFF
CAMERA
4
PHOTO
To stop playback, press p.
To rewind the tape, press 0.
To fast-forward the tape rapidly, press ).
Using the Remote Commander
You can control playback using the supplied Remote Commander. Before using the
Remote Commander, insert the R6 (size AA) batteries .
To display the LCD screen/viewfinder screen indicators
Press DISPLAY.
To erase the indicators, press again.
Using headphones
Connect headphones (not supplied) to the AUDIO VIDEO OUT/2 jack (p. 64). You can
adjust the volume of the headphones using VOLUME +/–.
17
DCR-PC7E
3-858-632-12E (E32)
Playing back a tape
To view the playback picture in the viewfinder
Close the LCD panel. The viewfinder turns on automatically.
When using the viewfinder, you can monitor the sound only by using headphones.
To view on the LCD screen again, open the LCD panel. The viewfinder turns off
automatically.
Various playback modes
To view a still picture (playback pause)
Press P during playback. To resume playback, press P or ·.
To locate a scene (picture search)
Keep pressing 0 or ) during playback. To resume normal playback, release the
button.
To monitor the high-speed picture while advancing the tape or
rewinding (skip scan)
Keep pressing 0 while rewinding or ) while advancing the tape. To resume
normal rewinding or fast-forward, release the button.
To view the picture at 1/3 speed (slow playback)
Press & on the Remote Commander during playback. For slow playback in reverse
direction, press <, then press &. To resume normal playback, press ·.
To view the picture at double speed
For double speed playback in the reverse direction, press <, then press ×2 on the
Remote Commander during playback. For double speed playback in the forward
direction, press >, then press ×2 during playback. To resume normal playback, press
·.
To view the picture frame-by-frame
Press ' or 7 on the Remote Commander in playback pause mode. If you keep
pressing the button, you can view the picture at 1/25 speed. To resume normal
playback, press ·.
To change the playback direction
Press < on the Remote Commander for reverse direction or > on the Remote
Commander for forward direction during playback. To resume normal playback, press
·.
Notes on playback
• The sound is muted in the various playback modes.
• During playback other than normal playback, the previous recording may appear in
mosaic image. This is not malfunction.
• When playback pause mode lasts for 5 minutes, the camcorder automatically enters
stop mode. To resume playback, press ·.
Note on slow playback
The slow playback can be performed smoothly on this camcorder; however, this
function does not work for an output signal from the DV IN/OUT jack.
18
DCR-PC7E
3-858-632-12E (E32)
Searching for the end of the picture
You can go to the end of the recorded portion after you record and play back the tape.
The tape starts rewinding or fast-forwarding and the last about 5 seconds of the
recorded portion plays back. Then the tape stops at the end of the recorded picture
(End Search).
Open the LCD panel and press END SEARCH during recording standby.
This function works when the POWER switch is set to CAMERA, VTR or PHOTO.
Basic operations
ENDSEARCH
Note on End Search
The End Search function does not work once you have ejected the cassette after you
recorded in the tape or if you do not record after you have inserted a tape.
19
DCR-PC7E
3-858-632-12E (E32)
Advanced operations
Using alternative power sources
You can choose any of the following power sources for your camcorder: battery pack,
mains, and 12/24 V car battery. Choose the appropriate power source depending on
where you want to use your camcorder.
Place
Power source
Accessory to be used
Indoors
Mains
Supplied AC power adaptor
Outdoors
Battery pack
Battery pack NP-F100
(supplied), NP-F200
In the car
12 V or 24 V car battery
Sony car battery charger
DC-V515
Note on power sources
Disconnecting the power source or removing the battery pack during recording or
playback may damage the inserted tape. If this happens, restore the power supply
again immediately.
Using the mains
To use the supplied AC power adaptor:
(1) Open the jack cover and connect the connecting plug on the camcorder to the
DC OUT jack on the AC power adaptor using the supplied connecting cord.
(2) Connect the mains lead to the AC power adaptor.
(3) Connect the mains lead to mains.
1
2
3
20
DCR-PC7E
3-858-632-12E (E32)
Charging the battery pack
You can charge the battery pack installed in the camcorder by connecting the AC power
adaptor to the camcorder and setting the POWER switch to OFF. The CHARGE lamp
lights up, and goes out when normal charge is completed. For a full charge, leave the
battery pack in place for approximately one hour. Charging time of the supplied NPF100 battery pack is as follows:
Full charge: approx. 2 hours and 30 minutes
Normal charge: approx. 1 hours and 30 minutes
Advanced operations
Charging two battery packs at the same time
Install one battery pack in the camcorder and another one on the AC power adaptor.
The CHARGE lamps on the camcorder and on the AC power adaptor light up, and go
out when normal charge is completed. For a full charge, leave the battery pack in place
for approximately one hour. If either of the CHARGE lamps remains lit, charging both
battery packs is not completed. Time taken to charge two NP-F100 battery packs
simultaneously is as follows:
Full charge: approx. 2 hours and 40 minutes
Normal charge: approx. 1 hours and 40 minutes
Notes on the CHARGE lamp
• The CHARGE lamp will remain lit for a while even if the unit is unplugged after use.
This is normal.
• If the CHARGE lamp does not light, disconnect the AC power adaptor. After about
one minute, reconnect the AC power adaptor.
To remove the connecting cord
While pressing the button on the connecting plug, pull out the connecting cord. Never
pull the connecting cord itself.
When you use the AC power with the connecting cord, the battery pack installed in the
camcorder is not used because the AC power has priority over the battery pack.
WARNING
The mains lead must only be changed at a qualified service shop.
PRECAUTION
The set is not disconnected from the AC power source (mains) as long as it is connected
to the wall outlet, even if the set itself has been turned off.
Using a car battery
Use a car battery charger such as Sony DC-V515 (not supplied). Connect the car battery
cord to the cigarette lighter socket of a car (12 V or 24 V). Connect the car battery
charger and the camcorder using the supplied DK-626 connecting cord.
Note on the battery pack
You cannot charge the battery pack (NP-F100, NP-F200) using the car battery charger
DC-V515.
This mark indicates that this product is a genuine accessory for Sony
video product.
When purchasing Sony video products, Sony recommends that you
purchase accessories with this “GENUINE VIDEO ACCESSORIES”
mark.
21
DCR-PC7E
3-858-632-12E (E32)
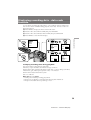
Changing the mode settings
You can change the mode settings in the menu system to further enjoy the features and
functions of the camcorder.
(1) Press MENU to display the menu on the LCD screen.
(2) Press v or V to select the desired item, then press EXECUTE. Only the selected
item is displayed.
(3) Press v or V to select the desired mode, then press EXECUTE. If you want to
change the other modes, repeat steps 2 and 3.
(4) Press MENU to erase the menu display.
1
MENU
2
MENU
PGM AE
WHT BAL
D ZOOM
AUTO
MENU
PGM AE
WHT BAL
D ZOOM
MENU
PGM AE
WHT BAL
D ZOOM
16:9 WIDE
S SHOT
COMMANDER
REC MODE
[MENU]:END
AUTO
MENU
PGM AE
WHT BAL
D ZOOM
AUTO
EXECUTE
ON
MENU
D ZOOM
ON
OFF
3
MENU
D ZOOM
ON
OFF
MENU
D ZOOM
4
MENU
EXECUTE
MENU
PGM AE
WHT BAL
D ZOOM
ON
OFF
OFF
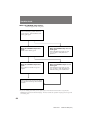
Note on changing the mode settings
Menu items differs depending on the setting of the POWER switch to VTR or
CAMERA/PHOTO.
22
DCR-PC7E
3-858-632-12E (E32)
Selecting the mode setting of each item
Items for both CAMERA/PHOTO and VTR modes
COMMANDER <VTR4/OFF/ID/ID SET>
• Select VTR4 when using the supplied Remote Commander for the camcorder.
• Select OFF when not using the Remote Commander.
• Select ID when using the Remote Commander set to the ID number.
• Select ID SET when setting the ID number to the Remote Commander.
BEEP <ON/OFF>
• Select ON so that beeps sound when you start/stop recording, etc.
• Select OFF when you do not want to hear the beep sound.
Advanced operations
REC MODE <SP/LP>
• Select SP when recording in SP (standard play) mode.
• Select LP when recording in LP (long play) mode.
LCD COLOUR
Select this item and change the level of the indicator by pressing + or – to adjust the
colour intensity of the picture.
Items for CAMERA/PHOTO mode only
PGM AE* <AUTO/SPORTS/SUNSETMOON/LANDSCAPE>
• Select AUTO to set PROGRAM AE (Auto Exposure) automatically depending on
your shooting situation.
• Select SPORTS to set PROGRAM AE to the sports lesson mode.
• Select SUNSETMOON to set PROGRAM AE to the sunset and moon mode.
• Select LANDSCAPE to PROGRAM AE to the landscape mode.
WHT BAL* <AUTO/HOLD/OUTDOOR/INDOOR>
• Normally select AUTO to adjust the white balance automatically.
• Select HOLD when recording monochromatic subject or background.
• Select OUTDOOR when recording in the outdoor mode.
• Select INDOOR when recording in the indoor mode.
D ZOOM <OFF/ON>
• Select OFF not to use the digital zoom.
• Select ON to activate digital zooming. More than 10x zoom is performed digitally.
16:9 WIDE <OFF/ON>
• Normally select OFF.
• Select ON to record a 16:9 wide picture to watch on a wide-screen TV.
S SHOT <ON/OFF>
• Normally select ON.
• Select OFF when you do not have to worry about camera-shake.
REC LAMP <ON/OFF>
• Normally select ON.
• Select OFF when you do not want the camera recording/battery lamp at the front of
the unit to light up.
CLOCK SET
Select this item to reset the date or time.
23
DCR-PC7E
3-858-632-12E (E32)
Changing the mode settings
Items for VTR mode only
AUDIO MIX*
Select this item and adjust the balance between the stereo 1 and stereo 2 by pressing
v or V.
DATA CODE <DATE/CAM or DATE>
• Select DATE/CAM to display date and recording data during playback.
• Select DATE to display date during playback.
* These settings are retained even when the battery is removed, as long as the
vanadium-lithium battery is charged. As far as the items without an asterisk are
concerned, their settings return to the default 5 minutes or more after the battery is
removed.
When recording a close subject
When REC LAMP is set to ON, the red camera recording lamp on the front of the
camcorder may reflect on the subject if it is close. In this case, we recommend you set
REC LAMP to OFF.
Note
When playing back a tape recorded in the 16-bit mode, you cannot adjust the balance in
AUDIO MIX.
24
DCR-PC7E
3-858-632-12E (E32)
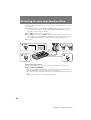
Letting the subject monitor the shot
You can turn the LCD panel over so that it faces the other way and you can let the
subject monitor the shot while shooting with the viewfinder.
Turn the LCD panel up vertically. When you turn the LCD panel 180 degrees, the
indicator appears on the LCD screen (mirror mode) and the time code and remaining
tape indicators disappear.
You can also use the Remote Commander.
Advanced operations
To cancel mirror mode
Turn the LCD panel down toward the camcorder body.
Notes on mirror mode
• Using the mirror mode, you can record yourself while watching yourself on the LCD
screen.
• The picture on the LCD screen appears as a mirror-image while recording in mirror
mode. Pr appears in Standby mode, and r during recording. Other indicators
appear as mirror-image. Some indicators do not appear.
• While recording in mirror mode, you cannot operate the following functions: MENU,
ZERO SET MEMORY on the Remote Commander.
25
DCR-PC7E
3-858-632-12E (E32)
Shooting scenery in several short takes
Long, continuous shots of scenery tend to be dull, and have to be edited to make an
interesting video. With 5SEC. REC (5-second recording) mode, the camcorder records
for only 5 seconds and then switches to Standby mode, so that you will automatically
take a series of quick shots resulting in a lively video.
(1) Set START/STOP MODE to 5SEC. Five dots appear on the LCD screen or in
the viewfinder.
(2) Press START/STOP. Recording starts.
The dots disappear at a rate of one per second. When 5 seconds elapse and all the dots
disappear, the camcorder switches to Standby mode automatically.
5
SEC
2
POWER
VTR
OFF
CAMERA
START/STOP MODE
1
REC
0:00:00
REC
0:00:04
PHOTO
To extend the recording time
Press START/STOP again before all the dots disappear. Recording continues for 5
seconds from the moment you press START/STOP.
To cancel 5-second recording
Set START/STOP MODE to
continues.
. If you set the switch while recording, recording
Note on 5-second recording
You cannot use FADER function during 5-second recording.
26
DCR-PC7E
3-858-632-12E (E32)
Fade-in and fade-out
You can fade in or out to give your recording a professional appearance.
When fading in, the picture gradually fades in from black while the sound increases.
When fading out, the picture gradually fades to black while the sound decreases.
When fading in [a]
(1) While the camcorder is in Standby mode, press FADER. The fade indicator
starts flashing.
(2) Press START/STOP to start recording. The fade indicator stops flashing.
(1) During recording, press FADER. The fade indicator starts flashing.
(2) Press START/STOP to stop recording. The fade indicator stops flashing, and
then recording stops.
[a]
STBY
REC
STBY
REC
Advanced operations
When fading out [b]
FADER
1
[b]
2
FADER
POWER
FADER
VTR
OFF
CAMERA
PHOTO
To cancel the fade-in/fade-out function
Before pressing START/STOP, press FADER until the fade indicator disappears.
When the START/STOP MODE control is set to
You cannot use the fade-in/fade-out function.
or 5SEC
27
DCR-PC7E
3-858-632-12E (E32)
Photo recording
You can record a still picture like a photograph for about seven seconds. This mode is
useful when you want to enjoy a picture such as a photograph or when you print a
picture using a video printer (not supplied). You can record about 510 pictures on a 60minute tape.
Shutter speed is automatically adjusted up to 1/1000 depending on the exposure.
(1) While pressing the small green button on the POWER switch, set it to PHOTO.
(2) Keep pressing START/STOP lightly until a still picture and “PHOTO
CAPTURE” appear on the LCD screen or in the viewfinder.
Recording does not start yet. To change the still picture, release START/STOP,
select still picture again, and keep pressing START/STOP lightly again.
If you press the PHOTO button on the Remote Commander when a still
picture appears on the LCD screen or in the viewfinder, the camcorder will
record that still picture. However, you cannot select other still pictures by
using this button.
(3) Press START/STOP deeper.
“PHOTO REC” flashes and the still picture on the LCD screen or in the
viewfinder is recorded for about seven seconds. The sound during those seven
seconds is also recorded and the pictures appear like an animation on the LCD
screen or in the viewfinder. You cannot change the POWER switch or press
START/STOP during recording.
1,2,3
POWER
VTR
OFF
CAMERA
PHOTO
Note on the still picture
When the still picture recorded on this camocorder is played back on the other VCR, the
picture may be blurred. This is not malfunction.
28
DCR-PC7E
3-858-632-12E (E32)
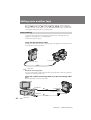
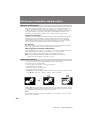
Printing the still picture
You can print a still picture by using the video printer (not supplied). Connect the
video printer using the supplied S video connecting cable. Refer to the instruction
manual of the video printer as well.
Video printer
AUDIO VIDEO OUT/2
Advanced operations
LINE IN
VIDEO S VIDEO
S VIDEO OUT
: Signal flow
If the video printer is not equipped with S VIDEO input
Use the supplied A/V connecting cable. Connect it to the AUDIO VIDEO OUT/2 jack
and connect the yellow plug of the cable to the VIDEO input of the video printer.
29
DCR-PC7E
3-858-632-12E (E32)
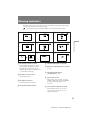
Using the wide mode function
You can record a 16:9 wide picture to watch on the 16:9 wide-screen TV (16:9WIDE).
The picture with black bands at the top and the bottom on the LCD screen or in the
viewfinder [a] is normal. The picture on a normal TV [b] is horizontally compressed.
You can watch the picture of normal images on a wide-screen TV [c].
[a]
[b]
16:9 WIDE
[c]
(1) Press MENU to display the menu on the LCD screen.
(2) Press v or V to select 16:9 WIDE, then press EXECUTE.
16:9WIDE appears on the LCD screen.
(3) Press v or V to select ON, then press EXECUTE.
(4) Press MENU to erase the menu display.
MENU
EXECUTE
16:9 WIDE
To cancel wide mode
Select OFF in the menu system.
To watch the tape recorded in wide mode
To watch the tape recorded in 16:9WIDE mode, set it to full mode. For details, refer to
the instruction manual of your TV.
Note that the picture recorded in 16:9WIDE mode looks compressed on a normal TV.
Note on wide mode
You cannot select or cancel the wide mode during recording.
Using the wide mode function
30
DCR-PC7E
3-858-632-12E (E32)
Releasing the SteadyShot function
When you shoot, the
indicator appears on the LCD screen or in the viewfinder. This
indicates that the SteadyShot function is working and the camcorder compensates for
camera-shake.
You can release the SteadyShot function when you do not need to use the SteadyShot
function. Do not use the SteadyShot function when shooting a stationary object with a
tripod.
(1) Press MENU to display the menu on the LCD screen.
(2) Press v or V to select S SHOT, then press EXECUTE.
1
MENU
2
EXECUTE
MENU
PGM AE
WHT BAL
D ZOOM
16:9 WIDE
S SHOT
COMMANDER
REC MODE
[MENU]:END
Advanced operations
(3) Press v to select OFF, then press EXECUTE.
(4) Press MENU to erase the menu display.
AUTO
MENU
PGM AE
WHT BAL
D ZOOM
16:9 WIDE
S SHOT
COMMANDER
REC MODE
[MENU]:END
MENU
ON
S SHOT
ON
OFF
[MENU]:END
3
EXECUTE
MENU
MENU
PGM AE
WHT BAL
D ZOOM
16:9 WIDE
S SHOT
COMMANDER
REC MODE
[MENU]:END
4
MENU
S SHOT
ON
OFF
[MENU]:END
OFF
To activate the SteadyShot function again
Select ON in step 3, then press EXECUTE.
Notes on the SteadyShot function
• The SteadyShot function will not correct excessive camera-shake.
• When the SteadyShot function is released, the
indicator does not appear.
31
DCR-PC7E
3-858-632-12E (E32)
Using the PROGRAM AE function
You can select from three PROGRAM AE (Auto Exposure) modes to suit your shooting
situation. When you use PROGRAM AE, you can get a capture high-speed action,
record night views, etc.
Selecting the best mode
Select a proper PROGRAM AE mode reffering to the discription on each PROGRAM
AE mark in the viewfinder or the PROGRAM AE mode indication on the LCD screen or
in the viewfinder.
[a]
[b]
[c]
/ SPORTS: Sports lesson mode [a]
Capturing high-speed action in sports such as golf or tennis
/SUNSETMOON: Sunset & Moon mode [b]
Recording sunset, night views, fireworks or neon signs
/LANDSCAPE: Landscape mode [c]
Recording a landscape through a window or wire net
Notes on focus setting
• In the Sports lesson mode, you cannot take close-ups because the camcorder is set to
focus only on subjects in the middle to far distance.
• In the Sunset & Moon and Landscape modes, the camcorder is set to focus only on
distant subjects.
32
DCR-PC7E
3-858-632-12E (E32)
Using the PROGRAM AE function
(1) While the camcorder is in recording or Standby mode press MENU to display
the menu on the LCD screen.
(2) Press v or V to select PGM AE, then press EXECUTE.
(3) Press v or V to select the desired mode, then press EXECUTE. If you want to
change the other modes, repeat steps 2 and 3.
MENU
Advanced operations
The symbol of the selected mode appears on the LCD screen.
(4) Press MENU to erase the menu display.
EXECUTE
To return to automatic adjustment mode
Select AUTO in the PGM AE menu. The symbol of the PROGRAM AE mode
disappears.
Note on shutter speed
The shutter speed in Sports lesson mode is from 1/250 to 1/4000.
Note on locking the exposure
If the exposure is locked when using the PROGRAM AE function, the exposure is
automatically released when the PROGRAM AE mode is changed.
Notes on white balance setting
• In the Sunset & Moon and Landscape modes, the white balance is automatically set to
outdoor mode.
• If the white balance is set to AUTO, it is automatically set when using the PROGRAM
AE function.
33
DCR-PC7E
3-858-632-12E (E32)
Adjusting the white balance
White balance adjustment makes white subjects look white and allows more natural
colour balance for camera recording. Normally white balance is automatically adjusted.
You can obtain better results by adjusting the white balance manually when lighting
conditions change quickly or when recording outdoors: e.g., neon signs, fireworks.
Selecting the Appropriate Mode
Select the appropriate white balance mode under the following conditions.
[a]
[b]
[c]
e Indoor mode
• Lighting condition changes quickly. [a]
• Too bright place such as photography studios
• Under sodium lamps or mercury lamps
w Outdoor mode
• Under a colour matching fluorescent lamp
• Recording a sunset/sunrise, just after sunset, just before sunrise [b], neon signs, or
fireworks [c]
HOLD mode
Recording monochromatic subject or background
34
DCR-PC7E
3-858-632-12E (E32)
Setting the White Balance
(1) Press MENU to display the menu on the LCD screen during recording or
Standby mode.
(2) Press v or V to select WHT BAL, then press EXECUTE.
(3) Press v or V to select the appropriate white balance mode, then press
EXECUTE.
Advanced operations
Each time you press the button, the indicator changes:
AUTO (no indicator) nHOLD n w (outdoor) n e (indoor)
(4) Press MENU to erase the menu display.
1
MENU
2
EXECUTE
MENU
PGM AE
WHT BAL
D ZOOM
16:9 WIDE
S SHOT
COMMANDER
REC MODE
[MENU]:END
AUTO
MENU
PGM AE
WHT BAL
D ZOOM
16:9 WIDE
S SHOT
COMMANDER
REC MODE
[MENU]:END
MENU
AUTO
WHT BAL
AUTO
HOLD
OUTDOOR
INDOOR
[MENU]:END
3
EXECUTE
MENU
4
WHT BAL
MENU
AUTO
HOLD
OUTDOOR
INDOOR
[MENU]:END
MENU
PGM AE
WHT BAL
D ZOOM
16:9 WIDE
S SHOT
COMMANDER
REC MODE
[MENU]:END
OUTDOOR
To return to automatic white balance mode
Select AUTO in step 3, then press EXECUTE.
35
DCR-PC7E
3-858-632-12E (E32)
Focusing manually
When to use manual focus
In the following cases you should obtain better results by adjusting the focus manually.
[a]
[b]
•
•
•
•
•
•
•
•
[c]
[d]
Insufficient light [a]
Subjects with little contrast — walls, sky, etc. [b]
Too much brightness behind the subject [c]
Horizontal stripes [d]
Subjects through frosted glass
Subjects beyond nets, etc.
Bright subject or subject reflecting light
Shooting a stationary subject when using a tripod
Focusing manually
When focusing manually, first focus in telephoto before recording, and then reset the
shot length.
(1) Press FOCUS lightly. The f indicator appears on the LCD secreen or in the
viewfinder.
(2) Turn the focus ring to focus on the subject.
1
2
FOCUS
To focus in infinity
Press FOCUS deeply.
indicator appears on the LCD secreen or in the viewfinder.
To return to the autofocus mode
Press FOCUS lightly to turn off f or
indicator.
Shooting in relatively dark places
Shoot at wide-angle after focusing in the telephoto position.
If lights up
Subject is too close.
36
DCR-PC7E
3-858-632-12E (E32)
Locking the exposure
When to lock the exposure
Lock the exposure by pressing the AE LOCK under the following cases.
• The background is too bright (backlighting)
• Insufficient light: most of the picture is dark
• Bright subject and dark background
• To record the darkness faithfully
• The subject is in the spotlight on a stage
Press AE LOCK during recording, standby or PHOTO mode. The AE LOCK indicator
appears on the LCD screen or in the viewfinder. The exposure is locked at the actual
brightness.
Advanced operations
Locking the exposure
AE LOCK
To return to automatic exposure mode
Press AE LOCK to turn off the AE LOCK indicator.
Shooting with the sun behind you
If the light source is behind your subject, or in the following situation, the subject will
be recorded too dark.
• The subject is indoors and there is a window behind the subject.
• Bright light sources are included in the scene.
• When shooting a person wearing white or shiny clothes in front of a while
background, the face will be recorded too dark.
Shooting in the dark
We recommend you to use a video light (not supplied). To get the best colour, you
must maintain a sufficient light level.
37
DCR-PC7E
3-858-632-12E (E32)
Watching on a TV screen
You can use the camcorder as a VCR by connecting it to your TV for playback. There
are some ways to connect the camcorder to your TV. When monitoring the playback
picture by connecting the camcorder to your TV, we recommend you to use the mains
for the power source.
If you connect directly to TV
Open the jack cover and connect the camcorder to the inputs on the TV by using the
supplied A/V connecting cable. Set the TV/VCR selector on the TV to VCR. Procedure
to play back is the same as when playing back on the LCD screen or in the viewfinder.
Turn down the volume of the camcorder.
To get higher quality pictures in DV format, connect the camcorder to your TV using
the S video connecting cable.
If you are going to connect the camcorder using the supplied S video connecting cable
[a], you do not need to connect the yellow (video) plug of the A/V connecting cable
[b].
TV
S VIDEO IN
[a]
S VIDEO OUT
AUDIO VIDEO OUT/2
VIDEO IN
[b]
AUDIO IN
: Signal flow
If your TV is already connected to a VCR
Open the jack cover and connect the camcorder to the LINE IN inputs on the VCR by
using the supplied cable. Set the input selector on the VCR to LINE. Set the TV/VCR
selector on the TV to VCR.
TV
S VIDEO IN
[a]
S VIDEO OUT
AUDIO VIDEO OUT/2
VIDEO IN
VCR
[b]
AUDIO IN
: Signal flow
If your VCR or TV is a monaural type
Connect the yellow plug of the A/V connecting cable for video to the VCR or TV.
Connect only the white or red plug for audio to the VCR or TV. If you connect the
white plug, the sound is L (left) signal. If you connect the red plug, the sound is R
(right) signal.
38
DCR-PC7E
3-858-632-12E (E32)
Displaying recording data – data code
function
You can display recording data (date/time or various settings when recorded) on the
LCD screen or in the viewfinder during playback (Data Code). The Data Code is also
displayed on the TV.
(1) Press MENU to display the menu on the LCD screen.
(2) Press v or V to select DATA CODE, then press EXECUTE.
(3) Press v or V to select DATE/CAM or DATE, then press EXECUTE.
(4) Press MENU to erase the menu display.
MENU
MENU
COMMANDER
REC MODE
BEEP
AUDIO MIX
DATA CODE
LCDCOLOUR
VTR4
2
EXECUTE
MENU
COMMANDER
REC MODE
BEEP
AUDIO MIX
DATA CODE
LCDCOLOUR
[MENU]:END
MENU
DATE/CAM
[MENU]:END
DATA CODE
[MENU]:END
3
4
DATE/CAM
DATE
Advanced operations
1
EXECUTE
MENU
MENU
DATA CODE
DATE/CAM
DATE
[MENU]:END
MENU
COMMANDER
REC MODE
BEEP
AUDIO MIX
DATA CODE
LCDCOLOUR
DATE
[MENU]:END
To display recording data during playback
Press DATA CODE on the Remote Commander.
Each time you press the button, the indicator changes as follows:
When DATE/CAM is selected in the menu system: date n various settings (AE LOCK,
white balance, gain, shutter speed, aperture value) n no indicator.
When DATE is selected in the menu system:
date n no indicator.
When bars (--:--:--) appear
• A blank portion of the tape is being played back.
• The tape was recorded by a camcorder without having date and time set.
• The tape is unreadable due to tape damage or noise.
39
DCR-PC7E
3-858-632-12E (E32)
Returning to a pre-registered position
Using the Remote Commander, you can easily go back to the desired point on a tape
after playback.
(1) During playback, press ZERO SET MEMORY at the point you later want to
locate. The counter shows “0:00:00” and “ZERO SET MEMORY” appears on
the LCD screen or in the viewfinder.
(2) Press p when you want to stop playback.
(3) Press 0 to rewind or press ) to fast-forward the tape to the counter’s zero
point. The tape stops automatically when the counter reaches approximately
zero. “ZERO SET MEMORY” disappears and the time code appears.
(4) Press ·.
1
ZERO SET
MEMORY
2
STOP
0:00:00
0:12:34
ZERO SET
MEMORY
3
REW
4
FF
PLAY
Notes on the tape counter
There may be a discrepancy of several seconds from the actual time or time code.
Notes on ZERO SET MEMORY
• When you press ZERO SET MEMORY, the counter’s zero point is memorized. Press
ZERO SET MEMORY again before step 3 to cancel the memory .
• Zero set memory may not function when there is a blank portion between pictures on
a tape.
• Zero set memory functions in recording standby mode.
40
DCR-PC7E
3-858-632-12E (E32)
Locating the beginning of each scene
You can search the beginning of the recorded picture with the date using the Remote
Commander. You can also search the photo-recorded pictures only in the backward and
forward direction from the preset position.
(1) Make sure that the POWER switch is set to VTR.
(2) Press SEARCH MODE on the Remote Commander to select date search (search
with the date) or photo search (search the photo-recorded pictures only).
(3) Press + for upward or = for downward on the Remote Commander to
select the desired picture.
2
1
SEARCH
MODE
POWER
VTR
OFF
CAMERA
PHOTO
Advanced operations
Each time you press + or =, the camcorder searches for the next scene.
3
To stop searching
Press p STOP.
When you use a recorded tape which has blank portions between pictures
The camcorder may not search for the recorded picture or data may not be stored.
Note on cassette memory
The cassette memory function cannot be used with this camcorder.
Notes on searching
• The camcorder may not search if the beginning of the search portion is too close to
the tape head position.
• When you use date search, the camcorder plays back the search picture, and when
you use photo search, the camcorder enters playback pause at the point.
41
DCR-PC7E
3-858-632-12E (E32)
Editing onto another tape
You can create your own video programme by editing with any other DV, mini DV,
h 8 mm, H Hi8, j VHS, k S-VHS, VHSC, K S-VHSC or l Betamax
VCR that has audio/video inputs. You can edit with little deterioration of picture and
sound quality when using the DV connecting cable.
Before editing
Connect the camcorder to the VCR using the VMC-2DV DV connecting cable (not
supplied) or the supplied A/V connecting cable.
Use this camcorder as a player.
Using the DV connecting cable
Simply connect the VMC-2DV DV connecting cable (not supplied) to DV IN/OUT and
to DV IN/OUT of the DV products.
DV IN/OUT
DV IN
DV IN/OUT
: Signal flow
About DV connecting cable
You can record picture, sound and system data at the same time on the DV products by
using the DV connecting cable only.
Using the S video connecting cable [a] or A/V connecting cable
[b]
Set the input selector on the VCR to LINE.
TV
S VIDEO IN
[a]
S VIDEO OUT
AUDIO VIDEO OUT/2
VIDEO IN
VCR
42
[b]
AUDIO IN
: Signal flow
DCR-PC7E
3-858-632-12E (E32)
Starting editing
(1) Insert a blank tape (or a tape you want to record over) into the VCR, and insert
your recorded tape into the camcorder.
(2) Play back the recorded tape on the camcorder until you locate the point where
you want to start editing, then press P to set the camcorder in playback pause
mode.
(3) On the VCR, locate the recording start point and set the VCR in recording
pause mode.
To edit more scenes
Repeat steps 2 to 4.
To stop editing
Press p on both the camcorder and the VCR.
Advanced operations
(4) Press P on the camcorder and VCR simultaneously to start editing.
Notes on editing when using the DV connecting cable
• You can connect one VCR only.
• You can use this camcorder as a recorder and also as a player without reconnecting
the DV connecting cable. When using as a recorder, make sure DV IN appears on the
LCD screen or in the viewfinder. DV IN may also appear on the connected VCR.
• When using this camcorder as a recorder, only the recording buttons on the Remote
Commander can be used. Press both red and black buttons simultaneously. When
using this camcorder as a recorder, the pictures on a monitor may be uneven,
however, these on the LCD screen, in the viewfinder or recorded pictures are not
affected.
• If you record playback pause picture via the DV IN/OUT jack, the recorded picture
becomes rough.
Notes on editing when using the A/V connecting cable
• Press DATA CODE button to turn off the display indicators. Otherwise, the
indicators will be recorded on the tape.
• If your TV or VCR is a monaural type, connect the yellow plug of the A/V connecting
cable for video to the TV or VCR. Connect only the white or red plug for audio to the
TV or VCR. If you connect the white plug, the sound is L (left) signal. If you connect
the red plug, the sound is R (right) signal.
• You can edit precisely by connecting VMC-LM7 adaptor (not supplied) and a LANC
cable to this camcorder and other video equipment having fine synchro-editing
function, using this camcorder as a player.
43
DCR-PC7E
3-858-632-12E (E32)
Replacing recording on a tape – insert
editing
You can insert a new scene from a VCR onto your originally recorded tape by
specifying starting and ending points.
Connection is the same as in “Using the DV connecting cable” on page 42. In recording
and recording pause mode, DV IN/OUT jack automatically works as input jack.
(1) While pressing the small green button on the POWER switch, set it to VTR.
(2) On the VCR, locate the start point to be inserted and set it to playback pause
mode.
(3) On the camcorder, press · to set it to playback mode, and then locate the
point where the insert should end by pressing 0 or ). Then press P to set
it to playback pause mode.
(4) Press ZERO SET MEMORY on the Remote Commander. The ZERO SET
MEMORY indicator flashes and the end point of the insert is stored in
memory.
(5) On the camcorder, locate the point where the insert should begin by pressing
0, then press r REC on the Remote Commander to set it to recording pause
mode.
(6) Press P on the camcorder and the VCR simultaneously to start insert editing.
The insert editing stops automatically near the counter's zero point. Press p to set the
camcorder to stop mode.
To change the end point
Press ZERO SET MEMORY on the Remote Commander so that the ZERO SET
MEMORY indicator disappears and begin from step 3.
To record without setting the end point
Skip steps 3 and 4. Press p when stopping insert editing.
Notes on the inserted picture
• The picture may be distorted at the end of the inserted portion when it is played
back.
• The picture and sound recorded on the portion where you insert a new scene will be
erased when you insert a new scene.
• If you insert a new scene (picture and sound) on a tape recorded by other camcorder
(including DCR-PC7E), the picture and sound quality may become worse.
44
DCR-PC7E
3-858-632-12E (E32)
Audio dubbing
You can record an audio sound to add to the original sound on a tape by connecting
audio equipment or a microphone. If you use the VMC-LM7 adaptor (not supplied) to
connect the audio equipment, you can add a sound on your recorded tape by specifying
starting and ending points. The original sound will not be erased. You can only operate
with the Remote Commander.
Audio equipment
Advanced operations
LINE OUT
VMC-LM7 adaptor
(not supplied)
RK-G128 connecting cable (not supplied)
: Signal flow
When using an external microphone, connect it to the MIC jack of the VMC-LM7
adaptor.
If you record the sound using the built-in microphone, you do not need to connect the
VMC-LM7 adaptor.
Notes on audio dubbing
• A new sound cannot be recorded on a tape already recorded in the 16-bit mode (32
kHz, 44.1 kHz or 48 kHz).
• When an external microphone is not connected, the recording will be made through
the built-in microphone of the camcorder.
• A new sound cannot be recorded on a tape already recorded in the LP mode.
• If you add a new sound on a tape recorded by other camcorder (including DCRPC7E), the sound quality may become worse.
45
DCR-PC7E
3-858-632-12E (E32)
Audio dubbing
Recording an audio sound on a recorded tape
(1) Insert your recorded tape into the camcorder.
(2) While pressing the small green button on the POWER switch, set it to VTR.
(3) On the camcorder, press · to set it to playback mode, and then locate the
point where the recording ends by pressing 0 or ). Then press P to set it
to playback pause mode.
(4) Press ZERO SET MEMORY on the Remote Commander. The ZERO SET
MEMORY indicator flashes and the end point of the recording is stored in
memory.
(5) On the camcorder, locate the point where the recording should begin by
pressing 0 or ). Then press P to set it to playback pause mode.
(6) Press AUDIO DUB on the Remote Commander.
(7) Press P on the camcorder and at the same time start playing back the audio
you want to record. The new sound will be recorded in stereo 2. The recorded
sound in stereo 1 is not heard.
The recording stops automatically near the counter's zero point. Press p to set the
camcorder to stop mode.
You can add the sound not using zero set memory function.
To change the end point
Press ZERO SET MEMORY on the Remote Commander so that the ZERO SET
MEMORY indicator disappears and begin from step 3.
To play back the new recorded sound
Adjust the balance between the original sound (stereo 1) and the new sound (stereo 2)
by selecting AUDIO MIX in menu system.
46
DCR-PC7E
3-858-632-12E (E32)
Additional information
Charging the vanadium-lithium battery in the
camcorder
Additional information
Your camcorder is supplied with a vanadium-lithium battery installed so as to retain
the date and time, etc., regardless of the setting of the POWER switch. The vanadiumlithium battery is always charged as long as you are using the camcorder. The battery,
however, will get discharged gradually if you do not use the camcorder. It will be
completely discharged in about 1/2 year if you do not use the camcorder at all. Even if
the vanadium-lithium battery is not charged, it will not affect the camcorder operation.
To retain the date and time, etc., charge the battery if the battery is discharged. The
following are charging methods:
• Connect the camcorder to mains using the supplied AC power adaptor, and leave the
camcorder with the POWER switch turned off for more than 24 hours.
• Or, install the fully charged battery pack in the camcorder, and leave the camcorder
with the POWER switch turned off for more than 24 hours.
47
DCR-PC7E
3-858-632-12E (E32)
Resetting the date and time
The date and time are set at the factory. Set the time according to your local time. If
you do not use the camcorder for about a year, the date and time settings may be
released (bars may appear) because the vanadium-lithium battery installed in the
camcorder will have been discharged. In this case, first charge the vanadium-lithium
battery, then reset the date and time.
(1) While pressing the small green button on the POWER switch, set it to
CAMERA.
(2) Press MENU to display the menu on the LCD screen.
(3) Select CLOCK SET, then press EXECUTE.
(4) Press v or V to adjust the year, and then press EXECUTE.
(5) Set the month, day, hour and minutes by pressing v or V and pressing
EXECUTE.
(6) Press MENU to erase the menu display.
1
3
POWER
EXECUTE
VTR
OFF
CAMERA
MENU
S SHOT
COMMANDER
RECMODE
BEEP
REC LAMP
LCDCOLOUR
CLOCK SET
[MENU]:END
PHOTO
2,6
MENU
1996 1 1
1 1 1996
12:00:00
CLOCK SET
[MENU]:END
12 00
MENU
4
5
EXECUTE
1996 1 1
12 00
1997 1 1
12 00
1997 7 1
1997 7 4
1997 7 4
12 00
12 00
17 00
EXECUTE
EXECUTE
EXECUTE
1997 1 1
12 00
To correct the date and time setting
Repeat steps 2 to 5.
The year indicators changes as follows:
1996
1997
... 2000 ...
2029
48
Note on the time indicator
The internal clock of this camcorder operates on a 24-hour cycle.
DCR-PC7E
3-858-632-12E (E32)
Usable cassettes and playback modes
Selecting cassette types
You can use the mini DV cassette only. You cannot use any other h 8 mm, H Hi8,
j VHS, k S-VHS, VHSC, K S-VHSC or l Betamax cassette.
When you play back
Copyright signal
When you record
You cannot use this camcorder and the DV connecting cable to copy a tape that has
recorded the copyright control signals for copyright protection of software. “COPY
INHIBIT” appears on the LCD screen, in the viewfinder or on the TV screen if the play
back signal of such a tape is input to this camcorder.
Additional information
When you play back
Using this camcorder, you cannot play back a tape that has recorded a copyright control
signals for copyright protection of software. “COPY INHIBIT” appears on the LCD
screen, in the viewfinder or on the TV screen if you try to play back such a tape. This
camcorder does not record copyright control signals on the tape when it records.
Audio mode
12-bit mode: The original sound can be recorded in stereo 1, and the new sound in
stereo 2 in 32 kHz. The balance between stereo 1 and stereo 2 can be adjusted by
selecting AUDIO MIX in the menu system during playback. Both sounds can be played
back.
16-bit mode: A new sound cannot be recorded but the original sound can be recorded in
high quality. Moreover, it can also play back sound recorded in 32 kHz, 44.1 kHz or 48
kHz. When playing back a tape recorded in the 16-bit mode, 16BIT indicator appears on
the LCD screen or in the viewfinder.
You cannot record in the 16-bit mode using this camcorder.
Recording mode
When you play back a tape, the SP/LP indicator on the LCD screen or in the viewfinder
shows the recording mode SP/LP.
Note on cassette memory
The cassette memory function cannot be used with this camcorder.
49
DCR-PC7E
3-858-632-12E (E32)
Usable cassettes and playback modes
Notes on the mini DV cassette
To prevent accidental erasure
Slide out the protect tab on the cassette so that the red portion is visible. [a]
When affixing a label on the mini DV cassette
Be sure to affix a label on only the location as illustrated below so as not to cause
malfunction of the camcorder. [b]
After using the mini DV cassette
Rewind the tape to the beginning, put the cassette in its case, and store it in an upright
position.
[a]
To record
Slide out to prevent accidental erasure.
[b]
We recommend to use an ME cassette
You can get the highest quality pictures with this camcorder using an ME cassette
which is the highest quality cassette.
You may not get as good quality with lesser quality cassettes.
50
DCR-PC7E
3-858-632-12E (E32)
Tips for using the battery pack
This section shows you how you can get the most out of your battery pack.
Preparing the battery pack
Always carry additional batteries
Have sufficient battery pack power to do 2 to 3 times as much recording as you have
planned.
Battery life is shorter in a cold environment
Battery efficiency is decreased, and the battery will be used up more quickly, if you are
recording in a cold environment.
Do not leave the camcorder in Standby mode when not recording to save the battery
power.
A smooth transition between scenes can be made even if recording is stopped and
started again. While you are positioning the subject, selecting an angle, or looking at
the LCD screen or through the viewfinder, the lens moves automatically and the battery
is used. The battery is also used when a tape is inserted or removed.
Additional information
To save battery power
When to replace the battery pack
While you are using your camcorder, the remaining battery indicator on the LCD screen
or in the viewfinder decreases gradually as battery power is used up [a].
The remaining time in minutes also appears.
[a]
When the remaining battery indicator reaches the lowest point, the i indicator appears
and starts flashing in the viewfinder.
When the i indicator in the viewfinder changes from slow flashing to rapid flashing
while you are recording, set the POWER switch to OFF on the camcorder and replace
the battery pack. Leave the tape in the camcorder to obtain a smooth transition between
scenes after the battery pack has been replaced.
Depending on conditions, the i indicator may flash, even if there are 5 to 10 minutes
remaining.
Notes on the rechargeable battery pack
Caution
Tips for using the battery
pack
Never leave the battery pack in temperatures above 60°C (140°F), such as in a car
parked in the sun or under direct sunlight.
The battery pack heats up
During charging or recording, the battery pack heats up. This is caused by energy that
has been generated and a chemical change that has occurred inside the battery pack.
This is not cause for concern, and is normal.
51
DCR-PC7E
3-858-632-12E (E32)
Tips for using the battery pack
“InfoLITHIUM” battery pack
The “InfoLITHIUM” battery pack is a lithium battery pack which can exchange data
with compatible video equipment about its battery consumption.
Sony recommends that you use the “InfoLITHIUM” battery pack with video equipment
having the
mark.
When you use this battery pack with video equipment having the
mark, the
video equipment will indicate the remaining battery time in minutes.* However, if you
use it with video equipment not having this mark, the remaining battery capacity will
not be indicated in minutes.
* The indication may not be accurate depending on the condition and environment
which the equipment is used under.
Battery pack care
• Remove the battery pack from the camcorder after using it, and keep it in a cool
place. When the battery pack is installed to the camcorder, a small amount of current
flows to the camcorder even if the POWER switch is set to OFF. This shortens battery
life.
• The battery pack is always discharging even when it is not in use after charging.
Therefore, you should charge the battery pack right before using the camcorder.
The life of the battery pack
If the battery indicator flashes rapidly just after turning on the camcorder with a fully
charged battery pack, the battery pack should be replaced with a new fully charged
one.
Charging temperature
You should charge batteries at temperatures from 10°C to 30°C (from 50°F to 86°F).
Lower temperatures require a longer charging time.
52
DCR-PC7E
3-858-632-12E (E32)
Notes on charging
A brand-new battery pack
A brand-new battery pack is not charged. Before using the battery pack, charge it
completely.
Recharge the battery pack whenever you like
You do not have to discharge it before recharging. If you charged the battery pack fully
but you did not use it for a long time, it becomes discharged. Then recharge the battery
pack before use.
If the terminals (metal parts on the back) are not clean, the battery charge
duration will be shortened.
When the terminals are not clean or when the battery pack has not been used for a long
time, repeatedly install and remove the battery pack a few times. This improves the
contact condition. Also, wipe the +, – and C terminals with a soft cloth or paper.
Additional information
Notes on the terminals
Be sure to observe the following
•
•
•
•
Keep the battery pack away from fire.
Keep the battery pack dry.
Do not open nor try to disassemble the battery pack.
Do not expose the battery pack to any mechanical shock.
53
DCR-PC7E
3-858-632-12E (E32)
Maintenance information and precautions
Moisture condensation
If the camcorder is brought directly from a cold place to a warm place, moisture may
condense inside the camcorder, on the surface of the tape, or on the lens. In this
condition, the tape may stick to the head drum and be damaged or the camcorder may
not operate correctly. To prevent possible damage under these circumstances, the
camcorder is furnished with moisture sensors. Take the following precautions.
Inside the camcorder
If there is moisture inside the camcorder, the beep sounds and the { indicator flashes.
If this happens, none of the function except cassette ejection will work. Open the
cassette compartment, turn off the camcorder, and leave it about 1 hour. When 6
indicator flashes at the same time, the cassette is inserted in the camcorder. Eject the
cassette, turn off the camcorder, and leave also the cassette about 1 hour.
On the lens
If moisture condenses on the lens, no indicator appears, but the picture becomes dim.
Turn off the power and do not use the camcorder for about 1 hour.
How to prevent moisture condensation
When bringing the camcorder from a cold place to a warm place, put the camcorder in a
plastic bag and allow it to adapt to room conditions over a period of time.
(1) Be sure to tightly seal the plastic bag containing the camcorder.
(2) Remove the bag when the air temperature inside it has reached the
temperature surrounding it (after about 1 hour).
Video head cleaning
To ensure normal recording and clear pictures, clean the video heads.
The video heads may be dirty when:
• mosaic-pattern noise appears on the playback picture
• playback pictures do not move
• playback pictures are hardly visible
• playback pictures do not appear
• the v indicator and “ Ò CLEANING CASSETTE” message appear one after another
or the v indicator flashes on the LCD screen or in the viewfinder
/
or
If [a] or [b] happens, clean the video heads with the Sony DVM12CL cleaning cassette
(not supplied). Check the picture and if the above problem persists, repeat the cleaning.
(Do not repeat cleaning more than 5 times in one session.)
Note
If the DVM12CL cleaning cassette (not supplied) is not available in your area, consult
your nearest Sony dealer.
54
DCR-PC7E
3-858-632-12E (E32)
Precautions
Camcorder operation
• Operate the camcorder on 7.2 V (battery pack) or 8.4 V (AC power adaptor).
• Should any solid object or liquid get inside the casing, unplug the camcorder and
have it checked by Sony dealer before operating it any further.
• Avoid rough handling or mechanical shock. Be particularly careful of the lens.
• Keep the POWER switch set to OFF when not using the camcorder.
• Do not wrap up the camcorder and operate it since heat may build up internally.
• Keep the camcorder away from strong magnetic fields or mechanical vibration.
On handling tapes
Camcorder care
• When the camcorder is not to be used for a long time, disconnect the power source
and remove the tape. Periodically turn on the power, operate the camera and player
sections and play back a tape for about 3 minutes.
• Clean the lens with a soft brush to remove dust. If there are fingerprints on the lens,
remove them with a soft cloth.
• Clean the camcorder body with a dry soft cloth, or a soft cloth lightly moistened with
a mild detergent solution. Do not use any type of solvent which may damage the
finish.
Additional information
• Do not insert anything into the small holes on the cassette.
• Do not open the tape protect cover or touch the tape.
• Avoid touching or damaging the terminals. To remove dust, clean the terminals with
a soft cloth.
AC power adaptor
Charging
• Use only a lithium ion type battery pack NP-F100/NP-F200.
• Place the battery pack on a flat surface without vibration during charging.
• The battery pack will get hot during charging. This is normal.
Others
• Unplug the unit from the mains when not in use for a long time. To disconnect the
power cord, pull it out by the plug. Never pull the cord itself.
• Do not operate the unit with a damaged cord or if the unit has been dropped or
damaged.
• Do not bend the AC power cord forcibly, or put a heavy object on it. This will
damage the cord and may cause a fire or an electrical shock.
• Be sure that nothing metallic comes into contact with the metal parts of the
connecting plate. If this happens, a short may occur and the unit may be damaged.
• Always keep the metal contacts clean.
• Do not disassemble the unit.
• Do not apply mechanical shock or drop the unit.
• While the unit is in use, particularly during charging, keep it away from AM
receivers and video equipment because it will disturb AM reception and video
operation.
•The unit becomes warm while in use. This is normal.
• Do not place the unit in locations that are:
– Extremely hot or cold
– Dusty or dirty
– Very humid
– Vibrating
If any difficulty should arise, unplug the unit and contact your nearest Sony dealer.
DCR-PC7E
3-858-632-12E (E32)
55
Using your camcorder abroad
Each country has its own electric and TV colour systems. Before using your camcorder
abroad, check the following points.
Power sources
You can use your camcorder in any country with the supplied AC power adaptor
within 100 V to 240 V AC, 50/60 Hz.
Difference in colour systems
This camcorder is a PAL system-based camcorder. If you want to view the playback
picture on a TV, it must be a PAL system-based TV.
Check the following list.
PAL system countries
Australia, Austria, Belgium, China, Denmark, Finland, Germany, Great Britain,
Holland, Hong Kong, Italy, Kuwait, Malaysia, New Zealand, Norway, Portugal,
Singapore, Spain, Sweden, Switzerland, Thailand, etc.
PAL-M system country
Brazil
PAL-N system countries
Argentina, Paraguay, Uruguay
NTSC system countries
Bahama Islands, Bolivia, Canada, Central America, Chile, Colombia, Ecuador, Jamaica,
Japan, Korea, Mexico, Peru, Surinam, Taiwan, the Philippines, the U.S.A., Venezuela,
etc.
SECAM system countries
Bulgaria, Czech Republic, France, Guiana, Hungary, Iran, Iraq, Monaco, Poland, Russia,
Slovak Republic, Ukraine, etc.
56
DCR-PC7E
3-858-632-12E (E32)
Trouble check
If you run into any problem using the camcorder, use the following table to
troubleshoot the problem. Should the difficulty persist, disconnect the power source
and contact your Sony dealer or local authorized Sony service facility.
Camcorder
Power
Symptom
Cause and/or corrective actions
• The battery pack is not installed.
m Install the battery pack. (p. 8)
• The battery is dead.
m Use a charged battery pack. (p. 6)
• The AC power adaptor is not connected to mains.
m Connect the AC power adaptor to mains. (p. 20)
• If the power is still not on after you tried the corrective
actions above, press the RESET button on the back of the
cassette compartment lid using a sharp-pointed object. (If
you press the RESET button, all the settings including the
date and time return to the default.) (p. 63)
The power goes off.
• While being operated in CAMERA mode, the camcorder
has been in Standby mode for more than 5 minutes.
m Set the POWER switch to OFF, then to CAMERA. (p. 11)
• The battery is dead.
m Use a charged battery pack. (p. 6)
The battery pack is quickly
discharged.
• The ambient temperature is too low. (p. 51)
• The battery pack has not been charged fully.
m Charge the battery pack again. (p. 6)
• The battery pack is completely dead, and cannot be
recharged.
m Use another battery pack. (p. 20)
The battery pack cannot be
installed.
• Only an NP-F100/NP-F200 battery pack can be used.
Additional information
The power is not on.
Operation
Symptom
Cause and/or corrective actions
START/STOP does not operate.
• The tape is stuck to the drum.
m Eject the tape. (p. 9)
• The tape has run out.
m Rewind the tape or use a new one. (p. 17)
• The POWER switch is set to VTR.
m Set it to CAMERA. (p. 10)
• The tab on the cassette is out (red).
m Use a new tape or slide the tab. (p. 9)
The cassette cannot be removed
from the holder.
• The battery is dead.
m Use a charged battery pack or the AC power adaptor.
(p. 6, 20)
{ and 6 indicators flash and no
function except for cassette
ejection works.
• Moisture condensation has occurred.
m Remove the cassette and leave the camcorder for at least
1 hour. (p. 54)
“CLOCK SET” appears when
the camcorder is turned on.
• Reset the date and time. (p. 48)
Continued to the next page
57
DCR-PC7E
3-858-632-12E (E32)
Trouble check
Operation
Symptom
Cause and/or corrective actions
The End Search function does
not activate.
• The cassette was ejected after you recorded on it.
m The End Search function will not activate until you make
a new recording after reinserting the cassette.
The tape does not move when a
tape transport button is pressed.
• The POWER switch is set to CAMERA or OFF.
m Set it to VTR. (p. 17)
• The tape has run out.
m Rewind the tape or use a new one. (p. 17)
No sound or only a low sound
is heard when playing back a
tape.
• The volume is turned to the minimum.
m Open the LCD panel and press VOLUME +. (p. 17)
The SteadyShot function does
not activate.
• S SHOT is set to OFF in the menu system.
m Set it to ON. (p. 31)
Recording stops at once.
• The POWER switch is set to PHOTO.
m Set it to CAMERA.
Recording stops in a few
seconds.
• The START/STOP MODE switch is set to 5SEC or
m Set it to . (p. 14)
The autofocus function does not
activate.
• Focus is set to the manual mode.
m Set it to autofocus. (p. 36)
• Shooting conditions are not suitable for autofocus.
m Set focus to manual mode to focus manually. (p. 36)
The fader function does not
work.
• The START/STOP MODE switch is set to 5SEC or
m Set it to . (p. 14)
.
.
Picture
Symptom
Cause and/or corrective actions
The image on the viewfinder
screen is not clear.
• The viewfinder lens is not adjusted.
m Adjust the viewfinder lens. (p. 11)
A vertical band appears when a
subject such as lights or a candle
flame is shot against a dark
background.
• The contrast between the subject and background is too
high. The camcorder is not malfunctioning.
m Change locations.
The picture is “noisy" or does
not appear.
• The video heads may be dirty.
m Clean the heads using the Sony DVM12CL (not supplied)
cassette. (p. 54)
v indicator flashes on the LCD
screen or in the viewfinder.
• The video heads may be dirty.
m Clean the heads using the Sony DVM12CL (not supplied)
cleaning cassette. (p. 54)
The picture is too bright or too
dark.
• LCD BRIGHT is not adjusted properly.
m Press + or – to obtain the brightness you want. (p. 13)
A vertical band appears when
shooting a very bright subject.
• The camcorder is not malfunctioning.
The picture does not appear in
the viewfinder.
• The LCD panel is open.
m Close the LCD panel.
The picture does not appear on
the LCD screen or in the
viewfinder.
• Incorporated fluorescent tube is worn out.
m Please contact your nearest Sony dealer.
58
DCR-PC7E
3-858-632-12E (E32)
Picture
Symptom
While editing using the DV
connecting cable, recording
picture cannot be monitored.
Cause and/or corrective actions
• Remove the DV connecting cable, and connect it again.
Others
Symptom
Cause and/or corrective actions
• If the power of the cammcorder is on for a long time, it
becomes warm, which is not mulfunction.
The supplied Remote
Commander does not work.
• COMMANDER is set to OFF in the menu system.
m Set it to VTR4 or ID. (p. 67)
• Something is blocking the infrared rays.
m Remove the obstacle.
• The battery is not inserted with the correct polarity.
m Insert the battery with the correct polarity. (p. 67)
• The batteries are dead.
m Insert new ones. (p. 67)
The CHARGE lamp flashes
after you charge the battery
pack installed in the camcorder.
• The camcorder is not malfunctioning.
No function works though the
power is on.
• Disconnect the connection plug on the battery pack or on
the AC power adaptor, then reconnect it in about 1 minute.
Turn the power on. If the functions still do not work, press
the RESET button on the back of the cassette compatment
lid using a sharp-pointed object. (If you press the RESET
button, all the settings including the date and time return to
the default.) (p. 63)
Additional information
The camcorder becomes warm.
AC power adaptor
Symptom
Corrective actions
The VTR/CAMERA or
CHARGE lamp does not light.
• Disconnect the mains lead. After about 1 minute, reconnect
the mains lead. (p. 6)
The CHARGE lamp flashes.
• See the chart on the next page.
59
DCR-PC7E
3-858-632-12E (E32)
Trouble check
When the CHARGE lamp flashes
Check through the following chart.
Remove the battery pack from the AC
power adaptor. Then install the same
battery pack again.
When the CHARGE lamp flashes
again
Install another battery pack.
When the CHARGE lamp does not
flash again
If the CHARGE lamp lights up and
goes out after a while, there is no
problem. *
When the CHARGE lamp flashes
again
The problem is with the AC power
adaptor.
When the CHARGE lamp does not
flash again
If the CHARGE lamp lights up and
goes out after a while, the problem is
with the battery pack installed first.
Please contact your nearest Sony dealer
in connection with the product with the
problem.
* If you use a battery pack which you have just bought or which has been left unused for a long time, the
CHARGE lamp may flash at the first charging. This does not indicate a problem. Repeat again to charge with
same battery pack.
60
DCR-PC7E
3-858-632-12E (E32)
Specifications
Video camera
recorder
System
LCD screen
AC power adaptor
S video output
4-pin mini DIN
Luminance signal: 1 Vp-p, 75 Ω,
unbalanced, sync negative
Chrominance signal: 0.3 Vp-p,
75 Ω, unbalanced
Audio/Video output/
Headphones jack
Special minijack, 1 Vp-p, 75 Ω,
unbalanced, sync negative
327 mV, (at output impedance
more than 47 kΩ)
Output impedance with less than
2.2 kΩ/Stereo minijack (ø 3.5 mm)
DV input/output
4-pin special connector
Speaker
Piezo-electric-speaker
Connection
26-pin connector
General
Power requirements
100 to 240 V AC, 50/60 Hz
Power consumption
25 W
Output voltage
DC OUT: 8.4 V, 1.8 A in operating
mode
Battery charge terminal: 8.4 V,
1.4 A in charge mode
Application
Sony battery pack NP-F100, NPF200 lithium ion type
Operating temperature
0°C to 40°C (32°F to 104°F)
Storage temperature
–20°C to 60°C (–4°F to 140°F)
Dimensions (Approx.)
57 x 44 x 107 mm (w/h/d)
Mass (Approx.)
190 g
Additional information
Video recording system
Two rotary heads, Helical
scanning system
Audio recording system
Rotary heads, PCM system
Video signal
PAL colour, CCIR standards
Usable cassette
Mini DV cassette with logo
printed
Tape speed
SP: Approx. 18.83 mm/s
LP: Approx. 12.57/s
Recording/playback time
SP mode: 1 hour (DVM60)
LP mode: 1.5 hours (DVM60)
Fastforward/rewind time
Approx. 2 min. 30 s (DVM60)
(using the battery pack)
Approx. 1 min. 45 s (DVM60)
(using the AC power adaptor)
Image device
CCD (Charge Coupled Device
1/3”)
Viewfinder
Electric viewfinder (colour)
Lens
Combined power zoom lens, 120x
(Digital), 10x (Optical)
Focal distance
f = 4.0 to 40 mm
(38 to 380 mm when converted
into a 35 mm still camera)
F 1.8 – 2.6
TTL autofocus system inner focus
wide macro system
Colour temperature
Auto
Minimum illumination
3 lux at F 1.8
Illumination range
3 to 100,000 lux
Recommended illumination
More than 100 lux
Input and output
connectors
Design and specifications are
subject to change without notice.
Power requirements
7.2 V (battery insertion input)
8.4 V (26-pin connector)
Average power consumption
5.0 W during camera recording
using viewfinder
6.0 W during camera recording
using LCD screen
Operating temperature
0°C to 40°C (32°F to 104°F)
Storage temperature
–20°C to 60°C (–4°F to 140°F)
Dimensions
Approx. 59 x 129 x 118 mm
(w/h/d)
Mass
Approx. 500 g excluding the
battery pack, lithium battery and
cassette
Approx. 620 g including the
battery pack NP-F100, lithium
battery and cassette DVM60
Microphone
Electret condenser microphone,
Stereo type
Supplied accessories
See page 5.
Picture
2.5 inches measured diagonally
50.05 x 37.1 mm
On-screen display
TN LCD/TFT active matrix
method
Total dot number
84,480 (384 x 220)
61
DCR-PC7E
3-858-632-12E (E32)
Identifying the parts
8
1
9
2
!º
!¡
3
!™
4
!£
5
6
7
1 Lens cap (p. 10)
8 Built-in microphone
2 LCD screen (p. 13)
9 Accessory shoe (p. 14)
3 START/STOP MODE swtich (p. 14, 26)
0 Eyecup (p. 16)
4 CHARGE lamp (p. 6, 21)
!¡ Viewfinder (p. 70)
5 Battery terminal cover (p. 8)
Remove the cover to install the battery
back.
!™ POWER switch (p. 10, 17)
6 AE LOCK button (p. 37)
7 FADER button (p. 27)
!£ Tape transport buttons (p. 17)
p STOP (stop)
0 REW (rewind)
· PLAY (playback)
) FF (fastforward)
P PAUSE (pause)
62
DCR-PC7E
3-858-632-12E (E32)
!¢
!∞
!¶
!§
Additional information
!¢ Cassette compartment (p. 9)
!∞ 6 EJECT button (p. 9)
!§ Cassette compartment lid (p. 9)
!¶ RESET button (p. 57)
63
DCR-PC7E
3-858-632-12E (E32)
Identifying the parts
@∞
!•
@§
!ª
@¶
@º
@•
@¡
@ª
@™
#º
@£
#¡
@¢
!• LCD BRIGHT button (p.13, 17)
@∞ END SEARCH button (p. 19)
!ª VOLUME button (p. 17)
@§ MENU button (p. 22)
@º Speaker
@¶ V/v buttons (p. 22)
@¡ DISPLAY botton (p.17)
@• START/STOP button (p. 10)
@™ 26-pin connector (p. 20)
@ª EXECUTE button (p. 22)
@£ S VIDEO jack (p. 38, 42)
#º BATT (battery) LOCK/RELEASE switch
(p. 8)
@¢ AUDIO VIDEO OUT/2 (headphones)
jack (p. 17, 38, 42)
#¡ Tripod receptacle (p. 15)
64
DCR-PC7E
3-858-632-12E (E32)
#™
#∞
#§
#£
#¶
#•
#ª
#¢
#£ Zoom switch (p. 12)
Additional information
#™ Viewfinder lens adjustment dial
(p. 11)
$º
#¶ Lens
#• Recording lamp (p. 10)
#ª Remote sensor
#¢ Grip strap (p. 15)
Aim the Remote Commander here for
remote control.
#∞ FOCUS/(INFINITY) button (p. 36)
$º DV IN/OUT jack (p. 42)
#§ Focus ring (p. 36)
65
DCR-PC7E
3-858-632-12E (E32)
Identifying the parts
Remote Commander
The buttons that have the same name on the Remote Commander as on the camcorder
function identically.
1
2
!º
3
!¡
4
!™
5
6
!£
7
8
9
1 PHOTO button (p. 28)
9 Power zoom button (p. 12)
2 DISPLAY button (p. 17)
0 ZERO SET MEMORY button (p. 40)
3 SEARCH MODE button (p. 41)
!¡ Transmitter
4 =/+ buttons (p. 41)
5 Tape transport buttons (p. 17)
Point toward the remote sensor to
control the camcorder after turning on
the camcorder.
7 AUDIO DUB button (p.46)
!™ VTR4/ID/VTR2 selector (p. 68)
Select VTR4 or ID, the same setting as
COMMANDER in the menu system.
Select VTR2 when using with 8 mm
camcorder.
8 DATA CODE button (p. 39)
!£ START/STOP button (p. 10)
6 Recording buttons (p. 44)
66
DCR-PC7E
3-858-632-12E (E32)
To prepare the Remote Commander
To use the Remote Commander, you must insert two R6 (size AA) batteries. Use the
supplied R6 (size AA) batteries.
(1) Remove the battery cover from the Remote Commander.
(2) Insert both of the R6 (size AA) batteries with correct polarity.
(3) Put the battery cover back onto the Remote Commander.
1
2
3
Additional information
Note on battery life
The batteries for the Remote Commander last about 6 months under normal operation.
When the batteries become weak or dead, the Remote Commander does not work.
To avoid damage from possible battery leakage
Remove the batteries when you will not use the Remote Commander for a long time.
To use the Remote Commander
Make sure that the COMMANDER is set to VTR4 or ID in the menu system on the
camcorder.
MENU
COMMANDER
VTR4
OFF
ID
ID SET
[MENU]:END
67
DCR-PC7E
3-858-632-12E (E32)
Identifying the Parts
About the ID of the Remote Commander
You can avoid misoperation from other remote commanders by setting the VTR4/ID/
VTR2 selector to ID. Use the supplied Remote Commander when you set the selector to
ID. When you use the Remote Commander for the first time, register the ID following
the procedure below. Once you register the ID, you do not need to do again.
(1) Open the LCD panel.
(2) Press MENU to display the menu on the LCD screen.
(3) Press V or v to select COMMANDER, then press EXECUTE.
(4) Press v to select ID SET.
(5) Set the VTR4/ID/VTR2 selector on the Remote Commander to ID.
(6) Point the Remote Commander at the camcorder and press p STOP on the
Remote Commander.
After the beep sound, the ID of the Remote Commander is registered, and the
COMMANDER is set to ID in the menu system.
(7) Press MENU to erase the menu display.
2
6
MENU
3,
4
STOP
EXECUTE
1
5
VTR 4
ID
7
VTR 2
MENU
When the BEEP is set to OFF in the menu system
The beep does not sound at step 6.
68
DCR-PC7E
3-858-632-12E (E32)
Remote control direction
Aim the Remote Commander to the remote sensor.
The operative range of the Remote Commander is about 5 m indoors. Depending on
the angle, Remote Commander may not activate the camcorder.
Additional information
Notes on the Remote Commander
• Keep the remote sensor away from strong light sources such as direct sunlight or
illumination. Otherwise, the remote control may not be effective.
• Be sure that there is no obstacle between the remote sensor on the camcorder and the
Remote Commander.
• This camcorder works at commander mode VTR4 or ID. The commander modes
(VTR4 or ID) are used to distinguish this camcorder from other Sony VCRs to avoid
remote control misoperation. If you use another Sony VCR at commander mode ID,
we recommend you change the commander mode or cover the remote sensor of the
VCR with black paper.
• You do not need to register the ID again once you have done so. Set the
COMMANDER to ID in the menu system, and set the VTR4/ID/VTR2 selector ID on
the Remote Commander to ID.
• The registered ID is not erased even if the built-in vanadium-lithium battery is
discharged.
69
DCR-PC7E
3-858-632-12E (E32)
Identifying the parts
Operation indicators
1
!¡
2
!™
3
!£
4
!¢
5
T
AE LOCK
16 : 9 WIDE
FADER
6
7
STBY
0:13:46:05
50min
16BIT
PHOTO
!∞
!§
!¶
W
8
VOL
!•
DV IN
20min
!ª
9
!º
1 Manual focus/infinity indicator (p. 36)
!¡ Mirror mode indicator (p. 25)
2 PROGRAM AE indicator (p. 33)
!™ Recording mode indicator (p. 11)
3 White balance indicator (p. 34)
!£ Recording standby mode (p. 10)/
Tape transport mode indicator
4 SteadyShot indicator (p. 31)
5 AE LOCK indicator (p. 37)
6 16:9 WIDE indicator (p. 30)
7 FADER indicator (p. 27)
8 Zoom indicator (p. 12)
9 BRT (bright) indicator (p. 13)/VOL
(volume) indicator (p. 17)
0 Warning indicator (p. 71)
!¢ Time code indicator (p. 11)
!∞ Remaining tape indicator (p. 11)
!§ Audio mode indicator (p. 49)
!¶ Photo recording indicator (p. 28)/
Electronic flash indicator
!• DV IN indicator (p.43)
!ª Remaining battery indicator (p. 51)/
Remaining time in minutes indicator
70
DCR-PC7E
3-858-632-12E (E32)
Warning indicators
If indicators flash on the LCD screen or in the viewfinder or warning messages appear
on the display window , check the following:
: you can hear the beep sound when BEEP is set to ON in the menu system.
1
2
3
5min
0min
5
6
7
8
9
1 The battery is weak or dead.
Slow flashing: The battery is weak.
Fast flashing: The battery is dead.
Depending on conditions, the i
indicator may flash, even if there are 5
to 10 minutes remaining.
2 The tape is near the end.
The flashing is slow.
3 The tape has run out.
The flashing becomes rapid.
4 No tape has been inserted.
Additional information
4
5 The tab on the tape is out (red).
6 Moisture condensation has occurred.
(p. 54)
7 The video heads may be
contaminated. (p. 54)
8 The clock is not set.
If the clock is not set when you press
START/STOP button in the CAMERA
mode, the message appears for 5
seconds.
9 Some other trouble has occurred.
Disconnect the power source and
contact your Sony dealer or local
authorized facility.
71
DCR-PC7E
3-858-632-12E (E32)
Index
A, B
F, G, H
R
AE LOCK ............................. 37
Audio dubbing .................... 45
Audio mode ......................... 49
BATT(LOCK/RELEASE) .... 8
BEEP ............................... 11, 23
Fade-in/fade-out ................ 27
FADER ................................. 27
FOCUS .................................. 36
Full charge ............................. 6
Remaining battery
indicator ............................... 51
Remaining tape indicator .. 11
Remote Commander .......... 66
I, J, K, L
S
ID ........................................... 68
InfoLITHIUM ...................... 52
LCD BRIGHT ...................... 13
LP mode ............................... 11
Skip scan .............................. 18
SP mode ............................... 11
Standby mode ..................... 10
START/STOP MODE
switch ................................... 14
SteadyShot ........................... 31
C
Camera recording ............... 10
Car battery ........................... 21
Charging battery pack ......... 6
Charging vanadium-lithium
battery .................................. 47
Cleaning video heads ......... 54
Clock set ............................... 48
Colour TV system ........... 4, 56
Connection ..................... 38, 42
COPY INHIBIT ................... 49
M, N
Manual focus ....................... 36
Menu system ....................... 22
Mirror mode ........................ 25
Moisture condensation ...... 54
Normal charge ...................... 6
D, E
Data Code ............................ 39
DISPLAY .............................. 17
Digital zoom ........................ 12
DV connecting cable ........... 42
DV format ............................ 38
DV IN/OUT ........................ 42
Editing .................................. 42
EJECT ...................................... 9
END SEARCH ..................... 19
Exposure .............................. 37
Sony Corporation
O, P, Q
PHOTO ................................. 28
Playback on a TV ................ 38
Playback pause .................... 18
Power sources ..................... 20
Power zoom ......................... 12
PROGRAM AE .................... 32
T, U, V
Time code ............................. 11
Tripod mounting ................ 15
Trouble check ...................... 57
VOLUME ............................. 17
W, X, Y, Z
Warning indicators ............. 71
White balance ...................... 34
Wide mode .......................... 30
ZERO SET MEMORY ......... 40
Zoom .................................... 12
Printed in Japan
DCR-PC7E
3-858-632-12E (E32)