1
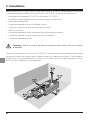
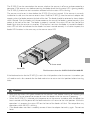
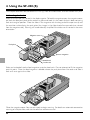
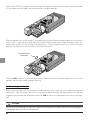
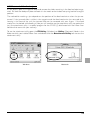
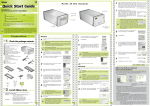
Slide Feeder SF-200 (S)
Contents
Cautions ..................................................................................................................................................................................................... 18
1. Overview .......................................................................................................................................................................................... 20
2. Parts and Accessories ................................................................................................................................................................ 21
3. Installation ......................................................................................................................................................................................... 22
4. Using the SF-200 (S) .................................................................................................................................................................. 24
5. Maintenance .................................................................................................................................................................................... 31
6. Specifications ................................................................................................................................................................................... 32
17
Cautions
• The reproduction of this manual in whole or in part is prohibited save in cases in which Nikon’s prior
permission has been obtained.
• The information contained in this manual is subject to change without notice.
• Nikon has made every effort to produce a perfect manual, but should you find any mistakes, we
would be grateful if you would kindly let us know. The address of Nikon’s representative in your area
is provided separately.
• Nikon is not liable for damages resulting from the use of this product.
Trademark Information
All trade-names mentioned in this manual are the trademarks or registered trademarks of their respective holders.
Symbol
The
symbols in this manual signify important safety precautions. All passages marked with this
indication should be read prior to installation to prevent injury to yourself or to others.
Symbol
The
symbols in this manual signify the need for caution when using the product. These indications
are placed in sections that should be read before operation to prevent damage to the product.
18
Federal Communications Commission (FCC) Radio Frequency Interference Statement
This equipment has been tested and found to comply with the limits for a Class B digital device, pursuant to Part 15
of the FCC Rules. These limits are designed to provide reasonable protection against harmful interference in a
residential installation. This equipment generates, uses, and can radiate radio frequency energy and, if not installed
and used in accordance with the instructions, may cause harmful interference to radio communications. However,
there is no guarantee that interference will not occur in a particular installation. If this equipment does cause harmful
interference to radio or television reception, which can be determined by turning the equipment off and on, the user
is encouraged to try to correct the interference by one or more of the following measures:
•
•
•
•
Reorient or relocate the receiving antenna.
Increase the separation between the equipment and receiver.
Connect the equipment into an outlet on a circuit different from that to which the receiver is connected.
Consult the dealer or an experienced radio/television technician for help.
CAUTIONS
Modifications
The FCC requires the user to be notified that any changes or modifications made to this device that are not
expressly approved by Nikon Corporation may void the user’s authority to operate the equipment.
Notice for customers in Canada
CAUTION
This class B digital apparatus meets all requirements of the Canadian Interference Causing Equipment Regulations.
ATTENTION
Cet appareil numérique de la classe B respecte toutes les exigences du Règlement sur le matériel brouilleur du
Canada.
Notice for customers in European countries
ACHTUNG
Dieses Gerät entspricht den Bestimmungen der EG-Direktive 87/308/EEC zur Störungsunterdrückung. Lärmemission
kleiner 70 dBA
Notice concerning prohibition of copying or reproduction
Note that simply being in possession of material which has been copied or reproduced by means of a scanner may
be punishable by law.
• Items prohibited by law from being copied or reproduced
Do not copy or reproduce paper money, coins, securities, government bonds, or local government bonds, even if
such copies or reproductions are stamped “Sample”.
The copying or reproduction of paper money, coins, or securities which are circulated in a foreign country is
prohibited.
Unless the prior permission of the government has been obtained, the copying or reproduction of unused
postage stamps or post cards issued by the government is prohibited.
The copying or reproduction of stamps issued by the government and certified documents stipulated by law is
prohibited.
• Cautions on certain copies and reproductions
The government has issued cautions on copies or reproductions of securities issued by private companies (shares,
bills, checks, gift certificates, etc.), commuter passes, or coupon tickets, except when a minimum of necessary
copies are to be provided for business use by a company. Also, do not copy or reproduce passports issued by the
government, licenses issued by public agencies and private groups, ID cards, and tickets, such as passes and meal
coupons.
• Comply with copyright notices
The copying or reproduction of copyrighted creative works such as books, music, paintings, woodcut prints, maps,
drawings, movies, and photographs is prohibited except when it is done for personal use at home or for similar
restricted and non-commercial use.
19
1. Overview
Thank you for your purchase of an SF-200 (S) slide feeder for 4000 ED (SUPER COOLSCAN 4000 ED)
and LS-2000 (SUPER COOLSCAN 2000) Nikon film scanners. The SF-200 (S), which can hold up to
fifty mounts 1.5 mm in thickness, automates the scanning of consecutive 35 mm slides. Like the other
adapters for the 4000 ED and LS-2000, the SF-200 (S) can be inserted while the scanner is on and
connected to a computer.
This manual describes the procedures for unpacking, setting up, and connecting the feeder to your
scanner. The next chapter, “Parts and Accessories,” details the contents of the package and the parts of
the feeder. This is followed by “Installation,” which describes how to connect the feeder to the scanner.
In “Using the SF-200 (S),” the procedures for loading and removing slides are explained. The final chapter,
“Maintenance,” gives instructions on how to care for and transport the feeder. Please read all instructions thoroughly to ensure that you can get the most from your SF-200 (S).
The procedures for scanning consecutive slides with the SF-200 (S) may be found in the software
reference manuals provided on the CD-ROM that came with your scanner.
We hope that you find this manual helpful.
A Note on Nikon Scan
If you are using the SF-200 (S) with LS-2000 film scanners, note that although Nikon Scan version 2.0
supports the SF-200 (S), it does not allow scanned images to be saved automatically. We recommend
that you upgrade to version 2.1 or later. To determine the version currently installed on your computer:
button in the Nikon Scan applet
• Windows: click the
• Macintosh: select About Nikon Scan from the Apple ( ) menu
For information on upgrading to Nikon Scan 2.1 or later, visit the following URL:
USA:
http://www.nikontechusa.com
Europe:
http://www.nikon-euro.com
20
2. Parts and Accessories
This chapter lists the items packaged with your slide feeder and identifies the parts of the SF-200 (S).
2.1 Package Contents
Purchasers of the SF-200 (S) should find that the package contains all the items listed below. Should you
find that anything is missing or damaged, contact your retailer immediately.
SF-200 (S) slide feeder (1)
Feed-mechanism
attachment for rounded
slide mounts (1)
Reference manual (this manual)
(1)
2.2 Parts of the SF-200 (S)
Magazine cover
Slide insertion guide
Push plate
Ejection magazine
Feed magazine
Status LED
Load mark
Push plate
21
3. Installation
Before installing the SF-200 (S), make sure that your scanner is set up in a suitable location, as described
in the documentation provided with the scanner. The SF-200 (S) should not be used where:
• the temperature exceeds 35ºC (95ºF) or falls below 10ºC (50ºF)
• it would be subject to condensation or drastic changes in temperature
• the humidity exceeds 85%
• it would be exposed to direct or reflected sunlight
• it might be subject to vibration or strong physical shocks
• there is a lot of dust
• it would be exposed to radio interference from other electronic devices
• it would be exposed to water vapor (e.g., from a humidifier)
• it would be exposed to smoke
Warning: Failure to observe the above precautions could result in fire or in scanner
malfunction.
The scanner must be on its base when the SF-200 (S) is used, and there must be sufficient space around
the scanner to allow the magazine cover to open and to ensure adequate ventilation. There should be
at least 15 cm (6″) of space above the unit and 10 cm (4″) open to the rear. Space requirements when
the SF-200 (S) is attached are illustrated below.
22
The SF-200 (S) can be mounted on the scanner whether the scanner is off or on and connected to a
computer. If the scanner is on, before mounting the feeder check that the status LED is glowing steadily.
The SF-200 (S) should NOT be inserted or removed while the status LED is blinking.
The scanner must be on its base before the SF-200 (S) can be inserted. If the scanner is currently
installed on its side, turn the scanner onto its base. Slide the SF-200 (S) into the scanner’s adapter slot,
stopping when the feeder contacts the back of the slot. The feeder should be oriented as shown below
when inserted. Push the feeder until the connector on the rear of the feeder is seated securely in the
socket at the back of the slot. The feeder is properly inserted if the status LED on the front of the
feeder lights when the scanner is turned on. If the scanner is on when the feeder is inserted, the feeder’s
status LED will blink to indicate that the feeder has been inserted correctly. In all other respects, the
feeder LED functions in the same way as the scanner status LED.
Power switch
Status LED
The illustration shows the SUPER COOLSCAN 4000 ED
If the feed mechanism for the SF-200 (S) is not in the initial position when the scanner is turned on, you
will need to wait a few seconds for the feed mechanism to return to initial position before inserting
slides.
Cautions
• Wait until the status LED glows steadily or the scanner is off before inserting or removing the
SF-200 (S). Do not attempt to remove or insert the feeder while the scanner is operating.
• When the SF-200 (S) is inserted with the power on, or the scanner turned on after the feeder has
been inserted with the power off, the feed mechanism will return to the initial position. While this
operation is in progress, the status LED on the front of the feeder will blink. Do not perform any
operations while the LED is blinking.
• If the feeder does not slide in smoothly, remove it from the adapter slot and try again. Do not use
force.
23
4. Using the SF-200 (S)
This chapter describes how to load the SF-200 (S), how to remove slides, and how to deal with jams.
4.1 Loading the feeder
Slides to be scanned are inserted in the feed magazine. To load the magazine, open the magazine cover,
pull back the feed push-plate to the end of its grove, and hook it in the notch so that it does not spring
back to its original position. Place the slides in the magazine with the long end of the aperture up and
the emulsion surface facing the push plate (the images in the slides should be reversed when viewed
from the magazine side). Scanning will be considerably simplified if the slides are all inserted in the same
orientation.
Magazine cover
Push plate
Ejection magazine
Notch
Load mark
Slides can be loaded into the feed magazine up to the load mark. Do not attempt to fill the magazine
past this point. Once the feed magazine is loaded, release the push plate from the notch and slide it
back until rests against the slides.
Close the magazine cover. You are now ready to begin scanning. For details on automatic consecutive
scanning of multiple slides, refer to the software reference manual.
24
Cautions
• Slides must be from 1.0 mm to 3.2 mm thick.
• Mounts with rough surfaces could cause the feeder to jam.
• Do not use mounts with peeling or burred edges, mounts to which seals or labels have been affixed,
or mounts with sharp corners. Such mounts could jam the feeder or cause problems during scanning.
• The feeder does not function equally well with all makes of slide mount. Makes that have projecting
parts or are not of an even thickness may jam in the feeder.
• Avoid slides with warped mounts. Warped slides may jam if placed in the feeder as shown below.
Slide feeder viewed
from above
Warped slide mount
• Do not load slides into the feeder with the longer side of the aperture facing the scanner, as this
could damage the film or slide mount or cause the feeder to jam. Insert slides as shown by the
insertion guide sticker next to the feed magazine.
Insertion guide
sticker
To scanner ⇒
• Do not load slides in the feed magazine past the load mark, as this may cause the feeder to jam.
• Do not move the scanner while scanning is in progress.
• Remove scanned slides from the ejection magazine before the magazine is full. Continuing scanning
when there is no room left in the ejection magazine could jam the feeder.
• Do not remove the feeder while scanning is in progress.
• Before turning the scanner off or removing the feeder, make sure that all slides have been removed
from the magazine and that the last slide to be fed has been ejected.
25
Slide Mounts That Can Be Used in the SF-200 (S)
•
The following mounts have been tested and approved for use in the SF-200 (S):
GEPE 3mm, GEPE 2mm, bonum, REVUE, AGFA system G, AGFA reflecta CS, Reflecta GR, Kaiser SR,
hama fix, ROWI quickslide
•
The following mounts can be used only in restricted orientations:
Mount
Cautions
Insert the slide with the front (the photograph
side) facing the right of the SF-200 (S) (when the
feeder is viewed from the front). When the slidemount adapter is used, slides can be inserted facing either direction.
WESS
Insert the slide with the front (the photograph
side) facing the right of the SF-200 (S) (when the
feeder is viewed from the front).
hama DSR
•
The following mounts are known to cause jams:
Kodachrome
1.1 mm cardboard
mounts
26
Mount
Notes
PLASTIMOUNTS
The uneven edges, surface projections, curled
edges or apertures, or
burrs on these mounts
can cause jams.
Pakon
4.2 Removing slides
Slides will be sent to the ejection magazine after scanning. To remove slides from the ejection magazine,
pull back the push plate and remove the slides. Slides must be removed before the ejection magazine
fills up.
4.3 Using the Feed-Mechanism Attachment
Thick mounts (over 2 mm thick) with rounded edges may not feed properly when used with the SF200 (S). A removable plastic part is provided for attachment to the feed mechanism, enabling the
scanner to feed such slides. A special attachment utility program, provided with the Nikon Scan software that came with your scanner, is required both when attaching this part to and removing it from the
feed mechanism.
To attach the feed-mechanism attachment, the scanner must be connected to the computer and both
scanner and computer must be on. After inserting the SF-200 (S) into the scanner as described above,
open the FDUtility (Windows) or Utility (Macintosh) folder in the folder to which you installed
Nikon Scan and then double-click the Attachment Utility icon to start the attachment utility.
Windows
Macintosh
The attachment utility window will appear on the desktop. If more than one scanner is attached to your
computer and powered on, select the scanner to which the SF-200 (S) is attached from the select a
scanner pop-up menu.
Nikon Scan does not support simultaneous connection of more than one 4000 ED. If more than one
scanner of the same type is connected, only one of the devices will appear in the Tools menu.
27
Open the SF-200 (S)’s magazine cover, pull back the feed push-plate to the end of its grove, and hook
it in the notch so that it does not spring back to its original position.
Click the double right-arrow button in the attachment utility to move the feed mechanism to where it
is fully visible. If you move the feed mechanism too far, click the left-arrow button to move it back. The
single-arrow buttons can be used for fine adjustments. Once the feed mechanism is visible, insert the
pegs on the attachment into the holes in the feed mechanism.
Feed-mechanism
attachment
Click the OK button in the attachment utility window to return the feed mechanism to its initial
position. You are now ready to begin scanning.
4.4 Removing attachment
When scanning slides with flat mounts or slides less than 2 mm thick, you will need to remove the
attachment. Use the attachment utility as described above to move the feed mechanism into the
magazine, then remove the attachment and click OK to return the feed mechanism to its initial position.
Caution
Be sure that the attachment is securely in place. If the attachment is loose, slides may not feed properly
and damage to the SF-200 (S) could result.
28
4.5 What to do if the feeder jams
If a jam occurs, open the magazine cover and remove the slides remaining in the feed and eject magazines. Pull back the feed push-plate and hook it in the notch so that it does not spring back to its original
position.
The method for resolving a jam depends on the position of the feed mechanism when the jam occurred. If the jammed slide is visible in the magazine and the feed mechanism has returned to its
housing in the front of the unit, the jammed slide can be removed with your fingers. If the feed
mechanism has locked while feeding a slide, you will need to use the attachment utility to resolve the
jam (the attachment utility is a special program for the SF-200 (S) distributed with the Nikon Scan
software that came with your scanner).
To use the attachment utility, open the FDUtility (Windows) or Utility (Macintosh) folder in the
folder to which you installed Nikon Scan and double-click the Attachment Utility icon to start the
attachment utility.
Windows
Macintosh
29
The attachment utility window will appear on the desktop. If more than one scanner is attached to your
computer and powered on, select the scanner to which the SF-200 (S) is attached from the select a
scanner pop-up menu.
Nikon Scan does not support simultaneous connection of more than one 4000 ED. If more than one
scanner of the same type is connected, only one of the devices will appear in the Tools menu.
If the feed mechanism has locked while pushing a slide, click the double left-arrow button in the attachment utility window to move the feed mechanism back to its housing, then remove the jammed slide
with your fingers. If two or more slides have jammed so that they overlap, remove the slide on the
magazine side first. If the mount has caught at the entrance to the ejection magazine while being
ejected from the feeder, click the right arrow button to move the feed mechanism out of the way, then
push the slide back gently back towards the scanner to clear the jam. Using the left-arrow button,
return the feed mechanism to its housing (if this does not clear the jam, you will need to take the feeder
to a Nikon service center for repairs).
30
5. Maintenance
This chapter describes how to clean, store, and transport the SF-200 (S).
5.1 Cleaning
Before cleaning the feeder, remove it from the scanner. The exterior of the feeder is made of plastic, and
should not be cleaned with volatile cleaners such as alcohol or paint thinner. Use a blower to blow off
dust or wipe the surface with a dry cloth. If this is not sufficient to remove all dirt, clean with a cloth that
has been slightly dampened with a neutral detergent or liquid soap.
Warning: Do not use water or a volatile liquid such as alcohol, benzine, or thinner. Should
any of these liquids enter the feeder, fire or electric shock could result. Volatile chemicals
could also stain the plastic exterior of the feeder.
5.2 Storage
When you do not plan to use the feeder for an extended period of time, remove it from the scanner.
Store in a dry, well-ventilated environment, away from electronic equipment such as televisions or
radios which produce strong magnetic fields. Do not store the feeder where the temperature exceeds
60ºC (140ºF) or goes below –20ºC (–4ºF), or where the humidity is less than 20% or more than 90%.
5.3 Transport
When transporting the scanner, remove the feeder from the scanner and pack it in the original packing
material.
31
6. Specifications
Film:
35 mm slide mount of 1.0 to 3.2 mm in thickness
Maximum number of slides: Approx. 50 slides with mounts 1.5 mm in thickness
(Housing space: Approx. 78.5 mm)
Operating mode:
4000 ED/LS-2000 installed on its base, SF-200 (S) connected directly
to the connector at rear of scanner adapter slot
Feed/eject time (reference): Feed: approx. 6 seconds per slide
Eject: approx. 6 seconds per slide
Dimensions:
32
142 mm (W) × 325 mm (D) × 85 mm (H) (5.63″ × 12.78″ × 3.37″)
Weight:
Approx. 700 g (1 lb 9.0 oz)
Power supply:
5 VDC, 0.7 A or less, supplied from scanner
Operating environment:
Operating temperature1
+10ºC to +35ºC
Humidity
20% to 85% (no condensation)