1
82269_Aldi AUS_RC1_content.book Seite 1 Donnerstag, 9. April 2009 2:59 14
Content
Content . . . . . . . . . . . . . . . . . . . . . . . . . . . . . . . . . . . . . . . . . . . . . . . . . . . . 1
DECT Cordless Phone with Answering Machine . . . . . . . . . . . . . . . 5
What your 1 year warranty means . . . . . . . . . . . . . . . . . . . . . . . . . . . . . . . . . . . . . . . . 5
What’s in the box? . . . . . . . . . . . . . . . . . . . . . . . . . . . . . . . . . . . . . . . . . . 6
Safety instructions . . . . . . . . . . . . . . . . . . . . . . . . . . . . . . . . . . . . . . . . . 7
Keeping electrical equipment out of reach of children . . . . . . . . . . . . . . . . . . . . 7
Potentially explosive areas . . . . . . . . . . . . . . . . . . . . . . . . . . . . . . . . . . . . . . . . . . . . . . . 7
Mains adapters . . . . . . . . . . . . . . . . . . . . . . . . . . . . . . . . . . . . . . . . . . . . . . . . . . . . . . . . . . 8
Setting the appliance up safely . . . . . . . . . . . . . . . . . . . . . . . . . . . . . . . . . . . . . . . . . . 8
Accessibility of mains power socket . . . . . . . . . . . . . . . . . . . . . . . . . . . . . . . . . . . . . . 8
Thunder storms/Non-use . . . . . . . . . . . . . . . . . . . . . . . . . . . . . . . . . . . . . . . . . . . . . . . . 9
Handling the rechargeable batteries safely . . . . . . . . . . . . . . . . . . . . . . . . . . . . . . . 9
Correct repair procedure . . . . . . . . . . . . . . . . . . . . . . . . . . . . . . . . . . . . . . . . . . . . . . . 10
What is DECT? . . . . . . . . . . . . . . . . . . . . . . . . . . . . . . . . . . . . . . . . . . . . . 11
History . . . . . . . . . . . . . . . . . . . . . . . . . . . . . . . . . . . . . . . . . . . . . . . . . . . . . . . . . . . . . . . . . 11
Distribution . . . . . . . . . . . . . . . . . . . . . . . . . . . . . . . . . . . . . . . . . . . . . . . . . . . . . . . . . . . . 12
Control . . . . . . . . . . . . . . . . . . . . . . . . . . . . . . . . . . . . . . . . . . . . . . . . . . . 13
Handset . . . . . . . . . . . . . . . . . . . . . . . . . . . . . . . . . . . . . . . . . . . . . . . . . . . . . . . . . . . . . . . . 13
Basestation . . . . . . . . . . . . . . . . . . . . . . . . . . . . . . . . . . . . . . . . . . . . . . . . . . . . . . . . . . . . 15
Preparation . . . . . . . . . . . . . . . . . . . . . . . . . . . . . . . . . . . . . . . . . . . . . . . 16
Setting the appliance up safely . . . . . . . . . . . . . . . . . . . . . . . . . . . . . . . . . . . . . . . . . 16
Insert rechargeable batteries into the handset . . . . . . . . . . . . . . . . . . . . . . . . . . . 17
Connecting the base station to the mains . . . . . . . . . . . . . . . . . . . . . . . . . . . . . . . 18
Connecting the charging station to the mains . . . . . . . . . . . . . . . . . . . . . . . . . . . 18
Charging the rechargeable batteries . . . . . . . . . . . . . . . . . . . . . . . . . . . . . . . . . . . . 19
Connecting the base station to the telephone network . . . . . . . . . . . . . . . . . . 22
1
After Sales Support TEL: 1 300 884 987 WEB Support: www.medion.com.au
82269_Aldi AUS_RC1_content.book Seite 2 Donnerstag, 9. April 2009 2:59 14
The display . . . . . . . . . . . . . . . . . . . . . . . . . . . . . . . . . . . . . . . . . . . . . . . 23
Basic display . . . . . . . . . . . . . . . . . . . . . . . . . . . . . . . . . . . . . . . . . . . . . . . . . . . . . . . . . . . 23
Other indicators on the display . . . . . . . . . . . . . . . . . . . . . . . . . . . . . . . . . . . . . . . . . 24
Telephone Calls . . . . . . . . . . . . . . . . . . . . . . . . . . . . . . . . . . . . . . . . . . . 27
Basic functions . . . . . . . . . . . . . . . . . . . . . . . . . . . . . . . . . . . . . . . . . . . . . . . . . . . . . . . . . 27
Additional functions . . . . . . . . . . . . . . . . . . . . . . . . . . . . . . . . . . . . . . . . . . . . . . . . . . . 30
Making calls with several callers . . . . . . . . . . . . . . . . . . . . . . . . . . . . . . . . . . . . . . . . 35
Setting the telephone via the menu . . . . . . . . . . . . . . . . . . . . . . . . 37
Navigating in the menu . . . . . . . . . . . . . . . . . . . . . . . . . . . . . . . . . . . . . . . . . . . . . . . . 37
Menu Call List . . . . . . . . . . . . . . . . . . . . . . . . . . . . . . . . . . . . . . . . . . . . . 38
STORE . . . . . . . . . . . . . . . . . . . . . . . . . . . . . . . . . . . . . . . . . . . . . . . . . . . . . . . . . . . . . . . . . 38
DELETE . . . . . . . . . . . . . . . . . . . . . . . . . . . . . . . . . . . . . . . . . . . . . . . . . . . . . . . . . . . . . . . . 38
DELETE ALL . . . . . . . . . . . . . . . . . . . . . . . . . . . . . . . . . . . . . . . . . . . . . . . . . . . . . . . . . . . . 38
DETAILS . . . . . . . . . . . . . . . . . . . . . . . . . . . . . . . . . . . . . . . . . . . . . . . . . . . . . . . . . . . . . . . 38
Menu Phonebook . . . . . . . . . . . . . . . . . . . . . . . . . . . . . . . . . . . . . . . . . 39
Add entry . . . . . . . . . . . . . . . . . . . . . . . . . . . . . . . . . . . . . . . . . . . . . . . . . . . . . . . . . . . . . . 39
VIEW . . . . . . . . . . . . . . . . . . . . . . . . . . . . . . . . . . . . . . . . . . . . . . . . . . . . . . . . . . . . . . . . . . . 41
EDIT . . . . . . . . . . . . . . . . . . . . . . . . . . . . . . . . . . . . . . . . . . . . . . . . . . . . . . . . . . . . . . . . . . . 41
DELETE . . . . . . . . . . . . . . . . . . . . . . . . . . . . . . . . . . . . . . . . . . . . . . . . . . . . . . . . . . . . . . . . 41
DELETE ALL . . . . . . . . . . . . . . . . . . . . . . . . . . . . . . . . . . . . . . . . . . . . . . . . . . . . . . . . . . . . 41
PB STATUS . . . . . . . . . . . . . . . . . . . . . . . . . . . . . . . . . . . . . . . . . . . . . . . . . . . . . . . . . . . . . 41
Menu Base-Settings . . . . . . . . . . . . . . . . . . . . . . . . . . . . . . . . . . . . . . . 42
BS RINGER . . . . . . . . . . . . . . . . . . . . . . . . . . . . . . . . . . . . . . . . . . . . . . . . . . . . . . . . . . . . . 42
RING VOLUME . . . . . . . . . . . . . . . . . . . . . . . . . . . . . . . . . . . . . . . . . . . . . . . . . . . . . . . . . 42
DELETE HS . . . . . . . . . . . . . . . . . . . . . . . . . . . . . . . . . . . . . . . . . . . . . . . . . . . . . . . . . . . . . 42
DIAL MODE . . . . . . . . . . . . . . . . . . . . . . . . . . . . . . . . . . . . . . . . . . . . . . . . . . . . . . . . . . . . 43
FLASH TIME . . . . . . . . . . . . . . . . . . . . . . . . . . . . . . . . . . . . . . . . . . . . . . . . . . . . . . . . . . . . 43
CHANGE PIN . . . . . . . . . . . . . . . . . . . . . . . . . . . . . . . . . . . . . . . . . . . . . . . . . . . . . . . . . . . 44
ECO MODE . . . . . . . . . . . . . . . . . . . . . . . . . . . . . . . . . . . . . . . . . . . . . . . . . . . . . . . . . . . . . 44
2
After Sales Support TEL: 1 300 884 987 WEB Support: www.medion.com.au
82269_Aldi AUS_RC1_content.book Seite 3 Donnerstag, 9. April 2009 2:59 14
HS Settings . . . . . . . . . . . . . . . . . . . . . . . . . . . . . . . . . . . . . . . . . . . . . . . 45
ALARM . . . . . . . . . . . . . . . . . . . . . . . . . . . . . . . . . . . . . . . . . . . . . . . . . . . . . . . . . . . . . . . . . 45
RING SETUP . . . . . . . . . . . . . . . . . . . . . . . . . . . . . . . . . . . . . . . . . . . . . . . . . . . . . . . . . . . . 46
TONE SETUP . . . . . . . . . . . . . . . . . . . . . . . . . . . . . . . . . . . . . . . . . . . . . . . . . . . . . . . . . . . . 46
LANGUAGE . . . . . . . . . . . . . . . . . . . . . . . . . . . . . . . . . . . . . . . . . . . . . . . . . . . . . . . . . . . . . 47
RENAME HS . . . . . . . . . . . . . . . . . . . . . . . . . . . . . . . . . . . . . . . . . . . . . . . . . . . . . . . . . . . . 47
HS DISPLAY . . . . . . . . . . . . . . . . . . . . . . . . . . . . . . . . . . . . . . . . . . . . . . . . . . . . . . . . . . . . 47
AUTO ANSWER . . . . . . . . . . . . . . . . . . . . . . . . . . . . . . . . . . . . . . . . . . . . . . . . . . . . . . . . . 47
DATE & TIME . . . . . . . . . . . . . . . . . . . . . . . . . . . . . . . . . . . . . . . . . . . . . . . . . . . . . . . . . . . 48
SELECT BASE . . . . . . . . . . . . . . . . . . . . . . . . . . . . . . . . . . . . . . . . . . . . . . . . . . . . . . . . . . . 48
REGISTRATION . . . . . . . . . . . . . . . . . . . . . . . . . . . . . . . . . . . . . . . . . . . . 49
DEFAULT . . . . . . . . . . . . . . . . . . . . . . . . . . . . . . . . . . . . . . . . . . . . . . . . . 49
Answering machine (Menu ANS. MACHINE) . . . . . . . . . . . . . . . . . . 50
MSG PLAYBACK . . . . . . . . . . . . . . . . . . . . . . . . . . . . . . . . . . . . . . . . . . . . . . . . . . . . . . . . 50
DELETE ALL . . . . . . . . . . . . . . . . . . . . . . . . . . . . . . . . . . . . . . . . . . . . . . . . . . . . . . . . . . . . 51
MEMO . . . . . . . . . . . . . . . . . . . . . . . . . . . . . . . . . . . . . . . . . . . . . . . . . . . . . . . . . . . . . . . . . 51
TAM ON/OFF . . . . . . . . . . . . . . . . . . . . . . . . . . . . . . . . . . . . . . . . . . . . . . . . . . . . . . . . . . . 52
TAM SETTINGS . . . . . . . . . . . . . . . . . . . . . . . . . . . . . . . . . . . . . . . . . . . . . . . . . . . . . . . . . 52
Using the answering machine at the
base station . . . . . . . . . . . . . . . . . . . . . . . . . . . . . . . . . . . . . . . . . . . . . . . 57
Switching on and off . . . . . . . . . . . . . . . . . . . . . . . . . . . . . . . . . . . . . . . . . . . . . . . . . . . 57
Displays on the base station . . . . . . . . . . . . . . . . . . . . . . . . . . . . . . . . . . . . . . . . . . . . 57
Playing back messages . . . . . . . . . . . . . . . . . . . . . . . . . . . . . . . . . . . . . . . . . . . . . . . . . 58
Deleting messages . . . . . . . . . . . . . . . . . . . . . . . . . . . . . . . . . . . . . . . . . . . . . . . . . . . . . 62
Tips on Troubleshooting . . . . . . . . . . . . . . . . . . . . . . . . . . . . . . . . . . 63
Factory settings . . . . . . . . . . . . . . . . . . . . . . . . . . . . . . . . . . . . . . . . . . . 66
Factory settings on the handset . . . . . . . . . . . . . . . . . . . . . . . . . . . . . . . . . . . . . . . . . 66
Factory settings on the base station . . . . . . . . . . . . . . . . . . . . . . . . . . . . . . . . . . . . . 66
Further factory settings . . . . . . . . . . . . . . . . . . . . . . . . . . . . . . . . . . . . . . . . . . . . . . . . . 67
3
After Sales Support TEL: 1 300 884 987 WEB Support: www.medion.com.au
82269_Aldi AUS_RC1_content.book Seite 4 Donnerstag, 9. April 2009 2:59 14
Repairs . . . . . . . . . . . . . . . . . . . . . . . . . . . . . . . . . . . . . . . . . . . . . . . . . . .
Cleaning . . . . . . . . . . . . . . . . . . . . . . . . . . . . . . . . . . . . . . . . . . . . . . . . . .
Disposal . . . . . . . . . . . . . . . . . . . . . . . . . . . . . . . . . . . . . . . . . . . . . . . . . .
Technical Data . . . . . . . . . . . . . . . . . . . . . . . . . . . . . . . . . . . . . . . . . . . .
Index . . . . . . . . . . . . . . . . . . . . . . . . . . . . . . . . . . . . . . . . . . . . . . . . . . . . .
68
68
69
70
71
4
After Sales Support TEL: 1 300 884 987 WEB Support: www.medion.com.au
82269_Aldi AUS_RC1_content.book Seite 5 Donnerstag, 9. April 2009 2:59 14
DECT Cordless Phone with Answering Machine
What your 1 year warranty means
Great care has gone into manufacturing this product and it
should therefore provide you with years of good service when
used correctly. In the event of product failure within its
intended use over the course of the first year after the date of
purchase, we will rectify the problem as quickly as possible
once it has been brought to our attention. In the unlikely
event of such an occurrence, or if you require any information
about the product please contact us via our after sales support
services, details of which can be found in this manual and on
the product itself.
Copyright © 2009
All rights reserved.
Medion® makes no warranty of any kind with regard to this material, including,
but not limited to, the implied warranties of merchantability and fitness for a
particular purpose.
Medion® shall not be liable for errors contained herein or for incidental or
consequential damages in connection with the furnishing, performance, or use
of this material.
Medion® assumes no responsibility for the use or reliability of its software on
equipment that is not furnished by Medion®.
This document contains proprietary information that is protected by copyright.
All rights are reserved. No part of this document may be photocopied,
reproduced, or translated to another language without the prior written
consent of Medion®.
The information in this document is subject to change without notice.
5
After Sales Support TEL: 1 300 884 987 WEB Support: www.medion.com.au
82269_Aldi AUS_RC1_content.book Seite 6 Donnerstag, 9. April 2009 2:59 14
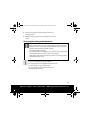
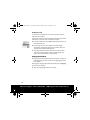
What’s in the box?
WARNING!
Do not let children play with the plastic film.
It may cause suffocation.
Remove all packaging materials including the film on the
displays of the base station an the handsets.
Unpack the unit and ensure that the following parts are
included:
1. 2 Handsets
2. Basestation
3. Charging station with mains
adapter
4. Mains adapter for basestation
6. 4 rechargeable batteries
1,2 V/600 mAh
Type NiMH, Size AAA
Operating instructions and warranty
documents (not shown)
5. Telephone cable
6
After Sales Support TEL: 1 300 884 987 WEB Support: www.medion.com.au
82269_Aldi AUS_RC1_content.book Seite 7 Donnerstag, 9. April 2009 2:59 14
Safety instructions
About these instructions
Please read these instructions carefully before using the
appliance. Note the warnings on the appliance and in the
operating instructions
Always keep the operating instructions close to hand. If you sell the appliance
or give it away, make sure you also hand over these instructions and the
guarantee slip.
Keeping electrical equipment out of reach of children
Children are not aware of the dangers associated with using
electrical equipment. Children should therefore always be
supervised when using electrical equipment.
Rechargeable batteries can be fatal if swallowed. For this
reason, keep the handset and the batteries out of reach of
small children. If a rechargeable battery is swallowed, please
obtain immediate medical assistance.
Keep plastic packaging out of reach of children. It may cause
suffocation.
Potentially explosive areas
Never use the handset in a potentially hazardous
environment, e. g. in a paint shop or in the vicinity of a gas
leak.
7
After Sales Support TEL: 1 300 884 987 WEB Support: www.medion.com.au
82269_Aldi AUS_RC1_content.book Seite 8 Donnerstag, 9. April 2009 2:59 14
Mains adapters
Use only the mains adapters supplied.
Setting the appliance up safely
Place the base station on a stable, level surface.
Make sure to set up the base station so that it is protected
from falling down.
Do not place the base station and handset near heat sources
(e. g. radiators) that could affect the base station and handset.
Do not expose the appliances to direct sunlight.
Contact with moisture, water and splashes must be avoided.
The appliance is not suitable for use in rooms that are very
humid (e. g. bathroom).
Do not place the base station or the charging station close to
other electrical equipment (e. g. television or microwaveoven).
Do not place the base station or the charging station close to
open sources of fire (e. g. burning candles).
Do not connect the device immediately to the power supply
if the unit has been moved from a cold to a warm room. The
ensuing condensation could damage the device. The device
can be operated as soon as it reaches room temperature.
Accessibility of mains power socket
Connect the base station to an easily accessible power outlet
(240 V ~ 50 Hz) that is close to where you have set up the
appliance. Keep the power outlet free of obstructions so that
the plug can be pulled out easily.
8
After Sales Support TEL: 1 300 884 987 WEB Support: www.medion.com.au
82269_Aldi AUS_RC1_content.book Seite 9 Donnerstag, 9. April 2009 2:59 14
To disconnect the appliance from the mains, always pull on
the plug rather than on the cable.
Do not kink or crush the mains cable.
Never put the handsets back in the base station and charging
station without the battery cover.
Thunder storms/Non-use
Pull the mains plug and telephone cable from the base
station and the charging station if you will be away for a long
period of time or if there is a thunder storm.
For non-use, always remove the rechargeable batteries from
the handsets to prevent leakage. Leaked batteries can
damage the handsets.
Handling the rechargeable batteries safely
You will need a rechargeable batteries for the handset. Please
note the following:
– Keep children away from the rechargeable batteries.
– Do not throw rechargeable batteries into a fire, do not
short-circuit them and do not dismantle them.
– Only use rechargeable batteries of the same type. Do not
use different types.
– Please note the polarity (+/-) when inserting the
rechargeable battery block.
– Remove the rechargeable battery block if the unit will not
be used for long periods.
9
After Sales Support TEL: 1 300 884 987 WEB Support: www.medion.com.au
82269_Aldi AUS_RC1_content.book Seite 10 Donnerstag, 9. April 2009 2:59 14
– Remove exhausted rechargeable batteries from the
appliance immediately! There is an increased risk of leakage.
– Do not expose rechargeable batteries to extreme
conditions; for example, do not place the appliance on top
of radiators! There is an increased risk of leakage.
– In the event of leakage, remove the rechargeable batteries
from the appliance immediately. Clean the contacts before
inserting new rechargeable batteries. There is a risk of skin
irritations from battery acid!
– If battery acid leaks out it is essential to avoid contact with
the skin, eyes and mucous membranes! Leaked battery
fluid can cause skin rash. If the acid does come into contact
with skin, immediately rinse the affected areas with plenty
of clear water and consult a doctor immediately.
Correct repair procedure
If the mains adapter, cable, charging adapter or base station is
damaged, detach the plug from the power supply
immediately.
Never try to open and/or repair the appliances yourself. There
is a risk of electric shock. In the event of a fault please contact
the Medion Service Centre or an approved repair specialist.
If the mains cable is damaged, it must be replaced by the
manufacturer or the manufacturer’s customer service
department or a similarly qualified person in order to prevent
exposure to danger.
10
After Sales Support TEL: 1 300 884 987 WEB Support: www.medion.com.au
82269_Aldi AUS_RC1_content.book Seite 11 Donnerstag, 9. April 2009 2:59 14
What is DECT?
DECT (Digital European Cordless Telecommunication) is the
standard for cordless digital telephones and cordless
telecommunication systems that was defined by the
European Standardisation Organization ETSI (European
Telecommunications Standards Institute). Nowadays, DECT is
mainly used for cordless telephones in the private sector,
even though DECT can do much more.
History
In 1988, the newly established European
Telecommunications Standards Institute (ETSI) was faced
with the task of defining a European standard for digital
cordless telephones. A British standard (CT2) and a Swedish
standard (CT3) already existed, but ETSI decided to create a
completely new standard that went much further. This was
the hour that DECT was born
In June 1991, the most important parts of the standard when
into the public comment phase and the first DECT units were
commercially available as early as 1992.
DECT received further momentum in 1994 through the
definition of the Generic Access Profile (GAP) which made is
possible to combine units from different manufacturers with
each other. Today, all DECT units are mostly GAP-compatible.
Work on DECT still continues. New extensions are
continuously being defined at ETSI.
11
After Sales Support TEL: 1 300 884 987 WEB Support: www.medion.com.au
82269_Aldi AUS_RC1_content.book Seite 12 Donnerstag, 9. April 2009 2:59 14
DECT describes a mobile communications system whose
fixed part consists of one or several base stations . The
counterpart to this is the mobile station. It is possible to use
several mobile stations, such as several cordless telephones
within one home or office.
It is also possible to use several base stations in a fixed mobile
communications system to supply a larger area (building
complex), or to enable several calls simultaneously. The base
stations are then controlled by an internal control module
(Fixed Part Controller).
Distribution
DECT was defined as the European standard for cordless
telephones.
The world has changed in the meantime: In addition to calls,
data is being increasingly transmitted in the office sector as
well as at home.
But at the same time, DECT continued its triumphal
procession around the world: Because of its universality,
DECT was accepted not only in Europe but also on other
continents as well. The regulatory authorities of Australia,
Hong Kong, China and the U.S. (under the name of PWT)
standardised DECT for their regions, sometimes in other
frequency ranges. DECT versions are now in use in over 100
countries.
12
After Sales Support TEL: 1 300 884 987 WEB Support: www.medion.com.au
82269_Aldi AUS_RC1_content.book Seite 13 Donnerstag, 9. April 2009 2:59 14
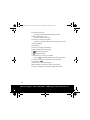
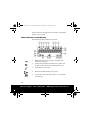
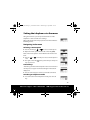
Control
Handset
1.Loudspeaker
2.Display
3.Control keys right and left
13
After Sales Support TEL: 1 300 884 987 WEB Support: www.medion.com.au
82269_Aldi AUS_RC1_content.book Seite 14 Donnerstag, 9. April 2009 2:59 14
4.Call key: End the call;
pressing longer will switch the handset on/off
5.Alphanumeric keys 0 to 9:
To enter numbers and letters
6.Hash key: To enter the #-symbol,
pressing longer while idle will switch ring tone on or off.
7.R-key: Recall key
8.Microphone
9.Contacts: To charge the batteries
Battery compartment (at the back)
10.
: Open the phonebook
11.
Handsfree button
12.Asterisk key: To enter the *-symbol
Pressing
longer while idle will active the keypad lock
13.Talk key: Accept the call; dial the selected number
14. Arrow keys
In the menus: Select entries/options;
When idle: Open redial; open Call list, message list;
During a call: Adjust the earpiece/loudspeaker volume;
14
After Sales Support TEL: 1 300 884 987 WEB Support: www.medion.com.au
82269_Aldi AUS_RC1_content.book Seite 15 Donnerstag, 9. April 2009 2:59 14
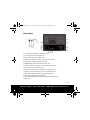
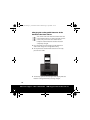
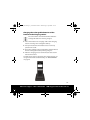
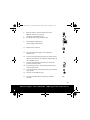
Basestation
1.Connection for telephone cable (RJ11 jack)
2. Connection for mains adapter lead
3.Cable holder for mains adapter lead
4.Charging cradle with contacts: To charge the handset
5.Paging key: Triggers ringing on handset
6. On/Off switch: Answering machine on or off
7.Delete key: Deletes messages on the answering machine
8.Flashes when the telephone rings
9.Glows when the handset is set into the charging cradle
10.Display: Shows information on the answering machine
11.Play: Begins playback of messages, pause playback
12.Raise the volume for the base station
13.Keys backward/forward: Jumps to the previous/next message
14.Speaker
15
After Sales Support TEL: 1 300 884 987 WEB Support: www.medion.com.au
82269_Aldi AUS_RC1_content.book Seite 16 Donnerstag, 9. April 2009 2:59 14
Preparation
Setting the appliance up safely
X
Place the base station on a sturdy, level surface.
X
Some aggressive furniture paints can weaken the
appliance's rubber feet. If necessary, place the base station
on a pad.
X
Set up the base station at a practical working height and
secure it from falling down.
X
Set up the base station close to a power outlet and a
telephone socket. Place the charging station close to a
power socket.
X
Prevent the appliances from coming into contact with
moisture or liquids.
X
Do not place the base station close to other electrical
equipment (e. g. televisions).
16
After Sales Support TEL: 1 300 884 987 WEB Support: www.medion.com.au
82269_Aldi AUS_RC1_content.book Seite 17 Donnerstag, 9. April 2009 2:59 14
Insert rechargeable batteries into the handset
4 rechargeable batteries 1,2 V/600 mAh Type NiMH, Size AAA
have been supplied for the handsets.
WARNING!
Only use nickel metal hydride rechargeable batteries of the supplied
type (NiMH) in the handset.
The appliance warranty will expire if you insert any other type of
rechargeable battery. The handset could be damaged.
X
Slide down the battery cover on the back of the handset.
X
Correctly insert 2 rechargeable batteries in the battery
compartment of each handset, observing the correct
polarity, and close the battery compartment.
X
Place the battery cover back on the battery compartment
and slide it shut.
17
After Sales Support TEL: 1 300 884 987 WEB Support: www.medion.com.au
82269_Aldi AUS_RC1_content.book Seite 18 Donnerstag, 9. April 2009 2:59 14
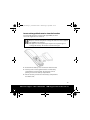
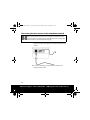
Connecting the base station to the mains
ATTENTION!
Only use the power supply unit for the base station to connect the
base station: Model No.: S005CV060060. A rating label with the
corresponding information will be located on the power supply unit.
Connect the plug of the mains adapter lead to the rightmost
connection of the base station.
Secure the plug from falling out by routing the cable behind
the cable clamp.
S005CV0600060
Plug the mains plug of the mains adapter into a mains socket.
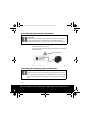
Connecting the charging station to the mains
ATTENTION!
Only use the power supply unit for the charging station to connect
the charging station: Modell No.: S002CV0600030. A rating label with
the corresponding information will be located on the power supply
unit.
18
After Sales Support TEL: 1 300 884 987 WEB Support: www.medion.com.au
82269_Aldi AUS_RC1_content.book Seite 19 Donnerstag, 9. April 2009 2:59 14
X
Connect the plug of the mains adapter lead to the
charging station.
X
Plug the mains plug of the mains adapter into a mains
socket.
Charging the rechargeable batteries
WARNING!
Only connect the base station to the telephone network after the
handset has been completely charged. Otherwise the rechargeable
batteries will not achieve their full capacity.
The charging time is 14 hours.
Do not interrupt the charging process, otherwise the capacity of the
rechargeable batteries can be permanently reduced.
Never put the handset back in the base station or charging station
without the battery cover.
You can leave the handset in the base station. This
ensures a maximum charging condition.
The capacity of the rechargeable battery will last for
10 hours of calls, or 100 standby hours.
The rechargeable battery will then have to be
recharged after that time.
19
After Sales Support TEL: 1 300 884 987 WEB Support: www.medion.com.au
82269_Aldi AUS_RC1_content.book Seite 20 Donnerstag, 9. April 2009 2:59 14
Charging the rechargeable batteries of the
handset in the base station
You cannot make calls with the handset while the
rechargeable batteries are being charged. For that
reason, only connect the base station to the
telephone network after the handset has been
completely charged.
X
Place the handset in the charging cradle of the base
station and charge the rechargeable battery.
X
A beep indicates that the handset has been correctly
placed in the cradle.
X
The battery symbol in the top right of the display indicates
that the rechargeable battery is being charged.
20
After Sales Support TEL: 1 300 884 987 WEB Support: www.medion.com.au
82269_Aldi AUS_RC1_content.book Seite 21 Donnerstag, 9. April 2009 2:59 14
Charging the rechargeable batteries of the
handset in the charging station
You cannot make calls with the handset while the
rechargeable batteries are being charged.
X
Place the handset in the charging cradle of the charging
station and charge the rechargeable battery.
X
A beep indicates that the handset has been correctly
placed in the cradle.
X
The battery symbol in the top right of the display indicates
that the rechargeable battery is being charged.
X
After the charging process has finished, the base station
detects the handset.
You will even be able to register the base station if it has not
recognised the handset automatically; see “REGISTRATION”
on page 49.
21
After Sales Support TEL: 1 300 884 987 WEB Support: www.medion.com.au
82269_Aldi AUS_RC1_content.book Seite 22 Donnerstag, 9. April 2009 2:59 14
Connecting the base station to the telephone network
WARNING!
Only connect the base station to the telephone network after the
handset has been completely charged. Otherwise the rechargeable
batteries will not achieve their full capacity.
X
Insert the phone cable jack (RJ11) of the supplied
telephone cable in the leftmost jack at the back of the base
station.
X
Insert the other plug on the telephone cable to the
telephone wall socket.
22
After Sales Support TEL: 1 300 884 987 WEB Support: www.medion.com.au
82269_Aldi AUS_RC1_content.book Seite 23 Donnerstag, 9. April 2009 2:59 14
The display
Basic display
When delivered, the display will show the following:
Range display
Battery indicator
Name of handset
Number of
handset
Open main menu
Call up internal
functions
Display language
On delivery, the display language is English. You can set the
display language to German and French; see page 47.
Rechargeable battery indicator
If the rechargeable battery is fully charged, the symbol
appears in the display.
When the handset is placed into the charging cradle of the
basestaion or charging station, the symbol the symbol
is
flashing while charging.
When the rechargeable battery is empty, or almost empty,
the symbol
appears and the handset must be placed in
23
After Sales Support TEL: 1 300 884 987 WEB Support: www.medion.com.au
82269_Aldi AUS_RC1_content.book Seite 24 Donnerstag, 9. April 2009 2:59 14
the base station or charging station so that the rechargeable
battery can be charged.
Other indicators on the display
The following graphical displays are possible.
1.
Off if the handset if out of range or not registered.
Flashes for low range.
2.
Steady, when transmission between base station and
handset is active. Flashes for incoming internal call.
3.
Shows when a call is active.
4.
On if the handsfree facility is being used
5.
Steady, when the answering machine is on. Flashes for
new message.
24
After Sales Support TEL: 1 300 884 987 WEB Support: www.medion.com.au
82269_Aldi AUS_RC1_content.book Seite 25 Donnerstag, 9. April 2009 2:59 14
6.
On if the alarm is activated. Flashes for alarm.
Off if the alarm is not activated
7.
8.
Steady for new VisualMessage
Steady when the ringer is deactivated
9.
Shows fully charged battery
Shows empty or low battery
10.
Button lock is activated
11.
Indicates that further digits can be displayed
after the text
12.
Press the corresponding control key to delete the last
digit, to stop the alarm, to switch the mute function to
on or off during a call
13.
Press the corresponding control key to skip to the
previous menu selection.
14.
In idle mode press the corresponding control key to
make an internal call.
15.
Scroll up and down, open phonebook, open redial list,
open call list
16.
Indicates a new TAM message.
17.
Press the corresponding control key to confirm a
selection.
C
INT
OK
25
After Sales Support TEL: 1 300 884 987 WEB Support: www.medion.com.au
82269_Aldi AUS_RC1_content.book Seite 26 Donnerstag, 9. April 2009 2:59 14
18.
Press the corresponding control key to show more
menu options
19.
Indicates that further digits can be displayed
before the text
Display digits
MEN
20.
26
After Sales Support TEL: 1 300 884 987 WEB Support: www.medion.com.au
82269_Aldi AUS_RC1_content.book Seite 27 Donnerstag, 9. April 2009 2:59 14
Telephone Calls
Basic functions
Switching the handset on and off
You can switch off the handset if it is not in the base station.
X
To switch off the handset, keep the call key pressed down
for a few seconds. The display turns off and the handset is
now switched off.
X
To switch the handset back on, briefly press the call key.
After a short moment, the standard display appears on the
display again.
You can also switch the handset back on by replacing it in the
base station.
Answering a call
When there is an incoming call, you will hear a ring. In the
display you will see a receiver symbol
and the phone
number of the caller or the identification number of another
connected handset.
NOTE: The phone number display may vary
depending on the network provider and the type of
telephone extension, or be unavailable.
To accept a call when the handset is in the charging cradle,
proceed as follows:
X
Lift the handset out of the charging cradle or press the
handsfree button to switch the telephone to handsfree
mode.
27
After Sales Support TEL: 1 300 884 987 WEB Support: www.medion.com.au
82269_Aldi AUS_RC1_content.book Seite 28 Donnerstag, 9. April 2009 2:59 14
X
To accept a call when the handset is not in the charging
cradle, press the talk key.
NOTE: It is possible to set up the handset to only
accept incoming calls by pressing the talk key (see
page 47).
Changing the earpiece volume
X
During a call, press the
or
arrow key. The indicator
VOLUME with five levels will appear on the display.
X
Use the
levels.
X
When the call is ended, the level that was set will be
accepted.
or
arrow keys to select one of the five
Ending a call
X
To end a call press the call key or place the handset in the
charging cradle.
After you have hung up, the duration of the last call is
displayed. After a brief moment, the display will switch to the
normal display.
Making internal calls
You can make calls from your handset to all other handsets of
the same base station without having to pay a fee.
X
Press the left control key for
.
All other handsets that are registered with the base station
will be shown on the display.
28
After Sales Support TEL: 1 300 884 987 WEB Support: www.medion.com.au
82269_Aldi AUS_RC1_content.book Seite 29 Donnerstag, 9. April 2009 2:59 14
X
Give in the number of the desired handset you want to call
by using the alphanumeric keypad.
The desired handset will now be called.
X
To call all handsets that are registered with the basestation, give in the last number in the display by using the
alphanumeric keypad.
All handsets are now be called.
The handset which accepts the call first, is connected for an
internal call.
X
To end the call, press the call key.
Making external calls
X
Take the handset out of the charging cradle.
X
Enter the relevant telephone number with the
alphanumeric keypad.
X
Press the talk key or the handsfree button.
The number will be dialled.
29
After Sales Support TEL: 1 300 884 987 WEB Support: www.medion.com.au
82269_Aldi AUS_RC1_content.book Seite 30 Donnerstag, 9. April 2009 2:59 14
Additional functions
Selecting from the phonebook
To set up the phonebook, see page 39.
X
Open the phonebook with the
X
Select the subscriber by using the arrow keys
and
or enter a letter by using the using the alphanumeric
keypad to search for the name of the subscriber (To input
letters and numbers with the alphanumeric keypad, see
“Available characters” on page 40).
X
Confirm your selection with the call-key or the handsfree
button. The number of the subscriber will be dialled.
key.
Handsfree mode
In the handsfree mode you can make calls without having to
hold the handset.
X
Press the handsfree key during the call. The handsfree
symbol
will appear on the display.
You can now make calls over the handset loudspeaker.
X
To adjust the volume, press the
or
arrow key in
the handsfree mode. The indicator VOLUME with five
levels will appear on the display.
X
Use the
or
arrow keys to select one of the five
levels. The correspondingly set level is highlighted and will
be accepted.
X
To return to normal telephone mode press the handsfree
key again. The handsfree symbol disappears and the
loudspeaker is switched off.
30
After Sales Support TEL: 1 300 884 987 WEB Support: www.medion.com.au
82269_Aldi AUS_RC1_content.book Seite 31 Donnerstag, 9. April 2009 2:59 14
Recall key
The R key only has one function when your telephone is
connected to a telephone system.
The R key interrupts the line connection for a few
milliseconds. The duration of the interruption is set using the
Flash Time function (see page 43). This interruption signals
the exchange that the following sounds in multi-frequency
selection procedures are commands to the exchange.
Typical applications for the R key are, e. g. call waiting, recall,
brokering, three-way conference with at least two external
subscribers.
Please note, however, that this function is
implemented by your telephone provider (not by the
telephone itself). Enquire with your network provider
which functions you may execute with the R key.
You can also ask for the exact key combinations for
the various R key functions (e.g.: "Accept call
waiting", "Reject call waiting", "Switch back and forth
between two connections", etc.)
Keypad lock
To prevent accidental dialling when you are carrying the
handset with you, you can activate the keypad lock. This is not
possible during a call.
X
Keep the asterisk(*)- button pressed until the symbol
appears on the display. .
31
After Sales Support TEL: 1 300 884 987 WEB Support: www.medion.com.au
82269_Aldi AUS_RC1_content.book Seite 32 Donnerstag, 9. April 2009 2:59 14
When the keypad lock is activated, you can continue
to use the emergency services.
You can also continue receiving calls.
X
To deactivate the keypad lock, keep the asterisk(*)- key
pressed down until the symbol
disappears on the
display.
Switching off the ring tone
X
To switch off the ring tone, press and hold the hash (#) key,
until the note symbol appears in the display.
X
To switch the ring tone back on, press and hold the hash
(#) key, until the note symbol disappears from the
display.
Muting the telephone
X
To mute the telephone, press the right function key (C)
during a call.
MUTED will be shown on the display. The caller is now
unable to hear you.
X
To end muting, press the right function key (C) again.
Caller identity function
You can see the telephone number of a caller on the display
if you have requested the CLIP function with your service
provider and if the caller also possesses a telephone
extension with CLIP function and hasn't suppressed his
telephone number.
32
After Sales Support TEL: 1 300 884 987 WEB Support: www.medion.com.au
82269_Aldi AUS_RC1_content.book Seite 33 Donnerstag, 9. April 2009 2:59 14
Depending on your network provider, you can also suppress
your telephone number. If that is what you want, then please
enquire of your network provider on how to proceed.
Call list
Calls are only stored to the call list
- if the answering machine does not record;
- if the caller’s telephone has the CLIP service feature
(the caller’s number can be seen on the display).
When calling, the caller number is shown in the display. If
there is a name and melody existing for this number in the
phonebook, the name will be shown in the display and the
assigned ring melody sounds.
If no caller number is transmitted, WITHELD appears in the
display.
The symbol for missed calls appears on the display when there
are new entries stored in the call list.
If for instance 3 new missed calls exist, 3 NEW CALLS appears
in the display.
Up to 10 entries can be recorded in the call list.
X
Press the arrow key
Calls in the idle state.
If there are no calls stored in memory, EMPTY will appear on
the display.
If new calls have been received, you have the following
possibilities with the left function key:
– STORE: You can store the telephone numbers to a name in
the phonebook.
– DELETE: Deletes the selected entry from the redial list.
33
After Sales Support TEL: 1 300 884 987 WEB Support: www.medion.com.au
82269_Aldi AUS_RC1_content.book Seite 34 Donnerstag, 9. April 2009 2:59 14
– DELETE ALL: Deletes all of the telephone numbers from
the redial list.
– DETAILS: Caller identity function, time and date are
displayed.
– Select the desired option and press the right control key
OK.
Redial
The last 5 telephone numbers (with a maximum of 24 digits)
that you dialled are stored in the redial list.
X
Press the down arrow key
.
The last telephone number dialled is displayed. If there are no
telephone numbers stored in memory, EMPTY will appear on
the display.
X
Select the desired telephone number with the
arrow keys.
X
To select this telephone number, press the talk key or
handsfree button.
or
If you confirm with the left function key you have still more
possibilities:
– STORE: You can store the telephone numbers to a name
in the phonebook.
– DELETE: Deletes the selected entry from the redial list.
– DELETE ALL: Deletes all of the telephone numbers from
the redial list.
X
Select the desired option and press the left function key
OK.
34
After Sales Support TEL: 1 300 884 987 WEB Support: www.medion.com.au
82269_Aldi AUS_RC1_content.book Seite 35 Donnerstag, 9. April 2009 2:59 14
Making calls with several callers
NOTE: The following functions are only available if at
least one additional, GAP-enabled handset is
registered with the base station.
Transferring calls
You can accept a call and then transfer it to an additional,
GAP-enabled handset on the same base station.
X
During the call, press the left control key and then choose
with the arrow keys
or
the entry INTERCOM.
X
Confirm with the right function key OK.
On the display all handsets registered with your base station
are being displayed with their corresponding number.
X
Give in the number of the desired handset you want to call
by using the alphanumeric keypad.
X
The desired handset will now be called.
If the person at the other handset accepts the call, you can
hold an internal conversation with that person.
X
To transfer the call, press the call key or place the handset
in the charging cradle.
The caller is now connected to the person with the other
handset.
Holding a conference call
If a second handset accepts the call as described above, you
can broker between the three subscribers or hold a
conference call.
35
After Sales Support TEL: 1 300 884 987 WEB Support: www.medion.com.au
82269_Aldi AUS_RC1_content.book Seite 36 Donnerstag, 9. April 2009 2:59 14
Conference call
A conference call between one external and two internal
subscribers is possible.
Transfer the external call to another handset and wait for the
subscriber accepts the call on the other handset.
X
Press the asterisk-key * for "Conf". Now all subscribers are
included in the call.
X
Every party can leave the conference call by simply
pressing the call key (hanging up). The other callers can
continue to hold the conference call.
X
The party who started the conference can also end the
conference by pressing the call key (hanging up). The
connections to all partners is then ended.
Paging the handset
X
If you page the handset from the base station, or if you are
looking for the handset, then press the paging key at the
base station.
This triggers a ringing signal from the handset, and "Paging"
appears on the display.
X
Stop the ringing signal with the call key.
36
After Sales Support TEL: 1 300 884 987 WEB Support: www.medion.com.au
82269_Aldi AUS_RC1_content.book Seite 37 Donnerstag, 9. April 2009 2:59 14
Setting the telephone via the menu
Using the menu lets you call up various functions of the
telephone as well as make some settings.
When idle the left control key open the main menu with the
following entries:
Navigating in the menu
Selecting a menu option
X
Use the arrow keys
X
Open the menu option with the left control key (OK).
or
to select a menu option.
Most of the menu options contain further sub-menus in list
form.
X
Use the
a list.
X
The right control key ( ) takes you back respectively one
step or one level.
or
arrow keys to select a menu option in
Control keys
Alternating commands that depend on the current menu or
current process appear on the left and right in the bottom
display line.
X
Use the control keys to activate each visible command.
Switching to telephone mode
X
To return to the normal telephone mode, press the call
key.
37
After Sales Support TEL: 1 300 884 987 WEB Support: www.medion.com.au
82269_Aldi AUS_RC1_content.book Seite 38 Donnerstag, 9. April 2009 2:59 14
Menu Call List
X
Select the entry CALL LIST and press the left control key
(OK). If there are no calls stored in memory, EMPTY will
appear on the display.
If new calls have been received, select a call from the list by
using the arrow keys
or
. Press the left control key
(OK), to select one of the following options:
STORE
You can store the telephone numbers from the call list to a
name in the phonebook. To store a number, read the menu
phonebook, “Add entry” on page 39.
DELETE
Deletes the selected entry from the call list.
DELETE ALL
Deletes all of the telephone numbers from the call list.
X
Confirm the following display CONFIRM with the left
control key(OK), to delete all numbers from the call list.
X
Caller identity function, time and date are displayed.
X
If a number is longer than 12 digits, you can display the
invisible digits by using the left and right control keys.
DETAILS
38
After Sales Support TEL: 1 300 884 987 WEB Support: www.medion.com.au
82269_Aldi AUS_RC1_content.book Seite 39 Donnerstag, 9. April 2009 2:59 14
Menu Phonebook
X
Select the entry PHONEBOOK and press the left control
key (OK). If there are no entries stored in memory, EMPTY
will appear on the display
X
Select an entry from the list by using the arrow keys
or
. Press the left control key (OK), to select one of the
following options:
Add entry
Here you can store a new number to the phonebook:
X
Confirm the entry ADD with the left control key. NAME
will appear in the display.
X
Enter the name of the subscriber using the keypad.
The name can contain up to 12 characters.
X
If necessary, press an alphanumeric key several times, until
the desired character appears in the display. (see table
“Available characters” on page 40).
X
Pressing the right control key (C) deletes the last character.
X
Press the left control key (OK), to store the name.
NUMBER appears in the display.
X
Enter the number of the subscriber using the keypad. The
number can contain up to 20 digits.
X
Press the left control key (OK), to store the number.
MELODY1 appears in the display.
39
After Sales Support TEL: 1 300 884 987 WEB Support: www.medion.com.au
82269_Aldi AUS_RC1_content.book Seite 40 Donnerstag, 9. April 2009 2:59 14
X
Select one of 10 available melodies for the subscriber
using the arrow keys
or
.
X
Press the left control key (OK), to store the melody.
A short beep indicates that the new entry has been stored.
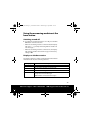
The new entry appears in the display.
AVAILABLE CHARACTERS
The following table shows the available characters you can
use for phonebook entries:
Key
Character
1
[SPACE] - 1
2
ABC2
3
DEF3
4
GHI4
5
JKL5
6
MNO6
7
PQRS7
8
TUV8
9
WXYZ9
0
0
*
#
40
After Sales Support TEL: 1 300 884 987 WEB Support: www.medion.com.au
82269_Aldi AUS_RC1_content.book Seite 41 Donnerstag, 9. April 2009 2:59 14
VIEW
Name, number and melody of a suscriber are displayed.
EDIT
You can change the name, number or melody of the selected
entry.
To change the entry, see “Add entry” on page 39.
DELETE
Deletes the selected entry from the phonebook.
DELETE ALL
Deletes all entries from the phonebook.
X
Confirm the security prompt (Confirm) with the left
control key. The phonebook is now empty.
PB STATUS
Shows the used and available memory of the phonebook.
41
After Sales Support TEL: 1 300 884 987 WEB Support: www.medion.com.au
82269_Aldi AUS_RC1_content.book Seite 42 Donnerstag, 9. April 2009 2:59 14
Menu Base-Settings
BS RINGER
X
Select the ringing signal at the base station and confirm by
pressing the left control key (OK).
RING VOLUME
X
Select a volume level (1-5) for the ring tone at the base
station and confirm by pressing the left control key (OK).
X
Enter the system PIN with the keypad (default setting
0000) and confirm by pressing the left control key (OK).
X
Select the handset to be unregistered from the base
station.
DELETE HS
NOTE: The handset in use cannot be unregistered
from the base station.
X
Confirm with the left control key ("Yes") to actually
unregister the handset.
The handset is unregistered now and has to be registered
again, before using it at the base station.
42
After Sales Support TEL: 1 300 884 987 WEB Support: www.medion.com.au
82269_Aldi AUS_RC1_content.book Seite 43 Donnerstag, 9. April 2009 2:59 14
DIAL MODE
Here you can adapt your telephone to the dialling mode of
your network provider. You can choose between tone
dialling and pulse dialling. The factory setting is TONE. That
is the most common dialling mode today. Pulse dialling can
be necessary for some older telephone systems.
Enquire of your network provider which dialling mode is
required for your connection.
X
Select TONE or PULSE for the dialling mode and confirm
by pressing the left control key (OK).
FLASH TIME
X
Here you can adapt your telephone to the specifications of
your network provider or your PABX. You can set the flash
times to the following stages:
LONG
100 ms
MEDIUM250 ms
SHORT 600 ms
NOTE: Enquire of your network provider which
settings are required for your connection or read the
operating instructions of your telephone system.
43
After Sales Support TEL: 1 300 884 987 WEB Support: www.medion.com.au
82269_Aldi AUS_RC1_content.book Seite 44 Donnerstag, 9. April 2009 2:59 14
CHANGE PIN
With this sub-menu you can specify any four-digit PIN for the
handsets and the base station:
X
Enter the valid PIN with the keypad and confirm with OK
(default setting 0000).
X
Enter a four-digit PIN you have chosen and confirm with
OK.
X
Enter the new PIN again and confirm with OK.
The system PIN has now been changed.
ECO MODE
The ECO Mode setting enables low emission operation when
the handset is placed in the base. The transmitting power is
reduced to a minimum.
X
Select the stting ON or OFF for the ECO mode and confirm
by pressing the left control key (OK).
In the setting OFF the transmitting power has a higher range.
Use this setting, to improve the reception under bad
transmitting conditions.
44
After Sales Support TEL: 1 300 884 987 WEB Support: www.medion.com.au
82269_Aldi AUS_RC1_content.book Seite 45 Donnerstag, 9. April 2009 2:59 14
HS Settings
ALARM
NOTE: Before you can use the alarm function, you
have to set the clock (see “DATE & TIME” on page 48).
X
Select the entry OFF, to switch off the alarm.
X
Select the entry ON, to switch on the alarm and confirm by
pressing the left control key (OK).
The alarm time is displayed.
X
Enter the alarm time (format hh:mm) using the keypad
and confirm by pressing the left control key (OK).
SNOOZE appears in the display.
X
Confirm by pressing the left control key (OK).
X
Select the entry ON, to activate the snooze time and
confirm by pressing the left control key (OK).
After you have turned off the alarm signal the alarm now
turns on again after 7 minutes.
X
If you do not want to use the snooze time, select OFF for
this setting.
If the alarm is switched on the symbol
display.
appears in the
45
After Sales Support TEL: 1 300 884 987 WEB Support: www.medion.com.au
82269_Aldi AUS_RC1_content.book Seite 46 Donnerstag, 9. April 2009 2:59 14
RING SETUP
INT. RING
X
Select a ring tone for internal calls and confirm by pressing
the left control key (OK).
EXT. RING
X
Select a ring tone for external calls and confirm by
pressing the left control key (OK).
RING VOLUME
X
Select a volume level (1-5) for the ring tone at the handset
and confirm by pressing the left control key (OK).
TONE SETUP
KEY TONE
X
Select OFF or ON, to switch the key tones off or on and
confirm by pressing the left control key (OK).
BATTERY TONE
X
Select OFF or ON, to switch on or off the signal for low
battery status and confirm by pressing the left control key
(OK).
OUT OF RANGE
X
Select OFF or ON, to switch on or off the signal for the
hanset being out of range and confirm by pressing the left
control key (OK).
46
After Sales Support TEL: 1 300 884 987 WEB Support: www.medion.com.au
82269_Aldi AUS_RC1_content.book Seite 47 Donnerstag, 9. April 2009 2:59 14
LANGUAGE
X
Select English, German or French as the menu
language and confirm by pressing the left control key (OK).
RENAME HS
You can enter a name for the handset by using the keypad.
The name is displayed when idle.
X
Confirm by pressing the left control key (OK).
HS DISPLAY
X
Select if the name of the handset (HS-name) or the clock
(TIME) should be displayed when idle.
X
Confirm by pressing the left control key (OK).
AUTO ANSWER
X
Select ON, so that an incoming call is accepted, when you
pick up the handset from the base station without having
to press the talk key
X
Select OFF, so that when you pick up the handset from the
base station you have to press the talk key first to accept a
call.
X
Confirm by pressing the left control key (OK).
47
After Sales Support TEL: 1 300 884 987 WEB Support: www.medion.com.au
82269_Aldi AUS_RC1_content.book Seite 48 Donnerstag, 9. April 2009 2:59 14
DATE & TIME
DATE FORMAT
X
Select a format for the date (DD:MM:YY or MM:DD:YY)
and confirm by pressing the left control key (OK).
TIME FORMAT
X
Select a format for the time (24 HR or 12 HR) and confirm
by pressing the left control key (OK).
SET TIME
X
Enter the correct time in the format HH:MM by using the
keypad and confirm by pressing the left control key (OK).
SET DATE
X
Enter the correct date using the keypad and confirm by
pressing the left control key (OK).
SELECT BASE
To increase the reception range of the handset, you can
register it with up to four base stations. This lets you set up a
"honeycomb structure" of base stations in your reception
range.
X
If multiple base stations exist, select the desired station
here and confirm by pressing the left control key (OK).
SEARCHING appears in the display and then BS SELECTED,
if the selected base has been found.
48
After Sales Support TEL: 1 300 884 987 WEB Support: www.medion.com.au
82269_Aldi AUS_RC1_content.book Seite 49 Donnerstag, 9. April 2009 2:59 14
REGISTRATION
The handset is already registered at the base station when
delivered. If this is not the case, register the handset as
described here:
X
Press and hold down the PAGE key for about 5 seconds,
until you hear a short signal tone.
X
Select a base station and confirm by pressing the left
control key (OK).
X
Enter the valid telephone-PIN (default setting 0000) and
confirm by pressing the left control key (OK).
SEARCHING appears in the display and you hear a short
signal tone, if the base has been found.
DEFAULT
This function resets all of the individually performed settings
on the handset back to the factory settings:
X
Enter the valid telephone-PIN (default setting 0000) and
confirm by pressing the left control key (OK).
X
Confirm the entry CONFIRM? with the left control key
(OK).
NOTE: After a reset to the factory settings call lists
and phonebook entries are kept!
49
After Sales Support TEL: 1 300 884 987 WEB Support: www.medion.com.au
82269_Aldi AUS_RC1_content.book Seite 50 Donnerstag, 9. April 2009 2:59 14
Answering machine (Menu ANS. MACHINE)
Use the answering machine to record incoming messages
during your absence or to leave a message for a caller.
The answering machine will automatically add the date and
time to every message. You must therefore set the date and
time in order to use the answering machine properly. If you
do not set the date and time, "00" will appear on the display
of the base station. The date and time for the messages will
all be incorrect in this case. Set the date and time at the
handset.
MSG PLAYBACK
The latest message is played back and in the display time and
date of the message are shown.
Messages, which have not been played back yet, are
displayed together with the symbol
. After the new
message has been played back, the symbol disappears.
X
Select a message by using the arrow keys
or
confirm by pressing the left control key (OK).
and
If there are no messages recorded, 00--00 00--00 is shown
in the display.
50
After Sales Support TEL: 1 300 884 987 WEB Support: www.medion.com.au
82269_Aldi AUS_RC1_content.book Seite 51 Donnerstag, 9. April 2009 2:59 14
X
Press the left control key (MENU), to display the following
playback functions:
PLAYBACK/STOP
start playback/pause playback
FORWARD
play next message
PREVIOUS
play previous message
DELETE
delete message
You can also control the playback functions via the keypad:
Key 5
start playback/pause playback
Key 4
play next message
Key 6
play previous message
Key 2
delete message
NOTE: If the display of the handset shows „NOT
AVAILABLE“, the answering machine is being used
from another person.
X
To end playback, press the call key.
DELETE ALL
X
Confirm the entry CONFIRM? with the left control (OK), to
delete all messages on the answering machine.
EMPTY appears in the display.
MEMO
You can record a voice message with the handset, which can
be played back from other handsets like a normal message.
X
Press the left function key (OK), to start recording.
RECORDING appears in the display.
51
After Sales Support TEL: 1 300 884 987 WEB Support: www.medion.com.au
82269_Aldi AUS_RC1_content.book Seite 52 Donnerstag, 9. April 2009 2:59 14
X
Press the left control key (OK) to stop and save the record.
X
Press the right control key (C), to stop the record without
saving.
The new voice message is saved now and can be played back
via the menu entry MSG PLAYBACK.
TAM (Answering machine) ON/OFF
Here you can switch on and off the answering machine via
the handset.
X
Confirm the setting by pressing the left control key (OK).
TAM (Answering machine) SETTINGS
ANSWER MODE
Select here, in which mode the answering machine should
turn on:
ANS. & REC
The answering machine will respond to
the call and record messages.
ANSWER ONLY
The answering machine will respond to
the call without recording a message.
TAM (Answering machine) LANGUAGE
X
Select the language for the standard announcements of
the answering machine. You can choose between
DEUTSCH and ENGLISH.
X
Confirm the setting by pressing the left control key (OK).
52
After Sales Support TEL: 1 300 884 987 WEB Support: www.medion.com.au
82269_Aldi AUS_RC1_content.book Seite 53 Donnerstag, 9. April 2009 2:59 14
OGM (Outgoing Message) SETTINGS
X
Select one of the following entries to playback and record
the different announcements.
ANS. & REC.
Here you can playback the speech for announcements with
recording afterwards or record a new announcement.
PLAYBACK: Play back the current announcement
REC MESS: Record a new announcement
X
Press the left control key (OK), to start recording.
RECORDING appears in the display
X
Press the left control key (OK) again, to stop recording and
save the announcement.
X
Press the right control key (C), to stop recording without
saving.
The new recording is saved now and can be played back via
the menu entry PLAYBACK as described above.
ANSWER ONLY
Here you can playback the speech for announcements
without recording afterwards or record a new announcement.
PLAYBACK: Play back the current announcement
RECORD MESS: Record a new announcement
X
To record a new announcement proceed as described
above.
53
After Sales Support TEL: 1 300 884 987 WEB Support: www.medion.com.au
82269_Aldi AUS_RC1_content.book Seite 54 Donnerstag, 9. April 2009 2:59 14
ANSWER DELAY
You can set the number of ringing signals after which the
answering machine is activated. You can choose between 2,
4, 6 and 8 ringing signals and the TIME SAVER.
X
In the TAM SETTINGS menu select the ANSWER DELAY
entry.
X
Select the desired number of ringing signals or the
economy mode and confirm with OK.
TIME SAVER
In the economy mode, you can avoid connection fees when
playing back your answering machine from outside. In the
economy mode, the answering machine switches on after
four ringing signals for the FIRST caller. For every call after
that, the answering machine switches on after the first
ringing signal. To listen to and set your personal messages
from outside, read the chapter “Playing back messages from
a different telephone extension” on page 59.
To check if you have new messages, proceed as follows:
X
Call your connection from the outside.
X
If new messages have been recorded, the answering
machine will switch on after the first ringing signal.
X
If you hear a second ringing signal, then this means that no
new messages have been recorded for you.
X
In this case, hang up immediately. Otherwise, the
answering machine will switch on after the fifth ringing
signal.
54
After Sales Support TEL: 1 300 884 987 WEB Support: www.medion.com.au
82269_Aldi AUS_RC1_content.book Seite 55 Donnerstag, 9. April 2009 2:59 14
RECORD TIME
X
You can set how long the message on the answering
machine may be:
UNLIMITED, 60 SEC, 120 SEC and 180 SEC.
REMOTE ACC.
You can activate the remote access to listen to recorded
messages from a different telephone.
X
Set the remote access to ON or OFF and confirm by
pressing the left control key (OK).
COMPRESSION
The file of a recorded message can be compressed to save
memory space. A higher compression results in a smaller file
at lower recording quality.
X
Set the compression to high, medium or low and confirm
by pressing the left control key (OK).
BS SCREENING
With the Screening function you can listen to a call without
interrupting the message being recorded on the answering
machine (Monitoring). This function is helpful, e. g. when you
first want to hear who the caller is. You can also take a call
when the answering machine is already recording.
X
Set the function to ON or OFF and confirm by pressing the
left control key (OK).
55
After Sales Support TEL: 1 300 884 987 WEB Support: www.medion.com.au
82269_Aldi AUS_RC1_content.book Seite 56 Donnerstag, 9. April 2009 2:59 14
Monitoring at the base station
To monitor a call, press the + or – volume key until you can
hear the caller.
Monitoring at the handset
While a recording is taking place, the BS SCREENING entry
appears on the display of the handset.
X
To monitor the call, press the left control key OK.
Accepting the call after monitoring
X
To accept the call press the talk key on the handset.
You can now talk to the caller and the answering machine
stop recording.
CHANGE PIN
The PIN for the answering machine protects the remote
enquiry from unwanted access. The default setting for the PIN
is „0000“. This PIN is not identical with the telephone PIN!
X
Enter the current remote enquiry PIN number and confirm
with OK.
X
Now enter the new four-digit PIN. After confirming with
OK you are prompted to repeat the entry. Confirm again
with OK.
56
After Sales Support TEL: 1 300 884 987 WEB Support: www.medion.com.au
82269_Aldi AUS_RC1_content.book Seite 57 Donnerstag, 9. April 2009 2:59 14
Using the answering machine at the
base station
Switching on and off
X
To switch the answering machine on or off, press the On/
Off button on the base station.
– When the answering machine is switched off, the display
will show: „– –", possibly alternating with the number of
new messages.
– When the answering machine is switched on, the display
will show the number of stored messages; in the factory
settings: "00".
Displays on the base station
The display of the base station shows important information
about the status of your answering machine.
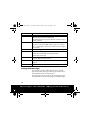
Display
Explanation
empty
The base station is not connected properly to the mains.
––
The answering machine is switched off.
00
There are no messages.
XX
Flashes for new messages.
Steady when no new messages
„XX“: Number of new/stored messages
57
After Sales Support TEL: 1 300 884 987 WEB Support: www.medion.com.au
82269_Aldi AUS_RC1_content.book Seite 58 Donnerstag, 9. April 2009 2:59 14
Display
Explanation
XX/FF
„XX“ and „ff“ flashing alternately.
„XX“ new messages and memory is full.
Only„FF“ flashing. The memory is full and no new messages
can be recorded.
--/XX
„XX“ and „--“ flashing alternately.
The clock is not set and „XX“ new messages are recorded
Only „--“ flashing. The clock is not set and no new messages
are recorded
YY
„YY“old messages stored.
A1/A2
The announcement is played back.
A1: Announcement with recording afterwards
A2: Announcement only
XX/An
„XX“ and „An“ flashing alternately
message „XX“ is being recorded
LA
Flashes, if the answering machine is controled from a
handset.
LX
Current volume level from 1-18
Playing back messages
The answering machine differentiates between already
played back ("old") messages and messages that have not
been played back yet ("new messages").
If new messages were recorded on the answering machine,
the symbol for the answering machine and "New Message"
58
After Sales Support TEL: 1 300 884 987 WEB Support: www.medion.com.au
82269_Aldi AUS_RC1_content.book Seite 59 Donnerstag, 9. April 2009 2:59 14
will appear on the display. The number of recorded messages
will flash on display on the base station.
If you play back the messages, the new messages will always
be played back first.
Playing back messages at the base station
X
To play back messages, press the play button at the base
station.
The recorded messages will now be played back.
X
To stop the playback, press the play button again.
Playback is now ended.
X
To skip a message, press the "Next Message" jump key.
X
To play back a message again, or to play back the previous
message, press the "Previous Message" key.
X
To change the volume during playback, press the + or –
keys on the base station.
Playing back messages from the handset
About how to playback messages from a handset, please read
the chapter “MSG PLAYBACK” on page 50.
Playing back messages from a different
telephone extension
You can playback the messages on your answering machine
from a different extension, such as a mobile phone or a
telephone booth.
Proceed as follows:
X
Dial the telephone number of your extension.
59
After Sales Support TEL: 1 300 884 987 WEB Support: www.medion.com.au
82269_Aldi AUS_RC1_content.book Seite 60 Donnerstag, 9. April 2009 2:59 14
X
If your answering machine is switched on, press the
asterisk key on the telephone.
X
Enter your remote enquiry PIN now with the keypad.
If you have entered an invalid remote enquiry PIN three times,
the connection will be interrupted automatically.
NOTE: If you do not make any entries for 15 seconds
the connection will be interrupted automatically.
If no new calls were received, you can avoid the fees
for the enquiry if the answering machine is set to
time saver (see chapter “TIME SAVER” on page 54).
60
After Sales Support TEL: 1 300 884 987 WEB Support: www.medion.com.au
82269_Aldi AUS_RC1_content.book Seite 61 Donnerstag, 9. April 2009 2:59 14
To operate the answering machine, use the number keys on
the telephone
Funktion
Key
During paused
playback
During playback
2
Delete current message
4
Repeat message;
Press twice to switch to
previous message
5
Playback message
6
7
Pause playback
Switch to next message
Switch on answering
machine
8
Pause playback
9
Switch off answering
machine
*
Enter remote enquiry
PIN
Switching on the answering machine from an
external extension
You can also switch on the answering machine from an
external telephone extension.
X
Dial your telephone number.
61
After Sales Support TEL: 1 300 884 987 WEB Support: www.medion.com.au
82269_Aldi AUS_RC1_content.book Seite 62 Donnerstag, 9. April 2009 2:59 14
X
Wait until after the 10th ringing signal.
X
Enter the four-digit code.
The answering machine is switched on. If there is a new
message, it is played back now.
Deleting messages
You can only delete messages that you have already
played back
Deleting messages on the base station
To delete all message simultaneously, proceed as follows:
X
End the playback with the stop button.
X
Press and hold the "Delete" key on the base station until
you hear a signal tone.
All messages are deleted now.
Deleting messages with the handset
About how to delete messages with the handset please read
the chapter “MSG PLAYBACK” on page 50.
62
After Sales Support TEL: 1 300 884 987 WEB Support: www.medion.com.au
82269_Aldi AUS_RC1_content.book Seite 63 Donnerstag, 9. April 2009 2:59 14
Troubleshooting
For appliance errors, please check first if you can eliminate the
error yourself with the help of the following overview.
Never try to repair the appliances yourself. If a repair is
necessary, please contact our MEDION Help Desk at 1300 884
987 or other or other qualified personnel.
For all problems
Check if the mains and telephone cables are
plugged in correctly (see page 16 and page 22).
Check the telephone at a different telephone
socket.
Check the battery indicator to see if the
rechargeable battery is charged.
Check if the handset is correctly registered (see
page 49).
Check if the handset is within the range of the base
station.
The display on the
handset is blank
Check if the handset is switched on (see page 27).
No dialing tone
Check if the base station is connected correctly
(see page 16 and page 22).
Check if the rechargeable batteries are charged
and inserted with correct polarity (see page 17).
Check if the handset is switched on, charged,
correctly registered and within the range of the
base station.
63
After Sales Support TEL: 1 300 884 987 WEB Support: www.medion.com.au
82269_Aldi AUS_RC1_content.book Seite 64 Donnerstag, 9. April 2009 2:59 14
The display on the
handset shows "Range"
Check if the base station is connected correctly
(see page 16 and page 22).
Check if the handset is within the range of the base
station.
Check if the handset is registered with the desired
base station (see page 49).
Check if the rechargeable batteries are charged
and inserted with correct polarity (see page 17).
No ring tone on handset
or base station
Check if the base station is connected correctly
(see page 16 and page 22).
Check if the volume of the ring tone was switched
off (see page 32).
Check if the handset is within the range of the base
station.
Check if the rechargeable batteries are charged
and inserted with correct polarity (see page 17).
"– –" appears in the base
station display.
The answering machine is switched off. (see
page 57).
The caller cannot
understand you
Check if the microphone is switched on and if
muting is switched off (see page 32).
64
After Sales Support TEL: 1 300 884 987 WEB Support: www.medion.com.au
82269_Aldi AUS_RC1_content.book Seite 65 Donnerstag, 9. April 2009 2:59 14
You cannot be called
Check if you pressed the talk key, if the "telephone
receiver" symbol is shown on the display and if you
hear a dialing tone when you pick up.
Check if another telephone works on the
telephone socket or if your telephone works on a
different telephone socket (see page 16, and
page 22).
There is interference with Check if the base station is located directly next to
other appliances.
another electrical appliance (e.g. other telephone
or fax machine, television or microwave oven). Set
up the telephone in a different location.
65
After Sales Support TEL: 1 300 884 987 WEB Support: www.medion.com.au
82269_Aldi AUS_RC1_content.book Seite 66 Donnerstag, 9. April 2009 2:59 14
Factory settings
Factory settings on the handset
Setting
Options
Factory setting
External ring tones
10 ring tones; 5x normal,
5 x polyphonic
Melody 6
Internal ring tones
10 ring tones; 5x normal,
5 x polyphonic
Melody 6
Ring tone volume
5 levels and off
Level 5
Receiver volume
Volume in 5 levels
Volume Level 3
Key protection
On/Off
Off
Auto-reply
On/Off
Off
Keypad tones
On/Off
On
Language
German/English/French
English
Factory settings on the base station
Setting
Options
Factory setting
Ring tones
5 different ring tones
Melody 1
Ring tone volume
5 levels and off
Level 5
Dialling mode
Pulse dialling/Tone dialling
Tone dialling
System PIN
–
0000
Handset priority
All/One handset
All
66
After Sales Support TEL: 1 300 884 987 WEB Support: www.medion.com.au
82269_Aldi AUS_RC1_content.book Seite 67 Donnerstag, 9. April 2009 2:59 14
Further factory settings
Setting
Options
Factory setting
Alarm for new
messages on
answering machine
On/off
Off
Number of ring tones
before the answering
machine is switched
on.
2 / 4 / 6 / 8 ring tones or
Economy Mode
Economy Mode
67
After Sales Support TEL: 1 300 884 987 WEB Support: www.medion.com.au
82269_Aldi AUS_RC1_content.book Seite 68 Donnerstag, 9. April 2009 2:59 14
Repairs
Please contact the MEDION Australia Helpdesk at
1 300 884 987 if you have any problems with your device.
ONLY have repairs completed by our authorised service
centre.
Contact you the MEDION Australia Helpdesk at 1 300 884 987
when...
– liquid has got into the device
– the device does not operate properly
– the device is dropped or the housing is damaged.
Cleaning
Before cleaning, remove the mains adapter from the mains
socket. Use a dry, soft cloth. Avoid the use of chemical
solutions and cleaning products because these may damage
the appliance surface and/or markings.
68
After Sales Support TEL: 1 300 884 987 WEB Support: www.medion.com.au
82269_Aldi AUS_RC1_content.book Seite 69 Donnerstag, 9. April 2009 2:59 14
Disposal
Packaging
Your DECT telephone has been packaged to protect it against
damage in transit. The packaging constituents are raw
materials and can be reused or recycled.
Appliance
At the end of its lifetime, do not dispose of the DECT
telephone in household rubbish. Enquire about the options
for environmentally-friendly disposal.
Batteries
Do not put used batteries in the household rubbish.
The batteries should be taken to a collection point for used
batteries.
69
After Sales Support TEL: 1 300 884 987 WEB Support: www.medion.com.au
82269_Aldi AUS_RC1_content.book Seite 70 Donnerstag, 9. April 2009 2:59 14
Technical Data
Base station dimensions
(W x D x H)
ca. 150 x 112 x 45 mm (B x T x H)
Handset dimensions
ca. 46 x 26 x 153 mm (B x T x H)
Charging station dimensions
ca. 63 x 70 x 31 mm (B x T x H)
Rechargeable Batteries for
handset
1,2 V/600 mAh Type NiMH, Size AAA
Standard
DECT/GAP
Approx. 300 m range
Mains adapter for base station
Input: 100-240 V ~ 50/60 Hz, 150 mA
Output: 6 V
600 mA,
Model No: S005CV0600060
Mains adapter for charging
station
Input: 100-240 V ~ 50/60 Hz, 100 mA
Output: 6 V
300 mA,
Model No: S002CV0600030
Charging time
Approx. 16 hours for complete discharge
Standby mode
Approx. 100 hours
Talk time
Approx. 10 hours
Subject to technical modifications.
70
After Sales Support TEL: 1 300 884 987 WEB Support: www.medion.com.au
82269_Aldi AUS_RC1_content.book Seite 71 Donnerstag, 9. April 2009 2:59 14
Index
Brokering
Service in T-Net, in T-ISDN and for PABX systems. Brokering
allows two external, or internal, callers to switch back and
forth without the waiting subscriber being able to listen in.
Caller identity function
see CLIP.
CLIP
Abbreviation for "Calling Line Identification Presentation".
Displays the caller’s telephone number. The telephone
extension must be enabled for this.
DECT
Abbreviation for "Digital European Cordless
Telecommunication". European standard for cordless digital
telephones and cordless telecommunication systems. Freeof-charge internal calls can be made between several
handsets. Another advantage is the increased safety from
interception.
DTMF
Abbreviation for dual-tone multifrequency. Signalling
procedure in T-Net. The dialling signals are transmitted as a
combination of tones (tone dialling). DTMF can be used to
transmit information, e. g. to a pager or for remote enquiries
of answering machines. The R-key with hook flash is required
71
After Sales Support TEL: 1 300 884 987 WEB Support: www.medion.com.au
82269_Aldi AUS_RC1_content.book Seite 72 Donnerstag, 9. April 2009 2:59 14
to use the convenience service in the most telephone
networks.
GAP
Abbreviation for "General Access Profile". Radio protocol
used by cordless telephones in DECT systems to keep contact
with the base station. Handsets in GAP technology can be
operated independently of manufacturer at all fixed stations
with GAP interface. The transmission rate is 9,600 bit/s.
Handsfree
Permits handsfree calling for telephones with installed
microphone and loudspeaker.
Hook flash
see R – key.
Internal calls
Free connection between terminals on a PABX.
Multi-Link function
Several cordless handsets at a fixed station can be utilised at
different locations within the operating range.
Muting the microphone
Key to mute the microphone. The caller on the telephone
cannot hear the conversation held in the room.
72
After Sales Support TEL: 1 300 884 987 WEB Support: www.medion.com.au
82269_Aldi AUS_RC1_content.book Seite 73 Donnerstag, 9. April 2009 2:59 14
Paging
For cordless telephones, an acoustic signal is sent from the
fixed station to the handset. This function is used to e. g.
search for misplaced appliances within the range of the
telephones.
PIN
Abbreviation for Personal Identification Number. Used as
protection from unauthorized use.
R – key
Telephones equipped with the R-key (recall key) are also
suitable for connection to PABX systems. The R-key on
modern telephones triggers the hook flash function: The line
connection is interrupted for 170 – 310 ms and the exchange
is signalled that the following DTMF tones are commands to
the exchange. This function is required to use services such as
recalls/brokering and three-way conference with at least two
external subscribers.
TAE
Abbreviation for telecommunication line unit. The sockets
common for connecting analogue telecommunications units
to the most telephone networks. The TAE plugs and TAE
sokkets differentiate between F and N coding. F coding: F
means telephony. These plugs are attached to telephones. N
coding: N means non-telephony. This plugs are attached to
auxiliary units, such as fax machines, modems and answering
machines. Different designs are available. The most frequent
73
After Sales Support TEL: 1 300 884 987 WEB Support: www.medion.com.au
82269_Aldi AUS_RC1_content.book Seite 74 Donnerstag, 9. April 2009 2:59 14
of these is the triple TAE (NFN) which is used to connect one
telephone and two auxiliary appliances.
Tone dialling
see DTMF.
Phone Jack RJ11
Plug format initially used in the US which has now become
the standard for telephone connections in Europe as well.
74
After Sales Support TEL: 1 300 884 987 WEB Support: www.medion.com.au