1
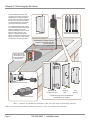
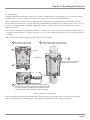
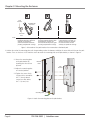
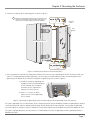
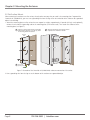
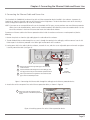
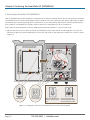
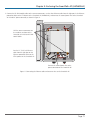
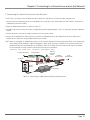
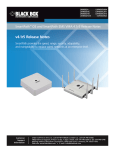
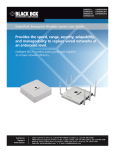
LWN602A-OUT
SmartPath 602HA Outdoor Kit
These instructions explain how to install
BOX
a SmartPath AP (LWN602HA) inBLACK
an outdoor
enclosure, mount it to a pole or flat surface, and
connect it to a power source and to the network.
®
1. Contents
Use the SmartPath AP (LWN602HA) outdoor accessory assembly (LWN602A-OUT) to mount the SmartPath AP (LWN602HA)
outdoors. The LWN602A-OUT package includes:
• (1) NEMA enclosure with (1) Ethernet protection device (passive PoE injector) installed
• (1) Ethernet protection device* (passive PoE injector) with four cross-slotted 6-32 machine screws and four cross-slotted #6
wood screws
*NOTE: One Ethernet protection device is pre-installed in the outdoor enclosure and a second Ethernet protection device
(mentioned above) is included for mounting indoors.
• (1) pole bracket
• (1) mounting plate
• (2) clamps
• (1) small bag containing (2) RP SMA terminators, (3) slotted machine screws with 10-32 threads, (4) 10-32 nuts, (4) #10
washers, and (4) #10 lock washers
Customer
Support
Information
Order toll-free in the U.S.: Call 877-877-BBOX (outside U.S. call 724-746-5500)
FREE technical support 24 hours a day, 7 days a week: Call 724-746-5500 or fax 724-746-0746
Mailing address: Black Box Corporation, 1000 Park Drive, Lawrence, PA 15055-1018
Web site: www.blackbox.com • E-mail: [email protected]
Chapter 1: Contents (continued) and Chapter 2: Safety Instructions and Warnings
• (4) dual-band antennas for (1) AP
• (1) 12" (30.5 cm) unshielded CAT5 Ethernet cable
• (1) 30-watt power supply
• (4) RP-SMA antenna cables
NOTE: The SmartPath AP (LWN602HA) is not included with the SmartPath 602HA Outdoor Kit (LWN602A-OUT). For more
information, contact Black Box Technical Support at 724-746-5500 or [email protected].
You will also need the following tools:
• Screwdriver for 1⁄4" (6-mm) slotted screws
• Screwdriver for cross-slotted 6-32 machine screws and #6 wood screws (Phillips #2 screwdriver)
• Drive sockets (nut drivers) for 1⁄2" (13 mm), 3⁄8" (10 mm), and 5⁄16" (8 mm) nuts
• 5⁄16" (8 mm) open-end wrench for coaxial antenna cable connectors
• Adjustable open-end wrench for cable grips
•(1) shielded CAT5 Ethernet cable rated for outdoor use; length determined by site requirements, but not to exceed 140 feet
(42.67 m)
2. Safety Instructions and Site Hazard Warnings
Read and follow these safety instructions and hazard warnings before installing a SmartPath AP (LWN602HA) outdoors. Also,
keep these instructions for future reference.
• To install the SmartPath AP (LWN602HA), you must be a qualified installation professional, licensed or certified in accordance
with local regulations.
• Make sure that the SmartPath AP (LWN602HA) enclosure and Ethernet protection device are connected to a suitably installed
ground conductor. Contact the appropriate electrical inspection authority if you are uncertain that suitable grounding is
available.
• To comply with RF (radio frequency) exposure limits, do not place the SmartPath AP (LWN602HA) within 8" (20 cm) of people.
• Do not locate the SmartPath AP (LWN602HA) enclosure near overhead power lines or other electric light or power circuits, or
where it can come into contact with such circuits. During installation, exercise extreme care not to come into contact with these
circuits, which can cause serious injury or death. For proper installation and grounding of the product, refer to national and local
electrical codes: NFPA (National Fire Protection Association) 70, National Electrical Code Article 810 (U.S.); Canadian Electrical
Code, Part I, CSA 22.1 and Section 54 (Canada). If local or national electrical codes are not available, refer to IEC (International
Electrotechnical Commission) 364, Part 1 through 7 (other countries).
• Do not connect or disconnect antennas or cables from the SmartPath AP (LWN602HA) during periods of lightning activity.
• You can install the SmartPath AP (LWN602HA) enclosure in wet, windy locations. Therefore, make sure to install closure caps
and securely fasten and waterproof all cable connections.
• Use only attachments and accessories specified by Black Box.
• After operating the SmartPath AP (LWN602HA), its rear surface can become hot. Use caution when handling it.
Page 2
724-746-5500 | blackbox.com
Chapter 3: Mounting the Enclosure
3. Mounting the Enclosure
You can mount the SmartPath AP (LWN602HA) within the outdoor enclosure on a variety of structures and adjust the enclosure
to a vertical orientation for optimum radio transmission. For example, you can mount the SmartPath AP enclosure to a
nonpenetrating roof stand or to a Winegard bracket, often used for mounting satellite dishes. The pole bracket is adjustable
to fit a pipe with a 1" to 3.5" (2.5 cm to 8.9 cm) diameter.
After checking that you have all the materials and tools necessary, removing the twist ties and plastic caps used to protect wires
and screws during shipping, and familiarizing yourself with the safety and site hazard warnings, you are ready to being mounting
the unit. You have a choice between mounting the SmartPath AP (LWN602HA) to a pole or to a flat surface. Both options are
described below. The major devices and accessories required for pole mounting the SmartPath AP (LWN602HA) outdoors are
shown in Figure 1.
NOTE: When mounting the Ethernet protection device inside a building, place it as close as possible to the point where the
shielded Ethernet cable enters the building and make sure the device is grounded.
Page 3
Chapter 3: Mounting the Enclosure
The SmartPath AP is shown pole
mounted in the outdoor enclosure. A
shielded Ethernet cable provides it
with a network connection and power
through PoE. The pole is grounded,
and the SmartPath AP is electrically
connected to the grounded pole.
The shielded Ethernet cable passes
to the Ethernet protection device just
inside the building beyond the
Ethernet cable entry point. A second
Ethernet cable connects to the
network. The Ethernet protection
device is powered by a 30-watt power
supply connected to a power source.
These devices are also grounded.
Dual Band N-Type Outdoor
Antenna Set (4 antennas)
SmartPath AP
SmartPath AP in outdoor enclosure
mounted to a grounded pole with
antennas attached
Shielded Ethernet Cable
Ethernet protection
device (above) and
30 watt power supply
(below) attached to a
grounded object
Ethernet Protection Device
SmartPath AP
Outdoor Enclosure
30-Watt Power Supply
Mounting
Plate
Pole
Bracket
Outdoor Enclosure Kit for SmartPath AP
(SmartPath AP not included)
Figure 1. SmartPath AP (LWN602HA) mounted on a pole with major devices and accessories called out.
NOTE: For best performance, deploy SmartPath APs at least 100 feet (30.5 m) apart from each other.
Page 4
724-746-5500 | blackbox.com
Chapter 3: Mounting the Enclosure
3.1 Pole Mount
To provide unobstructed RF coverage, mount the SmartPath AP (LWN602HA) in a relatively open area. At a minimum, mount it
on a pole or mast so that the antennas have at least a three-foot clearance from any nearby obstructions.
NOTE: To help protect the SmartPath AP from lightning strikes, do not place it at the highest point of a building or structure.
You can mount the enclosure on a vertically, horizontally, or diagonally oriented pole that has a diameter from 1" to 31⁄2" (2.5 cm
to 8.9 cm). The mounting plate is adjustable, allowing you to orient it vertically regardless of how the pole bracket must be
attached to the pole.
1. To mount the SmartPath AP (LWN602HA) enclosure on a pole or mast, first use the two clamps to attach the pole bracket to
the pole, as shown in Figure 2. To tighten the clamps, use a 1/4" (2 cm) slotted screwdriver or a 3/8" (10 mm) drive socket (or
nut driver).
NOTE: You can mount the pole bracket with either end at the top or bottom.
1.1 Run the two clamps through
1.2 Wrap the clamp bands around a pole and
the slots in the pole bracket.
pass the ends through the gap in the hinge.
Clamp
Hinge
Pole Bracket
1.3
Tighten each clamp around the
pole by pulling on the band.
Screwdriver
Screw
1.4 Swivel the screw inward until its grooves engage the slots in
the band. First, tighten the screw by hand until the clamp has a
firm grip on the pole. Then tighten with a screwdriver or drive
socket. When done, tuck the bands inside the pole bracket.
Figure 2. Mounting the pole bracket.
When attaching the pole bracket to a horizontal pole, such as the arm of a street light, make sure that the face of the pole
bracket is perpendicular to the Earth so that the SmartPath AP can provide optimal RF coverage. See Figure 3.
Page 5
Chapter 3: Mounting the Enclosure
Pole
Bracket
SmartPath AP
Enclosure
Horizontal
Pole
Earth
Not good. The face of the pole
bracket tilts downward. When the
assembly is complete, the
antennas will also tilt downward,
providing suboptimal RF coverage.
Not good. In this case, the face of
the pole bracket tilts upward. When
the assembly is complete, the
antennas will also tilt upward, again
providing suboptimal RF coverage.
Good! The face of the pole bracket
is perpendicular to the Earth, so
when the assembly is complete,
the antennas will be oriented
vertically for optimal RF coverage.
Figure 3. Orientation of the pole bracket when mounted to a horizontal pole.
2. Position the end of the mounting plate with the grounding stud at the bottom, and align the center hole with that on the pole
bracket. Then use the three 10-32 machine screws to attach the mounting plate to the pole bracket, as shown in Figure 4.
2.1 Fasten the mounting plate
to the pole bracket by
attaching the three screws
by hand.
Mounting
Plate
Pole
Bracket
2.2 Adjust the mounting plate
to a vertical position.
2.3 Tighten the screws firmly
in place with a screwdriver
for 1⁄4" (6-mm) slotted
screws or a drive socket
for 5⁄16" (8-mm) nuts.
Grounding Stud
Figure 4. Attach the mounting plate to the pole bracket.
Page 6
724-746-5500 | blackbox.com
Chapter 3: Mounting the Enclosure
3. Connect the enclosure to the mounting plate as shown in Figure 5.
3
Pass the mounting plate screws through the openings in the
enclosure, a #10 washer, #10 lock washer, and 10-32 nut.
Use a 3/8” (10 mm) drive socket to secure the assembly.
Mounting
Plate
Pole
Bracket
SmartPath AP Enclosure
Figure 5. Attaching the enclosure to the mounting plate.
4. You can ground the SmartPath AP (LWN602HA) enclosure in one of two ways, depending on whether the pole to which you
mount it is already grounded. For both approaches, you must connect the grounding wire from the mounting plate to the
ground lug at the bottom of the enclosure and tighten the ground lug nut as shown in Figure 6.
4.1 Thread the end of the grounding wire
through the hole in the grounding lug
on the underside of the enclosure
and make sure the exposed wire
contacts the walls of the lug.
4.2 With a 1⁄2" (13-mm) nut driver,
tighten the nut until the grounding
wire is secured.
Figure 6. Connecting the grounding stud on the mounting plate to the grounding lug on the enclosure.
If the pole is grounded, then the pole bracket, which is designed to pierce paint and oxidation, provides the grounding by forming
an electrical connection from the grounded pole through the pole bracket to the mounting plate, then through the grounding
wire to the lug on the enclosure, and then through the internal mounting plate to the enclosed SmartPath AP (LWN602HA) itself.
If the pole is not grounded, then you must connect a 10 AWG copper wire from the grounding stud to a grounding rod that is
bonded to the earth.
Page 7
Chapter 3: Mounting the Enclosure
3.2 Flat Surface Mount
When mounting the enclosure to a flat surface, the only other accessory that you need is the mounting plate. To ground the
SmartPath AP (LWN602HA), you must run a grounding wire from the lug nut on the underside of the enclosure to a grounded
object in the building.
1. Attach the mounting plate to a flat surface that can support its weight—approximately 15 pounds (6.8 kg)—and, optionally,
remove the wire from the grounding stud on the mounting plate (it will not be used). Then attach the enclosure to the
mounting plate (see Figure 7).
1a
Using up to five #10 wood screws (not included)
with a minimum length of 1 1/2” (3.8 cm), attach
the mounting plate to a flat surface.
1c
Attach the enclosure to the mounting plate as
explained in the “Pole Mount” section.
Mounting
Plate
SmartPath AP Enclosure
1b
(Remove the
grounding wire.)
Figure 7. Illustration of the SmartPath AP (LWN602HA) enclosure mounted to a flat surface.
2. Run a grounding wire from the lug nut at the bottom of the enclosure to a grounded object.
Page 8
724-746-5500 | blackbox.com
Chapter 4: Connecting the Ethernet Cable and Power Line
4. Connecting the Ethernet Cable and Power Line
The SmartPath AP (LWN602HA) enclosure ships with an Ethernet protection device installed in the enclosure. It protects the
SmartPath AP from any electrical surges on the Ethernet line that might occur. The device also directs some of the electricity it
receives through PoE to power the fan inside the enclosure.
NOTE: If you want to run a second Ethernet line to the SmartPath AP ETH1 port, you can purchase two more Ethernet protection
devices (one to be installed indoors, and one to be installed outdoors) from Black Box, mount the outdoor device it to the
rear of the enclosure in the lower left corner and mount the indoor device indoors.
To connect an Ethernet cable to the Ethernet protection device inside the enclosure and ensure a weatherproof seal, do the
following:
1. Remove the plastic nut from the right cable grip on the underside of the enclosure.
2. Thread shielded Ethernet cable through the nut, pass it through the opening in the cable grip, and then connect it to the left
Ethernet port in the Ethernet protector in the lower right interior corner of the enclosure.
3. Leaving some slack in the cable inside the enclosure, reattach the nut, and then use an adjustable open-end wrench to tighten
it securely around the cable (see Figure 8).
Ethernet
Protection
Device
Cable Grip
1
Remove the nut from the right cable grip on the underside
of the enclosure.
2
Pass the Ethernet cable through the nut and cable grip, and
then plug it into the left port on the Ethernet protection device.
3
Use an open-end wrench to tighten the nut around the cable
grip so it forms a weatherproof seal.
Nut
Shielded
Ethernet Cable
Figure 8. Connecting the Ethernet cable through the cable grip to the Ethernet protection device.
4. Attach either of the two power lines to the Ethernet protection device, as shown in Figure 9.
4
Attach one of the two power lines to the
power connector on the Ethernet protection
device.
Power Lines
Ethernet
Protection
Device
Figure 9. Attaching a power line to the Ethernet protection device.
Page 9
Chapter 5: Enclosing the SmartPath AP (LWN602HA)
5. Enclosing the SmartPath AP (LWN602HA)
With the shielded Ethernet cable and power line connected to the Ethernet protection device, you can now attach the SmartPath
AP (LWN602HA) to the internal mounting plate inside the enclosure. After that, connect the four antenna cables from the top of
the enclosure to the antenna connectors on the SmartPath AP, run the short Ethernet cable from the Ethernet protection device
to the SmartPath AP (LWN602HA) ETH0 port, and then connect the second power line to the SmartPath AP.
NOTE: Attach RP SMA terminators to the two middle antenna connectors labeled “B.” They will not be used.
1. Align the four slots on the rear of the SmartPath AP (LWN602HA) with the four tabs on the mounting plate. Then press the
SmartPath AP against the plate and downward, until the tabs slide inside the slots locking the SmartPath AP in place as shown
in Figure 10.
(The slots are on the other
side of the SmartPath AP.)
(view from inside the SmartPath AP)
Slot on
SmartPath AP
Tab on internal
mounting plate
Position the SmartPath AP
so the four tabs go into the
slots.
Press the SmartPath AP
downward, letting its weight
secure the tabs in the slots.
Figure 10. Attaching the SmartPath AP (LWN602HA) to the internal mounting plate.
Page 10
724-746-5500 | blackbox.com
Chapter 5: Enclosing the SmartPath AP (LWN602HA)
2. Connect the RP SMA coaxial cables to the antenna connectors, run the short Ethernet cable from the right port in the Ethernet
protection device to the ETH0 port on the SmartPath AP (LWN602HA), and connect the second power line to the SmartPath
AP 48-volt DC power connector, as shown in Figure 11.
Link the antenna connectors on
the enclosure to those on the
SmartPath AP with four RP SMA
coaxial cables.
Run the 12" (30.5 cm) Ethernet
cable from the right port on the
Ethernet protection device to the
ETH0 power on the SmartPath AP.
Connect the second power line to the
power connector on the SmartPath AP.
Figure 11. Connecting the Ethernet cable and antenna wires to the SmartPath AP.
Page 11
Chapter 6: Attaching External Antennas
6. Attaching External Antennas
The dual-band omnidirectional antennas are available from Black Box in a set of four to fit the four N-type antenna connectors on
the top of the enclosure. The two connectors near the rear are for the 2.4-GHz radio, and the two near the front are for the
5-GHz radio. You can attach any of the antennas in the set to any of the N connectors on the enclosure; they are all interchangeable.
1. Remove the plastic caps from the antenna connectors on the enclosure.
NOTE: If you do not use all four antennas, cover the unused connectors with weatherproof N-Type caps (included) to keep them
protected.
2. Screw the antennas onto the connectors by hand, turning them clockwise until tight (see Figure 12).
ou do not need to apply self-amalgamating PTFE (polytetrafluoroethylene) tape around the threads of the connectors to
Y
create a waterproof seal or use a tool to tighten the antennas.
Attach the four antennas to the
connectors on the top of the
enclosure.
Tighten by hand by turning them
clockwise.
You can attach any of the four
antennas to any of the connectors,
and you can attach them in any
order.
(bird’s eye view)
Antenna connectors
for the 5 GHz radio
Front
Rear
Figure 12. Attaching antennas to the enclosure.
Page 12
724-746-5500 | blackbox.com
Antenna connectors
for the 2.4 GHz radio
Chapter 7: Connecting to a Power Source and to the Network
7. Connecting to a Power Source and to the Network
The final step is to install an Ethernet protection device, ground it, and connect the Ethernet cables and power line.
1. Attach the Ethernet protection device to the building at the entry point of the shielded Ethernet cable from the SmartPath AP
(LWN602HA) inside the building.
2. Make the following connections, as shown in Figure 13:
• Ground the device by running a wire from the grounding stud to a grounded object, such as a water pipe, gas pipe, or grounding rod.
• Connect the device to the power supply and connect that to a power source.
• Connect the shielded Ethernet cable from the SmartPath AP (LWN602HA) to the port labeled Data & Power, and connect
another Ethernet cable from the port labeled Data to the network.
NOTE: When the SmartPath AP (LWN602HA) connects to the network through the Ethernet protection device, it can support only
10/100-Mbps speeds although it might autonegotiate 1-Gbps speed. Therefore, manually set the speed for eth0 on the
SmartPath AP and the connecting port on the adjacent switch to 100 Mbps and set the transmission type as full duplex.
For the SmartPath AP, make a console connection and enter these commands:
interface eth0 speed 100 … interface eth0 duplex full
To a grounded object
To network
Grounding Wire
Ethernet Cable
Power
Source
Ethernet
Protection
Device
Shielded
Ethernet Cable
To the
SmartPath AP
Power Supply
Figure 13. Connecting the indoor-mounted Ethernet protection device.
Page 13
Chapter 8: Specifications
8. Specifications
Understanding the range of specifications for the SmartPath AP (LWN602HA) is necessary for optimal deployment and device
operation. The following specifications describe the physical features and hardware components, the PoE (Power over Ethernet)
electrical requirements, and the temperature and humidity ranges and maximum wind speed in which the device can operate.
8.1 Device and Enclosure Specifications
• Enclosure dimensions (without antennas): 14 1/4" x 11 1/2" x 5 7/8" (36.2 cm x 29.2 cm x 15 cm)
• Enclosure dimensions with brackets: 14 1/4" x 11 1/2" x 8 1/4" (36.2 cm x 29.2 cm x 21 cm)
• SmartPath AP weight: 3 lb. (1.36 kg)
• Enclosure weight: 12 lb (5.44 kg)
• Antennas: 4 N-Type female connectors for external antennas (3-dBi outdoor antennas available)
• Ethernet ports: autosensing 10/100BASE-T Mbps; both ports are compliant with the IEEE 802.3af standard and the forthcoming
802.at standard for PoE with lightning protection (required)
• Mounting options:
- Pole mount; the pole must be 1" to 3.5" (2.5 cm to 8.9 cm) in diameter
- Wallmount
• Physical security: two padlockable latches
8.2 Power Specifications
• Power options: Passive PoE 48 V 30 watts
• RJ-45 power input pins: Wires 4 (+), 5 (+), 7 (-), 8 (-)
• RJ-45 data input pins: Wires 1, 2, 3, 6
8.3 Environmental Specifications
• Operating temperature: -13 to +140° F (-25 to +60° C)
• Storage temperature: -40 to +176° F (-40 to +80° C)
• Relative humidity: Maximum 100%
• Wind survivability: > 165 mph (266 kph)
• Environmental compliance: NEMA 4X, 6P
Page 14
724-746-5500 | blackbox.com
NOTES
Page 15
Black Box Tech Support: FREE! Live. 24/7.
Tech support the
way it should be.
Great tech support is just 30 seconds away at 724-746-5500 or blackbox.com.
Trademarks Used in this Manual
Black Box and the Double Diamond logo are registered trademarks of BB Technologies, Inc.
Any other trademarks mentioned in this manual are acknowledged to be the property of the trademark owners.
About Black Box
Black Box Network Services is your source for more than 118,000 networking and infrastructure products. You’ll find everything
from cabinets and racks and power and surge protection products to media converters and Ethernet switches all supported by
free, live 24/7 Tech support available in 30 seconds or less.
©
Copyright 2011. All rights reserved. Black Box Corporation.
LWN602A-OUT, version 1
724-746-5500 | blackbox.com