1
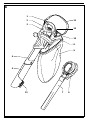
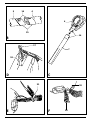
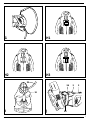
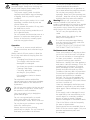
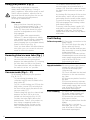
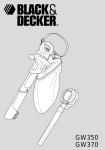
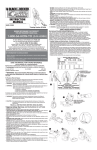
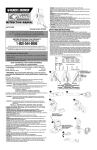
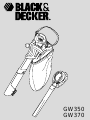
GW350
GW370
1
Copyright Black & Decker
2
A
1
2
11
3
12
10
8
9
4
5
13
7
6
3
5
14
4
6
15
16
B
17
7
18
D
C
21
E
4
20
F
19
G
H1
H2
H3
22
24
3
2
12
I
J
23
5
L
K
25
26
27
M
N
28
29
10
O
6
P
GW350/370
User manual
Congratulations!
Know your product
On purchasing the Black & Decker system which will
assure you of problem free leaf clearing.
Read this manual carefully, observing all
recommended safety precautions before,
during and after using your product.
Maintain your product in good working order.
Familiarise yourself with the controls on
your product before attempting to operate
it, but above all, be sure you know how to
stop the product in an emergency.
Retain this manual and all other literature
supplied for future reference.
GW350 & GW370 - Blower Vac
2-speed Vacuuming ✔ Shredding ✔
2-speed Blowing ✔
Your product has many features designed for your
benefit, including:
• Powerful motor that blows air and will vacuum/
mulch.
• Unique 5 blade fan that will shred leaves into
small debris in a 10 to 1 ratio.
• 2-speed switch for maximum convenience.
• Ergonomic design improves comfort and ease
of use.
• Large aperture vacuuming tube to maximise the
intake of leaves.
• 35 litre easy empty collection bag.
Safety instructions
Description (Fig. A)
Following is a list of parts that will be
mentioned in this user manual and are
shown in the diagrams:
1. Two-speed on/off switch
2. Powerhead
3. Release button
4. Vacuum tube - upper
5. Vacuum tube - lower
6. Blow clamshell
7. Blow tube
8. Bag top
9. Collection bag
10. Collection bag handle
11. Carrying strap
12. Cable restraint
13. Scraper
360˚
6m
A
Training
• Do not allow the unit to be used by
persons under the age of 16 or other
persons who have not read this user
manual. You are responsible if there is
an accident.
• Remember that the operator/user is
responsible for accidents or hazards
occurring to other people or their property.
• Do not allow children, animals or other
persons near your product when in use always keep them at least 6m (20ft) away
from the working area.
• Never carry your product by the cable
or jerk the cable. Keep the cable away
from heat sources, oils or sharp edges.
Check the condition of your cable
before use and do not use if damaged.
Preparation
• Do not operate your product barefoot
or in open sandals.
• To protect your feet and legs, always
wear stout shoes or boots and long
trousers - freshly cut grass is damp and
slippery. Rubber or man made footwear
will enhance your safety.
• Use protective equipment. Wear safety
spectacles or goggles whilst operating
your product in blow mode.
• To prevent dust irritation the wearing of
a suitable face mask is recommended.
• Use ear protection if the sound level
seems uncomfortable when using your
product.
7
•
Warning! Secure long hair so it is above
shoulder length. Keep loose clothing, ties,
tassels and hanging straps away from
openings and moving parts.
• The power supply cable should be
regularly inspected for signs of damage
or ageing, and only used if in good
condition.
• Always be sure your product is in a safe
operating condition and all parts are
secure before use.
• Do not operate the product if any parts
are defective or worn.
• Do not pick up burning materials such
as lit cigarette butts.
• Do not operate the blower/vacuum in a
gaseous or explosive atmosphere as
motors in these tools normally spark
and this may ignite fumes.
!
Operation
• Do not use in vacuum mode without
the vacuum tubes and collection bag in
place.
Always switch off your product, allow the
fan to stop and remove the plug from the
socket when:
• Changing from blower to vacuum.
• The supply cable has become
damaged or entangled.
• You leave your product unattended.
• Clearing a blockage.
• Checking, adjusting, cleaning or
working on your product.
• If the appliance starts to vibrate
abnormally.
• Do not place the inlet or outlet of the
vacuum near eyes or ears when operating.
Never blow debris in the direction of
bystanders.
• Do not use your product in the rain and
do not allow it to get wet. Avoid using
the product in wet conditions.
• Use your product only in daylight or
good artificial light.
• Do not cross gravel paths or roads
whilst your product is switched on
during blow/vac mode. Walk, never run.
• Do not place your unit down on gravel
whilst it is switched on.
• Always be sure of your footing,
particularly on slopes. Do not overreach
and keep your balance at all times.
8
Do not pick up matter that may be
contaminated with flammable or
combustible liquids such as gasoline, or
use in areas where they might be present.
• Do not place any objects into the
openings. Never use if the openings are
blocked - keep free of hair, lint, dust and
anything that may reduce the airflow.
Warning! Always use your product in the
manner outlined in this manual. Your
product is designed to be used in an upright
mode and if it is used in any other way it
may result in injury. Never run your product
whilst lying on it’s side or upside down.
• Do not carry the appliance by the
cable.
• Always direct the cable to the rear
away from the appliance.
• If a cord becomes damaged during
use, disconnect the supply cord from
the mains immediately.
DO NOT TOUCH THE CORD BEFORE
DISCONNECTING THE SUPPLY.
Maintenance and storage
• Store your product in a dry place when
not in use, out of the reach of children.
• Do not use solvents or cleaning fluids
to clean your product - use a blunt
scraper to remove grass and dirt.
• Before use, carefully check the appliance
and mains cable for damage. Check for
misalignment and seizure of moving
parts, breakage of parts, damage to
guards and switches and any other
conditions that may affect its operation.
Ensure that the appliance will operate
properly and perform its intended
function. Do not use the appliance if
any part is damaged or defective. Do
not use the appliance if the switch does
not turn it on and off.
• Have any damaged or defective parts
repaired or replaced by an authorised
repair agent. Never attempt any repairs
yourself.
• If the supply cord is damaged, it must
be replaced by the manufacturer or its
service agent or a similarly qualified
person in order to avoid a hazard.
Replace damaged or unreadable labels.
• Check the Debris collector frequently
for wear or deterioration.
• Replacement fans are available from a
Black & Decker service agent. Only use
genuine replacement parts and
accessories.
ENGLISH
Double insulation
This tool is double insulated; therefore no
earth wire is required. Always check that
the power supply corresponds to the
voltage on the rating plate.
Guard against electric shock.
• Electric safety can be further improved by using
a high-sensitivity (30 mA / 30 mS) residual
current device (RCD).
• Your appliance is designed for use on AC
(mains) electrical supplies only. Do not attempt
to use it on any other supply.
•
•
Carrying strap assembly (Fig. D - G)
• Fit the carrying strap to the powerhead,
if required, and adjust to suit the user.
For your comfort, the shoulder strap is
designed to be fitted in two ways:
Single Point Attachment (Fig. D)
• Clip the hook (17) through the eyelet
(18) on the powerhead.
• Adjust the length of the loop with the
buckle.
Double point attachment
(Fig. D, E, F & G)
• Clip the hook (17) through the eyelet
(18) on the powerhead.
• Remove the loose end of the strap from
the buckle.
• Pass the loose (19) end under the boss
(20), and thread it back through the
buckle (21).
• Adjust the length of the loop with the
buckle (Fig. G).
Plug replacement (UK only)
Mains plug replacement (U.K. & Ireland only)
If a new mains plug needs to be fitted:
• Safely dispose of the old plug.
• Connect the brown lead to the live terminal in
the new plug.
• Connect the blue lead to the neutral terminal.
• Connect the green/yellow lead to the earth
terminal.
Warning! Follow the fitting instructions supplied with
good quality plugs. Recommended fuse: 13 A.
Extension cables
When using the appliance outdoors, only use
extension cables intended for outdoor use.
Up to 25 m of Black & Decker 1.5 mm
HO5VVF 3-core extension cable can be used
without loss of power.
Assembly prior to use (Fig. B & C)
B
C
Vacuum tube assembly (Fig. B)
• Vacuum tubes must be assembled
together before use.
• To ease assembly apply soapy water
solution to joint area.
• Align the notches (15) and the triangles
(14) on upper (4) and lower (5) tubes.
• Push the lower tube (5) firmly into the
upper tube (4), until the triangles click
into place. (Never operate apart).
• In the interests of safety, it is not
intended for the tubes to be separated
once assembled.
Blow tube assembly (Fig. C)
• Blow tube must be assembled to the
blow clamshell before use.
• Align the circles (16) on the clamshell
(6) and the tube (7).
Push the tube (7) firmly onto the clamshell
(6) until the circles click into place.
For storage the blow tube can be
detached from the blow clamshell by
depressing the circles on either side
and gently sliding off the tube.
On/off switch (Fig. H1, H2, H3)
Warning! Use both hands to grip the
product firmly when switching on.
• For extra control, your blowvac is fitted
with a two speed switch located on the
handle of the powerhead.
• The switch has a central off. Position 0
(Fig. H1).
• To use in low speed, move the switch
fully to the rear. Position I (Fig. H2).
• To change to high speed push the
switch back to the off position and then
fully forward. Position II (Fig. H3).
Cable restraint (Fig. I)
• A cable restraint is incorporated into the
I
•
rear of the powerhead.
Loop the cable (22) through the cable
restraint (12).
9
Using your product (Fig. J)
When using as a blower or vacuum,
always wear safety glasses. If using in
dusty conditions, wear a filter mask as well.
Switch off your product, allow the fan to
stop and remove the plug from the socket
before carrying out any adjustment,
servicing or maintenance.
J
Blow mode
• Attach the blow clamshell and tube
(6 & 7) to the powerhead (2) (Fig. J) by
locating the blower as indicated by
arrow 23, then pivot about this point
until the locking/release catch (24) is
fully engaged.
• Hold the blow tube approximately
180mm (7”) above the ground, switch
your product on and using a sweeping
motion from side to side, advance
slowly keeping the accumulated debris/
leaves in front of you (Fig. K).
• Once you have blown the debris/leaves
into a pile, you can convert to vacuum
mode to collect the debris.
Removing blow/vacuum tube (Fig. J)
• To disconnect the blow clamshell or
J
•
vacuum tube from the powerhead,
depress the release button (3), ensuring
the tube does not fall to the ground.
The release button will not depress if
the switch is in the “on” position.
Vacuum mode (Fig. L - P)
To fit the bag assembly to your product:
(Fig. M, N, O)
• For vacuuming/shredding, the
collection bag (9) must be fitted to the
bag holder (8).
• Fig. M: Locate the bag rim (25) into the
bag holder channel (26) ensuring that
the front of the bag is placed over the
vacuum outlet (27).
• Slide the bag fully into the channel and
depress the latch (28) to lock the
handle into the bag top (Fig. N & O).
• Position the tube slightly above the
debris/leaves. Switch your product on,
then using a sweeping motion the
debris/leaves will be sucked up the
tube, shredded and thrown into the
collection bag (Fig. L).
10
•
•
•
•
For stubborn debris/leaves your
vacuum tube is incorporated with a
scraper (13). Use this scraper to loosen
the debris and continue to vacuum as
normal.
As the bag fills the power of the suction
will decrease, switch off your product
and unplug from the mains power supply.
To remove the bag, depress the latch
(28) to disengage from the bag holder
and slide the bag out.
To empty, hold the plastic handle (10)
and grab the nylon handle (29) on the
underside of the bag. Turn the bag
upside down and shake out any debris
and leaves.
Fault finding
Failure to operate (1) Check the connection to the
power supply.
(2) Check the fuse in the plug, if
blown, replace (UK only).
(3) Check that the blow/vacuum
tube assembly is correctly fitted
to the powerhead.
(4) If the fuse continues to blow immediately disconnect from the
mains power supply and consult
your local Black & Decker
authorised repair agent.
Poor vacuum/
(1) Switch off - disconnect from
high pitched whine the mains power supply, debris
should fall clear of the tube.
(2) Remove and empty the
collection bag.
(3) Check that both the inlet and
exit ports on the vacuum tube
are clear.
(4) Remove any debris from the
fan area.
(5) If poor vacuuming continues immediately disconnect from the
mains power supply and consult
your local Black & Decker
authorised repair agent.
Poor shredding (1) Switch off - disconnect from
the mains power supply and
remove the collection bag.
(2) Remove the vacuum tube
and inspect the fan.
(3) Clean any debris from the fan
blades.
(4) If the fan is cracked or
damaged, do not use - consult
your local Black & Decker
authorised repair agent.
ENGLISH
Cleaning your product
•
•
•
•
Keep your product dry.
Under no circumstances spray with water.
Clean your product regularly.
Remove any leaves stuck to the inside of the
vacuum tube.
Plastic parts may be cleaned using a mild soap
and a cloth dampened with hot water.
Do not use any type of detergent, cleaner
or solvent which may contain chemicals
that could seriously damage the plastic.
Self lubricating bearings are used in your
product, therefore lubrication is not required.
Protecting the environment
Black & Decker provides a facility for
recycling Black & Decker products once
they have reached the end of their working
life. This service is provided free of charge.
To take advantage of this service please
return your product to any authorised
repair agent who will collect them on our
behalf.
You can check the location of your nearest
authorised repair agent by contacting your local
Black & Decker office at the address indicated in
this manual. Alternatively, a list of authorised
Black & Decker repair agents and full details of our
after-sales service and contacts are available on the
Internet at: www.2helpU.com.
EC Declaration of conformity GW350/370
Black & Decker declares that these products
conform to:
98/37/EC, 89/336/EEC, 73/23/EEC,
EN 55014, EN 55104, EN 60335,
2000/14/EC, Leaf blower/collector =11 m3/min,
Annex V
Level of sound pressure, measured according to
2000/14/EC:
LpA (sound pressure)
dB(A)
92
LWA (acoustic power)
dB(A)
105
LWA (guaranteed)
dB(A)
107
Hand/arm weighted vibration value according to
EN ISO 5329: < 2.5 m/s2
Kevin Hewitt
Director of Consumer Engineering
Spennymoor, County Durham DL16 6JG,
United Kingdom
01-06-2003 (Date of 1st manufacture)
UK patent application nos. 0229517.8; 0300442.1; 0302170.6
UK design application no. 3 010 507
European patent nos. 0 723 758 B1; 0 723 759 B1
US patent nos. 5 673 457; 5 604 954
Guarantee
Black & Decker is confident of the quality of its
products and offers an outstanding guarantee.
This guarantee statement is in addition to and in no
way prejudices your statutory rights. The guarantee
is valid within the territories of the Member States
of the European Union and the European Free
Trade Area.
If a Black & Decker product becomes defective due
to faulty materials, workmanship or lack of
conformity, within 24 months from the date of
purchase, Black & Decker guarantees to replace
defective parts, repair products subjected to fair
wear and tear or replace such products to ensure
minimum inconvenience to the customer unless:
• The product has been used for trade,
professional or hire purposes;
• The product has been subjected to misuse or
neglect;
• The product has sustained damage through
foreign objects, substances or accidents;
• Repairs have been attempted by persons other
than authorised repair agents or Black & Decker
service staff.
To claim on the guarantee, you will need to submit
proof of purchase to the seller or an authorised
repair agent. You can check the location of your
nearest authorised repair agent by contacting your
local Black & Decker office at the address indicated
in this manual. Alternatively, a list of authorised
Black & Decker repair agents and full details of our
after-sales service and contacts are available on the
Internet at: www.2helpU.com.
Other outdoor tools
Black & Decker has a full range of outdoor power
tools that make life in the garden easy. If you would
like further information on the following products,
please contact our Service and Information Centre
(see the address page towards the end of this
manual) or your local Black & Decker retailer.
String trimmers
Chainsaws
Cordless shear
Hedgetrimmers
Lawnmowers
Lawnrakers
Leafbusters
Shredders
Not all products are available in all countries.
11
Australia
DEWALT Industrial Power Tool Company
7 Clarice Road
Box Hill, Victoria 3128
Tel. 03 9895 9200
Fax 03 9899 7465
New Zealand
Black & Decker
81 Hugo Johnson Drive
Penrose, Auckland, New Zealand
Tel. 09 579 7600
Fax 09 579 8200
United Kingdom
Black & Decker
210 Bath Road
Slough, Berkshire SL1 3YD
Tel. 01753 511234
Fax 01753 551155
Helpline 01753 574277
583494-04
07-03