1
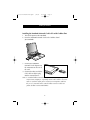
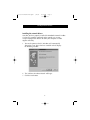
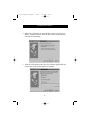
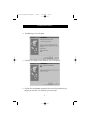
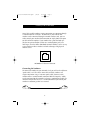
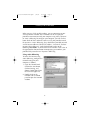
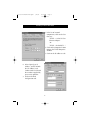
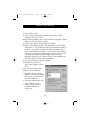
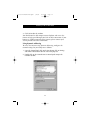
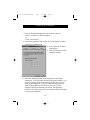
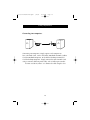
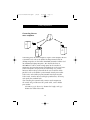
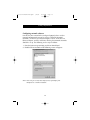
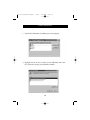
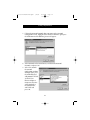
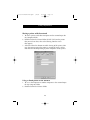
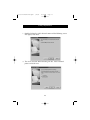
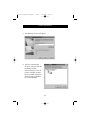
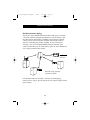
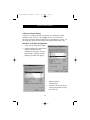
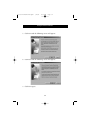
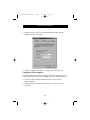
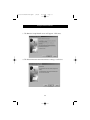
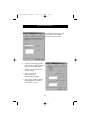
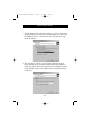
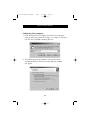
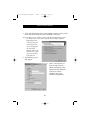
P73635-F5D5010-man.qxd
6/4/01
4:54 PM
Page 1
Notebook Network
CardBusCard
Connect your PC to a network or broadband modem
network
F5D5010
P73635-F5D5010-man.qxd
6/4/01
4:54 PM
Page 2
P73635-F5D5010-man.qxd
6/4/01
4:54 PM
Page 3
Table of Contents
Introduction . . . . . . . . . . . . . . . . . . . . . . . . . . . . . . . . . . . . . . . . .1
Installing the Hardware . . . . . . . . . . . . . . . . . . . . . . . . . . . . . . . . .2
Installing the Network Drivers . . . . . . . . . . . . . . . . . . . . . . . . . . .3-5
Connecting to a DSL or Cable Modem . . . . . . . . . . . . . . . . . . .6-13
Creating a Simple Network . . . . . . . . . . . . . . . . . . . . . . . . . . .14-28
Sharing an Internet Connection . . . . . . . . . . . . . . . . . . . . . . . .29-46
Product Specifications . . . . . . . . . . . . . . . . . . . . . . . . . . . . . . . . .47
Warranty, FCC, CE Statement . . . . . . . . . . . . . . . . . . . . . . . . . . . .48
P73635-F5D5010-man.qxd
6/4/01
4:54 PM
Page 1
Introduction
Congratulations on your purchase of this quality Belkin product.
You can now enjoy the benefits of sharing printers and
peripherals, exchanging data quickly between connected
computers, and communicating via e-mail and the Internet. This
guide explains how to install and use the Belkin Notebook
Network CardBus Card on a PC running Microsoft® Windows® 98,
2000, NT® 4.0, or Me operating system software.
Features:
• Compatible with PCMCIA CardBus specification
• Provides LED indicators for monitoring network traffic
Contents of Package:
• One Notebook Network CardBus Card
• One CD-ROM
• User Guide
1
P73635-F5D5010-man.qxd
6/4/01
4:54 PM
Page 2
Installing the Hardware
Installing the Notebook Network Card in PCs with CardBus Slots
1. Turn off the power to the notebook.
2. Insert the Notebook Network Card in the CardBus slot of
your notebook.
3. Connect the Notebook
Network Card’s adapter into
the connector on the rear of
the card.
4. Connect the other end of the
CAT5 cable and RJ45 plug
into the network device.
Note: A standard Belkin network cable cannot be used to directly
connect two computers. A specially wired cable called a crossover
cable is needed to allow you to connect two computers without
the use of a network hub or switch. Belkin crossover cables are
yellow (Belkin’s A3X126-XX-YLW-M).
2
P73635-F5D5010-man.qxd
6/4/01
4:54 PM
Page 3
Installing the Network Drivers
Installing the network drivers
Now that you have properly installed the Notebook Network CardBus
Card and it is properly connected to the network, we are now
ready to configure the software to allow your computers to work
together efficiently.
1. Turn on the power to the PC. Windows will automatically
detect that a new device has been installed and will display
the following window:
2. The "Add New Hardware Wizard" will begin:
3. Click the Next button.
3
P73635-F5D5010-man.qxd
6/4/01
4:54 PM
Page 4
Installing the Network Drivers
4. When asked, "What do you want Windows to do?" select the first
option- "Search for the best driver for your device.(Recommended)"
and click the Next Button.
5. Select the CD-ROM drive box. Place the CD-ROM supplied with the
card in your CD-ROM and click the Next Button.
4
P73635-F5D5010-man.qxd
6/4/01
4:54 PM
Page 5
Installing the Network Drivers
6. The following screen will appear:
7. Click the Next Button and the following screen will appear:
8. Click on the Finish Button to complete the wizard. Your computer may
prompt you to restart, if so, allow the system to restart.
5
P73635-F5D5010-man.qxd
6/4/01
4:54 PM
Page 6
Connecting to a DSL or Cable Modem
Many DSL or cable modems require connection to a computer through
a network interface card (NIC). To determine if your cable or DSL
modem can be connected through a network interface card, you can
either consult your modem’s documentation or simply look at the ports
on the back of the modem. If your modem has a port that looks just
like the one pictured below (similar to a standard phone jack, but a
little larger), then the Belkin Notebook Network CardBus Card is an easy
way to connect to these modems and take advantage of high-speed
Internet access.
10/100Base-T Ethernet Connector
Connecting the hardware
To connect the modem to your Network Card, you will need an Ethernet
"patch cable," or "CAT5 cable". Most cable and DSL modems will
require connection using a "crossover patch cable," however, some
modems offer a second network connector labeled "Computer," which
can be connected to the Network Card using a standard patch cable. To
determine which cable to use, it is recommended that you consult your
modem’s installation guide or user manual.
6
P73635-F5D5010-man.qxd
6/4/01
4:54 PM
Page 7
Connecting to a DSL or Cable Modem
Belkin offers a full line of these cables, available from any major
retailer or distributor of computer-related products. To achieve the
best performance from your Cable or DSL modem, we recommend
the following part numbers:
Crossover Ethernet Patch Cable:
A3X126-xx-YLW-M, where "xx" denotes the cable length in feet
FastCAT5e Ethernet Patch Cable:
A3L850-xx-yyy-S, where "xx" denotes the length, and "yyy"
denotes the color of the cable
To connect your DSL or cable modem to the computer, make sure
you have first installed both the Belkin Notebook Network CardBus
Card and its drivers as detailed earlier in this manual. Once the
hardware and drivers are installed, plug one end of the Ethernet Patch
Cable to the connector on the Network Card, and plug the other end
into the connector on the modem.
Configuring your computer
Once the computer is connected to your DSL or cable modem, you
will need to configure your computer’s network settings to access the
Internet using the modem.
Note: This section includes general instructions for configuring your
computer to use a DSL or cable modem, which work for most
DSL and cable service providers; however, some providers have
special requirements or non-standard configurations. If your DSL
or cable provider has provided instructions which differ from this,
please follow those instructions. If the procedure below does not
work for you, please contact your DSL or cable provider for
instructions on configuring your computer to use the modem.
7
P73635-F5D5010-man.qxd
6/4/01
4:54 PM
Page 8
Connecting to a DSL or Cable Modem
When you use a DSL or cable modem, you are connecting to your
service provider’s network. These networks can be set up by the
provider to communicate with your computer using either "dynamic"
or "static" addressing. To configure your computer, you will need to
know which of these methods is to be used. If your provider intends
for you to use "static" addressing, they should have provided you with
several Internet addresses (labeled "IP address", "Net Mask", and one
or more "DNS addresses"), each of which looks similar to the
following: 192.168.0.1. If you did not receive numbers such as this in
the paperwork or documentation accompanying your modem, your
provider likely intends to use "dynamic" addressing.
Using static addressing
To access the Internet using
static addressing, configure the
network settings for your
computer as follows:
1. Open the Control Panel:
click on the Start button,
click on Settings, and
choose Control Panel from
the menu that pops out.
2. Double-click on the
Network icon in control
panel to open the Network
window.
8
P73635-F5D5010-man.qxd
6/4/01
4:54 PM
Page 9
Connecting to a DSL or Cable Modem
3. In the list of network
components, click on the line
that says:
"TCP/IP -> 32-bit PCI Fast
Ethernet Adapter"
–or"TCP/IP -> Realtek RTL…"
4. Click on the Properties button
to open the TCP/IP Properties
window.
5. Click on the IP Addresses tab.
6. Select "Specify an IP
address", and fill in both
the "IP Address" and
"Subnet Mask" fields with
the numbers supplied by
your service provider.
7. Click on the DNS
Configuration tab.
9
P73635-F5D5010-man.qxd
6/4/01
4:54 PM
Page 10
Connecting to a DSL or Cable Modem
8. Select "Enable DNS".
9. If your service provider has supplied a "Host Name" and/or
"Domain", fill in these fields.
10.For each DNS address your service provider has supplied, add the
address in the "DNS Server" section.
11.Click OK to close the TCP/IP Properties window.
12.Back in the Network window, scroll through the list of network
components. If "File and Printer Sharing for Microsoft Networks" is
on the list, we strongly recommend removing it before using a
DSL or cable modem connection. Using File and Printer Sharing
makes it easier for other people on the Internet to access files on
your computer without your knowledge or consent, with
potentially harmful results. Check with your service provider for
their own specific security recommendations.
13.Click OK to close the Network window.
14.Windows will ask you to
restart your computer. Please
do so.
Once you have restarted your
computer, do the following:
1. Right-click on the "Internet
Explorer" icon on your desktop
to bring up its context menu,
and select Properties.
2. Select the "Connections" tab.
3. Under "Dial-up settings",
choose "Dial whenever a
network connection is
not present".
10
P73635-F5D5010-man.qxd
6/4/01
4:54 PM
Page 11
Connecting to a DSL or Cable Modem
4. Click OK to close the window.
You should now be able to open Internet Explorer and access the
Internet at high-speed through your DSL or cable connection. If your
browser is unable to connect to the Internet, please contact your
service provider for further information.
Using dynamic addressing
To access the Internet using dynamic addressing, configure the
network settings for your computer as follows:
1. Open the Control Panel: click on the Start button, click on Settings,
and choose Control Panel from the menu that pops out.
2. Double-click on the Network icon in control panel to open the
Network window.
11
P73635-F5D5010-man.qxd
6/4/01
4:54 PM
Page 12
Connecting to a DSL or Cable Modem
3. In the list of network components, click on the line that says:
"TCP/IP ->32-bit PCI Fast Ethernet Adapter"
–or"TCP/IP -> Realtek RTL…"
4. Click on the Properties button to open the TCP/IP Properties window.
5. Click on the IP Addresses tab.
6. Select "Obtain an IP address
automatically."
7. Click OK to close the TCP/IP
Properties window.
8. Back in the Network window, scroll through the list of network
components. If "File and Printer Sharing for Microsoft Networks" is on
the list, we strongly recommend removing it before using a DSL or
cable modem connection. Using File and Printer Sharing makes it
easier for other people on the Internet to access files on your
computer without your knowledge or consent, with potentially
harmful results. Check with your service provider for their own specific
security recommendations.
12
P73635-F5D5010-man.qxd
6/4/01
4:54 PM
Page 13
Connecting to a DSL or Cable Modem
9. Click OK to close the Network window.
10. Windows will ask you to restart your computer. Please do so.
Once you have restarted your computer, do the following:
1. Right-click on the "Internet Explorer" icon on your desktop to bring up
its context menu, and select Properties.
2. Select the Connections tab.
3. Under "Dial-up settings", choose "Dial whenever a network connection
is not present".
4. Click OK to close
the window.
You should now be able to
open Internet Explorer and
access the Internet at highspeed through your DSL or
cable connection. If your
browser is unable to connect
to the Internet, please
contact your service provider
for further information.
13
P73635-F5D5010-man.qxd
6/4/01
4:54 PM
Page 14
Creating a Simple Network
If you have two or more computers in your home or office,
connecting them via a network lets you cooperate, collaborate,
and make the most of your hardware. You can share files, printers,
and even access the Internet from all of your computers through
your network.
While networking was once a complicated matter, Windows 95, 98
and later versions, along with hardware like Belkin networking
products have made networking very easy to do for everyone. The
following section of this manual will help you set up a simple
network in your home or office. If you are connecting to a larger,
existing network, it is recommended that you consult your network
administrator (the person who originally set up the network) for
instruction on how to connect additional computers to the network.
There is a wide variety of network hardware available, ranging from
simple and inexpensive to very complex; however, for most home
and small offfice network needs, the hardware required is basic.
14
P73635-F5D5010-man.qxd
6/4/01
4:54 PM
Page 15
Creating a Simple Network
Connecting two computers:
PC
Tower
PC
Tower
Connecting two computers simply requires each computer to
have a Network Card, such as the Belkin Notebook Network CardBus
Card for notebook computers, or the Belkin Desktop Network PCI
Card for desktop computers. Simply connect the two Network Cards
using a crossover Ethernet patch cable, such as Belkin part number:
A3X126-xx-YLW-M, where "xx" denotes the cable length in feet
15
P73635-F5D5010-man.qxd
6/4/01
4:54 PM
Page 16
Creating a Simple Network
Connecting three or
more computers
PC
Tower
PC
Tower
PC
Tower
Connecting three or more computers requires each computer to have
a Network Card, such as the Belkin Desktop Network Card for
desktop computers, or the Belkin Notebook Network CardBus Card
for notebook or laptop computers. You should also have an
10/100Base-T hub or switch enough ports for the number of
computers you intend to connect immediately or in the near future.
Hubs and switches are physically and effectively very similar;
however, Belkin always recommends the use of switches when
possible (such as the Belkin 5-port Network Switch part number
F5D5130-5, or the Belkin 8-port Network Switch part number
F5D5130-8). Switches offer much higher performance, efficiency,
and speed than standard hubs.
After installing the network cards, connect each computer to
the switch using an Ethernet CAT5 patch cable, such as Belkin
part number:
A3L850-xx-yyy-S, where "xx" denotes the length, and "yyy"
denotes the color of the cable
16
P73635-F5D5010-man.qxd
6/4/01
4:54 PM
Page 17
Creating a Simple Network
Configuring your computers
For each computer you connect to the network, you must set the
network address to be used by other computers to communicate with
this one. Follow these steps on each computer on the network to
properly configure these settings:
1. Open the Control Panel: click on the Start button, click on
Settings, and choose Control Panel from the menu that pops out.
2. Double-click on the Network icon in control panel to open the
Network window.
17
P73635-F5D5010-man.qxd
6/4/01
4:54 PM
Page 18
Creating a Simple Network
3. In the list of network components, click on the line that says:
"TCP/IP -> 32-bit PCI Fast Ethernet Adapter"
–or"TCP/IP -> Realtek RTL…"
4. Click on the Properties button to open the TCP/IP
Properties window.
5. Click on the IP Addresses tab.
6. Select "Specify an IP
address", and fill in the "IP
Address" with the number
192.168.0.x, where "x" is a
different number between 1
and 255 for each of your
computers.
7. Fill in the "Subnet Mask"
field with the number
255.255.255.0
8. Click OK to close the TCP/IP
Properties window.
9. Click OK to close the
Network window.
10. Windows will ask you to
restart your computer.
Please do so.
18
P73635-F5D5010-man.qxd
6/4/01
4:54 PM
Page 19
Creating a Simple Network
Configuring network software
In order for your network to be configured properly there are four
network components that must be present. Client for Microsoft
Networks, 32-Bit PCI Fast Ethernet Adapter, TCP/IP- 32-Bit PCI Fast
Ethernet Adapter, and File and Printer Sharing for Microsoft Networks
should be set up. The following are the steps to follow:
1. From the Start menu go to Setting and select Control Panel.
2. Double-click on Network and the following screen will appear:
Note: There may be several other items listed, especially if your
computer has a modem installed.
19
P73635-F5D5010-man.qxd
6/4/01
4:54 PM
Page 20
Creating a Simple Network
3. Click on the Add button, the following screen will appear:
4. Highlight Service on the list and press the Add button and select
File and Printer Sharing for Microsoft Networks.
20
P73635-F5D5010-man.qxd
6/4/01
4:54 PM
Page 21
Creating a Simple Network
5. If Client for Microsoft Networks does not appear in the Network
Configuration screen, highlight Client on the list and once again press
the Add button and the following screen will appear:
6. Select Microsoft as the Manufacturer, and Client for Microsoft
Networks, and press OK.
7. After a few seconds
the network
configuration window
will open again, press
the Add button and
add protocol if TCP/IP32-Bit PCI Fast
Ethernet Adapter is
not present, this time
select Microsoft as
the Manufacturer,
and TCP/IP and
press OK.
21
P73635-F5D5010-man.qxd
6/4/01
4:54 PM
Page 22
Creating a Simple Network
8. The Network window will now look something like this:
9. The following network components should be installed:
If all clients and protocols are not
listed, press the Add button, and
add the missing components.
10.Press the File and
Printer Sharing button
and check both boxes,
then press OK. The
screen will now look
something like this:
22
P73635-F5D5010-man.qxd
6/4/01
4:54 PM
Page 23
Creating a Simple Network
11. Press the Identification Tab,
and then enter the details for
the three fields. In order to
share files each PC must have
its own unique name, but
belong to the same workgroup.
12. Press the Access Control
tab, and set the access to
share-level access control.
Press the OK button.
23
P73635-F5D5010-man.qxd
6/4/01
4:54 PM
Page 24
Creating a Simple Network
Sharing files and disk drives
1. To share files and access to a hard drive, floppy drive, or CD-ROM
with other computers on the network, open the My Computer
window on the computer containing the files or drive you wish to
share. RIGHT CLICK on the drive that you wish to share, then
select Sharing from the menu that appears, and set the level of
access that you want to allow.
Accessing resources on other computers:
1. To access resources available on other computers, click on the
Network Neighborhood icon on your desktop.
2. Double-click on the computer that you wish to access.
3. You can now access all the files that are available to you on
your network.
24
P73635-F5D5010-man.qxd
6/4/01
4:54 PM
Page 25
Creating a Simple Network
Sharing a printer with the network
1. To share a printer with other computers on the network open the
My Computer folder.
2. Double-click on the Printer folder, RIGHT CLICK on the printer
that you wish to share, then select Sharing from the menu
that appears.
3. Select the Shared As button to enable sharing of this printer. (You
may also want to assign the printer a meaningful name.) Select
Not Shared to disable printing by other computers to this printer.
Using a shared printer on the network
1. To use a shared printer on another computer in the network open
the My Computer folder.
2. Double-click on the Printers folder.
25
P73635-F5D5010-man.qxd
6/4/01
4:54 PM
Page 26
Creating a Simple Network
3. Double-click on the Add a Printer button and the following screen
will appear, click Next.
4. The screen will now look something like this. Select Network
printer and click Next.
26
P73635-F5D5010-man.qxd
6/4/01
4:54 PM
Page 27
Creating a Simple Network
5. The following screen will appear.
6. Type the network path
or queue name or click on
the Browse button.
You can browse to see all
printers available to share
on the network. Select the
shared printer and follow
the wizard prompts.
27
P73635-F5D5010-man.qxd
6/4/01
4:54 PM
Page 28
Creating a Simple Network
7. After the printer is installed the following icon will appear in the
printers folder showing a network printer is installed.
28
P73635-F5D5010-man.qxd
6/4/01
4:54 PM
Page 29
Sharing an Internet Connection
Sharing a single Internet connection is one of the most useful
advantages of networking your computers. Rather than having a
modem, phone line, and perhaps even a separate Internet account for
each of your computers, you can configure your network to allow all
of your computers to share a single dial-up, DSL, or cable Internet
connection. There are two ways to share an Internet connection,
either by running Internet sharing software on a computer on the
network which has a working Internet connection, or by using a
special piece of hardware called a "Gateway".
Software Internet sharing is appropriate for dial-up (normal phone
line) Internet connections, as well as for DSL and cable connections
which use either a modem which connects to the computer’s USB
port, or a modem which goes inside of the computer. Software
Internet sharing can be done through the Windows operating system
if the computer which has the Internet connection is running
Windows 98 SE, Me, NT 4.0., or 2000. If the computer with the
Internet connection to be shared is running another operating system,
third-party "proxy server" software is required.
Hardware Internet sharing, which requires a Gateway (such as the
Belkin Broadband Internet Gateway, part number F5D5230-X), is the
best way to share DSL or cable Internet connections which use a
modem connected to the Network Card in a computer.
Once you have your network running properly, which can easily be
verified by using Network Neighborhood to view the other computers
on your network, and have a working Internet connection through a
standard dial-up, DSL, or cable modem, setting up Internet
connection sharing is simple.
29
P73635-F5D5010-man.qxd
6/4/01
4:55 PM
Page 30
Sharing an Internet Connection
Hardware Internet sharing
Sharing of a single broadband Internet connection using a Gateway
is the most efficient and highest-performance way of sharing a DSL
or cable Internet connection. In addition, most Gateways provide
a basic level of security for your network, and include a built-in
switch to add more ports to your network. In fact, full-featured
Gateways such as the Belkin Broadband Internet Gateway (part
number F5D5230-X) can be used either in place of, or in addition to,
any existing network hub or switch.
Cable or DSL
Modem
Cable or
DSL line
PC
Tower
PC
Tower
PC
Tower
Network using Gateway
in place of switch
For full information on installing a Gateway and configuring
internet access using it, please consult the user manual supplied with
your Gateway.
30
P73635-F5D5010-man.qxd
6/4/01
4:55 PM
Page 31
Sharing an Internet Connection
Software Internet sharing
If you have a working Internet connection on a computer running
Windows 98 SE, Me, NT 4.0, or 2000, you can use the built-in
Internet Connection Sharing capabilities of your operating system. On
the computer which has the Internet connection follow these steps.
Windows 98 SE host configuration
1. Open the My Computer window.
2. Double-click on the Control Panel
and then double-click on
Add/Remove Programs and press
the Windows Setup tab and the
following window will appear:
3.
4.
31
Double-click on
Internet Tools.
Select the check box on the
Internet Connection Sharing
and click OK.
P73635-F5D5010-man.qxd
6/4/01
4:55 PM
Page 32
Sharing an Internet Connection
5. Click Next and the following screen will appear:
6. Click Next and the following screen will appear:
7. Click Next again.
32
P73635-F5D5010-man.qxd
6/4/01
4:55 PM
Page 33
Sharing an Internet Connection
8. When asked, "What type of connection do you use to access the
Internet?" select the first option, "Dial Up Connection", and
click Next.
9. Internet Connection Sharing will now create a Client
Configuration Disk to configure the browsers on the other
computers on your home network to use Internet
Connection Sharing.
33
P73635-F5D5010-man.qxd
6/4/01
4:55 PM
Page 34
Sharing an Internet Connection
10. Click the Next button and the following window will appear:
11. Insert a floppy disk into drive A and click OK.
12. You have now successfully created the Client Configuration
Disk to configure the browser on the other computers of your
home network.
Windows 98 SE host configuration check
1. From the Start Menu go to setting
and select Control Panel
2. Double-click on Network and the
following screen will appear:
Note: There are now a lot more entries
in the Network configuration.
3. Change the Primary Network
Logon to "Windows Logon".
4. The Internet Connection Sharing
setup made a modification to the
binding of the TCP/IP protocol, the
IP address has been changed to
192.168.0.1. This will need to be
changed to "Obtain an IP address
automatically."
34
P73635-F5D5010-man.qxd
6/4/01
4:55 PM
Page 35
Sharing an Internet Connection
5. Double-click on TCP/IP- Internet Connection Sharing and the
following screen will appear:
6. Click on "Obtain an IP address automatically" and click OK.
Configuring client computers
Now that you have successfully configured the host computer, we can
set up other computers on your network to access a remote modem.
1. Insert the Client Configuration disk into the A drive of the
client computer.
2. From the Start menu go to Run and enter A:\icsclset.exe and
click OK.
35
P73635-F5D5010-man.qxd
6/4/01
4:55 PM
Page 36
Sharing an Internet Connection
3. The Browser Setup Wizard screen will appear. Click Next.
4. The Wizard will now check the browser settings. Click Next.
36
P73635-F5D5010-man.qxd
6/4/01
4:55 PM
Page 37
Sharing an Internet Connection
5. You have now completed the Browser Setup Wizard. Click Finish.
Client configuration check
To access the Internet using a Connection Sharing Computer, ensure
that the TCP/IP settings for your
network adapter are set
correctly by carrying out the
following steps:
1. In the Control Panel, doubleclick on the Network icon.
2. In the list of network
components, click TCP/IP
associated with the
network adapter, and then
click Properties.
37
P73635-F5D5010-man.qxd
6/4/01
4:55 PM
Page 38
Sharing an Internet Connection
3. The following screen will appear. Select the "Obtain an IP address
automatically" check box.
4. Click the WINS
Configuration tab, and
then select the check box
next to "Use DHCP for
WINS resolution".
38
P73635-F5D5010-man.qxd
6/4/01
4:55 PM
Page 39
Sharing an Internet Connection
5. Click the Gateway tab, and
then remove any installed
gateways if any are listed.
6. Click the DNS Configuration
tab, and then select the check
box next to "Disable DNS".
7. Click OK to accept the new
TCP/IP settings.
8. Click OK again to
update your new
network configuration.
9. Any changes to the network
configuration will require a
restart of the system.
39
P73635-F5D5010-man.qxd
6/4/01
4:55 PM
Page 40
Sharing an Internet Connection
Windows Me host configuration
1. From the desktop, double-click on My Network Places and the
following screen will appear:
2. Double-click on the Home Networking Wizard and the following
screen will appear. Click Next.
40
P73635-F5D5010-man.qxd
6/4/01
4:55 PM
Page 41
Sharing an Internet Connection
3. The following screen will appear. Select Yes, if you use the Internet
on this computer and select, "A direct connection to my ISP using
the following device:" and select the device that you use to sign
on to the Internet.
4. You will now be asked if, "you want other computers on your
home network to use the Internet connection on this computer."
Select yes and the device that connects the host computer to your
home network if you want to enable Internet Connection Sharing.
Click Next.
41
P73635-F5D5010-man.qxd
6/4/01
4:55 PM
Page 42
Sharing an Internet Connection
5. The following screen will appear, enter a computer name and a
workgroup name and click Next.
6. The following screen will appear. Select the check boxes if you
want to share your files and printers with other computers on the
network. Click Next.
Note: To allow access to
other resources on
the computer that
cannot be found in
the screen above,
double-click on My
Computer. Rightclick on the
resources that you
want shared and
select sharing
from the menu
that appears.
42
P73635-F5D5010-man.qxd
6/4/01
4:55 PM
Page 43
Sharing an Internet Connection
7. You will now be prompted to create a setup disk to enable the
use of Home Networking in Windows 98 and Windows 95
operating systems. To create a setup disk, select the first option
and click Next.
8. Insert a disk in the floppy drive and click Next.
9. This completed the Home Networking Wizard, click Finish to have
the Wizard make any of the changes.
43
P73635-F5D5010-man.qxd
6/4/01
4:55 PM
Page 44
Sharing an Internet Connection
Configuring client computers
1. Insert the Setup disk in the floppy drive of the client computer.
From the Start menu go to Run and type, "A:\setup.exe" and click
OK. The screen will look something like this:
2. This will bring you to the Welcome screen of the Home
Networking Wizard. Click Next and the following window
will appear:
44
P73635-F5D5010-man.qxd
6/4/01
4:55 PM
Page 45
Sharing an Internet Connection
3. Select Yes, if you use the Internet on this computer and select, "A
connection to another computer on my home network that
provides direct access to my Internet Service Provider" and click
Next. The following screen will appear:
4. Be sure to change the Computer Name, but use the same
Workgroup Name. Click Next. The following screen will appear:
45
P73635-F5D5010-man.qxd
6/4/01
4:55 PM
Page 46
Sharing an Internet Connection
5. Select the check boxes to the corresponding resources you want to
share with other computers on the network. Click Next.
Note: To allow access to other resources on the computer that cannot
be found in the screen above, double-click on My Computer.
Right-click on the
resources that you
want shared and
select sharing from
the menu that
appears and set the
level of access that
you want to allow
and click OK.
6. The following screen
will appear:
7. Select, "No" because we
have already created a
Home Networking Setup
disk on the host computer.
Click Next and this
completes the client
network configurations.
46
P73635-F5D5010-man.qxd
6/4/01
4:55 PM
Page 47
Product Specifications
Notebook 10/100 Network CardBus Interface Card
F5D5010
Network Standards:
IEEE 802.3, 802.3u
Data Bus:
32-bit PCMCIA CardBus
Network Interface:
Female RJ45 jack
Full Duplex:
10Mbps and 100Mbps
LED Indicators:
Link/Activity and 100BaseT
Driver Support:
DOS, Windows® 3.x, 95, 98, Me, NT® 4.0,
and 2000
47
P73635-F5D5010-man.qxd
6/4/01
4:55 PM
Page 48
Warranty, FCC, CE Statement
FCC Statement
DECLARATION OF CONFORMITY WITH FCC RULES FOR
ELECTROMAGNETIC COMPATIBILITY
We, Belkin Components, of 501 West Walnut Street, Compton CA 90220, declare
under our sole responsibility that the product:
F5D5010
to which this declaration relates:
Complies with Part 15 of the FCC Rules. Operation is subject to the following two
conditions: (1) this device may not cause harmful interference, and (2) this device
must accept any interference received, including interference that may cause
undesired operation.
CE Declaration of Conformity
We, Belkin Components, declare under our sole responsibility that the F5D5010, to which this
declaration relates, is in conformity with Generic Emissions Standard EN50081-1 and with
Generic Immunity Standard EN50082-1 1992.
Belkin Components Limited Lifetime Product Warranty
Belkin Components warrants this product against defects in materials and workmanship for its
lifetime. If a defect is discovered, Belkin will, at its option, repair or replace the product at no
charge provided it is returned during the warranty period, with transportation charges prepaid, to
the authorized Belkin dealer from whom you purchased the product. Proof of purchase may be
required.
This warranty does not apply if the product has been damaged by accident, abuse, misuse, or
misapplication; if the product has been modified without the written permission of Belkin; or if
any Belkin serial number has been removed or defaced.
THE WARRANTY AND REMEDIES SET FORTH ABOVE ARE EXCLUSIVE IN LIEU OF ALL OTHERS,
WHETHER ORAL OR WRITTEN, EXPRESSED OR IMPLIED. BELKIN SPECIFICALLY DISCLAIMS ANY
AND ALL IMPLIED WARRANTIES, INCLUDING, WITHOUT LIMITATION, WARRANTIES OF
MERCHANTABILITY AND FITNESS FOR A PARTICULAR PURPOSE.
No Belkin dealer, agent, or employee is authorized to make any modification, extension, or
addition to this warranty.
BELKIN IS NOT RESPONSIBLE FOR SPECIAL, INCIDENTAL, OR CONSEQUENTIAL DAMAGES
RESULTING FROM ANY BREACH OF WARRANTY, OR UNDER ANY OTHER LEGAL THEORY,
INCLUDING BUT NOT LIMITED TO LOST PROFITS, DOWNTIME, GOODWILL, DAMAGE TO
OR REPROGRAMMING, OR REPRODUCING ANY PROGRAM OR DATA STORED IN OR
USED WITH BELKIN PRODUCTS.
Some states do not allow the exclusion or limitation of incidental or consequential damages or
exclusions of implied warranties, so the above limitations of exclusions may not apply to you.
This warranty gives you specific legal rights, and you may also have other rights that vary from
state to state.
48
P73635-F5D5010-man.qxd
6/4/01
4:55 PM
Page 49
Belkin Components
501 West Walnut Street
Compton • CA • 90220 • USA
Tel: 310.898.1100
Fax: 310.898.1111
Belkin Components, Ltd.
Unit 13 • Gatelodge Close • Round Spinney
Northampton • Northants • NN3 8RX • United Kingdom
Tel: +44 (0) 1604678300
Fax: +44 (0) 1604678330
Belkin Components B.V.
Diamantlaan 8 • 2132 WV
Hoofddorp • The Netherlands
Tel: +31 (0) 235698765
Fax: +31 (0) 235612694
Belkin Components, Ltd.
7 Bowen Cresent • West Gosford
NSW 2250 • Australia
Tel: +61 (2) 4325 4666
Fax: +61 (2) 4325 4277
© 2001 Belkin Components. All rights reserved. All trade names are registered trademarks of
respective manufacturers listed.