1
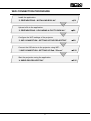
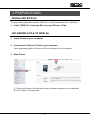
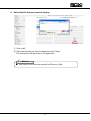
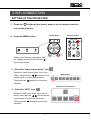
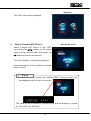
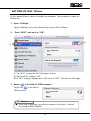
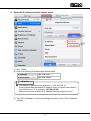
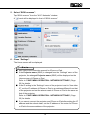
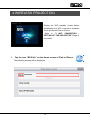
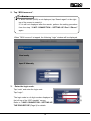
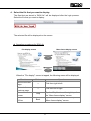
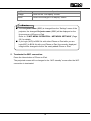
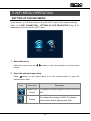
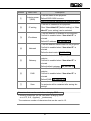
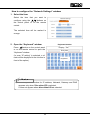
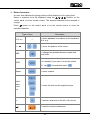
MP-350 INSTRUCTION MANUAL Network Operation Guide ENGLISH ■ Read this guide and the separate “IMPORTANT SAFEGUARD” carefully before using the projector. ■ This guide describes the configurations and operations using a wireless LAN (WiFi). ■ For the configurations and operations other than using a wireless LAN (WiFi), refer to the separate “INSTRUCTION MANUAL - MASTER OPERATION GUIDE”. ■ Keep this guide in a safe place for future reference. ©2012 Copyright ELMO Co., Ltd. All rights reserved. IMPORTANT SAFEGUARDS This section provides warnings about the wireless LAN (WiFi). Also read the “IMPORTANT SAFEGUARDS” and “BEFORE YOU USE” in the separate “INSTRUCTION MANUAL - MASTER OPERATION GUIDE”. NOTES ON THE USE OF WIRELESS LAN(WiFi) ■ This product uses 2.4GHz radio waves. The wireless device in this product has been certified under the Radio Law. Do not use this product under the following conditions: -Near industrial, scientific, and medical devices, such as a pacemaker -Near in-plant radio station for mobile equipment identifier (license required and being used in factory line; etc.) -Near low power wireless base station (license not required) ■ Depending on the using environment the wireless communication may be adversely affected. Especially the wireless communication is not available when there are reinforcing steel, metal and/or concrete between the product and the equipment. ■ The frequency bandwidth permitted to be used varies depending on the radio wave regulations in each country. Using this product outside the country may be illegal. Note ■ “Wireless LAN(WiFi)” is also referred to as “WiFi” in this guide. 2 TABLE OF CONTENTS IMPORTANT SAFEGUARDS..................................................................................... 2 NOTES ON THE USE OF WIRELESS LAN(WiFi) ................................................. 2 TABLE OF CONTENTS ............................................................................................. 3 1 BEFORE YOU USE ................................................................................................. 4 WiFi CONNECTION PROCEDURE ........................................................................ 5 2 PREPARATIONS ..................................................................................................... 6 INSTALLING BOXi Air ............................................................................................. 6 UPLOADING A FILE TO BOXi Air ........................................................................... 6 3 WiFi CONNECTION ................................................................................................ 9 SETTING UP THE PROJECTOR............................................................................ 9 SETTING UP iPad / iPhone .................................................................................. 12 4 WIRELESS PROJECTION .................................................................................... 15 5 WiFi MENU OPERATION...................................................................................... 19 SETTING UP THE WiFi MENU ............................................................................. 19 NETWORK SETTINGS ......................................................................................... 20 6 TROUBLESHOOTING .......................................................................................... 25 7 APPENDIX ............................................................................................................ 27 TRADEMARKS ..................................................................................................... 27 3 1 BEFORE YOU USE This guide contains the instructions on connecting the projector to iOS devices (iPhone/iPad) using WiFi (Wireless LAN) to project images from iOS devices wirelessly. Refer to the separate “INSTRUCTION MANUAL - MASTER OPERATION GUIDE” for the operations of the projector. ■ Benefit of the WiFi function You can project Office documents (Word, Excel, PowerPoint) or PDF files using the proprietary application software “BOXi Air” (a client software) installed in iOS devices. ■ Supported devices / OS version iPhone / iPad iOS Version 4.0 or higher The connection architecture is based on Peer-to-Peer systems Note ■ The wireless connection architecture between the projector and iPhone or iPad is based on Peer-to-Peer connection (Ad-hoc connection). Multiple number of iPhone or iPad cannot be connected using WiFi (Wireless LAN) at the same time. 4 WiFi CONNECTION PROCEDURE Install the application. “2 PREPARATIONS - INSTALLING BOXi Air” →P6 Upload a file to the application. “2 PREPARATIONS - UPLOADING A FILE TO BOXi Air” →P6 Configure the WiFi settings of the projector. “3 WiFi CONNECTION - SETTING UP THE PROJECTOR” →P9 Connect the iOS device to the projector using WiFi. “3 WiFi CONNECTION - SETTING UP iPad / iPhone” →P12 Start the projection using the application. “4 WIRELESS PROJECTION” →P15 5 2 PREPARATIONS INSTALLING BOXi Air The proprietary application software “BOXi Air” can be downloaded from “App Store”. 1. Install “BOXi Air” from App Store to your iPhone or iPad. UPLOADING A FILE TO BOXi Air 1. Install iTunes to your computer. 2. Connect your iPhone or iPad to your computer. Use a proprietary cable for iPhone or iPad to connect it to your computer. 3. Start iTunes. ② ① ① From the left menu, click the device that you have connected to your computer. ② Click “Apps” in the top menu. 6 4. Scroll down the screen. 5. Click the icon “BOXi Air”. The files that are stored in the application will be displayed. ELMO ELMO ELMO 7 6. Select the file that you want to display. My document Save in ELMO File name Open Save as type Cancel ② Open as read only ① ① Click “Add”. ② Select the file that you want to display and click “Open”. The selected file will be saved in the application. Note ■ Also refer to the instruction manual for iPhone or iPad. 8 3 WiFi CONNECTION SETTING UP THE PROJECTOR 1. Press the button on the control panel or on the remote control to turn on the projector. control panel 2. Press the MENU button. Remote control Perform the following operations after the flashing wireless LAN indicator (blue) turns steady. 3. Select the “Input source select” icon . Select the “Input source select” icon in the “Main” menu with the buttons on the control panel or on the remote control. Then press the selection. Main menu button to execute the Input source select menu 4. Select the “WiFi” icon . Select the “WiFi” icon in the “Input source select” menu with the buttons on the control panel or on the remote control. Then press the selection. button to execute the 9 WiFi Menu The “WiFi” menu will be displayed. 5. Select “Connect WiFi Device”. WiFi standby screen Select “Connect WiFi Device” in the “WiFi” menu using the buttons on the control panel or on the remote control. Then press the button to execute the selection. The “WiFi standby” screen will be displayed. Leave the projector in this condition to connect iPad or iPhone. Note ■ In the “WiFi standby” screen, the “LOGIN CODE****(4-digit number)” will be displayed at the left top of the screen. This code will be automatically renewed every time the projector is turned on. This code is for “BOXi Air”. 10 Note ■ Pressing the buttons on the control panel or on the remote control too fast may freeze the screen. If the screen is frozen, try to press the buttons slowly several times. ■ When changing the input source to “WiFi”, make sure that the wireless LAN indicator is on. 11 SETTING UP iPad / iPhone In this manual iPad is used to illustrate the procedure. The procedure is same for iPhone too. 1. Open “Settings”. Tap the “Settings” icon on the Home screen of your iPad or iPhone. 2. Open “Wi-Fi” and set it to “ON”. ② ① xxxxxxx ① Tap “Wi-Fi” to open the “Wi-Fi Networks” window. ② Set the “Wi-Fi” setting to “ON”. If the “Wi-Fi” setting is already set to “ON”, set it to “OFF”. Then set it to “ON” again. 3. Select in the field of “BOXi-xxxxxxx”. Tap the icon in the field of “BOXi-xxxxxxx”. xxxxxxx Note ■ At the time of purchase, you will find numbers in the field of “xxxxxxx”. For example) BOXi-2000000 12 4. Enter the IP address and the subnet mask. xxxxxxx ③ ① *** ② ① Click “Static”. ② Enter the following IP address and subnet mask. IP address 192. 168. 100. *** Subnet mask 255. 255. 255. 0 Note ■ The default IP address of the projector is “192.168.100.10”. If the projector has the default IP address, enter a number other than 10 to the field of xxx. (For example: 192.168.100.20) (Make sure to enter a different IP address from the projector’s one.) ③ Tap “Wi-Fi Networks” to save the settings and return to the “Wi-Fi Networks” window. 13 5. Select “BOXi-xxxxxxx”. Tap “BOXi-xxxxxxx” from the “Wi-Fi Networks” window. A mark will be displayed in front of “BOXi-xxxxxxx”. xxxxxxx xxxxxxx 6. Close “Settings”. The Home screen will be displayed. Note ■ Also refer to the instruction manual for iPhone or iPad. ■ If the Projector name (SSID) is changed from the “Settings” menu of the projector, the changed Projector name (SSID) will be displayed on the Home screen of iPhone or iPad. Refer to “5 WiFi MENU OPERATION - NETWORK SETTINGS” (Page 20) for details. ■ If the IP setting in the “Settings” menu of the projector is set to “Use other IP”, set the IP address of iPhone or iPad to an address different from that of the projector and set the subnet mask of iPhone or iPad to the same as that of the projector. Refer to “5 WiFi MENU OPERATION - NETWORK SETTINGS” (Page 20) for details. ■ If you cannot connect the projector and iPhone or iPad after setting the IP address and the subnet mask, set the IP address of the router for iPhone or iPad to the same address of the projector. 14 4 WIRELESS PROJECTION WiFi 待機画面 Display the “WiFi standby” screen before establishing the WiFi connection between the projector and iPad or iPhone. Refer to “3 WiFi CONNECTION SETTING UP THE PROJECTOR”(Page 9) for details. 1. Tap the icon “BOXi Air” on the Home screen of iPad or iPhone. The following window will be displayed. xxxxxxx 15 2. Tap “BOXi-xxxxxxx”. Note ■ If “BOXi-xxxxxxx”(SSID) is not displayed, tap “Search again” at the right top of the screen to search it. If it is still not displayed after the search, perform the setting procedure from the step “3 WiFi CONNECTION - SETTING UP iPad / iPhone” again. ■ When “BOXi-xxxxxxx” is tapped, the following “login” window will be displayed. xxxxxxx 3. Enter the login code. Tap “code” and enter the login code. Tap “Login”. The login code is a 4-digit number displayed at the left top of the “WiFi standby” screen. Refer to “3 WiFi CONNECTION - SETTING UP THE PROJECTOR”(Page 9) for details. 16 ① ② 4. Select the file that you want to display. The files that are stored in “BOXi Air” will be displayed after the login process. Select the file that you want to display. The selected file will be displayed on the screen. ★ Operation procedures for BOXi Air File display screen Menu frame display screen 停止 戻る Tap Tap When the “File display” screen is tapped, the following menu will be displayed. Function Button Operation Move to the next page ― Flick from right to left. Return to the previous page ― Flick from left to right. Pause the screen Stop Tap the “Stop” button at the right top of the “Menu frame display” screen. Return to the list of files Back Tap the “Back” button at the left top of the “Menu frame display” screen. 17 Function Operation Enlarge Pinch out the “File display” screen. Shrink Pinch in the enlarged “File display” screen. Note ■ If the Projector name (SSID) is changed from the “Settings” menu of the projector, the changed Projector name (SSID) will be displayed on the Home screen of iPhone or iPad. Refer to “5 WiFi MENU OPERATION - NETWORK SETTINGS” (Page 20 ) for details. ■ If you login (WiFi) to BOXi Air with other iPhone or iPad while you are login(WiFi) to BOXi Air with your iPhone or iPad, the currently displayed image will be changed to that of the newly added iPhone or iPad. 5. Terminate the WiFi connection. Press the Home button of iPhone or iPad. The projected screen will be changed to the “WiFi standby” screen after the WiFi connection is terminated. 18 5 WiFi MENU OPERATION SETTING UP THE WiFi MENU In this section, you will learn how to set up the “WiFi” menu for the network settings. Refer to “3 WiFi CONNECTION - SETTING UP THE PROJECTOR”(Page 9) for details about how to show the “WiFi” menu. 1. Select the menu. Select the menu using the control. buttons on the control panel or on the remote 2. Open the selected menu item. Press button on the control panel or on the remote control to open the selected menu item. Icon Menu item Description Connect WiFi Device To display the screen image of iPad or iPhone via WiFi. Setting To configure the settings of SSID, IP address, subnet mask, default gateway and DNS. 19 NETWORK SETTINGS 1. Select “Settings” from the “WiFi” menu. WiFi menu Select the menu item using the buttons on the control panel or on the remote control and press to display the “Network Settings” window as shown below. The following “Network Settings” window will be displayed. ① BOXi-xxxxxxx ② ③ ④ ⑤ ⑥ ⑦ 20 Number ① ② Menu item Description To set the name of the projector. Projector name *Default SSID:BOXi-xxxxxxx (SSID) Refer to the below instruction for changing SSID. IP setting To set the IP address of the projector. Either “Use default IP”(default setting) or “Use other IP”(user setting) can be selected. ③ IP address To set the desired IP address for the projector. This field is enabled when “Use other IP” is selected. *Default IP address:192.168.100.10 ④ Netmask To set the desired subnet mask for the projector. This field is enabled when “Use other IP” is selected. *Default subnet mask:255.255.255.0 ⑤ Gateway To set the desired default gateway for the projector. This field is enabled when “Use other IP” is selected. *Default default gateway:192.168.100.10 To set the desired DNS(domain name) for the projector. ⑥ ⑦ DNS Save This field is enabled when “Use other IP” is selected. *Default DNS:192.168.100.10 To save the selected settings. The projector will be restarted after saving the settings. Characters that can be used when changing SSID Following characters can be used when changing SSID. a~z, A~Z, 0~9, -(hyphen), _(underscore) The maximum number of characters that can be used is 15. 21 How to configure the “Network Settings” window 1. Select the item. Select the item that you want to configure using the buttons on the control panel or on the remote control. BOXi-xxxxxx x The selected item will be marked in orange. 2. Open the “Keyboard” window. Keyboard window Press button on the control panel or on the remote control to open the “Keyboard” window. (In case “IP setting” is selected, a ✔ mark will be displayed in the tick-box in front of the option.) Display Title Entry form Keyboard Note ■ The “Keyboard” window for IP address, Netmask, Gateway and DNS appears only when “Use other IP” is selected. It does not appear when “Use default IP” is selected. 22 3. Enter characters. A cursor that indicates the typing position will be displayed in the typing field. Select a character from the keyboard using the buttons on the control panel or on the remote control. The selected character will be marked in orange. Press button on the control panel or on the remote control to enter the selected character. Type of keys 0~9, a-z ― Description To enter alphabets or numbers on the keyboard. (0~9, a-z). ←、→ To move the position of the cursor. ABC To change the alphabet between capital and small letter. SYM To enter symbols on the keyboard. For example) If you want to enter the symbol “%”, tap Space http:// www. .com .cn × first and then select . To enter a space. To enter the texts on the respective keys. To delete a character in the left of the cursor. To save the entered characters. 23 Note ■ Press the “MENU” button on the operating panel or on the remote control to return to the “Network Setting” window without saving the entered characters. ■ If you enter a character that is not supported, a warning message will be displayed and you cannot save the entered character. 24 6 TROUBLESHOOTING This section describes troubleshooting related to the wireless LAN (WiFi). Also refer to the separate “INSTRUCTION MANUAL - MASTER OPERATION GUIDE”. The problems described in the following table may not be caused by malfunction of the projector. Check the following table before asking for repair. If the problem still remains after the troubleshooting, please contact your dealer for a check. Problem Cannot establish WiFi connection. Check These Items Related Page ➡ There is an obstacle between the projector →P2 and iPad or iPhone or the distance between the projector and iPad or iPhone is too far. 【Remedy】Remove the obstacle or reduce the distance between the projector and iPad or iPhone. ➡ There are other devices in the neighborhood that are using the same frequency as that of the projector. 【Remedy】Keep those devices away from →P2 the projector. ➡ The network information such as the IP address has been changed. 【Remedy】Check the IP address of the →P20 projector and iPad or iPhone. WiFi connection is sometimes cut off. ➡ There is an obstacle between the projector →P2 and iPad or iPhone or the distance between the projector and iPad or iPhone is too far. 【Remedy】Remove the obstacle or reduce the distance between the projector and iPad or iPhone. 25 Problem WiFi connection is sometimes cut off. Check These Items Related Page ➡ There are other devices in the neighborhood that are using the same frequency as that of the projector. 【Remedy】Keep those devices away from the projector. →P2 ➡ There is other device in the neighborhood that is using the same IP address as that of the projector. →P20 【Remedy】Change the IP address. No image is projected. ➡ The projector is not in the “WiFi standby” mode. 【Remedy】Call the “WiFi standby” screen. →P9 ➡ The projector is in the “Blank screen” mode. 【Remedy】Press the button on the “INSTRUCTION remote control. MANUAL MASTER OPERATION GUIDE” →P39 26 7 APPENDIX TRADEMARKS The following trademarks /registered trademarks are used in this guide. Is a registered trademark of ELMO Co., Ltd. DLP(Digital Light Processing) is a trademark of Texas Instruments. iPhone, iPad and iTunes are trademarks of Apple Inc. App Store is a service mark of Apple Inc. iOS is a trademark or registered trademark of Cisco Systems Inc., registered in the U.S. and other countries. Microsoft, Windows, Word, Excel and PowerPoint are trademarks or registered trademarks of Microsoft Corporation, registered in the U.S. and other countries. Adobe PDF is a trademark or registered trademark of Adobe Systems Incorporated, registered in the U.S. and other countries. Other company and product names mentioned in this guide are trademarks or registered trademarks of their respective companies. 27 6-14, Meizen-cho, Mizuho-ku Nagoya, 467-8567, Japan OVERSEAS SUBSIDISRY COMPANIES ELMO USA CORP. ELMO Europe SAS Headquarters Headquarters 1478 Old Country Road Immeuble Elysées La Défense, Plainview, NY 11803, U.S.A. 7C, Place du Dôme, Tel. (516) 501-1400 Fax.(516) 501-0429 92056 Paris La Défense, France E-mail: [email protected] Tel. 33 (0) 1 73 02 67 06 Web: http://www.elmousa.com Fax. 33 (0) 1 73 02 67 10 West Coast Branch German Branch 5676 Corporate Avenue Hansaallee 201, Haus 1 Cypress, CA 90630, U.S.A. 40549 Düsseldorf Germany Tel. (714) 828-8457 Fax. (714) 823-8429 Tel. 49 (0) 211 544756 40 Fax. 49 (0) 211 544756 60 28