1
TABLE OF CONTENTS
Page
For Future Reference
Important
......................................................................
Safety Instructions
...............................................................
Range Control Panel .......................................................................
• Electronic Clock and Oven Control Functions ...............................................
• Setting the Clock and Timer ..............................................................
Surface Cooking ...........................................................................
1
24
5 6
5-6
6
7-8
• Panel Light (select models) ...............................................................
•Tlle Controls ..........................................................................
7
7
• Using Your Coil Element Cooking Surfaee ..................................................
8
Using Your Oven ...........................................................................
• Baking and Roasting ....................................................................
• Broiling ...............................................................................
• Programmed Oven Operations ............................................................
Cleaning
..................................................................................
9-11
9
10
10-11
12-15
• Porcelain Enamel Cooktop ...............................................................
12
• Drip Bowls ............................................................................
• Manual Clean Oven (select models) ........................................................
12
1"2
• Self-Clean Oven (select models) ...........................................................
12-13
• Range Cleaning Chart ...................................................................
14-15
Maintenance
..............................................................................
• Adjusting the Oven Thermostat
...........................................................
16
16
• Storage Drawer ........................................................................
16
• Leveling Legs ..........................................................................
I6
• Light Replacement
16
.....................................................................
Before You Call for Service
Warranty
.................................................................
..............................................................................
17
Back Cover
FOR FUTURE REFERENCE
Congratulations
on your choice of a Maytag electric
range. As you use your new range we know you will
appreciate the many features that provide excellent
performance,
ease of cleaning, convenience
and
dependability,
For future reference, keep this manual in a convenient
location. Record the model number and serial number
of this electric range in the spaces provided. (This
information can be found on the data plate located on
the frame around the storage drawer.)
New features have dramatically changed today's cooking
appliances and the way we cook. It is therefore very
important to understand how your new electric range
operates before you use it. On the following pages you
will find information regarding the operation of your
new range. By following these instructions carefully, you
will be able to fully enjoy and properly maintain your
new Maytag range.
ModelNumber
SerialNumber
Please take a moment to review the enclosed booklet,
"Cooking Made Sin]ple" as well. Whether you need
assistance in selecting the right cookware or reviewing
the "dos and don'ts" of baking, roasting and broiling, the
answers are contained in this booklet. We want you to
have excellent results with the food yon prepare.
Should you have any questions about using your Maytag
range, call or write us. Be sure to provide the model and
serial numbers of your range.
BE
SURE
YOU
READ
THE
INSTRUCTIONS
ON PAGES
2-4
YOU START TO USE THIS RANGE.
SAFETY
BEFORE
PAGE 1
IMPORTANT
Read
all
instructions
SAFETY INSTRUCTIONS
before
using
In Case
of Fire
this appliance.
Turn off appliance
The following
instructions
are based on safety
considerations and must be strictly followed to reduce
the potential risks of fire, electric shock, or personal
inj m_.
spreading the flame.
Use dD' chemical or foam-type extinguisher or baking
soda to smother fire or flame. Never use water on a
grease fire.
Be sure appliance is properly installed and grounded by
a qualified technician,
If fire is in the oven or broiler pan, smother by dosing
oven door.
Do not attempt to adjust, repair, selvice, or replace any
part of appliance unless it is specifically recommended
in this boo];. All other servicing should be referred to a
qualified servicer. Always disconnect power to unit
be{bre any servicing by tripping circuit breaker to the
OFF position or removing the fuse.
If fire is in a pan on the surface burner, cover pan.
Never attempt to pick up or move a flaming pan.
Child Safety
Do not leave cbildren alone or unsupervised
appliance when it is in use or is still hot.
Locate and mark the breaker or fuse. Never replace a
blown thse or reset a breaker until you know what has
Children must be taught that the appliance and utensils
in or on it can be hot.
caused the problem. Always replace a blown fuse with
one of the correct amperage.
Children should be taught that an applianee is not a to:_
Children should not be allowed
To Prevent
Fire or Smoke
Damage
Remove all packing materials fi'om the appliance before
operating it.
Flammable materials should not be stored in an oven or
on or near surface elements,
to play with controls or other
parts of the unit. Children should
never be allowed to sit or stand
on any part of the appliance.
CAUTION: Do not store items
of interest to children in cabinets
If appliance
is installed
near a window, proper
precautions should be taken to prevent curtains from
blowing over surface elements,
Do not leave any items on the eooktop. The hot air from
the vent may ignite flammable items and may increase
pressure
in closed containers which may cause them to
burst.
Many aerosol-type spray cans are EXPLOSIVE when
exposed to heat and may be highly flammable. Avoid
their use or storage near an appliance,
Do not leave plastic items on the cooktop as they may
melt or soften if left too close to the vent or surface
element,
To eliminate the hazard of reaching over hot surface
burners, cabinet storage should not be provided directly
above a unit. If such storage is provided, it should be
limited to items which are used infrequently and which
are safely stored in an area subjected to heat from an
appliance. Temperatures may be unsafe for some items,
such as volatile liquids, cleaners or aerosol sprays,
PAGE 2
and ventilating
hood to avoid
near the
_--'_.
above an appliance or on the
backguard of a range. Children
climbing on the appliance or on
the appliance door to reach items
eould be seriously injured.
About
Your Appliance
To prevent injury or
damage to the appliante, do not use appliance
as a space
heater to heat or warm
a room. Also, do not
use the eooktop or
oven as a storage area
for food or eooking
utensils.
Keep the oven vent duets UNOBSTttUCTED
(located
under the right rear element for coil cooktops or on the
eooktop tbr smoothtop models). Blockage of the vent
prevents the proper oven air circulation and will affect
the oven perforinanee.
CAUTION:
Do not use
stool to cabinets
N
above.
___,_
/
_
.
Make sure the drip bowls are in place. Absence of tlmse
underneath to damage.
Misuse
of appliance
doors or drawers, such as
stepping,
leaning
or
an appliance
a step
sitting
on the asdoor
or _,
drawer, may result in
Loose
fitting
or long
-'_
_
hanging-sleeved
apparel
should not be worn while
bowls during
cooking
subject wiring or components
cooking.
Clothing
maymay
ignite
or catch utensil handles.
possible
....
tipping of the appliance, breakage of door, and
senous lnlunes,
WARNING: To reduce the risk of tipping of appliance,
the appliance must be secured by a properly installed
anti-tip device. When removing the appliance for
cleaning, be sure the anti-tip device is engaged when
the range is replaced. Look underneath range to verify
that one of the rear leveling legs is properly engaged in
the bracket slot. The anti-tip device secures the rear
leveling leg to the floor when properly engaged,
Always place oven racks in the desired positions while
oven is cool. If a rack must he moved while hot, use a
dry potholder and avoid touching hot element in oven.
Do not touch a hot oven light bulb with a damp cloth as
the bulb could break. Shonld the bulb break, chseonnect
power to the appliance before removing bulb to avoid
electrical shock.
and its container. The food could be contaminated.
DO NOT TOUCH THE SURFACE
OR OVEN
ELEMENTS, AREAS NEAR THE ELEMENTS OR
THE INTERIOR SURFACES OF OVEN. Elements
may be hot even though they are dark in color. Areas
near surface elements and the interior surfaces of the
Cooking
Safety
Always turn off surface
cooking is completed,
element
or the oven when
It is normal for some parts of the cooktop, especially
areas surrounding the surface elements, to become hot
during cooking operations. Do not touch the cooktop
until it has cooled,
Never leave surface cook- _
-7
/
Use care when opening the oven door. Let hot air or
steam escape before removing or replacing food.
PREPARED
FOOD
WARNING:
Follow food
manufacturer's
instructions. If a plastic frozen food
container and/or its cover distorts, warps, or is otherwise
damaged during cooking, immediately discard the food
oven may become hot enongh to cause bnms. Dnring
and after use, do not touch or let clothing or other
flammable materials contact beating elements, areas
near elements or interior surfaces of oven until they
have had sufficient time to cool. Among these areas are
the eooktop, the surfaces facing the eooktop, the oven
vent opening and the surfaces near opening, oven door,
and oven window.
at high heat setting or
when deep fat frying,
Boilovers cause smoking
and greasy spillovers may
ing operations unattended
_._
ignite.
Never heat an nnopened food container. Pressure build-
met_ object (other than a pan on a su_aee element) to
eontaet heatingelements.
up may cause container to burst resulting in personal
injmy or damage to the appliance,
utensils having flat bottoms large enough to cover the
surface element. The use of undersized utensils will
Use dry, sturdy potholders. Damp potholders on hot
surfaces may cause burns from steam. Towels or other
bulky"items should never be used as pothoIders. Do not
let potholders touch hot heating elements,
expose a portion of the heating element to direct
contact and may result in the ignition of clothing. The
proper relationship of the utensil to the element will
also improve efficiency.
Always let quantities of hot fat cool before attempting to
move or handle,
Use pans with flat bottoms and handles that are easily
grasped and stay cool. Avoid using unstable or loose
Do not let grease or other flammable
materials
accumulate in or near the appliance, hood or vent fan.
Clean hood frequently
to prevent
grease from
accmnulating on hood or filter,
handIedpans.
Be sure utensil is large enough to properly contain food
and avoid boilovers. Pan size is particularly important in
deep fat frying.
Utensil Safety
Do not allow aluminum foil, meat probes or any other
Usc proper pan size. This appliance is equipped with
one or more surface elements of different sizes. Select
PAGE
To minimize bm'ns, ignition of flammable materials and
Self-Clean
spillage due to unintentional contact with tile utensil, do
not extend handles over adjacent surface elements. A1ways turn pan handles toward the side or back of the
appliance, not out into the room where they are easily
hit or reached by small children,
Clean only parts listed in this booklet. Do not clean
door gasket. The door gasket is essential for a good seal.
Care should be taken not to rub, damage, or move the
gasket. Do not use oven cleaners of any kind in or
around any part of the self-elean oven.
Never let a pan boil dv as this could damage the utensil
and the appliance,
Follow the manufacturer's directions when using oven
cooking bags.
Before self-eleaning the oven, remove broiler pan, oven
racks, and other utensils, and wipe off excessive
spillovers to prevent excessive smoke or flare-ups.
CAUTION: DO NOT LEAVE FOOD OR COOKING
Only certain types of glass, glass/ceramic, ceramic, or
glazed utensils are suitable for cooktop or oven usage
without breaking
due to the sudden change in
temperature,
UTENSILS, ETC., IN THE OVEN DURING TttE
SELF-CLEAN CYCLE.
It is normal for the eooktop of the range to become hot
during a self-dean cycle. Therefore, touching or lifting
This appliance has been tested for safe performance
using conventional cookware. Do not use any devices or
accessories that are not specifically recommended
in
this manual. Do not use eyelid covers for the surface
units, stove top grills, or add-on oven convection
systems. The use of devices or accessories that are not
expressly recommended
in this manual can create
the cooktop dm'ing a clean cycle should be avoided.
A fan should be heard during the self-clean cycle (select
models). If not, cancel the cycle and call smvicer. Refer
to the Table of Contents for location of self-clean
instructions and for information, if equipped.
serious safety hazards, result in performance problems,
and reduce the life of the components of the appliance.
Tile California
Safe Drinking
Water and Toxic
Enfnrcement Act of 1986 (Proposition 65) requires the
Governor of California to publish a list of substances
known to the State of California to eause cancer or
Cleaning
Safety
Important
Oven (select
Safety
Notice
models)
and Warning
Turn off aIl controls and wait for applianee parts to cool
before touching or cleaning them.
reproductive harm, and requires businesses to warn
customers of potential exposures to sueh substances.
Clean cooktop with caution. Use care to avoid steam
bm'ns if a wet sponge or cloth is used to wipe spills on a
hot surface. Some cleaners can produce noxious fumes
if applied to a hot surface,
Users of this appliance are hereby warned that when
the oven is engaged in the self-clean cycle (seleet
models), there may be some low level exposure to some
of the listed substances, including carbon monoxide.
Do not soak or immerse the removable
heating
elements in water (select models). Immersing
an
element in water would damage the insulating material
inside the element.
Exposure to these substanees can be minimized by
properly venting the range to the outdoors during the
self-clean cycle.
Do not use aluminum foil to line the surface unit drip
bowls or the oven bottom. Improper installation of
these liners may result in a risk of electric shock or fire.
SAVE THESE
PAGE 4
INSTRUCTIONS
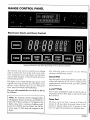
RANGE
CONTROL
Electronic
Clock
PANEL
and Oven
Control
&
CANCEL
Styling and features may differ depending
on the model you selected.
The electronic clock and oven control on your Maytag
range is used for the time-of-day clock, timer, bake,
broil, programmed
oven operations and self-clean
(select models) fimctions. A beep will sound each time a
function pad is pressed.
The following
pads are found
electronic cloek and oven control:
The dispFay on the control will flash when power is first
supplied to the range or ff there is a power thilure. Once
the time-of-day clock has been set (see Setting the
of-day clock and timer. If yoti are ever unsure if you've
programmed the control correctly, press the CANCEL
pad and start over.
Clock, page 6), the display will stop flashing.
•
The oven will automatically"
for 12 hours,
Press or press and hold these pads to enter the time or
temperature desired. These pads are also used to select
Hi or Lo broih
turn off if it is left on
NOTE: The electronic control is equipped with a
self-diagnostic feature for service use ONLY. If a
fault code (F plus a number, ex. F1) appears in the
display along with a continuous beeping sound,
press the CANCEL pad. See Before You Call for
Service (page 17', if the fault code reappears in the
display.
on your
Maytag
Cancel Pad
Press this pad to cancel all operations except the time-
and •
Timer
Pads
Pad
The timer can be set from 1 minute to 9 hours, 50
minutes. It will count down by seconds (when set for 1
minute) or minutes (when set for 2 minutes or more
time). See page 6 for instructions on setting the timer.
PAGE 5
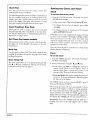
Clock Pad
Setting
Use tbis pad to set the time-of-day
instructions to do this, see below.
clock.
time to the display. The timer will continue to count
down and a signal will sound when the time expires.
Time/Oven
Stop
These pads are used to program the oven to start and
stop automatically; either immediately or at a later tinm.
Self
Clean
Pad (select
Oven
models)
This pad is pressed to set the oven foraself-cleaaeyele,
See pages 12 i3 for detailed information on the selfclean feature.
Broil
Clock
To set the time-of-day
clock:
1. Press the CLOCK pad once. The words "Set Time"
will flash in the display.
2. Set tile correct time of day using the • and • pads.
• To change the time by one minute, press either
pad once.
Pads
For
detailed see
information
on using Programmed
Operations,
pages 10-11.
and Timer
For
You may also press this pad to recall the current time of"
day. For example, if the timer is counting down in the
display, press the CLOCK pad to return the current
Cook
the Clock
Pad
Use this pad to select broil. Two heat selections are
available for broiling--Hi and Lo. See page i0 for more
broiling information.
Oven Temp Pad
The oven temperature is set by pressing this pad and
the • or • pad. Additional
baking and roasting
information can be found on page 9.
• To change the time in increments
press and hold either pad.
of 10 minutes,
When the power is first supplied to the range or if there
has been a power failure, the display will flash. Follow
above instructions
cannot be changed
self-clean
(select
operation to set the
to set the clock. The clock time
when the oven is set for a cook or
models) operation.
Cancel the
clock.
Press the CLOCK pad to recall the time of day when
another function is displayed.
Timer
To set the timer:
i. Press the TIMER pad once. The words "Set Timer"
will flash in the display:
2. Set the desired time using the • and • pads.
• Press either pad once to change the time by 1
minute (if the Timer is set for up to 1 hour), 5
minutes (if the Timer is set for over 1 hour), or 10
minutes (if the Timer is set for over 2 hours).
• Press and hold either pad to change the time in 5
minute or 10 minute increments, depending upon
the time set in the display.
The TIMER can be set from I mimlte (0HR:01) up to 9
hours and 50 minntes (9 HR:50).
The timing operation will start automatically. Colons
will flash in the display to indicate a timing operation.
One long continuous beep will signal the end of the
timing operation and "End" will briefly appear in the
display. The time of day will automatically reappear in
the dispIay. The TIMER pad does not control the oven.
To cancel:
Press the TIMER pad and bold for 3
seconds. The time of day will reappear after a slight
delay.
PAGE 6
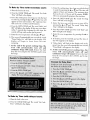
SURFACE COOKING
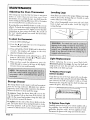
Panel Light
'
(select
models)
Suggested
Heat Settings
The panel light is turned on by pushing
the rocker
switch on the control panel and holding it in until the
fluorescent
light comes on. It may be turned off by
pushing the other side of the switch,
Turn the control knob to the desired heat setting. If'in
doubt, it is better to select a lower setting and increase
to a higher one later if needed. It will take longer ibr
tile element to cool to a lower temperature
than to heat
The Controls
.p to a higher temperature.
Your range is equipped with surface control knobs that
provide an infinite choice of heat settings from Low to
Use the following chart as a guideline until you become
more familiar with your new range. Information
in the
chart
is based
on the use of heavy gauge
metal
eookware. Other pan materials
may require a different
beat setting for the same cooking operation,
(For more
information
on cookware,
see "Cooking
Made
Simple" booklet.)
High. The knobs can be set on or between any of the
numbered
settings,
To operate the control: Push in and turn the knob in
either direction to the desired heat setting. A surt:aee
indicator light on the control panel will turn on to alert
you that one or more of the surface elements are on.
After a cooking operation,
be sure the elements
and
indicator
lights are off.
Setting
Uses
HIGH
To bring liquid to a boil. blanch or bring
up pressure in a pressure cooker.
Always reduce to a lower heat setting
when liquids just begin to boil or food
begins to cook.
8-9
To quickly brown or sear meat, for fast
cooking of non-protein foods such as
vegetables or pasta/.
7
To maintain a fast boil for large amounts
of liquid.
8-6
To maintain a slow boil for large
amounts of liquid, for most frying.
3--4
To continue cooking uncovered foods,
for most slow frying, stewing, braising or
ste#ming.
1-2
For long, slow cooking of covered thuds
s_mmering]
LOW
To keep foods wam_ before serving, melt
ehooolate or butter,
PAGE 7
Using Your Coil Element
Surface
Cooking
It is normal for some parts of the cooktop, especially
Coil Elements
areas surrounding the surface elements, to become
warm or hot during surface cooking operations,
Therefore, do not touch or let heat-sensitive materials
such as plastics touch the eooktop until it has had time
to cool.
The coil elements of your range are self-eleaning.
not immerse the elements in water.
Lift-up Cooktop
Your range features an upswept cooktop that can be
lifted up for convenient access to the area under the
cooktop. The top is hinged and can be raised but not
removed.
Do
To remove: Raise the element when cool and carefully"
pull out and away from tile receptacle.
To replace: Insert the terminals on the element into
the receptacle and guide the element into place until it
sits level on the drip bowl.
Drip
Bowls
The drip bowls, located under each surface element, are
designed to catch hoilovers. They must always he
used--absence
of these bowls during cooking may
damage wiring or other parts underneath the eooktop.
Clean the drip bowls frequently. See cleaning section,
pages 12-i5.
To llft eooktop: When cool, grasp the front edge of the
cooktop and gently lift up until the two automatic prop
rods at the front of the cooktop snap into place.
To lower eooldop: Hold the front edge of the eooktop
and carefully pnsh back on each prop rod to release the
notched support. Then gently lower the top into place.
The prop rods will slide into the range frame.
PAGE 8
USING YOUR OVEN
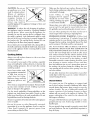
Every oven has its own characteristics. You may find
that the cooking times and temperatures vary" slightly
from your old oven. This is normal,
To remove:
Be sure the rack is cool Pull tile rack
straight out until it stops. Tilt the front end of the rack
up and continue pulling it out.
For safety reasons, when opening the oven door, allow
steam and hot air to escape before reaching into the
oven to remove food.
To replace: Tilt the front end of the rack up and place
it between the rack supports. Slide it back until it clears
the lock-stop position. Lower the front and slide the
rack straight in.
Baking and Roasting
Do not cover an entire oven rack or oven bottom
with aluminum foil. This will restrict air flow.
(For additional
baking and roasting
"Cooking Made Simple" booklet.)
Setting
the Oven
Controls
tips, refer
to
for Raking
and Roasting:
1. Press the OVEN TEMP pad. "Bake" and 000° will
appear in the display.
Rack
Positions
Do not attempt to change the rack positions when the
oven is hot. Use the following guidelines when selecting
the proper rack position. Never place pans directly
on the oven bottom.
2. Press either the • or • pad once and 350 ° will
appear in the display. Press the • or • pad until the
desired oven temperature is displayed.
The word ON will light in the display, the oven will
turn on and the temperature display" will rise in 5°
increments while the oven is preheating. A beep will
sound to indicate that the oven has preheated. Allow
10-15 minutes for preheating.
3. After the cooking operation, turn the oven off by
pressing the CANCEL pad. Remove food from the
oven,
Oven
Light
Push the switch on the control panel marked OVEN
LIGHT to turn it on and off. On select models the oven
1?tghtautomatically comes on whenever the oven door is
opened.
Oven
Vent
The oven vent is located under the right rear element.
When the oven is in use, this area may feel warm or hot
to the touch. To prevent problems, do not block the
vent opening.
Oven
Racks
Fan (CHE9000
model
only)
The oven racks are designed with a lock-stop edge to
keep the racks from coming eompletely out of the oven
A fan automatically turns on whenever the oven is set
for a cooking or self-clean operation to ensure long life
of the clock and oven controls.
The fan will
when there is food placed on them.
automatically turn offwhen the oven has cooled.
PAGE
Broiling
For best results, use the broiler pan and insert supplied
with your range,
2. Place the broiler pan on the recommended
position shoual in the broiling chart.
(For additional broiling tips, refer to "Cooking
Simple" booklet.)
3. Follow the suggested times in the broiling chart
below. Broil with the oven door open about 4 inches.
4. Cheek the doneness by cutting a slit in the meat near
the center to check the color.
Setting
the
Controls
for
Made
Broiling:
l. Press the BROIL pad and press the • or • pad to
select either Hi or Lo broil as indicated in the
display. Hi is used for most broiling operations. Lo
should be selected when broiling thicker meats to
the well-done stage (to prevent excessive browning).
Broiling times may increase if LO is selected. Allow
the element to preheat for 3--4 minutes.
Broiling
5. To cancel or end the broiling operation,
CANCEL pad.
rack
press the
6. Broil times may need to be increased if the range is
installed on a 208 volt circuit.
Chart
Until you become more familiar with your new range, use the following chart as a guide when broiling foods.
Rack
Position °
Doneness
LO
4
4
4
4
3
well
well
medium
well
well
4-6
8-10
8-10
10-13
16-25
2_t
7-8
7-8
9-10
14-20
Ham Slices (precooked
l_2-inchthick
I-inch thick
1/_-inchthick
HI
HI
HI
4
4
4
flaky
flaky
heated
4-5
7-9
5-7
4_
4-6
4-6
Pork Chops
i-inch thick
HI
3
well
12-14
10-12
Food
Bacon
Beef Patties
Steaks
Q.antity &/Or
Thickness
Temp.
3/4qnch thick
1-inch thick
HI
H]
H1
Chicken Pieces
Fish
°The
bott cm_ rack position
Programmed
is #1.
Oven Operations
The Programmed Oven Operations feature is used to
turn the oven off at a preset time of day or delay the
start and then turn offthe oven.
This feature will not operate unless the clock is
functioning and is set to the correct time of day.
If you delay more than 30 seconds between touching a
pad and pressing the • or • pad, the display will either
return to the previous setting or the time of day will
reappear and the program will cancel.
To recall the preset stop time or cook time, just press
the corresponding pad.
PAGE 10
Approx. Minutes/Side
1st Side
2nd Side
To reset or cancel the program,
pad.
press the CANCEL
To Bake
by Time
(with
immediate
start):
1. Place the food in the oven.
2. Press the COOK TIME pad. The words "'Set Cook
Time" will flash in the display.
3. Enter the cooking time (how long you wish the food
to cook} by pressing the • or • pad. The time will
appear in hours and minutes. The maximum time
that can be set is 11 hours and 55 minutes.
4. Press the OVEN
000° will light in
within 7 seconds
control will beep
TEMP pad. The word "Bake" and
the display. If this step is not done
after entering the cook time, the
until another pad is pressed.
5. Enter the oven temperature with the • or • pad.
6. The oven wilI automatically' turn on and the words
"Timed Bake On" will light in the display. The
display will begin to count down the time
remaining.
7. At the end of the preset eooking time,
oven
will automatleally
turn
off
continuous
beeps will sound. Remove the
from the oven and press the CANCEL pad to
the beeps,
To Bake
by Time
(with
delayed
the
and
food
stop
3. Enter the cooking time (how long you wish the food
to cook} by pressing tile • or • pad. The time will
appear in honrs and minutes. The maximum time
that can be set is 11 hours and 55 minutes. NOTE:
The oven automatically programs the start time.
4. Press the OVEN STOP pad. The words "Set Stop
Time" will {lash in the display.
5. Enter the time you wish the oven to turn off by
pressing the • or • pad. Tile words "Delay Stop
Time" will light in the display.
6. Press the OVEN TEMP pad. The word "Bake" and
000° will light in the display.
7. Enter the oven temperature
• pad.
by pressing the •
or
8. If desired, press the CLOCK pad and the time of
day will reappear in the display.
9. "Delay Bake" will light in the display and at the
preset time the oven will automatically turn on and
"Timed Bake" will appear in tile display'.
10. At the end of the preset
cooking time,
oven
will
automatieally
turn
off
continuous
beeps will sound. Remove the
from the oven and press the CANCEL pad to
the beeps.
the
and
{hod
step
start):
1. Place the food in the oven.
2. Press the COOK TIME pad. The words "Set Cook
Time" will flash in the display.
PAGE 11
CARE AND CLEANING
Self-Clean
Oven (select
models)
A self-clean
oven uses above normal cooking
temperatures
to automatically clean the entire oven.
The separate clean cycle eliminates soil completely or
Porcelain
All spillovers,
Enamel
especially
Cooktop
acidic spillovers,
should be
reduces it to a gray ash which is easily wiped up with a
damp cloth when the wcle is complete and the oven has
cooled.
wiped up as soon as possible with a dry cloth. To
prevent possible cracking or chipping of the porcelain,
never wipe a warm or hot surface with a damp cloth.
It is better to clean the oven regularly than to wait
until there is a heavy build-up of soll in the oven.
Do not use abrasive or caustic cleaning agents on the
Clean bowls frequently, Bemove soiled bowls by first
removing the coil elements (see page 8). To clean by
hand, soak in got, sudsy water. Use a mild abrasive
deauer or soap-filled scouring pad for hard to remove
soil.
It is normal _br the cook'top, oven door and window to
become hot during a clean cycle. Therefore,
avoid
touching these areas during a clean cycle. As the oven
heats and cools, you may hear the somlds of metal parts
expanding and contracting. This is normal and will not
damage your oven.
The first few times the oven is cleaned, some smoke
and odor may be detected. This is normal and will
lessen or disappear with use. If the oven is heavily
soiled, smoke and odor are common. During the
cleaning process the kitchen should be well ventilated.
Bowls may also be washed in an automatic dishwasher
or placed on newspapers and sprayed with commercial
oven cleaner. For heavy soils, spray with oven cleaner
and place in plastic bag overnight. Follow the manufaeturer's instructions. CAUTION: When using oven
The oven will automatically begin to heat when the door
is locked and the SELF CLEAN pad is pressed. When
the oven reaches cleaning temperature,
the word
"Lock" will light in the display. At this point, the
oven door cannot be manually opened.
cleaner, spray carefully.
damage finishes,
To prevent damage to the door and lock lever, do not
force the door open when the word "Lock" is displayed.
porcelain finish. Abrasive cleaners
damage the finish,
Porcelain
will permanently
Drip Bowls
Spraying
other areas could
Manual-Clean
Oven
(select models)
Clean as directed in the cleaning chart on pages 14-15.
Preparing
for the Self-Clean
Cycle
1. Remove oven racks and any pans, utensils or the
broiler pan fi'om the oven. The oven raeks should be
washed by hand. If left in the oven during the
self-dean
cycle,
the racks
will become
permanently
discolored
and may not slide
easily.
2. Clean the oven frame and door frame with a nonabrasive cleaning agent such as Bon And. These
areas are not exposed to cleaning temperatures and
should he cleaned to prevent soil from baking on
during the clean cycle.
3. Wipe up any excess grease or spillovers from the
oven bottom to prevent excessive smoking and flareups during the dean cycle.
PAGE 12
4. Wipe up acid spillovers such as lemon juice, tomato
sauce or milk-based sauces and sugary
Porcelain enamel is acid resistant, not
The porcelain finish may discolor if
are not wiped up prior to a self-dean
spillovers.
acid proof,
acld spills
eyrie.
5. Do not use oven cleaners
or oven liner
protective coatings of any kind on the self-clean
oven finish or around any part of file oven as
they will damage the oven finish.
6. To prevent damage, do not clean or rub the gasket
on the oven door. The gasket is designed to seal in
heat during the clean cycle.
7. Turn off the oven light before starting the self-clean
operation. If the oven light is left on during the clean
cycle, the light bulb will born out.
Setting
the
Controls
for the Self-Clean
TO Interrupt
or Reset
the
Clean
Cycle
If the door has not locked, the lock lever can be moved
completely to the left to cancel the cycle.
If the door is locked, push the CANCEL pad. Tile door
will not open until "Lock" turns off in the display. At
that time, the door lock lever can be returned to its
original position and the door can be opened. The oven
will still be hot.
After
the Self-Clean
Cycle
About one hour after the clean cycle is complete, the
word "Lock" will turn off in the display and the door
lever can be returned to its original position. The oven
will still be hot.
Some soil may leave a light gray, powdery ash which can
1. Close the oven door and move the door lock lever to
the right until it rests in the lock position,
be removed with a damp cloth. If soil remains, it
indicates that the clean cycle was not long enough or a
large spillover was not wiped up before the self-clean
cycle. The soil should be removed during the next clean
cycle.
2. Press the SELF CLEAN pad. The words "Set Clean
Time" will flash and "3:00" will appear in the display,
Also,"Clean On" will light as the oven begins to heat.
If the oven racks were left in tile oven dining the selfclean cycle and do not slide smoothly, wipe the rack
edges and rack supports with a small amount of
The oven will antomatic_tlly set a clean cycle of three
hours. A shorter (2 hours) or longer (4 hours) clean
cycle can be selected by"pressing tile SELF CLEAN
pad and pressing the • or • pad to select 2 to 4
hours,
vegetable oil to restore the ease of nmvement.
Fine hair-like lines may appear in the oven interior or
oven door. This is a normal condition resulting from the
heating and cooling of the porcelain finish. These lines
do not affect the performance of the oven.
Cycle
3. Press the CLOCK pad and the current time of day
will reappear in the display. "Clean" and "On" will
remain in the display to show that the oven is in a
clean cycle.
If the door is not locked properly, the word "door" will
appear in the display" and beeps will sound.
PAGE 13
RANGE CLEANING
Cleaning
CHART
Agents*
Many different cleaning agents are recommended
for the various parts of the range. Read product
specific recommendations.
The following brand names may help you to make an appropriate
selection:
1. Mild abrasive cleaners such as Bon Ami, Soft Scrub, Smart Scrub, Baking Soda.
2. Mild liquid sprays such as Fantastik, Formula 409.
3. Glass cleaners such as Windex and Glass Plus.
4. Non-abrasive
plastic and nylon scouring
labels
for
pads.
DO NOT USE abrasive cleansing powders such as Comet, soap-filled
oven cleaners, or an automatic dishwasher except when indicated.
Be certain all range parts are cool before
parts that are removed
for cleaning should
scouting
pads like S.O.S. or Brillo, commercial
removing
any part or cleaning
be replaced
correctly.
the unit to avoid
damage.
Any
_Brandnamesofe|eaningagentsare trademarksof the respectivemanufacturers.
Soap and water
Mild liquid cleaner
Glass cleaner
Wash, rinse, dry with soft cloth.
Do not use oven cleaner or abrasive agents.
Soap and water
Plastic or soap-filled
seouring pad
Dishwasher
Pretreat the broiler pan and insert with a non-stick
vegetable coating such as Pare or Mazola to make
denning easier.
Soaking makes cleaning easien
Soap and water
Mild liqnid sprays
Glass cleaners
Remove knobs by pulling forward. Wash, rinse, d_ with
soft cloth. Do not soak knobs in water. Do not use
abrasive cleaning agents.
Soap and water
Glass cleaners
Avoid using excessive amounts of water which may seep
under or behind glass.
Soap and water
Mild abrasive cleaners and
Do not use metallic scouring pads beeanse they will
scratch the s__rthce
plastic pads
Commercial oven cleaner
When using eommercial oven cleaners follow the
manufacturer'S instructions
Wipe up acid spills (lemon. tomato or rffilk based foods)
as soon as oven is cool with soap and water. If the spill
is not wiped up, it may discolor the porcelain. ,
To make cleamng castor, remove oven door. rf
desired {see page 15).
PAGE 14
Soap and water
Mild abrasive cleaners
Do not use oven cleaner or abrasive agents.
Polish with a soft cloth.
Soap and water
Plastic seonring pads
Cleansing> powders,,
So!lt>(}lted seounng pads
ffracks are left in oven during a self-clean cycle select
models they wiI1discolor and may become difficult to
slide, A thin coat of vegetable oil on the rack edges will
make slitting easier.
Continuedon heart
Range
Cleaning
Chart
(continued)
Soap and water
Mild liquid sprays
Do not use oven cleaner, abras;ve or caustic cleaning
agents on plastic finishes, These cleaning agents will
scratch or mar the finish. To prevent staining or
discoloration, remove fat, grease or acid (tomato,
lemon_ vinegar, milk, fruit juice, marinade soils
immediately with a dry paper towel or cloth. When
surface is cool. clean with soap and water: rinse, and
dry.
Soap and water
Mild abrasive cleaners
Frequently wash. rinse and dry to prevent soil build-up.
Soak in hot. suds_ water. Use mild abrasive cleaners
Soap-filled scouring pads
Dishwasher
Commercial oven cleaners
and soap-filled scourin gP ads, if necessary. For difficuh
soils, remove, place on newspapers and spray carefully
with commercial oven cleaner. Place in plastic bag
overmght for heavy soils. Follow manufacturer's
instructions. DO NOT COVER WITH ALUMINUM
FOIL.
Soap and water
Mild abrasive cleaners
Mild liquid sprays
Wipe up all spillovers immediately with a dry cloth-especially acid spills (milk. fruits, tomato_ etc./.
Never wipe a warm or hot surface with a damp
cloth as cracking and chipping may result,
NOTE: Do not use abrasive cleaning agents such as steel
wool pads, These products will scratch the surface.
Follow instructions an ]?ages
12-13 for the self-clean
cycle.
3n a self-clean oven
Do not clean or rub door gasket.
Wipe up acid spills flemon, tomato or milk based foods
as soon as oven is cool with soap and water. If the spill
is not wiped up, it may discolor the porcelain.
oemoeoenD
oaOeD
rhdi
the door
(opened
to the
about
"stop" position
6 inches)
and
align the slots in the door with the hinge arms and slide
the door
down onto the hinge
arms until it is
grasp the door with both hands at
completely
each side. Do not use the door
handle to lift the door. Lift up
evenly until the door clears the
hinge arms.
Do not attempt to open or close the door until the door
is completely
seated on the hinge arms. Never tuna the
oven on unless the door is properly
in place. When
baking, be sure the door is completely
closed. Baking
results wiI1 be affected
if the door is not securely
closed.
seated
on the hinges.
PAGE 15
MAINTENANCE
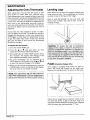
Adjusting
the
Oven
Thermostat
Leveling
Legs
After using your oven the first few times, it may seem
hotter or cooler than your previous oven. Oven
thermostats, over a period of years, may drift from the
Some floors are not level. For proper baking, }_ur range
must be level. The leveling legs are located on each
corner of the base of the range.
factory setting and timing chfferenees of 5 to 10 minutes
are not unusual between an old and a new oven.
If yon think the oven should be hotter or cooler, you can
adjust it. To decide how much to change the thermostat,
set the oven temperature 25°F higher or lower than the
temperature in your recipe, then bake. The results of
the "test" should indicate how much the thermostat
should be adjusted.
Place a level horizontally on an oven rack and check
front-to-back
and side-to-side.
Level the range by
turning the legs.
To adjust
_
]
I]1
_
(.®)
the thermostat:
1. Pressthe OVEN TEMPpad.
2. Press the • pad and select an oven temperature
between 500°F and 550°E
3. Press and hold the OVEN TEMP pad for about four
seconds. The display will change to the oven
adjustment display which reads 00°.
4. Tile oven thermostat
can be adjusted up to +35°F
hotter or _35°F cooler. Use the • or • pad to select
the desired change in the display.
5. When you have made the adjustment,
press the
CANCEL pad to return to the time of day display,
Use your oven as you would normally,
Light Replacement
Before replacing
the oven or panel light bulb,
disconnect
power to range. Be sure the bulb and
range parts are cool. Do not touch a hot bulb with a
damp cloth as the bulb may break.
To Replace
Panel
(select models)
Storage
Drawer
The storage drawer in the range is a safe and convenient
place for storing cookware. Do not store plastic,
paperware, food or flammable material in this drawer.
To remove; Empty the drawer then pull it out to the
first stop position. Lift up the front of the drawer and
pull
it to the
the drawer
second tostop
position.
Grasp
the sides and
Remove
clean
under the
range.
lift up and out to remove the drawer.
To replace: Fit the ends of the drawer glides onto the
rails. Lift up the drawer front and gently push in to the
first stop position.
Lift up the drawer again and
continue to slide the drawer to the closed position,
PAGE 16
Light
Grasp the top trim of the back pane] with your thumbs
under the front edge and pull outward while lifting the
trim. Remove the bulb and replace it with an 18 watt
fluorescent tube. Snap the top trim back into place and
restore the power. Reset the clock.
_
I <
__._
_
__[
_
To Replace Oven Light
Carefully unscrew the lens cover (select models) with a
dry" potholder. Very"carefully remove the bulb with the
potholder.
Replace with a 40 watt appliance bulb.
tleeonnect the power to the range and reset the clock.
BEFORE YOU CALL FOR SERVICE
Check
these
points
if...
Part or all of your electric range does not operate
Food does not broil properly
• Is the range plug loose or disconnected
from the
electrical outlet (if not wired direct to tim electrical
• Are the controls for broiling
Broiling section, page 10.)
supply)?
• Are any house
tripped?
breakers
• Was the proper rack position used? (See Broiling
section, page 10.)
• Did you allow time for the broil element to preheat?
• Has a range fuse blown (Canadian ranges only)?
• Has the power supply to the home been interrupted?
• Are the oven controls properly set?
• Was the broiler pan received with the range used?
• Was aluminum foil used on the Broiler pan insert,
bloeking the slits for fat drainage?
• Was the door left in the loeked position fnlIowing a
self-dean cycle (select models)?
Oven light does not operate
fuses blown
or circuit
• Is the oven set for a programmed oven operation?
Surface elements
set properly?
(See
• Is the bulb loose or burned out?
• Is tile light switch in the On position?
fail to turn on or heat the food
properly
Oven will not self-clean
• is the range plug loose or disconnected
from the
electrical outlet (if not wired direct to the electrical
• is the self-clean control set properly? (See Self-Clean
instructions, pages 12-13.)
supply)?
• Has a range fuse blown (Canadian ranges only)?
• If the range has coil elements, are they properly
plugged into the receptacles?
• Is the oven set for a programmed
• Were appropriate pans used (See "Cooking Made
Simple" booklet)?
• Are the surf:tee element controls properly set?
Food not baking correctly
• Are the oven racks properly placed for baking (See
"Cooking Made Simple" booklet)?
• Have yon used ahnninum foil correctly?
(select models)
oven operation?
Oven door won't lock (select models)
• Are the proper controls set for the self-clean cycle?
(See Self-Clean instructions, pages 12-13.)
Oven door will not unlock (select models)
• Has the self-clean cycle been finished for at least one
hour?
"F" plus a number
models)
appears in the display (select
• Was the oven preheated as recommended?
• Are the controls for bake operations properly set?
• Is there 1 to '2 inches of space between pans and the
oven walls? Are the range and oven racks level?
• These are fault codes. If a fanlt code appears in the
display and a continuous
beep sounds, press the
CANCEL pad. If the fault code reappears, disconnect
power to the range and call a qualified service
technician.
• Was good cookware/bakeware
used?
Fan sound (select models)
of the proper
size
• Are yon using a tested recipe from a reliable source?
The oven thermostat on your new range may be more
accurate than the one on your okt range,
• Was the oven vent covered or bk)eked on the range
surface?
• A fan will automatically turn on when the oven is
operated to cool the clock controls. This is normal. It
may continue to mn even after the oven is turned off.
For further assistance contact your May-tag dealer
or call Maytag Customer Ser_4ee:
U.S.
1-800-688-9900
CANADA
1-800-688-2002
PAGE 17
RANGE WARRANTY
Full One Year Warranty
For one (l/ year from the date of original retail purchase, any part which fails in normal home use will be
repaired or replaced free of charge.
Limited Warranty
After the first year from the date of original retail purchase through the second year, parts which fail in
normal home use will be repaired or replaced free of charge for the part itself, with the owner paying all
other costs_ including labor, when the appliance is located in the United States or Canada.
Third Through Fifth Year
After the second ),ear from the date of original retail purchase through the fifth year. all of the following
components which fail in normal home use will be repaired or replaced free of charge for the part itself,
with the owner paying 'all other costs, including labor, when the appliance is located in the United States
or Canada.
These components inelnde:
All Electronic Clocks: on electric or gas ranges.
Electric Heating Elements:
Includes all surface elements tsolid disc. coil and smooth top), glass
cooking surfaces, broil elements and oven bake elements on electric ranges.
Third Through Tenth Year
After the second year from the date of origin_ retail purchase through the tenth year. sealed gas burners
on gas ranges which fail in normal home use will be repaired or replaced free of eharge for the part itself;
with the owner paying all other costs, including lal_or, when the appliance is located in the United States
or Canada.
Canadian Residents
This warranty covers only- those appliances installed in Canada that have been listed with Canadian Standards
Association unless the appliances are brought into Canada due to transfer of residence from the United States to
Canada
Limited Parts Warranty Outside The United States Or Canada
For two (2 years from the date of original retail purchase, any part which fails in normal home use will be
repaired or replaced Free of charge for the part itsel_i with the owner paying all other c_sts, including labor, when
the appliance is located outside the United States or Canada.
This Warranty gives you speci_c legal rights, and you may"also have other rights which vary from state to state.
To Receive
Warranty
Service
Tolocate an authorized service comp_myin your area contact the May_agdealer (Yorewhom your appliance was prochased; or call
MavntagCustomer Service. Should you not receive satisfactorywarranty service, call or write:
Maytag Cl_stomer Assistance
% Maytag Customer Service
RO. Box2370
Cleveland, TN 37320-_,370
US
1-800-688-9900
CANADA 1-800-688-2002
YVhe_tcontacting Maytag Customer Sex,ice be sure to provide the model and serial n_mbers of your appliance, the name and
address of the de,tier from whom you purchased the appliance and the date of purchase.
Should you still have a problem, write, to: Major Applianc*e Consumer Action Program, 20 North Wacker Drive., Chicago, Illinois 606(_.
MACAP is an industD sponsored but independent group of consumer experts who receive and act on complaints from appliance owners.
NOTE:
When writing about an unsolved ser_4ce problem, please include the following infbnnatiom
(a) _tbur name, address and telephone number;
(b) Model nmnber and serial mmaber (found on the &ata plate) of your appliance;
(el Name al_d address of your dealer and date the appliance was bought;
(d) A clear desc'fiption of the problem )_m are havillg.
MAYTAG
Form No. 002CM-0695
• One Dependability Square • Newton, Iowa 50208
Part No. 8111 P057-60
MP
Litho U.S.A,
During the Self-Clean
Cycle
After the Self-Clean
Cycle
The oven will automatically
begin to heat up when
the door lock lever is moved to the right and the
SELF CLEAN pad is pressed.
When
the oven
reaches
cleaning
temperature,
the word Lock will
About one hour after the clean cycle is complete,
the word Lock will turn off in the display and the
door lever can be returned
to its original position.
The oven will still be hot.
light in the display.
cannot be manually
Some
which
The first few times
At this point, the oven
unlocked
and opened,
the oven is cleaned,
door
some smoke
and odor may be detected.
This is normal and will
lessen or disappear
with use. During the cleaning
process
the kitchen
should be well ventilated.
If
the oven is heavily soiled, heavier smoke and odor
may occur. Do not leave a soiled broiler pan in the
.....
during a self-clean
cycle,
Avoid contact _th the oven door and window since
it will get warm d_:ring the self-clean
cycle. As the
oven heats and cocls, you may hear sounds of the
metal parts
expai_ding
and contracting.
This is
normal and wlli not damage your range,
To prevent damage to the door and the lock lever,
do not force the door open when the word Lock is
displayed.
remains,
soil may leave
can be removed
it indicates
a light gray, powdery
ash
with a damp cloth. Ifa stain
that
the
clean
cycle
was
not
long enough or a large spillover was not wiped up
before the self-clean
cycle. The stain should
be
removed during the next clean cycle.
If the oven racks were left in the oven during the
self-clean
cycle and do not slide smoothly,
wipe
the racks
and embossed
rack supports
(on the
oven walls) with a small amount
of vegetable
oil to
restore
the ease of movement.
Fine hair-like
lines
or oven door. This
from the heating
finish. These lines
the oven.
may appear in the oven interior
is a normal
condition
resulting
and cooling
of the porcelain
do not affect the performance
of
For more information
on cleaning
range, refer to the cleaning
chart
and 21.
your Maytag
on pages 20
PAGE 19
Range Cleaning Chart
Cleaning Agents*
Many
names
different
cleaning
agents
are recommended
for the
may help you to make
an appropriate
selection:
1. Mild
abrasive
2.
Mild
liquid
3.
Glass
4.
Non-abrasive
sprays
cleaner
]DO NOT
commercial
Be certain
Any parts
* Brand
cleaners
such
such
such
as Bon
as Fantastik,
as Windex,
plastic
and
Anli,
Formula
Glass
nylon
Plus,
scouring
USE abrasive
cleansing
powders
oven cleaners,
or an automatic
all range
parts
that are removed
names
of cleaning
are cool before
for c|eaning
agents
Soft
are trademarks
Scrub,
various
Bar
parts
Keepers
of the
Friend,
range.
The
following
brand
Cameo.
409.
Cinch.
pads.
such
as Zud,
soap-filled
scouring
pads
like
dishwasher
detergent
except
when
indicated.
removing
any part or cleaning
should
be replaced
correctly.
of the respective
the
unit
S.O.S.
to
avoid
or
Brillo,
damage.
manufacturers.
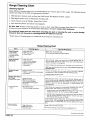
Range Cleaning Chart
BiLked Enamel:
• Side Panels
• Control Panel
• Storage Drawer
• Subtop
* Soap and water
• Mild liquid cleaner
• Glass cleaner
Wash, rinse, dry with soft cloth,
Do not use oven cleaner or abrasive agents.
Black Poxcelaln
Drip Bowls
* Soap and water
• Mild abrasive cleaners
• Plastic scouring pads
• Self-clean oven
• Dishwasher
After each use, wash, rinse and dry to prevent difficult soils. To
clean by hand, soak in hot sudsy water, then use mild abrasive
cleaner and plastic scouring pad.
Broiler Pan and
Insert
• Soap and water
• Plastic or soap-filled
• Dishwasher
and Rings
•Chrome
Brown food
Drip stains
Bowls
• Bine/gold
stains
heat
Can be cleaned in self-clean
scouring
• Soap and water
• Plastic scouring pads
• Mid abrasive c caners
• Soap-filled scouring pads
• Ammonia
l
.
• Fhtz Metal Polish
(Follow package directions)
pad
oven. See page 18 for instructions.
Pretreat the broiler pan and insert with a non-stick
vegetable
coating rear
aluminumRlght
such
boWlfoil.has
as Pamhole
or Mazola
in it for to
oven
make
venting.
cleaning
Do easier.
not cover with
Soaking makes cleaning
easier.
After each use, wash, rinse and dry to prevent difficult softs. If
heavily soiled, place an ammonia-soaked
paper towel on stains to
loosen soil, then gently scrub with plastic scouring pad. If soil is
allowed to burn on, r_ay be impossible to remove (gently use
scouring pads).
These stains are caused by overheating,
normally occur over a
period of time, and usually are permanent.
To minimize:
i. Avoid excessive use of the high heat setting. Use it only to start
cooking, then lower the heat setting to finish cooking.
2. Use fiat bottom pans that do not extend more than two inches
from the surface element. If large pans or canners are used,
alternate the elements that are used.
A non-abrasive
metal polish such as Ffitz may be used to help
remove stains. Fltiz is available in many automotive supply and
hardware stores. Call 800-558-8611
for the distributor in your
area
Control
K_Iobs
• Soap and water
Wash, rinse, dry with soft cloth.
•• Mild
sprays
Glass liquid
cleaners
For ease of cleaning, remove knobs by pulling forward.
(Continued
PAGE 20
next page)
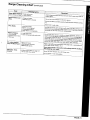
Range Cleaning Chart (continued)
Oven
Metal
Trim
Window/Door
Finishes
_md
• Soap azld water
• Glass cleaner
Avold using excessive
behind
glass.
• Soap and water
* Mild abrasive
cleaners
Do not
use oven cleaner
Remove
ter.
stubborn
Polish
Oven
Racks
Plastic Finishes:
• Door Handle
• Control Panel Trim
• Endcaps
Self-Cleaz
Interior
Oven
of water
or abrasive
soil with a paste
which
may
seep under
or
agents.
of mild abrasive
cleaner
and wa-
with a soft cloth.
* Soap and water
• Plastic scouring
pad
• Cleansing
powders
• Soap-filled
scouring
pads
If racks are left in oven during a self-clean
cycle they will discolor
and may become difficult to slide. A thin coat of vegetable
oil on the
underside
of the rack will make sliding easier.
• Soap
* Paste
DO not use oven cleaner,
powder or liquid cleansers,
abrasive
or
caustic
cleaning
agents on plastic
finishes. These cleaning
agents
will scratch or marr the finish. To prevent
staining or discoloration,
remove fat, grease or acid (tomato, lemon, vinegar, milk, frufijuice,
marinade)
soils immediately
with a dry paper towel or cloth. When
surface
is cool, clean with soap and water; rinse, and dry.
a_d water
of baking
soda
and water
u
Po,_elaln
Enamel
Top _.nd Back Panel
amounts
* Soap and water
• Mild abrasive
cleaners
Wipe up all spfllovers Immediately
spills (milk, fruits, tomato,
etc.).
• Mild liquid
Never wipe a warm or hot surface
and chipping
may result.
sprays
* Follow instructions
for the self-clean
on page
cycle.
18
Never use oven
Do not clean
cleaner
with a dry cloth
- especially
with a damp cloth
on a self-clean
acid
as cracking
oven.
or rub door gasket.
PAGE 21
MAINTENANCE
Adjusting the Oven Thermostat
Leveling Legs
After using your oven the first few times, it may
seem hotter
or cooler than your previous
oven.
Oven thermostats,
over a period of years, may drift
from the factory setting and timing differences
of 5
to 10 minutes are not unusual
between an old and
a new oven. You may be inclined to think that the
new oven is not performing
correctly;
however,
your new oven has been set correctly at the factory
and is more likely to be accurate
than the oven it
replaced.
Some floors are not level. For proper baking, your
range must be level. The leveling legs are located
on each corner of the base of the range.
Place a level horizontally
check
front-to-back
and
turning
the legs.
you can adjust it yourself. To decide how much to
change the thermostat,
set the oven temperature
25°F higher or lower than the temperature
in your
recipe, then bake. The results
of the "test" should
give you an idea of how much
the thermostat
If
you think
the oven should be hotter or cooler,
should
be changed.
To adjust
the
on an oven
side-to-side.
rack and
Level by
"_
J /
_
thermostat:
1. Press the OVEN TEMP pad.
2. Press the • or • pad and select
an
temperature
between 500°F and 550°F.
oven
3. Press and hold the OVEN TEMP pad for about
four seconds.
The display will change
to the
oven adjustment
display which reads 00 °.
4. The oven thermostat
can be adjusted
up to
+35°F hotter or -35°F cooler. Use the • or • pad
to select the desired change in the display.
5. When you have made the adjustment,
press
CANCELpadtoreturntothetimeofdaydisplay.
Use your oven as you would normally,
the
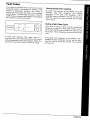
Fuses
(Canadian
Ranges
Only)
Your range is equipped
with seven (7) type "P"
fuses. The fuses
are located
on the back wall.
Remove the storage drawer for access to the fuses.
LOCATION OF
//
7 FUSES _
If part of your range does not operate, check to see
if a fuse has blown. A gap in the fuse strip or a
darkened
window indicates
a blown fuse. Replace
with the same type and amperage
"P" fuse.
PAGE 22
Light Replacement
Oven Door
Before replacing
the
connect
power to
range pm-ts are cool.
a damp cloth as the
Do not place excessive
weight on an open oven
door or stand on an open oven door as, in some
cases,
it could damage
the door, cause the appliance to tip over and possibly cause injury.
oven or panel light bulb, disrange. Be sure the bulb and
Do not touch a hot bulb with
bulb may break,
To Replace Panel Light
(select
When opening
air to escape
models)
Grasp the top trim of the backpanel
with your
thumbs
under
the front edge and pull outward
while lifting to release the trim from the catches
at
each end. Remove the bulb and replace it with an
18 watt fluorescent
tube. Snap the top trim back
into place and restore the power. Reset the clock to
the current
time of day.
check,
the oven door, allow steam
before
reaching
into the
add or remove
and hot
oven to
food.
TO Remove Lift-Off Door
Open the oven door to the "stop" position
(opened
about
6 inches)
and grasp
the door with both
hands at each side. Do not use door handle to lift
door. Lift up evenly until the door clears the hinge
arms. (Oven door window available
on select models.)
\
To Replace Oven Light
Very carefully
unscrew
the lens cover with a dry
potholder
to prevent possible harm to hands, then
very carefully
remove the bulb with a dry potholder. Replace with a 40 watt appliance
bulb. Reconnect the power to the range and reset the clock to
the current
time of day.
To Replace Door
Grasp
-
II_
--- _
the oven door at each
side, align
the slots in
pletely
hinges.
the doorseated
with on
the the
hinge
arms and slide the door
down onto the hinge arms until the door is comDo not attempt to open or close the oven door until
the door is completely
seated on the hinge arms.
Never turn on oven unless
the door is properly
in
place. When baking, be sure the door is completely
closed. Baking results will be affected if the door is
not securely
closed.
PAGE 23
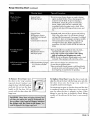
BEFORE YOU CALL FOR SERVICE
Check these points if...
Part or all of your
operate
•
•
electric
Are any house
the
fuses
blown
Has
•
interrupted?
Are the oven controls
power
supply
Was the door
left
following a self-clean
Surface elements
food properly
electrical
electrical
to
*
been
range may be more
your old range.
Was the oven vent
range
(select
does
Are the controls
Broiling section).
in the locked
position
cycle? (select models),
Was the
used?
broiler
models).
•
or disconnected
(if not
wired
utensils
element
controls
Food not baking correctly
Are the oven racks properly
(See Baking Chart).
Have you used
aluminum
•
Was the oven preheated
from the
to
ranges
the
only)?
°
properly
set?
on the
set properly?
time
for the
pan
received
placed
broil
(see
element
with
the
foil used
on the broiler
the slits for fat drainage?
does
to
range
pan
not operate
loose
Is the light
switch
or burned
out?
in the On position.
will not self-clean
(select
Is the oven set for delay
Oven
door won't
lock
models)
set
properly?.
(see
start?
(select
models)
self-clean
for baking?
Oven
*
as recommended?
operations
{see
used?
Are the proper controls
set for the
cycle? (see Self-Clean
instructions).
properly
Is there 1 to 2 inches of space between pans and
the oven walls? Are the range and oven racks
level?
Was good cookware/bakeware
of the proper size
used?
door will not unlock
Has
the
self-clean
least
one hour?
"F" plus a number
{select models)
•
cycle
appears
(select
been
models)
finished
for at
in the display
These are fault codes. If a fault code appears
in
the display
and a continuous
beep sounds,
press
the CANCEL button.
If the fault code
reappears,
disconnect
power to the range and
call a qualified service technician.
: ,!i :i_i!
i
PAGE 24
or blocked
position
Is the self-clean
control
Self-Clean
instructions).
(See Cookware
foil correctly?.
for bake
oven on
properly
rack
Is the bulb
Oven
are they properly
used?
the
the
direct
(Canadian
covered
for broiling
Was aluminum
insert, blocking
Oven light
•
not broil
allow
(select
than
surface?
Did you
preheat?
start?
from a reliable
on your
new
accurate
Was the proper
Broiling section)
control
fuse blown
Are the controls
set?
home
the
set?
Kthe range has coil elements,
plugged into the receptacles?
Are the surface
only)?
using a tested recipe
The oven thermostat
models)
plug loose
Were appropriate
Section).
ranges
fail to turn on or heat
outlet
supply)?
Has a range
•
Are you
source?
breakers
properly
Is the oven set for delay
Is the range
or circuit
(Canadian
Was the electronic
correctly set?
•
not
Food
fuse blown
•
•
does
Is the range plug loose or disconnected
from the
electrical
outlet
(if not wired
direct
to the
electrical
supply)?
tripped?
• Has a range
•
range
Fault Codes
Your range
is equipped
with an electronic
featuring
built-in,
self-diagnostic
software
continuously
monitors
ensure
safe and proper operation,
control
software.
This
the control
to
ff the software
should
detect a questionable
situation,
a FAULT
CODE (F plus a number)
will appear in the display
and continuous
beeps will sound,
-_[
Ii
-__
-- J
A fault
code indicates
that
there
may
be a
functional
error. As a safety precaution,
the control
will automatically
cancel the program.
Follow the
procedures
described
below to check the range,
During Normal Oven Cooking
If a fault code appears
in the display,
press the
CANCEL
pad
and
reprogram
the
cooking
operation.
K the fault
code reappears,
call a
qualified
service technician.
Do not use the oven
until the control has been serviced.
The cooktop
can be used.
flaring may result in a fault code. If this occurs,
press the CANCEL pad and allow the oven to cool
During
a Self-Clean
Cycle
If
the
isThen,
heavily
soiled,
excessive
smoke
and
for
an oven
hour.
reprogram
the oven for
the clean
cycle.
If the fault code reappears
qualified
service technician.
until the control has been
can be used.
in the display,
call a
Do not use the oven
serviced.
The cooktop
PAGE 25
RANGE WARRANTY
Full One Year Warranty
For one ( I ) year from the date of original
or replaced
free of charge.
Limited
retail
purchase,
any part which
fails in normal
home
use will be repaired
Warranty
After the first year from the date of original retailpurchase,
through the second year, parts which failin normal
home use will be repaired
or replaced free of charge for the part itself, with the owner paying all other costs,
including
labor, when the appliance
is located in the United States or Canada.
Electric
Heating Elements:
After the second year from the date of original retail purchase,
through the fifth
year, all surface elements
(solid disc, coil and smooth top), glass cooking surfaces,
broil elements
and oven
bake elements
on electric ranges,
which fail in normal home use will be repaired
or replaced
free of charge
for the part itself, with the owner paying all other costs, including
labor, when the appliance
is located in the
United States or Canada.
Sealed Gas Burners: After the second year from the date of original retail purchase,
through
the tenth year,
sealed gas burners
on gas ranges, which fail in normal home use will be repaired
or replaced
free of charge
for the part itself, with the owner paying all other costs, including
labor, when the appliance
is located in the
United States or Canada.
Canadian
Residents
This warranty
covers only those
Association
unless
the appliances
Canada.
Limited
Parts Warranty
appliances
installed
in Canada
that have
are brought
into Canada
due to transfer
Outside
The United
gives
you specific
legal rights,
with Canadian
Standards
from the United States to
States Or Canada
For two (2) years from the date of original retail purchase,
or replaced free of charge for the part itself, with the owner
is located outside the United States or Canada.
This Warranty
been listed
of residence
and you
any part which fails in normal
paying all other costs, including
may also
have
other
rights
home use will be repaired
labor, when the appliance
which
vary from
state
to state.
dealer
from whom
your
service
or need fur ther
To Receive Warranty Service
First:
To locate an authorized
service company
was purchased
or call Maytag Customer
USA
CANADA
Second:
in your area,
Service:
contact
the Maytag
appliance
1-800-688-9900
1-800-688-2002
Should you not receive satisfactory
assistance,
call or write:
warranty
service
froln the dealer
or authorized
firm,
Maytag Customer
Service
A division of Maytag Corporation
P.O. Box 2370
Cleveland,
TN 37311
USA
1-800-688-9900
CANADA
1-800-688-2002
When contacting
Maytag Customer
Service be sure to include the model and serial numbers
of your appliance,
the name and address
of the dealer from whom you purchased
the appliance
and the date of purchase.
Should
Illinois
plaints
you still have a problem,
write to: Maj or Appliance
Consumer
60606. MACAP is an industry
sponsored
but independent
group
from appliance
owners.
NOTE: When writing about an unsolved
service problem,
(a} Your name, address
and telephone
number;
(b)
Model number
and serial
of your appliance;
(c)
Name
and address
(d) A clear
description
of your
number
dealer
of the problem
(found
and
Part No. 8111P070-60
include
on the data plate
date
the appliance
the following
located
information:
on the frame
around
the storage
drawer)
was bought;
you are having.
MAYTAG
Form No. 854FE-1094
please
Action Panel, 20 North Wacker Drive, Chicago,
of consumer
experts who receive and act on com-
• Newton,
Iowa
50208
M,P. Litho U.S.A.
Tableof Contents
Surface Cooking .........................................................................
3-5
Proper Cookware ..............................................................
3-5
Heat Settings ........................................................................
5
Using Your Oven.........................................................................
6-7
General"_ps.........................................................................
6
Baking Pans..........................................................................
7
RackPositions ......................................................................
7
Pan Positions .......................................................................
7
Common Baking Problems and Causes..................................
8-9
Roas'_ing...................................................................................
10-_1
Roasting T_ps.....................................................................
10
Roasting Chart ...................................................................
11
Convection Bakingand Roasting...............................................
12
General Convection "_ps ..................................................
13
Broiling ....................................................................................
14-15
Broiling "_ps..................................................................
14-15
Other PublicetionsAvailable From Maytag .............................15
Surface
ProperCookware
Cooking
Regardless of the
cooking surface usedcoil elements, ceramic
glass, standard gas
burners or sealed gas
burners - good results
depend on several
factors. Cookware
Proper pans will reduce cooking
"
times,use less en-
ergy and cook food more evenly. Optimum cooking performance can be achieved when heavy
gauge, flat, smooth bottom, metal pans with straight
sides and tight fitting lids are used. When selecting
cookware consider construction, material and size.
Flat Bottom Construction
construction, size and
Heat transfers primarily by conduction (contact). If
the pan is not flat, heat is not transferred as well
material; plus proper
heat setting or flame
size are critical for
and food will cook unevenly and take longer. To
determine the flatness of the bottom of a pan, try
one of these tests:
good results.
CookingTest: Put an inch of water into the pan. Place
it on the cooktop and turn the control to High. As
the water heats, observe the bubble formation. If
the bubbles are uniform across the bottom of the
pan, it will perform satisfactorily. Uneven bubbre formation indicates poor pan/cooktop contact which
causes hot spots and uneven cooking.
Ruler Test: Place the edge of a ruler across the
bottom of the pan. HoJd it up to the light. Little or
no right should be visible under the ruler.
3
PanMaterial
The pan material determines how evenly and quickly
heat is transferred
from the heat source to the pan
bottom. Some widely used pan materials are:
?
a
Pan Size
On electric cooktops, match the size of
the pan to the coil element or indicated
cooking area. ldeally, the pan should not
extend more than 1/2-1" over the cook-
When canning, use the High setting
just until the water comes to a boil or
pressure is reached in the pressure
canner, then reduce to the lowest heat
ing area on ceramic glass cook-tops and
notmorethan2"beyondtheelementon
coil eooktops. Avoid using small pans
on large elements to reduce energy loss
and for safety reasons.
setting that maintains the boil or pressure. If the heat is not turned down,
the cooktop may be damaged.
On gas cooktops, adjust the burner
flame so it does not extend beyond the
tension Office.
edge of the pan. This is for safety
reasons and also to save energy.
Heat
For more information on canning procedures, contact your local county Ex-
Settings
It is better to select a lower setting and
Do not use oversized pans or pans that
rest across two elements or burners.
increaseto a higher one later if needed.
There are many factors that affect the
These may transfer heat to the porcelain
cooktop which causes cracking or chipping.
Likewise, on ceramic glass
cooktops oversized pans (more than 1"
beyond indicatedcooking area) lengthen
cooking times.
choice of the heat setting.
Home Canning
Recommendations
Acceptable water-bath or pressure canners should not be oversized and
should have flat bottoms. When canners do not meet these standards, cooking times may be extended and
cooktops may be damaged. For best
results, use a canner not more than 1"
Keepinmindthatfooddeesnotcook
anyfasteratahighersettingorflame
size than that which maintains
larger than the cooking area on a coramic glass surface and not more than
2" larger than a coil element or gas
burner,
gentle boil. Water boils at the same
temperature, whether boiling vigorously or gently. If too high a setting
is used, food may burn on the bottom before it is completely cooked.
a
5
UsingYour
Oven
Delicious baking and
As ranges and wall ovens get older, it is not uncom-
roasting results
mon for the oven temperature to shift. It is normal
depend on the recipe,
to notice some cooking time differences between a
type of pan used and
new oven and an old one. Compare your recipes
with tested recipes for proper recommendations,
the rack and pan
_ositions.
Use tested recipes from dependable cookbooks.
Follow directions carefully and use fresh ingredients,
Measure and mix as instructed and use the recommended pan size.
Preheat the oven if called for in the recipe or on the
package directions. Preheating is NOT necessary for
roasting. Selecting a temperature higher than the
desired temperature will not preheat the oven any
faster. In fact, this may have a negative effect on
baking results.
PanPositions
Do not cover the entire oven rack or oven bottom
with aluminum foil or place it directly under a pan. If
needed to catch spill-overs from baked items, place
a piece of foil cut a little larger than the pan on the
rack below the pan. However, foil will reduce air flow
and may cause poor baking results. In a gas oven,
placing foil on the oven bottom may cause permanent damage to the porcelain enamel,
Most recipes provide minimum and
maximum baking times such as "bake
35-45 minutes."
Check the baking
progress at the minimum time. DO
NOT open the door until the minimum
time haselapsed. Ifthe doorisopened
too frequently, heat will escape, which
can affect baking results.
Frozen pies in foil pans should be
placed on pans with dark or dull finishes for baking. The shiny foil pan
reflects heat away from the pie decreasing browning while the dark pan
helps absorb the heat and improves
bottom browning.
Rack Positions
BakingPans
The correct rack position depends on
Always use the pan size recommended
in the recipe. Many pans have the measurements marked on them. If there
are no measurements, measure inside
width and length of the pan.
the kind of food and the browning
desired. As a general rule, center the
rack in the middle ofthe oven. If food
is placed on a rack toward the top of
the oven, top browning may be too
dark. If food is placed on a rack located near the bottom of the oven, the
food may be too dark on the bottom.
Refer to the User's Guide for specific
rack positions,
PanPositions
When baking foods in one pan, place
pan in the center of the oven rack.
When baking in more than one pan,
allow one to two inches between the
pans and the edge of the pan(s) and
the oven walls.
If baking on more than one rack, stagger the pans so one pan is not directly
over another pan.
@
Cookies baked in pans with short sides
all around may result in lighter top
browning or uneven top browning. For
best results select cookie sheets without sides.
Do not crowd a rack with pans. Never
place more than one 9x13-inch or
larger pan on one rack.
Do not place pans directly on the oven
bottom.
Roasting is the
Preheating is not necessary,
method for cooking
Place the oven rack in either of the two lowest rack
large, tender cuts of
meat uncovered,
positions.
without adding
Use open pan roasting for tender cuts of meat,
weighing three pounds or more. Place meat or poultry on the slotted portion of the two-piece broiler
pan included with the oven. Do not add water to
the pan.
moisture,
Place meat fat-side-up to allow self-basting of the
meat during roasting,
Cooking time for roasting is determined by the
weight of the meat and the desired doneness. Use
a meat thermometer for best results. Insert the thermometer so the tip end is in the center of the thickest part ofthe meat. It should not touch fat or bone.
Refer to the Roasting Chart on page 11 for best resuits,
Remove the roast from the oven when the thermometer registers approximately 5° below the aloneness
desired. Cooking will continue after the meat is removed from the oven.
Less tender cuts of meat need to be roasted in a
covered pan or in an oven cooking bag,
10
Cutof Meat
Beef
Rib Roast (cut-sidedown)
Rib Eye Roast
Tenderloin Roast
Pork, Fresh
Shoulder B)ade Roast (boneless)
Shoulder Blade Roast
Loin Blade or Sirloin Roast
Boneless Pork Loin
Pork, Smoked
Ham Half
(fully cooked boneless)*,
Ham Half (cook-before-eating)
Poultry
Turkey, unstuffed...
Turkey Breast
Chicken Fryer
Chicken Roaster
Lamb
Leg (boneless)
Whole Leg
• Cookingtimesa_e_oximat¢ trodmayvaWdependi_gon the s_
of the ;_st.
,.Add waterandfollow pacl_ge direceons. Not recommendedfor ConvectionRoasting.
,°,Stuffed turkeyrequiresadditionalroastinB time. Shieldlegs and breastwith foil to preventoverbrowninSr
and
dlying of skin.
_1
Convection
Baking and
Roasting
._ich
Method Works Best for .....
In a convection oven,
Baking
a fan circulates hot
air evenly over, under
• Convection baking is good for Jarge quantities of
baked foods such as cookies, biscuits, muffins,
and around the food.
As e result, foods are
evenly cooked and
browned - often in
shorter cooking times
brownies, cupcakes, sweet rolls and bread.
• Foods such as layer cakes or quick breads have a
more even top when baked with the regular conventional baking method.
at lower temperatures and with the
Roasting
flexibility of using
more racks at one
• Convection roasting, in most cases, takes less
time and is good for large tender cuts of meat.
Use uncovered roasting pans with low sides.
Meats are generally dark brown on the outside
and tender and juicy inside,
time.
• Less tender cuts of meat are best roasted with
the regular conventional method. The regular
conventional method is also best when an oven
cooking bag or covered dish is required.
Baking:
Reduce the oven temperature by 25 °
for convection baking. Times will be
similar to or a few minutes lees than
recipe recommendations.
For multi-rack baking, it may be necessary to remove the pan on the bottom rack and/or top rack 1-2 minutes
before the set time to prevent
overbrowning.
Cookie sheets should be made of
shiny metal without sides.
Three Rack Baking - For optimal
brown ing, place cookie sheets or rectangular (9"x13") pans lengthwise,
front to back on the oven racks. Arrange pans so they are directly over
each other. Stacking pans one above
the other centers the food in front of
the convection fan which improves air
circulation and browning. If pans are
too long to place front- to-back, center the pans side-to-side on the racks,
Four Rack Baking - (This is based on
the use of rack positions 2, 3, 4 and 5
with the lowest position being #1--recommended only on 30 inch width ovens.) Stagger the pans on the racks
so that one pan is NOT directly over
another pan. For example, on rack 2
place the pan within one inch of the
left wall of the oven, on rack 3 place
the pan within one inch of the right
wall and so on,
Roasting:
Do not reduce oven temperature by
25° for convection roasting. However
roasting times can be reduced up to
25% when using convection heat,
Refer to the Roasting Chart on page
11 for best results,
Do not use a roasting pan with high
sides.
Do not cover meat.
Since the breast meat and drumsticks
on a turkey cook more quickly than the i
thigh areas, place a "foil shield" over I
these areas after desired brownees is
reached to prevent overbrowning,
Broiling
Broiling is used for
tender cuts of meat or
When broiling in an electric oven, preheat 3-4 minutes for optimal browning.
marinated meats, fish
and some fruits and
vegetables. The food
For best results, steaks and chops should be at least
3/4" thick. Thinner cuts should be panbroiled.
is placed directly under
the top element or
Before broiling, trim excess fat to prevent excessive spattering or smoking. Cut srashes in the outer
under the gas flame,
The desired doneness
edges of the fat to prevent curling during cooking.
is determined by the
Season meat after cooking.
distance between the
juices out of the meat and delay browning.
Salt tends to draw
food and the heat
source and the cooking
time.
Use the broiler pen supplied with your oven. It is
designed to drain excess liquid and fat away from
the cooking surface to prevent spatters and smoke.
Do not cover the broiler insert with aluminum foil.
This prevents fat from draining into the pan bottom. However, for easier clean-up, line the broiler
pan (bottom portion) with foil and spray the insert
with non-stick vegetable coating.
The rack position selected for broiling depends on
the thickness of the meat and the desired doneness.
Thin cuts (3/4 to 1 inch) should be placed 2-3 inches
from the heat; thicker cuts should be placed 3-6
inches from the heat,
14
Generally for a brown exterior and
rare interior, the meat should be close
to the element or flame. If you want
the meat well done, place the broiler
pan farther from the element or flame.
Increasing the distance between the
meat and the heat source will decrease spattering and smoking.
When broiling in an electric oven, the
door should be opened to the broil
stop position (about 4"). When broiling with e gas oven, the door should
be closed.
If the food requires turning, broil until
the top side is brown. Turn only once
during broiling. Meat should be approximately half cooked by the time
the top is browned.
Consult the User's Guide for specific broiling times and rack positions.